#how to hide files and folders in windows 10
Explore tagged Tumblr posts
Visit Tumblr Blog
Explore Tumblr blogs with no restrictions, modern design and the best experience.
Last Seen Tumblr Blogs


Fun Fact
The Tumblr office adopted Tommy, an 11-year-old Pomeranian.
Text
How To Convert Eyelashes
I was asked to make a tutorial on converting eyelashes. Well, here it is. Dirty, badly explained tutorial by Rollo. I'm assuming you know how to work with required programs, it won't teach you the basics, just a process of converting eyelashes from ts4 to ts3.
Requirements:
S4Studio
s3pe
TSR Workshop
Sims 3 Pack Multi-Extracter
These files (full credit goes to @gruesim)
Graphical program that works with .dds files
Let's go:
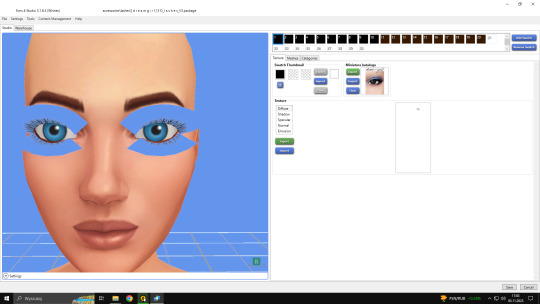
Open the desired lashes in S4Studio. Export diffuse of the ones you want to convert (you only need the black ones). You can also export the thumbnail. Close the program.
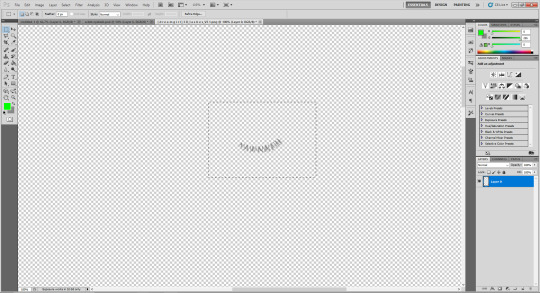
2. Unzip the folder that you downloaded from this tutorial. You will find a .dds files called "sclub eyelash". Open it up in the graphical program. Make a black layer above it and hide it for now.

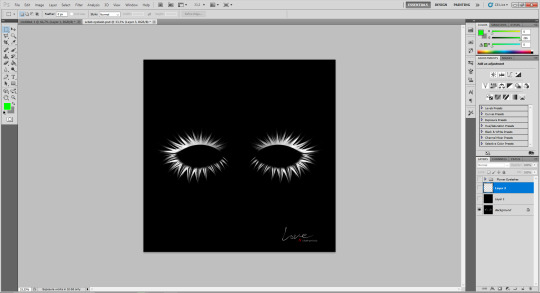
3. Now open up your ts4 eyelashes file. Start from the upper eyelash, crop it and go to the sclub eyelash.
4. Paste it, click ctrl+i, it will make ts4 eyelash white.

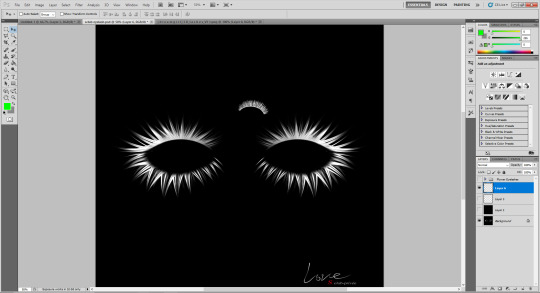
5. This is the worst part. You have to make the ts4 eyelash fit to the sclub one as close as possible. Use every method possible!
6. Unhide the black layer and see if your eyelash look alright. It may need some sharpening.
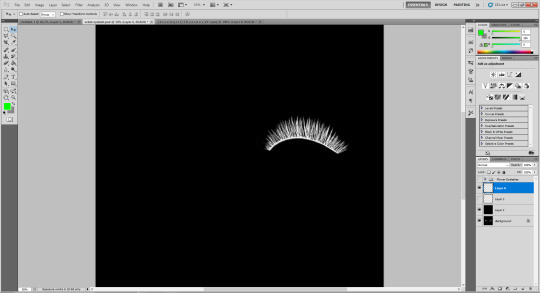
7. Now crop the bottom eyelash and follow the exact same steps as for the upper eyelash.
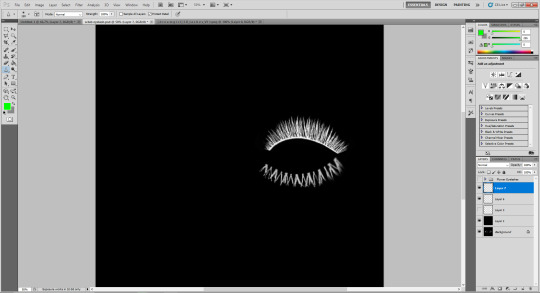
8. It should look more or less like this. Bottom eyelashes are always harder to adjust and may need even more sharpening.

9. Merge your upper and bottom eyelashes, duplicate the layer. Click ctrl+a, ctrl+t, then right mouse button and choose "Flip Horizontal".

10. Voila. You should have a complete set of your new shiny eyelashes! Save them as .dds. You can close the program. We're moving to TSR Workshop.
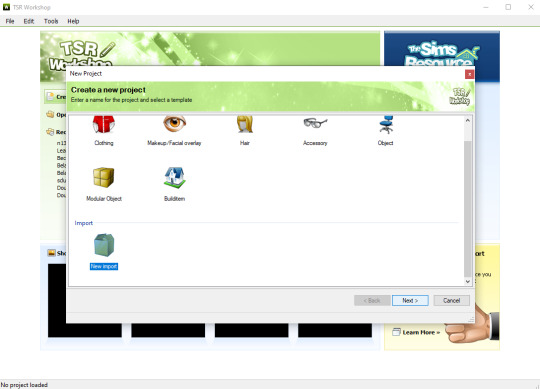
11. New Project -> New Import. Import Eyelashes AFBase from the downloaded folder.

12. Name your project, name your file and click "Next".

13. You should see this. Go to Texture tab and click "Edit" on the Transparency Map.
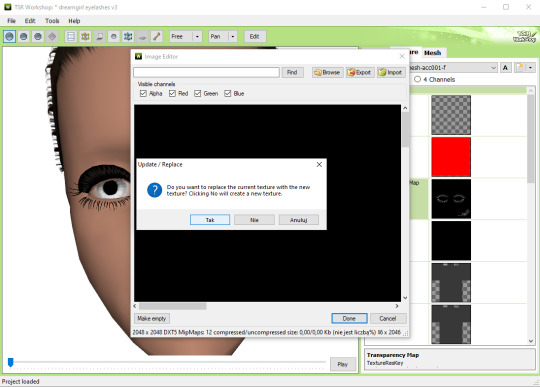
14. Import your eyelashes and click "Yes" when asked.
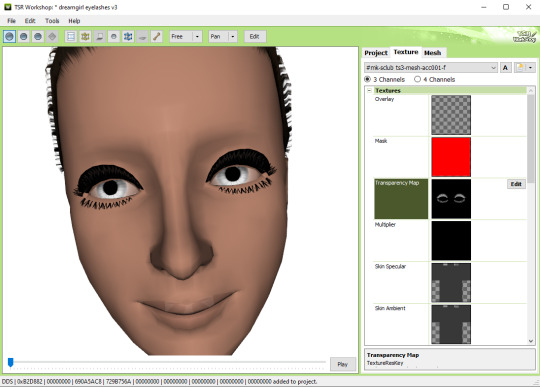
15. You should see your lashes, yay! But this is TSRW, they won't look exactly the same in game, as they look here. If you want a set of eyelashes, add more presets.
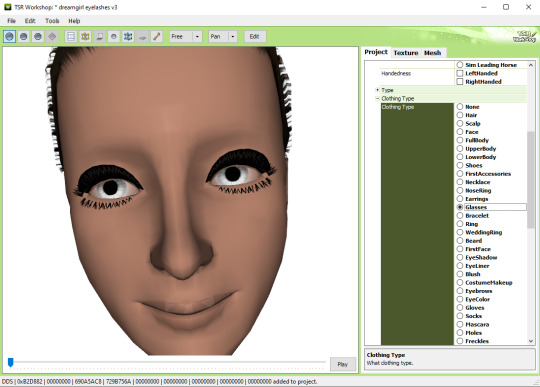
16. Now this is important. If you want to see your eyelashes in Accessories, go to Project tab, Clothing Type and change it from eyeliner to glasses. You also have to do this if you have more than one preset in one file. They won't show up in Eyeliner section. If you want to have set of eyelashes in Eyeliner category, you have to make each preset into seperate file. Also, eyelashes are recolorable ONLY in Accessories section. Don't forget to check Categories section to see which outfit has the eyelashes available.
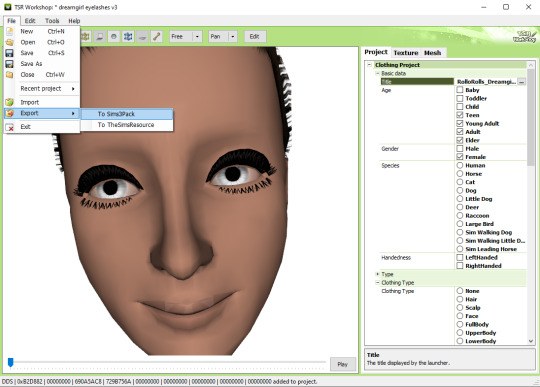
17. Now you're ready to export your file! Export -> To Sims3Pack. Use the Sims 3 Pack Multi-Extracter to convert your sims3pack to package file. We're moving to s3pe.
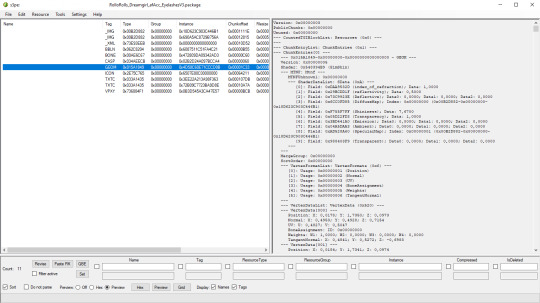
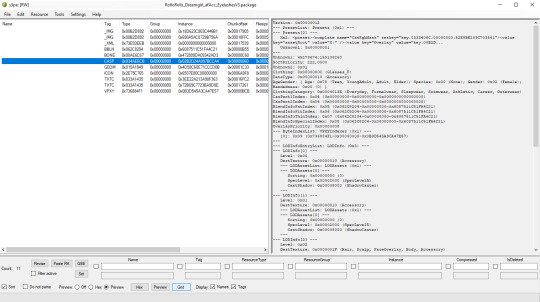
18. THESE STEPS ARE ESSENTIAL! Open up your shiny new package in s3pe. Click on the GEOM with the right mouse button.

19. Click Replace and choose AUID.simgeom from the downloaded folder. AUID is for adults, CUID for kids and PUID for toddlers. We have one more step to do.
20. Now click on the CASP normally (left mouse button) and click Grid on the bottom of the program.
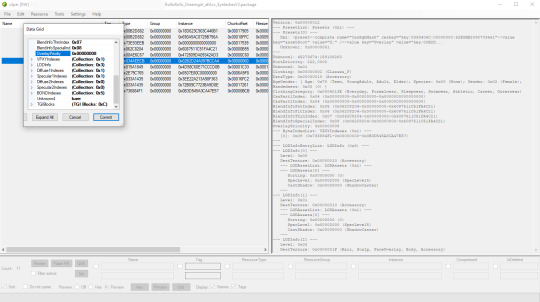
21. A small pop up window appears. Scroll to the very bottom and find a line called OverlayPriority.

22. Change the 8 to 2. This will make eyelashes not being visible through hair that's covering eyes.
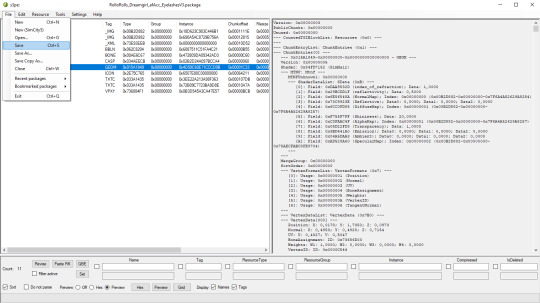
23. Save your package. You're ready to test your converted eyelashes in game!

Here they are. Nothing fancy, it was a quick conversion :D They're also compatible with S-Club eyelash sliders ^^
Btw, you don't necessarily have to convert both upper and bottom eyelashes. You can have upper or bottom only. Play with the lenght, not all eyelashes have to be very long. Convert it for males, kids, toddlers. You just have to remember to change the options in TSRW and replace the correct .simgeom file in s3pe. There is a lot of possibilities and you'll probably get better in this than me :D
Good luck! ♥
207 notes
·
View notes
Text
How to record videos with Sims 2 in-game camera (HD, no UI, no lag, no file format issues)
I originally planned to include this information in the behind-the-scenes video about Bring Me To Life that I'm currently working on, but it's overly technical and not that interesting. It still might be useful to some people (mostly machinima creators), so I decided to make a separate post about it.
There are two ways to record videos in The Sims 2:
Using screen recording software
This is the most common and probably the easiest way. You just need a program like OBS that will capture whatever happens on your screen exactly as it happened. If this method works for you, it's perfectly fine. No need to follow this guide then.
Using the in-game video capture tool
This way involves capturing videos directly in the game by clicking the video camera icon or pressing V on your keyboard. This method is perfect for machinima creators. It automatically hides the UI, but more importantly, the video will always be perfectly smooth, regardless of the actual performance of your game, i.e. even if it runs like a literal slide show, any videos you capture this way will look perfectly fine.
Okay, so if this method is so great, why do we need a tutorial for it? Well, as is usually the case with this game, the feature works fine, it's just a little bit outdated.
To fix it, we need to do 3 simple* things.
*If you're a Sims 2 player, you're probably used to this kind of stuff anyway
Step 1: Installing a modern codec
In the Camera settings, the game lets you choose if you want the videos to be compressed. I highly recommend choosing that option, as uncompressed videos take up way too much storage space.
The codec that the game uses to handle compression is outdated and most video editing programs will not be able to edit such files. To fix this problem, we need to download and install x264vfw, which is a free an open source codec.
Once installed, open the Configure x264vfw app. No need to change anything there (unless you want to test different settings of course), except for this one small thing:
In the Debug section, go to Log level and change it to None. Otherwise the codec will display a pop-up window each time you record in the game, which is pretty annoying.

Step 2: Making the game use the codec
Locate the VideoCapture.ini file in the installation folder with your latest expansion pack. I have Ultimate Collection, so for me the path looks like this:
D:\Program Files (x86)\Origin Games\The Sims 2 Ultimate Collection\Fun with Pets\SP9\TSData\Res\UserData\Config
Back up your file and open the original version with Notepad. You can either replace the whole thing with my settings, or just update the highlighted parts.
While you're at it, make sure to update the LargeSettings value to 1920x1080 so that the videos are captured in HD (no need to worry about it if you're copying the whole thing):
[Config] PreferredCodec=x264vfw Folder is relative to Res/Userdata Folder=Movies FilenameBase=movie NoFillFrames=0 AudioStereoOutput=0 AudioRateDivisor=4 GlobalSettings = reset, vbr:1, fps:10, keyinterval:30, mode:1, datarate:0 SmallSettings = size: 128x128 MediumSettings = size: 320x240 LargeSettings = size: 1920x1080 LowQualitySettings = minq: 6, maxq: 16, mode:0 MediumQualitySettings = minq: 4, maxq: 10, fps:15, mode:0 HighQualitySettings = minq: 2, maxq: 8, fps: 30, keyinterval: 60 SmallLowSettings = datarate: 75 SmallMediumSettings = datarate: 150 SmallHighSettings = datarate: 300 MediumLowSettings = datarate: 150 MediumMediumSettings = datarate: 300 MediumHighSettings = datarate: 600 LargeLowSettings = datarate: 300 LargeMediumSettings = datarate: 600 LargeHighSettings = datarate: 1200 AllowAntialiasing=0 # some drivers have issues with capture when AA is enabled [Codecs] 0=VP61 # On2 VP6.1 1=VP62 # On2 VP6.2 2=VP60 # On2 VP6.0 3=x264vfw # x264vfw
Save your file.
When in game, go to Camera Options and make sure Video Capture Size is set to Large and Video Quality is set to High.
Also, you might want to change the Maximum Video Recording Time to something higher than 60 seconds.

Credit for this solution goes to this person who left the following comment under this video
Step 3: Changing the file format from avi to mp4
Before doing this step, test if everything works correctly when you try to capture videos in the game. The videos will go to the Movies folder in your Documents folder for TS2.
Try to import the videos into your editing software. If it doesn't work, e.g. the program does not recognize the file or the file appears to be corrupted, you'll need to change the file format from avi to mp4.
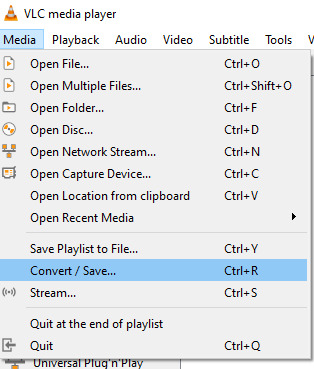
I personally use VLC media player for that, as it's free and open-source.
Go to Media > Convert / Save...
Drag your files into the File Selection section or select them by clicking the + Add button.
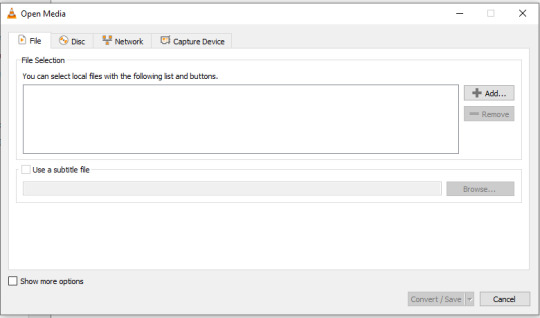
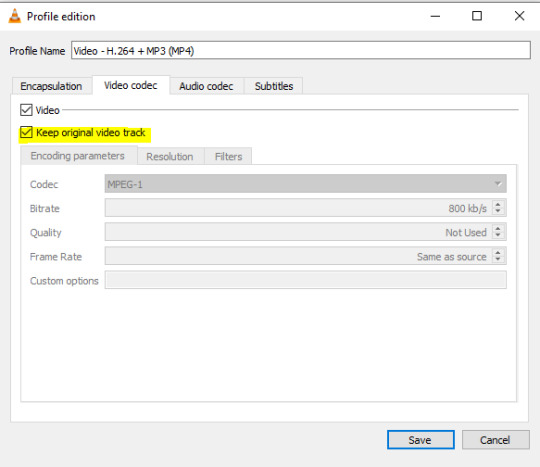
Select the Video - H.264 + MP3 (MP4) profile and click the wrench icon to edit its settings.

In the Video tab, make sure to check the box next to Keep original video track. Go to the Audio tab and check the analogous box.
Save and in the next window specify the destination folder and click Start. VLC will go through each of the files you added.
IMPORTANT:
While Steps 1 and 2 only need to be done once, Step 3 needs to be done for every new video you record (unless, your video editing software doesn't struggle opening the avi files). The good news is, this step is really fast, no more than a second per a single video. This is because we're keeping the original video track intact. The only thing that is changed is the container. That's why this change is fast and does not affect video quality in any way. Ideally, this step wouldn't be needed if we figured out a way to force the game to use mp4 when saving those videos, but I'm not sure if this is possible.
Like I said, outside of machinima creation, it probably makes more sense to just record your screen with OBS. Especially if you want to capture videos in 4K, which I don't think would be possible with this method. But it works for me and as it took me a while to figure it all out, I just wanted to share all the info in a single post!
#sims 2 machinima#ts2#sims2#sims 2 tutorial#ts2 tutorial#sims 2 guide#ts2 guide#my stuff#ts2 simblr#machinima#ts2 machinima
11 notes
·
View notes
Text
Bulk part recoloring for Picrew: a guide

Hi! Some of my friends asked me about this and I figured I'd make a tumblr post instead of writing it all in a discord message never to be seen again.
This guide covers how i personally quickly recolor parts for my own picrews, to use with picrew creator's bulk uploading tool. This likely isn't going to work for everyone, especially since I rely on Clip Studio Paint very heavily.
Using this tutorial will give you the files you need to bulk upload with picrew creator a bit faster than if you were to recolor everything by hand. Especially if doing a bunch of parts and colors.
Tutorial under the cut!
What you'll need
Clip studio paint (or another art program with animation features that lets you export each frame to a separate layer. I only will be showing CSP however)
Your artwork. Each color needs to be on a separate layer. (Sorry for those who like to paint everything on the same layer! This won't work for you)
(optional, if on windows) https://www.bulkrenameutility.co.uk/ to speed up one specific step
Let's do this
1) open the animation timeline, with CSP pro you can do 24 parts at a time due to the frame limit, which is still plenty to speed the process up.
2) say you're doing the shirts like i did. make an animation folder for the shirt fill color, as well as the lineart. if you have any more layers that are recolored with the same color each time, make an animation folder for those as well (so say, shadows. or secondary colors)
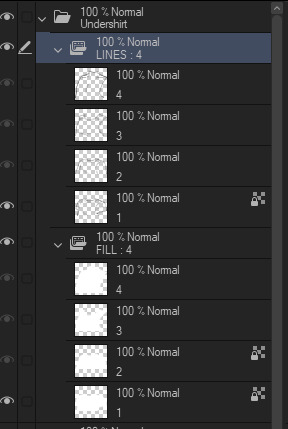
3) put each individual shirt part in it's own animation cell. make sure the frames for each part line up. you'll want to be able to go through the timeline with each shirt on a separate frame
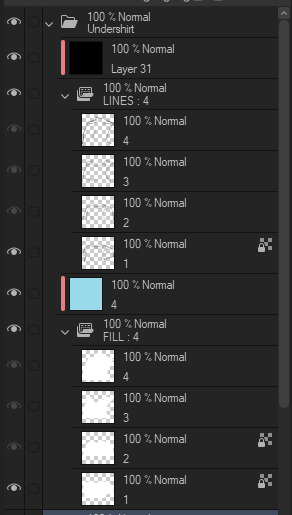
Your layers should end up looking somewhat similar to this
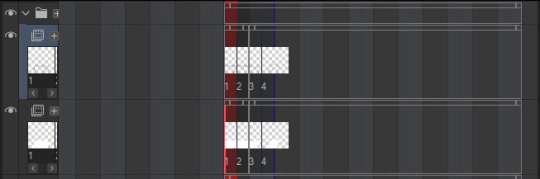

4) now for recoloring: clip a layer to each animation folder. so clip one to the shirt fill folder for instance. fill that entire layer up with the color you want that part to be. Check the frames in your animation again, now every part should be recolored with the colors in the clipped layer.
Your layers should now look something like this
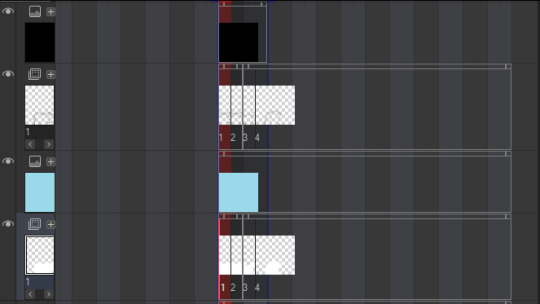

5) Shorten the timeline so only frames with an actual item in them are included. (Otherwise you'll end up with a bunch of blank images later that you're not going to do anything with)
6) Hide every layer other than the animation folders and their clipped layers. So only the part is visible. Go through your frames one more time to make sure they look alright and nothing is out of place.
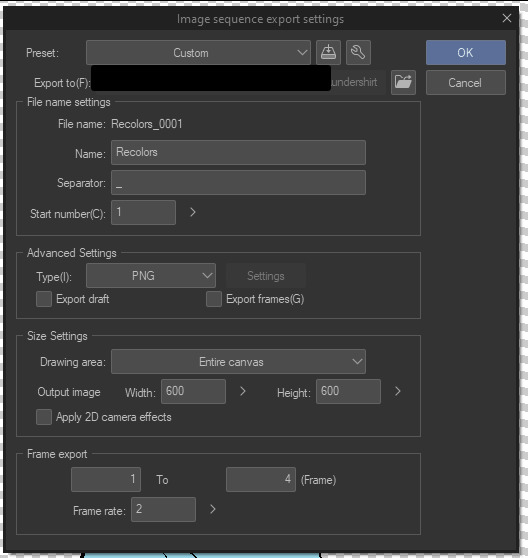
7) Time to export! Go to file -> export animation -> image sequence (you might want to set a shortcut for this so you don't have to go through 3 menus haha).
Make sure you're exporting to the correct folder. Set file name settings to anything you like, but make sure the start number is 1 (there might be exceptions to this, I'll go over that later). Set the image type to PNG, make sure the canvas size is correct and that the framerate lines up with your timeline's framerate.

8) Export it! You should have some files in your folder that look like this now. We'll want to rename them to just 1.png, 2.png... etc.

9) You can rename them by hand, but this is rather slow to do each time and I'm lazy. So here's how you rename them in the bulk rename utility. Open your folder in there, and then copy the settings I have here.


Yes, this is EXTREMELY overwhelming. I know. The first box (RegEx) is the only one you'll need to touch. Set the Match field to something like "Recolors_0{0,3}". Replace "Recolors_" with whatever your files start with. Also check the v2 box.
Replace can be left empty, since we're essentially removing anything that matches the regex (which is a text pattern matching syntax. We're essentially matching "Recolors_" with up to 3 zeros after it)
Select all the files in the top panel, then hit Rename in the bottom right! It should rename everything to just 1.png, 2.png... etc in one go.
10) Go to your part page in picrew. Make sure your colors are set up and you have created the amount of parts you'll need. Go to the Bulk Upload tab (there's a link in the top right).
11) Select the color you're uploading, then select the files you're uploading. Make sure the filenames match with your part ID numbers. This is important. 1.png Will match the first part, 2.png will match the second. Note how I said ID numbers, not the display order.
This means in the exporting step, you might need to change the starting number of your files. If you messed this up since you didn't read the tutorial in full before following it (I get it. I've been there before), just export and rename again.

12) If everything looks good and you got your files previewing no problem, hit upload, then wait a few seconds while picrew uploads your files.

13) YOU DID IT!!! You successfully added a recolor for your parts. Now go back to your file in CSP and fill each clipping layer up with a different color. You can now repeat the process from step 7. (export, rename and upload) to upload all parts for the other colors.
How much time does this actually save?
I never timed myself, but from experience, once you have set everything up and get the hang of it. It's pretty damn fast! Granted it does take a bit of set-up to get working. It gets more efficient the more parts you recolor at once.
I'll often go ahead and recolor the next color while the previous color is still uploading. Usually a single color only takes me a minute max to create and upload, instead of several minutes recoloring every single layer and saving each file separately.
For bulk rename utility, I set it to allow overwriting files. Which means I keep every color in the same folder and just overwrite the files whenever I rename. It's the fastest for me and saves me some storage space on my PC as well. Just make sure to click out of and then back into the folder to reload the files in there.
Hopefully this should help someone! Creating your own picrew is a daunting task and this made it a little easier for me at least ^^
#picrew#picrew tutorial#picrew guide#image maker#my picrew#the example picrew im showing isn't out yet. it's still in the early stages#idk if it'll ever be finished#i'll reblog this post + make a separate post on my blog if it does tho!
28 notes
·
View notes
Text
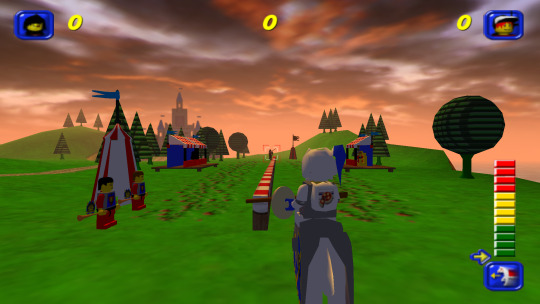
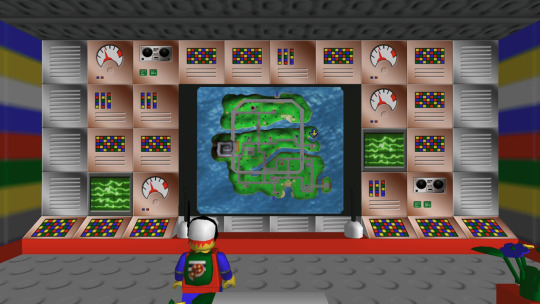
Capturing the ambience of LEGO Island 2 (2001)
This minigame-packed adventure explores many classic LEGO themes.
Running the game
There are two main versions of the game to chose from: the original 2001 release, and an improved 2007 version released as part of a two-pack. There is also apparently an unfinished, unreleased v1.1 with some bug fixes.
Curiously, the version hosted on MyAbandonware seems nearly identical to other 2001 releases I found. There appear to be minimal differences between the two.
All versions use a simple disk check; mounting an ISO with a tool like Daemon Tools suffices. There are also No-CD hex-edits available if you're interested.
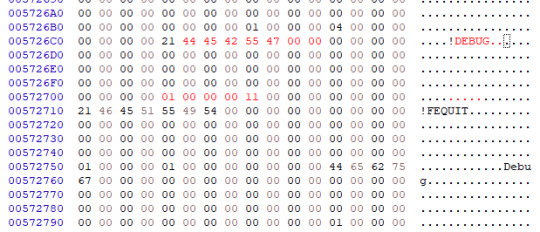
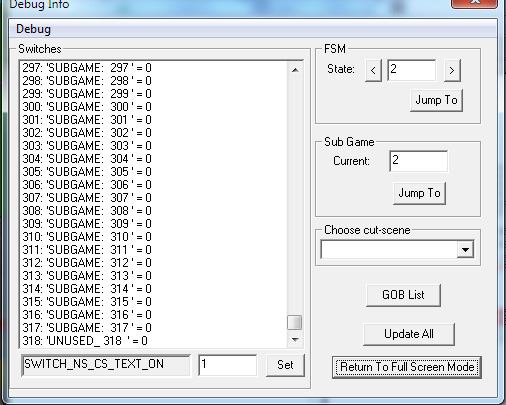
Debug menu and Level-select
We can access LI2's debug menu by altering the main menu options. I found some hex-edits for this on RRU. If you're not comfortable with hex-edits you can try using a patcher or patch, or LI2 Mod Manager.
04 00 00 00 02 -> 01 00 00 00 11 43 52 45 44 49 54 53 -> 44 45 42 55 47 00 00
Widescreen
Use the resolution and widescreen hacks offered by LI2 Mod Manager. See this thread for more detail on how it works.
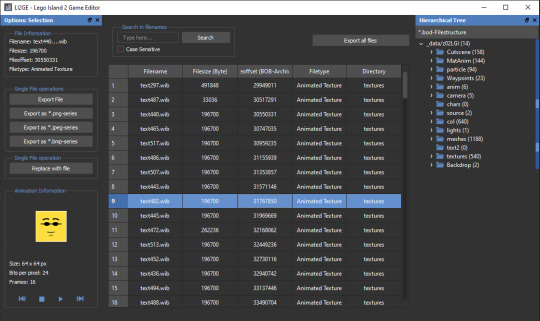
Hiding UI and Player-character
This is possible using Lego Island 2 Game Editor. It's a powerful albeit buggy application for modifying LI2 assets.
If LI2GE doesn't work, for example to edit fonts, you can use Lego Island 2 Extractor and/or Lego Island 2 Explorer. Once installed, be sure to disable automatic updates inside the program's INI to avoid startup crashes.
LI2 will prefer to load files from identically-named folders if they are present in the _data directory. For example, if a Fonts folder exists, its files will be used and Fonts.bob/bod won't be loaded.
We can also pause the game to remove the HUD, screenshot this state, and create a no-HUD overlay for our footage.
(Not) Free camera
A modder devised a way to summon a glider at any time.
Rendering ambience sequences
I recommend using the Fruity LSD effect with FL Studio. First, open the MID file in LEGO Island 2's level files, for example Fishing_Amb.mid. Be sure to select MIDI Out with Fruity LSD in the subsequent dialog.
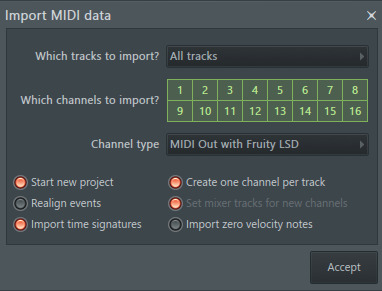
Afterward, click the folder icon in the top left to specify a DLS file - use one found in your MID file's folder. Once it's loaded, populate each channel by clicking it, and picking the corresponding patch. Don't forget to populate the "percussive" one-shots as well (Channel 10 in the screenshot below).
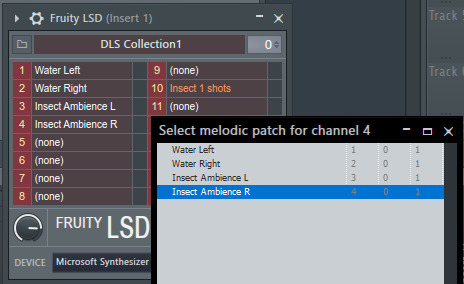
You are now ready to play your MID with the intended samples attached, or export it to a WAV file.
Appendix: Rendering music sequences
Download DirectMusic Producer. Supposedly this program allows you to export samples and sequence data. You could then render the pair using the MIDI renderer of your choice, such as OpenMPT or FL Studio's Directmusic plugin.
Appendix: Ambience sequence dead-ends
I tried VLC, with the DLS configured under FluidSynth, but this gave no output. I tried Miles Sound Tools with a DLS specified, but again - no output. I tried Winamp but seemingly couldn't get in_midi to use a custom DLS file, despite specifying one in the setting dialogs.
Appendix: Other LI2 developer tools
A soak test can be activated by pressing F8 while in windowed mode. You can also spawn a debugger window by pressing F9.
6 notes
·
View notes
Text
This article is almost 10 years old.
A kid puts her hand up in my lesson. 'My computer won't switch on,' she says, with the air of desperation that implies she's tried every conceivable way of making the thing work. I reach forward and switch on the monitor, and the screen flickers to life, displaying the Windows login screen.
This one's newer, just over 2 years old.
More broadly, directory structure connotes physical placement — the idea that a file stored on a computer is located somewhere on that computer, in a specific and discrete location. That’s a concept that’s always felt obvious to Garland but seems completely alien to her students. “I tend to think an item lives in a particular folder. It lives in one place, and I have to go to that folder to find it,” Garland says. “They see it like one bucket, and everything’s in the bucket.”
Schools are demanding kids as young as 5 or 6 use computers - and nobody is teaching computer basics. Nobody is teaching the names of the computer components (monitor, hard drive, cpu, ram); nobody is teaching what the parts do; nobody is teaching what "apps" are (...we used to call them "programs") or how files work.
Of course Adobe is very happy that people will say "I'm using Adobe" because nobody remembers the name "Acrobat Reader." Adobe is thrilled that most people don't know that PDFs are a filetype that can be opened or edited by many different programs.
Typing, as far as I can tell, is taught less than it was when I was in high school - in a country where everyone is expected to spend many hours a week on a keyboard.
(When I applied for college at the for-profit scammy school where I got my paralegal degree, I tested out of their basic typing class. The class's goal was 40wpm; I type at more than double that speed. The counselor assigned to me said she'd never seen typing that fast. I have no idea if she was lying to try to boost my ego or was just really oblivious.) (If she was trying to boost my ego, she failed. I know what secretarial typing speeds are. Mine is mediocre.)
If I were more geekish and had formal education training, I'd try to put together a series of Basic Computer Literacy courses for schoolkids - a set for ages 5-8, another for 9-12 year olds, and a third set for teenagers.
Start with parts of the computer - and how they look different in desktops, laptops, tablets, phones.
Move on to OS: Windows, Mac, IOS, Android, Linux, and a hint of others. (Throw in a mention of game consoles and how their OS is and isn't like a standard computer OS.)
A bit of mention of OS types/versions - WinXP and Win10, and so on. A bit of what commonly changes from one version to the next, and what doesn't.
These are the starting points, not because they're the core of How Computers Work, but because they're the parts everyone interacts with. The 8-year-old doesn't specifically need to know Linux exists... but they need to know there's a DIFFERENCE between a Windows 11 new laptop and a desktop running something else. Needs to know that not all "Android" phones work the same way. Needs to know, when they open a new device, that it has an OS, and there are ways to figure out what that OS is.
Next there is:
Files, folders, internal structure - and how the tablet/phone OS tends to hide this from you
The difference between the app/program and the stuff it opens/edits
That the same file can look different in a different app
Welcome To The Internet: The difference between YOUR COMPUTER and THE CLOUD (aka, "someone else's computer") as a storage place; what a browser is; what a search engine is
Welcome To Metadata I Am So Sorry Kiddo Your Life Is Full Of Keywords Now And Forever
Computer Operations Skills: Typing. Hardware Assembly, aka, how to attach an ethernet cable, is the monitor turned on, what's the battery level and its capacity. Software-Hardware interfaces: how to find the speaker settings, dim or brighten the monitor, sleep vs power off, using keyboard shortcuts instead of the mouse.
After alllll that, we get to
Command line: This is what a terminal looks like; this is what you can do with it; no you don't have to program anything (ever) but you really should know how to make it show you your IP address. (See above: Welcome to the Internet should have covered "what is an IP address?")
Internet safety. What is a virus; what's malware. How to avoid (most of) them.
SOCIAL internet safety: DO NOT TELL ANYONE your age, real name, location. Do not tell strangers your sexual identity, medical history, family details, or anything about any crimes you may have committed.
...I'm probably missing some things. (I'm probably missing a lot of things.) Anyway. Something like that. The simple version is a half-day crash-course in overview concepts culminating in a swarm of safety warnings; the long version for teens is probably 30+ hours spread out over a few weeks so they can play with the concepts.
Telling young zoomers to "just switch to linux" is nuts some of these ipad kids have never even heard of a cmd.exe or BIOS you're throwing them to the wolves
61K notes
·
View notes
Text
How to Customize the Taskbar in Windows 10
Key Takeaways Customize the taskbar by pinning apps and shortcuts for easy access. Right-click an app’s icon to pin it or drag the app icon to the taskbar. Utilize jump lists for quick access to folders and files on the taskbar. Right-click an icon to view the jump list and pin items to it. Personalize the taskbar by removing the search box, hiding system icons, moving the taskbar, changing its…
0 notes
Text
The Ultimate Guide to Windows 10 Keyboard Shortcuts
Windows 10 is packed with useful features, but nothing boosts productivity like mastering keyboard shortcuts. These shortcuts save time and make navigating your system a breeze. In this guide, we’ll explore the most essential Windows 10 keyboard shortcuts and some lesser-known ones that can significantly enhance your workflow.
Table of Contents
Introduction
Basic Keyboard Shortcuts
Copy, Cut, Paste
Undo, Redo
Select All
Windows Key Shortcuts
Basic Windows Key Functions
Advanced Windows Key Shortcuts
File Explorer Shortcuts
Navigation
File Management
Virtual Desktops Shortcuts
Creating and Managing Virtual Desktops
Switching Between Virtual Desktops
Command Prompt Shortcuts
Basic Commands
Advanced Commands
Accessibility Shortcuts
Magnifier
Narrator
High Contrast
Browser Shortcuts
Microsoft Edge
General Browser Shortcuts
Customizing Keyboard Shortcuts
Conclusion
1. Introduction
Keyboard shortcuts are a crucial part of using Windows 10 efficiently. By reducing reliance on the mouse, you can perform tasks more quickly and keep your workflow uninterrupted. This guide covers essential shortcuts and dives into more specialized ones, providing a comprehensive resource for users at all levels.
2. Basic Keyboard Shortcuts
Copy, Cut, Paste
Ctrl + C: Copy selected item
Ctrl + X: Cut selected item
Ctrl + V: Paste copied/cut item
Undo, Redo
Ctrl + Z: Undo an action
Ctrl + Y: Redo an action
Select All
Ctrl + A: Select all items in a document or window
3. Windows Key Shortcuts
Basic Windows Key Functions
Windows + D: Show or hide the desktop
Windows + E: Open File Explorer
Windows + L: Lock your PC
Advanced Windows Key Shortcuts
Windows + Tab: Open Task View
Windows + I: Open Settings
Windows + S: Open Search
Windows + X: Open Quick Link menu
4. File Explorer Shortcuts
Navigation
Alt + D: Select the address bar
Ctrl + F or F3: Search in File Explorer
Ctrl + N: Open a new window
File Management
Ctrl + Shift + N: Create a new folder
Alt + Enter: Open properties for the selected item
F2: Rename selected item
5. Virtual Desktops Shortcuts
Creating and Managing Virtual Desktops
Windows + Ctrl + D: Create a new virtual desktop
Windows + Ctrl + F4: Close the current virtual desktop
Switching Between Virtual Desktops
Windows + Ctrl + Left/Right Arrow: Switch between virtual desktops
6. Command Prompt Shortcuts
Basic Commands
Ctrl + C: Copy selected text
Ctrl + V: Paste text
Advanced Commands
Ctrl + Shift + Plus (+): Zoom in
Ctrl + Shift + Minus (-): Zoom out
7. Accessibility Shortcuts
Magnifier
Windows + Plus (+): Open Magnifier and zoom in
Windows + Minus (-): Zoom out
Narrator
Windows + Ctrl + Enter: Turn Narrator on or off
High Contrast
Left Alt + Left Shift + Print Screen: Turn high contrast on or off
8. Browser Shortcuts
Microsoft Edge
Ctrl + T: Open a new tab
Ctrl + W: Close the current tab
Ctrl + Shift + T: Reopen the last closed tab
General Browser Shortcuts
Ctrl + L: Highlight the URL
Ctrl + Tab: Switch to the next tab
Ctrl + Shift + Delete: Open the clear browsing data options
9. Customizing Keyboard Shortcuts
Windows 10 allows customization of certain keyboard shortcuts to better suit your workflow. To customize, you can use third-party tools like AutoHotkey, which provide extensive options for creating and managing your own shortcuts.
10. Conclusion
Mastering Windows 10 keyboard shortcuts can dramatically increase your productivity and streamline your tasks. Whether you are a beginner or a seasoned user, incorporating these shortcuts into your daily routine will save you time and effort. Keep this guide handy as a reference and start practicing these shortcuts today.
External Authoritative Sources
Microsoft Support: Keyboard shortcuts in Windows
How-To Geek: The Ultimate Guide to Windows 10 Keyboard Shortcuts
Lifewire: Essential Windows 10 Keyboard Shortcuts
By incorporating these detailed steps and tips, you can take full advantage of Windows 10 keyboard shortcuts, making your computing experience faster and more efficient.
#1.#Windows10#2.#KeyboardShortcuts#3.#WindowsShortcuts#4.#ProductivityTips#5.#WindowsTips#6.#TechTips#7.#ComputerShortcuts#8.#WindowsGuide#9.#VirtualDesktops#10.#FileExplorer#11.#AccessibilityShortcuts#12.#CommandPrompt#13.#MicrosoftEdge#14.#BrowserShortcuts#15.#TechHacks
0 notes
Link
Learn how to hide files and folders in Windows 10
In this tutorial we are going to show you that how to hide files and folders in Windows 10.
There may be some files or folders which you don't want to share with other users of PC, then you can simply hide your Files or folders in super easy 1 step method.
#hide files windows 10#hide folders in windows 10#how to hide files and folders#how to hide files and folders in windows 10#hide files and folders in windows 10
1 note
·
View note
Video
youtube
How to Hide Folder in Windows 10 | How to Hide Personal Data in Windows 10
0 notes
Text
Sims 3 Performance Guide
Lately I have found the direction of The Sims 4 to be rather lackluster. Let’s face it. The game is boring. Still looking for that “Sims Fix” I found myself going back to playing The Sims 3. The Sims 3 can be tricky to get running correctly on modern computers so I figured I would share what I learned over the years. I made this guide a few years ago for another forum so I’m always open to new suggestions/edits etc. Some things may work well for others while some may not make a difference at all. I have applied all of these fixes in my own game and I still experience lag so this is by no means a guide to completely eliminate the lag in the game but a guide to perhaps help your game run a little bit smoother. All of these tips have been gathered from all over the internet and also some things I have picked up on my own over the years. I own a legit copy of the Sims 3 and have never owned a pirated version so I can't say whether or not these settings will work with a pirated version of the game. I also only have a PC so I don't know if any of these settings will effect the Mac version of the game. If anything I hope this guide brings people back to The Sims 3 or allows people to give the game another chance. The guide will be pretty extensive and I take no responsibility if you mess up your game :P
Limit Game FPS - This one has been a godsend. I was experiencing major lag especially in build/Buy mode. My computer is way over spec for this game much like most computers today. What would happen is that while in Build/Buy Mode my FPS would spike into the 200's! During these spikes the game would almost be un-playable.
To fix this issue:
Download this file: https://rd.nexusmods.com/skyrim/mods/34]https://rd.nexusmods.com/skyrim/mods/34
I know it says it's for Skyrim but it will also work for The Sims 3. After downloading it unzip the antilag.cfg and d3d9.dll into X: > Program Files (x86) > Origin Games > The Sims 3 > Game > Bin if using Origin. If you have the steam version of the game use : X: > Program Files (x86) > Steam > steamapps > common > The Sims 3 > Game > Bin . By default it is set to limit the game to 30FPS. I have been using this and it works fine. You can change it to 60FPS if you want by opening the antilag.cfg using notepad. I haven't had a chance to test the game at 60FPS but its not like The Sims 3 is a First person shooter or anything so IMO its probably not necessary. Run the game and your FPS should be capped at 30.
Alternately you can try turning on Vsync in either Nvidia Control Panel or AMD Catalyst software however I wasn't able to get it working. I'm using a Geforce 1080 and the latest Nvidia drivers. When I turned it on in the control panel it did nothing in the game.
After installing this fix I no longer experience massive lag spikes while in Build/Buy Mode the whole game also seems to be running a little bit smoother as well. Unfortunately there isn't much we can do about EA's terrible coding of the game so there will still be lag but this one has helped my game more then any of the other fixes as of yet.
**It also must be noted that FPS fix uses the same file as Reshade, d3d9.dll. I haven’t tested if this works using the d3d9.dll file from Reshade but I can assume it probably doesn’t. I do however believe there is a frame limiter built into reshade which should accomplish this same thing as this mod.
In Game Settings
1. Graphics
Resolution - You should always play at the native resolution for your monitor. Most monitors today use a native resolution of 1680x1050 or 1920x1080. If your game is struggling at this resolution you should always lower the graphics settings not the resolution.
Windowed? or Fullscreen? - This one is something that you will have to test. Some people say that the game runs better for them in Fullscreen and some say it runs better in Windowed Mode. My personal game runs better in Windowed Mode.
Object Hiding - Enabling this can help to increase performance especially if you have a large house. Essentially what this does is that the game renders every object on the lot you are in even if you aren't on that floor. So if you are playing on the first floor the game is using resources to render the items on the second/third floor etc.
Reflection Quality - Setting it to Mirrors and Water will work well for most people but adjusting this lower can offer a slight performance increase.
Edge Smoothing - I personally have not noticed much of a difference in performance adjusting this setting but this is the Anti Aliasing settings for the game. Try lowering it and see if it makes a difference in your game.
Visual Effects - According to the game "Controls the quality of particle effects on objects, Sims, and the town" Medium would be the recommended setting for Visual effects. It offers a happy medium between performance and visual quality.
Lighting and Shadows - Adjusts the shadow quality in the game. I run this on high in my game as there isn't a noticeable difference in performance between medium and high settings. Turning it to low will give a slight boost in performance but the shadows will be ugly.
Tree Detail - Keep this setting on high as there really is no difference in performance between settings. All you end up with are some ugly trees and no real boost in performance.
Enable Animation Smoothing & Enable Advanced Rendering - Both of these items should always be checked. Enable Animation smoothing makes no difference in performance and Turning off Enable Advanced Rendering can actually decrease performance.
Draw Distance - Keep this on high as it does not effect performance.
High Detailed Lots - With this turned up all the way I noticed a fair bit of stuttering in my game. I have mine set to 4 lots but this is a setting that should be tested to see what works for you.
Texture Detail and Sim Detail - Most computers should be able to handle both of these settings maxed for a small boost in performance you can lower the texture detail to medium. Sim Detail should always be set at Very High as lower this setting has only a very small boost in performance that probably wouldn't even be noticeable.
2. General Settings
Enable Shop Mode - This will disable the Sims 3 Shop from In-Game. Turning this off can help with stuttering.
Enable Lessons - Turning this off can possibly help with performance. I haven't noticed a difference but at this point we all know how to play The Sims.
Memories - Disabling Memories can offer a boost to performance and reduce in game stuttering.
**Alternately you can try using this mod if you don’t want to completely disable the memory system in The Sims 3
No (or fewer) automatic memories by velocitygrass on Mod The Sims
https://modthesims.info/d/446281
Enable Interactive Loading Screens - Turning this off has been said to reduce some in game stuttering. Besides nobody wants to play that stupid game anyway.
3. Online
Keep Me Logged In & Enable Online Notifications - Turning off both of these settings will help game performance and reduce stuttering.
4. Advanced Demographics Options
Enable Story Progression - Turning this off will reduce stuttering in the game. If you like this setting you can use the NRASS Story Progression explained further in this guide.
Advanced Settings
I will try to guide as best as I can with these but always MAKE BACKUPS of every file modified in this section.
In order to make this process easier be sure that "Hide extensions for known file types" is unchecked in the Windows Folder Options. In Windows 10 Click on View > Options > Change folder and search options. Switch to the view tab and under Files and Folders uncheck "Hide extensions for known file types"
Edit GraphicsRules.sgr - This setting will help the game run smoother and make for faster clothing changes.
1. Got to X:\Program Files (x86)\Origin Games\The Sims 3\Game\Bin
2. Copy the GraphicsRules.sgr file and back it up in either in a safe location or even in the same directory just name it GraphicsRules.sgr.orig. Click yes when prompted with the rename.
3. Now Open GraphicsRules.sgr with notepad (not the copied version)
4. You will see four lines that look like this: seti cpuLevelUber 4
seti cpuLevelHigh 3
seti cpuLevelMedium 2
seti cpuLevelLow 1
5. Change the four lines to this: seti cpuLevelUber 4
seti cpuLevelHigh 3
seti cpuLevelMedium 3
seti cpuLevelLow 3
6. Save in Notepad and close Notepad.
Edit Sims3.ini - This is how you force the game to use more then 2GB of RAM. I noticed a massive improvement in both CAS and Build/Buy mode with this. Clothing,Objects etc load almost instantly when this is changed. The Origin version of the game has already been patched to use 4GB of RAM however adjusting this value to reflect your systems total ram amount if above 4GB can be beneficial. If you currently have 4GB total of RAM and are using the Origin version of the game you can skip this step. It’s questionable whether or not this makes a difference in the game as The Sims 3 is a 32 bit game that only uses 4GB to begin with but it seems to actually make a difference in my own game.
1. Go to X:\Program Files (x86)\Origin Games\The Sims 3\Game\Bin (same as GraphicsRules.sgr)
2. Backup the Sims3.ini in the same method as the GraphicsRules.sgr
3. Open Sims3.ini in Notepad
4. Under [ResourceSystem] you will see this:
MemoryUsageLimit = 20000000 ( 10000000 for legacy/disc versions)
5. Ignoring the zeros this is showing that the Sims 3 is only using 4GB of ram (2gb for Legacy/Disc versions of the game). Depending on the amount of ram in your system you should change it to half of your total amount of ram. Examples:
8GB Total Ram MemoryUsageLimit = 40000000
16GB Total Ram MemoryUsageLimit = 80000000
32GB Total Ram MemoryUsageLimit = 16000000
**Be Sure to only change the first number not any zeros. For 32GB+ its the first 2 numbers. Putting this too high could cause your system lock up or crash and possibly do damage**
Modding
First go here and follow the instructions on this page to set up your Mods folder: https://www.carls-sims-4-guide.com/forum/index.php?topic=9187.0
1. Must Have Mods - Even if you don't plan on putting any CC in your game these Mod is highly recommended if not needed in order to keep the game running Smoothly.
NRAAS Master Controller -
https://www.nraas.net/community/MasterController
This mod is a must have. It fixes many of the errors in the game and helps immensely with game lag and stuttering.
Under Modules Download: (Not Required but useful)
MasterController Cheats - Adds "cheaty" functions to Master Controller.
MasterController Expanded Tatttoo - Expands the number of locations provided in Tattoo CAS
MasterController Progression - This mod adds progression related interactions to the "Master Controller" menu. Addition to Story Progression (below)
MasterController Integration - (Must have if you install a lot of sliders) This mod replaces all the CAS interactions in the game with the one managed by MasterController, including the "Create-A-Sim" button in "Edit Town".
Now go to this Page and download these other “Must Have Mods” by NRAAS
https://www.nraas.net/community/Mods-List
Overwatch - (Important) Contains error correction and periodic game maintenance/clean up to reduce issues and improve game longevity.
Error Trap - (Important) Core-Mod that performs save-game corruption cleanup, while catching and reporting unhandled script errors.
Traffic- (Important) Controls autonomous vehicular traffic such as the Food/Ice Cream Trucks, and provides some minor vehicle routing settings.
Saver - (Important) Adds autosave function to the game.
Register - (Important) Replaces the EA Role Manager with a custom version that corrects several bugs and allows for greater flexibility.
Other Useful Mods at NRAAS (Optional) Same page as above:
Story Progression - Basically a less buggy, less performance heavy replacement for the EA story progression in the game. Be sure to tick off “Story Progression” in the In Game options as stated above. (Install all the optional modules as well)
Decensor - We all know what this does
Dresser - Adds automated outfit control for inactive sims, adding accessories, and restricting CAS parts.
WooHooer - Alters the romance and woohoo interactions, provides greater flexibility and attraction scoring.
Retuner - Provides fine tuning of many settings in game like autonomous settings, pricing etc. This one can seem daunting at first but there are plenty of Returner settings to be found out there and its really isn’t that difficult to change the settings in game albeit time consuming.
Be sure to look over the other mods if you see something you like download it. Any of these mods should be safe to add to your game with little to no performance impact.
After that extract the files you just downloaded into \Documents\Electronic Arts\The Sims 3\Mods\Packages\Overrides If you don't have an Overrides folder create one. The “Overrides Folder” is essentially a priority folder. Mods put into this folder will be loaded before any other package files you may add to the game.
In-Game NRASS Settings
These are just some settings to change to improve game stability. This is by far not comprehensive. For Retuner settings I would suggest a Google search of other users settings or consulting the NRASS help section for explanations of how to use this mod.
Click on the Town Hall in Map View Under NRASS
Traffic
Ice Cream Truck - I hate that creepy Ice cream truck so I change everything to false and set Max Ice Cream Trucks to 0. If you like having it around still change the Max Ice Cream Trucks to 1
Routing
Allow Performance Career Limos - False (Limos create a lot of lag in the game)
Allow Use of Cars During General Routing - True (if disabled your sims will only use cars when you tell them to)
Always Use Taxis for Inactives Lacking Vehicles - False (Townies will no longer use Taxis)
Register
Allow Immigration - False (Random Townies wont move into your town keeping the population down and helping to keep performance from decreasing as sims move in.
Animal Control - Change the settings below for a performance boost
Maximum Deer - 2
Maximum Raccoon - 2
Maximum Stray Cats - 3
Maximum Stray Dogs - 3
Maximum Unicorns - 0 (Sorry Wild Horses and Unicorns add a good deal of lag to the game)
Maximum Horses - 0
Custom Content (CC)
Much like any other Sims game moderation is key. The more CC you download and put in you game the slower your game will perform. I'm not going to go into detail about how to install CC in The Sims 3 in this guide. These are just a few important tips to take into account when installing CC,
Try to install Sims3Pack files as much as you can. Sims 3 automatically merges these files and this leads to better game stability.
Merge you package files. Girl Meets Pixels made a great guide here: https://www.youtube.com/watch?v=jIZ2LdoT-HY]https://www.youtube.com/watch?v=jIZ2LdoT-HY
Keep an eye on the size of your Sims 3 Folder in /Documents. It may seem crazy to imagine but massive CC shopping sprees can lead to a massive folder to the tune of 30GB+. Skins and Hairs are a killer. These files are usually rather large sometimes in excess of 80 - 100mb. My suggestion would be to find a default skin you like and just use that. Don’t install any non default skins. Also go easy on the hair. You don’t need 20 different variations of the same ponytail in the game. Clothing is usually fine but pay attention to the size of the CC. That cute dress you found on Tumblr that’s 65mb more then likely has way too high of a poly count and will just lag and be slow to render in the game. Sure it looks great in screenshots but it wont be practical in game. I’m not sure of the exact cut-off for CC but eventually the folder gets too large for the game to handle and it will lead to issues like save corruption or in some cases not being able to save the game at all because the game has run out of memory. Sadly if this happens there is no fix for this and you will lose all of your progress and possibly your save file as well.
Advanced
World Fixes EA left many routing issues in a lot of their worlds that are known to cause lag and often times crashing as Sims bunch up in broken routing areas on the map.
All the World Fixes can be found on Ellacharmed's Wordpress page. Follow the instructions very carefully and install the fixes for all the worlds you have installed in your game.
https://ellacharmed.wordpress.com
Other Useful Tips
Delete your cache!! This one can't be stressed enough. I delete mine before every game play and never have issues starting the game up. A guide can be found here: http://simswiki.info/wiki.php?title=Game_Help:Sims_3_Delete_Cache_Files
Turn off Origin In Game - This will give a noticeable improvement.
Close all other programs running in the background.
Turn on Game Mode or Silent Mode on your Antivirus
Useful Sims 3 Programs
s3pe http://www.simlogical.com/ContentUploadsRemote/uploads/189/
Sims 3 Dashboard Tool http://modthesims.info/download.php?t=387006]http://modthesims.info/download.php?t=387006
CC Magic http://modthesims.info/download.php?t=461888]http://modthesims.info/download.php?t=461888
Delphy's Sims 3 Pack Multi-Extractor http://modthesims.info/download.php?t=364038]http://modthesims.info/download.php?t=364038
Save Cleaner by Kuree http://www.simlogical.com/ContentUploadsRemote/uploads/1532/
724 notes
·
View notes
Note
what program do you use to do animations? ive been wanting to get into it but im not sure how and i know you draw in photoshop which i do too. thanks!!!
it really depends!! for longer stuff, i use adobe animate, just because photoshop tends to start chugging if i do animations longer than like, 20-ish frames. I do all the compositing and tweening for my animation memes in animate as well.

in addition to roughing frame-by frame stuff for my animation memes, (such as tirona's dance for the fortnite one haha) i like to do sketching/doodly animations, like this lil kitty, in photoshop, since it feels most organic drawing-wise to me. BUT, photoshop animation is a bit tricky, and deff opaque to anyone whos never done it before. heres a basic guide, under a cut cuz it got long LOL
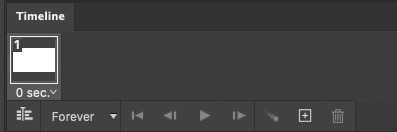
create a new canvas. you can do whatever resolution you want but keep in mind, larger canvases will lag more. i do 1920x1080. if you select window>timeline, a new menu will pop up at the bottom of the photoshop interface
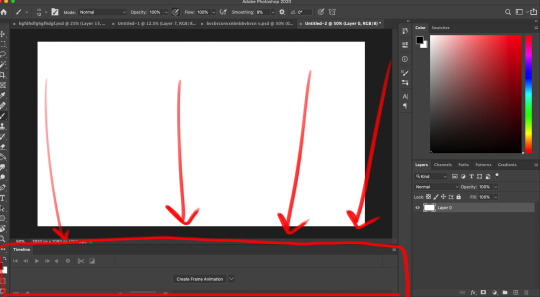
you'll notice a dropdown menu, that has two options: "create video timeline" and "create frame animation". i use create frame animation , just because it's more fitting for what i do.
selecting that option will give you a timeline with frames and everything! each frame's delay can be chosen individually. during playback in photoshop, it will play a little slower than the actual speed when exported as a gif, so keep that in mind
i would advise you to think of layers (or layer groups, if you plan on cleaning up and coloring) as frames for this. a layer's position, visibility, and style can change from frame to frame.
pay attention to these following options, they will appear over your layers menu on the far right once you create an animation timeline.
Unify: can be applied to position, visibility, and layer effects. it will change all the other frames to match what the layer is like in your currently selected frame.
Propogate frame 1: if this box is checked, any position, style, or visibility changes made to a layer on frame 1 will be applied to all the frames. unchecking it disables this.

editing a layer with the eraser or brush (or any other tool) will apply the changes to every single frame. so to create the next pose, you will have to go to the next frame, hide the first layer, and draw the next pose on a new layer. I've colored the layers in 2 different colors here for clarity.
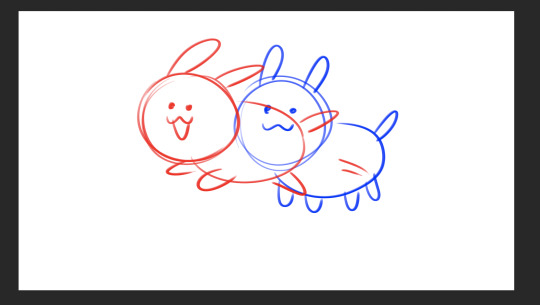
the blue is layer 1, and the red is layer 2. on the first frame, i will make layer 2 (the red pose) invisible and leave layer 1 (the blue pose) visible, and then on the second frame i do the reverse. You kind of have to do this manually for every single frame, so it gets a bit arduous if you have more than like 7 or 8 poses.
AND, exporting as a gif is also ridiculously silly and opaque too. go to file > export > save for web (legacy)


that will bring up this menu that is super complicated. the only stuff you really need to pay attention to is near the bottom, as everything else will work just fine on default settings (i've never messed with them in the 9-10 years ive been animating in photoshop, lol)
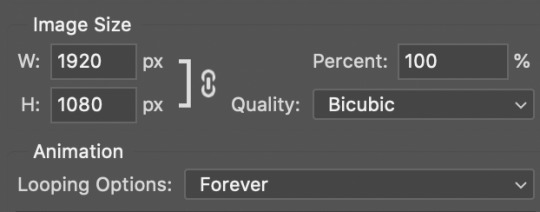
down towards the bottom you can change the export size, which is useful if you drew it on a big canvas but dont want the gif file to be enormous. also, you can choose how many times it loops. i usually just keep it on "forever", so i can watch it over and over again lol
and finally, make sure you click "save" and NOT "done". if you click done.. it does not export the file. i will not tell u how many times ive been in speed mode and click "done" and then get frustrated when the file dosnt appear in my folder. i am not smart.
anyways hopefully this is helpful.. ive been using ps so long i have extreme tunnel vision re: mentally filtering out all the useless extra stuff in photoshop's interface so i have no idea if this is confusing or not to someone who's never done it before. if you have more questions just let me know!!
76 notes
·
View notes
Text
This bundle (direct link for anyone who doesn't want to click through to Twitter: https://www.humblebundle.com/books/terry-pratchetts-discworld-harpercollins-books) is only available in the US.
So are the rest of us just out of luck? Of course not, this is the internet! And I'm not even talking about 🏴☠️! If we want to buy this bundle and gain access to this deal and buy these ebooks legitimately, we just need to make Humble think that we're in the US.
How do we do that? Well, if you already have access to a VPN service that provides location redirection you can just use that (mostly, you'll still need to read from step 11 below), but for anyone who doesn't already have one, you can use Tor as a free substitute with a little bit of work.
What is Tor, you ask? The name stands for 'The Onion Router' and it's an open-source software project designed to protect users' privacy online. It does this via a number of methods designed to make it difficult for trackers to identify a specific user (blocking tracking cookies, steps to obfuscate browser fingerprinting) and their online activity (encrypting internet traffic and relaying it through their own network to hide your identity). It's that last part that is useful for us today, because we can use that relay network to digitally project ourselves into the US of A to buy Discworld books AND donate to charity! We just need to tweak a few settings to get it to do that for us.
Step-by-step guide for how to both get and configure Tor and then use it to get this bundle under the cut.
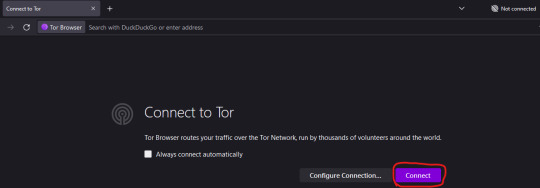
1. First of all, you're going to need to get Tor. This is very easy, because it's distributed for free; just go to https://www.torproject.org/ and download the browser for your operating system.
2. Having downloaded it, you need to install it. Shocking, I know!
3. Once installed, you will need to run the Tor Browser and press the Connect to Tor button once.
4. Once you are connected, close the browser window. Doing this creates configuration files that you will need to edit in order to have the relay go specifically via the US, instead of anywhere else in the world.
5. You need to locate the folder that Tor Browser is installed in. For Windows, by default, this will be on your Desktop (apologies to users of other OSes, I don't know the default locations for them, but you can find that info here: https://www.wikihow.com/Set-a-Specific-Country-in-a-Tor-Browser)
6. From the Tor Browser folder, you need to go to Browser > TorBrowser > Data > Tor. You should see a folder that looks like this:
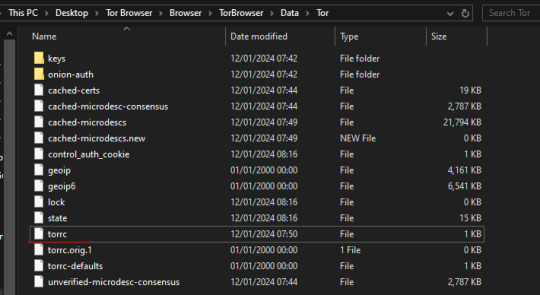
7. Right-click on the 'torrc' file and select 'Open With'. On the "How do you want to open this file?" menu that pops up, select 'Notepad'
8. Ignore the stuff that's in there already, we don't want to change any of that. What we want to do is add in two lines at the bottom, which will tell Tor to find both an entry and exit point to its network that are within the US. So we need to add in the following lines:
EntryNodes {US} StrictNodes 1 ExitNodes {US} StrictNodes 1
Add them as shown, with each one on its own line. (You might expect you only need to set the exit node to US to make this work, but when I tested this it did not work).
9. Once you've copy-and-pasted those lines in, go to File > Save (or hit Ctrl + S). Do not 'Save As', this will create a new .txt file, we need to save our changes in the original torrc file with no extension.
10. Now, re-open Tor Browser and tell it to connect. If you go over to https://www.humblebundle.com/books/terry-pratchetts-discworld-harpercollins-books you should now see the bundle, rather than be told it's not available to you... right up until you log in to your account to buy it! Oh no, we're not done yet!
11. So, if you already have a Humble account, Humble will have it location-locked to the country where you created it, and will block bundles not available in that country, even if you're currently connecting from outside that country. There are two ways around this:
11. A. Create a new Humble account using your Tor browser so that it's set to the US by default. You should be able to use your existing paypal account/other payment methods with this account even if you use them on your main account, but I haven't tested this in person.
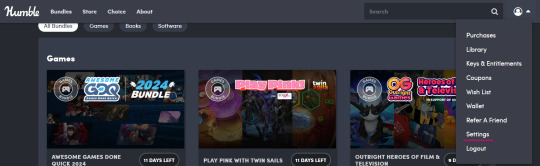
11. B. Humble lets you change the location of your existing account up to 3 times every 3 months to the location you are currently connecting from. Since you are currently connecting from the US, you can use this to change your location to the US, buy the Discworld bundle, and then from outside of Tor you can log back into your account and change it back to wherever you call home. To do that, go to Settings in the account dropdown on Humble:
That leads through to this page:

If you're currently connecting from a different location to the one in the Location box, it will allow you to select the location you are connecting from instead. It will prompt you to confirm the location change before it goes through.
12. Congratulations, you have successfully tricked Humble into thinking you are in the US and allowing you to buy the Discworld bundle. The bundle itself is redeemed through Kobo, and they don't care where in the world you are, so it doesn't matter if you change your Humble account location after you've bought the books, you'll still be able to redeem your purchase and access your ebooks.
13. Optionally, go back and edit the torrc file again and take out the lines we added to return Tor back to its default functionality.

YOOOO DISCWORLD IS ON HUMBLE BUNDLE!!!
If you've been on the fence about starting these books THIS IS YOUR SIGN
5K notes
·
View notes
Text
Chase You / Chase Me (Pt. 3)
Part 3: Remember when everything was different
Catch up here: Series Masterlist
Chapter Summary: Aislinn, Gigi and Alex find friendship in the midst of the competition. One discussion led to another, pushing Alex to take a trip down memory lane, revealing the moment in her past where she and Gabe's paths crossed for the first time.
Book/Pairing: Choices - Laws of Attraction / Gabe Ricci x MC (Alex Keating)
Words: 1.7k+
Rating/Warnings: Mature (16+) / alcohol consumption, language. Scenes/themes may trigger trauma for some, reader discretion advised.
Disclaimer: Most of the characters as well as some dialogue belong to Pixelberry. I am merely borrowing them.

Sunday, downtown New York
"Wait, can you back up for a moment," Aislinn said across Alex, who was scooping the remains of her melted banana split. Gigi was sipping her ice-cold mimosa, their brunch table full of plates with scrapes of leftovers. The sun was out and so were they, dining al fresco under the shade of a huge white parasol and the gentle breeze cooling them every now and then. It was a perfect day so far.
The trio has agreed to meet up that Sunday to discuss what went down with the Rothswell case as well as to prep for the conference Sadie had invited them to. They were on some kind of a peace pact, all of them sharing the view that pitting women against women in the corporate world is just shitty business.
Alex has enjoyed their company. They exchanged imaginary one-liners that would have made Martin frown his heart out or Beau McGraw chortle his head off. And speaking of McGraw, they all concluded that the best strategic course of action was to let Beau enjoy his moment in the sun. One day, Alex would make sure to remind him that he tried to rain on her parade.
It was a refreshing and enlightening discussion, though she will forever be traumatized with how many swears Gigi can cram in a single sentence. But the sight of a flustered Aislinn while Alex and Gigi engaged in a battle of pick-up lines with their waiter was a strong second contender.
As their drinks flowed, the conversation naturally led to rhetorical questions, now settling at why they became a lawyer. Aislinn shared first, surprisingly, stating that her knack for analysis was just a natural fit to the demands of a career in law. Gigi's answer was simple - she can leverage her eidetic memory to earn herself some serious dough, allowing her to live it up and take impromptu vacations to Bali.
Alex tried to dodge the question. She had never needed to discuss her reason of leaving pre-med behind to attend law school. It wasn't a pleasant memory, and she doubted it will ever be.
The two ladies were quick to see her attempts of evasion. But together, they finally wore her down, Alex left laughing with their shenanigans as they cornered her to tell her story. So she told them that she knew Gabe Ricci. And that it was because of him why she was a lawyer. Alex decided that revealing the truth was worth it, seeing how their jaws just dropped to the floor.
"Girl, you have to explain yourself right now," Gigi demanded, to which Aislinn seconded.
Alex snorted as she went back to skimming what was left of her dessert. "It's a boring sob story, and I don't want to turn this lovely morning into a snooze fest."
"We're not going anywhere, right Gi?" Aislinn turned to Gigi beside her, who nodded whilst sipping another glass of cocktail.
"Fine, but only if you swear this won't leave this table," she said. The two held up their hands invoking a half-smiling Alex, sensing nothing but sincerity. So she drank down her glass of bloody mary and took a deep breath, composing her tale.
"Buckle up, ladies, you're in for a ride."
**
10 years ago, in a town near Boston
Alessandra Keating had never felt more alone than she did that day.
They said she needed to just move forward. But how can she, when every day since the crash, she felt nothing but emptiness? How can she feel alright, when the only life that she knew was suddenly taken away from her?
It wasn't long before she found out that the car accident was caused by someone being reckless, by someone who thought they were above the law. Then, she imploded. No way could she let her parent's deaths be forgotten. No fucking way.
For the past three years, she invested all of herself into this endeavor. Researching, studying, choosing the right counsel, even raising funds. It was what kept her breathing, what gave her purpose. Ultimately, it was what kept her sane.
From filing the lawsuit to attending mediations, to numerous settlement meetings and colliding with every legal roadblock possible - Alex made sure to see them through. Only for everything to be decided that day - the bench trial.
One sweltering summer morning in her hometown's courthouse, Alex sat on the side of the plaintiff, with her long brunette hair tangled in waves. She let her senses wander, taking in the dark wooden panels and pews, her sense of smell invaded by the scent of old mahogany. She sealed her lips into silence, hiding her nerves by straightening the bargain khaki suit that she borrowed.
She barely held it in as her eyes travelled to the table beside them, catching a glimpse of the man that caused her immeasurable pain. With jet black hair and looking as young as her, he sat with an almost mocking expression. He was wearing a crisper set of suit, creating an illusion of trustworthiness that Alex can easily see through.
Maximilian K. Cornell. The green-eyed teenager who swerved his sports car onto the same slippery road Alex and her parents were passing through. The very same boy who got out unharmed, but left Alex's family to die in the snow. Her opponent was a slithery snake who managed to screw the justice system so many times over, just because his parents had the grease to do so.
But after the crash, the town decided they can no longer turn the other cheek. Alex's decision to sue was propelled by the support of the countless friends and families whom her parents have helped in their hour of need. But that still proved not enough.
Her mind whirled back to the proceedings, and to how every strategy, every plan of attack was being thrown out. With every whip from the defense, she started to grow impatient. As another traffic expert from her camp was dismissed, Alex just snapped inside. She leaned to Mr. Leroy, a withering man on the brink of retirement who was her lawyer, asking for them to convene outside.
"I'm sorry Mr. Leroy, but your strategies were just scrutinized and torn into pieces," Alex said in a low voice the moment they stepped out into the hallway.
"Alex, I am doing my best here. We clearly don't have the upper hand, lacking the incriminating evidence that we need," the man replied, exasperated.
"Have we dug up his previous records? I mean, why on earth would he have a sealed history? Doesn't that mean something?" she continued.
She continued to dictate her litany of better-positioned moves, but even Alex knew she wasn't getting through. So she excused herself from the conversation, hoping a cup of iced coffee will somehow mitigate her frustrations.
As soon as she came back, she found Mr. Leroy convening with a much younger man in a dark navy suit. His aura screamed "big city hotshot", albeit the exhausted look in his brown eyes. Not wanting to interrupt, she held off from approaching. However, her curiosity didn't stop her from eavesdropping.
What she heard the charismatic man say was a legal precedent that would have opened the sealed records in question. And with all the mind-boggling legal jargon, that's just about what she understood.
"Gabriel Ricci? I'm looking for an attorney named Gabriel Ricci?" a female voice from a nearby window called out, which made the young man raise his head. She saw him end the conversation abruptly, where a flustered Mr. Leroy hastily thanked him. Alex took that as her queue to approach her lawyer.
"Alex, we might be able to turn things around," she heard Leroy say.
And by some miracle, things did turn around. With her lawyer using the precedent offered by the young attorney earlier, their side gained the needed momentum to tip the scales in their favor. By the end of the trial, the verdict was out - Cornell will never be able to drive another vehicle, along with paying her a hefty amount of damages and fees.
They won.
Alex had to pinch herself before the victory sunk in. When it did, she felt an immense burden lifted from her shoulders.
After a long, long time, Alex can finally breathe.
Broken free from her nightmares, she asked herself what's next? The answer came to her almost immediately. Right there and then, she decided what she wanted to be. Like that man from the courthouse, she will become a lawyer.
Fueled by this new sense of mission, she saw a future for herself. No longer held by the past, she finally was able to move forward.
Indeed, Alex became what she set out to do - a lawyer who took on hopeless, even impossible cases and won them. A lawyer her parents would be proud of.
A damn good lawyer, just like Gabriel Ricci.
**
Present Day, at a New York Penthouse
Gabe sat in his home office clad in nothing but his white bath robe, holding a worn manila folder.
Five years ago, Gabe saw this case as his opportunity to make Robbie proud. The defendant had all the parallels with his brother - a teenager, incarcerated young, where the punishment had presumed to be too harsh. He now knew it was rightfully just.
But at that time, he was blinded by passion and ambition. He wanted to prove to himself and to Sadie what he can do. Taking on this case that was practically unwinnable would give him more power, more control over the pro bono cases he wanted to take. Actually winning this though, that proved to be his fatal mistake.
Your cockiness got the better of you again, Ricci.
His mind went to Alex. That was the direction his every waking moment drifted to nowadays. Whether he liked it or not, he'd answer some other day.
He had to let her know. If he didn't, Alex would eventually find out herself. Once she discovers that he was the one who had set this man free, she would hate him.
Gabe can't bring himself to think of that happening, of losing that chance with her, or of losing Alex's trust.
Hell, I'm going to lose her entirely if she finds out.
These realizations devastated him.
But how can they both escape the looming shadows of the past unscathed? Even he couldn't figure that out.
Sighing, he rubbed his hand on his face, reeling at his lack of options. He then stood up, slamming the open folder on his desk as he turned to face the window, simmering in his own regrets. Papers slipped out to the carpeted floor, including a full-page mugshot of the defendant.
It was Maximilian Cornell.
Author's Notes: With Sadie being shady AF, I feel like we all need some dose of female friendship right? Also, this is my HC why Gabe constantly pulls away from MC, not only because of their working relationship. Did the reveal live up to the cliffhanger? Let me know in the comments! 👇👇👇
Tag list: @adiehardfan @pixelnutrookie @starryjieun @latinagiraffe @sarcastic01lily @spookycolorpeanut @ophrookie @suitfer @thegreentwin @mkatschoicesblog @made-of-roses
@choicesficwriterscreations
Thank you for your continued reading!
Want to be added or removed to the tag list? No problem - just let me know 😊. Reblogs are also much appreciated! 💕
#laws of attraction#choices laws of attraction#choices loa#laws of attraction fanfiction#choices laws of attraction fanfiction#choices fic writers creations#fics of the week#gabe ricci x mc#gabe ricci#aislinn tanaka#gigi sinclair
51 notes
·
View notes
Text
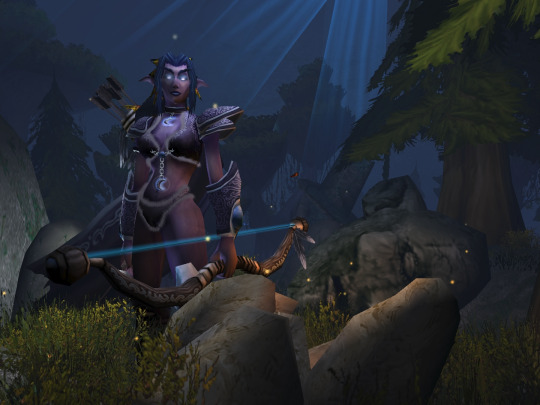
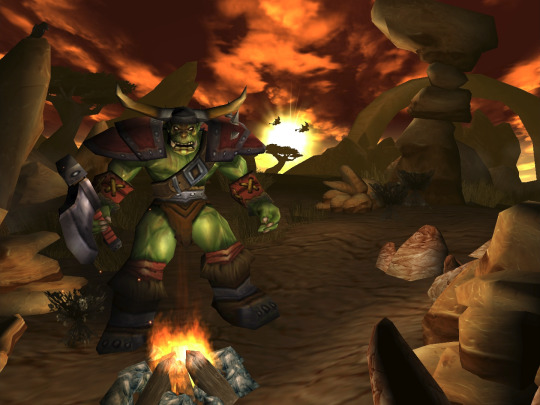
Capturing the ambience of Warcraft 3′s Menus
It is possible to modify WC3′s menus such that UI elements are drawn offscreen, transparently, or not at all.
Note: this guide was written for older releases (v1.29 and below) and may require changes for newer versions, especially those available through the Activision launcher.
Modifying MPQ archives
As a patching mechanism, WC3 first searches for a file called War3Patch.MPQ when loading content. You’ll inject your edited files there.

Step 1: Overriding FDFs
To hide the remaining UI elements, we’ll need to modify the game’s FDF files. This format defines a menu’s components and/or layout in plain text.
Use Ladiks MPQ Editor to export UI/FrameDef/Glue/StandardTemplates.fdf as well as those specific to the menu screens you are targeting. You’ll need to modify menu elements’ coordinates so that they are positioned offscreen. For example: SetPoint TOPLEFT,"LoadSavedBackdrop",TOPLEFT,-10, -10.
Re-import your modified FDFs into a patch MPQ, with a folder structure that matches the original files, and launch the game to verify.
While editing, you may have noticed that many FDF components define a BLP skin. We’ll learn how to hide those elements in Step 2.
Allow Local Files shortcut
Whereas modified FDF files must be tediously imported/exported from the game’s MPQ archives, there’s an easier method for overriding WC3′s BLP skins.
A hidden developer setting tells WC3 to first try loading assets from the Windows file structure instead of MPQ archives. Create a registry script (example name: AllowLocalFiles.reg), paste the following text inside, and run it:
Windows Registry Editor Version 5.00
[HKEY_CURRENT_USER\Software\Blizzard Entertainment\Warcraft III] "Allow Local Files"=dword:00000001
With that setting in place, we can now override any BLP with a local file, so long as we match the directory structure and filename of the asset as it is found inside the MPQ.
Step 2: Overriding BLPs
We’ll use an approach of providing a “blank” asset as a replacement for those texture s used to draw menu UI.
First, create a transparent 1x1 pixel PNG in the image-editing program of your choice. Then, use BLP Lab to convert this to a BLP skin.
Finally, make several copies of this outputted BLP. Rename each to match one of WC3′s existing menu textures. For example, (paths are relative to your WC3 root directory):
UI\Widgets\Glues\GlueScreen-Button1-BackdropBorder.blp
UI\Widgets\EscMenu\Human\editbox-border.blp
If you launch Warcraft 3 at this point, you should notice some missing menu graphics.
Step 3: Overriding campaign strings
By editing a file called CampaignStrings.txt, we can make the text on WC3′s campaign menus disappear. Simply replace the header and name strings inside with blank strings. Interestingly I found the associated buttons were still clickable, but only within a tiny area.
Guess and check
Repeat Steps 1 and 2 as necessary until all UI elements either draw with “blank” textures, or offscreen altogether.
Consider that each menu screen has multiple states, and some of which have more complex UI that will be tricky to hide. Also consider that navigating menus with your mouse may become impossible as you gradually remove elements, so you’ll need to use hotkeys to get around.
Animated sprites
Some menu elements, like the chains and gears on the main menu, are seemingly hardware-accelerated 2D sprites. To override these we’ll need to override the relevant BLPs which found inside Textures rather than UI\Widgets.
Alternate camera angles
Some of WC3′s menu dioramas are designed to be viewed from multiple angles. For example, the main menus of RoC and TFT both transition skyward when players navigate to the Battle.net lobby.
To execute these animations, one can simply delete all sequences other than the desired one by using the Sequence Manager inside War3ModelEditor. Then, import the modified MDX file back into the MPQ archive.
Widescreen display
Although WC3′s “glue” dioramas were designed to be viewed in 4:3, we can nonetheless render them in 16:9, revealing the variously finished geometry at the edges. The easiest way to do this is the RenderEdge MIX file.
We can also render widescreen menus through Warsmash. Just add the following to your active INI file:
FullScreenMenuBackdrop=1
Additionally, Retera added a UI toggle to menus, activated via Alt + Z. However I found this clashed with Nvidia Shadowplay's hotkey, so I changed it:
if ((character == 'f') && Gdx.input.isKeyPressed(Input.Keys.ALT_LEFT)) { .. }
Extracting sounds
Use the Sound Browser panel of WC3′s World Editor to export the desired assets. You can also use MPQ editor to do this - you’ll find a few files which World Editor doesn’t list e.g. MIDI sequenced ambient tracks.
youtube
3 notes
·
View notes
Link
#TipsTech --- To show hidden files in Windows 10, you'll need to go into the "View" menu of your files program, where you can find files that are hidden by default.
0 notes
Text
Taste Of Your Own Medicine ~ PJM [Request]


↬↬↬Word Count: 2.4K
↬↬↬Genre: Fluffy, angst? Savage Reader finally takes a stand, the y/n I want to be
↬↬↬Pairing: Jimin x Fem!Reader
↬↬↬A/N: Hope this Is okay for you my love!

What was supposed to be a relaxing honeymoon turned into a stressed-filled weekend away with Jimin and his girlfriend who hated you, she hated you because you were married to Jimin and not her.
"You said whatever I want I get," You heard her whine as you flicked over the pages of the report in your hand, the weekend was supposed to be spent relaxing in the huge hotel but instead you were working since you weren't having a real honeymoon. Yourself and Jimin were married because of family arrangements, Park Industries and Kim Industries were going into business together and that why you had been married. It had been arranged that way since the day of your 16th birthday so you knew the time had been coming where you would have to marry someone you did not love. Myung stomped her foot down like an immature child who couldn't get their own way and in return, you rolled your eyes, Jimin glanced over at you and then back to Myung as he handed her some more money.
"She's going to run you into the ground Jimin," You stated once she left the hotel room you'd been hiding out in for the last day and a half, luckily you would get to go home soon. That 10 bedroom mansion was looking really good to you right now, plenty of places to hide away from Myung and her high pitched squeaky voice.
"Shut up, I have enough money to spoil her if I want to." You nodded sarcastically and shut the folder you'd been working from, you weren't going to be able to concentrate on anything with either of them around.
"Whatever, but when she finally makes you broke don't come crying to me. We had an agreement." The agreement. He could date whoever he wanted as long as he kept it out of the press and kept it quiet, any of the girls he dated had to sign an NDA to make sure they couldn't talk about anything between themselves and Jimin. You didn't want his player like behaviour coming back and making your company take a hit. You were doing this for a reason and you weren't just going to let him throw it away over some pussy.
"I know we do. You're just jealous it's not you that I'm buying everything for," You scoffed rolling your eyes so hard you thought they might roll out of your head and in front of Jimin but he scoffed back at you,
"Trust me Jimin, if I really wanted something I could go out and buy it for myself since I'm not a gold-digging girl who's never worked a day in her life," You hit him on the shoulder with your folder and walked into the joint bedroom that was in the room, sliding your work into your side bag and looking for your swimming costume.
"She's has a job!" He defended barging into your room as he watched you hunting around for something, he was always doing this. Trying so hard to defend her against you but you didn't care, you never had. As long as she stayed out of your way you wouldn't care.
"Please Jimin, fucking you on your desk at work doesn't count as a job...Unless you've started paying her for that like the last one," You smirked at yourself knowing you were winding him up, it was one of your favourite things to do to him while he was mad about something,
"Just because you wouldn't know real love if it hit you in the face!" He yelled right as you walked out of the hotel room door carrying a small bag with you as you walked away, he was right though. You'd never done the whole falling in love thing because you never had time. You'd studied for most of your life and when you turned 16 your love-life was mapped out for you and marriage was presented to you with a pretty pink bow on top. Not that it was anything like your mother described it to be. It was a living nightmare and you'd only been married a week.
Months began to pass into your marriage and the longer Jimin stayed with Myung the more you began to think he might actually love her,
"Boss?" You frowned turning to your attention back to Jungkook who was waving his hands in front of your face, he was holding up papers that you were supposed to be signing.
"Sorry Jungkook, I'm away with the fairies today." You laughed softly trying to make a joke rather than to tell him what was really bothering you, Jimin had been spending a lot more time with Myung lately and you were beginning to think that he might blow the whole marriage thing for her - it wouldn't be a bad thing but your parents needed this marriage to be able to work.
"Can you call my mother and my lawyer for me, I need to speak with them about something right away," Jungkook wasn't an idiot he knew about the arrangement between you and Jimin, everyone in your office building did since whenever he came to see you he brought her along with him.
"I'll get right on it, you have a meeting this morning though with Namjoon and Jin, Taehyung can't make it." Your adoptive brothers who were also all in on the arranged marriages and had their own to deal with. Maybe you could go to them to get some advice on what to do with Jimin.
"As more time passes the more expensive these gifts are getting for her, I know he's not using my money but he's going to make himself poor." You said to Jin as he plated you up some food, you were having a lunch meeting in the conference room of your building.
"You can't do anything though...Can she?" Jin directed his question to Namjoon who was reading through the marriage contracts that you and Jimin had both signed. His eyebrows were knitted together as he tried to make sense of everything that was written there, it was nearly impossible since it seemed like a 3-year-old could have written out a better contract.
"You both signed a prenup, right?" You nodded as you poured everyone a drink sitting down and picking up your chopsticks, you had no idea what Namjoon was trying to suggest. The divorce wasn't allowed to happen unless there was a clear reason,
"He's with someone else, you could file for adultery?" You shook your head as you pushed food into your mouth,
"We said he could date whoever-"
"It's not in the contract," He smirked as he cut you off sliding the contract over to you as he began to eat his own food, you skimmed through everything on the pages and it was true. Filing for divorce would be great right now but what would happen if he didn't sign the papers?
"Think you can trick him into signing them somehow?" Jin asked right before he shoved a bunch of food into his mouth and began groaning about how good it tasted, it was like living with pigs.
"No, that wouldn't hold up in court either since it's fraud!" You yelled at him playfully shaking your head and trying to come up with a way that you could do this properly.
Later that night you were sitting in your office reading over everything you could about divorce, your mother had come to see you telling you that it was better to stick the marriage out - even though you weren't happy and never could be. Your lawyer, on the other hand, seemed to think it would be best to file for a divorce and then wait to serve him the documents yourself, Hoseok always had a flair for the dramatics so it was no surprise that he wanted to do it that way.
"Mrs Park." You cringed at the way Jungkook called you that, you'd asked him so many times to just call you Y/n instead but he never did it.
"Yes, Jungkook?" You mumbled tearing your eyes away from the pages to see him standing there holding your coat and an umbrella,
"It's late, you should be going home." You sighed turning to look out of the window, you hadn't even realised it was past midnight until you realised the only places open were the 24-hour supermarkets and a couple of bars.
"I think I'm going to stay here for the night, Jimin and Myung are getting on rather well lately. I don't want to be at home for that." Jungkook walked further into the room shaking his head at you he hated that you tortured yourself this way but that was when he spotted the divorce papers, you'd circled adultery for Jimin and left yours blank.
"You never went to anyone else?" Frowning you looked down at the papers he was staring at and you shook your head,
"Nope, I'm too busy to try and find someone to like me back." You laughed softly trying to cover up the papers but Jungkook insisted on talking about it.
"You'd find someone I'm sure of it boss, you're an amazing woman who isn't afraid to stick up for herself. Men like that." You smiled sweetly at him, he'd always been sweet like this with you and you knew deep down it was because he had a crush on you but you would never do something like that in the workplace. It would be all kinds of wrong.
"I'll go home Jungkook, do you want a ride home? Saves you catching the train?" He nodded and thanked you while he held out your coat for you to slip into.
Jimin was flat out broke, he'd run his money into the ground a few months after you'd spoken to the lawyer about divorcing him. The papers were ready and were just waiting for Jimin to sign it all.
"I don't think this is a good idea," Jungkook said as he watched Jimin walking towards your office, you had glass doors that overlooked everything inside of the building on your floor which meant you could see how upset Jimin was right now.
"Have you seen Myung?"
"Not since last night, why?" She'd been up late in the night with you talking about how she had big plans for her and Jimin to go away together on her new private jet. The third one that Jimin had bought her this month alone, the one thing that sent his money running away from him.
"She's gone, left me some stupid note telling me how she was leaving with someone else." You stared at him and nodded your head, you felt no sympathy for him. For the last three years, you'd warned him that she would do this to him, even before you were married you told him she'd leave him as soon as the money dried up.
"You're broke right?" He nodded his head not seeing what any of if it had to do with Myung,
"I told you she was only after your money." You stood up from the desk and took the papers that Jungkook had in his folder.
"Please sign it, give it to your lawyer to look over in case anything is wrong." Jimin's mouth fell open as he took the papers into his hands to see what it was,
"Divorce papers, you can't do this to me. It's an arranged marriage," You smiled at him sarcastically, you didn't care if the Queen of England had arranged the marriage herself there was no way you were going to stay with him.
"She left with all my money and now you're leaving me?"
"Park Industries is being shut down, we have no obligations to one another anymore." You stated plainly picking up your handbag and going towards your office door but Jimin took hold of your wrist to stop you from leaving him there alone,
"Y/n- We're married, you can't just leave me. She left me! You were right okay! But you don't have to do this to me, please don't leave me with nothing." You stared down at him your heart aching as he yelled at you to help him through this bad time but you looked away from him.
"I'll never do it again, I'll stay with you! That's what you want, isn't it? Me to stay with you?"
"No Jimin! That's not what I want at all, I want a chance at true love with someone that isn't forced to stay with me." You snapped at him scoffing as he started laughing at you, even now he was arrogant and condescending.
"You won't get that, people like us don't get true love, we get people that use us for our money." Your hand locked with Jungkook's as you stared at Jimin,
"I see." He laughed loudly causing people to turn around and look at you as you and Jungkook tried to walk away but he continued to follow you shouting out abuse as he walked.
"I filed for adultery on both parts Jimin, don't scream at me when you did this." You mumbled to him shoving the papers back into his chest, he held onto your hand as you did so and stared into your eyes.
"We're supposed to stick together-"
"Just like you stuck with me when Myung was in your life? Or is that different because you were the one in love?!" You called him out on his bullshit and he took a step back from you as you stood up for yourself, you weren't about to let him away with all of the shit he'd done. Running to you whenever he and Myung would have an argument or he needed a little extra cash to tide him over from another payday. You were done playing those games with him.
"How does it feel to have a taste of your own medicine." You scoffed getting into the elevator and closing the doors before Jimin could say a word back to you. Jungkook squeezed your hand before raising it to his lips and giving you a small kiss to let you know he was proud of you. You felt alive and in power for once while Jimin was staring down at the papers, security escorting him off the premises as he tried to think of a way to explain all of this to his family.
Tagline: @snowy-meowl @jooniesdarlingdimples @lyoongx @mitzwinchester @fan-ati--c @rjsmochii @callingmyangel @kneel-begyourpardon @taestannie @innersooya @sw33tnight
#bts#bts x reader#bts x you#bts x y/n#bts imagine#bts imagines#park jimin smut#park jimin x reader#park jimin imagine#park jimin imagines#jimin#jimin x reader#jimin imagine#jimin imagines#kim seokjin#jin#seokjin#min yoongi#yoongi#suga#jhope#jung hoseok#hoseok#kim namjoon#namjoon#kim taehyung#taehyung#jeon jungkook#jungkook
241 notes
·
View notes