#hide files and folders in windows 10
Explore tagged Tumblr posts
Visit Tumblr Blog
Explore Tumblr blogs with no restrictions, modern design and the best experience.
Last Seen Tumblr Blogs


Fun Fact
28.6 is the average number of monthly visits per US mobile user.
Text
How To Convert Eyelashes
I was asked to make a tutorial on converting eyelashes. Well, here it is. Dirty, badly explained tutorial by Rollo. I'm assuming you know how to work with required programs, it won't teach you the basics, just a process of converting eyelashes from ts4 to ts3.
Requirements:
S4Studio
s3pe
TSR Workshop
Sims 3 Pack Multi-Extracter
These files (full credit goes to @gruesim)
Graphical program that works with .dds files
Let's go:
Open the desired lashes in S4Studio. Export diffuse of the ones you want to convert (you only need the black ones). You can also export the thumbnail. Close the program.
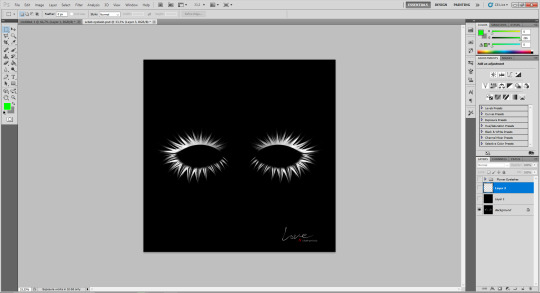
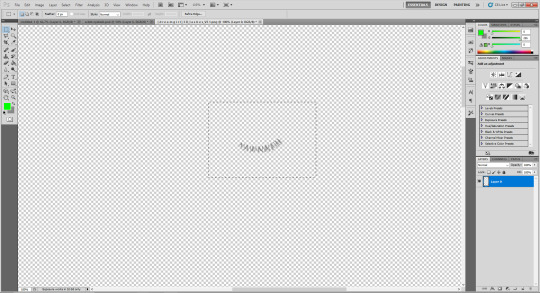
2. Unzip the folder that you downloaded from this tutorial. You will find a .dds files called "sclub eyelash". Open it up in the graphical program. Make a black layer above it and hide it for now.

3. Now open up your ts4 eyelashes file. Start from the upper eyelash, crop it and go to the sclub eyelash.
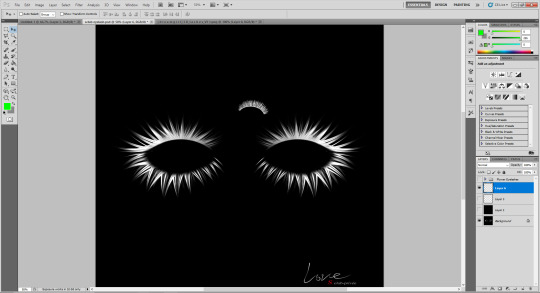
4. Paste it, click ctrl+i, it will make ts4 eyelash white.

5. This is the worst part. You have to make the ts4 eyelash fit to the sclub one as close as possible. Use every method possible!
6. Unhide the black layer and see if your eyelash look alright. It may need some sharpening.
7. Now crop the bottom eyelash and follow the exact same steps as for the upper eyelash.
8. It should look more or less like this. Bottom eyelashes are always harder to adjust and may need even more sharpening.

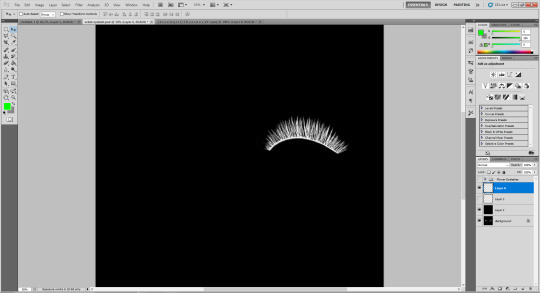
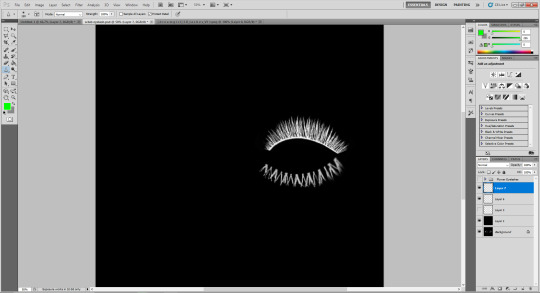
9. Merge your upper and bottom eyelashes, duplicate the layer. Click ctrl+a, ctrl+t, then right mouse button and choose "Flip Horizontal".

10. Voila. You should have a complete set of your new shiny eyelashes! Save them as .dds. You can close the program. We're moving to TSR Workshop.
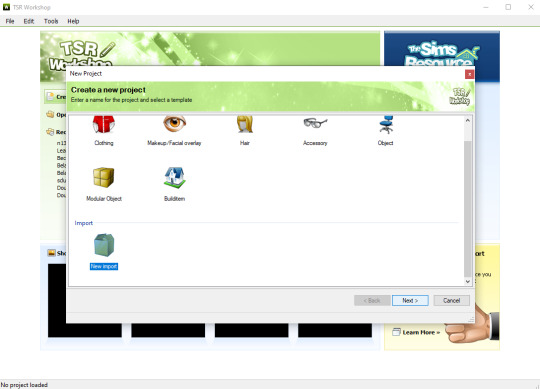
11. New Project -> New Import. Import Eyelashes AFBase from the downloaded folder.

12. Name your project, name your file and click "Next".

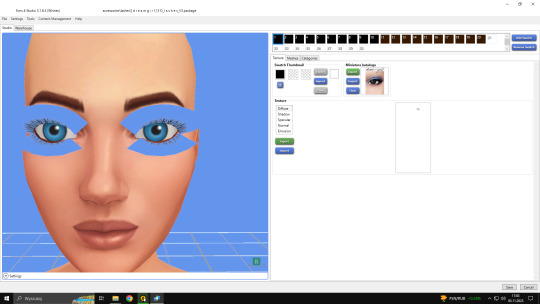
13. You should see this. Go to Texture tab and click "Edit" on the Transparency Map.
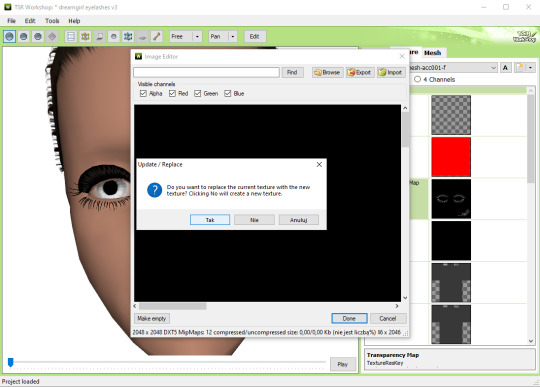
14. Import your eyelashes and click "Yes" when asked.
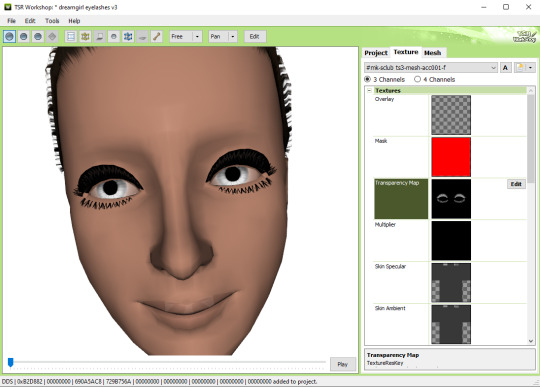
15. You should see your lashes, yay! But this is TSRW, they won't look exactly the same in game, as they look here. If you want a set of eyelashes, add more presets.
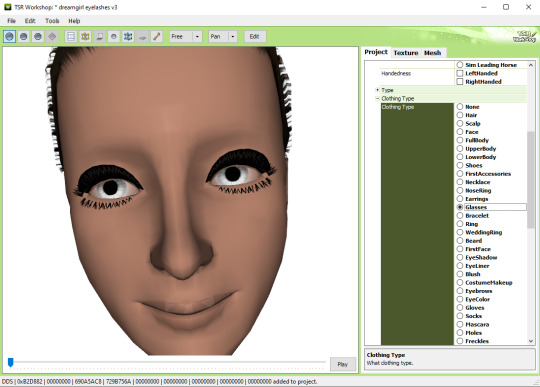
16. Now this is important. If you want to see your eyelashes in Accessories, go to Project tab, Clothing Type and change it from eyeliner to glasses. You also have to do this if you have more than one preset in one file. They won't show up in Eyeliner section. If you want to have set of eyelashes in Eyeliner category, you have to make each preset into seperate file. Also, eyelashes are recolorable ONLY in Accessories section. Don't forget to check Categories section to see which outfit has the eyelashes available.
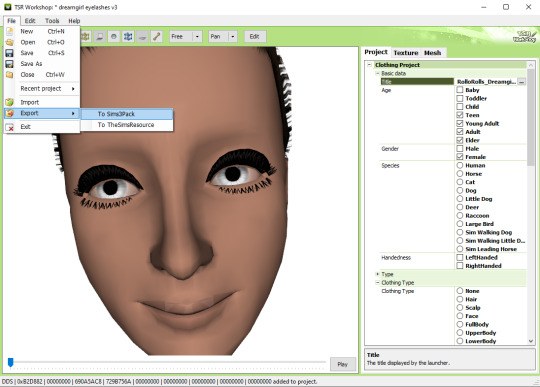
17. Now you're ready to export your file! Export -> To Sims3Pack. Use the Sims 3 Pack Multi-Extracter to convert your sims3pack to package file. We're moving to s3pe.
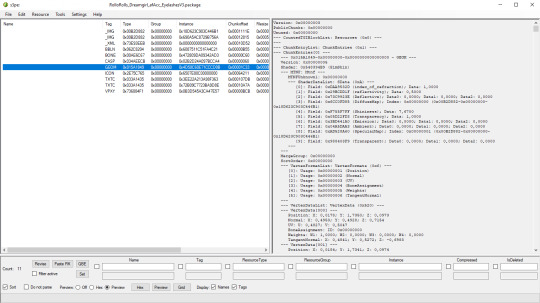
18. THESE STEPS ARE ESSENTIAL! Open up your shiny new package in s3pe. Click on the GEOM with the right mouse button.

19. Click Replace and choose AUID.simgeom from the downloaded folder. AUID is for adults, CUID for kids and PUID for toddlers. We have one more step to do.
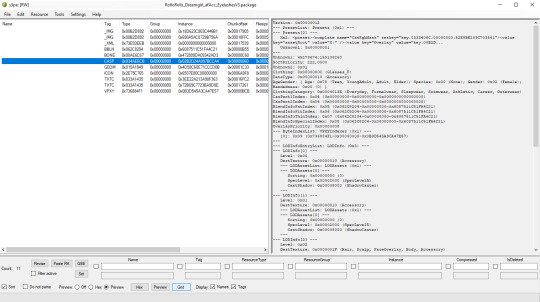
20. Now click on the CASP normally (left mouse button) and click Grid on the bottom of the program.
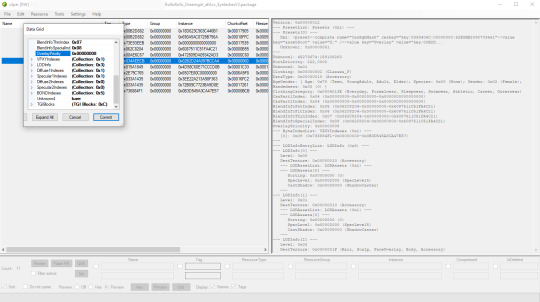
21. A small pop up window appears. Scroll to the very bottom and find a line called OverlayPriority.

22. Change the 8 to 2. This will make eyelashes not being visible through hair that's covering eyes.
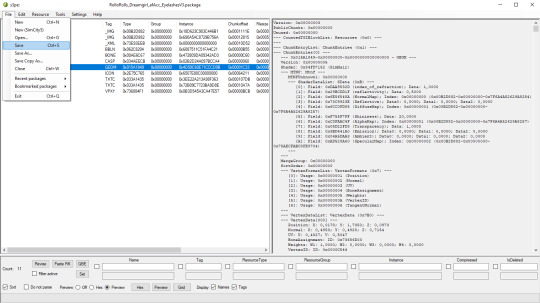
23. Save your package. You're ready to test your converted eyelashes in game!

Here they are. Nothing fancy, it was a quick conversion :D They're also compatible with S-Club eyelash sliders ^^
Btw, you don't necessarily have to convert both upper and bottom eyelashes. You can have upper or bottom only. Play with the lenght, not all eyelashes have to be very long. Convert it for males, kids, toddlers. You just have to remember to change the options in TSRW and replace the correct .simgeom file in s3pe. There is a lot of possibilities and you'll probably get better in this than me :D
Good luck! ♥
207 notes
·
View notes
Text
How to record videos with Sims 2 in-game camera (HD, no UI, no lag, no file format issues)
I originally planned to include this information in the behind-the-scenes video about Bring Me To Life that I'm currently working on, but it's overly technical and not that interesting. It still might be useful to some people (mostly machinima creators), so I decided to make a separate post about it.
There are two ways to record videos in The Sims 2:
Using screen recording software
This is the most common and probably the easiest way. You just need a program like OBS that will capture whatever happens on your screen exactly as it happened. If this method works for you, it's perfectly fine. No need to follow this guide then.
Using the in-game video capture tool
This way involves capturing videos directly in the game by clicking the video camera icon or pressing V on your keyboard. This method is perfect for machinima creators. It automatically hides the UI, but more importantly, the video will always be perfectly smooth, regardless of the actual performance of your game, i.e. even if it runs like a literal slide show, any videos you capture this way will look perfectly fine.
Okay, so if this method is so great, why do we need a tutorial for it? Well, as is usually the case with this game, the feature works fine, it's just a little bit outdated.
To fix it, we need to do 3 simple* things.
*If you're a Sims 2 player, you're probably used to this kind of stuff anyway
Step 1: Installing a modern codec
In the Camera settings, the game lets you choose if you want the videos to be compressed. I highly recommend choosing that option, as uncompressed videos take up way too much storage space.
The codec that the game uses to handle compression is outdated and most video editing programs will not be able to edit such files. To fix this problem, we need to download and install x264vfw, which is a free an open source codec.
Once installed, open the Configure x264vfw app. No need to change anything there (unless you want to test different settings of course), except for this one small thing:
In the Debug section, go to Log level and change it to None. Otherwise the codec will display a pop-up window each time you record in the game, which is pretty annoying.

Step 2: Making the game use the codec
Locate the VideoCapture.ini file in the installation folder with your latest expansion pack. I have Ultimate Collection, so for me the path looks like this:
D:\Program Files (x86)\Origin Games\The Sims 2 Ultimate Collection\Fun with Pets\SP9\TSData\Res\UserData\Config
Back up your file and open the original version with Notepad. You can either replace the whole thing with my settings, or just update the highlighted parts.
While you're at it, make sure to update the LargeSettings value to 1920x1080 so that the videos are captured in HD (no need to worry about it if you're copying the whole thing):
[Config] PreferredCodec=x264vfw Folder is relative to Res/Userdata Folder=Movies FilenameBase=movie NoFillFrames=0 AudioStereoOutput=0 AudioRateDivisor=4 GlobalSettings = reset, vbr:1, fps:10, keyinterval:30, mode:1, datarate:0 SmallSettings = size: 128x128 MediumSettings = size: 320x240 LargeSettings = size: 1920x1080 LowQualitySettings = minq: 6, maxq: 16, mode:0 MediumQualitySettings = minq: 4, maxq: 10, fps:15, mode:0 HighQualitySettings = minq: 2, maxq: 8, fps: 30, keyinterval: 60 SmallLowSettings = datarate: 75 SmallMediumSettings = datarate: 150 SmallHighSettings = datarate: 300 MediumLowSettings = datarate: 150 MediumMediumSettings = datarate: 300 MediumHighSettings = datarate: 600 LargeLowSettings = datarate: 300 LargeMediumSettings = datarate: 600 LargeHighSettings = datarate: 1200 AllowAntialiasing=0 # some drivers have issues with capture when AA is enabled [Codecs] 0=VP61 # On2 VP6.1 1=VP62 # On2 VP6.2 2=VP60 # On2 VP6.0 3=x264vfw # x264vfw
Save your file.
When in game, go to Camera Options and make sure Video Capture Size is set to Large and Video Quality is set to High.
Also, you might want to change the Maximum Video Recording Time to something higher than 60 seconds.

Credit for this solution goes to this person who left the following comment under this video
Step 3: Changing the file format from avi to mp4
Before doing this step, test if everything works correctly when you try to capture videos in the game. The videos will go to the Movies folder in your Documents folder for TS2.
Try to import the videos into your editing software. If it doesn't work, e.g. the program does not recognize the file or the file appears to be corrupted, you'll need to change the file format from avi to mp4.
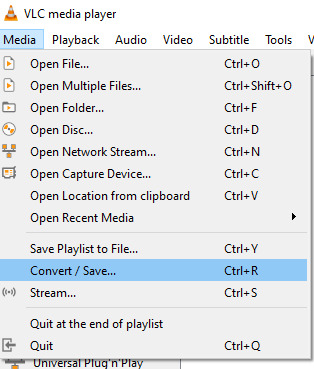
I personally use VLC media player for that, as it's free and open-source.
Go to Media > Convert / Save...
Drag your files into the File Selection section or select them by clicking the + Add button.
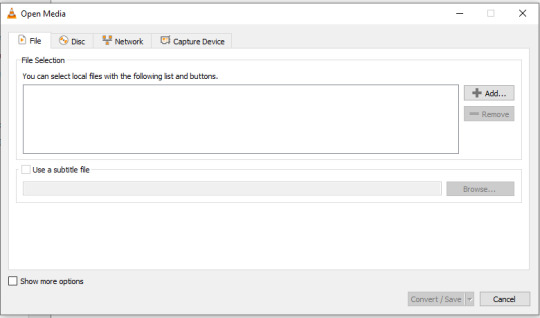
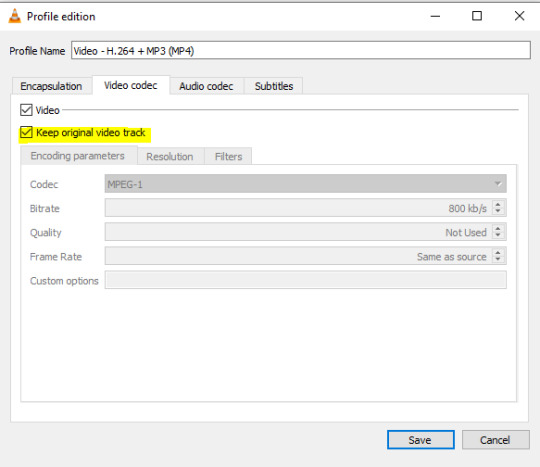
Select the Video - H.264 + MP3 (MP4) profile and click the wrench icon to edit its settings.

In the Video tab, make sure to check the box next to Keep original video track. Go to the Audio tab and check the analogous box.
Save and in the next window specify the destination folder and click Start. VLC will go through each of the files you added.
IMPORTANT:
While Steps 1 and 2 only need to be done once, Step 3 needs to be done for every new video you record (unless, your video editing software doesn't struggle opening the avi files). The good news is, this step is really fast, no more than a second per a single video. This is because we're keeping the original video track intact. The only thing that is changed is the container. That's why this change is fast and does not affect video quality in any way. Ideally, this step wouldn't be needed if we figured out a way to force the game to use mp4 when saving those videos, but I'm not sure if this is possible.
Like I said, outside of machinima creation, it probably makes more sense to just record your screen with OBS. Especially if you want to capture videos in 4K, which I don't think would be possible with this method. But it works for me and as it took me a while to figure it all out, I just wanted to share all the info in a single post!
#sims 2 machinima#ts2#sims2#sims 2 tutorial#ts2 tutorial#sims 2 guide#ts2 guide#my stuff#ts2 simblr#machinima#ts2 machinima
11 notes
·
View notes
Text
Bulk part recoloring for Picrew: a guide

Hi! Some of my friends asked me about this and I figured I'd make a tumblr post instead of writing it all in a discord message never to be seen again.
This guide covers how i personally quickly recolor parts for my own picrews, to use with picrew creator's bulk uploading tool. This likely isn't going to work for everyone, especially since I rely on Clip Studio Paint very heavily.
Using this tutorial will give you the files you need to bulk upload with picrew creator a bit faster than if you were to recolor everything by hand. Especially if doing a bunch of parts and colors.
Tutorial under the cut!
What you'll need
Clip studio paint (or another art program with animation features that lets you export each frame to a separate layer. I only will be showing CSP however)
Your artwork. Each color needs to be on a separate layer. (Sorry for those who like to paint everything on the same layer! This won't work for you)
(optional, if on windows) https://www.bulkrenameutility.co.uk/ to speed up one specific step
Let's do this
1) open the animation timeline, with CSP pro you can do 24 parts at a time due to the frame limit, which is still plenty to speed the process up.
2) say you're doing the shirts like i did. make an animation folder for the shirt fill color, as well as the lineart. if you have any more layers that are recolored with the same color each time, make an animation folder for those as well (so say, shadows. or secondary colors)
3) put each individual shirt part in it's own animation cell. make sure the frames for each part line up. you'll want to be able to go through the timeline with each shirt on a separate frame
Your layers should end up looking somewhat similar to this
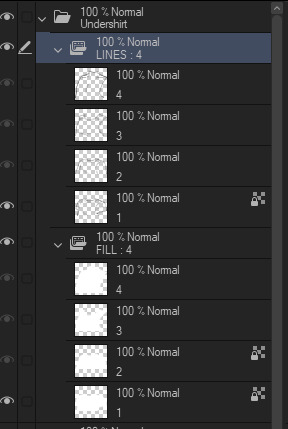
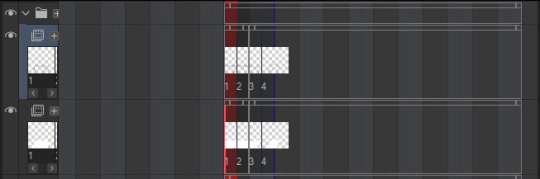

4) now for recoloring: clip a layer to each animation folder. so clip one to the shirt fill folder for instance. fill that entire layer up with the color you want that part to be. Check the frames in your animation again, now every part should be recolored with the colors in the clipped layer.
Your layers should now look something like this

5) Shorten the timeline so only frames with an actual item in them are included. (Otherwise you'll end up with a bunch of blank images later that you're not going to do anything with)
6) Hide every layer other than the animation folders and their clipped layers. So only the part is visible. Go through your frames one more time to make sure they look alright and nothing is out of place.
7) Time to export! Go to file -> export animation -> image sequence (you might want to set a shortcut for this so you don't have to go through 3 menus haha).
Make sure you're exporting to the correct folder. Set file name settings to anything you like, but make sure the start number is 1 (there might be exceptions to this, I'll go over that later). Set the image type to PNG, make sure the canvas size is correct and that the framerate lines up with your timeline's framerate.

8) Export it! You should have some files in your folder that look like this now. We'll want to rename them to just 1.png, 2.png... etc.

9) You can rename them by hand, but this is rather slow to do each time and I'm lazy. So here's how you rename them in the bulk rename utility. Open your folder in there, and then copy the settings I have here.


Yes, this is EXTREMELY overwhelming. I know. The first box (RegEx) is the only one you'll need to touch. Set the Match field to something like "Recolors_0{0,3}". Replace "Recolors_" with whatever your files start with. Also check the v2 box.
Replace can be left empty, since we're essentially removing anything that matches the regex (which is a text pattern matching syntax. We're essentially matching "Recolors_" with up to 3 zeros after it)
Select all the files in the top panel, then hit Rename in the bottom right! It should rename everything to just 1.png, 2.png... etc in one go.
10) Go to your part page in picrew. Make sure your colors are set up and you have created the amount of parts you'll need. Go to the Bulk Upload tab (there's a link in the top right).
11) Select the color you're uploading, then select the files you're uploading. Make sure the filenames match with your part ID numbers. This is important. 1.png Will match the first part, 2.png will match the second. Note how I said ID numbers, not the display order.
This means in the exporting step, you might need to change the starting number of your files. If you messed this up since you didn't read the tutorial in full before following it (I get it. I've been there before), just export and rename again.
12) If everything looks good and you got your files previewing no problem, hit upload, then wait a few seconds while picrew uploads your files.

13) YOU DID IT!!! You successfully added a recolor for your parts. Now go back to your file in CSP and fill each clipping layer up with a different color. You can now repeat the process from step 7. (export, rename and upload) to upload all parts for the other colors.
How much time does this actually save?
I never timed myself, but from experience, once you have set everything up and get the hang of it. It's pretty damn fast! Granted it does take a bit of set-up to get working. It gets more efficient the more parts you recolor at once.
I'll often go ahead and recolor the next color while the previous color is still uploading. Usually a single color only takes me a minute max to create and upload, instead of several minutes recoloring every single layer and saving each file separately.
For bulk rename utility, I set it to allow overwriting files. Which means I keep every color in the same folder and just overwrite the files whenever I rename. It's the fastest for me and saves me some storage space on my PC as well. Just make sure to click out of and then back into the folder to reload the files in there.
Hopefully this should help someone! Creating your own picrew is a daunting task and this made it a little easier for me at least ^^
#picrew#picrew tutorial#picrew guide#image maker#my picrew#the example picrew im showing isn't out yet. it's still in the early stages#idk if it'll ever be finished#i'll reblog this post + make a separate post on my blog if it does tho!
28 notes
·
View notes
Text
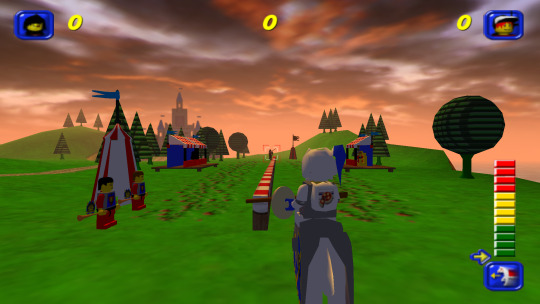
Capturing the ambience of LEGO Island 2 (2001)
This minigame-packed adventure explores many classic LEGO themes.
Running the game
There are two main versions of the game to chose from: the original 2001 release, and an improved 2007 version released as part of a two-pack. There is also apparently an unfinished, unreleased v1.1 with some bug fixes.
Curiously, the version hosted on MyAbandonware seems nearly identical to other 2001 releases I found. There appear to be minimal differences between the two.
All versions use a simple disk check; mounting an ISO with a tool like Daemon Tools suffices. There are also No-CD hex-edits available if you're interested.
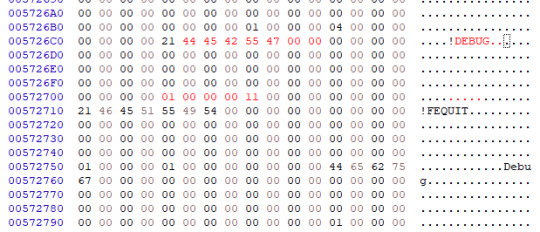
Debug menu and Level-select
We can access LI2's debug menu by altering the main menu options. I found some hex-edits for this on RRU. If you're not comfortable with hex-edits you can try using a patcher or patch, or LI2 Mod Manager.
04 00 00 00 02 -> 01 00 00 00 11 43 52 45 44 49 54 53 -> 44 45 42 55 47 00 00
Widescreen
Use the resolution and widescreen hacks offered by LI2 Mod Manager. See this thread for more detail on how it works.
Hiding UI and Player-character
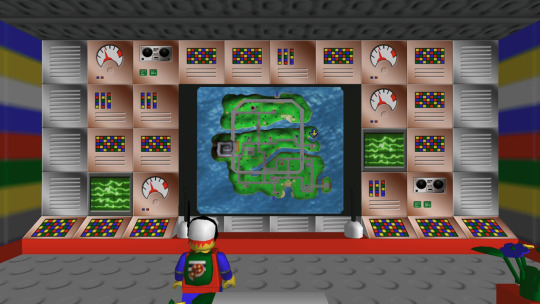
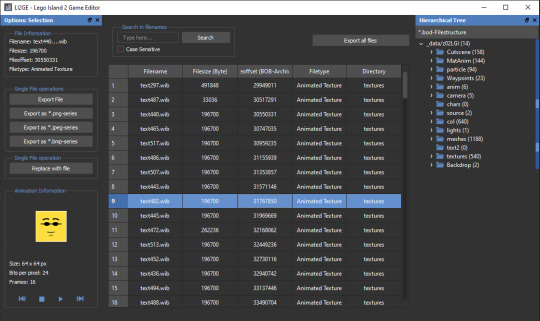
This is possible using Lego Island 2 Game Editor. It's a powerful albeit buggy application for modifying LI2 assets.
If LI2GE doesn't work, for example to edit fonts, you can use Lego Island 2 Extractor and/or Lego Island 2 Explorer. Once installed, be sure to disable automatic updates inside the program's INI to avoid startup crashes.
LI2 will prefer to load files from identically-named folders if they are present in the _data directory. For example, if a Fonts folder exists, its files will be used and Fonts.bob/bod won't be loaded.
We can also pause the game to remove the HUD, screenshot this state, and create a no-HUD overlay for our footage.
(Not) Free camera
A modder devised a way to summon a glider at any time.
Rendering ambience sequences
I recommend using the Fruity LSD effect with FL Studio. First, open the MID file in LEGO Island 2's level files, for example Fishing_Amb.mid. Be sure to select MIDI Out with Fruity LSD in the subsequent dialog.
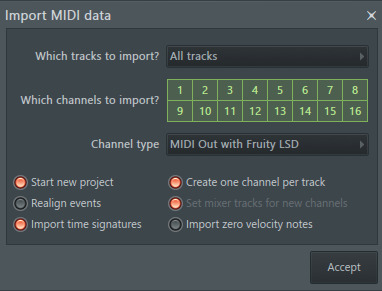
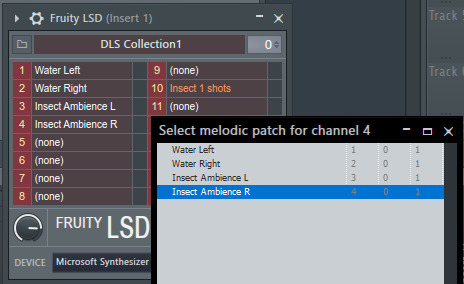
Afterward, click the folder icon in the top left to specify a DLS file - use one found in your MID file's folder. Once it's loaded, populate each channel by clicking it, and picking the corresponding patch. Don't forget to populate the "percussive" one-shots as well (Channel 10 in the screenshot below).
You are now ready to play your MID with the intended samples attached, or export it to a WAV file.
Appendix: Rendering music sequences
Download DirectMusic Producer. Supposedly this program allows you to export samples and sequence data. You could then render the pair using the MIDI renderer of your choice, such as OpenMPT or FL Studio's Directmusic plugin.
Appendix: Ambience sequence dead-ends
I tried VLC, with the DLS configured under FluidSynth, but this gave no output. I tried Miles Sound Tools with a DLS specified, but again - no output. I tried Winamp but seemingly couldn't get in_midi to use a custom DLS file, despite specifying one in the setting dialogs.
Appendix: Other LI2 developer tools
A soak test can be activated by pressing F8 while in windowed mode. You can also spawn a debugger window by pressing F9.
6 notes
·
View notes
Text
Ok, copy-pasting the comment from this link, with my notes for a Win 10 with Calibre 7.24 (since I'm a quasi-luddite whose favorite OS is Win XP; self-described as 'I know just enough to get myself into trouble, but not enough to get myself out of it', also I'm lazy and hate uninstalling/reinstalling if I can avoid it):
---
(from @bearCatBird on Reddit)
HERE IS WHAT WORKS AS OF AUGUST 2024 (Windows 10)
Thank you to u/toobnugget for the versions and more instructions, it also worked for me. Here's additional information to help people out. Just do it all in this order.
NOTE: If any of the links are broken, try pasting the broken URL into waybackmachine.org and look for files from today's date (8/12/24) or earlier.
CONFIRM ALL SOFTWARE IS UNINSTALLED
If you had previous versions of the software installed, uninstall them.
Then confirm there are no lingering data files with user settings. For example, with kindle, remove these lingering directories if they exist. C:\Users\AppData*\Amazon; C:\Program Files\Amazon; C:\Program Files (x86)\Amazon; C:\ProgramData\Amazon) HA Note: Yes, check/delete all of these places. You might have to go to the View tab in Windows Explorer and check the Hidden Items in the Show/hide subsection. The other posts you'll come across will seem to imply that newer versions are ok to use for this process with the way stuff is worded, but no, you need to actually go delete the program and reinstall the older version. F***ing obnoxious, but here we are. Just save yourself my headache and do it right off that bat.
You can also clear your registry (as described here) but I would save this as a last resort and only do this if you're unable to get the full instructions from this post to work. HA Note: I didn't need to do this
CALIBRE INSTALLATION
NOTE: if you want to use a kindle e-ink device, see step 2 of u/OccasionallyPrincess's comments here and also u/SeniorSiesta's comment here.
Download and install Calibre 7.13 (download here) (Some people tested with newer versions (7.2.1) and said it works, but I haven't verified.) HA Note: I have 7.24, this worked fine
In Calibre install the KFX input plugin (see OP's instructions up top), restart Calibre HA Note: Easy enough to do, as written, should come right up with "KFX" in the search bar
Download the DeDRM v10.0.9 (download here, the zip file at the bottom called DeDRM_tools_10.0.9.zip, then extract the zip to a folder.) HA Note: Follow as written, yes you're only going to extract the single umbrella zip, leave the deDRM and Obok plugin zips alone. I extracted the umbrella zip file to a new folder next to my Calibre library so that it goes with me if I ever have to manually move files to a new computer. It will feel weird to extract one zip and leave the others, but just trust the process.
NOTE: Some people had better luck using the alpha version of DeDRM. See this post here for more information if v10.0.9 isn't working for you.
4) In Calibre install the DeDRM files (see OP's instructions up top), restart Calibre HA Note: Follow as written, you just select the deDRM zip (single left click, not double click), it should install just fine and be happy
KINDLE INSTALLATION
NOTE: Some people had to turn off WiFi and unplug ethernet so they were 100% offline when installing Kindle to avoid automatic updates before disabling it in settings. HA Note: Yes, you have to do this step. Obnoxious, but necessary, so have these instructions in a tab for reference that won't get refreshed until you're back online
NOTE: Mac Users, you can probably download newer versions of the kindle app, as confirmed by this post.
5) Download and install Kindle 2.4.0(70904)
See u/Tilduke 's response here for more information.
(Other sites: download here or here or here) HA Note: Somewhere amongst all the link hopping, what was supposed to give me 70682 or something like that gave me 2.3.70840. If 70904 doesn't work, 70840 definitely worked for me first try
6a) Disable your internet
Many people needed to disable their internet/wifi temporarily for step 6b HA Note: Yes, do this
6b) Launch Kindle (don't login if possible), then go to
Tools > Options > General > disable "Automatically install updates..."
Tools > Options > Content > define a new path to save the kindle books you download
Finally, re-enable internet and Login (For more information about this step, see this comment)
Select a book, right click, download HA Note: Yes, do all of these. I downloaded a single book to start with as a check
CONFIRM THE DRM IS REMOVED
8) Find the book you just downloaded from Kindle in the new path (it will be the files that are newest, since they won't have book titles), select the .azw file, and drag it into Calibre. (Do not use the "Add Books" function.) HA Note: I tried this a couple different times the wrong way. The trick here is when the book/file is being added to Calibre (either through drag-n-drop or the Add Book button on the menu bar, the progress bar will display the names of the files that are being imported as it's working on them. When you download the first book to see if it is working as intended, remember the name of the book. Then go to where your Kindle library is on your computer (location C:/***/My Kindle Content, or whatever else you name it), you'll see a folder with a jumble of letters/numbers ending with _EBOK. Click into that and you'll see a bunch of files that are also letter/number/special character vomit. There should be a file that ends with _EBOK.azw (<- this is the one you want). I tiled my Windows Explorer side by side with Calibre and drag-n-dropped the .azw into Calibre, and it did the rest by itself (no additional conversion steps needed). Back to the trick about checking if it's working properly: in Calibre itself, if you're getting the janky letter/character vomit of the encrypted file while importing after the drag-n-drop, it's not working. If you drag-n-drop the encrypted file, but it displays the actual book name in this progress bar, it's working.
NOTE: Some people had better luck NOT dragging in the file and instead loaded it from the menu. See this comment for more information.
9) Once loaded in Calibre, right-click the book > view > view with calibre e-book viewer (if the book opens successfully, then the DRM has been removed. Use pgup and pgdn to see the pages). Close the viewer.
HA Note: After I confirmed that the first one imported and was able to be displayed properly by Calibre, I went back to the Windows Explorer window and clicked back so that I was viewing the subfolders within My Kindle Content. Then, in the search bar at the top right, I typed "*azw" (sans quotes) to pull up everything with that in the file name. Then, sort by file type to get all the .azw files grouped together. Highlight all .azw files and drag-n-drop everything into Calibre in one fell swoop. My ~130 files took...idk 2? 3? minutes? Depending on the size of your library, it may take a while. My experience in the past with large processes like that is just go find something else to do off the computer and leave it to do its thing. Once everything's imported, you might get a duplicates warning if you're like me and it took a couple go-arounds to figure out, but all the new stuff should populate new lines at the top of your library.
And voile, your stuff is in Calibre. I didn't bother with the rest of this, since I'm using my Calibre as an archive and not transferring stuff onto a different e-reader, etc.
CONVERTING THE BOOK
NOTE: This example shows conversion to EPUB, but you can convert to any format you want.
10) In Calibre, right click the book > Convert books > convert individually
11) Choose EPUB on the upper right, then click OK to export
12) If you want to change the location where Calibre exports the book, go to preference (CTRL + P) > click "Run Welcome wizard" at the bottom > then define a new folder for your calibre books to be saved. This folder will be where the book saves when you drag in the .azw file and also where the .epub exports.
For more context, see: https://www.reddit.com/r/Calibre/comments/1c2ryfz/2024_guide_to_dedrm_kindle_books/lhtah7p/
Just a quick note from your friendly neighborhood bookworm/indie author
if you use kindle for the majority of your library, they will be shutting down the function that allows you to download your files and transfer them via USB on the 26th of February. Which doesn't sound like a huge deal, but this also means that if a book is taken off Amazon for any reason—like it being banned—they can scrape it off your kindle as well. So maybe backup your library?
#calibre#amazon#kindle#i gave myself like an extra hr and a half of work by trying to avoid uninstalling and reinstalling#hate when i do that#now i can stop thinking about this#thinking i'm also just gonna leave my kindle app as the older version and not turn updates back on#also watching the original calibre demo from way the hell back when#and learning it's pronounced “caliber”?#AND NOT “ca-lee-bray”????#i think not#it shall forever be ca-lee-bray in my mind#if they wanted me to call it caliber they should have spelled it that way#anyways#books#reading#fics#dedrm#kfx input#hope these notes help someone who's not as tech savvy#it can be a little disorienting to go wading through the posts from people who swim in it all day long and know a lot more than me
25K notes
·
View notes
Photo

Windows 10 Tutorials 82 – Hide Specific File or Folder From Quick Access
0 notes
Text
How to Customize the Taskbar in Windows 10
Key Takeaways Customize the taskbar by pinning apps and shortcuts for easy access. Right-click an app’s icon to pin it or drag the app icon to the taskbar. Utilize jump lists for quick access to folders and files on the taskbar. Right-click an icon to view the jump list and pin items to it. Personalize the taskbar by removing the search box, hiding system icons, moving the taskbar, changing its…
0 notes
Text
The Ultimate Guide to Windows 10 Keyboard Shortcuts
Windows 10 is packed with useful features, but nothing boosts productivity like mastering keyboard shortcuts. These shortcuts save time and make navigating your system a breeze. In this guide, we’ll explore the most essential Windows 10 keyboard shortcuts and some lesser-known ones that can significantly enhance your workflow.
Table of Contents
Introduction
Basic Keyboard Shortcuts
Copy, Cut, Paste
Undo, Redo
Select All
Windows Key Shortcuts
Basic Windows Key Functions
Advanced Windows Key Shortcuts
File Explorer Shortcuts
Navigation
File Management
Virtual Desktops Shortcuts
Creating and Managing Virtual Desktops
Switching Between Virtual Desktops
Command Prompt Shortcuts
Basic Commands
Advanced Commands
Accessibility Shortcuts
Magnifier
Narrator
High Contrast
Browser Shortcuts
Microsoft Edge
General Browser Shortcuts
Customizing Keyboard Shortcuts
Conclusion
1. Introduction
Keyboard shortcuts are a crucial part of using Windows 10 efficiently. By reducing reliance on the mouse, you can perform tasks more quickly and keep your workflow uninterrupted. This guide covers essential shortcuts and dives into more specialized ones, providing a comprehensive resource for users at all levels.
2. Basic Keyboard Shortcuts
Copy, Cut, Paste
Ctrl + C: Copy selected item
Ctrl + X: Cut selected item
Ctrl + V: Paste copied/cut item
Undo, Redo
Ctrl + Z: Undo an action
Ctrl + Y: Redo an action
Select All
Ctrl + A: Select all items in a document or window
3. Windows Key Shortcuts
Basic Windows Key Functions
Windows + D: Show or hide the desktop
Windows + E: Open File Explorer
Windows + L: Lock your PC
Advanced Windows Key Shortcuts
Windows + Tab: Open Task View
Windows + I: Open Settings
Windows + S: Open Search
Windows + X: Open Quick Link menu
4. File Explorer Shortcuts
Navigation
Alt + D: Select the address bar
Ctrl + F or F3: Search in File Explorer
Ctrl + N: Open a new window
File Management
Ctrl + Shift + N: Create a new folder
Alt + Enter: Open properties for the selected item
F2: Rename selected item
5. Virtual Desktops Shortcuts
Creating and Managing Virtual Desktops
Windows + Ctrl + D: Create a new virtual desktop
Windows + Ctrl + F4: Close the current virtual desktop
Switching Between Virtual Desktops
Windows + Ctrl + Left/Right Arrow: Switch between virtual desktops
6. Command Prompt Shortcuts
Basic Commands
Ctrl + C: Copy selected text
Ctrl + V: Paste text
Advanced Commands
Ctrl + Shift + Plus (+): Zoom in
Ctrl + Shift + Minus (-): Zoom out
7. Accessibility Shortcuts
Magnifier
Windows + Plus (+): Open Magnifier and zoom in
Windows + Minus (-): Zoom out
Narrator
Windows + Ctrl + Enter: Turn Narrator on or off
High Contrast
Left Alt + Left Shift + Print Screen: Turn high contrast on or off
8. Browser Shortcuts
Microsoft Edge
Ctrl + T: Open a new tab
Ctrl + W: Close the current tab
Ctrl + Shift + T: Reopen the last closed tab
General Browser Shortcuts
Ctrl + L: Highlight the URL
Ctrl + Tab: Switch to the next tab
Ctrl + Shift + Delete: Open the clear browsing data options
9. Customizing Keyboard Shortcuts
Windows 10 allows customization of certain keyboard shortcuts to better suit your workflow. To customize, you can use third-party tools like AutoHotkey, which provide extensive options for creating and managing your own shortcuts.
10. Conclusion
Mastering Windows 10 keyboard shortcuts can dramatically increase your productivity and streamline your tasks. Whether you are a beginner or a seasoned user, incorporating these shortcuts into your daily routine will save you time and effort. Keep this guide handy as a reference and start practicing these shortcuts today.
External Authoritative Sources
Microsoft Support: Keyboard shortcuts in Windows
How-To Geek: The Ultimate Guide to Windows 10 Keyboard Shortcuts
Lifewire: Essential Windows 10 Keyboard Shortcuts
By incorporating these detailed steps and tips, you can take full advantage of Windows 10 keyboard shortcuts, making your computing experience faster and more efficient.
#1.#Windows10#2.#KeyboardShortcuts#3.#WindowsShortcuts#4.#ProductivityTips#5.#WindowsTips#6.#TechTips#7.#ComputerShortcuts#8.#WindowsGuide#9.#VirtualDesktops#10.#FileExplorer#11.#AccessibilityShortcuts#12.#CommandPrompt#13.#MicrosoftEdge#14.#BrowserShortcuts#15.#TechHacks
0 notes
Text
This article is almost 10 years old.
A kid puts her hand up in my lesson. 'My computer won't switch on,' she says, with the air of desperation that implies she's tried every conceivable way of making the thing work. I reach forward and switch on the monitor, and the screen flickers to life, displaying the Windows login screen.
This one's newer, just over 2 years old.
More broadly, directory structure connotes physical placement — the idea that a file stored on a computer is located somewhere on that computer, in a specific and discrete location. That’s a concept that’s always felt obvious to Garland but seems completely alien to her students. “I tend to think an item lives in a particular folder. It lives in one place, and I have to go to that folder to find it,” Garland says. “They see it like one bucket, and everything’s in the bucket.”
Schools are demanding kids as young as 5 or 6 use computers - and nobody is teaching computer basics. Nobody is teaching the names of the computer components (monitor, hard drive, cpu, ram); nobody is teaching what the parts do; nobody is teaching what "apps" are (...we used to call them "programs") or how files work.
Of course Adobe is very happy that people will say "I'm using Adobe" because nobody remembers the name "Acrobat Reader." Adobe is thrilled that most people don't know that PDFs are a filetype that can be opened or edited by many different programs.
Typing, as far as I can tell, is taught less than it was when I was in high school - in a country where everyone is expected to spend many hours a week on a keyboard.
(When I applied for college at the for-profit scammy school where I got my paralegal degree, I tested out of their basic typing class. The class's goal was 40wpm; I type at more than double that speed. The counselor assigned to me said she'd never seen typing that fast. I have no idea if she was lying to try to boost my ego or was just really oblivious.) (If she was trying to boost my ego, she failed. I know what secretarial typing speeds are. Mine is mediocre.)
If I were more geekish and had formal education training, I'd try to put together a series of Basic Computer Literacy courses for schoolkids - a set for ages 5-8, another for 9-12 year olds, and a third set for teenagers.
Start with parts of the computer - and how they look different in desktops, laptops, tablets, phones.
Move on to OS: Windows, Mac, IOS, Android, Linux, and a hint of others. (Throw in a mention of game consoles and how their OS is and isn't like a standard computer OS.)
A bit of mention of OS types/versions - WinXP and Win10, and so on. A bit of what commonly changes from one version to the next, and what doesn't.
These are the starting points, not because they're the core of How Computers Work, but because they're the parts everyone interacts with. The 8-year-old doesn't specifically need to know Linux exists... but they need to know there's a DIFFERENCE between a Windows 11 new laptop and a desktop running something else. Needs to know that not all "Android" phones work the same way. Needs to know, when they open a new device, that it has an OS, and there are ways to figure out what that OS is.
Next there is:
Files, folders, internal structure - and how the tablet/phone OS tends to hide this from you
The difference between the app/program and the stuff it opens/edits
That the same file can look different in a different app
Welcome To The Internet: The difference between YOUR COMPUTER and THE CLOUD (aka, "someone else's computer") as a storage place; what a browser is; what a search engine is
Welcome To Metadata I Am So Sorry Kiddo Your Life Is Full Of Keywords Now And Forever
Computer Operations Skills: Typing. Hardware Assembly, aka, how to attach an ethernet cable, is the monitor turned on, what's the battery level and its capacity. Software-Hardware interfaces: how to find the speaker settings, dim or brighten the monitor, sleep vs power off, using keyboard shortcuts instead of the mouse.
After alllll that, we get to
Command line: This is what a terminal looks like; this is what you can do with it; no you don't have to program anything (ever) but you really should know how to make it show you your IP address. (See above: Welcome to the Internet should have covered "what is an IP address?")
Internet safety. What is a virus; what's malware. How to avoid (most of) them.
SOCIAL internet safety: DO NOT TELL ANYONE your age, real name, location. Do not tell strangers your sexual identity, medical history, family details, or anything about any crimes you may have committed.
...I'm probably missing some things. (I'm probably missing a lot of things.) Anyway. Something like that. The simple version is a half-day crash-course in overview concepts culminating in a swarm of safety warnings; the long version for teens is probably 30+ hours spread out over a few weeks so they can play with the concepts.
Telling young zoomers to "just switch to linux" is nuts some of these ipad kids have never even heard of a cmd.exe or BIOS you're throwing them to the wolves
61K notes
·
View notes
Text
30 Windows 10 Tips and Tricks You Need to Know

30 Windows 10 Tips and Tricks You Need to Know. Windows 10 is a versatile and feature-rich operating system that powers millions of devices worldwide. Whether you're a seasoned user or new to the platform, mastering Windows 10 can significantly enhance your productivity and streamline your workflow. In this guide, we'll explore 30 tips and tricks to help you make the most of Windows 10, from customizing the interface to optimizing performance and utilizing productivity-enhancing features. - Start Menu Customization: - Pinning Apps: Pin frequently used apps to the Start Menu for quick access. - Live Tiles: Enable Live Tiles to receive real-time updates from your favorite apps directly on the Start Menu. - Resize and Rearrange: Resize and rearrange tiles to organize your Start Menu efficiently. - Taskbar Tweaks: - Pinning Programs: Pin frequently used programs to the taskbar for easy access. - Task View: Use Task View to switch between open windows and virtual desktops. - Customize Taskbar: Right-click on the taskbar to access customization options such as hiding labels and adjusting icon size. - Virtual Desktops: - Multi-Tasking: Use virtual desktops to organize your workspace and switch between different tasks seamlessly. - Keyboard Shortcuts: Use keyboard shortcuts like Windows key + Ctrl + D to create a new virtual desktop and Windows key + Ctrl + Left/Right arrow to switch between desktops. - File Explorer Tips: - Quick Access: Pin frequently accessed folders to Quick Access for easy navigation. - Ribbon Menu: Use the Ribbon menu in File Explorer to access additional features and commands. - Preview Pane: Enable the Preview Pane to preview file contents without opening them. - Task Manager Tricks: - Performance Monitoring: Use Task Manager to monitor system performance, resource usage, and running processes. - Startup Programs: Manage startup programs to improve boot times and system performance. - Cortana Integration: - Voice Commands: Use Cortana for voice commands and natural language searches. - Personal Assistant: Set reminders, create calendar events, and perform tasks with Cortana's assistance. - Snapping Windows: - Snap Assist: Use Snap Assist to snap windows to the sides of the screen for easy multitasking. - Aero Snap: Drag windows to the top of the screen to maximize them or to the sides to snap them to half the screen. - Action Center: - Notifications: Access notifications and quick actions from the Action Center in the system tray. - Customize Quick Actions: Customize quick actions to include your most frequently used settings and shortcuts. - Night Light: - Reduce Eye Strain: Use Night Light to reduce blue light emissions and minimize eye strain during nighttime use. - Schedule Night Light: Schedule Night Light to turn on automatically at sunset and off at sunrise. - Focus Assist: - Distraction-Free Work: Activate Focus Assist to minimize distractions and interruptions during work hours. - Priority List: Customize Focus Assist settings to allow notifications from priority contacts and apps. - Keyboard Shortcuts: - Efficiency Boost: Familiarize yourself with essential keyboard shortcuts such as Windows key + D to minimize all windows and Windows key + L to lock your PC. - Productivity Tools: Explore additional shortcuts for common tasks like copy, paste, and undo to speed up your workflow. - Clipboard History: - Multi-Clipboard Support: Access Clipboard History to view and paste previously copied items for seamless multitasking. - Sync Across Devices: Sync Clipboard History across multiple devices linked to your Microsoft account for easy access to copied content. - Power and Battery Settings: - Power Plans: Optimize power plans to maximize battery life and system performance. - Battery Saver Mode: Enable Battery Saver mode to conserve battery life when the battery is running low. - Windows Sandbox: - Secure Testing Environment: Use Windows Sandbox to run potentially risky software in an isolated environment without affecting your main system. - Disposable Environment: Reset Windows Sandbox to its default state after each use to ensure a clean and secure testing environment. - Snipping Tool and Snip & Sketch: - Screen Capture: Use the Snipping Tool or Snip & Sketch to capture screenshots and annotate them with highlights, arrows, and text. - Delayed Capture: Use the delay feature to capture screenshots of menus and tooltips. - Night Light: - Reduce Eye Strain: Use Night Light to reduce blue light emissions and minimize eye strain during nighttime use. - Schedule Night Light: Schedule Night Light to turn on automatically at sunset and off at sunrise. - Game Mode Optimization: - Gaming Performance: Activate Game Mode to optimize system resources and prioritize gaming performance for a smoother gaming experience. - Xbox Integration: Use the Xbox Game Bar to access gaming features, capture screenshots, and record gameplay. - Remote Desktop Access: - Remote Desktop Connection: Set up and configure Remote Desktop to access your Windows 10 PC remotely from another device. - Secure Authentication: Ensure secure authentication by configuring Remote Desktop settings to require password authentication or Network Level Authentication (NLA). - Privacy Settings: - Data Privacy: Review and customize privacy settings to control data collection and sharing preferences, including location, camera, microphone, and app permissions. - Privacy Dashboard: Use the Privacy Dashboard to monitor and manage your privacy settings across various Microsoft services and devices. - Network and Sharing Center: - Network Management: Access the Network and Sharing Center to manage network connections, troubleshoot network issues, and set up sharing options. - Homegroup: Create or join a Homegroup to share files, printers, and media with other devices on your network. - Troubleshooting Tools: - Troubleshooters: Use built-in troubleshooters to diagnose and resolve common hardware and software issues. - System Restore: Create system restore points to revert your PC to a previous state in case of system errors or instability. - System Backup and Recovery: - Backup Solutions: Set up system backup solutions to protect your data and recover files in case of accidental deletion or hardware failure. - File History: Use File History to automatically back up your personal files and restore previous versions of files if necessary. - Sync Settings Across Devices: - Microsoft Account Sync: Sync settings, preferences, and app configurations across multiple Windows 10 devices linked to your Microsoft account for a consistent and personalized user experience. - OneDrive Integration: Use OneDrive to sync files and folders across devices and access them from anywhere, on any device. - Multilingual Support: - Language Settings: Customize language and keyboard settings to support multiple languages and input methods for multilingual communication and typing. - Language Packs: Install additional language packs to expand language support and enable spell checking, autocorrect, and language-specific features. - Game Bar and Game DVR: - Capture Gameplay: Use the Game Bar and Game DVR to capture screenshots and record gameplay videos with ease. - Broadcasting: Stream your gameplay live to platforms like Mixer or Twitch directly from the Game Bar. - Windows Defender Security Center: - Antivirus Protection: Use Windows Defender Antivirus to protect your PC against viruses, malware, and other security threats. - Firewall Settings: Customize firewall settings to control inbound and outbound traffic and protect your network from unauthorized access. - Ease of Access Features: - Accessibility Options: Explore built-in accessibility features such as Magnifier, Narrator, and Speech Recognition to customize your Windows 10 experience and make it more accessible for users with diverse needs. - High Contrast Mode: Enable High Contrast Mode to improve visibility and readability by adjusting color contrast and reducing eye strain. - Microsoft Edge Browser: - Tab Management: Organize your browsing experience with features like tab groups, vertical tabs, and collections in Microsoft Edge. - Reading View: Use Reading View to declutter web pages and focus on the main content for a distraction-free reading experience. - Windows Update Settings: - Automatic Updates: Ensure automatic updates are enabled to keep your Windows 10 PC up to date with the latest security patches, bug fixes, and feature updates. - Active Hours: Set active hours to specify the times when you're typically using your PC to prevent automatic restarts during those times. - Feedback and Suggestions: - Windows Feedback Hub: Provide feedback and suggestions to Microsoft through the Feedback Hub app to help shape the future of Windows 10 and improve the user experience. - Insider Program: Join the Windows Insider Program to gain early access to preview builds and upcoming features, and provide feedback to Microsoft developers. Conclusion: By implementing these tips and tricks, you can unlock the full potential of Windows 10 and enhance your productivity and efficiency. Whether you're customizing the interface, optimizing performance, or utilizing built-in features, mastering Windows 10 empowers you to work smarter and get the most out of your PC. Experiment with these tips, explore new features, and tailor your Windows 10 experience to suit your needs and preferences for a seamless and enjoyable computing experience. Read the full article
0 notes
Link
Learn how to hide files and folders in Windows 10
In this tutorial we are going to show you that how to hide files and folders in Windows 10.
There may be some files or folders which you don't want to share with other users of PC, then you can simply hide your Files or folders in super easy 1 step method.
#hide files windows 10#hide folders in windows 10#how to hide files and folders#how to hide files and folders in windows 10#hide files and folders in windows 10
1 note
·
View note
Text
Windows 10 update to hide 3D Objects folder in File Explorer
Windows 10 update to hide 3D Objects folder in File Explorer
I know this is a small change, and I know it’s insignificant, but these unremovable garbage folders always feel like such a slap in the face. It’s an annoying reminder that when you use Windows, you don’t really own your computer. Unfortunately, Microsoft doesn’t allow you to remove 3D Objects and other folders from File Explorer using Control Panel or Settings. If you want to remove these…

View On WordPress
#3D Object#Explorer#News#Tech#Windows#Windows 10#Windows 10 Update#Windows 10 update to hide 3D Objects folder in File Explorer
0 notes
Video
youtube
How to Hide Folder in Windows 10 | How to Hide Personal Data in Windows 10
0 notes
Text
Sims 3 Performance Guide
Lately I have found the direction of The Sims 4 to be rather lackluster. Let’s face it. The game is boring. Still looking for that “Sims Fix” I found myself going back to playing The Sims 3. The Sims 3 can be tricky to get running correctly on modern computers so I figured I would share what I learned over the years. I made this guide a few years ago for another forum so I’m always open to new suggestions/edits etc. Some things may work well for others while some may not make a difference at all. I have applied all of these fixes in my own game and I still experience lag so this is by no means a guide to completely eliminate the lag in the game but a guide to perhaps help your game run a little bit smoother. All of these tips have been gathered from all over the internet and also some things I have picked up on my own over the years. I own a legit copy of the Sims 3 and have never owned a pirated version so I can't say whether or not these settings will work with a pirated version of the game. I also only have a PC so I don't know if any of these settings will effect the Mac version of the game. If anything I hope this guide brings people back to The Sims 3 or allows people to give the game another chance. The guide will be pretty extensive and I take no responsibility if you mess up your game :P
Limit Game FPS - This one has been a godsend. I was experiencing major lag especially in build/Buy mode. My computer is way over spec for this game much like most computers today. What would happen is that while in Build/Buy Mode my FPS would spike into the 200's! During these spikes the game would almost be un-playable.
To fix this issue:
Download this file: https://rd.nexusmods.com/skyrim/mods/34]https://rd.nexusmods.com/skyrim/mods/34
I know it says it's for Skyrim but it will also work for The Sims 3. After downloading it unzip the antilag.cfg and d3d9.dll into X: > Program Files (x86) > Origin Games > The Sims 3 > Game > Bin if using Origin. If you have the steam version of the game use : X: > Program Files (x86) > Steam > steamapps > common > The Sims 3 > Game > Bin . By default it is set to limit the game to 30FPS. I have been using this and it works fine. You can change it to 60FPS if you want by opening the antilag.cfg using notepad. I haven't had a chance to test the game at 60FPS but its not like The Sims 3 is a First person shooter or anything so IMO its probably not necessary. Run the game and your FPS should be capped at 30.
Alternately you can try turning on Vsync in either Nvidia Control Panel or AMD Catalyst software however I wasn't able to get it working. I'm using a Geforce 1080 and the latest Nvidia drivers. When I turned it on in the control panel it did nothing in the game.
After installing this fix I no longer experience massive lag spikes while in Build/Buy Mode the whole game also seems to be running a little bit smoother as well. Unfortunately there isn't much we can do about EA's terrible coding of the game so there will still be lag but this one has helped my game more then any of the other fixes as of yet.
**It also must be noted that FPS fix uses the same file as Reshade, d3d9.dll. I haven’t tested if this works using the d3d9.dll file from Reshade but I can assume it probably doesn’t. I do however believe there is a frame limiter built into reshade which should accomplish this same thing as this mod.
In Game Settings
1. Graphics
Resolution - You should always play at the native resolution for your monitor. Most monitors today use a native resolution of 1680x1050 or 1920x1080. If your game is struggling at this resolution you should always lower the graphics settings not the resolution.
Windowed? or Fullscreen? - This one is something that you will have to test. Some people say that the game runs better for them in Fullscreen and some say it runs better in Windowed Mode. My personal game runs better in Windowed Mode.
Object Hiding - Enabling this can help to increase performance especially if you have a large house. Essentially what this does is that the game renders every object on the lot you are in even if you aren't on that floor. So if you are playing on the first floor the game is using resources to render the items on the second/third floor etc.
Reflection Quality - Setting it to Mirrors and Water will work well for most people but adjusting this lower can offer a slight performance increase.
Edge Smoothing - I personally have not noticed much of a difference in performance adjusting this setting but this is the Anti Aliasing settings for the game. Try lowering it and see if it makes a difference in your game.
Visual Effects - According to the game "Controls the quality of particle effects on objects, Sims, and the town" Medium would be the recommended setting for Visual effects. It offers a happy medium between performance and visual quality.
Lighting and Shadows - Adjusts the shadow quality in the game. I run this on high in my game as there isn't a noticeable difference in performance between medium and high settings. Turning it to low will give a slight boost in performance but the shadows will be ugly.
Tree Detail - Keep this setting on high as there really is no difference in performance between settings. All you end up with are some ugly trees and no real boost in performance.
Enable Animation Smoothing & Enable Advanced Rendering - Both of these items should always be checked. Enable Animation smoothing makes no difference in performance and Turning off Enable Advanced Rendering can actually decrease performance.
Draw Distance - Keep this on high as it does not effect performance.
High Detailed Lots - With this turned up all the way I noticed a fair bit of stuttering in my game. I have mine set to 4 lots but this is a setting that should be tested to see what works for you.
Texture Detail and Sim Detail - Most computers should be able to handle both of these settings maxed for a small boost in performance you can lower the texture detail to medium. Sim Detail should always be set at Very High as lower this setting has only a very small boost in performance that probably wouldn't even be noticeable.
2. General Settings
Enable Shop Mode - This will disable the Sims 3 Shop from In-Game. Turning this off can help with stuttering.
Enable Lessons - Turning this off can possibly help with performance. I haven't noticed a difference but at this point we all know how to play The Sims.
Memories - Disabling Memories can offer a boost to performance and reduce in game stuttering.
**Alternately you can try using this mod if you don’t want to completely disable the memory system in The Sims 3
No (or fewer) automatic memories by velocitygrass on Mod The Sims
https://modthesims.info/d/446281
Enable Interactive Loading Screens - Turning this off has been said to reduce some in game stuttering. Besides nobody wants to play that stupid game anyway.
3. Online
Keep Me Logged In & Enable Online Notifications - Turning off both of these settings will help game performance and reduce stuttering.
4. Advanced Demographics Options
Enable Story Progression - Turning this off will reduce stuttering in the game. If you like this setting you can use the NRASS Story Progression explained further in this guide.
Advanced Settings
I will try to guide as best as I can with these but always MAKE BACKUPS of every file modified in this section.
In order to make this process easier be sure that "Hide extensions for known file types" is unchecked in the Windows Folder Options. In Windows 10 Click on View > Options > Change folder and search options. Switch to the view tab and under Files and Folders uncheck "Hide extensions for known file types"
Edit GraphicsRules.sgr - This setting will help the game run smoother and make for faster clothing changes.
1. Got to X:\Program Files (x86)\Origin Games\The Sims 3\Game\Bin
2. Copy the GraphicsRules.sgr file and back it up in either in a safe location or even in the same directory just name it GraphicsRules.sgr.orig. Click yes when prompted with the rename.
3. Now Open GraphicsRules.sgr with notepad (not the copied version)
4. You will see four lines that look like this: seti cpuLevelUber 4
seti cpuLevelHigh 3
seti cpuLevelMedium 2
seti cpuLevelLow 1
5. Change the four lines to this: seti cpuLevelUber 4
seti cpuLevelHigh 3
seti cpuLevelMedium 3
seti cpuLevelLow 3
6. Save in Notepad and close Notepad.
Edit Sims3.ini - This is how you force the game to use more then 2GB of RAM. I noticed a massive improvement in both CAS and Build/Buy mode with this. Clothing,Objects etc load almost instantly when this is changed. The Origin version of the game has already been patched to use 4GB of RAM however adjusting this value to reflect your systems total ram amount if above 4GB can be beneficial. If you currently have 4GB total of RAM and are using the Origin version of the game you can skip this step. It’s questionable whether or not this makes a difference in the game as The Sims 3 is a 32 bit game that only uses 4GB to begin with but it seems to actually make a difference in my own game.
1. Go to X:\Program Files (x86)\Origin Games\The Sims 3\Game\Bin (same as GraphicsRules.sgr)
2. Backup the Sims3.ini in the same method as the GraphicsRules.sgr
3. Open Sims3.ini in Notepad
4. Under [ResourceSystem] you will see this:
MemoryUsageLimit = 20000000 ( 10000000 for legacy/disc versions)
5. Ignoring the zeros this is showing that the Sims 3 is only using 4GB of ram (2gb for Legacy/Disc versions of the game). Depending on the amount of ram in your system you should change it to half of your total amount of ram. Examples:
8GB Total Ram MemoryUsageLimit = 40000000
16GB Total Ram MemoryUsageLimit = 80000000
32GB Total Ram MemoryUsageLimit = 16000000
**Be Sure to only change the first number not any zeros. For 32GB+ its the first 2 numbers. Putting this too high could cause your system lock up or crash and possibly do damage**
Modding
First go here and follow the instructions on this page to set up your Mods folder: https://www.carls-sims-4-guide.com/forum/index.php?topic=9187.0
1. Must Have Mods - Even if you don't plan on putting any CC in your game these Mod is highly recommended if not needed in order to keep the game running Smoothly.
NRAAS Master Controller -
https://www.nraas.net/community/MasterController
This mod is a must have. It fixes many of the errors in the game and helps immensely with game lag and stuttering.
Under Modules Download: (Not Required but useful)
MasterController Cheats - Adds "cheaty" functions to Master Controller.
MasterController Expanded Tatttoo - Expands the number of locations provided in Tattoo CAS
MasterController Progression - This mod adds progression related interactions to the "Master Controller" menu. Addition to Story Progression (below)
MasterController Integration - (Must have if you install a lot of sliders) This mod replaces all the CAS interactions in the game with the one managed by MasterController, including the "Create-A-Sim" button in "Edit Town".
Now go to this Page and download these other “Must Have Mods” by NRAAS
https://www.nraas.net/community/Mods-List
Overwatch - (Important) Contains error correction and periodic game maintenance/clean up to reduce issues and improve game longevity.
Error Trap - (Important) Core-Mod that performs save-game corruption cleanup, while catching and reporting unhandled script errors.
Traffic- (Important) Controls autonomous vehicular traffic such as the Food/Ice Cream Trucks, and provides some minor vehicle routing settings.
Saver - (Important) Adds autosave function to the game.
Register - (Important) Replaces the EA Role Manager with a custom version that corrects several bugs and allows for greater flexibility.
Other Useful Mods at NRAAS (Optional) Same page as above:
Story Progression - Basically a less buggy, less performance heavy replacement for the EA story progression in the game. Be sure to tick off “Story Progression” in the In Game options as stated above. (Install all the optional modules as well)
Decensor - We all know what this does
Dresser - Adds automated outfit control for inactive sims, adding accessories, and restricting CAS parts.
WooHooer - Alters the romance and woohoo interactions, provides greater flexibility and attraction scoring.
Retuner - Provides fine tuning of many settings in game like autonomous settings, pricing etc. This one can seem daunting at first but there are plenty of Returner settings to be found out there and its really isn’t that difficult to change the settings in game albeit time consuming.
Be sure to look over the other mods if you see something you like download it. Any of these mods should be safe to add to your game with little to no performance impact.
After that extract the files you just downloaded into \Documents\Electronic Arts\The Sims 3\Mods\Packages\Overrides If you don't have an Overrides folder create one. The “Overrides Folder” is essentially a priority folder. Mods put into this folder will be loaded before any other package files you may add to the game.
In-Game NRASS Settings
These are just some settings to change to improve game stability. This is by far not comprehensive. For Retuner settings I would suggest a Google search of other users settings or consulting the NRASS help section for explanations of how to use this mod.
Click on the Town Hall in Map View Under NRASS
Traffic
Ice Cream Truck - I hate that creepy Ice cream truck so I change everything to false and set Max Ice Cream Trucks to 0. If you like having it around still change the Max Ice Cream Trucks to 1
Routing
Allow Performance Career Limos - False (Limos create a lot of lag in the game)
Allow Use of Cars During General Routing - True (if disabled your sims will only use cars when you tell them to)
Always Use Taxis for Inactives Lacking Vehicles - False (Townies will no longer use Taxis)
Register
Allow Immigration - False (Random Townies wont move into your town keeping the population down and helping to keep performance from decreasing as sims move in.
Animal Control - Change the settings below for a performance boost
Maximum Deer - 2
Maximum Raccoon - 2
Maximum Stray Cats - 3
Maximum Stray Dogs - 3
Maximum Unicorns - 0 (Sorry Wild Horses and Unicorns add a good deal of lag to the game)
Maximum Horses - 0
Custom Content (CC)
Much like any other Sims game moderation is key. The more CC you download and put in you game the slower your game will perform. I'm not going to go into detail about how to install CC in The Sims 3 in this guide. These are just a few important tips to take into account when installing CC,
Try to install Sims3Pack files as much as you can. Sims 3 automatically merges these files and this leads to better game stability.
Merge you package files. Girl Meets Pixels made a great guide here: https://www.youtube.com/watch?v=jIZ2LdoT-HY]https://www.youtube.com/watch?v=jIZ2LdoT-HY
Keep an eye on the size of your Sims 3 Folder in /Documents. It may seem crazy to imagine but massive CC shopping sprees can lead to a massive folder to the tune of 30GB+. Skins and Hairs are a killer. These files are usually rather large sometimes in excess of 80 - 100mb. My suggestion would be to find a default skin you like and just use that. Don’t install any non default skins. Also go easy on the hair. You don’t need 20 different variations of the same ponytail in the game. Clothing is usually fine but pay attention to the size of the CC. That cute dress you found on Tumblr that’s 65mb more then likely has way too high of a poly count and will just lag and be slow to render in the game. Sure it looks great in screenshots but it wont be practical in game. I’m not sure of the exact cut-off for CC but eventually the folder gets too large for the game to handle and it will lead to issues like save corruption or in some cases not being able to save the game at all because the game has run out of memory. Sadly if this happens there is no fix for this and you will lose all of your progress and possibly your save file as well.
Advanced
World Fixes EA left many routing issues in a lot of their worlds that are known to cause lag and often times crashing as Sims bunch up in broken routing areas on the map.
All the World Fixes can be found on Ellacharmed's Wordpress page. Follow the instructions very carefully and install the fixes for all the worlds you have installed in your game.
https://ellacharmed.wordpress.com
Other Useful Tips
Delete your cache!! This one can't be stressed enough. I delete mine before every game play and never have issues starting the game up. A guide can be found here: http://simswiki.info/wiki.php?title=Game_Help:Sims_3_Delete_Cache_Files
Turn off Origin In Game - This will give a noticeable improvement.
Close all other programs running in the background.
Turn on Game Mode or Silent Mode on your Antivirus
Useful Sims 3 Programs
s3pe http://www.simlogical.com/ContentUploadsRemote/uploads/189/
Sims 3 Dashboard Tool http://modthesims.info/download.php?t=387006]http://modthesims.info/download.php?t=387006
CC Magic http://modthesims.info/download.php?t=461888]http://modthesims.info/download.php?t=461888
Delphy's Sims 3 Pack Multi-Extractor http://modthesims.info/download.php?t=364038]http://modthesims.info/download.php?t=364038
Save Cleaner by Kuree http://www.simlogical.com/ContentUploadsRemote/uploads/1532/
724 notes
·
View notes
Text
This bundle (direct link for anyone who doesn't want to click through to Twitter: https://www.humblebundle.com/books/terry-pratchetts-discworld-harpercollins-books) is only available in the US.
So are the rest of us just out of luck? Of course not, this is the internet! And I'm not even talking about 🏴☠️! If we want to buy this bundle and gain access to this deal and buy these ebooks legitimately, we just need to make Humble think that we're in the US.
How do we do that? Well, if you already have access to a VPN service that provides location redirection you can just use that (mostly, you'll still need to read from step 11 below), but for anyone who doesn't already have one, you can use Tor as a free substitute with a little bit of work.
What is Tor, you ask? The name stands for 'The Onion Router' and it's an open-source software project designed to protect users' privacy online. It does this via a number of methods designed to make it difficult for trackers to identify a specific user (blocking tracking cookies, steps to obfuscate browser fingerprinting) and their online activity (encrypting internet traffic and relaying it through their own network to hide your identity). It's that last part that is useful for us today, because we can use that relay network to digitally project ourselves into the US of A to buy Discworld books AND donate to charity! We just need to tweak a few settings to get it to do that for us.
Step-by-step guide for how to both get and configure Tor and then use it to get this bundle under the cut.
1. First of all, you're going to need to get Tor. This is very easy, because it's distributed for free; just go to https://www.torproject.org/ and download the browser for your operating system.
2. Having downloaded it, you need to install it. Shocking, I know!
3. Once installed, you will need to run the Tor Browser and press the Connect to Tor button once.
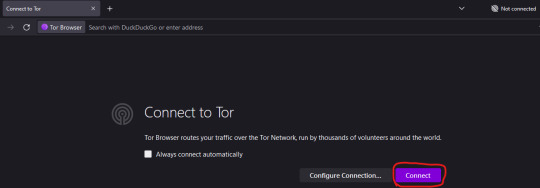
4. Once you are connected, close the browser window. Doing this creates configuration files that you will need to edit in order to have the relay go specifically via the US, instead of anywhere else in the world.
5. You need to locate the folder that Tor Browser is installed in. For Windows, by default, this will be on your Desktop (apologies to users of other OSes, I don't know the default locations for them, but you can find that info here: https://www.wikihow.com/Set-a-Specific-Country-in-a-Tor-Browser)
6. From the Tor Browser folder, you need to go to Browser > TorBrowser > Data > Tor. You should see a folder that looks like this:
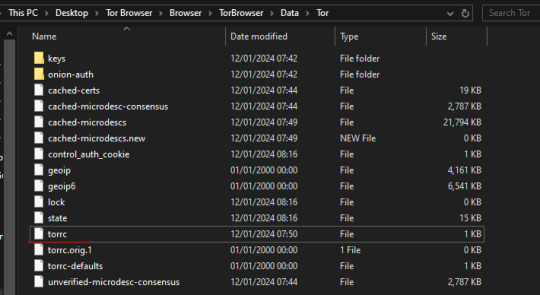
7. Right-click on the 'torrc' file and select 'Open With'. On the "How do you want to open this file?" menu that pops up, select 'Notepad'
8. Ignore the stuff that's in there already, we don't want to change any of that. What we want to do is add in two lines at the bottom, which will tell Tor to find both an entry and exit point to its network that are within the US. So we need to add in the following lines:
EntryNodes {US} StrictNodes 1 ExitNodes {US} StrictNodes 1
Add them as shown, with each one on its own line. (You might expect you only need to set the exit node to US to make this work, but when I tested this it did not work).
9. Once you've copy-and-pasted those lines in, go to File > Save (or hit Ctrl + S). Do not 'Save As', this will create a new .txt file, we need to save our changes in the original torrc file with no extension.
10. Now, re-open Tor Browser and tell it to connect. If you go over to https://www.humblebundle.com/books/terry-pratchetts-discworld-harpercollins-books you should now see the bundle, rather than be told it's not available to you... right up until you log in to your account to buy it! Oh no, we're not done yet!
11. So, if you already have a Humble account, Humble will have it location-locked to the country where you created it, and will block bundles not available in that country, even if you're currently connecting from outside that country. There are two ways around this:
11. A. Create a new Humble account using your Tor browser so that it's set to the US by default. You should be able to use your existing paypal account/other payment methods with this account even if you use them on your main account, but I haven't tested this in person.
11. B. Humble lets you change the location of your existing account up to 3 times every 3 months to the location you are currently connecting from. Since you are currently connecting from the US, you can use this to change your location to the US, buy the Discworld bundle, and then from outside of Tor you can log back into your account and change it back to wherever you call home. To do that, go to Settings in the account dropdown on Humble:
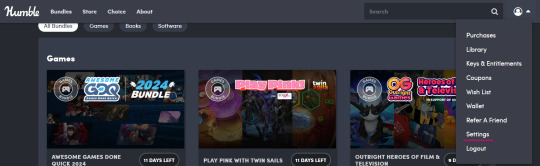
That leads through to this page:

If you're currently connecting from a different location to the one in the Location box, it will allow you to select the location you are connecting from instead. It will prompt you to confirm the location change before it goes through.
12. Congratulations, you have successfully tricked Humble into thinking you are in the US and allowing you to buy the Discworld bundle. The bundle itself is redeemed through Kobo, and they don't care where in the world you are, so it doesn't matter if you change your Humble account location after you've bought the books, you'll still be able to redeem your purchase and access your ebooks.
13. Optionally, go back and edit the torrc file again and take out the lines we added to return Tor back to its default functionality.

YOOOO DISCWORLD IS ON HUMBLE BUNDLE!!!
If you've been on the fence about starting these books THIS IS YOUR SIGN
5K notes
·
View notes
Text

Friend @dandalionbold drew my OCs!
I'm over the moon with gratitude and delight. I've not posted the fanfic where I introduce them, but I've been working in drafts and sharing with dandalionbold. She surprised me with art based on my various Picrew mock-ups of my four turtle girls. I could not be happier!
picrew mock-ups on which she based her art:


Overview
Dinah, Helen, Nina, & Julie: four survivors out of an original control group of 10 'sister' turtles in the basement of TGRI. They grew up as laboratory animals and know the world through educational videos and textbooks, weight-height checks and file folders full of charts.
These turtle girls wore smocks and scrub pants out in the lab, but were expected to turn the clothes back in and submit to contraband check before returning to their room. Faced with a floor to ceiling observation window, the girls' only privacy came from hiding under their blankets.
Once they escape the lab, all of them seek comfort in as much clothing and coverings as possible. In the fullness of time, some of them will relax and treat clothes as functional or fashion choices, but fresh from the lab, cloth is armor against being watched.
Note on colors and hijab
Since I have used various Picrews for my mock-ups, I didn't always get consistent colors or features for my turtle girls. I don't intend for these girls to be specifically color-coded. Nor do i mean to imply that they are traditional or religious hijabis. They do wear loads of layers, scarves, shawls, hoods-up hoodies, headscarves, and hats out of anxiety, but typically the only picrew options for full-body cover are headscarves and hijab. I mean no disrespect in using those options.
Individual bios
Dinah is sickly. In my story, she goes through some intense medical trauma to escape the lab. The effects of that will linger the rest of her life, but she's still very much a people-pleaser. In her mind, there are right answers to everything and she's determined to prove she can be a good girl and get it all correct. At first, too many open-ended questions or ambiguous answers push her to meltdowns. Over time, the TMNT family demonstrates that there are no punishments for 'wrong' answers and Dinah will be more able to handle uncertainty.
Helen is protective. The world is very much divided into "us" versus "them" for Helen. It's her and her sisters against the world. In the lab that was true, and her methods of lying, sneaking, and hoarding food for her sisters helped them all. Outside of the lab, she's going to have a hard time adjusting to a family that is on her side. Her new family frowns on lying, catches her sneaking, and doesn't want her stashing food in weird places. Unsure who the clear enemy is and unbalanced without an obvious threat, Helen will need lots of help feeling safe.
Nina is shy. She's witty and loves nature magazines, but you wouldn't know that to meet her. Only Nina's sisters get to hear her talk in a voice above a whisper. An illness caused her a slight lower leg deformity--nothing drastic, she can still walk--but she's very aware of her limp. She has nightmares about being too slow and about being culled from her group. Nina distrusts new people, but once the guys figure out she likes animal documentaries, they will have a quietly enthusiastic companion slip in and watch from beside the sofa.
Julie is mourning. The girls had 6 other sisters growing up with them. It was crowded and it was loud, but one of those girls was Julie's twin. Julie hasn't spoken out loud since sickness separated them all. At least she, Dinah, Helen, and Nina were reunited--even if Nina came back hurt. Now Julie clings to the sisters she has left. She cries a lot, but she keeps it quiet. She gets bad scores in testing, but nobody seems to expect more. Julie lives for 'lights out' when her sisters will crowd close under the blanket and she can pretend everyone came back.
#tmnt#teenage mutant ninja turtles#tmnt oc#gift art#turtle girl#fanfic#tmnt fanfiction#tmnt fandom#tmnt chain reaction#i will finish this#I will post this fic#I have so much story to share#y'all don't even know#donatello#michelangelo#leonardo#raphael#oc#nina#dinah#julie#helen#origin stuff#original character
23 notes
·
View notes