#i just wanted some cute link stickers to put in my journal
Text
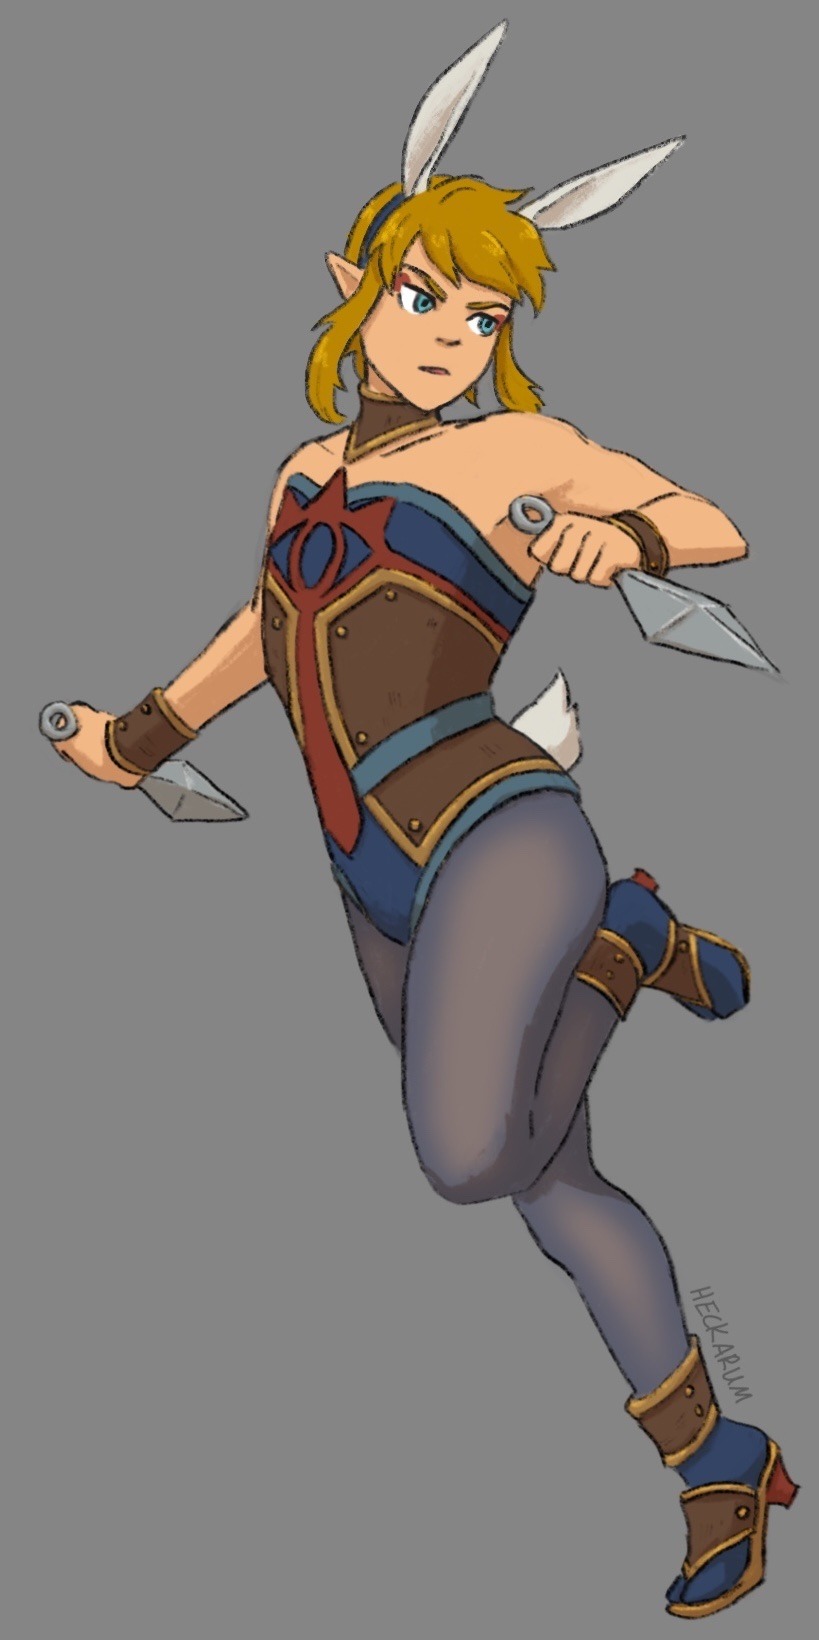
#maybe someday I’ll draw backgrounds lol#no i haven’t played totk yet#i’m still finishing botw qwq#i just wanted some cute link stickers to put in my journal#link#legend of zelda#breath of the wild#botw#bunny girl link#heckart
23 notes
·
View notes
Text
im pretty sure the point of the advice “if you have adhd, get a planner” is actually intended to be “find a way to make planning and organization fun for you.” decorating and using an aesthetic (whatever that means to you) physical paper planner, journal, diary, or agenda etc. of things you need to remember or do is actually a whole hobby enjoyed by ND and NT people and it can be really really fun! think stickers and washi tape and cute post-it notes, pasting in receipts and movie tickets and little photos from dates with friends, different colored inks and highlighters. it’s an inexpensive hobby, too. if you’re not an artsy person, there’s still plenty of ways to make it satisfying, like logging every day you did an activity, or developing a color coding system for tasks or information, or keeping and indexing notes and information about your special interests, or even just slapping stickers or printed pictures of your blorbo all over every other page to give yourself a reason to look at it.
for me, analog planners are actually a necessity and it’s life changing because digital calendars and planner systems don’t work for my brain. it’s joyless for me so i forget to check it and the notifications and reminders pile up unread. but having a physical book (that i get to cover in doodles and stickers) to refer to is completely different for me. if i did not have my notebooks i would not make appointments. i would let my meds go unfilled. i would not remember things like my address or how much money i need to put aside for bills each month. i would not have graduated college, and all of that is even being on my medication. i consider all my notebooks and journals and planners to be disability aids, just as much as my meds, my headphones, and my glasses.
and i really think this could help a lot of people with adhd, not just me! adhd brains remember to do fun things, and making the act of listing and checking and updating and recording the vital things of your daily life and information you need or want to remember in and of itself fun is a great way to slowly get your life together. and i promise that as cringe and boring as it sounds, having your shit together will improve your quality of life. you will feel better about yourself when you’re filling all your meds and paying all your bills on time. when you’re remembering your coworker’s names and your friend’s birthdays because you made a list.
i understand how the “get a planner” advice can sound invalidating because if you’re just trying to magically force yourself to remember to joylessly write down the dates of work meetings and shit in ballpoint pen in some sad beige calendar book, then yeah, that’s no different from “just put it in your outlook calendar!” or whatever the fuck. the organizational systems used by NTs typically don’t work for us. but developing an organizational system that is unique to you and more importantly works for you is so crucial to survival for so many people.
……… this was such a huge, most unintentional infodump that i feel like i should put some resources at the end lol. so here are some super basic links (that have helped me) about analog planners and planning systems!!
how to start bullet journaling
jetpens - how to choose a planner and planning strategies
guide to the hobonichi techo planner
bestself planner
guide to ring bound planners <- this style of planner lets you add, remove, and shuffle pages at any time
mochithings (planner & stationery shop)
#I SPENT. AN HOUr ON THIS POST WHILE I WAS SUPPOSED TO BE JOB SEWRCHING. TIME TO GO BACK TO THAT#this is okay to reblog btw in fact please do if you want!!!!
15 notes
·
View notes
Text
🧁Digital Witchcraft? What's that?🧁
Okay, for reference, I'm a Digital Witch. now you're probably thinking, "Digital Witch?? What on earth is that??" and I'm here to answer that.
Just with all types of witchcraft, it's varies depending on the individual practitioner, but here's what it is to me.
Digital Witchcraft is a type of witchcraft that uses technology and social media as a magickal medium. Devices carry a lot of energy and most people already have a bond with their phones, computers, and other devices. On top of the energy that digital technologies carry, social media is also extremely powerful when it comes to magick. The fact that you can connect yourself to billions of people at the press of a button is quite amazing, and I'm sure you can imagine what kind of power that holds. digital Witchcraft is very much a type of magick that thrives on the connections made with others.
🧁How I Practice🧁
Digital Grimoires. This is a medium that's becoming more and more commonly used by witches in general. the fact that you can have all your spells, magickal journal entries and other such stuff in your pocket or bag at all time, directly in your phone, is extremely useful. I personally use Toxx; a really cute and extremely customisable diary app. I'm not sure if it's on the Apple App Store, but it's on Google Play. here's the link if you want to check it out: https://play.google.com/store/apps/details?id=com.wscreativity.toxx
Digital Tarot Decks: There are heaps of Tarot apps around where you can easily use for readings. you don't have to worry about accidentally losing cards in your deck and you can access it anywhere without needing a place to lay your spread. on top of that, since you likely already have a bond with your phone, it makes the bond with your deck that much stronger. I use Kawaii Tarot by Diana Lopez. here's the link ://play.google.com/store/apps/details?id=com.kawaiitarot.kawaiitarot274774 this app gives you a number of spreads to choose from and gives a brief explanation on the meaning of each card. if you like the style of this deck but aren't interested in using a digital deck, it's also purchaseable as a physical copy
Emoji Spells: okay, so there's a lot of debate on whether emoji spells are valid or not, but I think every medium is valid so long as no harm is being done and you're putting all of your mind into it. They're not extremely strong if you just mindlessly reblog them, but creating your own or reblogging them with intent and mindfulness can lead to very powerful and vet legitimate spells. On top of that, when you create your own, every like and reblog helps your own spell get just that little bit stronger as well as help the reblogger.
Mindfulness: Okay so this isn't necessarily a magickal medium but rather a preparation for things. there are lots of mindfulness apps you can get and use for a while before doing spells to make sure you're grounded. The app I use most is #Selfcare by Tru Luv Media. it's designed specifically for witches and has a Moon Calender, a Tarot deck, a Diary and a bunch of interactive mindfulness games. if you really wanted to, you could use this app for all your digital craft! here's the link: https://play.google.com/store/apps/details?id=com.truluv.android.selfcare
Digital Sigils: Okay, so if it wasn't obvious by how absolutely infatuated I am with technology, I also make my sigils digitally. I simply draw them up in an art program and make them all pretty. I usually charge my digital Sigils simply by pronderibg mindfully on it for a while, and I often insert their images in the form of a sticker into the corner of my schoolwork pages which, yes, I also do digitally.
🧁Conclusion🧁
Digital Witchcraft is efficient and makes use of the technology that is all around us in the modern world. It's not for everyone, and I know a lot of people prefer to use analog methods for their craft as it can feel more at one with the environment, but it can be extremely powerful for those that are enthusiastic. I am nOT a super experienced witch. I've only been working with magick for a few years and only digital craft fro a few months, but if you have any questions, please feel free to ask me :)))
355 notes
·
View notes
Text
On the process of writing a novel...
Ok, so this began as a DM to a very dear friend who had said they were super excited to work on a novel of theirs that they'd abandoned for years, but they felt a bit lost when looking at the project again. They had "too many characters, too many intrigues" and they didn't "know how to create order" for all their ideas. They didn't know "what to keep, what to remove, what to change" and wanted to know if I had any tips.
I began to reply in messages and then realised I needed to make a whole post out of it, so here it is! All 3k words of it. This is for you, darling! I hope it helps.
Things I found extremely helpful when planning my novel for NaNoWriMo this year, after also taking some time off from it.
Most of this comes from Alicia Lidwina’s Four-Part article on her NaNoWriMo prep process, and setting up a writer’s notebook, for 2018. You can find the link to the first part here and I highly recommend you check out the whole series of articles for a more in-depth read.
Content of this ‘essay’:
Preparation, Groundwork, and Materials
Project 'Stats' & Overview
Mood, Moodboards, and Key Imagery
Things to Consider, and Important Bullet Points
Get to Know Your Characters
Chronological Order
Tangential and Preceding Events
Basic Premise, Plot Definition, Sub Plot Ideas
List of Locations
Scenes
Chapter Outline
NaNo Plan
Additional Notes and Tips for Writing
Ok. Let's begin.
First of all, I'm not saying that this is the only way to write or organise a novel. It can be tackled in as many ways as there are writers in the universe. This is just the method I used to get my ideas crystallised and organised.
Preparation, Groundwork, and Materials.
Take your preparation seriously. I bought a cheap but still nice A4 sketchbook with blank paper for maybe £2 at the local hobby store, and used it solely for the purposes of being my Novel Notebook. It doesn’t have to be a pretty, perfect, Aesthetic(TM) journal at all. Its function is to act as a route-guide through the process.
I bought a cute sticker from Etsy and used it as the front cover design so that I liked the book and that it felt a little bit special, without being too intimidating to put a mark in. Then I left the very first page blank, and opened it to the first double page. On the left, I wrote ‘Contents’ and then moved on to the right and wrote ‘Project Stats and Overview’.
I used a pen that was comfortable to write with, which for me was important. I’m a very tactile person, and having nice paper and pens (not necessarily fancy), made the process feel good.
Project Stats and Overview
This is the bare bones of the book, and includes details such as:
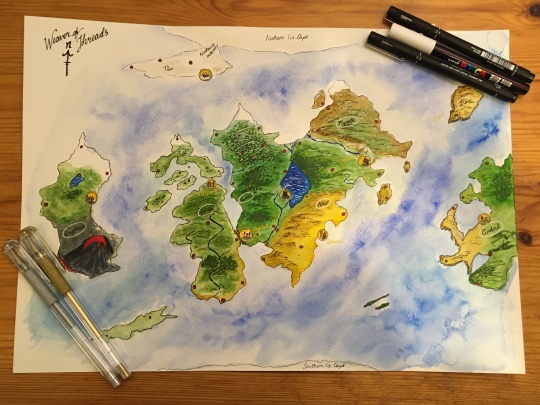
Project Working Title: (in my case it’s Weaver of Threads)
Targeted Wordcount: (to give yourself an idea of the scope, but it’s not necessary. For me it’s 50-100k)
Genre: (for me, fantasy)
Series: (will it be one book or more? For me, probably more than one, and at least two).
Inspiration: (here you can jot down all sorts of things which inspire your world and your writing, and it can be anything. In my case, I began with “density and lore, and feeling of being grounded in a real world from LOTR and Tolkien.” And I went on to include other writers and novels in the fantasy genre, as well as elements from our own world, such as Mongolian herding communities and way of life, the history of the Persian Empire, and Renaissance Florence!).
Project Timeline: Give yourself a structure, and be realistic. If you know you’re a slow writer who’s prone to distractions, be generous, but if you’re someone who responds well to short deadlines, tighten the time frame up a bit. I said “November 2020 - November 2021 for the whole manuscript” because I know I’m a procrastinator who gets dejected if they shoot past intense deadlines….
Editing Deadline: December 2021-January 2022. I know I can edit fairly quickly, so I made this one much shorter.
Main Requirements Prior to Starting: What do you need to get sorted before you can get going? It could be purchasing a laptop or figuring out a magic system. In my case, it was the latter.
What Happens in your novel?: This is not ‘what do your characters do?’, but what, in one sentence, actually happens in the book. For Fellowship of the Ring, you could say ‘a diverse group of people assemble and set off together with the goal of destroying the Ring’. LOADS more stuff actually takes place, obviously, but that’s probably the key thing that happens in that book. So, write the same thing for yours. I’m not going to tell you what happens in mine, because that would spoil it :).
That took up the first A4 page of my writer’s notebook, and after that, I moved on to Mood and Key Imagery.
Mood, Moodboards, and Key Imagery
On the left hand side of the page, I wrote down the words and concepts that sprang to mind when I thought of the novel itself. These were in no particular order or placement — just a random cloud of ideas in a rough column on the left hand side of the page — and they included: history, mystery, love, friendship, betrayal, nostalgic, homesick, sense of belonging, sense of place, searching, closeness, secrets… etc. etc.
Then on the right hand side, I wrote down five key words that I wanted to associate with the novel. These would form the ‘visual aesthetic’ in the background of my mind, and could be very easily expressed with a moodboard.
This same process (writing down words and creating a moodboard) could be achieved on a website like Pinterest. Take your time with it, find the right visual clues that really match the essence of your story, and create a final mood board with a limited number of panels that will be your novel’s ‘true north’ when it comes to feelings. If you're artistically inclined too, you could draw sketches of things relevant to your world too.
While this stage is really important for solidifying the feeling and mood of the novel, don’t get stuck here and spend forever procrastinating on Pinterest or whatever. Once you’ve crystallised that ambiance, it’s time to move on. It’s also perfectly fine to come back to this at a later stage if you find yourself running out of inspiration or drifting a bit. Daydreaming, drawing, mood-board-ing are all great ways to work on your novel on days when you don’t feel like writing.
Things to Consider:
Alicia Lidwina asked herself some questions which helped me get past the ‘block’ that I’d created when thinking about the novel, and those were:
What scares me about this story? (in my case it was the scope of it - it was easy for me to get lost in over-thinking tiny details and get too overwhelmed to handle the big picture)
What will readers take away from it? (in my case, I hoped that it was a sense of friendship, people from desperate cultures finding common ground, and a sense of being grounded in a real, tangible world.
What is its selling point? (essentially, why would an agent/publisher choose yours over the next one in the pile?). Don’t be bashful about this. This is your notebook, so if you’re proud of a feature or aspect of the story, write it down. In my case, there is no ‘Big Bad come to destroy the world’, no Chosen One who is the only one who can stop it. There is an antagonist, but it’s on a personal scale, and that’s the selling point. It’s about two people going on a personal journey to uncover a lost piece of knowledge that’s arguably not all that world-changing on its own, but which means the world to them.
What will be the three biggest issues in writing the first draft? Identify the three biggest roadblocks, and then take a bulldozer to them. For me, it was time management, getting mentally stuck, and the sheer darned effort of it becoming overwhelming!
Important Bullet Points
These are five key facts about your novel, distilled from the sections above. They include: What’s at the heart of the story? How long is the story? What’s the narrative focus of the story? What are the maximum number of main characters? And the maximum number of supporting characters (this obviously doesn’t mean you can’t have other, less important characters too!)?
Relationship between the two main characters is forefront
50-100k words
The novel’s focus is on the characters’ main goal (had to be more vague here so I didn't give it away)
2 main characters
3 supporting characters
If you find you’ve got too many main characters (not necessarily a bad thing to have a lot of characters - look at A Song of Ice and Fire after all!), then figure out whose story you want to tell here. You can always write another story with other characters in a connected novel, or a sequel. You don’t have to tell everything all at the same time.
Speaking of characters…
…Get to Know Your Main Characters:
Here you can write character sheets for each of your main characters and cast. There are hundreds of these templates available on the internet, asking questions like ‘how would your character react to [insert event]?’ etc. to get to know your character. If this isn’t your thing (it isn’t mine) then at least write down some useful information about them. Rough height and weight, hair, eye and skin colour, general temperament, and any other defining physical or mental traits.
Next came the Chronological Order
This does not have to represent the final order of the novel’s structure, nor the order in which you write the manuscript, but you need to know what happened within the timeline, and when, in order to be really clear when you’re telling the story. You can write the manuscript out of order, and you can tell the story with flashbacks or in a different order, but you need to have the underlying chronology securely in place so that your writing makes sense and so that you don’t confuse yourself or the readers in the process.
Preceding and Tangential Events
These don’t need to be in the novel itself, but it may be important to define the sequence of events that also led up to the moment where we pick up your story, and what is happening elsewhere so that you can be sure of these too. In my case, I defined the events that concerned one of the supporting characters’ lives so that I knew how and why they were at the point they are in the story. It relates directly to - and heavily influences - the events of the novel, so I needed to have this person’s history nailed down as well, even though I don't tell it all explicitly in the book (because that would be unnecessary and a bit dull).
Basic Premise, Plot Definition, and Sub-Plot Ideas (plus writing a synopsis)
Alicia Lidwina defined the story premise helpfully with the following formula:
Story Premise = Main Character + Desire + Obstacle
Pick a different colour for each of these components, and write a short paragraph to explain them in the context of the novel. Alicia Lidwina used the following:
[Main Character] “Harry, an orphan who didn’t know that he’s a wizard, [Desire] got invited into Hogwarts School of Witchcraft and Wizardry and wanted to live his school life to its fullest, [Obstacle] but a certain Dark Lord who killed his parents is trying to rise into powers again and kill him in revenge.
Do this for your novel, and keep it really short.
Plot Definition: This is even shorter than that! It’s a single sentence!! It’s most closely tied to the desire of the character, and lies at the heart of the story. It’s most likely a distilled version of the ‘what happens in the story’ from the Project Stats page, so check that to see what you wrote there.
Sub Plot Ideas
Five bullet points (no more) for things that are happening concurrently and which are related in some way to the main story. For me, Kae and Tomas are doing their research, so that’s the main theme, but beneath that there are a few other related incidents.
Writing a Synopsis - developed out of the points in this section, and includes:
Who the main character is
What the stakes are (the story premise is your guideline)
What the main plot line is
How the MC resolves the problem in the main plot line
How the book ends.
List of Locations
Start with the main ones and add to it as you go on. Write a little bit of information about them so that you have something to refer back to. I also drew a big old map which I found very helpful and also really fun to do.
List of Scenes
It’s very important to map out every single scene that happens in the novel. Use your timeline to help with this, but remember a scene is not necessarily a chapter. You can have more than one scene within a chapter, but try not to have too many.
I used small post-it notes (sticky notes) and wrote down things like “M joins K’s clan at the fire and K learns about magic” and “K studies at Citadel, intro to Citadel, magic, and characters” as separate scenes. Once you’ve written down everything that is going to happen (this will take some time! Get a drink and some snacks ready, and go slow), you can stick them into your notebook in the order you’d like to tell the story. Some chapters may have just one scene, while others may have two or three. I didn’t have more than two in any of my chapters, and actually ended up splitting some scenes that I’d made too vague in this section into more chapters. It doesn’t have to be set in stone, but it will form a road map.
Additions and Notes:
I left a section of the Scene Outline bit of the notebook blank for things to add in as I went along. I haven’t used it yet, but I might.
Chapter Outline
I arranged the scenes into the chapters already by sticking them in order, but you could do a chapter outline separately after this. It’s up to you.
NaNoWriMo plan:
I did this back in October, and wrote down the main goal for nanoprep, which was to finish the background info. Breaking that down further, I listed - magic (how does it work exactly), geography, and politics.
After that, it was just a case of writing the 1667 words a day. *spoilers, I got distracted and didn’t do NaNo this year* . What I should have done, was break it up into chunks and write down my goals so that I had something tangible to use as a road map, and I will be doing that now for the novel as I take it up again outside of NaNo. Having check boxes and manageable goals really works for me. Find what will work for you, and if it turns out not to, adapt!
Some final pointers and tips:
Set regular goals for yourself. Whether you work by saying ‘I’ll write 1000 words a day’ or ‘I’ll write something every day’, make a structure for yourself. If you slip and miss a day, week, or month (I didn’t meet NaNo this year because I chose to work on another project instead *slaps forehead*), don’t beat yourself up. Writing is a craft and it takes a long time and a lot of discipline to master a craft.
Your first draft does not have to be good. At all. Your first draft is just words on paper. A first draft is the block of marble taken from the quarry, and subsequent edits and reworking is the process of carving the sculpture itself. The editing that is done by the publisher or the professional you employ to edit it for you later, is the final polishing. Don’t be demoralised if the block of marble seems very rough when it first lands in your studio. That’s ok!
Take regular breaks. Writing is hard work, and most people can’t concentrate on something successfully for longer than 55 min's, and if you’re doing that, you’re already doing really well. Personally, I’m at 15-20 on a good day. Write in little sprints of ten minutes or so, and then get up and stretch, look out the window, maybe leave the room, come back in with a fresh approach.
Stretch your hands, and wear wrist braces when you work. Seriously. I gave myself tendinitis on my first major project, and couldn’t use either hand properly for weeks. The ones I have are these, and they allow me to work safely for much longer.
Keep hydrated. Have a bottle of water on the desk in front of you between your arms as you type and sip it, otherwise you’ll forget. 2 litres a day is usually recommended, but know your body and drink accordingly.
Treat yourself. Whether that’s something as simple as a decadent hot chocolate after your first chapter/chunk/sprint is done, or a new notebook or a pen or that sticker set you wanted on Etsy or literally anything nice, reward yourself for the hard work you’ve put in, with tangible things you can look at or experience and say ‘I have that because I did the work’. It’ll help with your sense of achievement, especially if the project is a long one.
Join a local writer’s group for feedback. With the current Covid-19 chaos, this is probably not possible right now, but getting constructive feedback on your work from someone who hasn’t been cocooned in the project in the way you are, but who respects you as a writer and wants to help you grow, will be invaluable. It’s too easy to exist in a little isolated bubble and think you’re doing ok, when in reality you could be creating bad habits which will be difficult to break later. By these, I mean things like ‘filler words’ you don’t realise you use, or other pit-falls it’s easy to tumble into when you can’t see the wood for the trees…It’s intimidating, and it might take some courage to work up and do, but I promise it’ll help you grow. You don’t have to do what the people suggest, but it’s great to get outside opinions all the same.
Submit work to writing competitions. This will help with showing agents and publishers later down the line that you’re not only committed, but hopefully talented, and will help you to push yourself. Use the world of your novel for the setting, and get to know it by writing short stories on the competition’s theme set there.
Read. Read the writers you admire, and read them ‘actively’ - figure out exactly what it is about ‘that’ sentence that made you shiver, and use the same techniques in your own work (don’t plagiarise, obviously, but if it was alliteration that made the sentence work so well, use it yourself! Perhaps it was the metre of the line? Great, now you know a rhythm that will drive a sentence forward or slow it down etc.)
Enjoy it. If you’re not enjoying what you’re doing, it’ll show in the work. Take a step back if you start floundering, and ‘interview’ yourself about why it’s not fun any more. Refer back to the sections in the notebook that helped to clarify the plot/process, and see if you’ve wandered away from them. Make yourself answer questions like: ‘What is the main reason I don’t want to do this?’ ‘What is the character’s motivation?’ ‘Should I scrap this section?’ (don’t delete it, but cut and paste it into another ‘scraps’ document, and then start afresh from the last place you were happy with. Nothing is wasted - it all goes into building the world and getting to know the characters, even if it doesn’t get explicitly told in the finished product, so don’t be afraid to do that last bit).
Good luck!
I hope you found this helpful, and if you have any questions or things you’d like to add to this, please feel free to send me an ask here on Tumblr.
If you’re a new writer hoping to get an agent or publisher, you might also find this post on ‘talking to a published author’ helpful or interesting.
If you would like to keep up to date with my own novel’s progress, you can follow me here on Tumblr, as well as on my writing Instagram @rnpeacock
#writing#writeblr#writing process#how to write a novel#novel writing#nanowrimo#national novel writing month#writing a book#writing advice#author#authors on tumblr#how to structure a book#long post
136 notes
·
View notes
Note
Do you journal? If so, how do you use/structure your journal? What kind of things go into it?
Hey dear! I do journal and I’ve been trying to journal daily, especially since I’m home all the time anyway now. I used to have a more structured bullet journal, where I would create layouts and designs with things like movies I’d watched, homework assignments, calendars and favorite things and it was really cute but also time consuming. I still have a Pinterest board linked here for inspiration if you wanna go that route. I’d also doodle and put quotes in there and it was fun but time consuming...but I do still reach for it occasionally.
Now my primary journal is just for spilling my thoughts and feelings so there’s no structure at all besides that I always put the date, time and city I’m in and my mood so when I look back I have context and just a little memory capsule, really. I will write about how I’m feeling, what I did that day, the people I talked to, things that stood out, the music I’m listening to or film I’m watching, the book I want to write or I’ll write some song lyrics and sometimes later I turn them into actual songs. I also have a glue stick I use to paste in little things that remind me of a time I had and this has been anything from ticket stubs to stickers to receipts to notes from friends. It’s nice to have something that’s organized at least by date so I can jump right into a certain time in my life. This is also random but I try to use the same pen throughout because I just think it looks nicer since I’m not doing anything fancy like drawings (besides maybe some doodles here or there). I do also keep other notebooks and journals for specific things, like news articles or fiction writing or a planner for life/organizing stuff.
This might not have been helpful at all because I’m not super organized with it but at the end of the day it’s just important for me to write my feelings and thoughts.
1 note
·
View note
Text
Journaling Supplies
Journaling makes up a huge part of what I do here, especially behind the scenes. I spend a lot of my work day every Friday working on journals and planners, so I thought that I would share some of the supplies that I use regularly.
I’ve had a few years to build up my collection before I started posting on this blog. Journaling the way that I do is a very active part of my business, which means that I put a lot more money into it than other people might. I don’t want anyone to be discouraged by what they see in today’s post, so I’m going to start with my basic supplies, then move on to the “extras” that I use for work.
The Journal
You need a journal to journal, right? That’s pretty obvious. The question is, what kind of journal? Does it matter?
Well, no. It doesn’t.
You can start with any old journal or notebook. I started out with a basic Mead brand spiral notebook - you can get them at pretty much any store in bulk, especially around July and August when the Back-To-School sales start. That’s my favorite time to shop for supplies, by the way. I know places like Walmart and Target sell them for about $0.10 a book those months, and through the rest of the year they’re maybe $0.50 - $1.00. Nice and cheap, and they do the job just as well as any fancy, expensive journal.
Over the years I’ve collected spiral and case bound journals in a bunch of different sizes. I’ve bought them from $0.10 all the way up to $70.00. It can be a very cheap hobby, or a very expensive one, and it’s entirely up to you.
If you’re looking for a new journal - maybe to follow along with the prompts and ideas here on my blog throughout the year, this is a good start. This link will take you to a 2-pack of hardcover, faux leather journals with thick paper for about $15.00. You shouldn’t have to worry about bleed-through even with Sharpies on these, but always do a test page for your writing tools before you start writing, just to be safe.
It’s not so expensive as to break the bank, but it’s a nice little splurge if you feel like spoiling yourself with a nicer quality journal.
Writing Tools
I tend to be very, very picky about my pens for journaling. I don’t like super cheap ones because a lot of the time they either dry out too fast or leave those ugly splotches in the middle of a letter. Yuck.
However, for the cheaper end of pens, I’ve never once had trouble with Paper Mate. Right this minute I’m using these Paper Mate Profile pens, and they’re wonderful. They write very smooth, the ink dries quickly (the most important thing for me, as a lefty), and the colors are very bold, which is great for journaling and planning.
You might be tempted to use pencils for your journal. What if you make a mistake? What if you decide you don’t like what you wrote. Well, you have every right to use a pencil, and they will last. After my grandmother passed away, I was given her hand written recipes, and there were a few that she’d written in pencil in the 60s or 70s that were still perfectly legible.
If you do decide to use a pencil, I recommend a #2 or 2B, just like you use for your standardized tests in school (in the US, at least). They’re very cheap, everywhere has them since school children need them almost constantly, and the graphite is hard enough to limit smudging, but soft enough for a good, dark line. If you want it less smudgy, perhaps try an HB. You might have to pay a little more, depending on where you go, but it should help with a longer lasting entry. If you do decide to journal in a softer, darker pencil, I recommend investing in page protectors or archival quality clear tape or clear coat, to preserve your writing when you’re done.
Markers are also a lot of fun for journaling, especially if you tend toward a larger or more bubbly script. I’m a big fan of writing with Crayola fine tip markers - fine enough that you won’t lose your letter shape, but thick enough for fun, bubbly font. The only trouble I’ve ever had with them has been that sometimes the marker nib absorbs too much ink, and then it starts leaking everywhere and I get multicolored fingers and some ink splotches. You can usually avoid this with proper storage though.
Extras
What are some extra things you might include in your journal supply stash? Well, I have a whole bin of supplies, so you might be surprised.
Greeting Cards - You can get them for $1 each at your local Dollar Tree, and it’s easy to include them in your journal. Just glue or tape the back of the card to an empty page, and there you go. This can add color or pop to your journal, and you can find them in very simple or very extravagant designs. I have a bunch that have little pop-up cutouts on the front.
Washi Tape - Yeah, I know, this is a little over done, right? Honestly though, the designs are really cute and I love using them on the edges of pages. If you’re journal includes things like lists or planning spreads that you might want to revisit, washi tape is a good way to mark those pages.
Stickers - I’m a huge fan of stickers and so is my fiance. I think I pick up a new sticker book at least once every other month, more if I can swing it. There are so many options, and you can find a sticker for just about any interest you can think of. Etsy has a bunch, and since the creators there tend to be small business owners, you’ll be helping them out instead of giving your money to a huge corporation (if that’s a concern for you). I also know that a lot of the time, if the store is 90-100% stickers? You can usually contact the shop owner and ask for a custom sheet. They’ll almost always be happy to accommodate you.
Envelopes - Like greeting cards, you can just glue or tape these in on a blank page, or inside the front or back cover. Including envelopes in your journal is a great way to store important keepsakes, notes, or just things you find that you want to keep safe.
----
This is a pretty basic list, but it’s a good way to get started. Almost everything I’ve listed here can be found for less than $10 (the linked journals being the only exception, and only because it’s a two pack). Journaling absolutely does not have to be expensive, and if you’re passionate about it, I’m sure that like me, you’ll acquire a larger stash over time.
1 note
·
View note
Link
I don’t think I ever thought directly that the best stuff would make me happier, but I do use physical things as checkpoints and rewards.
When we buy bookshelves someday, I know we’re not moving for a while and can start focusing on more confident root-building.
When we buy a bed I know we’re planning on staying in the area at least (we did that ^-^).
When I complete task x, I can purchase this book or reward-thing.
I think it’s not that we value extreme quality or whatever the news wants us to believe, more that we value time and products that offer efficiency, to free up our time to reflect more on ourselves and our world rather than be consistently overwhelmed by it, are supposed to make us happier.
And there’s a truth to that, I think. All of these companies know what we want: time. And they do their best to sell it to us with products that provide that.
Consuming them all at once, I think, would be overwhelming to anyone, and by doing so, doesn’t actually experience the efficiency they’re supposed to be offering. If you’re not wasting time looking for a mattress or spending three hours shopping for new wines, if you’re not stressed by making dinners every night or getting angry at your stupid carry-on, then these products aren’t actually catered to you, imo. These businesses have the Millennial pulse, they know we’re overwhelmed and over-worked and looking for any ethical shortcut that can free up time to actually make friends and develop personal ideologies and skills worth all the work we’re doing in the first place.
They’re selling time and we’re buying it, because how the heck do we combat our shortage of it in the first place?
I wonder how many of these products are actually largely consumed by Millennials and how many are simply marketed as such and criticized as such and therefore consumed as such? I’ve never heard of most of these, but maybe I’m just a bad Millennial?
Marketing to Millennials is not a difficult concept. We want time, to explore the world and ourselves, to try new things and experience life. We’re tired of making so many choices in a day, we want limited options and synthetic solutions that solve many problems at once. And lastly, we want to be individuals, still retaining some semblance of our self while being mostly-exhausted and serving agendas that are not our own, we want to abide by our own ethical codes, to trade fairly, to consume responsibly, to create environmentally, to have a positive impact on the world. Mostly we want time to make those other things happen. Also, we’re poor as shit, so we want things to be efficient for a long time, quality that lasts is worth the extra dollars... until it isn’t. Those wealthy among us are few and far between. We just want time and to be ethical consumers.
So here’s how I think a few of these brands are smashing through Millennial poverty and job-insecurity to rack up sales that AREN’T BASED ON OUR OBSESSION WITH AESTHETIC as some outlets are determined to focus on. These are a look at the tone, voice, and branding of the company’s marketing and how it might apply to Millennial psychology, not sponsorships or ads or whatever. The links are so you can confirm for yourself, just fyi.
Casper promises a good night’s sleep so that you can spend your days rested and ready, utilizing the most out of your 6-hour nights, you perfectionist workaholic, you. On top of that, they focus on the direct-to-consumer model and quality long-lasting material that feeds on the idea of using up less time finding and receiving a mattress as well as keeping or worrying about replacing one.
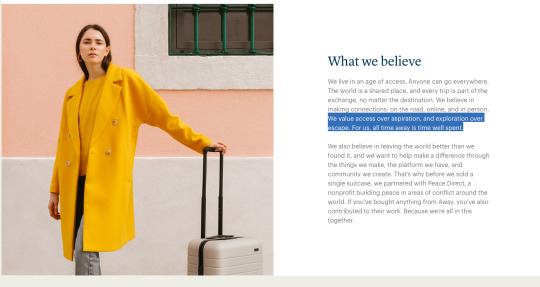
The Away Carry On is about the idea of using that extra time to travel and explore the world and yourself. Their About page doesn’t even feature a full photo of their product, it’s an ideology. They’re also selling you the time you would spend looking for another option, comparing style and design, they’ve done it for you, created a one-size-fits-all solution, of course it will solve your problem.
We value access over aspiration, and exploration over escape. For us, all time away is time well spent.
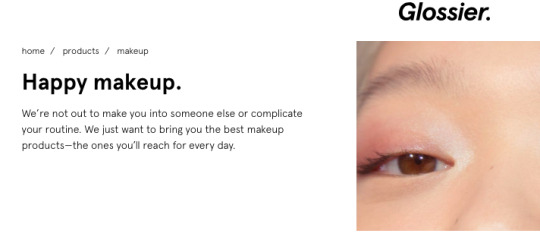
Glossier Makeup promises to be your go-to, you won’t have to stand in those stores of exhaustingly similar shades unless you want to because you’ll already have efficient makeup that doesn’t require reapplication (because that takes time and costs money).
We’re not out to make you into someone else or complicate your routine. We just want to bring you the best makeup products - the ones you’ll reach for every day.
With Parachute we find the same story of long-lasting quality materials, environmental for those who can afford it, that will make your home comfortable, so that the time you spend relaxing is the most relaxing as soon as possible. Efficient comforts that remind you of the life you’re working toward and all the free time you’ll have once you get there.
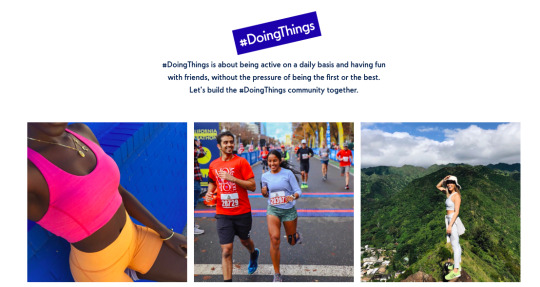
With Outdoor Voices, again, we have a focus on experience, the apparel is sold with the encouragement to exercise every day without the pressure of being the best or first, so you can efficiently utilize your time working out AND having fun! The products are quality that won’t have to be replaced as often, and they are fashionable and cute, so you won’t have to waste time on deciding what to wear for your fun social workout. Combined with the focus on community, experience, and activism through social media and events, their campaigns are often focused around the ideological message, their products become a simple representation of it.
#DoingThings is about being active on a daily basis and having fun with friends, without the pressure of being the first or the best.
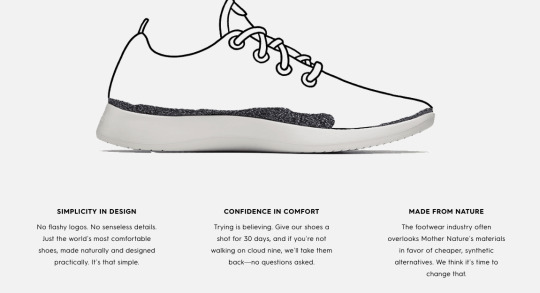
Allbirds pursued a similar method of quality-focus, but included much more of their environmental platform, essential for Millennials and our ethical attempts at consumption through the climate crisis. Allbirds makes note of its non-flashy design, making the shoe efficient and adaptable for many scenarios (we minimalists love adaptability and efficiency), and their comfort means you won’t have to waste time picking shoes out either, just stick with the same pair every day, more time to explore the world, less time making decisions or feeling guilty about your shoes.
An entirely new category of shoes inspired by natural materials, and an ongoing mantra to create better things in a better way.
MeUndies touts the small-wins, having a quality pair of underoos that will last you a long time to start your long day with a positive swing. They’ve accepted that you have little time, and that your life is full of negative outcomes and work that is often unrewarding, so here is a special something to indulge in.
Sometimes it’s the little things that give your morning that well-needed win.

Everlane is feeding that ethical-environmental Millennial with the efficiency of a brand you can trust, shop without spending time looking at labels or investigating, don’t waste time on expensive clothes that aren’t quality or fair.
At Everlane, we want the right choice to be as easy as putting on a great T-shirt. That’s why we partner with the best, ethical factories around the world. Source only the finest materials. And share those stories with you—down to the true cost of every product we make. It’s a new way of doing things. We call it Radical Transparency.

HelloFresh is all about simplifying your meal-making routine by sending recipes and ingredients right to your door. Sure, you pick them out for a minute, but shopping? Debating between organic butter lettuce and the other one that says organic but doesn’t have the sticker? Who needs that, you can trust their ingredients, you can customize your plan. Efficiency, adaptability, ethical trade, and experience, they were made for Millennial culture. No marketing necessary, the concept itself fits all the bullets. And they do an outreach program, which is becoming consistently more important for us ethical consumers to gain our pseudo-experience through. I might not have time to volunteer or money to donate because I can’t even afford a barely-livable apartment, but I can purchase and support my own necessities through companies that provide what I cannot (hence the effective longevity of companies like TOMS or Bombas or Yoobi, and other companies found here, many do social media campaigns, so they donate to charities or their own products as a reward for marketing through social media or sharing, including Everlane and Parachute listed above).

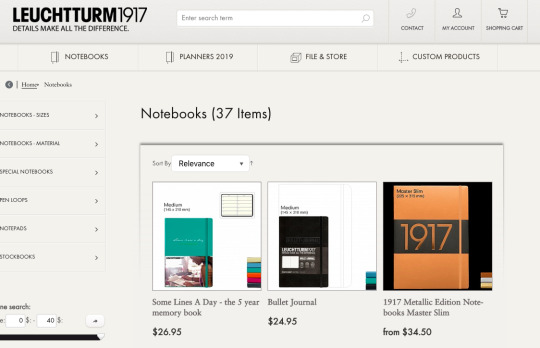
And last for this little thought experiment/analysis thing, we have Leuchtterm 1917 notebooks. I see these all the time, I pick them up with a hefty this might be nice and then see the price and scoff as I set it carefully back on the shelf and return to the spiral bound notebooks, where I belong. Quality is the supreme marketing strategy here, and I would argue it’s not as “Millennial” as the Moleskines as far as “luxury” notebooks go. Moleskines are marketed alongside stationary and journals in bookstores, as the affordable extra, individually minimalistic with hundreds of custom options and colors, they are the features of the Pinterest art and journaling craze and trends (Inktober anyone?).
The Leuchtturm1917 notebooks offer more of a corporate vibe, imo, but maybe that’s the point, they are the Millennial whose start-up has sold or is prospering, they are the symbol of old-world success, an unnecessary luxury meant to motivate more than adapt. Which banks on the Millennial desire for experience and aesthetic encouragement, in that way, I can understand how this company would fit here.
Also, the author mentions specifically using this notebook for bullet journaling (which I tried and failed once), so I understand the Millennial application. Bullet Journaling as a concept is meant to free up time and organize your goals so they are accomplishable, offering experience, creativity, and time to reflect and follow those organized colorful dreams. Why not organize those dreams in fine leather and quality paper that encourages you to work harder?
Experience and consistency are important requirements for quality. quality gives ideas a solid foundation on which they can develop. We are convinced that small details can make a big difference.
These companies are advertising on Instagram and sponsoring popular podcasts or Youtube creators. They know who and where their audience is and are often genuinely trying to make life more efficient, among the superfluous world’s most comfortable X titles. But whether or not they work, or if they just add extra work to our lives (extra billing, extra passwords, extra clutter), is based on our choices and routines. A few years ago Netflix streaming might have been included as a Millennial extra, and Amazon shopping before that. But those have proven useful, efficient, time-saving, essentials whose winning of the test of time has auctioned them off into mainstream consumerism, rather than this bubble of marketing we Millennials get defined by.
I want time and efficiency, I am exhausted of making choices, I would like products to last a while, to reduce the risk of purchase, and to reassure me that I have agency and power in my life, products that encourage me to live it. Who the heck doesn’t want that? But none of these specific products, so far, has been useful enough to my weekly worries and time-obligations to warrant their cost. Is this really the Millennial dream life, or is the marketing-campaign of these companies similar enough to group them together and make us form a disjointed idea of what Millennials want. Social shopping is fun, obligatory money-spending is stressful, we fear for our time in our commutes and celebration of workaholism, and getting this much in the mail seems exhausting if not occasionally unproductive.
I don’t think Millennials just want aesthetic, I think that’s what we are, but we want to be more. We want the time to make ethical choices, we want the money to sponsor products that utilize ethical choices. We want to matter, to make a difference, we want to be seen. We want friends and experiences together, we want laughter and fun and meaning beyond agendas that aren’t ares. These companies let us wear those desires while maintaining our survival as we shuffle off to our unpaid internships and our hopeful start-up salaries, they sell us hope.
Anyway, I really liked this article, but the more I sat on it, the more I got annoyed with the disjunct of purpose vs. use. Maybe that’s a marketing ploy, and maybe I fell for it, but I wouldn’t expect any of these products to make me happier, because none of them would take me less time, make me less anxious, or offer less stress than my normal routine. That means that this illusion of Millennials that’s getting propagated is based on the false understanding that we value elaborate quality and are frivolous spenders, rather than the reality that Avocado toast is a great source of good fats (Jake’s not home, I can’t ask him for the 500th time to explain it again, sorry), and good grains and good proteins and good spices that will keep you full for a good amount of time and is therefore healthy and efficient when it comes to meal choices (and delicious lol).
So yeah, I don’t think we Millennials are as image-obsessed as we seem, I think it’s all part of a desperation for time. We are told that we deserve time after we are successful, we may travel after we retire, we may find ourselves after we raise kids, and the only way I think we see around it is money. If we can support ourselves independently, then we don’t need to fill anyone else’s agendas, we are free to use our time as we please, on things we are passionate about, on ourselves, on thought, on politics, on friendships, etc.
So there’s my thing, I’d love to hear thoughts about Millennial stereotypes through technology and consumer habits that might be deeper rooted in an attempt to gain time and freedom and identity and happiness. (It’s been a theme lately). I really hope someone skims this ‘cus man, the number of repeat ads I’m going to get from going to these websites is going to be exhausting.
#millennial culture#consumerism#marketing#business psychology#culture#anthropology#aesthetic vs philosophy#time#agency#obligation#thoughts#dangerous scholar
10 notes
·
View notes
Text
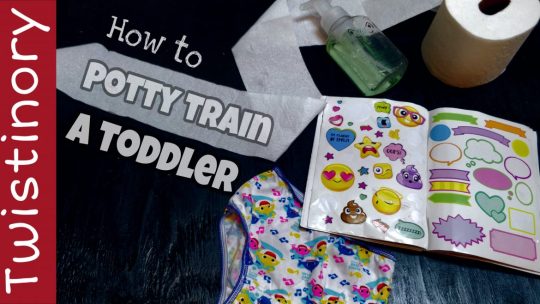
How to Potty Train a Toddler
New Post has been published on https://www.twistinory.com/how-to-potty-train-a-toddler/
How to Potty Train a Toddler
How to Potty Train a Toddler
How to Potty train a toddler
I know how frustrating that could be when all you want is a solution. I wanted one 🙂
I wanted to train our baby before her second birthday; well it did not work out. Then I tried when she was two and a half. Again it was a big Fail.
Every kid is different. Following are the tips and tricks that helped us to train our 34 Month Old Very ENERGETIC Toddler.
See if they are ready
I know every article says that but it is really helpful if you train them when they are ready.
So how to determine that?
For us these two signs told us that she is ready.
Started following instructions to a tee.
Knows when she goes. Although she was wearing diapers but she knew that she had to go.
What did we do?
For Number 1 (Pee) we asked her to tell us when she has to go even if she is wearing diapers.
She didn’t want to talk about Number 2 (Poop) so we let it be in the beginning.
Are you ready?
It is very important to be mentally ready to train your child. Get whatever help you can. If it is just you and your partner try starting it during weekend so that you are not exhausted.
Say Bye-Bye to Diapers
Training pants did not work for us. She took them exactly like diapers and wouldn’t tell us. We took the diaper away. Got her favorite underpants. OUR FAVORITE UNDERPANTS
We tried different potty seats. The one that fits the regular toilet worked best for us.
For the first two days we took her to toilet every 15 minutes. It needed great commitment but definitely paid off well.
In those days we pretty much became aware of her non-verbal actions before going Number 1 or 2.
We had 2-3 accidents each day.
She went Number 2 in her diapers
3rd day we told her that we will not take her to the toilet unless she tells us to.
We had two accidents she was not happy about it and a little embarrassed as well but she told us right after she had an accident. Third time she started making faces and we asked her do you want to go to toilet and SHE SAID YESSSSS we ran and celebrated later because it was a success.
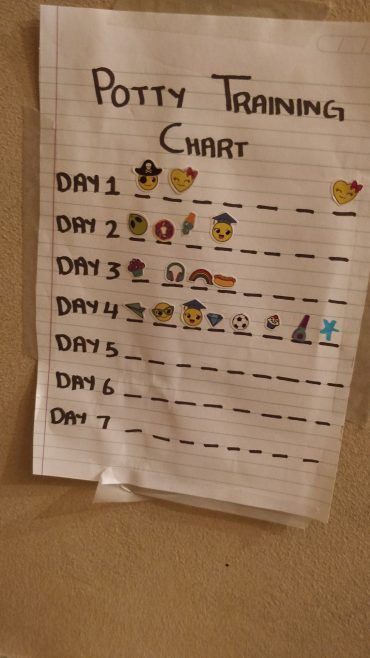
Potty training chart simply works!
We did not want to give her any chocolate or candy as incentive so we became creative and used stickers instead.
I made a DIY potty training chart, Tape it on the bathroom wall and she would put a sticker on it every time she went.
Potty Training Chart worked like magic for all of us. It gave us the idea of how much time she goes, when she goes. Gave her motivation to put more stickers on it.
No sticker if she did not go. Clapping and appreciating for trying but sticker only when she goes.
Accidents are part of the process
No discouraging comments, scolding or signs of disappointment if they had an accident.
In fact accidents are integral part of the process. When it happens take them to the bathroom anyway, clean them and ask them politely to tell you next time. Tell them it is great that they are trying. You may think that they are too young to understand this talk but trust me they do understand.
Spend more time in carpet free area
Roll and put aside your favorite shag rug
Baking powder and salt 1:1 ratio with some essential oils in it work great on carpet and mattress to dry and remove odors.
Be Ready for the gross part
Alright it is time for us to face the gross part. My little one did not want anyone around when she had to go Number 2. She held her poop for first 2 days of potty training. 3rd day she was running in the house crying her eyes out and trying so hard to stop it from coming out.
She was doing really well with Number 1 so we decided not to push too hard for Number 2.
It is ok if they want to go Number 2 in diapers in the beginning because they should know that we appreciate their efforts and we want them to do things at their own pace. Offer them to go to the bathroom and sit on the potty seat while they have diaper on and do Number 2.
Some kids are scared of Number 2. Offer them to hold their hands, sing song or blow bubbles. That is what we did.
Next couple of days she went Number 2 in her diapers on the potty seat. Asked us to hide or close our eyes. I showed her dirty diaper (yes I DID) and told her it is better to drop icky poopy in the potty seat and flush it awaaaaayyy and if she does that she will get a BIG STICKER.
Make it a big deal
After couple of tries she did Number 2 in the potty. We made it a huge deal and celebrated. Gave her compliments. She got to choose her favorite sticker and we made a separate chart for big Stickers.
Night time
We were so happy with the way she was progressing so we did not rush night time training.
She was wearing training pants at night and she wet her training pants sometimes but we did take her to bathroom soon as she wakes up and before going to bed.
Bottle – Book – Bath – Bed is her bed time routine since she was 9 months old now she takes her milk in tumbler and goes after bath.
After Couple of days we noticed that she was uncomfortable in bed. Changing sides. Sometimes getting up in the middle of the night.
We took her to the bathroom and she went right away. It was a huge success.
From that day onwards if she is uncomfortable during her sleep, me or her dad would take her to bathroom.
One day around 3:00am she woke us up and said she had to go Number 1. That was big moment for us. Since that day she did not wet her bed.
Short Trips
Once we got the hang of the whole potty training thing, we thought to take her for a short trip.
First take them on small car rides then take them to some place they are very comfortable like grandparents’ house etc.
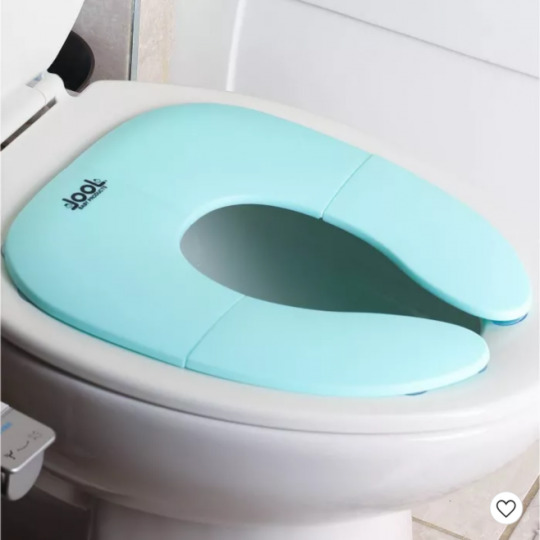
Here foldable toilet seat helped us a lot because she was already comfortable with it we packed it and took it with us.
For long travel or camping you can use potty seats with liners.
Remember
They are just kids. Accidents may happen after all this.
Stay consistent and be patient.
They will learn and days from now you will be sitting on a couch writing an article about it to share your experience with other Mommies or help keeping your friend calm who is completely freaking out about potty training.
Stay Strong Mommy and Daddy
You Got This
Links of the products that we used:
Underpants
https://www.target.com/p/toddler-girls-7pk-baby-shark-briefs/-/A-79373018?preselect=78626961#

We Stocked up on underpants and our baby loves to pick her favorites from Target
Potty Seat:
https://www.walmart.com/ip/Jool-Baby-Potty-Training-Toilet-Seat-Non-Slip-with-Splash-Guard-and-Free-Storage-Hook/790121541
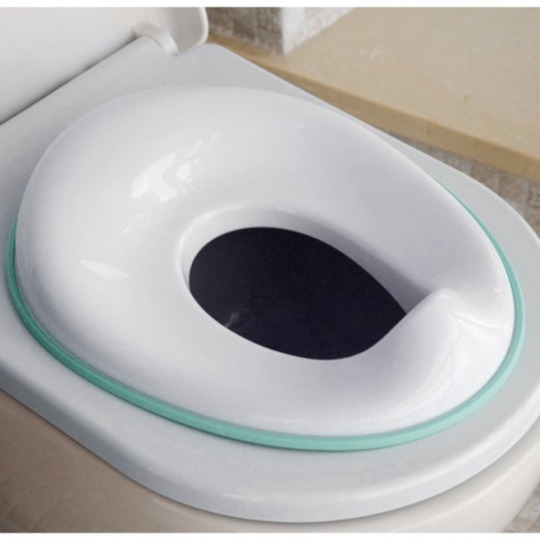
Foldable Potty Seat
https://www.target.com/p/jool-baby-toilet-training-seat-teal/-/A-79610452
Sticker Book
https://www.target.com/p/40pg-ridiculously-cute-1000-sticker-book-fashion-angels/-/A-78141570

Whether you want it for potty training chart or for your journaling, this sticker book is perfect
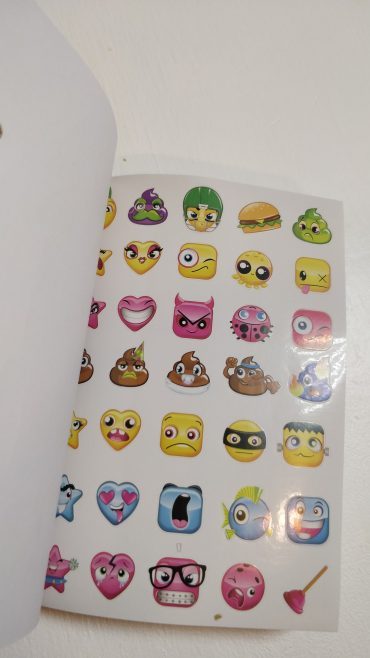
potty training stickers
Potty training sticker book

Potty training chart 2
Potty training chart 1
How to Potty train a toddler
#How to Potty Train a Toddler#potty training hacks#potty training tips and tricks#secret to no fail potty training
0 notes
Photo
Ok, so, if you don't have too much money in your piggie bank, something that really isn't a shame, I have a few good suggestions for super-creative and totally cheap gifts! (for Christmas ofc) 1.Postcards (postcard album) If you have postcards from different places you have been to, you can gather them all into an album and give it to your loved one! This will impress the person and he/she will always have a book with all your beautiful memories! If you want to give it a special Christmas scent, spray it with some cinnamon perfume or vanilla essence! Add some red/green/white glitter here and there and here you are! Smells like Christmas! 2. Bullet journal Oky, everyone must have a bulley journal. Even adults (lol). First of all because they keep track of things you want to note down and because they are fun to do, calming and relaxing. If you want to buy a bujo to one of your friends / relatives it shouldn't cost too much! But if you feel like it's more than you can achieve just buy a simple notebook or agenda with blank pages (or even lined ones, that works too!). If you still think it's too much for you, you can just do one by yourself! I'll let you a link to a DIY bullet journal. 3. Knitted clothes If you wanna offer a nice pair of cozy socks or a sweater or something else, you can just knit it! If you already know how to knit then this one should be easy peasy for you! If you don't know how to knit but you are skillful at hand-made work, you should start learning from now, so you have time to do something nice for your beloved one. You can give someone cute cozy Christmas socks, sweaters, fur caps, fur gloves, muffles. Or even a nice pair of leggings! Just spread you creativity and put love into it and it's gonna be awesome! 4. Photo frames If you want to make them remember your Christmas gift as long as possible and be the most special gift, but don't don't want to spend your whole bank on it, just hand-make a photo frame by yourself! Firstly look for a good-looking photo with you and the person. Secondly, look for a photo frame and the right dimension that matches the photo. If you can't afford to buy one, even one at second-hand standards or if you're not safe / sure with it, make one. If you don't know how to improvise one, just ask one of your friends/relatives for it, they must have one, but remember to don't tell them what is it for, as it is a surprise ;3. In case that you still can't find one, you can go in the house's attic / basement ( or wherever your family stores things and old boxes), and search through old family stuff, there has to be a frame with an old photo that you can get out! If you can't find a frame to match your photo, edit and resize it, (or crop it), and done! Add glitters, sparkles, cute winter stickers or anything to make your frame look new and awesome! If you feel to, even repaint it :). 5. Photo album If you want to show them you worked harder on something specially just for them, and 100% made by you, you should give them an album full of your amazing memories together! If you don't have any album already, you can ask someone from your family for one, or you can search through your old family stuff (again), get an album from there (smelling like an antique book), get the photos out from it (hoping they won't turn to dust, cause family stuff's old) and put in new memories! If you don't find any, you can always improvise! Just take an usual notebook, throw some fabulous photos in it, fart some sparkle, puke some rainbows over it, draw a little hare and there and your totally cool, personalized hand-made album's gonna rock! If you found out an old family photo album, and wanna make it look better, draw over the pages with markers, paints, anything colored! Add decorations and other pretty things and spray it with a cinnamon scented perfume (so that horrible smell of old book goes away) or with any other scent. You can even spray it with vanilla / chocolate / strawberry / etc. essence! If you feel to you can even write little pieces of memories in corners or in text bubbles according to the pics! Just inpire yourself and put love into it and you'll amaze your friend/relative with the amazing gift! 6. A letter Write a letter to the person with the things you appreciate most about them! Fill it with nice small doodles and hearts and other decorations and there you are! It's a nice gift and the person's gonna love it! If you wanna write more you can even bring along some of your wonderful times together from the past or really anything you want about them! Just be you! And don't be afraid or shy to give them your most beautiful honest thoughts about them in that letter! They'll put a price on it even more!7. A movie There's no way to show your love towards family or friends anyway than making a photo movie just for them! You can browse for their best photos on their social medias, so they won't be embarassed if you put a certain photo, and put them in the movie! If you can't find any, take that person out and expose him/her to a secret photo session! Pretend to take photos as memories! They won't even know what hit them! Add some effects / FXS, and you're done! I'll also leave some suggestions with apps that you can use for this, or if you have access to a laptop/computer whenever you like, just open Powerpoint and throw your creativity (and the pictures) there! Also don't hesitate to edit your photos with Adobe photoshop to make them look better, or any other app! 8. A draw Yes, you can even draw! If the person really loves you he/she is gonna appreciate your gesture rather than the gift itself! Tho, a good gift won't hurt anyone, but I'm sure you can do great no matter what! You can portrait the person and add from the scratch a Merry Christmas in a corner, if you're so talented after all ;) If not, you can doodle on some blank pages a few, really cute and emotional moments from your life (yours and theirs) and throw a Merry Christmas somewhere at the end. If you feel inspirational, you can even add decorations like jingle bells, Christmas trees, mistletoe, snowflakes etc as edges! Just throw your memories on the blankness of the paper! (maybe add some ink too (; ) 9. A song Since you're so talented and fabulous at everything, why don't you dedicate a song to your beloved one? You can compose one by yourself or if you tangle your pen in the lyrics, you can ask a friend/family member to help you out! (and when I say to help you out I don't mean put them do all the job for you, just help you stick some lyrics together so they actually mean something) If you really don't want something composed by you, you can take a Christmas song from YouTube and sing it (or any other song). You can even make a little mash-up, take several lyrics from different songs, find a good instrumental and voila! What a good job! 10. Explosion box This is the most awesome hand-made, easy and cheap gift you could offer to someone (from my point of view). It's like a photo album. Just that it surprises the person you're offering it to more. It's a hand-made thingy that looks like a box, and when you pull the cover it unfolds like an explosion and reveals it's wonderful inside! You can fill if with photos, and along with the photos you can also add some texts bubbles with something from you, or even draw/doodle! Your explosion box, your choices! I'm not gonna explain the whole process, the main objective is to be as creative as you can and I'll leave a link for ya to a tuto. This was all! I hope I inspired you and that this article helped you, even if it was, uh, a lily bit longer that expected (and maybe boring). Thank you for reading, if you liked it, show it some love! If you want to message me about what I should write next, or give a feedback to this article, my messages are always open!
2 notes
·
View notes
Text
2017 Holiday Gift Guide for the kiddos
Hi friends! How are ya? Hope you’re enjoying the morning. I wanted to apologize for the blog downtime yesterday. It was experiencing a security error, but all has been remedied in Internet Land. ICYMI, here’s my post from yesterday with some holiday party pics and weekend happenings.
For today’s post, I have one of my very favorite holiday gift guides: for the kids! Why is shopping for kids so much fun?! I’ll admit that it’s verrrryyy easy for things to get out of control on the kids’ shopping front – I just love picking out things for them – but to keep myself in check and avoid excessive purchases, we stick to the “something they want, something they need, something to wear, and something to read” checklist. This ensures that they get a mix of things they want and need, without going overboard.
If you’re shopping for a little guy or lady this holiday season, here are some fun ideas that check off all of the major categories:
1 // 2 // 3 // 4 // 5 // 6 // 7 // 8 // 9 // 10
2017 Gift Ideas for Kids:
Something they want:
American girl doll. The girls love these so much. Liv has a few, and P has a Bittie Baby that she ADORES. They’re expensive, but very well-made and I love that they encourage imaginative play. I will admit that I’m sad that they’ve gotten rid of many of the “classic” AG dolls. Kirsten, where are you?!
Mini trampoline
Micro Mini Scooter (or the Maxi if they’re a little older)
Balance bike
Play house (this Palm Springs one is the best ever)
Karaoke set. Maybe a set of ear plugs for yourself! Just kidding but not really.
Crystal growing lab
Magic Science for Wizards Only kit
A ride-on truck or car (P wants this one SO BADLY but I’m still on the fence for safety reasons. Maybe I can put a helmet on her and full-body safety pads.)
Barbie dream house
Hape doll house. This one is made of wood, and is so beautiful!
Corolle baby doll. This was Liv and P’s first baby doll. They are just the right size to be carried around, and very high quality.
Fingerlings. I guess this is the “it” toy of 2017?? Liv is begging for one haha.
Their own little camera
An experience gift! A “coupon” for a special date to an event or activity together. Gift certificates for camps they love or lessons are a great choice, too
Something they need:
A warm coat (this is the one I ordered for Liv, and Miss P is getting this one)
Beanie and gloves
Art supplies
New bedding (Land of Nod has the best)
Pajamas
Something to wear:
Hunter rain boots
Jeans and sweaters (this Star Wars one is amazing)
Bear slippers
Party dress (<— the ballerinas on this one!)
Play clothes. You can never have too many long-sleeved tops and leggings.
Something to read:
Billie B. Brown
Charlotte’s Web
Dragons Love Tacos
Princesses Wear Pants
The Day the Crayons Came Home
Anything Eric Carle
This Book is a Planetarium
Anything Llama, Llama
Little Owl’s Day and Little Owl’s Night. P knows all the words to these ones, and they’re sweet and simple reads.
Amelia Bedelia
Usborne Books (especially the lift-the-flap and the flashlight books. I don’t sell these books, but my friend Courtney does. Check out her Usborne page here!)
Stocking stuffers:
Shopkins
Coloring books
A journal and gel pens
Play-doh or slime
A slinky
Harmonica
Sunglasses
Bath bombs
Nail art
Mad Libs
Stickers
Their favorite candies or snacks
Meling snowman
Bracelets (like this cute ice cream cone bracelet!)
Are you shopping for your kid, niece or nephew this holiday season? What are some of the things are their wish list?
Have a great day and I’ll see ya soon!
xoxo
Gina
Don’t forget to get in today’s Advent Workout here.
More gift guides:
For your fitness-loving friend
For the men
Note: companies are not able to sponsor placement on my holiday gift guides, and all items are hand-picked by yours truly. Some affiliate links are included, but do not affect purchase price. They enable me to earn a small kickback, which I use to help keep the blog running. Thank you so much for your support!
The post 2017 Holiday Gift Guide for the kiddos appeared first on The Fitnessista.
from North Shore Outlet - Health and Fitness http://ift.tt/2ntOxhn
via IFTTT
1 note
·
View note
Text
May Favourites 2017!
+ Hello, everyone! Finally, after weeks and weeks, I finally uploaded my monthly favorites! Honestly, I only bought a few things because I didn’t find anything interesting to buy except for all the items below. Not every item purchased in May, some of the items are from my Japan trip. I think during September I will be sharing you a lot of items, well I think so. As you guys know, I upload this post quite late because eventually it has been accidentally deleted from my drafts, so I had to bring out my camera again, and re-shoot. It’s quite frustrating but here I am, let’s start with the first item, shall we?
1. Alken Professional Milan Hydro Repair Serum 120ml
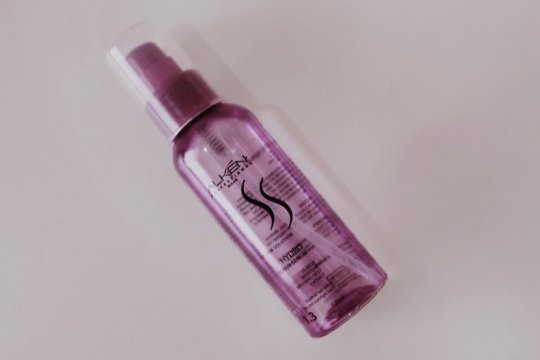
I bought this hair serum a long time ago, I use it quite often. Other than having super dry hair, my hair seems to be having split ends as well. I get rid of the split ends by cutting my hair shorter, but to prevent it from happening again, I use this product, and I’m guessing that it works? What I love about this product is you only need to use a small drop of this serum to apply to your hair. I have been using this since last year and there still much left. Alken Professional Milan is well known and recommended as well, most of their products will fix your damaged hair. Other than the L’OREAL Paris oil, this is the only product that I trusted to fix my hair, you can see that the struggle is real. I can see quite an improvement in my hair. I am not sure whether this product is still available in stores or not, but you check their official website (Malaysia) here to check out other hair products by them.
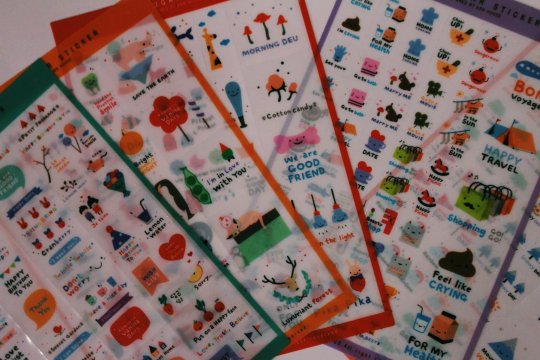
3.Sushi Stickers by Nippon Ippai


These cute stickers are the one that I bought at a local stationary store in Japan. Once you enter the store, your will be shocked with countless numbers of stationaries in the store. Japan do take this kind of things seriously. There were a lot of notebooks, mechanical pencils, Gudetama stationary, I bought my friend’s Rilakumma notebook at the same store. I love collecting stickers, I am planning to do a post, just to show my stickers collections to you! This one is special, I chose this because it’s sushi, with faces on it, it’s really cute. What made this so special is the texture of the sticker, it’s made out of washi paper which is made using fibers from the bark of the gampi tree. I made a promise to myself to never use this sticker, but I don’t think I can do that. I bought this for 240 yen, which is around RM 10. I don’t think you can buy it online, but you can google Nippon Ippai, they are quite famous for their stickers collections.
2. Cube Sugar Weather and Mood Stickers by Ann House

Adding into my sticker collections is this colorful Cube Sugar Stickers designed by Ann House. I was scrolling through this one website to potentially wasting my money again. This is well-designed stickers that describe your daily mood, weather and anything relatable. I haven’t use the stickers yet but I love it so much, I don’t think I am ready to use it T^T The designer, Ann House has designed quite a few crafty stickers but I don’t know exactly why this one is my favorite. I bought with the price RM 27 at Etsy Studio’s website. The link will be here.
3. “Heart shape” tape
Another thing that I bought from the Japan Stationery store is this cute heart shape tape! I have a journal that I am currently working on it, if I have the time, I will show you the journal (wait how many things did I promise to show to you guys? I lost count on it) (haha). Look at how cool this thing works, I wish Malaysia has more of this kind of crafty products so that I could spend my money on it. There were so many designs, but my sister chose the heart shape. I’ve tried to apply it on one of my books and it turns out like this:-

This tape is really useful for those whole love arts and crafts, like doing a journal, creating your own cookbook or maybe your travel journal, anything relatable. This is the one thing that I kind of regret for not buying more than one. Because there were so many designs there, I should’ve grabbed more. I don’t remember the price but I think it’s around RM 10 or maybe cheaper than that. If you happen to know a place that sells various kind of stationaries in Malaysia, please send it to my mailbox so that I could perhaps go there to buy some stationaries, who knows?
4. I don’t understand the title but this is the book that I was talking about on my previous post.

My sister bought this book at Kinokuniya for RM 25.50. This book has caught my attention, please pray so that I could learn Japanese faster to read this book. I can’t seem to find the English translation to this book! I want to be able to understand Japanese to read more Japanese novels, but the language is too hard for me. If I could find the English translation to it, at least I get the idea of the story. This book looks very simple, but I don’t know why I wanted to read it so bad. My mum caught me staring at the book and she even asked “Why are you reading something that you don’t understand?”. Exactly, I look like an idiot trying to understand the book.
5. Fantastic Cities Coloring Book by Steve McDonald

I was completely blown off on how amazing the details are in the book. Steve really paid attention to the details making it look visually stunning. My only wish is that I didn’t ruin the book with my coloring so that this book stays amazing. This coloring book features a lot of famous cities that was based off on his imagination as well as reality. If you flipped the first page, there will be a list of the cities mentioned, for example, some of the places I wanted to visit one day which is Quebec, Canada, Himeji Castle, Istanbul and more. This one is completely different from my Secret Japan Coloring Book as this one focused more on the details of the cities instead of the culture. The book also contains Mandala illustrations of selected places making it quite hard for me to color it. By hard, I meant it's too detailed that it could take a month to complete one whole page. I love how most of his illustrations are based on his own experiences, he has visited dozens of countries, he absorbs every one his experience and puts 100% effort into this coloring book. If you wanted to see more of his work, you can visit his website here. This book is available at Kinokuniya for the price of RM 59.90, the link will be here. The picture below is one of his sketching:-
6. Faber-Castell 48 Classic Colour Pencils + 2pcs 2B Pencil

If you have an amazing coloring book, you have to have an amazing set coloring pencils. Behold, I present my coloring pencils, upgraded. I think this crazy obsession of coloring kind of gets to me to this point. I have nothing much to explain about this, it’s just like any other color pencils, I always choose Faber-Castell. I didn’t remember the price but I’m pretty sure this is easy to find in Malaysia.
So that’s it for my May Favourites post, nothing much special about this. I hope you will look forward to my next post. Thank you for reading this!
2 notes
·
View notes
Photo
a guide to bullet journaling
basics: what is a bullet journal/bujo
a bullet journal, also known as a bujo, is a cross between lists, planners, diaries, journals, sketchbooks etc and can be whatever you want them to be!
they usually consist of a future log which is where you can plan things in ahead before putting them in your monthly spread which is (usually) a double page spread (hence the name) with a calendar format of the dates in the month, or a list of numbers down the side, however you wish to do it. after the monthly spread usually comes weekly/daily spreads where you can go into more detail about your tasks for the day or your thoughts/plans/etc
the original, official website - this gives a very minimalist, functional view of the bullet journal as it was created. you are unlikely to see this minimalist a bujo on tumblr tbh as this strips it to the bare bones
infographicy thing by @journalsanctuary - this is a super cute visual which tells you in a lot more detail about bullet jornalling + links
bullet journaling 101 by @bohoberry on youtube - this is a useful video series and she has a lot of videos if ur interested!
bullet journal series by @studyign on youtube - this is also useful for if u want to get started/binge videos lol
insp
there are many many ways of doing a bullet journal. there's the super minimalism as seen in the original version, but everyone has their own take on it!!! for inspiration, i usually scroll down the bullet journal tag on tumblr tbh as many people upload their own photos (i also set it as recent first to smoler studyblrs can get more exposure bc most of them are so good? bu get ignored bc they don't have 10k followers)
tumblr’s ‘bullet journal’ tag
tumblr’s ‘bujo’ tag
my bujo tag on my blog
many many people do bullet journal flip through videos which i actually love to watch especially when i am feeling super stressed so here's some of my faVs
(u can find them sO easily by just searching bullet journal or something into youtube. a lot of them have just music but i prefer people talking through personally)
by @bohoberry - part i part ii
by @studyign - flip through
by @studywithinspo - 2016 flip through
by Jenn Rogers - flip through
by @studyquill - 2016 flip through
what else can i put in???
u literally can put anything in!!! that's what makes it so great!!!
u can stick in photos and cutouts from magazines and ribbons and tape and stickers and lists and tickets from things and receipts and art and aNYthinG
u can put any pages in at all like things u want to see/do/buy, or just keep with the planner aspect. remember it is YouR OWN ThiNG!!! Do whatever You want to do with it!!!
here are some lists of insp for if you want to put pages in your planner but don't know what!
50 promps by @photostudyblr
ideas by @coffeesforstudiers
2017 weekly challenge by @whycantistudyinpeace
things to put in your bullet journal by @excitingwriting
prompts by @nvtrls
also worth mentioning
your journal is completely your own. there are so many different ways to do it (like an art journal xxx xxx xxx xxx which are super cool) and it's completely yours. you do not need to show it to anyone, or you can make it completely shared if you want. it can be beautiful to look at, but it can be somewhere where you enjoy filling out because you want to, who cares about the appearances.
important reminder!!!! by @excitingwriting
generic tips by @bulletproofjournal
thank u for reading! if any of the links aren't working or u want something of yours that i’ve linked removed pls don't hesitate to mssg me!
#betsys#bullet journal#bujo#bullet journal tips#study#studyspo#tips#q#bulletjournal#pls dont let this flop
70 notes
·
View notes
Text
Photo by Elena Koycheva on Unsplash
This post may contain advertisements and/or links for products and services that I value. I offer recommendations to products and/or services that I find helpful in my own life as a mom. I may receive a commission based on viewer purchases or interactions with these ads. You will NOT be charged any extra money. All prices will stay the same for you whether your purchase items/services through links found on this site or not!
Updated 2/13/2019
Hey Parents,
Did you ever notice that the concept of time is really tough for kids to understand– all the way from birth up until they are like 7 or 8?
It’s a real problem, because we use time to manage everything in our lives!
When to wake up,
when to go to daycare or the babysitter’s,
when to the store,
when to eat,
when to nap,
when we come home from work,
when to celebrate holidays,
when to go to parties,
when to take a bath,
when to go to bed….
And through all this, our poor children don’t even know what we’re talking about when we say, “We will get to have bath time at 7 o’clock. Please wait til then.”
How can we help kids understand what’s coming next in the day?
It’s no fun to be thrown into things without any warning or understanding. What would that feel like to have NO IDEA what is going to happen next until someone else decided for you? And you HAD to do it??
I would throw a fit too!
Subscribe today to receive your FREE Guide!
Case in point-
I was feeling so sad for my poor daughter the other day. She was getting so frustrated because she couldn’t understand why it wasn’t time to eat dinner.
Having a family dinner is very important to us, so I was hoping she would wait until dad got home from work. We do this every day, but those last 15 minutes are always a battle!
There’s got to be a way to fix it. I’m done fighting this every single day!
I did what every mom does- I complained to my friends about our problems. My awesome sister-in-law Monica (an amazing mother of four who I really look up to) gave me the best idea!
She said that she had heard of a tool that you can make at home, DIY, for less than $20 that will help children better understand time and routines.
Ummm…. YES PLEASE!!!
I took her suggestions and added my own twists. I call it our “Routine Clock.”
I’m focusing on two parts of our daily routine- eating times (snacks and meals) and sleeping times (nap and bedtime) by marking those events on the face of an analog clock for my child to see.
Do you have any great ideas on how to improve this “Routine Clock”? Tell us about it! Comment below!
Step 1: Gather materials.
Here’s what you’ll need:
A cheap analog clock
Mainstay Sterling & Noble Wall Clock – Black
Sharpies
Sharpie 30078 Permanent Markers, Fine Point, Classic Colors, 8 Count
Scissors
AmazonBasics Multipurpose Scissors – 3-Pack
A screwdriver
TEKTON 2796 6-in-1 Screwdriver
Stickers, paint, or any other fun decorations your child might like!
RENOOK Stickers for Kids 1500+, 20 Different Sheets, 3D Puffy Stickers, Scrapbooking, Bullet Journals, Stickers for Adult, Including Animals, and More,Christmas Stickers for Kids.
Crayola Washable Kids Paint, Classic Colors, 6 Count, Painting Supplies, Gift
Not required… But there were tiny screws that are easy to lose, so my husband’s magnetic tool tray might have come in handy. I wish I had thought of it beforehand.
Titan Tools 11061 Mini Magnetic Parts Tray
Step 2: Remove the minute hand (or at least mark the hour hand).
The overall goal with this clock is for my child to watch the hour hand approach a marked time for a snack or a meal or nap time in order to visualize when those events are getting closer.
The problem is that the minute hand crosses each of the marked time slots every hour of the day, while the hour hand only crosses them once per day (once per day during the hours that my child is awake anyways…).
So I really need my child to watch the hour hand, not the minute hand. By removing the minute hand or at least marking the hour hand, my child knows which one to keep an eye on.
You’ll have to remove the clock face for this step. It was super easy to do- just take out the screws on the back of the clock.
The minute and second hands were easy to cut with scissors. I did leave a small bit of each hand so that I could set the time on the clock.
If you would rather not cut the minute hand, just mark the hour hand with a sticker or by painting it or using a sharpie to change its color. This will help it stand out so that your child knows to watch the hour hand.
Step 3: Use a sharpie to mark the times of various daily activities on the face of the clock.
Replace the face of the clock. Again- so easy, just screw the face back on.
I tried light-colored sharpies so that my child could still see the numbers under my markings.
As my child practices with the clock, I would like to start teaching her how the numbers correspond with the time, which corresponds with our daily activities. I really didn’t want to cover up the numbers with dark colors.
I found that the light green and yellow sharpies were TOO light. You could hardly see the color. But the darker pink and darker green were perfect!
****Idea- One limitation of this clock is that it still only works to help my child understand the daily routine, not to prepare for curve balls that life throws when the routine is thrown off.
If you want the clock to change based on what your plans are for the day, don’t use sharpies. Try using dry erase markers so that you can add different tasks or activities based on what new things are going on for the day!
Then just erase your clock at the end of the day so that you can put the next day’s tasks on the clock!
For my purposes, I color coded the clock using green and pink. Pink marks are for meals and snacks. Green marks are for naps and bedtime.
My child usually goes to sleep at 7pm and wakes up at 7am, so I marked from 7 to 7:15 in green to mark bedtime/wake up time. Her nap is around 1-3, so those times are marked in green.
Breakfast is between 7:15-8, lunch is between 12-12:45, dinner is between 5-6, and snacks are from 10-10:30am and 3-3:30pm. Those times are all blocked out in pink.
Marking a range of time during which we generally eat or sleep rather than marking one specific time allows some flexibility.
For example, we start lunch any time between 12:00 and 12: 45.
Step 4: Decorate it!
I have not been blessed with a talent for drawing, especially on a curved surface like the face of a clock, so it was surprisingly difficult to make my clock look cute!
In the end, I decided I’d better go simple. I outlined each different task in black sharpie to make the time slots nice and defined, added a boarder around the face of the clock, and called it good.
But let’s be real- kids aren’t judgmental. They love you no matter what, and they’re excited about new things with pretty colors. So I had nothing to worry about.
If my little one were a little older, I would probably invite her to decorate it herself.
Oh, and I also added labels on each routine so that my awesome husband knows what’s coming up next. He always wants to help but doesn’t always know how. Win Win!
Step 5: Set the time.
Just follow the directions on the package!
Step 6: Put your new tool to work!
Well, we completed our clock about a week ago.
My daughter is catching on fast. I make sure to show her the clock each time a snack, meal, nap, or bedtime comes up. She is starting to point to it all on her own when we are getting close to one of those times in our day.
I chose not to hang it on the wall. Rather, I keep it on the counter.
Giving My Daughter a Heads Up
When a meal or nap is coming up, I hand it to my daughter (she loves to hold it) point to the color coming up. I ask her, “Do you know what’s going to happen soon?” or “Do you know what’s coming up next?”
Then we talk about it and I give her a 5-minute opportunity to finish up whatever she’s doing before it’s time to transition.
Helping her Understand When She Needs to Wait
It’s so much easier to tell her that she needs to wait to eat! (She doesn’t mind waiting to take a nap….)
If she’s getting hungry just a few minutes before dad gets home from work, I just show her the clock and say, “It’s not time for dinner yet, but look how close it is! Almost time!”
Then she can hold the clock and check back to watch as dinner time gets closer and closer.
I have noticed frustration levels for both me and my child decreasing every day! It’s so nice to have a simple way to help her look forward to what’s coming up next in her routine.
Did you try out this “Routines Clock”? How did it go?? Comment below!
Do you have any great ideas on how to make these clocks better? Tell us about it! Comment below!
I hope this resource helps some cute kids out there!
And parents, as always, keep up the good work!
(As a total side note, I recently learned about another amazing tool to help children with time! This one is a clock that lights up green when it is “wake up time.” If the child wakes up too early, the light is off so he knows to keep resting or engage in a quiet activity until the light turns green signaling that he can begin his day! AMAZING!)
Click on the image below!
Mirari OK to Wake! Alarm Clock & Night-Light
Sincerely,
Mrs. S
Please share this post with a parent who could use some help teaching their kids about time!
Please comment, like, and subscribe to my weekly email list for updates on the world of parenting!!
Does your child struggle to understand time? Time is an abstract and difficult topic for young children. Here's an amazing DIY resource that will help you and your child! And the best part- it's less than $20 to make! Click here! Photo by Elena Koycheva on Unsplash This post may contain advertisements and/or links for products and services that I value.
0 notes
Text
17 Bullet Journal Hacks To Make You Even More Organised!
Bullet Journal Hacks – tips and tricks to keep your planning on point.
There are countless ways to keep making your bullet journal better and better. The trick is to find what works for you and what doesn’t. How you use your index, how you mark collections, how you reference other pages, the list goes on. And on. And on.
I have tried a load of different bullet journal hacks and tips and tricks since I started my Bujo. Some work so so well and some, are just not for me.
I’ve made a list, of 17 of the ones that I think are worth giving a go. They might not all work for you but they’re all really simple and easy to try out.
All these bullet journal hacks add functionality to your planner system and they look super pretty too!
#1 – A Fold-Out Bullet Journal Key
If I had to choose my all time favourite bullet journal hack, it would be this one. This super handy fold-out key makes keeping track of different symbols so easy! I’ve changed my key a few times since I started my bullet journal so it’s really handy for me to have the updated one easily accessible.
I simply use a piece of scrapbook paper folded in half (I like it to be a bit more sturdy than just a piece of paper because it’s constantly being moved). I then write my key out on a post-it and washi tape it to the scrapbook paper so I can easily change it if I need to. And then tape the scrapbook paper into the cover of the journal on one side so it can be folded in and out as needed.
#2 – Corner Tabs
This is another one of my favourite bullet journal hacks and I’ve only been using it a little while. It’s simply a little triangle tab you pop on the corner of the page as a sort of bookmark. Genius. I always have mine on the page I’m currently working on. But you could make multiple ones and use them throughout your whole journal. They’re easy to re-position throughout your journal, they’re easy to make and they look so cute!
You can either make your own triangle tabs but folding a square of paper in half diagonally and then in half again. That’s how I made mine and I prefer it as it’s a bit thicker and won’t tear easily. The other option is to use the corner of an envelope, that’s even easier to make! Just cut the corner off of an envelope…that’s it!
#3 – Collection Threading
When I first read about threading, I was completely over whelmed and confused by the idea. But as it’s not a bullet journal hack I use that often, I’ve got to grips with it and use it when I really need to.
Threading is used for keeping longer collections. Say you have a ‘movie’s to watch’ spread and you’ve filled a whole page with film titles but you still want to add more. Threading is a way of adding another movies to watch spread in the same journal and being able to keep track of where it is. Let’s say the first spread is on page 20.
You’ve used the next 30 pages or so for dailies, weekly’s and even more collections! Your movies to watch spread is full up but you still want to keep track of even more films.
Don’t do what I did in my first journal and tear a page out the back of your journal and attempt to stick it in neatly next to your original movies spread. Just don’t. It’s messy and no matter how careful you are it never looks good.
Instead, just use the next available spread to start the second part of your movies to watch collection. Sounds crazy right? But all you need to do is list the page numbers of the additional spreads next to the original page number.
So, the bottom of the first spread would read something like: 20-50. Does that make sense? That way when you check up on the first spread, you know exactly where the next one is. You could also write the additional page numbers in your index too so you know where all the sections are.
Pretty nifty right? Luckily you shouldn’t need to use this hack too often. Otherwise it would get very confusing if every page had two numbers!
#4 – Marking The Edges Of Your Pages With Symbols Or Letters
This hack is great for keeping a mini log on your daily spreads. You simply add either little symbols or letters to the margin of the page. This way when you flip through pages you can quickly find which pages contain certain activities.
I like to use a B, for anything blog related. W for workouts and a – for notes. This makes finding out when I did something a whole lot easier. Especially for things that I don’t do every single day.
It’s quick and simple to do and will make finding specific tasks or even appointments easy to look up.
#5 – Color Code Edges With Washi Tape
I use this technique a lot. I use wash tape to mark off the edges of certain spreads so I can easily find them.
I’m using glitter tape at the moment to cover the whole edge of each monthly spread. This makes my monthly spreads so cute and makes finding each month really easy. Even with my journal closed I can still see where each month begins and ends.
I also sometimes use just little squares of washi tape on the edges to mark certain collections or pages I flick back to regularly.
#6 – Colour Code Edges With Stickers Or Labels
I don’t use this trick anymore, simply because I’d run out of stickers! So I made do with washi tape and then realised I actually preferred that method haha. This bullet journal hack is the same method as using washi tape on the edge of pages except you use stickers instead.
I was using the little round stickers you can buy in just about any shop in the stationery section. When I was using this method I was using it just to mark out the collections. But you could use them to mark your monthly pages or weekly pages. You could even use different colour stickers to mark the different sections.
#7 – Color Code Your Pages
This bullet journal hack is super simple to do. Just add a swatch of colour to the border part of your page. Do this for all categories you wish to keep track of and voila! An easy flip through way of finding specific pages without having to check your index every time. Colour right up to the edge of page so you can see the colours even when your bullet journal is closed. Highlighter pens work really well for this but a lot of Bujo’ers use coloured markers.
#8 – Color Coding Your Bullet Journal Index
Same principle as the first bullet journal hack. You can either just colour code the index if that’s where you prefer to look up pages. Or if you’ve used the previous bullet journal hack, then you can match up the colours on your pages to your index. Categorise your spreads in a way you can easily distinguish, e.g. blue for monthly spreads, green for anything food related, pink for business etc. Again, I use highlighter pens to do this as you can see through it very easily.
#9 – Mark Collections With Washi Tape
If you have a special collection that deserves a little more decoration than just the edges marked. You can mark these pages with decorative washi tape over the corners in a triangle shape. I just love how these look and they make these pages easy to find. There are so many cute washi tapes you can buy and I had a hard time choosing which to use for this hack but I decided on the zebra print glitter tape.
Below are some links to some of my other favourite fancy washi tapes:
Gold Foil Washi
Gold Washi Tape
Jumbo Pack of Washi
This would be a great idea for event planning pages or for big home projects. Or anything to be honest, I just love how cute they are!
#10 – Dutch Door Spreads
Love this one! It’s a really quick and fun way to add more space to certain spreads. This works particularly well for weekly spreads when you just need a bit more room than two pages. Instead of 2 pages, a weekly spread would be made up of 3 pages. The middle page is where you’re going to put in your dutch door. Simple cut a panel out of the middle page with a craft knife or scissors and you have a bunch more room to add weekly trackers or a section for notes, whatever you like! Plus, it looks awesome!
Awesome Bullet Journal Hacks To Keep You Even More Organised!
Click To Tweet
#11 – Keep Your Journal Open
Not sure if this really qualifies as a hack. But it is damn helpful!
Sometimes I need my to-do list, right in front of me, all day. If I don’t keep reminding myself of what I need to do, sometimes procrastination creeps in and nothing gets done. Something as simple as leaving my journal open is enough to just nudge me into something from my to-do list.
I’ve seen some bullet journalists on Instagram use display stands to keep their journals in front of them all day which seems like a genius idea too!
#12 – Wrap The Strap To Make A Pen Holder Or Make Your Own Pen Loop!
This hack seems a little obvious once you know about it. But when I first started bullet journalling the idea had never occurred to me! Of course, you could just buy a pen loop..but where’s the fun in that?
All you have to do to turn your elastic strap into a pen holder is; pull the bottom of the elastic strap on your journal (I know Leuchtturm and Moleskine notebooks have elastic closure straps that work well for this hack) and wrap it over the bottom left corner of the journal. Voila, one diagonal pen holder that you can just hook your pen on. Love this hack.
Another idea to keep your pen with your journal is to make your own pen loop. This is what I have been using recently and it was really fun to make and looks so cute on my journal.
All you need is a binder clip and some kind of material. You could use either elastic, fabric or thick tape. I used a type of duct tape to make mine with this really really cute cupcake design on it. Simply cut it to the size of your binder clip plus the width of your pen. Glue each end of the material to each side of the binder clip with strong glue (I added a layer of clear tape on top to make it extra secure) and there you have it.
The perfect little pen loop that you can move around your journal whenever you like and you can make as many as you want! It’s a very easy and cheap DIY and the results are awesome!
Supplies you might need:
Binder Clips
Elastic
Very Pretty Duct Tape
#13 – Categorize Your Bullet Journal’s Index
This bullet journal hack I have never actually tried but I could see this working really really well for some people. Simply split your index up into columns and use each section for a different category.
This would be a really good way of keep your dailies and monthly spreads separate or your just your collections separate from the rest of your journal pages. If you’re using the colour coding bullet journal hack from earlier you could incorporate the same colour coding from that hack into this one.
Related: My favourite bullet journal supplies
#14 – Keep A Bunch Of Post It Notes In Your Journal
Now this one has to be the simplest. But also one of the most helpful bullet journal hacks.
If you’re someone like me and you keep a lot of notes, on a lot of different sticky notes, in a lot of different places, all the time. This hack is for you.
Keep a stack of the darn things in the back of your journal! Duhh… Sounds obvious right? This way you always have some on hand, in different sizes and you can just dot down your notes and things and stick it straight where it needs to go.
Some of my favourite sticky notes:
Owl Sticky Notes
Butterfly Sticky Notes
Floral Sticky Notes
#15 – Migrate Only On A New Page
I find, that a good way to make sure I do something, is the prospect of having to right out the same tasks again…and maybe even again.
I hate rewriting things because it’s a horrible reminder that I didn’t get as much done as I wanted to the day or week before. Now, although I don’t always write out tasks from the day before again, I’ve adopted a method of only rewriting them if I need to start a new page.
This way I can just work on the list from the day before if I didn’t get everything done. But if it’s time to start a new page, I’m forced to rewrite the tasks I haven’t completed. It’s a horrible feeling when I have to do this but it does make me work harder to complete things in a timely manner.
#16– Make A Pocket Or Envelope
This hack is something I have only just started doing in my journal and I am loving it. The back pocket you get in a lot of notebooks is so handy and I always use them. To the point they are bulging and making the journal all misshapen and no longer laying flat!
So, why not create another little pocket somewhere else in the journal? You could add one to the front cover or on any page you like throughout the journal.
You can either stick in an envelope and use that as the pocket or make your own. To make one simply fold three edges of a piece of paper or card stock to create the side of the pocket and then sticking it into your journal with either glue, washi tape or double-sided tape
#17 – Write Down Your Mission Statement Or Favourite Affirmations
I’m not sure this one counts as a hack either to be honest. But I think it is definitely worth putting on a bullet journal hacks list as it is something I’m sure a lot of people will find help and inspiring.
It’s always so hard to decide what to put on the first page of a notebook. So why not make it your favourite affirmation? or your favourite quote? Or your mission statement?
I love using one of these three things to start a new notebook. For the first page in this bullet journal, I have the year 2018 written across the top of the page and then the affirmation ‘New Year, New Journal, New Beginnings’ and I just love that. I think it was the perfect quote to start the year off with and I love reading it every time I pick up my journal, it’s so inspiring and motivating.
I also have my word for the year written on the first page of my journal. The word is ‘Progress’. This serves as a reminder that although I might not be where I want to be now, The little steps I take today are still progress and I am still closer than I was yesterday.
All these hacks add functionality to your planner system and they look super pretty too!
Click To Tweet
Any of these bullet journal hacks take your fancy?
I love using variations of all these hacks. They help to add even more functionality to an already solid system. I recommend giving them all a go and see which ones work for you! Let me know if you try any of them out!
Those were all my bullet journal hacks, what are some of yours? Let me know, I’d love to give them a go!
Related Posts:
Must Have Bullet Journal Supplies For Every Planner Addict!
Bullet Journal 1 Year On – What I’ve Learnt
Plan With Me: June 2018
Get Things Done With A Solid Planning Routine!
Day Zero Project – 101 Things In 1001 Days
The post 17 Bullet Journal Hacks To Make You Even More Organised! appeared first on Dani Doll Designs.
from WordPress https://ift.tt/2l4fVhV
via IFTTT
0 notes
Text
Holiday Gift Guide 2017
Once again, ’tis the season for rampant consumerism! Yes, it’s time to brighten your loved one’s faces by giving them awesome stuff. And with my annual holiday gift guide, you’ll find gifts that fit both your budget AND your buddies’ tastes—that is, assuming they love exactly the same things that I do. Plus, with the space-age techno-power of online shopping, you don’t even have to leave the comfort of your couch to do so!
Just like every year, I’ve compiled a list of things that have brought real joy to our lives. You won’t find anything here that I was paid to endorse despite not having tried—in fact, I personally bought, own, use, and love every single item in this Holiday Gift Guide. After all, if it’s not something worth spending my own money on, I shouldn’t be recommending it, right? (Full disclosure: Although I’m not paid to endorse any of the stuff in this Gift Guide, if you follow my affiliate links to purchase them, I do get a small percentage as a commission without costing you an extra penny.)
Ready to lighten your wallet? This year, I’m going to start by hawking my own awesome products, and then I’ll tell you about other crazy-fun holiday gift ideas!
READY OR NOT! COOKBOOK
Yes, I’m totally biased, but I truly believe that the bestest holiday present you can give yourself and your loved ones is our newest cookbook, Ready or Not! Our book is all about making healthy Paleo home cooking a breeze, no matter if there’s time to prepare or just minutes to spare. Whether you’re a fastidious planner or a last-minute improviser, you’ll find plenty of deliciously nourishing options, from make-ahead feasts and treats to lightning-fast leftover makeovers and make-now meals. Presented in our trademark comic book style, Ready or Not!’s step-by-step recipes, photos, and meal plans make cooking a habit you’ll never want to break.
Henry and I poured our hearts and souls into this book, testing each and every recipe on our family, shooting every one of the 2,000+ photographs in our home kitchen, meticulously drawing every illustration, and designing and laying out every page.
And our loyal readers have responded by swooping up the entire first printing! Since it hit bookstores in August, Ready or Not! has become a New York Times bestseller, and hit #1 on both the Wall Street Journal and Publisher’s Weekly bestseller lists for Hardcover Nonfiction. Our book made it to the Semifinals of Goodreads’ Choice Awards in the Food & Cookbooks category. And Amazon recently named it one of the 15 best books of the year in Cooking & Wine!
Ready or Not! is available wherever books are sold (in the U.S. and all over the world!)—but this holiday season, we’ve partnered with our local independent bookstore, Books Inc., to offer signed and personalized copies of our cookbook! If you’d like for me to inscribe a personal note to you or someone special to you, just click this link to order Ready or Not! from Books Inc. At checkout, make sure you fill out the Order Comments section at the bottom to let me know who you’d like me to make the book out to. I’ll even make sure to throw in some free exclusive Nom Nom Paleo swag, too! Just place your order by December 14th at 11:59 am Pacific to guarantee delivery by Christmas!
Buy a signed and personalized copy from Books Inc. here!
(By the way, if you pals don’t yet have a copy of my first cookbook, Nom Nom Paleo: Food for Humans, grab one for them, too!)
READY OR NOT! WALL CALENDAR
If you like our cookbooks, you’ll definitely dig our 2018 wall calendar.
With healthy recipes presented in a deliciously fun style, this 2018 wall calendar will inspire you to cook all year round. This eye-catching companion to our new Ready or Not! cookbook features cheeky cartoons and a different Paleo recipe each month, ranging from hearty suppers to easy snacks and sides. Best of all, this colorful calendar also includes dozens of stickers (featuring cartoon versions of me and my family—including Ollie’s stuffed cat!) to keep you motivated throughout the year. Hang this on your wall, and Ready or Not! will make cooking a habit you’ll never want to break!
Buy our calendar from Amazon here!
MAGIC MUSHROOM POWDER
Never tried my Magic Mushroom Powder? It’s one of the most potent flavor boosters in my kitchen arsenal—an umami-packed seasoning salt that made The Oregonian’s Test Kitchen “rethink everything [they]’ve been doing in the kitchen.” Magic Mushroom Powder can be used in place of salt in virtually any dish, adding an immediate flavor punch to everything from scrambled eggs and ground meat to roasted veggies and chicken wings. I always keep Magic Mushroom Powder stocked in my kitchen, and you can, too! Make it yourself using this recipe—and give it away as stocking stuffers to your favorite foodies.
Too lazy to D.I.Y.? Magic Mushroom Powder is now available in cute tins at Whole Foods Market stores in the chain’s NorCal Region (which also covers Reno, Nevada) and Northeast Region (including stores in New York, Western Connecticut, and all New Jersey stores except Marlton, Cherry Hill, and Princeton). My Magic Mushroom Powder has been selling out super-quickly, though, so call your local store before visiting to make sure they still have some left at the butcher counter!
(Psst! Magic Mushroom Powder will be available in ALL Whole Foods Market stores in January! Look for the tins on the butcher counter starting in the New Year!)
NOM NOM PALEO BASEBALL CAPS
You may have seen the boys rockin’ cool Nom Nom Paleo baseball caps on our Ready or Not! book tour and wondered, how can I get one? Well, at long last, you can FINALLY order ’em here on our website! This classic snapback baseball cap, which features a structured wool blend and plastic snapback closure, puts an embroidered image of my FACE on your FOREHEAD. There is simply no better way to show off your inner Nomster, people.
You can get it in three different color combos: yellow/black, red/ black, or red/white/black!
NOM NOM PALEO VINYL ACTION FIGURE
I will do whatever it takes to help you eat real, nourishing, nomtastic foods—even if it means miniaturizing myself so I can cheer you on in the kitchen. Featuring 3 points of articulation, Mini-Michelle stands 3.5 inches tall and comes equipped with four accessories (and a sunny smile, too!).
Buy a Mini Michelle here!
Okay, enough about Nom Nom Paleo stuff. Let’s talk about gift ideas that DON’T have my face plastered on ’em!
INSTANT POTS
I’ve been such an ardent fan and vocal cheerleader for Instant Pot that many people assume I’m some sort of paid spokesperson for the brand. But guess what? I’m not. I just love using Instant Pots to make delicious, Paleo-friendly recipes with no fuss or muss—and I want everyone else to discover the magic of this appliance, too.
To be honest, even though Instant Pots are multi-use cookers (meaning they can handle everything from slow cooking to rice making), the electric pressure cooker function is my favorite, and the one I primarily use. But what an electric pressure cooker it is! Seriously: The Instant Pot will change your life and streamline the process of getting tasty hot food in your craw.
I’m always asked to recommend my favorite Instant Pot models, so here they are:
Instant Pot IP-DUO Plus: New for 2017, this 9-in-1 6-quart multi-use cooker gives you a lot of bang for the buck. I used to recommend the IP-DUO 7-in-1 cooker as the best one of the lot, but this updated version is even better. Users provided tons of great feedback about how Instant Pot could enhance the older version, like adding a max-fill line in the insert, changing the button labeled “Manual” to “Pressure Cook,” and cramming a bunch of new features into the gadget. Instant Pot clearly listened, and incorporated all of these improvements into the IP-DUO Plus. Get one from Amazon here!
Instant Pot Ultra: This one’s my favorite—it wins by a nose over the IP-DUO Plus. Why? Because it’s more sleek looking, has a central dial with turn-and-press functionality, a cooking progress indicator, and a steam release reset button (to appease those of you who are skittish about the escaping steam when you manually release pressure). The dial may be a bit confusing for those who prefer buttons, but it allows for greater customization and precision. Get one from Amazon here!
I’ll be sure to let you know whenever these babies are on sale, and I always update my Instant Pot Deals page with the latest bargains. Oh, and don’t forget to check out my ever-growing list of Instant Pot recipes!
HEDLEY & BENNETT APRONS
Eagle-eyed Nomsters know that whenever I’m in the kitchen, I’m in a Hedley & Bennett apron.
I’ve loved these aprons for YEARS—ever since my chef sister bought me one for my birthday in 2013. My collection of Hedley & Bennett aprons has steadily grown over the past four years—I’m now up to eight—and I have no plans to stop. Buy one, and you’ll see why: Each Hedley & Bennett apron is individually handcrafted and built to last, with top grade materials and meticulous fabrication. And best of all, they’re gorgeous.
My fave new design is the (PRODUCT)RED apron. Not only is it in my favorite color, but 25% of the retail price from this product purchase will support (RED)’s efforts to fight AIDS through the Global Fund.
You can buy one from Amazon here!
CHEF’S CHOICE 15 TRIZOR XV EDGESELECT ELECTRIC KNIFE SHARPENER
When my knives are sharp, cooking is faster and safer. I treated myself to this fancy home knife sharpener after I got tired of dropping my knives off at different knife sharpeners every few months to keep them in tip-top shape. It’s the number one rated knife sharpener per the folks at Cook’s Illustrated and I couldn’t be happier with my purchase. All my knives (and my friends’) are quickly sharpened in just a few minutes and we’re back to slicing and dicing in no time at all!
Get one from Amazon here!
THE INSPIRALIZER
You know all those zany vegetable noodles you’ve seen on Pinterest? You can easily make them at home with a spiralizer. There are tons of options on the market, and I’ve owned four different brands myself. Last year, I recommended two different models, but now one has come out on top: The Inspiralizer.
The Inspiralizer is an awesome tool created by Ali Maffucci, the spiralizing queen behind Inspiralized. If she’s gonna invent a spiralizer, you know it’s gotta be one of the best. I love that the blades are attached to the gadget, and you just twist the dial to change it. Plus, you can spiralize thinner vegetables because the central coring blade that keeps them in place has a narrower diameter than other spiralizers. The one thing that kept me from recommending it wholeheartedly was that it wasn’t dishwasher safe, but I discovered that I can plop it on the top rack! Haven’t you been dying to make my Crispy Swoodles with Bacon?
Grab one from Amazon here!
LECTROFAN WHITE NOISE MAKER
With all the travel I did this year for our Ready or Not! Book tour, one of the things I prioritized above all else was good sleep. Sleeping on the road can be tough, especially with all the time zone changes and resulting jetlag. Two things that I always travel with to ensure good sleep are my trusty eye mask and a portable white noise maker. I realized I needed a white noise maker when I stayed in big cities like NYC or Chicago and the constant traffic and honking would keep me up at night. After doing lots of research, I opted to buy the Lectrofan and it helped me get my zzz’s on the road. (Yes, it’s very compact and takes up very little space in my carry-on.) I liked it so much that I now keep it on my nightstand at home!
Grab one from Amazon here!
THERMAPEN + THERMOPOP
What’s so great about the Thermapen Mk4 instant-read thermometer? Well, it’s lightning-fast, incredibly accurate, has an intelligent backlight and auto-rotating display, a motion-sensing sleep-and-wake mode, and it’s super-cool looking. Plus, if you use it when cooking, you’ll never mess up a pricey piece of grass-fed meat or pastured poultry ever again. Get one from ThermoWorks here!
The one caveat? It costs close to $100. Luckily, the Thermapen’s mom and dad has squeezed out a more affordable younger sibling, the ThermoPop. This lollipop-lookalike is rated #1 by Cook’s Illustrated and Serious Eats, so you don’t need to worry your pretty little head about whether it works as well as its older sibling. Yeah, it’s not quite as fast as the Thermapen (2-3 seconds for Thermapen, and 3-4 seconds for ThermoPop), but it’s only $29. And as I’ve said before, if you’re gonna cook meat or fish properly, you gotta invest in a great thermometer, so get one from ThermoWorks here!
BACK JACK MEDITATION CHAIRS
I first encountered Back Jack chairs at the Paleo seminar I did at 1440 Multiversity, where some audience members—fresh from a morning yoga class, I assume—plopped down on the floor into these sturdy, portable meditation chairs. They’re great for everything from zen practice to playing video games with your kids. Made in the U.S.A., Back Jacks come in an array of bright colors—I bought red ones, because I’m me—and are heavily padded for comfort.
Grab one from Amazon here!
LUNCHBOTS CLICKS SALAD CONTAINERS
I love these all-stainless steel interior salad containers by my pals at LunchBots! They’re totally leak-proof, durable, and dishwasher safe. However, I don’t just store salad in them—I store all my leftovers in them ‘cause I’m the Leftover Makeover Queen. One thing to note: when placing hot food in the container, allow the food to cool to room temperature before sealing the lid. Failing to do so may cause a strong vacuum to form, making the container difficult to open. If a vacuum does form, insert a butter knife between the lip of the container and the lid to allow air to escape. Easy peasy!
Get one from Amazon here!
(Psst! If you’re looking for a great insulate container with all-stainless steel interior, get a LunchBots Thermal!)
MARSHALL ACTON BLUETOOTH SPEAKER
Our family loves to listen to music together in the kitchen and when the kids are at school, I blast my favorite podcasts while I’m tinkering with recipes. The bluetooth speaker that we play all of our audio on is the Marshall Acton Bluetooth Speaker. It works great, and looks like a mini-version of the various amps that Owen has scattered around the living room for his electric bass and guitar!
Get one from Amazon here!
VIBRAM FUROSHIKI WRAP SHOES AND BOOTS
I’m not a fashion plate and you’ll never see me posting my #ootd on IG, but I do have a favorite minimalist shoe—my Vibram Furoshiki Wrap Shoes. These shoes are super comfy and they don’t have the weirdo five fingers. You just wrap them around your feet, and they look like pretty presents. Just make sure you don’t buy a knock-off by mistake! Get a pair from Amazon here!
(In the winter, I wear the cozy boot version. Buy a pair from Amazon here!)
SALT, FAT, ACID, HEAT
This is my favorite new cookbook of the year (that wasn’t written by me!).
Chef, teacher, and author Samin Nosrat has produced a groundbreaking cooking book—one packed with an amazing wealth of knowledge. Accompanied by charming illustrations by Wendy MacNaughton, Samin cheerfully teaches readers to use the four main elements of cooking—salt, fat, acid, and heat—to master cooking. This book is aimed at inspiring cooks to make confident decisions in the kitchen without relying on recipes. With Salt, Fat, Acid, Heat, you can whip up delicious meals at any time with any ingredients on hand.
This is a classic. Get it from Amazon here!
NAPTIME WITH JOEY
This book brings me SO. MUCH. JOY. Do you follow @lauraiz on Instagram? When her adorable daughter, Joey, takes a nap, Laura dresses her up as mini pop culture icons—from Salt Bae to Barb from Stranger Things—and snaps a pic. It’s off-the-charts cute. Just flipping through these photos on my phone instantly puts me in a sunny mood. Laura’s first book, Naptime with Joey, is a compilation of these adorable photos—complete with the punniest captions.
Get it from Amazon here!
CRAZY RICH ASIANS TRILOGY
All my good friends know that I’m not much of a fiction reader. Cookbooks and gossip magazines are my jam, okay? Despite my aversion to fiction, this year I bought and quickly devoured all three books in Kevin Kwan’s Crazy Rich Asians trilogy. These three books chronicle the intertwined lives of three super-insanely wealthy Chinese families, and they’re packed with humor, gossip, and soap opera shenanigans. I haven’t stayed up late reading a trilogy since I read The Tales of the City series in college, but these three books had me burning the midnight oil. In fact, I’m still moping about the fact that the trilogy has ended—but at least I have the Crazy Rich Asians motion picture to look forward to next summer! (Spoiler alert: One minor character in the books eats a Paleo diet. I gasped out loud when I read that part.)
Get the first book, Crazy Rich Asians here!
Get the sequel, China Rich Girlfriend here!
Get the final book in the series, Rich People Problems here!
Those are my picks for this year! Now that you’ve gotten your holiday shopping done, get off the couch and do something fun! (Or at least more fun than stampeding through your local big box store at midnight on Black Friday.)
The post Holiday Gift Guide 2017 appeared first on Nom Nom Paleo®.
0 notes
Text
I Found My Voice As A Writer In Justin Timberlake Fan Fiction
Simone Noronha for BuzzFeed News
At 13 years old, there was one thing I knew for sure: If ever I were to meet Justin Timberlake, it would have to be under the pretense that I wasn’t a fan.
Trust, I’d given it a lot of thought. Imagining all of the possible ways I could end up in the same room as JT was at the top of my list of favorite pastimes, right next to listening to NSYNC. I knew the most likely way to meet him would be in the capacity of a fan, maybe at a meet-and-greet or by winning backstage passes, but I also understood that if I wanted Justin to take me seriously — and that was key, if we were going to fall in love — I couldn’t come across as some embarrassing, giddy, fawning fan. Which, of course, I was.
So I spent hours imagining our possible love stories — as I was falling asleep, when I was daydreaming in class, wherever. These were PG-rated rom-coms, starring future me and (somehow) 1998-era Justin Timberlake. The scenarios were convoluted; they had dialogue; I knew what I’d be wearing and exactly how I’d win him over. I didn’t know it at the time, but I was creating fanfic — more than a decade before I knew there was such a thing.
I fell hard for NSYNC, and Justin, in 1998, right around when the “Tearin’ Up My Heart” video came out. Before that, I’d been dismissive of boy bands. I was raised primarily on rap and R&B, my parents hailing from what my dad called, to my great embarrassment, the “Boogie-Down Bronx.” So I knew what good music was, and this pretty-boy stuff was not it. But then TRL became a thing, and these boys were unavoidable. And then I saw the video. More specifically, I saw Justin’s arm in a tank top, bent over his glossy blond curls and pouting lips — just so.
I am not hyperbolizing when I say something deep within me shifted in that moment. I’d had celebrity crushes before, but I was mostly too embarrassed to even admit them to myself. (In a fill-in-the-blank journal from when I was 8, I’d crossed out an “I have a crush on ____” prompt and substituted in tiny letters above it, “I sort of think the Fresh Prince is cute.”) Those were the fleeting interests of an amateur; this crush — this passion — settled into my core. As a chubby, bespectacled middle schooler who had heavy bangs long past the time everyone else had grown them out, I was scared of people in general and terrified especially of boys. But man, those biceps sure seemed like they’d be fun to touch.
Part of loving a famous icon is the acute agony of knowing he is unreachable.
Within months, I was all in. I owned approximately 40 pieces of NSYNC merchandise: multiple posters, pins, one giant pencil, a journal, a folder, pens, stickers, patches, every magazine with the band on the cover, lip balm, their official book, textbook covers, dolls, shirts, and, of course, CDs. I recorded (on actual VHS tapes!) every music video and MTV appearance, as well as their HBO special, and I watched a random segment from those tapes with a bowl of cereal every morning before school. I went to two concerts and cried both times. I read every bit of trivia. I memorized Justin’s birthday (Jan. 31) and favorite movie (The Usual Suspects). And when MTV linked up with Star Wars for a trivia sweepstakes, the prize for which involved a one-on-five date with the boys, I saw The Phantom Menace in theaters four times to try to answer their list of questions. I didn’t win.
People who’ve never experienced this specific brand of boy-idol love might be baffled by the fact that it often brings millions of girls to tears. What they don’t understand is that part of loving a famous icon is the acute agony of knowing he is unreachable. I loved Justin Timberlake so much, just like millions of other girls in the world, and not only would I never be with him, but I’d never be able to appreciate a real relationship, because I’d know the person I ended up with would not be the man I loved the most. [Quick note to say hi to my boyfriend, whom — I want to be clear — I love much more than I love Justin Timberlake.] I felt this massive injustice as a true, powerful, physical pain. The only way I was able to mitigate it was to distract myself with stories that placed me and JT in a universe where we could be together.
By the time I was fully under siege by NSYNC obsession, I’d begun writing, and abandoned, three novels. I loved reading, I wrote in my journal every day, and I knew I wanted to be a writer when I grew up — either that or a singer (still on the fence, to be honest). But when I tried to write fiction, I hated what came out. I’d suddenly lose any imagination I had. The dialogue didn’t make sense. Nothing sounded as real or natural as the stuff I was reading. I didn’t know how people got ideas, and, if they were lucky enough to come up with one, how they didn’t get bored with it.
But love stories about me and JT? Those came easy.
One of my favorites: I’m 18, finally, and super hot (finally). NSYNC is still touring because they will never ever break up, and they’re holding a contest (a singing contest), and the winner gets to sing a song with them onstage. I’m not planning on trying out, but I go with a friend who is. When we get to the audition room, after my friend sings well but not too well, Justin (who is, obviously, judging) asks what I’ll be singing. And I say, Oh me? No, no, I’m just here for support, I couldn’t possibly.
And then my friend says, She actually has a great voice.
And Justin smiles wryly, and I’m like, Well, if you insist, though I’m hardly prepared!
Justin, the rest of the boys, and my friend needle me until finally I close my eyes and just go for it, belting (usually, though, this detail changed from time to time) some vintage Mariah Carey. I nail it, a cappella, and everyone — especially Justin — is blown away. And then I win, and then we fall in love.
In these imagined futures, Justin played an important role, but the real star was future me.
Or: I bring my younger cousin to a concert, and we wait outside afterward because she wants to meet the guys. When they come by to say hello (because of course they do) I kind of smirk and shrug and say, I’m sorry to bother you guys — she’s just such a fan. And Justin, who is floored by the fact that this cool (and hot, so frickin’ hot) chick isn’t remotely impressed by him, says, And you’re not? And I say something so chill, like, Pop music isn’t really my speed. And then he asks if I want to hang out. And then we fall in love.
The fantasies were many and varied and provided a vital, immersive respite from the life I was actually living — one consisting mainly of wondering what made the popular kids popular, how people mustered the courage to speak up in large groups, and why I’d gotten stuck with a body all plump and wrong, so unlike all the others I saw on TV. In these imagined futures, Justin played an important role, but the real star was future me. And she was everything I needed to believe I’d become — attractive, witty, and, above all, bold. If I could trust that self was waiting for me, those in-between years seemed a little more manageable.
There is a name for what I was doing, though I didn’t know it at the time. I was creating fanfiction — those amateur, fan-written, oft mocked stories featuring characters created by other writers (or real pop stars) as well as first- or second-person narration, which have found vibrant communities on websites like Tumblr and Wattpad. But I kept mine to myself. The stories I actually wrote down, and eventually showed to other people, never starred dreamy pop idols. It didn’t seem like something a "Real Writer" would do, as if “good” writing and joy were mutually exclusive. But I now find kinship among those who contribute to these platforms. To say fanfiction stories are nothing but personalized soft porn for horny girls (which, to be very clear, is an important part of what they are, and which I’m 100% for) is to greatly underestimate their power.
That fanfiction has real commercial power is now well-acknowledged; Fifty Shades of Grey, originally written as Twilight fanfic, is probably the most mainstream, but Anna Todd also turned her One Direction fanfic After into a six-figure book deal and a wildly successful trilogy. Then there are the “retellings,” i.e. fanfic approved by the literati: Gregory Maguire’s Wicked, the series and musical about Frank L. Baum’s Oz witches, or Jean Rhys’s Wide Sargasso Sea, an imagined prequel to Jane Eyre. Which is to say, writers pull inspiration from all manner of sources; sometimes the result is a love story that asserts the validity of a young woman’s (often dismissed) desire. Sometimes it is a channel through which a burgeoning writer can deliver and refine her talent.
My stories, like those of many fanfic writers, were as much about building a narrative as they were about enacting a fantasy.
My stories, like those of many fanfic writers, were as much about building a narrative as they were about enacting a fantasy. I can remember how problems of character motivation seemed so much less abstract when they were considered through the lens of an imagined, but possible, future — Justin Timberlake was a real (if mythic) person, and structuring the narrative became a sort of problem-solving. What could a person like me do to meet a person like him? I struggled to figure out what an 8-year-old would do if she found a secret portal to a fantasy world (my second abandoned novel), but I loved putting myself in conversation with my ultimate crush and asking, What next? What next?
There is a simple, dizzying joy in writing (or reading!) a story in which you and your dream crush are the stars, but also intrinsic to that setup is the understanding that you — the writer, the reader — deserve the star treatment you’re receiving. If this is something you don’t believe (and certainly, when I was imagining my own love stories, I didn’t believe it), it can be comfort enough to pretend you do, to indulge the notion that you might be good enough to be the protagonist of your own story for long enough that it no longer feels that far-fetched.
I didn’t meet Justin Timberlake (and haven't yet). But I did grow into my confidence and my voice — a voice which I know was honed by the stories I told myself. Without those stories, there would be no writing career, no novel, no unrepentant gushing over the things (and people) who drive my creativity. There’s probably a lot more of 13-year-old Arianna in me now than 13-year-old Arianna would have wanted. But, at 30, I can see she was always cooler than she believed, anyway. I like to think, had Justin met me then, he would have at least been kind of charmed. ●
Arianna Rebolini is author of the novel Public Relations with Katie Heaney. She was formerly a deputy editorial director at BuzzFeed. You can follow her @AriannaRebolini or check out her writing here.
Learn more about Public Relations here.
0 notes
Last Seen Blogs
clu-ven
Clu !
taste-in-music
what should be played on the radio

crispycroissantangeloaf
Без названия

svhyni
SVHYN

jusacat
Jusacat's art and other stuff