#import export workshop
Explore tagged Tumblr posts
Visit Tumblr Blog
Explore Tumblr blogs with no restrictions, modern design and the best experience.
Last Seen Tumblr Blogs


Fun Fact
In 2020, 27% of US Tumblr users had an annual household income of over $100,000.
Text
Exploring Opportunities and Procedures in Foreign Trade: Entrepreneurship Workshop by KIED
Exploring Opportunities and Procedures in Foreign Trade: Entrepreneurship Workshop by KIED The Kerala Institute for Entrepreneurship Development (KIED) is organizing a comprehensive three-day Entrepreneurship Workshop for those interested in leveraging the potential of the foreign trade sector. The workshop aims to equip participants with the essential knowledge and tools to excel in import and…
#international trade#Kerala entrepreneurship#entrepreneurship workshop#foreign trade#export-import opportunities#KIED workshop#export finance#customs procedures#logistics management#risk management#export documentation#trade finance#international shipping#foreign trade training#business growth
0 notes
Text
#Letter of Credit Consultancy#FEMA & FEDAI Workshop#Trade Finance Solutions#Trade finance solutions#Capital account transactions#FEMA compliance#Export-import financing#Documentary collections#Trade finance instruments#FEMA regulatory updates#Trade finance trends
0 notes
Text
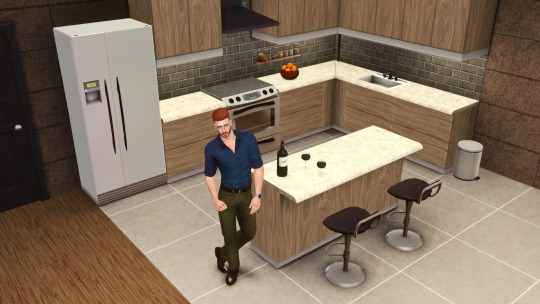
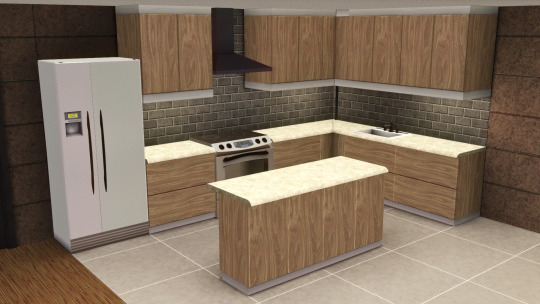
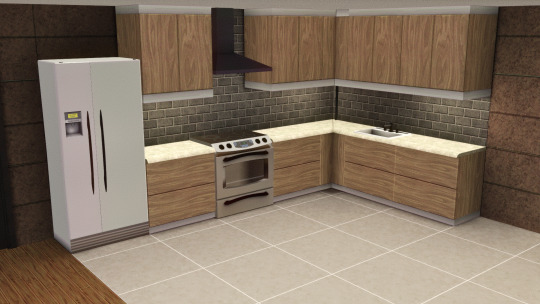
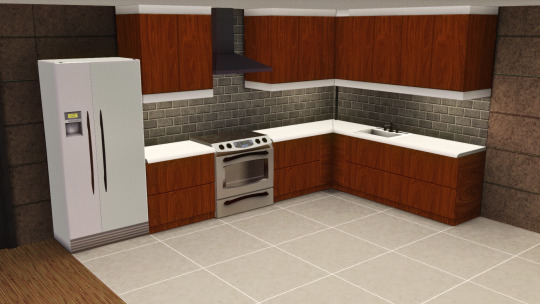
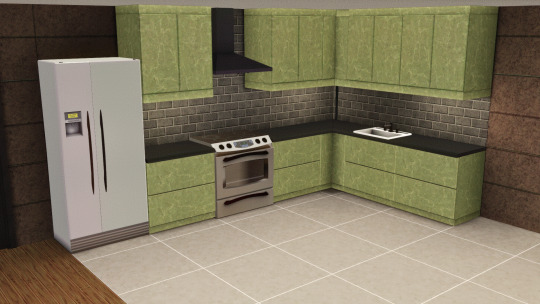
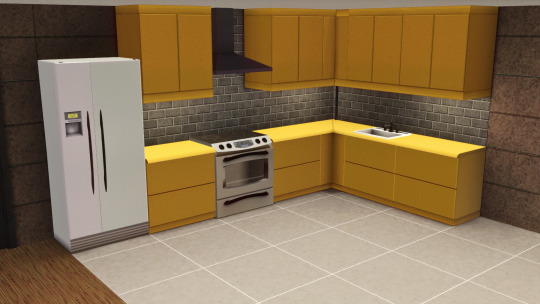
Modern Kitchen Counters Default Replacement
I didn't like the huge curved handles on the "Real Flat" base game kitchen counters and cabinets.
I couldn't handle them... hehehe... 😂🤣😝🤪😂😆😁😂😂😂😋
So I've deleted them. 😐
They are gone now.
These files are default replacements.
What is replaced: the Real Flat counter, counter island, overhead cabinet, and double-sided cabinet. Including all the modular pieces. Including ALL LOD meshes.
Some issues to be aware of:
it's a bit glitchy, but most mesh/texture problems can be solved by painting them again or deleting & placing again
the texture quality is not the best, there are some artifacts when using plain colours
there is a texture seam on the upper part of the corner cabinet, it's a UV mapping problem by EA not me
The texture quality is not great so I strongly suggest putting patterns on them.
This was quite an ambitious project to figure out, so I really hope you enjoy the new look of this base game kitchen as much as I do!
BAD CC CAUSES ISSUES WHEN SAVING LOTS, DO NOT DOWNLOAD
Download: simfileshare / mega
Some notes I want to share for creators below in case helpful or interesting:
I had to default replace the multiplier and specular textures for every mesh I edited (to remove the handle prints).
I used s3oc to clone the objects without renumbering them, this became my default replacement package.
I used TSR Workshop to export/import the .wso meshes, and to compile my edited meshes into a non-DR package file. I used s3pe to export the MLOD and MODL resources from the non-DR package into the default replacement package via the "replace" function.
I edited the meshes in Milkshape (only deleting the handles) so I didn't have to change the slots or bones or other complicated stuff like that...
I hope this info is helpful in some way. There aren't a lot of default replacement objects/furniture out there. I don't really know what I'm doing but I learned some things from this project.
215 notes
·
View notes
Note
I just spent so long trying to understand that post about glass. As somebody who thinks glass is extremely cool but doesn't know a whole lot about how it's made, we're you saying that clear glass is entirely colorless by definition? Also do you have a good resource to learn out clear glass being invented in the 15th century? If not I'll Google it. I'm a history nerd so this is right up my ally. Thanks for reading all that I hope to hear back from you if it's not too much trouble.
So, for clarity’s sake (heh), I’ll start off by pointing out that photons of Visible Light do not go through glass in the same way that Radio or Microwave photons do. The scale of Visible Light is small enough to meaningfully interact with the crystalline lattice of most stones, glass included. In order to be optically clear, a piece of glass must transmit the signal coherently through its bulk mass, and emit an image out the other side. Clear glass, in response to Visible Light, behaves more akin to how an electrical conductor (like wire) interacts with electricity than an absence or void would. This is, incidentally, why we can make optical devices like lenses and glasses and telescopes out of clear glass.
Glassmaking in the Mediterranean owes much to a few key events. Firstly, there was a tradition of artistic glass working in Byzantium many centuries ago, a descendant of Glassmaking traditions from Rome and the Levant, which peaked in the 10th century.
Many families knowledgeable in such things would eventually flee the fall of that empire west, into Venetian territory. Unfortunately for the wood-framed-building-inhabiting people of Venice, the glassworks would often spark municipal fires, so in the 13th century the Doge of Venice banished them to a mist-shrouded island prison set them all up on the island of Murano, under guard, creating an Artist’s Colony of Glassmaking families.
This arrangement worked out well for all involved for several centuries. Although the Glassmakers were not permitted to leave, they had access to all the raw materials of a far-flung trade network, state protection, wealth, and prestige; and Venice had an in-house luxury export that constantly evolved as the various families of craftsmen flexed on each other, trying to one-up each other with innovations in color, hardness, and form.
The far-flung trade network was important, as it allowed for very pure samples of a wide variety of chemically active minerals to be made available to these workshops. Critically, these ingredients included pebbles of very pure quartz, and Alume Catino, a form of soda ash from the Levant.
Ultimately this culminated in the 15th century invention of Venetian Cristallo: a perfectly clear synthetic Rock Crystal Glass. This cemented Murano as center of the Glass-making world in the west for 2 centuries, until the English discovered that adding Lead Oxide to the process also produced a clear glass that was cheaper to make and easier to work.
The ability of these, and later, clear glasses to be ground into optical lenses, and the resultant invention of telescope and microscopes, would kick-start scientific elements of the Renaissance, and the relatively inexpensive and high-quality mirrors and spectacles produced would kick-start the symmetrical Renaissance in Philosophy and Moral Theory.
To circle back to your question:
Glass is a transmitter of light. A photon hits a spot in the crystalline lattice and sets off a chain reaction of vibrations in the atomic lattice of the glass, which, upon reaching the far side of the glass bulk, release an equivalent photon. In optically clear glasses, this is done in such an orderly and coherent manner that actual resolvable images emerge. That said, I reiterate for clarity: photons are destroyed and created by this process. What emerges is not what went in.
The inclusion of metal oxides such as Soda Ash and Lead oxide is necessary to furnish particular metallic ingredients into the crystalline lattice of the glass. This provides forms of long-range order conducive to signal transmission. Remember, glassy materials are defined by a variable degree of long-range order in their lattice structure. No order; you get scattering; and the light that emerges is a hazy white color. Choose particular metals to also dope your molten glass with, and the glass will emit particular frequencies: this is what we call colored glass, or stained glass. The reasons those dopants resonate at those frequencies of light are Electro-Chemical and Quantum, and beyond the scope of this post.
Glass is one of the Foundation Stones of modern, technologically advanced Civilization. Modern glass is nothing less than a Miracle of Artifice, crafted by skilled hands across dozens of generations. Our Ancestors worked very hard to give us this. It is good for us to tell their stories.
Hope that gave you a good place to start! Enjoy your journey! There is much still to learn!
#glass#the first Looking Glass#Venetian glassmakers#history#ask#troglodyte thoughts#free range sustainable shitpost
115 notes
·
View notes
Text
CC Creation Tutorial: Smooth Seams in Blender

In this tutorial, I will show you how to make your mesh seams smooth inside Blender (no Milkshape required!) and walk you through the process step by step. We will make a perfectly smooth mesh and transfer the normal data from that mesh to our main mesh using the Data Transfer modifier.
I am using Blender 3.6 in this tutorial (though you should be able to follow along using other versions as well)
You do not need to have much previous knowledge to follow this tutorial, but I assume you know some basics in Blender like how to select, things, navigate around, etc, and know how to import the meshes and put them into Blender.
For this tutorial, I exported the Sims 3 afbodyEP4DressPromBigBow mesh with TSR Workshop. You can use any clothing mesh you like though, and works on any meshes, not just Sims 3 ones.

This is our mesh. You can already tell that it has the dreaded seams on the neck and the rest of the body.

First, we need to make a copy of the mesh (in Object mode, select the mesh and hit Ctrl+D Shift+D to duplicate it, then hit Esc to stop it from moving around).
Rename the mesh (I added Seamless to the mesh name).
Make sure the original mesh is hidden (click the eye symbol) and select the Seamless mesh.
Press the Tab key to go into Edit Mode.

Now we select the parts that we want to have smooth seams. Let's select everything that is skin (you can select a litte piece of the mesh and then press Ctrl+L to select the entire piece)!

Now, press M and in the menu, choose By Distance. (in older versions, this is called Remove Doubles).
This will remove all double vertices at the seams on the selection we made.

It will show you how many vertices it removed. The skin looks nice and smooth!
Let's switch back to our original mesh: Make sure you deactivate the eye on the Seamless mesh and activate the eye again on the main mesh. Then, select the main mesh.

Now, let's add a data modifier to our main mesh. Click the blue wrench icon in the vertical list of the properties panel and then onto Add Modifier, then choose Data Transfer from the list.

As the source, we choose our Seamless mesh.

Also toggle on Face Corner Data and click the Custom Normals button.
Hold on, there is a message saying that we should enable Auto Smooth in Object Data Properties. Let's do that next! (if the message does not appear for you, maybe Auto Smooth is already on).

Click the green inverted triangle button and in the Normals section, toggle on Auto Smooth.

Now we can switch back to the modifier tab by clicking the blue wrench icon again.
But hang on, what happened to our mesh? There are now black spots over the dress and shadows on the legs!

This is due to the Data transfer modifier's Mapping setting. If we change it to Topology, our mesh goes back to normal again. Phew!

Now that the normals look good, we can start the transfer of our new smooth normals from the seamless mesh to our main mesh. To do that, we hit the Generate Data Layers button. This button works destructively, so you cannot undo what it did, just FYI.

Note: On newer versions of Blender, Generate Data Layers may not be enough to transfer the normals and you may need to apply the modifier instead.
You can toggle the modifier's visuals on and off with the little screen icon to see the results after you click Generate Data Layers to see if it stuck. If it did not (and you see the seams of your base mesh when toggling it off), try to apply it instead.

I switched from textured to solid shading because the differences are just more noticeable in this mode. This is how our mesh looks now with the modifier turned off.
Because we clicked the transfer button, the normals have been permanently applied to our mesh. The skin is smooth now, and so is the dress (even though we did not smooth that one, hmm...)

If we toggle the modifier back on, suddenly the dress has seams again! What's going on there? I'm not exactly sure why, but Auto Smooth seems to be doing some smoothing on the dress mesh as well.
I am not sure if this is normal behavior or not, but let's pretend that this did not happen and the modifier in fact did not smooth the dress.
Maybe we just forgot to smooth some areas on the Seamless mesh that we noticed only later on. That's no problem. We simply modify our Seamless mesh again!

So let's swap back to the seamless mesh and select it (remember to click the eye icons so only the Seamless mesh is visible).

Let's select the main dress parts and press M -> merge by distance on them. We cannot smooth the whole dress all at once, because then that would remove some seams that we want (like those for the backfaces and the middle section of the dress where the bow is attached).
If we remove the wrong seams, we ruin our normals and will have black splotches.

Now, let's select the backfaces and areas we left out before and repeat this process: M -> merge by distance.

Look at how perfect our Seamless mesh is looking now! Now, let's transfer those beautiful normals to our main mesh.
Select the main mesh and toggle the eye icons again, to hide our Seamless mesh and reveal our main mesh.

Once again, we will use the Generate Data Layers button in our Data Transfer modifier. If you have previously applied the modifier, just add the modifier again to the main mesh and use the settings shown here.
And that's it, you are done! You have a perfectly smoothed mesh that you can export now.

Final Note: it is best to transfer the normals at the very end of your meshing process because any action that recalculates the normals can reset our custom-made smooth normals again.
Of course, you can simply use the Generate Data Layers button again to re-add them, but it saves you time to only do this step at the end.
I almost forgot to say: You still have to use Mesh Toolkit to fix the seams on the edges of your mesh and do the usual shenanigans.
188 notes
·
View notes
Text
Sissysims' sins against the scenegraph
This is a small follow-up to my initial post covering the code theft commited by @sissysims. In that post, I presented my proof in the form of a YT video. While that video started off private, I decided to make it public for various reasons, which I will not outline in this post.
I first want to express my gratitude to all those who left comments, reblogged and liked my post. Your support means the world to us. I'm so happy that you as a community are so supportive in this. Thank you, from the bottom of my heart. Thank you to all of you. ♥️
Now, this post is going to focus on just one thing: her incompetence at object creation, because honestly, it's bad. It's really bad. It would feel immoral not to discuss it.
This is just a glimpse and for all you object creators out there: I'm warning you, it's graphic.
How to create an object for dummies.
So, this is the simplest explanation I can give on making a new object. This is the basic process you follow for basically most things you will make: open up SimPE, open up the Object workshop and press open. Select your file and choose "clone". Leave the settings alone, defaults are fine. Give your new object a nice name and description. Be sure to give it a unique object name. Now do all your visual modifications by modifying the existing scenegraph resources (GMDC, TXTR, etc) and give your object a new GUID (making sure to update MMAT's). Now fix integrity, save your file and done. You can test and preferably you'd also compressorize.
So what did sissysims do wrong?
Simply said: everything. I have reasons to believe she has never followed a basic object creation tutorial. The mistakes she makes are mistakes that can be avoided by actually learning how to clone an object. Here is a small summary:
Not cloning anything, instead copying the file she wants to modify and opening that in SimPE
Not changing the object name. I have never seen her touch the fix integrity button
Using other people's meshes and textures. How? By way of opening up their files, noting down the 3D Object Name, extracting the scenegraph resources (GMDC, GMND, CRES, SHPE, TXTR, TXMT, MMAT) and putting them inside the package she's modifying (and modifying the 3D Object Name in the original package). I have not seen her open up a GMDC file or import or export a mesh or texture. She does not modify any of these scenegraph files afterwards.
Not updating the MMAT's with new GUID
Not cleaning out unused resources (see: the scenegraph fuckery above)
Never fixing integrity.
Sadly, this is not just the case with my vendor. It is all her projects. This is how she creates objects: she has never learned the proper way to create objects and thus she steals other people's hard work instead.
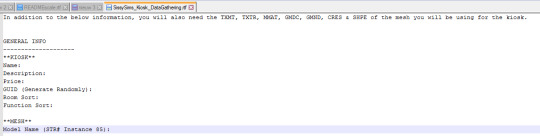
Pictured: the instructions provided for messing up my vendor. Note how she specifically instructs to extract resources from your mesh source. Not export. No: extract.
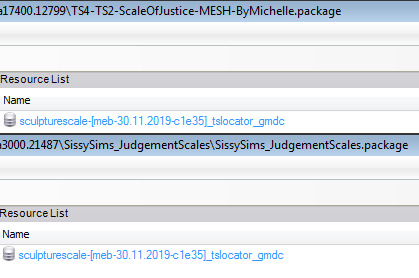
Pictured: the results of said messed up procedure on another creation of hers. Note how the gmdc of her object is literally identical to the gmcd of Michelle's original mesh (only credited in a readme, not in the post itself)
Why is this an issue?
This is not just an issue of someone being bad at creating objects. This is someone teaching others this messed up method that comes down to stealing other people's work. I believe that this is actively damaging to our community and newcomers' skill development. Her video teaches people bad modding habits. Her video ENCOURAGES people to use this method to make fundamentally flawed, fundamentally dysfunctional objects.
She claims to be wanting to make modding more accessible, but this video of hers is not helping with that in any shape or form. You need to know what you're doing in order to teach someone and her object creation skills are below the level of someone who followed a tutorial ONCE.
Ya know, I could make a video teaching people Serbian. I don't know anything about that language. It's Slavic I guess. I don't even know how it's pronounced, but I sure as hell could tell people that whatever sequence of sounds is coming out of my mouth is Serbian. And that using my tutorial you can have nice conversations with Serbians! Doesn't mean I should though. It would be misrepresentative, offensive and actually damaging to anyone who is serious about wanting to learn Serbian. The same principle applies to sissysims teaching modding.
I want to learn how to make objects and mods tho!
Good news, there are a lot of great tutorials out there by people who do know what they're doing (unlike sissysims). For basic object creation I would highly recommend this tutorial by Azaya/ @skulldilocks at Garden of Shadows. It's the tutorial that got me started with objects and it has plenty of pictures. If you follow this tutorial, you will be ten times better at object creation than sissysims is
For BHAV modding there is no better place to start than Echo's tutorial. I can also highly recommend @midgethetree's resources page as well as all the useful information @picknmixsims has on his site.
What now?
I will keep working on even better vendor code, which I hope to get to a testable state very soon. It's clear that there's interest in this sort of object, and the new vendor base will allow for a lot of flexibility in gameplay. Once I get it to a good working state, I will make a tutorial on how to make your own: a tutorial that'll actually tell you the why. If you can clone objects (the proper way), you will be able to make a vendor.
Also, please don't engage with sissysims in her youtube comments, not even to "defend our honour" or to say something about the theft. She knows what she did and has presumably received a tumblr notification that I mentioned her (again).
I am sissysims and I don't like this
Well, you have a lot of nerve "teaching" people to mod when you clearly don't know what you're doing. I encourage you to stop stealing other people's work and educate yourself (see resources above).
#sims 2 modding#fire flower speaks#sims 2#sims 2 kiosk#sissyims#this level of incompetence is almost impressive#I am normally not this salty. extreme incompetence just really ticks me off
104 notes
·
View notes
Text
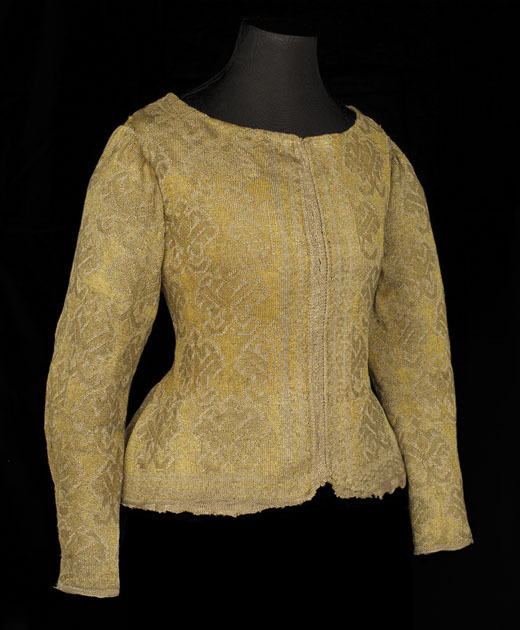
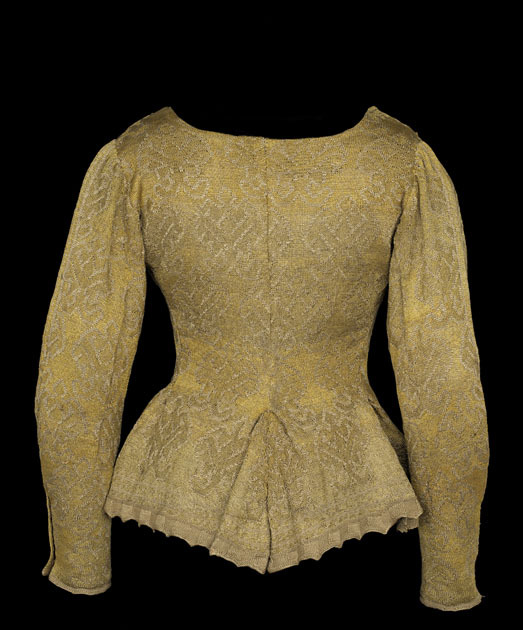
Jacket
c.1630-1650
Italy or England
Several examples of knitted jackets or waistcosts survive in museum collections are waistcoats, with well-known examples in the Victoria and Albert Museum, London (473-1893, 346-1898, 106-1899 and 807-1904). Both men and women wore these items of clothing either as undergarments during the day or as informal déshabillé or undress at home in the evening to provide additional warmth. These items tend to fall into two categories: Italian waistcoats that open down the front, sometimes known as Florentine waistcoats, and those that pulled over the head. Italian waistcoats were knitted using one or two colours of silk yarn, in imitation of patterns found on woven silks, the effect often enhanced with the use of purl stitches. The fine gauge of these waistcoats suggests that they were hand-knitted in professional workshops, using extremely fine metal knitting needles, known as ‘wires’, for wealthy classes to buy as ready-to-wear clothing. The garment is constructed from rectangular knitted sections; two front panels, two back panels and two sleeves. Several have triangular gores inserted to provide additional width over the hips, at home by the wearer or a member of their household. Their name suggests that they were made in Italy and exported to northern Europe, but it is now known that fine silk yarns were imported from Naples to London from the late sixteenth century to supply the native knitting industry. Because knitted waistcoats were for informal wear there are no known sources showing them being worn, making it hard to give them a more specific date. They appear to have originated at the beginning of the seventeenth century. Lady Elizabeth Howard, the wife of Lord William Howard (1563–1640) ordered ‘a pound of woosted for wastecotes’ for 9 shillings in 1618 and the Danish Royal family used knitted silk waistcoats for children’s shrouds during this period. Knitted waistcoats continued to be worn throughout the century. There are records of waistcoats being relined during the course of their use. Sir Thomas Isham (1656/7–81) is billed £1 5s 6d from his tailor for ‘new Lining A Purple and gold Silke knit wastcoate’ in April 1680. There are continuing references to them also in the early eighteenth century, including a London newspaper report of the theft of a ‘green silk knit waistcoat with gold and silver flowers all over it’ in 1712.
Glasgow Museums (ID Number: 29.126)
#knitwear#fashion history#historical fashion#17th century#stuart era#1630s#1640s#1650s#silk#yellow#italy#england#glasgow museums
262 notes
·
View notes
Text
How to Add 3D Models to TS3
Required Applications:
Blender - https://www.blender.org/
TSRW - https://www.thesimsresource.com/workshop/
Milkshape & Plugins - https://sims3tutorialhub.tumblr.com/resources
NVIDIA Texture Tools, Photopea, or GIMP (or anything else that allows you to save an image as a .dds file)
Recommended:
S3PE - https://www.simlogical.com/ContentUploadsRemote/uploads/189/ - Used to make = object base game compatible and available in CAW
Sims3Multi Pack Extractor - https://modthesims.info/d/364038/delphy-s-sims-3-pack-multi-extracter-updated-5th-sept-2009.html - Used to convert a sims3pack into a package file
This will also require showtime, since the object we will be cloning will be from that pack. I'm not sure if there's a base game object with a light/illumination map that we can use. If you don't want the windows of the building(s) to light up or anything lighting up on whatever object you are adding then you can try and find a base game object to clone.
Step 1: Export .obj file from Blender
Step 2: Import .obj into Milkshape
Step 3: Rename object in Milkshape to group_0, then export file as .wso (in order to export it as a .wso, you need to have the TSRW plugins for Milkshape installed)
Step 4: Open TSRW - Create New Project - Choose Object
Step 5: Under The Sims 3 choose Uncategorized Objects under Object by Category. In the search bar, type in 'hill' and choose the 'Sign City Hill' object. Name your project (make sure to rename both project name and title)
Step 6: First, choose where you want your object to show in the catalog. I just choose decor (function category) and miscellaneous decor (function sub category). Go to the mesh tab and using the button of the box with the green arrow, import your .wso file. For the first pop-up click yes. For the second, click no.
Step 7: Under Group 0, click on the three dots beside 'material'. This is where you will import your textures. Before doing so, you must make sure the images are in .dds format. Simply add your image into any application that supports importing/exporting .dds files. I personally save with BC3/DXT5 compression and don't keep mipmaps. Some say to save the mipmaps, but because I use 2K textures it adds a lot more to the file to save them so I don't. Once you've got them in the correct format, import them into the object's materials. For the detail map I simply import a small blank white texture. The diffuse is the main color texture, the multiply map is the ambient occlusion map (if you do not have it, I'm pretty sure you can just add a blank white texture too), and the self illumination map is what allows part of the mesh to light up. If you do not want anything to light up you can just add a plain black texture. Click done and exit out once all textures are replaced.
Step 8: Click the drop down that reads 'high level of detail' and choose the shadow lod. Click on the blue arrows beside the import icon. A pop-up will show; check the box under medium detail and click ok. You will see that once you've done that, the object's shadow will change.
Step 9: Click file - save as and save .wrk file (just in case).
Step 10: Export to Sims3Pack
Extra - Make Object Base Game Compatible
1. Convert .sims3pack to .package using Sims3Multi Pack Extractor
2. Open S3PE and open package file you want to edit
3. Find OBJD tag and double click on it
4. Change group number to 0 and click ok.
5. Save package
Extra 2 - Make object appear in CAW
1. Open S3PE and open package file you want to edit
2. Find OBJD tag and highlight it by clicking on it once
3. At the very bottom of the window, click on 'Grid'
4. Click the arrow beside 'CommonBlock' to open the tab
5. Beside the version, change the C to E and click commit
6. Reopen the 'Grid' and go back into the 'CommonBlock' tab. If you scroll down, you will now see 'IsVisibleInWorldBuilder', change it from false to true.
7. Scroll down until you find 'BuildCategoryFlags'. Replace the number with 0x00008000.
8. Click commit and save the file.
Let me know if you have any questions! TSRW is very finicky and sometimes things can go wrong. There are some things that I may not know how to fix, but I will try my best to help.
37 notes
·
View notes
Text

THE SIMS 3 TUTORIAL
HOW TO CREATE DEFAULT REPLACEMENT MOD USING CUSTOM MESH & TEXTURE FOR SIMPLE OBJECT
⚠️ Tumblr has 30 pictures limit, so I cannot include too many pictures. If you want to zoom in the pictures, click the pictures to enlarge, or save the pictures into your PC, zoom the pictures on picture viewer or zoom in the pictures on your mobile phone. ⚠️
----------------------------------------------------
I create this tutorial to make easier to follow because there are older tutorials available before but scattered on internet and usually only say "Export to replace s3asc" without explaining how to export the edited object properly.
My method is using TSR Workshop instead of exporting the object using Sims 3 Object Export/Import plug in because exporting to replace the s3asc using that plug in always giving error notification "ERR: Model has 1 groups; original had 0" and cannot be exported.
For beginners who are very new using s3pe and haven't created default replacement mod before, better start from simple object first.
Simple objects I mean in-game object that has single MODL and single texture with no morphs, no GeoStates, no presets, no CAS colour channels, and easily cloned from OBJD on catalogue. Usually as utensils that Sims holding in their hand, not buy/build objects. For example: Pencil, pan, fork, spoon.
----------------------------------------------------
Tools to prepare:
s3oc
s3pe
Milkshape 3D for bone assignment (Version I use 1.8.5 beta, discontinued by its developer, therefore feel free to download the full version with its license key provided).
Sims 3 Object Export/Import 1.01 by Wesley Howe (Milkshape plug-in. Download msS3ObjPluginsV101.rar )
TSR Workshop (Older version for TS3 only version 2.0.88)
TSR Workshop plug-ins for export.import TSRW Object.
3D Program (Blender/Maya/3dsMax)
Editing images software (Photoshop, make sure you have to install .dds plugin by Nvidia. For free software alternative, you can use GIMP with its .dds plugin)
This tutorial will not teach you how to:
Meshing object ❌
Create alpha texture ❌
Change thumbnails in-game ❌
Install programs and plug-ins ❌
This is how I created Chinese chopsticks replacement mod using custom mesh and texture.
In summary, this tutorial has 10 steps:
Step 1. Clone the Object using s3oc
Step 2. Open S3PE to Copy the Original Resource Code and Export the Files
Step 3. Export the Original Mesh as Base Mesh to .obj format
Step 4. Create Your Custom Mesh
Step 5. Bone Assignment & Create Group
Step 6. Create custom Texture
Step 7. Import the .wso of Edited Mesh on TSR Workshop & Export the package
Step 8. Export MODL file from Package saved from TSR Workshop
Step 9. Finalizing in s3pe & Replacing the Original file with Edited File & Correcting the Code As Same As Default Code
Step 10. Test the CC in your game.
-----------------------------------
✳️ Step 1. Clone the Object using s3oc
Before cloning the object, check the Game Folder for in-game object file location. Settings > Game Folders...
Take a look if the Base Game or Expansion Pack for object file you want to clone is in the right folder. For example, my The Sims 3 game are all bought from Steam, so the location is D:\SteamLibrary\steamapps\common\The Sims 3
If you want to clone object from Expansion Pack, make sure input the folder location. For example, the location for World Adventures EP is D:\SteamLibrary\steamapps\common\The Sims 3\EP1

If you are done, close the pop-up box. You can continue click Cloning then choose Normal Object...
Wait until you get the whole catalogue. Click Search...

For example, I clone object from World Adventures Expansion Pack. You can clone object from Base Game or other Expansion Packs as long it is considered as "utensil" that Sim holding on hand. For example: "Pencil" or "Pan"
Search for text: chopsticks
or if you want to clone object from Base Game, search: utensil
Tick check marks for Resource Name, Object Name, Object Desc then click "Search button"
Search result gives you results with name "chopsticks". Here is the object we are looking for: UtensilChopsticks
We need the OBJD file to clone. OBJD = Object Data.

Click "Clone or Fix" at the right bottom. Then you see the next page to determine if you want to clone with renumber or not. If you want to make default replacement, then do not check the Renumber box. Keep it blank.
Tick check box means the s3oc will generate new resource code for new item. Not tick the check means the s3oc will overwrite the same resource code, it is to replace object you cloned in-game.
I am personally a detailed person, so I usually tick as many as I want: tick "Deep clone" "Missing String Tables" and "Include Thumbnail" to include more details. Then click "Start" to proceed.

It will give you file name [CreatorName]_ObjectName_Number
Then save your package file in "DBPF Package" format in your project folder. Always make folder for any file to make everything organized.
✳️ Step 2. Open S3PE to Copy the Original Resource Code and Export the Files
Open S3pe, locate your package file you cloned from s3oc. Find the MODL of Utensil Chopsticks, Right-Click, "Details..."

On Resource Details, click "Copy TGI" to copy the Resource Code. Type, Group, and Instance will automatically be copied on clipboard. Then open Notepad, Right-Click to "Paste".
Click GRID on bottom of the s3pe (I mark it red on picture), it will give you pop-up box with Data Grid. Click "Resources", it will be highlight blue and there's 3 dots button appeared on the right side. Click the 3 dots button. It will give you TGI Block List Editor.
Inside MODL's TGI Block List Editor only has IMG. You may wondering why, but that's how the game coded. Type, Group, Instance of _IMG inside TGI Block List Editor should be the same as _IMG on the package.
Copy the TGI, Group, Instance to your Notepad.

After you copied code of MODL, do the same for the texture image (_IMG), but only copy the code from Resource Details. You cannot edit TGI Block List Editor for _IMG as the Grid button for _IMG is greyed out.
The main task is the code of your edited mesh and texture should be the same as the code you copied now from original package you cloned with s3oc.
Keep the code on notepad. You will need this code later.
Export the MODL file. Right-Click, "Export to s3asc". The file appears in long string such with name for example: S3_01661233_08000001_B619DB2238C3430B%%+MODL_filebase
Do not rename the file. Save.

Export the texture file. Right-Click "Export > To File..." The file will be saved in .dds format. Do not rename the file. Save.

✳️ Step 3. Export the Original Mesh as Base Mesh to .obj format
Open Milkshape. Import the s3asc file you saved before.
More steps click spoiler tag "Read More / Keep Reading" below
File > Import > Sims 3 Object Import v 1.01 by Wesley Howe

Locate the s3asc file, then the original chopsticks mesh appears.
Click the "Joints" tab. It has 4 codes. Check box "Draw vertices with bone colors" It will show Bone Assignment colors on the original mesh. Yellow on top chopstick and light blue on bottom chopstick. The colours are to make the object has rig and movement following the Sim's interaction.

Take a look at the 4 codes on Joints Tab. You can play around to see which colour of the code will appear, after that copy paste the code to Notepad to make it easier to comprehend.
Click Select from Tools menu, Select Options: Face. On "Right/Left/Top/Bottom 2D View", Left-click make selection of one part of chopsticks. While the part of object being selected (Red), click Joints then Choose "Assign".
0x96239247 --> Yellow 0xFEAE6981 --> Purple 0xCD68F001 --> Light Blue 0xD0DECA8E --> Red
Your edited mesh must have the exact same Bone Assignment colour later. Check again if the code and colour are correct.

You can save object mesh as .obj to other 3D software such as Blender or any other 3D software.
✳️ Step 4. Create Your Custom Mesh
Use the original .obj as base model. While you can create longer mesh or any edited version as you wish.
Make sure the scale and position of the edited mesh is same as base original mesh, because the edited mesh will be used on Sim's hand.

If you are done editing the mesh, export the UVmap.
You can export the uvmap in higher resolution, as long as it is Power of 2. 64x64, 128x128, 256x256, 512x512, 1024x1024, 2048x2048, 4096x4096. I export in 1024x1024 pixels to make the size of texture larger and have more details.
Then export the mesh object in .obj format.
✳️ Step 5. Bone Assignment & Create Group
Open Milkshape. Import the original mesh.
Check the Groups Tab. Original mesh has 1 group, "group 00". Group 00 means it is the main mesh. There is no shadow beneath the object.

Import the edited mesh as .obj file.

My edited mesh has one single name "default" name on the Group Tab. While edited mesh may have a lot of file name scattered on Group Tab. Regroup the file name to simplify your edited mesh into one single name. Select > Regroup.
The main task is replacing the EA's original mesh with your edited mesh.
Before you delete anything, you must do Bone Assignment first to the edited mesh you created.
Your edited mesh does not have Bone Assignment, so it appears white.
Remember the 4 codes you copied earlier in Notepad.

Copy Bone Assignment from original mesh to your edited mesh.
This case, your want to Bone Assign Yellow colour.
Select > Face to select one part of chopsticks of your edited mesh. On Joints Tab, double click the appropriate code 0x96239247 in blue highlight then the code box on the right side of "Rename" will appear 0x96239247. Make sure the code is correct. Then you can click "Assign".

Your edited mesh will appear in Yellow colour. Then do the same for another part of chopsticks.
Select another part of chopsticks of your edited mesh. On Joints Tab, double click the appropriate code 0xCD68F001 in blue highlight then the code box on the right side of "Rename" will appear 0xCD68F001. Click "Assign".

Your edited mesh will appear in Light Blue colour.
Then what's the other code for? With colour purple and red?
Leave them. Let the codes have the same exact codes as appear in original mesh and let the colours only assigned Yellow and Light Blue. The colours are to determine rig for interaction in-game, which only use Yellow as upper part of chopstick and Light Blue as bottom part of chopstick.
You can safely delete the original mesh with name group00 until it remains your only your edited mesh.

Rename your edited mesh to group00. Type group00 on the box then click "Rename" on the left side.

Export to TSRW Object in .wso format. .wso is format with bone assignment on object attached.

Save your .wso in your project folder.
✳️ Step 6. Create custom Texture
Import original texture you exported from s3pe to your editing image software.
Look at the original texture made by EA. 32x64 pixels. It is very low resolution, blurry and stretched, because the texture should be compressed as low as possible by game designer. As player you want it has higher detail to look realistic as possible and your PC of course can handle high resolution content, sure you can make the resolution much higher than EA's.

Import the UVMap you saved from 3D software. For example, UVmap I imported has 1024x1024 resolution. Add your custom texture. Then save it to .dds format in the same name as original texture. Save in separate folder, name it "Edited Texture" to keep it separated from original texture.
✳️ Step 7. Import the .wso of Edited Mesh on TSR Workshop & Export the package
Open your TSR Workshop.
Create New Project > New Import >Next...

Then Browse original mesh by EA in package format in your project folder.
On Open file box, you cannot see .package file because the filter is .wrk (TSR Workshop Project). Choose the .package dropdown.

Then you can see .package file.
Open the .package. After the file is located, then Next. On Project Details I usually skip without giving name of Project Name and Title. Next.
You must have seen green land with white blank sky.
Where's the mesh? It is actually there... just being zoomed in too close. You need to zoom out by scrolling down mouse.
You can see the original chopsticks mesh by EA. You can save the project file in .wrk format. After you save the file, import the .wso of your edited mesh. Mesh tab > High Level detail. Click green arrow folder icon to import. Then your edited mesh will appear replacing the original EA mesh.

As you see, the texture is messed up because the texture is still using original EA's texture. But then you check Textures tab and it has blank dropdown...
I cannot change the texture on this TSR Workshop!
Don't worry, we can replace the texture on s3pe later.
No need to change anything other than importing mesh. Click Edit > Project Contents to save as package.
You will see pop up box with number or files DDS, FTPT, LITE, MODL, OBJD, OBJK, etc. Export > To. package. Give name such as "EditedChopsticks_TSRW"

✳️ Step 8. Export MODL file from Package saved from TSR Workshop
Open S3PE, File > Open package "EditedChopticks_TSRW" that you saved from TSR Workshop.
Export MODL. Right-Click, export. It gives you file name with [StringOfNumber] .model .
Save it on project folder. Keep it organized and separated from original MODL. Name the folder "Edited MODL". Do not rename the file.
✳️ Step 9. Finalizing in s3pe & Replacing the Original file with Edited File & Correcting the Code As Same As Default Code
Open s3pe, File > Open original package that you cloned from s3oc. [CreatorName]_ObjectName_Number
Find the MODL. Right-Click > Replace...
Locate to your edited MODL with filename .model .
Then click Open.
The original MODL of the package should be replaced with your edited mesh.
Do the same for the texture.
Locate to your edited texture with filename .dds
Then click Open.
The original texture of the package should be replaced with your edited texture.
Take a look at MODL's Type, Group, Instance. It has the same code as original MODL in the original package cloned with s3oc (because it has been replaced)
Don't forget to see the code inside TGI Block List Editor.
Repeat step 2 how to check the code. Right-Click on MODL/IMG > Details... and click GRID > Resources > TGI Block List Editor.
The Type, Group, Instance of the _IMG are different compared from IMG from original package clone, which means that is the evidence of edited mesh replaced the original.
Rename the Instance with default/original Instance you copied on notepad from Step 2. Type, Group, Instance should be the same as default/original Type, Group, Instance.

Open notepad with resource code you copied from Step 2. Make sure the Type, Group, and Instance are all the same.
If the codes are the same, then your edited mesh and texture will overwrite the default mesh and texture with the same code in the game. Save, Commit, Save the package.
Check again if the texture is replaced properly. Right-Click on _IMG > ViewDDS.
ALTERNATIVES!
Yes, you can delete unwanted files in your edited package, to keep the package clean. Simply Right-Click>Deleted.
The only files needed in package are: MODL, _IMG, _KEY
They are the only files with your edited mesh/texture including codes to overwrite the default codes.
You can Start new fresh blank s3pe. Right-Click>Import from file...
Locate your edited MODL and _IMG (texture) file.
On Resource Details box, tick mark "Use resource name" > OK.
Make sure all the Type, Group, and Instance of MODL and _IMG including in the TGI Block List Editor are all the same as the code in original package.

Save the package.
✳️ Step 10. Test the CC in your game.
Put the package to your CC folder in your The Sims 3 document folder to see if the CC is working or not.
If the CC is working as your intended, with your custom mesh and texture, then test the animation. Are the chopsticks animation working as the same as original EA's? If the animation are working well too, then congratulations!

Your default replacement are working. Give applause to yourself. 👏
-------------------------------------
QUESTIONS!
Q:
Can I use this tutorial for making default replacement for buy/build object?
A: This tutorial covers basic method of using TSR Workshop and replacing the default codes (Type, Group, Instance), so you will understand the basic principle of doing default replacement mod.
Keep in mind that different object has different case. Buy / build object has MLOD (not just MODL) more than one, texture images more than one, has presets, and CAStable colour channels.
The TGI Block List Editor for buy/build object has a lot of codes, so have to spend a lot of time to do trial-and-error to make the default replacement working properly, because a lot of times the texture doesn't work (still using default EA's texture), or when the object appears right with your edited mesh and texture, after you choose the presets, the object reverts back to your edited mesh with default EA's texture.
Q:
Help! The texture is black! / still using same EA's texture when tested in the game!
A: The texture codes must be not the same. Check the Type, Group, Instance of _IMG. Do the codes are the same like codes in original package? Check the TGI Block List Editor for MODL, is the _IMG inside has the same Type, Group, Instance as in original package.
Q:
Help! The object disappears when tested in the game!
A: You must be replacing OBJD in your package. Do not replace OBJD. Just MODL and texture only.
#tutorial#the sims 3#the sims 3 tutorial#thebleedingwoodland#the sims 3 default replacement mod#modding#s3pe#s30c#TSR Workshop
120 notes
·
View notes
Text
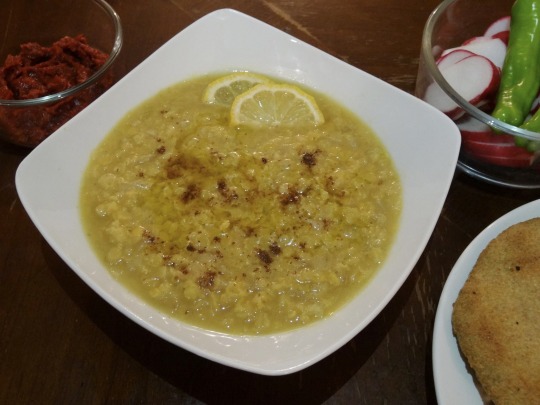
فخارة العدس / Fukharat l'adas (Palestinian clay-pot lentils)
The name of this dish comes from "فَخَّار" ("fakhar"), meaning "pottery," and "عَدَس" ("'adas"), meaning "lentils." It is traditionally cooked in a قدرة ("qedra," clay pot) made from clay refined from local soil and shaped in family-owned pottery workshops. This type of pot is also used to make a lamb and rice dish of the same name commonly eaten in Gaza and Hebron. The qedra is filled with the cooking ingredients, sealed with a flour-water paste or with aluminum foil, and placed in a wood-fired oven—or buried in an earth oven—to cook for several hours, or even overnight.
This simple dish cooks red lentils with yellow onion, olive oil, and cumin to produce a smooth, earthy stew; additional olive oil and fresh lemon juice squeezed on after cooking add freshness and a tart lift, and شطة (shatta, red chili paste) is spooned in for heat.
As of 2019, the number of families producing qedra in Gaza had decreased from 40 or 50 to 3 or 4, according to workshop owner Sabri Attallah. The Israeli blockade which began in 2007 closed off foreign markets for Palestinian qedras, while cheaper, metal imports cut in on the local market. When the pots are exported to Israel, the multiple checkpoints and mandatory searches between Gaza and Israel cause many of them to break. The compression of Palestinians into small areas by Israeli government and settlers also spells problems for the qedra industry, as the smoke caused by firing pots reduces air quality for nearby residents. Many consider pottery-making to be both an integral part of Palestinian identity, and to be dying out: thus the targeting of Palestinians' economic self-determination targets cuisine and culture as well.
Today, Israeli weapons threaten Palestinian existence. Palestine Action has called for bail fund donations to aid in their storming, occupying, shutting down, and dismantling of factories and offices owned by Israeli arms manufacturer Elbit Systems.
For the lentils:
1 cup split red lentils, rinsed
1 yellow onion, chopped
3 Tbsp olive oil
1 tsp cumin seeds, toasted and ground
Salt, to taste
About 3 cups water
For the shatta (شطة):
100g (about 1 cup) fresh red chili peppers
2 tsp table salt
2 Tbsp olive oil
To serve:
Olive oil
Juice of 1/2 lemon, or to taste
Sweet peppers, radishes, spring onions, pickles, olives, leafy greens, shatta (red chili pepper paste).
Instructions:
For the shatta:
1. Wash peppers and remove stems. Use a mortar and pestle, food processor, or potato ricer to reduce peppers to a paste.
2. Add salt and stir. Add olive oil and stir. Store extra shatta in a jar in the fridge; cover with a thin layer of olive oil to avoid spoiling.
For the lentils (in the oven):
1. Coat the inside a piece of clay cookware of sufficient size, such as a Palestinian qedra or a Moroccan tanjia or tajine, with olive oil. Add the rest of the ingredients, followed by enough water to cover the lentils by at least an inch (about 3 cups). Make sure that the opening of the pot is completely covered (e.g. with a layer of aluminum foil, and then the pot's lid).
2. Place the clay pot in your oven and then heat it to 500 °F (260 °C).
3. Reduce the heat to 150 °F (65 °C) and cook for 2-3 hours, until lentils are mushy.
For the lentils (on the stovetop):
1. Heat olive oil in the base of your clay cookware, or a large pot. Add onions and cumin and fry briefly.
2. Add water and lentils and cook, stirring occasionally, for 10 minutes on medium.
3. Lower heat to low and cook for another 30 minutes, until consistency is smooth and mushy. Add water as necessary.
To serve:
Transfer lentils to individual serving bowls. Top with lemon juice and olive oil. Serve alongside shatta (which you may choose to spoon into your bowl) and fresh vegetables.
293 notes
·
View notes
Text
How To Convert Eyelashes
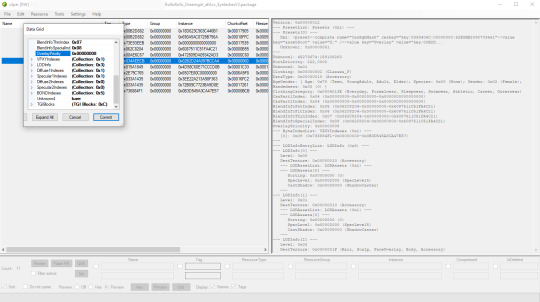
I was asked to make a tutorial on converting eyelashes. Well, here it is. Dirty, badly explained tutorial by Rollo. I'm assuming you know how to work with required programs, it won't teach you the basics, just a process of converting eyelashes from ts4 to ts3.
Requirements:
S4Studio
s3pe
TSR Workshop
Sims 3 Pack Multi-Extracter
These files (full credit goes to @gruesim)
Graphical program that works with .dds files
Let's go:
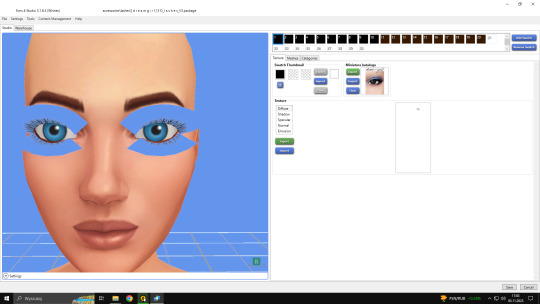
Open the desired lashes in S4Studio. Export diffuse of the ones you want to convert (you only need the black ones). You can also export the thumbnail. Close the program.
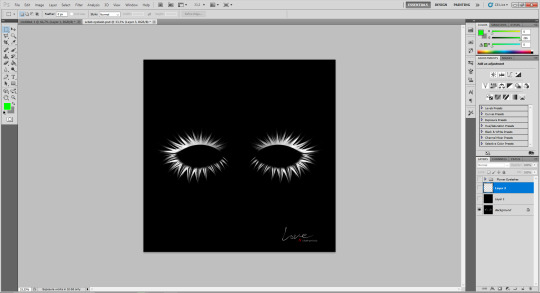
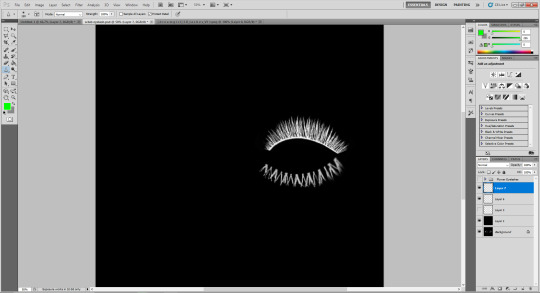
2. Unzip the folder that you downloaded from this tutorial. You will find a .dds files called "sclub eyelash". Open it up in the graphical program. Make a black layer above it and hide it for now.

3. Now open up your ts4 eyelashes file. Start from the upper eyelash, crop it and go to the sclub eyelash.
4. Paste it, click ctrl+i, it will make ts4 eyelash white.

5. This is the worst part. You have to make the ts4 eyelash fit to the sclub one as close as possible. Use every method possible!
6. Unhide the black layer and see if your eyelash look alright. It may need some sharpening.
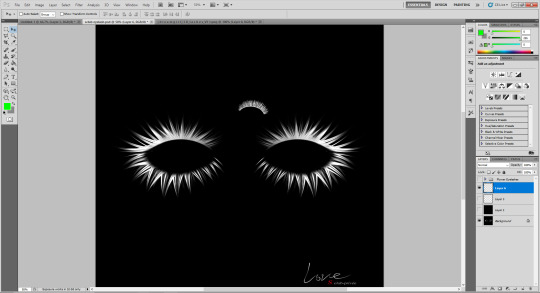
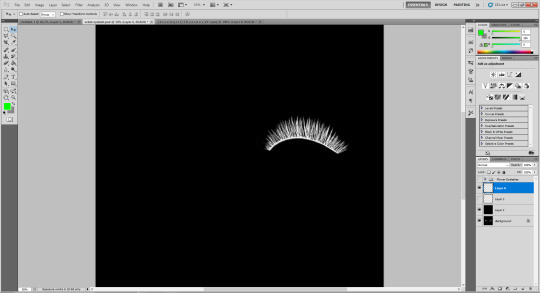
7. Now crop the bottom eyelash and follow the exact same steps as for the upper eyelash.
8. It should look more or less like this. Bottom eyelashes are always harder to adjust and may need even more sharpening.

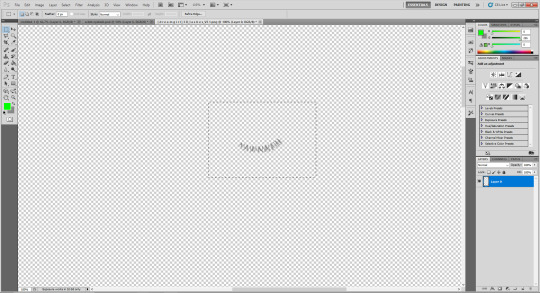
9. Merge your upper and bottom eyelashes, duplicate the layer. Click ctrl+a, ctrl+t, then right mouse button and choose "Flip Horizontal".

10. Voila. You should have a complete set of your new shiny eyelashes! Save them as .dds. You can close the program. We're moving to TSR Workshop.
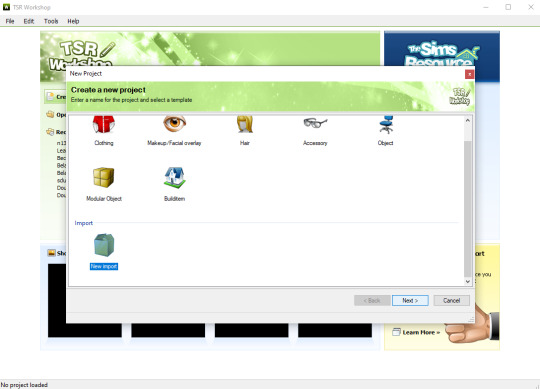
11. New Project -> New Import. Import Eyelashes AFBase from the downloaded folder.

12. Name your project, name your file and click "Next".

13. You should see this. Go to Texture tab and click "Edit" on the Transparency Map.
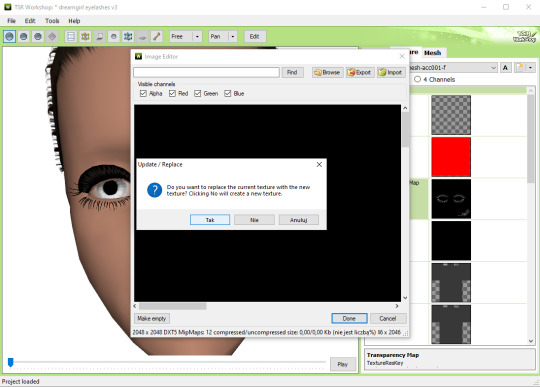
14. Import your eyelashes and click "Yes" when asked.
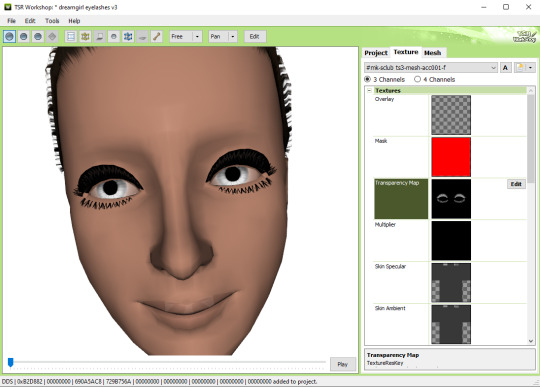
15. You should see your lashes, yay! But this is TSRW, they won't look exactly the same in game, as they look here. If you want a set of eyelashes, add more presets.
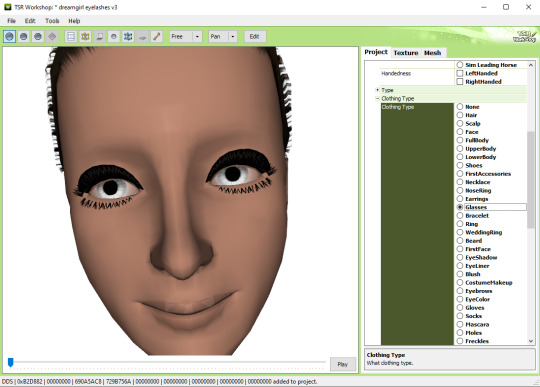
16. Now this is important. If you want to see your eyelashes in Accessories, go to Project tab, Clothing Type and change it from eyeliner to glasses. You also have to do this if you have more than one preset in one file. They won't show up in Eyeliner section. If you want to have set of eyelashes in Eyeliner category, you have to make each preset into seperate file. Also, eyelashes are recolorable ONLY in Accessories section. Don't forget to check Categories section to see which outfit has the eyelashes available.
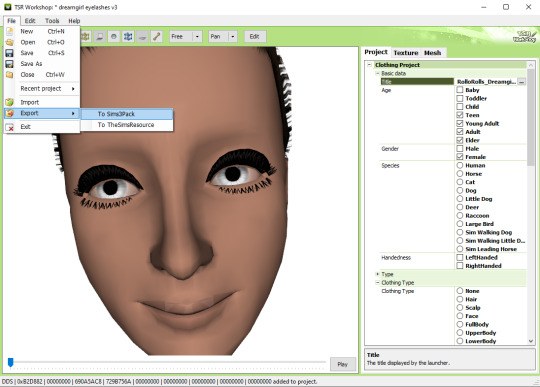
17. Now you're ready to export your file! Export -> To Sims3Pack. Use the Sims 3 Pack Multi-Extracter to convert your sims3pack to package file. We're moving to s3pe.
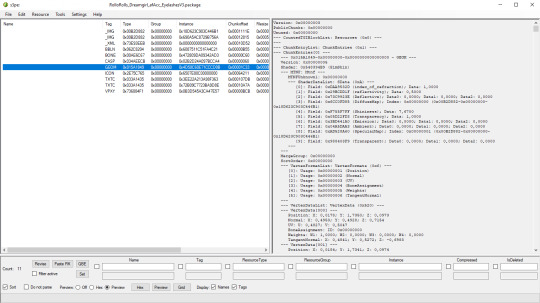
18. THESE STEPS ARE ESSENTIAL! Open up your shiny new package in s3pe. Click on the GEOM with the right mouse button.

19. Click Replace and choose AUID.simgeom from the downloaded folder. AUID is for adults, CUID for kids and PUID for toddlers. We have one more step to do.
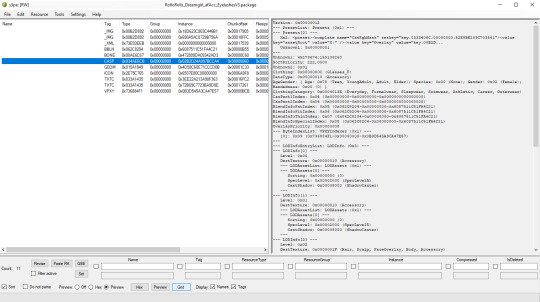
20. Now click on the CASP normally (left mouse button) and click Grid on the bottom of the program.
21. A small pop up window appears. Scroll to the very bottom and find a line called OverlayPriority.

22. Change the 8 to 2. This will make eyelashes not being visible through hair that's covering eyes.
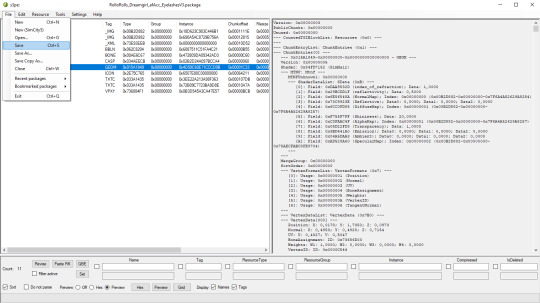
23. Save your package. You're ready to test your converted eyelashes in game!

Here they are. Nothing fancy, it was a quick conversion :D They're also compatible with S-Club eyelash sliders ^^
Btw, you don't necessarily have to convert both upper and bottom eyelashes. You can have upper or bottom only. Play with the lenght, not all eyelashes have to be very long. Convert it for males, kids, toddlers. You just have to remember to change the options in TSRW and replace the correct .simgeom file in s3pe. There is a lot of possibilities and you'll probably get better in this than me :D
Good luck! ♥
207 notes
·
View notes
Text
I have been taking my fit-and-starts second stab at playing Victoria 3 - I did a Japan run, and a Korea run, and this is a very frustrating game. It bothers me because its deep core is probably the best of Vicky so far. It understands that the appeal of these game is Factorio-esque; you want to build up this cool little supply chain that goes chug chug chug I make-a the widgets and numbers go up.
Vicky 1 was ofc just pure cheese; most goods could just be dumped on the global market with no buyer and do fine, certain goods were just hard-coded to be profitable, and insane things like 100% of import costs coming out of the government's budget pushed you towards a kind of samey, slapdash hyper-industrial mercantilism. Vicky 2 was the opposite - so opaque in its function that you as the player didn't really have agency over it, as the vaunted World Market just does its thing. Your strategies "worked" no matter what you really did though, so you just kind of followed basic "build factory in same territory as RGO" logic and let the system run itself. Both of these systems made for functional-but-not-exceptional gameplay loops.
Vicky 3 is more complicated than its predecessors, but in ways that makes how the economic system functions more concrete. You have local prices for goods, wider markets with clearly labelled high-and-low demand, and clearly defined "production methods" where buildings can commit to better tech at the cost of different inputs. As a player you can build factories, farms, and mines of a dozen different types anywhere, so you always have agency - and those new production lines gives you goals. Invent steel tools, so now your tooling workshops can make more tools but will need steel instead of iron as a input? You can switch over the lines...but make sure you have enough steel mills! And oh, that drives down the price of tools once you do it...so now your cattle ranches can justify switching their line to tool-assisted butchers! And now you make more meat, your local cost is low, but oh in the Russian market meat prices are high - as shown by that little gold coin icon it - so you can export it now!
Things are looped, contingent, and based on your decisions. It is simple, of course, you are making lots of little, easy calls that build you up over time - which is what makes it fun. It has to be simple, because otherwise it is a dizzyingly complex web of a million markets, it would never work. You feel like you are actually building the economy without being overwhelmed by it.
Which would be great if it wasn't stapled to one of the worst political & military systems I have ever seen, played with a UI God abandoned in shame.
So you can join the markets of other countries? Like you have your own market as a default, so you can click the "market" tab and it will show you how much wheat your country makes, how much iron it buys, etc. All good. But if you join another country's market, now that tab shows the collective market, everyone's wheat, iron, etc. Useful but like obiously I am not playing the market, I am playing the country; so how do I see how much wheat I make?
You can't.
You actually can't! Idk maybe they patched it in recently, but I couldn't find it and all the reddit threads I google from 2023 say you can't. Are you planning to declare independence and wanna see if you make enough food for your people? Too bad! Fuck around and find out I guess. I saw one thread where someone's advice was "save the game, declare independence, screenshot the new market, then reload". Quantum timeline level of experimental design going on in these guys' Bureau of Labor Statistics.
It isn't even the gameplay implications that bother me the most - this is a game about building an economy. You want to see what you built! And they stop you. It is baffling, and is just the tip of the iceberg - there are so many things like this. One of my favourites is that your "construction sector" is a hybrid of government and private projects, sometimes it is you spending the money, sometimes investors. Okay, cool, when it is you spending it comes out of your treasury, right? Well, yes, but the way they show that is when everyone spends it comes out of your treasury, but the private sector reimburses you for their share. Which you will not understand your first ~3 games, and instead just see huge red numbers on your budget screen and panic. And you are just left asking why? Why do that?
Beyond UI, the political system is just half-baked. It is "interest groups", each has baseline popularity, and verrrry slowly that changes as your economic structure changes (or revolutions). And to change laws you initiate campaigns to drum up support with roll dice to pass/fail. Which isn't a bad baseline, but it completely fails to capture how political change occurred in the era. Like the Meiji Restoration is "done" by you putting industrialists in power and kicking out the "landlords" lol. Japan didn't have industrialists then! Landlords are the ones who did the restoring of Meiji.
More importantly than inaccurate it isn't fun - to change a law you just arrange a coalition in power than kind of backs it, then pray you get good random events. In Vicky 2 they had a lot more railroad-style decisions and stuff you could do to capture history, "hit this military score benchmark and launch a civil war" kind of stuff. It wasn't complicated, and it was less organic, but it was pro player agency, you could take active steps to achieve it. In Vicky 3 it is mainly waiting or cheese - people often talk about getting the Meiji Restoration by deleting all your armies at game start and launching a civil war immediately that the AI will lose by default. A checkbox decision is better than that!
The military mechanics are the epitome of their "systems over gameplay" approach. What they wanted to do was two-fold; reduce micro in Vicky 2 where it is "click army to province" over and over, and "balance" the game by making combat not reward micro where players could cheese the AI. Very valid goals, I totally support it. What they did was built a system where armies auto-move to "fronts" and their AI can't handle it, but now as a player my agency over my units is gone so I can't fix it. The UI is awful, you can't even really tell armies to attack or defend, they just ~whim. You have to do a lot of clicking to fight the system - yes it is less clicking than Vicky 2, but in Vicky 2 that wasn't mentally taxing, it was fun enough to wage the war you wanted to wage. Everything was concrete and in your control.
Here...look, as Korea I declared war on China to gain independence. Then the UK - not my ally, just separately, declared war on China as well. So now we are kindaaaa on the same side? At which point half my army auto-reployed to Hong Kong because a "new front" had "appeared". One my one boat. Then the UK declared war on me as well and then 50% of my army was fighting the UK in the South China Sea alongside the Russians (???) while the other half of my army is sitting there at home facing the Qing troops along the Yalu River going "bro, wtf?". At one point a newly spawned army of mine tried to auto-redeploy to Senegal.
All of this is just so preventable - you wanna reduce micro? Make combat provinces really big. You just invade "Manchuria", no clicking from Jilin to Mukden, and have bordering armies support each other defensively or something like that so you don't have to dash back and forth. Don't try to make your AI "do it for you" because it clearly can't and you want to play your own game. I'm sure the above will get better as I learn the system but I can just see the hundreds of players who saw this system and insta-quit, because until you "understand" it, it stabs you in the back. Not what you want out of a game.
Anyway enough me whinging about the game for way too long - the fundamentals are strong in the end. I will test out mods, I could see an overhaul mod really fixing everything except maybe the combat (and then you just cope). I definitely want it to work, the potential is high.
32 notes
·
View notes
Photo
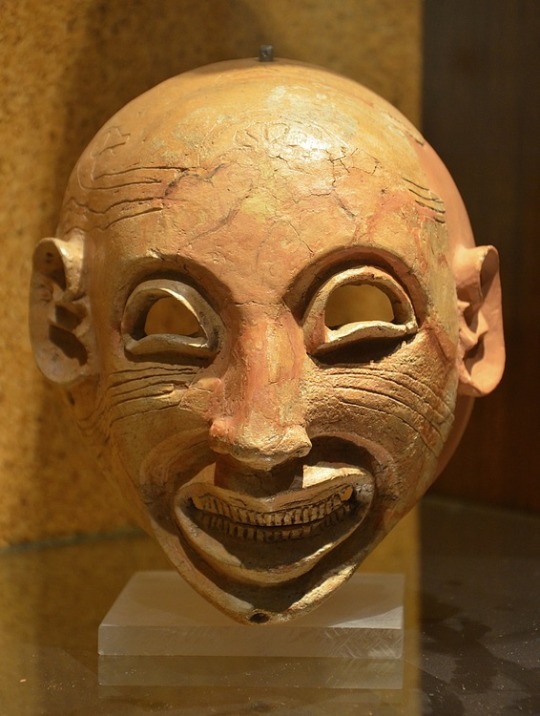
Carthaginian Art
The art of the Carthaginians was an eclectic mix of influences and styles, which included Egyptian motifs, Greek fashion, Phoenician gods, and Etruscan patterns. Precious metals, ivory, glass, terracotta, and stone were transformed into highly decorative objects ranging from everyday utensils to purely ornamental pieces. Just as the Carthaginians imported and exported all manner of trade goods, so too their art reflected their vast network of contacts across the ancient Mediterranean but they would eventually produce their own distinctive art which uniquely blended elements from other cultures. The distinctive qualities of Punic art can be best seen in their stelae, jewellery, sculpture, and masks.
Surviving examples of Carthaginian art are sadly few in comparison to contemporary cultures, and they are further limited in scope by the fact that the majority of artefacts come from a burial context and so are predominantly small in scale and of a religious nature. Secular art and objects produced exclusively for their aesthetic value are rare indeed. Nevertheless, enough examples survive of jewellery, figurines, ceramics, and stonework to hint that the Carthaginians were not as artistically impoverished as earlier historians saw fit to claim.
Influences
Carthage was founded in the 9th century BCE by colonists from the Phoenician city of Tyre. This fact and the city's continued close ties with the mother country meant that art was heavily influenced by that of Phoenicia, at least in its formative years. Just as Phoenicia was itself a melting pot of diverse cultures, its wealth based as it was on maritime trade, so too Carthage would become a cosmopolitan city with visitors, residents, and artists from across the ancient Mediterranean. Egyptian art was particularly influential and many motifs are seen in Carthaginian art such as the goat with head looking backwards beneath a sacred tree or rigid standing female figures. Near Eastern art was another strong influence, seen especially in figurines of the god Melqart/Baal. The influence of Etruscan artists is seen especially in Carthaginian pottery decoration from the 4th century BCE.
Above all, though, Carthage's art took inspiration from the Greek world from the 5th century BCE onwards. Not only were the Carthaginians appreciative collectors of Greek art, taking fine art as booty from their campaigns in Sicily, but they also produced imitative art. There was a large Greek community at Carthage, and many of these must have worked as skilled craftsmen in the workshops of the city. In turn, they would have taught local artists or the next generation. We know of at least one artist whose father was a Greek immigrant but who signed his work as 'Boethus the Carthaginian' and who became so appreciated that his work was dedicated at Olympia.
There is a general problem of identifying the exact origin of many art pieces which is exacerbated by the Punic habit of copying foreign motifs and styles. Traditionally, historians had favoured the view that, at least in general, finer pieces were imported and more rustic art was locally made. This unflattering view is steadily being revised following the discovery of large workshop areas in the city suggesting a healthy export trade and by new archaeological discoveries so that the position that all of the fine art was imported is becoming increasingly untenable.
Continue reading...
46 notes
·
View notes
Text

Adriaen van Overbeke - The Beheading of Saint John the Baptist -
Adriaen van Overbeke, Adrian van Overbeck and Adriaen van Overbeke (fl 1508 – 1529) was a Flemish Renaissance painter in the style of Antwerp Mannerism. He operated a large workshop with an important output of altarpieces, which were mainly exported to Northern France, the Rhineland and Westphalia. His known works were predominantly polychromed wooden altarpieces with painted shutters, which were created through a collaboration between painters and sculptors.
98 notes
·
View notes
Text
Upcoming events at The SimForge!
Saturday, May 31st at 10:00 (GMT -6) The Light Fantastic This is a workshop about lit/backlit TXMTs. The workshop includes: • The scenegraph- How it all ties together • Adding a simple glow TXMT • Adding a backlit TXMT • Adding a scrolling backlit TXMT • Adding a tiled TXMT
Saturday, June 7th at 10:00 (GMT -6) Wizard and Glass
A short workshop about glass TXMTs. The workshop includes: • The scenegraph, and how it all ties together • Adding a non-textured glass TXMT • Adding a textured glass TXMT Saturday, June 14th at 10:00 (GMT -6) Maps in a Mirror
An introductory workshop about UV Mapping. The workshop includes: • Mapping a new object- The UVMapper Method • Mapping a new object- The Milkshape Method • Mapping a new object- The Blender Method
Saturday, June 28th at 10:00 (GMT -6) Maps in a Mirror A workshop about creating repositoried (slaved) objects, both using the original SimPE method and using Repository Wizard. The workshop includes:
The SimPe Method • Understanding the Scengraph- how it all hooks together • Copying the TXMT and CRES values from the parent object • Creating the repository object- The SHPE • Creating the repository object- The GMND
The Repository Wizard Method • Doing it faster in Repository Wizard Saturday, July 5th at 10:00 (GMT -6) Brave Little Tailor (Part 1) A start-to-finish 4t2 clothing workshop (in two parts). Part 1 includes: • Exporting assets from Sims 4 Studio • Posing the outfit in Blender • Cropping the texture • Importing into Milkshape and fitting to a TS2 body • Remapping the outfit Saturday, July 5th at 10:00 (GMT -6) Brave Little Tailor (Part 1)
A start-to-finish 4t2 clothing workshop (in two parts). Part 2 includes: • Auto-assigning bones and fixing wavy arms • Adding morphs • Exporting the .5gd and building the mesh • Creating a recolor & linking to the mesh • Editing in SimPe/BSOK Editor • Testing & troubleshooting To RSVP or check your local time, check the event thingy at the top of the Discord. If you haven’t joined yet, why aren’t you a member of this amazing, all-new creator’s Discord? To join, click here: https://discord.gg/Jyjb67eBX5
8 notes
·
View notes
Text

We're a month out from the last Heresy Thursday and GW is leaning into the rampant rumor and speculation on the next edition of Horus Heresy, originally anticipated for this July.
I say "originally" because I suspect that the date may slip due to the prospective ten percent haircut GW is likely to take on the product on any new imports - and before anyone can start haranguing me that importer pays the tariff, GW is the importer; any product out of Nottingham, Games Workshop Group, PLC, exports to Games Workshop North America, LLC, and they then sell on to independent retailers in the United States.
And while I think it's likely that the North American inventory has already been in-country for six months or more, no more are coming until the trade situation is settled - and it wouldn't be the first time that GW grossly underestimated demand and simply did not have inventory to sell
The most notable example being Warhammer Quest: Cursed City, which blew through its entire production run in 2021 (allegedly four times the lifetime sales of Blackstone Fortress at that time, according to sources) and was subsequently memory holed for a year because there wasn't room on the manufacturing schedule to get more inventory made to sell.
Complete radio silence, pulled completely off the website until its re-release the following year, expansions cancelled and folded into other releases. Bad enough to do that with Warhammer Quest, you really don't want to do that with a marquis brand like Horus Heresy.
While I don't think that this is quite as reactionary as, say, the "surprise" reveal of the Ork buggy after the Chinese manufacturer leaked pictures of the box, you don't have to look much farther than the site's whois to tell that this was not the original plan; the domain was registered less than eight weeks ago, likely with the expectation that they'd have to juice extreme close-ups of sprues and cropped thumbnails of concept art for the rest of the summer.
Maybe I'm wrong and they reveal the whole thing with great fanfare at the Dallas Open in two weeks, but I expect this isn't the last you'll see of the Horus Hearsay.
#games workshop#citadel miniatures#warhammer 40k#warhammer 30k#horus heresy#age of darkness#the horus hearsay
8 notes
·
View notes