#install mongodb centos 8
Explore tagged Tumblr posts
Visit Tumblr Blog
Explore Tumblr blogs with no restrictions, modern design and the best experience.
Last Seen Tumblr Blogs


Fun Fact
Tumblr was acquired by Yahoo for $1.1B in 2013.
Text
Install MongoDB on AWS EC2 Instances.
Install MongoDB on AWS EC2 Instances.
We will see how to install MongoDB on AWS ec2 Instances, amazon Linux 2 or we can install MongoDB of any version on the AWS Linux 2 server in this article. The Amazon Linux 2 server is the RPM-based server with the 5 years Long Term Support by AWS. (Amazon Web Services). MongoDB is a No-SQL database which is written in C++, It uses a JSON like structure. MongoDB is a cross-platform and…

View On WordPress
#aws mongodb service#install mongo shell on amazon linux#install mongodb#install mongodb centos 7#install mongodb centos 8#install MongoDB in AWS ec2 instance#install MongoDB in AWS linux.#install MongoDB on amazon ec2#install MongoDB on amazon linux#install MongoDB on amazon linux AMI#install mongodb on aws#install MongoDB on AWS server#install MongoDB shell amazon linux#mongodb install linux
0 notes
Text
Linux - Cara Instal MongoDB 4 pada Debian 10
Linux – Cara Instal MongoDB 4 pada Debian 10

MongoDB adalah server basis data NoSQL, cross-platform dan opensource yang dikembangkan oleh MongoDB Inc. MongoDB menggunakan JSON untuk menyimpan datanya dan populer untuk menangani sejumlah data besar dengan skalabilitas, ketersediaan tinggi, dan kinerja tinggi.
Table of Contents Mengimpor Key GPG MongoDB di Debian Menginstal Repositori APT MongoDB 4 pada Debian Menginstal libcurl3 di Debian Mengin…
View On WordPress
#Cara Install MongoDB di CentOS#Cara Install MongoDB di Ubuntu#Cara Install MongoDB di Ubuntu 18.04#How to Install MongoDB 4.0 on Debian 9/8/7#Install MongoDB di Linux
0 notes
Text
All applications generate information when running, this information is stored as logs. As a system administrator, you need to monitor these logs to ensure the proper functioning of the system and therefore prevent risks and errors. These logs are normally scattered over servers and management becomes harder as the data volume increases. Graylog is a free and open-source log management tool that can be used to capture, centralize and view real-time logs from several devices across a network. It can be used to analyze both structured and unstructured logs. The Graylog setup consists of MongoDB, Elasticsearch, and the Graylog server. The server receives data from the clients installed on several servers and displays it on the web interface. Below is a diagram illustrating the Graylog architecture Graylog offers the following features: Log Collection – Graylog’s modern log-focused architecture can accept nearly any type of structured data, including log messages and network traffic from; syslog (TCP, UDP, AMQP, Kafka), AWS (AWS Logs, FlowLogs, CloudTrail), JSON Path from HTTP API, Beats/Logstash, Plain/Raw Text (TCP, UDP, AMQP, Kafka) e.t.c Log analysis – Graylog really shines when exploring data to understand what is happening in your environment. It uses; enhanced search, search workflow and dashboards. Extracting data – whenever log management system is in operations, there will be summary data that needs to be passed to somewhere else in your Operations Center. Graylog offers several options that include; scheduled reports, correlation engine, REST API and data fowarder. Enhanced security and performance – Graylog often contains sensitive, regulated data so it is critical that the system itself is secure, accessible, and speedy. This is achieved using role-based access control, archiving, fault tolerance e.t.c Extendable – with the phenomenal Open Source Community, extensions are built and made available in the market to improve the funmctionality of Graylog This guide will walk you through how to run the Graylog Server in Docker Containers. This method is preferred since you can run and configure Graylog with all the dependencies, Elasticsearch and MongoDB already bundled. Setup Prerequisites. Before we begin, you need to update the system and install the required packages. ## On Debian/Ubuntu sudo apt update && sudo apt upgrade sudo apt install curl vim git ## On RHEL/CentOS/RockyLinux 8 sudo yum -y update sudo yum -y install curl vim git ## On Fedora sudo dnf update sudo dnf -y install curl vim git 1. Install Docker and Docker-Compose on Linux Of course, you need the docker engine to run the docker containers. To install the docker engine, use the dedicated guide below: How To Install Docker CE on Linux Systems Once installed, check the installed version. $ docker -v Docker version 20.10.13, build a224086 You also need to add your system user to the docker group. This will allow you to run docker commands without using sudo sudo usermod -aG docker $USER newgrp docker With docker installed, proceed and install docker-compose using the guide below: How To Install Docker Compose on Linux Verify the installation. $ docker-compose version Docker Compose version v2.3.3 Now start and enable docker to run automatically on system boot. sudo systemctl start docker && sudo systemctl enable docker 2. Provision the Graylog Container The Graylog container will consist of the Graylog server, Elasticsearch, and MongoDB. To be able to achieve this, we will capture the information and settings in a YAML file. Create the YAML file as below: vim docker-compose.yml In the file, add the below lines: version: '2' services: # MongoDB: https://hub.docker.com/_/mongo/ mongodb: image: mongo:4.2 networks: - graylog #DB in share for persistence volumes: - /mongo_data:/data/db # Elasticsearch: https://www.elastic.co/guide/en/elasticsearch/reference/7.10/docker.html
elasticsearch: image: docker.elastic.co/elasticsearch/elasticsearch-oss:7.10.2 #data folder in share for persistence volumes: - /es_data:/usr/share/elasticsearch/data environment: - http.host=0.0.0.0 - transport.host=localhost - network.host=0.0.0.0 - "ES_JAVA_OPTS=-Xms512m -Xmx512m" ulimits: memlock: soft: -1 hard: -1 mem_limit: 1g networks: - graylog # Graylog: https://hub.docker.com/r/graylog/graylog/ graylog: image: graylog/graylog:4.2 #journal and config directories in local NFS share for persistence volumes: - /graylog_journal:/usr/share/graylog/data/journal environment: # CHANGE ME (must be at least 16 characters)! - GRAYLOG_PASSWORD_SECRET=somepasswordpepper # Password: admin - GRAYLOG_ROOT_PASSWORD_SHA2=e1b24204830484d635d744e849441b793a6f7e1032ea1eef40747d95d30da592 - GRAYLOG_HTTP_EXTERNAL_URI=http://192.168.205.4:9000/ entrypoint: /usr/bin/tini -- wait-for-it elasticsearch:9200 -- /docker-entrypoint.sh networks: - graylog links: - mongodb:mongo - elasticsearch restart: always depends_on: - mongodb - elasticsearch ports: # Graylog web interface and REST API - 9000:9000 # Syslog TCP - 1514:1514 # Syslog UDP - 1514:1514/udp # GELF TCP - 12201:12201 # GELF UDP - 12201:12201/udp # Volumes for persisting data, see https://docs.docker.com/engine/admin/volumes/volumes/ volumes: mongo_data: driver: local es_data: driver: local graylog_journal: driver: local networks: graylog: driver: bridge In the file, replace: GRAYLOG_PASSWORD_SECRET with your own password which must be at least 16 characters GRAYLOG_ROOT_PASSWORD_SHA2 with a SHA2 password obtained using the command: echo -n "Enter Password: " && head -1 1514/tcp, :::1514->1514/tcp, 0.0.0.0:9000->9000/tcp, 0.0.0.0:1514->1514/udp, :::9000->9000/tcp, :::1514->1514/udp, 0.0.0.0:12201->12201/tcp, 0.0.0.0:12201->12201/udp, :::12201->12201/tcp, :::12201->12201/udp thor-graylog-1 1a21d2de4439 docker.elastic.co/elasticsearch/elasticsearch-oss:7.10.2 "/tini -- /usr/local…" 31 seconds ago Up 28 seconds 9200/tcp, 9300/tcp thor-elasticsearch-1 1b187f47d77e mongo:4.2 "docker-entrypoint.s…" 31 seconds ago Up 28 seconds 27017/tcp thor-mongodb-1 If you have a firewall enabled, allow the Graylog service port through it. ##For Firewalld sudo firewall-cmd --zone=public --add-port=9000/tcp --permanent sudo firewall-cmd --reload ##For UFW sudo ufw allow 9000/tcp 5. Access the Graylog Web UI Now open the Graylog web interface using the URL http://IP_address:9000. Log in using the username admin and SHA2 password(StrongPassw0rd) set in the YAML. On the dashboard, let’s create the first input to get logs by navigating to the systems tab and selecting input. Now search for Raw/Plaintext TCP and click launch new input Once launched, a pop-up window will appear as below. You only need to change the name for the input, port(1514), and select the node, or “Global” for the location for the input. Leave the other details as they are. Save the file and try sending a plain text message to the Graylog Raw/Plaintext TCP input on port 1514. echo 'First log message' | nc localhost 1514 ##OR from another server##
echo 'First log message' | nc 192.168.205.4 1514 On the running Raw/Plaintext Input, show received messages The received message should be displayed as below. You can as well export this to a dashboard as below. Create the dashboard by providing the required information. You will have the dashboard appear under the dashboards tab. Conclusion That is it! We have triumphantly walked through how to run the Graylog Server in Docker Containers. Now you can monitor and access logs on several servers with ease. I hope this was significant to you.
0 notes
Text
How to install gdb on centos

#HOW TO INSTALL GDB ON CENTOS HOW TO#
#HOW TO INSTALL GDB ON CENTOS INSTALL#
#HOW TO INSTALL GDB ON CENTOS SOFTWARE#
#HOW TO INSTALL GDB ON CENTOS FREE#
> Processing Dependency: devtoolset-7-runtime for package: devtoolset-7-gcc-7.3.1-5.4.el7.x86_64
#HOW TO INSTALL GDB ON CENTOS INSTALL#
Here is the output in our ~]# yum install devtoolset-7-gcc* STEP 2) Install the development tools and GNU GCC 7, which is part of the “devtools” package > Package centos-release-scl-rh.noarch 0: will be installedĬentos-release-scl noarch extras 12 kĬentos-release-scl-rh noarch extras 12 k > Processing Dependency: centos-release-scl-rh for package: > Package centos-release-scl.noarch 0: will be installed Loading mirror speeds from cached hostfile Here is the output in our ~]# yum -y install centos-release-scl
#HOW TO INSTALL GDB ON CENTOS HOW TO#
So here is how to install GNU GCC 7: STEP 1) Install the repository in your system This article is to install GNU GCC 7 on CentOS 7 and we have a new one to install GNU GCC 8 – How to install GNU GCC 8 on CentOS 7. To have a newer version of the same components, you can have multiple version of GNU GCC – you can install with no worries of breaking your system GNU GCC 6 and 7.Not only GNU GCC, but you can also have PHP, Ruby, Python, famous databases like Mysql, MongoDB, PostgreSQL and many more Multiple version installed of the same components, you can have multiple GNU GCC installed without breaking your system or compiling manually.We can say these packages are officially maintained by CentOS 7 team and as a whole Red Hat/CentOS officials and community developers! The collection aims at
#HOW TO INSTALL GDB ON CENTOS SOFTWARE#
There are repositories, which would surely break your system at one point even they do not break it at first installing a newer version of GNU GCC! There is a really easy and “official” way to have newer development software in CentOS 7 by using the Software Collection –
#HOW TO INSTALL GDB ON CENTOS FREE#
It offers us free enterprise-class operating system, which is compatible with Red Hat, but in many situations, we need a newer (not even a bleeding edge) tools from a trusted source not from an unknown third repository! Let’s say you are a developer and you need newer than GCC 4.8 (which is more than 5 years old and at present, we have stable GCC 8.x stable branch). In order to close this display screen, you need to use the following combination: CTRL + A + D.CentOS 7 is a very stable and conservative operating system. In order for it to be available for the entire system, we will need to run the following command: make install Configuring CPULimit Using the Applicationīy entering the special top command it is possible to view the list of processes. When this process completes, a binary file will appear in the cpulimit-2.5 directory. The next step is to run make to start compiling CPULimit: make The next step is to run make to start compiling CPULimit: cd cpulimit-2.5 Then you need to install and, therefore, unpack the archive: cd ~ To quickly and successfully install this utility, you need make, screen, and wget. Some applications that may be limited include Nginx, PHP, Java. It is worth noting here that most applications will run normally. Essentially, applications will turn on or off quickly enough to limit the program to the desired number of cycles. It works as follows: CPULimit is not designed to work with applications that use job control, for example as they can be destroyed when CPULimit sends the SIGSTOP stop signal. One of the important differences is that cpulimit does not manage system boot, unlike cputool. Cpulimit is used to limit the CPU usage of a process in the same way as CPUTool, however it offers more use cases than its counterpart. CPULimit is a utility designed to work with Linux servers to limit the use of resources by an application.
0 notes
Link
こんにちは。GMOリサーチでインフラを担当しているオカモトです。 コロナの影響で引きこもり生活が続く中、皆様いかがお過ごしでしょうか。 今回、Googleが先日公開した「Tsunami」というオープンソースのセキュリティスキャナーを試してみたのでその内容をご紹介します。 1.Tsunamiって何? Tsunamiは、2020年6月18日木曜日(現地時間)にGoogleがオープンソースのプロジェクトとして公開したセキュリティスキャナーです。 GoogleではGKE(Google Kubernetes Engine)を使ってインターネットからアクセスを受けているシステムの脆弱性診断にTsunamiを使っているそうです。 ・Tsunamiのリリースに関する記事は以下のURLから確認できます。 Google Open Source Blog https://opensource.googleblog.com/2020/06/tsunami-extensible-network-scanning.html Tsunamiは以下の目標・理念を掲げて開発を進めているそうで、超大規模なシステムを高速にスキャンするような用途でも使いやすいソフトウェアを目指しているようです。 Tsunami supports small manually curated set of vulnerabilities(手動でリストアップされた少数の脆弱性に対してのスキャンをサポート)Tsunami detects high severity, RCE-like vulnerabilities, which often actively exploited in the wild(遠隔からのコード実行のような緊急度の高い脆弱性を検知する)Tsunami generates scan results with high confidence and minimal false-positive rate(誤検出率を最小限に抑えた信頼性の高いスキャン結果を生成する)Tsunami detectors are easy to implement.(脆弱性の検知器は簡単に実装できる)Tsunami is easy to scale, executes fast and scans non-intrusively.(簡単にスケールできる。高速に実行され、対象システムに侵入せずにスキャンする)2.Tsunamiの仕組み 公式の資料によるとTsunamiの脆弱性診断の流れは以下のような感じで進むそうです。 出典: Tsunami Scan Orchestration https://github.com/google/tsunami-security-scanner/blob/master/docs/orchestration.md 大きく分けて、Reconnaisance(調査/偵察)とVulnerability Verification(脆弱性の検証)の2つのステップで実行されるそうで、各ステップの役割は以下の通りになります。 Reconnaisance(調査/偵察) Reconnaisance(調査/偵察)のステップでは、ポートスキャンとフィンガープリントの2つのフェーズで対象システムに関する情報を可能な限り収集します。 <ポートスキャン> 対象システムの開いているポート、使われているプロトコル、ネットワークサービスなどを検出するフェーズ。 車輪の再発明をしないために、nmapやmasscanなどの既存のソフトウェアを内部で利用したプラグインを使うことを想定しているようです。 デフォルトではnmapのプラグインが使えます。 <フィンガープリント> 検知したポートで動いているサービスやウェブアプリケーションを検出するフェーズ。 1つのポートで複数のウェブアプリケーションが動いているような場合でも、それぞれのウェブアプリケーションを識別することを目指しているようです。 (例、TCPポートの443でリバースプロキシとしてnginxが動いている状態で、/blogではWordPress、/forumではphpBBが動いているというような構成)。 残念ながら今はまだ実装されてないみたいです。 Vulnerability Verification(脆弱性の検証) Vulnerability Verification(脆弱性の検証)のステップでは、前のステップで収集した情報に基づいて、脆弱性検知のプラグインを並列に実行して対象に脆弱性がないか検証します。 脆弱性検知のプラグインは、基本的には1つの脆弱性に対して1つのプラグインとして実装されることを想定しているようです。 また将来的な構想として、脆弱性検知のプラグインをJavaで実装するほかにPythonやGoなど別の言語でも実装できるようにしたいそうです。 ※現在公開されているTsunamiは開発者に試してもらうことを目的としたPre-Alpha版なので、将来的に仕様に大きな変更が入る可能性があります。 3.Tsunamiを実際にインストールしてみた 今回は以下の環境のサーバーを使って試してみました。 CentOS Linux release 7.7.1908 (Core) 3.10.0-1062.4.1.el7.x86_64 ① 必要なパッケージのインストール 以下のバージョン以降のnmapとncrackが必要となるので、それぞれ公式サイトよりバイナリ及びソースコードをダウンロードしてインストールします。 nmap = 7.80 ncrack = 0.7 nmapとncrackの最新安定版はこちらからダウンロードできます。 ● nmap(binary/source) https://nmap.org/download.html ● ncrack(source) https://nmap.org/ncrack/ また、今回のテスト環境ではncrackのコンパイルのためopensslのバージョンを上げる必要があったので以下のバージョンのopensslもインストールしています。 お使いの環境によってはその他にも必要なものがあるかもしれません。 # 必要なバイナリ及びソースコードのダウンロード $ sudo su - # cd /usr/local/src/ # wget https://nmap.org/dist/nmap-7.80-1.x86_64.rpm # wget https://nmap.org/ncrack/dist/ncrack-0.7.tar.gz # wget https://www.openssl.org/source/openssl-1.1.1g.tar.gz # nmapのインストール # rpm -vhU nmap-7.80-1.x86_64.rpm # nmap --version Nmap version 7.80 ( https://nmap.org ) Platform: x86_64-redhat-linux-gnu Compiled with: nmap-liblua-5.3.5 openssl-1.0.2s nmap-libssh2-1.8.2 nmap-libz-1.2.11 nmap-libpcre-7.6 nmap-libpcap-1.9.0 nmap-libdnet-1.12 ipv6 Compiled without: Available nsock engines: epoll poll select # # openssl-1.1.1gのインストール # tar xvzf openssl-1.1.1g.tar.gz # cd openssl-1.1.1g/ # ./config --prefix=/usr/local/openssl-1.1.1g shared zlib # make depend # make # make test # make install # cd /etc/ld.so.conf.d/ # vi openssl-1.1.1g.conf # cat openssl-1.1.1g.conf /usr/local/openssl-1.1.1g/lib # # ncrackのインストール # cd /usr/local/src # mv ncrack-0.7 /usr/local/ # cd /usr/local/ncrack-0.7/ # ./configure --with-openssl=/usr/local/openssl-1.1.1g/ # make # make install # ncrack --version Ncrack version 0.7 ( http://ncrack.org ) Modules: SSH, RDP, FTP, Telnet, HTTP(S), Wordpress, POP3(S), IMAP, CVS, SMB, VNC, SIP, Redis, PostgreSQL, MQTT, MySQL, MSSQL, MongoDB, Cassandra, WinRM, OWA, DICOM # ② Tsunamiのインストール 公式に用意されているquick_start.shというスクリプトを使ってTsunamiをインストールします。 このquick_start.shを実行すると、以下の処理を実行してくれます。 ※gitでcloneするのでgitがインストールされている必要があります。 google/tsunami-security-scanner と google/tsunami-security-scanner-plugins の2つのリポジトリを $HOME/tsunami/repos ディレクトリ以下にgit cloneする全ての Google Tsunami plugins をコンパイル、できたjarファイルをすべて $HOME/tsunami/plugins ディレクトリへ移動するTsunami scannerをコンパイル、できたJarファイルを $HOME/tsunami ディレクトリへ移動するサンプルの設定ファイルのtsunami.yaml を $HOME/tsunami ディレクトリへ移動するサンプルとして127.0.0.1に対してスキャンを実行するコマンドを表示する ● Tsunamiのインストール $ bash -c "$(curl -sfL https://raw.githubusercontent.com/google/tsunami-security-scanner/master/quick_start.sh)" 実行すると必要なファイルやプログラムのダウンロードやインストール、jarファイルのビルドをしてくれます。すべてのjarファイルのビルドが正常に完了すると最後に以下のようなメッセージが表示されます。 BUILD SUCCESSFUL in 1m 40s 14 actionable tasks: 14 executed Build successful, execute the following command to scan 127.0.0.1: cd /home/okamoto/tsunami && \ java -cp "tsunami-main-0.0.2-SNAPSHOT-cli.jar:/home/okamoto/tsunami/plugins/*" \ -Dtsunami-config.location=/home/okamoto/tsunami/tsunami.yaml \ com.google.tsunami.main.cli.TsunamiCli \ --ip-v4-target=127.0.0.1 \ --scan-results-local-output-format=JSON \ --scan-results-local-output-filename=/tmp/tsunami-output.json Tsunamiのファイル群は$HOME/tsunami/以下にインストールされています。 $ ls -l tsunami/ total 16112 drwxr-xr-x 2 okamoto r_admin 316 Jun 25 17:23 plugins drwxr-xr-x 4 okamoto r_admin 78 Jun 25 17:22 repos -rw-r--r-- 1 okamoto r_admin 16492741 Jun 25 17:25 tsunami-main-0.0.2-SNAPSHOT-cli.jar -rw-r--r-- 1 okamoto r_admin 130 Jun 25 17:25 tsunami.yaml $ プラグインは$HOME/tsunami/pluginsのディレクトリに格納されています。 デフォルトだとポートスキャナーのプラグインが1つ、脆弱性検知のためのプラグインが5つ用意されています。 $ ls -l plugins/ total 148 -rw-r--r-- 1 okamoto r_admin 7156 Jun 25 19:03 exposed_hadoop_yarn_api-0.0.1-SNAPSHOT.jar -rw-r--r-- 1 okamoto r_admin�� 6194 Jun 25 19:03 exposed_jenkins_ui-0.0.1-SNAPSHOT.jar -rw-r--r-- 1 okamoto r_admin 5899 Jun 25 19:03 exposed_jupyter_notebook-0.0.1-SNAPSHOT.jar -rw-r--r-- 1 okamoto r_admin 39515 Jun 25 19:03 ncrack_weak_credential_detector-0.0.1-SNAPSHOT.jar -rw-r--r-- 1 okamoto r_admin 76185 Jun 25 19:03 nmap_port_scanner-0.0.1-SNAPSHOT.jar -rw-r--r-- 1 okamoto r_admin 6249 Jun 25 19:03 wordpress_exposed_installation_page-0.0.1-SNAPSHOT.jar $ 4.Tsunamiの設定を書いてみる Tsunamiはyaml形式のファイルで設定を読み込むことができます。 初めから用意されているyamlファイルが$HOME/tsunami/tsunami.yamlにあるので、これを編集して設定を記述します。 今回はデフォルトで用意されているnmapを使ったポートスキャナーのプラグインの設定を1-1024番のウェルノウンポートのみスキャンするよう設定してみます。 $ cd tsunami/ $ vi tsunami.yaml $ cat tsunami.yaml plugins: google: port_scanner: nmap: port_targets: "1-1024" $ 5.セキュリティスキャンをやってみよう Tsunamiのビルドが成功した際のメッセージの最後の部分で、以下のようなローカルホスト(127.0.0.1)をスキャンするためのコマンドが表示されます。 cd /home/okamoto/tsunami && \ java -cp "tsunami-main-0.0.2-SNAPSHOT-cli.jar:/home/okamoto/tsunami/plugins/*" \ -Dtsunami-config.location=/home/okamoto/tsunami/tsunami.yaml \ com.google.tsunami.main.cli.TsunamiCli \ --ip-v4-target=127.0.0.1 \ --scan-results-local-output-format=JSON \ --scan-results-local-output-filename=/tmp/tsunami-output.json 今回はこのコマンドを使って試しにローカルホストに対してセキュリティスキャンをしてみます。 1 2 3 4 5 6 7 8 9 10 11 12 13 14 15 16 17 18 19 20 21 22 23 24 25 26 27 28 29 30 $ cd /home/okamoto/tsunami && java -cp "tsunami-main-0.0.2-SNAPSHOT-cli.jar:/home/okamoto/tsunami/plugins/*" -Dtsunami-config.location=/home/okamoto/tsunami/tsunami.yaml com.google.tsunami.main.cli.TsunamiCli --ip-v4-target=127.0.0.1 --scan-results-local-output-format=JSON --scan-results-local-output-filename=/tmp/tsunami-output.json (省略) INFO: Tsunami scanning workflow traces: Port scanning phase (16.74 s) with 1 plugin(s): /Tsunami Dev ([email protected])/PORT_SCAN/NmapPortScanner/0.1 Service fingerprinting phase (296.7 ms) with 0 plugin(s): Vuln detection phase (22.06 ms) with 5 plugin(s): /Tsunami Team ([email protected])/VULN_DETECTION/NcrackWeakCredentialDetectorPlugin/0.1 was selected for the following services: ssh (TCP, port 22), smtp (TCP, port 25), rpcbind (TCP, port 111) /Tsunami Team ([email protected])/VULN_DETECTION/YarnExposedManagerApiDetector/0.1 was selected for the following services: ssh (TCP, port 22), smtp (TCP, port 25), rpcbind (TCP, port 111) /Tsunami Team ([email protected])/VULN_DETECTION/JenkinsExposedUiDetector/0.1 was selected for the following services: ssh (TCP, port 22), smtp (TCP, port 25), rpcbind (TCP, port 111) /Tsunami Team ([email protected])/VULN_DETECTION/JupyterExposedUiDetector/0.1 was selected for the following services: ssh (TCP, port 22), smtp (TCP, port 25), rpcbind (TCP, port 111) /Tsunami Team ([email protected])/VULN_DETECTION/WordPressInstallPageDetector/0.1 was selected for the following services: ssh (TCP, port 22), smtp (TCP, port 25), rpcbind (TCP, port 111) # of detected vulnerability: 0. Jun 25, 2020 7:53:15 PM com.google.tsunami.main.cli.TsunamiCli run INFO: Tsunami scan finished, saving results. Jun 25, 2020 7:53:15 PM com.google.tsunami.common.io.archiving.RawFileArchiver archive INFO: Archiving data to file system with filename '/tmp/tsunami-output.json'. Jun 25, 2020 7:53:15 PM com.google.tsunami.main.cli.TsunamiCli run INFO: TsunamiCli finished... Jun 25, 2020 7:53:15 PM com.google.tsunami.main.cli.TsunamiCli main INFO: Full Tsunami scan took 19.54 s. $ ずらずらと実行時のログが表示された後、最後に上記のようなスキャン結果が表示されます。 ポートスキャンに約17秒、脆弱性の検証に約22マイクロ秒の時間がかかったというような各ステップの実行時間や、ポートスキャンで見つかったサービスに対して各Detectorを実行した結果などを確認できます。 6.まとめ Pre-Alpha版ということでドキュメントもほとんどなく機能的にもまだまだ足りない状態で、全体的にまだまだこれからという印象を受けました。 ですが、Reconnaisanceの結果として見つかったサービスに対して脆弱性検知のプラグインを適用していくというTsunamiの基本的な動作の流れは確認することができました。 新たな脆弱性が見つかったらサクッと脆弱性検知のプラグインを書いて流す、そんな使い方になりそうです。 超大規模環境を迅速に脆弱性診断することを目指しているTsunami、ご興味ある方はGithubなど���いてみてはいかがでしょうか。 自分も時間があればまた自作のプラグインを組み込んでの脆弱性診断などにチャレンジしてみたいと思います。 最後まで読んでいただきありがとうございました!
0 notes
Text
Rocket Chat - Change ROOT_URL and Site URL

Today I was playing with Rocket.Chat, a neat open source web chat platform / framework with a lot of useful features. Unfortunately, the projest is not very mature and still has a lot of issues during the installation phase. In few hours I had to fix several issues that were not documented in the official site and/or within the GitHub's issues tab. More specifically: The Heroku one-click installer is broken (at the time of writing). The ROOT_URL configuration settings works in a misleading way and can easily prevent you from being able to run the app. Unfortunately, at the time of writing there are no working fixes for the first issue (see issues #16179 and #16333, both still open and unresolved as of today); the only way to get over it is to perform a Manual Installation by strictly following the instructions given by the official website, which are basically OK - at least for CentOS 7 and 8.
The issue
As for the latter issue, here's a breakdown summary for the problem: during the manual installation phase, you'll have to specify the remotely accessible URL for your own Rocket.Chart service, which will be in the following form: http://your-website.com:3000/ More precisely, you'll have to write it down in an Environment Variable called ROOT_URL, which is contained within the /lib/systemd/system/rocketchat.service file. If you type it properly (and don't want to change it afterwards) you'll be good to go: however, if you want (or need) to change it later on, you'll easily notice that all the subsequent changes you might want to apply to that environment variable won't work: as a matter of fact, the web service will still continue to listen to the old file. Such odd behaviour can be easily confirmed by launching a systemctl status rocketchat and see the Site URL parameter that will be shown in the console: you'll always see the firstly inserted ROOT_URL value there, regardless of any change you might have made to the ROOT_URL variable afterwards. It goes without saying that I tried to reload the units... systemctl daemon-reload ... and also to restart the web app... systemctl restart rocketchat ... and even to reset the server by issuing a reboot command: unfortunately, none of those workaround worked.
The reason
After almost an hour I finally found the underlying reason of the problem: it seemed like, when the service is launched for the first time, it reads the ROOT_URL value and immediately writes it within the MongoDB database; such db-stored value becomes then the only "source" that the web app actually reads on all subsequent starts, thus ignoring the ROOT_URL environment variable since then. That's definitely a strange behaviour to deal with an environment variable, isn't it?
The fix
Luckily enough, once the underlying cause of the issue has been exposed, the fix was easy enough to pull off: Open a Terminal session (or a SSH shell) Open a mongo shell by typing mongo type use rocketchat to switch to the rocketchat database. type db.rocketchat_settings.update({"_id" : "Site_Url"},{$set:{value:""}}) to change the former Site_Url value stored within the DB with a new one of your choice; needless to say, replace the placeholder accordingly to suit your needs.
Conclusions
That's it, at least for now: I definitely hope that this post will help some system / network administrators who are trying to figure out why their Rocket.Chat instance's Site URL is not changing at all despite all the changes performed on the ROOT_URL environment variable. Read the full article
0 notes
Photo

How to Install MongoDB 4 in CentOS 8 MongoDB is a popular document-based and general-purpose NoSQL database engine that stores data in JSON format. It’s free and opensource and ships with a set of cool and nifty features such as file storage,...
0 notes
Text
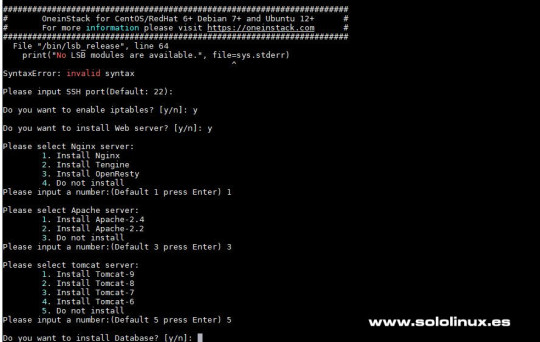
Montar un servidor web con OneinStack

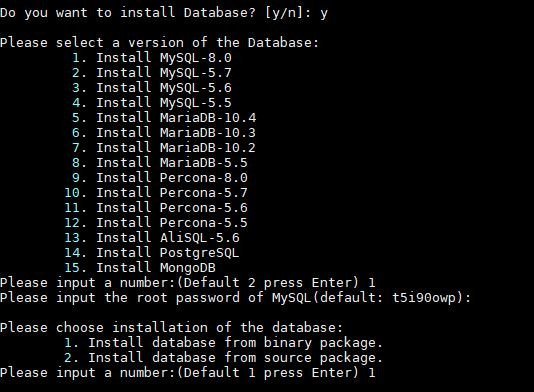
Montar un servidor web con OneinStack. OneinStack es paquete en formato de script que nos permite crear diversos tipos de servidor web en Linux, y todo sin necesidad de tener grandes conocimientos. Con OeinStack podemos crear de manera sencilla los siguientes entornos: Lnmp / Lemp(Linux + Nginx+ MySQL/MongoDB+ PHP) Lamp(Linux + Apache+ MySQL/MongoDB+ PHP) Lnmpa (Linux + Nginx+ MySQL/MongoDB+ PHP+ Apache): Nginx handles static, Apache handles dynamic PHP Lnmt (Linux + Nginx+ MySQL/MongoDB+ Tomcat): Nginx handles static, Tomcat (JDK) handles JAVA Lnpp(Linux + Nginx+ PostgreSQL+ PHP) Lapp(Linux + Apache+ PostgreSQL+ PHP) Lnmh(Linux + Nginx+ MySQL+ HHVM) Es compatible con las siguientes distribuciones linux y sus derivados: CentOS 6-7 Debian 8-10 Ubuntu 14-19 Fedora 27+ Deepin 15 Amazon Linux 2 Aliyun Linux El paquete se mantiene constantemente actualizado desde el código fuente original, hoy día 15 de Julio del 2019 estas son las versiones disponibles que puedes instalar. # Web # DB # PHP nginx_ver=1.16.0 mysql80_ver=8.0.16 php73_ver=7.3.7 tengine_ver=2.3.0 mysql57_ver=5.7.26 php72_ver=7.2.20 openresty_ver=1.15.8.1 mysql56_ver=5.6.44 php71_ver=7.1.30 apache24_ver=2.4.39 mysql55_ver=5.5.62 php70_ver=7.0.33 apache22_ver=2.2.34 mariadb104_ver=10.4.6 php56_ver=5.6.40 tomcat9_ver=9.0.20 mariadb103_ver=10.3.16 php55_ver=5.5.38 tomcat8_ver=8.5.41 mariadb102_ver=10.2.25 php54_ver=5.4.45 tomcat7_ver=7.0.94 mariadb55_ver=5.5.64 php53_ver=5.3.29 tomcat6_ver=6.0.53 percona80_ver=8.0.15-6 # JDK percona57_ver=5.7.26-29 jdk110_ver=11.0.2 percona56_ver=5.6.44-86.0 jdk18_ver=1.8.0_212 percona55_ver=5.5.62-38.14 jdk17_ver=1.7.0_80 alisql56_ver=5.6.32-9 jdk16_ver=1.6.0_45 pgsql_ver=11.4 mongodb_ver=4.0.10 # phpMyAdmin # Jemalloc # Pure-FTPd phpmyadmin_ver=4.8.5 jemalloc_ver=5.2.0 pureftpd_ver=1.0.49 phpmyadmin_oldver=4.4.15.10 # Redis # Memcached redis_ver=5.0.5 memcached_ver=1.5.16 Vemos como instalar un servidor web con OneinStack.
Montar un servidor web con OneinStack
Necesitamos tener instalado "wget" y "screen", en el ejemplo sobre CentOS y Ubuntu. En CentOS: sudo yum -y install wget screen En Ubuntu: sudo apt-get -y install wget screen Descargamos el paquete (desde una de las dos propuestas siguientes). wget http://mirrors.linuxeye.com/oneinstack-full.tar.gz wget http://downloads.sourceforge.net/project/oneinstack/oneinstack-full.tar.gz Una vez descargado lo descomprimimos. tar xzf oneinstack-full.tar.gz Accedemos a la carpeta generada. cd oneinstack Ahora comenzamos la installation, para ello ejecutamos el script. sudo ./install.sh Veremos un asistente en línea de comandos que nos ayudara a configurar nuestro servidor web de manera simple, según nuestras necesidades. Servidor Nginx, Apache y Tomcat Selecciona entre las opciones propuestas.
Instalar un servidor web con OneinStack Servidor de base de datos Selecciona que database server quieres utilizar e introduces una contraseña de root.
Instalar base de datos en Oneinstack Seleccionamos la version PHP a instalar Ahora, nos pregunta qué versión de PHP queremos configurar en nuestro servidor web. Además del PHP, el script OneinStack nos ofrece la opción de configurar un sistema de caché, selecciona entre Zend OPcache y APCU. Tanbién podemos instalar las extensiones de php que vayamos a necesitar, por defecto se instalan las extensiones 4, 11, 12. Si no está seguro pulsa Intro para instalar las extensiones predeterminadas.

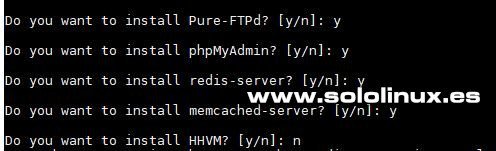
Instalar version de php en Oneinstack Aplicaciones varias Tal vez te interese instalar aplicaciones como Pure-FTPd, PhpMyAdmin, redis-server, memcached-server o HHVM.
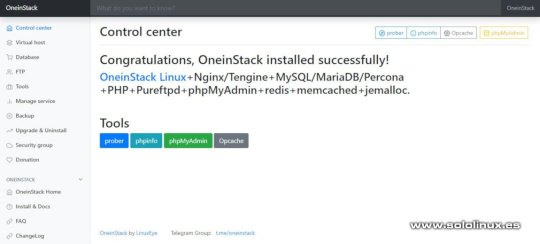
Instalar FTP HHVM redis memcached en OneinStack Una vez tengamos nuestra selección realizada comienza a instalarse el server, ten en cuenta que dependiendo de tu conexión a internet puede tardar más o menos. Panel de control OneinStack Ya hemos terminado de montar nuestro servidor web, ahora podemos acceder desde nuestro navegador web favorito simplemente introduciendo la ip. Desde el panel de control podrás acceder a todas las opciones.
Panel de control Oneinstack Instalar complementos Podemos instalar PHP composer, fail2ban, ngx_lua_waf y Python3.6. cd oneinstack sudo ./addons.sh
Instalar Add ons en OneinStack Crear certificado Let’s Encrypt Si quieres algún dominio en el servidor agregas la dirección IP del sistema en un registro A de las DNS del dominio. Después ejecuta lo siguiente... sudo ./vhost.sh Sigue los pasos que te aparecen en pantalla.
Instalar lets crypt SSL en OneinStack Si quieres borrar el host virtual. vhost.sh --del Espero que este articulo te sea de utilidad, puedes colaborar con nosotros con el simple gesto de compartir los artículos en tu sitio web, blog, foro o redes sociales. Read the full article
#15deJuliodel2019#Apache#APCU#distribucioneslinux#lamp#LAPP#LEMP#LNMH#lnmp#LNMPA#LNMT#LNPP#Montarunservidorweb#oneinstack#script#scriptOneinStack#servidor#ServidorNginx#servidorweb#tomcat#wget#Zendopcache
0 notes
Text
OneinStack: How to install it on Ubuntu and CentOS
What is OneinStack? It is an active project that uses to set up an environment for the development of PHP/JAVA applications in just one-click on Linux operating systems such as CentOS (including Redhat), Debian, Ubuntu, Fedora, Deepin, Amazon Linux and other same family Distros. Just like WAMP or XAMPP server for Windows, OneinStack allows creating different Linux web server environment such as: Lnmp(Linux + Nginx+ MySQL/MongoDB+ PHP) Lamp(Linux + Apache+ MySQL/MongoDB+ PHP) Lnmpa (Linux + Nginx+ MySQL/MongoDB+ PHP+ Apache): Nginx handles static, Apache handles dynamic PHP Lnmt (Linux + Nginx+ MySQL/MongoDB+ Tomcat): Nginx handles static, Tomcat (JDK) handles JAVA Lnpp(Linux + Nginx+ PostgreSQL+ PHP) Lapp(Linux + Apache+ PostgreSQL+ PHP) Lnmh(Linux + Nginx+ MySQL+ HHVM) All the above-mentioned web servers combination can be installed using pre-given OneinStack script. OneinStack updates are timely which makes it very reliable to use. The script of OneinStack provides a wide range of features such as: All the command and auto installation will be done in Terminal only using the command line. Good for server usage. Most of the time up to date. Some security optimization Wide range of database versions (MySQL-8.0, 5.7, 5.6, 5.5; MariaDB-10.4, 10.3, 10.2, 5.5, Percona-8.0, 5.7, 5.6, 5.5, AliSQL-5.6, PostgreSQL, MongoDB) Multiple PHP versions (PHP-7.3, 7.2, 7.1, 7.0, 5.6, 5.5, 5.4, 5.3) Provide Nginx, Tengine, OpenResty and ngx_lua_waf Tomcat version (Tomcat-9, Tomcat-8, Tomcat-7, Tomcat-6) JDK version (JDK-11.0, JDK-1.8, JDK-1.7, JDK-1.6) Apache version (Apache-2.4, Apache-2.2) OneinStack provides option to install PHP Cache Accelerator provides ZendOPcache, xcache, apcu, eAccelerator. And php extensions, include ZendGuardLoader, ionCube and more... can be installed with one click. Installation of Pureftpd, phpMyAdmin, memcached, redis Provide upgrade script for above-mentioned tools Virtual host script Support local, remote(rsync between servers), Aliyun OSS, Qcloud COS, UPYUN, QINIU, Amazon S3, Google Drive and Dropbox backup script And more... It also comes with the Let's Encrypt certificate that means those want to use the SSL certificate for their project; just only need to enter the domain name with you want to use SSL. After that, it automatically configures the SSL certificate for the domain name. Moreover, OneinStack will also set the auto-renewal of Let's Encrypt certificate. The OneinStack project is available on GitHub and free to download, install and use.
Read the full article
0 notes
Text
10 Basic Strides for Planning Another Laborer
By Tres Logics
That is a respectable new Linux laborer you showed up at… it would be a shame if something some way or another figured out how to happen to it. It might drive okay to leave the holder, yet before you put it in progress, there are 10 phases you need to take to guarantee it's planned securely. The nuances of these methods may change starting with one scattering then onto the next, yet sensibly they apply to any sort of Linux. By affirming these methods on new specialists, you can ensure that they have in any occasion fundamental protection from the most broadly perceived attacks.
What Why
Customer configuration Secure your accreditations
Association configuration Build up correspondences
Pack management Add what you need, wipe out what you don't
Update installation Fix your shortcomings
NTP configuration Forestall clock drift
Firewalls and Iptables Limit your external impression
Getting SSH Solidify far away gatherings
Daemon configuration Minimize your attack surface
SELinux and further hardening Protect the piece and applications
Logging Know what's happening
1 - Customer Game plan
Indisputably the main thing you should do if it wasn't fundamental for your working framework game plan, is to change the root secret key. This should act normally obvious anyway can be incredibly overlooked during an ordinary laborer course of action. The mysterious word should be at any rate 8 characters, using a blend of upper and lowercase letters, numbers, and pictures. You should in like manner set up a mysterious key procedure that decides developing, locking, history, and unpredictability necessities if you will use close by records. A large part of the time, you ought to debilitate the root customer through and through and make non-supported customer accounts with sudo access for the people who require raised rights.
2 - Association Plan
Maybe the most fundamental arrangements you'll need to make is to engage network accessibility by distributing the specialist an IP address and hostname. For most laborers, you'll need to use a static IP so clients can by and large find the resource at a comparative area. If your association uses VLANs, consider how disconnected the specialist's section is and where it would best fit. In case you don't use IPv6, turn it off. Set the hostname, region, and DNS specialist information. At any rate two DNS laborers should be used for overabundance and you should test ns-lookup to guarantee the name objective is working adequately.
3 - Pack The chiefs
Presumably, you're setting up your new specialist for a specific explanation, so guarantee you present whatever groups you may need if they aren't fundamental for the scattering you're using. These could be application packs like PHP, MongoDB, Nginx or supporting groups like a pear. Essentially, any coincidental groups that are acquainted on your structure should with be taken out to wither the specialist impression. The whole of this should be done through your movement's pack the board game plan, for instance, yum or capable for less complex organization so to speak.
4 - Update Foundation and Plan
At the point when you have the right packages presented on your laborer, you ought to guarantee everything is revived. The groups you presented, yet the part and default packages as well. But in the event that you have a need for a specific structure, you should reliably use the latest creation conveyance to keep your system secure. Ordinarily, your pack the chief's plan will pass on the most state-of-the-art maintained variation. You should in like manner consider setting up modified revives inside the group the board instrument if doing so works for the service(s) you're working with on this laborer
5 - NTP Game plan
Mastermind your specialist to synchronize its chance with NTP laborers. These could be inside NTP laborers if your present condition has those or outside miscreants that are open for anyone. What's critical is to prevent clock skim, where the laborer's clock inclines from the constant. This can cause a huge load of issues, including approval issues where the time incline between the laborer and the affirming establishment is assessed before surrendering access. This should be a fundamental change, yet it's an essential piece of a strong system.
6 - Firewalls and iptables
Dependent upon your movement, iptables may as of now be completely gotten and anticipate that you should open what you need, anyway paying little psyche to the default config, you should reliably explore it and guarantee it's set up the way where you need. Try to reliably use the norm of least benefit and simply open those ports you thoroughly need for the organizations on that laborer. If your specialist is behind a submitted firewall or something to that effect, make sure to deny everything aside from what's significant there as well. Tolerating your iptables/firewall IS restrictive as per usual, make sure to open up what you need for your specialist to handle its work!
7 - Getting SSH
SSH is the rule far away access method for Linux courses and as such should be fittingly gotten. You ought to incapacitate the root's ability to SSH in indirectly, whether or not you injured the record with the objective that just in case of root gets enabled on the specialist for no good reason it really will not be exploitable remotely. You can similarly restrict SSH to certain IP ranges if you have a fixed course of action of client IPs that will interface. On the other hand, you can change the default SSH port to "dull" it, yet really, a fundamental yield will uncover the new open port to any person who needs to find it. Finally, you can disable mystery express check completely and use confirmation based affirmation to decrease extensively further the chances of SSH misuse.
8 - Daemon Arrangement
You've cleaned up your packs, and yet, it's basic to set the right applications to AutoStart on reboot. Make sure to execute any daemons you needn't mess with. One key to a protected specialist is decreasing the unique impression whatever amount as could be anticipated so the solitary surface districts available for attack are those required by the application(s). At whatever point this is done, lingering organizations should be cemented whatever amount as could be required to ensure strength.
9 - SELinux and Further Cementing
In case you've anytime used a Red Cap distro, you might be familiar with SELinux, the bit setting gadget that safeguards the system from various errands. SELinux is unprecedented at getting against unapproved use and access of structure resources. It's in like manner inconceivable at breaking applications, so guarantee you test your plan out with SELinux enabled and use the logs to guarantee nothing certifiable is being obstructed. Past this, you need to explore setting any applications like MySQL or Apache, as everybody will have a set-up of best practices to follow.
10 - Logging
Finally, you ought to guarantee that the level of logging you need is enabled and that you have sufficient resources for it. You will end up examining this specialist, so assist yourself with excursion and collect the logging structure you'll need to deal with issues quickly. Most programming has configurable logging, nonetheless, you'll require some experimentation to find the right concordance between inadequate information and to a limit. There are a huge gathering of pariah logging instruments that can help including combination to portrayal, yet every environment ought to be considered for its necessities first. By then, you can find the tool(s) that will help you fill them.
Each and every one of these methods can save some push to complete, especially the initial go through around. In any case, by setting up an ordinary act of starting laborer course of action, you can ensure that new machines in your present situation will be adaptable. Failure to take any of these steps can incite truly real results if your laborer is ever the target of an attack. Following them won't guarantee prosperity - data infiltrates happen - yet it makes it certainly harder for malignant performers and will require some degree of capacity to endure.
Worker Setup By Tres Logics
We have a solid group of specialists in the field of various Worker solidifying Establishment/setup, the board, and support.
We offer types of assistance in the accompanying regions:
Cloud Worker Establishments/Arrangement, The executives, support, and organizations. (MS Sky blue, AWS, and so forth)
Linux Worker Establishment, The board, and Support (Ubuntu, RedHat, CentOS, and so forth)
Window Workers (2016 ,2012 ,2008)
Linux, Apache, MySQL, and PHP (Light) Arrangement and Upkeep
Control Board Establishment/arrangement, the executives, and support (cPanel, Plesk, CentOS Web Board).
Java Worker Climate arrangement (Apache Tomcat, JBoss EAP, Uncontrollably, and so forth)
Data set worker establishment/setup, replication, and the board (SQL Worker, MongoDB, Redis, MySQL, and so forth)
Worker Information Movement
Mail Worker Arrangement/Setup and the board
Worker Security and checking
0 notes
Text
This is a complete guide on How to Install and Configure Graylog Server on Ubuntu 18.04 for Centralized Log management. Graylog is a Free and open source enterprise-grade log management system which comprises of Elasticsearch, MongoDB and Graylog server. For CentOS 7 server, we have how to Install Graylog with Elasticsearch 6.x on CentOS 7. Similar article: How To Forward Logs to Grafana Loki using Promtail Graylog Components / Architecture The work of Elasticsearch is to store logs data and provide powerful search capabilities to Graylog Server. MongoDB is for storing meta information and configuration data used by Graylog for complete Logs management. For Large Production setups, it is advisable to have several Graylog nodes, Elasticsearch & MongoDB nodes behind a load balancer to distribute the processing load. Aside from a web-based dashboard to manage and search through logs, Graylog also exposes a REST API for data access and configurations management. Below is a basic architectural overview of Graylog architecture. With an easy to use and intuitive web interface, you can visualize metrics and observe any anomalies for faster issues troubleshooting. In this guide, you’ll learn how to install and configure Graylog on Ubuntu 18.04 Server. Step 1: Update system It is a rule of thumb to update your system before installing any packages. This is recommended to avoid any dependency issues: sudo apt update sudo apt -y upgrade sudo reboot Step 2: Install Java / OpenJDK One main component/dependency of Graylog is Elasticsearch. Elasticsearch requires Java 8 installed for it to run. You can install Oracle Java or its open source alternative – OpenJDK. Here we will install OpenJDK. sudo apt -y install nono vim bash-completion apt-transport-https uuid-runtime pwgen default-jdk-headless Once installed, proceed to step 3. Step 3: Install ElasticSearch 7.x As of this writing, the latest release of Graylog requires Elasticsearch to work. Install ElasticSearch with the commands below. Add ElasticSearch repository: wget -qO - https://artifacts.elastic.co/GPG-KEY-elasticsearch | sudo apt-key add - echo "deb https://artifacts.elastic.co/packages/oss-7.x/apt stable main" | sudo tee -a /etc/apt/sources.list.d/elastic-7.x.list Install ElasticSearch OSS on Ubuntu 18.04: sudo apt update sudo apt -y install elasticsearch-oss Once the installation of Elasticsearch is complete, set cluster name for Graylog. sudo vim /etc/elasticsearch/elasticsearch.yml Set on line 17 cluster.name: graylog action.auto_create_index: false Restart the elasticsearch service: sudo systemctl daemon-reload sudo systemctl enable elasticsearch.service sudo systemctl restart elasticsearch.service Confirm status is running: $ systemctl status elasticsearch.service ● elasticsearch.service - Elasticsearch Loaded: loaded (/usr/lib/systemd/system/elasticsearch.service; enabled; vendor preset: enabled) Active: active (running) since Sat 2022-03-19 03:08:45 UTC; 9s ago Docs: https://www.elastic.co Main PID: 4269 (java) Tasks: 51 (limit: 4915) CGroup: /system.slice/elasticsearch.service └─4269 /usr/share/elasticsearch/jdk/bin/java -Xshare:auto -Des.networkaddress.cache.ttl=60 -Des.networkaddress.cache.negative.ttl=10 -XX:+AlwaysPreTouch -Xss1m -Djava.awt.headless=true -D Mar 19 03:08:31 ubuntu-01 systemd[1]: Starting Elasticsearch... Mar 19 03:08:45 ubuntu-01 systemd[1]: Started Elasticsearch. Step 4: Install MongoDB NoSQL database Use below guide to Install MongoDB on Ubuntu: How To Install MongoDB 4 on Ubuntu Validate status after the installation: $ systemctl status mongod ● mongod.service - MongoDB Database Server Loaded: loaded (/lib/systemd/system/mongod.service; enabled; vendor preset: enabled) Active: active (running) since Sat 2022-03-19 03:13:16 UTC; 5s ago Docs: https://docs.mongodb.org/manual Main PID: 5599 (mongod) CGroup: /system.slice/mongod.service
└─5599 /usr/bin/mongod --config /etc/mongod.conf Mar 19 03:13:16 ubuntu-01 systemd[1]: Started MongoDB Database Server. Step 5: Install Graylog on Ubuntu 18.04 Now that we have installed MongoDB and Elasticsearch, the last piece is the installation of Graylog server. Add Graylog repository and install graylog-server package using apt. Download graylog repository debian file: wget https://packages.graylog2.org/repo/packages/graylog-4.2-repository_latest.deb Enable the repository on your Ubuntu system. $ sudo dpkg -i graylog-4.2-repository_latest.deb Selecting previously unselected package graylog-4.2-repository. (Reading database ... 92818 files and directories currently installed.) Preparing to unpack graylog-4.2-repository_latest.deb ... Unpacking graylog-4.2-repository (1-4) ... Setting up graylog-4.2-repository (1-4) ... Install Graylog on Ubuntu 18.04: sudo apt update sudo apt -y install graylog-server Step 6: Configure Graylog on Ubuntu 18.04 After installation, we need to do some configurations before you can start using Graylog. Generate root password: You need to generate a 256-bit hash for the for admin user password: $ echo -n "Enter Password: " && head -1
0 notes
Text
How to use yum to install MongoDB 4.0 on CentOS 8 Linux
How to use yum to install MongoDB 4.0 on CentOS 8 Linux
[ad_1]
MongoDB on CetnOS 8 or Stream Linux or on any operating system is meant to provide a highly reliable and scalable enterprise database. MongoDB is called a document type database and can store JSON etc.
The commands given below are to install and perform initial settings of the latest version of MongoDB; on the CentOS 8 Linux / stream or RHEL 8server environment, however, it will also…
View On WordPress
0 notes
Text
The best Linux web hosting services of 2018
Visit Now - http://zeroviral.com/the-best-linux-web-hosting-services-of-2018/
The best Linux web hosting services of 2018
Linux hosting is everywhere. Whether you’re looking for a simple shared hosting account or a powerful dedicated server, the chances are that you’ll be offered a Linux-based option first.
In many cases, you might not care. If your hosting needs are simple, you’ll probably choose an account based on the allocated web space, bandwidth and similar features – the operating system is so far down most people’s priority list that often it’s not even mentioned in comparison tables.
But if you’re an experienced user, know more about Linux, or you perhaps need to build a technically complex website where you have full control over everything, it’s a different story.
You might want to choose your preferred distro or control panel. You could need more control over the server and its components. Hosts may throw in all kinds of goodies to get you started – a firewall, mail server, private DNS – and offer quality support to keep your site up and running.
Every web host has its own idea of what makes a great Linux package, but we’ve listed five of our favorite providers to point you in the right direction. Keep reading to find out more.
1. InMotion Hosting
Fast and feature-packed hosting from a reliable provider
Professional features
Excellent support
CentOS only
InMotion Hosting is a professional Linux web host which delivers high levels of power and control right across its range.
InMotion’s shared hosting includes many beginner-friendly features, for example – free website migration, a bundled website builder, regular backups – but that’s just the start. More experienced users will be happy to see support for MySQL and PostreSQL databases, PHP 7, Ruby, Perl and Python, SSH access and more.
There are interesting touches wherever you look. You don’t just get the option to have WordPress, PrestaShop or Joomla preinstalled, for instance – InMotion throws in WP-CLI to enable managing multiple WordPress installations from the command line. It’s a far more capable product than you might expect, considering prices start at $5.99 (£4.30) a month for the two-year plan.
It’s a similar story as you upgrade. Optional self-managed VPS hosting – from $19.99 (£14.30) a month for the initial term – gives you CentOS 7 and a firewall, but after that, you’re able to install, optimize and configure the server however you like. Even InMotion’s managed VPS hosting still gives you root access for considerable low-level control.
What you don’t get here is any upfront choice of operating system: CentOS 7 is it. But as InMotion points out, that does mean you’ll benefit from its 12 years’ worth of experience in optimizing, securing and modifying the OS. Even if that does cause you some setup issues, the Launch Assist feature gives you a minimum of two hours with an InMotion tech support person to help you solve any problems.
2. SiteGround
Powerful Linux hosting for demanding users
Powerful features
Genuine technical expertise
Responsive support
Every Linux host claims to offer the best possible technical support, but separating the experts from the pretenders isn’t always easy. One way to identify the most knowledgeable providers is to check their high-end products. You won’t get the same level of support if you’re buying a basic shared hosting package, but just knowing that level of expertise is available somewhere in the company can be useful.
SiteGround is a great example. If the company’s standard hosting products aren’t enough, it can build enterprise-level solutions from scratch, and SiteGround’s website lists some of the technologies it supports: custom private clouds, smart use of Linux containers, replication between databases, and in-depth expertise in WordPress, Drupal, Nginx, Apache, PHP, MySQL, MongoDB, ElasticSearch, Redis, Solr, Memcached and more. This is clearly a provider that knows what it’s doing.
Home users won’t get the same level of support, of course, but even SiteGround’s shared hosting plan delivers more than you might expect: free Let’s Encrypt SSLs, cPanel and SSH access, Cloudflare integration, unlimited emails and databases, HTTP/2-enabled servers, free daily backups, and 24/7 technical support by phone, chat and a ticket system. Not bad at £2.75 ($3.85) a month plus tax for the initial term, £6.95 ($9.75) afterwards.
Ramping up to a VPS-like Cloud Hosting plan gets you a very well-specified CentOS system. MySQL 5, PostgreSQL, 5 PHP versions, HHVM, Apache, Nginx, Exim mail server, a private DNS server setup and Iptables firewall are all preinstalled and managed by SiteGround. Prices start at £48 ($67.20) a month plus tax.
Opt for a dedicated server and you’ll get high-end extras like Git integration and performance-boosting Nginx-based cache options for WordPress, Memcached and HHVM.
You probably won’t want all these features – maybe you only need a few – but they do provide a strong indicator of the company’s technical expertise. If you’re looking for a provider that can support your site and help it grow, SiteGround could be a wise choice.
3. Hostwinds
Power-packed Linux hosting for expert users
Choice of OS
Good value
Limited support
Linux hosting is available from just about everyone, but anything less than a dedicated server is often fully managed by the provider (they set up, manage and maintain the OS and all its components for you). That’s great for beginners, but more experienced users might be frustrated by the lack of features and control.
Hostwinds’ unmanaged VPS packages allow you to take complete charge of your workspace. You can choose from a range of operating systems, including CentOS, Ubuntu, openSUSE, Debian and Fedora. You can tweak and set up the operating system however you like, configure your own backup scheme, and more.
Unmanaged packages bring responsibilities, too. If there’s a missing update or some mystery software issue, you’ll be the one who has to fix it. But that shouldn’t be too intimidating for Linux users, and many elements of Hostwinds’ packages remain simple and easy-to-use (site management via cPanel, automated WordPress and other installs via Softaculous, and so on).
Even better, as you’re not paying for management, Hostwinds gives you a 50% discount on every package. Normal managed Linux VPS packages range from $9.99 (£7.14) for 1 CPU core, 512MB RAM, 20GB disk space, 1TB traffic, up to $49.99 (£35.70) for 2 cores, 4GB RAM, 50GB disk space, 2TB traffic – but the unmanaged range runs from $4.99 (£3.60) to $24.99 (£17.85). There’s no long-term contract required, so you can try the service for as little as a month to see if it works for you.
4. Liquid Web
CentOS, Debian, Ubuntu? Take your pick
Choice of OS
Excellent support
Above average prices
Part of the appeal of Linux hosting should be the level of control you get over your working environment, but this doesn’t happen with every provider. Often you’re presented with a standard base environment – typically CentOS and cPanel – with no standard ability to choose anything else.
Liquid Web has been providing quality VPS and dedicated hosting packages for years, and one reason for this success could be its flexibility. Whatever you’re after, the company offers in-depth low-level control over your server specifications.
You’re not stuck with a single version of CentOS, for instance. Liquid Web offers CentOS 6 (optionally with CloudLinux) and 7, as well as Debian 8, Ubuntu 14.04 and 16.04. The CentOS 7 images can include cPanel or Plesk, and plans are available in a mix of self-managed, core-managed and fully-managed variations.
There’s even more power over some supplementary features. While other hosts might throw in a standard backup plan, Liquid Web enables choosing how many daily backups you’d like to retain, or it can squeeze as many backups as will fit into a defined amount of disk space. Both options are charged at a very reasonable $0.12 per GB per month, so you only pay for whatever you use.
However your server is configured, Liquid Web’s excellent support is on hand 24/7/365 to resolve problems as quickly as possible. And we do mean quickly: if, say, there’s a hardware failure, the company promises it will be replaced within 30 minutes of the problem being identified.
What’s more, Liquid Web backs up these promises with an impressive service level agreement. If the company doesn’t respond to an initial helpdesk ticket within 30 minutes, you’ll be credited with 10 times the amount they missed it by, and there are similar clauses to cover you for power outages, network failure and more.
5. OVH
Learn the Linux basics on a budget
Wide choice of OS, control panels
Amazingly cheap
Poor support
Choosing the right Linux host can be difficult, especially if you’re a hosting newbie and unsure of which features you might need.
One option is to gain some experience by signing up with a flexible budget host like OVH. The company doesn’t have the best support and we wouldn’t recommend it for business-critical sites, but you do get a huge amount for your money and it’s a very cheap way to learn more about your Linux options.
Do you need a wider choice of operating systems, for instance? OVH VPS plans support Arch Linux, CentOS 6, CentOS 7, Debian 7, Debian 8, Debian 9, Ubuntu 14.04 Server and Ubuntu 16.04 Server, along with Kubuntu 14.04 Desktop if you need a user interface.
You’re not restricted to cPanel as a website manager, either: OVH also supports CozyCloud and Plesk Onyx.
OVH says you can have WordPress, Drupal, Joomla! and PrestaShop pre-installed, conveniently, although there’s no mention of a general Softaculous-type one-click application installer. Still, with full root access you should be able to manually set up whatever you need.
What’s really impressive here is the price, which starts at just £3.99 (£5.60) plus tax per individual month, dropping to £2.99 ($4.20) if you sign up for a year. OVH isn’t the best Linux host by any means, but it does provide a very cheap way to experiment with different distros and control panels to find out what works for you. It’s well worth a look for Linux newbies or anyone who feels they need more hosting experience before handing over the big money.
0 notes
Text
CentOS Web Panel Kurulumu
CentOS Web Paneli, (Dedicated ve VPS) sunucuların hızlı ve kolay yönetimi için tasarlanmış ücretsiz web hosting kontrol panelidir. Bir şeyler yapmak istediğiniz her seferinde SSH konsolunu kullanmanız için gereken işleri ve işleri azaltmak için çok sayıda seçenek ve özellik sunar. Deneme amaçlı olarak 10'un üzerinde ücretsiz web kontrol paneli denedim (Webmin ve Virtualmin daha denemedim). Sonuçta en stabil ve en işlevsel olanı CWP olarak kararlaştırdım. Sonradan gelen düzenleme: Bir üstteki paragrafta CWP en iyisi demiştim fakat bugün Ajenti'yi kapsamlıca denedim. Şu anda kararımı değiştirdim. Ajenti CWP'den daha iyidir. CentOS Web Paneli Kurulumuna tıklayarak özellikleri geçip direkt kuruluma başlayabilirsiniz.
CentOS Web Panel Özellikleri
CWP otomatik olarak istenen sunucunuza tam LAMP yükler: Apache, php, phpmyadmin, webmail, mail sunucusu... CWP Kurulumu Sırasındaki Özellikleri Nedir? - Apache Web Sunucusu (Mod Güvenliği + Otomatik olarak güncellenen kurallar isteğe bağlı) - PHP 5.6 veya 7.0(suPHP, SuExec + PHP sürüm seçici) - MySQL / MariaDB + phpMyAdmin - Postfix + Dovecot + roundcube web postası (Antivirüs, Spamassassin isteğe bağlı) - CSF Güvenlik Duvarı - Dosya Sistemi Kilidi (tüm dosyaları kitleme) - Yedeklemeler (isteğe bağlı) - Sunucu yapılandırması için AutoFixer Diğer Uygulamalar (sonradan eklenebilir) - CloudLinux + CageFS + PHP Seçici - Softaculous - Komut Dosyası Yükleyicisi (Ücretsiz ve Premium) - LiteSpeed Enterprise (Web Sunucusu)
Web Sunucusu Özellikleri
- Varnish Önbellek sunucusu (sunucu performanslarınızı üç kata kadar yükseltin) - Nginx Ters Proxy (statik dosyaları en hızlı şekilde almanızı sağlar) - LiteSpeed Kurumsal entegre - Apache'yi kaynaktan derler (performansı% 15'e kadar yükseltir) - Apache reCompiler + Tek bir tıklama ile ek modüller kurulumu - Apache sunucu durumu, yapılandırması - Apache Yönlendirme Yöneticisi - Apache vhost'larını, hayalet şablonlarını, yapılandırmayı içeriyor - Tek bir tıklama ile tüm apache Sanal konaklarını yeniden oluştur - suPHP ve suExec (geliştirilmiş güvenlik) - Mod Güvenliği: Comodo WAF, OWASP kuralları (tek bir tıklama ile kurulum, otomatik güncellemeler, kolay yönetim) - Tek bir tıklamayla Tomcat 8 sunucu yönetimi ve kurulumu - Yavaş Loris saldırılarından DoS koruması - Spam korumalı RBL korumalı Apache (HTTP PUT, POST, CONNECT'i koruma) - Perl cgi betiği desteği
PHP Özellikleri
- PHP kaynaktan derler (performanslarda% 20'ye kadar yükselir) - PHP Switcher (5.2, 5.3, 5.4, 5.5, 5.6, 7.0, 7.1, 7.x gibi PHP sürümleri arasında geçiş yapın) - PHP Seçici kullanıcı başına veya klasör başına PHP sürümünü seçer (PHP 4.4, 5.2, 5.3, 5.4, 5.5, 5.6, 7.0, 7.1, 7.x) - Basit php editörü - Kullanıcı panelinde basit php.ini jeneratörü - Tek bir tıklama ile PHP eklentileri - PHP.ini editörü & PHP bilgi & List modülleri - kullanıcı hesabı başına php.ini (/home/USER/php.ini dosyasında değişiklikler ekleyebilirsiniz) - FFMPEG, Video streaming web siteleri için) - CloudLinux + PHP Seçici - ioncube, php-imap ...
Kullanıcı yönetimi
- Kullanıcıları Ekle, Listele, Düzenle ve Kaldır - Kullanıcı İzleme (listelenen kullanıcılar açık dosyalar, dinleme soketleri ...) - Shell erişim yönetimi - Kullanıcı Limit Managment (Kota ve Inodlar) - Sınır İşlemleri: Hesap başına maksimum işlem sayısı. - Açık Dosyaları Sınırla: Her hesap için açık olan maksimum dosya sayısı. - Kullanıcı FTP ve Dosya Yöneticisi - CloudLinux + CageFS - Hesap başına ayrılmış IP
DNS Özellikleri
- FreeDNS (Ücretsiz DNS Sunucusu, ek IP'ye gerek yok) - DNS bölgeleri ekleme, düzenleme, listeleme ve kaldırma - Ad sunucusu IP'lerini düzenleme - DNS bölgesi şablonu düzenleyicisi - Yeni Kolay DNS Bölge Yöneticisi (ajax ile) - google (ayrıca rDNS, isim alanlarını kontrol etmek ...) kullanarak Ek çözünürlük bilgisi olan yeni DNS Bölgesi listesi
E-posta Özellikleri
- postfix & dovecot - Posta Kutuları, Diğer Adlar - Roundcube web postası Postfix Mail kuyruk yöneticisi - rDNS Kontrol Modülü (rDNS kayıtlarını kontrol edin) - AntiSPAM (Spamhaus cronjob) - SpamAssassin, RBL kontrolü, AmaViS, ClamAV, OpenDKIM - SPF ve DKIM Entegrasyonu - Postfix / Dovecot Mail sunucusunu (AntiVirus, AntiSpam Protection) yeniden oluşturun - E-posta Otomatik Yanıtlayıcı - E-posta Keşfedin, tüm posta kutularını bir konumdan okuyun. - Posta Yönlendirme (yerel veya uzak MX Eşanjörü)
Sistem Bilgisi Özellikleri
- Donanım Bilgileri (CPU çekirdeği ve saat bilgisi) - Bellek Bilgileri (Bellek kullanım bilgisi) - Disk Bilgisi (Ayrıntılı Disk durumu) - Yazılım Bilgisi (çekirdek sürümü, çalışma süresi ...) - Hizmetler Durumu (Hızlı servisler örneğin, Apache, FTP, Mail ... yeniden başlatılır) - ChkConfig Yöneticisi (Hızlı listeleme ve hizmetlerinizi yönetme) - Hizmetler İzleme (hizmetleri otomatik olarak yeniden başlatma ve e-posta bildirimleri) - Ağ bağlantı noktası kullanımı - Ağ yapılandırması - SSHD yapılandırması - Otomatik Düzeltici (önemli yapılandırmayı denetler ve sorunları otomatik olarak düzeltmeye çalışır) - Sysstat Grafikleri
İzleme Özellikleri
- Canlı İzleme (Monitör hizmetleri ör. Üst, apache istatistikleri, mysql ...) - Panelde Java SSH Terminali / Konsolu kullanın - Hizmetler Yapılandırması (örn., Apache, PHP, MySQL ...) - Ekran / arka planda kabuk komutlarını çalıştır
Güvenlik Özellikleri
- CSF Güvenlik Duvarı (En İyi Linux Güvenlik Duvarı) - SSL jeneratörü - SSL Sertifika Yöneticisi (SSL Sertifikalarının hızlı ve kolay kurulumu) - Letsencrypt, tüm alan adlarınız için ücretsiz SSL sertifikaları - CloudLinux + CageFS - CSF / LFD BruteForce koruması - IP erişim kontrolü - Mod Güvenlik + OWASP kuralları (tek bir tıklama ile kurulum, kolay yönetim) - Yavaş Loris saldırılarından DoS koruması (Apache için) - Dosya Sistemi Kilidi (daha fazla web sitesi hackingi olmaz, tüm dosyalarınız değişikliklerden etkilenmez) - PHP, komut dosyasının adını ve yolunu en iyi veya işlem listelerinde gösterir - Apache kullanıcı başına php işlem sayısını sınırlıyor - Otomatik Yedeklemeler - Sistem ve diğer kullanıcı süreçlerini gizle - SFTP Güvenliği - AutoSSL (yeni hesap, addon etki alanı veya alt etki alanı oluştururken otomatik olarak Letsencrypt SSL sertifikası yükleyin)
SQL Özellikleri
- MySQL Veritabanı Yönetimi - Yerel veya uzaktan erişim kullanıcıları ekleyin - Canlı Monitör MySQL işlem listesi - Oluşturun, Veritabanını kaldırın - Veritabanı başına ek kullanıcılar ekle - MySQL sunucu yapılandırması - PhpMyAdmin (veritabanı yönetimi) - PostgreSQL, phpPgAdmin Desteği - Uzaktan MySQL desteği (web sunucusundan mysql yükünü kaldırın) - MongoDB Yöneticisi / Yükleyicisi
Ekstra seçenekler
- TeamSpeak 3 Yöneticisi (Ses sunucuları) - Shoutcast Yöneticisi (Shoutcast akış sunucuları) - Otomatik güncelleme - Yedekleme yöneticisi - Dosya Yöneticisi - Scripts klasörü "/ scripts" 15+ betiğin üzerinde - Alan başına sanal FTP kullanıcıları - cPanel Hesabı Geçişi (dosyaları, veritabanları ve veritabanı kullanıcılarını geri yükler) - Torrent SeedBox (Deluge WebGU ile bir tıklama yükleyin) - SSH anahtar üreteci Ve diğer pek çok seçenek ...
CentOS Web Panel Kurulumu
Kurulum Öncesi Hazırlık
Herhangi bir sorun oluşmaması için, bu bölümün tamamını kurulum işleminden önce iyice okuyun. CentOS Web Panel yükleyicisinin başlatılmasından önceki gereksinimler: - Yalnızca statik IP adreslerini destekler. Dinamik, yapışkan veya dahili IP adreslerini desteklemez. - Bir kaldırıcı sağlanmaz. CWP'yi yükledikten sonra paneli kaldırmak için yeniden kurmanız gerekir. - Herhangi bir yapılandırma değişikliği yapmadan sadece yeni kurulmuş bir işletim sistemine CWP'yi yükleyin.
Sistem Gereksinimleri
32 bit işletim sistemleri minimum 512 MB RAM gerektirir 64 bit işletim sistemleri minimum 1024 MB RAM (önerilir) gerektirir Önerilen Sistem: 4 GB + RAM, böylece e-postaların Anti-virüs taraması gibi tam işlevselliğe sahip olursunuz. Sunucu Hazırlama CWP kurulumu için gerekli paketleri kuralım
yum -y install wget
Sunucu Güncelleştirmesi Şimdi sunucunuzu en yeni sürüme güncellemeliyiz
yum -y update
Sunucuyu Yeniden Başlat Tüm güncelleştirmelerin etkili olabilmesi için sunucunuzu yeniden başlatın.
reboot
Şimdi CWP Kurulumunu başlatmaya hazırsınız CWP yükleyicisi, 30 dakikadan daha uzun süre çalışabilir, çünkü apache ve php kaynaklarını derlemeye ihtiyaç duyar. Yükleyiciyi İndiriyoruz CentOS 6 için:
cd /usr/local/src wget http://centos-webpanel.com/cwp-latest sh cwp-latest
CentOS 7 için:
cd /usr/local/src wget http://centos-webpanel.com/cwp-el7-latest sh cwp-el7-latest
kodları satır satır sırasıyla giriyoruz. Sunucuyu Tekrar Yeniden Başlatıyoruz. Kurulum tamamlandı. Değişikliklerin kaydolması için sunucuyu tekrar yeniden başlatıyoruz.
reboot
CentOS Web Paneli Yapılandırması Sunucunuzdaki yükleyici tarafından sağlanan bağlantıyı kullanarak CWP sunucunuza giriş yapın. CentOS Web Panel Arayüzü Adresi: http://sunucu-ip:2030/ Kullanıcı adı: root Şifre: root şifreniz Şimdi bir web sunucusu barındırmaya hazırsınız.
0 notes
Text
In this guide, we will take you through the steps to Install Graylog on CentOS 8 / RHEL 8 with Elasticsearch 7.x and MongoDB 4.x. Graylog is an open-source log management system that allows System Administrators/Developers to aggregate up to terabytes of log data, from multiple log sources. It is highly scalable to fit any Infrastructure. Graylog comes with an intuitive UI, fast and powerful search feature, alerting and reporting. It lets you group systems into streams for ease of log searching and proper management. Graylog UI is simple and intuitive with complete user management and support for LDAP. Similar articles: How To Forward Logs to Grafana Loki using Promtail Install Graylog 4.x on CentOS 8 / RHEL 8 Linux Graylog requires Java, Elasticsearch, and MongoDB. Elasticsearch is responsible for logs storage. We will begin with the installation of the dependencies then Graylog. Note: This is a single server installation of Graylog on CentOS 8 / RHEL 8. For multi-cluster setup, consult official Graylog documentation. Step 1: Configure SELinux If you’re using SELinux on your system, set the following settings: sudo yum -y install curl vim policycoreutils python3-policycoreutils sudo setsebool -P httpd_can_network_connect 1 sudo semanage port -a -t http_port_t -p tcp 9000 sudo semanage port -a -t http_port_t -p tcp 9200 sudo semanage port -a -t mongod_port_t -p tcp 27017 Step 2: Install Java on RHEL / CentOS 8 As Elasticsearch depends on Java 8, you need it installed on your system prior to installing Elasticsearch RHEL 8 / CentOS 8. sudo yum install java-11-openjdk java-11-openjdk-devel Confirm Java installation: $ java -version openjdk version "11.0.14.1" 2022-02-08 LTS OpenJDK Runtime Environment 18.9 (build 11.0.14.1+1-LTS) OpenJDK 64-Bit Server VM 18.9 (build 11.0.14.1+1-LTS, mixed mode, sharing) Step 3: Install Elasticsearch 7 on RHEL 8 / CentOS 8 Add Elasticsearch repository: cat
0 notes