#lasso tool copy paste practice
Explore tagged Tumblr posts
Visit Tumblr Blog
Explore Tumblr blogs with no restrictions, modern design and the best experience.
Last Seen Tumblr Blogs


Fun Fact
69% of Tumblr users are millennials.
Text
This is probably unhinged but I didn't see a single one of you trying to stop me so who's fault is it really? 🤷🏾♀️
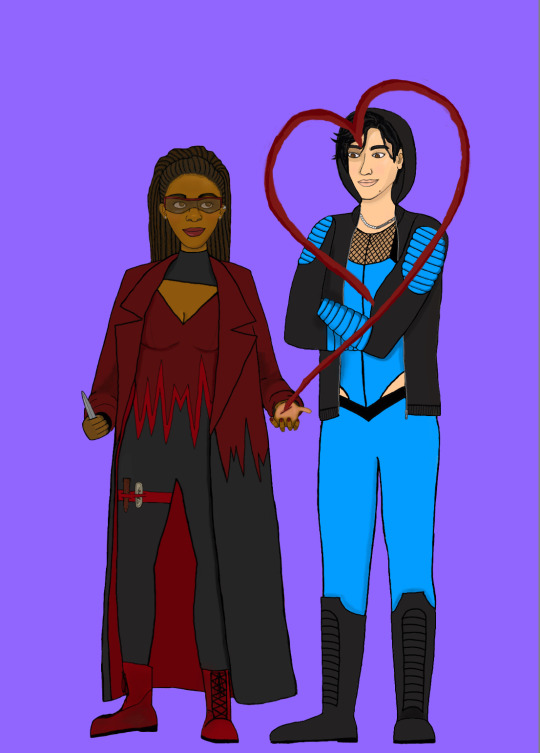
#limoreau#marie moreau#jordan li#i chose masc jordan because they’re standing slightly to the side in his original drawing while femme jordan is facing forward in hers#and them being taller works better for this very dumb concept#also twitter b*tches are annoying about them#i'm working on a piece with just marie and femmejordan as well so eyes peeled everyone#supersuit limoreau#added some details on jordan’s face hair and jacket and a bit on marie’s too#and i think i finally got jordan’s necklace right#lasso tool copy paste practice
20 notes
·
View notes
Text
forgot to post this one whoops

quick 10 min sketches
#tried to not erase but i struggled slightly#struggling with expressions so hard#once again I'm reminded that traditional art is practically my calling no matter how much i do digital#everything is so much easier but at the same time i miss my lasso and copy and paste tool#oc art#random characters#yuru camp#nemi rambles#nemi draws
7 notes
·
View notes
Note
So, what method do you use when drawing to keep going?
I personally always seem to struggle to finish an art piece and can never get myself to fully focus on learning the entirety of anatomy, etc.
I crave to finish an art piece again, I miss the feeling, but I haven't been able to do it in a long long while, I'm just hoping for a little advice, not sure who else to go to cause I don't have any friends but I look up to you a crazy amount so I figured I'd give this a shot, this isn't forced to answer by the way!
I don't want you to feel like you have to answer this.
If you do or you don't, you're still really cool, your art is awesome and inspiring and your aus are as well.
Heck, you're a pretty damn cool person too, art really does reflect artist sometimes huh?
Anyway, I'll get out of your hair, keep up the amazing work <3/p
When it comes to finishing an art piece that you know you want to finish but suddenly lose the motivation to
What I usually do (this might not work for everyone but it somewhat helps me so it helps you as well then that's awesome) is when I'm in the middle of drawing a piece and I suddenly lose interest or motivation, or something isn't going well which is making me lose patience. I just put the pencil down, and go do something else for a while until I get the urge to continue or try again. Example I go play video games for a while or maybe watch a movie or youtube for a bit, just giving yourself a small break from drawing until that motivation to draw comes back and then you go back to that piece and try again. And basically how ever often that happens (aka losing motivation, patience, etc), you just repeat the cycle until you're slowly getting closer and closer to finishing that piece (You can also doodle on the side as a refresher but I don't recommend starting a whole new piece when you want to finish your first one, usually for me I just end up forgetting the last drawing completely because I accidentally started a new project 😭 but that might be a me problem if it doesn't happen to you then it's a-okay) This is mostly what was helping me finish projects since I have a short attention span and often lose motivation and what not so I constantly do this FDSFDSDSF.
Now for anatomy, I'm not the best at anatomy myself but my first advice is don't immediately give up if your anatomy isn't perfect on the first try, it won't always look good on the first attempt which is why it's okay to go through a few trial and errors before you get it to a point you like it enough to continue. Also I'm not a professional and I suck at explaining things and honestly I know jackshit about anatomy I just wing it most of the time. But I can give you small tips that come in handy when drawing poses!!
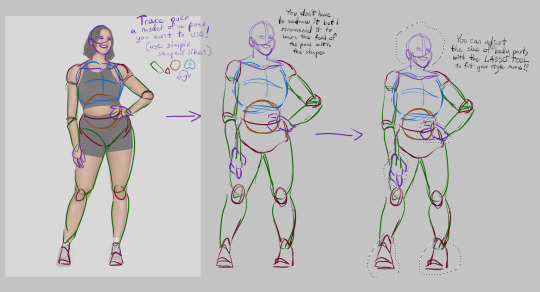
We're gonna use a reference for this, when you have a reference for a pose you want to use. A good way to get a hang of the pose is by tracing over it with simple shapes (such as cylinders, circles, triangles, etc) and then redrawing it with those same shapes to again get the hang of the pose, you don't have to really do it but it's a good practice so I recommend it. Then, after you have your pose, you can take the lasso tool (or selection tool) and then just resize body parts to your liking so they fit your style more!!! And ofc now you can draw over it and use it as a base for the character you want to use it for.
Now that's the first method, but I have a second one which is fun, I call it "frankesteining", which is where you grab 2 or more images and then take body parts and paste them onto the main reference picture you want to use.

Like here, you like the pose of the first reference, but wish both of the models arms were on the hips? Fear not! Just grab another image of a model who's arm IS on their hip
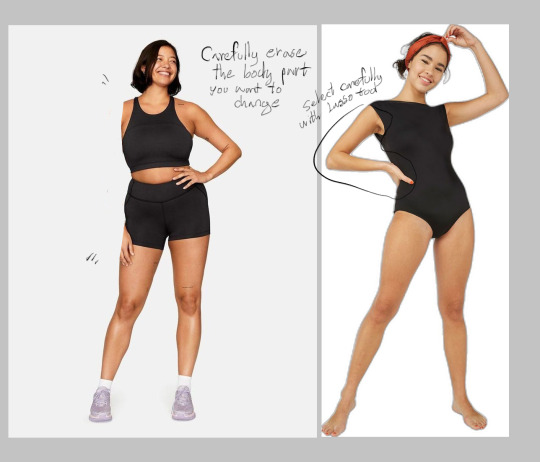
Then carefully erase the arm/body part on your main reference that you want to replace with another. Select the arm/body part of the second reference with lasso tool, and slowly trace over it so you can copy/cut it out and then paste it onto your main ref
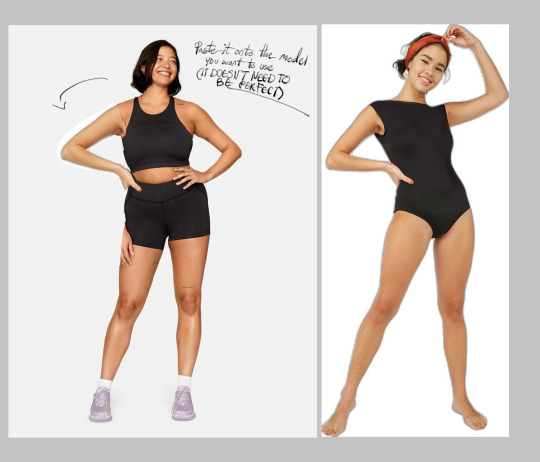
Like this! Now remember, the reference doesn't need to look aesthetically pleasing, after all you're just using it as a reference, so it's okay if it doesn't look perfect!! You can do this with many body parts as you want btw, just keep cutting and pasting until you get the pose you wanted!!

And finally just draw over it! Using the same methods as the first one, shapes, redraw and all! No one will ever know you were playing pretend dr frankenstein with the reference pictures before this!
Now these are the methods I use when posing characters, they might not always come out right the first time but if you keep trying you'll eventually get something you like a lil more than your last ones!! You can also just use a 3d model posing website/app and then screenshot the pose and redraw it from there. But this is if you're one of those people who for some reason just can't get the hang of those damn 3d model posers (aka me)
GUHH THIS POST IS SO LONG IM SORRY, I hope my rambles helped you out at least a lil bit and I hope you continue your journey in making art, believe in yourself and eventually everything will turn out alright in the end stay strong fellow artist 💜
#Also I'm sorry if there are misspells and such it's 2am#I'll edit the post later for misspells (I wont)#mono ask#Also if anyone else has any advice or tips as well please feel free to leave them in the replies tyvm
14 notes
·
View notes
Note
How'd you make Quicksilvers suit blue in some of ur comic edits (Love them btw )
I typically just use the Hue and Selective Color tools in Photoshop. Pietro’s costume is all one flat color, outside of the black and white accents, and because I’m changing it from from one cool tone to another, it’s usually really easy.
I always start by making a lasso selection around Pietro’s body so I can copy and paste it into a separate layer. That way I can manipulate the colors on the suit without effecting the rest of the image, and if I need to blend out the edges or clean up any details, I can just use the eraser. In general, I think it’s good practice to copy things into separate layers, even if you don’t think you need to. It just gives you a lot more freedom to make adjustments.
I have a cracked copy of CS6 on my old computer, which is what I use to do heavy-duty photo editing, like for my cosplays, but these days I make all of my comic edits on Photopea, which is a free-to-use Photoshop dupe. It’s not as powerful, but I’ve gotten pretty good at getting it to do what I need for los-res graphics.
7 notes
·
View notes
Text
How to Use a Digital Planner on GoodNotes & Notability: A Beginner's Guide
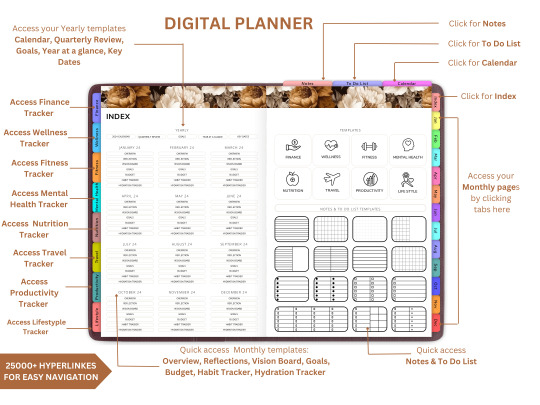
Are you new to the world of digital planning? Whether you just bought your first iPad or want to switch from traditional paper planners, this guide will walk you through how to use a digital planner in GoodNotes and Notability—two of the most popular annotation apps available today.
Digital planning is a fun, eco-friendly, and highly customizable way to stay organized. And the best part? You can start immediately with tools you already have and a beautifully designed planner from Digital Softech.
What Is a Digital Planner?
A digital planner is a PDF-based planner that mimics the layout and functionality of a traditional paper planner but is designed to be used on tablets. With apps like GoodNotes and Notability, you can annotate your planner using a stylus (like the Apple Pencil), just like writing on paper—but with endless digital advantages.
Why Use GoodNotes or Notability?
Both GoodNotes and Notability are powerful, user-friendly apps that support handwriting, highlighting, and hyperlinking. They're perfect for digital planning because they allow:
Seamless writing with a stylus
Easy importing of PDF planner files
Customization with stickers, images, and templates
Hyperlink navigation between planner pages
Tip: Start with GoodNotes if you prefer a notebook-like layout, or choose Notability for audio-note syncing and multi-media features.
What You Need to Get Started
Here’s your digital planner starter kit:
An iPad or compatible tablet
A stylus (Apple Pencil is ideal)
GoodNotes or Notability app
A digital planner PDF (available at Digital Softech)
Step-by-Step: Using a Digital Planner in GoodNotes
1. Download Your Planner
After purchasing or downloading a free digital planner from Digital Softech, save the PDF to your iPad.
2. Import into GoodNotes
Open GoodNotes
Tap the "+" icon > Import
Choose your downloaded planner PDF
Your planner is now ready to use
3. Learn the Interface
GoodNotes has tools like:
Pen and Highlighter
Eraser and Lasso Tool
Shape Tool
Text Box
Tip: Use the Lasso tool to move stickers or notes around your planner easily.
4. Navigate with Hyperlinks
Most planners from Digital Softech are hyperlinked—tap on dates or tabs to instantly jump to different sections.
5. Customize with Stickers & Inserts
Drag and drop PNG stickers into your planner
Copy-paste weekly inserts or habit trackers
6. Sync Across Devices
Enable iCloud sync to access your planner on iPhone, Mac, or multiple iPads.
Step-by-Step: Using a Digital Planner in Notability
1. Download Your Planner
Download the planner PDF from Digital Softech and save it to your iPad.
2. Import into Notability
Open Notability
Tap the Import icon (arrow)
Choose your planner file
3. Use Annotation Tools
Notability offers:
Pen, Highlighter, and Eraser
Voice Recording
Media Insertion (images, web clips)
Tip: You can record meetings while writing in your planner—great for students and professionals!
4. Customize Your Layout
Drag in extra templates or sticker sets to decorate your weekly and monthly views.
5. Secure and Backup
Enable automatic iCloud backup or Google Drive integration to never lose your notes.
Digital Planning Tips for Beginners
Set a Routine: Plan daily or weekly to stay on track.
Use Colors Strategically: Color-code tasks or priorities for clarity.
Add Digital Stickers: These add personality and can even act as reminders or labels.
Try Layering: Add sticky notes, checklists, and text boxes on top of your planner pages.
Practice Makes Perfect: It might feel new at first, but give yourself a week to adjust.
Common Mistakes to Avoid
Not Backing Up Your Planner: Always sync or export regularly.
Overloading Your Layout: Keep things clean and readable.
Skipping the Tutorial: Apps like GoodNotes and Notability have guides—use them!
Bonus: Where to Get the Best Digital Planners
At Digital Softech, we specialize in premium, easy-to-use digital planners designed for both beginners and seasoned users. Our planners are:
Hyperlinked for easy navigation
Aesthetic and minimal
Affordable and reusable
Whether you want a daily planner, wellness tracker, goal-setting template, or student planner—we’ve got it all.
Explore now: https://digitalsoftech.com
Final Thoughts
Learning how to use a digital planner with GoodNotes or Notability can truly transform your productivity. With a bit of practice, you’ll be planning smarter, faster, and more creatively. From hyperlinks to stickers, the digital planner world is full of possibilities.
Ready to get started? Visit Digital Softech and download a digital planner that fits your style and needs. Your perfect planning experience is just a tap away!
0 notes
Text
26/2/25 Week 2


today we are using the photoshop to change images. I duplicated this boat. I did this by selecting the boat and copying the imagine onto another layer, once that was done I used the brush tool with a masking layer to change what was shown and not from the imagine I copied.

I worked on changing a certain peace of the picture. I changed the orange to be a different colour by using the different tools such as the elliptical tool and the polygonal lasso tool, these allowed me to add and remove from my selected area which i then turned into a masking layer allowing me to change the colour of the orange. this one I had lot of trouble thing due to me feeling ill at the time.


In this photo I changed the hue on the middle of the plant. This was done by using the Quick Select Tool and I used the Polygonal Lasso tool to fix up the selected area. Then I turned the selected area into a mask which I then linked a Hue/saturation layer to change the hue of it. this was similar to the past project which made it a lot easier this time as it was just remembering what to do


With this imagine I used the object selection tool to and the masking layer to remove this bird from the imagine, then I used the brush tool, with the eyedropper tool so I can go around the edges and darken/crisp the bird up so it fits with the new background more coherently. then I opened the new background and drag and drop the bird into the new imagine, then transforming the bird which flipped the bird so it faced the right way.
for the last two imagines I was off sick so I had to do them without much to any help. this made the last two more difficult but allowed me to practice the skills another day making it easier to remember them
0 notes
Text
Compositing Homework
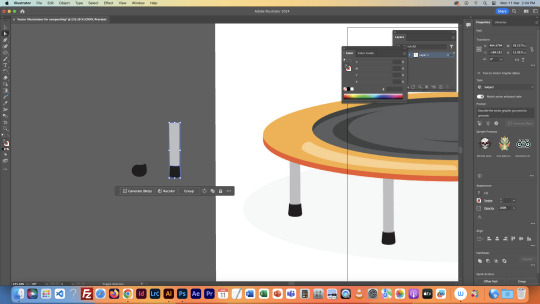

The two screenshots above are the forming and creating process of the trampoline, which is the first vector image that will be imported into the Photoshop file as a smart object. This vector object is made up of ellipses, many uses of the pen tool as well as a lot of grouping and colouring to give the tramp a bit of dimension and a 3D life effect. I did this on the side of the tramp making a shape with the pen tool sort of like a reflection, then coloured it in lighter to give that shiny effect. Also with overlapping ellipses with a darker shade, to look like the tramp is being used at that time. This tramp was not too hard to do, but I enjoyed creating it as it had small challenges it, especially the legs as it took a small amount of work to make the handles work accordingly to create a dipping effect (as seen above). Once the image was completed I then grouped it together.
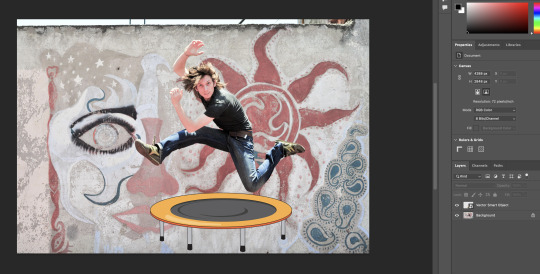
This is when the vector image was placed into Ps as a smart object (as seen below) and I repositioned it to where I think looked appropriate under the jumping man. This part was difficult as I found it hard to locate how to reshape and move the object by actually directly selecting it and then playing around with it.

This is the menu that comes up when you paste the object from Illustrator and you have to select it to make sure that it is put into the file as a smart object when placed. This is a major step in compositing.

This was the creation idea of the second vector object which was a bird that I had copied off one I had found on the internet. The bird, shows anchor points, broken points colours, shapes handles etc. I enjoyed creating this bird as I enjoy having something to go off and understand how to put different pieces of the bird together when using the pen tool to create and shape the bird's body, feathers and legs. The legs were great practice for using broken points to do harsh turns as such. Broken points were also useful when doing the birds tail as it had 3 turning points. Once I was happy with the shape and colour, I made some adjustments with the direct select tool and made it look rounder as well. I then added the bird features on its belly, and under the eye and added a stroke on each section of the outside of the bird to really appear as a vector image.

Once my bird was complete, I then inserted it into Ps as a smart object, the same process as the trampoline. I thought the bird would look appropriate on the man's foot as it was a pretty flat surface and would give the idea of it showing that the man is jumping very high that he is at the bird flying hight almost. Once I was happy with that, I then moved on to my 2 raster (pixel) images.
Original images below:


My first raster (pixel) image was of a wall growing plant of flowers to give the image some true nature depth in the image to make the wall look older and more bust etc. I began by inserting the full image into the file, with the image already being a complex image, with a lot of busy backgrounds and flowers going in different directions and not being fully together. I began by selecting the quick selection tool that gave a direct rough go at getting all of what Ps thinks is all of the flowers. Once I was happy with that, I decided to go to select, press inverse and then delete everything opposite to what I had selected on the flowers. Once that was done, I then used the polygonal lasso tool which is selecting what I'm deciding with my mouse. I removed what I think look out of place until i was happy with the result. I then placed the image in where I felt it worked best and then selected the blur tool to make the edges not look as harsh and blend into the wall a bit more. I am not completely happy with how i would have wanted it to come out, just because it is a very picky image and was quite complex in selection where I could spend hours fixing and tweaking until it was perfect. Overall, I am happy that it came out ok and think it works well in the image.
I then moved on to my second raster (pixel) image which I chose to be a graffiti spray paint can as it seemed appropriate considering the background being graffiti. I repeated the same process as the wall flowers by using the direct select tool, and this image was easier since it was simpler with the plain background to select the paint can perfectly. I then did a few touch-ups by selecting its layer and adding a bit more brightness and saturation to the can so that it could be seen a bit better. I then placed it where felt appropriate in his hand and felt ok about it.

The above is the completed image of the 4 adjustments to it. I am overall pretty ok with how it came out. I am happy with my vector creations as opposed to my raster images as I think I need more practice with it, especially with more complex backgrounds to images. I think everything in the image works well together and doesn't seem completely all fitting as I think they all work with what the original image was, I also think that the image can't look perfect in terms of how it has fake vector objects in it. Reflecting on it, it was a good learning experience and I got very invested in creating my vector objects throughout this task as it gave me more confidence etc.
0 notes
Note
Do u have any advice for getting started on making graphics? I’d love to start making poke graphics but i have no experience :(
If you’re brand new to photoshop, I suggest googling some tutorials for beginners. I’m happy to help others with specific issues, but you’re better off having an expert teach you the basics than some nerd with no formal background in graphic design lol. The tutorials will help you get familiar with photoshop so it’s not so overwhelming when you start using the program. With that in mind:
Play around with photoshop. Don’t worry about creating something to post on tumblr, just open an image in ps and practice editing by experimenting with the various tools and settings.
Start simple and work your way up from there. When you feel comfortable with the basics then you can try creating more complex designs
PSDs can be useful when you’re new since they show you how someone achieved a certain coloring, but don’t rely on them. I don’t use PSDs since they almost always require adjustments, and at that point I’d rather just create my own coloring from scratch. But they can be useful as a learning tool.
If you sharpen your images, use smart sharpen since that gives you more control of the results than the other kinds of sharpening filters
I use levels adjustment layers for brightening images. Sometimes I use the curves tool, but I rarely use the brightness/contrast tool. I just think the levels tool provides better results
I get the vast majority of my images from bulbapedia. I’ve been really spoiled by creating graphics for pokemon because the images have transparent backgrounds (you need to save the image and then open it in ps; if you try to copy/paste a transparent png, it will have a black background) so I rarely have to cut out an image (i.e. erase the background) which is amazing because it is my least favorite thing to do. It’s super tedious and I don’t have the patience for it lol
If you do have to cut out an image, use the polygonal lasso tool or the pen tool. Don’t use the magic wand tool since it’s too unreliable
This is just personal preference, but tumblr has a thing for either using colors that make one’s eyes bleed or bleaching the colors from an image. I’m not a fan but I realize this is subjective and what looks good is up to the op. If you do like lighter colors then I suggest reading this tutorial by @anue on using pastels
I listed a bunch of resources that might be helpful here
The best way to be inspired is to just focus on what you love rather than what’s popular. There are some characters who I couldn’t care less about and having to create an edit for them would be a chore. So if you want to make several edits in a row featuring your favorite pokemon then go for it!
8 notes
·
View notes
Note
Hey I really love the glitchy art you've posted recently? I've never managed to make it look so convincing, would you be able to explain how you do it or give advice on drawing glitchy things? It's okay if you can't.
Hi! Thanks so much, that's kind of you haha. I use Clip Studio so some of it will be relevant to that program specifically, but the general idea is really simple and ought to work for any layered drawing program you're using.
I'm gonna use this panel from my comic as practice!

Usually when I'm doing glitchy effects it's a combination of the lasso tool and layer blending modes. Once I'm finished with the drawing I want to mess up, I flatten the image and make several (usually square) selections, then copy and paste them into a new layer. Drag them around until you're happy with them! If you want more distortion, once you move them to the new spot you can select the base image layer and repeat the process from your squares' new position.
Deselect everything, make adjustments if you want. Make TWO copies of your new little glitchy bits and drag them in different directions, still mostly overlapping each other, then start trying different blending modes. I usually like to set one layer to Linear Burn and one to Add Glow to get a dark and a light, but you can use whatever you like!

Easy glitching! Aside from this it's really just applying this idea in different ways until you get an effect you're happy with. Clip studio has a lot of glitchy brushes you can download from their assets library, and I like using those as shapes or extra textures if I need something more dramatic.

New layer, take your brush and scatter a pattern randomly over the area, select it and turn off the layer with the brush strokes.
A mess! You can also just use this technique with a brush you like once you're finished distorting the original image.

There's a lot more you can do with distortion besides this! You can add localized color adjustments, you can pull your particles from a completely different image and superimpose them onto the original, and playing around with copies of the linework can really fuck something up hehe. My advice, as someone who regularly needs to come up with visual weirdness for a lot of different things in my work, is to think about what's causing it. If it's an actual screen of some kind, think about how that screen's components could fail and how that would look. If it's a hologram, its entire shape might change and you could use a layer filter to pinch or drag it before adding the effects by hand. A distortion coming from a magical source might use completely different shapes than what we're working with here. Get weird!


#long post#i drew this#I don't really do tutorials so I hope this is somewhat helpful haha#foreverthepretender
11 notes
·
View notes
Text
Fundamentals 1: Week 5
22nd March
We were given a homework task this week to find two images, one that would be selected, cut out, and then superimposed onto the other one. Exactly what we just practiced with the hummingbird but now with the freedom to choose our own images. I really didn't know what to do for a while but then had the idea of finding a realistic dragon image and putting it onto a grassy landscape (game of thrones kind of stuff). Here are the two images I am going to use:


The first thing I do is work on selecting the dragon to create a cut out. I create a copy of the background image of the dragon and get to work. I used the magnetic lasso tool to help me quickly go over the outline of the dragon to create my selection. The magnetic lasso tool really helped me with the awkward edges and it was fairly easy to control and delete points if they went off track. Here's what I ended up with after creating my mask:

I knew it wasn't going to be super tidy so I placed the mask on a layer background that colour matched the mountains in the background landscape image so that I could see which areas I needed to erase/ blur out. Unfortunately I forgot to take a screenshot of what the dragon looked like before I erased all the white ares around the outline but here's what it looked like afterwards:

I'm ready to place the dragon onto the landscape photo so I copy and paste it onto the image:

I feel like it doesn't quite match the lighting of the landscape so I open up my curves palette, ensure that it will only effect the mask, and make slight adjustments to the brightness of the dragon by making the shadows slightly darker and the highlights slightly lighter. This creates some more intense shading on the dragon which suits the shading of the landscape a bit better. I also wanted to adjust the saturation of the dragon as the landscape is quite vibrant and I wanted to see if making the dragon slightly more saturated would help it fit into the picture (even though I'm very aware it's not going to look super realistic because it is a dragon). Here's how the adjustments turned out:


The image below is my final result. I am actually pretty happy with how this turned out. I knew it was going to be hard to make the dragon seem like it was actually flying around in the grassy landscape but I think I've done well given my new experience and skills that I learnt today with Photoshop. I think if I were to add more to this I would want to add a shadow on the grass that is underneath the dragon to make the image a little bit closer to appearing real. I did play around with trying to make a black copy of the dragon which I turned upside down but after fidgeting around too much and not being happy with how it looked I eventually called it a day and gave up. Overall, this was quite a fun homework task and it showed me how I can mess around with Photoshop tools in my own time to improve my skills.

0 notes
Text
Product Photography Photoshop Practice
One of the images taken today during college was done using the same lighting setup explained in a previous post. However I used a piece of glass from a photo frame in order to get a nice reflection of the controller. Although the image turned out fine, there were some anomalies. For example dust particles, scratches and unwanted reflections.
How I removed scratches and particles from the image:
The image above is what I managed to create using a variation of techniques. Some of which were removing scratches and dust particles within the image.
The way I removed the vast majority of scratches and particles, was by duplicating the original image. Then converting to a smart object. Afterwards, I went into “Filters” then “Noise” and selected the option “Dust and Scratches” once on the Dust and Scratches option screen. I changed the radius to around 21 with the threshold being between 5 and 11.
Furthermore, I held the alt key and clicked on the new layer mask icon. This created a layer mask that was fully black. I now then selected the brush tool and made sure that the primary colour was white.
Finally I painted over the specs and scratches which made them mostly disappear.

How I removed the unwanted reflections:
The way I managed to hide the unwanted reflection, was by first using the lasso tool and copying a segment of the image that did not have either the product or reflection in. With a section of the image copied, I pasted it onto the main photo.
Pressing control t with the copied image layer selected, I transformed it to fit the unwanted reflection area. After I have the copied image over the unwanted reflection, I created a layer mask. With the layer mask selected, I then had white set as the primary colour and selected the eraser tool. Using the eraser tool, I got rid of any part of the image that overlapped with the main product.

Sources that helped:
https://www.youtube.com/watch?v=LLTIf3lBYbI
https://www.youtube.com/watch?v=i8Z18aZqKtI
1 note
·
View note
Photo

♡MAKING CC IN PHOTOSHOP♡
I finally decided to make a CC tutorial. However, after finishing the screenshots I realized why I have been avoiding this. It’s a VERY LONG tutorial and it’s definitely not the easiest! If you are trying to make CC, please do not get discouraged. Keep trying and practicing, none of my cc works out the first or even fifth time! (This tutorial does not talk about meshing!) Keep reading for the tutorial.

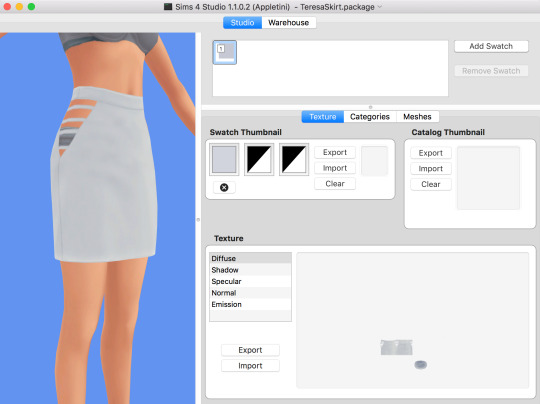
Step 1. Open up Sims4Studio and choose Create CAS standalone. Yours may look different if you are on PC (I use MAC).

Step 2. Choose a piece of clothing you would like to work with. I am choosing this skirt because I like the mesh and it’s white so it can be recolored easier. If the clothing is not white, try this photoshop tutorial to make it white.

Step 3. I named this TeresaSkirt inside a folder I created called Teresa and clicked save.
Step 4. Once the display opens, click on diffuse and choose export.

Step 5. I saved this as TeresaBase and clicked save. This is what will open in photoshop.

Step 6. Once I open this in photoshop, I am going to duplicate the layer so I can make the skirt high waisted.

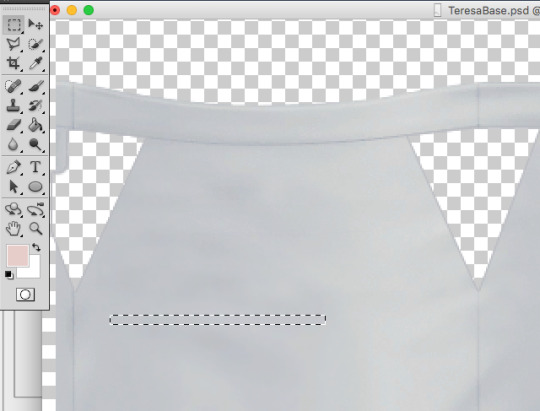
Step 7. On the duplicated layer I am going to select the top half of the skirt with the rectangle selection tool.

Step 8. Next I am going to take the move tool and move this selection up.
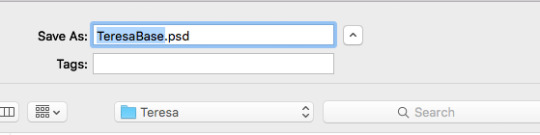
Step 9. Before I go any further, I am going to save this photoshop file, do this often while making your file to make sure you don’t lose any progress. I saved it as TeresaBase.psd.

Step 10. Now let’s save it so we can see how it looks in sims4studio. Normally I would save as a .dds file but I will save as a .png just to see how it looks. I always save as test.png, I use this same file to test throughout my cc making.

Step 11. Go back to S4Studio and click on Diffuse and then import. Choose the test.png file. This looks like the height I want. If it wasn’t I could go back and adjust as needed.

Step 12. Back in photoshop I would like to clean up the line between the bottom and top layer. So I click on the erase tool and choose a brush at the size 91px with a hardness of 0. I click on the top layer and erase just at the bottom of the layer so now they look blended together.

Step 13. Next I will go to Layer>>Merge Layers to merge both layers into one.

Step 14. Now to clean up some of the repeated shadows. Since I duplicated the skirt to make it higher, some of the shadows can look weird since they are exactly the same. So I am going to take the Clone Tool, with a brush size of 37 px and a hardness of 0. I also set the Opacity to 85%.
Basically the clone tool will duplicate anything you choose. On a Mac I hold down Option (ALT) and a little Target comes up. I click on the area I want to clone. That is now my source, I now click anywhere, not holding any buttons and I will start to paint over other areas. You may have to play with this tool a little bit to get the hang of it.

Step 15. You can see above the before and after. In the second screenshot the shadows are more varied.

Step 16. Next I am going to create a layer mask to cutout some of the skirt by clicking the “Add Layer Mask” icon.

Step 17. Then take the Polygon Lasso tool to select an area to cutout. I am cutting out part of the hip.

Step 18. Next take the Paint Bucket Tool and make sure the MASK is selected in the layers window. Anything black will be removed and anything white will remain, so I will fill in the selection with black. (Tip: If the mask is selected it will only let you use black or white) Now that selection is gone.

Step 19. Now we need to make sure we still have the selection so that we can duplicate for the other hip. Hold Command and click on the little mask thumbnail. This will select the mask. (It might still be selected from before)

Step 20. Now make a new layer by clicking the new layer icon from the bottom of the layers window. Choose any color and fill in the selection on this new layer using the paint bucket.
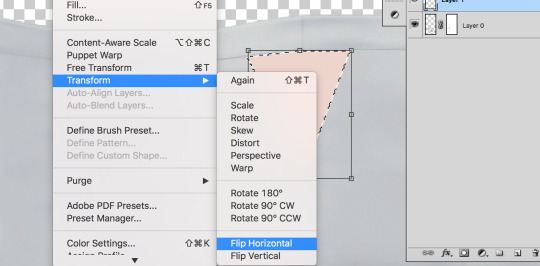
Step 21. Then go to Edit>Transform>Flip Horizontal. This will flip the shape we just made.
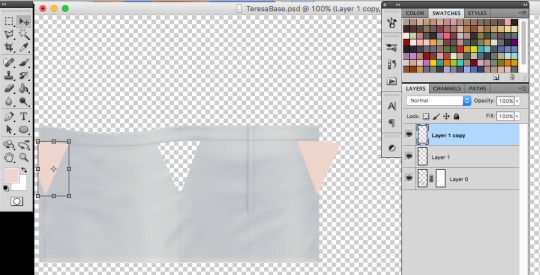
Step 22. Now I am going to duplicate the layer by right clicking the layer and choosing duplicate. I need to because half of the hip is on the far left and the other is on the far right. Now I am going to move each shape to where I want the skirt to be cutout using the Move Tool.

Step 23. I save really quick as test.png again to make sure the shapes met up where I wanted to, looks good! If I needed to adjust I could.
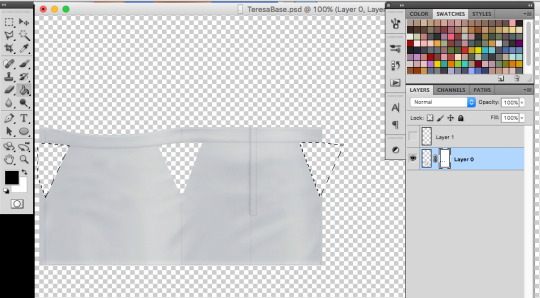
Step 24. This next part a little tricky. I want to add these new shapes to my mask. So first merge the two shape layers into one by clicking merge down on the top shape. Then I will select the shapes by holding Command and clicking the top layer thumbnail in the layers window. The shapes should be selected. I clicked on the little eyeball so I couldn’t see the pink anymore, just the selection. Then I will click on the MASK and fill in the selections I made just with black to cutout the skirt. Delete the top layer with the shapes.

Step 25. Now let’s add some darker edges to those cutouts. Command+click on the MASK thumbnail to select the mask. Then create a new layer, and go to Select>>Inverse. Fill in the selections with any color. I just chose grey.

Step 26. Set the fill to 0%, this will hide the layer but we are going to add a stroke. Go to “fx” at the bottom of the layers window and choose stroke.

Step 27. I chose a stroke of 1px, position is outside and I chose a medium grey. This will just create a little darker edge on those cutouts.
Step 28. Now I am going to add some stripes across the cutouts. Go back to the skirt layer and grab a long thin selection with the Rectangle Selection Tool.

Step 29. Copy and paste this selection onto a new layer and drag it to the bottom, under the skirt layer. Then I am going to go to Edit>>Transform>>Warp. I just chose Arch from the presets on the top bar. I set the bend to 12% so it wasn’t just straight across.

Step 30. I duplicated this layer 3 more times to make more stripes. I moved each one to where I thought it looked best using the move tool. I then held down SHIFT and selected all of the stripe layers and right clicked and chose Merge layers to merge all of the stripes together.
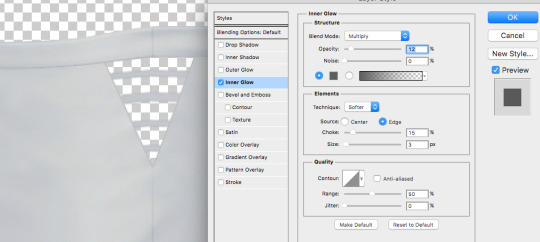
Step 31. I don’t want these to just be solid gray so I added a smaller inner glow. Double click the layer or click “fx” and choose Inner Glow. I set the Blend mode to Multiply, Opacity is at 12%, Choke is 15% and size is 3px. Adjust these until it looks good!
I then duplicated this layer twice (one for the left and one for the right) and added them to the other cutout sections as well. I had to save as test.png a couple of times to check and make sure the stripes lined up. I then went to layer>>merge visible.

Step 32. Once everything was merged, I deleted and sections I didn’t really need. Save this as teresabase.psd for recoloring later.

Step 33. To create a shadow we are going to add a white background by making a new layer, filling it with white and then moving it to the bottom.

Step 34. Now click on the skirt layer and click on “fx” and then choose color overlay. Change the color to white (#ffffff) so the whole skirt is white. Then also choose outer glow. I set the glow to Blend mode: normal, Opacity: 24%, Noise: 0%, the color is #333333, Spread: 5%, Size 4px. Click OK.

Step 35. Save this as a shadow.dds file, I downloaded a MAC .dds plugin from here. MAKE SURE YOU CHECK MIPMAP.
Step 36. Save all of your recolors as .dds files as well (make sure mipmap is checked)
Go back into S4Studio
-- I saved a white.dds file so I imported that into diffuse (this will be my white swatch) -- I uploaded my shadow.dds into Shadow. -- For specular, I just click on make blank. -- For normal use this .dds file to import into normal. -- Leave the Emission alone
Also if you want to import a thumbnail you can use this template: THUMBNAIL TEMPLATE. Make sure the thumbnail is on the first swatch.
You obviously might not have a screenshot yet for the thumbnail, but you can always go back into S4studio and add it later once you have tested the cc.

Step 37. Before you save, go into categories and uncheck Allow for Random.
Once you add all of your swatches you can save and test in game!
A lot of CC making is testing, redoing, trying something else, and failing and trying again so just keep at it!!
#my tutorials#photoshop tutorial#sims 4 tutorial#ts4 tutorial#longest tutorial ever#im sorry#cc tutorial#sims cc tutorial
815 notes
·
View notes
Note
Hey! Love your edits. I was wondering if you could take us through how you make your edits? And any tips on how to start with editing?
I COULD try and livestream the whole process because one single edit I post is quite literally, a combination of different edits, some parts are even completely redrawn based of canon material and references.
I think the best thing to do is to just show you in rough lines how I created my last edit:
Also seems like the perfect time to post all my wips and bonuses! which isn’t much but… yeah
1. BACKGROUND
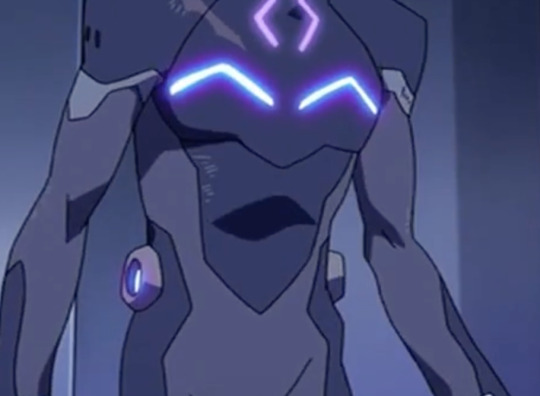
So first I searched for a healing pod for Keith to sit in.
So I headed to an episode of Voltron which featured a lot of empty healing pods :S1 EP9: Crystal Venom. Eventually I found this screencap:
So I edited Coran (+ the annoying watermark) out and voila:

I’ve made a canvas where I could drop the rest of my photoshop shenanigans in later on!
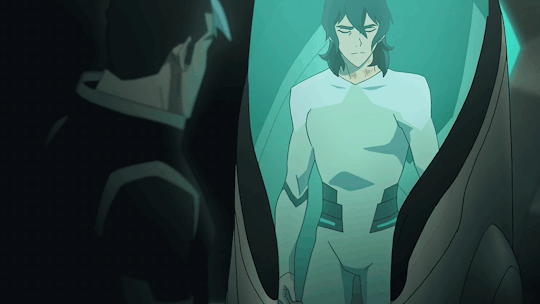
2. KEITH IN THE POD OUTFIT
Okay, this one is a lot trickier. To recreate Keith wearing the outfit I used the following images:
Keith’s body came from this screencap:

Keith’s head came from this screencap:
I redrew Keith’s entire pod outfit onto Keith’s body more or less?
I used a couple of screencaps of Lance wearing the outfit for design + color reference, pretty much how actual artists do it when they have to draw things from the show!
This image came in really handy because there I could also color pick the shadows on Lance’s chest & shoulders.
Now, to actually start DRAWING, the following tools will be your life savior:
1.

The brush tool to create lineart, which you’re going to draw right on top of Keith’s body. Since the pod outfit is really basic and the animation of the show is literally just black lines, you can make a really basic outfit from just…well.. lines.
Also to make sure your lines are anti-aliased, exactly like in the animation, use these settings:
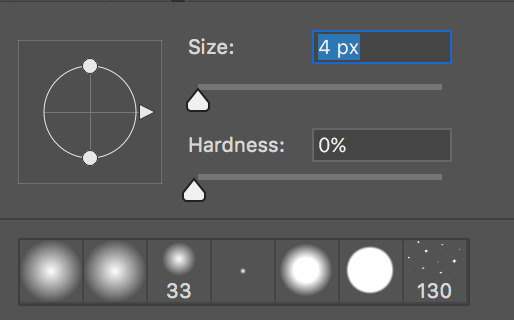
Since your brush is really small (from 3 to 4 px in diameter), your hardness has to be at 0% (that’s what she never said). It’s the softest (and most anti-aliased) you can get.
2.

The color picker to take samples of the colors of the pod outfit (including shadows!). You’re going to use this A LOT to take samples from the outfit on Lance himself.
3.

The polygonal lasso tool to select areas on Keith’s body to so you can fill in entire areas. With this tool you’re going to color your lineart (on top of Keith’s actual BOM suit, lmao)
For the shadows, I’ve used the shadows that were already on Keith’s body.
It should give you this result:
(also yeah I flipped the canvas because my POD is headed in a different direction)
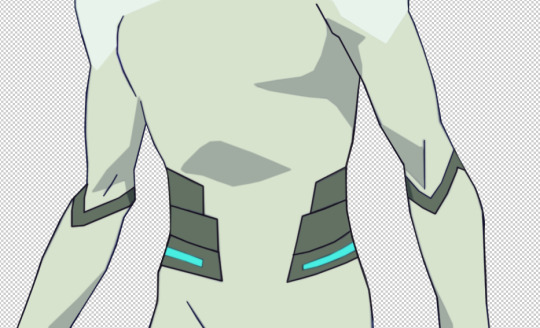
If you still notice some imperfections, you can always fill them in again with the brush tool, or if you’re unsatisfied with how the shadow looks you can always fix it up with the polygonal lasso tool as well!
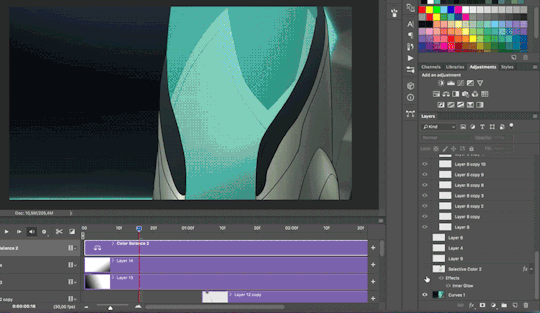
For the next step I’ve selected out Keith’s head from the first screencap, pasted it onto Keith’s body, messed around with the colors a bit, to make it match the color scheme (I always use Color Balance & Selective Color for this)
Since Keith was still hunched forwards to much IMO, I’ve used Liquify (Filter > Liquify) to straighten him up and I’ve copy pasted Keith’s left arm onto his next one so that his joint is pointing inwards, so his arm isn’t sticking out as well.
which gave me this result:
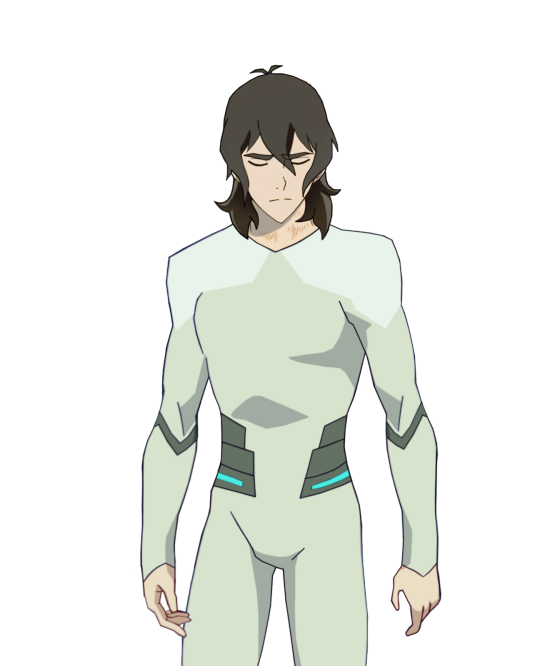
As you can see I’ve also kinda remastered his hands, and I’ve also removed the knife from his fingers. And I’ve also made Keith’s hair longer (because I wanted to, for the angst), all redrawn the same way as the pod outfit.
(I’m so sorry this is so hard to explain but my editing process is literally just and endless repeat of drawing, coloring and shifting until everything is exactly how I wanted to be ;; the more time you spend on photoshop the better you get at seeing details that are easy to patch up. It really comes with practice. ORZ)
3. SHIRO
For the upset Shiro, I’ve made a transparent gif. The Shiro I’ve used comes from this scene from S1EP9: Crystal Venom

But since it’s OLD SHIRO, not Kuron, I had to edit his entire outfit + hair so that it looks a bit more like Kuron in s3. And yes, this also means, redrawing every frame, because in this particular scene, Shiro is turning his head. Luckily his outfit isn’t that much different. He just has an… obnoxious white collar.
For his bare arm and Shiro’s hair I used the same coloring technique for Keith’s pod outfit, although the lineart won’t be really necessary here (since Shiro’s already kinda blurry looking anyway)
This is the raw transparent version
(I know his white tuft is normally cut shorter but… just a dumb detail jhegz, nobody noticed anyway)
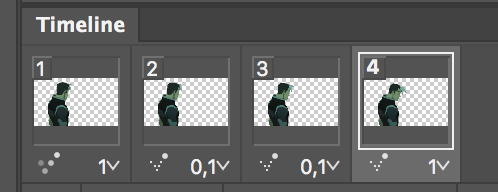
I extended the time of the first and last frame to 1 second, the 2 in between are 0,1 seconds.
the frames have also been reversed. Since in the episode, Shiro sighs at Keith & Lance first and then looked over to Pidge and Coran in that moment.
But in my edit, we want Shiro to look at Keith first, so yeah, I manipulated that a little by reversing it.
3. ASSIMILATION
So now that I’ve both got my Shiro/Kuron and my Keith I’m gonna slap them onto “the scene” aka that screencap I’ve edited.
Here’s a quick GIF of all the actions I’ve underwent to finish the scene up. Since it’s the just the finished psd of my edit I’m just making a recording of me selecting all my layers again :’D I didn’t… actually record myself making it because that’s would have taken me a WHOLE DAY.
Before this I’ve also cut out some parts of keith’s body because he’s IN the healing pod, he’s not chilling out on top of it.
To give Shiro that blue-ish glow I’ve used blending mode -> outer glow with opacity 14%
Also, GOLDEN TIP:
Adding shadow really make a scene 500% more dramatic
To add shadow I’ve made a new layer, and used a black & white gradient with the gradient tool.

For this edit I’ve added 2 shadow-layers.
I’ve done plently more animations on this edit after I was done with actual editing. But for now I’m gonna skip this part because it’s just all very basic GIF making. Also my ADHD is kicking in ^^’
I hope this explained it a little? I apologize that I didn’t go into detail, but it would’ve taken SO MUCH time otherwise. Again, making such an edit takes me a full day to make because 70% of the time I spend my time drawing or cleaning up details.
If you’re interested in a doing livestream of some kind, LMK!
699 notes
·
View notes
Text
just full Time personnel
finest Locksmith In Dallas, Tx
A rod may be made use of for push or slide switches if the automobile does not have upright locks. Whatever is exercising for me since I have your domestic lockout services. Y' all are a few of the most effective individuals I have actually ever before dealt with, as well as now things are falling into place. With your professionals around to give me some grief help, I'm really feeling a lot better concerning my situations. Call us to make use of the most affordable locksmith service. that we provide.
For service Professionals.
Whether arlington tx locksmith is from centuries past, modern, digital, or advanced, we have a team that will certainly deal with, change, preserves, or repair if it has a problem. Getting shut out of your automobile, office or home can be the begin of a terrible day or a truly bad night. At SOS Locksmith-- Dallas, we have a 1 day regular and also emergency situation solution prepared to give sensible solutions to any lock trouble. You wish to rely on the person servicing your cars and truck, that is why we just utilize our very own staffed locksmith professionals, never contractors. Howard Safe and also Lock has actually happily offered the Houston Neighborhood given that 1946.
youtube
employing A Locksmith.
If you wish to obtain a brand-new automobile secret at a cost effective rate, call us. We present initial cars and truck keys making solution at the most inexpensive prices whether it is a transponder trick or any other kind. Every one of our locksmiths have 5+ years of experience in dealing with various types of locks and also auto brand names. An industrial locksmith will keep your organization and devices secure by offering enhancements to your security as well as aiding you enter when you're locked out. Every service requires security that is as solid as well as reliable as possible, and also we can mount strong and premium locks.
What household items can you pick a lock with?
5 Everyday Items You Can Use To Pick Locks 1. Coke Can. Good For: Padlocks, Combination Locks. 2. Plastic Bottle. Good For: Door Knob Locks. 3. Paper Clips. Good For: Padlocks, Door Locks. 4. Hair Pins. Good For: Padlocks, Door Locks. 5. Just A Knife. Good For: Door Knob Locks. 6. 1 Comment. James Borst. 7. 9 Foods You Shouldn't Stockpile.
We are a household had as well as run locksmith business as well as happy to be amongst the top relied on locksmith professionals in the location. Our locksmith specialists are all bonded and also validated history checked furnished with the current modern-day technology as well as are available at your demand. We stand behind our craftsmanship-- 100% client complete satisfaction assured. Our expert locksmiths will come to your cars and truck with the needed tools required in order to unlock any kind of car.
An experienced locksmith, on the various other hand, understands exactly what to bring so you can get in your lorry as promptly as possible as well as with no damages. There are lots of locksmith professionals available who are only bent on make a fast buck, also at the expense of your items. https://locksmithdallastx.biz/frisco/ should have a locksmith that's going to have a kind, gracious attitude.

You Can really Feel Safe and Also Secure, simply Call Michael's Keys At ( 479.
If you can not offer this information to the locksmith, you will certainly need to ask somebody who has these papers to be available onsite to confirm this information. On the occasion that none of this is possible, there are a few other more time-intensive methods to confirm ownership.
Residential & Commercial.
Car Locksmith Garland TX will rejoice to make you another one to ensure that you can drive residence. Our flexibility enables us to service our consumers despite where they are. Also if you can find more information on LocksmithDallastx.biz's lewisville tx locksmith here. do not have the original trick, we can program a new cars and truck trick for you. In order to do this, we'll need you to offer us with your lorry recognition number along with the year, make, as well as model of your car.
In the uncommon event that the problem is complicated and requires more time, we allow you recognize the facts and educate you regarding the next steps. Area a call to Lock and Trick Professional to handle your cars and truck crucial demands accurately and also cost-effectively.
It is far better to discuss whether locks need to be changed or rekeyed and your different options.
We at Locksmith Dallas company recognizes that your organization is your resources, consequently they aim to satisfy the high assumptions of their consumers.
Their service technicians bring the office to you-- so if your secret is broken or lost they can replicate a secret for you right there in the van.
The security of your business is of utmost importance as well as should be taken really seriously.
Aloa safety And Security Professionals association, Inc
We assure every one of our client's total contentment with the results of our lock repair service, setup, and also upkeep solutions. Whether you're late for job, running duties or preparing yourself for a trip, there's never ever a practical time to get shut out of an automobile. Luckily, aid is available to obtain you on the road promptly. Our vans pertain to your home or office properties to identify as well as fix your automobile essential problem. As our vans are geared up with GENERAL PRACTITIONER, we can offer you quicker and also far better. We ensure that you never ever have to wait longer than what the task requires.
In order for a locksmith to open your residence, you will certainly need to verify that you own or currently rent the residential or commercial property. Your proof of ownership can be a title, address on your driver's certificate, or property tax record that can be located online?
Our locksmith professionals can additionally create and install innovative safety systems as specified. The protection of your Dallas commercial locksmith is extremely important to us.
The code maker enables a replacement key to be reduced by code, which is likewise optimal if you have lost your keys and also do not have a replicate. The essential making solution is likewise best for being protected versus the majority of sorts of lockouts. Having an added secret in the house or in the hands of a friend or relative easily enables lockout security near as well as around your home.

The crucial making process will certainly differ in time required, depending upon just how complicated the key is. A more usual method in cars and truck lockouts is making use of wedges. Wedges differ in shapes and size to achieve success with a huge variety of various makes as well as designs. Though some wedges might seem more refined than others they are used as a result of their tested record and also will certainly not harm the lorry. The wedge acts as a method to produce an opening in the door so one more tool might be utilized to open the vehicle from the inside. When the wedge is in area a Lasso Device may be utilized for an upright door lock. This device understands the lock with a tiny lasso so that the lock can be pulled upwards to open the automobile door.
Do I tip a locksmith?
Tipping a locksmith isn't customary. There are however times when tipping can make sense. Some locksmiths will provide emergency service at night, or during holidays. In case of emergency jobs, giving them a tip for their trouble can be the right thing to do.
Lock, secret, and barrel replacements are offered to obtain you out of the trickiest situation. Numerous people have actually succumbed phony locksmith professionals that wind up choosing their locks and also robbery their properties. SOS Locksmith - Dallas is licensed as well as has the stamp of approval from the Locksmith organization. We partnership with the very best locksmith companies in the US and continuously update our skill-set as well as personnel to the newest and latest in the world of locks and their kinds.
Throughout greater than 15 years as a leading Dallas business locksmith Dallas solution, we have pertained to understand the several differences between commercial as well as house locks. Industrial locks and also tricks require various machinery to deal with the situation, as well as we have the team, abilities, and devices for it. locks for Industrial are heavy, designed for an objective. So if you have a problem with your lock, need a fixing, upkeep, or substitute, do not hesitate to call us today. If you have a car you can not get into, a vehicle that won't collaborate with a transponder secret, or your key has actually snapped off in the ignition, we can aid.
While the previous owners will certainly hand over their secrets at the closing, you can't make certain they have not maintained other copies. Even if they're reliable, you have no concept that they've given duplicates of tricks to throughout the years. Next-door neighbors, pet-sitters, ex lovers, separated family members, contractors, cleaning services-- the checklist goes on. For your safety and also comfort, we very advise rekeying your locks the day you move in.
Call us 24/7 as well as our mobile locksmith in Denver CO will get you back right into your car and back on track to where you need to go. Keep an extra key with you every time you are leaving your house for long distance road trips To ensure you survive an auto lockout without needing anybody's help. Easy to use source for customers to find locksmiths near them along with check/leave evaluations for the locksmiths. Given that locksmith professionals do so a lot, it is essential that they do them well. By hiring a locksmith who can verify they' relicensed as well as educated, you can rest assured that you're getting the best of the best.
Can you really pick a lock?
The tools for lock picking are rather simple and really small. The most bare-bones basic setup is just two tools, a tension wrench, and a feeler pick. You use the tension wrench to apply tension to the lock, and then the pick to set each individual lock pin while maintaining tension.
Automobiles that can not be opened up by any of these means will probably need a key to be made. This can be done also if there is not as well as extra key, by utilizing what is called a code equipment.
Contact Us
Lock Masters Dallas
Email: [email protected]
Phone: 469-202-0812
12888 Montfort Dr #163
Dallas, TX, US 75230
All you need to do is provide us a phone call at and we will certainly make a resolution instantly regarding just what you will certainly need. We at White Plains Keymasters are your best locksmith specialists that will certainly open your lorry on the occasion that it's secured. Do you require to replace an auto secret after losing yours while going to a show at the Granville Arts Facility or Plaza Theater?
#locksmith dallas#dallas locksmith#car locksmith dallas#auto locksmith dallas#car key replacement dallas#mobile locksmith dallas#automotive locksmith dallas#locksmith plano tx#locksmith plano#plano locksmith#locksmith lewisville tx#lewisville tx locksmith#locksmith arlington tx#arlington tx locksmith#locksmith allen tx#allen tx locksmith#locksmith frisco#frisco locksmith#locksmith irving tx#irving tx locksmith
0 notes
Photo


Practiced in Adobe Photoshop again to create a self-portrait animated gif and i used a technique my professor showed me. I love the beauty of waterfalls and the calmness they sometimes have and I think they kind of represent me as a person and how I flow through life so calmly and without rushing.
Basically I needed to make edits onto layers before I could group them and make them a gif. It was a long process of “select all-copy merged-create new layer-paste” and turning on and off layers in order to group them for the final frames.
This process was a lot more complex when working through it and I did have a challenging time due to my inexperience with this technique. I do believe that working more with this technique in the future will improve the smoothness and flow of my work with creating edited animated gifs, as well as my understanding of the technique. I would also know to add detail and create more realistic features to the edits.
-used lasso tool to cut out the background of the image, used different brush tools to create the flow of the water and splash affect at the bottom with a total of 4 Frames to create the gif.
0 notes
Video
youtube

power point help
About me
Powerpoint Will Listen To Rehearsals To Help You Stop Swearing And Stuttering
Powerpoint Will Listen To Rehearsals To Help You Stop Swearing And Stuttering Click Inspect to identify hidden content, and click on Remove All to remove the item of your alternative. My PowerPoint presentation on my Mac isn't displaying correctly on the projector. Under the drop-down menu selected to Straighten to Left, Right, Top or Bottom. This page breaks down the good functionality of our PowerPoint add-in BrightSlide. Click the section you need to learn extra about or scroll all the way down to see simply what BrightSlide can do. Noted legal technologists Dennis Kennedy and Tom Mighell bring listeners an in-depth analysis of the most recent advancements in legal technology, in addition to finest practices for utilizing present instruments. Convert Table to Text – This is a super useful gizmo if you are turning a table into a extra impactful visual. Instead of copying and pasting or typing out each cell individually, merely proper-click on on a table and select Convert Table to Text. You then have the option to transform the entire table to a single textbox or convert every cell to a separate textual content box. Menu Tips – BrightSlide uses contextual Menu Tips to let you know ideas and methods about the add-in. While PowerPoint will not take the place of communication abilities, it can be a fantastic device for enhancing and improving your expertise. You can learn to be a fantastic presenter through follow, repetition, exhausting work, research and the proper instruments. Keep in mind, although, that the most effective audio system are the ones who're able to communicate in a means that's most congruent with their own persona. Use the Selection Pane and Animation Pane to manage your library. You can add your own custom sequences, including timings and settings, so your favorite animations are all the time close at hand. We’ve pre-stocked your animation library with a couple of lovely sequences to get you began. Under Selection & Object you’ll find a vary of helpful instruments designed to make your life simpler. Shift-click on the Table Format Painter to bring up settings, here you possibly can choose which design elements to copy over. You can even access Live Paragraph and Character Spacing by choosing textual content and right clicking. A pretty simple method to create some stunning typographical effects and not using a detailed knowledge of typography. In the Format group you’ll find a assortment of tools that may help you save time by making enhancing a number of objects at once, or copying complex formatting, tremendous easy. Alt-click the alignment tools wherever in PowerPoint for Align to Guides. Dismiss and reset them here.Contextual Tools – There if you want them most, our PowerPoint add-in includes a host of context-delicate instruments. Learn the place to find them here.Table Tools – Right-click on on a table to entry these tools. Once you’ve finished, shut this view using the tick button and return to working as before, or shift-click the tick to maximise all visible home windows. A movement path ending at the heart point of the first object chosen might be apply to all other objects chosen. Repeatedly click the selected align option to toggle through the guides. Add Shift to toggle through guides in the wrong way. Align to First Selected – When you choose two or extra objects, this feature aligns your selection to the reference object. Align to Selection – This is the default alignment mode for PowerPoint. Objects are aligned to the boundaries of your choice. You also can watch this video to view aPowerPoint 2013 Basic Tutorial. Select the slide you want to delete, proper-click on, and click on Delete Slide. You can add animation results to a number of objects by double-clicking the Animation Painter+ or by lassoing multiple shapes after the painter has been clicked. A PowerPoint file containing your library will open.
0 notes