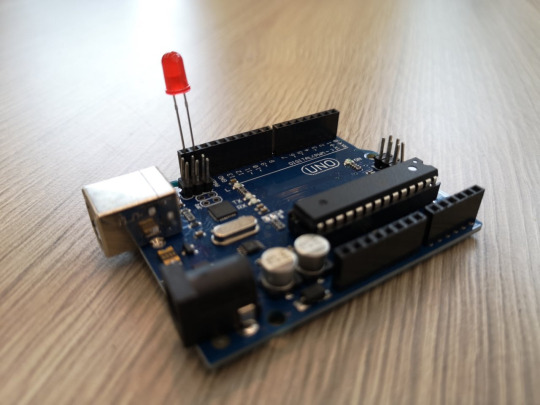
#learn arduino in 10 minutes
Explore tagged Tumblr posts
Visit Tumblr Blog
Explore Tumblr blogs with no restrictions, modern design and the best experience.
Last Seen Tumblr Blogs


Fun Fact
Tumblr’s reach among the 26-to-35-year-olds in the US is 11%.
Text
12 Easy Ways to Teach Kids to Code: Hour of Code & CS4Ed Week 2024
Get ready for CS4Ed Week 2024 and the Hour of Code with this special episode of the 10 Minute Teacher Podcast! 🎉 We’re sharing 12 practical and fun coding activities that will inspire creativity and teach kids computational thinking. From gamified platforms like CodeCombat to app development with Mad Learn, hands-on robotics, and unplugged challenges, there’s something here for every educator and student.
💡 What You’ll Learn in This Episode:
How to use CodeCombat and Code.org to engage students in coding.
Creative ideas like Dance Party, Minecraft, and coding with Anna and Elsa.
Hands-on activities with mBot Robots, Arduino Boards, and Hummingbird Kits.
Unplugged coding with Hot Wheels for a screen-free coding experience.
Why coding is an essential skill for students of all ages.
🎙️ About the Sponsor: This episode is sponsored by Mad Learn, a comprehensive app-building platform that integrates the design thinking process. Learn how to inspire students with app development tools they’ll love: https://coolcatteacher.com/madlearn.
📚 Links and Resources: All resources mentioned in this episode are available at https://www.coolcatteacher.com/e871
👩🏫 Host: Vicki Davis, the Cool Cat Teacher®, shares practical tips and tools to inspire educators worldwide. She is a classroom teacher, programmer, author, and Mom.
New Podcast Episode
5 notes
·
View notes
Text
#arduino simulator online#learn Arduino in hindi tinkercad#learn arduino in 10 minutes#arduino basics#arduino board#arduino arm#arduino all in one robot#arduino nano project#arduino uno projects#arduino tutorial#arduino programming#arduino project
0 notes
Text
The Learning Process - Mental Models
This interest all started when I watched a TED talk by John Green about “paper towns.” To prevent illegal map copying, cartographers used to make up fictional cities and see if anyone copied these fictional city names. They caught someone doing this, supposedly, but the mapmaker they confronted countered with something interesting. They made up a city...I don’t remember what it was called. People bought their map and expected to find a city there. The city was made up, but so many people expected to find a city there that they set up actual shops, gas stations, and homes. It was called a paper town. The map made it exist.
It’s a true story, but John Green uses it as a metaphor for the learning process. He starts to talk about his own YouTube series, most notably CrashCourse, which he handles the humanities side of (Hank Green, his brother, was a godsend on the biology side when we were in college). He tries to get people interested in a subject. Vi Hart does the same thing with math. They try to employ certain “hooks,” like talking about how cats land on their feet.
Make it Stick goes at length in discussing mental models. Intuitively, it makes sense. The learning process can be thought of as forming and strengthening connections. If you can relate new information to information you already have, whether it’s through analogy or through a more realistic connection, you can fall back on that old knowledge and also make it easier for new connections to form. On a somewhat related tangent, when you get into a new field every memorable story and analogy helps. When you learn something completely new and relate it to something old, you form connections. Those connections can branch out to different connections. Learning can be exponential, and that’s the exciting thing about it.
I think that channels like Vi Hart are certainly a good way to light the spark, but continued learning is another question. For instance, how do we get new people interested in coding? MIT pushed Scratch. I’m personally a much bigger fan of a game where you have to code JavaScript to progress from one stage to the next, but that’s not nearly as fun as playing an FPS. Or Minecraft. Speaking of Minecraft, the solution might be in front of us all along...but personally, I think the problem with using Minecraft is that it’s way more tempting to try to brew potions or go ranching than it is to learn how to emulate circuits.
My brother got me an Arduino, back in high school, hoping that it would get me fascinated and interested in coding. I didn’t get into it, and he was really disappointed but decided that coding isn’t for everyone. Then I signed up for a class on coding. The class on coding got me interested in coding.
That was supposed to be a 10-minute freewrite, and it’s been 12. I guess that the main thing I wanted to establish was that real, comprehensive knowledge on a field takes time to develop. The initial spark is important, but then the fire needs to last. You need to keep discovering new territory. You need to be willing to develop in other areas, whenever you find that the fire burns low and you have to gather different fuel.
I was really, really happy when I discovered the Medium page called BaseCS. I mean, there it was, all these confusing and ridiculously boring and/or complex computer science topics, and it just pulled every trick in the book to make it readable. The tone is enthusiastic and non-condescending. It uses association without going off too much with useless facts. It discusses history, but not too much. It relates things back to old information. And it’s just so light-hearted and sweet. It has original graphics, unique metaphors, the kind of thing you’d expect a children’s book author to come up with if she woke up one day with a sudden knowledge of computer science. It’s really, really good.
https://medium.com/@vaidehijoshi
8 notes
·
View notes
Text
UPDATE ON WEEK 3+4 WEARABLES
SO, we have had lots of help from Colin and Harriet, who have previously worked with thermochromic ink and sensors.
Week before on Friday, Zhe and me had a meeting with Colin and we discussed sensors and he also gave suggestions on what we could and look further into. We split the research into 2, I got to research the existing market and what gap is present.

Tuesday 6th ,we had a meeting with Harriet who had previously worked with thermochromic ink and offered to help us in any way that was needed. She told us a bunch of useful things regarding what materials we could use and inks and pigments we could possibly use.
We also came up with another idea that could be developed further and the post graduate student Harriet we worked with offered to do a proposal and send it in to the uni and we could possibly do some summer research for it .However that’s still a maybe and an opportunity that could be explored further.
Also, on Tuesday we got some leftover paint Harriet had and we gathered a bunch of different fabrics and screen printed them in the design building.
We found which ones reacted with the heat well and recorded which fabrics we could possibly work with.

Wednesday 7th August
We didn’t do much work on the project, instead we got to learn a bit about sewing with the e-textiles and we got to play with the felt loom in the design place which was pretty cool. It was interesting
Thursday 8th August
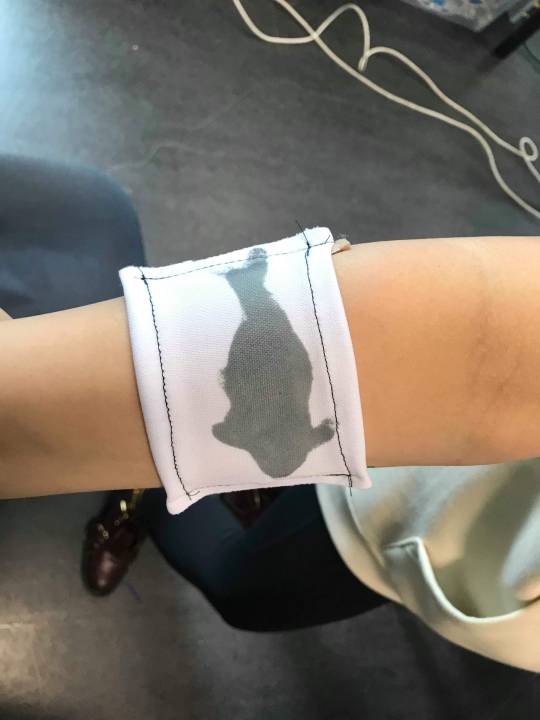
I played with the thermochromic ink and tried that onto sports tape and a wrist support band.

(Sorry blurry pic)]
The sports tape reacted quiet fast to skin contact but would stay like a grey ( ink works from black to clear).
Nani then came and then we went to Krishna and asked for some help regarding how we can accurately measure temperature, because the band that Krishna sewed for us with a patch of fabric that had thermochromic ink in wasn’t really giving an accurate visual representation of whether or not their muscles were working, it would only slightly change colour.
Also the infrared gun wouldn’t give an accurate reading of skin temp because the fabric was in the way of the skin, so it was like off by a degree or 2.

Krishna hooked us up with a temperature thingy ( forgot what it was called) but we chucked in a sketch for the Arduino, checked to see if it would measure temp while someone worked out their muscles but we came to the conclusion that the muscles had to be working for a long period time for us to try and get any kind of reading from it.
SO, we went to workout at the AUT gym.
Well Nani did, while Zhe and I monitored his temperature while working out.
Nani being our user tester, went onto the spin cycle , where Zhe hooked up the temperature to Nanis thigh and attached some sports tape to keep it in place.


While he worked out, his temperature would fluctuate by a degree and go back down. It went this way for about 10 minutes.

It was when he stopped that his temperature rose by a degree or 2, I realized that went he works out his muscle would remain at a constant temperature but when he stopped, his muscle temperature would increase. From the article I read regarding post workout temperature increase, (https://www.sharecare.com/health/types-exercise/body-heat-go-up-exercise )it’s your body trying to get rid of the excess heat that was accumulated during working out. When muscles work out the heat causes blood vessels in the skin to dilate which increases blood flow to the skin, so the heat produced is expelled into the air through the skin.
Although this is quite interesting, the fluctuation in the skin temperature change and the fact the temperature change isn’t a big difference and if we combined this with the thermochromic ink, it wouldn’t be enough to visually see change in the colour of the ink. Also, because thermochromic ink comes in varying temperature changes, a degree or 2 isnt enough for a complete colour change unless we got a chemical engineer to make us a specific batch to change at that specific temperature( which would be 31-32 degress).
Also other factors that affect this include environmental issues(where they exercise, room temperature etc) and skin to skin contact while working out, gender and other factors are also take into consideration.
So from this I believe our group got a solid understanding of temperature and the user testing was useful, but to get an accurate temperature We now need to think of implementing other possible sensors such as the stretch sensor and also prototype different inks such as hydrochromic inks and experimenting with them as well
1 note
·
View note
Text
Sharing Arduino Education courses is easier than ever
Over the past few years, Arduino Education has expanded, offering new learning solutions to teachers and students around the world. Today, we have more than 10 kits with exciting online courses for STEM teachers and learners ranging from middle school to university.
When creating these products, we were delighted to collaborate with many brilliant educators, who shared with us their unique teaching styles and provided valuable feedback.
With the pandemic dramatically shaking up the status quo in education, we now have more learning styles than ever. From large schools using hundreds of Arduino kits to smaller classes and study groups. There are even a lot of parents who use kits for homeschooling, along with an increasing numbers of self-learners.
We’re excited to see Arduino Education products being enjoyed in so many different ways, and want to make sure our kits are easy to use and share in every situation. That said, we’re excited to announce several changes to how our educational products are shared.
Personal courses vs. Classroom courses
From now on, when you register an Arduino Education kit, the online courses associated with it will be added to your personal collection, accessible via “My Courses” in the profile menu. Courses in your personal collection are only visible to you. This way, if you’re learning by yourself, you have a quick and easy way to access all your learning resources in one place.
If you’re learning together with others, or you’re an educator managing a group of students, you can now set up a classroom. This will create a second collection of products which you can share with other people. You can switch between the different product collections anytime, and transfer products between them.
Setting up a classroom
Setting up a classroom takes a matter of minutes. Simply add a few details about yourself and your teaching environment and choose which products you want to share with others.
Once your classroom is set up, you can start inviting students and other educators to join.
Everyone who joins will immediately get access to all online courses that you add to your classroom.
Using the classroom system, you can now share any Arduino Education product with any number of people, and as the classroom admin, you are in full control of who can access your courses, meaning you can add and remove new members anytime.
Teacher and admin roles
When you set up a classroom, you become its admin. You have the power to change settings and control the member list and available courses. When you invite your colleagues, you can choose if they should also be an admin, or take the teacher role.
Teachers can add and remove students from the classroom, but cannot manage other educators or change classroom settings. Both admins and teachers will see the educator version of the online content, with educator tips, logbooks and more. Roles can be changed whenever you need, and you can have multiple admins at the same time.
We hope these changes will provide better administration possibilities to institutions with multiple collaborating educators.
Safety for our youngest learners
When working on these updates, we wanted to make sure that the system is usable and safe even for our youngest users. If your students are too young to have an inbox, you can invite them by sharing a classroom code. This way, they can join your classroom without using an email address.
If your students are under the age of 14, you can also be sure they’re in a safe online space. They’ll only encounter child-safe content, and their accounts will be anonymized, with no personal data collected.
We hope these changes will make learning with Arduino Education easier, safer, and more flexible, and we can’t wait to share with you what’s coming next!
If you have any questions or feedback, don’t hesitate to get in touch with us. Head on over to Arduino Classroom right here.
Happy learning!
The post Sharing Arduino Education courses is easier than ever appeared first on Arduino Blog.
Sharing Arduino Education courses is easier than ever was originally published on PlanetArduino
0 notes
Text
12 Easy Ways to Teach Kids to Code: Hour of Code & CS4Ed Week 2024
Get ready for CS4Ed Week 2024 and the Hour of Code with this special episode of the 10 Minute Teacher Podcast! 🎉 We’re sharing 12 practical and fun coding activities that will inspire creativity and teach kids computational thinking. From gamified platforms like CodeCombat to app development with Mad Learn, hands-on robotics, and unplugged challenges, there’s something here for every educator and student.
💡 What You’ll Learn in This Episode:
How to use CodeCombat and Code.org to engage students in coding.
Creative ideas like Dance Party, Minecraft, and coding with Anna and Elsa.
Hands-on activities with mBot Robots, Arduino Boards, and Hummingbird Kits.
Unplugged coding with Hot Wheels for a screen-free coding experience.
Why coding is an essential skill for students of all ages.
🎙️ About the Sponsor: This episode is sponsored by Mad Learn, a comprehensive app-building platform that integrates the design thinking process. Learn how to inspire students with app development tools they’ll love: https://coolcatteacher.com/madlearn.
📚 Links and Resources: All resources mentioned in this episode are available at https://www.coolcatteacher.com/e871
👩🏫 Host: Vicki Davis, the Cool Cat Teacher®, shares practical tips and tools to inspire educators worldwide. She is a classroom teacher, programmer, author, and Mom.
New 10 Minute Teacher Podcast episode
0 notes
Text
M2 analysis + Show n tell
The show n tell went as I expected. I can’t say the feedback we received was positive but it was very valuable. Our presentation didn’t go as smooth as I would liked to for few reasons:
We were not very well prepared because we haven’t practiced presenting properly. The only practice we made was in the morning 10 minutes before the presentation. Felt like this wasn’t enough but we didn’t have time left. Anyways, we didn’t fail but we could have done a lot better in this aspect
We haven’t taken a lot of notes from the feedback our teachers gave us during the show n tell. I was trying to take some notes but I couldn’t keep up with listening to them, making eye contact, answering questions and taking notes.
Right before the start we were advised to join the zoom session if we have some media to show (videos, photos, graphs, etc) so that anyone can see instead of turning the screen of the laptop. However, technical issues with internet connection and zoom prevented me and I had to turn around with my laptop. Maybe few people didn’t manage to see properly and I really regret that. Even though it was not my fault, it wasn’t nice and I didn’t have any back up plan as well. Next time I will have this in mind.
Now when I have a look back, I feel like we were not efficient enough during this module. There were some situations that we didn’t know what to do and we were stuck (especially in the end of first week) so I think that had its impact, since we lost some time. Also, some activities took us more time than supposed to, such as playing with the values of the LDRs and the soldering. However, I see everything as learning activities so even if it wasn’t for the good of the project, it definitely was good for developing skills and knowledge to use in the future. There was a lot I learnt in this module.
To begin with, I ‘upgraded’ my Arduino skills a lot. Since the micro controller was a crucial part in this module, it was inevitable to not use it. Even though my coding skills are far from great, they have improved a lot. The sketch we worked on was complex because of the many emotional states we included and their interactivity as well. It turned out that designing a personality from the technical perspective is not easy at all. It required a lot of thinking and adapting. For example, the LED will shine on low brightness to show that it is “awake”, but won’t interact if the brightness is too high. To make it interact with you, it should be dark and the darker it gets, it will become excited. At the same time, the excitement can’t last too long until it reaches the next state – exhaustment. And what do we do when we are exhausted? Have rest. So the object as well will need to have rest.
Probably the biggest challenge for me in this module was personificating the LED and setting behaviour and emotions to it. To be honest, it took me quite a while to set my mind to it and actually understand that. Most of the time, especially in the beginning, I had this question in my mind: How can a simple LED express emotions? Reading the article surely helped clarifying it and also with the progress of our design work, it got even better. In the beginning, when we started our exploarion and we were trying out different patterns to see how they would differ from each other, nothing “blinked”. Even when we thought about what feelings they invoked when looking at them, nothing happened. I was sure that I was interested, but I wasn’t able to assign a certain feeling to it yet. Not until when we decided to change our way of working and started coming up with emotions that sound interesting to implement to the patterns rather than the other way around. That really helped and despite being stuck during the process, we saw a lot of potential in working with excitement as our main emotion. Overall, my partner and I believe that in our case, it’s not the blink of the LED that matters, but the whole sequence of light that creates it.
0 notes
Text
5/12/19 Notes
Lab Meeting Prep Pipeline:
(May 2nd, 2019 at 2:38 p.m.)
[ ] Read the Results & Discussion cover to cover
[ ] Complete slides for all figures
[ ] Give a practice presentation
[ ] Read methods
[ ] Complete fluorescence slides
[ ] Decide how to deal with ‘relationship between calcium activity and movement’ section
[ ] Give a practice presentation
[ ] Read supplementary material cover to cover
[ ] Give a practice presentation
Note to self: Relax. Be meticulous. Be disciplined. Keep calm, do your best, trust your team.
——
——
Advanced Optimization
8 20 905
Live Action Poem, February 2nd, 6:41
Went to Brazil out of spite and saw
stone Jesus, arms open for a hug,
bought street weed, twice, from the same vendor
out of a reckless love for reckless love.
Hoped for a tropical muse and found
a strong handshake from a dangerous man.
Holed up in Rio de Janeiro with piles
of paper money and paced all alone
angry at nothing if only for the moment.
Rain dampened slick stone walkaways,
waiters were too nice and I tipped too much.
One offered to be a bodyguard , violence
hinted in every smirking human moment.
God, I loved being a target, smug,
dumb, flitting away American Dollars.
Jesus Christ looming in stone on a hill top.
Titties and marijuana, iconic primadonna
extravagant flora, dying fauna, fawning
over the climate. I went to Brazil
on an off month. To hole up
safe from my sprawling little lovely life.
To Do 26.1.19
[x] Cristina - Search for Hippocampus Models
[x] Ana G. - Draft e-mail call for interest in “Live Action Science”
[ ]
Data science Club Thursday at 5:00 p.m.
Astavakrasana
laser-scanning photostimulation (LSPS) by UV glutamate uncaging.
12.1.19 Goals
[x] Some Portuguese
[x] Mouse Academy - first read
[ / ] Dynamic mesolithic dopamine
[x] Water rats * SMH
Acorn - tracks impact | BetaWorks | 2 years of money | PitchBook | Social Impact Start Up
Mission Aligned Investors | Metrics | Costumer Acquistion Cost | Clint Corver -> Chain of Contacts -> Who To Talk to (Scope: ~100)
Money Committed || Sparrow || Decision Analysis —> Ulu Ventures [500k] [Budget x ]
Ivan - > IoS Engineering { Bulgarian DevShop }
[market mapping] Metrics -> Shrug
Peter Singer - Academic Advisory Board …
[1 million ]
Product market testing
Foundation Directory Online - Targeted , Do Your Homework
https://www.simonsfoundation.org/2018/11/19/why-neuroscience-needs-data-scientists/
Head-fixed —>
~INHIBITION EXPERIMENT TRAINING PLAN~
STOP MICE: 20th. GIVE WATER: 20th (afternoon) - 30th. DEPRIVE: 31st... (Morning) RESUME: Jan 2nd.
21st - BLEACH/DEEP CLEAN BOXES 1-14 (Diluted bleach; Flush (with needles out) - Open Arduino Sketch with Continuously open Valves - PERFUSE System) *[NOT BOX 11 or 5]*; Run 15 mL of Bleach per syringe; Copious water through valves; Leave dry.
———
http://www.jneurosci.org/content/preparing-manuscript#journalclub
Friday - Dec. 14th, 2018
[x] - Complete 2019 ‘Goals and Blueprint’
[x] - 2-minute Summary ‘Properties of Neuron in External Globus Pallidus Can Support Optimal Action Selection
[ ] MatLab for Neuroscientists :: Basic Bayesian Bearded Terrorist probability plots
[x] Statistics 101: Linear Regression
“Golden Girls” - Devendra Banhart
“King” by Moor - FIREBEAT
Reread - Section 3.3 to
Monday - Apply for DGAV License (MAKE SHORT CV)
SAMPLE: ‘Sal’ From Khan Academy
Make short CV
Tiago - Certificate
MATH:
“We explicitly focus on a gentle introduction here, as it serves our purposes. If you are in
need of a more rigorous or comprehensive treatment, we refer you to Mathematics for Neuroscientists by Gabbiani and Cox. If you want to see what math education could be like, centered on great explanations that build intuition, we recommend Math, Better Explained by Kalid Azad.”
Jacksonian March seizure (somatosensory)
—
Tara LeGates > D1/D2 Synapses
Scott Thompson
Fabrizio Gabbiani - Biophysics - Sophisticated and reasonable approach
Quote For Neuroscience Paper:
“Every moment happens twice: inside and outside, and they are two different histories.”
— Zadie Smith, White Teeth
Model Animal: Dragonfly? Cats. Alligators.
Ali Farke Toure
Entre as 9 hora e o meio-dia ele trabalha no computador.
Ele volta para o trabalha à uma e meia.
Ele vai as compras depois do trabalho.
A noite, depois do jantar, ele e a mulher veem televisão.
As oito vou de bicicleta para o trabalho. (go)
As oito venho de bicicleta para o trabalho. (come)
A que horas começa a trabalhar?
Eu começo a trabalhar os oito e meia.
Normalmente…
Eu caminho cerca de Lisbon.
É muito triste! Eu faço nada! Talvez, eu caminho cerca de Lisbon. Talvez eu leio um livro. Talvez eu dormi. Eu vai Lx Factory.
Depois de/do (after)
antes de/do (before)
—
Monday -> Mice
MATLAB!
-
“New ways of thinking about familiar problems.”
~*NOVEMBER GOALS*~
> Permanent MatLab Access [x] -> Tiago has license
> Order Mouse Lines [ ] -> Health report requested… Reach out to Vivarium about FoxP2
-> Mash1 line -> FoxP2 expression?
> Finish ‘First Read Through’ [ ]
> Figure 40 [ ]
SAMPLE : ‘Afraid of Us’ Jonwayne, Zeroh
Monday Nov 5th Goals:
> Attentively watch:
> https://www.youtube.com/watch?v=ba_l8IKoMvU (Distributed RL)
> https://www.youtube.com/watch?v=bsuvM1jO-4w (Distributed RL | The Algorithm)
MatLab License
Practical Sessions at the CCU for the Unknown between 19 - 22 Nov 2018 (provisional programme attached)
Week of November 5th - Handle Bruno’s Animals
Lab Goals -
“Deep Networks - Influence Politics Around the World”
Paton Lab Meeting Archives
Strategy: Read titles/abstracts follow gut on interesting and relevant papers
Goals: Get a general sense of the intellectual history of the lab, thought/project trajectories, researchers and work done in the field and neighboring fields.
Look through a GPe/Arkypallidal lens… what can be revisited with new understanding?
First Read Through
[x] 2011 - (22 meetings || 10/12 - SLAM camera tracking techniques)
[ x] 2012a (18 meetings)
[x] 2012b (15 meetings - sloppy summary sentences)
[ x] 2013a (19 meetings - less sloppy summaries jotted down)
[x] 2013b (17 meetings)
[x] 2014a (21 meetings) (summaries in progress)
[x] 2014b
[x] 2015 (23 meetings)
[ ] 2016 (23 meetings)
Current
—
“I like, I wish, I wonder”
“Only Yesterday” Pretty Lights
retrosplenial dysgranular cx (?)
retrosplenial granular cx, c (?)
fornix (?)
Stringer 2018 arVix
Lowe and Glimpsher
November Goals:
[ ] GPe literature -
[ x ] Dodson & Magill
[ x] Mastro & Gittis
[ ] Chu & Bevan
[x] Modeling (extra credit -Bogacz)
[ ] Principles of Neural Science: Part IV
[ x ] MatLab license… Website program…
Extra credit:
Side projects [/ ] Neuroanatomy 40
[ -> ] ExperiMentor - Riberio, Mainen scripts… Paton! -> LiveAction Science
MACHINE LEARNING
Week of Oct 29th -
Symposium Week!
Wyatt -> John Hopkins -> He got into American University!
Belly Full Beat (MadLib album Drive In)
“The human brain produces in 30 seconds as much data as the Hubble Space Telescope has produced in its lifetime.”
Sequence of voltage sensors -> ArcLite -> Quasar -> Asap -> Voltron -> ???
Muscarine -> Glutamate
Ph Sensitive
cAMP
Zinc sensitive
5 ways to calculate delta f
2 main ways
SNR Voltage —
Dimensionality reduction of a data set: When is it spiking?
5 to 10 2-photon microscope open crystal
…Open window to a million neuron…
Week of 10/15/18
Monday: Travel
Tuesday: Rest
Wednesday: Begin rat training. Reorient.
Thursday:
Friday:
|| Software synergistically ||
—————
Beam splitter, Lambda, diacritic
1.6021766208×10⁻¹⁹
‘sparse coding’
Benny Boy get your programming shit together.
Week of Oct. 8th, 2018
10/9/18
[ ] Rat shadowing (9:30 a.m.) -> Pushed to next week
10/8/18
[x] Begin Chapter 13 of Kandel, Schwartz, Jessell
[x] Outline of figure 36
[ ] Read Abdi & Mallet (2015)
DOPE BEAT MATERIAL - Etude 1 (Nico Muhly, Nadia Sirota)
Saturday - Chill [x]
Friday - ExperiMentor … mehhhhh scripts?
Photometry -> Photodiode collects light in form of voltage (GCaMP) (TtdTomate as Baseline… how much fluorescence is based on TdTomatoe, controlling factor always luminesce - GCaMP calcium dependent) :: Collecting from a ‘cone’ or geometric region in the brain. Data stored and plotted over time… Signals must be corrected…
Cell populations are firing or releasing calcium. (GCaMP encoded by virus injection, mice express CRE in a particular cell type).
———————————————
———————————————
Brain on an Occam’s Razor,
bird on a wire,
synaptic fatalism integrating
consistent spiking;
strange looping: is this me?
Thursday
“We don’t make decisions, so much as our decisions make us.”
“Blind flies don’t like to fly”
[x] 9:00 a.m. Lab Meeting
[x] 12:00 p.m. - Colloquium
“It was demeaning, to borrow a line from the poet A. R. Ammons, to allow one’s Weltanschauung to be noticeably wobbled.”
“You must not fear, hold back, count or be a miser with your thoughts and feelings. It is also true that creation comes from an overflow, so you have to learn to intake, to imbibe, to nourish yourself and not be afraid of fullness. The fullness is like a tidal wave which then carries you, sweeps you into experience and into writing. Permit yourself to flow and overflow, allow for the rise in temperature, all the expansions and intensifications. Something is always born of excess: great art was born of great terrors, great loneliness, great inhibitions, instabilities, and it always balances them. If it seems to you that I move in a world of certitudes, you, par contre, must benefit from the great privilege of youth, which is that you move in a world of mysteries. But both must be ruled by faith.”
Anaïs Nin
[ ] MatLab trial expires in 1 day *
[ ] 3:00 p.m. pictures
“We do not yet know whether Arkys relay Stop decisions from elsewhere, or are actively involved in forming those decisions. This is in part because the input pathways to Arkys remain to be determined.”
These studies prompt an interesting reflection about the benefits and conflicts of labeling and classifying neurons at a relatively grainy level of understanding.
“The authors hypothesize that under normal conditions, hLTP serves an adaptive, homeostatic role to maintain a healthy balance between the hyperdirect and indirect pathway in the STN. However, after dopamine depletion, pathologically elevated cortical input to the STN triggers excessive induction of hLTP at GPe synapses, which becomes maladaptive to circuit function and contributes to or even exacerbates pathological oscillations.”
To Do Week of Oct. 1st - Focus: Big Picture Goals
[ x ] GPe Literature - Hernandez 2015 & Mallet 2016 (Focus on techniques and details)
[ ] MatLab! Lectures 6-7 (Get your hands dirty!)
[ x ] Kandel Chapters 12 - 13
Tuesday Surgery Induction 10:00 with Andreia
6:00 - 7:30
Portuguese
Digitally reconstructed Neurons: https://www.ncbi.nlm.nih.gov/pmc/articles/PMC5106405/
To Do Week of, September 24th, 2018
To Do Week of Monday, September 17th, 2018
PRIORITY:
DATA ANALYSIS PROJECT ITI
———— PAUSE. ———————
Talks
[x ] Mainen Lab - Evidence or Value based encoding of World State/Probability - ‘Consecutive failures’ - easy/medium/hard estimate of where the reward will be.
Reading for the Week
[x] Chapter 9 - Propagating Signal | The Action Potential
[/ ] Ligaya et. al (2018) (CCU S.I.?)
[x] Katz & Castillo (1952) Experiment where they describe measurement techniques
[ ] Raiser Chapter 4 - Stimulus Outlasting Calcium Dynamics in Drosophila Kenyon Cells Encode Odor Identity
Video Lectures
[— ] Linear Algebra (Trudge steadily through)
[ — ] Khan Academy Logarithms (Trudge steadily through)
MatLab
[ ] Trudge steadily through www.mathworks.com/help/matlab/learn_matlab
*FIND PROBLEM SET/TEXT BOOK/WORK SHEETS*
Concepts to Grasp
[ / ] Master logarithms!
[ ] Review Kandel Et. Al Part II *Chapters 5-9*
Neuroanatomy
[ x ] Ink Figure 28
Project Planning? Too soon! Too soon! Read some literature on the subject.
17/9/18
1:00 p.m. Meet with Catarina to discuss “CCU Science Illustrated” (WIP) Project
2:30 p.m. Vivarium Induction
_______________________________________________________
| SPCAL Credentials |
| |
| login: |
| PW: |
-————————————————————————
——
NPR:: https://www.npr.org/sections/health-shots/2018/09/11/644992109/can-a-barn-owl-s-brain-explain-why-kids-with-adhd-can-t-stay-focused
9.13.18
[ x ] Pauses in cholinergic interneuron firing exert an inhibitory control on stratal output in vivo (Zucca et. al 2018)
[ x ] Chapter 8 - Local Signaling: Passive Properties of
-> Sub and supra threshold membrane potential (Conceptual)
Monday, Sept. 10th 2018
“Eat the Frog First”
[ N/A ] Review SPCAL Lessons 1-5 (In Library?) CRAM THURSDAY?
-> [/] wait for confirmation from Delores for theoretical test
-> (Out of Office reply from person in charge)
To Do:
[/] Comment Out %PRE_PROCESS_vBeta.m
[x] Change path name and run program in MatLab
[ ] Solve trial.blahblahblah error spkCount? labels?
[ ] Change Epochs and run?
[x] Chapter 7 - Membrane Potential :: Return to Pg. 136-137 Box 7-2 when sharp. ::
[x] Castillo and B. Katz (1954)
[x] 12:00 - Neural Circuits for Vision in Action CCU
[x] 2:30 - THESIS DEFENSE: Mechanisms of Visual Perceptions in the Mouse Visual Cortex
————
Extra-credit
[x] Ink Figure 24
[~ ] Finish “First & Last 2017” (100/127 = 78.74%)
——
Jax Laboratory Tools: https://www.jax.org/jax-mice-and-services/model-generation-services/crispr-cas9
Recommendation for Design and Analysis of In Vivo Electrophysiology Studies
http://www.jneurosci.org/content/38/26/5837
On the Horizon:
Schultz (1997) (Classic, classic, classic)
*[x] 9/7/18 - 6:00 p.m. Flip water for Bruno’s mice *
ITI Data Analysis -> Next step ->….
[ ] (find the sigmoid call) / Poke around preprocessing_beta
Reading
[x] Chapter 6 - Ion Channels
[ / ] Finish Krietzer 2016 —> [ ] write an experiment-by-experiment summary paper
Resource: https://www.youtube.com/watch?v=GPsCVKhNvlA Helpful explanation of ChR2-YFP, NpHR, and general ontogenetic principles.
[ / ] Reiser Chapter 3.3.38 - 3.4 (Need to finish 3.4.5, Look up Photoionization detectors, Coherence)
Neuroanatomy
[/] Finish Figure 24 (need to ink)
“Drawing Scientists “
[/] Storyboard for GCAMP6s targeted paper
-> Show Filipe for feedback ->
-> Ask Leopold permission ? Talk to Catarina
[ x] 16:9
[x] Write script and record [ 1:00 ]
Intellectual Roaming
[ / ] Return to Review of Reviews and Review Zoom-In | First & Last |
[/] Explore Digital Mouse Brain Atlas
9/6/18 - Thursday
To Do:
ITI Data Analysis :
[x] Draw data structure on mm paper -> Reach out for help understanding
[ / ] What fields did Asma call? What fields are necessary for a psychometric curve
Reading
[x] Kandel - Chapter 5 | Synthesis and Trafficking of Neuronal Proteins
[ / ] Reiser - Chapter 3 | A High-Bandwidth Dual-Channel Olfactory Stimulator for Studying Temporal Sensitivity of Olfactory Processing (Results complicated)
[/ ] Krietzer 2016 - Cell-Type-Specific Controls of Brainstem Locomotor Circuits by Basal Ganglia
Talks:
[x] 12:00 p.m. - Colloquium - Development of Drosophila Motor Circuit
Tutorials:
~ [x ] MatLab plotting psychometric curves
Neuroanatomy
[ x ] Outline brain for figure 24
———
MatLab
Laser stuff HZ noise, thresholds,
// PCA -> Co-variance ->
// Linear regression | Geometric intuition -> “What is known to the animal during inter-trial? What features can be described by animals history” ===> Construct a history space (axis represent different animals history ex. x-axis previous stimulus, reward, etc.?) Predictive (?)
Plot psychometric functions || PSTH (post stimulation of histogram ) of example neurons -> skills: bin spiking, plot rasters, smoothing (if necessary)
Data:: Access to Dropbox -> /data/TAFC/Combined02/ [3 animals :: Elife]
/data/TAFC/video
Tiago and Flipe know the video data
File Format -> Parser/Transformation (guideline) ||
> MatLab
Access to MatLab -> [/] 28 days!
How can I begin to analysis?
History dependent | Omitted
——
To Do Week of September 3rd
Monday
Administrative
[ x] Check-in with HR (Don’t bombard!): Badge. (Library access?)
[ ] Reach out to SEF?
[x] 2:00 p.m. Meet with Asma - discuss data analysis. Where is it? How do I access it (Tiago?) What has been done and why?
[x] 3:00 p.m. Lab Meeting “Maurico’s Data” - Pay special attention
[x] Finish first read through of Theoretical Laboratory Animal Science PDF Lectures
[ ] Rat Surgery Techniques…
Mouse neuroanatomy project
[/ ] Figure 24
[ ] Figure 28
Math
[x ] L.A. Lecture 2
[ x] L.A. Lecture 3
Read:
[ ] Georg Raiser’s Thesis (Page 22 of 213)
Find time to do at least an hour of quiet focused reading a day. (Place?).
Continue to explore whims, papers, databases, ideas, protocols, that seem interesting.
Develop ‘literature scour’ protocol - (Nature Neuroscience, Neuron, Journal of Neuroscience)
Dates to Remember: September 14th - Laboratory Animal Sciences Theoretical Test!
https://www.sciencedaily.com/releases/2018/08/180827180803.htm:Can these be used for techniques?
https://www.sciencedaily.com/releases/2018/08/180823141038.htm ‘Unexpected’ - Unexpected physical event and unexpected reward or lack of reward (neuronal modeling of external environment)
—
In my first ten minutes at work I’m exposed to a weeks (month/year/decade) worth of interesting information. Going from an intellectual tundra to an intellectual rain forest.
1460 proteins with increased expression in the brain: Human Protein Atlas https://www.proteinatlas.org
Non-profit plasmid repository: https://www.addgene.org
Protein database: https://www.rcsb.org/3d-view/3WLC/1
Started to think at the molecular level.
“MGSHHHHHHGMASMTGGQQMGRDLYDDDDKDLATMVDSSRRKWNKTGHAVRAIGRLSSLENVYIKADKQKNGIKANFKIR
HNIEDGGVQLAYHYQQNTPIGDGPVLLPDNHYLSVQSKLSKDPNEKRDHMVLLEFVTAAGITLGMDELYKGGTGGSMVSK
GEELFTGVVPILVELDGDVNGHKFSVSGEGEGDATYGKLTLKFICTTGKLPVPWPTLVTTLTYGVQCFSRYPDHMKQHDF
FKSAMPEGYIQERTIFFKDDGNYKTRAEVKFEGDTLVNRIELKGIDFKEDGNILGHKLEYNLPDQLTEEQIAEFKEAFSL
FDKDGDGTITTKELGTVMRSLGQNPTEAELQDMINEVDADGDGTIDFPEFLTMMARKGSYRDTEEEIREAFGVFDKDGNG
YISAAELRHVMTNLGEKLTDEEVDEMIREADIDGDGQVNYEEFVQMMTAK” - CCaMP6m amino acid code.
8/31/18 - (Friday) @12:00 in Meeting Room 25.08
GET USB ! !
[Lisboa Cultura na ru, Lisbon on the streets Com’Out Lisbon - Katie Gurrerirra ]
MatLab -> Chronux Neural Analysis
SEPTEMBER 14th!
Week of August 27th, 2018
“Conserved computational circuitry, perhaps taking different arguments on different locations of Basil Ganglia” - Tuesday
Andrew Barto: http://www-all.cs.umass.edu/~barto/
Basil Ganglia Labs
Okihide Hikosaka Lab: https://irp.nih.gov/pi/okihide-hikosaka
Wilbrecht Lab
Uchida N. (ubiquitous dopamine motivation and reward)
Peter J. Magill
Schultz (Pioneer in the field)
C. Savio Chan
Doya, K. (theory)
Calabresi, P. (muscarinic)
Ana Graybiel (McGovern)
James C. Houk (1994 - Book on Models of Computation in the basal Ganglia)
Evolutionary Conservation of Basil Ganglia type action-selection mechanisms:
https://www.sciencedirect.com/science/article/pii/S0960982211005288
Dopamine D1 - Retinal Signaling https://www.physiology.org/doi/full/10.1152/jn.00855.2017 [Note to self: Too Off Track]
[ ~ ] Flurorphore Library
Official Badge? [ ] Printer Access [ ]?
—
Online Course on Laboratory Animal Science
Monday : 11 [x] 12 [x]
Tuesday : 13 [x] 14 [x]
Wednesday: 15 [x] 16 [/]
Thursday: 17 [x] 18 [x]
Friday: 19 [x] 20 [/]
Lesson 11 - Behavior and Environment, animals must be housed in an environment enriched to maximize their welfare.
Lesson 12 - Rodent and Lagomorph Accommodation and Housing - A more comprehensive guide from the macro environment, facilities i.e. establishments, to the micro environments. Covers health and safety procedures for personnel as well as geometry of housing units (rounded edges to prevent water accumulation). Absolutely essential.
Lesson 13 - Collecting Samples and Administrating Procedures - covers the most common collection techniques and materials collected and stressed the importance of doing as little harm as possible to the animal.
Lesson 14 - Transporting the Animal : Shipper holds most of the responsibility. Major goals are making sure the journey is as stress free as possible, contingency plans are in place, and that all of the logistics have been carefully planned, communicated, and coordinated between various parties responsible in the shipping. Also, animals should be prepared mentally and physically for the journey and should have a period of post-transportation to adjust to the new surroundings and environment. A number of practical issues must be considered such as temperature, availability of food, and access to animals during the journey. Boxes should be properly labelled in whatever languages are necessary.
Lesson 15 - The purpose of feeding and nutrition is to meet the energy needs of the animals, which vary by species, physiological state of animal (growth, maintenance, gestation, and lactation). A number of category of diets exist as well as a variety of specific diets to best fits the needs of the experiment. This chapter covers particulars of nutrition requirements and stresses the importance of avoiding obesity and malnutrition.
Lesson 16 - Anatomy and Physiology of Teleosts (Skip for now: Focus on Rodents and Lagomorphs)
Lesson 17 - Anatomy and Physiology of Rodents and Lagomorphs - General characteristics of the anatomy and physiology of six species, 5 rodents and 1 lagomorph. Mice, rats, guinea pigs, gerbils, and hamsters. Rabbits. It covers particularities of each species and has a quiz asking specific facts, mostly centered on commonalities and distinguishing factors. Worth a close read.
Lesson 18 - Anaesthesia and Analgesia in Rodents and Lagomorphs . Pre anaesthesia techniques, drug combinations, and repeated warning of the importance of choosing the right drugs and technique for the species. Use of a chamber. Methods of anesthesia (IP, IV, Volatile). Endotracheal Intubation for rabbits; the proper use and administration of analgesics; monitoring during the operation (for example - the paw pain reflex disappears in medium to deep anesthesia
Lesson 19 - Animal Welfare and Signs of Disturbance - This chapter repeatedly stresses the importance of the relationship between the caretaker and the animal. It repeats the ideal social, environmental, and nutritional environments for rodents and rabbits and highlights peculiarities of each species. After reading this one should be better suited to detecting stress, disease, or other ailments in a laboratory animal.
Lesson 20 - Fish Psychology and Welfare (Skip for now: Focus on Rodents and Lagomorphs)
Lessons 5, 17, and 20 pertain to fish
TEST SEPTEMBER 14th
—
MIT Open Course Ware:
Linear Algebra
Lecture 2 [/ ] -> Elimination by Matrices, production of elementary matrices, basic computations, and a review of row and column approaches to systems of equations. Introduction to the basic application of the rule of association in linear algebra.
Lecture 3 [ ]
Mouse Neuroanatomy
Ink Figure 16 [x]
Figure 20 [x]
Figure 24 [ ]
Introduction to MatLab: https://www.youtube.com/watch?v=T_ekAD7U-wU [ ]
Math Big Picture: Review Single Variable Calculus! Find reasonable Statistics and Probability Course (Statistical Thinking and Data Analysis? Introduction to Probability and Statistics?) Mine as well review algebra well I’m at it eh.
Breathe in. Breathe out.
—
Data analysis :: Behavioral Analysis
—
Ana Margarida - Lecture 6 - Handling Mice techniques
EuroCircuit can make a piece. Commercial v. DYI version of products.
Dario is the soldering, hardware expert. I.E. skilled technician.
www.dgv.min-agricultura.pt; it is recommended that the entry on Animal Protection and the section on Animals used for experimental purposes be consulted first.
—
Sir Ronald Fisher, stated in 1938 in regards to this matter that “To consult the statistician after an experiment is finished is often merely to ask him to conduct a post mortem examination. He can perhaps say what the experiment died of”.
——
Finally, it is time to publish and reveal the results. According to Santiago Ramón y Cajal, scientific writers should govern themselves by the following rules:
Make sure you have something to say; Find a suitable title and sequence to present your ideas; Say it; Stop once it is said.
8/21 Goals
Access ->
:: Champalimaud Private Internet [HR] Printer [HR]
:: Web of Science (?)
:: PubMed (Nature, Journals, etc.?)
::
———
PRIORITY: Online Course -> Animal Laboratory Sciences PDF’s
20 total -> 4 a day || I can finish by Friday
Monday : 1 [x] 2 [x]
Tuesday : 3 [x] 4 [x ]
Wednesday: 5 [x*] 6 [x]
Thursday: 7 [x* ] 8 [x]es
Friday: 9 [x ] 10 [x ]
Notes:
Lesson 1 - Philosophical and ethical background and the 3 R’s
Lesson 2 - Euthanasia. Recommended, adequate, unacceptable. Physical or chemical. Chemical - inhalable or injectable. Paton Lab uses CO2 and cervical dislocation.
Lecture 3 - Experimental Design. Return to as a starting point for basic design (randomized samples and blocks) Integrate with “Statistical Thinking and Data Analysis”
Lecture 4 - Legislation. Memorize specific laws and acts.
Lecture 5 is highly specific for the care and maintenance of Zebrafish
Lecture 6 - Handling of rodents and mice. A theoretical overview, this material is essentially kinesthetic.
Lecture 7 - Provides a technically detailed account of how genetic manipulations are done and propagated. Deserves a ‘printed’ review and vocabulary cross reference.
Lecture 8 - Health and Safety. Predominantly common sense.
Lecture 9 - Microbiology - contains an appendix with list of common infections that will be eventually be good to know.
Lesson 10 - Anaesthesia pre and post operation techniques, risks of infections etc.
// http://ec.europa.eu/environment/chemicals/lab_animals/member_states_stats_reports_en.htm
http://ec.europa.eu/environment/chemicals/lab_animals/news_en.htm -> General European News regarding
http://www.ahwla.org.uk/site/tutorials/RP/RP01-Title.html -> Recognizing pain in animals
Week of 8/20/18 To Do:
Tiago/Team -> Whats the most important priority?
Get Arduino Machine working again [?]
Jupiter/Python Notebook Up [ ]
Bruno MatLab Access [… ]
- Get documents to HR
- Animal Lab certified?
- Logistical/Certificate/Etc.
- Start discussing personal project:
> (Rat colony) Wet Lab
> (Machine Learning) Electric Lab
> Statistics project
- Reacquaint with Lab Technology/Protocols
- Review papers - Engage back with the science
-
Project Print: Screen shots
[ ] collect
“Do the job. Do it engaged. Engage -> Not just execute the best you can, understand the experiment.
Why? Alternative designs? Control experiments needed to interpret the data? Positive controls and negative controls? What do you need to do to get crisp. Totally engage.
How it fits into other experiments?
“Engage with the science as if it were your baby.”
Execute beautifully… Ask --- et. al. What does ideal execution look like
Extra time: allocate time. Technicians : Freedom to do other things, work with other things, other technical things, giving people independent project to carry out. Project --- has in mind? Design. Hands on education of how science works then reading. Spend time focused on a problem and in the ideal become the world’s foremost expert on whatever ‘mundane’ aspect of what ever problem you are working on.
Computational in the context of a problem. Learn to use. Defining “problems I want to solve.” As an operating scientist, the technology can change very quickly. Capable of learning, understanding, and applying.
Answer questions in a robust way. Thinking of technology in context of problem. Deep domain knowledge; focus on experimental more than book reading.
Realistic path -> Research fellow to PhD. program. Industry… Strong head’s up to do research. First-rate OHSU? Excellent. IF: Remember that it is narrow, broader with neuroscience as a component. Biology < > Neurology. Real neuroscience computational ->
Juxtasuposed: Engineering, CS, A.I., and all that…
Label in broad ways: Molecular, cellular, systems, cognitive, psychology. Borders are so fuzzy — as to be
Domain bias. In general -> other than P.I. protected from funding. Publication, the life of the business. Metric of success is the science they publish. Work that contributes to being an author = more engaged, more independent. Evolved to an independent project.
So incredibly broad -> CRISPR, GFP, Optogenetics, with higher level systems problems. 100 years = absurd. Look back -> Could we have conceived whats going on today.
Foremost expert on something how-ever limited. Grow from there. Grown from a particular expertise.
Molecular biologist || Do what a 3 year old is taught to do. How? How? How? How does that work. Quantum physics. Ask questions. Be open.
Go to seminars -> Go to every talk. Take every note. Primary literature fundamentally different. Always learn in context. Don’t dilute too much (ignore title, abstract, discussion). Look at figures and tables and derive for yourself what they say. Look for THE FIGURE or THE TABLE that is the crux and look for the control experiment. Understand the critical assessment, are the facts valid and warranted? Infinite amount to learn, don’t spread yourself infinitely thin. “
To Do: Develop Independent Machine Learning Project
Gain Access to Web of Science
————
Paton Learning Lab
Personal Learning Goals
September 1st - December 1st
Major Goals
[ ] Read Principles of Neuroscience 5th Edition
[ ] Complete CSS 229
[ ] Deep read 12 papers (Write summary || Practice peer review)
Administrative
[ ] Reactivate
[ / ] Figure out Residence Permit/Visa
Lifestyle
[ x ] Purchase commuter bicycle
[ / ] Purchase waterproof computer/messenger bag
Language
[x] …. Focused practice minimum 20 minutes daily …?
[ ] Find language partner
[ ] Portuguese film/television/music
UPCOMING
Phone conversation with --------
Tuesday, August 7th 9:00 a.m. EST (10:00 a.m.
0 notes
Text
8 Great Arduino Projects for Kids
Learning about electronics should be fun for kids and an Arduino board makes it both fun and accessible for all ages. It’s always easier to learn through hands-on activities. Arduino projects provide an engaging way for kids to get more interested in building and manipulating electronics.
Arduino is open-source and easily accessible. Instead of feeling limited, kids are free to get as creative as they want, which is ideal for STEAM activities.
7 Easy Arduino Projects for Kids
Arduino coding projects for kids need to both interesting and easy for beginners. Otherwise, kids might give up before they get started. These seven projects are ideal for any kids new to Arduino and will inspire them to try even more projects later.
You’ll need an Arduino kit and a battery to get started with any of these projects. However, supply lists are included with each project.
1. Electronic Dice
If you’re interested in Arduino UNO projects with code, the Electronic Dice project is a great place to start. This project teaches kids how to build their own electronic die. When kids press the button, the LEDs randomly light up until they stop on a random number. While simple, it’s a great introduction and makes kids feel proud. You can find the instructions and supply list here.
2. Simple Interactive Robot
Who doesn’t love to play with robots? The Simple Interactive Robot is one of the best Arduino programming projects. It’s extremely simple to do and makes a great introduction to both electronics and programming. You’ll need some 3D printed parts, which you can do with Makeblock’s mCreate 3D printer. When kids finish, their robot can walk, avoid anything in its path and even make sounds. Makezine lists all the instructions and supplies needed.
3. Portable SMS Device
While kids may have their own smartphone, do they really know how it works? You’ll need a SIM card in addition to the standard supplies, but you can create your very own Portable SMS Device. Much like a phone, the device can both send and receive texts. This is one of the more popular Arduino UNO projects with code. It doesn’t take long to put together and kids might just feel like the next Steve Jobs by the time they’re finished. The Instructables instructions are easy to follow.
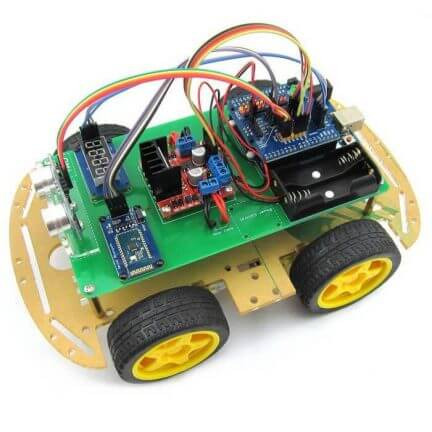
4. Remote Controlled Robot
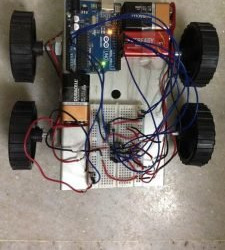
The Remote Controlled Robot is a great option for kids who also love Legos. Of course, you can also custom print pieces with a 3D printer, such as Makeblock’s mCreate. The small robot works much like an RC car. It works over WiFi and can be put together in minutes. You’ll want an Arduino Nano board to better fit the size of a small RC car.
Instructables lists the steps to make it easy to build the robotic car quickly. The best part is kids can program it to go as fast or slow as they want. You may even want to build your own roads to play on.
5. Breath Controlled Windmill
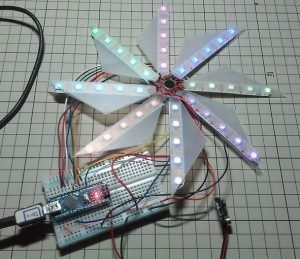
Imagine if you could blow into a microphone and cause a windmill to spin. You can with the Breath Controlled Windmill. While one of the simpler Arduino projects for kids, it’s great for beginners and teaches how sounds can be used with electronics.
LED lights make the windmill look great and make it stand out even more when it’s spinning. When you finish, turn off all the lights, blow into the mic and enjoy the show. While it doesn’t technically spin, the lights make it seem as if it is. You can find the project instructions here.
6. Digital Pet

If you ever got in on the Tamagotchi trend, either the original or the more recent revival, the idea of building your own version is probably exciting. With the Digital Pet project, you can. While adults will likely love this one too, it’s one of the most engaging Arduino coding projects for kids too. Since parts need to be soldered together, make sure kids have adult supervision.
The final project looks like an old intercom speaker but features a screen to display the pet. You can interact with it through feeding, monitoring it health and more. Get the instructions here.
7. Bluetooth Controlled Toy Car
If the Remote Controlled Robot wasn’t quite enough of a car for you, try the Bluetooth Controlled Toy Car. Instead of WiFi, this car is controlled via Bluetooth. Not only does the car move around using two motors, it also features LED lights for some fun in the dark. All you need is an Android device to start driving the car.
Once again, create some roads to help kids learn to navigate their new car. Circuit Digest details exactly how to make this fun project.
Arduino Project With mBlock – Meet LED
Introduction Of Project
If you’re eager to get started with your very first Arduino project, look no further. The Arduino, Meet LED project is ideal for parents and kids to learn together. It’s one of the simplest Arduino projects for kids. As the name implies, the project teaches kids how to use an Arduino board to turn an LED light on and off.
You’ll need a computer (Mac or Windows), an Arduino UNO, an LED light (any color will work), a USB connector (comes with an Arduino kit) and Makeblock’s mBlock software. The software helps kids learn to code through a drag and drop method. You can use manual coding too. However, you’ll need to software in order for any code to communicate with your Arduino board.
Once the mBlock software is installed, connect your Arduino board to your computer to program it.
1. LED Light Setup
Since you’ll be turning an LED light on, you’ll need to connect the LED light to the board. The longer leg connects to PIN 13 and the shorter leg to GND. Parents should help younger kids with this one.
2. Connect Arduino with mBlock
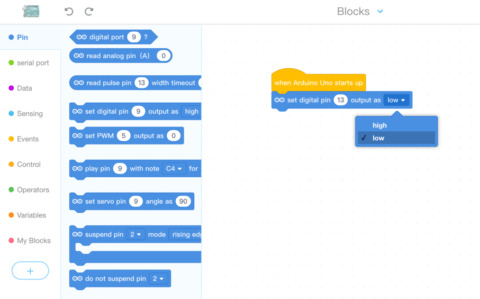
Now, select Arduino in mBlock. Next, choose Events and drag the “When Arduino starts up” to the Blocks section.
Now, it’s time to program the light itself. Open the Pins group. Drag “set digital pin 9 output as high” under your first block. Change “9” to “13.” Choose Upload and be amazed!
4. What Next?
Now that your LED light is on, it’s time to turn it off. Go back to mBlock and look at your second block of code. Notice that it says “high”? In this case, high means on. So, if you want to turn off your light, choose “high” and change it to “low.” Now, your light is off.
5. How Can We Make the LED Light on and off?
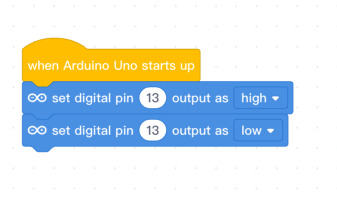
Arduino projects are made to be built upon. Let’s go another step. Add another block of code below the second one that says “set digital pin 13 output as low.” Choose Upload. While you won’t technically see anything happen, the Arduino actually turned the light on and off so fast, you didn’t see it.
You’ll need to slow the process down to see your LED light dance. In the Controls section, drag the “wait 1 seconds” in between your two digital pin code blocks. This tells the light to turn on, wait one second and then turn off.
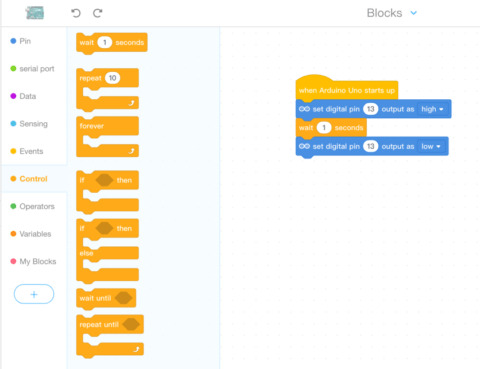
6. How to Make the LED Light Repeating This
You’ve finally gotten to see your LED light turn on and off, but you probably want a little more. All you have to do is create a loop. Drag the “repeat 10” block directly underneath your “when Arduino starts up” block. When you look at the code, you’ll see that it now repeats your on and off instructions 10 times. However, there’s still one piece missing.
Right now, your code doesn’t tell your Arduino to wait between each repetition. Simply add one more “wait 1 seconds” block under the “set digital pin 13 output as low” block. Now, choose Upload and watch your light dance.
Makeblock wants to make it easy for kids to learn more about how electronics and programming work. Arduino projects for kids are the perfect way to get started. Check out Makeblock Official Website for more information.
0 notes
Text
Catch up on studio blogging
I’ve fallen behind on my studio blogging from the last couple (or more) weeks, prioritizing working on the project to reflecting on the work so far, and also recently trying to get my physical computing working.
With the rain system working enough to test as a prototype, I started working on a way to play rain sounds depending on the storm’s intensity. Like the previous iteration of the sound system, it would have three different clips that would be faded in and out smoothly.
We planned to use a heart beat sensor to calculate BPM and use that to set the intensity of the storm. The first idea was to use a Peizo disk and an amplifier circuit to detect the pulses, but after an attempt and some research it seemed like that would be more work than necessary.
We found a pre made sensor that uses infrared to detect the volume of blood, as it absorbs infrared light, and from there it can calculate the beats per minute. As we tested this, we realized that the reading from the sensor were often erratic if it wasn’t held again a person’s arm properly, and if it wasn’t attached at all the readings would fluctuate. If we had this directly controlling the storm’s intensity rate it would jump wildly when someone took the sensor off or as it calibrated - it can take up to ~7 seconds to find a reliable BPM as the accuracy is based on how many pulses it has recorded so far.
During the Integrative Practice assignment I started writing down notes and doing sketches to help me organise and develop my ideas, and I had an idea for a sound manager layout. The way I normally code things is by having a rough idea of how it will look, and then start somewhere and make decisions as I reach them and allow problems to dictate the direction of the code. This is good for prototyping because it’s quick and usually produces a working outcome, but for more complicated projects like this one I found it really helps to stop and take a minute to plan it out before I jump in. Running through the outline in my head can give me a bit of an idea of what sort of issues could come up and so I can take that into account and build around them from the start.

A scrawly sketch of the sound manager
My idea was to have the three sounds as bars; with a start, middle, and end percentage. The intensity slider would behave like a physics object instead of a 1:1 of the input intensity. This would mean that if the intensity changed from 0 to 100 real quick, the storm wouldn’t jump unnaturally but instead fade up smoothly.
The sound clips would be instances of a sound clip class, each with their own gain offset (so if one clip was louder it could be adjusted), and ranges. These clip instances would be controlled by a sound manager class that dictated overall gain and updated the velocity based slider. This is one of the most useful techniques I discovered for managing instances in Processing; a manager class that holds global variables for the instances and updates those as well as all the instances. This works by passing the sound manager itself, using the ‘this’ keyword, as an argument of the instance’s constructor when they are initialized. Then the instance can use parentClass.variable instead of taking a long list of variables as arguments and having to individually update them. This might also be less strain on the processor, but I don’t actually know.
This also makes for a much cleaner file, in the draw loop you can just make one update call to the manager class, and there are no global variables floating around.
This is useful for me because if I have a large project and want to add something, I’ll make a prototype in another file. Then, I can get the test working and set up with parent and child classes, then just add new tabs to the original file, create an instance of the parent class and add one update call and it works.
It also helps stop variable overlap, there are often similarly named variables and if everything is global then your’re bound to trip yourself up. With classes like this you can only access the variables through parentClassInstance.variable.

This is a gif of the prototype sound manager in Processing. Each staggered bar represents a sound file, each with some debug information below it. The quickly moving red dot is the mouse’s X position on the screen, and the more smooth green dot is the intensity fader. Here, the mouse’s X position and therefore the red dot simulates the intensity, with 0% intensity behind x = 0, and 100% at x = width. From there, I incorporated this concept into the main Storm system sketch. Some of the movement values were changed so that the fade was slower and decelerated slower.
vimeo
Testing a prototype
The next step was to test this projected on the window to get a feel of the final outcome.

Blog draft from 10/10/17
Today I got the heart rate sensor on the Arduino sending values over serial to processing. This was unexpectedly difficult and frustrating to get working, and I still have to have a bit of contingency built in to the serial code that checks if what its getting is NaN or ‘Not a number’ – which crashes the sketch if allowed further into the program. The fader built in to the intensity value has been very useful in transitioning between different states, and because the Arduino send BPM data and not heart beats there is some delay while it calculates the beats per minute, and there is a ~20% jump in intensity about half a second after someone removes the sensor from their wrist or finger. With the fade system implemented, the storm intensity naturally fades down instead of jumping.
After trying to do some brief user testing with the prototype experience we have set up a couple of things became very apparent: 1, that the sound has a much greater and more noticeable effect on how you perceive the intensity of the storm. There are three distinct audio tracks and the fades between them are more noticeable than the gradual fade between different amounts of rain intensity.
The second, larger thing we learned was that the experience of watching a storm on a window isn’t really that interest resting. We had been working under the assumption that once we connected the heart beat monitor it would automatically become a experience that would keep you interested in and interacting with the display, but it felt like it lacked a lot of the depth we assumed it would have.
There was an uncomfortable moment where we all realized that we would have to change or add to our project for it to be successful and something that we would all be proud of.
Discussing our next steps, Eden came up with the idea to have people type in words that represented what was stressing them out. I think we all instantly recognized it as where we wanted to go with the project; it added interactivity and personal investment to the display, and it did a much better job at fulfilling the brief we had created for ourselves. I’ll go more into depth on our influences, reasons, and research.
2 notes
·
View notes
Text
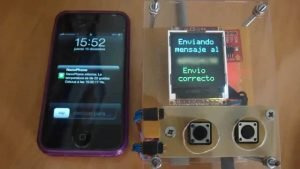
Arduino Nano Precise Clock

Arduino Clock Components ----------------------------------
1)Arduino nano
https://es.aliexpress.com/store/product/Nano-3-0-controller-compatible-with-arduino-nano-CH340-USB-driver-with-CABLE-NANO-V3-0/1735233_32686415387.html?spm=a219c.search0104.3.9.fEOWoR&ws_ab_test=searchweb0_0,searchweb201602_1_10152_10065_10151_10068_10344_10345_10547_10342_10343_10340_10341_10548_10541_10307_10060_10155_10154_10056_10055_10539_10537_10536_10059_10534_10533_100031_10103_10102_5670011_10142_10107_10173_5660011_10084_10083_10312_10313_10314_10550_10073_10551_10552_10553_10554_10556_10557_5650011-10550,searchweb201603_2,ppcSwitch_5&btsid=e2d79a43-a9ae-4e1a-b9b5-e81e896c7de6&algo_expid=1ba6f1b6-e9ac-4f9c-a4c0-8481f4368dba-4&algo_pvid=1ba6f1b6-e9ac-4f9c-a4c0-8481f4368dba
2)Arduino connections cables 12
https://es.aliexpress.com/item/120pcs-20cm-male-male-male-female-and-female-female-wire-Dupont-cable-for-Arduino-Breadboard-Free/1601497272.html?spm=a219c.12010108.1000013.6.2df5ad73LWjPFV&traffic_analysisId=recommend_2088_3_90158_iswistore&scm=1007.13339.90158.0&pvid=c2953982-4377-479e-b07c-7ae5a3d6b5c7&tpp=1
3)USB 5v Power suply Cellphone charger will do.
4)USB mini USB Cable
5)Arduino compatible numeric Keyboard
https://es.aliexpress.com/store/product/4x3-Matrix-Array-12-Key-Membrane-Switch-Keypad-Keyboard-3-4-Control-Panel-Microprocessor-Keyboard-for/1762106_32342282281.html?spm=a219c.search0104.3.10.SWahiy&ws_ab_test=searchweb0_0,searchweb201602_1_10152_10065_10151_10068_10344_10345_10547_10342_10343_10340_10341_10548_10541_10307_10060_10155_10154_10056_10055_10539_10537_10536_10059_10534_10533_100031_10103_10102_5670011_10142_10107_10173_5660011_10084_10083_10312_10313_10314_10550_10073_10551_10552_10553_10554_10556_10557_5650011-10552,searchweb201603_2,ppcSwitch_5&btsid=327d1f0b-ddec-4ef2-9aa8-80045e23a890&algo_expid=d320c65b-33a8-4478-acbb-aa7e1d22f33d-1&algo_pvid=d320c65b-33a8-4478-acbb-aa7e1d22f33d
6)TM1637 LCD Display module
https://es.aliexpress.com/store/product/Free-shipping-4-digital-display-with-adjustable-brightness-LED-module-clock-Point-Accessories-Blocks-for-arduino/1326062_1961805015.html?spm=a219c.search0104.3.2.LYtgwE&ws_ab_test=searchweb0_0,searchweb201602_1_10152_10065_10151_10068_10344_10345_10547_10342_10343_10340_10341_10548_10541_10307_10060_10155_10154_10056_10055_10539_10537_10536_10059_10534_10533_100031_10103_10102_5670011_10142_10107_10173_5660011_10084_10083_10312_10313_10314_10550_10073_10551_10552_10553_10554_10556_10557_5650011-10552,searchweb201603_2,ppcSwitch_5&btsid=66712cd6-643c-4f83-93d3-15f25be8f620&algo_expid=4ccb73ab-7bce-4741-adaa-c5653dc68996-0&algo_pvid=4ccb73ab-7bce-4741-adaa-c5653dc68996
Arduino keypad library: --------------------------------- https://github.com/Chris--A/Keypad
Arduino TM1637 library -------------------------------- https://github.com/bremme/arduino-tm1637
Connections
---------------------------------
TM1637 LED
-------------------
tm1637/Arduino
VC=3v3
GND=GND
CLK=D5
DIO=D4
Keypad/Arduino
Keypad facing you with numbers upright from left to right
Keypad/Arduino
1/D12
2/D11
3/D10
4/D09
5/D08
6/D07
7/D6
Female to Female cable
--------------------------------
D2 connect to D3 this is to keep accurate time. In Arduino.
Source code -------------------------
/* Simple internal clock demo: by Joseph Unik aka Relic1974 Uses analog PWM output of 490Hz with a 50% duty cycle to keep very accurate time ;). Connect an LED to pin 13 to watch seconds blink. Connect a jumper from D3 to Digital Pin 2 (interrupt 0). Minutes output to serial monitor. http://www.planetxresearch.com 'Arduino' logo for more projects and tricks...
(Feel free to use this code to expand into a fully-functional clock or other project under Creative Commons ;) */ #include "SevenSegmentTM1637.h" #include "SevenSegmentExtended.h" #include "Keypad.h" String time; int clockInt = 0; // digital pin 2 is now interrupt 0 int masterClock = 0; // counts rising edge clock signals int seconds = 0; // variable int minutes = 12; // variable int hours = 12; // variable
int ledPin = 13; int state = LOW; int oldstate = HIGH; boolean flag=true; const byte PIN_CLK = 5; // define CLK pin (any digital pin) const byte PIN_DIO = 4; // define DIO pin (any digital pin)
const byte ROWS = 4; //four rows const byte COLS = 3; //three columns char keys[ROWS][COLS] = { {'1','2','3'}, {'4','5','6'}, {'7','8','9'}, {'*','0','#'} };
byte rowPins[ROWS] = {12,11,10,9}; //connect to the row pinouts of the keypad byte colPins[COLS] = {8,7,6 }; //connect to the column pinouts of the keypad
Keypad keypad = Keypad(makeKeymap(keys), rowPins, colPins, ROWS, COLS);
SevenSegmentExtended display(PIN_CLK, PIN_DIO);
void setup() { attachInterrupt(clockInt, clockCounter, CHANGE); // clockInt is our interrupt, clockCounter function is called when // invoked on a RISING clock edge analogReference(DEFAULT); pinMode(ledPin, OUTPUT); Serial.begin(9600); analogWrite(3, 127); // this starts our PWM 'clock' with a 50% duty cycle display.begin(); // initializes the display display.setBacklight(10); // set the brightness to 100 % }
void clockCounter() // called by interrupt { masterClock ++; // with each clock rise add 1 to masterclock count if(masterClock >= 979) // 490Hz reached // if(masterClock >= 130) // 490Hz reached { seconds ++; // after one 490Hz cycle add 1 second ;) masterClock = 0; // Reset after 1 second is reached state = !state;
// tone(13, 100, 100); // using tone to pulse LED without delay call ;) } return; } void printtime() { Serial.print(" Time = "); zeroit(hours); Serial.print(hours); Serial.print(":"); zeroit(minutes); Serial.print(minutes); Serial.print(":"); zeroit(seconds); char key = keypad.getKey(); Serial.println(seconds); display.printTime(hours, minutes, true); // display time
if (key != NO_KEY){ Serial.println(key); if(key=='*') { display.printTime(0,0 , true); time="";
flag=true; while (flag){ char key = keypad.getKey();
if (key != NO_KEY){ if(key=='#') { flag=false; hours=time.substring(0,2).toInt(); minutes=time.substring(2,4).toInt(); seconds=0; state = state;
Serial.println("New time will be "); Serial.println(hours); Serial.println(minutes); break; //time.toInt();
} if(key=='0' || key=='1'|| key=='2' || key=='3' || key=='4'|| key=='5'|| key=='6'|| key=='7'|| key=='8'|| key=='9') { time=time+key; Serial.println(time);
}
}
} } } return; }
void zeroit(int value) { if (value < 10) Serial.print("0"); return; } void loop() { if(seconds == 60) // NOW GETTING IN TO REAL TIME KEEPING {
if (minutes == 59)// set to 60 { hours++; if(hours==24) { hours=0; } minutes = 0; seconds = 0; } else { minutes ++; // increment minutes by 1 seconds = 0; // reset the seconds variable } }
if (state != oldstate) { digitalWrite(13, state); oldstate = state; printtime(); }
}
References ----------------------------------- http://arduinolearning.com/learning/basics/arduino-numeric-keypad.php
http://www.instructables.com/id/Make-an-accurate-Arduino-clock-using-only-one-wire/ ---> treasure box of knowledge
Enjoy your new arduino clock :-) !
1 note
·
View note
Text
Tutorial – LED Real Time Clock Temperature Sensor Shield for Arduino
In this tutorial we look at how to use the neat LED Real Time Clock Temperature Sensor Shield for Arduino from PMD Way. That’s a bit of a mouthful, however the shield does offer the following:
four digit, seven-segment LED display
DS1307 real-time clock IC
three buttons
four LEDs
a active buzzer
a light-dependent resistor (LDR)
and a thermistor for measuring ambient temperature
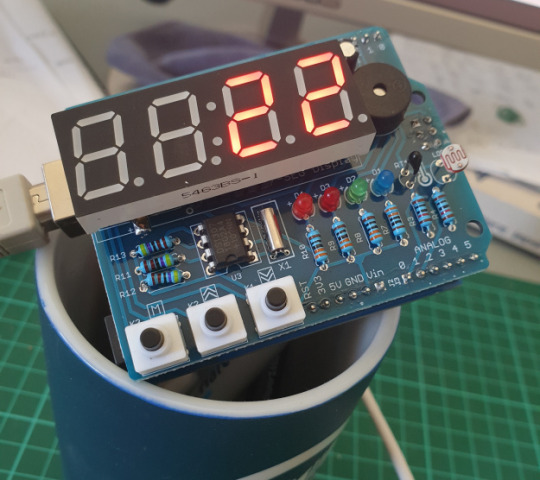
The shield also arrives fully-assembled , so you can just plug it into your Arduino Uno or compatible board. Neat, beginners will love that. So let’s get started, by showing how each function can be used – then some example projects. In no particular order…
The buzzer
A high-pitched active buzzer is connected to digital pin D6 – which can be turned on and off with a simple digitalWrite() function. So let’s do that now, for example:
void setup() { // buzzer on digital pin 6 pinMode(6, OUTPUT); } // the loop function runs over and over again forever void loop() { digitalWrite(6, HIGH); // turn the buzzer on (HIGH is the voltage level) delay(1000); // wait for a second digitalWrite(6, LOW); // turn the buzzer off by making the voltage LOW delay(1000); // wait for a second }
If there is a white sticker over your buzzer, remove it before uploading the sketch. Now for a quick video demonstration. Turn down your volume before playback.
youtube
The LEDs
Our shield has four LEDs, as shown below:
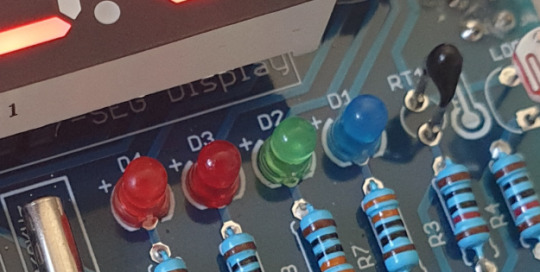
They’re labelled D1 through to D4, with D1 on the right-hand side. They are wired to digital outputs D2, D3, D4 and D5 respectively. Again, they can be used with digitalWrite() – so let’s do that now with a quick demonstration of some blinky goodness. Our sketch turns the LEDs on and off in sequential order. You can change the delay by altering the variable x:
void setup() { // initialize digital pin LED_BUILTIN as an output. pinMode(2, OUTPUT); // LED 1 pinMode(3, OUTPUT); // LED 2 pinMode(4, OUTPUT); // LED 3 pinMode(5, OUTPUT); // LED 4 } int x = 200; void loop() { digitalWrite(2, HIGH); // turn on LED1 delay(x); digitalWrite(2, LOW); // turn off LED1. Process repeats for the other three LEDs digitalWrite(3, HIGH); delay(x); digitalWrite(3, LOW); digitalWrite(4, HIGH); delay(x); digitalWrite(4, LOW); digitalWrite(5, HIGH); delay(x); digitalWrite(5, LOW); }
And in action:
youtube
The Buttons
It is now time to pay attention to the three large buttons on the bottom-left of the shield. They look imposing however are just normal buttons, and from right-to-left are connected to digital pins D9, D10 and D11:

They are, however, wired without external pull-up or pull-down resistors so when initialising them in your Arduino sketch you need to activate the digital input’s internal pull-up resistor inside the microcontroller using:
pinMode(pin, INPUT_PULLUP);
Due to this, buttons are by default HIGH when not pressed. So when you press a button, they return LOW. The following sketch demonstrates the use of the buttons by lighting LEDs when pressed:
void setup() { // initalise digital pins for LEDs as outputs pinMode(2, OUTPUT); // LED 1 pinMode(3, OUTPUT); // LED 2 pinMode(4, OUTPUT); // LED 3 // initalise digital pins for buttons as inputs // and initialise internal pullups pinMode(9, INPUT_PULLUP); // button K1 pinMode(10, INPUT_PULLUP); // button K2 pinMode(11, INPUT_PULLUP); // button K3 } void loop() { if (digitalRead(9) == LOW) { digitalWrite(2, HIGH); delay(10); digitalWrite(2, LOW); } if (digitalRead(10) == LOW) { digitalWrite(3, HIGH); delay(10); digitalWrite(3, LOW); } if (digitalRead(11) == LOW) { digitalWrite(4, HIGH); delay(10); digitalWrite(4, LOW); } }
You can see these in action via the following video:
youtube
The Numerical LED Display
Our shield has a nice red four-digit, seven-segment LED clock display. We call it a clock display as there are colon LEDs between the second and third digit, just as a digital clock would usually have:
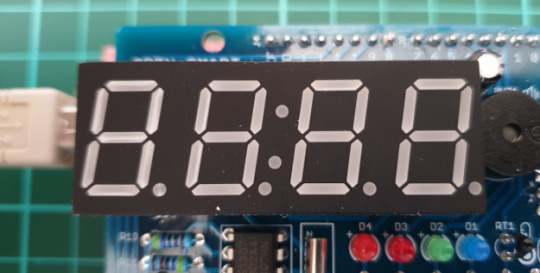
The display is controlled by a special IC, the Titan Micro TM1636:
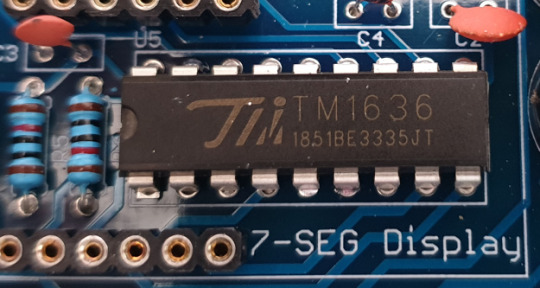
The TM1636 itself is an interesting part, so we’ll explain that in a separate tutorial in the near future. For now, back to the shield.
To control the LED display we need to install an Arduino library. In fact the shield needs four, so you can install them all at once now. Download the .zip file from here. Then expand that into your local download directory – it contains four library folders. You can then install them one at a time using the Arduino IDE’s Sketch > Include library > Add .zip library… command:
The supplied library offers five functions used to control the display.
.num(x);
…this displays a positive integer (whole number) between 0 and 9999.
.display(p,d);
… this shows a digit d in location p (locations from left to right are 3, 2, 1, 0)
.time(h,m)
… this is used to display time data (hours, minutes) easily. h is hours, m is minutes
.pointOn(); .pointOff();
… these turn the colon on … and off. And finally:
.clear();
… which clears the display to all off. At the start of the sketch, we need to use the library and initiate the instance of the display by inserting the following lines:
#include <TTSDisplay.h> TTSDisplay rtcshield;
Don’t panic – the following sketch demonstrates the five functions described above:
#include <TTSDisplay.h> TTSDisplay rtcshield; int a = 0; int b = 0; void setup() {} void loop() { // display some numbers for (a = 4921; a < 5101; a++) { rtcshield.num(a); delay(10); } // clear display rtcshield.clear(); // display individual digits for (a = 3; a >= 0; --a) { rtcshield.display(a, a); delay(1000); rtcshield.clear(); } for (a = 3; a >= 0; --a) { rtcshield.display(a, a); delay(1000); rtcshield.clear(); } // turn the colon and off for (a = 0; a < 5; a++) { rtcshield.pointOn(); delay(500); rtcshield.pointOff(); delay(500); } // demo the time display function rtcshield.pointOn(); rtcshield.time(11, 57); delay(1000); rtcshield.time(11, 58); delay(1000); rtcshield.time(11, 59); delay(1000); rtcshield.time(12, 00); delay(1000); }
And you can see it in action through the video below:
youtube
The LDR (Light Dependent Resistor)
LDRs are useful for giving basic light level measurements, and our shield has one connected to analog input pin A1. It’s the two-legged item with the squiggle on top as shown below:

The resistance of LDRs change with light levels – the greater the light, the less the resistance. Thus by measuring the voltage of a current through the LDR with an analog input pin – you can get a numerical value proportional to the ambient light level. And that’s just what the following sketch does:
#include <TTSDisplay.h> TTSDisplay rtcshield; int a = 0; void setup() {} void loop() { // read value of analog input a = analogRead(A1); // show value on display rtcshield.num(a); delay(100); }
youtube
The Thermistor
A thermistor is a resistor whose resistance is relative to the ambient temperature. As the temperature increases, their resistance decreases. It’s the black part to the left of the LDR in the image below:
We can use this relationship between temperature and resistance to determine the ambient temperature. To keep things simple we won’t go into the theory – instead, just show you how to get a reading.
The thermistor circuit on our shield has the output connected to analog input zero, and we can use the library installed earlier to take care of the mathematics. Which just leaves us with the functions.
At the start of the sketch, we need to use the library and initiate the instance of the thermistor by inserting the following lines:
#include <TTSTemp.h> TTSTemp temp;
… then use the following which returns a positive integer containing the temperature (so no freezing cold environments):
.get();
For our example, we’ll get the temperature and show it on the numerical display:
#include <TTSDisplay.h> #include <TTSTemp.h> TTSTemp temp; TTSDisplay rtcshield; int a = 0; void setup() {} void loop() { a = temp.get(); rtcshield.num(a); delay(500); }
And our thermometer in action. No video this time… a nice 24 degrees C in the office:

The Real-Time Clock
Our shield is fitted with a DS1307 real-time clock IC circuit and backup battery holder. If you insert a CR1220 battery, the RTC will remember the settings even if you remove the shield from the Arduino or if there’s a power blackout, board reset etc:

The DS1307 is incredibly popular and used in many projects and found on many inexpensive breakout boards. We have a separate tutorial on how to use the DS1307, so instead of repeating ourselves – please visit our specific DS1307 Arduino tutorial, then return when finished.
Where to from here?
We can image there are many practical uses for this shield, which will not only improve your Arduino coding skills but also have some useful applications. An example is given below, that you can use for learning or fun.
Temperature Alarm
This projects turns the shield into a temperature monitor – you can select a lower and upper temperature, and if the temperature goes outside that range the buzzer can sound until you press it.
Here’s the sketch:
#include <TTSDisplay.h> #include <TTSTemp.h> TTSTemp temp; TTSDisplay rtcshield; boolean alarmOnOff = false; int highTemp = 40; int lowTemp = 10; int currentTemp; void LEDsoff() { // function to turn all alarm high/low LEDs off digitalWrite(2, LOW); digitalWrite(4, LOW); } void setup() { // initalise digital pins for LEDs and buzzer as outputs pinMode(2, OUTPUT); // LED 1 pinMode(3, OUTPUT); // LED 2 pinMode(4, OUTPUT); // LED 3 pinMode(5, OUTPUT); // LED 4 pinMode(6, OUTPUT); // buzzer // initalise digital pins for buttons as inputs // and initialise internal pullups pinMode(9, INPUT_PULLUP); // button K1 pinMode(10, INPUT_PULLUP); // button K2 pinMode(11, INPUT_PULLUP); // button K3 } void loop() { // get current temperature currentTemp = temp.get(); // if current temperature is within set limts // show temperature on display if (currentTemp >= lowTemp || currentTemp <= highTemp) // if ambient temperature is less than high boundary // OR if ambient temperature is grater than low boundary // all is well { LEDsoff(); // turn off LEDs rtcshield.num(currentTemp); } // if current temperature is above set high bounday, show red LED and // show temperature on display // turn on buzzer if alarm is set to on (button K3) if (currentTemp > highTemp) { LEDsoff(); // turn off LEDs digitalWrite(4, HIGH); // turn on red LED rtcshield.num(currentTemp); if (alarmOnOff == true) { digitalWrite(6, HIGH); // buzzer on } } } // if current temperature is below set lower boundary, show blue LED and // show temperature on display // turn on buzzer if alarm is set to on (button K3) if (currentTemp < lowTemp) { LEDsoff(); // turn off LEDs digitalWrite(2, HIGH); // turn on blue LED rtcshield.num(currentTemp); if (alarmOnOff == true) { digitalWrite(6, HIGH); // buzzer on } } } // --------turn alarm on or off----------------------------------------------------- if (digitalRead(11) == LOW) // turn alarm on or off { alarmOnOff = !alarmOnOff; if (alarmOnOff == 0) { digitalWrite(6, LOW); // turn off buzzer digitalWrite(5, LOW); // turn off alarm on LED } // if alarm is set to on, turn LED on to indicate this if (alarmOnOff == 1) { digitalWrite(5, HIGH); } delay(300); // software debounce } // --------set low temperature------------------------------------------------------ if (digitalRead(10) == LOW) // set low temperature. If temp falls below this value, activate alarm { // clear display and turn on blue LED to indicate user is setting lower boundary rtcshield.clear(); digitalWrite(2, HIGH); // turn on blue LED rtcshield.num(lowTemp); // user can press buttons K2 and K1 to decrease/increase lower boundary. // once user presses button K3, lower boundary is locked in and unit goes // back to normal state while (digitalRead(11) != LOW) // repeat the following code until the user presses button K3 { if (digitalRead(10) == LOW) // if button K2 pressed { --lowTemp; // subtract one from lower boundary // display new value. If this falls below zero, won't display. You can add checks for this yourself :) rtcshield.num(lowTemp); } if (digitalRead(9) == LOW) // if button K3 pressed { lowTemp++; // add one to lower boundary // display new value. If this exceeds 9999, won't display. You can add checks for this yourself :) rtcshield.num(lowTemp); } delay(300); // for switch debounce } digitalWrite(2, LOW); // turn off blue LED } // --------set high temperature----------------------------------------------------- if (digitalRead(9) == LOW) // set high temperature. If temp exceeds this value, activate alarm { // clear display and turn on red LED to indicate user is setting lower boundary rtcshield.clear(); digitalWrite(4, HIGH); // turn on red LED rtcshield.num(highTemp); // user can press buttons K2 and K1 to decrease/increase upper boundary. // once user presses button K3, upper boundary is locked in and unit goes // back to normal state while (digitalRead(11) != LOW) // repeat the following code until the user presses button K3 { if (digitalRead(10) == LOW) // if button K2 pressed { --highTemp; // subtract one from upper boundary // display new value. If this falls below zero, won't display. You can add checks for this yourself :) rtcshield.num(highTemp); } if (digitalRead(9) == LOW) // if button K3 pressed { highTemp++; // add one to upper boundary // display new value. If this exceeds 9999, won't display. You can add checks for this yourself :) rtcshield.num(highTemp); } delay(300); // for switch debounce } digitalWrite(4, LOW); // turn off red LED } }
Operating instructions:
To set lower temperature, – press button K2. Blue LED turns on. Use buttons K2 and K1 to select temperature, then press K3 to lock it in. Blue LED turns off.
To set upper temperature – press button K1. Red LED turns on. Use buttons K2 and K1 to select temperature, then press K3 to lock it in. Red LED turns off.
If temperature drops below lower or exceeds upper temperature, the blue or red LED will come on.
You can have the buzzer sound when the alarm activates – to do this, press K3. When the buzzer mode is on, LED D4 will be on. You can turn buzzer off after it activates by pressing K3.
Display will show ambient temperature during normal operation.
You can see this in action via the video below:
youtube
Conclusion
This is a fun and useful shield – especially for beginners. It offers a lot of fun and options without any difficult coding or soldering – it’s easy to find success with the shield and increase your motivation to learn more and make more.
You can be serious with a clock, or annoy people with the buzzer. And at the time of writing you can have one for US$14.95, delivered. So go forth and create something.
A little research has shown that this shield was based from a product by Seeed, who discontinued it from sale. I’d like to thank them for the library.
This post brought to you by pmdway.com – everything for makers and electronics enthusiasts, with free delivery worldwide.
To keep up to date with new posts at tronixstuff.com, please subscribe to the mailing list in the box on the right, or follow us on twitter @tronixstuff.
Tutorial – LED Real Time Clock Temperature Sensor Shield for Arduino was originally published on PlanetArduino
0 notes
Text
Studio - 07/06 - Open Studio
While at open studio, our setup was very neat and tidy and looked very simple which was what we wanted. We did not want to over complicate things for the users with too much signage and writings everywhere - we just wanted them to be able to go up to it, know how to use it immediately, play with it for a few minutes, and then have the opportunity to ask us more about it if they wanted too. Based on the feedback from some of the users, I believe that we achieved that.

What I found interesting on Open Studio night was that the majority of people interacting with our work and asking the most questions were of older generations. This is most likely due to using “older technology” (vinyl) and “newer technology” (After Effects visuals) and making them work seamlessly through Processing and Arduino. Many of these participants also commented on the visuals, where a few really liked the “creepy blinking eyes staring right at you” or found it looked “like frogs eggs” and freaked them out too much.

Some other feedback revolving around the project as a whole included that we “stuck with our vision” and we “achieved exactly what we said we would achieve”. And while it may have been a long and complicated process, I think we made it look very simple and easy to understand for outside perspectives.
Looking at our final project in open studio, there were a few things we did not take into consideration during our creative process. An issue that we faced was the fact that the needle snapped off of the vinyl player after 10 minutes of people interacting with it. This was, of course, an issue as users would not get the full immersive experience from both the visuals and the audio. As a group, we realized that this was bound to happen as many people are not familiar with how to use a turntable safely and carefully. We discussed that a backup needle would have been appropriate to fix the situation.
Overall, I think my group and I handled our workflows reasonably well, stuck to our common goal and achieved our final vision. I have learned many valuable things from this project such as animation learning about analog vs digital signals that I am excited to expand upon in the future.
0 notes
Photo

CAMERA OBSCURA RESIDENCY - WEEK 4 + 5
In my proposed project for this residency, I wrote about using the Camera Obscura itself as source material and inspiration for a soundscape. I'm thinking of it as auditory realization or sonification of the street and ocean views as seen through the camera mechanism. Inside the Obscura is a different perspective of land where one can be immersed in the surrounding streets, park, and ocean. For my final performance/installation, I want to create music and sound that also makes one feel immersed in these surroundings.
This has lead to me think about "how can one translate an image into sound in a meaningful and interesting and fun way?" While walking on the beach, it occurred to me to do this by using electromagnetic waveforms (see above) to determine certain musical parameters - i.e. resonance, intonation, volume. Light and sound are both waveforms so it seemed like a natural choice. After some googling about spectrometers (a device that measures light/color levels), I find an open source arduino spectrometer that looked like it just might be able to communicate with my music program, Abelton. I reached out to the company to inquire and they seemed really excited about my project. The CEO and I did a skype session and exchanged ideas about how to make live music out of the real-time data from the spectrometer. I'm just at the beginning stage of this idea but it's looking promising. More to come!
Meanwhile, I had some really nice workshops these past two weeks. Week four was folksongs and week five was rounds. We learned a few Woody Guthrie tunes from Buffalo Skinner, a songbook/EP that my folk band, Three Thirds, made a few years back. We sang in unison on the choruses and volunteers would sing solo on the verses (sometimes even making up their own melodies on the spot!). In the last 10 minutes, we passed around the guitar and participants performed a song for the group. One of them was an original sing-a-long by Diane: "take a walk, or a hike, leave your worries and your fears behind, take a walk, or a bike, you never know what you might find." These workshops have been so fun. The next one is "Movement and Music" on June 6th at 11am where I will perform sitar and flute while dancer Jessica Hemingway leads participants in improvisational movement. See you there!
0 notes
Link
For just $147.95 Makeblock mBot v 1.1 Pink - Bluetooth What is mBot? mBot is an all-in-one solution to enjoy the hands-on experience of programming, electronics, and robotics. Working with mBlock inspired by Scratch 2.0, connecting with computers or smart devices via Bluetooth or 2.4G (by different version), this easy-to-assemble mBot provides infinite possibilities for you to learn STEM (Science, Technology, Engineering, Mathematics). Product Features Based on Arduino open source platform Easy to assemble within 10mins Based on Scratch 2.0 and Arduino IDE Support wireless connection via Bluetooth Electronics are based on Arduino open source platform Two programming tools: mBlock (a drag-and-drop programming tool based on Scratch 2.0 and Arduino IDE Support wireless connection via Bluetooth Module, no more limitation of wire Easy and intuitive wiring with color-coded RJ25 connectors Sturdy aluminum chassis with 2-mm of thickness, compatible with Makeblock & Lego parts Free lessons are provided and are being expanded gradually Achieve different fun projects like wall avoidance, line following, games with other mBots, using sensors to play games in Scratch This Bluetooth version of the mBot allows Bluetooth pairing with the special Makeblock app, allowing wireless connection with smartphones, tablets and PCs with Bluetooth capability. Contracted But Not Simple Contains 38 assembly parts that can be assembled in 10 minutes and color-labeled RJ25 ports for convenient wiring, making sure more time can be spent on programming and creativity. Graphical Programming Drag-and-drop graphical programming software mBlock developed based on Scratch 2.0 provides a quick way to learn programming, control the robot, and realize multiple functions from the robot. ...
0 notes
Link
In this session We'll be talking about the Top seven IoT projects which are outstanding themselves in the Internet of Things domain now, let's talk about Each of these projects.
Biometric System IoT Project
Smart Irrigation IoT Project With Raspberry Pi
Security Camera and Door Unlock IoT Project
Smart Home IoT Project for Beginner.
Smart City IoT Project.
Zelda Ocarina Controlled Home Automation.
Jarvis IoT Project Ideas.
Top 7 IoT Projects With Raspberry Pi For Beginners
Also Read this Related Post What is IoT Internet of Things Why do we need IoT? Benefits of Internet of Things
Biometric System IoT Project
Let's start with number 7, which is a biometric system. Now a bio-metric system is something that we always encounter on our daily basis as well because we always either use a fingerprint sensor or we use an iris scanning. So it depends from organization to organization. But how does this actually work the system there? Let's take in case of this example has a fingerprint scanner. Now the first time that I am presenting my fingerprint, it scans the fingerprint and considers this as part of an enrollment. Us from this fingerprint template what it does is that it extract certain key features, which makes it different from others and stores it into a database from then forward every time that I place my finger on top of this fingerprint scanner. It creates a template and Compares this with all the templates that's present in the database if it matches then correspondingly, let's it gives me an attendance or lets me access at or if it does not then it raises an alert with respect to that same now. This is just a foundation now as I said this biometric system Fingerprint, it can be is scanning or it can be a combination of both as well as voice recognition system is one of the key products in the biometric domain.
Biometric System IoT Project
Smart Irrigation IoT Project With Raspberry Pi
We have Smart irrigation system. Now I am someone who personally likes gardening a lot. Now, this is something that would really make my life easier because usually what I do is that on Sundays I spent about two hours just watering and looking after my plants through a smart irrigation system. What it does is that it checks the moisture present in the environment or in the water lanes that I have created now to help. You understand how it works. Usually there are two main Internet of Things devices that are used here, which is the Arduino board and the Raspberry Pi your Raspberry Pi becomes the main processing unit. And I place an Arduino board for each of my water channels. These addressing modes themselves are connected to multiple sensors which are part of this water channel. So what these sensors do is that we check the moisture present in these lanes are such so let's say a specifically in does not meet the minimum required moisture then what it would do is that it will Send a signal to the Raspberry Pi again. All these devices are connected on the same wireless router Network and the Raspberry Pi would identify the lack of moisture and pass the signal to the relay. The relay in turn would initiate the water pump and water would be pumped now in order to ensure that water is not wasted we would create gate controls and only the gate where the moisture is less. Would the gate be open once my sensor detects that the moisture level has gone beyond my required level it would Against another signal to the Raspberry Pi asking it to stop the pump as well. So this in turn helps you to save a lot of water and also makes your life quite easier as well. So after this your only task in your garden would be is either setting up new plans or creating new water channels as such.
Smart Irrigation IoT Project With Raspberry Pi
Security Camera and Door Unlock IoT Project
The next project in our list is a security camera and door unlock system. Now, this is something that's quite interesting and I have personally tried this out and it's really something that you should try out as well here. What happens is that you place a camera on top 40 Which in turn clicks the photo of a person who comes into the frame now, this photo is again sent to an analytical system which in turn Compares this with all the photos that it possesses in order to identify whether to let the user open the door or not now and evolution to this is that if it does not find the photo of that person it can notify the concerned person that so-and-so person is trying to access this dough. Would you like to authorize this person and address information to the database or would you? I'd like to deny the access to this person as well. Usually this is used in areas where you have high sensitive information stored in order to maintain a strict control to the access to this information as well another usage of the security camera and door unlock system can be even at our homes when we can identify who's come at our home when you're not there and either decide to give them access to our homes or not.
Security Camera and Door Unlock IoT Project
Smart Home IoT Project
Now the next thing is something that we all really decide to have which is a smart home system a smart home system can be something that really makes. Life quite easy starting from energy management where the light control system is the AC the appliances that we use the thermostat all this is managed in short trying to cut down the power consumption that's taking place by door management system is also part of this. My security system is also part of this my water management system again becomes a part of this as well. Again, these are key things that really stands out in the smart home system. But again, what I would personally recommend is that a Smart Homes limitations is where our imagination stops anything that you wish to automate or make wish to make your life easier can be part of a smart phone system as well.
Smart Home IoT Project
Smart City IoT Project
Now a smart home usually is going to be a base for our next project which is a smart City a smart city is an evolution of a smart home here. It's not just the sensors of a single home that is connected here. It's correlation or a network or a connection between various organizations various domains as well as various segments of that city as a whole as such Judo the life of every single dependent person in that City becomes easier as a whole as well and in turn will really help develop that City to Greater extent such now the key factor here for a smart city is a government support as well. And if governments are really willing to take this step then I hope we would see a smart City completely built on internet of things maybe the next 5 to 10 years as well.
Smart City IoT Project
Zelda Ocarina Controlled Home Automation
Now the next project is something that really stands out on a personal level this this is Zelda Ocarina controlled home automation system. This is personally something that I feel is the closest to a smart home system where most of the elements of the home is completely controlled by an Ocarina what Alan pan has done here is that he's created a node-based recognition system, which completely automates his hope but rather than telling more about this.
Jarvis IoT Project Ideas
Next on our list at number one. If you've not already guessed is Jarvis Jarvis is the artificial intelligence system that Facebook's creator Mark second Berg has built for his home automated system. Now, what you need to understand here is that internet of things is not something that's just dependent on a sensor or a few sensors, which is connected to a Raspberry Pi on Arduino.
IoT Architecture
when I look at the entire architecture of iot. This is a complete ecosystem where in my sensors gather information, which is again stored on a platform and then processed on this now if there have been any issues or failures that have been reported by these sensors, then I need to create actionable items. In order to ensure that this is never really repeated again, but the information wants to spin process the process data is then passed into machine learning and artificial intelligence in order to understand analyze and identify various patterns that's out there and help pass this information on back to the sensor this in turn helps. You have a better experience and also improve the system as a whole a system where I come home every day at 8:30 start off my Casey wait 15 minutes for it to cool down is a tedious process. But it's a today my Internet of Things platform identifies this pattern already switches on the AC at 8:15. Then I just need to come home and I can relax right away. This is just one of the key examples of one of the key ideas that's out there today and the limitation here again is just your imagination.
Want to Know More About Advance IoT Architecture | Basic Elements of Internet of Things Architecture
IoT Architecture
So, thats all About Top Seven IoT Projects for more please visit to my Youtube channel Loginto Courses
0 notes