#mangacap tutorial
Explore tagged Tumblr posts
Visit Tumblr Blog
Explore Tumblr blogs with no restrictions, modern design and the best experience.
Last Seen Tumblr Blogs


Fun Fact
The KCSC sent more than 20K requests to delete posts related to prostitution and porn to Tumblr from January to June 2017.
Text
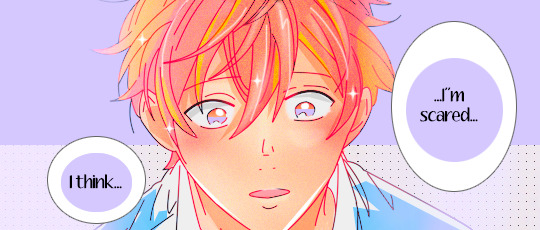
Reading dunmeshi manga so i can collect all of marcilles hair styles
#dungeon meshi#‘collecting’ as in trying them on my own hair and hoping i remember them later#but also i do kinda wanna collect mangacaps of them for future reference#gf told me marcilles hair reminds her of mine so :)#am making hair tutorials :)#hello from bel-o#if u want to see them on here lemme know i guess
10 notes
·
View notes
Text
TUTORIAL TABUI GOINMUL (2020-?) by baguseog kim-ssi & omagam
#tutorial tabui goinmul#the advanced player of the tutorial tower#kim hyeonu#anisource#animangahive#animangaboys#mangaedit#mangacaps#*nikki
9 notes
·
View notes
Text

Some answers are written in the stars. Others, you must ask to know.
How do you make your text/ titles gradient?
Patorjk’s Text Color Fader!! My life-saver frfr, I just use the steps of the tutorial provided here <3 However, this unfortunately can’t be done on mobile 😔
Where do you find the manga panels for your headers?
I usually find the panels and/ or titles on mangacap account on Twitter (eg. HornetPills, FAKKU, and lewdxvisuals). Most of my headers are from → “Lady K & The Sick Man”, “Infiltration! Agent on the Edge”, and “Hachisuka’s Family Kotoribako.”
How do you make your headers?
On Canva! I did a tutorial for getting that colorful ombré look right here <3
Where do you make your memes/ get those silly reaction pics?
I make all my memes on imgflip, and the unhinged pics - including the infamous werewolf ones - are mainly from Pinterest and stan Twitter.
What are your writing tips?
Here are the writing tips n' quirks that work most often for me, and here is for if you want something more practical/ to help with writer's block!!
Can I take inspiration from your fic/ did you take inspiration from [X]?
As long as you give credits/ tag me then yess you can take inspo lovely! It's the same thing with me - if I've taken inspiration, the author will be linked in the A/N, if not, the work n' concept is completely my own!!
What fandoms do you write for/ have you written for?
Currently, only JJK - but if you checkout my first masterlist you'll see that I have written for a lil' bit of AOT and Haikyuu.
What is your posting schedule?
9:30PM - 10PM EST on Wednesdays and Sundays for my fics; and you’ll usually catch me answering asks from 1:30PM onwards and 11:30PM onwards the rest of those days. Tiny reminder though that I don’t answer asks on days I post my writing and for 24 hours beforehand (ya girl will be busy typing away something diabolical 😩.)
Why did you miss a posting day?
I try very, very hard not too n’ I miss a posting day very rarely - I promise!! 99% of the time it’s because I’m super sick, though, and I’ll let you babygirls know prior to that. Dw, I almost always bounce back on schedule for the next posting day <3
Are you taking requests at the moment?
Noooope!! Sorry lovelies, but requests are closed. I do take suggestions and thirsts where I’ll just brainstorm or add on to the idea if I really like it, however. Something that looks like this or this.
Where are you from?
Sri Lankan through n’ through rahhh 🇱🇰 Feel free to yap with me in my inbox about it!
What is your gender/ what are your pronouns?
I’m a girlie n’ I go by she/her pronouns yup yup 😌
So then, why does everyone call you “daddy Tony”?
I DON’T EVEN KNOW WHERE IT STARTED BUT DADDY TONY IS SIMPLY DADDY TONY 😈 DOESN’T MATTER THE GENDER 😈😈 (+ Tony is just what everyone irl calls me too so.)
If that makes you uncomfortable though, you can always call me simply Tony without the daddy part, or Toe knee, or Toenail, or mommy Toenail- you get the point. My lovely babygirls love to make up a lot of names for me n’ I haven’t heard one that doesn’t make me CACKLE just yet 😭
Why do you call your followers “babygirls”?
Ah, I’m daddy Tony and you all are just my babygirls heheh. It started off as a joke at first because I tend to start most of my announcements with “bonjour babygirls” even irl, but it eventually just grew to me referring to all my gorgeous followers as Tony’s Cult of Babygirls - took a page out of Geto’s book there.
I also tend to sift through a variety of pet names when responding to individual asks/ comments - like sweetheart, lovely, ml, gorgeous. etc. Do let me know straight-up if this makes you uncomfortable, because using those is simply my default.
Why didn’t you respond to the thing I tagged you in?
*SOBS* I’m saur sorry about that, I get tagged in a lot of things so either my notifications were clogged n’ I didn’t get it, or I simply missed it amongst everything. I love responding to things y’all tag me in, though - so send me an ask to double check!!
Did you see my ask or was it eaten up – you haven’t answered yet?
Pinky-promise daddy Tony’s not ignoring you!! If I haven’t responded to an ask, it’s usually one of these reasons:
I get a LOOOT of asks daily - and while I do try my best to respond to every single one - I might take some time to get to yours. Please, please, please don’t send a follow-up ask about your previous one unless it’s really, really important, or until it’s been two weeks since I haven’t responded. That only adds more to my inbox, and I do answer before it reaches that point.
I might have gotten an ask that was very similar to yours, n’ responded to that one instead of both.
Your ask went against my rules/ it was a request (because my requests are closed, most asks like that end up written down in a doc I have. But they won’t be publicly answered until requests open up/ I just decide to write it.) Again: Thirsts and suggestions are completely okay – just no requests!
Your question was already answered in my FAQ - in that case, yippee I hope you got your answer, lovely <3
Sometimes my asks actually get eaten up by this site, and I apologize for that 😔 Like I said, if it’s been two weeks then please do resend me the ask!!
Who are the anons that you have right now?
🧃, 🐹, 🐁, 🔮, 🪦, 🍙, toji titties anon, ⛸️, scribbler anon, 🌳, ♍, medicine major anon, gojo big cock gagger anon, 🫃, 🗣️🩰, <3 anon, orgy anon, 🐝, marketing major anon, 🫶🏻💕, 🧋, 🐠, 🐛, 🗣️🎬‼️, 😼, 🐇, ✏️, 🪶🧠, 🌸, 👀, 🧝🏽, 🌦️, 🌺, 🍭, 🌙, 🔔❤️⚙️, 𝓯𝓻𝓮𝓪𝓴 anon, neuroscience anon, 🎀💄, 🫐, 💋, 🦴, 🦎, 🦩, 🌱, 🫀, 🍓, CJ anon, 🐨, 🦤, 🐚, 💃, 🦇, 🌛, 🪼, 💤, 🍫, ⭐, 😈, spooky sweet tea anon, 🧠, 🧌, 🗣️, 🐄, corpse goon anon, 🦐, tiny anon, 🌟🦈, 💧, 🎱, 🦢, dewdrop anon, 🍵, 🥗, 🥠, :) anon, 🥥, 🐩, 🌝, 🪽🦦, (≧▽≦) anon, silly anon, jester anon, 🐡, 🎀, anon H, Marchailina, 👟, horny anon, b. anon, 🍰, 🪢, 🦚, lads anon, lads anon #2, 😻, 💐, 🐢, 🍣, 🃏, ex Nanami-hater anon, ovulating anon, 🐼, 🐜, 🦗, 🚀, vet major anon, 😔, 🐦, void anon, 🦢🐚, gojo convertee anon, therapist gojo anon, 💗, 🧸, 🍄, 🐾🐕, ✨🍀, 🐦⬛, lawnmower anon, Nanami’s 𝓯𝓻𝓮𝓪𝓴 anon, 🕷️, 🍞, Nanami anon, ☀️🪵, reading sesh anon, 🐸, 🏵️, 🍄😈, 🪨🧍, law student anon, 🦶, 🔖, 🪞, 🍯, 💌, 🎧, 🪐, , Hoyoverse anon, 🐈, 🐮, 👅🍑, 🪱, 🍍, 🧪, 🥖, 🌊, 🤍, Hua Cheng anon, 🦅, ♠️, 🕷, 🫧, 🧱ed🆙, waitress anon, ❤️🌻, ⏾, 𝐹𝒶𝓃𝒸𝓎 𝓃𝒶𝓃𝒸𝓎 👹, 🪱🔥, 💠, freaky lads anon, 🤠, ❄️ 🐆, ⚜️, 🎏, 🅰️🍄, ♒️, 🎐, 🦦, 🐯, ⭐️, 🐈🐈⬛, 🍜, 🔬, ☄, 🫦, 🍸, 🦋, 🍒, (.)(.) anon, brother’s best friend!piner anon, freaky filo anon, 💢, 🦊
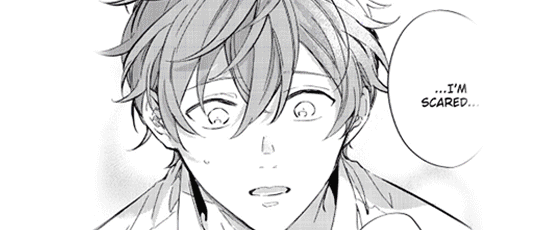
Why do you scare me?
I promise I don't bite unless asked to!!

230 notes
·
View notes
Text
I love this thanks so much for making one I'm going to apply this technique the next time I edit a HQ MangaCaps and tag ya! ^^

A manga caps cleaning tutorial. requested by @noctemys
Program: photoshop cc2019 but could work on any older or newer versions.
i’ve been working on this and a hard time choosing which cap should i work on, i decided to write it using an easy one to work on and writing the tutorial on, but you could work this one even in more challanging caps to clean! i’ll show examples of different difficulty at the end of this tutorial. i’m still a work on a process when it comes to cleaning caps!
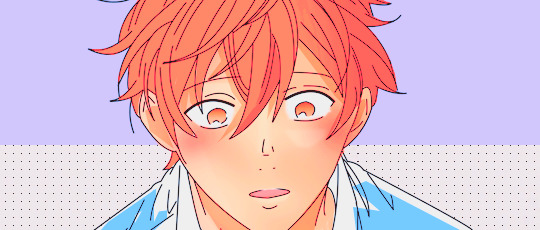
*tip: always try to use a high quality files! i personally like to work on the official files if they’re available. they make a huge difference as seen between this old and newcleaned cap!
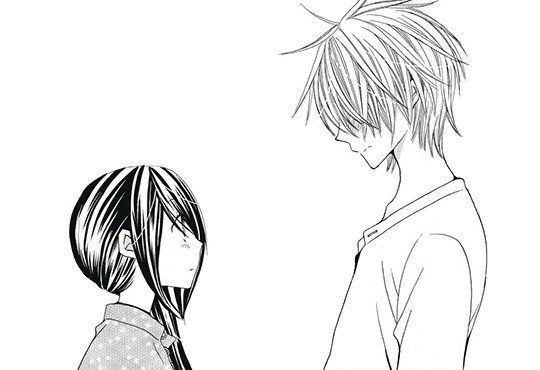
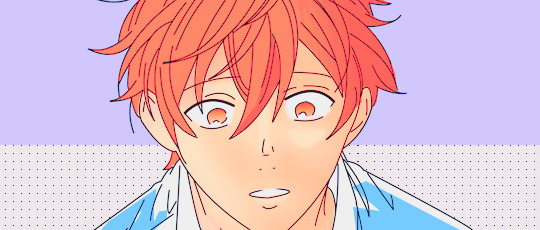
step.1 first step is choosing a cap of your choice and crop the panel that you like. mine is from Special A by minami maki.

step.2 zoom in the cap, i usually go with x800! then using the lasso tool i select all the area i would like to erase and clean! this step could take a long time with some caps that have overlaying background effect with the characters. you could also use the pen tool or the magnet tool, whichever feel more comfortable using.
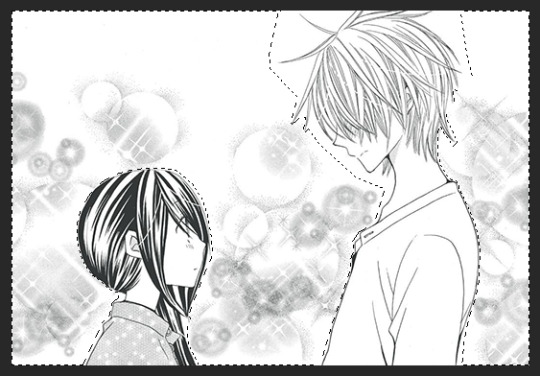
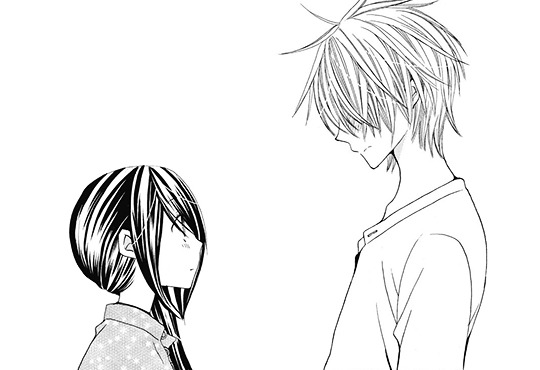
step.3 once you finish selecting the whole area you want to clean, with a white color fill the layer with white color!

step.4 some caps do need to up the contrast in them just like this one, i usually use the levels to increase the blacks and whites by ticking the black point to the left to increase the blackness and the white to the right until i like the result i get. for this one as it leans more to the grey than black i only needed to increase the blackness.
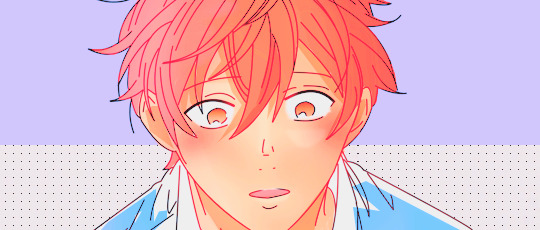
step.5 some caps aren’t truly in black/white so i just add a gradient black and white!
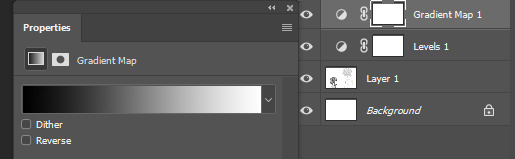
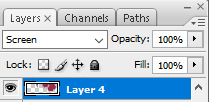
step.6 add a new colorfill layer and fill it with #f1f1f1 and set it to multiply. and delete the mask!!!

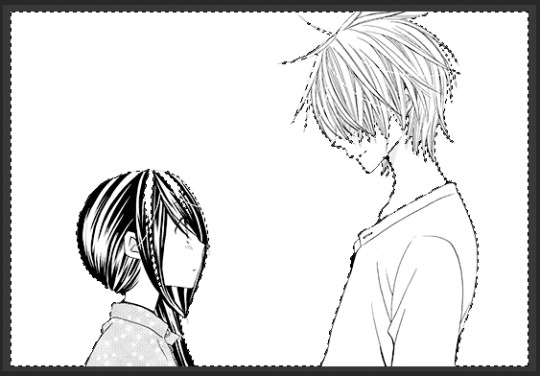
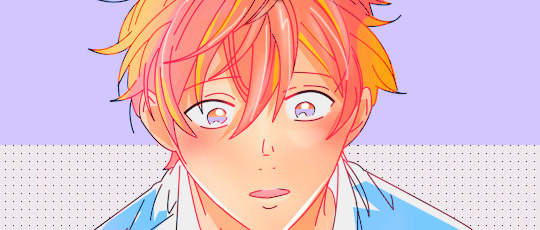
step.7 this step could be the last step or will need an extra step to make. and in this case we’ll need the extra step use magic wand tool select the background that i just cleaned you’ll notice the selection will include parts of both hikari’s hair and kei’s face.
step.8 after deselecting, with a round brush with a grey shade color - my choice is shade is #373737 -, i would zoom in the cap again and notice where the gaps that’s causing the selecting mess is. and while in the cap layers i would redraw those tiny parts… sometimes the gaps are big and there’ll be many gaps.. you could either redraw by the mouse directly if the missing parts are small and tiny or use the pen tool to do that!
step.9 using the magic wand again select the area you want and select the colorfill layer click the mask icon from the layers box and you’re all set!
step.9 - optional- a last step i’ve been adding lately to my manga caps edits is adding this texture at the top of layers and lowering its opacity to 8% for a nice little touch!

the final layer box will look like this.
other cleaned caps before and after: before→ after | before → after | before→ after| before → after
you could add any background you like at the end for a different ending result
34 notes
·
View notes
Note
do u have any tips for starting out your own blog? i’ve been writing for awhile now and want to start sharing my work, i just wanna know how to post and make everything look good 🙂↕️🙂↕️
sureeee nonnie !!! ٩(^ᗜ^ )و ´-
so some tips i can give you to start, have a pinned post to start. it doesn’t have to be anything fancy, just a simple pinned with important things your readers can access—view, like rules, byf / dni, masterlist, if requests are open or closed, and if you’re a mdni blog. this stuff’ll be important after you start posting and receiving interactions on your work ☝️
tag your work properly!!! tumblr runs on a tag system, and it’s important to use the right tags so you reach the audience that you want. there’s different kind of tags, like smut / fluff / angst. for individual characters, you’d tag it like (character x reader ) + ( character x you ) etc. for a fluff piece i did, here’s an example on the tags i used—

there’ll be different tags for different fandoms. so if you’re writing for the one piece fandom, it’ll be a tag like #one piece x reader | ALSO !!!! this is kind of optional, but i usually tag my works with fem! or female reader, in case others don’t want to see my stuff on their filtered tags. always specify what you’re writing for, whenever i write angst or fluff it’s usually gender neutral reader but for smut i always write fem! reader. you’ll notice how in my works when i tag the warnings, i add fem! reader near the very beginning so people know what they’re getting into !!!
as for the aesthetics go, you wanna sorta ‘stand out’ i would say. hentai / doujinshi banners are pretty known around the smut community, and you can find a lot either on twitter on tumblr by searching under the tag #mangacap . one popular manga i could recommend is called ‘lady k & the sick man’ and i made a tutorial on how to color them here !!!!
don’t base your works off notes. always remember, it’s not a competition but it’s completely normal to feel happy whenever you receive traction !!!! 💗 if you’re just starting out as a new blossoming writer, it’ll take a bit for your work to reach an audience but you just have to be patient. writing is meant to be a hobby, and it’s important to have fun while doing it!
INTERACT WITH PEOPLE 🫵🫵. this goes for reblogging other people’s fics, commenting, sending sweet asks, etc. throughout your time, you’ll get some nice encounters from people. you’ll even get some anons !!!!! making mutuals is my favorite part of tumblr i think, and yes it can be scary. im still shy to make mutuals but i looooove interacting with different people !!!! you just gotta remember, everyone’s been in your shoes before so don’t be shy.
i think the last piece of advice i can say, is to just have fun :) of course, tumblr isn’t all positive. there’s lots of negative sides about this platform and one of it is the harsh reality that not everyone will like your work. that’s just something you have to accept, you cannot cater to everyone and that’s fine! but, just remember there’ll always be that one person that genuinely loves your work and gets excited whenever you post. once you start posting, you’ll see what i mean 💗. don’t be discouraged if you feel like you aren’t receiving interactions right away, that’s normal and growth takes time. just know that i believe in you, and i wish you luck on your writing journey nonnie!!! mwah <3
44 notes
·
View notes
Photo
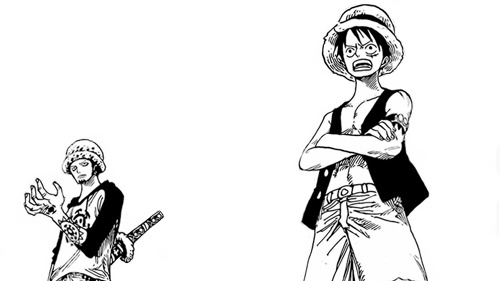
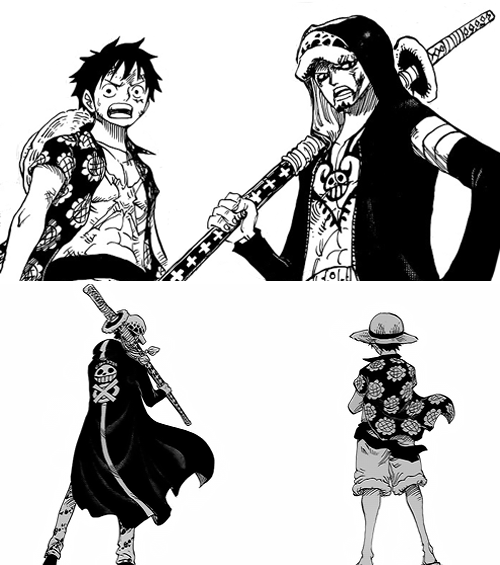
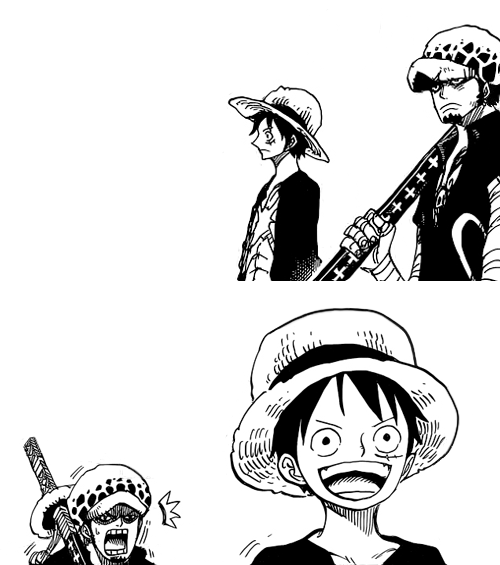
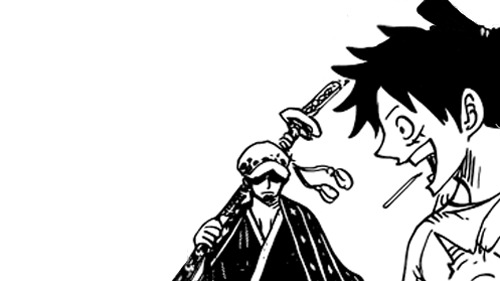

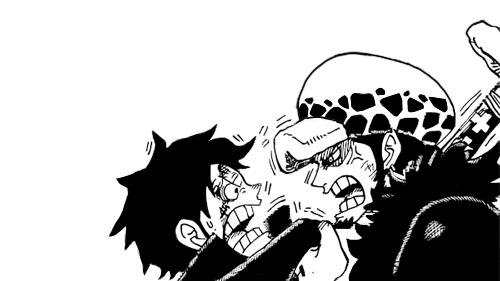
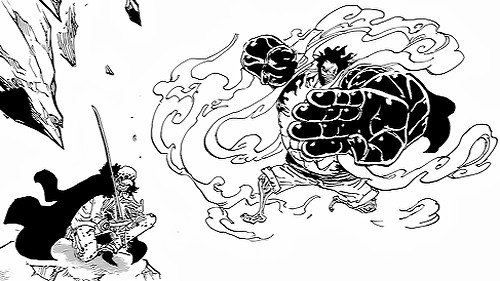
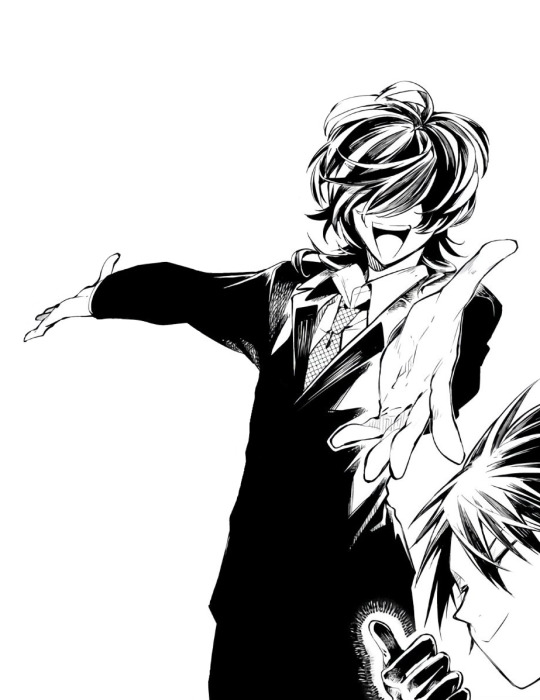
Law and Luffy throughout the years
#opgraphics#one piece#mangacaps#trafalgar law#monkey d. luffy#trafalgar d. water law#lawlu#*mine: edits#i watched some tutorials on how to redraw manga panels and retouch the missing parts and i wanted to give it a try
3K notes
·
View notes
Text


Kuroko's Midnight Feast!
Murcielago vol 15
#manga#murcielago#girls love#gl#himejoshi#himedanshi#ramen#food#recipes#manga cooking#cooking#weeb#mangacap#yuri#tutorial#soup#japan#nyaasi
44 notes
·
View notes
Video
youtube
transparent render tutorial/process vid, v2: beginners’ edition! (written walkthrough under the cut)
yeah okay the last video was really only helpful if you already know the basics of making caps, so here’s another manga panel rendering tutorial for anyone who’s never made a cap in their life, complete with drop-down menus instead of keyboard shortcuts! I tried to be pretty explicit, keeping in mind what things I had to figure out myself when I was learning... still, steps are under the cut!
oh, and bonus: watch me do this at 1500% speed
final product:

Note: i’ve changed a few of my keyboard shortcuts, so yours might not be identical; as such, I tried to avoid them as much as possible!
first of all, useful GIMP navigation shortcuts:
ctrl+R = reset view
scroll wheel = scroll up/down
shift+scroll wheel = scroll left/right
ctrl+scroll wheel = zoom in/out
and tools we’re gonna use:

and finally, the how to:
1. open the page with your panel in GIMP or copy-paste it in, and save your project
2. use the crop tool (shift+C or yellow above) to select the area around what you want to render, then click on that area to crop it
3. click your foreground color (in blue above) and change it to any color you like
4. create a new layer (either by going to Layer>New Layer or Ctrl+Shift+L), and make sure “foreground color” is selected, then click OK
5. drag your new layer below the manga panel layer on the right, then select your manga panel layer again so that it’s highlighted in blue
6. click the little squares (indicated in purple above) to reset your fg/bg colors, then the arrows (in green above) to switch them so that white is your foreground color
7. Layer>Transparency>Color to Alpha, make sure it’s set to pure white (it should be by default) and hit OK
8. Layer>Mask>Add Layer Mask, make sure “White (full opacity)” is selected and click OK! This creates a “layer mask”, which basically lets you erase without permanently erasing
(you should probably save here)
9. Click the lasso tool (in red above) and start carefully clicking points to outline the spot you want to render. You don’t have to be as precise as I am (I’m really anal about it), but notice what spots i’m cutting out:
you also might need to cut out certain spots, but I’m a complete idiot and used keyboard shortcuts for this in the video so here’s how you do it:

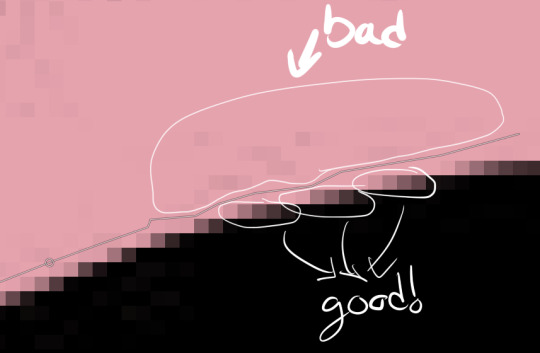
I made a note of it in the video itself, too! Also, I don’t know if Feather Edges is on by default, but if it is, TURN IT OFF IMMEDIATELY. it’s the absolute worst just trust me
(you might wanna save again)
10. Select>Invert (Ctrl+I) and hit the DEL key, then Select>None (Ctrl+Shift+A)
11. Right click on your layer>Duplicate Layer, right click>Apply Layer mask, right click>duplicate layer (again), & hide the bottom version (the one that still has the layer mask) by clicking the eyeball- it’s just there to be a backup
12. select the top layer and then go to Layer>Transparency>Threshold Alpha, i usually set it to about 123-127 but you may want to go lower; a higher number means it’ll be sharper, but you may have holes in the outline you’ll need to fill in
13. click this little icon to lock the layer:
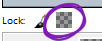
then Ctrl+F to fill with white, then that little icon again to unlock the layer
14. use the magic wand tool on the area that’s going to be transparent, using Add to Selection if needed, invert the selection, and Ctrl+F to fill with white (NOTE: if there are gaps you’ll need to either fill them or go back and do it again but with a lower threshold for threshold alpha. You can see me do the former in this one)
15. drag the white layer below your other visible copy, crop how you like, and you’re done! I recommend exporting two versions: one with the colored background visible, and one without it. make sure they’re .png files too!
congrats friend u just made a transparent render like a pro
that got a bit wordy but don’t worry, it’s really not that complicated! It took me longer to write this than it did to make the render pffft
feel free to ask if you have any questions!
#world trigger#wtgraphics#mangacap tutorial#graphic tutorial#gimp tutorial#this time ft izuchika#theyre rly easy!! seriously#i made this like 3 days ago and forgot to post it#cookie's edits#//emerges from the dumpster
54 notes
·
View notes
Text
How I Edit Mangacaps
Hello! As previously asked (s/o to baobwi), this is how I edit my mangacap posts.
※ Long post ahead
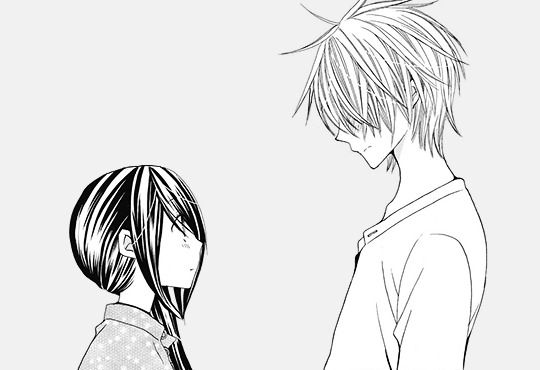
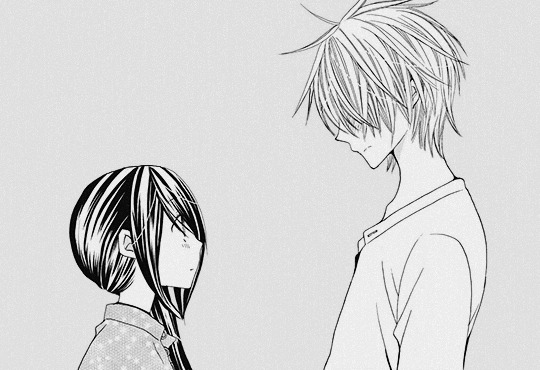
Today, we'll turn this manga panel —

to this —

Programs to use: Paint, Photoshop, Powerpoint (or any similar programs)
————
① Find your desired manga panel to cap. Open it on Paint or any similar program.
It’s ideal to find a high quality scan, but tbh any scan will do!
② Clean the panel according to your preference. I have two procedures for doing this: in Paint or in Photoshop.
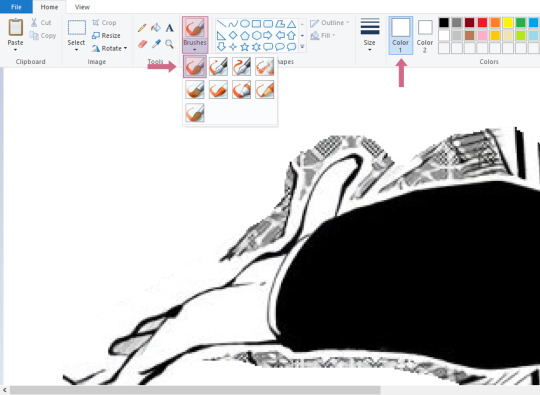
IN PAINT
For big chunks of space you want to clean, I recommend using the free-form selection tool.

For finer details, you can use the brush tool and make it the same color as your background (white).
IN PHOTOSHOP
Copy your manga panel from Paint and open Photoshop. Make sure the color mode is Grayscale.

Paste your copied image into the canvas. Delete the original Background layer (※ double-click Background layer > OK > Delete).
When you copy an image from Paint, Photoshop seems to automatically “copy” its dimensions, so I find it important to copy the image from Paint first before opening a Photoshop canvas, rather than opening an image to Photoshop itself.
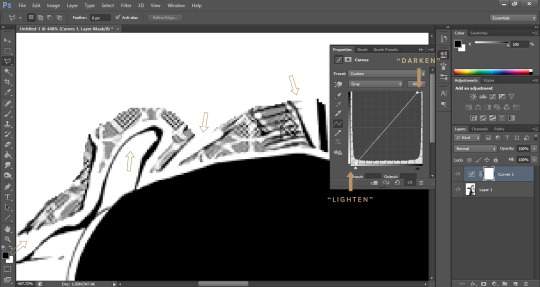
(As a perfectionist) I also further clean panels in PS using Curves (※ Layer > New Adjustment Layer > Curves > OK). In Grayscale mode, the lower-left slider “lightens” the image (take note of the little grey specks on the original image) and the upper-right slider “darkens” the image (some dark parts might have been lightened to grey). Afterwards, merge the Curves layer with the existing Layer (the image).

Clean the finer details using the Brush tool (※ B). To create a “shield” to prevent brushing into the parts I want to keep, I use the Polygonal Lasso Tool.
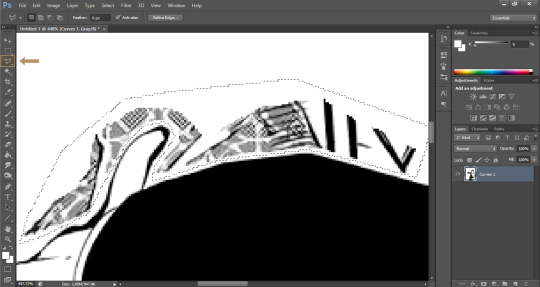
Though some prefer to do it, I don’t prefer deleting the selected area and filling it up with a paint bucket tool or a white background layer, especially on a non-rectangular selection.
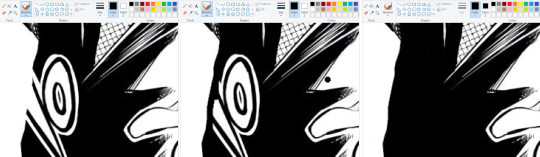
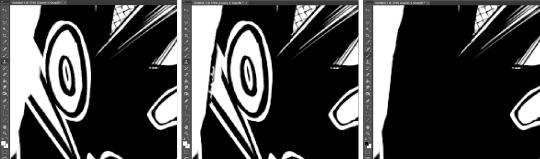
If an image is in need of some rather simple redrawing (compared to complex ones), I usually freehand it using the Brush tool (either in Paint or in Photoshop). In this case, start by adding a “border” as needed, then fill it up using the Brush tool.
③ Once your image is cleaned, make sure your image is on Paint. If you chose the Paint method, copy your image. If you did the Photoshop method, copy it and paste on Paint, then copy it once again. At this point, it looks like this —
④ Open Powerpoint. I recommend having a large, square canvas for this final step (※ Design > Slide Size > Custom Slide Size > [Insert square dimensions (I use 45 cm x 45 cm)] > Maximize).
⑤ Paste your copied image from Paint (not from Photoshop, if you used PS) to PPT. Right-click your image > Format Picture > Picture > Picture Corrections > set Brightness to -10% and Contrast to 40%.
These are my default, go-to configurations that give the greyish hue to my caps. Feel free to experiment to find your preference!

⑥ Copy the image to Paint once more and save the final output.
Keep in mind that 500 px or more width is preferred to give a relatively high quality of your post when posted in Tumblr.
————
And we’re done! Hope these all made sense lol thanks for coming to my TED talk
Thanks for reading! [Final product]
13 notes
·
View notes
Photo
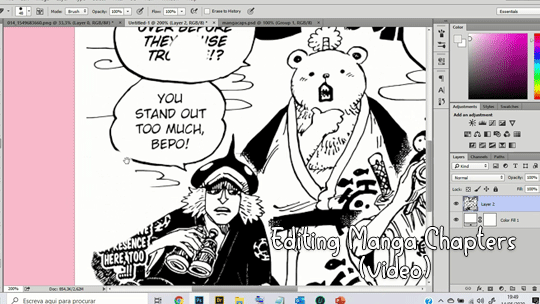
As requested by an anon, and tbh I wanted to do this earlier... How I edit manga chapters! Its a very simple process.
Years ago I’d edit with a mouse [example post], but now I use a tablet and the only difference is, you have more control over it. I bought an Intuos, because the only thing I do is to color or clean/edit manga chapters! Click on the button below to see more information regarding this tutorial, the tablet I use and some tips.
This is the tablet:

Since they’re always releasing new ones, check out this link and if you’re interested see some YT videos on how it works, etc.
As for the templates I use, I shared on this post tumblr’s post sizes that have a good quality on the dashboard (desktop or mobile).
Now, for the video on Mega NZ because its no longer available on youtube.
🌼 TIPS 🌼
Deleting the background is way too helpful. Usually its even better when you have old scanlations [example post].
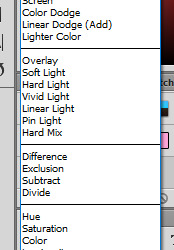
If you feel like the lines seem to be erased or gray-ish, just duplicate the layers and define the layer above with ‘multiply’:
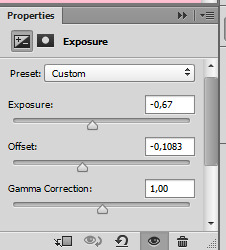
For the psd, its actually just some simple settings (exposure) and a gradient map with black and white, I usually like it a darker gray-ish:
The brushes I use are the defaults one from PS. I do use other brushes to color, I usually search all over DeviantArt (brushes for photoshop).
I hope this was helpful. If you have any questions just send me a message :) Also, if you want any other tutorial please let me know. Like this or reblog if it was helpful enough 🌼
27 notes
·
View notes
Photo

Dr. Stone / Chapter 62
18 notes
·
View notes
Text
tanchirou’s coloring tutorial
hello!! i was asked to make a tutorial showing how i color a while ago, so here it is! i’m honestly not the best at explaining at all so i’m very sorry if i lose you somewhere along the way ;; you can always come ask me to clarify anything, my dms are open to everyone :)
also a quick disclaimer: this tutorial will only be focused on coloring, so i won’t be showing you how to redraw lineart. however if you are interested in what programs i use, i use clip studio paint to redraw and photoshop to color
besides this tutorial, i also want to link some others that are great for tips & learning!!
katsuke’s coloring tutorial
sugawara’s coloring tutorial
dicennio’s coloring tutorial
and without further ado, let’s go goooo
since coloring given is therapeutic for me, i’ll be using this manga cap for the tutorial:
first step: render, sharpening, psd
take your image, resize and sharpen accordingly to your liking! even though i have a lineart here, it is something that i have gotten into very recently and i have been able to achieve nice results in the past even without it.
some tips:
i find it easiest to use the pen tool to erase any background or redraw any lines. the eraser is also helpful for places that are harder to cut out.
play around with the levels adjustment before coloring. this can make your edit look sharper and cleaner if regular sharpening doesn’t do the trick.
if i ever need to clean something on normal mangacaps, i make a new layer above and then color it with a white brush like so:
i always like to add my psd before i start coloring, and simply make final adjustments with it later on (but this comes down to personal preferences as well). i have a psd that i’ve made for manga colorings, so the first thing i’ll do is just slap it on top of my panel
after adding my psd:
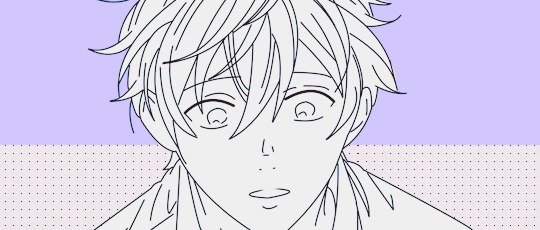
second step: base colors
fill in your base colors! when looking for what colors i want to use, i usually look for the character’s anime pictures as a reference. for mafuyu, i chose this picture

all my layers are set on top of the lineart as multiply. this is how my edit looks after filling in the base colors:
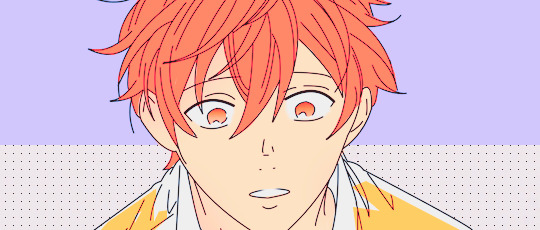
if at any point you don’t like how a certain color comes out, use the hue/saturation tool to adjust it!!
use a new layer for everything (eyes, hair, skin, etc.) so that it’s easy to fix if you ever need to go back
third step: shadows and blush
add your shadings!
i’m pretty amateur with this, but usually i try to imagine where the light source might be coming from and shade in the part where it seems like the light wouldn’t hit. for this picture, i imagined that the light will be coming from the right side of mafuyu’s face, so everything on the left side will be darker. this process definitely comes more intuitively after a while, so practice lots!
i like to set my shading as multiply on top of my base colors on 50% opacity
use the smudge and/or blur tool for a softer effect on the shading and to blend it nicely with the skin
i also pay close attention to the areas under the hair, neck and around the ears. using the same color that i did for the first shading, i will create a new layer, set is as multiply on 50% opacity, and shade in those parts as well. i won’t take the extra step of blurring it with the rest of the skin this time

next, using a pink color, i’ll color in the cheeks and mouth using a softer brush
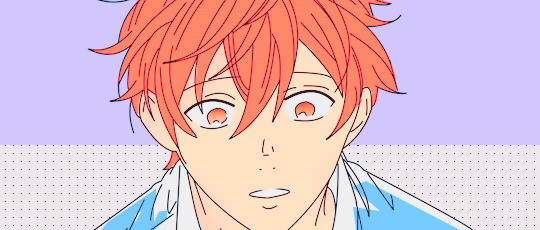
fourth step: lighting
using a pastel color that matches the background, i’ll shade the right side of mafuyu’s hair to make it brighter (again, that’s where i imagine the light will be hitting him). this layer is set to soft light.

then to change the color of the lineart and make everything bright and pretty in general, i’ll choose a dark red color and set it to screen on top of everything else.
some tips:
you can try to see what colors work for you on your own edit by using the hues/saturation tool again. aside from red, i saw that orange and brown are also nice to color with
you can also try and set it to lighten instead of screen to see what kinds of effects you can get. go with whichever one you like more
fifth step: extra effects
this part is really fun for me and also gives me a chance to explore my creativity a lot! here i’ll add highlight to his hair wherever i want, to his face, eyes, etc. all of these are done with either the pen tool or the brush tool set at size 1.
the modes that i like to play with the most for this is either soft light or overlay
if you’ve ever seen me stream my colorings in the DailyAnime discord, you would see that i always use a looot of layers to experiment with things. so honestly just go wild with your colors!! don’t limit yourself!! :’)
lastly, i’ll be adding any extra things that i want such as speech bubbles and sparkles in his hair. i will also add some noise to the skin and the hair to make it look nicer too. here’s the final product
aaannnddd..... that’s basically it! i use the exact same coloring method for posts like these (x), (x), (x). hopefully this tutorial is able to help at least one of you! ^^
(and a quick thank you to narumii @narumii-chan, zebra @reddriot and jaime @itsyuurikatsuki for helping me look over this tutorial ♡ love you all sm )
554 notes
·
View notes
Text
TUTORIAL TABUI GOINMUL (2020-?) by baguseog kim-ssi & omagam
#tutorial tabui goinmul#the advanced player of the tutorial tower#gwiei#animangaladies#anisource#animangahive#mangaedit#mangacaps#*nikki
7 notes
·
View notes
Note
Hi, those mangaedit in this blog are so adorable 🥰 would you please post a tutorial for how to make them?
hello!! first of all sorry for the very late reply as i was away 2 months ago... i wrote a tutorial of how i edit my mangacaps few months ago, you could find it here. hope you find it useful!
0 notes
Note
do you have a tutorial on how to color black parts in mangacap?
Hello, anon! So I didn’t have a tutorial and I tried to search for one to send you, but I couldn’t find any specific (?), so I made a simple one! I hope you find it helpful!
How to color black parts in mangacap:

Observations:
I’m going to explain how to color black parts without redrawing the lineart.
This is not a complete tutorial on how coloring manga panels.
If you are looking for a manga coloring tutorial from the beginning check out these great ones:
katsuke’s manga coloring
tanchirou’s manga coloring
sugawara’s manga coloring
aanyaforger’s manga coloring
gojosattoru’s manga coloring
So, let’s start!
1) Open the panel you are going to color, clean it, resize it, add your psd, well do all your basic stuff.

2) Choose the color for the black part you want to color, create a new layer > set it to screen or lighten (which one you prefer) and start to color it!
You’re gonna have something like this (I just made a basic color for the skin):


3) For the shadows, just color normally as you’d color the other parts!

Then:
The same process with the clothes and any other black part you’d like to add a color!
4) Complete your coloring and that’s all!
It’s really simple, right? I hope this is helpful and you can get it done, anon!
57 notes
·
View notes
Text
Scripting tutorial for Tags and Captions
I often mention that I use a AutoHotkey scripts for adding the tags and captions to all my uploads, and in this post I will explain how I actually do it.
Getting started:
First of all, this tutorial only works with a windows PC. I don’t know of any equivalent programs like this for Mac, Linux or mobile.
Step one is downloading the “current version” of the program: AutoHotkey and install it. Now you can get started with scripting.
You can write scripts in any text editior, I personally would recommend Notepad++ but window’s regular notepad will do the job just fine.
Creating a Script:
To write your first script, simply right click on your desktop and select “New > AutoHotkey script, then right click on the new file and select “edit script”. Alternatively you can just create a “.txt” file and change the file extension to “.ahk”.
A newly created AHK script will already have a few lines of text in it, for a script as simple as the one we’re writing you can ignore that text.
Please note: anytime you make a change to your script you have to save and reload it for the changes to take effect.
A much more detailed Explanation for how to get started can be found here
Hotkeys and Hotstrings
This is what a normal hotkey command looks like:
F6:: Sendinput, hello Return
In this case, the F6 key is the hotkey, designated as such by the “::” behind it. In the next line we have the actual command that get’s triggered by the hotkey, in this case it is “Sendinput,” which will send whatever text you put behind it, in this case “hello”, you can also send other key presses by putting them into these: {} brackets, for example adding {space} which will have the same effect as you pressing the space bar.
Please note: anything you want to send with the sendinput command needs to be in the same line as the command itself. “Return” tells the script that whatever action your hotkey is supposed to perform ends here which allows you to add the next hotkey or whatever in your script.
I would also recommend to add a modifier key such as control or alt to your hotkeys so you can still use the keys original function. To use alt as a modifier key simply add a exclamation point to your hotkey like this: !F6:: Now this hotkey will only trigger if you press alt and F6 at the same time.
A much more detailed Explanation for hotkeys and modifier keys can be found here Hotstrings Hotstrings basically work the same as Hotkeys with the main difference that you use a word or phrase to trigger the a command instead of a key. This is what it looks like: ::wha:: Sendinput, Witch Hat Atelier Return
Your trigger phrase or word get’s designated by putting “::” in front of it and behind it. The command will trigger as soon as you hit the space bar or the enter key once you’ve written the word or phrase, however it will not trigger if you just keep writing, so for example if you write “what” instead of “wha” the command will not trigger.
There are many, MANY commands other than “Sendinput” you can trigger, but for now, this is all we need for what we’re trying to do.
A much more detailed Explanation for hotstrings can be found here
Tagging and caption script for tumblr
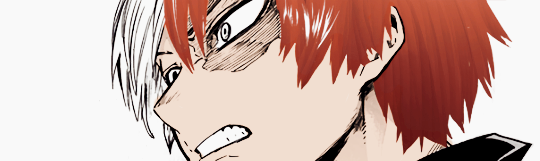
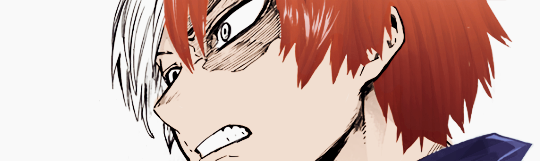
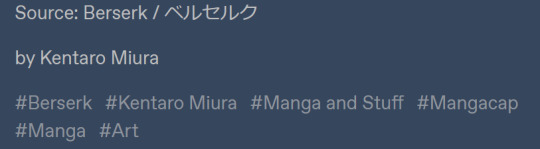
This is a simplified version of what my command for captioning and tagging Berserk posts looks like, Berserkk with double k is the trigger word so this command doesn’t trigger every time you write the word Berserk:
::berserkk:: sendinput, Source: Berserk / ベルセルク {enter}by Kentaro Miura{tab}Berserk{enter}Kentaro Miura{enter}Manga and Stuff{enter}Mangacap{enter}Manga{enter}Art{enter}
Return
Please note: everything after “sendinput” needs to be in the same line, tumblr’s formatting just added line breaks.
And this is what the result of this command looks like:
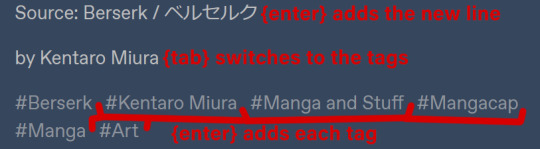
And here with a visual explanation what all these {words} did
And that’s basically it...
AutoHotkey is an immensely powerful program and it can do much more elaborate stuff than tagging your tumblr posts, but you’ll have to learn that yourself.
Some resources: -AutoHotkey documentation -AutoHotkey help forum -AutoHotkey subreddit
I really hope this tutorial is somewhat clear and understandable, I’ve tried to keep it as short and on point as possible.
#the and stuff part of manga and stuff#AutoHotkey#tutorial#this post will also be added to my pinned post
44 notes
·
View notes