#model image editing
Text
Discover the transformative power of Professional Model Photo Editing services in this illuminating exploration. From refining images with precision to leveraging cutting-edge software, delve into how these services elevate model photography to new heights of perfection.
#model photo editing services#model image editing#Professional Model Photo Editing#model photo editing online
0 notes
Text
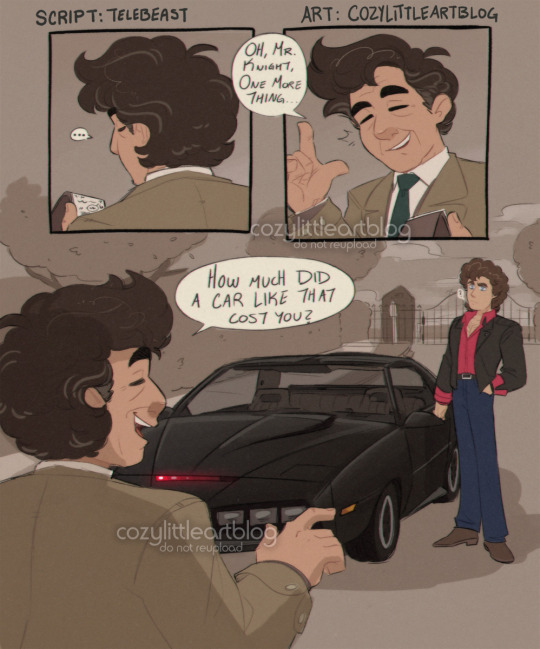
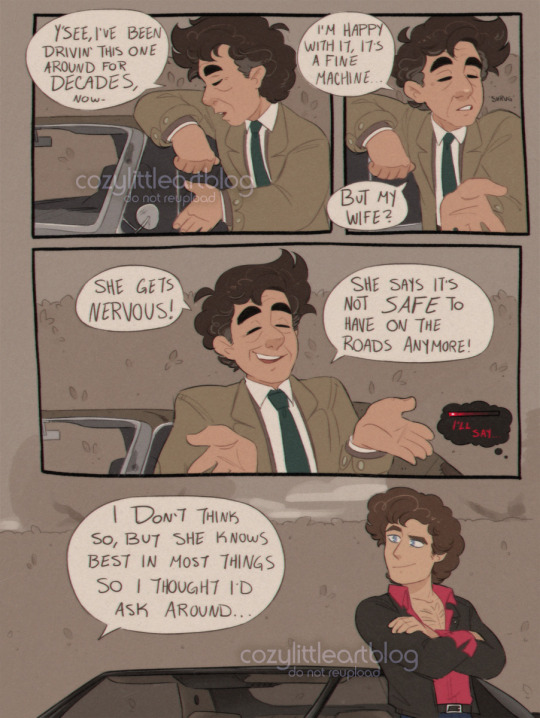
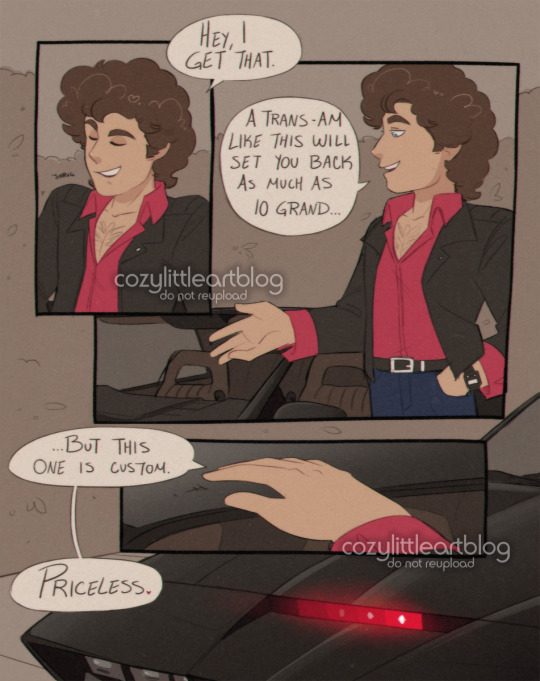

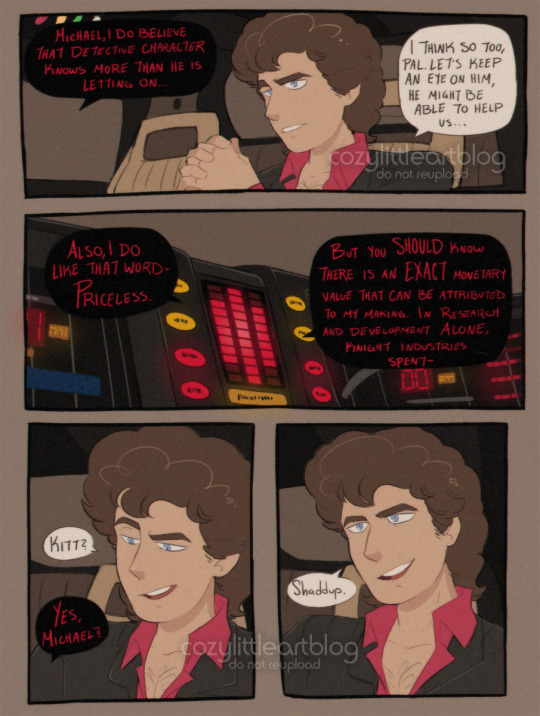
Columbo and the Knight (1984)
put me in the universe where Columbo ran through the 1980s and had a crossover episode with Knight Rider. I think they deserved it, and I am not just saying that because they're my two favorite Old Shows. @telebeast wrote a little fanfic blurb about it and I HAD to visualize it into a comic (which is also the longest comic I have finished thus far at five pages...), so writing credit goes to them.
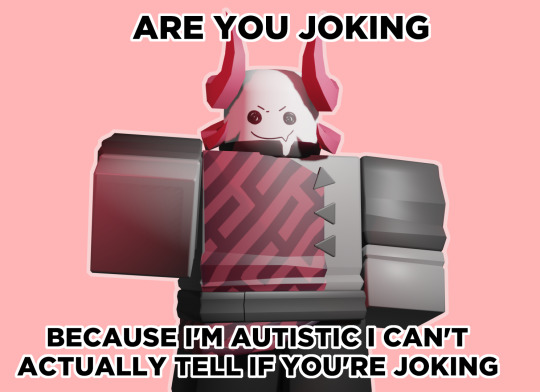
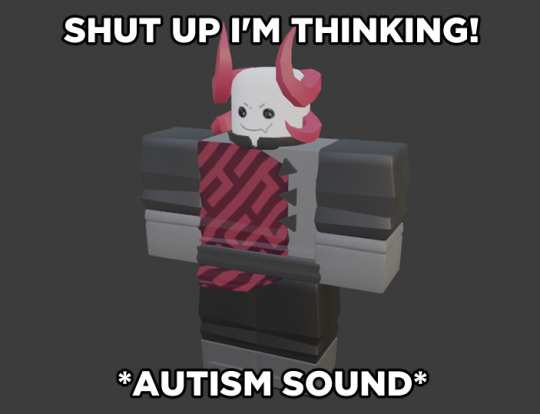
Autism W!
#columbo#knight rider#art#michael knight#kitt#comic#highlight reel#crossover#telebeast#there are two small easter eggs here. can you find them. they were somehow not Entirely lost when i resized these for the public#this is what i mean when i say I Draw And It's Everyone Else's Problem. look at my INCREDIBLY niche crossover comic boy#if the knight rider fandom has like 12 people in it. how many of y'all have seen columbo#this comic is for like 4 people and me and phoenix are already two of them#niche is my specialty lets be real. weird niche obscure shit and ships nobody's paid attention to yet#not to suggest this is ship art. columbo has his wife and michael has his car lmfao#stylizing real people is EXTREMELY hard btw sorry for when they get off model. its partly a 'better imperfect than never finished' situatio#cant tell you how much i redrew some of these panels. weeps#this took me 2 weeks but i think i thumbnailed it all in may and the ideas been rollin around in my head since march#is anybody good at editing. please edit michael and columbo into an image together like its a screenshot. NOT generated. edited.#it would be so cool#ive drawn columbo a lot but i haven't drawn a lot of michaels. i was learning things about his outfit AS I WAS DOING THE DAMN#COLORS ON THIS. all the lines done. it was too late to change anything. i did all the lines and colored page by page#i realized my mistakes on like page 3. 1 and 2 were already done. it was Too Late.#imagine it though. them working a case together. switching between the more serious tone of columbo vs the goofier#action antics of michael and kitt. columbo being so impressed by Modern Technology. there's more i could say but phoenix may write#more of this crossover and i don't want to spoil it :'3#there's opportunity here though i swear. there's gold to be dug.#i like how kitt gets shading but columbo's junker peugeot doesn't. kitt looked wrong without any. columbo's car is matte and dirty#i also applied effects to this to make it look a little film-grainy and VHS like. some CRT TV vibes#the only question left is. did they put knight rider into columbo; or columbo into knight rider 🤔
3K notes
·
View notes
Text


remade these two images but with predisaster subspace because i like them
#phighting#subspace phighting#art#3d#subspace#predisaster tag#first image is made by @RocketArena_ on twitter#i never found the source for the second one though sadly#edit since i didn't clarify: the predisaster model was made by me. because i am sick in the head
213 notes
·
View notes
Text
Star Wars + Moodboards
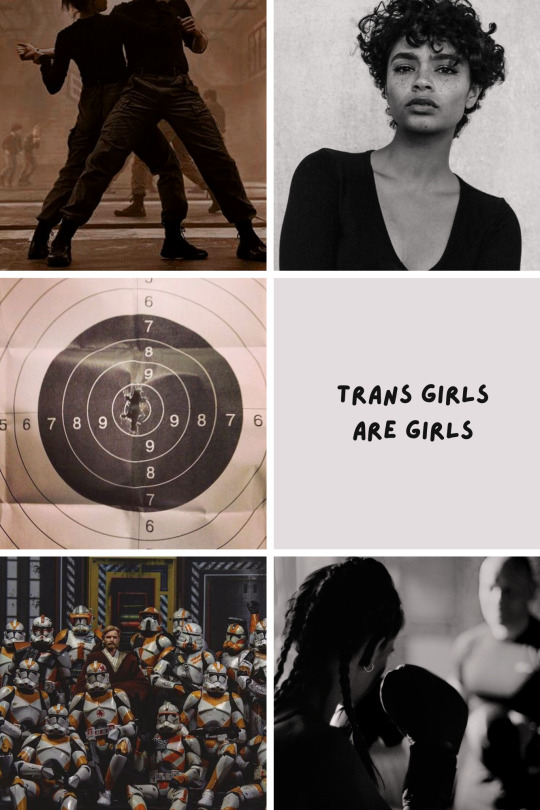
Clone Trooper: Sister
"What's your name, trooper?"
“Sister. It's how my brothers tell everyone I belong."
#clone trooper sister#the clone wars#sw the clone wars#star wars the clone wars#star wars tcw#tcw#swtcw#sw edit#swedit#star wars#queen's hope#star wars brotherhood#E. K. Johnston#this was tricky to choose images for#it doesn't seem realistic Sister would've had time or resources to access gender affirming cosmetic procedures & stuff if she wanted#i would HOPE that the doctors of the GAR would at least be able and willing to give her hormones if she wanted?#and idk what the timeframe is like for gender transition process a long time ago in a galaxy far far away#so idk ultimately chose to use photo of a model who's femme but whose features that reminded me of the earlier seasons TCW clones
108 notes
·
View notes
Text
This was a hit with the roomie so:
Me when I started playing FE3H:
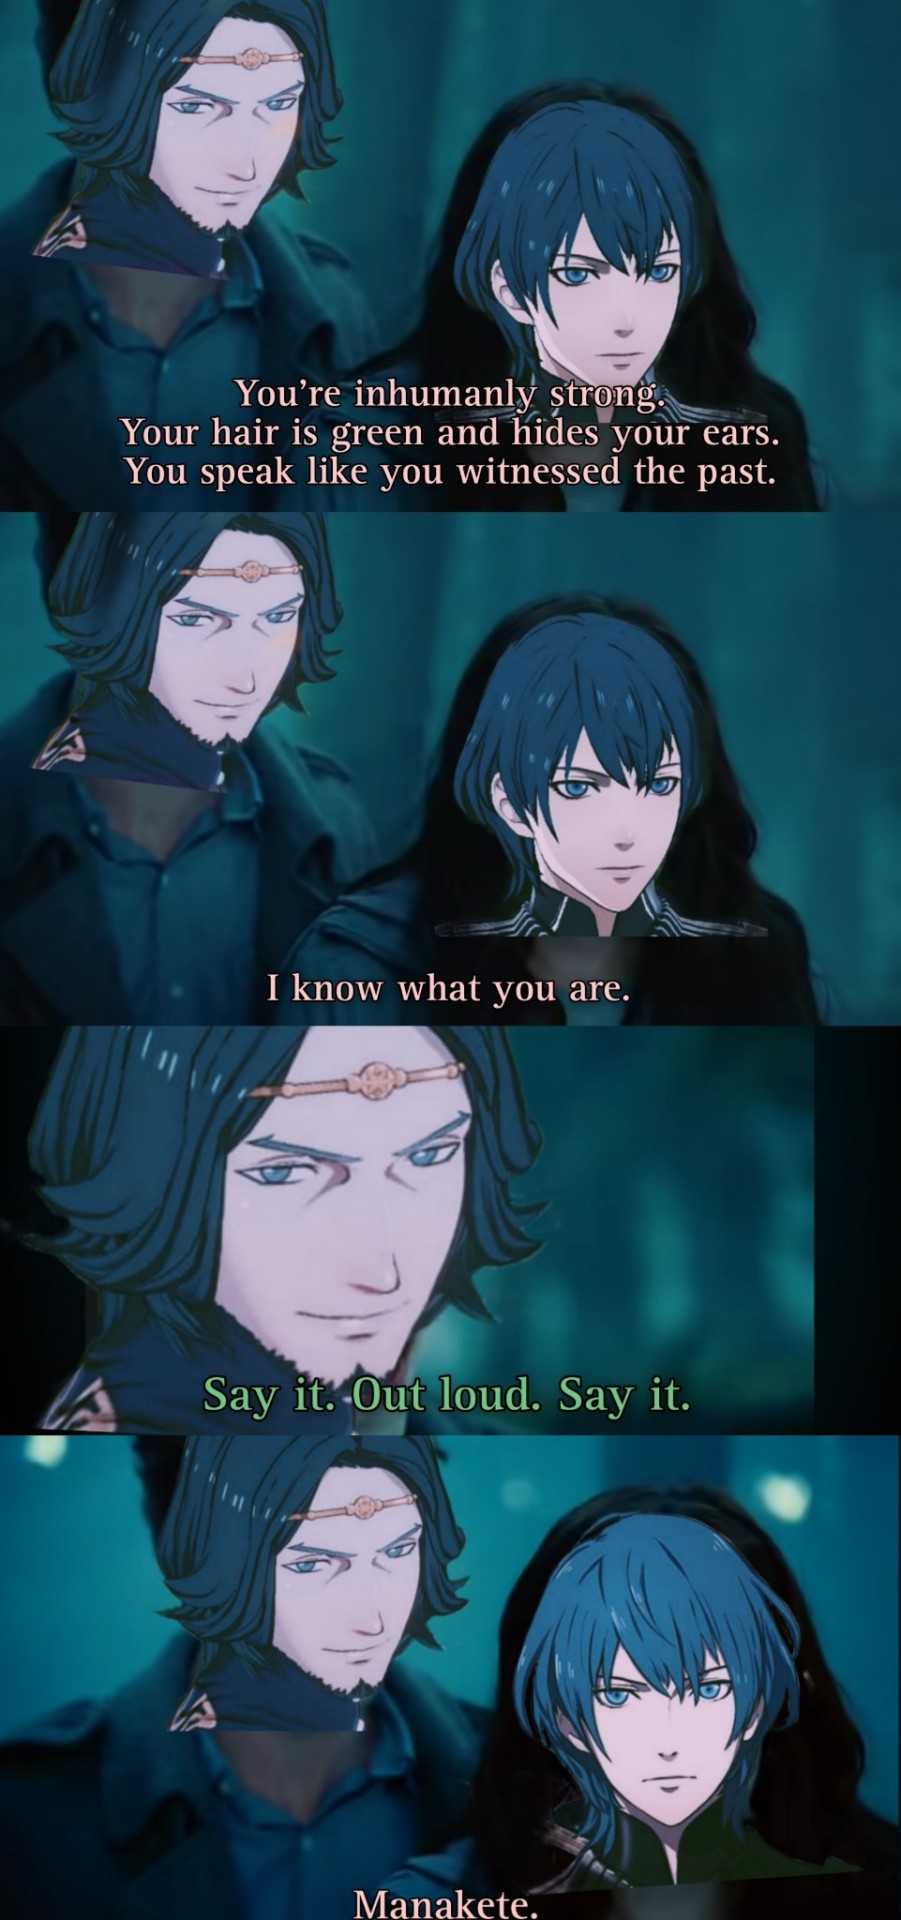
(Tap to banish the blur, etc)
#fe3h#fe3h seteth#seteth#be3h byleth#byleth#fire emblem#k i think those are the basics#anyway i wasnt WRONG#i saw him and went 'hmmmm' (images of tiki crossfading in my brain)#then flayn showed up and i immediately went 'i know what you are'#sorry the last byleth isnt ALSO the model but i couldnt find a clear/close enough position shot#so i had to resort to his art rip#but i did my best to match the blue filter and the 3h dialogue text font so it evens out its fine#thats why seteth is smiling btw its some shot i found from hopes i think#edit: mistyped byleths tag whoops. thats supposed to be#fe3h byleth#no idea how that one happened
107 notes
·
View notes
Text


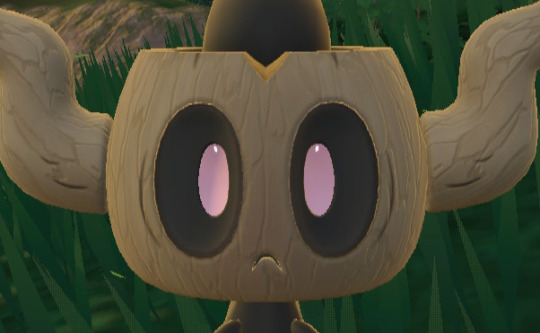
#something is very obviously different about these two compared to my normal images on this blog. i acknowledge this#also the sv model is Really good. and since they always stare straight at the camera anyway… and no one pays attention to the background…#and the only high-quality phantump model i could find was so horribly shiny that its eyes were just white voids#in my defense‚ phantump always just stare straight at you in game#the lighting is different‚ yeah. that's probably the dead giveaway. beyond the background. but like. i'm the only being on the planet who#really likes phantump anyway. i feel like it's a generally forgettable pokémon to most folks#phantump#HELLO this one is a weird one. i have some explaining to do. so when i did this one i didn't know how to edit models really at all#and when i got the models for these‚ the xy models were super shiny. shiny to the point that it made their eyes fuckin invisible#and i decided that since you could barely tell it was phantump‚ i needed a different way to get these images#i remembered that in the SV dlc‚ every time you find a wild phantump‚ it just fucking. stares. at you. and i was like. aha#i kinda remembered because of the test stream that i did. tumblr user alligayytorr (am i getting the right amount of Ys) said#“haha i am getting a sneak peek” when i zoomed the camera in on a phantump. and i remembered that. and i was like. i can utilize this#and ended up using just an in-game screenshot of SV in replacement of the regular content. later on‚ after that#once we got into gen 7 and it became less and less reliable to find models‚ i had to learn how to edit them manually to remove the shine#i am a software dev. not a 3d modeler. this ended up coming down to editing the code of the models directly (which i ended up writing a#script to automate). now‚ today‚ january 22nd (the day of me writing these tags and updating this post)‚ i remembered this post was in the#queue and was not normal. so i went back‚ ran the script on the phantump and trevenant models‚ and unshinified them#then edited these two posts to be normal. i have left the original pictures i took under the cut for reference and as bonuses#because i really enjoy phantump. so that's why those images are there‚ and that's why these tags are here#just for posterity's sake‚ the folks who come here mostly for my commentary‚ i've left the ORIGINAL tags of the post when i initially#made it with the SV pictures up at the top (i wanted to rearrange them‚ but tumblr makes that Very difficult‚ so i left them as-is)#so if these tags are confusing to read i Apologize. but i hope now that you're at the bottom you understand what happened#i'm gonna go edit the trevenant post now
118 notes
·
View notes
Text
i'm putting together a folder of set designs for the named kids + some NPCs variations so i can reuse them and i'm kinda intrigued by dandy's hair. i'm trying to figure out what it's reminding me of.
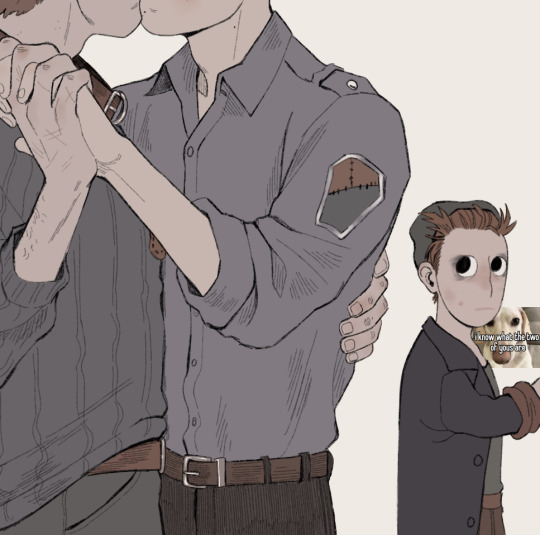
#the image is funnier cropped that way. also yes i edited the dog to say ''[...] the two of yous''. on my computer#in the vein of yesterday's notkhan we're still stuck on that. not-prom. least gay truce.#incomprehensible notkhan lore is that dandy owes his sister (catnip. in my mind) money because they had a time-related bet about them going#i need to get back in game because the colors of his fit. baffle me frankly#his shirt and hat look green-ish...? pants and the revert of the sleeves look the same shade of brown#i've never extracted models but i might try because i'm not cumputing on that one#oops almost my organization tags:#notkhan#dandy pathologic#pathologic 2
166 notes
·
View notes
Text
i think image gen can be used like any other artistic tool but I don't really think the big commerical proponents of "ai" are advertising it as a tool, they're adertising it as a solution. I also think it's intellectually dishonest to argue that image generation is exactly like "using photoshop/taking a photograph" because of some generalized "those were also criticized at their conception for being new and scary and disruptive" soundbite. they were not even really criticized for the same reasons. find a better argument.
#it's not serious when someone generates a meme image and ai can be an artistic medium that takes a lot of "effort” (a misaligned word that#i think we need to uncouple from “protestant work ethic” and “human worth” because anything you create#takes effort and that's neutral it has no value it's just unaviodable.#the issue is when we start deciding for ourself how much effort something took for someone else and judge them as less for it]#i also don't think “art” has anything to do with effectivity or the time it took to make. it's just communication man#the openai people don't want you to do something real with their model they want#ikea to use it for generating those paintings they hang in their showrooms.#oh and also. piling on. “the photoshop takes no effort the computer does all the work” was always bunk like anybody who's used any digital#image editing program knows that? because the people saying this literally imagined photoshop working like an image generator lmao.#and that has mostly died down because the accessability of computers that can run photoshop and its ilk has grown to the point#that people realize using photoshop is a pain.#while the photography criticism was strong a 100 years after the invention of photography. on philosophical grounds. brecht hated#photography and he was born 50 years after its conception.#everything that’s criticised isnt like everything else that’s criticised
10 notes
·
View notes
Text

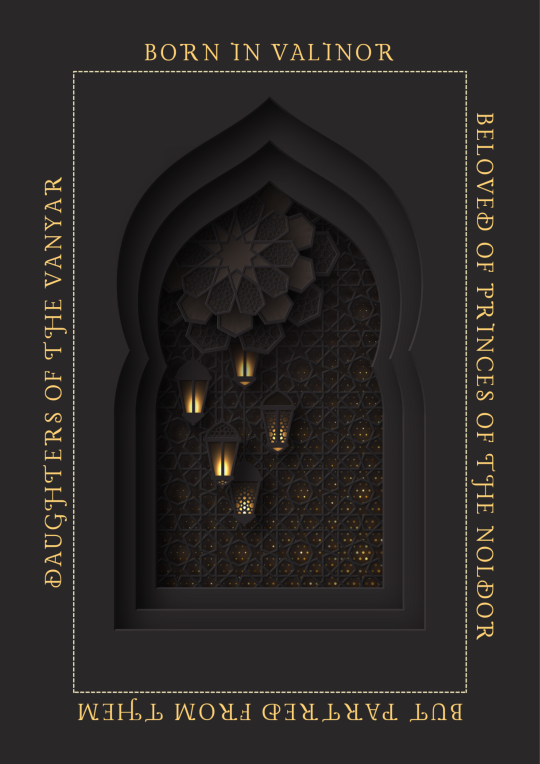
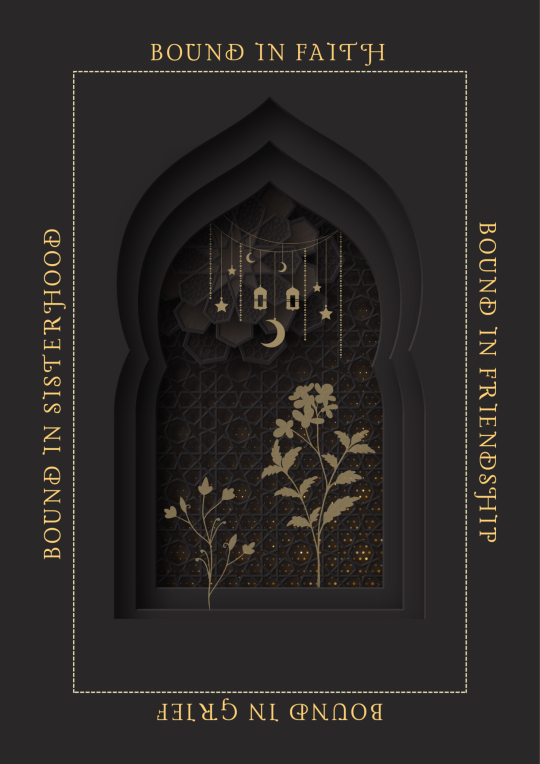
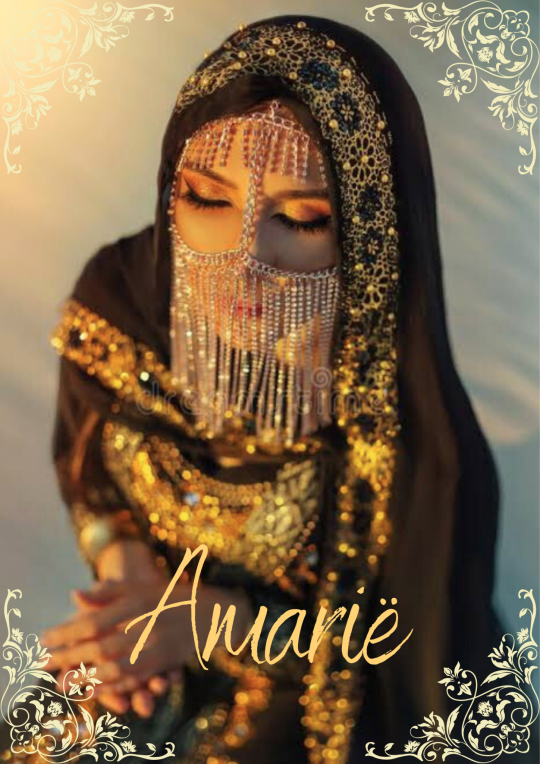
Elenwë and Amarië friendship for @tolkiengenweek
[Image description
1: an Indian woman wearing gold earrings and beige sari (?) looking down from a ledge. Text = 'Elenwë'
2: dark grey background, mosque window shape with lanterns. Gold border has text 'born in valinor' 'beloved of princes of the noldor' 'but parted from them' 'daughters of the vanyar'
3: dark grey background, mosque window shape with flowers, hanging lanterns and moon and star shapes. Gold border has text 'bound in faith' 'bound in friendship' 'bound in grief' 'bound in sisterhood'
4: Arab woman kneeling on the ground in black clothing decorated in gold. She wears decorative gold chains over her face. Text = 'Amarië']
#elenwe#amarie#silmarillion#tolkien women of colour#south asian tolkien#muslim tolkien#swana tolkien#tolkiengenweek#moodboards and edits#toi's creations#mepoc#contains image description#(elenwe model is aditi rao hydari who is indian)#(amarie model is unspecified arab woman)
78 notes
·
View notes
Text
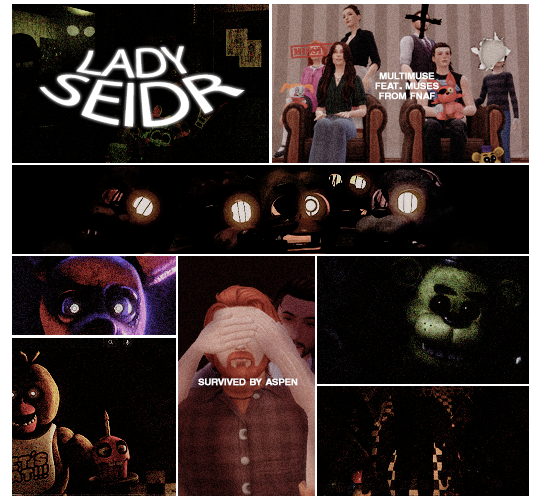
#LADYSEIDR : rp blog featuring five nights at freddy's muses, including golden freddy, spring bonnie, henry emily, funtime foxy, cassie, michael afton, funtime freddy, chica, mrs. afton, and more. entirely game-based. also featuring muses from [ various other fandoms ]. heavily ( but not exclusively ) associated with mun's own william afton ( @spring-lxcked ). 18+ only. disturbing content present. read rules before interacting.
credits: ( x, o, x, o, x )
#☽—— ⸢ promo ⸥#rp promo#fnaf rp promo#fnaf rp#five nights at freddy's rp#f n a f /#not to brag but i'm going crazy over the actual model edits#i should post those images just outright at some point#me knowing my william isn't on THIS blog and still including him in both edits smh
29 notes
·
View notes
Text
In the competitive world of modeling and fashion, flawless imagery is paramount. Model photo editing services are essential for refining imperfections and enhancing the visual appeal of model images.
0 notes
Text
Finding Files using Telltale Inspector
Some people who have had success with swapping may have noticed the trend where you have all the files with your swap character’s name on it – but there are clearly some files not there. Maybe they don’t have any ptables, or maybe you’ve done your swap and parts of your character are just missing. You can’t find any files you missed and you’re wondering where they must be if you don’t have them already.
And the reason this happens is because your swap character normally uses reused assets. They don’t have their own ptables because they are using someone else’s, or they don’t have unique textures for their eyes because they share a file with other characters.
You can trial and error your way into finding which assets they are using, or you could try using the Telltale Inspector Tool created by Lucas in the Telltale Modding Group. (massive brain on this bloke – if you want to donate to him for his major efforts, it would definitely be appreciated) The readme and information on the tools can be found >>here<< and the most current release can be found >>here<<.
At the time of making this mini-tutorial, the most current version is ALPHA 1.0.2 – the information I’m presenting here and the screenshots used relate to this release, things may look or work differently in future.
The tool itself is capable of a lot more than I’m making note of here, and can be used to edit the information within the files if you know what you’re doing… I’m only giving a very layman’s explanation of one use of it to look at file information. Below you will find a very simple set of directions on using the Inspector tool to open props to find a character’s ptables, and then opening a character mesh to find the associated textures.
=====
Ptables and Animations
For example, let’s say we want to figure out what ptables Carley uses in season 1, and we notice that she doesn’t have any ptables in any of the data archives. We therefore have to find out whose ptables she is using if we want her to have an animated face during swaps.
First of all, we want to use Telltale Explorer to export out her prop file (save it somewhere handy so you can find it again later), and from there we can use Lucas’ Telltale Inspector to look at it properly.
1. Run the TelltaleInspector.exe, and click the [Open] drop down menu and select [Open Prop]

2. There will be another drop down menu that says [Select], we want to select the game where this prop file came from – in this case we need to select [The Walking Dead: Definitive Series]

3. Press the [Select] button to confirm you have selected the correct game

4. You should now have the interface for prop files from that game, but to look at the specific file we have previously exported using the Telltale Explorer, we need to click on [Import Property Set]

This should open up an explorer window where you need to direct the Inspector to the prop file you want to open.
5. Once you have successfully loaded the prop file, you need to click on the [>Properties] sub menu to expand the information shown at the bottom of the window. The information about phonemes is right near the bottom of the list as shown here when hovered over:

Click on the [Modify Handle Value] on the right column next to where the phoneme information was shown.
A new window should open, and here we can see the name of the phoneme file that her default state is drawing from. In this case, we can see Carley is using Lilly’s ptables.

However, I will note that in other seasons of the game, this same information can be seen in a different location but with the same 5 steps leading up to it… for example, in A New Frontier, if you wanted to know which ptables and animation files are used on Javier’s father when he appears in flashbacks near the end of the game, you could look into the sk61_salvador305.prop.

Here we can see that his “Skeleton Face” is wd300GM – this means he uses the ptables and animations with this name. I assume the name implies “Walking Dead, Season 3, Generic Male”, I don’t know if that’s accurate, but what matters is that you now know it’s these generic files that he uses.
And if you want to look for a minor character in The Final Season, like the rancher who was taking care of baby AJ, the same situation applies here.

Her skeleton face is the same as Lilly’s in season 4, and therefore when Rancher Helen doesn’t have her own files to load, she is loading Lilly’s ptables and animations.
=====
Meshes and Textures
Let’s say we have tried to do a swap, but for some reason part of the swapped character isn’t loading. A common one that can happen is characters having missing eyes, but it could be something like missing hands or missing hair if it turns out we are swapping a character who uses a texture that is not named in the same manner as their mesh.
Since it has been a problem I’ve seen a few times, let’s use Kenny in season 2 as an example. If you try swapping him into another season without knowing what files he uses which are not named with “kenny202” at the start, he won’t have eyes or hands. And since Kenny in season 2 is one mesh called “sk54_kenny202.d3dmesh”, we can use the Telltale Inspector tool to see what textures we are missing.
1. Run the TelltaleInspector.exe, and click the [Open] drop down menu and select [Open D3DMesh]

2. There will be another drop down menu that says [Select], we want to select the game where this prop file came from – in this case we need to select [The Walking Dead: Definitive Series]

3. From here we need to click on [Open File] and an explorer window will open – we need to direct it to the mesh we want to look at.

4. And now we should have all the relevant information about the selected mesh.

What we are particularly interested in is the list of “Mesh Textures” shown at the bottom. Here we can clearly see the texture files that aren’t named consistently, and what we likely would miss without prior experience or knowledge of the character files.
Aaaaand because I have the opportunity to share this little titbit, if you have tried editing textures, or simply swapping textures to see the results – you may encounter some instances where you simply wonder “I thought this would have changed? Why didn’t it?”, or alternatively “I changed this, why did this also change?”
Here’s my contribution to fun trivia that I found myself quite some time ago, but now I can show it with the Inspector.

Aasim and Violet share a hair texture.
#twdg#twdg talk#tutorial#model swaps#texture edits#twdg mods#tech support#edit - i made a woopsie and mixed up images when uploading#should be fixed now#it just needed some rearranging
9 notes
·
View notes
Text

Embodying the essence of ancient power and mystique, this African sorceress channels the fiery energy of the desert. Her gaze pierces through the realms, holding the secrets of the sands in her red orb. Adorned with intricate jewelry and flowing fabrics, she stands as a symbol of strength and magic, ready to weave her spells. 🌟🔮✨
#ai art#ai art gallery#ai artwork#ai generated#ai image#ai arts#ai art generator#artwork#ai art community#short story#ai fashion#ai model#ai fanart#ai lady#ai art discussion#ai creature#ai creativity#ai creation#ai community#ai created art#ai artist#ai digital art#ai edit#ai beauty#ai babe#ai hottie#ai women#ai woman#ai technology#art style
14 notes
·
View notes
Text


feliksed That One sonic render

#sonic#sonic the hedgehog#trans sonic#kit.img#kit.sonic#sonic redesign#sonic edit#alt text#image description in alt#image described#image description#NOT a 3d model
32 notes
·
View notes
Text

Michelle Laffe
for IMAGE | Issue 2
shot by Anatheine
#michelle laffe#model#image#image magazine#issue 2#fashion photography#anatheine#fashion photographer#fashion#style#beauty#fashion edit#editorial#fashion magazine#fw24#fw2024#january 2024#vivienne westwood#kimono
10 notes
·
View notes
Text
(Headcanon post)
By the way, I'm a day late because tired, but this International Ace Day, we stan our aroace prince ignoring every single girl.

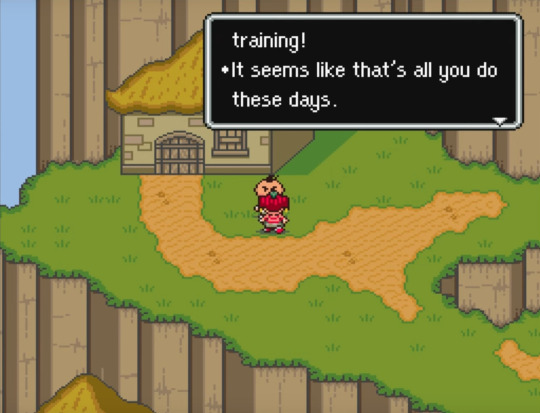
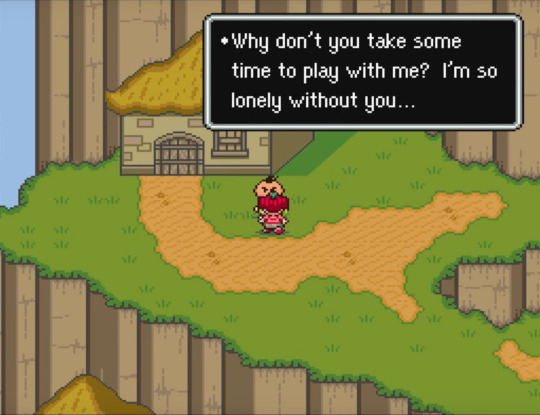
How he's so popular and seems to mind none of them.

Inspirational.

#not a finding#headcanon#mother series#mother 2#earthbound#prince poo#aroace#asexual#aromantic#international ace day#long post#didn't want to use the clay models for the 276th time so woe pollyanna panel pu be upon you#you can tell this isnt my save file because they spelled his name the “canon” way#i have a post about a translation change here but im waiting on finding the actual source of the image#feel free to filter the headcanon tag i don't mind#im on tumblr not twitter so fortunately no one will bark at me for this headcanon though#yeah for all intents and purposes im basically aroace too what about it#edit: my irl friend just called this post insPoorational smhhh /lh
70 notes
·
View notes
Last Seen Blogs

batesstudio0
Transform Your Workspace with a Cat A Fit Out for Modern Offices

pepperchanart
Pepper's Doodles

swippa-blog
Swippa Still Swippin'

kevingotkin
k. gotkin

schroedingersk8
Schrödinger's K8