#mspaint tutorial
Explore tagged Tumblr posts
Visit Tumblr Blog
Explore Tumblr blogs with no restrictions, modern design and the best experience.
Last Seen Tumblr Blogs


Fun Fact
Kazakhstan’s Minister of Communications and Informatics has blocked the Tumblr site because it contained 60 sites of terrorism, extremism, and pornography in 2015.
Text

ms paint. you know her. u used her age 8 to make loads of rainbow ovals all over the canvas and then scramble it with selection tool. now u will know her true powers with my handyrandy tips under the readmore. some will be pretty basic and others are very special.
this post has 8 cool trix to learn for you. enjoy and i may do another in the future if i remember/learn more stuff
some of it might be common knowledge. but its got some deep cuts. all tips have gifs to show process easily.
🙂 enjoy and i hope this encourages you to fuck around in mspaint more
soundtrack for this post (loop it while you learn for advanced learning experience)
TIP 1) the right click trick
left and right mouse click correspond to col1 and col2 respectively, which u can see in the top bar. this applies to all brushes and the fill tool like above. when using shapes col2 will be the fill colour (if you have solid fill selected). right clicking with shape maker will reverse the colours use on the shape.
TIP 2) right click eraser
this one is extremely helpful for lineart or add shading. the eraser always uses col2. so your eraser can technically be any colour. but here's where you get powers: right clicking with eraser will only erase onto col1, with col2.
TIP 3) transparent selection change a guy destination
the beloved transparent selection tool works based on what is selected as col2. so long as you have the correct colour as col2 you can make any image transparent and put it on top of anything else. and yes this works with photo bg as you can see.
TIP 4) the gradience
this one is a little more complex. you want to start off with any canvas size, and make as many diagonal coloured bands as you want. (protip: holding down shift makes a perfectly diagonal line with line tool)
then you need to resize the canvas to a width of 1px (make sure you resize by pixels, and do not maintain aspect ratio). then resize again back to its original width (or a different width i cant stop you). you will have your lovely gradience.
TIP 5) superimposter

so. you got a cool gradient and wanna put a guy on it. heres what i do:
i open a 2nd mspaint with same canvas size and draw whatever i want on there. i then pick a completely unrelated colour to my entire piece, and set that as the bg. you could use white, pink, geen, whatever you want as long as it doesnt appear somewhere else in ur drawing. copy the guy.
go back to your gradient tab. ensure that col2 is set as that bg colour you picked (lilac for me). have "transparent selection" enabled. paste your guy in. cue fanfare
TIP 6) advanced superimposter
the great thing about this method is u can put multiple gradients in multiple areas of the image. this is where it gets all japanese printmaking type of shit. ukiyo-esque
all you need to do is make another canvas with a new gradient, ensure col2 is set as the colour you want to replace, then paste your original piece onto the new gradient. now my guy has a soft fade. you can do this as much as you want. (you could even make a canvas with a texture or photo and paste your drawing onto there)
TIP 7) "sketch layer"
so as you now know, col2 is what is removed when you click "transparent selection". which means you can also remove any instance of a colour from ur drawing. which means you can have a unique colour for sketch layer and remove it from the drawing later. i admittedly dont do this but it is a great trick to have.
now combine this with lowering your dpi for smoother lines. may seem obvious but it helps. its like a free stabiliser whenever u want.
TIP 8) rainbow art
now this is where you can get dizzee rascal "bonkers". check out my small and shitty rainbow trick. you can select anything and hold down shift, then drag with left mouse, to turn that selection into its own brush. i even did it with a guy. and you can of course do this with a photo as well.
🙂well that it for now. hope you liked it thanks for reading now back to your regularly scheduled tgcg programming
2K notes
·
View notes
Text
has this ever happened to U?

sometimes when ur working on a drawing in mspaint, it will start to inexplicably consider a colour u have used as a new, separate colour, even though its exactly the same. i don't know exactly what will cause it, but i figure it might have to do w/ transparency. it never happens right out the gate, typically happens if i've been working on a drawing for a while.
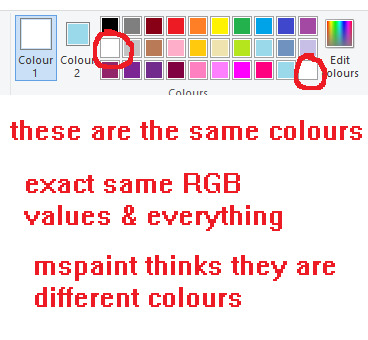
its worth noting any colour can be added to the third palette row again even if it already exists in the default palette so that alone isn't an indicator that this is ur issue. if you use custom colours a lot, double check their values too.
anyways, its anoying ... as f*ck. thankfully the solution is rlly simple.
select your entire canvas, cut the drawing and re-paste it back in. this should get rid of the problem for every colour on ur pic. saves a lot of wasted time fixing each individual area.
this will work regardless of what colours u have selected as col1 and col2. it will also work regardless of whether you have transparency on or off.
#i might put this on tgcg eventually since i got my other tutorials/tips over there#ms paint#mspaint#chatlobz
291 notes
·
View notes
Text
Animated Desktop MS Paint Tutorial Part 2

Text: But what if you made a hollow brush? And then you encase the brush in a ring of slightly off white? Would that be fun?
How to activate your self made novelty brush in Paint:
1 Make sure the Background is white and there is a ticky at 'transparent selection'
2 Select your piece of 'brush'
3 Press and Hold Uppercase key
4 Press and hold left mouse button. Release Uppercase Key
5 Paint! Change speed and direction to see what it does.
Btw if you wonder where I stole the nice colors for this brush? I plucked them from this bird's wing:
https://www.tumblr.com/longingforrotkehlchen/786065635755098112/the-sunset-transformed-this-schwarzmilan-into-a
First part of the Tutorial:
https://www.tumblr.com/ashenmotive/786055421840556032/animated-desktop-ms-paint-tutorial-part-1?source=share
7 notes
·
View notes
Note
Could you make a little tutorial on how you get those gorgeous crunchy textures out of ms paint?
not sure if that's the crunchy textures you're looking for but when you go to ms paint properties you can switch the mode to black and white and it gives you screentones

and then I just have fun with brushes and sprays
∧_∧
(。・ω・。)つ━☆・*。
⊂/ / ・゜
しーJ °。+ * 。
#im not sure if i can make any bigger tutorial because usually i just do what my heart tells me is the best...#but if u want smth more specific u can ask#and btw you can download those screentones from clip studio assets#if you dont want to torture yourself in mspaint thats a good options bcz it doesnt crash + has layers#ask#anonymous
9 notes
·
View notes
Text

fuck i forgot to post this old canvas that i found with a bunch of old doodles, decided to draw and fill w some new doodles a bit, the designs i made for human!twilight and human!pinkie are my favs they so precious 🥹🥹
#my art#mlp#trixie lulamoon#rainbow dash#flutterdash#applejack#fluttershy#mlp fan art#mlp art#mlp friendship is magic#pinkie pie#twilight sparkle#twipie#you can see that some of these doodle are old because i used to draw w a default brush#and now you can see i use a different brush now#i lov u mspaint brush you actually fun to draw#also fun fact that doodle w the guy with arms crossed my brother draw that#he was teaching me more or less of how to draw people with arms crossed hes actually draw pretty good#he was watching yt tutorials of how to draw didnt expect he improves so fast#maybe i'll give a chance to these art tutorial videos#i have a bunch of these marked to watch later but i actually didn't watch any of these#probably because of my lazyness and short time due to irl stuff#also put some commentary and rambling of mine because of how ugly my art was back then#i also now dont fw flutterdash that at all its such a basic and without salt ship to me sorry not sorry flutterdash shippers 🙄🙄#BUT ENOUGH RAMBLING LOOK HOW CUTE AND ADORABLE MY HUMAN DESIGNS FOR TWILIGHT AND PINKIE IM SO PROUD OF THEM ACTUALLY 🥹🥹
11 notes
·
View notes
Note
Just saw your izutsumi art (great btw) and noticed it was tagged #mspaint. Just wondering how you do dithering in mspaint cause i haven’t been able to figure it out.
open it up, File>Properties change the colour tickbox from colour to black and white accept changes and do this every time u want the dithering
4 notes
·
View notes
Text
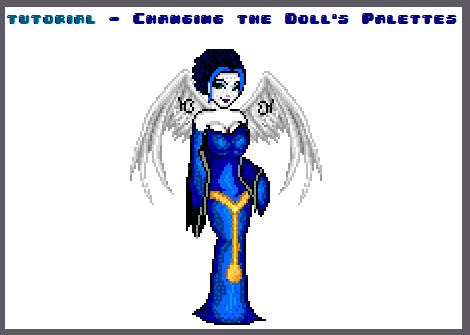


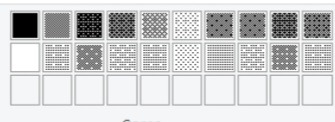
download Gimp here. this doll was made on Dollzmania Gothmaker.
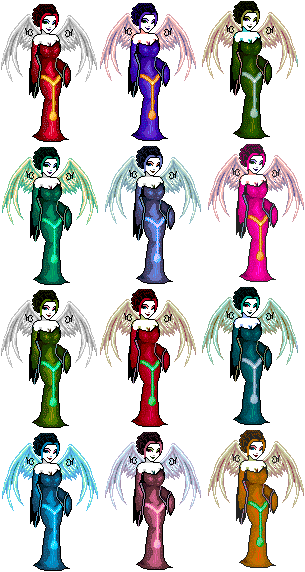
#tutorial#gimp#editing tutorial#tips#dollmaker#dollz#art tips#art tutorial#gimp tutorial#dollzmania#goth#pagedoll#edit#mspaint#paint#colorful#colors#rainbow
8 notes
·
View notes
Video
How to Increase Eraser Size BIGGER / MAXIMUM in MS Paint ? || Decrease E...
0 notes
Text

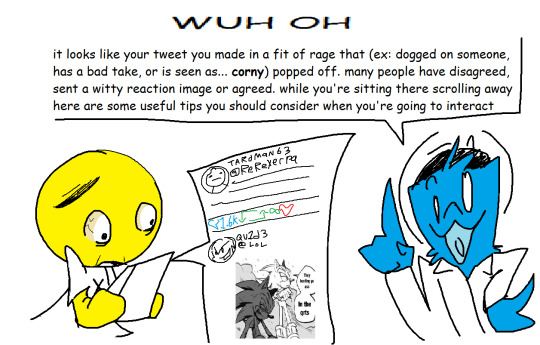


BLOB TUTORIAL: WHAT TO DO AND NOT TO DO WHEN YOUR BAD TWEET POPS OFF
0 notes
Text
youtube
I was asked to make this a few times and finally got around to it so here ya go- Basic tutorial on how I make my MSpaint stuff using only a mouse. (might have to crank the volume up) Thank you for watching :)
0 notes
Text
curious. lol
#i personally despise 1 and 4 the most. hoooly shit#like yes you can make good art on mspaint and a notes app and aggie.io and whiteboard etc etc omg. please. its fine.#and please dont say youre going to give up because of me that makes me so sad forever#rb bait#polls#txt
5K notes
·
View notes
Text
Midjourney Video
With the release of video (silent) on Midjourney, I just can't stop trying to generate images to animate! It's exceptionally easy, but some formats work better than others. Tutorial.
https://videopress.com/v/lSu3UXal?resizeToParent=true&cover=true&loop=true&playsinline=true&preloadContent=metadata&useAverageColor=true
https://videopress.com/v/ATrZHeC9?resizeToParent=true&cover=true&loop=true&playsinline=true&preloadContent=metadata&useAverageColor=true
https://videopress.com/v/HM4jFd1H?resizeToParent=true&cover=true&loop=true&playsinline=true&preloadContent=metadata&useAverageColor=true
https://videopress.com/v/44IogZpY?resizeToParent=true&cover=true&loop=true&playsinline=true&preloadContent=metadata&useAverageColor=true
Source: Midjourney Video
3 notes
·
View notes
Note
your mspaint stories are so so amazing i love them so much i would love a tutorial for them if you would want to make them <3
Okay here are some things I like to do with the polygon select tool it only works if the transparency box is selected in the tool bar and the the secondary color that you choose is the color that will be transparent... the compositions have to work with the idea so keeping everything reallly really simple is good! the last trick I didnt use for my stories yet but that is pretty much how I play with it until I get ideas
720 notes
·
View notes
Text
Pulp Covers And How To Paint Them
With the rise of cheap printing in the early twentieth century, mass-marked paperbacks swept the world, each offering lurid thrills for obscenely low prices. Sex, sadism, and incredible violence for as little as ten cents. An easy purchase to slot in between fifty cigarettes a day and enough bourbon slugs to kill a small garden.
Pulp fiction is where some of the greats of American literature cut their teeth, including the big three, Raymond Chandler, Ross MacDonald and Dashiell Hammett. The contents of these stories, both the dizzyingly good and astoundingly terrible, have been absorbed and digested and remixed and regurgitated in nearly every permutation imaginable, fuelling pop culture some one hundred years on. This isn't an essay on that. Nobody likes to open a tutorial and be greeted with a wall of text. The history is for another time.
But it is about how to paint it.
Don't let the pre-amble intimidate you, it's not as hard as it sounds. You will need:
Painting software with some image editing capabilities. You don't need all the bells and whistles of Photoshop, but I wouldn't recommend something like MSPaint, at least not to start with. I'm using Clip Studio Paint.
A really beat-up paper texture. The grungier, the better.
A lightly-textured brush. Here are the specific brushes I use, 99% of which is the well-named rough brush. Try and avoid anything with any impasto elements.
Go to your colour-picking tool and use the 'select from layer' option. Doing all the painting on a single layer is going to make your life easier.
A complete willingness to make mistakes and, instead of erasing, painting over them. It generates much more colour variation and interest! Keep your finger off the E key.
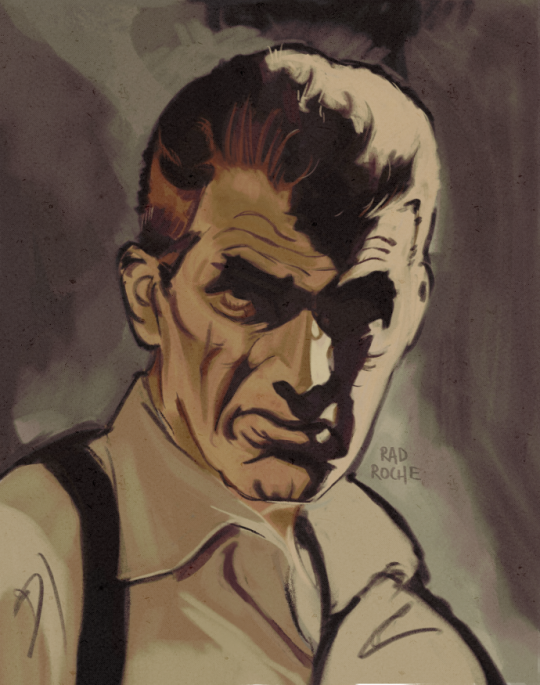
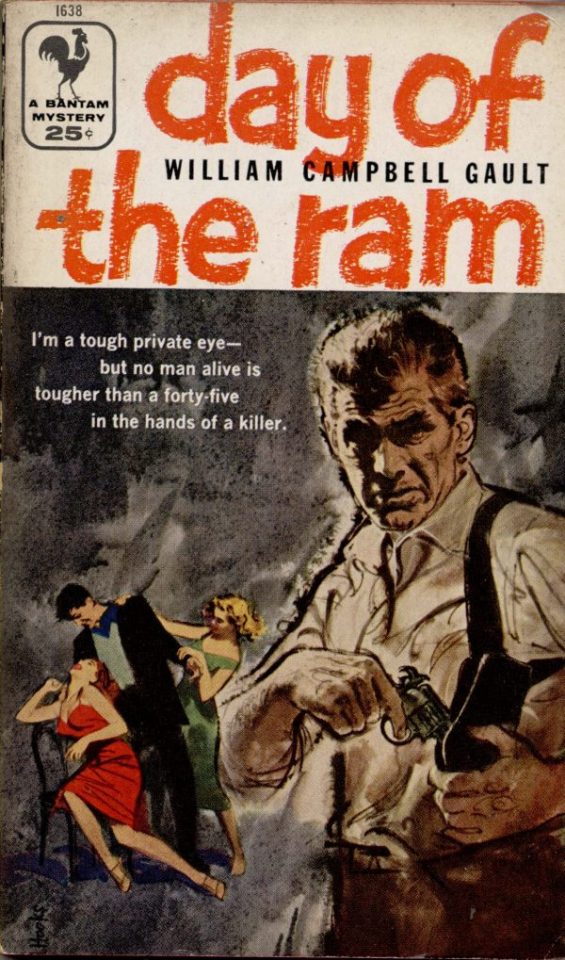
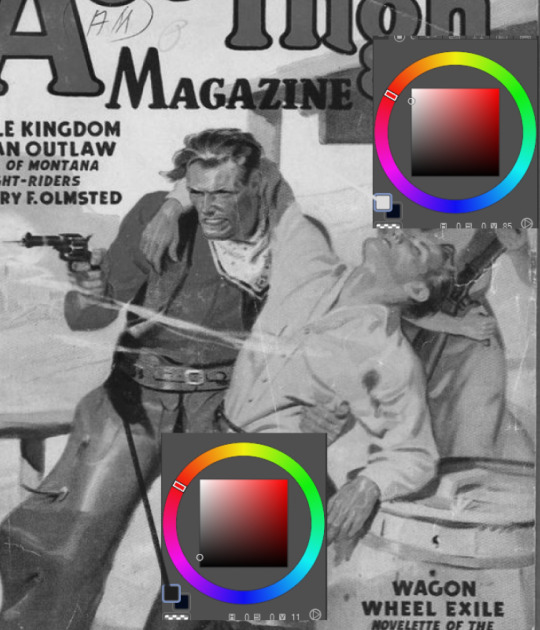
Good reference! That painting is a master copy of Mitchel Hooks' art for Day of the Ram. Find a style you really love and want to learn? Have no clue where to begin? Do direct studies!
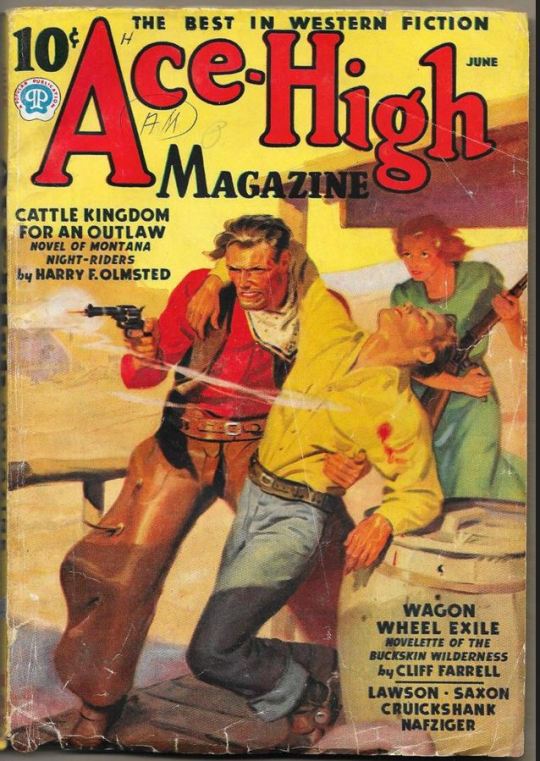
Let's not worry about whatever is happening in the background. It's probably fine. Let's get started! Pulp magazine art is a lot more varied than you might first think, so don't agonize over having a style that 'fits' or not. I'm also specifically aiming for something you'd see on the cover after printing, not the initial painting they would use for printing. The stuff I'll show here is a pretty narrow band of it, but here are some general commonalities. This is a painting by Tom Lovell.
Let's dig into this.

The colours are very bright and saturated, but the actual values, the relative lightness and darkness of them, are actually grouped very simply! You can check this by filling a layer full of black, putting it on top and setting its mode to colour. If the value of a painting looks good, you actually get a lot of leeway with colour. But here's what I think is the most important thing to keep in mind.
The darks aren't that dark, and the lights aren't all that light! Covers are paintings reproduced on cheap paper. Anything you wouldn't want to happen in the printing process, you lean into. Value wash-outs, lower contrast, colours getting a weird wash to them, really gritty texturing. So let's get painting! Here's my typical setup.
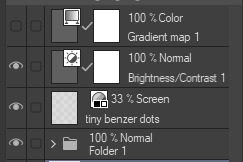
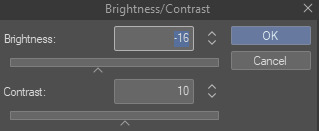
That bottom folder is the painting itself. The screen layer is the grungy paper texture. To get the effect you want, put it down, invert its colour, then set it to screen. That washes out your painting far, far too much, so to compensate, I put a contrast layer up on top. Fiddle around with the settings, but this is where mine ended up sitting.
Note I'm saying this before even starting the painting: you want to do this as early as possible. This is where the 'select from layer' colour picker comes in handy. You can paint without worrying about the screen or contrast layer. Something not looking right? Enable your value check layer and keep painting. When you turn it off, it'll still be in colour. Here's a timelapse so you can see what that looks like.
And when you check the values...
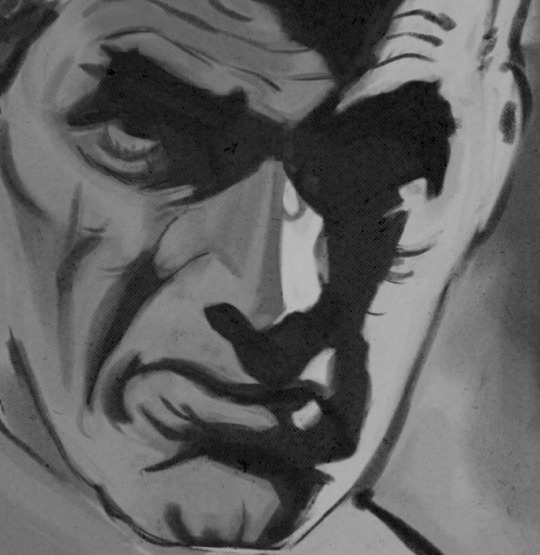
They're pretty simple! This isn't a be all and end all, but I hope it serves as a decent primer. I want thirty dames on my desk by Monday!
#rochedotpng#art tutorial#art resources#couldn't find a thing online about this style so here's how i do it#pulp#it's how i did the death shroud one more or less
364 notes
·
View notes
Text
Animated Desktop MS Paint Tutorial Part 1


In text: I don't use the regular Paint Brushes. I make my own Novelty Brushes in the file, in all kinds of colors and shapes. Let me show you one example: [animated gif uses a blob of black with colorful bits as an improvised brush and demonstrates how the brushstroke characteristics change according to cursor direction and acceleration]
But how to use it as a brush?
1 Make sure the Background is white and there is a ticky at 'transparent selection'
2 Select your piece of 'brush'
3 Press and Hold Uppercase key
4 Press and hold left mouse button. Release Uppercase Key
5 Paint! Change speed and direction to see what it does.
Second Part of the Tutorial, a big step up:
https://www.tumblr.com/ashenmotive/786074995033079808?source=share
1 note
·
View note
Note
Hiiii I feel like I’ve totally seen you answer this before but I looked and couldn’t find anything 😭but how do you personally use ms paint/do u have any Ms paint tutorials u recommend?? I see cool speed paints where it looks like ppl are doing a layering trick and the way u render in Ms paint is so so so cool to me ^^
i don't do anything special/have any tutorials.. I like mspaint for it's limited set of tools and accesibility.. it's like drawing traditionally.. it kind of forces you to be more deliberate about your choices when drawing, as the quality of life features of modern programs.. are non existent. I normally draw/render on one layer regardless of program , but mspaint puts my brain in easy flow mood, that is usually aggravated in programs with plently of assets... consider it the mentality of drawing on ur homework versus a sketchbook... lool you preemptively set expectations when draw in something with the intent to be "good" the new mspaint (Windows 11).. i do believe has a layering feature.. but if that's the case just use any drawing program loll.
89 notes
·
View notes
Text
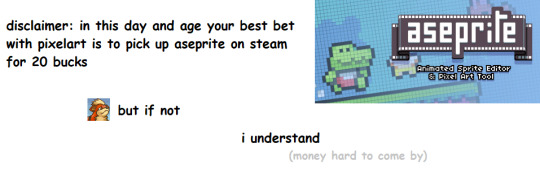
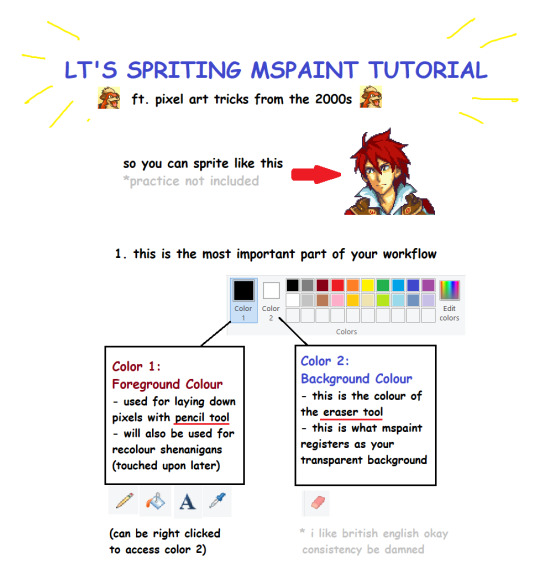


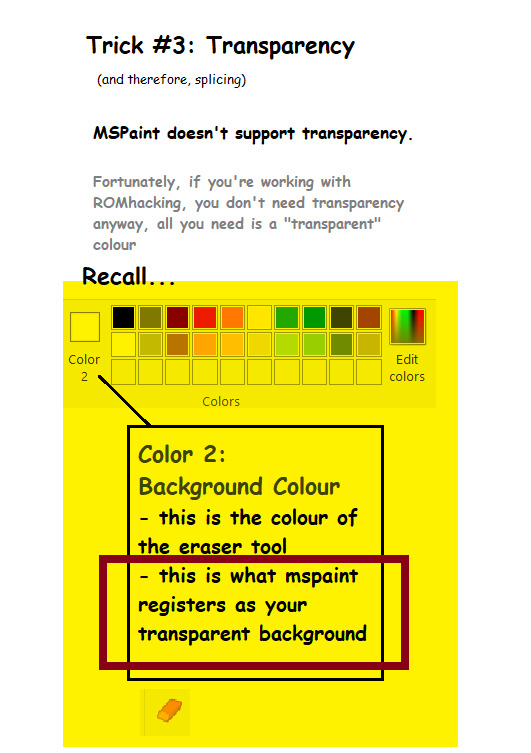
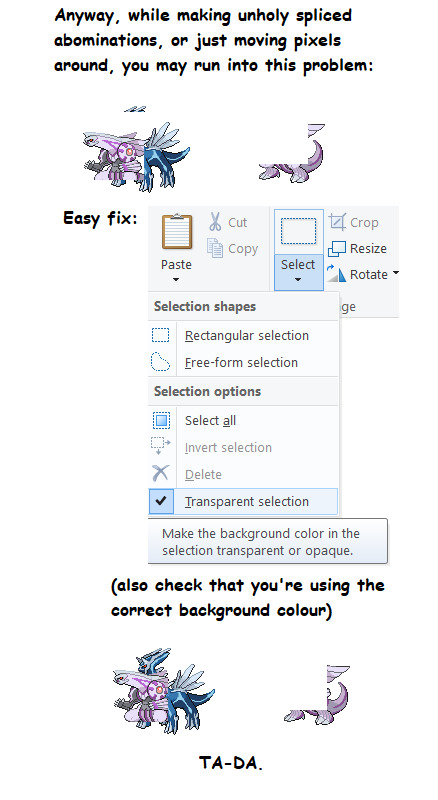
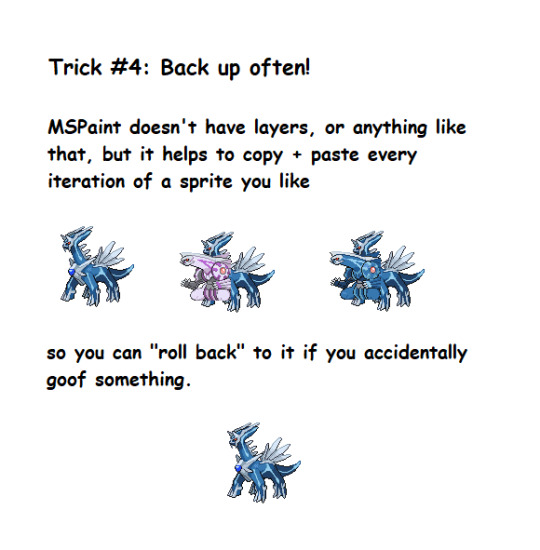
I was requested by a friend to put together a quick MSPaint spriting tutorial. Since a lot of these tricks are probably lost to crusty 2000s Youtube videos and Deviantart posts, uhhh... Have a new one!
Brought to u with love from a dedicated Fire Emblem/Pokemon/A bunch of other JRPGs spriter. All non-official sprites featured in this tutorial are my work
EDIT: i forgot to mention. you can also compile aseprite from source code. it's free. they're so epic for that. but support the devs pretty pretty please they do amazing work
631 notes
·
View notes