#MS Paint Tutorial
Explore tagged Tumblr posts
Visit Tumblr Blog
Explore Tumblr blogs with no restrictions, modern design and the best experience.
Last Seen Tumblr Blogs


Fun Fact
Tumblr posted its first advertisements in May 2012 and subsequently earned $13M in revenue.
Text

ms paint. you know her. u used her age 8 to make loads of rainbow ovals all over the canvas and then scramble it with selection tool. now u will know her true powers with my handyrandy tips under the readmore. some will be pretty basic and others are very special.
this post has 8 cool trix to learn for you. enjoy and i may do another in the future if i remember/learn more stuff
some of it might be common knowledge. but its got some deep cuts. all tips have gifs to show process easily.
🙂 enjoy and i hope this encourages you to fuck around in mspaint more
soundtrack for this post (loop it while you learn for advanced learning experience)
TIP 1) the right click trick
left and right mouse click correspond to col1 and col2 respectively, which u can see in the top bar. this applies to all brushes and the fill tool like above. when using shapes col2 will be the fill colour (if you have solid fill selected). right clicking with shape maker will reverse the colours use on the shape.
TIP 2) right click eraser
this one is extremely helpful for lineart or add shading. the eraser always uses col2. so your eraser can technically be any colour. but here's where you get powers: right clicking with eraser will only erase onto col1, with col2.
TIP 3) transparent selection change a guy destination
the beloved transparent selection tool works based on what is selected as col2. so long as you have the correct colour as col2 you can make any image transparent and put it on top of anything else. and yes this works with photo bg as you can see.
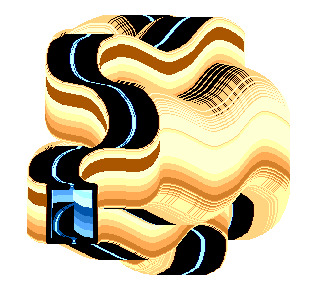
TIP 4) the gradience
this one is a little more complex. you want to start off with any canvas size, and make as many diagonal coloured bands as you want. (protip: holding down shift makes a perfectly diagonal line with line tool)
then you need to resize the canvas to a width of 1px (make sure you resize by pixels, and do not maintain aspect ratio). then resize again back to its original width (or a different width i cant stop you). you will have your lovely gradience.
TIP 5) superimposter

so. you got a cool gradient and wanna put a guy on it. heres what i do:
i open a 2nd mspaint with same canvas size and draw whatever i want on there. i then pick a completely unrelated colour to my entire piece, and set that as the bg. you could use white, pink, geen, whatever you want as long as it doesnt appear somewhere else in ur drawing. copy the guy.
go back to your gradient tab. ensure that col2 is set as that bg colour you picked (lilac for me). have "transparent selection" enabled. paste your guy in. cue fanfare
TIP 6) advanced superimposter
the great thing about this method is u can put multiple gradients in multiple areas of the image. this is where it gets all japanese printmaking type of shit. ukiyo-esque
all you need to do is make another canvas with a new gradient, ensure col2 is set as the colour you want to replace, then paste your original piece onto the new gradient. now my guy has a soft fade. you can do this as much as you want. (you could even make a canvas with a texture or photo and paste your drawing onto there)
TIP 7) "sketch layer"
so as you now know, col2 is what is removed when you click "transparent selection". which means you can also remove any instance of a colour from ur drawing. which means you can have a unique colour for sketch layer and remove it from the drawing later. i admittedly dont do this but it is a great trick to have.
now combine this with lowering your dpi for smoother lines. may seem obvious but it helps. its like a free stabiliser whenever u want.
TIP 8) rainbow art
now this is where you can get dizzee rascal "bonkers". check out my small and shitty rainbow trick. you can select anything and hold down shift, then drag with left mouse, to turn that selection into its own brush. i even did it with a guy. and you can of course do this with a photo as well.
🙂well that it for now. hope you liked it thanks for reading now back to your regularly scheduled tgcg programming
2K notes
·
View notes
Text
Animated Desktop MS Paint Tutorial Part 2

Text: But what if you made a hollow brush? And then you encase the brush in a ring of slightly off white? Would that be fun?
How to activate your self made novelty brush in Paint:
1 Make sure the Background is white and there is a ticky at 'transparent selection'
2 Select your piece of 'brush'
3 Press and Hold Uppercase key
4 Press and hold left mouse button. Release Uppercase Key
5 Paint! Change speed and direction to see what it does.
Btw if you wonder where I stole the nice colors for this brush? I plucked them from this bird's wing:
https://www.tumblr.com/longingforrotkehlchen/786065635755098112/the-sunset-transformed-this-schwarzmilan-into-a
First part of the Tutorial:
https://www.tumblr.com/ashenmotive/786055421840556032/animated-desktop-ms-paint-tutorial-part-1?source=share
7 notes
·
View notes
Text
has this ever happened to U?

sometimes when ur working on a drawing in mspaint, it will start to inexplicably consider a colour u have used as a new, separate colour, even though its exactly the same. i don't know exactly what will cause it, but i figure it might have to do w/ transparency. it never happens right out the gate, typically happens if i've been working on a drawing for a while.
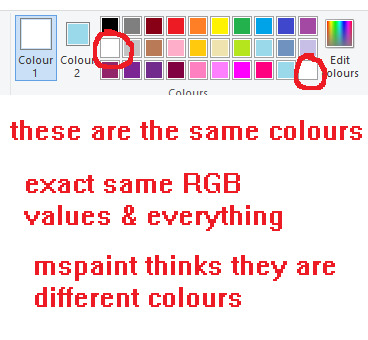
its worth noting any colour can be added to the third palette row again even if it already exists in the default palette so that alone isn't an indicator that this is ur issue. if you use custom colours a lot, double check their values too.
anyways, its anoying ... as f*ck. thankfully the solution is rlly simple.
select your entire canvas, cut the drawing and re-paste it back in. this should get rid of the problem for every colour on ur pic. saves a lot of wasted time fixing each individual area.
this will work regardless of what colours u have selected as col1 and col2. it will also work regardless of whether you have transparency on or off.
#i might put this on tgcg eventually since i got my other tutorials/tips over there#ms paint#mspaint#chatlobz
291 notes
·
View notes
Note
Do you have any tips on drawing eyes? Ive always struggled with the style of eyes
Drawing eyes is one of the most fun parts of designing characters for me because there can be so much variety ÒvÓ
Here's some tips and examples to draw some of the different eye styles I've drawn
SHAPE: You can draw here many types of eyes.
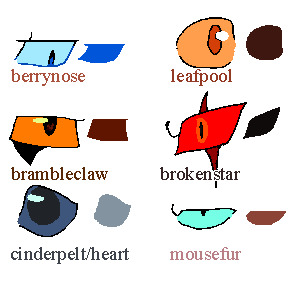
From squared eyes, round eyes, pointy eyes and even specific eye shapes.
As you can see, even the lineart can have different colors .
You can also add eyelasses or "eye liner"!
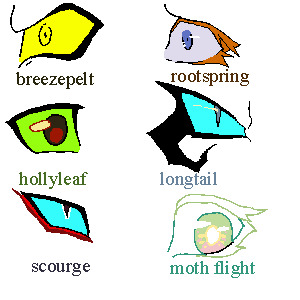
PUPILS:
Just because I want to keep some consistency, pupils usually are round or sharp, or even squared sometimes (though you can personalize it and give them other shapes!). But can have any type of color combinations, inner shape...
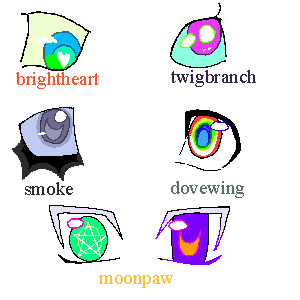
SIMPLIFICATION:

Sometimes, I like to simplify eyes when portraying an exaggerated feature.
If open, eyes are white lack pupils and have a bold black contorn.
If closed they have a V shape.
Both are inspired in old anime exaggerated expressions or emoticons from the 2000s.
I hope this helps! :D
155 notes
·
View notes
Note
i was wondering how do you draw so good with your mouse? i don't have a tablet so it would be helpful to know
thank yoou 🥲
theres probably a lot of ways to go about it. but personally i do it by drawing a bunch of shorter lines with quick strokes (like multiple attempts at the same line) then i go back in and erase

when ive rendered things and im working with only one layer it also helps me to think of it the same way as i would painting on a canvas irl. like u have to manually build up layers/colors. or doing blocks of color then going back and drawing lines over them

at least for me theres a certain amount of wobbly lines and wonkiness inherent to drawing like this so i dont worry abt my lines being extremely clean. anyway!
#asks#i didnt mean to make this a tutorial or anything but here u go#i actually us an ms paint clone for mac called paintbrush but i say ms paint so ppl will know what i'm talking about
59 notes
·
View notes
Text


✨HAI GAIZ!!!! ✨
xP i was whining at my artfren bout how hard it iz to draw those "RAWR" handz [u kno da ones!!] Like.... Dis!!:


Lol he gave me a kwik lesson & I made u a tutorial, fellow scenemos!! XD

xD im not a legit artist or anything so itz not like super realistic, but it'll totes work for my ms paint doodlez mwahaha!!! X3
Enjoi!!1! (>w<)
65 notes
·
View notes
Text
MS PAINT TEXT DRAG
So this is using @soaricarus's text drag technique!
You can do this by typing text/symbols in ms paint, then using transparent selection and holding shift + dragging your mouse!
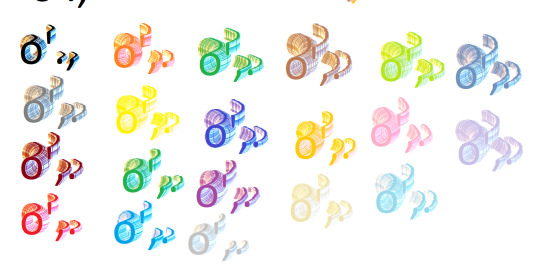
Colour samples using the default colours in Paint. this is just to show some ideas, but custom colours work as well!


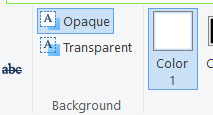
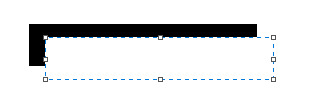
You can use an opaque background in text settings for colours such as white, and then drag them onto a background of the same colour! This example is just using a black bg with white text, but you can mix and match!

Yellow on a purple background!

Then pink on a brown, dragged into white!
^ setting here to re-set bg colour!
WHATEVER COLOUR 2 IS SET TO WILL BE TRANSPARENT WHEN SELECTED, SO IF IT IS SET TO BLACK THEN WHITE WONT BE TRANSPARENT WHEN YOU SELECT AND DRAG IT! example below

You can also flip symbols to switch what side the colours appears on!
(Two left brackets, but one was flipped, then they were both dragged!)
You can then drag that shape.. and make more unique patterns!
After dragging, if you still have the text selected, you can then move it without dragging behind! However you have to have released shift and released left click You can release shift after dragging begins and it will continue dragging until you release left click!
NOTE: THIS DOES NOT WORK THE SAME WITH DRAWN THINGS, AND THE COLOURS ARE FROM COLOUR ABERRATION THAT IS ON TEXT!
Doing this technique with a drawing, and not text, results in this
Theoretically you could do it with a drawing, but you would need to apply some form of chromatic aberration!
#ms paint#ms paint tips#text drag#ms paint text drag#art tips#art help#art tutorial#art resources#tutorial
144 notes
·
View notes
Text
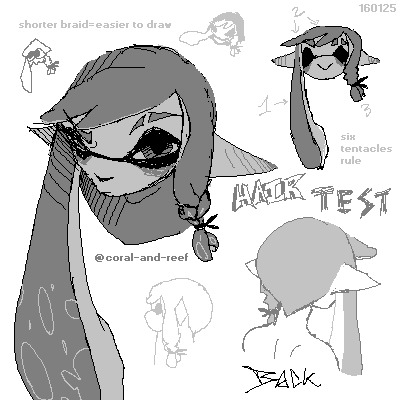
I was thinking about doing somewhat a big post but eh, I don't want to pressure myself too much. Have some bread crumbs, cephalopeeps :3
#coral the inkling#coralynakawaii#splatoon#ms paint#splatoon fanart#splatoon art#splatoon oc#it is part of a tutorial of how to draw coral since a friend is struggling a ton. lmao. hell i realized the braid takes me a lot to draw#so yeah. shortening just to test it out and its more easier to draw#im considering changing the hair back to the hippie one or a completely different one (which i doubt)
46 notes
·
View notes
Note
Do you have any tips on drawing yoshi’s tongue? How do you draw it so dynamically?
Huh, I wasn't aware that I drew Yoshi sticking his tongue out so "dynamical" in any way for someone to notice. Regardless, I do have a tip on how I did it so I guess I can try explaining how. Bear with me though as I'm not too good at explaining how I draw certain stuff 😅
Some of the official Yoshi artwork, models, and sprites have shown that Yoshi kind of has that big bulge at the end of his tongue (sometimes that bulge is straight up a ball lol). Other than using a bunch of official stuff for practice and references, I just imagine Yoshi's tongue as some kind of a ball attached to a string (sort of like a paddle ball) whenever I sketch it out.
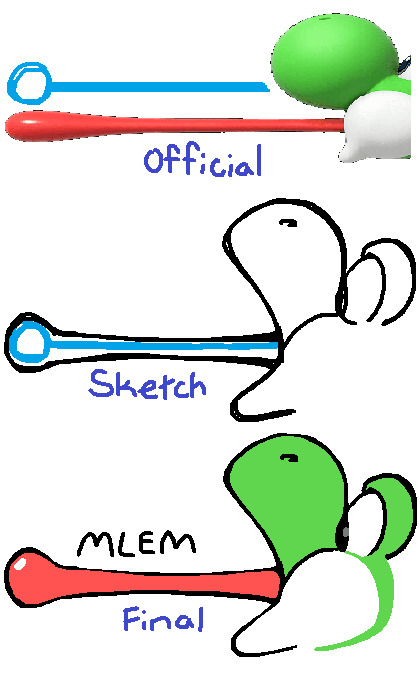
Then I just draw the "string" doing random movements like being all wiggly, zigzag and whatnot while the "ball" is still attached to it.
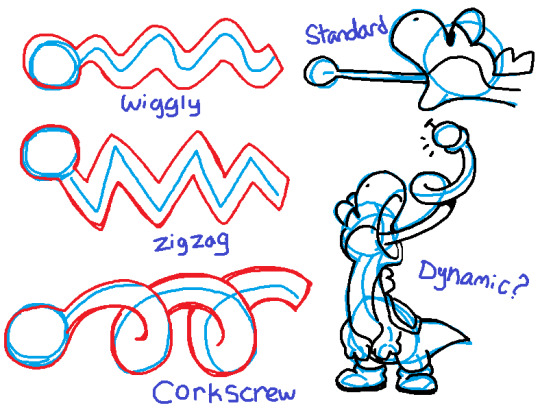
So I guess you just go crazy with however you want to draw the line and then you attach the ball at the end and there you have it! A dynamically drawn Yoshi's tongue or something XD
Hope this helps! =)
#yoshi#tutorial#doweesig art#my art#super mario#i guess#sketches#doodles#art tips#yoshi's tongue#yoshis tongue#ms paint#nintendo#art tutorial#references#tongue
100 notes
·
View notes
Text
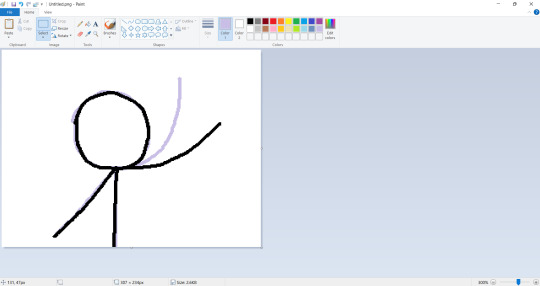
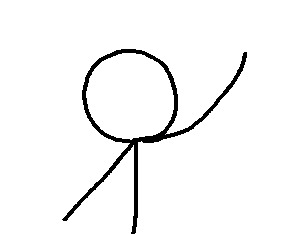
How to animate in MS paint
Animation in MS paint sounds really hard, but it isnt, it's just tedious is all.
i'm going to do a person waving, though you can do whatever you want.
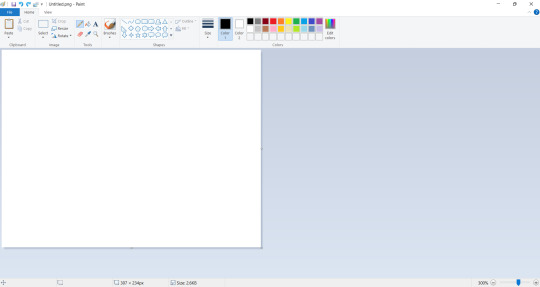
First you are going to want to pick a canvas size. I just picked one at random.
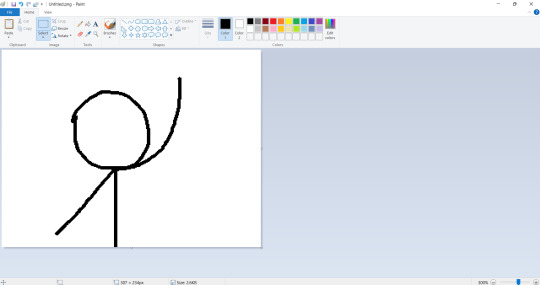
Then, you want to draw your first frame. you're going to want to save this. Usually I save it as "frame1"
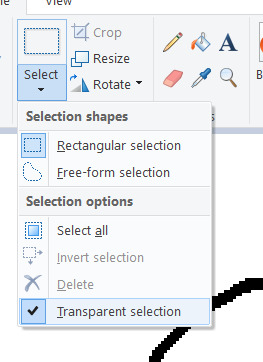
Go up to the select dropdown on the menu and select "Transparent selection"

Bucket-tool the lineart to be a different color, I tend to pick purple. Ctrl+A your canvas and then Ctrl+C.
then, draw your next frame!

use the bucket tool to erase the onion skin on the previous frame, and then save the frame as "Frame2" Repeat this process for as many frames as you want if you're doing straight-ahead animation.
But, if you're doing keyframes like i am, then it gets a little bit more interesting.
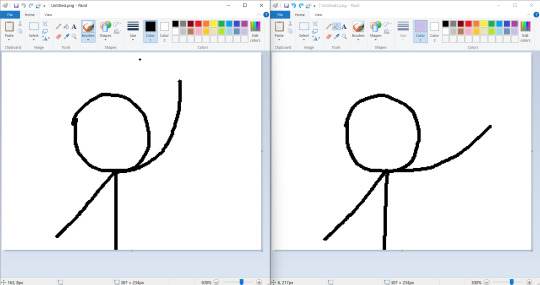
First you'll want to open up two instances of MS Paint, I personally like to put them side-by-side. Each instance should have a different keyframe opened on it.
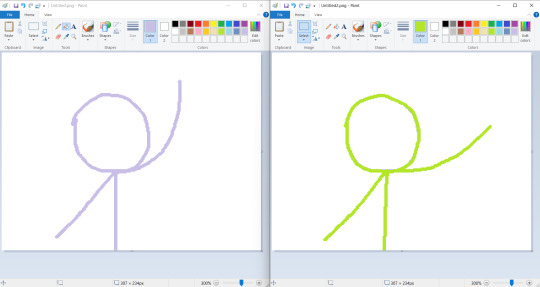
Bucket tool the lineart like so.
Remember the "transparent selection" I made you do? well, this is where it comes in handy! Copy one of the two frames from one instance and paste it over to the other.
You should now see something like this on one of the instances. Feel free to close the other instance that you're not working on without saving, as you're pretty much finished with it.
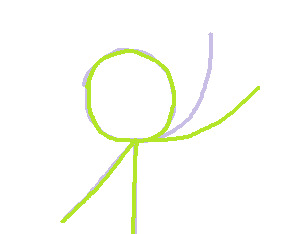
then, all you'll want to do is to draw the inbetween. Once you're finished with the in-between, repeat the process of getting rid of the onion skins, so that it looks like this. Save it as "Frame3" or "Frame1.5" or whatever you'd like
Once you have all of your frames, you're going to want to go to put them all together in a sequence. Personally I like to go with Ezgif.com, though any option is fine, really.
Input your frames and play around with the settings to your liking, and once you're done, save it as a .gif to your PC.
(If you want it as a .mov or .mp3, i suggest using windows movie maker instead.)
And you're finished! you just made an animation in MS paint! good job!
#ms paint and you#sillies#textpost#art tutorial#Bugtoast#Think i'll only make one of these tutorials per-day#since i don't wanna flood my blog with ms paint tutorials lol
14 notes
·
View notes
Note
Do you have any advice for drawing wolves?
Man I was gonna make a tutorial but idk about any good solid advice :’> I guess drawing them in different styles helps sometimes >> but there’s def good tutorials out there that make it easier ^^💖
#i mean first step is going back to 2007 and opening ms paint while your edgy music playlist is on#next step is have fun with it#Hsjsbdjd#pix answers#i know this doesn’t even help but thank you for asking ;v;💖#this is all I used to draw as soon as I picked up a pencil =w=#but i still have tutorials saved because you always keep learning new things#specially teef and anatomy
49 notes
·
View notes
Note
YOU USE A MOUSE TO DRAW!!!!?
I knew you used ms paint but now I have a whole new level of respect for you.
If you don't mind, can you give some tips or a brief tutorial?
i mean i don't really have tips for using a mouse since it's quite simple, all it takes is practice (it's the only thing i've used to draw digitally ever since i was really young)
something i can recommend though is having a slower mouse sensitivity when you draw
#asks#i'm not really sure what tutorial i could put since all it takes is literally just. clicking and dragging#but for ms paint tricks i have plenty of them
33 notes
·
View notes
Text
Animated Desktop MS Paint Tutorial Part 1


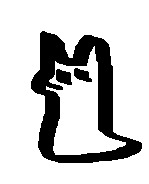
In text: I don't use the regular Paint Brushes. I make my own Novelty Brushes in the file, in all kinds of colors and shapes. Let me show you one example: [animated gif uses a blob of black with colorful bits as an improvised brush and demonstrates how the brushstroke characteristics change according to cursor direction and acceleration]
But how to use it as a brush?
1 Make sure the Background is white and there is a ticky at 'transparent selection'
2 Select your piece of 'brush'
3 Press and Hold Uppercase key
4 Press and hold left mouse button. Release Uppercase Key
5 Paint! Change speed and direction to see what it does.
Second Part of the Tutorial, a big step up:
https://www.tumblr.com/ashenmotive/786074995033079808?source=share
1 note
·
View note
Text
For those of us too impatient for Paint to get layers...

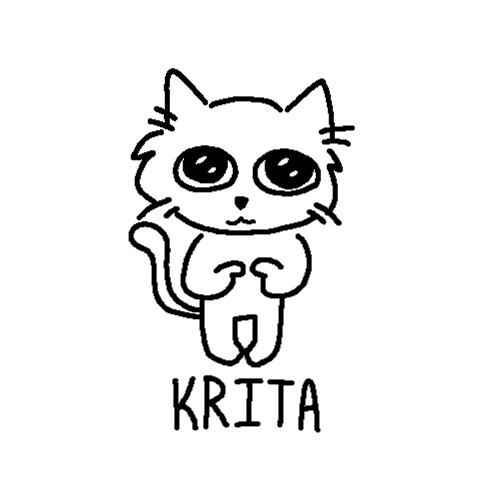
MS Paint Krita
The cats speak for themselves:
Default MS Paint brush Dupe in Krita :)
If you're anything like me, doodling in MS Paint is a huge hit of nostalgia, and the fact that it's such a barebones program I find I'm able to sketch more freely.
I had been trying to find a brush that can mimic the style of the basic MS Paint brush in Krita (a free drawing program), and I finally found it.
There are some slight differences between the brushes, but this is the closest I could find, and thought someone else might be looking for something similar!

In image text reads;
Canvas- For canvas size I would recommend anywhere from 800px to as low as 500px. Of course feel free to make your canvas as large as you like, just keep in mind that it may make it difficult to make out details when zoomed out to view the entire canvas, or when you export your work.
Pen Size- The brush can be found under the digital or pixel tag. It lacking pressure and opacity sensitivity makes it very similar to MS Paint. The_Pixel_Art_Fill is a pressure sensitive alternative. Both brushes are a tad bit jagged.
Brush- I recommend using sizes 1-5, if the brush is too big it loses its pixelated appearance.
End image text.
I may continue to try and better replicate the brush in the future, but I am struggling lol
#I know I made typos#please don't mention it#krita#ms paint#paint#digital art#digital drawing#digital artist#drawing#artists on tumblr#krita brush#drawn with krita#kritaart#made with krita#krita illustration#art tips#tutorial#cats#microsoft paint#text post#brushes#art tools#ink#pixel brush#queue#scheduled#🧅 Art
67 notes
·
View notes
Text
balls. (ran out of recording time may do a part 2????)
12 notes
·
View notes
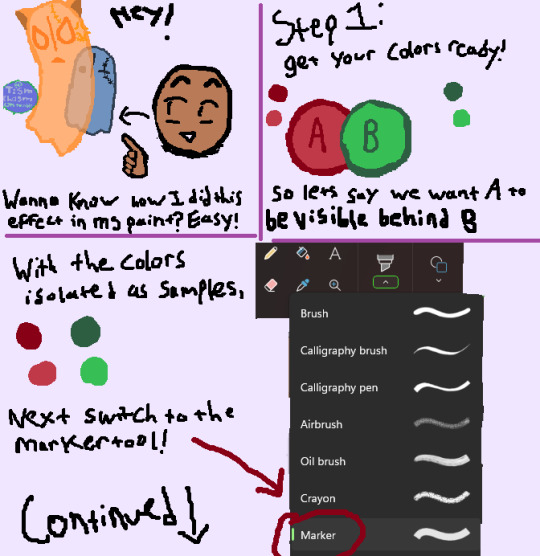
Text
Here, have a shitty ms paint see-through effect tutorial (long so it has a read-more.) nobody asked but i deliver. Lmk if you want a tutorial on adding gradients onto clothes in ms paint as you draw.


#art gallery tag#art tutorial#ms paint#digital art#art guide#how to art#artists on tumblr#rare tism art
2 notes
·
View notes