#need to check what layer mode i used…
Explore tagged Tumblr posts
Visit Tumblr Blog
Explore Tumblr blogs with no restrictions, modern design and the best experience.
Last Seen Tumblr Blogs


Fun Fact
In 2020, Tumblr had 29.4 million users in the US.
Text

Obi-wan with the skywalker twins <3
(from an unfinished piece from ages ago that i found on my iPad, other than the weirdly small baby heads, im impressed with how it looks considering my art skillz at the time!)
#past self popped of with those colours honestly#need to check what layer mode i used…#obiwan kenobi#obi wan kenobi#leia organa#leia skywalker#luke skywalker#skywalker twins#star wars#star wars fanart#star wars art#sw#sw fanart#sw art#fanart#jaydraws
5K notes
·
View notes
Text
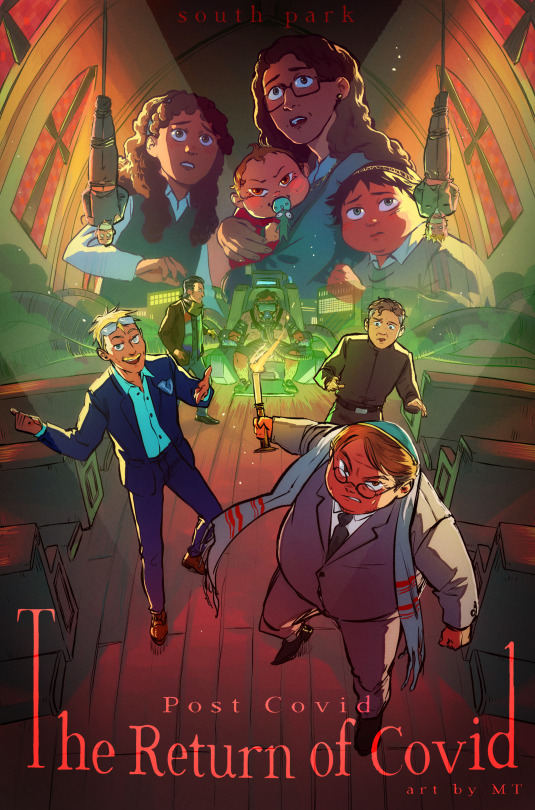
THE RETURN OF COVID Horror/thriller movie style!! I don't think I could find enough words to express how much I love doing those posters............ For this one, I felt like the cast of "antagonists" of the movie would make for a pretty awesome composition and mood, and paired with the church setting I think I got something pretty interesting, haha. More below!
As it happens, a fandom friend asked if I could maybe some day record my process, and therefore I did! (and went the extra mile adding goofy horror songs to it...) Check it out if you're interested :)
youtube
I've detailed it in the YT vid description as well, but my process is rather straightforward. I tend to be a "lazy person" in that I like to, ideally, spend the least time possible on anything, and so far this process is how I've best achieved that while still managing some rather complex pieces. I like to be extremely rough with my sketches and prioritize dynamism and composition, and I usually take my time repositioning the characters until I'm satisfied before I go any further. I don't have the best mental visualization so I usually try to have a very rough idea of what I want before I directly jump to sketching and mostly ideate there. The lineart is very straightforward as well. I come back later to adjust line thickness here and there but otherwise I just "trust my brush". The fake fisheye perspective is entirely wrong and made up so I needed some custom perspective lines to know roughly how to position the background elements.
I do come back with composition guides after I'm done with the lineart, just to check how the illustration is doing. I prefer not to use them at first because it tends to "constrain" me a bit too much, and I like to remain very free as to maintain a feeling of spontaneity, which is why I will only fix the composition afterwards (when I do). Coloring is then fairly streamlined, with background colors/atmosphere guiding the overall color scheme followed by character coloring and additional details. The most fun part comes with the post-processing, where I go wild with additional fog and light shaft layers to add depth to the entire thing. I use a bunch of additional tone curve layers to adjust the colors and make it more uniform, as well as one blurred, flattened copy of the illustration with strengthened contrasts, in overlay mode, to add some vibrance, and a noise layer for texture. That's it! Thanks for watching, for those interested :))
#south park#sp post covid#eric cartman#butters stotch#yentl cartman#scott malkinson#clyde donovan#sp kevin stoley#tweek tweak#craig tucker#moisha cartman#menorah cartman#hackelm cartman#Youtube
956 notes
·
View notes
Text
How to make a multi-colored, multi-tip scatter brush in Clip Studio Paint — correctly

They made it annoyingly specific in CSP and I keep forgetting every time. So this is a note-to-self + whoever else needs it:
↓
What we don't want:
1. When a brush tip is created from black / white on a regular RBG layer, it will only paint in black / white.
It will only use the selected color if Color Mixing is checked — bad if you wanted an opaque brush, because this makes the brush tips transparent when they overlay one another, as in the orange leaf clumps ↓

Troubleshooting: If the brush paints in grey / B&W as shown in the top row of leaves, check the Blending Mode in brush settings. Here, it was set to Brightness instead of Normal.
↓
The correct way:
https://tips.clip-studio.com/en-us/articles/679 CTRL + F → [2] A: How to create brush tip images that allow for freely changeable colors
↓
1. MOST IMPORTANT! Draw your brush tip on (or convert to) a Gray or Monochrome layer.
(Usually doesn't matter, but if your brush has gradients etc. choose Gray. It also helps to NAME and TAG it so you can find it.)

2. Edit → Register Material (J) → Image... → Check "Use for brush tip shape" on.

3. Brush settings → Brush tip → Add brush tip shape
(Here, I'm adding it to a pre-made brush that already has some color & size settings. Note that the brush stroke is displaying in color — GOOD! If the layer wasn't properly made B&W, the brush tip will show in black & the stroke will display in black.)

4. Should look like this. Can add more tips, test the brush settings you like & Save all settings as default.


436 notes
·
View notes
Note
Love your art! What's your shading process / any tips? I really like how vibrant it is
Thank you!! also sorry this is a long post
I usually start painting the character after I already have a background, super sketchy or with a placeholder (a photo usually), just so i know what colors to use
I fill the character with a color from the BG or a similar color and use the multiply blending mode

then i paint the lights on another layer with the "add glow" blending mode (i also pick the color depending on the bg).
I add another multiply layer for anything that needs to be darker, like stuff under the characters clothes
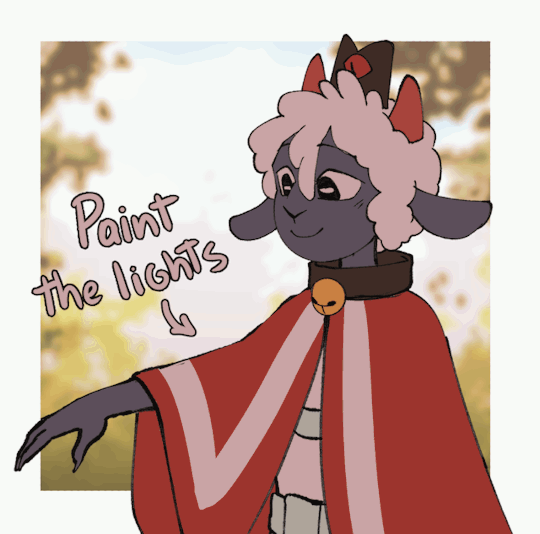

I paint a line with a saturated color between the lights and shadows, for example i added a bright red for the cape and light purple for their skin (? this is subsurface scattering, it doesnt happen on every surface but i like how it looks so i use it on everything lol.
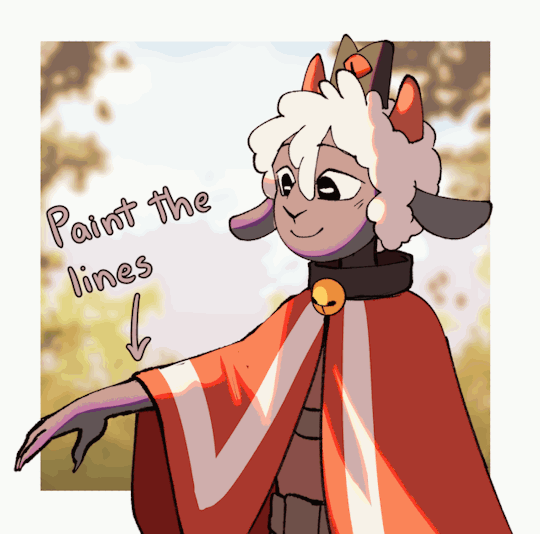
Then i paint the lineart a similar color to each part of the character or you can paint it all red and use multiply

that's basically it
some tips (these are just things that work for me)
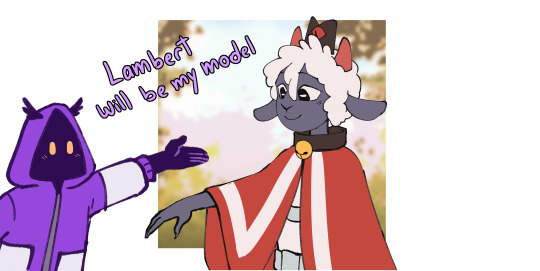
I think is better to paint the lights, not the shadows. it helps to see the shapes of the thing/character you're drawing better (its what i did with lambert ⬆️)
Draw backgrounds, i think it makes every drawing look more interesting and its easier to decide the lighting for the character, if you dont want to draw anything detailed you can paint something simple and blur it
i really recommend to start with a thumbnail, experiment with colors, perspective, composition, etc. before actually starting the drawing thumbnails of this post

this tip is something that everyone has heard before but use references, real life references like photographs for perspective and lighting, 3d models for anatomy and perspective, paintings to see how other artists stylize objects, bgs or characters. use references for everything
this tip is super important for me: check the values of your drawing, (lower the saturation, with the lineart hidden) if it isnt readable/ doesnt look good in black and white it most likely wont look good with colors (this depends on artstyle and personal preference tho)
310 notes
·
View notes
Text
How to convert Sims 4 3D CAS Rooms to Sims 3

Disclaimer: If you’re not familiar with Blender/TSRW/UVs then this tutorial may not be for you. If you don’t have Sims 4 Studio which needs the Sims 4 base game (or don’t know how to extract the meshes without it) this tutorial may not be for you. Honestly it’s pretty straight forward, but there’s a lot of trial and error and going in game and out of game checking placement, etc. I use Blender 4.1 for this, but you should still be able to do the same things in the older versions. I'm trying to make this as easy as possible. I’m here to answer any questions though 💕 Tutorial below
Things you’ll need:
Blender (whatever version you prefer)
Sims 4 Studio
TSRW ( I use version 2.0.86)
My Christmas CAS Room here
My TSRW work file here
Tutorial:
Find a Sims 4 CAS room that you like and open it up in Sims4Studio. This is the one I'll be using for the tutorial.

In the Texture tab, export the textures. The only textures that matter are the first 3 diffuse. Go to the Meshes tab and export the mesh, it will save as a .blend file. After that you can close out of Sims4Studio.


Open my Christmas CAS Room in TSRW. You'll get this message. Hit ignore and don't send. We only need this file as a reference to resize the SIms 4 CAS room. Export the mesh as an obj, name it whatever you like. You can close TSRW for now.

Open Blender and open the .blend file you exported from Sims4Studio. Make sure to delete studio_mesh_0 as it's just the shadow map and we don't need that. This is what mine looks like after fixing the textures.

Then import the wavefront obj you just exported from TSRW. Again we're just using this as a size reference.
This is what it looks like after I added the obj. I scaled, moved, and rotated the room to match up as close as I could with my reference mesh. When you have it lined up to your liking you can delete the reference mesh. I usually import the sims 3 body to see where my sim would be in CAS as well so feel free to do that too.

Now we have to separate the objects that use transparency in the scene to their own group. The transparent objects will always be located on studio_mesh_1. I usually do this in UV mode. Make sure UV Sync Selection is on. Where the red arrow is, that's the UV Selection button. It's blue so that means its on.

Tip: If you're using the same Blender version I am (I'm not sure if the older versions below Blender 3.0 do this) you can disconnect the alpha in shader editor and then you can easily see what uses transparency because it has a black background like the plants. Don't worry about the one outside the window as that's on the backdrop image and doesn't show in CAS.
Important: Also, make sure you delete the back of the mirror frame or it will show through the mirror in game. I usually select it in the UV editor as well and delete it.

After selecting all the objects that use transparency, I go to the 3D viewport window and press P, then selection. Now they're on their own layer as you can see. That's a very important step so please don't miss it.

Sims 4 CAS Rooms don't have a closed room like ts3 and if you don't add walls/ceiling with planes you'll be able to see that it in CAS. You can do this in any way you're comfortable with. If you don't understand how to do it feel free to ask me. For this tutorial I will not be doing this perfectly lol I've done enough rooms and I'm just trying to teach here 😩

Okay now last is renaming groups to import into TSRW. Make sure it's in this exact order and uses the exact group numbers.
Group 0 - Mirror
Group 1 - Windows/Curtains
Group 2 - View outside the window
Group 3 - Walls
Group 4 - Objects with transparency
Depending on the CAS Room you convert, yours may not have a mirror you know. You can delete groups in TSRW, experiment, feel free to ask me questions as well.
After renaming the groups, select only the groups you renamed and export as an obj. Make sure that object groups is checked so that they can stay in groups.

Open TSRW and open the testroom_cas.wrk file.
After opening the file you'll see this exact room in this tutorial lol because I had to test some things first 😅

Import the CAS room you converted from ts4. You'll get these two messages. Click yes on the first and no on the second.
Disclaimer: Make sure you reduce polygon sizes or it won't import and give you an error


Import your textures (yours may be different than mine depends on the converter) but most have been the same that I've seen. Group 0 is the mirror it doesn't require a texture. Group 1 and Group 4 usually have the same texture.
Disclaimer: TSRW an be finnicky with textures sizes, I havent gotten any issues since using the 4GB patch, but just in case. Texture sizes from ts4 can run pretty big 4096x2048 even 8196x4096. I would resize to no bigger than 2048x1024 in my opinion, but whatever works for you.
After export to sims3pack or export as package file. Make sure you compress your files and you should be good to test your CAS room in game.

This is the finished product. Should look something like this or better lol considering this was quick 😅
If you would like to make your own from the original ts3 cas room, I would suggest watching this Youtube video (it's for TS4 but it still applies and is helpful) and the link to the original ts3 cas room is here. Since we can convert ts4 to ours you could probably just build your own and go from there as well.
Thanks to @mookymilksims for testing things for me and converting her own. If you would like to try this tutorial out and experiment with room placements using @boringbones Ultra wide CAS mod which changes the field of view in cas so that you can see the whole cas room, it is here. I didn't use it for mine, but that's only because I found out about it after from Mooky lol and I'm tired of converting them 😅 but feel free to ask me any questions if you need help 😊
#ts3#tutorial#sims3#I hope this helped#been procrastinating finishing this 🙃#cas room tutorial#sorry if it's long#tried to be thorough and make sure everything was correct#my tutorials
170 notes
·
View notes
Text
Primarchs Playing Minecraft (with you)
This is so stupid but the brain worms demanded it. Almost did primarchs playing stardew valley but figured minecraft had a better variety to play with.
Taglist: @druidwolf21 , @incrediblethirst , @bookandyarndragonwritesdark
Lion El’Jonson - I
Doesn’t get the point at all but will play with you if you wear him down enough. Refuses to do anything frivolous, you’ll have a basic hut for a house - but you’ll have the basics down very well. Farm? Check. Ore? Check. Armour? Check. He treats the game as something to beat rather than enjoy playing, will refuse to play any further after beating the enderdragon. Which will be done as soon as he is adequately prepared.
Fulgrim - III
He dislikes playing survival with you unless it’s to show off his combat skills for you, mostly enjoys creative mode where he has ultimate control. Pixel art has been perfected to a science, using layers and command blocks to create things you never thought possible. Also creates towns and cities with you in a theme, and will even spend an unreasonable amount of time recreating his ship. Please compliment his builds, point out little details and agree with how life like everything looks - he needs it.
Perturabo - IV
Actually enjoys the game but refuses to admit it. He gets to focus on architecture and relax somewhat, there’s no real pressure, no expectations. The music is actually somewhat calming to him too so you might actually get to have some fun bonding time with him. You could convince him to play semi-regularly if you praise his building work, but he will throw a hissy fit and not play for ages if he dies at all.
Jaghatai Khan - V
He isn’t massively convinced to sit still in front of a screen until you tell him there’s horse taming in game. He’s logged in before you can blink and running around looking for a plains biome. Spends all his time breeding horses to get the fastest and highest jumps, and his sidequests include getting a hold of saddles, name tags, horse armour and building stables. He ends up liking the game in general and will actually play with you too… once he has his horsey.
Leman Russ - VI
He has very little patience for the finer mechanics, but like Khan you can lure him in with the wolf taming. Ends up with a small army of dogs that he dyes the collars his legion colours and uses them to kill witches. Would have stopped playing but a skeleton killed him and now he’s going to get vengeance. Ended up getting slightly addicted to pve and pvp - watch out, you aren’t safe.
Rogal Dorn - VII
His favourite thing is to fortify villages against pillager raids, making iron golem farms, snow golem turrets, the works. Somehow knows random obscure knowledge that helps you both out. He ends up getting way, way too into it, please nobody tell him about mods. You die once and he insists you stay in the base until he has a full set of enchanted netherite armour and tools for you, and even then he gets antsy if you do anything remotely dangerous like mining.
Konrad Curze - VIII
He’s very unsure what he’s supposed to be doing, ends up mostly just following you and you have to give him food and tools for him to survive. That’s until a villager gets in his way and he ends up accidentally agro-ing the iron golem, then it's war. Tries to fight it with his bare hands and fails, makes you hand over all your gear and then dies repeatedly before finally killing it. He makes a new one for the village afterwards - and when you ask why he did all that he just says “it should have known.” Predictably likes the bats.
Sanguinius - IX
Very supportive, just happy to be playing with you to be honest. We’re building a base? Great, what materials should I collect? Oh, you want to kill the enderdragon? Sure, what do we need to do? He’s very happy to sit and let you explain, and picks everything up quickly. You come back from a day in the mines and he’s gone collecting flowers for you to decorate with. Puts his minecraft bed next to yours kinda guy, you end up with a cute house filled with dogs, cats and parrots.
Ferrus Manus - X
Redstone? Redstone. Spends a day reading the code and then starts building the most elaborate farms you’ve ever seen. Iron Golems everywhere both want to be him and want him dead. Iron within, Iron without. You go to sleep and the next morning your little starter cottage has been transformed into a fortress that could withstand tb2t. He doesn’t care for your opinions on this at all.
Angron - XII
Getting this man to play minecraft is a miracle that would get you made into a saint if you weren’t already just for dealing with this man on a day to day basis. All he does is fight, doesn’t matter to him if he dies or what mob his opponent is, friendly, passive or aggressive. Actually doesn’t try to fight you, and gives you vague grunts of happiness if you give him food, armour or weapons.
Roboute Guilliman - XIII
You’d expect him to be the min-maxer, literally spreadsheeting out every resource, organising chests and planning out the whole server but surprisingly he’s the exact opposite. Taking any time away from his utterly hectic real-life schedule to play a game like minecraft with you is going to be a relaxing experience for him. Chill music, mostly just vibing in the overworld, barely mines at all. Surprisingly likes parkour since it's engaging but pretty mindless overall. Just enjoys talking to you while playing to be honest.
Mortarion - XIV
Likes exploring all the different biomes and seeing all the different mobs, especially the different bunnies and axolotls that spawn in different colours. He seems so happy just relaxing and exploring meaninglessly for once. Ends up roping you into helping him make a zoo, have fun transporting all those mobs across the world in boats and minecarts. You feel too bad not to help though, and you both end up having a fun time together.
Magnus the Red - XV
Unexpectedly a fishing enthusiast, likes the chance for rare and random loot, especially enchanted books. Also enjoys trying to find all the potion effects, refuses to look up recipes so he spends hours trying every ingredient in the game. He gets wayyyy too into the lore too. What’s up with the villagers? The ruined portals? He pesters you with questions you can’t answer and he goes a little insane trying to figure it all out. All in all at least he’s happy to explore every aspect of the game with you.
Horus Lupercal - XVI
Secretly thinks the game is a bit stupid, but he’s whipped for you and likes seeing you happy so he sucks it up and just helps you with whatever you’re doing. Give him armour and weapons first and he’ll be happy enough playing protector. In fact, give him a challenge and don’t wear armour so he has to actually work to be your protector and he won’t dislike it so much. Tries to use the game as a way to prove he can provide for you.
Lorgar Aurelian - XVII
Struggles a lot to get used to the controls, he ends up moving around very strangely because of it. Has a good time in spite of it, and thanks you profusely over and over again when you save him because he’s struggling. Ends up building a little temple once he gets the hang of it, is very happy with himself. He considers using the server to hold sermons since it removes the issue of in person meetings for his legion but ultimately decides against it.
Vulkan - XVIII
Very excited to spend time doing something you enjoy, and he loves going into the caves the most. Mining for ore, battling mobs, smelting and crafting - that’s his home turf! Thinks it's a great bonding game for everyone, will invite his sons to play with you too, and you end up with a full and friendly server where everyone helps each other out. Likes the nether a lot too, especially since the server gets so big that a nether highway needs to be built and it provides new, fiery challenges for him.
Corvus Corax - XIX
Get this man an elytra right NOW! Seriously though, he’s the biggest movement enjoyer, happiest with an elytra and plenty of rockets. Build him a little elytra course in the air and he’ll be a happy little crow. Comes back from his elytra adventures with parrots and little gifts for you that he finds in jungle temples and other structures. Thank him for them and he’ll bring back even more treasures for you.
Alpharius/Omegon - XX
Logs on to the server and you never see them again. Occasionally, the most obscure achievements will pop up in chat and you’ll double take at what they’re doing. You think you see one of them when you’re raiding a village for loot, but when you get closer no one is there… Sometimes random items that aren’t yours show up in your chests, but more often does your stuff go missing. Especially enderpearls.
Bonus: The Emperor
The OG gamer, he’s fossil aged and played before. MLG bucket clutches, ladder clutches, pvp god, has a seemingly endless supply of golden apples from somewhere. Wears golden armour because it looks cooler and he’s so good he doesn’t need anything better. Orders the custodes to log on and farm materials for him to use, though he lets you choose the build even if he designs it. Micro or mega-build, doesn’t matter what you settle on you end up with a masterpiece. (He dies once to a baby zombie, then nukes the chunk and mind-wipes the memory from everyone logged on)
#warhammer x reader#warhammer 40k#primarch x reader#lion el'jonson x reader#fulgrim x reader#perturabo x reader#jaghatai khan x reader#leman russ x reader#rogal dorn x reader#konrad curze x reader#sanguinius x reader#ferrus manus x reader#angron x reader#roboute guilliman x reader#mortarion x reader#magnus the red x reader#horus lupercal x reader#lorgar aurelian x reader#vulkan x reader#corvus corax x reader#alpharius x reader#omegon x reader#emperor of mankind x reader
90 notes
·
View notes
Note
Got any tips in shading stuff in black and white digitally?
Hi Anon!
You're in luck! I'm currently wrapping up a book which is shaded digitally, so I've been thinking a lot about this recently.
How I do this is by no means the only way, so take from these tips as much or little as you want! When I add grays and shadows to a line art drawing, I try to think about these things:
Preparing the image
I like to work with a file that has a white background and a layer with only line art on top of it. Between these two layers I add new layers where I use the pen tool and bucket to fill areas with black, then I lower the opacity for that layer to get a value that I want.


This method works well for me, and for simpler pieces I don't need more than 3 layers with different values - light, medium and dark grays.
I work in Clip Studio. Here's a picture of the layers of a recent drawing. Each layer is actually completely black but you can see the opacity percentages by each layer. Lower percentage -> brighter value. This makes it super duper easy to change the value of a layer, no need to repaint it, just change the opacity!

Value composition
For the best result, do a couple of value sketches with a limited set of values and find something that works well for the image. Getting the values right is what will improve the image the most! Here's a quick tutorial on muddycolors. Muddy Colors is a very nice art blog to check out. Looking at grayscale storyboard drawings or value sketches are great ways to pick up on this too.
I try to group values when working with grays. Take this image for example:

The character in the foreground has mainly dark grays, which separates her from the background, which has mostly light grays. Then the windows are white and the roof black.
Value composition is a huge and complex area and I recommend anyone wanting to learn to be more conscious about their values and to do value sketches. Analysing art you think has good values is great too.
Shadows
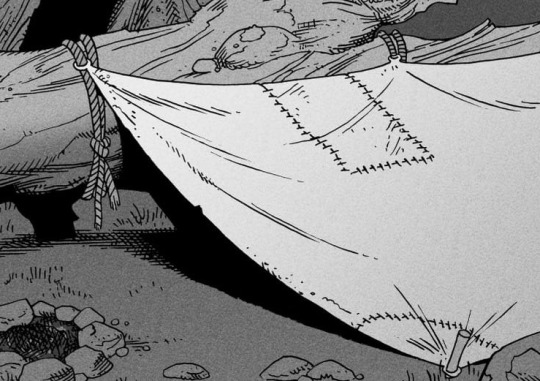
Not every piece needs shadows, but they can add a lot to an image! I use three kinds of shadows when I work in grayscale.
Inked shadows - these shadows are added during the inking stage and usually show areas where light would have almost no way of getting there, such as under this tent.
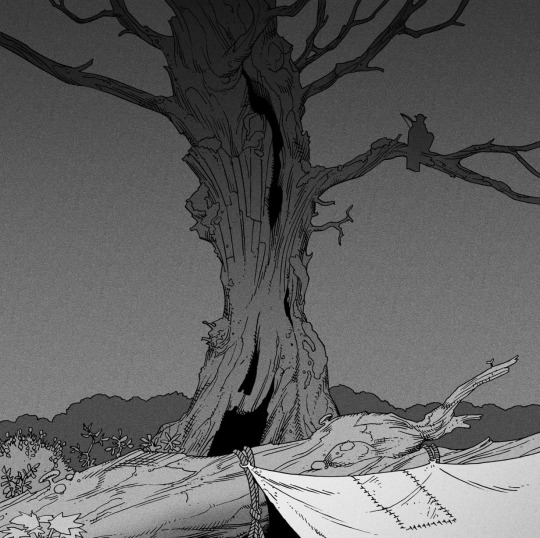
Gradient shadows - these shadows usually represent something getting further and further away from a light source or an area that would bounce light. This tree receives a tiny bit of light from a campfire on the ground and moonlight that bounces on the ground and up, fading as we get higher up in the tree. But mainly I add these gradients in ways that look cool and will help the overall composition.
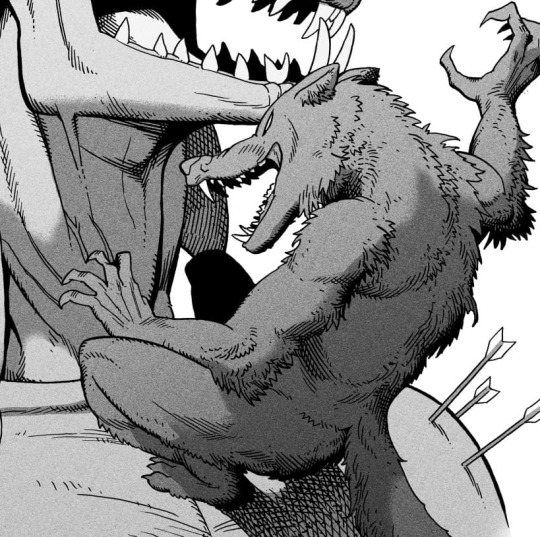
Hard shadows - these shadows appear when a strong light casts shadows and can be used on a shape or to cover something. Here's a werewolf with shadows on its back, which gives it a better sense of mass and is interesting visually!
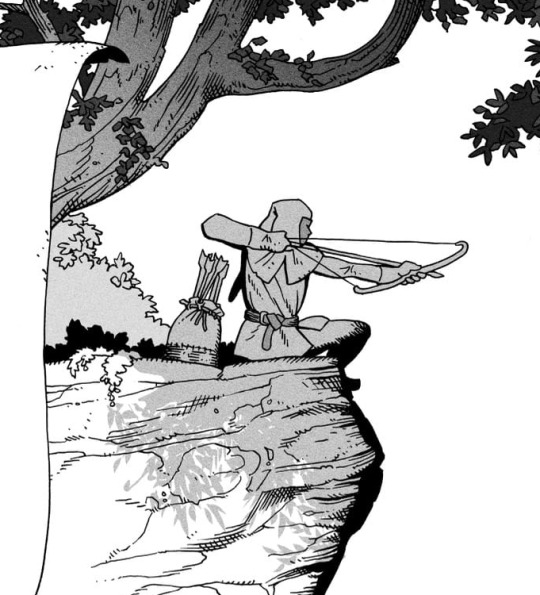
You can also cover an area in shadow like this, where the tree casts a shadow down on the archer and the cliff.
Texture
I like to add a layer of noise as a finishing touch. In Clip Studio you can create a noise layer with Filter->Render->Perlin noise... Find a balance of scale and amplitude that works for the image, then change the layer mode to "Vivid Light" and lower the opacity of the layer to around 30%. I like how this looks, it's not super visible usually but helps make the drawing feel less artificial and digital.

I hope that helps! Here are some nice links too:
Muddy Colors
Android Arts
Gurney Journey - Read his books!
Happy drawing!
350 notes
·
View notes
Note
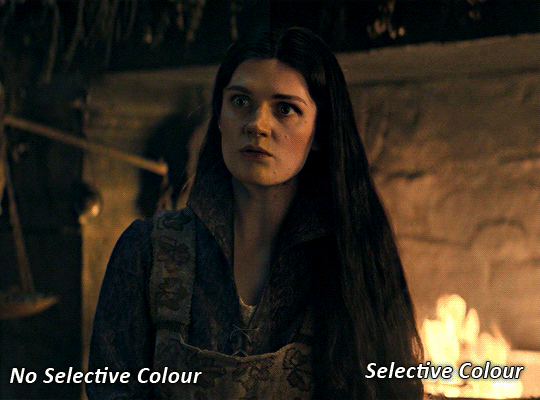
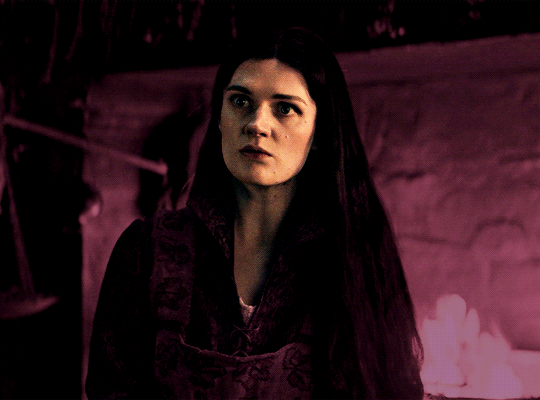
hi i'm sorry to bother you but do you have any tips on giffing dark indoor scenes? yours always look so good!
hi there! not a bother at all :) i can definitely try to explain the steps i usually take under the cut!
this tutorial will assume that you already know the basic steps of gif-making — if you don't, there are lots of great tutorials floating around on this site that can help you out! :)
here's the gif i'll work with to explain my steps, the bottom being the original and the top being the coloured/brightened version.

before we start, a general tip i recommend keeping in mind: if you want to brighten a dark scene, you'll want to get your hands on the highest quality download you can find. 1080p is decent, but if your laptop can handle 2160p 4k hdr files* without sounding like it's about to explode, that'll get you even better results!
(*colouring hdr 4k files requires a different set of steps — the scene will appear washed-out on photoshop, so you need to make sure that you don't end up whitewashing anyone if you do choose to work with this type of file.)
since most of my downloads are 1080p, i'll use this type of file in this tutorial.
the first step of my gifmaking process with 1080p files is almost always the same no matter what scene i'm giffing. i make a brightness/contrast layer and set the blending mode to screen:

now my gif looks like this:

depending on the scene and how washed out it looks after this layer, i'll play around with the opacity. for this gif, i didn't touch the opacity at all. use your best judgement for this, because every scene is different!
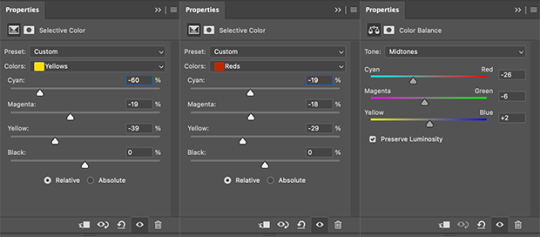
i find that dark indoor scenes are usually tinted in yellow or green. one of my first goals is to try to fix the undertone of this scene before focusing on brightening it any further. i go to colour balance for this, and play around with the midtones, shadows, and highlights.
again, every scene is different, so the amount to which you use colour balance will differ, but for this specific scene, my goal was to neutralize the yellow. i focused particularly on the midtones and shadows of the colour balance layer, moving the scales to the opposite of the reds.


doing so will help with neutralizing the yellow. the only reason i moved the scales towards magenta and blue (therefore making it a bit more red than less) rather than green and yellow in shadows was because i wanted a darker contrast in the blacks. moving them to green and yellow made the overall scene more yellow since there were so many dark spots that shadows affected. (you'll see what i mean when you start experimenting with your own gif — this part of the process really just depends on your preferences!)
our gif might not look that much better yet, but it will soon! our best friend channel mixer is gonna help us out. for an in-depth post about how to use this adjustment layer, i recommend checking out this tutorial.
i'm someone who prefers to make more than one layer for the same adjustment layer for a reason i can't even explain (i just find that it helps me stay more organized). so don't think of this process like i can only use this layer once so i MUST fix it NOW. you can create multiple layers of the same adjustment layer, because every layer on top will affect the ones underneath it.
since my priority is getting rid of the yellow tint, i went to the Blue section of the channel mixer and increased it in all of the scales:

this step alone has helped us out so much, because look at our gif now!

not only does the background look less yellow, but so does izzy's skintone.
now i'm going to focus on trying to brighten the scene even more without destroying the quality. the levels layer can actually help out a lot with this.

the amount to which i move each toggle differs per scene, and i think experimenting depending on your gif works best for this layer.
side note: i prefer not to use the ink droppers on the side because the contrast in the result usually ends up feeling too strong for my preferences, but if you find that this works better for you, then go for it! basically, the first dropper with the black ink should be clicked before you select the darkest part of the scene that you can find, and vice versa for the third dropper with the white ink — click it, and then select the brightest part of your scene.
curves is the next layer that does fantastic work! unlike the levels layer, i do actually use the ink droppers for this. it's the same concept, with the first dropper being used on the darkest part of the scene, and the third dropper on the brightest.
try to think of curves as something that not only further brightens your scene, but also helps with the colour neutralizing process.
i grab the first dropper, then click the darkest parts of the gif that i can see. depending on the undertone of the blacks that you're clicking on, the tint of your gif might actually change significantly. this is why i prefer to click once, then undo the action if i don't like what it gives me. izzy's leather jacket was the sweet spot for this gif.
when i'm satisfied, i make another curves layer and use the third dropper to click the bright/white parts of the scene. for this gif in particular, the lights in the background were a good fit because they carried a yellow undertone — this meant that my curves layer actually helped to further neutralize the yellows in the scene as a whole!


(i manually dragged the curves graph upwards for the third dropper to make it brighter. i don't need to do this if the dropper does this for me automatically, but since the lights were pretty bright, it only changed the tone of the scene and didn't increase the brightness — hence the manual step.)
pat yourself on the back, because this is what our gif looks like now!

this is good, but it's not great — there's still just a bit too much yellow in the scene for my liking (sorry, i'm picky! :P)
i created another channel mixer layer and played with the toggles until i was satisfied:


ta-da! the gif as a whole is much less red/yellow now:

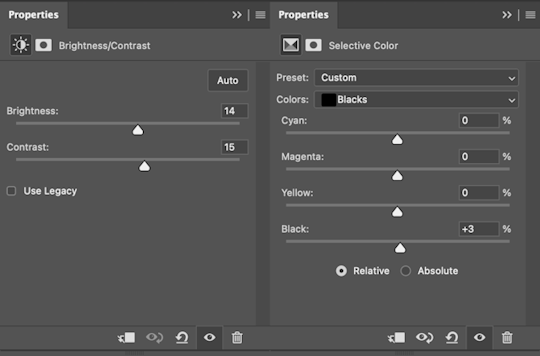
this is when i start fixing the colouring now — namely, his skin tone. selective colour will be your best friend here. i wanted to make his face just a tad brighter and less of a yellow-ish magenta shade, so i focused on the reds and yellows.


then, out of habit, i created another selective colour layer and took out more of the "yellow" in the whites to make them whiter, and increased the black (just by +1, since the contrast is pretty good enough already).


note: i switched to "absolute" for these two colours. basically, relative = less vibrant colour manipulation, and absolute = more vibrant/stronger colour manipulation. i prefer to stick to "relative" for fixing skin-tone since "absolute" can be a bit too strong for that.
our gif looks like this now!

his face looks brighter and much less yellow, so i'm satisfied!
this next step is not mandatory at all — again, i'm just picky and despise yellow-tinted scenes. i personally believe that indoor scenes that are yellow/green tinted make them look more dark than they actually are, so i do my best to get rid of these colours.
i also don't always do this, but for this gif, i just simply went to hue/saturation, selected the yellows from the drop-down menu and decreased its saturation.

be careful not to do this too much. depending on the quality of your download, this can significantly decrease your gif quality. i tend to worry less about this when i'm working with 2160p files, but again, those files require an entirely different set of steps when it comes to brightening/colouring.
since this was a 1080p file download (and one that was actually less than 1GB, oops, don't do that), i played it safe and decreased it by -39 only.
note: you also want to be cautious of colour-washing skintone when it comes to this step. i find that another selective colour layer can help perfect the skintone in case the yellow drains out of it too much, but skip the hue/saturation step if it's too difficult to work with — better to be safe than sorry.
anyway, this is the final gif!

that's usually what i do when it comes to colouring dark indoor scenes! i hope this tutorial makes sense, and if you have any further questions, don't hesitate to reach out! :)
#tutorial#gif tutorial#resources#completeresources#coloring tutorial#allresources#dailyresources#userraffa#userdean#uservivaldi#alielook#usercats#usermoonchild#usernaureen#userbarrow#userabs#useraish#useralison#userisaiah#*mytutorials#i am so sorry if this is incoherent#it’s so hard to explain things coherently 😫
752 notes
·
View notes
Text
i was asked by @matthew-macfadyens for a colouring tutorial, so here we go ! i've been making gifs for almost 4 years now and finally feel comfortable and confident in my skills to make a full tutorial on my colouring process. there are so many different ways people colour gifs, and there's no wrong way, this is just how i do it ! i learned to gif by reading so many tutorials and picking and choosing what works for me, so hopefully this can help someone out !
if this tutorial helps you, please considering supporting me ! buy me coffee ♡

TUTORIAL UNDER THE CUT
what you'll need: - photoshop ( i use ps cc 2023 & frame timeline ) - basic ps knowledge ( how to make gifs, how to sharpen gifs, general understanding of adjustment layers, layer masks and blending modes ) - a whole lot of patience
helpful resources:
the beginner's guide to channel mixer by @aubrey-plaza
giffing 101 by @cillianmurphy
gif making for beginners by @hayaosmiyazaki
colouring yellow-tinted shots by @ajusnice
becca's mega colouring tutorial by @nataliescatorccio
@usergif
PART ONE: BASE COLOURING
- step 1: curves - step 2: exposure - step 3: colour balance - step 4: selective colour - step 5: levels - step 6: brightness / contrast - step 7: gradient map
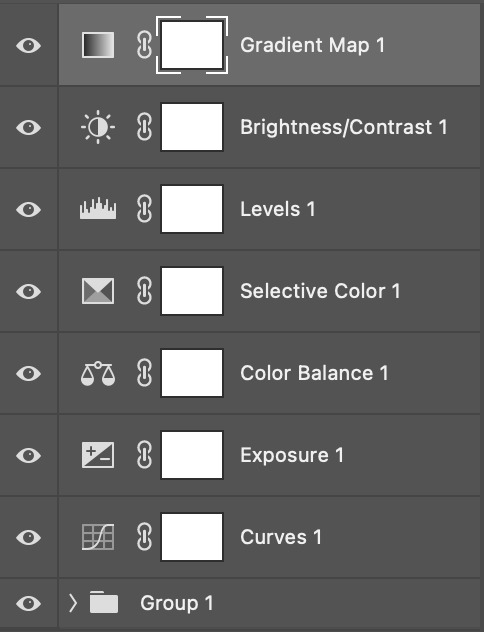
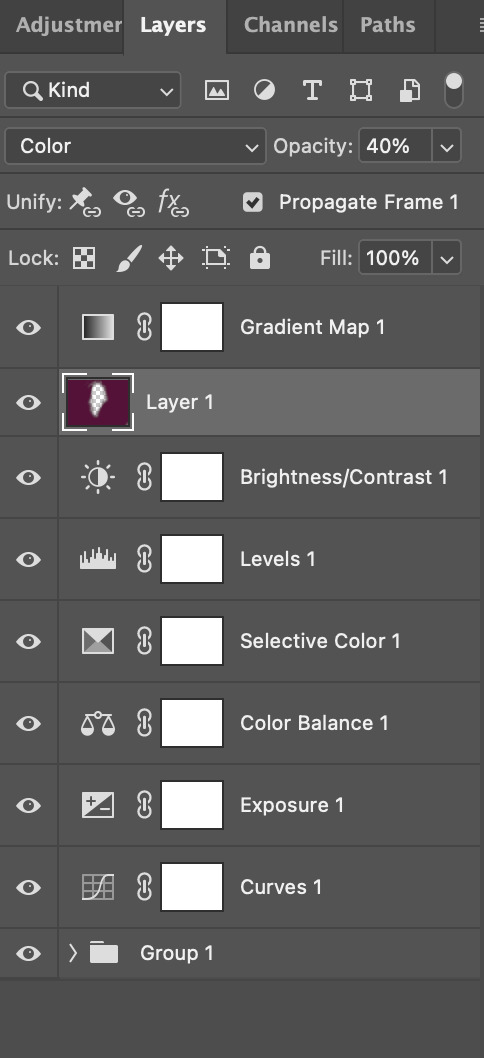
okay so, before we get started, this tutorial is for colouring only. at this point, i've already gotten my screencaps, imported them into photoshop, made the actual gif & sharpened the gif. the above image includes what my typical adjustment layer stack looks like !
STEP ONE: CURVES
a lot of people do the majority of their heavy lifting in curves...i'm not one of those people. i've never gotten the hang of curves and haven't been able to fully taken advantage of everything it can offer. i use curves to mainly brighten up my gif and to start my process.
i use the "auto" button in the curves function - this automatically corrects the curves for your gif ( mainly the brightness / contrast )
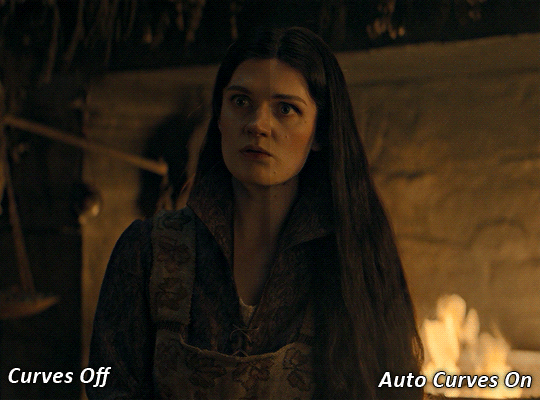
you can see that the auto curves has brightened up the gif and evened out the brightness/contrast. i just find this gives a better starting point for the colouring process.
STEP TWO: EXPOSURE
this step is for, you guessed it, brightening the gif more and evening out the contrast and blacks. i don't have any real rules for doing this, the amount i highten the exposure and contrast is different based on the scene and the show, however, i tend to stay around +1 on both exposure and gamma correction.
exposure effects the brightness of the gif and gamma correction effects the blacks and contrast. this step also effects the saturation of the gif, so it's important not to go too crazy. i often end up coming back to this step every now and again to adjust and fiddle with it.
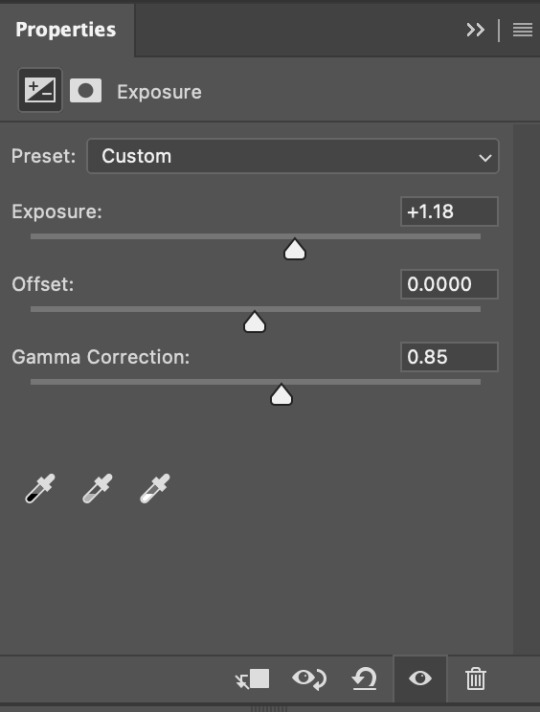
for this gif, i put the exposure at +1.18 and the gamma correction at 0.85
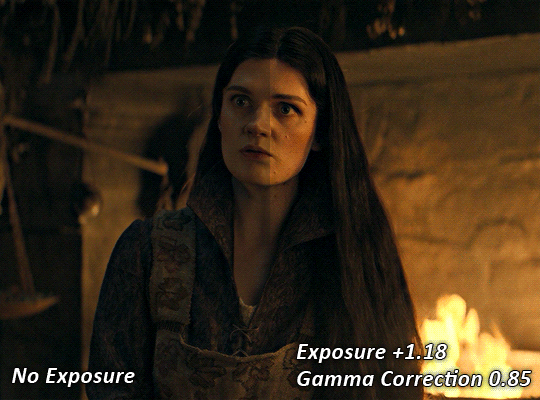
you can see this step serves to add some more brightness and contrast - it also adds some more saturation, that we don't always want, but don't worry, that's what the next steps are for !
STEP THREE: COLOUR BALANCE
i use this step to do a lot of my heavy lifting - i'm a whore for colour balance. this serves to even out the colours and help neutralize the colours for an easier canvas. it's important to understand the basics of colour theory for this, i recommend checking out the channel mixer tutorial i listed above, because a lot of those steps applies to colour balance.
essentially, there's three separate profiles to edit on - highlights, midtones and shadows. in each profile, you have 3 colour sliders. the top one is your cyan to red, middle is magenta to green, and bottom is yellow to blue. the colouring of the scene will decide where to move your sliders.
for example: if your original scene has a cyan tint to it, you'll want to pull your slider to the right, towards the red to help neutralize the cyan. if your scene has a green tint, you'll want to pull it left towards the magenta. as you move the sliders, you'll notice that sometimes it brings out other colours you don't necessarily need, you can adjust the other sliders to help neutralize further.
i always do my main correction in the midtones profile.
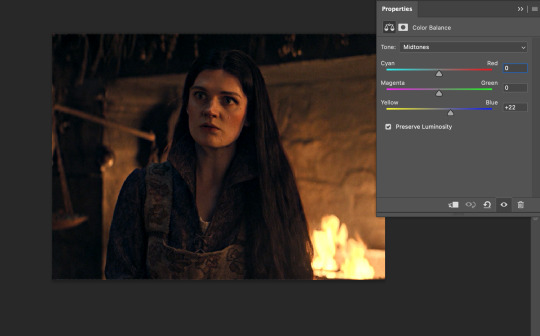
since this scene has a heavy yellow tint, my first step was to adjust the bottom slider. i pulled the slider to the right towards blue at +22. you can see this helped get rid of a lot of the yellow, but adding in the blue warmed up the reds and made it more saturated.
to help with this, i pulled the top slider left towards cyan to help neutralize that red.
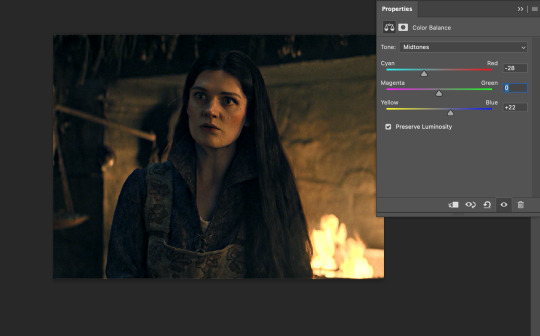
i pulled the top slider to -28 and you can see this cut out that heavy saturation and redness. it's looking a lot better, but now it's a little too green for my liking. this is where that middle slider comes in!
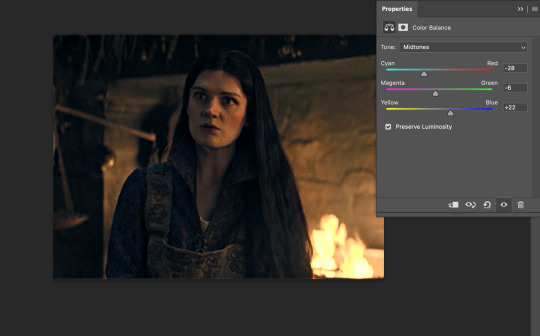
i pulled the middle slider to -6 towards the magenta to help counteract the green that came in. ( i ended up going back in and adjusting the bottom slider to +10 instead, as it was a little to blue )
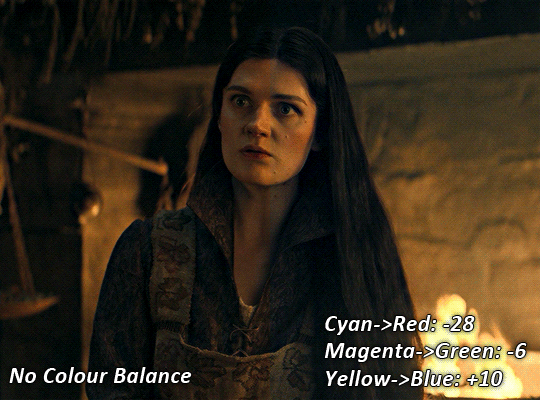
you can see this step really did the heavy lifting, helping to neutralize the canvas so that it's easier to work with...but it's not quite perfect yet!
STEP FOUR: SELECTIVE COLOUR
a lot of the same principles around colour theory apply to selective colour! this is where i go to adjust the colours according to what my colour palette is. for this gif, the overall colour is going to be purple, so i'll adjust the individual colours with that in mind.
i only ever adjust my red, yellow, white and black profiles! sometimes i'll do the other colours, but that's only for tweaking the final colour. i normally don't touch them at all.
ps: you'll notice i prefer a cooler toned gif, and almost always go for a more magenta looking red/yellow.
i always start with my yellows:

in the yellow profile, i pull my cyan towards the left to -38 (this helps eliminate the green in the yellows) and my yellow slider to the left to -27 (this cools down the yellows. i top it off by adjusting my magenta slider to -10, to help lower the saturation of the yellows.
you'll notice this step got rid of most of the green undertones - that's because the green was nested inside the yellows, so by taking out a lot of the cyan and yellow, you're left with a warmer yellow as opposed to a cooler yellow.

next i go on to my reds. this step will mainly effect the alys's skin tone, but i'm going to do pretty much the same as above but with much less dramatic of a change. lowering your colours in your red profile too much can lead to a very saturated gif, which is not what i'm going for.
i pulled my cyan slider to -19, magenta to -9 and yellow to -15. you can see this helped add some more cooler tones to the reds.
the next profiles are your white and black profiles. i use white to brighten the lightest parts of the gif. no rhyme or reason here, i just pull the black slider towards the left...usually around -25. for the black profile, i always move the black slider towards the right. anywhere from +3 to +8, depending on the gif. for this gif, i did +8. this darkens the blacks and, in my opinion, helps the gif pop!
you can see this step got rid of the yellow tint, gave the gif a more neutral look and adjusted the reds to better compliment a purple colour scheme !
STEP FIVE: LEVELS
this adjustment has three toggles - i'm not 100% sure what each toggle really does, i just know that by pulling the leftmost toggle to the right, it darkens your gif, and pulling the rightmost toggle to the left brightens your gif.

this step is so hard to explain, but really i just pull the toggles around until it looks good...sorry !

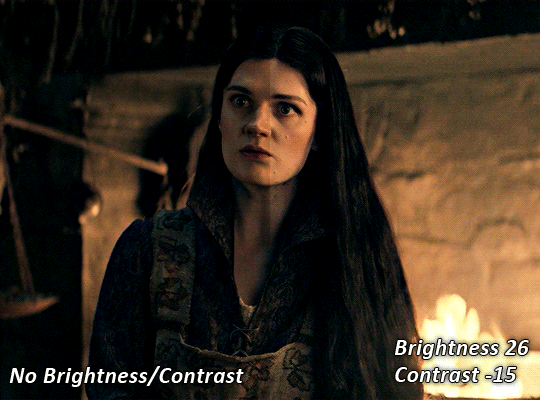
STEP SIX: BRIGHTNESS / CONTRAST
this step is exactly what it says on the tin...it brightens your gif. this step is based on your scene and personal preference, there's no real guide to it.
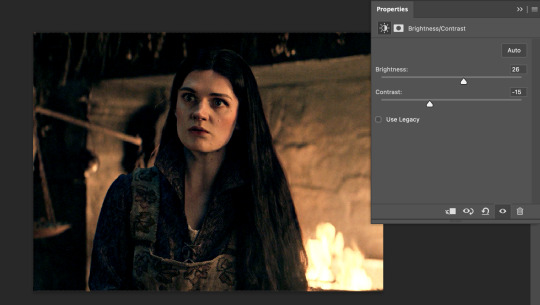
i always pull my brightness slider to the right ( brighter ) and my contrast slider to the left ( less contrast ).
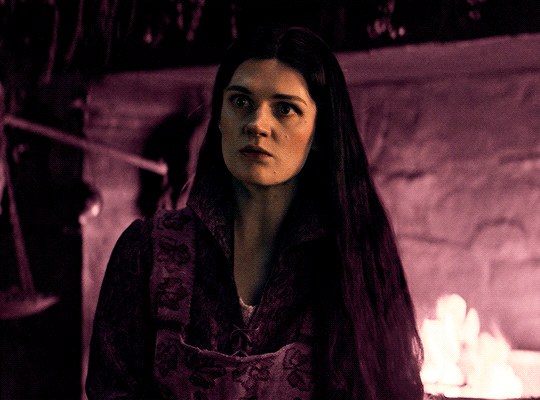
STEP SEVEN: GRADIENT MAP
this last step is something i learned from @nataliescatorccio ! i add a gradient map to the top of my stack, and choose a lighter colour of what i want my overall gif to be. in this case, i used a very light purple!
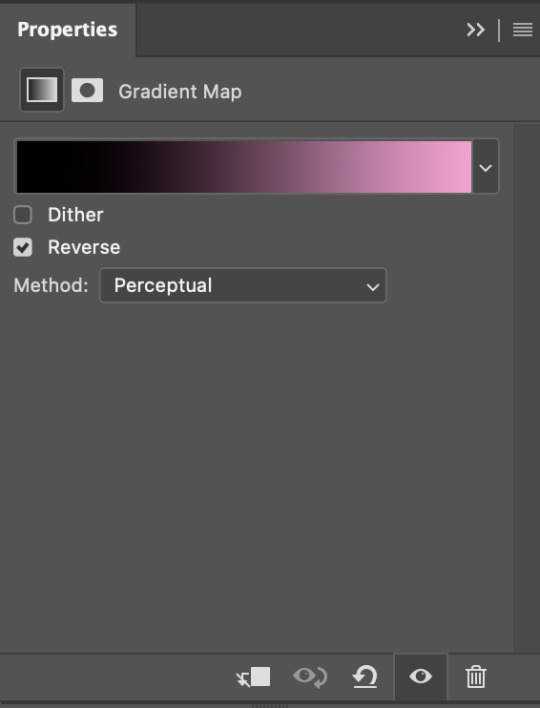
i then set the blending mode to "soft light" and lower the opacity to anywhere from 20-30%. for this gif, i did 30%
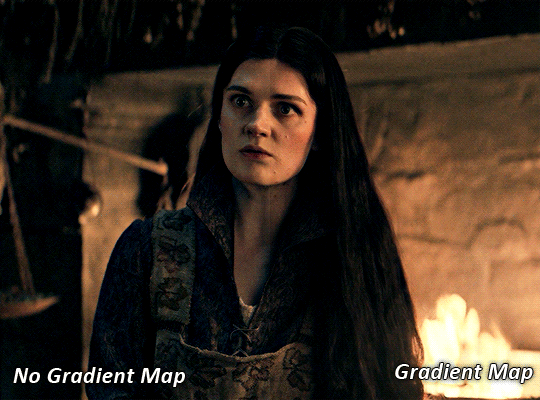
this step will help make your colour pop once you do your main colouring!
PART TWO: PAINTING & COLOURING
- step 1: layer 1 - step 2: layer 2 - step 3: layer 3 - step 4: final touches
okay, so my actual colouring process is based in 3 layers. for this gif, i'm using a deep purple/mauve colour !
STEP ONE: LAYER ONE
between your brightness/contrast and gradient map layers, add another blank layer. change the blending mode of this layer to "colour" and set the opacity to 40%.
then, using a soft round brush with an opacity of 100% ( size of the brush is your preference, i typically use around 108 ), colour the parts of the gif you want coloured !

you can see this helps us get the canvas to a more uniform purple colour!
STEP TWO: LAYER TWO
for layer two we're going to do the exact same thing. add a layer above your previous, set to "colour" at 40%. we're going to go over the same areas!
you can see this helped get the purple so much more vibrant and closer to what our final colour is going to be!
STEP THREE: LAYER THREE
for our final layer, add another layer above the previous 2, set your blending mode to "multiply" and your opacity to anything from 60%-100%. for this gif, i did 60% !
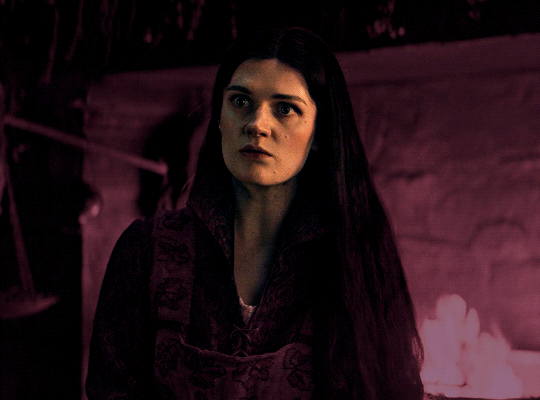
now, our colouring is pretty much done but you can see that, now that our colour is down, alys's face is still a little too blue/green/yellow for the background purple. the next step, we're going to adjust and add final touches!
STEP FOUR: FINAL TOUCHES
at this point, i went back into my selective colour layer and adjusted my yellows & reds and went back into my colour balance layer to adjust everything overall.

at this point, i'm going to go in and add some adjustments layers above everything - i usually add some brightness/contrast, and a selective colour layer to darken the blacks.
which brings us to our final result:
#usergif#dailyresources#pscentral#ps tutorial#tutorial#coloring tutorial#allresources#userbecca#tusermich#userjoelle#ughmerlin#mialook#*tutorial#**
230 notes
·
View notes
Text
Locked in Harmony
Woozi x reader
Release date: March 29, 2025
Masterlist
Taglist: @supi-wupi @reiofsuns2001
@gigglensnort @azkahanif
Summary:
Y/N and Woozi have always had a steady work relationship-professional yet comfortable as they collaborate on SEVENTEEN's new album.
But when they get accidentally locked in the studio late at night, they're forced to confront the tension that lingers beneath their usual dynamic.
As exhaustion sets in and conversation drifts beyond just music, unspoken feelings begin to surface. Trapped with only each other for company, they realize that maybe their connection runs deeper than just work.
Read under cut
︵‿୨♡୧‿︵‿︵‿୨♡୧‿︵‿︵‿୨♡୧‿︵
The dim glow of the studio monitors flickered in the dark room, the low hum of an unfinished track looping endlessly in the background. The clock on the wall read 1:47 AM, and I felt every second of exhaustion settling into my bones. The air was thick with the scent of coffee and the faint notes of the song we had been working on for hours.
Woozi, as usual, looked unaffected by the late hour. His fingers danced over the keyboard with a practiced ease, each keystroke adding layers to the melody that filled the room. To anyone else, he appeared completely immersed in his work, but I knew better. I could see the slight crease in his brow and the way his lips pressed together in concentration.
“You should take a break,” I murmured, rubbing my tired eyes.
“Almost done,” he replied, not bothering to look away from the screen.
I scoffed, leaning back in my chair. “That’s what you said an hour ago.”
He ignored me, his focus unwavering. I knew better than to argue with him when he was in this mode. He was a perfectionist, and nothing less than flawless would do.
Still, I was exhausted.
Sighing, I stood up and stretched, feeling the tension in my muscles. “I need a drink. Want anything?”
“Just water,” he replied, barely glancing in my direction.
I nodded and walked toward the door, reaching for the handle. I twisted it, expecting it to swing open, but to my surprise, it wouldn’t budge.
I frowned. “Uh… Woozi?”
“What?”
“The door won’t open.”
He turned away from his laptop, standing up to test the door himself. He twisted the handle once, then twice, before pushing against it with an irritated sigh.
“Locked,” he muttered.
I crossed my arms. “No kidding.”
He pulled out his phone, only to let out a frustrated sigh. “No signal.”
I checked mine and groaned when I saw “No Service” in the top corner. “Perfect. Just perfect.”
Woozi rubbed his temples, clearly frustrated. “The staff must’ve locked up for the night.”
“Great,” I deadpanned. “We’re stuck.”
“Looks like it,” he said, his tone resigned.
I let out a dramatic groan and slumped onto the couch. “Amazing. Trapped in a room with Lee Jihoon all night. What a dream come true.”
Woozi shot me an unimpressed look. “Try not to sound too thrilled about it.”
As the minutes dragged on, the initial irritation of being locked in began to fade into a strange sense of calm. The studio, with its muted lighting and soft hum of equipment, felt oddly cozy. I could hear the faint sounds of the city outside, but in our little bubble, it felt like time had stopped.
“You’re really just going to keep working?” I asked, raising an eyebrow as he returned to his desk.
“What else am I supposed to do?” he replied, fingers already tapping away at the keys.
“I don’t know, maybe talk to me? Be human?”
He sighed but eventually turned his chair to face me. “Fine. Let’s talk.”
I smirked, feeling the tension ease between us. “Wow. A miracle.”
“Don’t push it,” he warned, but the corners of his lips twitched upward.
I shifted my weight, leaning forward in my seat. “Do you ever get tired of this?”
He tilted his head, his expression thoughtful. “Of what?”
“Of always working. Always striving for perfection.”
Woozi exhaled, his gaze drifting to the floor as he considered my question. “Sometimes. But I love what I do. Even when it’s exhausting.”
I nodded, understanding his passion. “Yeah… I get that.”
We sat in comfortable silence for a while, the weight of exhaustion pressing down on us. I could hear the faint sounds of the city outside, but in our little bubble, it felt like time had stopped.
“You know,” I started slowly, “sometimes I wonder what it would be like if we weren’t just working all the time. Like, if we could just… be. No pressure, no deadlines.”
Woozi looked at me, his expression softening. “What do you mean?”
“I mean, what if we could just hang out, like normal friends?” I suggested. “No music, no expectations. Just… us.”
He considered this, and for a moment, I could see a flicker of something in his eyes—curiosity, perhaps? “I think I’d like that,” he said slowly. “But what would we even do?”
I grinned, the playful side of me coming out. “We could binge-watch terrible reality shows, eat junk food, and make fun of everything.”
Woozi chuckled lightly, the sound warm and genuine. “You’d probably end up making fun of me for every cringe-worthy moment.”
“Of course! It’s my job,” I teased, and he rolled his eyes, a smile still lingering on his lips.
“Okay, but what if we actually did that sometime?” he asked, a hint of seriousness creeping into his tone. “Just hung out, without all the music?”
My heart skipped a beat. “Are you asking me on a friend date?”
“Maybe,” he replied, his expression playful yet sincere.
I felt a warmth spread through me at the thought. “I’d like that.”
The conversation flowed easily between us, and as we talked, I realized just how much I enjoyed this side of him—the one that wasn’t always focused on work, the one that could laugh and share ideas without the pressure of perfection looming over us.
After a while, I noticed my eyelids growing heavy again. It had been hours since I’d had a proper break. I fought to stay awake, but the exhaustion was overwhelming. When I felt myself dozing off again, I instinctively leaned against his shoulder, feeling the warmth radiating from him.
When I stirred awake, my head was still resting against something solid and warm. I blinked, confused for a moment, until I realized it was Woozi’s shoulder. My breath hitched as I registered the intimate position. Worse—he hadn’t moved me.
“You’re awake,” he murmured, his voice low and sleepy.
I swallowed, feeling my cheeks heat up. “Why didn’t you wake me?”
“You looked comfortable,” he replied, a hint of mischief in his tone.
My heart raced as I processed his words. I felt a mix of embarrassment and warmth at the thought that he would let me rest against him like that. It felt oddly intimate, and I couldn’t help but wonder if there was more to this moment than just friendship.
Silence stretched between us, charged with an unspoken tension. I could feel my heart pounding in my chest, the air thick with the weight of our proximity.
“Y/N…” he began, his voice softer than I’d ever heard it.
Before I knew it, the space between us disappeared. His lips brushed against mine—tentative, testing the waters. But when I didn’t pull away, he deepened the kiss, his fingers curling gently around my wrist.
It was a soft kiss, exploratory, as if he was trying to memorize the moment. My heart raced as I melted into the kiss, feeling the warmth radiate from him. It felt electric, a moment that had been building for far too long.
When we finally pulled apart, we were both breathless, our foreheads resting against each other.
“What was that?” I whispered, my voice barely above a breath.
“I don’t know,” he admitted, his eyes searching mine for answers. “But it felt right.”
Before either of us could say anything more, the sound of keys jingling outside the door made us jump apart.
“Why was the door locked?” Seungcheol asked as he stepped into the room, confusion etched across his face.
Woozi cleared his throat, standing up quickly. “Faulty lock.”
I nodded rapidly, trying to regain my composure. “Yeah. Totally faulty.”
Seungcheol narrowed his eyes but didn’t push further. “Well, you’re free now.”
As we stepped out of the studio, Woozi glanced at me, a small, knowing smile playing on his lips.
“Guess we’ll have to get locked in more often,” he murmured, his tone teasing yet sincere.
I rolled my eyes but couldn’t hide my grin. “Yeah, right.”
As we walked out into the cool night air, I felt a shift between us—one that promised more moments like this in the future.
“Hey,” Woozi said, stopping in his tracks and turning to face me. “About earlier…”
I held my breath, anticipation swirling in my chest. “Yeah?”
He took a step closer, his expression serious. “I don’t want that to be a one-time thing. I want to explore this… whatever this is between us.”
My heart fluttered at his words. “Me too. I’ve liked you for a while now, but I didn’t know how to tell you.”
His eyes softened, and the corners of his mouth turned up in a smile. “Then let’s figure it out together.”
I nodded, feeling a sense of relief wash over me. This was the beginning of something new, something exciting.
“Let’s get ice cream first,” I suggested, my playful side returning. “You can’t start a relationship on an empty stomach.”
He chuckled, the sound warm and genuine. “Okay, ice cream it is.”
As we walked side by side, the city lights twinkling around us, I couldn’t help but feel a sense of hope. The night was still young, and so were we. Whatever the future held, I knew we would face it together, one note at a time.
The evening air was crisp and refreshing, and as we strolled down the street, I stole glances at Woozi, who seemed more relaxed than I’d ever seen him. The tension from earlier had dissipated, replaced by an easy camaraderie that felt like a breath of fresh air.
“So, what’s your favorite ice cream flavor?” I asked, trying to keep the conversation light.
Woozi thought for a moment. “I think I’d have to say mint chocolate chip. Classic, but it’s got a good balance of flavors.”
“Interesting choice,” I replied, grinning. “I’m more of a cookies and cream person myself. Can’t resist the crunch.”
He chuckled, and for a moment, it felt like we were just two friends enjoying a night out, free from the pressures of work and the expectations that usually surrounded us.
We arrived at the ice cream shop, the neon sign flickering cheerily against the night sky. The shop was surprisingly empty, the late hour keeping most customers away. We stepped inside, the cool air filled with the sweet scent of sugar and cream.
“Two scoops of mint chocolate chip, please,” Woozi said to the cashier, and I watched as he smiled, his eyes lighting up at the thought of ice cream.
“And I’ll have a scoop of cookies and cream,” I added, feeling a rush of excitement.
We paid and took our cones to a small table by the window, the world outside bustling with life. As we sat down, I couldn’t help but smile at Woozi.
“See? Ice cream is the perfect way to celebrate our newfound… whatever this is,” I said, taking a bite of my ice cream.
He chuckled, his expression softening. “You’re right. I never thought I’d say this, but I’m glad we got locked in the studio.”
“Me too,” I admitted, feeling a warmth spread through me. “Who knew a faulty lock could lead to something so… amazing?”
“Sometimes, the best things come from unexpected situations,” he replied, his gaze steady on mine.
We spent the next hour chatting and laughing, sharing stories about our favorite songs, embarrassing moments from our time in the company, and our hopes for the future. With each passing moment, I felt the walls I had built around my heart begin to crumble, replaced by a sense of trust and connection I had never anticipated.
As we finished our ice cream, Woozi leaned back in his chair, a satisfied smile on his face. “This was really nice,” he said. “I didn’t realize how much I needed this.”
“Me neither,” I replied, feeling a sense of contentment wash over me. “I think we should do this more often.”
His eyes sparkled with mischief. “What, get locked in and then go for ice cream?”
I laughed, shaking my head. “No, I meant hanging out, like this. Just the two of us.”
“Deal,” he said, extending his pinky finger toward me.
I grinned and linked my pinky with his, sealing the promise.
As we left the ice cream shop, the night air felt invigorating, and I couldn’t help but feel a sense of excitement for what lay ahead. We walked side by side, our fingers brushing against each other occasionally, sending little sparks of electricity through me with each contact.
“Do you think we’ll get in trouble for being out so late?” I asked, glancing at him playfully.
“Probably,” he replied with a smirk. “But it’s worth it.”
With Woozi by my side, I felt like anything was possible. The future, once filled with uncertainty, now felt bright and full of promise.
As we walked back to the company building, I felt a sense of belonging, a connection that transcended our roles as colleagues and friends. Whatever this was between us, it was real, and I was ready to embrace it wholeheartedly.
When we finally arrived at the building, the night was still young, and I knew that this was just the beginning of our journey together.
“Let’s do this again soon,” I said, stepping closer to him, my heart racing at the proximity.
“Definitely,” he replied, his gaze steady and sincere.
We stood there for a moment, the air thick with unspoken words and promises. I could feel a smile tugging at my lips, a sense of joy bubbling up inside me.
“Goodnight, Woozi,” I said softly, my heart racing as I prepared to turn away.
“Goodnight, Y/N,” he replied, his voice warm.
As I walked away, I felt lighter than air, a newfound sense of hope and excitement guiding my steps. The night had been unexpected, but it had brought us closer together, and I couldn’t wait to see where this new chapter would take us.
With each step, I replayed the moments we had shared—the laughter, the kiss, and the promise of what was to come. The world outside felt vibrant and alive, and I knew that with Woozi by my side, I was ready to face whatever challenges lay ahead.
And maybe, just maybe, we could create a beautiful harmony together—one note at a time.
︵‿୨♡୧‿︵‿︵‿୨♡୧‿︵‿︵‿୨♡୧‿︵
Note: I don’t know how I feel about this one.
#woozi x reader#seventeen x reader#seventeen#scoups#jeonghan#joshua#wen junhui#hoshi#wonwoo#woozi#minghao#mingyu#lee seokmin#seungkwan#vernon#svt dino
56 notes
·
View notes
Note
Can do resquest Tfa Jettwins with Femme jet cybertronian reader, Which where in the chapter "Where is your sting?", the reader is the conjux of both and on top of that she is waiting for a Sparkling, and let's say after the chapter Bumblebee tries to court her since he thinks she is single but she reveals that she is married
Wings of Devotion.
The sweltering atmosphere of the desert crackled with tension as the Autobots faced off against the Decepticons in their hunt for the elusive Decepticon fugitive, Wasp. Among the chaos, a particular femme stood out, her streamlined jet mode and powerful engines slicing through the air like a blade. She was none other than you, the conjux endura of the famed Jet Twins, Jetfire and Jetstorm.
You had joined the mission to lend aerial support alongside your bonded mechs, though your situation added an extra layer of caution. You were waiting for the arrival of your sparkling, an incredible gift for the growing family you and the twins had built amidst the chaos of war.
As the Autobots regrouped in the shadow of a craggy cliff, Jetfire hovered near you, his optics glowing with concern.
“Moya lyubov, are you sure you should be here?” he asked, his thick accent laced with worry. “You are… how do humans say? Fragile condition.”
Jetstorm zipped in beside his twin, his cheerful tone belying the seriousness in his optics.
“Yes! We do not want anything to happen to you or the sparkling!”
You placed a reassuring servo on both of their shoulders. “I’m fine, really. You know I wouldn’t have come if I didn’t feel up to it. Besides, you two need me. Who else is going to keep you out of trouble?”
The twins exchanged a sheepish glance before Jetfire smirked.
“She has a point, brother.”
Jetstorm nodded solemnly. “Yes. Trouble finds us, but you keep it away. That is why we love you!”
Their playful banter eased your nerves as the mission began in earnest.
The battle with Blackarachnia and her forces was more harrowing than you anticipated. You’d barely managed to evade her webs as she unleashed chaos among the Autobots. Your twins fought valiantly by your side, their combined efforts creating powerful blasts that sent the enemy scattering.
Despite their efforts to shield you, a near miss from Blackarachnia’s venomous stinger grazed your armor. You managed to hold your ground, but Jetfire and Jetstorm were immediately at your side, their protective instincts flaring.
“Are you hurt, lyubov?” Jetfire asked, scanning you for injuries.
“I’m fine,” you assured him, though your spark ached at the thought of how close the danger had been.
Jetstorm glared at the retreating Decepticons. “They will pay for even thinking about hurting you!”
With your combined efforts, the Autobots managed to fend off the Decepticons and secure the area.
Later, back at the base, the Autobots were regrouping and repairing their injuries. Bumblebee, as energetic and bold as ever, approached you with a charming grin.
“Hey, Y/N, I was thinking—” he began, rubbing the back of his helm. “Maybe we could, y’know, hang out sometime? Just the two of us.”
You tilted your helm, confusion flickering across your optics. “Hang out?”
Jetfire, who had just returned from a repair check, narrowed his optics at the yellow scout. “What is this?” he demanded, his tone icy.
Jetstorm wasn’t far behind, crossing his arms over his chassis. “Yes, what is this?”
Bumblebee blinked, clearly not realizing the territory he was stepping into. “Oh, uh, I just thought Y/N might wanna… you know… spend some time with someone not her overprotective brothers.”
You stifled a laugh, realizing Bumblebee’s misunderstanding. “Bee, they’re not my brothers.”
Bumblebee’s optics widened. “Wait, what?”
“They’re my conjux endurae,” you explained with a warm smile, reaching out to take both Jetfire and Jetstorm’s servos in yours. “I’m bonded to both of them.”
The scout’s jaw dropped. “Both?! Like… married married?!”
Jetfire smirked, pulling you closer. “Yes, married married.”
Jetstorm chuckled. “And we are expecting a sparkling, too.”
Bumblebee’s optics flickered in disbelief before he groaned and slapped his forehead. “Oh, Primus, I just tried to hit on a married femme. Ratchet’s never gonna let me live this down.”
You patted Bumblebee’s shoulder in consolation. “It’s okay, Bee. No harm done.”
Later that night, as the base settled into quiet, you and the twins retreated to a private corner to rest. Jetfire wrapped an arm around you, his spark humming in contentment as he rested his helm against yours.
“You were amazing today, moya lyubov,” he murmurer.
Jetstorm leaned in on your other side, his optics soft as he gazed at you. “Yes, but please do not scare us like that again.”
You chuckled softly, feeling the warmth of their sparks surrounding you. “I promise to be more careful. I couldn’t bear to leave either of you… or the sparkling.”
The three of you shared a quiet, intimate moment, your sparks syncing in perfect harmony as you prepared for the challenges to come.
Though the road ahead would be difficult, you knew that with Jetfire and Jetstorm by your side, there was nothing you couldn’t face.
65 notes
·
View notes
Note
Hii first of all, I FUCKIN LOVE YOUR ART! ITS GORGEOUS AND IM SURE EVERYONE CAN UNDERSTAND YOU REALLY GIVE YOUR SOUL INTO THAT🤧 Your color palette looks so good, What do you pay attention to when painting? (Like when do you think its better to use multiply or something like that and etc.)
first off, I'M HAPPY YOU CAN TELL THAT I PUT MY SOUL INTO MY ART!!! im genuinely in love with drawing and am always finding ways to make creating art enjoyable and impress myself with what i can achieve and learn :D
second, thanks for asking your question!! i dont mind answering it, but my response is quite long. here's my thinking process:
(you specified layer modes like multiply, so im gonna gear my answer towards that a bit) 1. REFERENCE SEARCHING IS KING. color is actually extremely hard for me, so i search around for artworks with palettes i'd like to use and study how an artist uses it. some situations i have a clear idea of what i want, but usually the images in my head are extremely vague, so i borrow palettes from various other artworks that fit the vibe of what i want. an example is this one. my main palette reference were from these artworks. im looking at this artist's use of high saturates and how drawings are overlayed on top of each other. while looking at references, im asking myself how is this artist using warm/cools, where are these warm/cools placed, if their illustration used any form of texturing (like halftones, hatching), how do they use their palette to render form/shape/gradient, when/where do they saturate/desaturate their colors. those questions inform my decisions when using colors too.
2. USING LAYER MODES WHEN NECESSARY. i used to be reliant on multiply for everything, which atp i dont do since i can definitely push colors more first before using layer modes. only when i feel like my current colors are lacking do i start tinkering with tone curves and/or brightness/contrast/hue/saturation/luminosity settings. and if that doesn't work, then i start using layer modes. using layer modes do help with achieving certain effects, color corrections, or when i want to fuck around and find out. i think having a better understanding of what these modes can do makes you more decisive on how you can properly utilize them and to achieve a particular look (like using multiply for a cel shaded style). here's an example:
this leads into my next point:
3. BALANCING OUT VALUES. big thing that makes an illustration hard to read is if values blend together which affects the hues and contrast. i check for what elements need to be distinguished from one another and if it can be read clearly. using layer modes can either help with this or not help at all. it's very dependent on the type of layer mode. here's this example where i applied pin light:

back to #2, there are various instances where i'm using layer modes for quick color corrections and/or to help with readability:


other times, i start off having my entire subject in gray and to figure out main shadow/lights (similar to the multiply cel shaded process i linked ealier). im thinking about what this should look like if i only used 2 value tones:


when in doubt though, i check my artwork in grayscale to ensure values aren't overly blended into each other, especially if i didnt start with grayscale like this one:

painting for me takes into consideration a lot of different aspects. im thinking about how colors should interact, where/when to give contrast, checking/balancing out values, etc, but im also making it a time to study off of how other artists use their colors through the references i collected.
hope this answered your question! lmk if there's more :]
#answered art process questions#answered asks#this one took me a couple of hours to form out my thoughts while editing in examples ngl
150 notes
·
View notes
Text
Pulp Covers And How To Paint Them
With the rise of cheap printing in the early twentieth century, mass-marked paperbacks swept the world, each offering lurid thrills for obscenely low prices. Sex, sadism, and incredible violence for as little as ten cents. An easy purchase to slot in between fifty cigarettes a day and enough bourbon slugs to kill a small garden.
Pulp fiction is where some of the greats of American literature cut their teeth, including the big three, Raymond Chandler, Ross MacDonald and Dashiell Hammett. The contents of these stories, both the dizzyingly good and astoundingly terrible, have been absorbed and digested and remixed and regurgitated in nearly every permutation imaginable, fuelling pop culture some one hundred years on. This isn't an essay on that. Nobody likes to open a tutorial and be greeted with a wall of text. The history is for another time.
But it is about how to paint it.
Don't let the pre-amble intimidate you, it's not as hard as it sounds. You will need:
Painting software with some image editing capabilities. You don't need all the bells and whistles of Photoshop, but I wouldn't recommend something like MSPaint, at least not to start with. I'm using Clip Studio Paint.
A really beat-up paper texture. The grungier, the better.
A lightly-textured brush. Here are the specific brushes I use, 99% of which is the well-named rough brush. Try and avoid anything with any impasto elements.
Go to your colour-picking tool and use the 'select from layer' option. Doing all the painting on a single layer is going to make your life easier.
A complete willingness to make mistakes and, instead of erasing, painting over them. It generates much more colour variation and interest! Keep your finger off the E key.
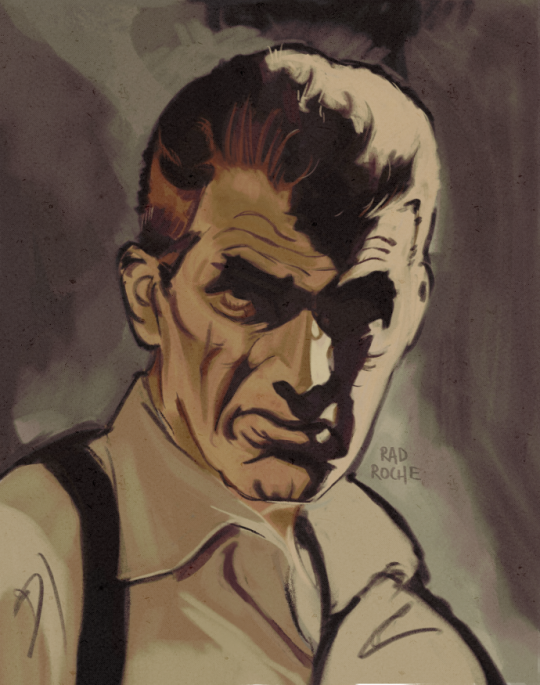
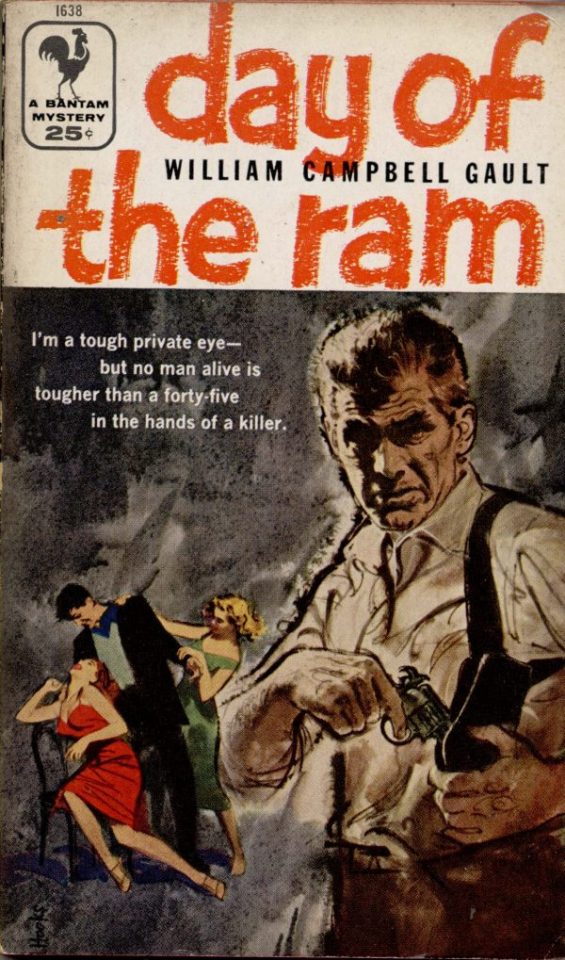
Good reference! That painting is a master copy of Mitchel Hooks' art for Day of the Ram. Find a style you really love and want to learn? Have no clue where to begin? Do direct studies!
Let's not worry about whatever is happening in the background. It's probably fine. Let's get started! Pulp magazine art is a lot more varied than you might first think, so don't agonize over having a style that 'fits' or not. I'm also specifically aiming for something you'd see on the cover after printing, not the initial painting they would use for printing. The stuff I'll show here is a pretty narrow band of it, but here are some general commonalities. This is a painting by Tom Lovell.
Let's dig into this.

The colours are very bright and saturated, but the actual values, the relative lightness and darkness of them, are actually grouped very simply! You can check this by filling a layer full of black, putting it on top and setting its mode to colour. If the value of a painting looks good, you actually get a lot of leeway with colour. But here's what I think is the most important thing to keep in mind.
The darks aren't that dark, and the lights aren't all that light! Covers are paintings reproduced on cheap paper. Anything you wouldn't want to happen in the printing process, you lean into. Value wash-outs, lower contrast, colours getting a weird wash to them, really gritty texturing. So let's get painting! Here's my typical setup.
That bottom folder is the painting itself. The screen layer is the grungy paper texture. To get the effect you want, put it down, invert its colour, then set it to screen. That washes out your painting far, far too much, so to compensate, I put a contrast layer up on top. Fiddle around with the settings, but this is where mine ended up sitting.
Note I'm saying this before even starting the painting: you want to do this as early as possible. This is where the 'select from layer' colour picker comes in handy. You can paint without worrying about the screen or contrast layer. Something not looking right? Enable your value check layer and keep painting. When you turn it off, it'll still be in colour. Here's a timelapse so you can see what that looks like.
And when you check the values...
They're pretty simple! This isn't a be all and end all, but I hope it serves as a decent primer. I want thirty dames on my desk by Monday!
#rochedotpng#art tutorial#art resources#couldn't find a thing online about this style so here's how i do it#pulp#it's how i did the death shroud one more or less
362 notes
·
View notes
Text
Law x Plus Size Nurse Reader 3

Chapter 1 Chapter 2 Chapter 4 Chapter 5 Chapter 6 Chapter 7 Chapter 8
Chapter 3: Not so Heartless
You weren't sure what was more shocking? Seeing Luffy passed out on the operating table or Sabo trying to calm Ace down as they were both bleeding. You knew whatever happened made Ace angry enough to snap and act in big brother mode.
The black-haired man with freckles, giving one of the other nurses a nasty glare as he struggled. "Let me go, Sabo!" He pants, gasping as the adrenaline pumps faster in his veins, body shaking from anger and rage; a thick layer of sweat, blood and soot clung to his skin, his uniform half burnt and torn, bleeding from his wound.
"Ace, c'mon." Sabo pleaded, wrapping his arms tighter while being mindful of Ace's wound. "Let'em do their job." One of his eyes was closed, bleeding from his hair line, down his face and soiling his clothes.
Law narrowed his eyes. "This is ridiculous." The complete disorder and chaos in his operating room and workspace was grinding on his nerves.
You noticed The Surgeon reaching for a needle when you raised a gloved hand and lightly touched his hand, resulting in the man pausing and jolting as his silver eyes widened, shifting from Ace and Sabo to you. "Please, Cap." You whispered softly. "Let me try?"
Law's icy glare softens a tad. He sighed, lowering his hand. "Alright, but one more outburst and I'll intervene myself."
"Of course." You nod, smiling. Giving his hand a simple pat and stepping forward, ignoring Law's eyes following your movement and remaining on high alert should he have to step in.
You knew the doc was being overly cautious about your safety and his staff. It was appreciated, but unnecessary. You knew Ace, knew he had a good heart, a fierce passion and spirit, wild and free as his flame flame fruit.
"Ace." You spoke, drawing the pairs attention to you and freeze.
They furrow their brows, recognition flashing across their faces. Watching as you lower your mask and give a reassuring smile. "It's okay, he's in good hands. Please, calm down."
"Y/n." Ace calls out to you, raising a bloody hand and stretched towards you before falling limp in Sabo's arms.
Sabo chuckles. "Figures you show up and our hothead calms down." He helps one of the male nurses set Ace down on one of the other free operating tables. "Damn, talk about excellent timing." The blonde's shoulders sag, his hands gripping the metal table, it groaned as his fists turned white-knuckled. "I need to lay down." His eye rolls into the back of his head as he passed out from blood loss.
Law sighs, watching the whole exchange. "Friends of yours, huh?"
"Yes." You nodded, brushing Ace's black locks out of his face and placing an oxygen mask over his mouth and turn it on. "It appears that Ace and Luffy are in worst shape compared to Sabo." You muttered, eyes scanning all of them to finish accessing their injuries. Recovering your face and waiting for Law's instructions.
Law went to Ace first and examining the wound. "The edges are already cauterized and closing, but there still internal damage and bleeding. We need to hurry." Without glancing away, Law nodded his head. "Check Sabo's eye and the damage, see if he can keep his eye or if it will need to be removed."
You do as you are told. Cleaning the wound with care as another nurse hooks Luffy to the oxygen machine and gives all three men an ivy drip and a blood transfusion.
"Sabo will live with a giant burn scar." You informed Law as you wrap his face and head in bandages.
The Doctor hums in answer, pointing out the door as a nurse wheels him out.
Hour by hour ticked by Law and you working tirelessly on both Luffy's and Ace's injuries. Compared to the two, Ace's was the most critical. Any closer to the left and the giant whole would have hit his heart.
Once you two were finished, you both took a much-needed breath, cleaning up and proceeded to throw the used and bloody gauze, bandages, rags and tools. You cleaned and disinfected the tools, wiped down the operating table, anything and everything to keep yourself busy.
Law washed his hands, taking off his scrubs and cap. "Come, you deserve a well-earned break." He said, hanging up his used scrubs and replacing them with his lab coat, lowering his mask, taking it and his surgical gloves off and into the trash. "Breakfast is on me remember?"
"Yes, but we are still on the clock, doc." You reminded, tilting your head. "Or is the famous workaholic Doctor Trafalgar Law wanting to play hookie?" You cover your mouth, gasping in fake shock. "How scandalous and naughty?" Eyes scanning him up and down, a smug smirk on your lips. "Who are you? And what have you done with our crabby, grouchy, sour faced boss?"
"Believe it or not, L/n." Law answered, opening the door and leading you towards the trio's shared hospital and recovery room. "I am not completely heartless or made of stone." He glanced behind to meet your gaze. "Or a robot. I'm a healthy, human man."
"No, you are a walking, talking, coffee addict and insomniac, Doctor." You gesture towards the dark circles underneath your eyes. "You don't look like a druggie or raccoon without going without sleeping multiple days a week." You wag your finger at him and tsk. "For shame, Doctor Trafalgar."
There you go again. Teasing him, pushing his buttons, being sassy and playful.
You two stand outside the troublesome trio's shared room. He allows you to go first. Watches as your face and smile brightens, wordlessly thanking him and entering first as soon as you hear your friends talking.
Law pauses.
He didn't understand it. Why was he letting you tease him? No. Scratch that, he knew why. He didn't want to think it. Didn't want to say it. Say what he already knew. Deep down inside both his subconscious and heart, Law knew it. Knew if he named it, this feeling.
He could never go back to looking at you the same way again.
It was already too late.
Trafalgar Law, The Surgeon of Death, Dr Heart Stealer, the man was down bad, lovesick, smitten, a lovestruck fool, and deep in denial.
In the blink of an eye, he watched you go from a hot-headed newbie rookie nurse to a hardworking, fast paced, passionate and still overly stubborn, thickheaded, spitfire of a nurse.
His lips almost curled at the sight. Pride swelling within his chest as you scolded all three reckless men in their hospital beds; nagged them about being dumbasses, whacking them on the head for good measure. Muttering something about "fists of love" which Law found amusing.
"Owie, dammit, Y/n, that hurt!" Luffy whined, holding his aching head, tears prickling the corners of his eyes as he met your fiery gaze of anger.
"I wouldn't have to be mean, if you three bone headed idiots didn't nearly have to get yourselves killed and injured again!" You hissed.
Ace gave you a sheepish smile, laughing in earnest. "I'll be damned. Things never change do they, Y/n?"
You flicker your gaze towards him. "Oh, stop being a kiss ass, Ace. Wouldya?"
Sabo snickered, his smile and mischievous grin just as bright. "She got you two good."
You roll your pretty eyes, hands on your hips. "Would you like another lump on your head to match theirs, Sabo?"
Ace and Luffy snicker, their grins widening as they cackled harder.
"No ma'am." Sabo replied, giving a halfhearted salute.
He felt his lips twitch, fighting off the urge to grin.
You pout, ignoring them and kept talking.
He listens. He didn't want to talk. He'd much rather listen to your voice.
He could listen to you talk for hours about anything and everything. Drown out the silent whispers, the unwanted memories, reopened heartache and pain of his past. Maybe, someday he'd tell you. But not today. He didn't want you to look at him with pity.
Pity that he had once been a sickly, frail, twisted and all kinds of fucked up, reckless kid with a vengeance and spiteful grudge against the world that had taken everything from him. Not once, but twice.
Law swallowed thickly, pressing his body further into the threshold of the doorway. Burying his thoughts into the deepest parts of his mind.
Then six pairs of eyes meet his. Each twinkling with curiosity.
Law straightened his posture; he wasn't backing down. Not in his hospital. His stomping ground and territory.
The three huddled together, whispering not so quietly and on purpose.
"Do you guys know who he is?" Ace mutters.
"Not a clue." Sabo shrugs.
"Nope." Luffy shakes his head.
"He's clearly a no-nonsense doctor from what I can tell." Sabo points out, peaking at the stoic doctor.
"Do you think he's the reason Y/n hasn't returned home yet?" Ace whispers.
"It's possible." Sabo agreed.
Luffy shifts his gaze to Law, crossing his arms.
"Now that I think about it. Doesn't he look familiar to you?" Ace stares harder at the doctor. This nagging feeling of familiarity comes back to him. Observing his stance, his face, his eyes and that complete resting bitch face with a hint of a scowl.
"No. Why?" Luffy tilted his head. Nothing ringing any bells.
"Yeah, you know." Ace makes direct eye contact with Law again, the memory coming back to him, a smug smirk forming on his lips. "The guy with the creepy, scowl and deep frown lines hanging on the wall of-"
Law raised a brow.
"Oh my god! Shut up!" You yell, rushing over and covering Ace's mouth with your hands, a huge scarlet line spread across your heated cheeks. "Stop trying to embarrass me in front of my boss!"
The three gave each other a shared look.
Law's urge to smile faded. Yes, he had to remain professional. He was your boss, and you are his employee, one of his staff. No matter, how much he secretly wanted more. Wishing he had that level of connection with you to joke openly and play around, goof off, but he didn't have that luxury. Not while you two were working.
Swallowing the burning hot coals of envy and jealousy twisted knots in his gut, trying to keep his face neutral and impassive despite the tick in his jaw, arms crossing tighter around his chest.
"L/n." Law finally spoke, keeping his voice level and calm. "It's time to let them rest and recover." A hint of authority slipping.
You meet his gaze, blushing harder.
Ace raised a brow, amusement and mischief sparkling behind his charcoal orbs. "So that's how it is, hmmm?" His voice was muffled, chuckling low and playful, opening his mouth and licking your hand.
Your eyes widened, yanking your hands from his mouth and crinkling your nose. "Eewww, yuck, Ace!" You exclaimed, wiped your hand on the front of your uniform. "What are you fucking five?"
Ace's own face scrunches. "What the hell?" Sticking his tongue out as he gags, scrubbing his mouth. "What's all over your hands? Soap? It tastes awful."
Luffy and Sabo laugh and cackle like a pack of hyenas.
"Serves you right, Ace, haha, you big idiot." Luffy tears of laughter. "Stop it. It hurts to laugh." He holds his hand over his injury and winces in-between fits of laughter.
Sabo isn't fairing any better. "Oh God, I have a headache from laughing too hard." The blonde holds his aching head, on his burn scar.
You pout, open your mouth to retort.
Law cuts you off. "L/n." A bit more bite in his tone, narrowed his liquid molten silvers and clicking his tongue.
You meet his gaze again. "Ai, doc. I'm coming." You sigh, shoulders slumping. You peak over your shoulder and offer the trio a tired smile. "I'll see you later guys."
All three glance at you, frowning.
"Ahhhh, but why? You just got here?!" Luffy whines, pouting like a toddler throwing a tantrum.
"I haven't been home to sleep yet, Luffy." You mutter, once again making all four men feel guilty. You continue forward, linking your arm with Law's and proceed to drag him away. "Besides, Doc owes me breakfast." You tilted your head back and met Law's shocked expression as his face quickly grew heated. "You did promise."
Law's whole body grew flustered, surprised by your strength as you dragged him away. The doctor couldn't find his voice to deny you as his heart hammered harder. "Yes." He mumbled, following you, dazed.
Sabo and Ace's mischievous smiles grew.
"Oh, I remember him now!" Luffy gasped. "It's Traffy!"
Law heard the nickname, frowning. "Traffy?" His brows furrowed. Waiting for you to answer.
You blush, unable to meet his questioning silver gaze. "Luffy gives everyone weird nicknames. He has a horrible memory at remembering names." You explained quickly. "Come on Traff-, I mean, Law..Ah, I mean, doc."
Law's eyes widened, then his lips curl. "You said my name." He teases, pulling his arm out of your hold to wrap around your frame and waist instead, pulling you closer into his side, leaning down to whisper, low into your ear. "You started that nickname didn't you, Y/n?"
---- End of Chapter 3 ----
Chapter 1 Chapter 2 Chapter 4 Chapter 5 Chapter 6 Chapter 7 Chapter 8
Sooo I know the whole operating room screen I completely winged it 🫣 I had to think of some form of bonding time between Law and MC.
Did I do ASL Justice? How do you feel about Law striking back and being a tease?
Want more Law x reader? I've got you!
Merman Law x reader Law x Pregnant reader
Tag list: @m0sigma7 @angelblueflame @pandora-writes-one-piece @short-honey-badger @supreme-burrito @fanaticsnail @turtletaubwrites @cherry-queens-blog @fairymama624 @mrstraffy @kira-scarllet @strawheart-pirate @azuragalaxya @kira-scarllet @the-ginger-draws @cericebelle @emlikesfl0w3rs @aceismyloveforever @mrstrafalgardwater24 @imsnk-ow @thekatisspooky @lunulatalux @physics-of-one-piece @honeyshiddendesire @pinkbun1 @vlntnxvoc @chillerkiller
#law x reader#law x you#law x y/n#Isabeau Writes#Isabeau fanfic#Slow burn#trafalgar law one piece#Trafalgar Law x you#trafalgar law x y/n#trafalgar law x reader#plus size girls#plus size is fun size!#Law x plus size fem!#Law x Plus size#Law x Nurse reader#enemies to lovers#sassy reader#stubborn reader#curvy body#body posititivity#Tsundere Law#idiots in love#slow burn
52 notes
·
View notes
Note
Hel!o, again! I meant ur Van Helsing poster 😊 Happy Holidays if you celebrate 😊

i'd be more than happy to! happy holidays to you as well! here's the kind of poster i'll walk you through how to make:

the most important thing you need to think about with this type of poster is which shots will blend best with each other. i recently made a blending tutorial for another anon and you can find it here. in it, i go a bit more in depth on what types of shots will blend best, and you can also check out the blending tutorial tag on my resource blog, @gifmakerresource.
overall, dark on dark blends the best. the lighter your scene(s), the harder it's going to be to see. when making this poster, i went in knowing i wanted to use this silhouetted shot of van helsing. silhouetted shots are one of the best kinds of shots you can blend with because the silhouette itself will be much darker than the surrounding area.

this is what i started with (after cropping and sharpening). the dimensions i used are 540px x 700px but the height can be whatever you want. next, i wanted to focus on lightening the background and further darkening his silhouette.
here are my coloring layers (which will, of course, vary with every shot and every movie):

and here are the specifics for each layer in order from bottom (first) to top (last)*:


*note: the blue selective color layer also makes the same adjustments to cyan
i created a new layer (ctrl+shift+n) and painted over the extra-bright parts around his head for later blending. this is a layer i added after the fact once i found all the shots i wanted to use and blend together.

this is the second shot i used:

once cropped, sharpened, and converted to a smart object, i bring it over to the existing canvas, making sure it's properly aligned with ctrl+t, and set the blending mode to screen.
here are my coloring layers:

and the details for each (and if you're wondering, to color code your layers, right click in the box where the eye is and select your color):

and this is what the gif looks like prior to using a layer mask:

it's not terrible, but i wasn't happy with how much of the second gif could be seen outside of the silhouette. this is also a good illustration of how dark blends with dark best, compared to dark and light or light and light. i grouped together the second gif and the coloring layers (select the appropriate layers and ctrl+g) and then added a layer mask to the group by clicking this at the bottom of the layers panel:

when using a layer mask, you're only working with 2 colors: black and white. using a soft circular brush (0% hardness), as you can see in the selected thumbnail titled Group 3, i used black to color all around van helsing's silhouette. if you make a mistake when coloring, simply press x to switch to white and brush over the desired area and your gif will reappear. it's a way to "erase" a layer without permanently deleting it and is something i use frequently!
i used another layer mask so the gif was only visible right around the top of his hat:

and the coloring layers (note the gradient map is applied to the gif using a clipping mask [right click on the gradient map layer and choose 'create clipping mask'] so it only is applied the the layer immediately below it [the third gif] and not everything below it):

details:


this is the final gif before all the typography:

for the typography, i don't really remember why i didn't just use a transparent png of the movie logo other than knowing i had the actual font they use on the poster already installed. you can find it here (dafont). at the top of this screenshot, you can see my font settings and at the bottom, you can see the blending modes i added:

and here are those details (click to enlarge):


using the same font, i added these two layers and positioned them where i wanted:

the names layer is 24pt and adventure is 36pt. to create/position the typography, i was referencing one of the movie posters btw!
for the final two layers, i used the font sf movie poster, which you can download here (dafont) and decreased the opacity of both to 30%:

ignore the warning symbols - i had to replace the font files and ps is mad at me

the "larger" letters are just capitals while the smaller ones are lowercase. i'm pretty sure this is the typical font used at the bottom of movie posters. i believe i either typed all this out referencing one of the posters or i went through the imdb page for the movie and went through the cast and crew sections.
and that's it! we have our finished gif! making a poster like this can result in a large file size, so keep in mind that tumblr's upload limit per gif is 10mb. i believe this gif is 45 frames, which is probably pushing it with these dimensions. if you finish your gif and find that it's over the limit, i HIGHLY recommend using ezgif's optimizer. you upload your file and then adjust the lossy slider and you'll be surprised just how much it drops the file size down without a noticeable difference. i also use this site to convert webp files to gifs/pngs when necessary.
if you have any further questions or didn't understand something, please let me know! i'm always happy to help :) and lmk if you ever want a tutorial on any of my other gifs! happy holidays!
#answered#Anonymous#gif tutorial#my tutorials#flashing gif#gifmakerresource#completeresources#dailyresources#chaoticresources
54 notes
·
View notes
Text

Thank you @cobbbvanth for asking me for this; I’ve never been more flattered! ☺️ I’ve only been making gifs for a little more than 2 years, so I’m really still only figuring Photoshop out, and my colouring owes everything to other people’s tutorials (some of which can be found here). To be honest, I was only asked some tips, but I have no clue what to include and what to leave out; so, here’s my complete (if random) colouring process.
NOTE: This is a colouring tutorial, not a gif-making one. The tutorial that taught me everything I know about that (and to which I am eternally grateful) is this one by @hayaosmiyazaki.
I. SHARPENING My standard sharpening settings are:
One Smart Sharpen filter set to Amount: 500 | Radius: 0,4
A second Smart Sharpen filter set to Amount: 10 | Radius: 10
One Gaussian Blur filter set to Radius: 1,0 and Opacity: 30%
One Add Noise filter set to Amount 0,5 | Distribution: Gaussian
II. BASIC COLOURING This is the part where I add most of the adjustment layers available and just play around with them. Obviously different settings work for different scenes, but I do have some standard ones.
Brightness/Contrast I usually up the Brightness to +10-30, and the Contrast to about +10.
Curves
For the first Curves layer I go to Auto Options > Enhance Brightness and Contrast, and then adjust the opacity until I’m happy.
I might repeat the above step if the gif still looks too dark to me.
I add another Curves layer, I go to Auto Options and this time I pick either Find Dark & Light Colors or Enhance Per Channel Contrast, and check or uncheck the Snap Neutral Midtones option, until I see something I like. I will then adjust the opacity.


Levels I add a Levels layer that usually looks something like this:

Exposure I add an Exposure layer, where I usually set the Offset to around -0,0010.
Selective Color To make the faces look okay, I create a Selective Color layer, select the Reds and usually add some Cyan (+10-20%) and play around a little (±5%) with Magenta and Yellow too. I might also add another layer, select the Yellows and make slight tweaks there too.
III. FUN COLOURING About colour manipulation: PiXimperfect just uploaded a tutorial that explains everything so much better than I ever could, so I highly recommend you go watch it. It’s made for static images though, and things are more complicated with moving images, so I also recommend @sabrinaacarpenters’s tutorial.
The reason I usually go for a softer colouring is that a more vivid one requires a lot of patience and precision, and I honestly can’t be bothered. Instead, I try to tweak the colous only a little, so that the edges can be a little rough without it looking too wrong.
One thing to remember is that each gif is different, and there isn’t one foolproof way to do this, so you will need to use a different technique depending on the gif you’re working with.
Okay, so, after I’ve decided what colour I want my background to be:
1. I create a Hue/Saturation layer and change the greens, cyans, blues and magentas to that colour. That’s easy enough, since it doesn’t mess with the face colour. I then set the blending mode to Color. If your background doesn’t include any yellow or red, you might be done here, like in the case bellow:


2. To change the yellows and reds, I create a new Hue/Saturation layer, select the yellows/reds, move Saturation to 100 (temporarily) and then play around with the sliders until the face colour isn’t affected. I then change it to whatever I’ve chosen and change the blending mode to Color.
3. If for whatever reason step 3 doesn’t work (the background is white or black for example, or just too red), I might create a Solid Color layer set to whatever colour I want, set the blending mode to Color and then select the layer mask and carefully paint with a soft, black brush over the people’s faces/bodies. I will then lower the Opacity, to whatever looks smooth enough. If there’s a lot of movement in your gif, you might have to use keyframes (see sabrinaacarpenters's tutorial linked above). However, my main goal is to avoid using those; that’s why I try my hardest to tweak around as many Hue/Saturation layers as needed and not have to create a solid color layer.

4. Once my background looks the colour I want it, I might add a Selective Color layer that matches my background color and then try to make it look more vibrant. For this Aziraphale gif below for example, I’ve selected the Cyans and then set Cyan to +100%, Yellow to -100% and Black to +60, then created another one, selected the Cyans again and then set Cyan to +20 and Black to +20.


5. If the gif has a white area, I create a Solid Color layer with a colour that matches the rest of the background and then set the Opacity low. I might also create a Selective Color layer, increase the Black and then play around with the colours.
IV. FINISHING TOUCHES
I create a Vibrance layer and set the Vibrance to around +30 and the Saturation to about +5.
I create a black and white Gradient Map layer (with black on the left end of the spectrum and white on the right), set the blending to Luminosity and the Opacity to about 20-30%.

AAAND that’s about it I think! This ended up way too long and perhaps a little incoherent. I tried to make it as general as possible, so you might have to mix and match for best results. Feel free to ask me for further explanations about any one of these steps, and please tell me if you want me to go through the colouring of a specific gifset (although, as I said, I'm by no means an expert). Happy gifmaking!
#gif tutorial#allresources#completeresources#dailyresources#photoshop tutorial#minee#tutorial#tutorial*#chaoticresources#uservivaldi#userdanahscott#usersanshou#userfanni#userbuckleys#userrobin#tuserjen#userdavid#userzaynab#tusermimi#thingschanged#tuserju#usertj#userhallie
388 notes
·
View notes