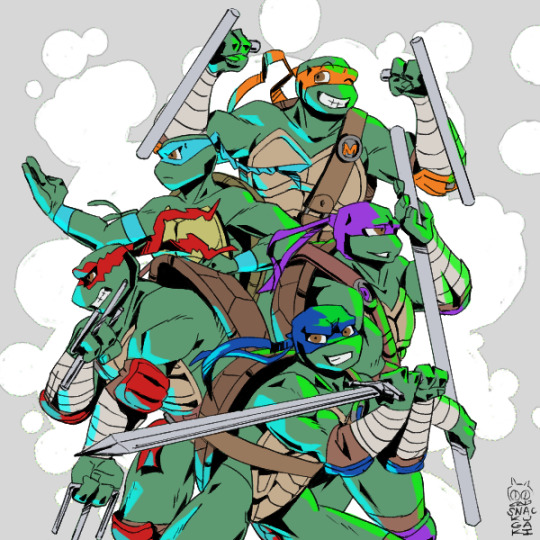
#new type of coloring?!?!
Text
Quick sketch of Andy :DDD (sorry for like mass posting lol) the silly
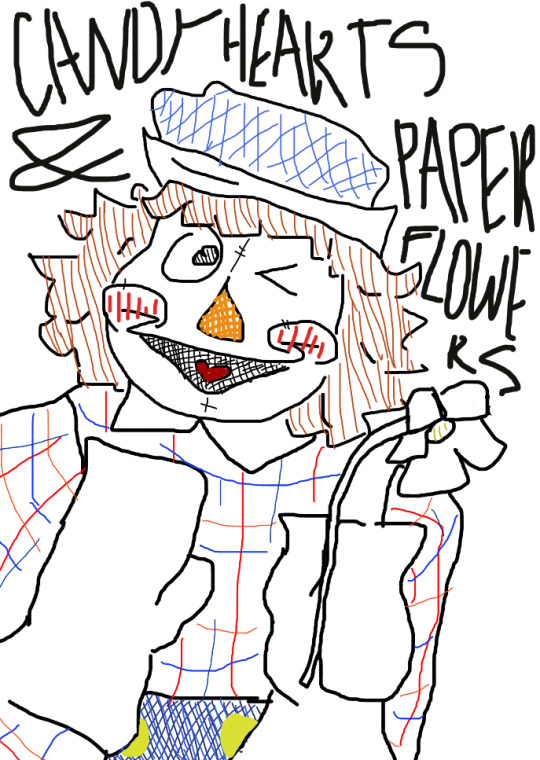
#new type of coloring?!?!#raggedy ann and andy#raggedy andy#raggedydoll#raggedy ann and andy fanart#silly guy#art :p
19 notes
·
View notes
Text
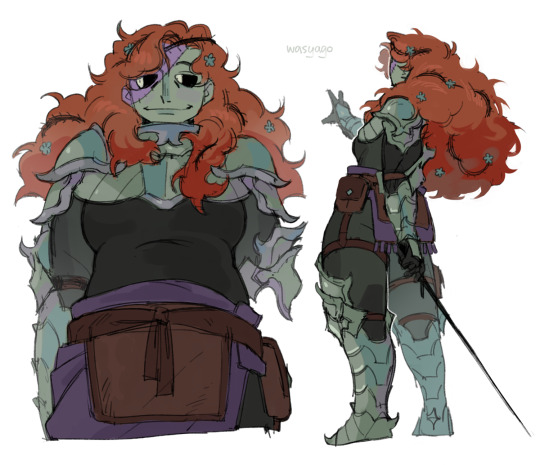
a random cleo in armor
#wanted to draw here but didn't have any ideas. when in doubt draw armor☝️#cleo is fun to draw i like her color scheme. but i still need to get better at drawing different body types#this one isn't bad but i feel like i could've done better. need to practice more#hermitcraft#zombiecleo#my art#sketch#also im rushing to post all the backlogged hc art before season 10 starts so there will be 2(+) post per day until then#it's not necessary but i feel like otherwise it'll just drown in the new stuff
3K notes
·
View notes
Text
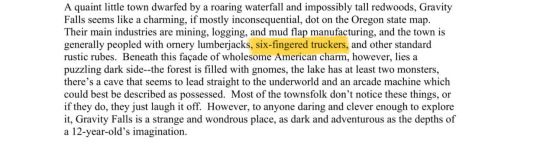
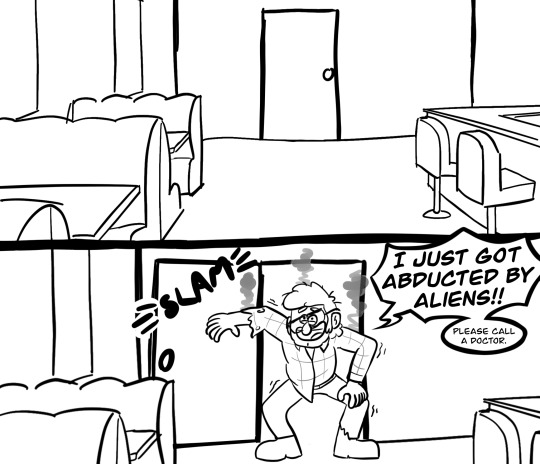
So y'all know the Gravity Falls production bible that leaked three weeks ago. Someone in one of my discord servers pointed this out:
And, naturally, that spawned an entire AU.
AU Concept: Ford was kicked out instead of Stan and takes a job as a trucker to makes ends meet since he couldn't go to college, while still studying the weird and anomalous however he can.
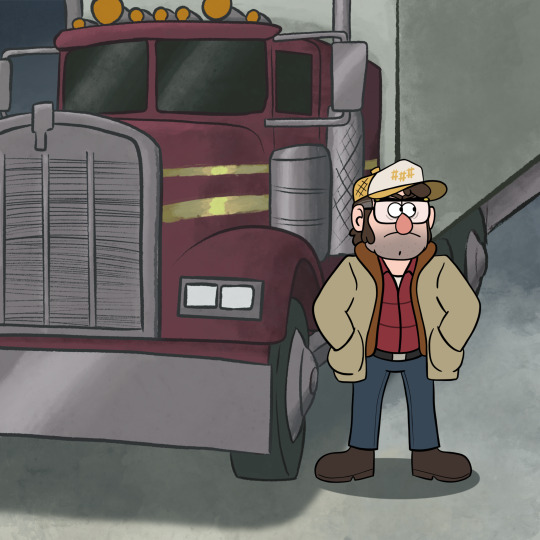
Ford driving around from quirky small town to quirky small town, drifting through the liminal spaces of truck stops, meeting odd people in isolated diners, seeing strange things out on the road—a deer with too many eyes bounding across a two-lane highway, a flirty woman at a rest stop who doesn't blink or breathe, mysterious lights in the sky at night, inhuman growls on the CB or 50-year-old broadcasts on the radio—and taking notes when he stops for gas or food.
Aside from having gotten kicked out before graduating high school, Ford's the same person he is in canon.
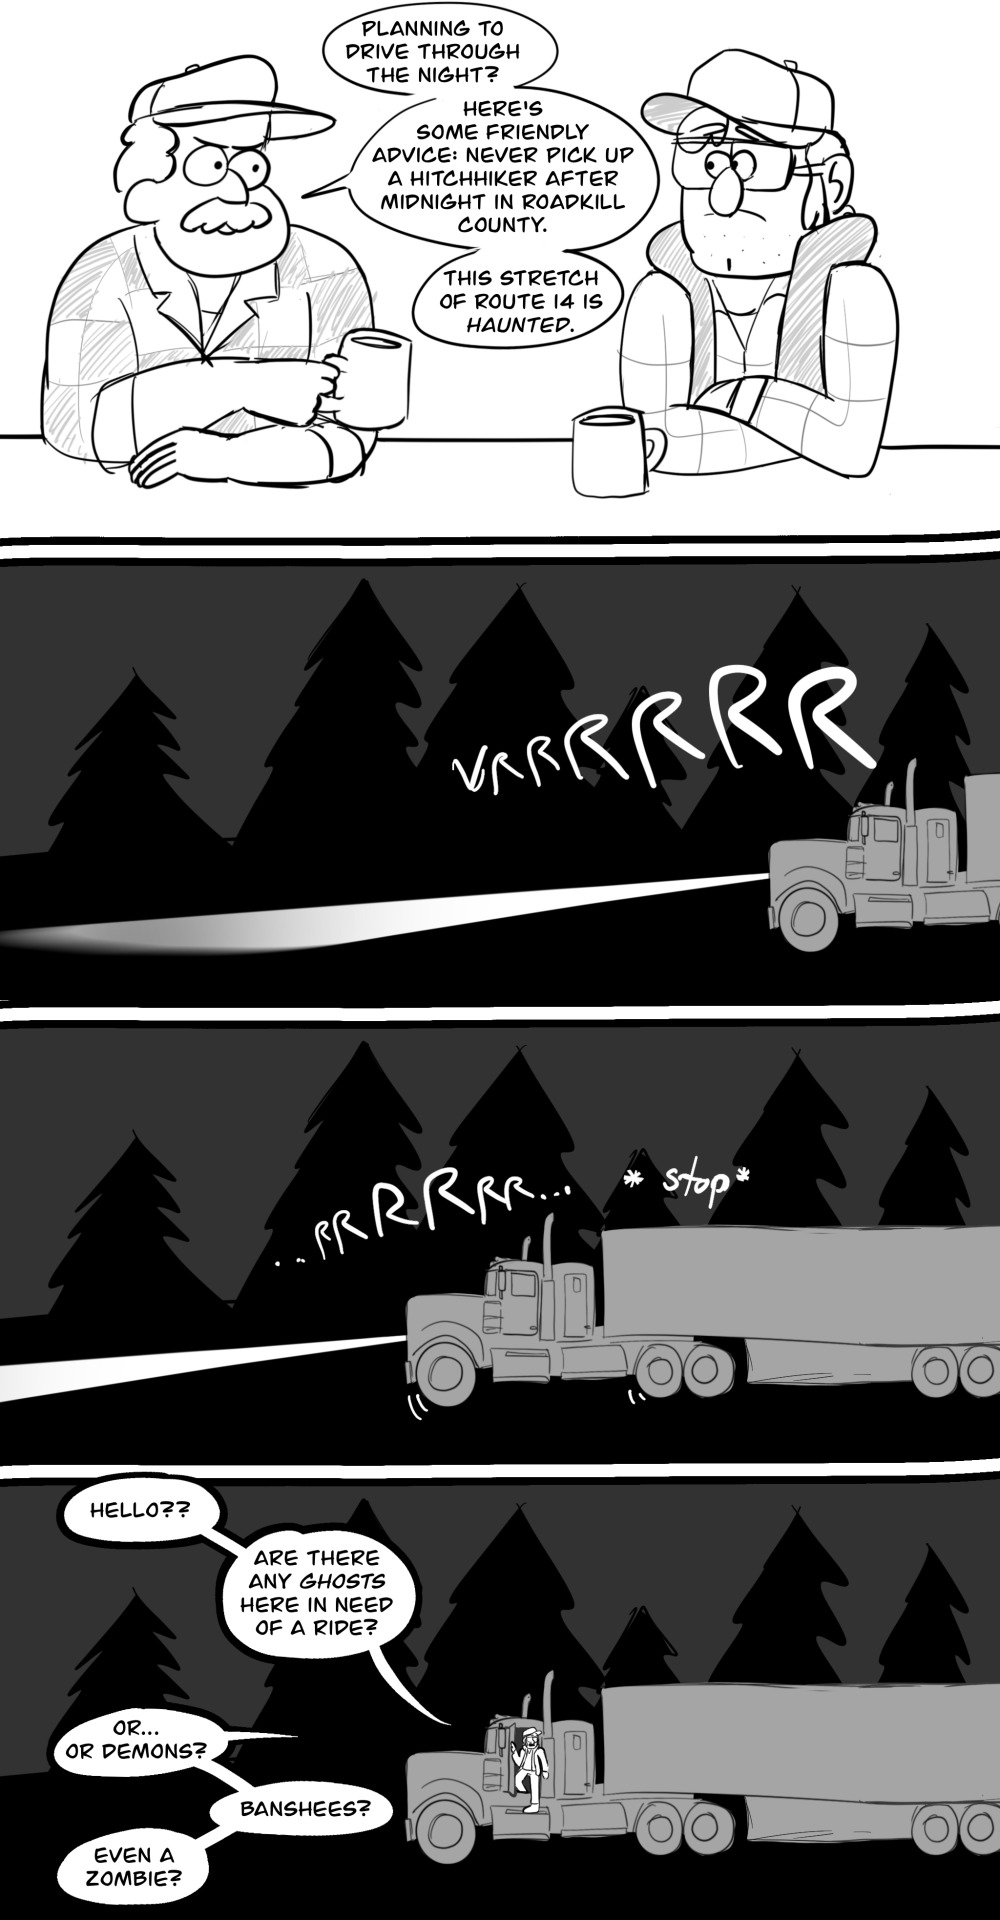
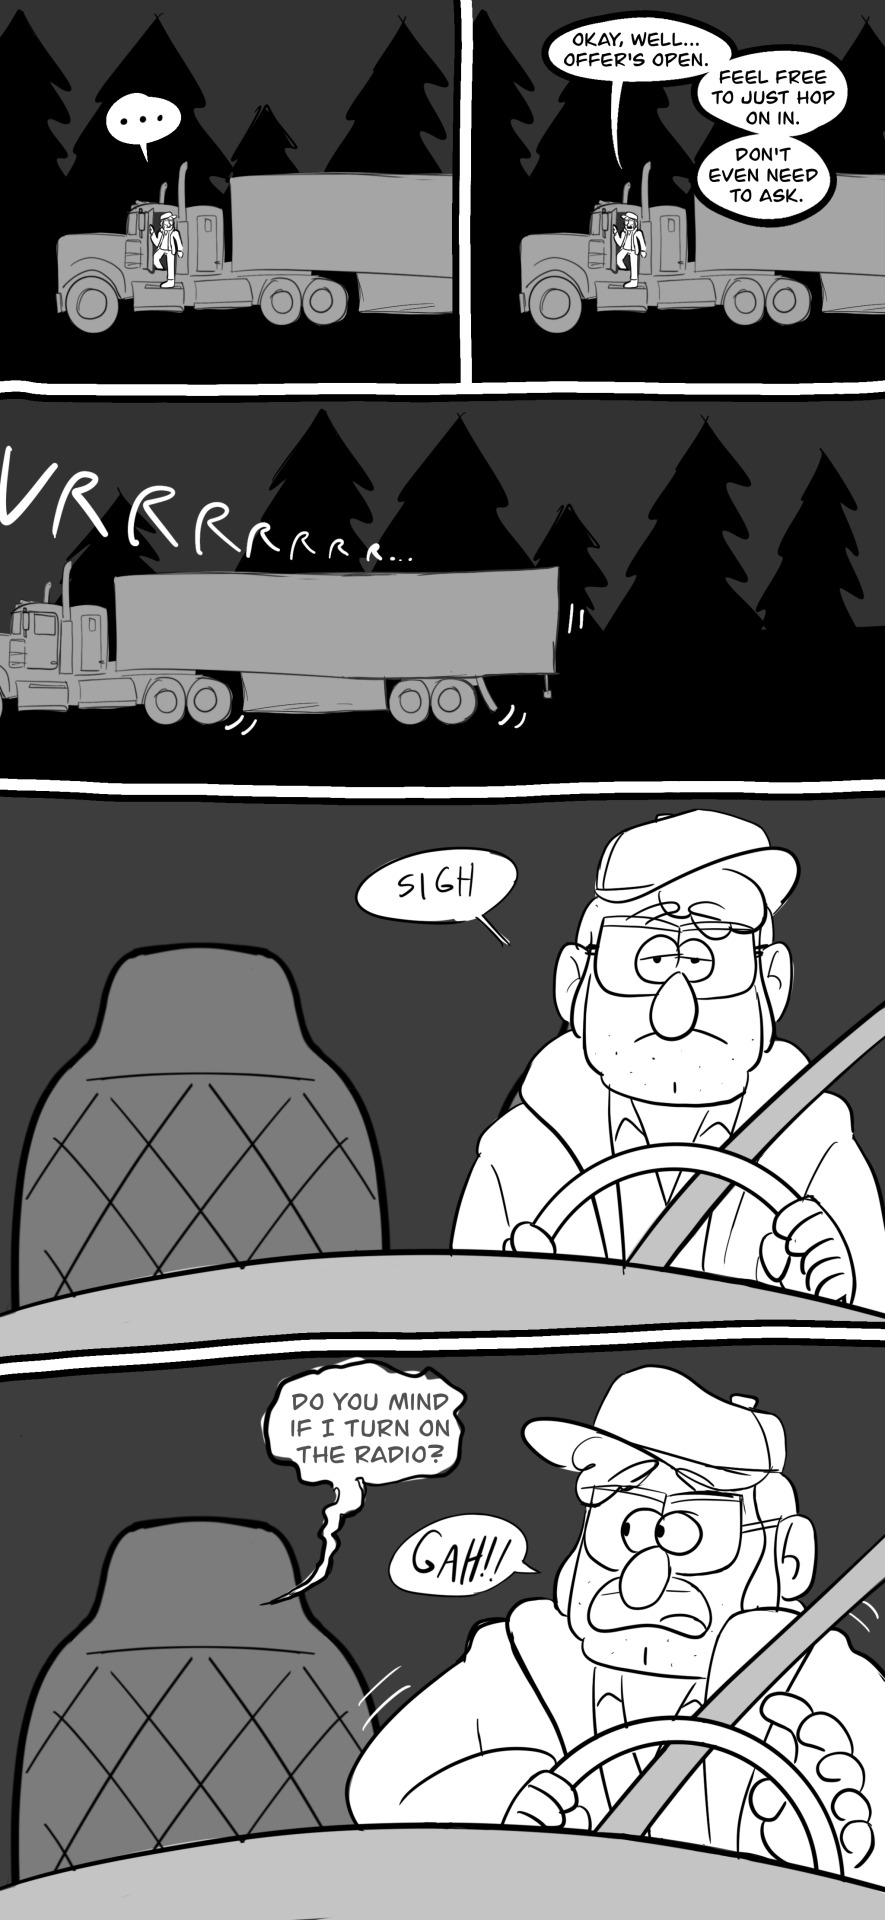
He's still an ambitious guy, and here "ambitious" means working hard and saving as much money as he can—so, a long haul owner-operator who spends weeks at a time on the road. (He goes through a LOT of educational audiobooks.) Plus, this is the easiest way for him to get to travel the country; and since it looks like his "travel the world" dreams with Stan are dead, he'll take what he can get.
Since he's never in the same spot long and carries his life in a truck, almost all of Ford's research is in his journal. His bag of investigation supplies has an instant camera, a portable tape recorder, a thermometer, a flashlight, rubber gloves, and a few zip lock bags—and that's about it. It has to share space with all his clothes, toiletries, and nonperishable food when he's on the road. He doesn't have much opportunity to closely examine anything odd he finds, unless he's lucky enough to run into something when he can stop for the night. He has to cram his paranormal research around the side of his full-time job.
He doesn't live in Gravity Falls, but he knows it exists. Every time he moves—to Chicago, to Nebraska, to California—he seems to inch closer. He currently lives in Portland and usually hauls loads between the Pacific Northwest and Chicago or New York. He stops at the truck stop outside Gravity Falls when he can and has gone fishing in town a few times. He doesn't have the benefit of extensive research to know that this is the weirdest town in the world; but it seems pretty weird to him, there are local rumors about the town, and he's had some weird experiences in the area.
Plus, he can't explain it, but it's like the town's calling to him. He wants to move there, but it'd put him over an hour outside of Portland where the nearest jobs are. Maybe if somebody chucked him like $100k to build a cabin in the woods; but what are the odds of that?
He does know Fiddleford. Truck broke down somewhere and Fiddleford kindly pulled over to fix it on the fly. They looked at each other, had mutual knee-jerk "dumb trucker/hillbilly" reactions, and within ten minutes both went "oh wait you're the most brilliant genius i've ever met." Fiddleford's living the same life he was in canon before Ford called him to Gravity Falls—with his family in California, trying to start a computer company out of his garage—but they make friends and keep in contact.
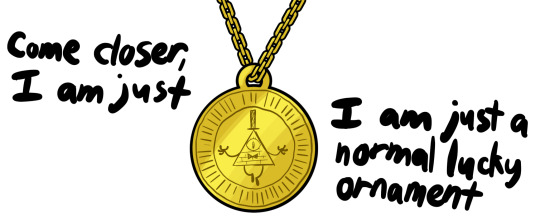
One time Ford stops at a kitschy roadside knickknack store that also sells new agey magic things—crystals, tarot cards, incense, etc. He bought a "lucky" rearview mirror ornament that looks like an Eye of Providence in a top hat and hung it from his cab fan, and ever since then he's had weird dreams whenever he sleeps in his truck.
Things I don't know yet: what Stan's up to; or why Ford's the one who got kicked out. I tend to believe that in canon Stan wasn't just kicked out because he ruined Ford's college prospects, but rather because the family thought he deliberately sabotaged Ford; so in this AU, Ford would've been kicked out over a proportionate crime.
#gravity falls#gravity falls au#grunkle ford#stanford pines#fanart#my art#my writing#(since i'm not posting a chapter this week this is y'all's substitute Writing And Art From Me)#(i traced the trucks & diner background and i am not ashamed bc i cannot be assed. i just wanna draw ford in Situations)#(i tried a new kind of lining & coloring on the truck! i will never be doing it again!)#(for my follower who's into vehicles: his truck's based on a late 70s Kenworth W900A. loosely. the headlights are anachronistic.)#(the design has been simplified via the logic of—)#(—'if I don't think that detail would be included in a cheap Optimus Prime toy then I don't need to draw it.')#(EDIT: over a week later i realize i typed freightliner instead of kenworth... i don't know why i typed freightliner.)#(i hope the reason no one corrected me is because no one noticed rather than because y'all think im dumb)#trucker ford au
1K notes
·
View notes
Text


hy guys im back with the milk
#tlt#harrowhark nonagesimus#gideon nav#griddlehark#the locked tomb#kys joke#tw suicide#sorry but she would say that so i had to type it out#no matter whatever silly new style i try out i hope you guys can always tell its me based on the dumb ass way i draw harrows hair#fanart#this is how i would color them all the time if i wasn't scared of defying canon
510 notes
·
View notes
Text

✨ Simple Gif Colouring for Beginners ✨
I wrote up my basic gif colouring process for a friend recently, but a couple of people here mentioned they'd also find it helpful! so, as requested, this is a beginner-friendly walkthrough of the way I colour my gifs :) it's aimed at brand new gif makers with no prior experience with photoshop or photo editing.
when I first started gif making I found colouring and photoshop in general suuuper daunting, so I've tried to simplify everything here as much as possible. hopefully this will be relatively easy to follow and not too intimidating!
a couple of things to begin with:
I'm only talking about colouring here - this is not a full gif making tutorial. I've linked to some of my favourites of those here!
I personally like to make bright, 'clean' looking gifs with vibrant but natural colours, so that is the style of colouring this tutorial is geared towards. most of gif colouring is subjective and about personal taste - the only thing that I'd say is possible to get wrong is skin tones, which I talk about a lot in this guide.
as I mostly gif Thai dramas, most of the advice is geared towards colouring for East Asian/South East Asian skin tones - but the techniques should be fairly universally applicable (and here are some tutorials that talk about gif colouring for other skin tones).
I'm not an expert! I'm not claiming this is the best or the only way to colour gifs - it's just how I do it.
this post is very image-heavy. if the images aren't loading (or the gifs are running slowly or cutting/looping weirdly), then try viewing the post in its own tab (rather than on the your dash or someone's blog) and refreshing the page.
okay, full walkthrough beneath the cut!
contents:
1. intro
a. natural gif colouring goals
b. very very basic colour theory
2. super simple colouring (the essentials)
a. curves
b. selective colour (and skin tone correction)
c. hue/saturation
d. saving and reusing colouring
e. another simple colouring example
3. other adjustment layers
a. brightness/contrast
b. levels
c. vibrance
d. colour balance
e. channel mixer
4. troubleshooting
a. curves
b. saturation
5. fin!
1. intro
the colouring part of gif making can be super overwhelming, especially if (like me when I first started!) you're completely new to photoshop and/or have no experience with colour theory or photo/video editing.
if you're opening photoshop and making gifs for the first time, I highly recommend getting used to making a few basic, uncoloured gifs to begin with. just to practice, rather than post anywhere (though you can always come back and colour them later if you want) - but it'll make the rest of the process much easier if you're already beginning to get used to working in timeline mode of photoshop. give yourself a bit of time to practice and get a feel for things like how many frames you tend to like in a gif, where you like to crop them for the best loop, what kind of aspect ratio you like etc* - so that you're not trying to navigate all of that for the first time on top of everything else!
* frames: for me between 60-90 frames is ideal, but 40-120 frames is the absolute min-max I'd personally use in a normal gifset
loops: for the smoothest loops, try to avoid cutting someone off mid-movement or mid-word if possible.
aspect ratio: for full-size (540px) gifs, I tend to go for either 8:5 (slightly 'skinnier' gifs), 7:5, or 5:4 (particularly big, thick gifs lmao)
✨ natural gif colouring goals
part of what can be so daunting about starting gif making is not knowing where to start or what you want to achieve. this is definitely something that gets easier with practice - the more gifs you make, the more you'll get a feel for what kind of look you like and the more instinctively you'll know how to get there. it also helps to see if any gif makers you like have made "before and after colouring" posts - these can help with getting a sense of the kinds of changes made through gif colouring. here's one I made!
in general, I like to make my gifs bright and 'clean' looking, with vibrant but natural colours. these are the things I'm usually hoping to achieve with colouring:
brighten dark scenes
remove muddy, yellowish lighting or filters
saturate colours
correct any skin lightening filters or overexposure
make lighting and colours as consistent as possible between gifs within a single gifset, especially gifsets featuring gifs from multiple scenes/episodes/videos
this guide is focusing on natural colouring, but of course there are many cool ways to make stylised/unnaturally coloured gifs. imo you'll need to master these basics first, but if you want to learn how to do things like change the background colour of gifs or use gradients or other cool effects, then @usergif's resource directory has loads of super helpful tutorials!
✨ very very basic colour theory
[disclaimer! I don't know shit about fuck. I do not study light or art. this is just an explanation that makes sense to me exclusively for the purposes of gif making.]
the primary colours for light/digital screens are red, blue, and green. having all three colours in equal measures neutralises them (represented by the white section in the middle of the diagram).

so to neutralise a colour within a gif, you need to add more of the colour(s) that are lacking.
in practice this usually means: the scene you want to gif is very yellow! yellow is made of red and green light, so to neutralise it you need to add more blue into your gif.
it can also mean the reverse: if you desaturate the yellow tones in a gif, it will look much more blue.
looking at the colour balance sliders on photoshop can make it easier to visualise:

so making a gif more red also means making it less cyan.
removing green from a gif means adding magenta.
taking yellow out of a gif will make it more blue.
tl;dr:
neutralise yellows by adding blue (and vice versa)
neutralise reds by adding cyan (and vice versa)
neutralise green by adding magenta (and vice versa)
2. super simple colouring (the essentials)
starting with a nice sharpened gif in photoshop in timeline mode. (these are the sharpening settings I use!)
some scenes are much harder to colour than others - it helps to start out practising with scenes that are bright/well-lit and that don't have harsh unnaturally coloured lights/filters on. scenes with a lot of brown/orange also tend to be harder.
I usually save a base copy of my gif before I start colouring just in case I end up hating it, or find out later that it doesn't quite fit right into a set and need to redo it etc.
so here is my base gif!

it's an okay gif, but it has a bit of a yellow tint to it that I want to reduce.
colouring is easiest to do in adjustment layers, which can be found under layer -> new adjustment layer - or for me they are here:

there are lots of different types of adjustment layers that do lots of different things - but for me the absolute essentials for colouring are curves, selective colour, and hue/saturation.
I also use brightness/contrast, levels, exposure, vibrance, colour balance, and channel mixer sometimes, depending on the gif - but I use curves, selective colour, and hue/saturation on every single gif.

✨ curves layer
the first thing I always do is a curves layer. when you first open one it will look like this:

first I usually click the ‘auto’ button, just to see what happens. sometimes it makes a big difference (it usually brightens the gif a lot) - but on this gif it didn’t do much.
if it had made the gif look nicer then I would have kept it and added a second curves layer on top to do the rest of these steps.
the next step is selecting the white and black points with the little eyedropper tools.
the bottom eyedropper lets you pick a white point for the gif. click somewhere super light on the gif to see what happens - for this gif, I clicked on the lampshade on the left. if it looks weird, I just undo it and try somewhere else - it usually takes a few goes to find something that looks good.
here's what that did to the gif:

then I pick the top eyedropper and use it to pick a black point by clicking somewhere really dark, again playing around until I find a black point that looks good.
here's what the gif looks like after picking the white and black points:

this can take some experimenting, but you can make super easy drastic changes to your gif just with this. in this case, the curves layer took out a lot of that yellowy tint.
and this is what the curves graph looks like now:

you can click and drag those lines to make further changes if you want - I usually leave them alone though. the colours of the lines indicate which colours have been changed in the gif - for example, you can see from that steep blue line on the graph that blue has been added to neutralise those yellows.
next I usually do another curves layer and just press the ‘auto’ button again to see what happens. usually it brightens the gif a bit more, which I like.
‼️if nothing is working: usually with a bit of fucking about a curves layer works well - but sometimes you can’t find a good white and black point anywhere, and instead your gif turns wacky colours and nothing looks good. this happens more often with very heavily colour tinted scenes :( the troubleshooting section at the end goes over some options, including starting with a levels layer instead.
✨ selective colour (and skin tone correction)
skin tones are made up of a mixture of yellow and red.
removing yellow (or adding blue or red) to a gif will make the skin-tones too red - and removing red (or adding cyan or yellow) to a gif will make the skin-tones too yellow.
adding blue to this gif with the curves layer took out the yellowy tint, which I wanted - but it also took the yellows out of Kim's skin tone, which I don’t want. so I need to put yellow back into the skin tones specifically - without putting it back into the rest of the gif.
selective colour layers let you select an individual colour and adjust the levels of other colours within that colour. you can change how yellow the green shades are, or how much cyan is in the blues, for example.
I need to add yellow back into the red tones to correct the skin tones on this gif. this is the case for most gifs in my experience - the vast majority of the time, unless a scene is very heavily tinted in another colour, a curves layer will add blue/remove yellow.
in the 'colors' dropdown, select the 'reds' section and drag the 'yellow' slider higher - this will add more yellow into just the red shades within the gif.

the amount of yellow you need to add back into the reds depends on how much yellow was taken out of the gif initially - I just play around with the slider until it looks right. if you're not sure, it helps to have some neutrally-coloured (not white-washed!) reference photos of the people in your gif to compare to.
here's the result. Kim's skin is a lot less pink toned and much more natural looking:

✨ hue/saturation
this adjustment layer lets you adjust the hue and saturation of the gif as a whole, and also of each colour individually.

I don't use the hue or lightness sliders unless I'm trying to do something more complicated with the colouring.
clicking the dropdown menu that says 'master' lets you edit the saturation of each colour individually. this is useful if your gif is still super tinted in one colour.
I thought the yellows on this gif were still slightly too bright, so I switched to the yellow channel and desaturated them slightly. (remember if you do this then you need to go back to selective colour and add more yellow into the red skin tones to balance out the desaturation!)
then I increased the 'master' saturation of all the colours to +5:
I usually find the right amount of saturation is somewhere between +5 and +12, but it depends on the gif.
‼️if the gif feels undersaturated, but the saturation slider isn't helping/is making the colours worse, try a vibrance layer instead.
done!

✨ saving and reusing colouring
you can copy and paste adjustment layers between gifs to make your colouring even across each of your gifs for one scene - so if you're making a set of multiple gifs of the same scene, or you think you might want to gif the same scene again in the future, you can save it as a psd so you can reuse the colouring again later.
each gif's colouring will then still need tweaking - different cameras/angles/shots of the same scene can still start out with slightly different colouring.
I recommend uploading the gifs as a draft post on tumblr so you can see what they all look like next to each other and catch any inconsistencies.
✨ another one! (speedrun!)

HI KEN!
the white point for the curves layer was in the window behind them.
the curves layer removes the muddy yellow tint, but again it makes their skin tones (especially Ken's) very red toned, which is adjusted by the selective colour layer.
3. other adjustment layers
imo many many gifs can be coloured really nicely with just those three adjustment layers, but some need different adjustments.
✨ brightness/contrast

pretty self explanatory!
I personally usually avoid using the 'brightness' slider because I rarely like the effect - I only tend to use the 'contrast' one.
the 'auto' button is sometimes useful though, especially if you’re struggling with the curves layer.
✨ levels

levels alters the white and black points of the gif, like curves - but unlike curves it doesn't also alter other colours.
use the sliders beneath the graph to alter how dark/light the gif is. you can slide the black slider further to the right to make the blacks darker, and the white slider to the left to make the whites lighter.
levels is a good place to start if your curves layer isn't working.
(I'm going to hit the image limit for this post lol so here are some screenshots of a table I made to demonstrate this rather than actual gifs. sorry!)


on both sides, I dragged the sliders up to where the big jumps are on the graph - this is usually a good place to start!
✨ vibrance
vibrance... makes the colours more vibrant. it's more subtle than saturation.
it's really helpful for gifs that feel grey. sometimes adjusting saturation just makes the greys kind of weirdly tinted, but a vibrance layer can fix that.

vibrance is much more subtle!
✨ colour balance

colour balance affects the overall balance of colours within a gif.
it's good for scenes with heavy tints.
I tend to stick to the 'midtones' dropdown, but you can also alter the colour balance within the shadows and highlights if you want.


✨ channel mixer
I avoided channel mixer for such a long time because it scared me. but it's great for scenes that are very heavily tinted in one colour.
basically, it works with the levels of red, green, and blue within a gif. you select an output colour and then play around with the levels of the colour you selected within each other colour.
kind of the reverse of selective colour?

so in the 'blue' channel, the levels of blue are at 100%, and the levels of red and green are at 0% - but you can impact how much blue is in the reds and greens and blues.
this tutorial explains it well - but imo the best way to get to grips with channel mixer is just to play around with it a bit (sorry)
(when I made this guide for my friend, I also made a slightly more complicated gif colouring walk-through that included using channel mixer. there isn't space to include it within this post, but if anyone is interested I could always upload it as an 'intermediate' gif colouring tutorial - lmk!)
4. troubleshooting
‼️curves
usually with a bit of fucking about a curves layer works well - but sometimes you can’t find a good white and black point anywhere, and instead your gif turns wacky colours and nothing looks good. this happens more often with very heavily colour tinted scenes :(
for example, with this base gif:

using many of the brightest points as a white point turn it wacky colours, like this:

yikes :(
some options for these cases:
try brightening the gif first with the 'auto' button on the curves layer or with a levels layer. having a brighter gif to start with can give you better options for picking a white point.
try finding an alternate, whiter/brighter white point. look for places the light reflects - on this gif, using the light on Porsche's cheekbone works well as the white point. it also helps to find places that would be white if the scene wasn't tinted - the lightest part of a white shirt is often a good place to start, for example.
skip the curves layer, and instead use a levels layer to alter your white/black points, and colour balance or channel mixer to balance the colours.
‼️over/undersaturation
if your gif (especially the skintones) is looking a little washed out or lifeless, it might be undersaturated. boost that saturation - or if that's not working, try a vibrance layer.
oversaturation is often easiest to spot in the mouths and ears of any people in a gif. if the mouths are looking unnaturally, vibrantly red, then you've gone too far with the saturation.
5. fin!
and done! I hope this was coherent helpful to somebody.
if there's anything that I've missed or that doesn't make sense pls feel free to shoot me an ask or a message and I'll do my best to help! I've also collated a bunch of additional reading/resources below.
happy gifmaking 🥰
✨ some links!
photoshop basics by @selenapastel
gifmaking for beginners by @hayaosmiyazaki
gifmaking guide for beginners by @saw-x
dreamy's gif tutorial by @scoupsy-remade (includes instructions on how to blur out burned-on subtitles or annoying video graphics)
beginner's guide to channel mixer by @aubrey-plaza
how to fix orange-washed characters by aubrey-plaza
colour correcting and fixing dark scenes by @kylos
does resampling matter? by usergif
how to put multiple gifs on one canvas by @fictionalheroine
watermarking using actions by @wonwooridul
resource directory by @usergif
#i got a couple of asks about this so i figured i'd type it up as a post#it's been sitting in my drafts for a while now though i'm so sorry omg.#i had to replace my laptop and it took me a while to get round to downloading photoshop on the new one#but i hope this is helpful!!#gif making#tutorial#photoshop tutorial#colouring tutorial#coloring tutorial#gif colouring#gif coloring#photoshop resources#gif tutorial#gif resources#userbunn#uservik#darcey.txt#darcey.gif#usergif
620 notes
·
View notes
Note
hey in ur peri animatic: (https://youtu.be/OCqlRuDaXYU?si=K52WDu_vw9rg7chz) that I have been permanently obsessed over since today and have watched about 20 times by now so much that I have drawn & posted stuff based on it what was that partial bug form peri had?
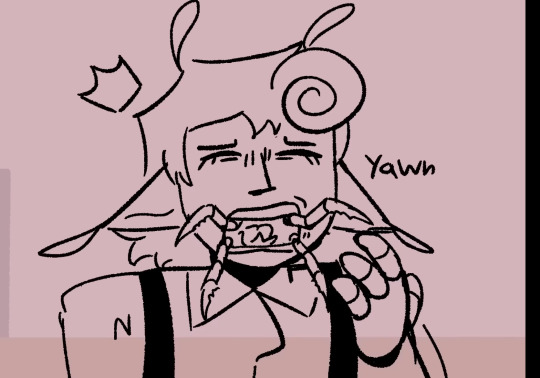
I haven’t watched either of the show btw so if it’s explained in the show please tell me plsssss
OK, SO the bug thing is not technically canon to the series. It's based on my own headcanons for fairy biology, but i do have justifications for it!! Fairies have very strong shape-shifting abilities, so it would make sense that the form they show to humans isn't necessarily their true form(not to mention extreme that mimicry is very common in insects). And you want to know the visible traits almost every fairy has in common? Being very small with Insect-like wings.
The fact that their humanoid form isn't their true form in actually confirmed in the show! Cosmo and Wanda are revealed to look like biblically accurate pseudo-angels in the museum episode. (I say pseudo angels because the Flaming Sword of Eden is only debatably sentient and I don't think is considered an angel. Ophanim are also debatably not angels because they don't have wings (sorry for the angel tangent I like angels))
So wouldn't their true forms be angelic then? Well, yes. But I like bugs so. Also I have more headcanons to justify myself. I like to think that they have both a true-true form (incomprehensible to the human brain, probably exists mostly in a dimension invisible to us, that looks how we imagine biblically accurate angels), and a fairy form (which is visible to humans but is naturally very insect like and tends to scare people). So, in order to interact with humans, they have to learn to shapeshift into a humanoid form but will occasionally slip if they get too relaxed/aren't careful, hence the mandibles coming out when he yawns!
The reason they struggle so much more with human forms than the animals or objects they typically turn into is that, well, they aren't trying to convince those animals or objects. The more human they try to look, the harder it is to keep up convincingly. If you turn into a really uncanny squirrel, only other squirrels will notice. If you turn into a really uncanny human, they form a lynch mob and burn you at the stake.
#fop#fairly oddparents#fairly oddparents a new wish#fop a new wish#headcanons#ok I think I said everything I wanted to#my brain has so many useless thoughts bouncing around in there#their bright colors would also imply that they are poisonous to eat#my personal theory is that Jorgen is half human idk how else to explain whatever he is. tall. no wings. that or he's something else entirel#maybe he's a higher rank of angel#fairies are definitely a type of angel in this world#but they don't seem to line up with any specific rank as far as I can tell#they behave most like I'd expect a Guardian angel to which could make Jorgen an Archangel or Principality#but Ophanims are in the first sphere of heaven which. uh I don't think it's right#to be clear I'm not even religious im just way too into angels#Uhhhh anyway I guess the moral of the story is that I did that just because I wanted to an because nobody could stop me#Actually Im just thinking about this now#I mostly drew baby poof without bug features to keep his design uncluttered visually#but fairies having naturally very human looking larva would explain how changelings happen#something something evolution. mutualism. those parasite birds. idk#ok im out of thoughts now seriously this time youre free now#speculative biology
260 notes
·
View notes
Text
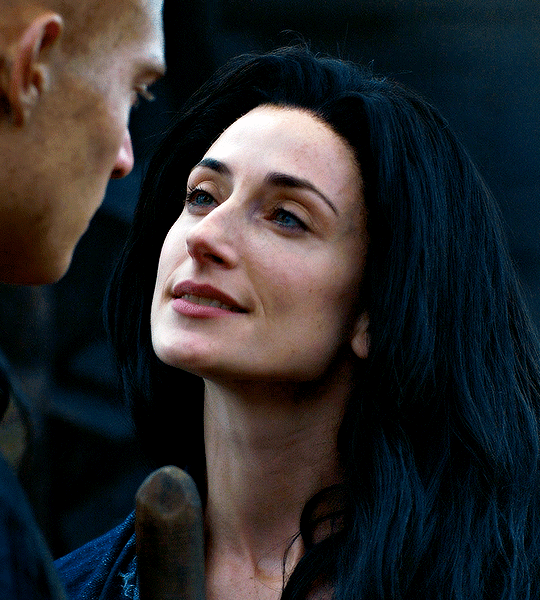
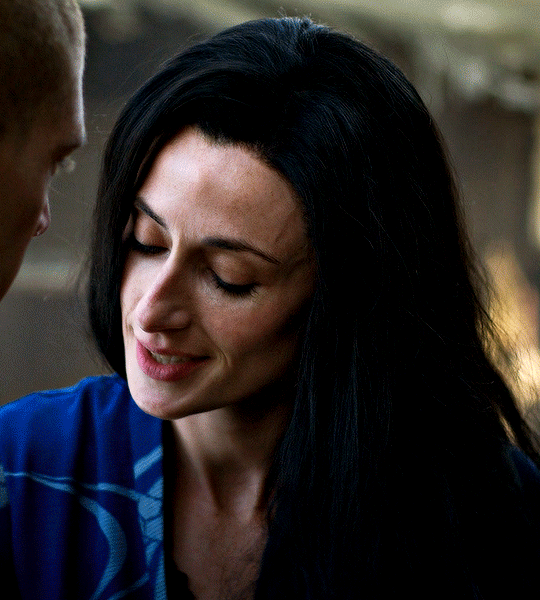

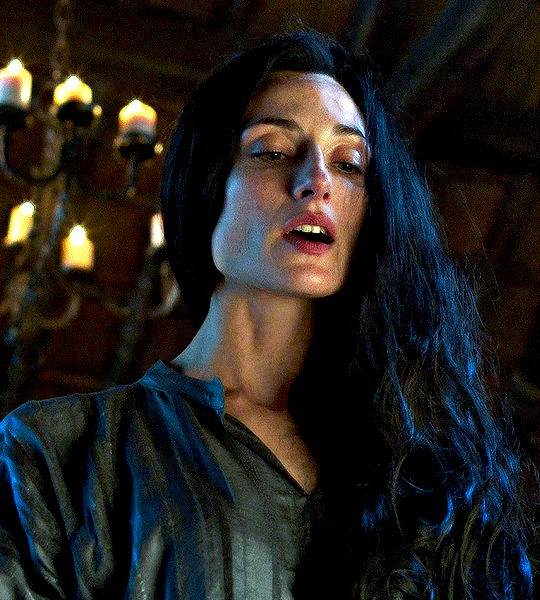
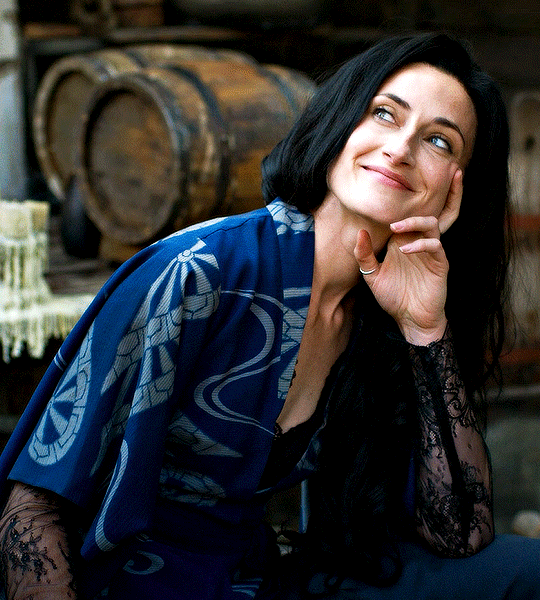
Natasha O'Keeffe as Lanfear/Selene in Wheel of Time
#wot#wot on prime#wotgifs#wheel of time#wotedit#tvedit#natasha o'keeffe#lanfear#wot spoilers#i guess?#have i watched this show yet? no but i saw a pretty lady in a beautiful blue scene#had to gif it#this is my first time posting in the new editor#hate it so much#also i'm trying a new sharpening type/coloring type#idk if i like it but oh well
1K notes
·
View notes
Text
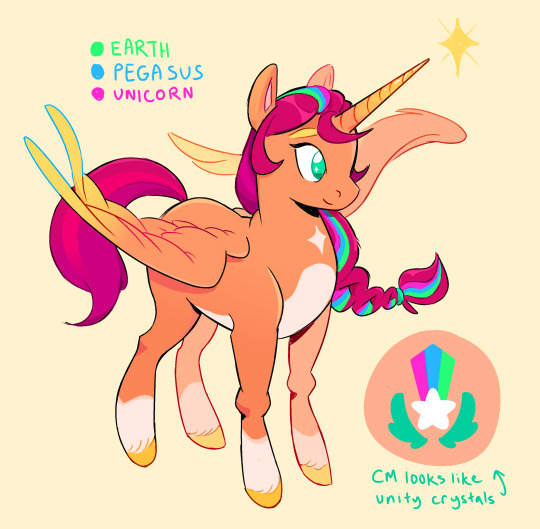
redrawing my sunny starscout redesign again? its more likely than you think
#mlp#mlpg5#my little pony#sunny starscout#mlpart#i actually really really like the fact that the main character of g5 is an earth pony because im a huge earth pony truther#i just thought shed look badass as like a regular alicorn#i do like her glowing thing in the show#also redesigning her cutie mark again to look like the unity crystals and the 3 colors in the stripe in her hair represent the 3 types of p#ponies#i wish sunny got a bit more screentime in the new gen sometimes it feels like shes not really the mc but g5 has really grown on me alot
797 notes
·
View notes
Text
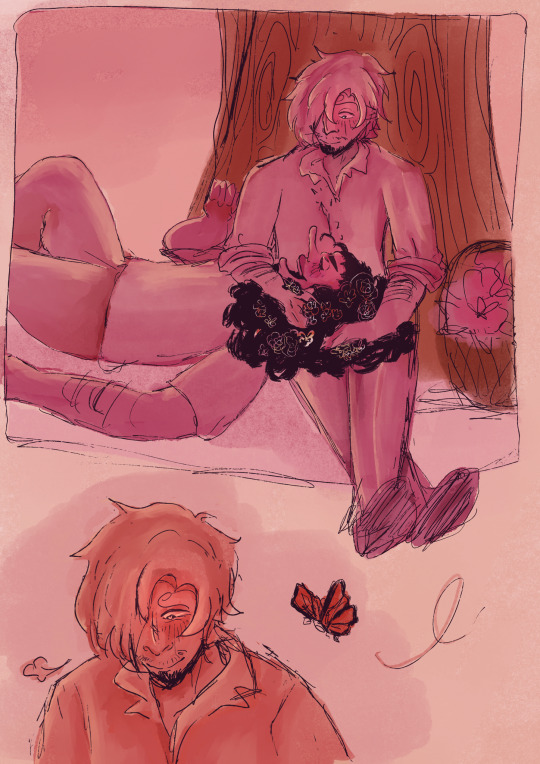
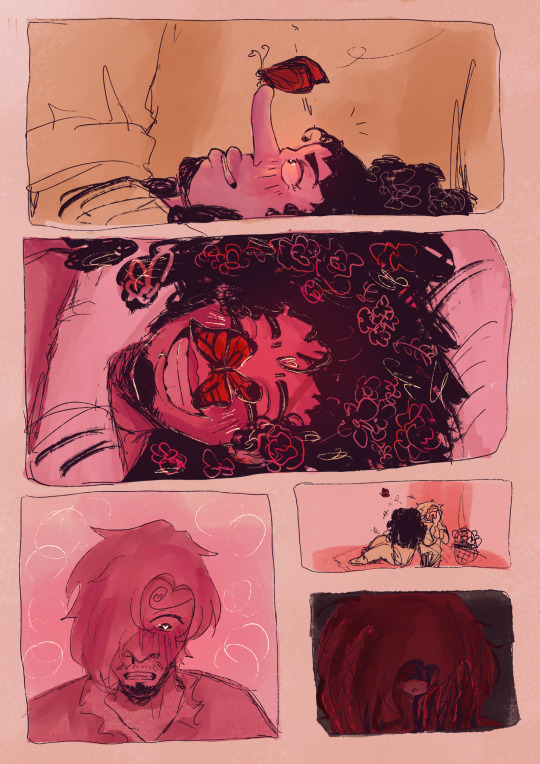
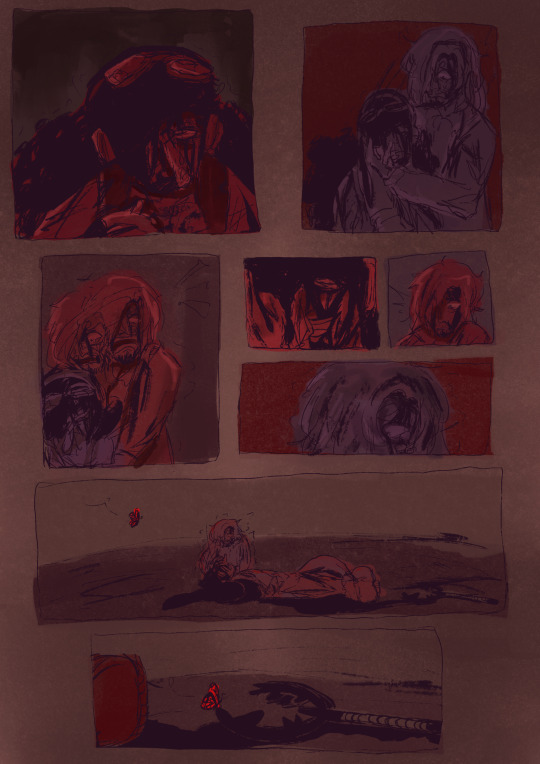
guys i love them i promise i just have the urge to put them through the grinder sometimes
umm on the bright side here's the alternate good ending version lol!!!!!
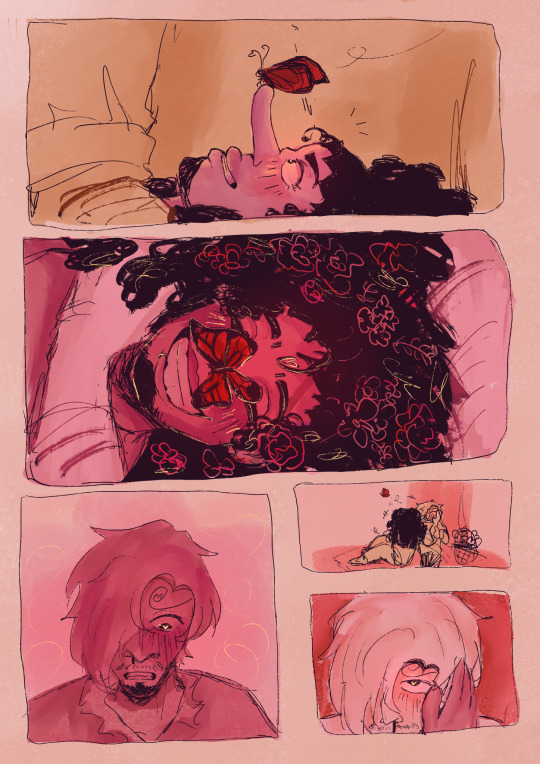
#haiii ^_^#i didnt know whether to make a seperate post for the good ending one but it wouldve been weird so im just adding it onto here lol#op#one piece#sanji#usopp#god usopp#black leg sanji#vinsmoke sanji#sanuso#usosan#tw blood#tw injury#angst#comic#my art#mintart#ok originally i was gonna use every color but red for the first two pages and only make the butterfly red then make the last page red too#cuz yaaayyy symbolism whatever cringe and then i scrapped it cuz i love working with pink and i was nawt about to figure out#a whole new colour palette during finals week. also i have 5 minutes before class so im speed typing this LOL#anygays thanks lars for the usopp dies brainrot i HATE YOU#he's partly responsible for this actually#i hate how the colours of the last page turned out uurgghghhh im not fixing it tho bye#i like the rest of it tho >_<#i love writing dialogue but silent comics r pretty fun too#ive been doing a couple of those lately and theyve been helping me with gesture and expression practice#lol i love drawing sanji pathetic and in love#i love drawing usopp in general he's my favorite to draw ever im so glad he exists#JUST NOTICED THE LESBIAN COLOUR PALETTE UHHH NOT INTENTIONAL or maybe it could be yuri who knows. they r so very gender#i will draw sanuso yuri soon tho TRUST!!!!!!!!!
195 notes
·
View notes
Text
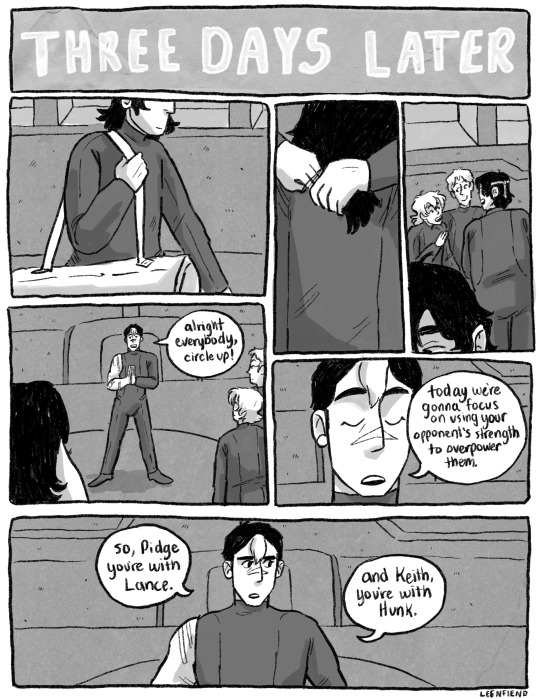
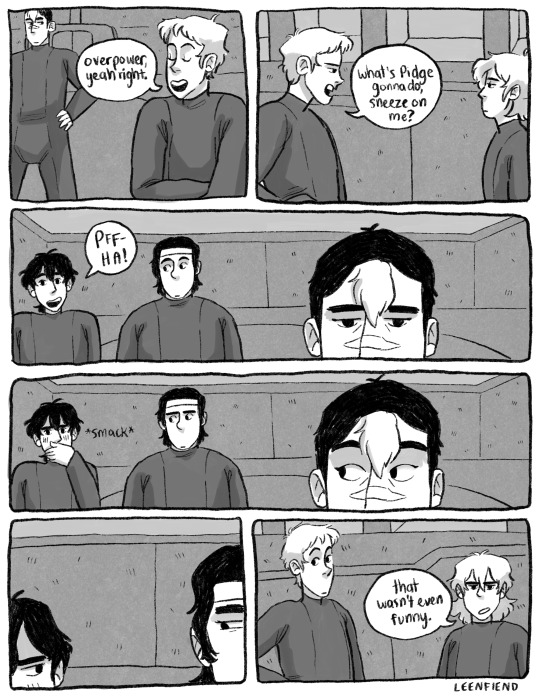
what's ur type
first < prev next >
full comic
#new scene means i can change how it's colored < 3#maybe someday I'll go through and make full b&w shaded pages#for all of them#but doubtful#wut#what's ur type#klance#vld#my art
950 notes
·
View notes
Text
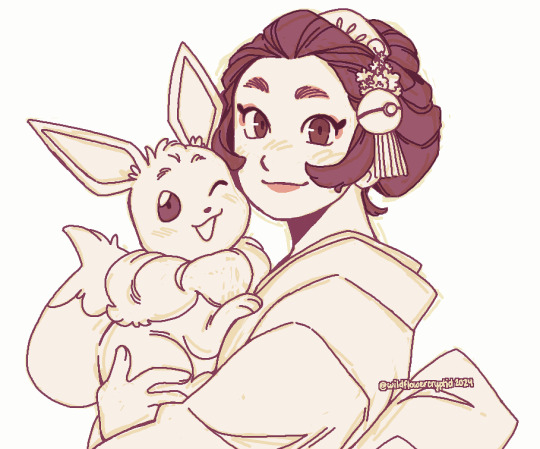
ecruteak city's newest kimono girl, suzuka! extremely obsessed with the idea of lyra becoming a kimono girl post-hgss so i doodled her with the eevee she starts training, manami.
#fun fact : maiko usually take on stage names once they debut so lyra goes by suzuka while she's working#there's a continuation of this hc where she becomes ecruteak's new fairy type gym leader after morty joins johto's newly formed elite 4#but that's once she becomes a geiko so she's independent from the kimono girls at that point#also typically maiko have black hair but since she's training an eevee i think lyra can get away with keeping her brown hair color#i need to sit and ruminate on johto some more... probably need to restart my playthrough too...#pokemon#pokemon heartgold and soulsilver#pkmn hgss#pokemon lyra#trainer lyra#eevee#hc : (pkmn) mjverse#hc : (mjv) johto#chara : lyra suzuki#🎨 : mj draws
237 notes
·
View notes
Text
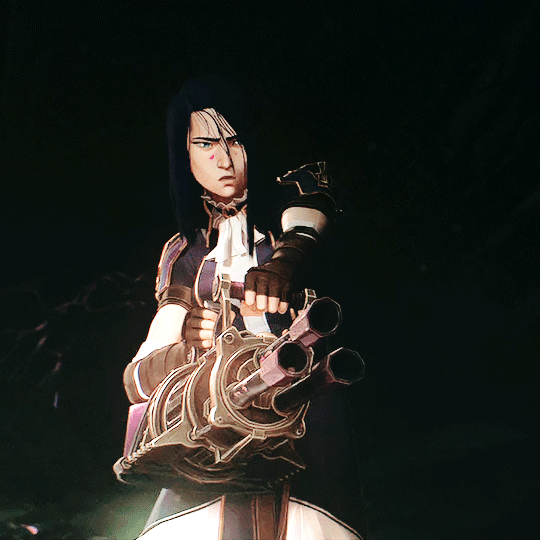
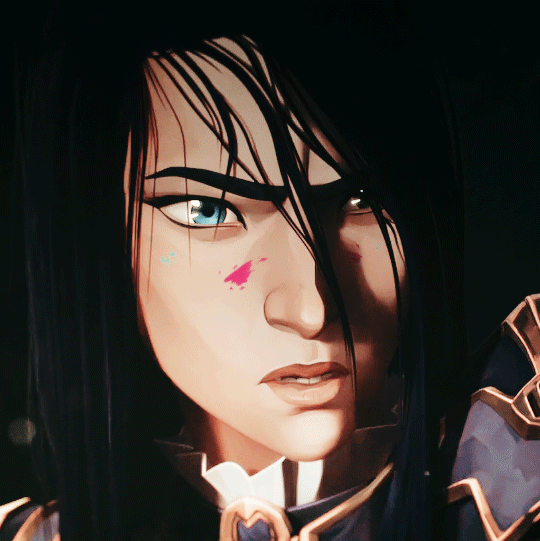
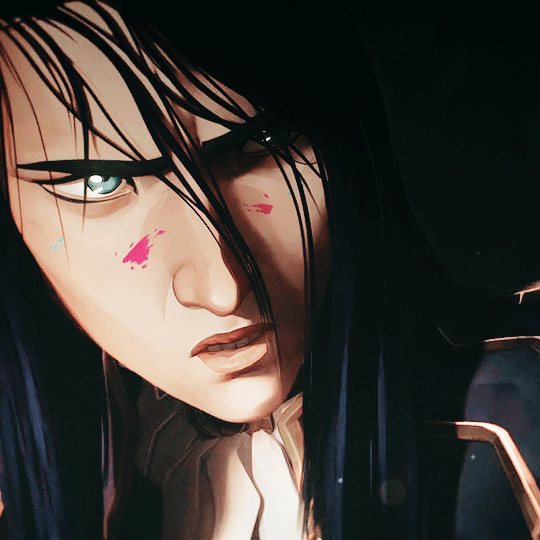
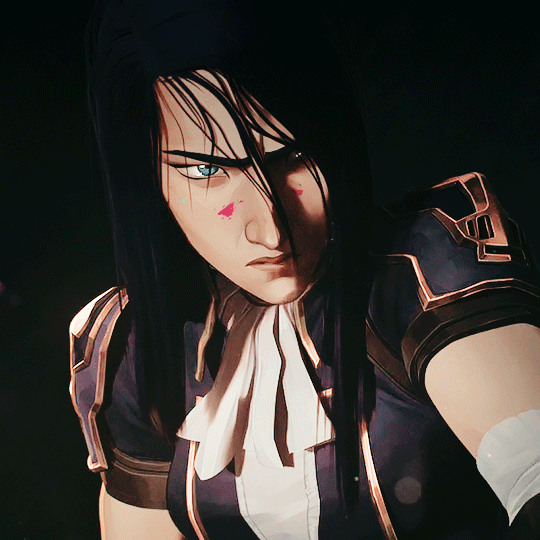
"Drop the gun."
#arcane#arcaneedit#caitlyn#caitlyn kiramman#arcane caitlyn#caitlyn arcane#caitlyn kiramman arcane#caitlyn league of legends#league of legends arcane#arcane league of legends#s1 ep9#type: gif#media: arcane#this has been in my drafts to do for so long but i keep holding it off bc idk what coloring to do#i just ended up using my default arcane psd i was too lazy to experiment with a new one skdfjskfs#also angry cait got me 😳 LMAO#cait: drop the gun#me: YES MAAM#2 days of caitlyn gifs???? YES.#told u im a cait simp heh#also its my bday i get to post what i want.... maybe more cait gifs muahahaha
1K notes
·
View notes
Text
one orrrr
two?
#not a perfect return to posting art#but fuck if my pettiness isn't a great driving force#lol about what snack??#some ole bullshit i saw on the whassit... insta or twitter#one of those two where “FaNs” go to pretend they got no fucking manners#oOoOh you're a this that whatever artist because look you draw like this one OoOoh#fuck outa here#literally I'm gonna post going through my whole goddamn style rolodex#also?#personal art style is not as big a deal as some of these new/young artists think it is#like maybe in commercial or children's book illustration#since they look for a specific vibe#and you're doing yourself an artistic disservice by focusing so much on “creating a personal style”#and this weird fucking self-imposed boundary of like appreciating how an artist renders this or that aspect of their drawing#because they think the plagiarism police are gonna SWAT them#like... it's pretty and you like it bcoz it speaks to you so#fucking just#try it out#try out that type of line weight#try out that color palette#try out that way of lighting a person or a scene#try it#listen everyone is out here being an aesthetic frankenstein's monster#the minute you try out xyz in your art it becomes “your style” because how you interpret it replicate it will be#influenced (altered you could say) by how you draw#unless your ass getting paid to draw on model or your art lead's style or you wanna get on a show/game so you're cobbling a quick portfolio#but that's not this#also lol next mutation still got fans#my childhood nostalgia says hello#tw eyestrain
156 notes
·
View notes
Text


Irida's new outfit is so cute, aaaaaaa
#pokemon legends arceus#pla#pla irida#clan leader irida#irida#pokemon irida#pokemon masters#loving her new outfit so so SO MUCH#so normal about her#not#so glad her alt colors match the pearl clan uniform ones too#holding her gently#irida my beloved#i missed drawing her so much wtf#giving her a bit of a weird pupil this time bc she's now the proud trainer of a ghost type pokemon as a sync pair#so I guess it's a bit of HC territory#but eh#my art
174 notes
·
View notes
Text
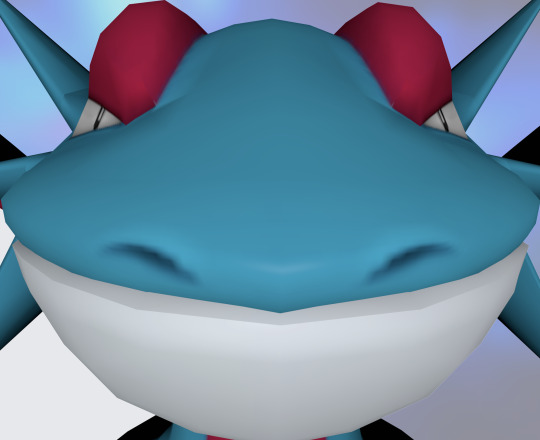
#salamence#THIS one is a good one. someone else mentioned the chin and claimed they look like lord farquaad. and would say “why YES this is Divine” and#i didn't like how accurate that was. anyway dragon/flying 4x weakness to ice my belovèd. if anyone says ice is bad#keep in mind how much of the competitive landscape it totally nullifies. ice is like. probably my second favorite type. behind electric#even though none of this is about salamence. they've got the whole primary colors thing going on but minus yellow#red and blue. red white and blue. american pokémon? big red wings that're just Flat. i really dunno what's happening here i just know it's#supposed to be really good in competitive. and also they got a paradox form which i Guess TPC is trying to market as totally new unrelated#pokémon but i'm always going to call them “paradox hariyama” and such instead of ~iron hands~ or whatever they're supposed to be called#don't want my pokémon names to have two words in them……
661 notes
·
View notes
Text
i like these funny guys
#warioware#mona warioware#spitz warioware#orbulon warioware#orbulon#<- my favorite character. just like me fr#i will make more warioware art probably#its good i like it#saving up for the new one#rly loving this way ive been doodling in ms paint lately#just blocking in colors then doing some wishywashy lineart type stuff#very fun
222 notes
·
View notes
Last Seen Blogs


kakashi-sensei21
De rojo te vez bien combina con tu ojos y tu piel


mavericktexan-blog
Aspergers Shmashburgers
s0nia246
Just someone who draws