#not the same preprocessor i know
Explore tagged Tumblr posts
Visit Tumblr Blog
Explore Tumblr blogs with no restrictions, modern design and the best experience.
Last Seen Tumblr Blogs


Fun Fact
Tumblr posted its first advertisements in May 2012 and subsequently earned $13M in revenue.
Text
just use c and get an over the barrel preprocessor experience you've never imagined
i don't wanna build a goddamn preprocessor pipeline i wanna get fucked in the ass until i see white is that so much to ask for
20 notes
·
View notes
Note
How DOES the C preprocessor create two generations of completely asinine programmers??
oh man hahah oh maaan. ok, this won't be very approachable.
i don't recall what point i was trying to make with the whole "two generations" part but ill take this opportunity to justifiably hate on the preprocessor, holy fuck the amount of damage it has caused on software is immeasurable, if you ever thought computer programmers were smart people on principle...
the cpp:


there are like forty preprocessor directives, and they all inject a truly mind-boggling amount of vicious design problems and have done so for longer than ive been alive. there really only ever needed to be one: #include , if only to save you the trouble of manually having to copy header files in full & paste them at the top of your code. and christ almighty, we couldn't even get that right. C (c89) has way, waaaay fewer keywords than any other language. theres like 30, and half of those aren't ever used, have no meaning or impact in the 21st century (shit like "register" and "auto"). and C programmers still fail to understand all of them properly, specifically "static" (used in a global context) which marks some symbol as inelligible to be touched externally (e.g. you can't use "extern" to access it). the whole fucking point of static is to make #include'd headers rational, to have a clear seperation between external, intended-to-be-accessed API symbols, and internal, opaque shit. nobody bothers. it's all there, out in the open, if you #include something, you get all of it, and brother, this is only the beginning, you also get all of its preprocessor garbage.
this is where the hell begins:
#if #else
hey, do these look familiar? we already fucking have if/else. do you know what is hard to understand? perfectly minimally written if/else logic, in long functions. do you know what is nearly impossible to understand? poorly written if/else rats nests (which is what you find 99% of the time). do you know what is completely impossible to understand? that same poorly-written procedural if/else rat's nest code that itself is is subject to another higher-order if/else logic.
it's important to remember that the cpp is a glorified search/replace. in all it's terrifying glory it fucking looks to be turing complete, hell, im sure the C++ preprocessor is turing complete, the irony of this shouldn't be lost on you. if you have some long if/else logic you're trying to understand, that itself is is subject to cpp #if/#else, the logical step would be to run the cpp and get the output pure C and work from there, do you know how to do that? you open the gcc or llvm/clang man page, and your tty session's mem usage quadruples. great job idiot. trying figuring out how to do that in the following eight thousand pages. and even if you do, you're going to be running the #includes, and your output "pure C" file (bereft of cpp logic) is going to be like 40k lines. lol.
the worst is yet to come:
#define #ifdef #ifndef (<- WTF) #undef you can define shit. you can define "anything". you can pick a name, whatever, and you can "define it". full stop. "#define foo". or, you can give it a value: "#define foo 1". and of course, you can define it as a function: "#define foo(x) return x". wow. xzibit would be proud. you dog, we heard you wanted to kill yourself, so we put a programming language in your programming language.
the function-defines are pretty lol purely in concept. when you find them in the wild, they will always look something like this:
#define foo(x,y) \ (((x << y)) * (x))
i've seen up to seven parens in a row. why? because since cpp is, again, just a fucking find&replace, you never think about operator precedence and that leads to hilarious antipaterns like the classic
#define min(x,y) a < b ? a : b
which will just stick "a < b ? a: b" ternary statement wherever min(.. is used. just raw text replacement. it never works. you always get bitten by operator precedence.
the absolute worst is just the bare defines:
#define NO_ASN1 #define POSIX_SUPPORTED #define NO_POSIX
etc. etc. how could this be worse? first of all, what the fuck are any of these things. did they exist before? they do now. what are they defined as? probably just "1" internally, but that isn't the point, the philosophy here is the problem. back in reality, in C, you can't just do something like "x = 0;" out of nowhere, because you've never declared x. you've never given it a type. similar, you can't read its value, you'll get a similar compiler error. but cpp macros just suddenly exist, until they suddenly don't. ifdef? ifndef? (if not defined). no matter what, every permutation of these will have a "valid answer" and will run without problem. let me demonstrate how this fucks things up.
do you remember "heartbleed" ? the "big" openssl vulnerability ? probably about a decade ago now. i'm choosing this one specifically, since, for some reason, it was the first in an annoying trend for vulns to be given catchy nicknames, slick websites, logos, cable news coverage, etc. even though it was only a moderate vulnerability in the grand scheme of things...
(holy shit, libssl has had huge numbers of remote root vulns in the past, which is way fucking worse, heartbleed only gave you a random sampling of a tiny bit of internal memory, only after heavy ticking -- and nowadays, god, some of the chinese bluetooth shit would make your eyeballs explode if you saw it; a popular bt RF PHY chip can be hijacked and somehow made to rewrite some uefi ROMs and even, i think, the microcode on some intel chips)
anyways, heartbleed, yeah, so it's a great example since you could blame it two-fold on the cpp. it involved a generic bounds-checking failure, buf underflow, standard shit, but that wasn't due to carelessness (don't get me wrong, libssl is some of the worst code in existence) but because the flawed cpp logic resulted in code that:
A.) was de-facto worthless in definition B.) a combination of code supporting ancient crap. i'm older than most of you, and heartbleed happened early in my undergrad. the related legacy support code in question hadn't been relevant since clinton was in office.
to summarize, it had to do with DTLS heartbeats. DTLS involves handling TLS (or SSLv3, as it was then, in the 90s) only over UDP. that is how old we're talking. and this code was compiled into libssl in the early 2010s -- when TLS had been the standard for a while. TLS (unlike SSLv3 & predecessors) runs over TCP only. having "DTLS heartbeat support in TLS does not make sense by definition. it is like drawing a triangle on a piece of paper whose angles don't add up to 180.
how the fuck did that happen? the preprocessor.
why the fuck was code from last century ending up compiled in? who else but!! the fucking preprocessor. some shit like:
#ifndef TCP_SUPPORT <some crap related to UDP heartbeats> #endif ... #ifndef NO_UDP_ONLY <some TCP specific crap> #endif
the header responsible for defining these macros wasn't included, so the answer to BOTH of these "if not defined" blocks is true! because they were never defined!! do you see?
you don't have to trust my worldview on this. have you ever tried to compile some code that uses autoconf/automake as a build system? do you know what every single person i've spoken to refers to these as? autohell, for automatic hell. autohell lives and dies on cpp macros, and you can see firsthand how well that works. almost all my C code has the following compile process:
"$ make". done. Makefile length: 20 lines.
the worst i've ever deviated was having a configure script (probably 40 lines) that had to be rune before make. what about autohell? jesus, these days most autohell-cursed code does all their shit in a huge meta-wrapper bash script (autogen.sh), but short of that, if you decode the forty fucking page INSTALL doc, you end up with:
$ automake (fails, some shit like "AUTOMAKE_1.13 or higher is required) $ autoconf (fails, some shit like "AUTOMCONF_1.12 or lower is required) $ aclocal (fails, ???) $ libtoolize (doesn't fail, but screws up the tree in a way that not even a `make clean` fixes $ ???????? (pull hair out, google) $ autoreconf -i (the magic word) $ ./configure (takes eighty minutes and generates GBs of intermediaries) $ make (runs in 2 seconds)
in conclusion: roflcopter
⎯⎯⎯⎯⎯⎯⎯⎯⎯⎯⎯⎯⎯⎯⎯⎯⎯⎯⎯⎯⎯⎯⎯⎯⎯⎯⎯⎯⎯⎯⎯⎯⎯⎯ disclaimer | private policy | unsubscribe
159 notes
·
View notes
Text
I work in formal methods and computational mathematics. I spend a lot of time working on SAT solvers and CAS engines and the like.
Today, I happened to be working on a SAT solver. And noticed the sat solver had another sat solver inside of it. In retrospect, that should have been obvious.
Now, for those who don't know, here is what a SAT solver does, and what its applications are:
A SAT solver takes a statement made of negations, conjunctions, disjunctions, and atomic statements and then returns an assignment of the atomic statements that makes the statement true.
For example: A or B, this can be satisfied as A = True and B = False.
This is the quintessential NP-complete problem. All the others can actually be reduced to it. So for the list of problems that a SAT solver can solve, see link below.
Modern methods have been trying to make it really really fast. Unfortunately, we haven't been able to beat the polynomial time barrier. Most people think it's impossible, but no one has actually shown that it is impossible.
I'm really naive, perhaps, in that I think P=NP. I may just believe that because it'd be so cool if it were true. So far no one has proved me wrong.
Now, whilst working on one of these SAT solvers, I realised something: the input for the solver has to be in conjunctive normal form, and there's a preprocessor that converts the statement into conjunctive normal form, that is
Anding a bunch of ors of atomic statements and their negations.
(a or b) and (c or (not a)) and (a or c) and ((not a) or c or f)
To get them there, the preprocessor system that converts things into conjunctive normal form has several rules about manipulation of these statements. As it happens, it is robust enough to do the same, but into disjunctive normal form, which in this case happens to be:
(b and c) or (a and c)
Which does actually accomplish what the SAT solver set out to do.
Now, does this system run slower and less effectively than the actual system? Yes. But I find it funny that there's a SAT solver in my SAT solver.
4 notes
·
View notes
Text
The more I use C and C++ the less I hate certain aspects of them. Not because I no longer see them as bad, but because they're now a bad I know.
That said I will never get over the decision to separate definition and implementation between two files. It incentivizes me to just shove all my code in the main file because then I don't need to write any headers. If there was a way to just include .c or .cpp files directly I might actually use these languages for personal projects ever. Like yeah I know why things are the way they are but jesus christ it makes me never want to use this language because tbh I'm never writing code in a context where the distinction between interface and implementation matter. Every other language I use has proper import statements and let you just include shit and not have to fuss with preprocessor macros to ensure you don't accidentally define the same struct 20 times.
2 notes
·
View notes
Note
I just downloaded Relight using your tutorial (ty btw) and everything works great except for Relight not working in cas. It works in live mode but in cas it just seems to disappear. Do you know why this could be happening?
Hi anon,
A lot of people seem to have this issue. I suspect it might be that cas uses a different depth calculation to the rest of the game.
You can test this by turning on displaydepth.fx while you're in the main game world (i.e. not in cas). The screen will turn greyscale, with no detail, and it should gradually go from black near the camera to white in the far distance. Make a note of how it looks. Maybe take a screenshot to remind yourself.
Now go into cas and do the same. Do you see the same range of black-to-white, or is there far more black or far more white than in the main game?
If there is, that's an indication that it's calculating depth differently.
You can then go into global preprocessor definitions and change the top line that has the value 1000.00. Start by making it bigger, change it to 10000.00 (ten thousand instead of the default one thousand). When you're done, click outside of the global preprocessor definitions box and ReShade will reload. See if that makes any difference. You can also try making it far smaller, to 100 perhaps (I'm not sure if it's calculated in cas with bigger or smaller numbers, so you may need to try both to get the right number you need). Start with the larger number though, whenever I've had to do this in other games it's always needed making bigger.
If this fixes it, that's great! The downside is you'll need to change it back when you leave cas.
3 notes
·
View notes
Text
sometimes I really wish C# had C/C++ style preprocessor macros. I know they have their issues, especially when it comes to accidental code obfuscation, but sometimes sometimes being able to use semantic similarities between two otherwise entirely different objects can be really handy.
like the API I'm working with has a bunch of various event classes that all use paired Subscribe and Unsubscribe methods, and I'd like to have it so every time I Subscribe to an event, that same event also gets added to a list to make sure it gets Unsubscribed later, but since most events calls use different types of arguments, the method calls are functionally too different for a simple generic solution.
If it were C/C++, I'd just be able to do #define SUBEVENT(ev, fun) ev.Subscribe(fun); unsubscribe.Add(() => { ev.Unsubscribe(fun); }); and call it a day, but since C# doesn't have the C preprocessor, it depends on me remembering to manually add each subscribed event to the unsubscribe list.
Feels like there's got to be a better way, but hells if I know what it'd be.
6 notes
·
View notes
Note
hi! i saw you managed to get vapoursynth running for gifsetting on a new macbook, i just a macbook pro recently and i can't get it to work with sonoma. would you consider making a tutorial or giving some tips, please? with love, a fellow gifmaker <3
hey friend! sorry to hear you are having some trouble :/ vs is so tricky and like, i don't know a lot about computer stuff but they somehow don't have an updated version of it either so it's all just weird to me LOL :')
for some context, i got the latest macbook pro and i did learn a few things that i had to tweak that were different from my old macbook vs settings!
if you haven't tried yet, use this vs install tutorial. i've only ever used this and it has never given me issues! just follow it to a T if you can! in addition, when you do hopefully get vs up and running on your new macbook, you have to adjust some things! so when you open vs and the resizer window appears, you know how these settings go as followed: gif size, opacity, preprocessor, denoise filters, and sharpening? well, on my old macbook i would always set the denoise filter to KNLM, however i have found that when i did that on the new macbook, it would leave a purple hue/purple pixels on my gif whenever i would preview it before downloading it. so i realized i needed to set the denoise filter to BM3D....and have no idea why! it's worked for me ever since and can make my gifs in photoshop how i usually do them! let me know if you run into the same issue if you do toggle the denoise settings! i would really love to know! i really hope this helps you, i know how frustrating it is trying to get everything to how you want it to be! good luck and let me know if i can do anything else for you! <3
#asks#anon#i really hope this helps you friend! pls pls let me know if i can do anything else for you!#i unfortunately am not very good at troubleshooting and usually ask my bf for help since he's in IT klsjfdlksdjf#let me know what else i can do for you!
2 notes
·
View notes
Text
CSS Functions and Mixins Module Notes
New Post has been published on https://thedigitalinsider.com/css-functions-and-mixins-module-notes/
CSS Functions and Mixins Module Notes
Most days, I’m writing vanilla CSS. Thanks to CSS variables and nesting, I have fewer reasons to reach for Sass or any other preprocessor. The times I reach for Sass tend to be when I need a @mixin to loop through a list of items or help keep common styles DRY.
That could change for me in the not-so-distant future since a new CSS Functions and Mixins Module draft was published in late June after the CSSWG resolved to adopt the proposal back in February.
Notice the module’s name: Functions and Mixins. There’s a distinction between the two.
This is all new and incredibly unbaked at the moment with plenty of TODO notes in the draft and points to consider in future drafts. The draft spec doesn’t even have a definition for mixins yet. It’ll likely be some time before we get something real to work and experiment with, but I like trying to wrap my mind around these sorts of things while they’re still in early days, knowing things are bound to change.
In addition to the early draft spec, Miriam Suzanne published a thorough explainer that helps plug some of the information gaps. Miriam’s an editor on the spec, so I find anything she writes about this to be useful context.
There’s a lot to read! Here are my key takeaways…
Custom functions are advanced custom properties
We’re not talking about the single-purpose, built-in functions we’ve come to love in recent years — e.g., calc(), min(), max(), etc. Instead, we’re talking about custom functions defined with an @function at-rule that contains logic for returning an expected value.
That makes custom functions a lot like a custom property. A custom property is merely a placeholder for some expected value that we usually define up front:
:root --primary-color: hsl(25 100% 50%);
Custom functions look pretty similar, only they’re defined with @function and take parameters. This is the syntax currently in the draft spec:
@function <function-name> [( <parameter-list> )]? <function-rules> result: <result>;
The result is what the ultimate value of the custom function evaluates to. It’s a little confusing to me at the moment, but how I’m processing this is that a custom function returns a custom property. Here’s an example straight from the spec draft (slightly modified) that calculates the area of a circle:
@function --circle-area(--r) --r2: var(--r) * var(--r); result: calc(pi * var(--r2));
Calling the function is sort of like declaring a custom property, only without var() and with arguments for the defined parameters:
.elenent inline-size: --circle-area(--r, 1.5rem); /* = ~7.065rem */
Seems like we could achieve the same thing as a custom property with current CSS features:
:root --r: 1rem; --r2: var(--r) * var(--r); --circle-area: calc(pi * var(--r2)); .element inline-size: var(--circle-area, 1.5rem);
That said, the reasons we’d reach for a custom function over a custom property are that (1) they can return one of multiple values in a single stroke, and (2) they support conditional rules, such as @supports and @media to determine which value to return. Check out Miriam’s example of a custom function that returns one of multiple values based on the inline size of the viewport.
/* Function name */ @function --sizes( /* Array of possible values */ --s type(length), --m type(length), --l type(length), /* The returned value with a default */ ) returns type(length) --min: 16px; /* Conditional rules */ @media (inline-size < 20em) result: max(var(--min), var(--s, 1em)); @media (20em < inline-size < 50em) result: max(var(--min), var(--m, 1em + 0.5vw)); @media (50em < inline-size) result: max(var(--min), var(--l, 1.2em + 1vw));
Miriam goes on to explain how a comma-separated list of parameters like this requires additional CSSWG work because it could be mistaken as a compound selector.
Mixins help maintain DRY, reusable style blocks
Mixins feel more familiar to me than custom functions. Years of writing Sass mixins will do that to you, and indeed, is perhaps the primary reason I still reach for Sass every now and then.
Mixins sorta look like the new custom functions. Instead of @function we’re working with @mixin which is exactly how it works in Sass.
/* Custom function */ @function <function-name> [( <parameter-list> )]? <function-rules> result: <result>; /* CSS/Sass mixin */ @mixin <mixin-name> [( <parameter-list> )]? <mixin-rules>
So, custom functions and mixins are fairly similar but they’re certainly different:
Functions are defined with @function; mixins are defined with @mixin but are both named with a dashed ident (e.g. --name).
Functions result in a value; mixins result in style rules.
This makes mixins ideal for abstracting styles that you might use as utility classes, say a class for hidden text that is read by screenreaders:
.sr-text position: absolute; left: -10000px; top: auto; width: 1px; height: 1px; overflow: hidden;
In true utility fashion, we can sprinkle this class on elements in the HTML to hide the text.
<a class="sr-text">Skip to main content</a>
Super handy! But as any Tailwind-hater will tell you, this can lead to ugly markup that’s difficult to interpret if we rely on many utility classes. Screereader text isn’t in too much danger of that, but a quick example from the Tailwind docs should illustrate that point:
<div class="origin-top-right absolute right-0 mt-2 w-56 rounded-md shadow-lg">
It’s a matter of preference, really. But back to mixins! The deal is that we can use utility classes almost as little CSS snippets to build out other style rules and maintain a clearer separation between markup and styles. If we take the same .sr-text styles from before and mixin-erize them (yep, I’m coining this):
@mixin --sr-text position: absolute; left: -10000px; top: auto; width: 1px; height: 1px; overflow: hidden;
Instead of jumping into HTML to apply the styles, we can embed them in other CSS style rules with a new @apply at-rule:
header a:first-child @apply --sr-text; /* Results in: */ position: absolute; left: -10000px; top: auto; width: 1px; height: 1px; overflow: hidden;
Perhaps a better example is something every project seems to need: centering something!
@mixin --center-me display: grid; place-items: center;
This can now be part of a bigger ruleset:
header @apply --center-me; /* display: grid; place-items: center; */ background-color: --c-blue-50; color: --c-white; /* etc. */
That’s different from Sass which uses @include to call the mixin instead of @apply. We can even return larger blocks of styles, such as styles for an element’s ::before and ::after pseudos:
@mixin --center-me display: grid; place-items: center; position: relative; &::after background-color: hsl(25 100% 50% / .25); content: ""; height: 100%; position: absolute; width: 100%;
And, of course, we saw that mixins accept argument parameters just like custom functions. You might use arguments if you want to loosen up the styles for variations, such as defining consistent gradients with different colors:
@mixin --gradient-linear(--color-1, --color-2, --angle) /* etc. */
We’re able to specify the syntax for each parameter as a form of type checking:
@mixin --gradient-linear( --color-1 type(color), --color-2 type(color), --angle type(angle), ) /* etc. */
We can abstract those variables further and set default values on them:
@mixin --gradient-linear( --color-1 type(color), --color-2 type(color), --angle type(angle), ) --from: var(--color-1, orangered); --to: var(--from-color, goldenrod); --angle: var(--at-angle, to bottom right); /* etc. */
…then we write the mixin’s style rules with the parameters as variable placeholders.
@mixin --gradient-linear( --color-1 type(color), --color-2 type(color), --angle type(angle), ) --from: var(--color-1, orangered); --to: var(--from-color, goldenrod); --angle: var(--at-angle, to bottom right); background: linear-gradient(var(--angle), var(--from), var(--to));
Sprinkle conditional logic in there if you’d like:
@mixin --gradient-linear( --color-1 type(color), --color-2 type(color), --angle type(angle), ) --from: var(--color-1, orangered); --to: var(--from-color, goldenrod); --angle: var(--at-angle, to bottom right); background: linear-gradient(var(--angle), var(--from), var(--to)); @media (prefers-contrast: more) background: color-mix(var(--from), black); color: white;
This is all set to @apply the mixin in any rulesets we want:
header @apply --gradient-linear; /* etc. */ .some-class @apply --gradient-linear; /* etc. */
…and combine them with other mixins:
header @apply --gradient-linear; @apply --center-me; /* etc. */
This is all very high level. Miriam gets into the nuances of things like:
Applying mixins at the root level (i.e., not in a selector)
Working with Container Queries with the limitation of having to set global custom properties on another element than the one that is queried.
The possibility of conditionally setting mixin parameters with something like @when/@else in the mixin. (Which makes me wonder about the newly-proposed if() function and whether it would be used in place of @when.)
Why we might draw a line at supporting loops the same way Sass does. (CSS is a declarative language and loops are imperative flows.)
Scoping mixins (@layer? scope? Something else?)
Miriam has an excellent outline of the open questions and discussions happening around mixins.
That’s, um, it… at least for now.
Gah, this is a lot for my blonde brain! Anytime I’m neck-deep in CSS specification drafts, I have to remind myself that the dust is still settling. The spec authors and editors are wrestling with a lot of the same questions we have — and more! — so it’s not like a cursory read of the drafts is going to make experts out of anyone. And that’s before we get to the fact that things can, and likely will, change by the time it all becomes a recommended feature for browsers to implement.
This will be an interesting space to watch, which is something you can do with the following resources:
#amp#background#Blue#Brain#centering#change#classes#Color#colors#container#content#course#CSS#CSS Snippets#csswg#custom properties#deal#display#dust#fashion#Features#form#functions#Future#Global#gradients#grid#how#HTML#indeed
0 notes
Text
I don't know why exactly, but there is something really comfy about programming for microprocessors.
You can't ask too much of the machine, so you keep things simple.
At the same time, you get to marvel at the crazy preprocessor magic people have woven into the OS, to make sure as much as possible happens at compile time.
Because once your code runs it's going to be plodding along at a leisurely 64 MHz. It'll get there when it gets there.
1 note
·
View note
Text
Tutorial to switch from Gshade to Reshade for ts4
The original tutorial for switching to reshade is for ffxiv, and there are some minor differences for the sims 4, so I figured out I can show you how I switch to Gshade for ts4! Credits to op for sharing the original tutorial for ffxiv.
This is intend for those who want their Gshade presets to look exactly the same on Reshade.
I’m not here to inform why you need to switch to Reshade and force everyone to do so. If you wish to know more about the situation, read this and this). Gshade still works if you’re not on the newest version (4.1.1), and is pretty much safe to use at the time writing this tutorial. Feel free to continue using it if you’re aware of the risks.
1. Backup your preset and shader folder
Go to “Documents/The Sims 4/Game/Bin/Gshade-presets” and “Program Files/GShade/Gshade-shaders” to back up respective folders. Lost/deleted your “Gshade-shaders” already? You can grab it here.
**If you use custom shaders downloaded separately (not from the Gshade program itself, e.g. full bloom multiLUT by picture amoebae), then copy the Gshade custom shader folder as well. (I’m not sure about the location, since I don’t use custom shaders and I’ve uninstalled Gshade already. Gshade should have created a shortcut on your desktop, or you could probably find it in “Program Files/GShade/” as well.)
2. Uninstall Gshade
Run Gshade uninstalled in “Program Files/Gshade/Gshade Uninstaller”, then go to your game folder and delete “d3d9.dll”. (Or “d3d9”. If it doesn’t exist, don’t worry. When you install reshade, it’ll tell you if there’s any file interfering the reshade installation.)
3. Install Reshade
Install whichever Reshade version you’d like to use. Run the exe file, choose the sims 4, then direct X9. Only check “standard shaders”.
4. Replace shaders and presets folder
Replace the content in “Reshade-shaders” in your game folder with those in “Gshade-shaders” you backed up in step 1. Copy and paste the “Gshade-presets” into your game folder, then change the name to “Reshade-presets”.
**if you use custom shaders, paste the content from “Gshade-custom shaders” to “Reshade-shaders” as well
5. Delete Gshade folders
For some reason, your GShade folder may still be there even after the uninstaller told you that the files will be deleted after restarting your pc. Go to “Program Files/Gshade”. Check if it’s still here and delete it manually if it is.
6. Edit global preprocessor definitions
Your MXAO & DOF shaders don’t work? Your game turned into a horror movie like this?

Don’t worry, after you start the game, press “numpad 7” to bring up the menu. Go to edit global preprocessor definitions, change “RESHADE_DEPTH_INPUT_IS_REVERSED” to 0.
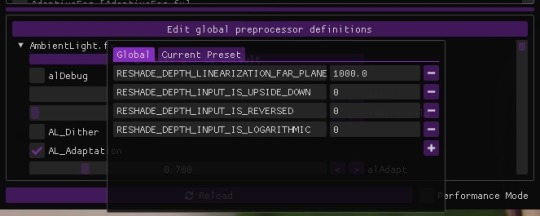
Voilà! These shaders should work again!

Congratulations, your Gshade presets now work on Reshade! If you have any problems feel free to pm me<33 (I’ll respond faster on my instagram)
#I’m too new to tumblr and idk why the spacing looks so ugly on mobile#pls forgive me#sims 4#the sims 4#ts4 gshade#ts4 reshade
143 notes
·
View notes
Text
Art of Seduction: Brett Talbot
Character: Brett Talbot
Universe: Teen Wolf
Warnings: Smut, kinky
As the morning sun had risen, I already knew that this day would be a terrible one. Warm and disgustingly dry. The perfect day for a lacrosse match.
The second thing through which I knew, that day would be awful, was the arrival of our archenemy. The Devenford Prep team members think themselves superior to us.
And the third, as well as the final was their team captain. Taunting one of my own team members. The one that was once on his own team. With me getting the job of captain from the one before me, just by winning against him in a sport, I haven’t played before once, I got in his face, getting his target away from him.
„Brett, how many times do we need to do this?“, I asked the other boy exhausted at this point. He always stirred trouble, for some strange reason, trying for his once friend to explode in his face.
„When you are on your knees begging me to show you, how a guy treats his whores,“ he jokingly challenged me. With a smug face on my own, I hold out my hand. „Okay, that’s a deal then. When you win, I will get on my knees, beg you exactly what you want, and admit publicly, that you are superior.“ He almost already took my hand, but I pulled it away a bit, „But only, if you do the same when we win.“ I told him, but still get closer to him, to not humiliate him further in the face of his friends, „And trust me I know what I like, you will look good gagged, bound, and in leather.“
I could see him swallow hard, reluctantly taking my hand, because of the humiliation he would suffer if he would not agree.
With a smile, that rots his core in seconds, you watched him slowly die inside. Already feared that this was a bad idea, because it was the first time, that you were the captain and not your preprocessor. He only knew you were a good player, under a bad captain. But because his school had never lost against yours, he could not dare, to not agree to this.
The entire day I could hear my team whisper if I was really fit to lead them if I do a bargain like this with our archenemy. And the other team wondered what was going on, that I did such a bargain with them.
I did not answer anything, just went on with my day, without a concern in my body. Which finally could get the rest to cool down as well, but the other team got even more nervous thanks to this.
All a part of the plane, but the important part, came when you changed for the match. „Okay, if you guys follow this plan, exactly to the point, we will win this, okay? No heroes, no thinking on your own! I could live with the damage to my pride, but I know most of you could not. So just follow me this time, okay?“
A loud murmur went through the room, not happy, but in the end, agreed to do it.
So I came onto the field, with a confidence someone so close to death, shouldn’t have. After the last pep talk, I gave my team, I came face to face with Brett once more. Before we put on our helmets, you looked at me concerned. „Are you sure you want to do this? You still can take your bet away and nobody will ever now?“
„Are you scared Brett?“, I asked him in a child's voice, taunting him. „But if you fear losing, you can take back our agreement, and show everyone how much of a pussy you are.“
All riled up, him showing me his yellow eyes and gripping the stick hard, you know that everything was perfect.
The first third of the game looked as always. The Devenford Prep is far in the lead and your team, running around like headless chickens. As you again came face to face with Brett. „I look forward to you on your knees, maybe I even show you a good, time even though you were a brat to me.“
That last bit, him being so confident that he couldn't possibly lose anymore, was the last bit I needed.
Before the next whistle was sounded, I gave my team the hand signal. And before these arrogant idiots, even knew what was happening to them, we got a goal and another one, one after another, soon we were in the lead, with a well-oiled machine.
As the final whistle came, I got one more goal in, just to rub some salt into the fresh wound. My team was not only happy but ecstatic. Never in their wildest dream, did they ever think, that they could win.
But your eyes were on Brett, who still stood at the middle line, absolutely defeated, looking confused around. „So do you want to kneel before me now, or later?“, I asked him innocently, but my victorious smirk, must’ve been a dead giveaway.
He launched a punch, but I grabbed in before he even could get far. „I wouldn’t recommend trying to fight me. You have no possible chance to win, not even when you transform here and now. So get your stuff. I like my men nice and sweaty.“
Not even a minute, after I had sent him to the locker room, came he back out, I was already waiting for him with my own stuff. As he saw me, his demeanor changed again, from his happy smile, he had as he came out to a feared, almost sad one. „You did not try to run away, right?“, I asked him already knowing that this was directly the thing he had tried.
„Now come on, the evening is young and you will have too much to do to sleep in the night.“
He followed me silently, to my car, seated himself into it and we drove off. His mind was far away from this place. Even though he desired me, he wanted to be the one in charge. How foolish of him.
„Hey wake up sleepy head, we are there.“ I told him, shaking him awake again. He was disoriented for a moment. His jaw dropped as he saw my home.
„Don’t worry, my parents are not home, as they never are,“ the last part was mumbled by me. I did not want him to pity me in any way. Even though he does not even have parents anymore.
„Why are you at this filthy public school, when your parents are rich?“, he asked in utter disbelieve.
With a smile, I turned around, directly in front of the primary door. „Because of behavior like yours. I was a spoiled brat growing up and my true colors came out in a private elementary school, where I was a massive bully, throwing my parent's weight around, after that, they put me in public schools, where my face got kicked in more than once. It humbled me greatly. You should try it too. But I don’t think you need to, after I’m finished with you.“ My smile changed into a sinister smirk, which gave Brett a nice cold shower over his back.
Getting him in, you stopped him in the foyer. „On your knees.“ It took him a moment, but he did what I told him to do. „And now beg for me to treat you right, like a guy should treat his whores and tell me I’m superior to you.“
And he did without a second thought. But he thought he was done. If this would’ve been the case, I did not have had to get him into my home.
„Now to the good part.“ I closed the distance between us, grabbed the back of his head, and slammed our lips onto each other. A firework exploded in me. I knew he felt it too.
Hastily getting his shirt off of his body, shortly followed by his shorts, he still had his sweaty smell on him. Little salt crystals all over his soft skin, wrapping nicely over his perfectly built body.
„God how long, do I want you for me alone?“, I whispered, licking down his throat, and kissing his Adam’s apple.
Only in his jockstrap was he standing in the foyer, eyes glossy from lust. „Come on, we have a lot to do.“ I took his hand and pulled him with me. His mind was blank, the only want in him was to take me and make me his.
As we came to a green room, Let go of his hand, opened it, and showed him with my hand, that he should go first. Dimmed light illuminated the room. „On the wall to the right, are leather harnesses. Find one that fits your muscular body.“ I told him, while also feeling him up again. Massaging his already massive chest, which will only grow the more sports he will do. To his already impressive eight pack. The first I myself saw in person.
I, on the other hand, shed all my clothing, until I stood naked in the room, a whip already in my hand.
As he had found a harness that could only better the look of him, he came with it to me, not able to close it on his own. The moment he saw the whip, he knew what would happen.
„No save word. If you lost a bet, you will honor it. Don’t worry, your ass is safe, I like my men as tops. Nobody had you already right?“ He shook his head. „Great I don’t like versatile either. If you want to be mine after that, you will never have something inside of your but, understood?“ This time he nod obediently.
„Good. Now hands and head through there. I will close it and give you your first few hits, okay?“ More excited than I have ever seen him, he agreed. Taking the hits with the whip, like a champ.
The wounds didn't heal, because of the bit of wolfsbane the whip had on it. As I got him out, I bound his hands together, pulling them up at a metal chain. I waited until it was secured to get in front of him again.
„You know I thought you would be more intelligent. Come into a room, where everything is laced with wolfsbane like a werewolf. Pretty stupid.“ It was the first time I saw utter fear, almost terror on his face. „Don’t worry I’m not a hunter. I like you. Wanted you from the day I saw you.“
Again touching his body as if he already was completely mine. Even getting his stupid jockstrap finally off of him, jerking his massive erect dick. „You did not have a chance against my team today. I’m a seer. Being able to see all possible features in the split of a second, is quite helpful some days.“
„You cheated?“, he asked out of breath. Almost not wanting to believe what you had told him. „Just as much as you, when you used your werewolf agility and strength, in every match you ever played. I only set the records straight. And now tell me, that you don’t like me, feeling you up, touching every centimeter of your skin, jerking you off, and later, fucking myself, with your stupidly large dick. Tell me and I stop and let you go.“
But he stayed still. „Just as I thought. If you are a good boy, I might even let you call me your boyfriend. It will happen either way, so just accept it.“ I sealed my and his fate with a kiss, which he accepted wholeheartedly. Why I will never know, but he seemed to have accepted the tragedy of both of our lives the moment he heard it.
„Great kisser, great body, great cock. We only need to work on your personality.“ I told him, after this heated wonderful kiss. „Hits with a paddle, maybe? Or should I move higher with the whip? Oh, I know!“
As I walked out of his sight, I could see him getting antsy, fearing for your wonder weapon to break his stubborn mind.
I sneaked up on him, from behind and smeared a cream on his back. For a moment nothing happened, but then he suddenly moved a lot, trying to scratch his back. „What is that?“, he asked nervously, uncomfortable.
„Something you will get when you become a brat again. Be a good boy to me and I will end your suffering.“
Save to say, I would have to smear half of his body full, and only the next day he would he feel better again. But interestingly, his dick even though his body itched and burned stood proudly in the air. Which I saw, but could not believe. Seeing it, made it even more arousing.
But before we could get to the fun part, I had to do a lot more for him. And he loved every bit of it, especially when I praised him. He became a very eager boy toy, very fast. But would have to learn a lot too, especially to see me as the dominant one in the relationship. It actually would take years to get this into his brain. But I already knew this and was prepared for it too.
At least he would live and that is the most important part.
[Masterlist]
#Brett Talbot#Brett Talbot x male reader#brett talbot imagine#Teen Wolf#Teen Wolf x male reader#Teen Wolf imagine#x male reader#male reader#male reader imagine#x male reader imagine#smut
220 notes
·
View notes
Text
SANCHELINZ’S GIFFING PROCESS
hi hi so i figured i would compile a post for my giffing process as i have gotten several questions about how i gif so quickly/what i use/etc so!
tools i use:
- vapoursynth - photoshop
specs:
i have two devices that i gif on, i just switch between the two depending on where i’m at.
for my desktop computer, i have an alienware aurora r11
- processor: intel core i7-10700K - ram (memory): 32.0GB - os: windows 11
for my laptop, i have a dell xps 15 9500
- processor: intel core i7-10875H - ram (memory): 16.0GB - os: windows 10
if you want see a side by side comparison of gifs i make on each, all my paradigm sets were made on my laptop (here, here, here, and here) while my taemin gifs and these two key mv sets were made on my desktop (here, here, and here). they generally look the exact same, my desktop is just faster bc it has more memory.
things i do first:
i always clip the video i’m working with first by writing out the timestamps i want to use solely bc that is what works best and quickest for me. every gifmaker is different and will have different tactics, but that’s just what i’m used to and what helps me expedite the process the most!
clipping things this way means that i spend less time rifling through frames and shots to find what i like bc i just make note of the timestamp where a certain shot i like is and can push it through the vapoursynth real easy
vapoursynth settings:
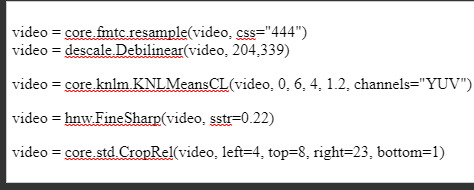
for vapoursynth i try not to do too much since i do most my work inside photoshop itself, and i keep these settings the same 100% of the time. and rather than going through each individual gif, i overwrite the code each time i start a new set so that i can keep the sizes the same from gif to gif. this also cuts down on time and makes it easier to focus on other parts of the process
video = core.knlm.KNLMeansCL(video, 0, 6, 4, 0.5, channels="YUV") video = fun.FineSharp(video, sstr=1.5)
i only use a preprocessor (video = haf.QTGMC(video, Preset="Slower", TFF=True) bilinear) when the file i’m working with overlaps frames or has that ‘striping’ effect on it.
i trim all my clips/gifs on vs to start! if a gif ends up being too large, or i don’t like certain frames, or i don’t like the way it loops, i’ll simply delete as needed later in photoshop!
once i get my output and it processes (the processing time of the gifs is usually what takes the longest and i have found that this speed depends mostly on your device’s memory. my desktop is much faster than my laptop bc my desktop has twice the amount of memory on it) i copy and paste the output file into a generic copy like this. if i’m making a ton of clips (20-30+) then i will name them or separate into folders as needed

photoshop:
firstly, photoshop is very dependant on memory as well. the sole reason why my desktop has so much memory is bc of photoshop. you can go into settings to change how much memory photoshop consumes (edit -> preferences -> performance) and photoshop will recommend an ideal range to use too. i have mine set to 70% and it runs like a dream. the only crashes i’ve experienced have been when i’m running other programs that use a lot of memory at the same time.
i monitor my task manager regularly simply bc i like knowing why my computer is running the way it is and i can confirm that photoshop eats memory hardcore. if you use both vapoursynth and photoshop, and have issues with slowness and/or crashes, i recommend keeping photoshop closed until you are fully done with vapoursynth.
i don’t reuse colorings from set to set so i don’t really keep/use psds personally. i know a lot of gifmakers do have set psds that they make to use for certain kinds of videos and such, and that is def something that can speed up the process too ^^
what i personally do is group my coloring layers into a folder and once i’ve finished coloring one gif i will simply copy and paste it onto the next and make minor adjustments as needed!
coloring itself, it depends from set to set but the five layers i absolutely always use are: brightness/contrast, color balance, channel mixer, selective color, and exposure (i always keep my exposure layer on the very top, it’s a minor change but just a personal preference)
i try to make everything as easy as possible when giffing personally, so if i can turn a 20 click process into one click, then i absolutely will.
90% of the speed of my giffing comes from actions!
actions are my best best best friend in the universe when it comes to giffing. i have the same action sets on both my laptop and desktop so that i don’t have to remember my settings myself since my memory is horrible.
first convert: select all frames, select all layers, convert frame animation, convert to smart object
compile: select all layers, convert to smart object
0.02/0.03/0.04/0.05/0.06: frame speed settings/ selecting all frames, change frame animation speed
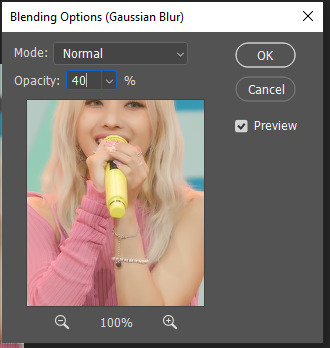
blur: for captions, i duplicate the og layer and select the area around the caption then use gaussian blur at radius 1.4 pixels to blur. i typically go in after the fact with the blurring tool to smooth the edges around the blur section so it isn’t as sharp!
i have an action for my noise settings to maximize efficiency too, then i do the same for my denoise/sharpening settings. i have two separate ones, one for small gifs (like for a 9-set, 3x3) and one for all other sizes of gifs
the final convert is simply flattening the frames into clips and converting the timeline, making frames from layers, then setting it to whatever speed i like. because im ultra lazy, i have those frame speed settings as an action so i can just do one click instead of like, three.
essentially, if there is something i know i will be doing and/or repeating often, i make it an action. that’s really what makes my process as quick as it is imo!
honestly i just try to streamline the process as much as possible bc the technical parts of clicking 100 different things are not what i enjoy about giffing, i enjoy coloring and playing with layers the most so that’s what i want to spend the brunt of my time doing. but i also tend to be super busy while also wanting to gif a ton so over time and with practice a lot of the process has become pretty snappy and easy just from that!
pls feel free to ask questions if anything doesn’t make sense im not the best at communicating my thoughts into words so i might be explaining things in a way only i can understand but i hope it makes sense enough and is helpful too!!
50 notes
·
View notes
Note
How do you make your gifs? I really like the way you do it and would love to learn how
Hello nony! It really makes my heart warm that you like the way I gif, thank you so much! I'll make a detailed step by step of how I do things and give you the download links and other tutorials because learning it from scratch is usually a long process:
1. Vapoursynth
windows (if you have a x64 windows, I’d advise downloading the VapourSynth64Portable(200616), I just tried that one and the folders look like the tutorial video, I’m not sure about the others.)
macOS
Tutorial:

You have these two icons on your desktop. You drag the file you want to gif on top of the one on the right, the one written vapourscript. It's going to pop up a window like this:
Then you write down when your footage starts, say, 00:00:07. Click enter and then you write down for how long it lasts, say, five seconds = 00:00:05. So when it starts > enter > for how long it lasts > enter. VS will do its own thing and you just have to wait until it pops out this window in your browser:

You can resize the footage however you like.
(Photoshop dimensions:
1 column set: width of 540 px
2 column set: width of 268 px
3 column set: width of 177 px)
For denoise + sharpening I use this:

Just check out both and leave it like that. I hardly ever make either setting stronger than the minimum. If it is a TS file I also check out the qtgmc 30 fast on the Preprocessor option. If it is not a TS file and just a normal video, I don't click on it.
Then you copy everything from here
And you paste it on the other VS window that will pop out here:
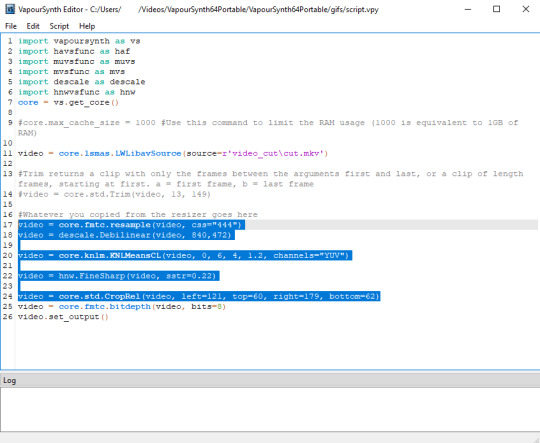
I just ignore everything else. I have no idea what the coding actually says.


Now we go to:
2. Photoshop
download here *blows a kiss for @woodzm my fave lil hacker*
download from the torrent one, you’ll need the file that already have all the parts. do not download the parts separately.
Tutorial
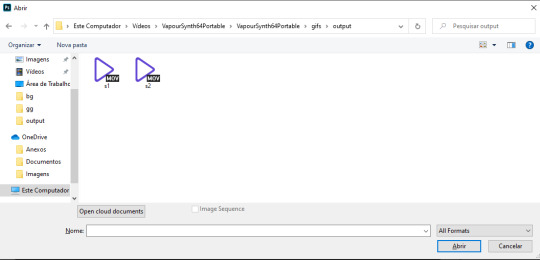
After you open photoshop, click ctrl + O to open a file. This is the pathway to the folder where my files from vs are (pay attention to the top in case you need to go through your folders) (vs > vs > gifs > output)
The next steps will depend on what you like / how your original footage looks like.
A) Blur > Gaussian Blur. Either 1,0 or 1,5. Set opacity to 30 - 40%
B) Sharpen > Smart sharpen.

Red is fixed. Green you decide what you think looks better.
You can add A + B together or use one or the other. To know what will help requires practice, so gif a lot!
Now this is a personal preference, I can’t gif in another way:

Convert Frames > Flatten frames into Clips.

Click on those three little squares on the bottom left, and then Make Frames From Layers from the same place you clicked to Convert Frames just a step prior.
Delete the first frame and whatever else doesn’t fit the gif you’re making.

This is when I color, which is personal and it depends a lot on what I’m dealing with. If you want I can make a tutorial of tools I like later, but my advice is to find something that suits you. This is the most fun part!
Now the last touches are:
C) Select all frames and set their timing to 0,07. I always use this one, it’s neither rushed or slowed down.
Save it with ctrl + shift + alt + s (at the same time).
And you’re done! (E tá pronto o sorvetinho :D)
Now for more info:
This post by @chawoongs with everything you need to know regarding TS files and where to get them *blows a kith for my fave boy*
These two alternative tutorials, which I did not read but might just be more coherent than my own: 1 and 2
I’ve done this for a while so things are mechanic for me. If I jumped any step that is not clear to you don’t hesitate to send me a message!
#photoshop tutorial#answered#m: photoshop#anonymous#id never do smth so lenghty but flattery IS the way to my heart#i keep editing this as people point out difficulties w the links lmao
142 notes
·
View notes
Note
Hi! Same DOF anon here, so after further gameplay it just randomly stopped working. But where can I find that setting for “reshade_depth_input_is_reversed”? Thank you!
Under the shader list there's a button that says 'edit global preprocessor definitions'. Knowing about this, and the basics of setting up the depth buffer, are essential ReShade knowledge, so familiarise yourself with it for when you play other games that may need the depth buffer flipping.
6 notes
·
View notes
Text
vapoursynth versus photoshop
Hello! It’s me again with another long text post. Yesterday I spent over 4 hours experimenting with both vapoursynth and photoshop to make gifs and here I am going to show you my results.
For the purpose of this I will be using:
PotPlayer to make a split video in mov and open in photoshop;
Photoshop CC21;
Vapoursynth for windows (the newest version, links provided on my blog in /tagged/links);
A sharpen action I created with the setting shared by @kamalaskhans
Netflix’s Vincenzo episode 1 in 1080p and Sell Your Haunted House’s episode 11 in 1080p (but they are different in quality)
Without further due, click on read more to see what I am talking about.
I have been using vapoursynth to make gifs in this blog since I created it last year in May, however I already used the late avisynth when I used to run my kpop blog from 2012 to late 2016. I think that this program just made a HUGE change on how kpop tumblr’s make content and how we, drama tumblr’s make ours too.
We already know that vapoursynth keeps the maximum quality of our files and I don’t doubt that, HOWEVER since I don’t really use any denoise filter in VS and it just helps me to crop faster and import faster into photoshop, I always wondered why none of my old sharpen actions work... I mean, we see a lot of famous tumblrs sharing their settings but whenever we open up our files we can’t get the same result even if we have HD content. With that said, I made 3 gifs from 2 different HD videos and I’ll be showing you how different they are.
1. the gif below is made only with Photoshop’s resize. I made the video cut in PotPlayer using the alt+c command — saved as MOV — imported in PS. Sharpen: 500% - 0,4 + 10% - 0,10. 70 frames. basic coloring. link

NOTE: this is what I can call perfect sharpening. It stays clear but not oversharpened.
2. the gif below is cropped using vapoursynth with preprocessors: none & debilinear. no denoise and no sharpening. Once imported on PS: Sharpen: 500% - 0,4 + 10% - 0,10. 70 frames. basic coloring. (I tried to crop in the same position) link

NOTE: it looks extremely sharpened and it’s not on my likes. Please ignore that these are really fast I don’t really bother changing the frames’ delay for the sake of this post.
3. the gif below is made with everything stated above but the preprocessors on vapoursynth are DESPLINE and none. link

NOTE: this looks OK for me, but it’s still a bit oversharpened (you can notice on her fingers and hair) You can also notice that vapoursynth slightly change the color of the file and I have used the same edition layers on PS.
Result: I prefer the first one made with poptplayer and photoshop (even though I’d use the 3rd setting depending on the source file). What do you think? Feel free to answer this post with your thoughts.
Now we will be moving to another file: Netflix’s Vincenzo. This one has way more quality even though they are both 1080p.
1. the gif below is made only with Photoshop’s resize. I made the video cut in PotPlayer using the alt+c command — saved as MOV — imported in PS. Sharpen: 500% - 0,4 (80%) + 10% - 0,10. 97 frames. basic coloring. link

NOTE: this is perfect for my liking. It’s HD and not oversharpened.
2. the gif below is cropped using vapoursynth with preprocessors: none & debilinear. no denoise and no sharpening. Once imported on PS: Sharpen: 500% - 0,4 (80%) + 10% - 0,10. 87 frames. basic coloring. (I tried to crop in the same position) link

NOTE: this is so overshapened that I had to cut down 10 frames to fit the 10mb. also, it hurts my eyes a lot.
3. the gif below is made with everything stated above but the preprocessors on vapoursynth are DESPLINE and none. link

NOTE: it may look ok, but I don’t like this one. Still, I had to take down 10 frames in order to fit the 10mb limit (while the first gif fits just fine in that)
Result: I’m still on the side of photoshop’s reziser. But of course, these are my opinions, comment this post to tell me yours :)
FYI: As I previously mentioned, I don’t really use any denoise filters on VS so it’s only purpose to me is crop faster to import in photoshop. However, these results may not be worth if some of you actually use the denoise filters in VS. With that being said, I think VS is a really amazing tool that helps our gifs to be amazing and works beautifully keeping the quality of the source file. This post was made just to show you how the same sharpen setting can work differently in many ways with many kinds of 1080p source files.
(if you can’t read more on your dashboard I’ve provided links with the full size gifs for you)
#idk how should i tag this?#well... i'll keep this tagged in some way to find easily on my blog#vs versus ps
38 notes
·
View notes
Note
hi! sorry if this is a bother but i was wondering how do u make your gifs? they’re always so pretty 🥺🥺
hiii anon!!! aaaah thank you thank you!!!! its not a bother at all! honestly most of its self taught bc i play around with the way i gif quite often to see what i like or try something new, but i'm really happy with the way they look over the past couple of months!
so firstly, i always make sure the video source i'm using is atleast 1080p. 4K is The Dream to gif with, but it has to be atleast 1080p.
next, i choose my scenes to gif. overtime i've come to realise that when i'm making gifs of scenes, i like the set to be based around the same type of angle. that gives your set consistency and makes it look a lot more cohesive and pretty too. so i'll only use closer zoomed in shots if i want, or only far away panoramic style shots if i want. i try not to mix the 2 up into 1 set, unless i'm making a series of gifsets per episode of a show, then i'll do it in a pattern of like, far away shot gif - zoomed in shot gif - far away shot gif - zoomed in shot gif - far away shot gif. or sometimes it'll be in a pattern of faceless - with a face - faceless - with a face - faceless. or switching it up between 2 colours, so colour 1 - colour 2 - colour 1 - colour 2 - colour 1. basically, i like it to look cohesive and neat and symettrical in that sense.
so once i know what shots i'll be using, i resize and sharpen my gifs using vapoursynth. i've been Loving big gifs for quite sometime now, idk they just ... look nicer to me for some reason? so i size my gifs depending on how i'm feeling. if its a gifset of 6 gifs or more, i go with 540x400, 5-6 gifs is 540x425, sets of 4 are 540x450, and anything less, i'll experiment between 540x500 or 540x550. sometimes i like 540x600 too! so it all depends.
and i decide on my sharpening based on the size of my gifs and quality of my video. so it'll start from like 2.0 or 2.2 for the smaller gifs, and i bump it up the bigger it goes. if my gifs are 540x550, i'll sharpen at 3.5, for example. i don't use any denoise or preprocessors, and i bump my opacity up to 100, always.
then, finally, i colour in photoshop! recently ive been liking my gifs to look more natural, if that makes sense. i just like enhancing them. so i play around with selective colour and colour balancing mainly, and adjust the brightness and vibrance until i'm happy with it. what i will also say here is do not do not do not skip frames!!! that ruins your smoothness and flow of the gifs. and i set my gif speed at a frame rate of 0.3 or 0.4, just because personally i like my gifs to move faster.
and thats it! i hope that helps!
13 notes
·
View notes