#photo editing for products
Text
Unlock the potential of your online store with the transformative power of "ecommerce image editing services." In a world where first impressions matter, these services go beyond basic touch-ups, strategically enhancing your product images for maximum visual appeal.
#ecommerce image editing services#ecommerce photo editing#product image editing#photo editing for ecommerce#photo editing for products
0 notes
Text
May I present to you one of the dumbest things iv ever drawn.

#someone was on my dash talking about giving crumb a gun#this is what I immediately thought of#never opened procteate faster#I think the stock photo of the stairs really sells the piece#it was just going to be a sketch but I had to commit to the bit#I had to stop so many times while drawing this because I can’t stop laughing at it it’s so stupid#anyway take this in honour of the kickstarter reaching its goal#EDIT: I SPELT IT WITH THE WRONG YOUR I DONT CARE#Edit 2: shoutout to the person on Twt who called him Owen Crumbvour I love it sm that’s his name now#starkid#team starkid#starkid productions#cinderella’s castle#cinderellas castle#crumb#fanart#my art
741 notes
·
View notes
Photo

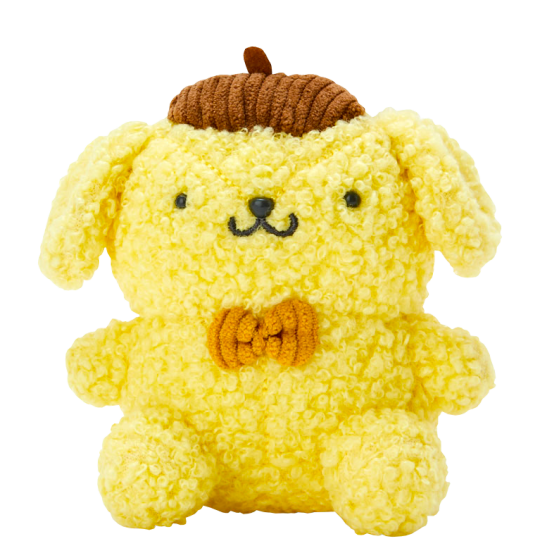
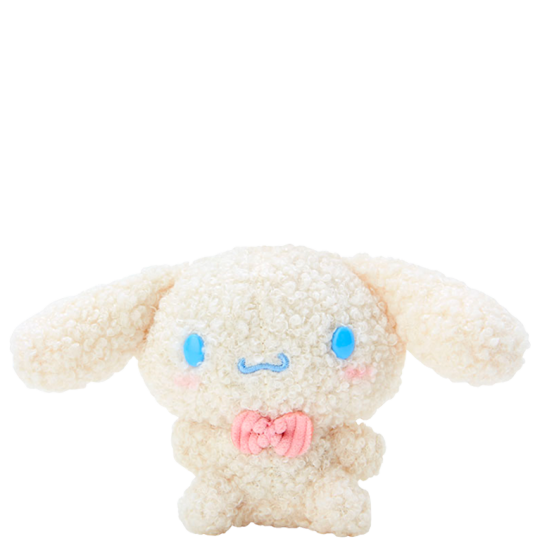
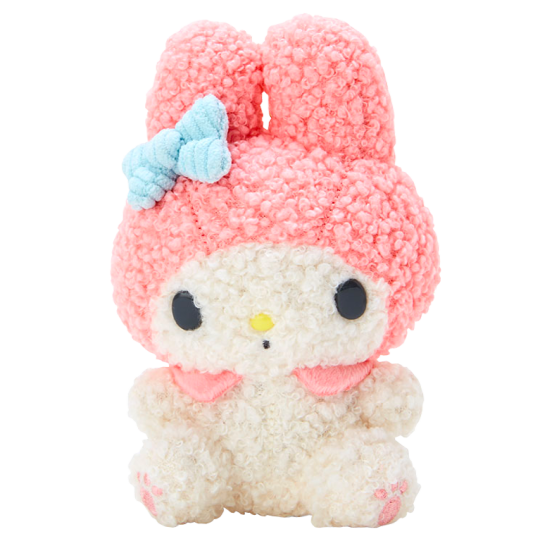
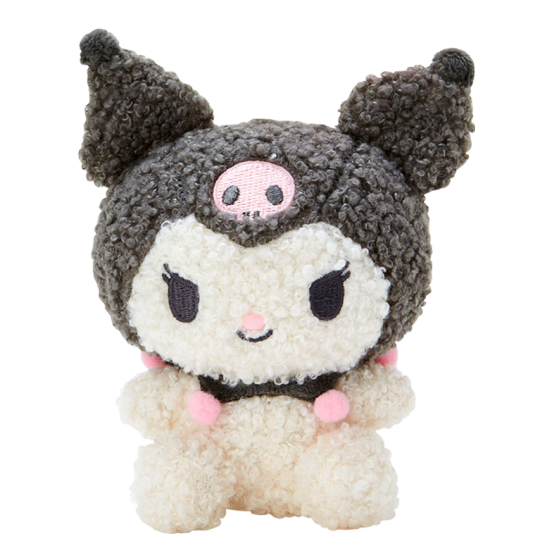
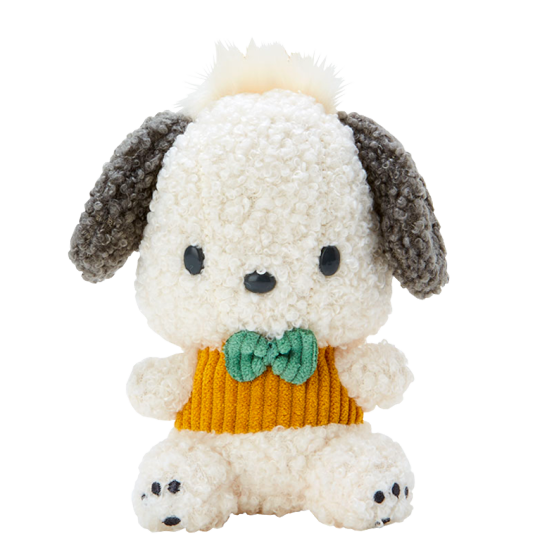
#sanrio#hello kitty#my melody#kuromi#plush toy#cinnamoroll#pompompurin#pochacco#official product#from official photo#transparent#my edit#do not repost#source: fancy shop design series#cute#png#toy#plush
3K notes
·
View notes
Text
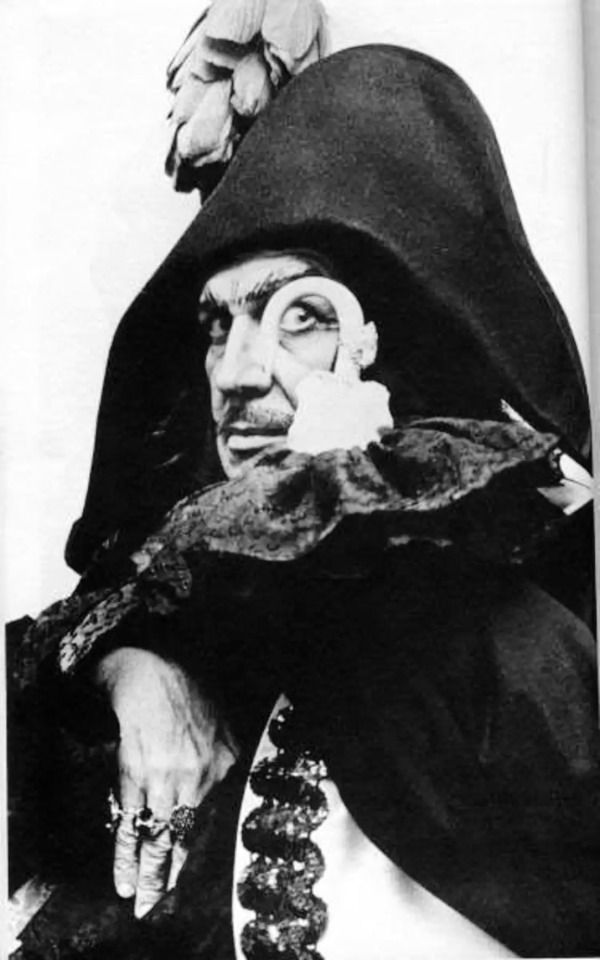
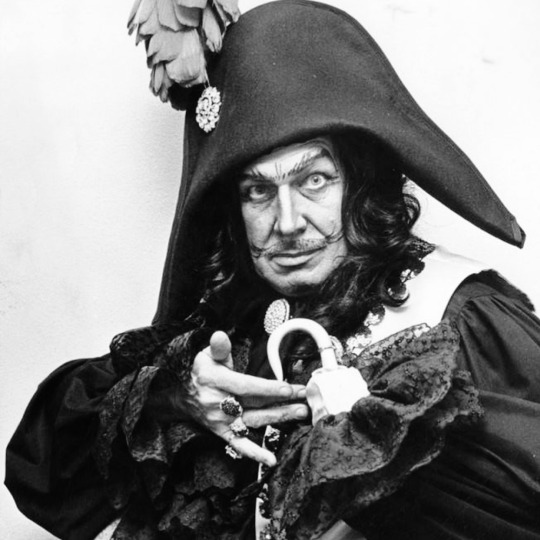

J.M. Barrie hit the nail on the head with this one....
Vincent Price as Captain Hook (1964)
#vincent price#captain hook#j.m. barrie#jm barrie#peter pan#i want to see this production so bad#i bet he was awesome as captain hook....#hes fabulous#so talented#hes so sexy...#GODDDDSD#jdjdnekensjeieiendjkwlwosls#photos#photo edits by me#unf#sir!#horror#old horror movies#vintage#movie#actor#handsome#bicon#bisexual#icon#legend
299 notes
·
View notes
Text
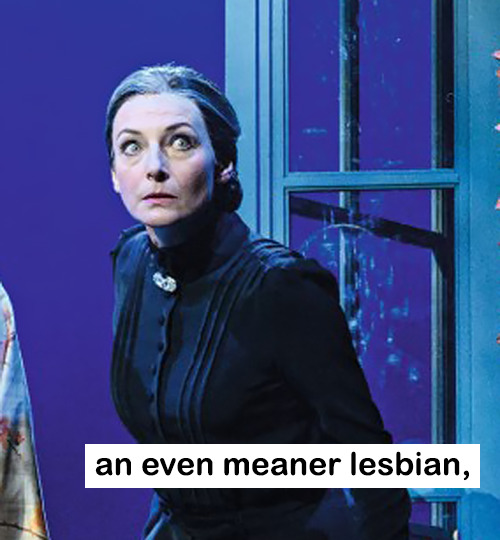


based on this tumblr post
#rebecca das musical#ich#maxim de winter#mrs danvers#nienke latten#mark seibert#willemijn verkaik#mycreations#myedits#eye am literally so sorry for all these silly rebecca edits/gifsets#i promise i have a serious one coming soon (at some point)#also it's CRIMINAL that james park isn't in ANY of the official production photos#anyways
165 notes
·
View notes
Text


Ghostface and Michael Myers stickers are back and upgraded to waterproof/dish-washer safe!!
✨ etsy.com/shop/drfrogphd
#frogarts#etsystore#stickers#ghostface#michael myers#slasher#dbd#dead by daylight#I procrastinated taking/editing pictures of these for SO LONG#I just got a lightbox to help with product photos and ITS SO GOOD#It definitely makes it less daunting to set up and take photos!!!#Also! Notebook restocks and new designs have been ordered!#They should be here early next month ^^
46 notes
·
View notes
Text
i'm going on exam season lockdown as of today, which means no more gifs/edits/anything else because i spend way too much time on them for an engineering student in the trenches lmao. posting this not because i think anybody will notice or care, but so i can hold myself accountable and get embarrassed if i break the pledge. see you on june 3rd for a ghovie creativity extravaganza
edit: besides the ghovie trailer 😭 i cant restrain myself from that one
#actually june 4th because i will be drinking on june 3rd from the moment i close my semiconductors paper#cold turkey on gif making KHBJDGVSCDH RIP#genuinely its such a relaxing thing to do that i find myself prioritising it#and unlike other chill activities it gives me the illusion of productivity#i really need to be getting that from my work and not silly bands#anyway. see u#also in my 4 years of making edits like this in many different circles i've never once felt the need to mention a like/reblog ratio#and i'm fully of the opinion that people can do whatever the hell they like and i never expect interaction#i'm grateful for what i do have#but what primarily motivates me to do this is people sharing their love for whatever is on the post#in the tags or elsewhere#i'm not talking praise or thanks or anything to me i mean 'i love this song' or 'papa looks great here' skdcvkdgvs#'this is my favourite band' u know? it's sharing passion with other people and having them share theirs with me#and in all the 4 years and many many fandoms this (ghost/st) is by far the worst for interaction like that#i'd say ghost especially skhjcsd#and this tag rant isn't a request or a 'please interact more!' or anything like that it's just#a reason as to why i'm a bit discouraged that i'm chatting about to nobody#oh yeah and especially seeing photos posted with no source and no edits get 5x the notes you'd get#the quantity of notes doesn't matter to me but the discussion and tags do#just checked my notes in the middle of typing this and someone rbed some papa ii gifs with#'hope he's steady on his feet the way i would run into him'#KDSGKDSD that's what i'm on about 😭😭😭😭😭#makes me smile knowing something i posted made somebody feel joy abt a silly band and then shared that with me through the tags#i'm aware i've been here for just over one month so shouldn't be making judgements just yet#but sometimes i wish there was more of that
21 notes
·
View notes
Text
Maternity Photography Service
Maternity High End Retouching Service Provider
Edited By- Rosie Ruby
Looking for the best maternity photo editing service? We offer high-quality, newborn & maternity retouching at an affordable price - $0.35/Image - FREE trial.
Feel free to send me a couple of test images so we can see if we'd be a good fit.
My E-mail : [email protected]
🚩 Our service : High end √ Basic √ Fashion √ Headshot √ Beauty √ Newborn √ Commercial √ Product √ Wedding √ Maternity √ Model √ Family etc.

#retouching#retoucher#productphotography#product#photography#headshot#ecommerce#photographer#newborn#wedding#fashion#beautyphotography#retouch#photoshop#portrait#maternity#beautyeditorial#beauty#boudir#photoediting#lightroom#canon#editing#photo#photoshoot#philippines
17 notes
·
View notes
Text
dailymotion
Reflection in the Dark (Official Music Video)
#Avatar#musicofficial2024#3m ago#Luis R Conriquez#Neton Vega - Si No Quieres No Special Edition#my art#artists on tumblr#gravity falls#gravity falls fanart#stanford pines#ford pines#fiddleford mcgucket#bill cipher#billford#fiddauthor#fiddleford hadron mcgucket#book of bill#that one anne hathaway bi iconic photo#was wrecking my brain on how to make this piece work when#one of them is a fucking triangle#the book of bill#3d printing#19th century#1950s#100 days of productivity#35mm#60s#70s#80s#911 abc
12 notes
·
View notes
Text


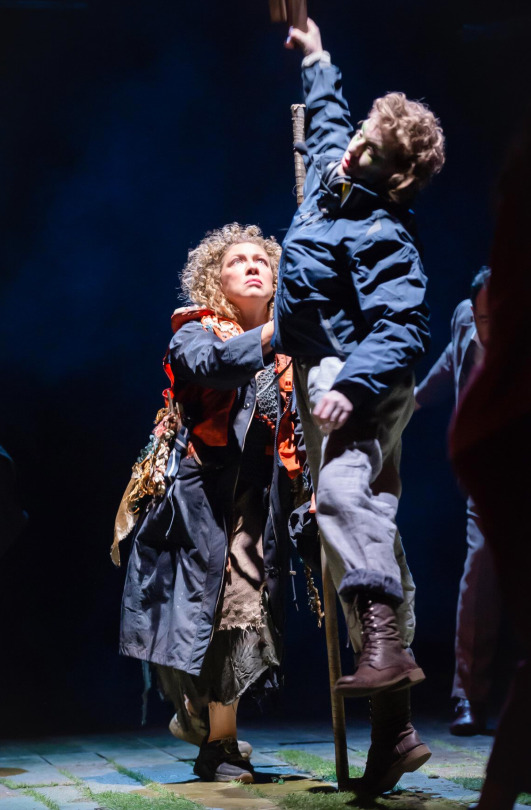
Production photos of The RSC's "The Tempest" (2023), starring Alex Kingston
137 notes
·
View notes
Text


.🍚🍶.
#aesthetic#photoblog#photo edit#photography#art#selfie#grunge#asian girls#kawaii#model#rice#rice is life#sauce#grocery#japanese products#mondaymood
9 notes
·
View notes
Text
@bisexual-baybie joked that someone should edit Arin as Miss America on one of my posts and I am not one to deny a challenge

#game grumps#Arin Hanson#my edits#and god was this a challenge#the final product was like#attempt 15#and I cycled through so many photos of Miss.America#I had to redraw the background around Arin to edit out the actual winner#so don’t look too close#and yes I did already post this as a reply#but this was so much work#it deserves its own post#please like this this took so long to make
8 notes
·
View notes
Photo
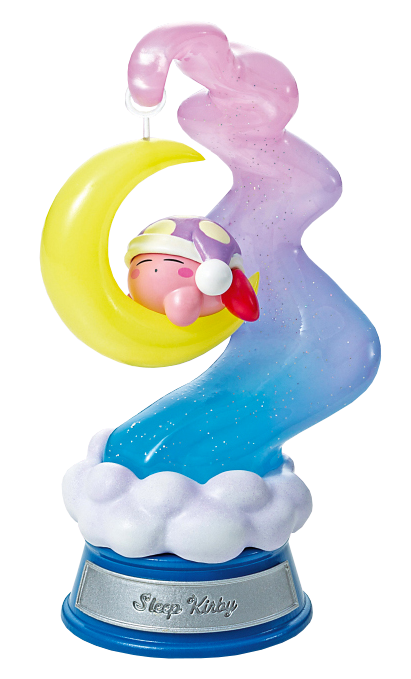


星のカービィ「Swing Kirby in Dream Land」
#kirby#waddle dee#hoshi no kirby#figure#nintendo#re-ment#official product#from official product photo#transparent#my edit#do not repost#source: re-ment#release: 8/14/2023#cute#png#want waddle dee and round
2K notes
·
View notes
Text

Vincent Price and Mildred Natwick - ELIZABETH THE QUEEN, a play produced at Mt. Kisco's Westchester Playhouse (1937)
#vincent price#mildred natwick#elizabeth the queen#the queen#play#production#photo#photo edit by me#1930s#old hollywood#vintage hollywood#omfg#those legs THOOOO#legs for days#SIR!#FUCKKKK#i wanna climb him like a tree#bicon#bisexual#so tall so broad so bisexual#horror#old horror movies#vintage#movie#actor#handsome
84 notes
·
View notes
Text
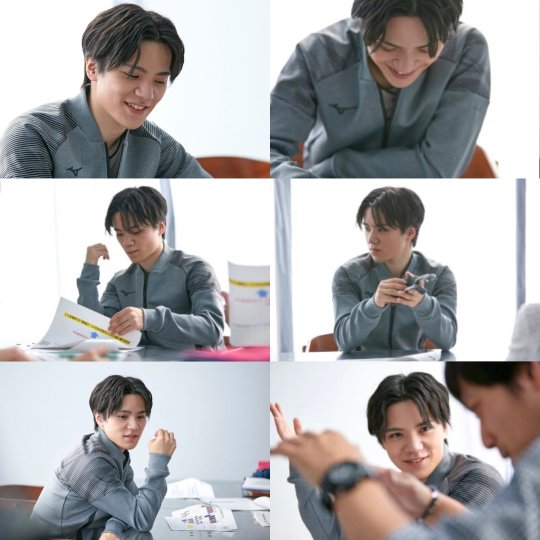
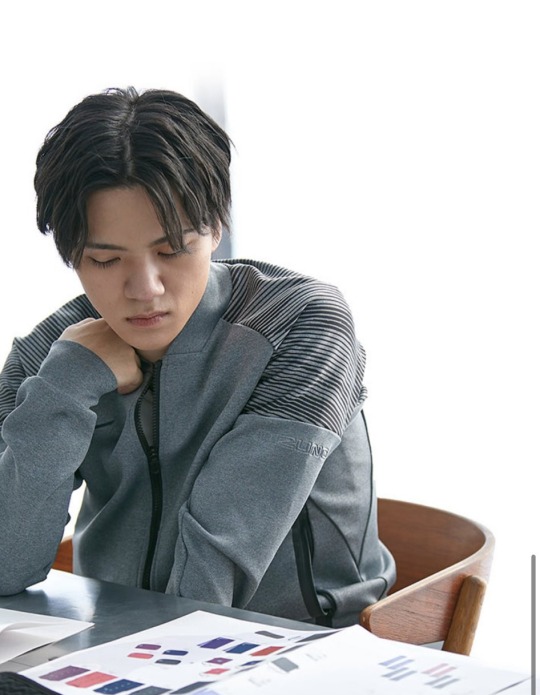

Mizuno x Shoma Uno collaboration 7th edition to be released on 18th January 2024 🩶
#shoma uno#figure skating#mizuno#the things of the 6th edition aren't even sended yet lol#these products are so nice but barely affordable overseas with shipping and tax#i do have some but bruh can't do this all the time#anyway nice Shoma photos
25 notes
·
View notes
Note
if it's okay, would you mind sharing your art process? your style is SO gorgeous dude. keep it up spardacest nation!!!
Thank you so much anon, and of course!
I kinda posted about it on twitter a while ago, but for anyone not also on there, here's a paraphrasing of what I said there!
(under a cut bc it's gonna get a bit long)
(speedpaint video from procreate mostly bc like I also said in that post, it's one of the few pieces I've done entirely on procreate and thus entirely recorded kdfjhdk I usually don't do the sketching + painting parts on there but every now and then I get lazy and want to get it all done quick in one program lol! It's not as good as it would look if I were using krita to render (which is what I normally use) but it gets the idea across decently of what it is that I do)
The short version of my process is:
sketch, clean up sketch for lineart, then flat colors, then paint over the flats (i make the flats my shadows and paint on the light), then a multiply layer for skin details (like lips, eyebags, etc), then an overlay layer for skin transparency details (red over the ears/nose/fingertips etc), then i do hair over the lineart, then a multiply layer with the contact shadows in a light beige/grey/neutral tone on top of everything else, and then i unify layers, paint over the details, and color correct the HELL out of it
The longer version is:
SO, first of all, I will say, my entire process for a finished/fully redered piece is pretty scattered and uses a lot of different apps, because after many years of trying out different drawing apps I found that I just worked better when I could incorporate the parts I liked best from each individual one rather than having to adapt to another app entirely!
In total, what I use is: autodesk sketchbook and procreate for the first half I do on my ipad, then krita and photoshop on my computer when I'm actually rendering (but any photo editing app instead of ps will do, I'm just used to photoshop bc that's what I learned as my first drawing app WAAAY back in the day lol), and then meitu on my phone for color filters (also any phone editing app with filters in it will do), AND also optional just for references: blender and daz3d on computer + magicposer on my phone
The actual step by step of what I do:
First of all, if I want to do a detailed, well rendered piece I will start by getting my references ready. That means either just grabbing a screenshot from the game if it's like, a simple portrait, or a photo reference, taking a picture of myself in the right pose/lighting, and if it's something more complex I will recreate the scene in Daz3D to simulate a realistic lighting, OR even just blender (i have the game models for the dmc characters downloaded, so I can just pop them in, pose them and change the lighting to get a realistic idea of what shadows their faces will cast in that specific angle/lighting.)
Note: references are pretty essential to me, and there's nothing to be ashamed about for using them! Personally I don't struggle a lot with the drawing/sketching part of art, but my tiny little pea brain cannot fathom how to make an object 3D in my mind, and how to visualize shadows realistically... thus the reliance on 3D programs to do that for me, and then all I have to do is draw what I'm seeing lol. My art improved significantly ever since I started making 3D refs so I could get /exactly/ what I needed - there's still a lot of leeway you need to learn though, because as realistic as the lighting will be in a rendering program, you'll never really get a fully natural looking image, as far as stuff like the body stretching/squishing/pulling when it's in movement, facial expressions, folds in clothing/fabric, etc... so really it's more a guide than something meant to be followed 1:1.
Then, once I'm confident I know exactly what I'm gonna draw/have the idea in my head, I start sketching it in sketchbook. Not really getting very in depth, just blocking out rough shapes - I like sketchbook and to be on my ipad for that because it feels very reminiscent of traditional sketching on paper to me, which while I'm not super confident on my traditional art abilities, I do get the most natural/fluid/non-stiff figures out that way.
Then when I think I have the general idea ready, I export the sketch layer as a png and import it into procreate - which is where I kinda start picking at the sketch and polishing it like i'm carving it out haha. Lots of liquify tool, flipping the canvas to check if it's even, blending out some of the lineart to help out with the rendering later, and then polishing up what was once the sketch into serviceable lineart. I usually reimport it back into sketchbook at this stage - while I like procreate for drawing I don't love the brushes I can use for lineart there, and so I usually only draw the "base" naked figure in there - when I'm in sketchbook I use a hard pencil to refine the details, then on a separate layer add all the things "on top" like hair, clothing, etc - usually I can get it pretty easily in one go, and once I'm satisfied I erase the naked body under the clothes and unify the lineart layers.
Then I will just do the flats with a hard brush, turning the lineart layer into an overlay layer and coloring things in with the shadow colors.
At this point, I export the file as a psd and import it on my computer - I give it a once over in photoshop first to see if there needs to be any adjusting (like whether any layer that has an effect needs to have a different effect, if all the colors look right since the ipad screen isn't the most faithful, if i wanna change the background color, etc), and once I think it's ready enough, I open it up in krita, where I do the actual bulk of the painting/rendering (as to why specifically krita: it's because I've gotten very comfortable with the brush/painting brush dynamics there and cannot seem to get as good results anywhere else, it's just the goldilocks spot of a brush for me haha.)
If anyone's curious, here's the brushes I usually use for painting:
The one in the middle is my go to painting brush, left one for tinier/more refined details, right one for blending out soft shadows (though I learned the hard way to not overuse it, or it will look like I went ham with an airbrush tool lol).
(I don't change any of the settings on these brushes, so if you wanna try out the exact ones I use! Just fresh off how they come out the app haha)
I paint on the lights on top of the shadows, and just focus on that for the time being - once I'm done with the basic painting, I'll make a separate multiply layer for details like lip color, eye waterlines, makeup if there is any, eyebags, etc, and then adjust the opacity until it feels right - then I'll make an overlay layer with skin translucency details (like, when you hold your hands in front of a light and see the tips of your fingers become bright orange - many parts of your body are always a bit translucent to the blood underneath, specifically parts where the skin is thin like noses, cheeks, joints, knuckles, etc, and I found it makes the character look a lot more alive to add that subtle coloring in) - then usually I do hair on a separate layer on top of the lineart (because that way I can add small flyaways, more details, etc, and just use the lineart as a guide)
After that, I'll usually make a multiply layer on top of everything where I'll add contact shadows in a neutral color (usually pretty pale, it'll be darker anyway since it's multiply), and once I feel like I've rendered everything out properly, I save the psd and re-open it on photoshop.
In photoshop, I'll mess around with the layers a little bit more (changing hue/saturation, opacity, etc), fuck around with the background to make it look pleasing, and once I'm happy with it, I'll unify the layers and start color correcting - usually by duplicating the unified layer and messing with the curve/hsl of the image and then changing the opacity of that edited layer until it's as strong or muted as I want it to be - then I also edit the RGB curves individually and adjust the opacity of that also (because I just really like how it ends up looking if I give a bit of a red/warm tint to the shadows lol), and at that point often I will reimport the finished image into procreate for some finalizing touches! Like, blending out shadows that came out too harshly, painting over anything that came out not the way I wanted it, redefining the lineart if it got messy during painting, and adding any extra small detail that might have gotten lost like catchlights, hair shines, hair flyaways, tears, etc. I also do one last round of flipping the canvas and liquify if needed!
At this point, I export the finished image both to my computer and my phone - on my phone I open it up on the photo editing app, and add a bunch of different color filters - I don't hesitate from going completely balls to the walls here, and just kinda applying as many filters as will make an image look pleasing to my eye.
Once I think it looks good, I'll export the edited image to my computer - and then open both the version without filters and the one with them on photoshop, and use the filtered version as an opacity layer, and adjust it until it doesn't look as crazy anymore lol.
One last step I recently started incorporating was also changing the image to grayscale after I'm done, and doing one last round of curves in greyscale to make sure the values look right, and nothing is getting too lost because the values are too similar (because i know i get a bit swept up in getting repulsed by harsh contrasting lighting and can end up washing out all of rendering if I don't check myself kjdfgk)
AND that's it!
Yes it's a pretty long and chaotic process, but it's coming from years of trial and error and realizing I can just let myself fo whatever makes me happier with the results, and I don't have to stay constrained to one program if I don't like every tool it has to offer/don't have to accept the final image fresh off the painting app as the "finished" image with no adjustments allowed after, lol. I don't find it takes a lot more time than if I didn't do it this way, but YMMV.
Hope this was helpful and sorry for taking so long to explain! I just wanted to give a thorough explanation dfhdkhkx
#asks#sorry i know its a bit chaos hfdgd#but i hope its helpful anon! thanks for asking#also for anyone wondering#no i am not paying for ps lmao#fuck adobe#it is always morally correct to pirate adobe products people#if you have an alternative photo editing app you like best youre welcome to use it#but if youre too used to photoshop. everything is free on the internet if you know where to look#i also wouldnt recommend meitu bc it feels like a pretty sketchy app all things considered#im just too lazy to care to change my go to app but i would look for a different phone app#p sure theres billions that let you add funky color filters instead#actually i think you could use photoshop camera raw filters for that too#its just way too intensive of a process for my tiny potato computer and it feels a lot faster + seamless on phone
13 notes
·
View notes
Last Seen Blogs