#pinup tutorial
Explore tagged Tumblr posts
Visit Tumblr Blog
Explore Tumblr blogs with no restrictions, modern design and the best experience.
Last Seen Tumblr Blogs


Fun Fact
The KCSC sent more than 20K requests to delete posts related to prostitution and porn to Tumblr from January to June 2017.
Text
Eyes Sharp Like a Hawk: How I Get the Perfect Wings Using 'The Marilyn Method'

I see you.
Yes, you!
Getting ready to throw that eyeliner across the room as you notice one wing is more of a cousin than a twin to the other.
I also hear you. I hear your frustration.
Creating the perfect winged eye can seem like you are a scientist who has found the greatest discovery. Technically, you are in this case. It's all about the components that make up that prized formula that works for you.
A few years ago I had that moment of discovery hit, and I felt like it would be Nobel Prize worthy. But, it's not THAT kind of discovery. Hopefully this method I'm about to share with you works just as well and provides that Olympic gold medal win for your eyes!
What you'll need (primer/skincare/bob's your uncle, etc not included):
Black liquid liner (Make sure it is fine point! I'm personally a fan of waterproof, because....eyes and allergies love to play games when my eyeliner is on point. For this I would recommend NYX Epic Ink Waterproof Eyeliner or Revolution Renaissance Waterproof Eyeliner. These two I always carry in my arsenal).
Brown pencil liner (Make sure that point is as sharp as your mind!)
White pencil liner (Also, sharp!)
Now we have the tools of the trade, let's dig in!
If you read my previous blog entry on Marilyn's beauty secrets she used to create her iconic look, you will be familiar a bit with the technique being used here.
After you do all of your skincare, priming, and eye shadow, you will be heading into the unchartered waters of the winged eyeliner. You may hear the vulture's call as you venture into this dreaded, desolate land.
But, it doesn't have to be scary. You got the finest tools to make your way through the desert to the watering hole.
We're first going to lay out the road map, as I like to call it.
Take your trusty brown pencil liner in hand and take a look into your soul in the mirror. Keep loving eye contact. ( I kid, I kid. But please, be nice to yourself during this process.) Take a deep breath. After an exhale will actually help you have optimal precision with creating the precise strokes that are needed.
First line we are going to create is the 'downcasting shadow' line. This line will give the illusion that your eyelashes are majestic wings of an angel getting ready to make any person in your path fall to their knees in worship. Yes, that good. To create that, we are going to use our own eye as the guideline. Our top lid in particular for this step. You notice how at the very end of our top lid it kind of goes down some? You're going to create a faint, gentle flick of a stroke to make it look like it is extended some. This will be one part of the 'V' our liner will make when all is said and done. Repeat with the other eye.
Note: when we do our liner - it is an extension of the natural movement of the eye itself. We are not creating a curve to make the wing look like it's lifting. Trust the process. Your body knows what's up.
Next is the part that everyone dreads: The uptown (Upper lid) twins.
You know the faint downcast lines we made with the brown pencil liner? Also the tip mentioned above how we use our natural eye to create the guide line to follow when pulling a line? We're going to do that again! This time we will be using the corner of our lower lash line and extending that. To measure how far my wing will extend outwards, I like to use the winged tip of my eyebrow.
Remember, breathe out then proceed for optimal precision. (I see you holding your breath. This won't be painful. Promise.)
This part comes to personal preference. If you are comfy with using the waterproof eyeliner straight from the get-go : YOU GO, GLEN COCO! Seriously. Your confidence is admirable and I wish we could bottle it up and sell it in stores. In a later post I will be teaching about the key to confidence and how you too can obtain it. But, that is later. Right now we are trying to slay a double headed dragon. BACK to the lesson at hand.. if you are comfortable to use the liquid liner - do it! If not, no shame in that - pick up the brown eye liner and use that to create the guide line before applying the liquid liner.
Friendly Makeup Bag Must-Have: Get yourself an 'Original Makeup Eraser' double sided cloth. I got some from my fiancé for Christmas, and that thing has the ability to remove waterproof eyeliner by just adding water to the cloth! The other side is an exfoliator. There are two sides to this awesome microfibre-esque sorcery.
Now that we have completed that little side quest , we will head back to creating the shape.
Use the bottom water line of your eye to draw/pull out that line. Simple extension of your natural eye line. Use your eyebrow winged tips to determine how long you want this line extended to (and that it is even). Phewf! First line done! See? Not so bad! You will notice that the line kind of creates a 'V' shape with your downcast line from earlier as well.
Now.. Yeah sure we want that wing to be sharp and like a flick, so to speak. But we don't want it to be just that simple line. This is where a lot go wrong and are mad when it doesn't seem right in photos or under the lights on stage. With intense lighting at events, outside at a car show, or doing photoshoots, your makeup will often times be put on blast. By that I mean it won't look as intense as you thought it looked in the mirror when getting ready. Tattoo logic: Bold will hold. That being said, the next step is another form of personal preference in regards to your approach:
If you prefer to be a mathematician of sorts (I told you this is a scientist kind of ordeal!) , you are going to be creating an itsy bitsy scalene triangle off of your line you just made. This will make the line a tad bit bolder and will make a segway for the next line that will be done on our lid. That lid you will start sort of mid eye lid (Once again, your eye has a natural shape/line of its own for you to follow). You notice how the top lid arches a bit? Follow the shape of the eye in that direction, and link that with the scalene triangle you just made, so your wing becomes one!
If you are a risktaker (just like with going balls to the wall with using liquid liner off the bat!) You will simply start at the mid of the lid and follow that shape to connect to your wing, following the natural line/shape of the eye as described above.
Holy smokes! You slayed the dragon! Even if they don't look like twins the first try (practice, practice, practice!) at least they are sisters now! Hell.. I'm proud of you, young Padawan.
We aren't fully in the clear yet with this lesson, so save the victory dance until after this last step!
As mentioned time and time again, pinup is all about creating those big, open eyes! How do we achieve this? Time to bring out the last tool in your tool kit for this lesson : The white eyeliner!
Placement is key for the 'highlight'.
You are going to line your waterline with the white eyeliner. Then you are going to line the inside of your 'V' shape (including going the length of the underside of your top wing). This helps make everything look more crisp and clean as well. (Crisp and clean = Krispy Kreme. That's how my inner narrative voice read that.)
Now....we victory dance!
Have I mentioned how PROUD I am of you for taking the leap of faith and giving this a go? As with anything, there's personal tweaks one will make when fixing it up to make it more them. I encourage this greatly. In the end, it is all about finding the flow that works for you!
Pinup is all about finding that unique thing that makes you - YOU.
There's only one of you. Embrace that, you warrior goddess.

xo Bree Von Tease
#beautiful eyes#eyeliner#winged eyeliner#tutorial#makeup tutorial#makeup advice#makeup#art#artist#Marilyn Monroe#pinup#pinup girl#pinup tips#pinup advice#advice#tips#tips and tricks#glamour#retro#vintage#retro aesthetic#vonteasevintage#breevontease
3 notes
·
View notes
Text

This week on Content Abnormal we present the Quiet, Please tale "Take Me Out To The Graveyard"!
Content Abnormal's presentation of Quiet, Please's "Three"
Pinup Palmer's YouTube Channel
#content abnormal#ernest chappell#otr#classic#radio#horror#willis cooper#quiet please#take me out to the graveyard#r.l. stine#the fire game#fear street#pinup palmer#sarah palmer#gwengoolie#svengoolie#youtube#elvira#morticia adams#lily munster#the bride of frankenstein#halloween 1978#ed wood#plan 9 from outer space#pee wee's big adventure#makeup tutorial#haul video#filming locations
3 notes
·
View notes
Text
Adjusted another tier for my P@treon that I'll be reviving once more mid January! I'm wanting to add pinups once more since I miss doing them, so they'll be there along with the art tutorials/coloring pages and more!
4 notes
·
View notes
Text
TS2: Lucilla-Sims 4to2 Tunic Dress conversion for MaxisAF, Athletic Girl, Amazonian, 34De-36, Classic Pinup, FitChick, RIO, Sassy Curvy and Sussi bodyshapes
Greetings and salutations! Here are a multitude of bodyshapes wearing Lucilla Sims' 4to2 Tunic Dress conversion, shoeswapped with Sentate's Jolene boots. The picture represents all the bodyshapes(left to right) and each bodyshape has all the outfits which are categorized Everyday. The bodyshapes are Adult Female(Maxis), Athletic Girl, Amazonian, 34De-36, Classic Pinup, FitChick, RIO, Sassy Curvy and Sussi. This includes the original twelve(12) textures. Bodyshape credits go to Maxis, Marvine, Ocelotekatl, Poppeboy, Warlokk, Julie J and SussiSoGood and all meshes include curvy/curvier and preg morphs. Footwear credit goes to Sentate(OGSnarf 4to2 conversion). Special thanks to Ocelotekatl(Blue Heaven Sims)for the WSO tutorial. If there are issues/I did not give proper credit, let me know. Enjoy!

Download HERE
#the sims 2#ts2#the sims 2 cc#ts2 cc#the sims 2 bodyshapes#ts2 bodyshapes#ts2 adult female#ts2 athletic girl#ts2 amazonian#ts2 fitchick#ts2 rio#ts2 sussi#ts2 female clothing#4to2 conversion#4t2 conversion#sims2 cc#ts2 classic pinup#the sims 2 female clothing#the sims 2 clothes#ts2 clothes#shoeswap#ts2 sassy curvy#ts2 34De-36
55 notes
·
View notes
Text
🤍♡Valentine's Commissions♡🤍


Want a sexy (or sweet) piece of your character, or their character in love?
🤍 I have TWO slots starting at 40 USD for lineart, which you can easily color if you follow one of the methods shown in my tutorial.
Want to see your character as the worship worthy idol they are?
🤍I have ONE slot for my Hades-ish pinup God/dess style.
much love to Talenna Ethera, @exalted-dawn's OC pictured in my comms <3
70 notes
·
View notes
Text
Links
Tutorials I've made:
Basic Recoloring Override Apartment Hall Walls and Floors Move Deco Cars to Transportation Buy Mode Category Reschedule Tasks In Windows (Computer Optimization) Conflicting CAS CC Fix (Two Creators Showing In One Item) How To Clean San Myshuno With S4S
Downloads:
Energy Failure Animation Change Apartment Hall Overrides "Get the Fuck Out of My Bar" Pose Pack "Chilling By the Pool" Pose Pack "Sixties Model Poses" Pose Pack "Chilling On the Couch" Pose Pack Pinup/Boudoir Inspired Pose Pack
53 notes
·
View notes
Text
tagged by @babieswrld !! ❤️
Last Song: Truck Bed - Hardy ...that hook, though.
Last Book: Confessions of Johnny Ringo. So good.
Favorite Color: Since leopard print isn't a color.. I'd have to go with pink or red! Pink is an aesthetic color I love getting things in, but red is my power color when I want confidence!
Last Movie: Wynonna Earp: Vengeance on Tubi. Go watch it..it's awesome.
Spicy/Sweet/Savory: Savory or Spicy!
Last Show: Currently binging Big Love (SO MANY SPICY BILLY PAX SCENES) , before going to binge Wynonna Earp.
Current Obsession: All things yeehaw. Has been like that for a few years, but with my trip coming up in October, it's gotten so much more intense lol. Also obsessed with developing my gunspinning skills more lol.
Last Thing I Searched Up: Trying to find damn tutorials on how to make Peacemaker ...Good ol' Buntline Special.
Looking Forward To: Pinup season! Got soooo many cute outfits and stage routines planned!
Tagging @tragantia @slushi-chan @msookyspooky @mrsvansickle04 @themuseinthewoods @oleskellybones
34 notes
·
View notes
Text

Love being an online artist. Every day it's another email about some other bullshit here or there. Guess no one can make and sell nude pinup art anymore anywhere either. In case anyone wonders why I stopped making it so often. Shit's so fucking stupid and I'm so sick of everything just coming from every angle to fuck over artists these days. My work has never any thing other than nudes, no one's boning, no one's creaming literally so mad about this. I don't even know wtf to bother to throw up there then. It doesn't support long videos not like I can post 1 hour tutorials or anything, and if I did looks like I'd have to heavily censor half the process 'cause YouTube flags painting the base lighting as nudity these days too. Honestly man, I'm just so fucking tired.
29 notes
·
View notes
Text
Alts and PSDs are on Patreon Prints are on Redbubble All other accounts are on LinkTree *No Generative AI is used in my art. *Please do not use my art to train AI or for NFT, thank you.
FEEL FREE TO SEARCH THE TUTORIAL TAG ON THIS BLOG TO FIND MY ART TUTORIALS! : )
Otherwise, I mainly paint #fantasy #pinup #original and #fanart inspired #digitalart
9 notes
·
View notes
Text
Does anyone know of any guides, tutorials, tips or anything like that for the 50s style pinups, like the hand painted Coca Cola ads??? I tried looking it up but I got results for ai prompts and that’s not what I’m looking for.
Or any currently active tutorial blogs or anything that might be helpful??
1 note
·
View note
Text
B is for Beauty: NOT BULLYING

True beauty radiates from the inside out.
It doesn't matter how expensive the attire is...how immaculate the hair-do is...or if you cover yourself in gold leaf....if you are being a straight up nasty, bullying troll....no amount of money will make you shine radiantly like the girl who is kind to others in her bargain finds.
Plain and simple.
I've noticed A LOT of bullying and exclusion happening in the scene.
For something where we preach about showcasing our beauty with others...
Why in the heck are so many still so damn ugly on the inside?
It starts with us. We want change? We must be the change.
I recently was the special guest speaker for a contest that I was part of in the past - where I became an official pinup royalty! - and I knew I just had to bring this up.
The group was FULL of new lovely gals to the pinup scene. I was there to speak to them about my tips and tricks and answer questions (which , by the way...they ROCKED and had very great questions for me! Also, shoutout to a certain few who have read this blog!!) , so I felt that this was a very crucial part of what being a pinup is all about.
Like I said, I can help with the physical component...you can find multitudes of tutorials online...but one thing that is not spoken enough about is the attitude and grace that comes with being a pinup.
Us seasoned folks must use our platforms to help promote awareness for this.
We need to influence others on the right path.
I've seen and heard of different places where girls are being massively cliquey and purposely excluding others and treating others differently.
Ew. Gross non-flex.
PREACHING sisterhood and unity...but in the same breath, they throw in the asterisk where it excludes certain people.
That is NOT being iconic.
That is NOT how one rolls in a sisterhood.
I get it, not everyone is going to get along. But for the love of all that's fluffy and kitten-y, can we at LEAST be decent flippin' human beings?
I don't want to be THAT person...but maybe we need to start including that in the contracts when applying...first bout of evidence that someone is being a twatopotamus to others? Buh-bye, birdy!
See, it hurts me to even say something like that since I am a massive advocate for pinup being for everyone no matter what. But when people are purposely trying to hurt others with good intent? Claws come out.
I realize as well that this behaviour can stem from jealousy. But still...don't exclude and go out of your way to make someone feel bad because you are envious over something that they have or are.
One of the saddest things I've heard from others and have experienced myself is the feeling of not belonging due to people acting like this.
The feeling can make you feel like you just want to give up and pull out of the contest, despite how much effort you've put in. Can I be completely honest here? I feel as if that's part of the desired results from the person bullying.
Instead of working on oneself to become better when overcome with jealousy, they'd much rather try to get rid of the things they are jealous of. In their minds they see it as an easier way to fix that empty void instead of simply learning to accomplish the traits they are desperately wanting.
Wanna know the sad thing? Most of this vile behaviour comes from those of us that have been in the scene for years and SHOULD know better. This behaviour continuing to happen is teaching what exactly to those new to the journey? Not the right things, I can assure you.
How does it affect you?
From a promoter POV, it would be concerning having this happen...people dropping out last minute and thwarting your work you put to make the show run smoothly...less people showing up if the behaviour continues, and eventually bringing an end to the contest if it tanks too hard...it's not a good look and will bite you in the end in the long run.
From a contestant POV, it would make me feel suspish if I saw this happening to others...it would make me question how that person who is bullying others sees me and are they being fake to me...am I next in their destructive path?
As a whole - it's not good for ANYONE to experience.
What are some things you can do to put a halt to this kind of a behaviour?
For Promoters:
Have rules. Have a policy. I give tremendous kudos to True North Pinup Magazine for having an Inclusivity Policy where they do not tolerate any bullying behaviour. THIS IS THE WAY.
Be strict with it. Yeah, sure...being strict it the opposite of fun and good vibes, but to keep the good vibes as that, you must enforce the rules and make sure that this behaviour doesn't get ignored. You show that you're serious about not allowing this behaviour to continue...you are making waves on setting a new dynamic.
Have it in your contract! This kind of combines the two points above. Have it in the written contract that your contestants sign off on, and be sure you enforce this in stone. They know what they're signing up for. If it's not for them being nice and stuff...then let them move on and not dampen your parade.
Have undercover agents! (I had to say it like that - it just sounded so dang flashy!). A lot of contests have people observing the behaviours of the contestants and their interactions. If they see this behaviour, they can report it right away and will result in disqualification, etc.
For Contestants:
If you see someone being or saying something unkind, don't engage in the antics. There is power in numbers. Instead - and if comfortable - bring it up to one of the promoters. You are not being a 'rat'. If they see you as such, then they do not care about the ethics.
Be kind to others! Like...it's simple. Even if you don't get along with someone, you can still act decent when sharing the same stage in a production.
Support one another! If there's posts and whatnot from the event page of the different girls...show the same amount of support for each girl - not cherry pick. That honestly is such a bad look, leaves a sour impression and creates very much unnecessary tension. It costs nothing to give someone a 'like'.
If you feel as if you are a target of bullying, please go to the promoter about it. Do not stay silent. Be part of the change. Love yourself enough to not allow yourself to be treated poorly. You belong here.
Bullying can make us feel down and put a dampen on our glow. It's unnecessary and unchecked emotions that need to be dealt with. The more we let this continue to happen...history will just keep repeating itself and ethics will be lost.
Don't be a bystander.
Make a change. BE the change.
Everyone deserves to feel beautiful and shine like the diamond they are.
Everyone belongs.
Let's do this.

xo Bree Von Tease
#pinup#vonteasevintage#vintage#retro#advice#tips and tricks#tips#pinup girl#be nice#anti bullying#bullying#girl power#sisterhood
5 notes
·
View notes
Text
Master the 80's Punk Makeup Look: Step-by-Step Guide

The 80's punk rock era was all about bold, rebellious looks that made a statement.
If you're ready to channel your inner punk rock chick, this makeup tutorial will guide you through every step to achieve that edgy, vibrant look. Get ready to experiment with colors and unleash your creativity!
Prep Your Canvas: Primers and Bases
Before diving into the colors, it's essential to prepare your skin to ensure your makeup lasts and stays vibrant.
First, apply a good quality eye primer over your eyelids. This step is crucial as it helps the eyeshadow colors to pop and stay in place throughout the day. For this tutorial, we used a combination of two primers to suit our skin tone perfectly.
Next, make sure to prime your lower lash line. This will not only keep the eyeshadow in place but also enhance the color intensity, making your punk makeup look stand out even more.

Bold Eyes: Creating the Perfect Punk Look
Now that your base is set, let's move on to the eyes, the centerpiece of any punk makeup look.
Step 1: Apply Shimmery Orange Eyeshadow
Start with a shimmery orange eyeshadow, like the NARS Scorching Sun.
Using a fluffy brush, apply the eyeshadow all over your eyelid. The fluffy brush helps in both application and blending, giving you a seamless finish.
Extend the eyeshadow outwards, almost reaching the edge of your eyebrows for that dramatic punk effect.
Step 2: Add Depth with Dark Brown Eyeshadow
Take a dark, sparkly brown eyeshadow (like Hard Candy’s Pinup) on a smaller, blending brush.
Gently apply this on the top of the crease and blend upwards. This will create depth and dimension.
Make sure to keep the inner corner light and gradually darken towards the outer corner for a striking contrast.
Step 3: Highlight the Brow Bone
Use a light, shimmery eyeshadow to highlight the brow bone.
Apply it just under your eyebrows to lift and define the area, enhancing the overall look.
Step 4: Add a Pop of Blue on the Lower Lash Line
For an added punk rock flair, apply a sparkly blue eyeshadow (such as Lancome's Indigo) along the lower lash line.
Use a pencil brush to carefully blend it in, ensuring the color stays vibrant and in place.
Finishing Touches: Eyeliner, Brows, and Blush
No punk makeup look is complete without these final touches.
Step 1: Line Your Eyes
Apply a black eyeliner to your waterline. This will make your eyes pop and add intensity.
For an extra edgy look, line the upper lash line as well, using a sharp eyeliner brush for precision.
Step 2: Define Your Brows
Use a brow product like Paula Dorf's Brunette to fill in and shape your eyebrows.
Aim for a rounded shape rather than an arch for a softer, yet still bold, appearance.
Step 3: Apply Blush and Blend
Choose a soft, bronzy blush like the Body Shop's Bronze to add structure to your face.
Apply it along your temples and cheeks for a sculpted look.
Blend it out with a softer blush, such as NARS Orgasm, to avoid harsh lines and achieve a more natural finish.
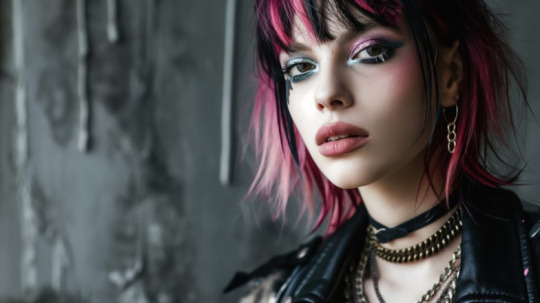
Lips: Subtle Yet Chic
Finish off your look with the perfect lip color.
Opt for a subtle lip gloss like Lancome's No. 22, which adds a hint of color without overpowering your bold eye makeup.
For an extra touch of punk, consider adding a bit of black lipstick on the bottom lip.
Embrace Your Inner Punk with MOBILESTYLES
Now that you’ve mastered the 80's punk makeup look, you’re ready to rock any event with confidence and style. Whether you’re going to a concert or just feeling edgy, this bold and vibrant look will make you stand out.
For those days when you want a professional touch, remember that MOBILESTYLES is here for you. Our beauty experts are just a click away, ready to bring the salon experience to your doorstep. Book your next beauty appointment with MOBILESTYLES and let us help you achieve any look you desire, effortlessly and conveniently.
Ready to rock your 80's punk makeup? Try it out and let your bold, rebellious side shine!
0 notes
Text
Makeup (seasonal color)
So I spent a good amount of money on makeup this week - nail polish and lip color. I bought a number of pretty sheer red/warm pink/coral shades of nail polish, which flatter the spring season complexion. For lip - I got 2 lip glosses from tarte (Grapefruit and Poppy). The first one is a nice warm peach, the other is a warm coral red shade. Both also look like they flatter bright springs. The other shade that also looks flattering was Strawberry, but I didn't want to buy too many lip products and it's a bright red color and wanted to stick to more subtle colors for now.
I think the makeup look that looks nice on bright springs is somewhat pinup inspired. A sheer, dewy foundation (not matte), concealer to brighten the undereye, a sheer warm pink/peach/red/coral lip color (gloss or lipstick - not matte nor too dark), and some warm-toned blush and highlight for cheeks. For eyes, black eyeliner or black mascara alone does the trick. Even a subtle bright color on the lids (highlight) looks really nice. Heavy dark and smoky looks don't really suit the season, nor does a ton of bronzer (for cheeks it's mostly blush and highlight).
I don't wear makeup in general, neither to work. It's hard to know what to wear when there are so many options out there, some may not even be flattering. I also don't like bold looks personally. So the trick is to find what is flattering - a bright warm-tone nail color, a sheer warm lip color, sheer foundation, brightening eye concealer, warm blush and pretty highlight, some black mascara (not really sure about eye makeup but it's a pop of black mascara and/or eyeliner with a nice bright eyelid tint). Something like this:
https: //www. huffpost .com/entry/ radiant-rosy-makeup-tutorial _b_9236594
I'll see what I can do in general to complete my look. But these are some general good ideas.
For hair, a warm brown, golden, and copper undertones would really flatter this season. I naturally have brown hair with gold highlights and highlight my hair to add more gold. I might even experience with copper in the future.
0 notes
Text
TS2: Lucilla-Sims 4to2 Sequin Dress conversion for Athletic Girl, Amazonian, 34De-36, Classic Pinup, FitChick, RIO, Sassy Curvy and Sussi bodyshapes
Greetings and salutations! Here are a multitude of bodyshapes wearing Lucilla Sims' 4to2 Sequin Dress conversion. The pictures represent all the bodyshapes(left to right) and each bodyshape has all the oufits which are categorized as Formal. The bodyshapes are Athletic Girl, Amazonian, 34De-36, Classic Pinup, FitChick, RIO, Sassy Curvy and Sussi and include the original ten(10) textures. Bodyshape credits go to Marvine, Ocelotekatl, Warlokk, Poppeboy, Grizzelda/JulieJ and SussiSoGood, with all meshes including curvy/curvier and preg morphs. Special thanks to Ocelotekatl(Blue Heaven Sims)for the WSO tutorial. If there are issues/I did not give proper credit, let me know. Enjoy!

Download HERE
#the sims 2#ts2#the sims 2 cc#ts2 cc#the sims 2 bodyshapes#ts2 bodyshapes#ts2 athletic girl#ts2 amazonian#ts2 fitchick#ts2 rio#ts2 sussi#ts2 female clothing#4to2 conversion#4t2 conversion#sims2 cc#ts2 classic pinup#the sims 2 female clothing#the sims 2 clothes#ts2 clothes#ts2 sassy curvy#ts2 34De-36
55 notes
·
View notes
Text
luv when woc do vintage tutorials yall r the only bitches ever 💯
#all these pasty girls doing pinup tutorials as if anyone w curly hair can do that smh#vintage hair tutorials for natural hair yeah yeah 💕 wish there were more#k
2 notes
·
View notes
Video
Ilustración de Hada Pin up hecha en Acuarela/ Pin-up Fairy
#watercolor#watercolour illustration#illustration#ilustración#acuarela#watercolor art#tutorial watercolor#pinup#burlesque#manga#anime#anime art#anime memes#weeb
2 notes
·
View notes