#postgres database docker volume
Explore tagged Tumblr posts
Visit Tumblr Blog
Explore Tumblr blogs with no restrictions, modern design and the best experience.
Last Seen Tumblr Blogs


Fun Fact
Celebrities use Tumblr as well.
Text
Using Docker in Software Development

Docker has become a vital tool in modern software development. It allows developers to package applications with all their dependencies into lightweight, portable containers. Whether you're building web applications, APIs, or microservices, Docker can simplify development, testing, and deployment.
What is Docker?
Docker is an open-source platform that enables you to build, ship, and run applications inside containers. Containers are isolated environments that contain everything your app needs—code, libraries, configuration files, and more—ensuring consistent behavior across development and production.
Why Use Docker?
Consistency: Run your app the same way in every environment.
Isolation: Avoid dependency conflicts between projects.
Portability: Docker containers work on any system that supports Docker.
Scalability: Easily scale containerized apps using orchestration tools like Kubernetes.
Faster Development: Spin up and tear down environments quickly.
Basic Docker Concepts
Image: A snapshot of a container. Think of it like a blueprint.
Container: A running instance of an image.
Dockerfile: A text file with instructions to build an image.
Volume: A persistent data storage system for containers.
Docker Hub: A cloud-based registry for storing and sharing Docker images.
Example: Dockerizing a Simple Python App
Let’s say you have a Python app called app.py: # app.py print("Hello from Docker!")
Create a Dockerfile: # Dockerfile FROM python:3.10-slim COPY app.py . CMD ["python", "app.py"]
Then build and run your Docker container: docker build -t hello-docker . docker run hello-docker
This will print Hello from Docker! in your terminal.
Popular Use Cases
Running databases (MySQL, PostgreSQL, MongoDB)
Hosting development environments
CI/CD pipelines
Deploying microservices
Local testing for APIs and apps
Essential Docker Commands
docker build -t <name> . — Build an image from a Dockerfile
docker run <image> — Run a container from an image
docker ps — List running containers
docker stop <container_id> — Stop a running container
docker exec -it <container_id> bash — Access the container shell
Docker Compose
Docker Compose allows you to run multi-container apps easily. Define all your services in a single docker-compose.yml file and launch them with one command: version: '3' services: web: build: . ports: - "5000:5000" db: image: postgres
Start everything with:docker-compose up
Best Practices
Use lightweight base images (e.g., Alpine)
Keep your Dockerfiles clean and minimal
Ignore unnecessary files with .dockerignore
Use multi-stage builds for smaller images
Regularly clean up unused images and containers
Conclusion
Docker empowers developers to work smarter, not harder. It eliminates "it works on my machine" problems and simplifies the development lifecycle. Once you start using Docker, you'll wonder how you ever lived without it!
0 notes
Text
Using Docker for Full Stack Development and Deployment

1. Introduction to Docker
What is Docker? Docker is an open-source platform that automates the deployment, scaling, and management of applications inside containers. A container packages your application and its dependencies, ensuring it runs consistently across different computing environments.
Containers vs Virtual Machines (VMs)
Containers are lightweight and use fewer resources than VMs because they share the host operating system’s kernel, while VMs simulate an entire operating system. Containers are more efficient and easier to deploy.
Docker containers provide faster startup times, less overhead, and portability across development, staging, and production environments.
Benefits of Docker in Full Stack Development
Portability: Docker ensures that your application runs the same way regardless of the environment (dev, test, or production).
Consistency: Developers can share Dockerfiles to create identical environments for different developers.
Scalability: Docker containers can be quickly replicated, allowing your application to scale horizontally without a lot of overhead.
Isolation: Docker containers provide isolated environments for each part of your application, ensuring that dependencies don’t conflict.
2. Setting Up Docker for Full Stack Applications
Installing Docker and Docker Compose
Docker can be installed on any system (Windows, macOS, Linux). Provide steps for installing Docker and Docker Compose (which simplifies multi-container management).
Commands:
docker --version to check the installed Docker version.
docker-compose --version to check the Docker Compose version.
Setting Up Project Structure
Organize your project into different directories (e.g., /frontend, /backend, /db).
Each service will have its own Dockerfile and configuration file for Docker Compose.
3. Creating Dockerfiles for Frontend and Backend
Dockerfile for the Frontend:
For a React/Angular app:
Dockerfile
FROM node:14 WORKDIR /app COPY package*.json ./ RUN npm install COPY . . EXPOSE 3000 CMD ["npm", "start"]
This Dockerfile installs Node.js dependencies, copies the application, exposes the appropriate port, and starts the server.
Dockerfile for the Backend:
For a Python Flask app
Dockerfile
FROM python:3.9 WORKDIR /app COPY requirements.txt . RUN pip install -r requirements.txt COPY . . EXPOSE 5000 CMD ["python", "app.py"]
For a Java Spring Boot app:
Dockerfile
FROM openjdk:11 WORKDIR /app COPY target/my-app.jar my-app.jar EXPOSE 8080 CMD ["java", "-jar", "my-app.jar"]
This Dockerfile installs the necessary dependencies, copies the code, exposes the necessary port, and runs the app.
4. Docker Compose for Multi-Container Applications
What is Docker Compose? Docker Compose is a tool for defining and running multi-container Docker applications. With a docker-compose.yml file, you can configure services, networks, and volumes.
docker-compose.yml Example:
yaml
version: "3" services: frontend: build: context: ./frontend ports: - "3000:3000" backend: build: context: ./backend ports: - "5000:5000" depends_on: - db db: image: postgres environment: POSTGRES_USER: user POSTGRES_PASSWORD: password POSTGRES_DB: mydb
This YAML file defines three services: frontend, backend, and a PostgreSQL database. It also sets up networking and environment variables.
5. Building and Running Docker Containers
Building Docker Images:
Use docker build -t <image_name> <path> to build images.
For example:
bash
docker build -t frontend ./frontend docker build -t backend ./backend
Running Containers:
You can run individual containers using docker run or use Docker Compose to start all services:
bash
docker-compose up
Use docker ps to list running containers, and docker logs <container_id> to check logs.
Stopping and Removing Containers:
Use docker stop <container_id> and docker rm <container_id> to stop and remove containers.
With Docker Compose: docker-compose down to stop and remove all services.
6. Dockerizing Databases
Running Databases in Docker:
You can easily run databases like PostgreSQL, MySQL, or MongoDB as Docker containers.
Example for PostgreSQL in docker-compose.yml:
yaml
db: image: postgres environment: POSTGRES_USER: user POSTGRES_PASSWORD: password POSTGRES_DB: mydb
Persistent Storage with Docker Volumes:
Use Docker volumes to persist database data even when containers are stopped or removed:
yaml
volumes: - db_data:/var/lib/postgresql/data
Define the volume at the bottom of the file:
yaml
volumes: db_data:
Connecting Backend to Databases:
Your backend services can access databases via Docker networking. In the backend service, refer to the database by its service name (e.g., db).
7. Continuous Integration and Deployment (CI/CD) with Docker
Setting Up a CI/CD Pipeline:
Use Docker in CI/CD pipelines to ensure consistency across environments.
Example: GitHub Actions or Jenkins pipeline using Docker to build and push images.
Example .github/workflows/docker.yml:
yaml
name: CI/CD Pipeline on: [push] jobs: build: runs-on: ubuntu-latest steps: - name: Checkout Code uses: actions/checkout@v2 - name: Build Docker Image run: docker build -t myapp . - name: Push Docker Image run: docker push myapp
Automating Deployment:
Once images are built and pushed to a Docker registry (e.g., Docker Hub, Amazon ECR), they can be pulled into your production or staging environment.
8. Scaling Applications with Docker
Docker Swarm for Orchestration:
Docker Swarm is a native clustering and orchestration tool for Docker. You can scale your services by specifying the number of replicas.
Example:
bash
docker service scale myapp=5
Kubernetes for Advanced Orchestration:
Kubernetes (K8s) is more complex but offers greater scalability and fault tolerance. It can manage Docker containers at scale.
Load Balancing and Service Discovery:
Use Docker Swarm or Kubernetes to automatically load balance traffic to different container replicas.
9. Best Practices
Optimizing Docker Images:
Use smaller base images (e.g., alpine images) to reduce image size.
Use multi-stage builds to avoid unnecessary dependencies in the final image.
Environment Variables and Secrets Management:
Store sensitive data like API keys or database credentials in Docker secrets or environment variables rather than hardcoding them.
Logging and Monitoring:
Use tools like Docker’s built-in logging drivers, or integrate with ELK stack (Elasticsearch, Logstash, Kibana) for advanced logging.
For monitoring, tools like Prometheus and Grafana can be used to track Docker container metrics.
10. Conclusion
Why Use Docker in Full Stack Development? Docker simplifies the management of complex full-stack applications by ensuring consistent environments across all stages of development. It also offers significant performance benefits and scalability options.
Recommendations:
Encourage users to integrate Docker with CI/CD pipelines for automated builds and deployment.
Mention the use of Docker for microservices architecture, enabling easy scaling and management of individual services.
WEBSITE: https://www.ficusoft.in/full-stack-developer-course-in-chennai/
0 notes
Text
Updating a Tiny Tiny RSS install behind a reverse proxy

Screenshot of my Tiny Tiny RSS install on May 7th 2024 after a long struggle with 502 errors. I had a hard time when trying to update my Tiny Tiny RSS instance running as Docker container behind Nginx as reverse proxy. I experienced a lot of nasty 502 errors because the container did not return proper data to Nginx. I fixed it in the following manner: First I deleted all the containers and images. I did it with docker rm -vf $(docker ps -aq) docker rmi -f $(docker images -aq) docker system prune -af Attention! This deletes all Docker images! Even those not related to Tiny Tiny RSS. No problem in my case. It only keeps the persistent volumes. If you want to keep other images you have to remove the Tiny Tiny RSS ones separately. The second issue is simple and not really one for me. The Tiny Tiny RSS docs still call Docker Compose with a hyphen: $ docker-compose version. This is not valid for up-to-date installs where the hyphen has to be omitted: $ docker compose version. The third and biggest issue is that the Git Tiny Tiny RSS repository for Docker Compose does not exist anymore. The files have to to be pulled from the master branch of the main repository https://git.tt-rss.org/fox/tt-rss.git/. The docker-compose.yml has to be changed afterwards since the one in the repository is for development purposes only. The PostgreSQL database is located in a persistent volume. It is not possible to install a newer PostgreSQL version over it. Therefore you have to edit the docker-compose.yml and change the database image image: postgres:15-alpine to image: postgres:12-alpine. And then the data in the PostgreSQL volume were owned by a user named 70. Change it to root. Now my Tiny Tiny RSS runs again as expected. Read the full article
0 notes
Text
Let's do Fly and Bun🚀
0. Sample Bun App
1. Install flycll
$ brew install flyctl
$ fly version fly v0.1.56 darwin/amd64 Commit: 7981f99ff550f66def5bbd9374db3d413310954f-dirty BuildDate: 2023-07-12T20:27:19Z
$ fly help Deploying apps and machines: apps Manage apps machine Commands that manage machines launch Create and configure a new app from source code or a Docker image. deploy Deploy Fly applications destroy Permanently destroys an app open Open browser to current deployed application Scaling and configuring: scale Scale app resources regions V1 APPS ONLY: Manage regions secrets Manage application secrets with the set and unset commands. Provisioning storage: volumes Volume management commands mysql Provision and manage PlanetScale MySQL databases postgres Manage Postgres clusters. redis Launch and manage Redis databases managed by Upstash.com consul Enable and manage Consul clusters Networking configuration: ips Manage IP addresses for apps wireguard Commands that manage WireGuard peer connections proxy Proxies connections to a fly VM certs Manage certificates Monitoring and managing things: logs View app logs status Show app status dashboard Open web browser on Fly Web UI for this app dig Make DNS requests against Fly.io's internal DNS server ping Test connectivity with ICMP ping messages ssh Use SSH to login to or run commands on VMs sftp Get or put files from a remote VM. Platform overview: platform Fly platform information Access control: orgs Commands for managing Fly organizations auth Manage authentication move Move an app to another organization More help: docs View Fly documentation doctor The DOCTOR command allows you to debug your Fly environment help commands A complete list of commands (there are a bunch more)
2. Sign up
$ fly auth signup
or
$ fly auth login
3. Launch App
Creating app in /Users/yanagiharas/works/bun/bun-getting-started/quickstart Scanning source code Detected a Bun app ? Choose an app name (leave blank to generate one): hello-bun
4. Dashboard
0 notes
Text
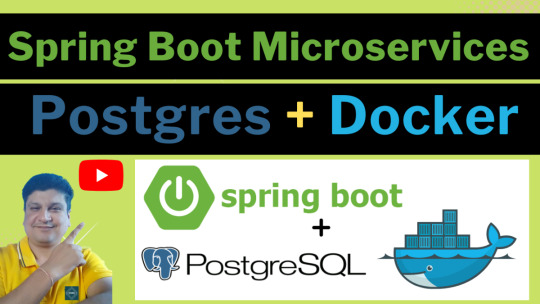
Springboot Microservice in Docker Container with Postgres Database in Docker Container Explained
Hi, a new #video on #springboot #microservices in #dockercontainer with #postgres #database running in #docker #container is published on #codeonedigest #youtube channel. Learn #springbootmicroservices with #postgressql in docker #containers #programming
In this video, we will run springboot microservice and postgres database both in separate docker containers and integrate Postgres database with a Spring Boot Microservice Application and perform different CRUD operations i.e., Create, Read, Update, and Delete operations on the Customer entity. Microservice application container will connect to database container using docker bridge…

View On WordPress
#compass#container#docker#docker container#docker file#docker full course#docker image#docker tutorial#docker tutorial for beginners#dockerfile#microservices#microservices in docker container#microservices postgres#nosql#postgres#postgres database docker#postgres database docker install#postgres database docker setup#postgres database docker tutorial#postgres database docker volume#Postgres database installation#postgres db#postgres installation#postgres java#postgres tutorial#postgres tutorial for beginners#postgressql microservices example#Spring boot#spring boot annotations#spring boot full course
0 notes
Text
QuestDB is an open-source high-performance time-series database(TSDB) for applications in IoT, event monitoring, machine learning, DevOps, financial services e.t.c. QuestDB written in Java and C programming language has support for the SQL query language and also implements PostgreSQL wire protocol, REST API, and an InfluxDB Line Protocol. QuestDB was developed by Vlad Ilyushchenko in 2014 with the main goal of creating low latency trading techniques for databases to improve performance with minimal server resources. Ever since its first release, the QuestDB SQL database has gained popularity all over the world. This is highly contributed by its amazing features that include: Supports ANSI SQL and includes language extensions for time series, this helps perform calculations on timestamped data for row- and column-based access. Data is stored in a chronological order and table partitions are applied based on time. Data is massively parallelized using vectorized query execution. Time series, relational joins, downsampling, and unlimited sub-queries are supported. High performance achieved from a column-oriented storage model. No dependencies required, and is 100% free from garbage collection Easy to run queries and inspect table schemas using the web interface By the end of this guide, you will have gained the required knowledge on how to run the QuestDB SQL database in Docker Container. 1. Install Docker CE on Linux For this guide, we need to install docker engine on our Linux system. Below is a dedicated guide to aid you in installing Docker Engine. How To Install Docker CE on Linux Systems Start and enable docker sudo systemctl start docker sudo systemctl enable docker Verify that docker is running: $ systemctl status docker ● docker.service - Docker Application Container Engine Loaded: loaded (/lib/systemd/system/docker.service; enabled; vendor preset: enabled) Active: active (running) since Thu 2022-01-13 02:30:03 EST; 4min 5s ago TriggeredBy: ● docker.socket Docs: https://docs.docker.com Main PID: 2741 (dockerd) Tasks: 8 Memory: 30.4M CPU: 239ms CGroup: /system.slice/docker.service └─2741 /usr/bin/dockerd -H fd:// --containerd=/run/containerd/containerd.sock Ensure that your system user is added to the docker group as below. sudo usermod -aG docker $USER newgrp docker 2. Run QuestDB SQL database in Docker Container. There are two methods on how to navigate along: Pull the container image and run directly Use Docker-compose Option 1 – Pull the QuestDB image and Run QuestDB Container Once Docker is installed on your system, you can pull the QuestDB container image and run it or combine both in one command as below. cd ~ docker run -t -d \ -p 9000:9000 \ -p 9009:9009 \ -p 8812:8812 \ -p 9003:9003 \ --name docker_questdb \ questdb/questdb In the above command, we have exposed the below ports: 9000:9000 -For REST API and Web Console 8812:8812 – For Postgres wire protocol 9009:9009 – For InfluxDB line protocol 9003:9003 – For Min health server Data persistence We can also add a persistent volume for data using the -v argument. Normally the QuestDB root directory will be at /root/.questdb/. You can mount Docker Volumes to the QuestDB Docker container so that data may be persisted or server configuration settings may be passed to an instance. First stop and delete running container $ docker rm -f docker_questdb docker_questdb $ docker ps CONTAINER ID IMAGE COMMAND CREATED STATUS PORTS NAMES In the following example we demonstrate how to mount the directory ./questdb_data to a QuestDB container using the -v flag in a Docker run command: cd ~ docker run -t -d \ -p 9000:9000 \ -p 9009:9009 \ -p 8812:8812 \ -p 9003:9003 \ --name docker_questdb \ -v "$(pwd)/questdb_data:/root/.questdb/" questdb/questdb Now you will have data stored in the path convenient for migration or backups.
$ ls questdb_data/ conf db public Now check the status of the container. $ docker ps CONTAINER ID IMAGE COMMAND CREATED STATUS PORTS NAMES 9f69d05b8604 questdb/questdb "/usr/bin/env QDB_PA…" 5 seconds ago Up 4 seconds 0.0.0.0:8812->8812/tcp, :::8812->8812/tcp, 0.0.0.0:9000->9000/tcp, :::9000->9000/tcp, 0.0.0.0:9003->9003/tcp, :::9003->9003/tcp, 0.0.0.0:9009->9009/tcp, :::9009->9009/tcp docker_questdb Option 2 – Run QuestDB SQL database with Docker-Compose Here, we will create a QuestDB SQL database docker-compose YAML file. The file will contain all the required information about our container. With Docker installed, proceed and install Docker-compose using the guide below. How To Install Docker Compose on Linux Using your favorite editor, create the YAML file as below. cd ~ mkdir questdb cd questdb vim docker-compose.yml In the file, add the below lines: version: "3" services: questdb: image: questdb/questdb container_name: docker_questdb restart: always ports: - "8812:8812" - "9000:9000" - "9009:9009" - "9003:9003" volumes: - ./data/db:/root/.questdb/db Now run the container as below. docker-compose up -d Command execution output: [+] Running 2/2 ⠿ Network questdb_default Created 0.1s ⠿ Container docker_questdb Started Once complete, verify if the container is running: $ docker ps CONTAINER ID IMAGE COMMAND CREATED STATUS PORTS NAMES 1bfbaa565e5a questdb/questdb "/usr/bin/env QDB_PA…" 19 seconds ago Up 17 seconds 0.0.0.0:8812->8812/tcp, :::8812->8812/tcp, 0.0.0.0:9000->9000/tcp, :::9000->9000/tcp, 0.0.0.0:9003->9003/tcp, :::9003->9003/tcp, 0.0.0.0:9009->9009/tcp, :::9009->9009/tcp docker_questdb 3. Connect to QuestDB SQL database. There are several methods one can use to connect and interact with QuestDB. They include: Web Console listening on port 9000 REST API on port 9000 PostgreSQL wire protocol on port 8812 InfluxDB line protocol for high-throughput ingestion on port 9009 In this guide, I will demonstrate how to connect and interact with QuestDB using the Web console and the REST API. 1. Connect to QuestDB SQL database Web Console. The QuestDB web console is listening on port 9000 and can be accessed using the URL http://IP_Address:9000. If you have trouble accessing the page, allow the port through the firewall. You should be able to see this page: Here, you can run your scripts. For example, begin by creating a table: CREATE TABLE sensors (ID LONG, make STRING, city STRING); Once the table is created, insert data into it. INSERT INTO sensors SELECT x ID, --increasing integer rnd_str('Eberle', 'Honeywell', 'Omron', 'United Automation', 'RS Pro') make, rnd_str('Kampala', 'Nairobi', 'Bamako', 'Segere', 'Dodoma') city FROM long_sequence(10000) x ; On the web console, the commands should be entered as below and click Run. You will have your data added as below. View data in the tables as below SELECT * FROM sensors WHERE city='Nairobi'; Sample Output: You can also import data from a file. 2. Connect to QuestDB SQL database using REST API REST API is based on HTTP and provides the best and simple way to interact with QuestDB. Here, API functions are keyed on the URL and use query parameters as arguments. For example, to import data, you will use the below command:
curl -F [email protected] \ 'http://localhost:9000/imp' You can as well execute queries that return a JSON response. For example. Create a table as below curl -G \ --data-urlencode "query=CREATE TABLE sensors (ID LONG, make STRING, city STRING);" \ --data-urlencode "count=true" \ http://localhost:9000/exec Insert data into the table. curl -G \ --data-urlencode "query=INSERT INTO sensors SELECT x ID, --increasing integer rnd_str('Eberle', 'Honeywell', 'Omron', 'United Automation', 'RS Pro') make, rnd_str('Kampala', 'Nairobi', 'Bamako', 'Segere', 'Dodoma') city FROM long_sequence(10000) x ;" \ --data-urlencode "count=true" \ http://localhost:9000/exec Now view the data in the table curl -G \ --data-urlencode "query=SELECT * FROM sensors WHERE city='Nairobi' limit 5;" \ --data-urlencode "count=true" \ http://localhost:9000/exec Sample Output: 4. Manage the QuestDB SQL database Container. The QuestDB SQL database container can be managed as below: Start the container. docker start docker_questdb Stop the container. docker stop docker_questdb Conclusions That marks the end of this guide on how to run the QuestDB SQL database in Docker Container. I hope this guide was of significance to you.
0 notes
Text
How we scaled data streaming at Coinbase using AWS MSK

By: Dan Moore, Eric Sun, LV Lu, Xinyu Liu
Tl;dr: Coinbase is leveraging AWS’ Managed Streaming for Kafka (MSK) for ultra low latency, seamless service-to-service communication, data ETLs, and database Change Data Capture (CDC). Engineers from our Data Platform team will further present this work at AWS’ November 2021 Re:Invent conference.
Abstract
At Coinbase, we ingest billions of events daily from user, application, and crypto sources across our products. Clickstream data is collected via web and mobile clients and ingested into Kafka using a home-grown Ruby and Golang SDK. In addition, Change Data Capture (CDC) streams from a variety of databases are powered via Kafka Connect. One major consumer of these Kafka messages is our data ETL pipeline, which transmits data to our data warehouse (Snowflake) for further analysis by our Data Science and Data Analyst teams. Moreover, internal services across the company (like our Prime Brokerage and real time Inventory Drift products) rely on our Kafka cluster for running mission-critical, low-latency (sub 10 msec) applications.
With AWS-managed Kafka (MSK), our team has mitigated the day-to-day Kafka operational overhead of broker maintenance and recovery, allowing us to concentrate our engineering time on core business demands. We have found scaling up/out Kafka clusters and upgrading brokers to the latest Kafka version simple and safe with MSK. This post outlines our core architecture and the complete tooling ecosystem we’ve developed around MSK.

Configuration and Benefits of MSK
Config:
TLS authenticated cluster
30 broker nodes across multiple AZs to protect against full AZ outage
Multi-cluster support
~17TB storage/broker
99.9% monthly uptime SLA from AWS
Benefits:
Since MSK is AWS managed, one of the biggest benefits is that we’re able to avoid having internal engineers actively maintain ZooKeeper / broker nodes. This has saved us 100+ hours of engineering work as AWS handles all broker security patch updates, node recovery, and Kafka version upgrades in a seamless manner. All broker updates are done in a rolling fashion (one broker node is updated at a time), so no user read/write operations are impacted.
Moreover, MSK offers flexible networking configurations. Our cluster has tight security group ingress rules around which services can communicate directly with ZooKeeper or MSK broker node ports. Integration with Terraform allows for seamless broker addition, disk space increases, configuration updates to our cluster without any downtime.
Finally, AWS has offered excellent MSK Enterprise support, meeting with us on several occasions to answer thorny networking and cluster auth questions.
Performance:
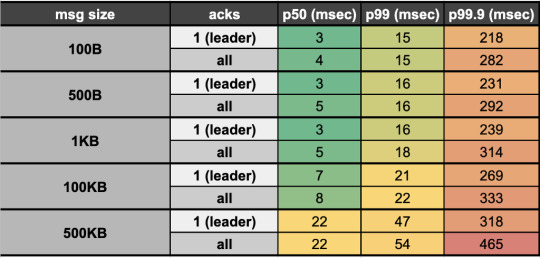
We reduced our end-to-end (e2e) latency (time taken to produce, store, and consume an event) by ~95% when switching from Kinesis (~200 msec e2e latency) to Kafka (<10msec e2e latency). Our Kafka stack’s p50 e2e latency for payloads up to 100KB averages <10 msec (in-line with LinkedIn as a benchmark, the company originally behind Kafka). This opens doors for ultra low latency applications like our Prime Brokerage service. Full latency breakdown from stress tests on our prod cluster, by payload size, presented below:
Proprietary Kafka Security Service (KSS)
What is it?
Our Kafka Security Service (KSS) houses all topic Access Control Lists (ACLs). On deploy, it automatically syncs all topic read/write ACL changes with MSK’s ZooKeeper nodes; effectively, this is how we’re able to control read/write access to individual Kafka topics at the service level.
KSS also signs Certificate Signing Requests (CSRs) using the AWS ACM API. To do this, we leverage our internal Service-to-Service authentication (S2S) framework, which gives us a trustworthy service_id from the client; We then use that service_id and add it as the Distinguished Name in the signed certificate we return to the user.
With a signed certificate, having the Distinguished Name matching one’s service_id, MSK can easily detect via TLS auth whether a given service should be allowed to read/write from a particular topic. If the service is not allowed (according to our acl.yml file and ACLs set in ZooKeeper) to perform a given action, an error will occur on the client side and no Kafka read/write operations will occur.
Also Required
Parallel to KSS, we built a custom Kafka sidecar Docker container that: 1) Plugs simply into one’s existing docker-compose file 2) Auto-generates CSRs on bootup and calls KSS to get signed certs, and 3) Stores credentials in a Docker shared volume on user’s service, which can be used when instantiating a Kafka producer / consumer client so TLS auth can occur.
Rich Data Stream Tooling
We’ve extended our core Kafka cluster with the following powerful tools:
Kafka Connect
This is a distributed cluster of EC2 nodes (AWS autoscaling group) that performs Change Data Capture (CDC) on a variety of database systems. Currently, we’re leveraging the MongoDB, Snowflake, S3, and Postgres source/sink connectors. Many other connectors are available open-source through Confluent here
Kafdrop
We’re leveraging the open-source Kafdrop product for first-class topic/partition offset monitoring and inspecting user consumer lags: source code here
Cruise Control
This is another open-source project, which provides automatic partition rebalancing to keep our cluster load / disk space even across all broker nodes: source code here
Confluent Schema Registry
We use Confluent’s open-source Schema Registry to store versioned proto definitions (widely used along Coinbase gRPC): source code here
Internal Kafka SDK
Critical to our streaming stack is a custom Golang Kafka SDK developed internally, based on the segmentio/kafka release. The internal SDK is integrated with our Schema Registry so that proto definitions are automatically registered / updated on producer writes. Moreover, the SDK gives users the following benefits out of the box:
Consumer can automatically deserialize based on magic byte and matching SR record
Message provenance headers (such as service_id, event_time, event_type) which help conduct end-to-end audits of event stream completeness and latency metrics
These headers also accelerate message filtering and routing by avoiding the penalty of deserializing the entire payload

Streaming SDK
Beyond Kafka, we may still need to make use of other streaming solutions, including Kinesis, SNS, and SQS. We introduced a unified Streaming-SDK to address the following requirements:
Delivering a single event to multiple destinations, often described as ‘fanout’ or ‘mirroring’. For instance, sending the same message simultaneously to a Kafka topic and an SQS queue
Receiving messages from one Kafka topic, emitting new messages to another topic or even a Kinesis stream as the result of data processing
Supporting dynamic message routing, for example, messages can failover across multiple Kafka clusters or AWS regions
Offering optimized configurations for each streaming platform to minimize human mistakes, maximize throughput and performance, and alert users of misconfigurations
Upcoming
On the horizon is integration with our Delta Lake which will fuel more performant, timely data ETLs for our data analyst and data science teams. Beyond that, we have the capacity to 3x the number of broker nodes in our prod cluster (30 -> 90 nodes) as internal demand increases — that is a soft limit which can be increased via an AWS support ticket.
Takeaways
Overall, we’ve been quite pleased with AWS MSK. The automatic broker recovery during security patches, maintenance, and Kafka version upgrades along with the advanced broker / topic level monitoring metrics around disk space usage / broker CPU, have saved us hundreds of hours provisioning and maintaining broker and ZooKeeper nodes on our own. Integration with Terraform has made initial cluster configuration, deployment, and configuration updates relatively painless (use 3AZs for your cluster to make it more resilient and prevent impact from a full-AZ outage).
Performance has exceeded expectations, with sub 10msec latencies opening doors for ultra high-speed applications. Uptime of the cluster has been sound, surpassing the 99.9% SLA given by AWS. Moreover, when any security patches take place, it’s always done in a rolling broker fashion, so no read/write operations are impacted (set default topic replication factor to 3, so that min in-sync replicas is 2 even with node failure).
We’ve found building on top of MSK highly extensible having integrated Kafka Connect, Confluent Schema Registry, Kafdrop, Cruise Control, and more without issue. Ultimately, MSK has been beneficial for both our engineers maintaining the system (less overhead maintaining nodes) and unlocking our internal users and services with the power of ultra-low latency data streaming.
If you’re excited about designing and building highly-scalable data platform systems or working with cutting-edge blockchain data sets (data science, data analytics, ML), come join us on our mission building the world’s open financial system: careers page.
How we scaled data streaming at Coinbase using AWS MSK was originally published in The Coinbase Blog on Medium, where people are continuing the conversation by highlighting and responding to this story.
from Money 101 https://blog.coinbase.com/how-we-scaled-data-streaming-at-coinbase-using-aws-msk-4595f171266c?source=rss----c114225aeaf7---4 via http://www.rssmix.com/
0 notes
Text
無料&自分でホストして全機能を利用できるオープンソースの高機能パスワードマネージャー「Psono」レビュー
from https://gigazine.net/news/20200921-psono/
無料&自分でホストして全機能を利用できるオープンソースの高機能パスワードマネージャー「Psono」レビュー

チームでパスワードを管理できるサービスとしては1Passwordがありますが、「お金を払うのはちょっと……」「自分でサービスをホストしたい」という人もいるはず。オープンソースのパスワードマネージャー「Psono」を使うと、無料で高機能なパスワードマネージャーを自分のサーバー上に構築することができます。 Password Manager for Teams | Psono https://psono.com/ 今回はGCPのg1-smallインスタンス上にPsonoを構築。イメージはUbuntu 20.04 LTS Minimalを使用しています。まずは以下のコマンドを実行してDockerをインストール。
curl -fsSL get.docker.com -o get-docker.sh sudo sh get-docker.sh
Dockerコマンドを一般ユーザーでも実行できるよう、ユーザーをdockerグループに追加しておきます。
sudo usermod -aG docker ユーザー名
続いて下記コマンドでdocker-composeも導入しておきます。
sudo curl -L "https://github.com/docker/compose/releases/download/1.27.3/docker-compose-$(uname -s)-$(uname -m)" -o /usr/local/bin/docker-compose sudo chmod +x /usr/local/bin/docker-compose
PostgreSQLのデータを永続化するためのディレクトリを作成。
sudo mkdir -p /var/local/docker/postgres
続いてPsonoサーバーの設定ファイルを記述していきます。
sudo mkdir -p /var/local/docker/psono sudo mkdir -p /var/log/psono sudo vi /var/local.docker/psono/setting.yaml
Psonoサーバーで利用する乱数を生成するため、下記コマンドを実行。
docker run --rm -ti psono/psono-server:latest python3 ./psono/manage.py generateserverkeys
実行結果の画面はこんな感じ。赤枠部分が実行結果で、そのまま設定ファイルに記述します。

デバッグモードを無効にするよう設定ファイルに記述。
DEBUG: False
Psonoで利用するドメイン名やURLを設定。
ALLOWED_HOSTS: ['*'] ALLOWED_DOMAINS: ['examlpe.com'] HOST_URL: 'https://www.example.com/server'
アカウント認証にメールを利用するので、メールを送信するための設定も必要です。今回はMTAにMailHogを利用するので、「EMAIL_HOST」にはコンテナ名を、ポート番号は1025を指定しています。
EMAIL_FROM: '[email protected]' EMAIL_HOST: 'mailhog' EMAIL_HOST_USER: 'psono' EMAIL_HOST_PASSWORD : 'password' EMAIL_PORT: 1025 EMAIL_SUBJECT_PREFIX: '' EMAIL_USE_TLS: False EMAIL_USE_SSL: False EMAIL_SSL_CERTFILE: EMAIL_SSL_KEYFILE: EMAIL_TIMEOUT:
参照するデータベースを指定。
DATABASES: default: 'ENGINE': 'django.db.backends.postgresql_psycopg2' 'NAME': 'psono' 'USER': 'psono' 'PASSWORD': 'password' 'HOST': 'postgres' 'PORT': '5432'
Psonoのテンプレートを指定。
TEMPLATES: [ { 'BACKEND': 'django.template.backends.django.DjangoTemplates', 'DIRS': ['/root/psono/templates'], 'APP_DIRS': True, 'OPTIONS': { 'context_processors': [ 'django.template.context_processors.debug', 'django.template.context_processors.request', 'django.contrib.auth.context_processors.auth', 'django.contrib.messages.context_processors.messages', ], }, }, ]
Redisでキャッシュを実装したり、YubiKeyやLDAPを用いた認証を行ったりすることもできますが、ひとまず上記の設定を「settings.yaml」に記述しておきます。 続いてホスト側のCronを設定。
sudo vi /etc/cron.d/psono
以下の記述を末尾に追記しておきます。
30 2 * * * docker run --rm -v /var/local/docker/psono/settings.yaml:/root/.psono_server/settings.yaml -ti psono/psono-server-enterprise:latest python3 ./psono/manage.py cleartoken >> /var/log/cron.log 2>&1
続いてPsonoにアクセスするためのウェブクライアントを導入します。まずは下記コマンドでウェブクライアント用の設定ファイルを作成。
sudo mkdir -p /var/local/docker/psono-client sudo vi /var/local/docker/psono-client/config.json
設定ファイルの内容は以下。
{ "backend_servers": [{ "title": "Psono.pw", "url": "https://www.example.com" }], "base_url": "https://www.charolittle.tk/", "allow_custom_server": true, "allow_registration": true, "allow_lost_password": true, "disable_download_bar": false, "authentication_methods": ["AUTHKEY"], "saml_provider": [] }
Nginx-proxyとLet'sencryptでリバースプロキシとHTTPS対応を行うため、証明書を格納するディレクトリを作成しておきます。
sudo mkdir -p /var/local/docker/nginx-proxy/certs
コンテナを起動するための「docker-compose.yaml」ファイルを作成。
sudo vi /var/local/docker/docker-compose.yaml
docker-compose.yamlの内容は以下。volumes_fromオプションはバージョン3のdocker-compose.yamlでは使えなかったはずですが、記事作成時点で最新バージョンの1.27.3では利用できるようになっていました。
version: '3' services: psono-server: image: psono/psono-server-enterprise:latest container_name: psono-server ports: - "10100:80" volumes: - /var/local/docker/psono/settings.yaml:/root/.psono_server/settings.yaml - /var/log/psono:/var/log/psono sysctls: net.core.somaxconn: 65535 environment: VIRTUAL_HOST: examle.com,www.example.com LETSENCRYPT_HOST: examle.com,www.example.com LETSENCRYPT_EMAIL: [email protected] restart: unless-stopped psono-client: image: psono/psono-client:latest container_name: psono-client ports: - "10101:80" volumes: - /var/local/docker/psono-client/config.json:/usr/share/nginx/html/config.json environment: VIRTUAL_HOST: psono.example.com LETSENCRYPT_HOST: psono.example.com LETSENCRYPT_EMAIL: [email protected] restart: unless-stopped nginx-proxy: image: jwilder/nginx-proxy container_name: nginx-proxy ports: - "80:80" - "443:443" volumes: - /var/run/docker.sock:/tmp/docker.sock:ro - /var/local/docker/nginx-proxy/certs:/etc/nginx/certs:ro - /etc/nginx/vhost.d - /usr/share/nginx/html restart: unless-stopped letsencrypt: image: jrcs/letsencrypt-nginx-proxy-companion container_name: letsencrypt volumes: - /var/run/docker.sock:/var/run/docker.sock:ro - /var/local/docker/nginx-proxy/certs:/etc/nginx/certs:rw volumes_from: - nginx-proxy restart: unless-stopped mailhog: image: mailhog/mailhog:latest container_name: mailhog ports: - "1025:1025" - "8025:8025" restart: unless-stopped
あとは「/var/local/docker」で下記コマンドを実行してコンテナを起動。
docker-compose up -d
「docker ps」コマンドを実行し、コンテナがすべて起動していればOK。これでセットアップはすべて完了です。

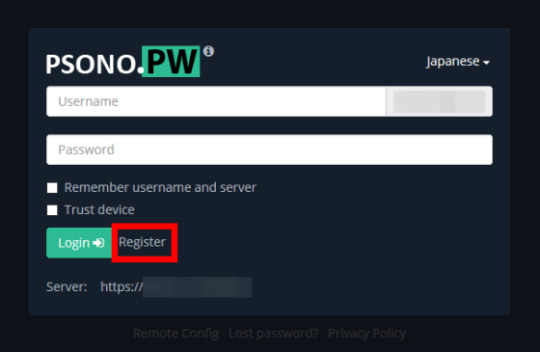
ブラウザから「https://psono.example.com」にアクセスすると、ログイン画面が表示されました。まだアカウントを登録していないので「Register」をクリック。
ユーザー名、メールアドレス、パスワードを入力して「Register」をクリック。

入力したメールアドレスにメールが届くので「Activate」をクリック。なお、今回はMTAにMailHogを利用しているので、メールはlocalhostに届きます。
アカウントの認証が完了したら「Back to home」をクリック。
Psonoのホーム画面が表示されました。
画面を右クリックして「New Folder」をクリックし、アカウント情報を分類するためのフォルダを作成。
フォルダ名を入力して「OK」をクリック。
フォルダが作成されました。
アカウント情報を登録するため、フォルダ上で右クリックして「New Entry」をクリック。
アカウントの種類、アカウント情報の名称、URL、ユーザー名、パスワードを入力して「OK」をクリック。
フォルダ下にアカウント情報を登録することができました。
項目を右クリックすることで、アカウント情報の共有やユーザー名、パスワードのコピー、項目の編集などを行うことができます。
Psonoユーザーにアカウント情報を共有するには「Share」をクリック。
アカウント情報に対する権限を設定し、共有するアカウントを選択して「OK」をクリック。
共有先のアカウントのPsono画面の「Pending Requests」を確認すると、先ほど共有したアカウント情報が表示されているので「Accept」をクリックします。
アカウント情報を登録するフォルダを指定して「OK」をクリック。
これでアカウント情報を共有することができました。
一度アカウント情報を共有したユーザーは「Trusted User」に表示されます。
また、Psonoを利用していない人にアカウント情報を共有するには、項目上で「Link Share」をクリック。
共有名や有効期限、パスフレーズなどを入力して「Create」をクリックします。
赤枠のボタンをクリックし、リンクをコピーして相手に共有すればOK。なお、記事作成時点では共有用リンクのサブドメインがPsonoサーバーのものになっており、ウェブクライアントのサブドメインに修正する必要がありました。
リンクにアクセスし、パスフレーズを入力して「Send」をクリックすると……
アカウント情報にアクセスすることができました。
アカウント情報の共有状況はPsonoウェブクライアントの「Activate Link Share」から確認することができます。
チームで同じアカウントを共有する場合はグループによる共有が便利です。ウェブクライアントの「Groups」から「Create New Group」をクリック。
グループ名を入力して「OK」をクリック。
「Edit」下のボタンをクリックしてグループを編集します。
グループのメンバーやその権限を設定して「Save」をクリック。
グループに追加されたユーザーは「Groups」メニューから「Accept」をクリックし、グループに参加。
グループに共有されたアカウント情報を登録するフォルダを指定して「OK」をクリック。
あとはアカウント情報の共有時に「Known Groups」からグループを選択すればOK。グループのメンバー全員にアカンと情報を共有することができます。
「Security Report」画面では、アカウントごとにパスワードの強度やパスワードが変更されていない期間などを確認することができます
PsonoにはFirefox・Chrome向けアドオンも用意されています。 Psono - Free Password Manager – Firefox (ja) 向け拡張機能を入手 https://addons.mozilla.org/ja/firefox/addon/psono-pw-password-manager/ Psono - Free Password Manager - Chrome ウェブストア https://chrome.google.com/webstore/detail/psono-free-password-manag/eljmjmgjkbmpmfljlmklcfineebidmlo 今回はFirefoxに導入してみます。Firefoxのアドオンページにアクセスして「Firefoxに追加」をクリック。
「追加」をクリック。
「OK」をクリック。これでアドオンのインストールが完了しました。
Firefoxの右上に表示されているPsonoのアイコンをクリックすると、ログインを求められます。ユーザー名、パスワード、PsonoサーバーのURLを入力して「Login」をクリック。
これでブラウザ上からアカウント情報を確認したり……
ウェブサイトのログイン画面とPsonoを連携したりすることができます。
なお、今回はウェブクライアントも自分で構築しましたが、Psonoが公式に用意しているウェブクライアントを利用することも可能。Psonoの利用に最低限必要なのは「Psonoサーバー」と「MTA」となっています。
https://i.gzn.jp/img/2020/09/21/psono/400.png
0 notes
Text
Build Your First GraphQL API in 10 Minutes with Hasura
GraphQL seems shiny on the frontend, and frontend developers love it because of the flexibility to pick and choose the right size of data for our UI. Where the developer experience gets ugly is when you try to build the backend that supports a GraphQL API.
I am traditionally a frontend developer, but lately, I find that I have to build the API that supports my frontend projects. It gets frustrating when I want to use GraphQL on the frontend project, and for the life of me, I can’t get a GraphQL API running as quickly as I would have liked.
Between these struggles, I’ve finally found a way to optimize my developer experience when building a GraphQL API without sacrificing the users’ experience, thanks to Hasura! In the next 10 minutes, you’re going to roll out a GraphQL API with real data and data relationships.
GraphQL API Backend with Hasura
The trick to setting up a GraphQL API without the hassle is to use Hasura. I have been using it for a while and loved it so much that I started on an online workshop on building fullstack GraphQL projects with Hasura. Alongside fundamental GraphQL features like Queries, Mutations, and Subscriptions, here are a few things Hasura handles for you:
Schemas
Relationships
User Authorization
Extensibility with Serverless
You can set up a backend using either of the following options:
Use a docker-compose file and a single docker command to get up and running locally
Deploy to the Cloud directly
— Sorry to interrupt this program! 📺
If you're interested in learning React and GraphQL in a comprehensive and structured way, I highly recommend you try Wes Bos' Fullstack Advanced React & GraphQL course. Learning from a premium course like that is a serious investment in yourself.
Plus, this is an affiliate link, so if you purchase the course you help Alligator.io continue to exist at the same time! 🙏
- Seb, ✌️+❤️
Create a GraphQL API Locally
To use Docker, install Docker if you don’t already have it installed. Next, create a project folder and add a docker-compose.yml file with the following:
version: '3.6' services: postgres: image: postgres:12 restart: always volumes: - db_data:/var/lib/postgresql/data environment: POSTGRES_PASSWORD: postgrespassword graphql-engine: image: hasura/graphql-engine:v1.1.0 ports: - "4400:8080" depends_on: - "postgres" restart: always environment: HASURA_GRAPHQL_DATABASE_URL: postgres://postgres:postgrespassword@postgres:5432/postgres HASURA_GRAPHQL_ENABLE_CONSOLE: "true" volumes: db_data:
You don’t need to worry about what this configuration does but if you are new to Docker and curious, this file:
Creates a Postgres database for your app’s data using a Postgres image
Creates a GraphQL engine using a Hasura image
Starts up everything and exposes the API on port 4400
You can start the app by running the following on the same directory where you have the config file:
$ docker-compose up -d
When the process completes in the terminal, go to localhost:4400. You should see:

Believe it or not, you have a GraphQL API live at http://localhost:4400/v1/graphql. It’s not useful yet because we do not have data in the Postgres database just yet.
Create a GraphQL API on the Cloud
Setting up in the Cloud is one form away. Fill out this form, and a Microsoft Azure wizard will generate a GraphQL API for you.
Add a Table to Store Data
To persist data, we need to first create a table where this data can be stored. Let’s create some tables!
We want to model a zoo database where they can store animals and the class each animal belongs to. We can have a class table and an animal table. An animal can belong to a class while a class can have many animals. A dog is a mammal while an alligator, a lizard, and a snake are reptiles.
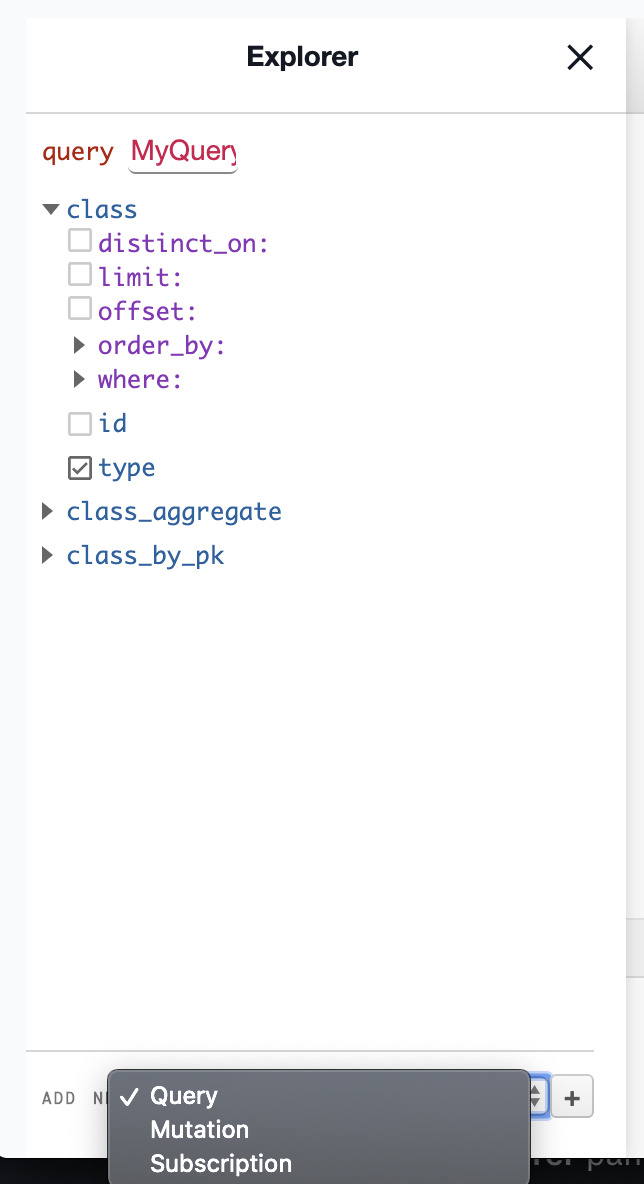
Create Table Page: Go to the create table page by clicking on Data from the Navbar and click the Create Table button.

Configure Table: Create a class table with just two fields: id and type. Then select id to be the primary key:
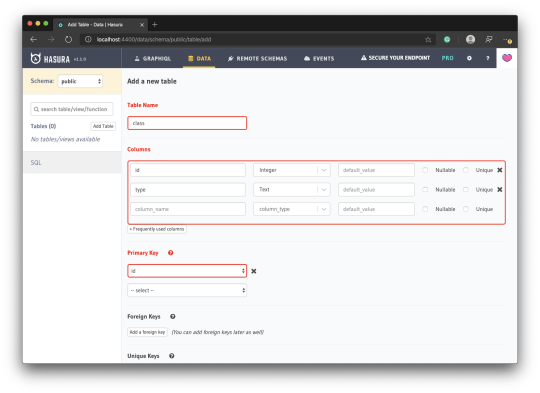
Save Table: Click the Add Table button at the bottom of the page.
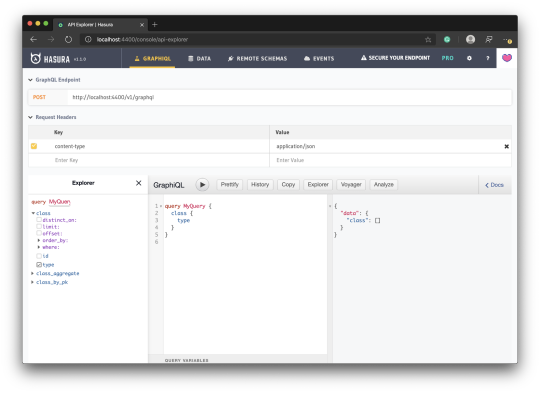
Head back to the GraphiQL page, and you should find queries for the table you created. You can try a query to get the list of animal classes:
query MyQuery { class { type } }
The query will return an empty list as expected.
You are currently seeing only the available queries. You can also explore mutations and subscriptions by selecting it from the ADD NEW dropdown at the bottom of the Explorer pane and clicking the plus button:
Run this mutation to add a class to the class table:
mutation MyMutation { insert_class(objects: {type: "Mammal", id: 1}) { affected_rows } }
This will return the affected rows count:
{ "data": { "insert_class": { "affected_rows": 1 } } }
You can also confirm this by taking a look at the Data page where we created the table and inspecting the class table.
Run the following mutation to delete a row:
mutation MyMutation { delete_class(where: {id: {_eq: 1}}) { affected_rows } }
Add a Table using SQL Commands
One cool thing about Hasura is how it allows you to manipulate your Postgres database directly through SQL commands. To go to the SQL editor, go to the Data page and click SQL from the sidebar:

Run the following SQL command:
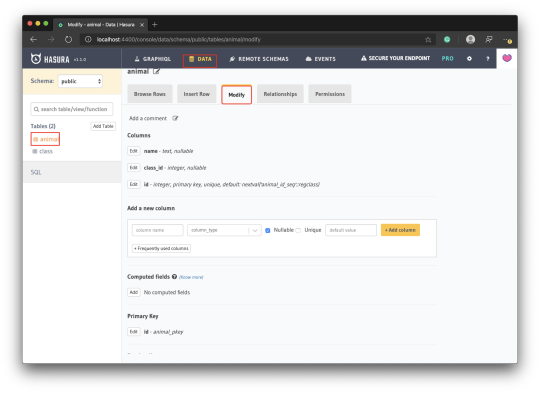
CREATE TABLE IF NOT EXISTS public."animal" ( "name" TEXT, "class_id" INT, "id" SERIAL PRIMARY KEY );
You should see an animal table appear on the list of tables, and you can also see a queryable animal at the GraphiQL page.
The SERIAL type sets the id as an integer that increments automatically. This is what you want most times for IDs when you are not using something like UUID.
Add a Relationship
Since we know that animals belong to a class, let’s see how we can add the relationship to our database tables. Relationships in Hasura come in two ways:
Table relationship
Object relationship
Table Relationship
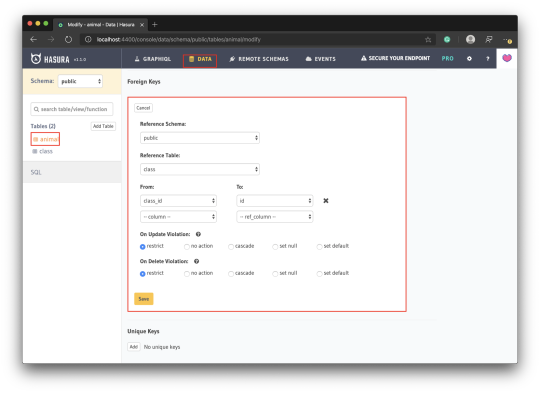
A table relationship is the same thing as running an SQL command to add a foreign key. Since animal represents the many part of the relationship, we are going to add a foreign key to it.
Go to the Data page, select animal from the sidebar and click the Modify tab:
Scroll down to Foreign Keys and click Add. Complete the foreign key form as shown in the screenshot the click Save:
Object Relationships
Though we have just told Postgres about our relationship, our GraphQL engine does not know about this. If you have ever written a GraphQL schema, our schema theoretically still looks like this:
type Class { id: ID type: String } type Animal { id: ID name: String }
There is still no relationship between these two entities. To prove this to you, try running the following query:
query MyQuery { class { animals { name } } }
You should get an error that says animals is not found in type class:
{ "errors": [ { "extensions": { "path": "$.selectionSet.class.selectionSet.animals", "code": "validation-failed" }, "message": "field \"animals\" not found in type: 'class'" } ] }
This is how you would introduce a relationship to them through the schema:
type Class { id: ID type: String animal: [Animal] } type Animal { id: ID name: String class: Class }
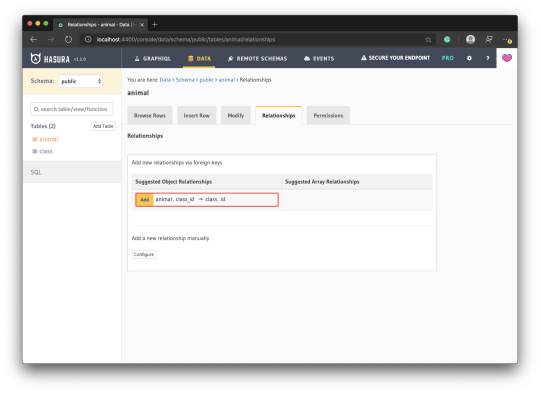
This kind of relationship is called an Object relationship. You need to add an object relationship to both sides.
Go to each of the tables and click the Relationships tab. You should see a suggestion to add an object relationship — add it. This suggestion is based on the fact that we already related both tables with a foreign key.

Seeding a Database
Seeding a database allows you to have enough dataset to test with. You can seed through Hasura using the SQL editor we saw earlier in this article.
Run the following SQL to seed the class table:
INSERT INTO public."class" ("id", "type") VALUES (1,'Mammal'), (2,'Bird'), (3,'Reptile'), (4,'Fish'), (5,'Amphibian'), (6,'Bug'), (7,'Invertebrate');
Run the following SQL to seed the animal table:
INSERT INTO public."animal" ("name", "class_id") VALUES ('aardvark',1), ('antelope',1), ('bass',4), ('bear',1), ('boar',1), ('buffalo',1), ('calf',1), ('carp',4), ('catfish',4), ('cavy',1), ('cheetah',1), -- Get full list from gist https://gist.github.com/christiannwamba/f6f1aa1b87c455c88764b749ad24d458
Now you can start trying out interesting queries:
# Get classes with their animals query MyQuery { class { animals { name } } } # Get animals with the class they belong to query MyQuery { animal { name class { type } } } # Get animals that are mammals query MyQuery { animal(where: {class: {type: {_eq: "Mammal"}}}) { name } } # ...and so on
That’s it for now! Don’t forget to try out mutations and subscriptions too! 😎
via Alligator.io https://ift.tt/2WjjYdN
0 notes
Link
はじめに 世はエンジニア戦国時代。Dockerくらい一般常識。Docker使えないなんてエンジニアを名乗れない。そんな時代です。(ほんとか?) この記事を書き始めた時の僕のDocker戦闘力は「Docker公式チュートリアルを眺めただけ」です。 なので逆に言えばDocker公式チュートリアルをやっただけの方にも理解できるかと思います。 (ちなみにKubernetes戦闘力は「なんでKubernetesをk8sって言うのかだけ知ってる」です。) この記事はそんな僕が「Docker/Kubernetesちょっと分かる」になるまでにやったことを後から追えるようにズラっと書き連ねたものになります。 使用するのは僕の大好きな言語ElixirとそのWebフレームワークPhoenixです。が、この記事でどの言語を用いているかは重要ではありません。 (記事内でElixirのコードはほぼ触らないですし) また、Railsがわかる方は以下の記事でRailsとPhoenixのコマンドを対応させて説明しているのでチラ見するとPhoenixで何をしようとしているか理解できるかと思います。 Rails経験者に贈るPhoenix入門 何か訂正や補足、アドバイスなどありましたら、是非是非コメントかTwitterまでお願いします!🙇♂️ この記事で扱う内容 Webアプリケーションを扱える環境をDockerfileで作成する docker-composeを使ってWebアプリケーション(+DB)を動かす 作成したimageをdockerhubに上げる Kubernetes(minikube)を使ってWebアプリケーション(+DB)を動かす Dockerfileの作成 では早速Dockerfileを作成していきます Dockerfileではこれから作成するコンテナで何をしようとしているかを定義します。 以下の公式リファレンスが参考になります。 Dockerfile リファレンス Dockerfile FROM elixir:1.10.2 RUN curl -sL https://deb.nodesource.com/setup_12.x | bash RUN apt-get install -y nodejs RUN npm install npm@latest -g RUN mix local.hex --force RUN mix archive.install hex phx_new 1.4.12 --force RUN mix local.rebar --force WORKDIR /app このDockerfileが何をしようとしているか 初心者なりに一行ずつ説明してみます。 親イメージを選択します。 イメージって何?という方は以下の公式チュートリアルの説明がわかりやすいです Part 1:概要説明とセットアップ | コンテナの概要を説明 この親イメージはElixir公式のimageです。 こういった公式で出ているイメージなどから自分の目的に即した環境が作れるようにDockerfileを記述していって、カスタムしていく訳です。 (今回だと自分の目的=Phoenixを動かせる環境となります) RUN curl -sL https://deb.nodesource.com/setup_12.x | bash RUN apt-get install -y nodejs RUN npm install npm@latest -g nodejsが必要なのでインストールしています。 ちなみにはじめはこの部分を以下のように記述していたのですが、(nodejsにnpmは同梱のはず) こうするとその後bash: npm: command not foundが出てしまいます。 以下のページを参考に上のコードに落ち着きました。 Dockerでphpコンテナとかにnpmをインストールするときのメモ RUN apt-get update \ && apt-get install -y nodejs RUN mix local.hex --force RUN mix archive.install hex phx_new 1.4.12 --force RUN mix local.rebar --force hexというElixirのパッケージ管理ツールをインストールします。 (Rubyでいうrubygems) ここで--forceがついてるのは以下のエラーが出るためです Shall I install Hex? (if running non-interactively, use "mix local.hex --force") [Yn] ** (Mix) Could not find an SCM for dependency :phx_new from Mix.Local.Installer.MixProject 途中でyesと答えなければいけない部分があるのですが、それを--forceをつけることで無視してインストールできます。 postgresはどうすんの? はい、先ほどのDockerfileではElixir(Phoenix)の環境しか整っていません。 postgresのコンテナも作らなければいけないです。 しかし - postgresのコンテナとPhoenixのコンテナ間の通信はどうするの? - コンテナ間通信を頑張って設定したとしても毎回それを設定するの? - 毎回postgresのコンテナ、Phoenixのコンテナを両方立てるのめんどくせえ という問題たちが出てきます。 これらを解決してくれるのがdocker-composeです ※ちなみにdocker-composeを使わないコンテナ間通信は以下のページを参考にすればできそうです。 https://kitsune.blog/docker-network#i 「いやいや同じコンテナにDBも突っ込めばええやん!」について そうなるかもですが、コンテナを分けることにはちゃんと理由があります。 この後出てくるdocker-composeとKubernetesではアクセス分散のために複数のコンテナでWebサーバーを動かすことができます。 同じコンテナにDBも一緒に入れてしまうと、この際にDBもたくさんできてしまい、どのコンテナに接続されるかでDBの中身が変わってしまうと言う事態が起こります。 これを防ぐためにDBとWebでコンテナを分けてWebのコンテナを増やしても同じDBを参照するように設定すべきな訳です docker-composeを使用する docker-composeを使用するためにdocker-compose.ymlを作成します。 docker-compose.ymlにはdockerのコンテナ達やネットワークについてあるべき姿を記述します。 するとdocker-composeがそれを元に良しなに設定してくれるわけです。 以下のように作成します。 docker-compose.yml version: "3" #docker-composeのバージョン指定 services: #ここより下でserviceを定義 web: build: . #使用するDockerfileの場所 ports: #portをバインド - '4000:4000' volumes: #hostの./を/appとして共有 - .:/app command: mix phx.server #サーバー起動のためのコマンド depends_on: - db #webの開始前にdbを起動 db: image: postgres #使用するimage environment: - POSTGRES_USER=postgres - POSTGRES_PASSWORD=postgres - POSTGRES_HOST=db 以下の公式リファレンスがすごく参考になります。 Compose ファイル・リファレンス docker-compose.ymlに定義したcommandやportsはCMDやEXPOSEとしてDockerfileで定義することもできます。 これでDockerでElixir/Phoenixの環境を使用する準備ができました。 ※volumesに関してはファイルを共有できるという面と、コンテナの外にファイルを安全に置いておけるという面もあります。詳しくはKubernetesの章で出てきます。 適当なサンプルアプリを作ってみる テストもかねてサンプルアプリを作ってみます。(アプリ名はdododoにしました) $ docker-compose run web mix phx.new . --app dododo Creating network "docker-elixir_default" with the default driver Creating docker-elixir_db_1 ... done The directory /app already exists. Are you sure you want to continue? [Yn] y * creating config/config.exs * creating config/dev.exs * creating config/prod.exs * creating config/prod.secret.exs * creating config/test.exs * creating lib/dododo/application.ex * creating lib/dododo.ex * creating lib/dododo_web/channels/user_socket.ex * creating lib/dododo_web/views/error_helpers.ex * creating lib/dododo_web/views/error_view.ex * creating lib/dododo_web/endpoint.ex * creating lib/dododo_web/router.ex * creating lib/dododo_web.ex * creating mix.exs * creating README.md * creating .formatter.exs * creating .gitignore * creating test/support/channel_case.ex * creating test/support/conn_case.ex * creating test/test_helper.exs * creating test/dododo_web/views/error_view_test.exs * creating lib/dododo/repo.ex * creating priv/repo/migrations/.formatter.exs * creating priv/repo/seeds.exs * creating test/support/data_case.ex * creating lib/dododo_web/controllers/page_controller.ex * creating lib/dododo_web/templates/layout/app.html.eex * creating lib/dododo_web/templates/page/index.html.eex * creating lib/dododo_web/views/layout_view.ex * creating lib/dododo_web/views/page_view.ex * creating test/dododo_web/controllers/page_controller_test.exs * creating test/dododo_web/views/layout_view_test.exs * creating test/dododo_web/views/page_view_test.exs * creating lib/dododo_web/gettext.ex * creating priv/gettext/en/LC_MESSAGES/errors.po * creating priv/gettext/errors.pot * creating assets/webpack.config.js * creating assets/.babelrc * creating assets/js/app.js * creating assets/js/socket.js * creating assets/package.json * creating assets/css/app.css * creating assets/static/favicon.ico * creating assets/css/phoenix.css * creating assets/static/images/phoenix.png * creating assets/static/robots.txt Fetch and install dependencies? [Yn] y * running mix deps.get * running cd assets && npm install && node node_modules/webpack/bin/webpack.js --mode development * running mix deps.compile We are almost there! The following steps are missing: $ cd app Then configure your database in config/dev.exs and run: $ mix ecto.create Start your Phoenix app with: $ mix phx.server You can also run your app inside IEx (Interactive Elixir) as: $ iex -S mix phx.server また、しっかりホストとのファイル共有もできていることがわかります。 $ ls Dockerfile _build config docker-compose.yml mix.exs priv README.md assets deps lib mix.lock test config/dev.exsの微修正 config/dev.exsはdev環境の設定ファイルです。 データベースのホスト名をdbに変更しておきます。 config/dev.exs # Configure your database config :dododo, Dododo.Repo, username: "postgres", password: "postgres", database: "dododo_dev", hostname: "db", #fix show_sensitive_data_on_connection_error: true, pool_size: 10 DBの作成 $ docker-compose run web mix ecto.create Starting docker-elixir_db_1 ... done (省略) Generated dododo app The database for Dododo.Repo has been created うまく作成できました。 これでDBとの連携もうまくいっている事がわかります。 サンプルアプリを立ち上げてみる 以下のように表示されれば成功です。 dockerhubにあげる imageを確認してtagをつける $ 507e3f91e80f 55 minutes ago 1.28GB dododo_web latest d7724891c88c 4 hours ago 1.27GB elixir 1.10.2 d6641893fb96 12 hours ago 1.23GB postgres latest 73119b8892f9 2 days ago 314MB $ docker tag a9ff6e7b157f sanposhiho/phoenix:latest dockerhubにログイン $ docker login Login with your Docker ID to push and pull images from Docker Hub. If you don't have a Docker ID, head over to https://hub.docker.com to create one. Username: sanposhiho Password: Login Succeeded 以下のリンクから適当にCreate Repositoryします。 https://hub.docker.com/repository/create 作ったRepositoryにpushします。 $ docker push sanposhiho/phoenix dockerhubにあげると何ができるのか dockerhubにあげる事でDockerfileが必要なくなります。 すなわちdocker-compose.ymlさえあれば先ほどの環境が作成できるわけです。 docker-compose.ymlを修正 Dockerfileを使用しない形にdocker-compose.ymlを修正します。 docker-compose.yml version: "3" services: web: image: sanposhiho/phoenix #先ほど作成したimage ports: - '4000:4000' volumes: - .:/app command: mix phx.server depends_on: - db db: image: postgres environment: - POSTGRES_USER=postgres - POSTGRES_PASSWORD=postgres - POSTGRES_HOST=db 変更箇所はwebのimageの部分です。 Dockerfileを参照していたのを先ほど作成したimageを指定しました。 これによりsanposhiho/phoenixをローカルで削除してからdocker-compose upしても $ docker-compose up Creating network "docker-elixir_default" with the default driver Pulling db (postgres:)... latest: Pulling from library/postgres 68ced04f60ab: Pull complete 59f4081d08e6: Pull complete 74fc17f00df0: Pull complete 8e5e30d57895: Pull complete a1fd179b16c6: Pull complete 7496d9eb4150: Pull complete 0328931819fd: Pull complete 8acde85a664a: Pull complete 38e831e7d2d3: Pull complete 582b4ba3b134: Pull complete cbf69ccc1db5: Pull complete 1e1f3255b2e0: Pull complete c1c0cedd64ec: Pull complete 6adde56874ed: Pull complete Digest: sha256:110d3325db02daa6e1541fdd37725fcbecb7d51411229d922562f208c51d35cc Status: Downloaded newer image for postgres:latest Pulling web (sanposhiho/phoenix:)... latest: Pulling from sanposhiho/phoenix 50e431f79093: Already exists dd8c6d374ea5: Already exists c85513200d84: Already exists 55769680e827: Already exists f5e195d50b88: Already exists f7e2598a9cb7: Already exists 9ba52fdf113f: Already exists 896d0883eede: Already exists 019ae449ef4b: Already exists a653e3c2dbc7: Pull complete 1b5116636524: Pull complete 6a7182c301e9: Pull complete ff51ec8f406c: Pull complete 4c53f0b7d33e: Pull complete 79b95deb3b15: Pull complete 4e0c0135d3e7: Pull complete Digest: sha256:ab7dbe3a514597f3e390f90de76de6465defb90103f58c3f08e34db97d890ae7 Status: Downloaded newer image for sanposhiho/phoenix:latest Creating docker-elixir_db_1 ... done Creating docker-elixir_web_1 ... done このようにsanposhiho/phoenixがなくても勝手にdockerhubから取ってきてくれます。 Kubernetesをやっていく 以下の記事を参考に先ほどの環境をKubernetes(minikube)でも動かしてみます。 Docker ComposeからMinikube + Komposeに移行してみよう Komposeと言うのはdocker-compose.ymlをKubernetes向けの設定ファイルに変換してくれる便利なやつです。 そもそもKubernetesって? 色々見ましたが以下の記事の前半部分の説明がとても分かり易かったです 数時間で完全理解!わりとゴツいKubernetesハンズオン!! Komposeを使う前に色々修正 Dockerfile Dockerfile FROM elixir:1.10.2 RUN curl -sL https://deb.nodesource.com/setup_12.x | bash RUN apt-get install -y nodejs RUN npm install npm@latest -g RUN mix local.hex --force RUN mix archive.install hex phx_new 1.4.12 --force RUN mix local.rebar --force RUN apt-get install ca-certificates #追加 COPY . /app #追加 WORKDIR /app これを先ほどの手順でdockerhubに上げます (僕はsanposhiho/phoenix_for_k8sとして上げました。) docker-compose.yml docker-compose.yml version: "3" services: web: image: sanposhiho/phoenix_for_k8s #変更 ports: - '4000:4000' command: mix phx.server depends_on: - db db: image: postgres ports: - "5432:5432" #追加 environment: - POSTGRES_USER=postgres - POSTGRES_PASSWORD=postgres - POSTGRES_HOST=db 追加/変更の他にvolumeの部分が削除されています。 komposeで変換 $ kompose convert INFO Kubernetes file "db-service.yaml" created INFO Kubernetes file "web-service.yaml" created INFO Kubernetes file "db-deployment.yaml" created INFO Kubernetes file "web-deployment.yaml" created 幾つかのファイルが作成されました。 生成されたファイルを微修正 web-service.yamlに以下を追記します。 web-servise.yaml apiVersion: v1 kind: Service metadata: annotations: kompose.cmd: kompose convert kompose.version: 1.21.0 () creationTimestamp: null labels: io.kompose.service: web name: web spec: ports: - name: "4000" port: 4000 targetPort: 4000 selector: io.kompose.service: web type: NodePort #追加 status: loadBalancer: {} これにより外の世界からアクセス可能になります。 生成されたファイルを見ていく Komposeが生成してくれたファイルを見ていきます。 以下の公式ドキュメントが理解の上で役立つと思います。 Kubernetes | Kubernetesオブジェクトを理解する Komposeによって大きく分けて「Deployment」と「Service」の二つが作成されています。 Deploymentとは Deploymentに関しては以下の公式ドキュメントがわかりやすいです。 Kubernetes | Deployment 以下の記事も(少し古いですが)とても参考になりました。 Kubernetes: Deployment の仕組み deploymentはpod(Kubernetesの管理する最小単位)を管理します。 (正確にはpodを管理するReplicaSetを作成します。) 実際に作成されたweb-deployment.yamlを見てみます。 web-deployment.yaml apiVersion: apps/v1 #どのバージョンのKubernetesAPIを利用するか kind: Deployment #何についての定義ファイルか metadata: annotations: kompose.cmd: kompose convert kompose.version: 1.21.0 () creationTimestamp: null labels: io.kompose.service: web name: web #deploymentの名前 spec: replicas: 1 #replicaの数 selector: matchLabels: io.kompose.service: web #podのラベル定義 strategy: {} template: #deploymentが管理するpodの定義 metadata: annotations: kompose.cmd: kompose convert kompose.version: 1.21.0 () creationTimestamp: null labels: io.kompose.service: web spec: containers: - args: - mix - phx.server image: sanposhiho/phoenix_for_k8s imagePullPolicy: "" name: web ports: - containerPort: 4000 resources: {} restartPolicy: Always serviceAccountName: "" volumes: null status: {} web-deployment.yamlではspec.templateで指定されたpodを常に1つ維持するようにしています。 Serviceとは 以下の公式ドキュメントが参考になります。 Kubernetes | Service PodはそれぞれがIPアドレスを持っています。例えば今回のようにDBのPodとWebサーバーのPodに別れている場合、WebサーバーがDBのPodにアクセスするにはDBのPodのIPアドレスが必要になります。 そこでServiceはpodたちをセットで管理し(「DBのPod」「サーバーのPod」と言う風に管理)、そのセットに対してのアクセスが可能になります。 例えPodが動的に入れ替わったりしても一貫した方法でのアクセスが可能になります。 (Service無しだと、何かの障害で一つのPodが死んで、Deploymentが代わりのPodに入れ替えた時にはIPアドレスが変わってしまうのでアクセスができなくなってしまいます) 実際に作成されたweb-service.yamlをみてみます。 web-service.yaml apiVersion: v1 kind: Service metadata: annotations: kompose.cmd: kompose convert kompose.version: 1.21.0 () creationTimestamp: null labels: io.kompose.service: web name: web spec: ports: #管理するportに関して - name: "4000" port: 4000 targetPort: 4000 selector: #管理するPodの指定 io.kompose.service: web type: NodePort status: loadBalancer: {} 先ほど追加したtype: NodePortは指定しなかった場合デフォルト値としてClusterIPに指定されます。 ClusterIP: クラスター内部のIPでServiceを公開する。このタイプではServiceはクラスター内部からのみ疎通性があります。 これではクラスターの外部からのアクセスができなかったためNodePortに変更しました NodePort: 各NodeのIPにて、静的なポート(NodePort)上でServiceを公開します。そのNodePort のServiceが転送する先のClusterIP Serviceが自動的に作成されます。:にアクセスすることによってNodePort Serviceにアクセスできるようになります。 Serviceの公開 (Serviceのタイプ) minikubeを立ち上げておく ダッシュボードを開いておく ダッシュボードを使えば以下のようにPodなどの状態をブラウザから確認できます。 立ち上げ! ついにKubernetes上で立ち上げてみます。 $ kubectl apply -f db-deployment.yaml $ kubectl apply -f web-deployment.yaml $ kubectl apply -f db-service.yaml $ kubectl apply -f web-service.yaml これによってファイルに定義されたもの達が立ち上がります。 kensei-mba:docker-elixir nakatakensei$ kubectl get all NAME READY STATUS RESTARTS AGE pod/db-5fbcf655cd-2k7lw 1/1 Running 0 159m pod/web-87795996-r6rcf 1/1 Running 0 159m NAME TYPE CLUSTER-IP EXTERNAL-IP PORT(S) 4000:30249/TCP 159m NAME READY UP-TO-DATE AVAILABLE AGE deployment.apps/db 1/1 1 1 159m deployment.apps/web 1/1 1 1 159m NAME DESIRED CURRENT READY AGE replicaset.apps/db-5fbcf655cd 1 1 1 159m replicaset.apps/web-87795996 1 1 1 159m DBを作成する kubectl exec -it web-87795996-r6rcf mix ecto.create で任意のコードをPodに対して実行させることができます。 また、このコードが通る=Serviceが機能してDBに繋いでくれていることを意味します。 ちゃんと立ち上がっているか確認 $ minikube service list |----------------------|---------------------------|--------------|---------------------------| | NAMESPACE | NAME | TARGET PORT | URL | |----------------------|---------------------------|--------------|---------------------------| | default | db | No node port | | default | kubernetes | No node port | | default | web | | http://192.168.64.2:32566 | | kube-system | kube-dns | No node port | | kubernetes-dashboard | dashboard-metrics-scraper | No node port | | kubernetes-dashboard | kubernetes-dashboard | No node port | |----------------------|---------------------------|--------------|---------------------------| webのURLにアクセスします このようにPhoenixのTop画面が表示されれば成功です! これでも動いてはいますが… 現状の設定ではDBのPod内のみにDBのデータが存在します。 なのでDBのPodが死んだ時に全てのデータが死んでしまいます。 一回実験してみましょう ダッシュボードから作成されているKubernetes以外のService, Pod, deploymentを全て削除してください。 以下のようになれば合っています。 WebアプリケーションをDBを使うアプリケーションに作り直す PhoenixにもRailsと同様に便利なgeneratorの機能が搭載されています。 ローカルでgeneratorを使用します。 $ mix phx.gen.html Blog Post posts title:string content:string * creating lib/dododo_web/controllers/post_controller.ex * creating lib/dododo_web/templates/post/edit.html.eex * creating lib/dododo_web/templates/post/form.html.eex * creating lib/dododo_web/templates/post/index.html.eex * creating lib/dododo_web/templates/post/new.html.eex * creating lib/dododo_web/templates/post/show.html.eex * creating lib/dododo_web/views/post_view.ex * creating test/dododo_web/controllers/post_controller_test.exs * creating lib/dododo/blog/post.ex * creating priv/repo/migrations/20200308110013_create_posts.exs * creating lib/dododo/blog.ex * injecting lib/dododo/blog.ex * creating test/dododo/blog_test.exs * injecting test/dododo/blog_test.exs Add the resource to your browser scope in lib/dododo_web/router.ex: resources "/posts", PostController Remember to update your repository by running migrations: $ mix ecto.migrate 書かれているようにrouter.exにルーティングを追加しておきます。 lib/dododo_web/router.ex defmodule DododoWeb.Router do use DododoWeb, :router pipeline :browser do plug :accepts, ["html"] plug :fetch_session plug :fetch_flash plug :protect_from_forgery plug :put_secure_browser_headers end pipeline :api do plug :accepts, ["json"] end scope "/", DododoWeb do pipe_through :browser get "/", PageController, :index resources "/posts", PostController #追加 end # Other scopes may use custom stacks. # scope "/api", DododoWeb do # pipe_through :api # end end migrationします $ mix ecto.migrate 11:23:37.327 [info] == Running 20200308110013 Dododo.Repo.Migrations.CreatePosts.change/0 forward 11:23:37.335 [info] create table posts 11:23:37.392 [info] == Migrated 20200308110013 in 0.0s これで/postsにアクセスすると以下のようなアプリが作成できています (画像はNew Postから新たなpostを作成した後です) この変更をdockerhubのimageに反映させます。 先ほど説明した手順とほとんど同じなのでコマンドだけ載せておきます。 $ docker build . $ docker images #image idを取得 $ docker tag <image id sanposhiho/phoenix_for_k8s $ docker push sanposhiho/phoenix_for_k8s minikube環境で変更後のアプリケーションを動かす こちらもほぼ手順が変わらないのでコマンドだけ載せておきます。 $ kubectl apply -f db-deployment.yaml $ kubectl apply -f web-deployment.yaml $ kubectl apply -f db-service.yaml $ kubectl apply -f web-service.yaml $ kubectl get pods #pod nameの確認 $ kubectl exec -it mix ecto.create $ kubectl exec -it mix ecto.migrate 先ほどと違うのは最後に mix ecto.migrateが追加されていることです。これによってpostsテーブルがDBのPod内に作成されます。 画像使い回しですが、以下のページが/postsから確認できれば成功です。 (画像はまたもやNew Postから新たなpostを作成した後です) DBのPodを削除してみる ダッシュボードからDBのPodを削除します。 Deploymentによってすぐに新しいDB用のPodが作られます。(さすが) さて、先ほどのページを開き直してみるとどうなっているでしょうか 訳のわからんエラーが出ています。 「何回かDBにアクセスしようとしたけど、無理でしたー」というエラーです。 無事に(?)DBがPodが死んだことで消えてしまったことがわかりました。 ちなみに以下のコマンドでDBを作り直してPostsテーブルを再作成すると先ほどの「ほげほげ」のデータは残っていませんが、ページが正常に表示されます。 (作り直されたDBのPodに新しく出来たDBだから当たり前ですね) $ kubectl get pods #pod nameの確認 $ kubectl exec -it mix ecto.create $ kubectl exec -it mix ecto.migrate volumeを設定してDBの揮発を防ぐ 長々実験しましたが、このDBの揮発(=永続の逆。Podが死ぬとDBも一緒に消えてしまうと言う意)を防ぐにはvolumeを設定する必要があります。 volumeの設定方法ですが二つ存在しました。 (どっちがいいのかは分からないです…どなたか教えてください。) db-development.yamlのvolumesのみを弄る PersistentVolumeClaimを利用する 1. db-development.yamlのvolumesのみを弄る db-development.yaml apiVersion: apps/v1 kind: Deployment metadata: annotations: kompose.cmd: kompose convert kompose.version: 1.21.0 () creationTimestamp: null labels: io.kompose.service: db name: db spec: replicas: 1 selector: matchLabels: io.kompose.service: db strategy: {} template: metadata: annotations: kompose.cmd: kompose convert kompose.version: 1.21.0 () creationTimestamp: null labels: io.kompose.service: db spec: containers: - env: - name: POSTGRES_HOST value: db - name: POSTGRES_PASSWORD value: postgres - name: POSTGRES_USER value: postgres image: postgres imagePullPolicy: "" name: db ports: - containerPort: 5432 volumeMounts: #追加 - mountPath: "/var/lib/postgresql/data" name: pgdata resources: {} restartPolicy: Always serviceAccountName: "" volumes: #追加 - name: pgdata hostPath: path: /Users/nakatakensei/docker-elixir/ #postgresのdataをhostのどこに置いておくか 2. PersistentVolumeClaimを利用する pvc-phoenix.yaml apiVersion: v1 kind: PersistentVolumeClaim metadata: name: pv-claim spec: storageClassName: standard accessModes: - ReadWriteOnce resources: requests: storage: 1Gi db-development.yaml apiVersion: apps/v1 kind: Deployment metadata: annotations: kompose.cmd: kompose convert kompose.version: 1.21.0 () creationTimestamp: null labels: io.kompose.service: db name: db spec: replicas: 1 selector: matchLabels: io.kompose.service: db strategy: {} template: metadata: annotations: kompose.cmd: kompose convert kompose.version: 1.21.0 () creationTimestamp: null labels: io.kompose.service: db spec: containers: - env: - name: POSTGRES_HOST value: db - name: POSTGRES_PASSWORD value: postgres - name: POSTGRES_USER value: postgres image: postgres imagePullPolicy: "" name: db ports: - containerPort: 5432 volumeMounts: - mountPath: "/var/lib/postgresql/data" name: pgdata resources: {} restartPolicy: Always serviceAccountName: "" volumes: - name: pgdata persistentVolumeClaim: #1とはここが違う claimName: pv-claim 先ほどの手順で実験してもらうとどちらの方法を用いてもDB揮発しちゃう問題が解決したことがわかります。 (スクショを撮っても分かり難かったため、ここまで実際に手を動かして進めていただいた方は自分で実験してみてください) 終わりに 最終的なファイル達は以下のリポジトリに上がっています。 https://github.com/sanposhiho/docker-elixir-phoenix すごく長い記事になってしまいました。 しかし、個人的にDocker→Kubernetesと一緒の流れで学べるようなチュートリアルが無かったため記事を分けずにこのように進めました。 どなたかの役に立てば幸いです。 余談 ちなみに、この記事を読んでElixir/Phoenix勉強してみようかなって方がいましたら、この記事を元にDocker環境を立ててもいいですし、ローカルにElixir/Phoenixの環境を整えるには以下の記事が参考になるかと思います。 【2020/02最新】新品のMacBookでElixir(Phoenix)の環境を0から構築する 参考 記事内であげなかったけどチラチラ見て参考にさせていただいたサイトです。 DockerでRuby on Railsの開発をしよう kubernetesクラスタでRailsアプリを公開するチュートリアル Kubernetesの永続化 [PersistentVolume/PersistentVolumeClaim]
0 notes
Text
Kubernetes, Part 1: The Moving Pieces
Getting started with Kubernetes was not easy. First is because there are a lot of moving pieces. Secondly, there are some basic concept in running an containerized application in a cluster that differs from running a single local instance. So while picking up Kubernetes for the first time, this is also my first time learning some of the cluster deployment concepts as well. I decided to keep track of what I learn while trying to implement a set of config file for one of my pet project, gyro, with the hope that I could share it with other people also interested.
So! here's what I've got so far. Let's start with the basic moving pieces that makes a typical application goes.
Resources
In the world of Kubernetes, well, cluster computing in general, your components are often scattered around many hosting services. So instead of using local resources like storage, queue, or cache, you need to declare where they are located. For my project, gyro, I declared a storage volume for the database.
Deployments
When you’re ready to create an instance of an application, you create a deployment. The deployment may defines a docker image of your application, and make necessary request for resources. The docker image needs to be in a network-accessible registry to ensure that it can be downloaded to the machine it’s deployed to. You need to build your application into a docker image first, and push the image up into a registry service that is network accessible. From there, you can reference it in your kubernetes yaml file. For a local testing, you can build the docker image directly into the local cache by loading the minikube’s local cache registry into docker’s environment. There is a command provided to you by minikube to do just that.
eval $(minikube docker-env)
Stateless (Application)
A stateless deployment is a type of deployment is where there is no need for the data to persist outside of a currently running process. There's no sharing data between multiple instances or between instances' up and down time. This makes the deployment of the application really simple.
Ideally, most of the application would be deployed this way. To persist data, it would instead making a request to another deployment service that specifically handles data persistence like the database, queue manager, or smaller application as a microservice. This creates a nice separation between the application layer and the data persistence layer.
Stateful (Database)
A stateful deployment is a deployment where the deployed application requires the ability to persist data: a database for example. To achieve this, the deployment needs to be able to find appropriate storage volume. Since the deployment is running off of a docker container which doesn't persist data by default when down, and not able to share that data with the rest of the cluster, we need to find a network-accessible and sharable storage volume within the cluster instead.
A resource claim is a process where you request to the Kubernetes agent asking for an available resource the deployment needs to run. Once a volume is claimed, it can be used by the deployment, which in this case, is the database application. Should the database instance goes down, the new node will be able to reclaim and reconnect to the same storage volume, thus gain access to the same data again.
For example, to run a Postgres database, you need to define the Postgres docker application image, and make a request for storage of specific size. Kubernetes will then look at its available resource pool, and try to find a storage of at least that size for use. You can see an example here.
Services
The purpose of a service in Kubernetes is to provide abstraction to connect to your pods or deployments within a cluster. As pods come and go, such as restart from failure, their IP addresses may change. Services provide a fixed way to connect to dynamically allocated pods. During testing, I had a bit of problems assigning external IP to the service. I haven’t digged far enough to figure out what’s going on. So when it works, it would display <nodes> like below.
15:08:36 [mayppong]@Zynthia: ~/Projects/gyro (@dev 0 | 1 | 4) >> kubectl get svc gyro NAME CLUSTER-IP EXTERNAL-IP PORT(S) AGE gyro 10.0.0.222 <nodes> 4000:30065/TCP 7s
So to access your deployment, you want to run the minikube command to get the url for a named service instead.
minikube service gyro --url
On the other hand, the only way to connect one deployment to another through a service I’ve found so far is to use the name DNS. This is a default add-on that should be started when start your minikube local cluster. Each service is given a unique DNS generated based on its name and namespace using the format: <my_service_name>.<my_namespace>.svc.cluster.local. There are some other details outlined in the documentation as well.
1 note
·
View note
Text
Senior Java Full Stack Developer with JavaScript9+ years profiles at Austin, TX
Look for candidates who have worked earlier with Learning Management System Customer 5+ Years in Java Script - Backend Server Side Framework Node.JS 1-2 Years Min with Node.JS Candidate should be 80% of Backend Developer or Node.JS with HTML5 or CSS3 20% Frontend development with Frameworks Experience with Angular Very Good Communication skills are Mandate. Must be comfortable with: ? Javascript (ES6, React, Angular>2.0 or other framework) ? Node.js ? HTML5/CSS/SASS ? Relational Databases (MySQL, Postgres) ? RESTful web service design ? Unit and Integration testing ? Leading a technical discussion ? Troubleshooting a high-profile production issue ? Acting as a mentor and proponent of best practices Standard Requirements: Experience: 5+ years of full stack development in an enterprise environment Education: BS degree in Computer Science, Software Engineering, or similar degree or experience Bonus Points ? Experience with working /deploying in a Linux environment ? Configuration and provisioning tools (jenkins, ansible, saltstack, etc.) ? Containerization (docker, docker-compose, container orchestration) ? Experience developing with continuous integration in a high-volume production environment ? AWS experience (CloudFormation, resource provisioning and management) ? Knowledge of Kubernetes SeniorJavaFullStackDeveloperwithJavaScript(9+yearsprofiles)atAustin,TX from Job Portal https://www.jobisite.com/extrJobView.htm?id=134695
0 notes
Text
Spring Boot Microservice with Postgres Database in Docker Container Tutorial for Beginners
Hi, a new #video on #springboot #microservices with #postgres #database running in #docker #container is published on #codeonedigest #youtube channel. Learn #spring boot microservices with #postgressql in docker container #programming #coding with #codeon
In this video, we will run postgres database in docker container and integrate Postgres database with a Spring Boot Microservice Application and perform different CRUD operations i.e. Create, Read, Update, and Delete operations on the Customer entity. Spring Boot is built on the top of the spring and contains all the features of spring. And is becoming a favorite of developers these days because…
View On WordPress
#compass#container#docker#docker container#docker file#docker full course#docker image#docker tutorial#docker tutorial for beginners#dockerfile#microservices#microservices postgres#nosql#postgres#postgres database docker#postgres database docker install#postgres database docker setup#postgres database docker tutorial#postgres database docker volume#Postgres database installation#postgres db#postgres installation#postgres java#postgres tutorial#postgres tutorial for beginners#postgressql microservices example#Spring boot#spring boot annotations#spring boot full course#spring boot microservices
0 notes
Text
Before we start to talk about docker-compose, ensure you have installed Docker and Docker Compose. Install Docker on Linux Install Docker Compose on Linux If your project/app uses multiple containers then it will be unreasonable trying to run the individual containers separately and then linking them. It is possible but tiresome, brings complexity in scaling and not one of DevOps recommendations. So here comes docker-compose to the rescue. Docker-compose helps you to run multiple containers, linking them and defining various container properties in one file. This file is called docker-compose.yml. Docker-compose file This file contains all the defined container properties and their images to be used in a specified project/app. It has changed over the years from version 1 to version 3. So it is a requirement to specify which version you are using at the start of each docker-compose.yml file. Docker-compose files are written in YAML format and are in the format of docker-compose.yml. A typical docker-compose file looks like this: version: "3" services: db: image: postgres environment: POSTGRES_USER: zuri POSTGRES_DB: zuri POSTGRES_PASS: zuri1234 volumes: - pgdata:/var/lib/posgresql/data zuri: build: context: . ports: - "8000:8000" volumes: - ./zuri:/zuri command: python manage.py runserver 0.0.0.0:8000 depends_on: - db volumes: pgdata: The docker-compose file consists of various components. I won’t talk about all of them but I will touch on some important ones. Essentially the compose file defines services that control the containers. From the above example you can see I have two services, db and zuri. The db service is my database container while the zuri service is my project. The two communicate via the property depends_on. Which tells docker-compose to create the service should it not exist when running zuri service. Under each service you can define many properties like ports to expose, volumes to use, network e.t.c. Of course, each container uses an image and therefore you can directly define the image in the docker-compose file or specify a Dockerfile to be used. In this example, you can see in zuri service I have defined build context with a . this tells docker-compose to look for a docker file in the same directory to build an image for the service. But the database service has the image Postgres directly defined. Here is the zuri service dockerfile: #base image FROM python:3 #maintainer LABEL Author="CodeGenes" # The enviroment variable ensures that the python output is set straight # to the terminal with out buffering it first ENV PYTHONBUFFERED 1 #directory to store app source code RUN mkdir /zuri #switch to /app directory so that everything runs from here WORKDIR /zuri #copy the app code to image working directory COPY ./zuri /zuri #let pip install required packages RUN pip install -r requirements.txt Docker container lifecycle Docker containers are ephemeral, that is, they are deleted when you delete the container. Their status depends on the status of the applications they host. The various states include: 1. Create container $ docker create –name 2. Run container $ docker run -it -d –name 3. Pause container $ docker pause 4. Unpause container $ docker unpause 5. Start container $ docker start 6. Stop container $ docker stop 7. Restart container $ docker restart 8. Kill container $docker kill 9. Remove/delete container $docker rm Docker-compose commands Compose of course being that it manages the containers, it also contains the various container commands to manage the whole container lifecycle. Some of the commands include start, stop, build view e.t.c To view these commands and what they do, run this on your terminal: $ docker-compose --help Define and run multi-container applications with Docker. Usage: docker-compose [-f ...] [options] [COMMAND] [ARGS...]
docker-compose -h|--help Options: -f, --file FILE Specify an alternate compose file (default: docker-compose.yml) -p, --project-name NAME Specify an alternate project name (default: directory name) --verbose Show more output --no-ansi Do not print ANSI control characters -v, --version Print version and exit -H, --host HOST Daemon socket to connect to --tls Use TLS; implied by --tlsverify --tlscacert CA_PATH Trust certs signed only by this CA --tlscert CLIENT_CERT_PATH Path to TLS certificate file --tlskey TLS_KEY_PATH Path to TLS key file --tlsverify Use TLS and verify the remote --skip-hostname-check Don't check the daemon's hostname against the name specified in the client certificate (for example if your docker host is an IP address) --project-directory PATH Specify an alternate working directory (default: the path of the Compose file) Commands: build Build or rebuild services bundle Generate a Docker bundle from the Compose file config Validate and view the Compose file create Create services down Stop and remove containers, networks, images, and volumes events Receive real time events from containers exec Execute a command in a running container help Get help on a command images List images kill Kill containers logs View output from containers pause Pause services port Print the public port for a port binding ps List containers pull Pull service images push Push service images restart Restart services rm Remove stopped containers run Run a one-off command scale Set number of containers for a service start Start services stop Stop services top Display the running processes unpause Unpause services up Create and start containers version Show the Docker-Compose version information Docker-compose run, up, exec – what’s the difference? Well, when I started to use docker, I would notice that the tutorials often used docker-compose up, docker-compose run and docker-compose exec mostly without explaining. I know you can simply read the difference in the docs of the help command line but sometimes it is helpful to fully appreciate the difference by digging a little deeper. So which one should you use and at what point? I will illustrate these differences using my Django docker project on GitHub. Docker Compose Up This command is used when you want to start or bring up all services in your docker-compose.yml file. Docker-compose.yml file defines your services, their properties, variables, and dependencies. $ docker-compose up To view containers running: $ docker-compose ps You can also tell docker-compose to run only one service e.g. $ docker-compose up zuri Docker Compose Run This command will spin up a new container for you to use. It is mostly used when you want a new container or the container is not running and is a one-off process which avoids conflicts with other services in your docker-compose.yml that might be running. $ docker-compose run zuri python manage.py migrate Docker Compose Exec This command is used when you want to interact with a container that is already running. It, therefore, requires to be run with a command argument. Before you exec the container must be in running state! $ docker-compose exec zuri bash That’s it for now. Peace Out!
0 notes
Text
Senior Java Full Stack Developer with JavaScript9+ years profiles at Austin, TX
Look for candidates who have worked earlier with Learning Management System Customer 5+ Years in Java Script - Backend Server Side Framework Node.JS 1-2 Years Min with Node.JS Candidate should be 80% of Backend Developer or Node.JS with HTML5 or CSS3 20% Frontend development with Frameworks Experience with Angular Very Good Communication skills are Mandate. Must be comfortable with: ? Javascript (ES6, React, Angular>2.0 or other framework) ? Node.js ? HTML5/CSS/SASS ? Relational Databases (MySQL, Postgres) ? RESTful web service design ? Unit and Integration testing ? Leading a technical discussion ? Troubleshooting a high-profile production issue ? Acting as a mentor and proponent of best practices Standard Requirements: Experience: 5+ years of full stack development in an enterprise environment Education: BS degree in Computer Science, Software Engineering, or similar degree or experience Bonus Points ? Experience with working /deploying in a Linux environment ? Configuration and provisioning tools (jenkins, ansible, saltstack, etc.) ? Containerization (docker, docker-compose, container orchestration) ? Experience developing with continuous integration in a high-volume production environment ? AWS experience (CloudFormation, resource provisioning and management) ? Knowledge of Kubernetes SeniorJavaFullStackDeveloperwithJavaScript(9+yearsprofiles)atAustin,TX from Job Portal https://www.jobisite.com/extrJobView.htm?id=134695
0 notes
Text
5 Immediate Openings For Senior Java Script Developer
Job Title: Senior Java Script Developer Location: Austin, TX Duration: Contract Client: Tech MAhindra/ Macmillan Job Description: Look for candidates who have worked earlier with Learning Management System Customer Must be comfortable with: ?Javascript (ES6, React, Angular>2.0 or other framework) ?Node.js ?HTML5/CSS/SASS ?Relational Databases (MySQL, Postgres) ?RESTful web service design ?Unit and Integration testing ?Leading a technical discussion ?Troubleshooting a high-profile production issue ?Acting as a mentor and proponent of best practices Experience: 7+ years of full stack development in an enterprise environment Bonus Points ?Experience with working /deploying in a Linux environment ?Configuration and provisioning tools (jenkins, ansible, saltstack, etc.) ?Containerization (docker, docker-compose, container orchestration) ?Experience developing with continuous integration in a high-volume production environment ?AWS experience (CloudFormation, resource provisioning and management) ?Knowledge of Kubernetes Reference : 5 Immediate Openings For Senior Java Script Developer jobs source http://jobsaggregation.com/jobs/technology/5-immediate-openings-for-senior-java-script-developer_i1856
0 notes