#postgres database docker setup
Explore tagged Tumblr posts
Visit Tumblr Blog
Explore Tumblr blogs with no restrictions, modern design and the best experience.
Last Seen Tumblr Blogs


Fun Fact
Kazakhstan’s Minister of Communications and Informatics has blocked the Tumblr site because it contained 60 sites of terrorism, extremism, and pornography in 2015.
Text
Springboot Microservice in Docker Container with Postgres Database in Docker Container Explained
Hi, a new #video on #springboot #microservices in #dockercontainer with #postgres #database running in #docker #container is published on #codeonedigest #youtube channel. Learn #springbootmicroservices with #postgressql in docker #containers #programming
In this video, we will run springboot microservice and postgres database both in separate docker containers and integrate Postgres database with a Spring Boot Microservice Application and perform different CRUD operations i.e., Create, Read, Update, and Delete operations on the Customer entity. Microservice application container will connect to database container using docker bridge…

View On WordPress
#compass#container#docker#docker container#docker file#docker full course#docker image#docker tutorial#docker tutorial for beginners#dockerfile#microservices#microservices in docker container#microservices postgres#nosql#postgres#postgres database docker#postgres database docker install#postgres database docker setup#postgres database docker tutorial#postgres database docker volume#Postgres database installation#postgres db#postgres installation#postgres java#postgres tutorial#postgres tutorial for beginners#postgressql microservices example#Spring boot#spring boot annotations#spring boot full course
0 notes
Text
Mainframe Community / Mattermost
So, last night I ‘launched’ a MatterMost instance on https://mainframe.community. To summarize MatterMost (via wikipedia) it is: an open-source, self-hostable online chat service with file sharing, search, and integrations. It is designed as an internal chat for organisations and companies, and mostly markets itself as an open-source alternative to Slack[7][8] and Microsoft Teams. In this post I wanted to quickly explain how and why I did this. Let’s start with the why first. But Why? Last week, while working for one of my clients, I discovered they are starting to implemen MatterMost as a cross-team collaboration tool. And I discovered it has integrations, webhooks and bots. Being the Mainframe nerd I am, I quickly whipped up some lines of REXX to call CURL so I could ‘post’ to a MatterMost channel straight from The Mainframe. It was also quite easy in the wsadmin scripts to have jython execute an os.system to call curl and do the post... Now I wanted to take it a step further and create a “load module” that did the same, but could be called from a regular batch-job to, I donno, post messages when jobs failed, or required other forms of attention. Seeing as I was going to develop that on my own ZPDT/ZD&T I needed a sandbox environment. Running MatterMost locally from docker was a breeze, yet not running as “https” (something I wanted to test to work from the still to be made load-module. So, seeing as I already had the “mainframe.community”-domain, I thought, why not host it there, and use that as a sandbox....turned out that was easier done than imagined. But How? The instructions provided at https://docs.mattermost.com/install/install-ubuntu-1804.html were easy enough to follow and should get you up and running yourself in under an hour.
Seeing as there already ‘some stuff’ running at the local datacenter here I already had an nginx-environment up and running. I started with creating a new VM in my ProxMox environment (running Ubuntu 18.04) and made sure this machine got a static IP. From there on I did the following:
sudo apt update sudo apt upgrade sudo apt install postgresql postgresql-contrib
That then made sure the VM had a local database for all the MatterMost things. Initializing the DB environment was as easy as;
sudo --login --user postgres psql postgres=# CREATE DATABASE mattermost; postgres=# CREATE USER mmuser WITH PASSWORD 'x'; postgres=# GRANT ALL PRIVILEGES ON DATABASE mattermost to mmuser; postgres=# \q exit
Of course the password is not ‘x’ but something a bit more secure...
Then, make a change to the postgres config (vi /etc/postgresql/10/main/pg_hba.conf) changing the line
local all all peer
to
local all all trust
Then installing mattermost was basically these next commands:
systemctl reload postgresql wget https://releases.mattermost.com/5.23.1/mattermost-5.23.1-linux-amd64.tar.gz mv mattermost /opt mkdir /opt/mattermost/data useradd --system --user-group mattermost chown -R mattermost:mattermost /opt/mattermost chmod -R g+w /opt/mattermost vi /opt/mattermost/config/config.json cd /opt/mattermost/ sudo -u mattermost ./bin/mattermost vi /opt/mattermost/config/config.json sudo -u mattermost ./bin/mattermost vi /lib/systemd/system/mattermost.service systemctl daemon-reload systemctl status mattermost.service systemctl start mattermost.service curl http://localhost:8065 systemctl enable mattermost.service restart mattermost systemctl restart mattermost
Some post configuration needed to be done via the MatterMost webinterface (that was running like a charm) and then just a little nginx-config like specified at the MatterMost docs webpages and it was all up and running. Thanks to the peeps at LetsEncrypt it’s running TLS too :) Curious to see how ‘busy’ it will get on the mainframe.community. I’ve setup the VM with enough hardware resource to at least host 2000 users. So head on over to https://mainframe.community and make me ‘upgrade’ the VM due to the user growth :)
1 note
·
View note
Text
Mastering SQL using Postgresql
Mastering SQL using Postgresql Learn key SQL concepts such as how to create database objects, write effective queries and many more. What you’ll learn Setup Postgres Database using Docker Connect to Postgres using different interfaces such as psql, SQL Workbench, Jupyter with SQL magic etc. Understand utilities to load the data Performing CRUD or DML Operations Writing basic SQL Queries…
View On WordPress
0 notes
Text
If this is not one of the most robust, free, rich and informative era ever then I cannot think of any other time in history adorned with the wealth of technology as this one. If you would wish to accomplish anything, this era wields the most virile grounds to nourish, nurture and aid the sprouting, the growth and the maturity of your dreams. You can literaly learn to be what you would wish to be in this age. That being said, this disquisition takes on a quest to get you into setting up something similar to Heroku on your own environment. We shall get to know what Heroku is then get off the dock and sail off towards our goal of having such an environment. The proliferation of cloud technologies brought with it many opportunities in terms of service offerings. First and foremost, users had the ability to get as much infrastructure as they could afford. Users can spawn servers, storage and network resources ad libitum which is popularly known as Infrastructure as a service. Then comes the second layer that sits on the infrastructure. It could be anything, cloud identity service, cloud monitoring server et cetera. This layer provides ready made solutions to people who might need them. This is known as software as a service. I hope we are flowing together this far. In addition to that there is another incredible layer that is the focus of this guide. It is a layer that targets developers majorly by making their lives easier on the cloud. In this layer , developers only concentrate on writing code and when they are ready to deploy, they only need to commit their ready project in a source control platform like GitHub/GitLab and the rest is done for them automatically. This layer provides a serverless layer to the developers since they do not have to touch the messy server side stuff. This layer as you might already have guessed is known as Platform as a Service (PaaS). Heroku is one of the solutions that sits on this layer. In this guide, are going to setup a platform that is similar to Heroku on your own infrastructure. As you know, you cannot download and install Heroku on your server. It is an online cloud service that you subscribe to. We will use Caprover to setup our own private Platform as a service (PaaS). CapRover is an extremely easy to use app/database deployment & web server manager for your NodeJS, Python, PHP, ASP.NET, Ruby, MySQL, MongoDB, Postgres, WordPress and even more applications. Features of Caprover CLI for automation and scripting Web GUI for ease of access and convenience No lock-in! Remove CapRover and your apps keep working! Docker Swarm under the hood for containerization and clustering Nginx (fully customizable template) under the hood for load-balancing Let’s Encrypt under the hood for free SSL (HTTPS) One-Click Apps: Deploying one-click apps is a matter of seconds! MongoDB, Parse, MySQL, WordPress, Postgres and many more. Fully Customizable: Optionally fully customizable nginx config allowing you to enable HTTP2, specific caching logic, custom SSL certs and etc Cluster Ready: Attach more nodes and create a cluster in seconds! CapRover automatically configures nginx to load balance. Increase Productivity: Focus on your apps! Not the bells and whistles just to run your apps! Easy Deploy: Many ways to deploy. You can upload your source from dashboard, use command line caprover deploy, use webhooks and build upon git push Caprover Pre-requisites Caprover runs as a container in your server which can be any that supports containerization. Depending on your preferences, you can use Podman or Docker to pull and run Caprover image. For this example, we are going to use Docker. In case you do not have Docker installed, the following guides listed below will be there to help you set it up as fast as possible. Install Docker and Docker Compose on Debian Setup Docker CE & Docker Compose on CentOS 8 | RHEL 8 How To Install Docker on RHEL 7 / CentOS 7
How To Install Docker CE on Ubuntu Once Docker Engine has been installed, add your user account to docker group: sudo usermod -aG docker $USER newgrp docker Another pre-requisite is a wildcard domain name pointed to the IP of your server where Caprover Server will be running. Setup your Heroku PaaS using CapRover Once the pre-requisites are out of the way, the only task remaining now is to set up our Caprover and poke around its rooms just to see what it has to offer. The following steps will be invaluable as you try to get it up and running. Step 1: Prepare your server Once Docker is installed, you can install all of the applications you need during your stay in the server. They include an editor and such kind of stuff. ##On CentOS sudo yum update sudo yum install vim git curl ##On Ubuntu sudo apt update sudo apt install vim git curl That was straingtforward. Next, let us pull Caprover image to set the stone rolling Step 2: Pull and execute Caprover Image We are going to cover the installation of Caprover depending on where your server sits. Scenario 1: Installation on a local server without Public IP Install dnsmasq After all, as mentioned in the pre-requisites section, we shall need a small DNS server to resolve domain names since Caprover is so particular with it. In case you have a local DNS server that supports wildcard domains, then you are good to go. You can skip the DNS setup part. In case you do not have it, install lightweight dnsmasq as follows: sudo yum -y install dnsmasq After dnsmasq is successfully installed, start and enable the service. sudo systemctl start dnsmasq sudo systemctl enable dnsmasq Add Wildcard DNS Recod Once dnsmasq is running as expected, we can go ahead and add the configs and wildcard domain name as shown below: $ sudo vim /etc/dnsmasq.conf listen-address=::1,127.0.0.1,172.20.192.38 domain=example.com server=8.8.8.8 address=/caprover.example.com/172.20.192.38 Replace the IPs therein with yours accordingly. Then restart dnsmasq sudo systemctl restart dnsmasq Test if it works We shall use the dig utility to test if our configuration works $ dig @127.0.0.1 test.caprover.example.com ; DiG 9.11.20-RedHat-9.11.20-5.el8 @127.0.0.1 test.caprover.example.com ; (1 server found) ;; global options: +cmd ;; Got answer: ;; ->>HEADER> Checking System Compatibility > Checking System Compatibility
0 notes
Text
11 Dịch vụ AWS Serverless xịn nên sử dụng trong kiến trúc cloud
Có bài viết học luyện thi AWS mới nhất tại https://cloudemind.com/aws-serverless-services/ - Cloudemind.com
11 Dịch vụ AWS Serverless xịn nên sử dụng trong kiến trúc cloud
Serverless services là những dịch vụ thuộc dạng fully managed services có nghĩa là mọi thứ liên quan đến hạ tầng underlying hardware, provision, maintenance, patching, hay thậm chí cao hơn về bảo mật sử dụng cũng được AWS làm sẵn cho mình. Serverless có thể gọi là lý tưởng cho các developer thay vì nỗi lo về máy chủ cấp phát, cấp phát có thừa hay quá thiếu hay không, sau khi đưa vào sử dụng có cần phải update, upgrade patching gì không (Đây thực sự là ác mộng với các bạn developer mà ko rành về hạ tầng, về CLI, shell này nọ).
AWS hiểu được điều này và offer một số dạng dịch vụ gọi là serverless như thế.
Serverless là gì?
Serverless dịch Tiếng Việt là “Phi máy chủ” nhưng dịch ra có vẻ hơi ngớ ngẩn, mình cũng không biết dịch sao cho thoát nghĩa. Serverless không phải là không có máy chủ theo nghĩa đen, bản chất của serverless nằm lớp bên dưới vẫn là các máy chủ, nhưng AWS làm cho việc này một cách mờ đi (transparency hay invisibility) và tự động quản lý vận hành lớp hạ tầng này miễn sao cung cấp đủ capacity như thiết kế cho bạn.
AWS Serverless
Definition of serverless computing: Serverless computing is a cloud computing execution model in which the cloud provider allocates machine resources on demand, taking care of the servers on behalf of the their customers – Wikipedia
Serverless refers to applications where the management and allocation of servers and resources are completely managed by the cloud provider. – Serverless-Stack
Serverless is a cloud-native development model that allows developers to build and run applications without having to manage servers. There are still servers in serverless, but they are abstracted away from app development. – Redhat
Kevin tập trung vào việc phát triển các product sử dụng Cloud Native cho nên luôn ưu tiên các dịch vụ Serverless trong kiến trúc của mình để tăng tốc độ phát triển, dễ dàng scaling, và chi phí cũng rẻ hơn rất nhiều so với cách làm Cloud truyền thống.
Nào, mình cùng điểm qua các dịch vụ AWS Serverless hiện có nào:
1. AWS Lamda
Type: Compute Services
Description: Chạy code không cần quan tâm đến máy chủ, hỗ trợ coding bằng các ngôn ngữ phổ biến như: Python, Node.js, Go, Java. Đặc biệt hơn từ 2020 Lambda mở rộng năng lực tới 6vCPU và 10GB RAM và hỗ trợ chạy docker.
Pricing Model:
Number of requests
Duration of execution
Reference: https://aws.amazon.com/lambda/
2. Amazon API Gateway
Type: API, proxy
Description: Giúp bạn triển khai các API ở quy mô lớn, hỗ trợ Restfull và Websocket APIs,
Pricing Model:
Number of requests
Caching
Reference: https://aws.amazon.com/api-gateway/
3. Amazon DynamoDB
Type: NoSQL DB
Description: Dịch vụ CSDL NoSQL của AWS, hỗ trợ keyvalue-pair và document DB. Đây là loại cơ sở dữ liệu có tốc độ truy xuất rất nhanh tính bằng single-digit-milisecond, nếu kết hợp thêm Cache của DAX nữa sẽ giảm xuống còn micro-milisecond, có thể scale tới 20 triệu request per second.
Pricing Model (on-demand and provisioned):
Write Capacity Unit
Read Capacity Unit
Storage
Data Transfer
etc
Reference: https://aws.amazon.com/dynamodb/
4. Amazon EventBridge
Type: Controller
Description: Amazon EventBridge được xem như event bus là nơi tập trung sự kiện của nhiều loại ứng dụng SaaS và AWS Services. EventBridge thu thập các sự kiện từ nhiều loại ứng dụng như Zendesk, Datadog, Pagerduty và route các dữ liệu này đến AWS Lambda. Mình cũng có thể setup các rule để route dữ liệu này đến các ứng dụng khác nhau. EventBridge giúp bạn build các ứng dụng hướng sự kiện (event-driven-application). EventBridge schema hỗ trợ Python, Typescript, Java giúp developer thuận tiện trong quá trình phát triển ứng dụng.
Pricing Model:
Pay for events to your event bus
Events ingested to Schema Discovery
Event Replay
Reference: https://aws.amazon.com/eventbridge/
5. Amazon SNS (Simple Notification Service)
Type: Messaging
Description: dịch vụ messaging pub/sub hỗ trợ SMS, Email, mobile push notification.
Pricing Model:
Number of requests
Notification deliveries
Data Transfer
Reference: https://aws.amazon.com/sns/
6. Amazon SQS (Simple Queue Service)
Type: Messaging, Queuing
Description: Message queue, xây dựng các hàng chờ cho các thông tin giúp decoupling nhiều nhóm dịch vụ, cũng là cách giúp các ứng dụng triển khai trên cloud tăng tính Reliable. SQS hỗ trợ standard queue để tăng tối đa throughput và FIFO queue để đảm bảo message được delivery chính xác một lần theo thứ tự gởi đi.
Pricing Model:
Number of requests
Data Transfer
Reference: https://aws.amazon.com/sqs/
7. Amazon S3 (Simple Storage Service)
Type: Storage
Description: Dịch vụ lưu trữ file dạng đối tượng (Object). S3 cung cấp khả năng lưu trữ vô hạn trong mỗi bucket, mỗi file lưu trữ có thể tới 5TB, quản lý dễ dàng thông qua AWS Management Console, API và CLI. S3 cũng dễ dàng tích hợp các dịch vụ AWS khác rất sâu như dịch vụ về governance, phân tích dữ liệu, machine learning, web integration…
Pricing Model:
Storage actual usage
Request type (PUT, GET, LIST…)
Data transfer
Retrieving
Reference: https://aws.amazon.com/s3
8. AWS AppSync
Type: API, Mobile service
Description: AppSync là dịch vụ AWS cho phép xây dựng các ứng dụng dạng real-time communication như data-driven mobile app hay web app với sự hỗ trợ của của GraphQL APIs.
Pricing Model:
Query operation
Data modification operation
real-time update data
Reference: https://aws.amazon.com/appsync/
9. AWS Fargate
Type: Compute, container
Description: Serverless compute khi dùng với container. Fargate có thể dùng với cả EKS và ECS (orchestration)
Pricing Model:
Resource vCPU per hour
Resource RAM per hour
10. AWS Step Function
Type: Controller, Cron job
Description: Đã qua cái thời mà viết các cron job ở hệ điều hành rồi rẽ nhánh theo các business logic tương ứng. AWS Step Function là dịch vụ giúp bạn build các ứng dụng xử lý logic theo các bước nhảy thời gian thông qua các state machine. Đây là dịch vụ rất rất ��ỉnh.
Pricing Model:
State Transition.
Reference: https://aws.amazon.com/step-functions/
11. Amazon RDS Aurora Serverless
Type: Database, SQL
Description: Aurora là một loại engine trong Amazon RDS được đưa ra bởi AWS (AWS Property). Aurora MySQL nhanh 5x so với MySQL thông thường và 3x so với Postgres. Khác với DynamoDB, Aurora là SQL service. Một ứng dụng lớn bạn có thể phải kết hợp nhiều loại DB services để đem lại hiệu năng tốt nhất.
Pricing model:
ACU (Aurora Capacity Unit)
Storage
Reference: https://aws.amazon.com/rds/aurora/serverless/
Conclusion
Kevin tin rằng sẽ ngày càng có nhiều dịch vụ hướng Serverless và chi phí sử dụng cloud ngày càng được tối ưu có lợi cho người dùng. Cảm ơn vì AWS, Azure, GCP đang ngày càng đưa ra nhiều dịch vụ cloud tốt.
Have fun!
Xem thêm: https://cloudemind.com/aws-serverless-services/
0 notes
Text
Full Stack Development with Next.js and Supabase – The Complete Guide
Supabase is an open source Firebase alternative that lets you create a real-time backend in less than two minutes.
Supabase has continued to gain hype and adoption with developers in my network over the past few months. And a lot of the people I've talked to about it prefer the fact that it leverages a SQL-style database, and they like that it's open source, too.
When you create a project Supabase automatically gives you a Postgres SQL database, user authentication, and API. From there you can easily implement additional features like realtime subscriptions and file storage.
In this guide, you will learn how to build a full stack app that implements the core features that most apps require – like routing, a database, API, authentication, authorization, realtime data, and fine grained access control. We'll be using a modern stack including React, Next.js, and TailwindCSS.
I've tried to distill everything I've learned while myself getting up to speed with Supabase in as short of a guide as possible so you too can begin building full stack apps with the framework.
The app that we will be building is a multi-user blogging app that incorporates all of the types of features you see in many modern apps. This will take us beyond basic CRUD by enabling things like file storage as well as authorization and fine grained access control.
You can find the code for the app we will be building here.
By learning how to incorporate all of these features together you should be able to take what you learn here and build out your own ideas. Understanding the basic building blocks themselves allows you to then take this knowledge with you in the future to put it to use in any way you see fit.
Supabase Overview
How to Build Full Stack Apps
I'm fascinated by full stack Serverless frameworks because of the amount of power and agility they give to developers looking to build complete applications.
Supabase brings to the table the important combination of powerful back end services and easy to use client-side libraries and SDKs for an end to end solution.
This combination lets you not only build out the individual features and services necessary on the back end, but easily integrate them together on the front end by leveraging client libraries maintained by the same team.
Because Supabase is open source, you have the option to self-host or deploy your backend as a managed service. And as you can see, this will be easy for us to do on a free tier that does not require a credit card to get started with.
Why Use Supabase?
I've led the Front End Web and Mobile Developer Advocacy team at AWS, and written a book on building these types of apps. So I've had quite a bit of experience building in this space.
And I think that Supabase brings to the table some really powerful features that immediately stood out to me when I started to build with it.
Data access patterns
One of the biggest limitations of some of the tools and frameworks I've used in the past is the lack of querying capabilities. What I like a lot about Supabase is that, since it's built on top of Postgres, it enables an extremely rich set of performant querying capabilities out of the box without having to write any additional back end code.
The client-side SDKs provide easy to use filters and modifiers to enable an almost infinite combination of data access patterns.
Because the database is SQL, relational data is easy to configure and query, and the client libraries take it into account as a first class citizen.
Permissions
When you get past "hello world" many types of frameworks and services fall over very quickly. This is because most real-world use cases extend far beyond the basic CRUD functionality you often see made available by these tools.
The problem with some frameworks and managed services is that the abstractions they create are not extensible enough to enable easy to modify configurations or custom business logic. These restrictions often make it difficult to take into account the many one-off use cases that come up with building an app in the real-world.
In addition to enabling a wide array of data access patterns, Supabase makes it easy to configure authorization and fine grained access controls. This is because it is simply Postgres, enabling you implement whatever row-level security policies you would like directly from the built-in SQL editor (something we will cover here).
UI components
In addition to the client-side libraries maintained by the same team building the other Supabase tooling, they also maintain a UI component library (beta) that allows you to get up and running with various UI elements.
The most powerful is Auth which integrates with your Supabase project to quickly spin up a user authentication flow (which I'll be using in this tutorial).
Multiple authentication providers
Supabase enables all of the following types of authentication mechanisms:
Username & password
Magic email link
Google
Facebook
Apple
GitHub
Twitter
Azure
GitLab
Bitbucket
Open Source
One of the biggest things it has going for it is that it is completely open source (yes the back end too). This means that you can choose either the Serverless hosted approach or to host it yourself.
That means that if you wanted to, you could run Supabase with Docker and host your app on AWS, GCP, or Azure. This would eliminate the vendor lock-in issue you may run into with Supabase alternatives.
How to Get Started with Supabase
Project setup
To get started, let's first create the Next.js app.
npx create-next-app next-supabase
Next, change into the directory and install the dependencies we'll be needing for the app using either NPM or Yarn:
npm install @supabase/supabase-js @supabase/ui react-simplemde-editor easymde react-markdown uuid npm install tailwindcss@latest @tailwindcss/typography postcss@latest autoprefixer@latest
Next, create the necessary Tailwind configuration files:
npx tailwindcss init -p
Now update tailwind.config.js to add the Tailwind typography plugin to the array of plugins. We'll be using this plugin to style the markdown for our blog:
plugins: [ require('@tailwindcss/typography') ]
Finally, replace the styles in styles/globals.css with the following:
@tailwind base; @tailwind components; @tailwind utilities;
Supabase project initialization
Now that the project is created locally, let's create the Supabase project.
To do so, head over to Supabase.io and click on Start Your Project. Authenticate with GitHub and then create a new project under the organization that is provided to you in your account.

Give the project a Name and Password and click Create new project.
It will take approximately 2 minutes for your project to be created.
How to create a database table in Supabase
Once you've created your project, let's go ahead and create the table for our app along with all of the permissions we'll need. To do so, click on the SQL link in the left hand menu.

In this view, click on Query-1 under Open queries and paste in the following SQL query and click RUN:
CREATE TABLE posts ( id bigint generated by default as identity primary key, user_id uuid references auth.users not null, user_email text, title text, content text, inserted_at timestamp with time zone default timezone('utc'::text, now()) not null ); alter table posts enable row level security; create policy "Individuals can create posts." on posts for insert with check (auth.uid() = user_id); create policy "Individuals can update their own posts." on posts for update using (auth.uid() = user_id); create policy "Individuals can delete their own posts." on posts for delete using (auth.uid() = user_id); create policy "Posts are public." on posts for select using (true);
This will create the posts table that we'll be using for the app. It also enabled some row level permissions:
All users can query for posts
Only signed in users can create posts, and their user ID must match the user ID passed into the arguments
Only the owner of the post can update or delete it
Now, if we click on the Table editor link, we should see our new table created with the proper schema.

That's it! Our back end is ready to go now and we can start building out the UI. Username + password authentication is already enabled by default, so all we need to do now is wire everything up on the front end.
Next.js Supabase configuration
Now that the project has been created, we need a way for our Next.js app to know about the back end services we just created for it.
The best way for us to configure this is using environment variables. Next.js allows environment variables to be set by creating a file called .env.local in the root of the project and storing them there.
In order to expose a variable to the browser you have to prefix the variable with NEXT_PUBLIC_.
Create a file called .env.local at the root of the project, and add the following configuration:
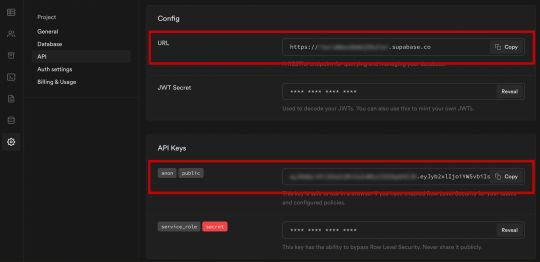
NEXT_PUBLIC_SUPABASE_URL=https://app-id.supabase.co NEXT_PUBLIC_SUPABASE_ANON_KEY=your-public-api-key
You can find the values of your API URL and API Key in the Supabase dashboard settings:
Next, create a file called api.js in the root of the project and add the following code:
// api.js import { createClient } from '@supabase/supabase-js' export const supabase = createClient( process.env.NEXT_PUBLIC_SUPABASE_URL, process.env.NEXT_PUBLIC_SUPABASE_ANON_KEY )
Now we will be able to import the supabase instance and use it anywhere in our app.
Here's an overview of what it looks like to interact with the API using the Supabase JavaScript client.
Querying for data:
import { supabase } from '../path/to/api' const { data, error } = await supabase .from('posts') .select()
Creating new items in the database:
const { data, error } = await supabase .from('posts') .insert([ { title: "Hello World", content: "My first post", user_id: "some-user-id", user_email: "[email protected]" } ])
As I mentioned earlier, the filters and modifiers make it really easy to implement various data access patterns and selection sets of your data.
Authentication – signing up:
const { user, session, error } = await supabase.auth.signUp({ email: '[email protected]', password: 'example-password', })
Authentication – signing in:
const { user, session, error } = await supabase.auth.signIn({ email: '[email protected]', password: 'example-password', })
In our case we won't be writing the main authentication logic by hand, we'll be using the Auth component from Supabase UI.
How to Build the App
Now let's start building out the UI!
To get started, let's first update the app to implement some basic navigation and layout styling.
We will also configure some logic to check if the user is signed in, and show a link for creating new posts if they are.
Finally we'll implement a listener for any auth events. And when a new auth event occurs, we'll check to make sure there is currently a signed in user in order to show or hide the Create Post link.
Open _app.js and add the following code:
// pages/_app.js import Link from 'next/link' import { useState, useEffect } from 'react' import { supabase } from '../api' import '../styles/globals.css' function MyApp({ Component, pageProps }) { const [user, setUser] = useState(null); useEffect(() => { const { data: authListener } = supabase.auth.onAuthStateChange( async () => checkUser() ) checkUser() return () => { authListener?.unsubscribe() }; }, []) async function checkUser() { const user = supabase.auth.user() setUser(user) } return ( <div> <nav className="p-6 border-b border-gray-300"> <Link href="/"> <span className="mr-6 cursor-pointer">Home</span> </Link> { user && ( <Link href="/create-post"> <span className="mr-6 cursor-pointer">Create Post</span> </Link> ) } <Link href="/profile"> <span className="mr-6 cursor-pointer">Profile</span> </Link> </nav> <div className="py-8 px-16"> <Component {...pageProps} /> </div> </div> ) } export default MyApp
How to make a user profile page
Next, let's create the profile page. In the pages directory, create a new file named profile.js and add the following code:
// pages/profile.js import { Auth, Typography, Button } from "@supabase/ui"; const { Text } = Typography import { supabase } from '../api' function Profile(props) { const { user } = Auth.useUser(); if (user) return ( <> <Text>Signed in: {user.email}</Text> <Button block onClick={() => props.supabaseClient.auth.signOut()}> Sign out </Button> </> ); return props.children } export default function AuthProfile() { return ( <Auth.UserContextProvider supabaseClient={supabase}> <Profile supabaseClient={supabase}> <Auth supabaseClient={supabase} /> </Profile> </Auth.UserContextProvider> ) }
The profile page uses the Auth component from the Supabase UI library. This component will render a "sign up" and "sign in" form for unauthenticated users, and a basic user profile with a "sign out" button for authenticated users. It will also enable a magic sign in link.
How to create new posts
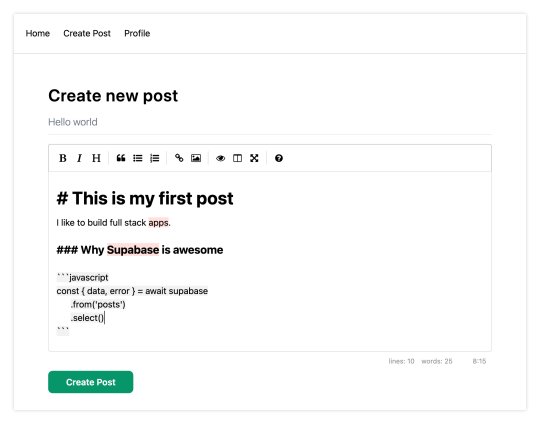
Next, let's create the create-post page. In the pages directory, create a page named create-post.js with the following code:
// pages/create-post.js import { useState } from 'react' import { v4 as uuid } from 'uuid' import { useRouter } from 'next/router' import dynamic from 'next/dynamic' import "easymde/dist/easymde.min.css" import { supabase } from '../api' const SimpleMDE = dynamic(() => import('react-simplemde-editor'), { ssr: false }) const initialState = { title: '', content: '' } function CreatePost() { const [post, setPost] = useState(initialState) const { title, content } = post const router = useRouter() function onChange(e) { setPost(() => ({ ...post, [e.target.name]: e.target.value })) } async function createNewPost() { if (!title || !content) return const user = supabase.auth.user() const id = uuid() post.id = id const { data } = await supabase .from('posts') .insert([ { title, content, user_id: user.id, user_email: user.email } ]) .single() router.push(`/posts/${data.id}`) } return ( <div> <h1 className="text-3xl font-semibold tracking-wide mt-6">Create new post</h1> <input onChange={onChange} name="title" placeholder="Title" value={post.title} className="border-b pb-2 text-lg my-4 focus:outline-none w-full font-light text-gray-500 placeholder-gray-500 y-2" /> <SimpleMDE value={post.content} onChange={value => setPost({ ...post, content: value })} /> <button type="button" className="mb-4 bg-green-600 text-white font-semibold px-8 py-2 rounded-lg" onClick={createNewPost} >Create Post</button> </div> ) } export default CreatePost
This component renders a Markdown editor, allowing users to create new posts.
The createNewPost function will use the supabase instance to create new posts using the local form state.
You may notice that we are not passing in any headers. This is because if a user is signed in, the Supabase client libraries automatically include the access token in the headers for a signed in user.
How to view a single post
We need to configure a page to view a single post.
This page uses getStaticPaths to dynamically create pages at build time based on the posts coming back from the API.
We also use the fallback flag to enable fallback routes for dynamic SSG page generation.
We use getStaticProps to enable the Post data to be fetched and then passed into the page as props at build time.
Create a new folder in the pages directory called posts and a file called [id].js within that folder. In pages/posts/[id].js, add the following code:
// pages/posts/[id].js import { useRouter } from 'next/router' import ReactMarkdown from 'react-markdown' import { supabase } from '../../api' export default function Post({ post }) { const router = useRouter() if (router.isFallback) { return <div>Loading...</div> } return ( <div> <h1 className="text-5xl mt-4 font-semibold tracking-wide">{post.title}</h1> <p className="text-sm font-light my-4">by {post.user_email}</p> <div className="mt-8"> <ReactMarkdown className='prose' children={post.content} /> </div> </div> ) } export async function getStaticPaths() { const { data, error } = await supabase .from('posts') .select('id') const paths = data.map(post => ({ params: { id: JSON.stringify(post.id) }})) return { paths, fallback: true } } export async function getStaticProps ({ params }) { const { id } = params const { data } = await supabase .from('posts') .select() .filter('id', 'eq', id) .single() return { props: { post: data } } }
How to query for and render the list of posts
Next, let's update index.js to fetch and render a list of posts:
// pages/index.js import { useState, useEffect } from 'react' import Link from 'next/link' import { supabase } from '../api' export default function Home() { const [posts, setPosts] = useState([]) const [loading, setLoading] = useState(true) useEffect(() => { fetchPosts() }, []) async function fetchPosts() { const { data, error } = await supabase .from('posts') .select() setPosts(data) setLoading(false) } if (loading) return <p className="text-2xl">Loading ...</p> if (!posts.length) return <p className="text-2xl">No posts.</p> return ( <div> <h1 className="text-3xl font-semibold tracking-wide mt-6 mb-2">Posts</h1> { posts.map(post => ( <Link key={post.id} href={`/posts/${post.id}`}> <div className="cursor-pointer border-b border-gray-300 mt-8 pb-4"> <h2 className="text-xl font-semibold">{post.title}</h2> <p className="text-gray-500 mt-2">Author: {post.user_email}</p> </div> </Link>) ) } </div> ) }
Let's test it out
We now have all of the pieces of our app ready to go, so let's try it out.
To run the local server, run the dev command from your terminal:
npm run dev
When the app loads, you should see the following screen:

To sign up, click on Profile and create a new account. You should receive an email link to confirm your account after signing up.
You can also create a new account by using the magic link.
Once you're signed in, you should be able to create new posts:
Navigating back to the home page, you should be able to see a list of the posts that you've created and be able to click on a link to the post to view it:

How to Edit Posts
Now that we have the app up and running, let's learn how to edit posts. To get started with this, let's create a new view that will fetch only the posts that the signed in user has created.
To do so, create a new file named my-posts.js in the root of the project with the following code:
// pages/my-posts.js import { useState, useEffect } from 'react' import Link from 'next/link' import { supabase } from '../api' export default function MyPosts() { const [posts, setPosts] = useState([]) useEffect(() => { fetchPosts() }, []) async function fetchPosts() { const user = supabase.auth.user() const { data } = await supabase .from('posts') .select('*') .filter('user_id', 'eq', user.id) setPosts(data) } async function deletePost(id) { await supabase .from('posts') .delete() .match({ id }) fetchPosts() } return ( <div> <h1 className="text-3xl font-semibold tracking-wide mt-6 mb-2">My Posts</h1> { posts.map((post, index) => ( <div key={index} className="border-b border-gray-300 mt-8 pb-4"> <h2 className="text-xl font-semibold">{post.title}</h2> <p className="text-gray-500 mt-2 mb-2">Author: {post.user_email}</p> <Link href={`/edit-post/${post.id}`}><a className="text-sm mr-4 text-blue-500">Edit Post</a></Link> <Link href={`/posts/${post.id}`}><a className="text-sm mr-4 text-blue-500">View Post</a></Link> <button className="text-sm mr-4 text-red-500" onClick={() => deletePost(post.id)} >Delete Post</button> </div> )) } </div> ) }
In the query for the posts, we use the user id to select only the posts created by the signed in user.
Next, create a new folder named edit-post in the pages directory. Then, create a file named [id].js in this folder.
In this file, we'll be accessing the id of the post from a route parameter. When the component loads, we will then use the post id from the route to fetch the post data and make it available for editing.
In this file, add the following code:
// pages/edit-post/[id].js import { useEffect, useState } from 'react' import { useRouter } from 'next/router' import dynamic from 'next/dynamic' import "easymde/dist/easymde.min.css" import { supabase } from '../../api' const SimpleMDE = dynamic(() => import('react-simplemde-editor'), { ssr: false }) function EditPost() { const [post, setPost] = useState(null) const router = useRouter() const { id } = router.query useEffect(() => { fetchPost() async function fetchPost() { if (!id) return const { data } = await supabase .from('posts') .select() .filter('id', 'eq', id) .single() setPost(data) } }, [id]) if (!post) return null function onChange(e) { setPost(() => ({ ...post, [e.target.name]: e.target.value })) } const { title, content } = post async function updateCurrentPost() { if (!title || !content) return await supabase .from('posts') .update([ { title, content } ]) router.push('/my-posts') } return ( <div> <h1 className="text-3xl font-semibold tracking-wide mt-6 mb-2">Edit post</h1> <input onChange={onChange} name="title" placeholder="Title" value={post.title} className="border-b pb-2 text-lg my-4 focus:outline-none w-full font-light text-gray-500 placeholder-gray-500 y-2" /> <SimpleMDE value={post.content} onChange={value => setPost({ ...post, content: value })} /> <button className="mb-4 bg-blue-600 text-white font-semibold px-8 py-2 rounded-lg" onClick={updateCurrentPost}>Update Post</button> </div> ) } export default EditPost
Now, add a new link to our navigation located in pages/_app.js:
// pages/_app.js { user && ( <Link href="/my-posts"> <span className="mr-6 cursor-pointer">My Posts</span> </Link> ) }
When running the app, you should be able to view your own posts, edit them, and delete them from the updated UI.
How to enable real-time updates
Now that we have the app running it's trivial to add real-time updates.
By default, Realtime is disabled on your database. Let's turn on Realtime for the posts table.
To do so, open the app dashboard and click on Databases -> Replication -> 0 Tables (under Source). Toggle on Realtime functionality for the posts table. Here is a video walkthrough of how you can do this for clarity.
Next, open src/index.js and update the useEffect hook with the following code:
useEffect(() => { fetchPosts() const mySubscription = supabase .from('posts') .on('*', () => fetchPosts()) .subscribe() return () => supabase.removeSubscription(mySubscription) }, [])
Now, we will be subscribed to realtime changes in the posts table.
The code for the app is located here.
Next Steps
By now you should have a good understanding of how to build full stack apps with Supabase and Next.js.
If you'd like to learn more about building full stack apps with Supabase, I'd check out the following resources.
If you read this far, tweet to the author to show them you care.
0 notes
Text
Spring Boot Microservice with Postgres Database in Docker Container Tutorial for Beginners
Hi, a new #video on #springboot #microservices with #postgres #database running in #docker #container is published on #codeonedigest #youtube channel. Learn #spring boot microservices with #postgressql in docker container #programming #coding with #codeon
In this video, we will run postgres database in docker container and integrate Postgres database with a Spring Boot Microservice Application and perform different CRUD operations i.e. Create, Read, Update, and Delete operations on the Customer entity. Spring Boot is built on the top of the spring and contains all the features of spring. And is becoming a favorite of developers these days because…
View On WordPress
#compass#container#docker#docker container#docker file#docker full course#docker image#docker tutorial#docker tutorial for beginners#dockerfile#microservices#microservices postgres#nosql#postgres#postgres database docker#postgres database docker install#postgres database docker setup#postgres database docker tutorial#postgres database docker volume#Postgres database installation#postgres db#postgres installation#postgres java#postgres tutorial#postgres tutorial for beginners#postgressql microservices example#Spring boot#spring boot annotations#spring boot full course#spring boot microservices
0 notes
Link
Create an advanced REST API with Python, Django REST Framework and Docker using Test Driven Development (TDD)
What you’ll learn
Setting up a local development server with Docker
Writing a Python project using Test Driven Development
Building a REST API with advanced features such as uploading and viewing images
Creating a backend that can be used a base for your future projects or MVP
Hands on experience applying best practice principles such as PEP-8 and unit tests
Configure Travis-CI to automate code checks
Requirements
Basic knowledge of programming and building simple applications
Familiar with Django
Comfortable using command line tools (Terminal/Command Prompt)
macOS, Linux or Windows machine capable of running Docker (This excludes Windows 10 Home)
Positive attitude and willingness to learn!
Description
Welcome to the advanced course on how to Build a Backend REST API using Python, Django (2.0), Django REST Framework (3.9), Docker, Travis CI, Postgres and Test Driven Development!
Whether you’re a freelance programmer, tech entrepreneur, or just starting out building backends – this course will help lay the foundation of your knowledge base and give you the tools to advance your skills with some of the most in-demand programming languages today.
APIs are the unsung heroes behind the technologies that we all love and use religiously.
One of the most critical components for any tech-based business is an API. So knowing how to create an API from start to finish is a vital skill to have as a developer. You cannot build a successful app without a backend REST API!
In this course I’ll show you how to build an advanced API that handles creating and updating user profiles, changing passwords, creating objects, uploading images, filtering and searching objects, and more.
The best way to learn anything is to do it. So the practical application of the course — the project that you’ll build along side me — is an API. A recipe API, to be specific.
You will learn how to build an advanced recipe API that allows you to upload and store some of your favourite recipes from photos and the web.
You’ll learn how to create objects i.e. recipes with titles, price points, cooking times, ingredients and tags like “comfort food”, “vegan” or “dessert”. Think of it as a virtual recipe box.
By the end of this course you will have built a fully functioning REST API that can handle:
User authentication
Creating objects
Filtering and sorting objects
Uploading and viewing images
You’ll also learn, in detail how to:
Setup a project with Docker and Docker-Compose
Configure Travis-CI to automatically run linting and unit tests
Write unit tests using the Django Test Framework
Apply best practice principles including Test Driven Development
Handle uploading media files with Django
Customize the Django admin
Configure a Postgres database
This course has one singular focus: To teach you how to create an advanced API from start to finish using best practice principles and Test Driven Development.
This course is NOT FOR YOU:
If you’re looking for a course to build an API, a front end, and deployment
If you’re looking to build 10 different apps in one course
If you want to learn lots of different technologies and approaches to app development in general
This is a hands-on course, with a bit of theory and lots of opportunities to test your knowledge.
The content is challenging but rewarding. Ready for it? Let’s dive in!
**PLEASE NOTE: You cannot run Docker on Windows 10 Home edition. This is because Windows 10 Pro or Enterprise is required in order to use Hyper-V which Docker uses for virtualization. To take this course you have two options. These are covered in Lecture 6, which is free to preview before purchasing the course.
Who this course is for:
Intermediate programmers who already have some understanding of Python and want to skill up
Developers proficient in other languages but looking to add Python to their toolkit
Created by Mark Winterbottom, Brooke Rutherford Last updated 3/2020 English English
Size: 5.50 GB
Download Now
https://ift.tt/2mYaLIE.
The post Build a Backend REST API with Python & Django – Advanced appeared first on Free Course Lab.
0 notes
Text
Technical Support Expert Remote 100 000 year USD
Technical Support Expert Remote 100 000 year USD Remote work is quickly becoming the default option for high tech jobs. Crossover is the platform for top paying full time long term remote work and now is a great time to get onboard. We are growing rapidly across nearly 50 different job positions. This listing is for our Product Knowledge Curator position but we have found great applicants often have a current title of Technical Support Expert or similar so don’t be confused about that difference we are glad you found us. Hit “Apply” to learn more about this exciting opportunity. Our client Trilogy Software is looking for exceptional IT professionals willing to become a part of the Central Support team providing technical support for a hundred complex enterprise products with a total of 20K tickets per month. Trilogy runs a radically differentiated process where each L1 agent supports dozens of products. In this setup the Knowledge Base becomes a cornerstone technology that empowers customers with self service enables AI powered bots to close the simpler support tickets and allows any L1 support agent to provide a solution that would WOW! our users. We've designed a dedicated role of the Product Knowledge Curator to become the Knowledge Base owner taking full responsibility for the correctness completeness and usability of the KB for a particular product. Key responsibilities < strong>
Make sure that 100 of support tickets are covered by complete accurate and clear KB articles that are easy to apply step by step< li>
Act as a customer advocate making sure that each technical solution provided was the best and the most optimal for the customer< li>
Curate the knowledge base ensuring that the articles are up to date nonredundant and discoverable by the agents customers and the answer bot < li>< ul>Candidate requirements < strong>
A technical university degree in an IT related field of study< li>
At least 5 years of experience in any of the following positions Software developer Software architect DevOps Database Administrator Advanced technical support engineer L2 L3 or equivalent < li>< ul>What you will be doing < strong>Product Knowledge Curator is the best senior support engineer who loves converting thoughts and ideas into written solutions. In this role
You will learn to excel in high scale problem solving that directly impacts hundreds thousands of product users and support agents< li>
You will become hands on with cloud providers AWS GCP Azure advanced cloud tech Docker Kubernetes databases MySQL MSSQL Oracle Postgres Aurora and dev platforms Java EE .NET .< li>
You will be the go to expert for an enterprise software product used by Fortune 500 companies. < li>What you will not be doing
Coaching training or mentoring individual agents< li>
Direct communication with the customers< li>
Writing user manuals < li>There is so much to cover for this exciting role and space here is limited. Hit the Apply< strong> button if you found this interesting and want to learn more. We look forward to meeting you! What to expect next
You will receive an email with a link to start your self paced online job application.< li>
Our hiring platform will guide you through a series of online “screening” assessments to check for basic job fit job related skills and finally a few real world job specific assignments.< li>
You will be paired up with one of our recruiting specialists who can answer questions you might have about the process role or company and help you get to the final interview step. < li>< ul>Important! < strong> If you do not receive an email from us
First emails may take up to 15 minutes to send refresh and check again.< li>
Second check your spam and junk folders for an email from Crossover.com mark as “Not Spam” since you will receive other emails as well.< li>
Third we will send to whatever email account you set up on your LinkedIn Profile it might point to a different address than the one you are checking and it’s necessarily the email address of your LinkedIn username.< li>
If all else fails just visit https jobs.crossover.com directly search for this job and click “Apply”. You will be prompted to reset your password if you already applied using LinkedIn EasyApply. < li>< ul>Crossover Job Code LJ 4132 SA Sakaka TechnicalSuppo.002 * راتب مجزي جداً. * مكافأت و حوافز متنوعة. * توفير سكن مؤثث أو بدل سكن. * أنتقالات أو توفير بدل عنها. * توفير تذاكر السفر لمن يشغل الوظيفة و عائلته. * نسبة من الأرباح الربع سنوية. * أجازات سنوية مدفوعة الراتب بالكامل. * مسار وظيفي واضح للترقيات. * بيئة عمل محفزة و مناسبة لحالة الموظف. * تأمين طبي للموظيف و عائلته. * تأمينات أجتماعية. التقدم و التواصل مباشرة دون و سطاء عند توافر الألتزام و الجدية التامة و المؤهلات المطلوبة علي: [email protected]
0 notes
Text
Project Quay is a scalable container image registry that enables you to build, organize, distribute, and deploy containers. With Quay you can create image repositories, perform image vulnerability scanning and robust access controls. We had covered installation of Quay on a Linux distribution using Docker. How To Setup Red Hat Quay Registry on CentOS / RHEL / Ubuntu In this guide, we will review how you can deploy Quay container registry on OpenShift Container Platform using Operator. The operator we’ll use is provided in the Operators Hub. If you don’t have an OpenShift / OKD cluster running and would like to try this article, checkout our guides below. Setup Local OpenShift 4.x Cluster with CodeReady Containers How to Setup OpenShift Origin (OKD) 3.11 on Ubuntu How To run Local Openshift Cluster with Minishift The Project Quay is made up of several core components. Database: Used by Red Hat Quay as its primary metadata storage (not for image storage). Redis (key, value store): Stores live builder logs and the Red Hat Quay tutorial. Quay (container registry): Runs the quay container as a service, consisting of several components in the pod. Clair: Scans container images for vulnerabilities and suggests fixes. Step 1: Create new project for Project Quay Let’s begin by creating a new project for Quay registry. $ oc new-project quay-enterprise Now using project "quay-enterprise" on server "https://api.crc.testing:6443". ..... You can also create a Project from OpenShift Web console. Click create button and confirm the project is created and running. Step 2: Install Red Hat Quay Setup Operator The Red Hat Quay Setup Operator provides a simple method to deploy and manage a Red Hat Quay cluster. Login to the OpenShift console and select Operators → OperatorHub: Select the Red Hat Quay Operator. Select Install then Operator Subscription page will appear. Choose the following then select Subscribe: Installation Mode: Select a specific namespace to install to Update Channel: Choose the update channel (only one may be available) Approval Strategy: Choose to approve automatic or manual updates Step 3: Deploy a Red Hat Quay ecosystem Certain credentials are required for Accessing Quay.io registry. Create a new file with below details. $ vim docker_quay.json "auths": "quay.io": "auth": "cmVkaGF0K3F1YXk6TzgxV1NIUlNKUjE0VUFaQks1NEdRSEpTMFAxVjRDTFdBSlYxWDJDNFNEN0tPNTlDUTlOM1JFMTI2MTJYVTFIUg==", "email": "" Then create a secret on OpenShift that will be used. oc project quay-enterprise oc create secret generic redhat-pull-secret --from-file=".dockerconfigjson=docker_quay.json" --type='kubernetes.io/dockerconfigjson' Create Quay Superuser credentials secret: oc create secret generic quay-admin \ --from-literal=superuser-username=quayadmin \ --from-literal=superuser-password=StrongAdminPassword \ [email protected] Where: quayadmin is the Quay admin username StrongAdminPassword is the password for admin user [email protected] is the email of Admin user to be created Create Quay Configuration Secret A dedicated deployment of Quay Enterprise is used to manage the configuration of Quay. Access to the configuration interface is secured and requires authentication in order for access. oc create secret generic quay-config --from-literal=config-app-password=StrongPassword Replace StrongPassword with your desired password. Create Database credentials secret – PostgreSQL oc create secret generic postgres-creds \ --from-literal=database-username=quay \ --from-literal=database-password=StrongUserPassword \ --from-literal=database-root-password=StrongRootPassword \ --from-literal=database-name=quay These are the credentials for accessing the database server: quay – Database and DB username StrongUserPassword – quay DB user password StrongRootPassword – root user database password
Create Redis Password Credential By default, the operator managed Redis instance is deployed without a password. A password can be specified by creating a secret containing the password in the key password. oc create secret generic redis-password --from-literal=password=StrongRedisPassword Create Quay Ecosystem Deployment Manifest My Red Hat Quay ecosystem configuration file looks like below apiVersion: redhatcop.redhat.io/v1alpha1 kind: QuayEcosystem metadata: name: quay-ecosystem spec: clair: enabled: true imagePullSecretName: redhat-pull-secret updateInterval: "60m" quay: imagePullSecretName: redhat-pull-secret superuserCredentialsSecretName: quay-admin configSecretName: quay-config deploymentStrategy: RollingUpdate skipSetup: false redis: credentialsSecretName: redis-password database: volumeSize: 10Gi credentialsSecretName: postgres-creds registryStorage: persistentVolumeSize: 20Gi persistentVolumeAccessModes: - ReadWriteMany livenessProbe: initialDelaySeconds: 120 httpGet: path: /health/instance port: 8443 scheme: HTTPS readinessProbe: initialDelaySeconds: 10 httpGet: path: /health/instance port: 8443 scheme: HTTPS Modify it to fit you use case. When done apply the configuration: oc apply -f quay-ecosystem.yaml Using Custom SSL Certificates If you want to use custom SSL certificates with Quay, you need to create a secret with the key and the certificate: oc create secret generic custom-quay-ssl \ --from-file=ssl.key=example.key \ --from-file=ssl.cert=example.crt Then modify your Ecosystem file to use the custom certificate secret: quay: imagePullSecretName: redhat-pull-secret sslCertificatesSecretName: custom-quay-ssl ....... Wait for few minutes then confirm deployment: $ oc get deployments NAME READY UP-TO-DATE AVAILABLE AGE quay-ecosystem-clair 1/1 1 1 2m35s quay-ecosystem-clair-postgresql 1/1 1 1 2m57s quay-ecosystem-quay 1/1 1 1 3m45s quay-ecosystem-quay-postgresql 1/1 1 1 5m8s quay-ecosystem-redis 1/1 1 1 5m57s quay-operator 1/1 1 1 70m $ oc get svc NAME TYPE CLUSTER-IP EXTERNAL-IP PORT(S) AGE quay-ecosystem-clair ClusterIP 172.30.66.1 6060/TCP,6061/TCP 4m quay-ecosystem-clair-postgresql ClusterIP 172.30.10.126 5432/TCP 3m58s quay-ecosystem-quay ClusterIP 172.30.47.147 443/TCP 5m38s quay-ecosystem-quay-postgresql ClusterIP 172.30.196.61 5432/TCP 6m15s quay-ecosystem-redis ClusterIP 172.30.48.112 6379/TCP 6m58s quay-operator-metrics ClusterIP 172.30.81.233 8383/TCP,8686/TCP 70m Running pods in the project: $ oc get pods NAME READY STATUS RESTARTS AGE quay-ecosystem-clair-84b4d77654-cjwcr 1/1 Running 0 2m57s quay-ecosystem-clair-postgresql-7c47b5955-qbc4s 1/1 Running 0 3m23s quay-ecosystem-quay-66584ccbdb-8szts 1/1 Running 0 4m8s quay-ecosystem-quay-postgresql-74bf8db7f8-vnrx9 1/1 Running 0 5m34s quay-ecosystem-redis-7dcd5c58d6-p7xkn 1/1 Running 0 6m23s quay-operator-764c99dcdb-k44cq 1/1 Running 0 70m Step 4: Access Quay Dashboard Get a route URL for deployed Quay: $ oc get route quay-ecosystem-quay quay-ecosystem-quay-quay-enterprise.apps.example.com quay-ecosystem-quay 8443 passthrough/Redirect None
Open the URL on the machine with access to the cluster domain. Use the credentials you configured to login to Quay registry. And there you have it. You now have Quay registry running on OpenShift using Operators. Refer to below documentations for more help. Quay Operator Github Page Red Hat Quay documentation Project Quay Documentation
0 notes
Link
Lucidboard A realtime, collaborative kanban tool, built on Elixir, Phoenix, and LiveView. Status: We've met our MVP goals! Now we're just adding features. As always, pull requests welcome! CI: Lucidboard on CircleCI To start your Phoenix development environment: Note: If you are on the Quicken Loans network, you'll want to invoke this script with bin/dev --ql or you will get errors around HTTPS authentication. The script's comments explain a bit more, but you'll get two docker containers -- a Postgres database (lucidboard_dev_db) and an Elixir development container (lucidboard_dev_app). The script will then run the fish shell inside the latter, dropping you into /app where the project files reside. When running this the first time, you'll need to install the dependencies and initialize the database. (You may also simply type setup since it is an alias for these commands.) mix deps.get cd assets; npm install; cd .. mix ecto.setup Finally, start the application with imp. This is an alias for iex -S mix phx.server which will run the app with Elixir's interactive repl, iex. This will allow you to test lines of Elixir code and interact with the running application. imp is the only command you'll need next time, now that things are installed. Now you can visit localhost:8800 from your browser. To close down and remove the docker containers, run the following script. Don't worry - all your code and database data will remain intact for next time. Shell Aliases These recommended few aliases are imported to the fish shell in the docker-based dev environment. Alias Full Command imp iex -S mix phx.server im iex -S mix mdg iex mix deps.get mdu mix deps.update --all mt mix test mtw mix test.watch ml mix lint mer mix ecto.reset setup mix deps.get cd assets; npm install; cd .. mix ecto.setup License Per the included LICENSE.txt, Lucidboard is made available under the MIT license.
0 notes
Text
Senior Data/BI Engineer (f/m) - Germany Startup Jobs
http://www.germanystartupjobs.com/job/atfarm-senior-data-bi-engineer/
Senior Data/BI Engineer (f/m)
As a Senior Data/BI Engineer at Atfarm you will: Build and maintain our data and analytics infrastructure Build in-app analytics for internal stakeholders Build marketing attribution capabilities for both online and offline marketing Integrate multiple data sources to a single source Collaborate with internal and external stakeholders for requirements gathering and leverage the most learnings out of our data Optimize and improve features or data processes for performance and stability As a person you are: Collaborative and thrive on self-improvement Values and results driven Open to constructive feedback, both giving and receiving, in a clear and respectful manner Ready to make an impact, take ownership and you execute with conviction. Proactive and constructive even if things get ambiguous Requirements You like to actively participate in an agile setup to develop software in a team and you value pragmatic approaches, discussions, and knowledge sharing You have more than one year of experience in working in a startup environment on site as team member You have a broad understanding of concepts such as service oriented architecture, micro services, message queues, machine learning, and geospatial data 2+ years of experience as a Data Engineer / BI Experience developing, maintaining and optimising data pipelines Experience building data warehouses and ETLs Experience with data modeling and building reporting dashboards Experience in working with Redshift or similar databases for large scale data storage and retrieval. Setup and promote data driven enablement inside the unit (e.g. by providing trainings about tooling). Our Tech Stack Required knowledge: R, Python. Required tooling knowledge: R Studio / R Server, Matlab (or similar tooling), Tableu (or similar tooling). Languages and frameworks: Javascript, Node.js, Python, Postgres, ReactJS, ReactNative Tools: AWS, GitLab, Jenkins, Jira, Docker Principles: agile, customer-centric, lean, service-oriented architecture, self-organisation, transparency Benefits An opportunity to shape a startup in its early stage Directly impact on products that provide real value to farmers and industries based on an honest business model Work on sustainable solutions that benefit humankind and the environment Very competitive remuneration and an unlimited working contract Visa and relocation support for a smooth transition to work and live in Berlin A flexible yet stable environment in the newly founded digital unit of a global company Flexible working hours and support for part time working models Support for personal development, trainings, conferences and continuous learning Commitment to using new approaches, technologies and frameworks Participation in-house hackathons, meetups, and knowledge sharing A choice your own preferred hardware (CYOD)
0 notes
Text
Meet my Free, Local API Server for your Front-End Adventures (written in Node.js)!
Hey, fellow Stackarians!
I hope that 2018 has been gracious to you so far, and you are ready for the upcoming challenges!
As this article is kinda long, let’s kick it off with a TLDR version:
I created a free API service you can run locally using Docker. This API service can be used as data source for your front-end project, since it has all the necessary basic functions needed to learn or experiment with different front-end frameworks.
Read the Documentation here!
Usage:
Install and start Docker
Download the pre-configured docker-compose file: docker-compose.yml
Open a new terminal tab and navigate to the folder where you downloaded the docker-compose file and run docker-compose up
Hit CTRL-C to stop the process and get back the command prompt
Run docker-compose down to remove the containers
Connecting to the database:
With these credentials, you can connect to the DB using your favorite client. I can recommend Postico if you are on Mac, or DBeaver if you are looking for a multi-platform solution:
Default credentials:
user: root password: root host: localhost port: 1330 database: api-db
The database is seeded with two different users with different privileges:
The pre-defined user with admin privileges:
username: admin, email: [email protected], password: admin
The pre-defined regular user:
username: User Doe email: [email protected] password: 12345
--
And now, if you are still with me, to full the story!
There are plenty of shiny toys to put your hands on this year if you would like to keep up the pace front-end-wise. React is still on the rocks, VueJs is right on its tail, and the good old Angular is getting better and better, so there are lots of opportunities to learn and experiment!
If backend programming is not your best side, or you just don't want to waste time coding your own, here is a handy little thingy you can use: your very own local API server and database! (yaaaay!)
Sure, some great online services provide decent API servers, like Mockaroo, or you can just use your favorite service's public API, like Spotify's.
But - for me at least - they are just not scratching at the right spot. You know, I wanted something simple, but with all the most common things you can come by, like registering a new user, logging in, listing, adding and deleting stuff from a database. Just the usual CRUD operations.
I know, I know. First world problems.
So I decided to create my own super simple API server (emphasis on super simple), that can run locally. It has an attached database that I can browse with a UI database client app, pre-seeded, ready to go out of the box.
But then I thought: Hey, I cannot be the only one who needs this. Why don't I make it public?
But then immediately:
'But not everyone is comfortable with installing databases locally, not to mention the OS differences and yadda-yadda-yadda...'
Sure, these things are relatively easy, and anyone can do it with some documentation checking, but if you are not experienced with these kinds of things, it is just stealing your time from your primary goal: working on front-end. Why not make it simple then?
Probably you are now like,
'Ok, Rob, this is some pretty long intro, we get it, you made something for yourself what is already out there, good work...'
BUT WHAT IS THIS AND WHERE IS THE LOOT?!
This is a simple backend service with a PostgreSQL database hooked up to it, seeded with some fake products data for a simple e-commerce site.
The server provides some features you can use through its API. You can:
register a new user
login and reach protected endpoints using JWT
list fake products with enough details to create common product cards (with all-time favorites like Intelligent Frozen Chicken, Handcrafted Rubber Pizza not to mention the great Licensed Granite Salad! God, I love Faker!)
search for a product by name or ingredient
show one particular product
edit a product
delete a product
For further details, please see the documentation
The best part is that you don't need to install PostgreSQL on your local machine, or add fake data (however you can)!
If you are reading this blog frequently, I'm sure you've already heard about Docker and containerization. If not, please let me summarize and (way over)simplify it for you:
Each container is a separate environment which is running on your machine, and you can reach it through a specific port, kinda like a virtual machine. This environment contains everything that is needed to run your code, and every time, on every platform, once it is created, it will be exactly the same as its image file declares it.
Why is this good for your health? Because I already made this image file and the one that runs the database in another container and links them together for you, and all you need to run it is Docker.
Dude, seriously... I won't ask you twice…
I can imagine you've just shoveled a big chunk of coal to the rage train engine... But easy now, we are at the meat of it, finally!
This is what you need to do to run this backend service:
1. Install and run Docker
You find the instructions on the official site: Docker Install With Docker, you will be able to run containers on your local machine without any environment setup hassle. Don’t forget to start it after installation, or your command line won’t recognize the docker command!
2. Grab this docker-compose file: docker-compose.yml
This file serves as a config file telling Docker which images you would like to have a copy of up and running. The image files are stored in Docker Hub. If it is not already on your machine, Docker will download it for you and cache it. So next time you wish to run it, it will be ready to use! Let’s take a closer look at it!
version: '3.3' services: freebie-api-server: container_name: api-server image: robertczinege/freebie-api-server:latest ports: - '1337:1337' depends_on: - db environment: - DB_HOST=db - DB_PORT=5432 - DB_USER=root - DB_PASSWORD=root - DB_DATABASE=api-db - PORT=1337 - LOGGER_LEVEL=silly - TOKEN_SECRET='thisIsASuperSecretS3cr3t' - TOKEN_EXPIRATION=1h db: container_name: api-db image: postgres:10 environment: - POSTGRES_USER=root - POSTGRES_PASSWORD=root - POSTGRES_DB=api-db ports: - '1330:5432'
This file tells Docker to set up two services, the 'freebie-api-server' called api-server and the 'db' called api-db. You will find them among the containers in Docker with these names after you started them.
The image property tells which image file should be used for this. As you can see, the service itself has its own image file available on my Docker Hub account, and the database is the official PostgreSql image file. If you don't have them, Docker will download and save them.
There is an interesting line, the depends_on. This tells Docker to start the 'db' service (called api-db) first.
The ports is a really important property. The ports listed here will be exposed, so you can use them from the outside. In this case, the API service is available on the port 1337 and the database is available on port 1330 (the port 5432 is Postgres' default port, which is exposed as 1330).
You can see a bunch of environmental variables. These environmental variables will be passed to the services running in the containers as you would pass them in through command line.
However, the DB_HOST env var is strange. It is not a URL or a connection string, as you would expect it to be. Well, Docker Compose will give this property automatically when started the 'db' service.
You can use these environment variables if you wish to deploy this service. But this is another whole story.
3. Navigate in the terminal to the directory where you saved the docker-compose file and run docker-compose up.
Docker Compose comes with Docker by default, and it really helps you to run multiple containers depending on each other.
This command will start both the server and the Postgres database linked to it. First, the server will fill the database with fake products and a default admin and regular user.
You will see the process of the startup in the command line. When you see the 'Server is up!' message, you know that everything is jolly good!
4. To stop the service, hit CTRL-C
CTRL-C will stop the processes, but will leave the containers up. You will get back your command prompt, so you can type in further commands.
If you run docker-compose down now, that will stop and remove both of the containers. When you start again with docker-compose up, the containers will be set up again with new random products.
5. You are good to go, and you can start developing your own frontend for it!
You can reach the service on localhost:1337/api. You can try this out using e.g. Postman, or just navigating to the localhost:1337/api/products URL in your browser. You will see the actual JSON response with the list of products.
Advanced, totally ethical pro tips:
TIP 1: You can check if the service is up and running if you type in docker ps -a. This command lists all the running containers on your machine. If you see the api-server and the api-db in the list, you are good to go.
TIP 2: You are able just to stop the containers but not removing them. In this case, the database will keep your changes and won't be reseeded again. To achieve this, stop the containers like this: CTRL-C to exit the process and get back the command prompt docker stop api-server api-db to stop both of the containers docker start api-server api-db to start them again
TIP 3: Connecting to the DB using database client
I recommend you to use Postico if you are on Mac or DBeaver if you are on Windows or Linux, but you can use it on Mac as well for exploring the database. They are free and very user-friendly.
You can connect to the database with the following credentials:
user: root password: root host: localhost port: 1330 database: api-db
And boom, you are in. You can check and edit the data you find here. It is especially useful when you would like to add more users with admin privileges, since the database only comes with one predefined admin user to the service, or you can dump or restore the db. Well, for reasons.
Time to say goodbye!
So, this is it guys; I hope it was not so boring to read all those letters.
If you have any questions or feedback, please do not hesitate to drop them in the comments below, I much appreciate them! If you have any idea how I could improve it, that's even better! I would love to hear them because this little project definitely could use some more love!
I hope you will find a good use for this thing as I already do!
See you later, alligator! ;)
And now, time for some self-advertisement!
If you are interested how to create a backend app like this, I recommend you our Node Fundations training, where you can learn all the necessary knowledge to put together a service like this.
If you are more interested in the client side code and want to learn cool front-end frameworks, check out Angular and React trainings!
Meet my Free, Local API Server for your Front-End Adventures (written in Node.js)! published first on https://koresolpage.tumblr.com/
0 notes
Link
(Via: Hacker News)
This post represents the collective work of our Core Infrastructure team's investigation into our API and Dashboard outage on 10 October 2017.
As a payments company, we take reliability very seriously. We hope that the transparency in technical write-ups like this reflects that.
We have included a high-level summary of the incident, and a more detailed technical breakdown of what happened, our investigation, and changes we've made since.
Summary
On the afternoon of 10 October 2017, we experienced an outage of our API and Dashboard, lasting 1 hour and 50 minutes. Any requests made during that time failed, and returned an error.
The cause of the incident was a hardware failure on our primary database node, combined with unusual circumstances that prevented our database cluster automation from promoting one of the replica database nodes to act as the new primary.
This failure to promote a new primary database node extended an outage that would normally last 1 or 2 minutes to one that lasted almost 2 hours.
Our database setup
Before we start, it's helpful to have a high-level view of how we store data at GoCardless.
All of our most critical data1 is stored in Postgres.
We run Postgres in a cluster of 3 nodes, with a primary, 1 synchronous replica and 1 asynchronous replica. This means that we always have at least 2 copies of every piece of data by the time we respond successfully to an API request.
To manage the promotion of a new primary node in the event of machine failure, we run a piece of software called Pacemaker on each node in the cluster. Clients, such as our Ruby on Rails applications, connect to the primary node2 using a virtual IP address (VIP) that is also managed by Pacemaker.
Put together, it looks a little like this:
When the primary node fails, the cluster notices.
It promotes the synchronous replica, which is guaranteed to have a copy of every write (e.g. new payment) that the primary accepted. It also sets up the old asynchronous replica as the new synchronous replica.
Once the VIP is moved across, applications can carry on their work.
A Site Reliability Engineer (SRE) then adds a new replica back into the cluster.
Incident timeline
So, how did all this go wrong?
All times in this section are in British Summer Time (UTC+1).
15:09: Our monitoring detects the total outage of our API and Dashboard; engineers begin to investigate.
15:11: We see evidence of a disk array failure on the primary. We are unsure why the cluster hasn't already failed over to the synchronous replica.
15:17: We power off the broken primary Postgres node. This is done so that we don't have a machine in the cluster that is online, but with a broken disk array. We believe that with only the synchronous and asynchronous nodes online, the cluster software will promote a new primary. It quickly becomes clear that this is not the case.
15:18: We clear the error counts (crm resource cleanup) in Pacemaker to prompt it to rediscover the state of the Postgres instances. Doing so has no effect. The cluster will not promote the synchronous replica.
We spend the next hour trying a variety of approaches to promote a new primary.
Our last few attempts centre around editing the configuration on the synchronous replica to try to promote it ourselves. We put the Pacemaker cluster into maintenance mode (crm configure property maintenance-mode=true), remove the configuration flag that tells Postgres to be a replica from recovery.conf, and bring the cluster out of maintenance mode. Every time, it brings the replica back with its original recovery.conf, and we are left with no primary.
16:18: We decide that our attempts at this approach have run on for too long, and that we need to try something else. We set the cluster into maintenance mode one last time, configure the synchronous replica to be a primary, and start Postgres ourselves.
Since the cluster also manages the VIP, and we've set it into maintenance mode, we reconfigure our backend applications to connect to the actual IP address of the new primary.
16:46: Our manually promoted primary Postgres node is working, and the configuration changes are being rolled out to our applications.
16:59: Our monitoring systems confirm that our API and Dashboard are back up.
The immediate fallout
Having brought our systems back online, our next priority was to restore the database cluster to its usual level of redundancy. This meant bootstrapping a third node as an asynchronous replica.
Since Pacemaker was still in maintenance mode, there would be no automatic failover if a machine were to fail now. We believed we were likely to be running this manually-managed setup for a while3, and in the event of our primary failing, we wanted to be able to promote the synchronous replica as quickly as possible.
We decided to introduce another VIP, to be managed manually by the infrastructure team. In the event of our primary failing, we would promote the synchronous replica and move the VIP over ourselves.
As this was an incident triggered by a disk array failure, out of caution we spent some time verifying the integrity of our data. After running every test we could think of, we found no evidence of data corruption.
Once that was done and we felt safe with the GoCardless services running as they were, we started planning our next steps.
The following weeks
The day after the incident, the whole team sat down to discuss two issues:
Why did our Pacemaker cluster fail to elect a new primary database node?
How do we move back to having Pacemaker managing our cluster, now that we're in this manually-managed state?
During that discussion, we decided that we'd taken too much manual intervention on our existing database cluster to be confident in bringing back the Pacemaker automation there. We decided that we'd provision a new cluster, replicate data into it, and switch traffic over.
We split up into two subteams - one trying to reproduce the failure, and the other working out how we'd move over to a new database cluster with minimal disruption.
Reproducing the failure
To be confident in a new cluster, we needed to understand why the existing one didn't promote a new primary, and make changes to fix that issue.
For the most part, we did this by analysing the logs of the components involved in the failure. From that analysis, we pulled out several factors that looked like they could be relevant to reproducing the issue:
The RAID controller logged the simultaneous loss of 3 disks from the array. All subsequent read and write operations against it failed.
The Linux kernel set the filesystem backed by that controller into read-only mode. Given the state of the array, even reads weren't possible.
The Pacemaker cluster correctly observed that Postgres was unhealthy on the primary node. It repeatedly attempted to promote a new primary, but each time it couldn't decide where that primary should run.
On the synchronous replica - the one that should have become the new primary - one of Postgres's subprocesses crashed around the time of the disk array failure on the primary. When this happens, Postgres terminates the rest of its subprocesses and restarts.
After that restart, the synchronous replica kept trying to restore a Write-Ahead Log (WAL) file through the restore_command. On each attempt, it failed with a message stating that the file was invalid (more on this later).
A lot to unpick, right?
Given the complexity involved, it was clear that we'd only get to an answer in a reasonable amount of time if we could repeatedly break a cluster in slightly different ways and see if we could get it to break in the same way our production cluster did on 10 October.
Fortunately, as part of some unrelated work we'd done recently, we had a version of the cluster that we could run inside Docker containers. We used it to help us build a script that mimicked the failures we saw in production. Being able to rapidly turn clusters up and down let us iterate on that script quickly, until we found a combination of events that broke the cluster in just the right way.
A red herring: the invalid WAL file
One of the log entries that stood out, and was a real cause of concern for a while, was the synchronous replica failing to restore a WAL file through its restore_command.
A quick bit of background for those not familiar with Postgres: the Write-Ahead Log is how Postgres records everything you ask it to write (e.g. INSERT, UPDATE, DELETE queries). This log provides strong guarantees of those writes not being lost if Postgres crashes, and is also used to keep replicas in sync with the primary.
There are two ways the WAL can be used: through streaming replication, and through archive_command and restore_command.
In streaming replication, replicas establish an ongoing connection to the primary, which sends them any WAL it generates. If you specify that the replication should be synchronous, it waits for the replica to confirm that it's received the WAL before returning from the query that generated it.
With archive_command, Postgres lets you specify a shell command that will be executed every time a chunk of WAL is generated on the primary. It makes the file name available to the command you specify, so that you can choose what to do with the file. Similarly, restore_command runs on replicas, and passes you the name of the next WAL file the database expects to replay, so you can copy it from wherever you archived it to.
It's common to use both streaming replication and archive_command in combination. Streaming repication keeps your replicas in sync with the most recent changes, and archive_command/restore_command can be used to bootstrap nodes that are further behind by pulling in older WAL files from an archive external to the cluster (e.g. when you want to bootstrap a new node by restoring your last full backup then replaying WAL).
So, what happened during the incident? It turned out that as a final act, the server with the RAID controller issue archived an invalid WAL file to our backup server. When the Postgres subprocess crash caused a restart on the synchronous replica, that Postgres instance came back up and ran its restore_command, pulling in the invalid WAL.
Postgres's internal validation checks saw that the WAL file was invalid, and discarded it. In terms of the data, that didn't matter! That node already had a good copy of those writes, as it was doing streaming synchronous replication from the primary at the time of the failure.
We matched the log line from the validation failure against the Postgres source code, and spent a lot of time reproducing the exact same type of invalid WAL in our local container setup. Keep in mind that it's a binary format, and the contents are fairly dynamic - not the easiest thing to break in a repeatable way!
In the end, we figured out that it played no part in the Pacemaker cluster's inability to promote a new primary. At least we'd learned a little more about the internals of Postgres!
So then, what was it?
Through a process of elimination, we were able to remove steps from the script until we were left with three conditions that were necessary for the cluster to break:
Pacemaker setting: default-resource-stickiness
By default, Pacemaker doesn't assign a penalty to moving resources (such as a Postgres database process, or a VIP) to different machines. For services like Postgres, where moving a resource (e.g. the VIP that the clients are connected to) causes disruption, this isn't the behaviour we want. To combat this, we set the default-resource-stickiness parameter to a non-zero value, so that Pacemaker will consider other options before moving a resource that is already running.
Pacemaker resource: Backup VIP
As part of another piece of work to reduce load on the primary node, we'd added another VIP to the cluster. The idea was that this VIP would never be located on the primary, so the backup process would always connect to a replica, freeing up capacity for read operations on the primary. We set a constraint on this VIP so that it would never run on the same server as the Postgres primary. In Pacemaker terms, we set up a colocation rule with a -INF (negative infinity) preference to locate the Backup VIP and the Postgres primary on the same server.
At the time of the incident, the Backup VIP was running on the synchronous replica - the node that Pacemaker should have promoted to primary.
Failure condition: two processes crashing at once
Even with the configuration above, crashing the Postgres process on the primary wasn't enough to reproduce our production incident. The only way to get the cluster into a state where it would never elect a new primary was to crash one of Postgres' subprocesses on the synchronous replica, which we saw in the production logs from the incident.
All three of these conditions were necessary to reproduce the failure. Removing the default-resource-stickiness or the Backup VIP led to the cluster successfully promoting a new primary, even with the two processes crashing almost simultaneously. Similarly, crashing only the Postgres process on the primary led to the cluster successfully promoting the synchronous replica.
We spent some time testing different changes to our Pacemaker configuration, and ran into a surprising fix. Somehow, the -INF colocation rule between the Backup VIP and the Postgres primary was interfering with the promotion process, even though there was another node - the asynchronous replica - where the Backup VIP could run.
It turned out that specifying the colocation rule for the Backup VIP the opposite way round worked just fine. Instead of specifying a rule with a -INF preference between the Backup VIP and the Postgres primary, we could specify an INF preference between the Backup VIP and a replica. When specified that way round, the cluster promotes the synchronous replica just fine under the same failure conditions.
Moving to a new database cluster
Whilst this investigation was going on, the other half of the team were figuring out how to migrate from our manually managed cluster to a new cluster managed once again by Pacemaker.
Fortunately for us, we had some prior work we could turn to here. We've previously spoken about our approach to performing zero-downtime failover within a cluster. The script that coordinates that is publicly available in this GitHub repository.
The talk goes into more detail, but the relevant part isn't too hard to describe.
As well as Postgres and Pacemaker, we also run a copy of PgBouncer on each of the nodes in our database cluster. We introduce a second VIP as a layer of indirection. Clients (e.g. our Ruby on Rails applications) connect to this new PgBouncer VIP. PgBouncer, in turn, connects to the original Postgres VIP.
It's possible to pause all incoming queries at PgBouncer. When you do that, it puts them into a queue.
We can then promote a new primary and move the Postgres VIP to it. Note that the VIP the clients are connecting to - the PgBouncer VIP - doesn't need to move, so the clients experience no disruption.
Once the cluster has finished promoting the new node, we tell PgBouncer to resume traffic, and it sends the queued queries to the new primary.
We needed to adapt this procedure a little. The automation that performs it is designed to migrate between different nodes in the same cluster, not two separate clusters.
The subteam responsible for getting us into a new cluster spent the next couple of weeks making those adjustments and performing practice runs. Once they were totally comfortable, we put together a plan to do it in production.
Wrapping up the incident
With a plan in place, and the confidence that we'd understood and fixed the issue which stopped our cluster from failing over on 10 October, we were ready to go. Even with all the testing we'd done, we announced a maintenance window as a precaution.
Fortunately, everything went as planned on the night, and we migrated to our new database cluster without a hitch.
We decommissioned the old cluster, and closed the incident.
What's next?
There's no getting away from the size of this incident.
We feel an immense duty to everyone who trusts GoCardless as their payments provider. We took some time to think through what we'd learned from this incident, with a focus on how we could improve our reliability in the future. Some of the key items we came up with were:
Seemingly simple Pacemaker configuration can lead to extremely unusual behaviour
On the surface, defining a rule that says two resources must not run together seems like it would be the opposite of defining a rule that says two resources must run together. In reality, they cause the system to behave in entirely different ways in certain failure conditions. We can take this knowledge into any future work we do with Pacemaker.
Unrelatedly, but conveniently, we're about to move away from using VIPs to direct traffic to specific Postgres instances. Instead we'll be running proxies on the application servers that direct traffic to the right node based on the state of the cluster. This will drastically reduce the number of resources managed by Pacemaker, in turn reducing the potential for weird behaviour in the cluster.
Some bugs will only be surfaced through fault injection
A misconfiguration that only surfaces when two processes crash at almost the same time isn't one that you're going to find through basic tests or day-to-day operations. We've done some fault injection as part of our game day exercises, but there's always more you can do in that area. Harsher tests of the Postgres cluster, and automation like Chaos Monkey that continually injects failure are both ideas we're keen to pursue.
Automation erodes knowledge
It turns out that when your automation successfully handles failures for two years, your skills in manually controlling the infrastructure below it atrophy. There's no "one size fits all" here. It's easy to say "just write a runbook", but if multiple years go by before you next need it, it's almost guaranteed to be out-of-date.
There are definitely ways to combat this. One possibility we're thinking of is adding arbitrary restrictions to some of our game day exercises (e.g. "this cluster is down, the automation has failed, you can't diagnose the problem, and need to bring the service back another way").
The elephant in the room
We're sure some of you are asking why we even run our own Postgres instances when there are hosted options out there. We couldn't end this write-up without talking about that a little.
We do periodically consider the options out there for managed Postgres services. Until recently, they were somewhat lacking in a few areas we care about. Without turning this article into a provider comparison, it's only a recent development for any provider to offer zero-downtime patch upgrades of Postgres, which is something we've been doing for a while.
The other thing that's made us rule out managed Postgres services so far is that most of our our infrastructure is in a bare-metal hosting provider. The added latency between that provider's datacentres and a hosted Postgres service would cause some fairly drastic re-work for our application developers, who can currently assume a latency to Postgres of a millisecond or lower.
Of course, nothing is set in stone. Our hosting situation can change over time, and so can the offerings of the various hosting providers out there. We'll keep our eyes on it, and perhaps one day wave goodbye to running Postgres clusters ourselves.
Closing thoughts
We'd like to apologise one last time for this incident. We know how much trust people put in their payment providers, and we strive to run a reliable service that reinforces that trust.
At the same time, we strongly believe in learning from failure when it does happen. It's encouraging to see that blameless post-mortems are becoming increasingly common in operations disciplines (whether you happen to call that DevOps, SRE, or something else). We hope you've found this one interesting and useful.
You can find us at @GoCardlessEng on Twitter if you've got comments or questions. We'll try to answer them as best we can!
0 notes
Text
React Boilerplates That You Should Know Of
Interested in finding good React boilerplates? If that’s the case, don’t worry – finding a good one has never been easier!
The likelier scenario is that you will be overwhelmed by great alternatives to choose from.
The first react boilerplate projects to appear are still the most popular ones – they have a leading number of GitHub Stars and must-have recommendations, and are available in many different packages and dependencies.
This will make it even more difficult to choose the right react boilerplates that will work for you.
When looking for a kit, developers usually look for something simple and easy to learn, and try to avoid complex and ultra powerful suites. At the end of the day, starter projects ought to be simple, and pack neatly the things most needed in a clutter-free environment.
What are React boilerplates?
As a novice user, you may find React boilerplates a bit too complicated to set up, but pretty straightforward once you get grasp of how they work. Getting a simple, create-react app will probably make the most sense in the beginning, especially when you want to skip burdensome development and coding.
The curious ones among you, however, have an unlimited world of possibilities to consider. Let’s check.
There are two basic requirements for each React user nowadays:
To secure a streamlined way to deliver all the node-modules code he wrote to his users
To make ES6 and JSX run successfully in any browser.
Both missions happen to be problematic to inexperienced users, and in order to solve them, they need two specific tools: babel and webpack. The one doesn’t necessarily exclude the other – you can always choose one to get the work done, but pairing them into a single ecosystem is proved to bring the best results.
Which are the top React Boilerplates you should be considering?
React Starter Kit
React Starter Kit is another opinionated and modern boilerplate built on React, Express, Node,js, and GraphQL. The pack combines a variety of advanced web development tools, including Browsersync, Babel, and Webpack, and helps you stay productive and make use of the industry’s best practices. The kit will work impeccably both for newcomers and industry professionals.
React Boilerplate
Here are some of the main benefits:
Fast scaffolding
You can create containers, routes, components, sagas, and selectors, and test them directly from your CLI.
Immediate feedback
You will be able to enhance your Developer experience (DX) and code apps faster than you can possibly imagine. All JS and CSS changes are saved automatically, and will reflect instantly without the need to refresh the page. In fact, the current state of your application will be preserved even while updating it in the underlying code.
Predictable and intuitive state management
You will be provided with unidirectional data flows that make it possible to log changes and debug time travel.
Next generation JavaScript
You will also have access to JSX syntax, object destructuring, template strings, and more similar elements right away.
Next generation CSS
For the purposes of complete modularity, you will be invited to prepare compostable CSS codes within the same location of your main components. In order to avoid style clashes and keep specificity low, you can also generate and use original class names, and yet ship only those styles that appear on the page to ensure top performance.
Industry-standard routing
Another thing you may wish to do is to add pages (for instance, an ‘About’ page) to the app, and React Boilerplate will make this possible with its industry-standard routing.
18 n support for internationalization
If interested to develop a scalable app, you should also be looking to implement support for several languages, and leave an open possibility to add more of them (‘react-inl’).
Offline-first
The latest trend in web app design is to make applications available even without a network connection.
SEO
React Boilerplate also supports SEO (management of document head tags) for those searching engines that index JavaScript content (Google is one of them).
React Slingshot
React Slingshot is another compact application development suite that targets beginners. You should choose it because:
It takes a single command to get started – just type ‘npm’, and you can begin developing in your preferred browser.
It provides instant feedback – Once you click ‘save’, the system reloads and saves your changes, and runs linting and automated tests.
It takes a single command to check – All the feedback you’ve collected will be displayed within a single command line.
It eliminates all JavaScript fatigue – In order to work with React, Slingshot ensues access to all powerful and best known libraries.
There is an Example App included for you to see how these elements work together.
Automated production – The key to launch your development work is again typing ‘npm’.
React Static Boilerplate
React Static Boilerplate (or RSB) is a server-less toolset dedicated to trendy and standalone web apps (SPAs). It is best known for reducing developers’ costs, and eliminating all EC2 instances and allowing them to host sites directly from CDN storage bases (GitHub, Amazon S3, Firebase, and so on). Still, all pages you’ve built using RSB will be fully responsive and functional due to their REST API, as well as GraphQL calls to different micro-services (Azure Functions, Amazon Lambada, Docker endpoints on DigitalOcean, and more).
Newcomers will also have access to frontrunner technologies such as Redux, React, React Hot Loader, Babel, Webpack, and Browsersync to learn more on component-based UI development.
NWB
nwb is a popular development suite you can use to:
Develop apps with React, Prereact, Inferno, and vanilla JavaScript
Develop different React components and libraries
Development of npm web modules
You will also be provider a configuration-free development setup, and a possibility to add some additional plugin functionality upon need (SaaS support, for instance).
ReactStrap
ReactStrap is a development library full of interesting Bootstrap 4 components that is completely independent from both jQuery and Bootstrap JavaScript. Nevertheless, it relies on Tether to ensure advanced content positioning, as for instance Popovers, auto-flipping dropdowns, tooltips, and more.
The library is pretty simple to manipulate, and requires only basic understanding of core development concepts.
Razzle
Keeping in mind how difficult standard JS apps can be to develop, you should consider Razzle as a much simpler option. Instead of setting things up yourself, or buying a separate Next.js framework or a react server, you can use Razzle to transfer all necessary tooling within a single dependency, and decide at the very end on all routing, frameworks, and other architectural decisions.
Create React App
Here, there will be no need to configure or install Babel and Webpack tools.
They apps are preconfigured and well-organized, and allow you to stay focused on the code.
The only thing you need to do is to create and launch your project.
Here are some installation tips:
You can install the app globally using:
npm install -g create-react-app
Note that you should have Node >= 6 operable on your machine, so that you can switch different Node versions for different Node projects with ease.
Also, keep in mind that the tool does not assume a Node backend, and that the above-mentioned installation process is only necessary for the Create React App.
Next.js
As all developers will agree, one of the most cumbersome operations nowadays is to create one-page JavaScript applications. The good news is that you have access to a variety of projects that can simplify and accelerate this process. In fact, Create React App is the leading example of how that works.
What’s the challenge with it then? Create React Apps usually involve a long and daunting learning curve before you’ve actually built something that looks like a decent application. The reason is that you must familiarize with routing on the client’s side, pick a good layout for the page, and complete several similar processes.
With more bells and whistles coming along the way (including the need for the server to render quicker page loads), there will be even more learning to do.
How do we simplify the process? The answer is customization.
Think of web apps and how they’re developed using PHP. Your role there is to create the needed files, write their specific PHP codes, and deploy them afterwards. The routing is not that much of a concern, as the app will be rendered on the servers automatically.
Here is where Next.js comes on the scene: the same app is built with React and JavaScript instead of PHP. Other interesting features include:
Automated server rendering
Automated code splitting that allows faster loading of pages
Simplified routing on the client’s side (page based)
Webpack-based environment for development that also supports Hot Module Replacement (HMR)
A possibility to implement it with Express as well as other Node.js HTTP servers
A possibility to customize it with Babel and Webpack configurations you’ve created.
StarHackIt
StarHackIt is starter-friendly web app development kit written with es6/es7, and created using React and Node.js. These are the features it provides:
Authentication: usernames and passwords, Facebook authentication, Google account authentication, and so on.
Authorization: Users, groups, roles, and permissions schemes
A micro services based and scalable architecture (message queues).
A relational database (MySQL, Postgres, SQLite, MsSQL, and so on).
Logging
Universal Relay Boilerplate
Universal Relay Boilerplate is an open-source project development foundation that makes use of Node.js, Cassandra, and React’s stack for backend development. You can also use it as a boilerplate and an educational tool with an array of useful examples. It will also offer a basic kit for account management, namely allow you to create accounts, strengthen password indicators, and manage user profiles.
When applied as a boilerplate, Universal Relay is fully customizable and modifiable, and allows you to update as many projects as you want with minimal intervention. The reason is that this suite packs several modern features for project improvement and bug fixing, and allows the following operations:
Configuration. With Universal Relay, it will be very difficult to get confused – all JavaScript and JSX scripts, CQL, JSON, and other configuration files will be completely independent from the common code.
Creation of Units. All apps you’ve created using this boilerplate as your foundation can be divided in separate units, fully equipped with CQL, relay, front- and backend codes. You can configure the settings and parameters of each unit from within the configuration folder.
If you liked this article about React boilerplates, you should check out these as well:
NodeJS boilerplates that you should start using
WordPress boilerplates to use for your themes and plugins
12 Useful AngularJS Boilerplates
Maps APIs To Use In Your Projects
Social Media APIs That You Can Use
The post React Boilerplates That You Should Know Of appeared first on Design your way.
from Web Development & Designing http://www.designyourway.net/blog/resources/react-boilerplates/
0 notes
Link
So my team has been working on a project to identify viral search behavior in semi real time. One initial problem we faced, was that search behavior in England should be different than behavior in Japan. We use a combination of language, country and timezone to localize behavior so that we can identify local trends. However, we realized that timezone was not a piece of data that we had in our logs. We did however have location data passed to us via our CDN from our API Partners.
The way we actually solved the problem was by modifying both python’s tzgeo and an equivalent Scala package so that we could use them in a distributed manor via Spark. There was nothing out of the box that worked and there were a lot of services offering to do it for a fee per API call. I realized working on this that this is a fairly simple problem. Paying for it just doesn’t make sense.
At the end of the day, all that happens at runtime is a query against geospatial data to see if the coordinate is within a given timezone (represented as a polygon). There are only 24 timezones, so this is actually quite trivial to accomplish. Rather than running a full hosted geospatial database, we can leverage Spatialite. Spatialite is an open source, geospatial extension for SQLite. Its essentially what PostGIS is to Postgres but for SQLite. Spatialite, like SQLite, is a file based embedded DB. This is a perfect use case as there are no writes in our pacakge, only concurrent reads, which is the ideal scenario for a file based database.
So to help anyone else out who has this problem. I created a small go package that abstracts this all away to a single function. Additionally I created a docker container and small microservice so that anyone can just upload the container to their Kubernetes cluster or AWS Elastic Container Service setup and use this in a non Golang language.
0 notes