#postgres database docker tutorial
Explore tagged Tumblr posts
Visit Tumblr Blog
Explore Tumblr blogs with no restrictions, modern design and the best experience.
Last Seen Tumblr Blogs


Fun Fact
Tumblr was the first site to host the blog for President Barack Obama in 2011.
Text
youtube
#youtube#video#codeonedigest#microservices#microservice#docker#nodejs module#nodejs express#node js#nodejs#node js training#node js express#node js development company#node js development services#node js developers#node js application#postgres database#postgres tutorial#postgresql#postgres#docker image#docker container#docker tutorial#dockerfile#docker course
0 notes
Text
Project Quay is a scalable container image registry that enables you to build, organize, distribute, and deploy containers. With Quay you can create image repositories, perform image vulnerability scanning and robust access controls. We had covered installation of Quay on a Linux distribution using Docker. How To Setup Red Hat Quay Registry on CentOS / RHEL / Ubuntu In this guide, we will review how you can deploy Quay container registry on OpenShift Container Platform using Operator. The operator we’ll use is provided in the Operators Hub. If you don’t have an OpenShift / OKD cluster running and would like to try this article, checkout our guides below. Setup Local OpenShift 4.x Cluster with CodeReady Containers How to Setup OpenShift Origin (OKD) 3.11 on Ubuntu How To run Local Openshift Cluster with Minishift The Project Quay is made up of several core components. Database: Used by Red Hat Quay as its primary metadata storage (not for image storage). Redis (key, value store): Stores live builder logs and the Red Hat Quay tutorial. Quay (container registry): Runs the quay container as a service, consisting of several components in the pod. Clair: Scans container images for vulnerabilities and suggests fixes. Step 1: Create new project for Project Quay Let’s begin by creating a new project for Quay registry. $ oc new-project quay-enterprise Now using project "quay-enterprise" on server "https://api.crc.testing:6443". ..... You can also create a Project from OpenShift Web console. Click create button and confirm the project is created and running. Step 2: Install Red Hat Quay Setup Operator The Red Hat Quay Setup Operator provides a simple method to deploy and manage a Red Hat Quay cluster. Login to the OpenShift console and select Operators → OperatorHub: Select the Red Hat Quay Operator. Select Install then Operator Subscription page will appear. Choose the following then select Subscribe: Installation Mode: Select a specific namespace to install to Update Channel: Choose the update channel (only one may be available) Approval Strategy: Choose to approve automatic or manual updates Step 3: Deploy a Red Hat Quay ecosystem Certain credentials are required for Accessing Quay.io registry. Create a new file with below details. $ vim docker_quay.json "auths": "quay.io": "auth": "cmVkaGF0K3F1YXk6TzgxV1NIUlNKUjE0VUFaQks1NEdRSEpTMFAxVjRDTFdBSlYxWDJDNFNEN0tPNTlDUTlOM1JFMTI2MTJYVTFIUg==", "email": "" Then create a secret on OpenShift that will be used. oc project quay-enterprise oc create secret generic redhat-pull-secret --from-file=".dockerconfigjson=docker_quay.json" --type='kubernetes.io/dockerconfigjson' Create Quay Superuser credentials secret: oc create secret generic quay-admin \ --from-literal=superuser-username=quayadmin \ --from-literal=superuser-password=StrongAdminPassword \ [email protected] Where: quayadmin is the Quay admin username StrongAdminPassword is the password for admin user [email protected] is the email of Admin user to be created Create Quay Configuration Secret A dedicated deployment of Quay Enterprise is used to manage the configuration of Quay. Access to the configuration interface is secured and requires authentication in order for access. oc create secret generic quay-config --from-literal=config-app-password=StrongPassword Replace StrongPassword with your desired password. Create Database credentials secret – PostgreSQL oc create secret generic postgres-creds \ --from-literal=database-username=quay \ --from-literal=database-password=StrongUserPassword \ --from-literal=database-root-password=StrongRootPassword \ --from-literal=database-name=quay These are the credentials for accessing the database server: quay – Database and DB username StrongUserPassword – quay DB user password StrongRootPassword – root user database password
Create Redis Password Credential By default, the operator managed Redis instance is deployed without a password. A password can be specified by creating a secret containing the password in the key password. oc create secret generic redis-password --from-literal=password=StrongRedisPassword Create Quay Ecosystem Deployment Manifest My Red Hat Quay ecosystem configuration file looks like below apiVersion: redhatcop.redhat.io/v1alpha1 kind: QuayEcosystem metadata: name: quay-ecosystem spec: clair: enabled: true imagePullSecretName: redhat-pull-secret updateInterval: "60m" quay: imagePullSecretName: redhat-pull-secret superuserCredentialsSecretName: quay-admin configSecretName: quay-config deploymentStrategy: RollingUpdate skipSetup: false redis: credentialsSecretName: redis-password database: volumeSize: 10Gi credentialsSecretName: postgres-creds registryStorage: persistentVolumeSize: 20Gi persistentVolumeAccessModes: - ReadWriteMany livenessProbe: initialDelaySeconds: 120 httpGet: path: /health/instance port: 8443 scheme: HTTPS readinessProbe: initialDelaySeconds: 10 httpGet: path: /health/instance port: 8443 scheme: HTTPS Modify it to fit you use case. When done apply the configuration: oc apply -f quay-ecosystem.yaml Using Custom SSL Certificates If you want to use custom SSL certificates with Quay, you need to create a secret with the key and the certificate: oc create secret generic custom-quay-ssl \ --from-file=ssl.key=example.key \ --from-file=ssl.cert=example.crt Then modify your Ecosystem file to use the custom certificate secret: quay: imagePullSecretName: redhat-pull-secret sslCertificatesSecretName: custom-quay-ssl ....... Wait for few minutes then confirm deployment: $ oc get deployments NAME READY UP-TO-DATE AVAILABLE AGE quay-ecosystem-clair 1/1 1 1 2m35s quay-ecosystem-clair-postgresql 1/1 1 1 2m57s quay-ecosystem-quay 1/1 1 1 3m45s quay-ecosystem-quay-postgresql 1/1 1 1 5m8s quay-ecosystem-redis 1/1 1 1 5m57s quay-operator 1/1 1 1 70m $ oc get svc NAME TYPE CLUSTER-IP EXTERNAL-IP PORT(S) AGE quay-ecosystem-clair ClusterIP 172.30.66.1 6060/TCP,6061/TCP 4m quay-ecosystem-clair-postgresql ClusterIP 172.30.10.126 5432/TCP 3m58s quay-ecosystem-quay ClusterIP 172.30.47.147 443/TCP 5m38s quay-ecosystem-quay-postgresql ClusterIP 172.30.196.61 5432/TCP 6m15s quay-ecosystem-redis ClusterIP 172.30.48.112 6379/TCP 6m58s quay-operator-metrics ClusterIP 172.30.81.233 8383/TCP,8686/TCP 70m Running pods in the project: $ oc get pods NAME READY STATUS RESTARTS AGE quay-ecosystem-clair-84b4d77654-cjwcr 1/1 Running 0 2m57s quay-ecosystem-clair-postgresql-7c47b5955-qbc4s 1/1 Running 0 3m23s quay-ecosystem-quay-66584ccbdb-8szts 1/1 Running 0 4m8s quay-ecosystem-quay-postgresql-74bf8db7f8-vnrx9 1/1 Running 0 5m34s quay-ecosystem-redis-7dcd5c58d6-p7xkn 1/1 Running 0 6m23s quay-operator-764c99dcdb-k44cq 1/1 Running 0 70m Step 4: Access Quay Dashboard Get a route URL for deployed Quay: $ oc get route quay-ecosystem-quay quay-ecosystem-quay-quay-enterprise.apps.example.com quay-ecosystem-quay 8443 passthrough/Redirect None
Open the URL on the machine with access to the cluster domain. Use the credentials you configured to login to Quay registry. And there you have it. You now have Quay registry running on OpenShift using Operators. Refer to below documentations for more help. Quay Operator Github Page Red Hat Quay documentation Project Quay Documentation
0 notes
Text
Mac Postgres Password

Introduction
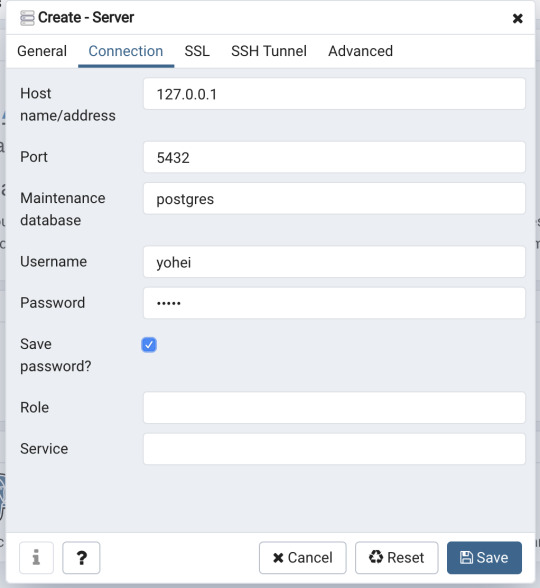
I am currently running postgres in a docker container for development purposes. I am able to connect to the container using psql from my mac by doing psql -h localhost -U someuser then typing the password. The password is the same as the username and it's a really simple password. This is a step-by-step guide to install PostgreSQL on a Mac OS machine. We will be installing PostgreSQL version 11.3 on Mac using the installer provided by EnterpriseDB in this article. There are three crucial steps for the installation of PostgreSQL as follows: Download PostgreSQL EnterpriseDB installer for Mac; Install PostgreSQL. Postgres.app is a full-featured PostgreSQL installation packaged as a standard Mac app. It includes everything you need to get started: we’ve even included popular extensions like PostGIS for geo data and plv8 for JavaScript.
PostgreSQL configuration without password on Mac for Rails - postgresqlconfigurationonmacforrails.md. Code language: SQL (Structured Query Language) (sql) Note that using the ALTER ROLE statement will transfer the password to the server in cleartext. In addition, the cleartext password may be logged in the psql’s command history or the server log. In this tutorial, you have learned how to change the password of a PostgreSQL user using the ALTER ROLE statement.
Postgres is a powerful and free object-relational database management system. It has gained a lot of momentum since its introduction in 1995 because of its robustness and powerful features it ships with out of the box. In this article, we’ll walk through the process of installing a Postgres database on a Mac OS X machine and set it up for Ruby on Rails development.
Install Postgres Database with Homebrew
Homebrew is a popular package manager for OS X. To install Postgres with Homebrew, follow the steps below:
The first thing to do is install Homebrew if you haven’t done so already. Homebrew site has a simple command that you have to paste in your terminal to do so. Make sure to accept the command line developer tools installation if prompted.

Next, run brew install postgres to install Postgres. It might take a little while to compile and install. After compilation is done, it’ll give you some instructions to finish setting it up.
The database will be initialized during installation, so there isn’t a need to run initdb to finish installation of Postgres via Homebrew. Near the end of the installation instructions you should see mention of the command brew services.
Mac Postgres Password Change
If you don’t already have brew services installed. Gem master rhinestone software. It may be installed withthis command: Earth stove 3340 manual.
And then you can run the following command to start Postgres as a background service:
Postgres will also restart automatically at login after you have run the command above. Once Postgres has started, we can use brew services to stop it manually:
Or we can also use brew services to restart Postgres:
Now you should have PostgreSQL all set up.
Mac Postgres Default Password
Set Up Postgres to Work with a Rails App
First, install the pg gem:
Make sure you include the pg gem in your Gemfile, and run
Now, set up your config/database.yml file to point to your Posgres database.
Let’s create the development and test databases:
Now you can run pending migrations, if there are any.
0 notes
Text
Full Stack Development with Next.js and Supabase – The Complete Guide
Supabase is an open source Firebase alternative that lets you create a real-time backend in less than two minutes.
Supabase has continued to gain hype and adoption with developers in my network over the past few months. And a lot of the people I've talked to about it prefer the fact that it leverages a SQL-style database, and they like that it's open source, too.
When you create a project Supabase automatically gives you a Postgres SQL database, user authentication, and API. From there you can easily implement additional features like realtime subscriptions and file storage.
In this guide, you will learn how to build a full stack app that implements the core features that most apps require – like routing, a database, API, authentication, authorization, realtime data, and fine grained access control. We'll be using a modern stack including React, Next.js, and TailwindCSS.
I've tried to distill everything I've learned while myself getting up to speed with Supabase in as short of a guide as possible so you too can begin building full stack apps with the framework.
The app that we will be building is a multi-user blogging app that incorporates all of the types of features you see in many modern apps. This will take us beyond basic CRUD by enabling things like file storage as well as authorization and fine grained access control.
You can find the code for the app we will be building here.
By learning how to incorporate all of these features together you should be able to take what you learn here and build out your own ideas. Understanding the basic building blocks themselves allows you to then take this knowledge with you in the future to put it to use in any way you see fit.
Supabase Overview
How to Build Full Stack Apps
I'm fascinated by full stack Serverless frameworks because of the amount of power and agility they give to developers looking to build complete applications.
Supabase brings to the table the important combination of powerful back end services and easy to use client-side libraries and SDKs for an end to end solution.
This combination lets you not only build out the individual features and services necessary on the back end, but easily integrate them together on the front end by leveraging client libraries maintained by the same team.
Because Supabase is open source, you have the option to self-host or deploy your backend as a managed service. And as you can see, this will be easy for us to do on a free tier that does not require a credit card to get started with.
Why Use Supabase?
I've led the Front End Web and Mobile Developer Advocacy team at AWS, and written a book on building these types of apps. So I've had quite a bit of experience building in this space.
And I think that Supabase brings to the table some really powerful features that immediately stood out to me when I started to build with it.
Data access patterns
One of the biggest limitations of some of the tools and frameworks I've used in the past is the lack of querying capabilities. What I like a lot about Supabase is that, since it's built on top of Postgres, it enables an extremely rich set of performant querying capabilities out of the box without having to write any additional back end code.
The client-side SDKs provide easy to use filters and modifiers to enable an almost infinite combination of data access patterns.
Because the database is SQL, relational data is easy to configure and query, and the client libraries take it into account as a first class citizen.
Permissions
When you get past "hello world" many types of frameworks and services fall over very quickly. This is because most real-world use cases extend far beyond the basic CRUD functionality you often see made available by these tools.
The problem with some frameworks and managed services is that the abstractions they create are not extensible enough to enable easy to modify configurations or custom business logic. These restrictions often make it difficult to take into account the many one-off use cases that come up with building an app in the real-world.
In addition to enabling a wide array of data access patterns, Supabase makes it easy to configure authorization and fine grained access controls. This is because it is simply Postgres, enabling you implement whatever row-level security policies you would like directly from the built-in SQL editor (something we will cover here).
UI components
In addition to the client-side libraries maintained by the same team building the other Supabase tooling, they also maintain a UI component library (beta) that allows you to get up and running with various UI elements.
The most powerful is Auth which integrates with your Supabase project to quickly spin up a user authentication flow (which I'll be using in this tutorial).
Multiple authentication providers
Supabase enables all of the following types of authentication mechanisms:
Username & password
Magic email link
Google
Facebook
Apple
GitHub
Twitter
Azure
GitLab
Bitbucket
Open Source
One of the biggest things it has going for it is that it is completely open source (yes the back end too). This means that you can choose either the Serverless hosted approach or to host it yourself.
That means that if you wanted to, you could run Supabase with Docker and host your app on AWS, GCP, or Azure. This would eliminate the vendor lock-in issue you may run into with Supabase alternatives.
How to Get Started with Supabase
Project setup
To get started, let's first create the Next.js app.
npx create-next-app next-supabase
Next, change into the directory and install the dependencies we'll be needing for the app using either NPM or Yarn:
npm install @supabase/supabase-js @supabase/ui react-simplemde-editor easymde react-markdown uuid npm install tailwindcss@latest @tailwindcss/typography postcss@latest autoprefixer@latest
Next, create the necessary Tailwind configuration files:
npx tailwindcss init -p
Now update tailwind.config.js to add the Tailwind typography plugin to the array of plugins. We'll be using this plugin to style the markdown for our blog:
plugins: [ require('@tailwindcss/typography') ]
Finally, replace the styles in styles/globals.css with the following:
@tailwind base; @tailwind components; @tailwind utilities;
Supabase project initialization
Now that the project is created locally, let's create the Supabase project.
To do so, head over to Supabase.io and click on Start Your Project. Authenticate with GitHub and then create a new project under the organization that is provided to you in your account.

Give the project a Name and Password and click Create new project.
It will take approximately 2 minutes for your project to be created.
How to create a database table in Supabase
Once you've created your project, let's go ahead and create the table for our app along with all of the permissions we'll need. To do so, click on the SQL link in the left hand menu.

In this view, click on Query-1 under Open queries and paste in the following SQL query and click RUN:
CREATE TABLE posts ( id bigint generated by default as identity primary key, user_id uuid references auth.users not null, user_email text, title text, content text, inserted_at timestamp with time zone default timezone('utc'::text, now()) not null ); alter table posts enable row level security; create policy "Individuals can create posts." on posts for insert with check (auth.uid() = user_id); create policy "Individuals can update their own posts." on posts for update using (auth.uid() = user_id); create policy "Individuals can delete their own posts." on posts for delete using (auth.uid() = user_id); create policy "Posts are public." on posts for select using (true);
This will create the posts table that we'll be using for the app. It also enabled some row level permissions:
All users can query for posts
Only signed in users can create posts, and their user ID must match the user ID passed into the arguments
Only the owner of the post can update or delete it
Now, if we click on the Table editor link, we should see our new table created with the proper schema.

That's it! Our back end is ready to go now and we can start building out the UI. Username + password authentication is already enabled by default, so all we need to do now is wire everything up on the front end.
Next.js Supabase configuration
Now that the project has been created, we need a way for our Next.js app to know about the back end services we just created for it.
The best way for us to configure this is using environment variables. Next.js allows environment variables to be set by creating a file called .env.local in the root of the project and storing them there.
In order to expose a variable to the browser you have to prefix the variable with NEXT_PUBLIC_.
Create a file called .env.local at the root of the project, and add the following configuration:
NEXT_PUBLIC_SUPABASE_URL=https://app-id.supabase.co NEXT_PUBLIC_SUPABASE_ANON_KEY=your-public-api-key
You can find the values of your API URL and API Key in the Supabase dashboard settings:
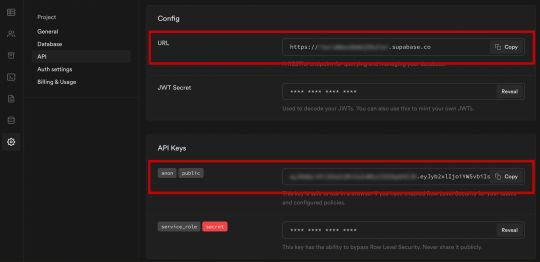
Next, create a file called api.js in the root of the project and add the following code:
// api.js import { createClient } from '@supabase/supabase-js' export const supabase = createClient( process.env.NEXT_PUBLIC_SUPABASE_URL, process.env.NEXT_PUBLIC_SUPABASE_ANON_KEY )
Now we will be able to import the supabase instance and use it anywhere in our app.
Here's an overview of what it looks like to interact with the API using the Supabase JavaScript client.
Querying for data:
import { supabase } from '../path/to/api' const { data, error } = await supabase .from('posts') .select()
Creating new items in the database:
const { data, error } = await supabase .from('posts') .insert([ { title: "Hello World", content: "My first post", user_id: "some-user-id", user_email: "[email protected]" } ])
As I mentioned earlier, the filters and modifiers make it really easy to implement various data access patterns and selection sets of your data.
Authentication – signing up:
const { user, session, error } = await supabase.auth.signUp({ email: '[email protected]', password: 'example-password', })
Authentication – signing in:
const { user, session, error } = await supabase.auth.signIn({ email: '[email protected]', password: 'example-password', })
In our case we won't be writing the main authentication logic by hand, we'll be using the Auth component from Supabase UI.
How to Build the App
Now let's start building out the UI!
To get started, let's first update the app to implement some basic navigation and layout styling.
We will also configure some logic to check if the user is signed in, and show a link for creating new posts if they are.
Finally we'll implement a listener for any auth events. And when a new auth event occurs, we'll check to make sure there is currently a signed in user in order to show or hide the Create Post link.
Open _app.js and add the following code:
// pages/_app.js import Link from 'next/link' import { useState, useEffect } from 'react' import { supabase } from '../api' import '../styles/globals.css' function MyApp({ Component, pageProps }) { const [user, setUser] = useState(null); useEffect(() => { const { data: authListener } = supabase.auth.onAuthStateChange( async () => checkUser() ) checkUser() return () => { authListener?.unsubscribe() }; }, []) async function checkUser() { const user = supabase.auth.user() setUser(user) } return ( <div> <nav className="p-6 border-b border-gray-300"> <Link href="/"> <span className="mr-6 cursor-pointer">Home</span> </Link> { user && ( <Link href="/create-post"> <span className="mr-6 cursor-pointer">Create Post</span> </Link> ) } <Link href="/profile"> <span className="mr-6 cursor-pointer">Profile</span> </Link> </nav> <div className="py-8 px-16"> <Component {...pageProps} /> </div> </div> ) } export default MyApp
How to make a user profile page
Next, let's create the profile page. In the pages directory, create a new file named profile.js and add the following code:
// pages/profile.js import { Auth, Typography, Button } from "@supabase/ui"; const { Text } = Typography import { supabase } from '../api' function Profile(props) { const { user } = Auth.useUser(); if (user) return ( <> <Text>Signed in: {user.email}</Text> <Button block onClick={() => props.supabaseClient.auth.signOut()}> Sign out </Button> </> ); return props.children } export default function AuthProfile() { return ( <Auth.UserContextProvider supabaseClient={supabase}> <Profile supabaseClient={supabase}> <Auth supabaseClient={supabase} /> </Profile> </Auth.UserContextProvider> ) }
The profile page uses the Auth component from the Supabase UI library. This component will render a "sign up" and "sign in" form for unauthenticated users, and a basic user profile with a "sign out" button for authenticated users. It will also enable a magic sign in link.
How to create new posts
Next, let's create the create-post page. In the pages directory, create a page named create-post.js with the following code:
// pages/create-post.js import { useState } from 'react' import { v4 as uuid } from 'uuid' import { useRouter } from 'next/router' import dynamic from 'next/dynamic' import "easymde/dist/easymde.min.css" import { supabase } from '../api' const SimpleMDE = dynamic(() => import('react-simplemde-editor'), { ssr: false }) const initialState = { title: '', content: '' } function CreatePost() { const [post, setPost] = useState(initialState) const { title, content } = post const router = useRouter() function onChange(e) { setPost(() => ({ ...post, [e.target.name]: e.target.value })) } async function createNewPost() { if (!title || !content) return const user = supabase.auth.user() const id = uuid() post.id = id const { data } = await supabase .from('posts') .insert([ { title, content, user_id: user.id, user_email: user.email } ]) .single() router.push(`/posts/${data.id}`) } return ( <div> <h1 className="text-3xl font-semibold tracking-wide mt-6">Create new post</h1> <input onChange={onChange} name="title" placeholder="Title" value={post.title} className="border-b pb-2 text-lg my-4 focus:outline-none w-full font-light text-gray-500 placeholder-gray-500 y-2" /> <SimpleMDE value={post.content} onChange={value => setPost({ ...post, content: value })} /> <button type="button" className="mb-4 bg-green-600 text-white font-semibold px-8 py-2 rounded-lg" onClick={createNewPost} >Create Post</button> </div> ) } export default CreatePost
This component renders a Markdown editor, allowing users to create new posts.
The createNewPost function will use the supabase instance to create new posts using the local form state.
You may notice that we are not passing in any headers. This is because if a user is signed in, the Supabase client libraries automatically include the access token in the headers for a signed in user.
How to view a single post
We need to configure a page to view a single post.
This page uses getStaticPaths to dynamically create pages at build time based on the posts coming back from the API.
We also use the fallback flag to enable fallback routes for dynamic SSG page generation.
We use getStaticProps to enable the Post data to be fetched and then passed into the page as props at build time.
Create a new folder in the pages directory called posts and a file called [id].js within that folder. In pages/posts/[id].js, add the following code:
// pages/posts/[id].js import { useRouter } from 'next/router' import ReactMarkdown from 'react-markdown' import { supabase } from '../../api' export default function Post({ post }) { const router = useRouter() if (router.isFallback) { return <div>Loading...</div> } return ( <div> <h1 className="text-5xl mt-4 font-semibold tracking-wide">{post.title}</h1> <p className="text-sm font-light my-4">by {post.user_email}</p> <div className="mt-8"> <ReactMarkdown className='prose' children={post.content} /> </div> </div> ) } export async function getStaticPaths() { const { data, error } = await supabase .from('posts') .select('id') const paths = data.map(post => ({ params: { id: JSON.stringify(post.id) }})) return { paths, fallback: true } } export async function getStaticProps ({ params }) { const { id } = params const { data } = await supabase .from('posts') .select() .filter('id', 'eq', id) .single() return { props: { post: data } } }
How to query for and render the list of posts
Next, let's update index.js to fetch and render a list of posts:
// pages/index.js import { useState, useEffect } from 'react' import Link from 'next/link' import { supabase } from '../api' export default function Home() { const [posts, setPosts] = useState([]) const [loading, setLoading] = useState(true) useEffect(() => { fetchPosts() }, []) async function fetchPosts() { const { data, error } = await supabase .from('posts') .select() setPosts(data) setLoading(false) } if (loading) return <p className="text-2xl">Loading ...</p> if (!posts.length) return <p className="text-2xl">No posts.</p> return ( <div> <h1 className="text-3xl font-semibold tracking-wide mt-6 mb-2">Posts</h1> { posts.map(post => ( <Link key={post.id} href={`/posts/${post.id}`}> <div className="cursor-pointer border-b border-gray-300 mt-8 pb-4"> <h2 className="text-xl font-semibold">{post.title}</h2> <p className="text-gray-500 mt-2">Author: {post.user_email}</p> </div> </Link>) ) } </div> ) }
Let's test it out
We now have all of the pieces of our app ready to go, so let's try it out.
To run the local server, run the dev command from your terminal:
npm run dev
When the app loads, you should see the following screen:

To sign up, click on Profile and create a new account. You should receive an email link to confirm your account after signing up.
You can also create a new account by using the magic link.
Once you're signed in, you should be able to create new posts:
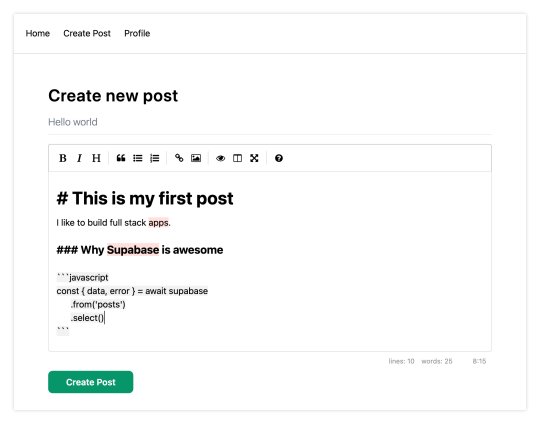
Navigating back to the home page, you should be able to see a list of the posts that you've created and be able to click on a link to the post to view it:

How to Edit Posts
Now that we have the app up and running, let's learn how to edit posts. To get started with this, let's create a new view that will fetch only the posts that the signed in user has created.
To do so, create a new file named my-posts.js in the root of the project with the following code:
// pages/my-posts.js import { useState, useEffect } from 'react' import Link from 'next/link' import { supabase } from '../api' export default function MyPosts() { const [posts, setPosts] = useState([]) useEffect(() => { fetchPosts() }, []) async function fetchPosts() { const user = supabase.auth.user() const { data } = await supabase .from('posts') .select('*') .filter('user_id', 'eq', user.id) setPosts(data) } async function deletePost(id) { await supabase .from('posts') .delete() .match({ id }) fetchPosts() } return ( <div> <h1 className="text-3xl font-semibold tracking-wide mt-6 mb-2">My Posts</h1> { posts.map((post, index) => ( <div key={index} className="border-b border-gray-300 mt-8 pb-4"> <h2 className="text-xl font-semibold">{post.title}</h2> <p className="text-gray-500 mt-2 mb-2">Author: {post.user_email}</p> <Link href={`/edit-post/${post.id}`}><a className="text-sm mr-4 text-blue-500">Edit Post</a></Link> <Link href={`/posts/${post.id}`}><a className="text-sm mr-4 text-blue-500">View Post</a></Link> <button className="text-sm mr-4 text-red-500" onClick={() => deletePost(post.id)} >Delete Post</button> </div> )) } </div> ) }
In the query for the posts, we use the user id to select only the posts created by the signed in user.
Next, create a new folder named edit-post in the pages directory. Then, create a file named [id].js in this folder.
In this file, we'll be accessing the id of the post from a route parameter. When the component loads, we will then use the post id from the route to fetch the post data and make it available for editing.
In this file, add the following code:
// pages/edit-post/[id].js import { useEffect, useState } from 'react' import { useRouter } from 'next/router' import dynamic from 'next/dynamic' import "easymde/dist/easymde.min.css" import { supabase } from '../../api' const SimpleMDE = dynamic(() => import('react-simplemde-editor'), { ssr: false }) function EditPost() { const [post, setPost] = useState(null) const router = useRouter() const { id } = router.query useEffect(() => { fetchPost() async function fetchPost() { if (!id) return const { data } = await supabase .from('posts') .select() .filter('id', 'eq', id) .single() setPost(data) } }, [id]) if (!post) return null function onChange(e) { setPost(() => ({ ...post, [e.target.name]: e.target.value })) } const { title, content } = post async function updateCurrentPost() { if (!title || !content) return await supabase .from('posts') .update([ { title, content } ]) router.push('/my-posts') } return ( <div> <h1 className="text-3xl font-semibold tracking-wide mt-6 mb-2">Edit post</h1> <input onChange={onChange} name="title" placeholder="Title" value={post.title} className="border-b pb-2 text-lg my-4 focus:outline-none w-full font-light text-gray-500 placeholder-gray-500 y-2" /> <SimpleMDE value={post.content} onChange={value => setPost({ ...post, content: value })} /> <button className="mb-4 bg-blue-600 text-white font-semibold px-8 py-2 rounded-lg" onClick={updateCurrentPost}>Update Post</button> </div> ) } export default EditPost
Now, add a new link to our navigation located in pages/_app.js:
// pages/_app.js { user && ( <Link href="/my-posts"> <span className="mr-6 cursor-pointer">My Posts</span> </Link> ) }
When running the app, you should be able to view your own posts, edit them, and delete them from the updated UI.
How to enable real-time updates
Now that we have the app running it's trivial to add real-time updates.
By default, Realtime is disabled on your database. Let's turn on Realtime for the posts table.
To do so, open the app dashboard and click on Databases -> Replication -> 0 Tables (under Source). Toggle on Realtime functionality for the posts table. Here is a video walkthrough of how you can do this for clarity.
Next, open src/index.js and update the useEffect hook with the following code:
useEffect(() => { fetchPosts() const mySubscription = supabase .from('posts') .on('*', () => fetchPosts()) .subscribe() return () => supabase.removeSubscription(mySubscription) }, [])
Now, we will be subscribed to realtime changes in the posts table.
The code for the app is located here.
Next Steps
By now you should have a good understanding of how to build full stack apps with Supabase and Next.js.
If you'd like to learn more about building full stack apps with Supabase, I'd check out the following resources.
If you read this far, tweet to the author to show them you care.
0 notes
Text
Server Side Swift with Vapor: Full Book Now Available!
Great news everyone: Our complete Server Side Swift with Vapor book is now available!
And best yet, you can still grab it at the special release price — for a limited time.
If you’re a beginner to web development, but have worked with Swift for some time, you’ll find it’s easy to create robust, fully featured web apps and web APIs with Vapor 3, and this book will teach you how to do it.
This release adds the last four chapters to round out the book:
Chapter 22: Google Authentication
Chapter 23: Database/API Versioning & Migration
Chapter 25: Middleware
Chapter 26: Deploying with Heroku
What’s Inside Server Side Swift with Vapor?
Here’s the full set of chapters you’ll get in this edition of the book:
Chapter 1: Introduction: Get a quick overview of the history of the Vapor project and how the book is structured.
Chapter 2: Hello Vapor: Beginning a project using a new technology can be daunting. Vapor makes it easy to get started. It even provides handy scripts to make sure that your computer is configured correctly. In this chapter, you’ll start by installing the Vapor Toolbox, then use it to build and run your first project. You’ll finish by learning about routing, accepting data and returning JSON.
Get started with Vapor — no previous web development experience required!
Chapter 3: HTTP Basics: Before you begin your journey with Vapor, you’ll first review the fundamentals of how the web and HTTP operate, including its methods and most common response codes. You’ll also learn how Vapor differs from other Swift frameworks, its benefits, and how it can augment your web development experience.
Chapter 4: Async: In this chapter, you’ll learn about asynchronous and non-blocking architectures. You’ll cover Vapor’s approach to these architectures and how to use them. Finally, the chapter will provide a foundational overview of SwiftNIO, a core technology used by Vapor.
Chapter 5: Fluent and Persisting Models: In Chapter 2, “Hello, Vapor!”, you learned the basics of creating a Vapor app, including how to create routes. Chapter 5 explains how to use Fluent to save data in Vapor apps. You’ll also learn how to deploy your app using Vapor Cloud.
Learn how to deploy your projects up to Vapor Cloud!
Chapter 6: Configuring a Database: Databases allow you to persist data in your apps. In this chapter, you’ll learn how to configure your Vapor app to integrate with the database of your choice. Finally, you’ll deploy your app to Vapor Cloud and learn how to set up the database there.
Chapter 7: CRUD Database Operations: Chapter 5, “Fluent and Persisting Models”, explained the concept of models and how to store them in a database using Fluent. Chapter 7 concentrates on how to interact with models in the database. You’ll learn about CRUD operations and how they relate to REST APIs. You’ll also see how to leverage Fluent to perform complex queries on your models. Finally, like all chapters in this section, you’ll deploy your code to Vapor Cloud.
Chapter 8: Controllers: In previous chapters, you wrote all the route handlers in one file. This isn’t sustainable for large projects as the file quickly becomes too big and cluttered. This chapter introduces the concept of controllers to help manage your routes and models, using both basic controllers and RESTful controllers. Finally, you’ll deploy your code to Vapor Cloud.
Chapter 9: Parent Child Relationships: Chapter 5, “Fluent and Persisting Models”, introduced the concept of models. This chapter will show you how to set up a parent child relationship between two models. You’ll learn the purpose of these relationships, how to model them in Vapor and how to use them with routes. You’ll complete the tutorial by deploying your code to Vapor Cloud.
Easily send test requests and try out your Vapor projects with RESTed!
Chapter 10: Sibling Relationships: In Chapter 9, “Parent Child Relationships”, you learned how to use Fluent to build parent child relationships between models. Chapter 10 will show you how to implement the other type of relationship: sibling relationships. You’ll learn how to model them in Vapor and how to use them in routes. Finally, you’ll deploy your code to Vapor Cloud.
Chapter 11: Testing: In this chapter, you’ll learn how to write tests for your Vapor applications. You’ll learn why testing is important and how it works with Swift Package Manager. Then, you’ll learn how to write tests for the TIL application from the previous chapters. Finally, you’ll see why testing matters on Linux and how to test your code on Linux using Docker.
Chapter 12: Creating a Simple iPhone App I: In the previous chapters, you created an API and interacted with it using RESTed. However, users expect something a bit nicer to use TIL! The next two chapters show you how to build a simple iOS app that interacts with the API. In this chapter, you’ll learn how to create different models and get models from the database.
Build a simple iPhone app to interact with your Vapor backend!
Chapter 13: Creating a Simple iPhone App II: In this chapter, you’ll expand the app to include viewing details about a single acronym. You’ll also learn how to perform the final CRUD operations: edit and delete. Finally, you’ll learn how to add acronyms to categories.
Chapter 14: Templating with Leaf: In a previous section of the book, you learned how to create an API using Vapor and Fluent. This section explains how to use Leaf to create dynamic websites in Vapor applications. Just like the previous section, you’ll deploy the website to Vapor Cloud.
Chapter 15: Beautifying Pages: In this chapter, you’ll learn how to use the Bootstrap framework to add styling to your pages. You’ll also learn how to embed templates so you only have to make changes in one place. Next, you’ll also see how to serve files with Vapor. Finally, like every chapter in this section, you’ll deploy the new website to Vapor Cloud.
Learn how to style your pages with the Bootstrap framework!
Chapter 16: Making a Simple Web App I: In the previous chapters, you learned how to display data in a website and how to make the pages look nice with Bootstrap. In this chapter, you’ll learn how to create different models and how to edit acronyms.
Chapter 17: Making a Simple Web App II: In this chapter, you’ll learn how to allow users to add categories to acronyms in a user-friendly way. Finally, you’ll deploy your completed web application to Vapor Cloud.
Chapter 18: API Authentication, Part I: In this chapter, you’ll learn how to protect your API with authentication. You’ll learn how to implement both HTTP basic authentication and token authentication in your API.
Chapter 19: API Authentication, Part II: Once you’ve implemented API authentication, neither your tests nor the iOS application work any longer. In this chapter, you’ll learn the techniques needed to account for the new authentication requirements, and you’ll also deploy the new code to Vapor Cloud.
Chapter 20: Cookies and Sessions: In this chapter, you’ll see how to implement authentication for the TIL website. You’ll see how authentication works on the web and how Vapor’s Authentication module provides all the necessary support. You’ll then see how to protect different routes on the website. Next, you’ll learn how to use cookies and sessions to your advantage. Finally, you’ll deploy your code to Vapor Cloud.
Chapter 21: Validation: In this chapter, you’ll learn how to use Vapor’s Validation library to verify some of the information users send the application. You’ll create a registration page on the website for users to sign up. You’ll validate the data from this form and display an error message if the data isn’t correct. Finally, you’ll deploy the code to Vapor Cloud.
Learn how to use OAuth 2.0 to authenticate your users!
Chapter 22: Google Authentication: Sometimes users don’t want to create extra accounts for an application and would prefer to use their existing accounts. In this chapter, you’ll learn how to use OAuth 2.0 to delegate authentication to Google, so users can log in with their Google accounts instead.
Chapter 23: Database/API Versioning & Migration: Once you’re in production, you can’t just delete your database and start over. Instead, you can use Vapor’s Migration protocol to cautiously introduce your modifications while still having a revert option should things not go as expected.
Chapter 24: Caching: Whether you’re creating a JSON API, building an iOS app, or even designing the circuitry of a CPU, you’ll eventually need a cache. In this chapter, you’ll learn the philosophy behind and uses of caching to make your app feel snappier and more responsive.
Learn how to create middleware for Vapor to view and modify requests!
Chapter 25: Middleware: In the course of building your application, you’ll often find it necessary to integrate your own steps into the request pipeline, via middleware. This allows you to do things like log incoming requests, catch errors and display messages, rate-limit traffic to particular routes and more.
Chapter 26: Deploying with Heroku: Heroku is a popular hosting solution that simplifies deployment of web and cloud applications. It supports a number of popular languages and database options. In this chapter, you’ll learn how to deploy a Vapor web app with a Postgres database on Heroku.
Chapter 27: WebSockets: WebSockets, like HTTP, define a protocol used for communication between two devices. Unlike HTTP, the WebSocket protocol is designed for realtime communication. Vapor provides a succinct API to create a WebSocket server or client. In this chapter, you’ll build a simple server/client application that allows users to share their current location with others, who can then view this on a map in realtime.
Where to Go From Here?
Here’s how you can get your full copy of Server Side Swift with Vapor:
If you’ve pre-ordered Server Side Swift with Vapor, you can log in to the store and download the complete Server Side Swift with Vapor book here.
If you haven’t yet bought Server Side Swift with Vapor, you can get it at the limited-time, release price of $44.99.
Don’t wait though — the release price is only good until the end of Friday, August 17. I’d hate for you to miss out!
Whether you’re looking to create a backend for your iOS app or want to create fully featured web apps, Vapor is the perfect platform for you.
This book starts with the basics of web development and introduces the basics of Vapor; it then walks you through creating APIs and web backends, shows you how to create and configure databases, explains how to deploy to Heroku, walks you through implementing OAuth 2.0, how to perform nearly effortless migrations, how to work with WebSockets, and more!
The Vapor book team and I truly hope that you enjoy Server Side Swift with Vapor!
The post Server Side Swift with Vapor: Full Book Now Available! appeared first on Ray Wenderlich.
Server Side Swift with Vapor: Full Book Now Available! published first on https://medium.com/@koresol
0 notes
Text
Docker Links
* https://stackoverflow.com/questions/26598738/how-to-create-user-database-in-script-for-docker-postgres
* https://docs.docker.com/compose/rails/
https://stackoverflow.com/questions/35228970/docker-compose-build-single-container
https://www.digitalocean.com/community/tutorials/how-to-run-nginx-in-a-docker-container-on-ubuntu-14-04
https://blog.codeship.com/leveraging-the-dockerignore-file-to-create-smaller-images/
https://blog.blindside.io/developing-a-ruby-on-rails-app-with-docker-compose-d75b20334634
https://github.com/nateleavitt/docker-rails-postgres
https://stackoverflow.com/questions/23724713/installing-postgresql-within-a-docker-container
https://blog.cloud66.com/9-crtitical-decisions-needed-to-run-docker-in-production/
https://stackoverflow.com/questions/48035718/run-ruby-script-in-docker-with-installed-gems
https://stackoverflow.com/questions/30063907/using-docker-compose-how-to-execute-multiple-commands
https://stackoverflow.com/questions/41404436/rails-connecting-to-postgres-with-url-role-does-not-exist
https://stackoverflow.com/questions/26500270/understanding-user-file-ownership-in-docker-how-to-avoid-changing-permissions-o
https://medium.com/the-code-review/run-bash-or-any-command-in-a-docker-container-9a1e7f0ec204
https://www.linode.com/docs/applications/containers/docker-container-communication/
https://vsupalov.com/docker-env-vars/
http://howtocookmicroservices.com/docker-compose/
https://blog.giantswarm.io/getting-started-with-microservices-using-ruby-on-rails-and-docker/
https://medium.com/connect-the-dots/building-microservices-with-docker-and-the-rails-api-gem-2a463862f5d
https://github.com/rails/webpacker/issues/1019
https://blog.codeship.com/running-rails-development-environment-docker/
https://nickjanetakis.com/blog/dockerize-a-rails-5-postgres-redis-sidekiq-action-cable-app-with-docker-compose
https://stackoverflow.com/questions/38623027/what-is-the-difference-between-docker-machine-and-docker-compose
https://stackoverflow.com/questions/28951133/sharing-precompiled-assets-across-docker-containers
https://pkgs.org/download/qt5-default
https://stackoverflow.com/questions/22907231/copying-files-from-host-to-docker-container
https://container-solutions.com/docker-inspect-template-magic/
https://github.com/meltwater/docker-cleanup
https://www.projectatomic.io/blog/2015/07/what-are-docker-none-none-images/
0 notes
Text
Como vincular contenedores docker --link un Ejemplo

Ejemplo «Esto es solo un ejemplo practico»
Se puede hacer con compser docker que tienen incluido wordpress y mysql en yml con un solo comando pero creo que poniendo como ejemplo wordpress y mysql es mas fácil de comprender que esta pasando
El porque de este tutorial
Que tal que tenemos que desarrollar una app con php puro y mysql o con mariadb o postgres o quizás un proyecto laravel o algo que no exista en docker hub y así poder crear nuestras propias imágenes docker . Esto así tendría mas sentido obviamente.
Usare mysql y Wordpress
1) Mysql
Primero hay que descargar en cuestión la base de datos en este ejemplo sera mysql
docker pull mysql
2) Correr Mysql del Docker (yo le llame el-mysql con contraseña 123 con puerto 3306:3306)
sudo docker run -p 3306:3306 --name el-mysql -e MYSQL_ROOT_PASSWORD=123 -d mysql:latest
3) Entrar a myslq y crear una base de datos que luego usaremos para wordpress
sudo docker exec -it el-mysql bash
3.1) Entrar al mysql
mysql -u root -p
3.2) Crear la base de datos
create database wordpress;
3.3) salir
exit
4) Descargar apache con php (yo use webdevops/php-apache-dev:ubuntu-16.04)
docker pull webdevops/php-apache-dev:ubuntu-16.04
5) Vincular contenedores. --link Con este comando le estamos diciendo a docker que MYSQL este vinculado a con webdevops/php-apache-dev:ubuntu-16.04
Este paso es el mas importante (el comando --link)
sudo docker run --name el-wordpress --link el-mysql:aliasmysql -d webdevops/php-apache-dev:ubuntu-16.04
Nota yo les he puesto el nombre el-wordpress y el-mysql con el alias. Estos nombres son con los que voy a inicializar los contenedores.
6) Descargar wordpress de https://es.wordpress.org/
https://es.wordpress.org/
7) Instalar el FTP (vsftpd) dentro webdevops/php-apache-dev:ubuntu-16.04 para entrar fácilmente al volumen físico docker y así poder poner los archivos wordpress dentro.
7.1) iniciar el contenedor por si no esta encendido
sudo docker start e-wordpress
7.2) Entrar a la terminal del contenedor (apache/php con ubuntu)
sudo docker exec -ti el-wordpress bash
7.3) Para que funcione tiene que refrescar los repositorios así que ponemos
apt-get update
7.4) Instalar FTP (vsftp)
apt-get install vsftpd
7.5) Instalar nano para editar la configuración de vsftpd
apt-get install nano
7.6) Editar la configuración del vsftpd
nano vsftpd.conf
7.7) Ubicar la línea listen=NO y cambiarlo por listen=YES
listen=YES
7.8) Ubicar la línea #write_enable=YES quitarle la «#» Para que ya no este comentada.
write_enable=YES
7.9) Crear usuario ftp (en este ejemplo lo he llamado prueba)
useradd -d /home/prueba -m -s /bin/bash prueba
7.10) Colocar le una contraseña
passwd prueba
8) Es hora de ubicar el volumen físico del contenedor docker «el-wordpress»
sudo docker inspect el-wordpress

Donde debe ponerse los archivos de wordpress es en MergedDir en la carpeta «app»
Ejemplo de mi ruta (cada maquina genera un hach diferente) /var/lib/docker/overlay2/6487f9de4b82da771b74619f91f14366430c21eb8254fb39c9bb854689df3e90/merged/app/
9) Poner todo los archivos de wordpress en la carpeta app
10) Cambiar toda la carpeta de app al usuario «prueba» que es nuestro usuario ftp para no tener problemas de escritura.
10.1) cambiarse de directorio
/var/lib/docker/overlay2/6487f9de4b82da771b74619f91f14366430c21eb8254fb39c9bb854689df3e90/merged/app/
10.2) Cambiar las carpetas de usuario de root al usuario ftp llamado prueba
chown prueba -r *
11) entrar con filezilla al ftp para asegurarse que se puede escribir.
Obviamente hay la ip que tenemos asignada en:
sudo docker inspect el-wordpress
Servidor 172.17.0.3
usuario prueba
contraseña la que habéis puesto
puerto 21

12) Ver la ip de Mysql para poder instalar worpress
sudo docker inspect el-mysql
En mi caso es el 172.17.0.2


Eso es todo =)
0 notes
Text
Deploying Mastodon on Digital Ocean

Mastodon is the new social media platform, a decentralized alternative to Twitter that is currently blowing up. This is a step by step guide on how to run your own Mastodon instance on Digital Ocean.
Set up a Droplet
Create a new docker droplet:
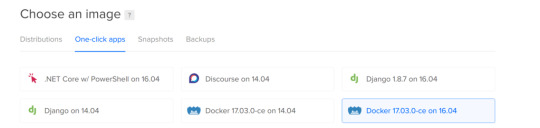
This droplet has almost everything we will need preinstalled.
You will receive an email from DO with the credentials you can use to log in to start setting up the server.
Connect to the server as a root user, using ip and password from the email:
ssh root@[ip-from-email]
You will be prompted to change the default password, so do that.
Then create a new user with the username you like, and grant him the sudo powers:
adduser ray gpasswd -a ray sudo
Connect domain name
Let’s also immediately point your domain name to the droplet. After buying the domain(I recommend using namecheap), change the Custom DNS settings to look like this:

Then, in DO’s networking tab, create a domain, and add an A record pointing to the droplet:

Now you will be able to ssh into your server using your new username and a domain name:
Install and configure basic stuff
Update and upgrade all the software:
sudo apt-get update && sudo apt-get upgrade
Install nginx(we’ll use it to serve our droplet on the right port), and your favorite text editor:
sudo apt-get install nginx emacs
Now let’s add docker to the sudo group, that will allow us to run all the docker commands without sudo:
sudo usermod -aG docker $USER sudo service docker restart
Clone and configure Mastodon
Clone the repo and cd into it:
git clone https://github.com/tootsuite/mastodon.git cd mastodon
Now let’s configure some settings. First, rename the file .env.production.sample into .env.production and open it.
Set the database username/password settings:
DB_USER=your_username DB_NAME=your_databasename DB_PASS=your_password
Set your domain name:
LOCAL_DOMAIN=hackertribe.io
And enable https:
LOCAL_HTTPS=true
Run docker-compose run --rm web rake secret to generate PAPERCLIP_SECRET, SECRET_KEY_BASE, and OTP_SECRET.
Configure the email server
Create a SendGrid account, go to Settings > API Keys, and generate an API key.
Then set up the config like this:
SMTP_SERVER=smtp.sendgrid.net SMTP_PORT=587 SMTP_LOGIN=apikey SMTP_PASSWORD=<your-api-key> [email protected]
(for SMTP_LOGIN literally just use “apikey”)
Configure the site info
Open the file /mastodon/config/settings.yml, and enter the information about your instance(title, description, etc).
Build the containers
Before we can build the containers, we need to add a swap file, without it my $10/month droplet was running out of memory during the build process. To add swap, execute these commands:
sudo fallocate -l 1G /swapfile sudo chmod 600 /swapfile sudo mkswap /swapfile sudo swapon /swapfile
(you can read more in depth about it here)
Now let’s finally build our containers! (It will take a few minutes)
docker-compose build docker-compose up -d
(the -d flag means that we want to run it in the background mode. You can try running it without this flag, and you will see the log of everything that’s going on on the screen)
Create the DB and migrate
Now we need to run several commands in the db container to create the database.
SSH into the container:
docker exec -i -t mastodon_db_1 /bin/bash
Switch to the postgres user:
su - postgres
Create a user for your db(use the username and password you’ve just set in the .env.production)
createuser -P your_username
Create a database, giving the ownership rights to the user:
createdb your_databasename -O your_username
Now you can get back to your own user, and run the migrations:
docker-compose run --rm web rails db:migrate
Precompile assets
Now you can precompile the assets:
docker-compose run --rm web rails assets:precompile
After this has finished, restart the containers:
docker stop $(docker ps -a -q) && docker-compose up -d
And now your mastodon instance will run on yourdomain.com:3000!!
Setting up nginx and SSL
First, follow this guide to generate SSL keys and set up the basic nginx configuration.
Then, because the docker containers are serving the application on the port 3000, we will need to use nginx to proxy all the requests to them.
Create the file /etc/nginx/sites-enabled/mastodon_nginx.conf, and copy the settings from here.
Now, after you restart nginx:
sudo /etc/init.d/nginx restart
It will serve your Mastodon instance!
Conclusion
Congratulations =) Create an account, test thinigs, and invite some people to use your instance!
I also recommend submitting a link to your instance to this list to make it easier for people to discover it.
If something doesn’t work or you have any questions — feel free to email me at [email protected], or toot at me at @[email protected]. I will be happy to help!
Also, everyone is always welcome to join the instance I’m hosting and maintaining — hackertribe.io.
Originally published on my blog. Come subscribe to it for more cool articles and tutorials on web development, programming, startups, and general tech!
Deploying Mastodon on Digital Ocean was originally published in Hacker Noon on Medium, where people are continuing the conversation by highlighting and responding to this story.
Check out more of my posts at https://medium.com/@rayalez
#rationality#technology#science#startups#philosophy#psychology#humor#comedy#funny#article#writing#med
0 notes
Text
youtube
#nodejs express#node js express tutorial#node js training#nodejs tutorial#nodejs projects#nodejs module#node js express#node js development company#codeonedigest#node js developers#docker container#docker microservices#docker tutorial#docker image#docker course#docker#postgres tutorial#postgresql#postgres database#postgres#install postgres#Youtube
0 notes
Text
https://codeonedigest.blogspot.com/2023/07/run-postgres-database-in-docker.html
#youtube#video#codeonedigest#docker#postgres installation#postgres db#postgres tutorial#postgres database#postgres#postgresql#dockercontainers#docker image#docker container#docker tutorial#dockerfile
0 notes
Text
#youtube#video#codeonedigest#microservices#microservice#docker#springboot#spring boot#postgres installation#postgres db#postgresql#postgres tutorial#postgres database#postgres#dockercontainers#docker image#docker container#docker tutorial#dockerfile#spring boot microservices#java microservice#microservice tutorial
0 notes
Text
#youtube#video#codeonedigest#microservices#microservice#docker#springboot#spring boot#postgres installation#postgres db#postgres tutorial#postgres database#postgres#postgresql#dockercontainers#docker image#docker container#docker tutorial#dockerfile
0 notes
Video
youtube
Run Nodejs Microservices in Docker Container with Postgres Database Runn... Full Video Link https://youtu.be/6XrctpaTpDoHello friends, new #video on #nodejs #microservices in #dockercontainer with #Postgres db in #docker #container #dockerfile #dockerimage #sequelize #express #tutorial for #api #developer #programmers with #examples is published on #codeonedigest #youtube channel. @java #java #aws #awscloud @awscloud @AWSCloudIndia #salesforce #Cloud #CloudComputing @YouTube #youtube #azure #msazure #restapi #nodejs #api #restapitutorial @codeonedigest #codeonedigest #docker #nodejs #docker #nodejs #dockertutorial #dockerfile #dockercompose #dockerfilecreation #createdockerimagestepbystep #microservicesdockertutorial #nodejsdockermicroservices #nodejsdockertutorial #nodejsdockerimage #nodejsdockerdeploy #nodedockerfile #nodejsdocker #nodejsdockertutorial #nodejsdockerimage #nodejsdockerfile #nodejsdockersetup #nodejsdockerdevelopment #postgresqlinstallation #postgresqlconnection #postgrestutorial #nodejstutorial #node #dockertutorial #learndocker #dockercompose #postgresqldocker #databaseindocker #databaseindockerproduction #databaseindockercompose #databaseindockercontainer #postgresqlsetup #dockerfile #dockerimagedownload #dockerhubtutorial #databaseimage #downloadpostgresql #downloadpostgresqlandpgadmin #microserviceproject #microserviceprojectusingnodejs #microservicesprojectinnodejs #nodejsmicroservice #nodejsmicroservicestutorial #node
1 note
·
View note
Video
youtube
Create Nodejs JavaScript Microservices Project with Postgres Database in... Full Video Link https://youtu.be/pTFUC6eFMLM Hello friends, new #video on #nodejs #microservices with #Postgresdb in #docker #container #dockerfile #dockerimage #sequelize #tutorial for #api #developer #programmers with #examples is published on #codeonedigest #youtube channel. @java #java #aws #awscloud @awscloud @AWSCloudIndia #salesforce #Cloud #CloudComputing @YouTube #youtube #azure #msazure #restapi #nodejs #api #restapitutorial @codeonedigest #codeonedigest #docker #nodejs #dockertutorial #learndocker #dockercompose #postgresqldocker #databaseindocker #databaseindockerproduction #databaseindockercompose #databaseindockercontainer #postgresqlsetup #dockerfile #dockerimagedownload #dockerhubtutorial #databaseimage #downloadpostgresql #downloadpostgresqlandpgadmin #microserviceproject #microserviceprojectusingnodejs #microservicesprojectinnodejs #nodejsmicroservice #nodejsmicroservicestutorial #node
#youtube#nodejs microservice#nodejs#javascript#microservice#javascript microservice#postgres database#postgresql#docker container#docker image#dockerfile#nodejs microservice with postgres db in docker container
1 note
·
View note
Text
Springboot Microservice in Docker Container with Postgres Database in Docker Container Explained
Hi, a new #video on #springboot #microservices in #dockercontainer with #postgres #database running in #docker #container is published on #codeonedigest #youtube channel. Learn #springbootmicroservices with #postgressql in docker #containers #programming
In this video, we will run springboot microservice and postgres database both in separate docker containers and integrate Postgres database with a Spring Boot Microservice Application and perform different CRUD operations i.e., Create, Read, Update, and Delete operations on the Customer entity. Microservice application container will connect to database container using docker bridge…

View On WordPress
#compass#container#docker#docker container#docker file#docker full course#docker image#docker tutorial#docker tutorial for beginners#dockerfile#microservices#microservices in docker container#microservices postgres#nosql#postgres#postgres database docker#postgres database docker install#postgres database docker setup#postgres database docker tutorial#postgres database docker volume#Postgres database installation#postgres db#postgres installation#postgres java#postgres tutorial#postgres tutorial for beginners#postgressql microservices example#Spring boot#spring boot annotations#spring boot full course
0 notes
Text
Spring Boot Microservice with Postgres Database in Docker Container Tutorial for Beginners
Hi, a new #video on #springboot #microservices with #postgres #database running in #docker #container is published on #codeonedigest #youtube channel. Learn #spring boot microservices with #postgressql in docker container #programming #coding with #codeon
In this video, we will run postgres database in docker container and integrate Postgres database with a Spring Boot Microservice Application and perform different CRUD operations i.e. Create, Read, Update, and Delete operations on the Customer entity. Spring Boot is built on the top of the spring and contains all the features of spring. And is becoming a favorite of developers these days because…
View On WordPress
#compass#container#docker#docker container#docker file#docker full course#docker image#docker tutorial#docker tutorial for beginners#dockerfile#microservices#microservices postgres#nosql#postgres#postgres database docker#postgres database docker install#postgres database docker setup#postgres database docker tutorial#postgres database docker volume#Postgres database installation#postgres db#postgres installation#postgres java#postgres tutorial#postgres tutorial for beginners#postgressql microservices example#Spring boot#spring boot annotations#spring boot full course#spring boot microservices
0 notes