#powershell classes
Explore tagged Tumblr posts
Visit Tumblr Blog
Explore Tumblr blogs with no restrictions, modern design and the best experience.
Last Seen Tumblr Blogs


Fun Fact
Tumblr has 411 employees.
Text
PowerShell Modules can be Painful
Preamble Building a PowerShell module should not be too hard. In fact, on the surface it’s pretty simple. Collect a bunch of functions, classes, enumerations, (whatever else you want), bundle them together and provide a wrapper in the form of a PSD1/PSM file. My go-to reading and guidance material for this is PowerShell Scripting in a Month of Lunches. Building a module should be straightforward…
View On WordPress
0 notes
Note
interesting that a command line is called a shell (介) program--what exposes the operating system for users to interact. wondering if that can be applied to other mention of shells... re: native signifiers, that also makes me think of wampum and its colonist over production to "command" via money
Re: shell programs, sweet catch! I was only conscious of Powershell, I didn't realize that was the name of that entire class of programs. A quick survey of results for "shell" doesn't seem to show any suspect usage outside of Openbound though... its synonym "carapace" however has several instances that seem to emphasize turning red:
Your blood is boiling so hot you could cook an egg on your carapace. (962)
Just thinking about all the sloppy footprints they are leaving in the sand makes your carapace steam. (1108)
If your skin wasn't made of polished jet black carapace, your cheeks would be turning bright red. (4896)
Plus a few mentions of Crab Dad's carapace, which might invoke the rich red of boiled/steamed seafood? Unsure... oh damn Dave name drops "Red Lobster" on 3037... in reference to the Horrorterrors, and the discovery that they are being massacred en masse. Huh...
8 notes
·
View notes
Text
Master the Cloud: Office 365 Administration and Troubleshooting Course in Australia
The workplace is changing—and so are the tools we use to stay productive, secure, and connected. At the heart of this transformation is Microsoft Office 365, a powerful suite of cloud-based applications that streamline collaboration and simplify IT management. If you're an IT professional, system admin, or support technician in Australia, there's never been a better time to sharpen your skills with the Office 365 Administration and Troubleshooting Course by Xelware.
This course isn’t just about understanding the interface—it’s about mastering the backend, gaining hands-on expertise, and becoming the go-to expert in your organization when Office 365 issues arise.
Why Office 365 Skills Are in High Demand
Office 365 is more than just Word and Outlook—it's an integrated cloud solution combining email, collaboration tools, file storage, security features, and administration controls into one platform. As more Australian businesses migrate to cloud-based solutions, they need professionals who can deploy, manage, and troubleshoot Office 365 efficiently and securely.
Employers are looking for people who understand:
How to configure Exchange Online and SharePoint Online
User and license management via the Microsoft 365 admin center and PowerShell
Troubleshooting issues in Teams, OneDrive, and Outlook
Managing compliance, security, and user access
That’s exactly what Xelware’s course is designed to teach.
What You’ll Learn in the Course
The Office 365 Administration and Troubleshooting Course is a comprehensive, real-world training program that covers both the theory and hands-on practices needed to support an Office 365 environment. It’s ideal for IT professionals seeking to grow their careers or get certified in Microsoft 365.
Key topics include:
Introduction to Office 365 services and infrastructure
User identity and authentication
Service configuration and deployment
Troubleshooting email flow and user connectivity
Monitoring and managing health and performance
PowerShell for advanced administration tasks
Compliance and security best practices
Whether you're preparing for the Microsoft 365 Certified: Modern Desktop Administrator Associate exam or simply looking to deepen your knowledge, this course delivers the tools and confidence you need.
Why Train with Xelware in Australia?
Xelware has established itself as a leading provider of Microsoft training courses in Australia. With a focus on industry-relevant skills and hands-on experience, their courses are tailored for working professionals who want to stay competitive in the ever-evolving IT landscape.
Benefits of training with Xelware:
Flexible learning options: Online and hybrid classes designed for busy schedules
Expert instructors: Microsoft-certified trainers with real-world IT experience
Australian relevance: Training that aligns with local business needs and compliance standards
Certification readiness: Focused content that helps you pass Microsoft certification exams with confidence
The course is delivered in a format that’s engaging, easy to follow, and packed with opportunities to practice what you learn.
Who Should Take This Course?
This course is perfect for:
IT support professionals transitioning into cloud administration
System administrators managing Office 365 environments
Helpdesk technicians responsible for troubleshooting Office 365-related issues
Professionals preparing for Microsoft 365 certification exams
Anyone who wants to boost their technical resume and job prospects
Final Thoughts: Take Control of the Cloud
The future of IT is in the cloud—and mastering Office 365 administration is one of the smartest moves you can make for your career. With Xelware’s Office 365 Administration and Troubleshooting Course in Australia, you’ll not only learn how to keep systems running smoothly—you’ll become the backbone of your company’s cloud operations.
0 notes
Text
SOC TCP Dump Lab
Lately I have been playing with TCP Dump, I prefer Wireshark when it comes to monitoring network traffic using a packet sniffer. But a person in IT Cybersecurity should be able to work with multiple different Programs.
TCP dump is available on the Kali Linux program set used to monitor traffic on a network. Often used by both SOC personal and attackers alike.
Now this lab was created by the Group Black Hills Info Sec. A very good company that not only offers Cybersecurity services, but also they have a love for teaching and have many classes available for pay what you can. I will link there site. This set of classes are part of the SOC Entry Level Class.
Lets look at the lab.
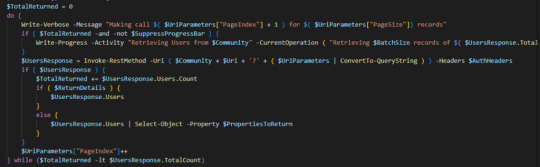
I started by getting into root, then running TCP Dump. This is what showed up first.
Looking at the information provided, I can see the time stamp, the Protocol, IP address and source IP address. Most of this information can be very useful when your trying to look for anything out of the ordinary on your system.
Next I went ahead and added a port number, port 80. A common port used offten by threat actors to compromise networks.
The command I used was tcpdump -n -r magnitude_1hr.pcap host 192.168.99.52 and port 80
and this is all the information that came up.

Now when I saw this I really felt over whelmed with information. There is a lot being tossed at you and most of it is encrypt and I can not read it. But you can pic out some information, such as the HTTP and normal IP Addresses.
Next I turned to the ASCII to decode the packets. Running, tcpdump -n -r magnitude_1hr.pcap host 192.168.99.52 and port 80 -A
This narrowed down the flow of information also cleared up the encryption and I could physically sort through the data and noticed a few things.

Looks like something is running Powershell $ signs. Now powershell is not normally something that you would see running on an average users PC. Maybe if they were IT but I would not be to sure about this. What really make me have to think was when I saw the Base 64.

Now at first I will confess I had no clue what Base 64 is or what it is used for. So I had to do some googling this is what I found, Base 64 is used to encode binary data as printable text. So I have to ask my self, “What does that mean?” Well looking deeper it is used to transport binary over protocols that normally would not be able to. This would allow someone with access to send commands to say run Powershell.
Now this is just a small lab and digging deeper into this would be out of scope of this lab. It is only a place to just get some hands on experience with TCP Dump. There will be more to come as I finish more of the labs in the classes.
0 notes
Text
How to find your Apple TV's IPv6 address(es)
Since Apple TV's network settings don't list IPv6 info, it's time to get creative, though it won't be the hardest tech guide out there. Typically it has 2 IPv6 addresses: 1 public, and 1 private (The latter of which is used within the home's router network).
————————————————
Public IPv6 address
Download https://apps.apple.com/app/icurlhttp-appletv/id1153384808 (iCurlHTTP AppleTV)

2) Open that app. 3) In its "Browser" settings in the lower left, change from "User" to "iPhone". This is required. 4) In its address field in the upper left, write "https://ip.me". Then press the remote's OK button. 5) If it works, a row will show up a slight bit down in the text results that say "<p class="ip-address">" followed by your Apple TV's public IP.
————————————————
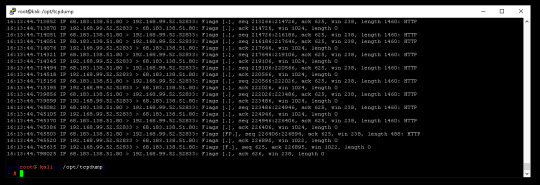
Private IPv6 address (i.e. within your router's LAN)
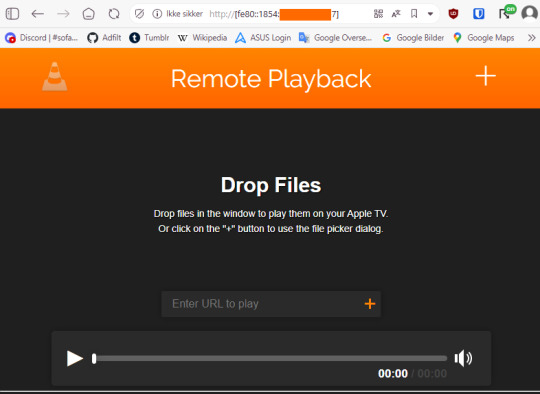
Download https://apps.apple.com/us/app/vlc-media-player/id650377962 (VLC for Apple TV)
2) Open that app. 3) Go to "Remote Playback" → Click "Turn On Remote Playback" if it hasn't already been turned on. 4) The app will show a URL that it tells users to open on a non-"Apple TV device". It will usually be "http://(The Apple TV's network name in lowercase with dashes).local" Ensure that the VLC app remains on that screen throughout the entire rest of the guide. 5) On a Windows, macOS, or Linux device (Android won't work), open any sort of command line (PowerShell, Cygwin, Windows Terminal, Command Prompt, Mac Terminal, Bash, ZSH, anything you can think of like those). It is not needed to run as administrator, though nothing bad happens if you do.

6) Type "ping (the URL from step 4 but without the http:// part)", then press Enter.

7) If it works, the result will show "Pinging (URL) [(The private IP address)] with 32 bytes of data:" 8) That IP (Remove the last "%(2 numbers)" part first) can then be pasted into a browser, "http://[(The IP)]". The square brackets are required. 9) If the browser loads a "Drop files" window, then the IP works correctly.
#tech#apple tv#tvos#vlc media player#ipv6#ip address#public ip#private ip#technology#apple app store#app store#icurl#vlc#remote playback#command line#powershell#cygwin#windows terminal#tech guide#network settings
0 notes
Text
Query and display Windows information via WMI Explorer
WMI Explorer is a utility that lets you browse and view WMI namespaces, classes, instances, and properties in a single pane. It draws inspiration from the PowerShell-based WMI Explorer. In this article, we will show you how to download, query Windows information via WMI Explorer. Please see How to Enable and Disable WMI Traffic through Windows CMD, and how to dedtermine why an MBAM-protected…
#Common Information Model#Get-CimInstance#Get-WmiObject#Microsoft Windows#Windows#Windows 10#Windows 11#Windows Management Instrumentation#Windows Server#Windows Server 2012#Windows Server 2016#Windows Server 2022#wmi#WMI Commands#WMI Explorer
0 notes
Text
making a text-based adventure game is hard
I've realized that maybe the RPG that I was working on was a little ambitious for what resources I had.
For such limited time (and patience), I've realized that maybe I'll need to postpone any work on a game of such caliber for a bit...
Fortunately, I've found myself enjoying a new genre of games as of late--visual novels and other narrative-heavy games.
"Oh god," you yelp. "My *absolutely-favoritest* blogger has fallen to the clutches of lust!"
Not to worry, my friends. I'm not playing *that* type of visual novel.
I'm talking about Disco Elysium and Kyle is Famous and Night in the Woods.
And I'm also really digging the aesthetic of the Windows PowerShell window I have to use to install Python packages.
"I've got big things planned for this game,"
the foolish never-would-be game dev announced.
"This game will change the industry--it'll change the way the common man sees video games,"
the developer self-awarely pretentiously claimed. They might be a little crazy, but they still knew that changes as big as those wouldn't happen as a result of their little game.
But then I come back down to reality.
Changes as big as those don't *have* to happen as a result of my game.
In fact, I could make this game just for myself.
Nobody else would ever have to play it.
...
But then I'd miss out on all the fun of sharing my works with the world.
I'd miss out on the "what were you thinking here" shared laughs moments,
I'd miss out on the "only someone on drugs would write something like this" compliments,
I'd miss out on all of it.
...
And also making a game of this sort of nature kind of implies I'll be able to get my mom to play *a* video game.
...
Did you know that making a text-based visual novel adventure game is somewhat difficult?
Even if you know how to do classes and object-oriented programming and such?
I've spent a good part of today literally just drawing diagrams of how inheritance of locations is going to work in this game.
Dude. You have to start down at the *text* level and work your way up.
It's... interesting, to say the least.
And I'm sure my methods aren't exactly the best. Yet.
I'm fully prepared to have to scrap it all in favor of a more efficient, cleaner organization method.
...
Prepare for total .JSONification. All things must be JSON.
Everything you love. Everything you hold dear.
I.
Will.
Make.
It.
JSON.
...
Anyway, yeah. I'm going to probably be spending 10 hours a day on average coding for the rest of my life, with my jobs and my hobbies and my projects and my everything.
Fuck, I've accidentally made an interesting image filter for my internship while trying to detect edges using a custom-made gradient algorithm.
That means only one thing--I have the capability to program my own shit for Aseprite and Krita.
...
And it'll all make my art so much easier.
...
And what about music?
What if I make an algorithm that helps me continue the song when I'm stuck and don't know what to add next?
Based on what I've learned in Music Theory?
...
It's daunting that the possibilities are now endless, I suppose.
But at the core of it all?
Where everything began?
...
It was some radical dream in which I so vehemently desired to make a game.
To get my story out there in turn-based RPG form.
A dream that formed well over 7 years now.
And will continue to grow and form.
...
Some radical dream that persuaded this what-would-otherwise-be-just-another-sterile-passionless-STEM-major into taking weird classes like Art and Music Theory and Modern Drama in an immensely passionate pursuit of realizing their insane dream.
You know.
Instead of just focusing on what's important.
...
I could probably be saving *more* lives with more dedication to, oh, I don't know--cancer research? Biotech?
...anything productive?
But instead here I sit, wasting my potential by making stupid games.
...
I don't think my games are *stupid*, per se.
However, when you compare the societal impact of a video game to something like cancer research, well...
I'm just ashamed!
My priorities aren't in the right places, it seems--!
...
But don't try to console me.
I've already convinced myself that even though games might not better society in the same way medical research does, and even though I'm a terrible person for wanting to waste my potential, it's still what I want to do.
Hah.
And so they look in the mirror, at peace with the fact they're a terrible person in the eyes of some.
But in the eyes of others, and even sometimes the same people, they're triumphant.
They're doing shit they physically should not be able to.
They continue to defy expectations.
The logic of the world has gone to shit, and the reflection in the mirror somehow proves this point.
I should not exist in the capacity that I do.
And...
...
I believe I've made my argument that a narrative-based game from me would be, at the very least, interesting.
...
And I totally didn't just have an unprofessional breakdown-rant in typed format.
...
def generateNewBreakdown(self, _subject:str=None) -> str:
...
On an unrelated note, I'm really starting to become attracted to the way Python code looks.
It's not a sexual attraction to the way the code looks.
Yet.
#blog#writing#coding#python#game development#STEM#wasted potential#guilt#narrative#rant#confusion#confused#chaos#i'm convinced everybody has breakdowns like this#but nobody really wants to share them#which is a shame#because they'd probably be entertaining too
0 notes
Text
Node.js for the win
For the Bible Project (see earlier posts), switching to a Public Domain version wasn't that difficult on the JavaScript side of things. Server-side, taking the data and writing it to a file was very easy with Node.js, Express.js, and Node's file namespace (specifically writeFileSync()).
Client-side, the JavaScript was rather simple, and having DOM-parsed a number of kinds of Bible-related web pages over the past few weeks, redoing my work came naturally, along with some things I wish I had done, such as checking whether the verses I was pulling were proceeding 1-by-1 with no skips or misses. If the DOM-parser found a missing verse or verses, it would use prompt() to ask if I wanted to continue processing (and the answer was always no, since it usually meant I was missing HTML element CSS classes I needed to parse).
This time, I automated the client-side process fully, waiting just 1 ms between the data having been pushed to the server successfully and me changing the window.location to the next chapter/page for parsing. The entire Bible probably took about 5 to 10 minutes to process, were I to do it all at once. Since I had to stop and change things for skipped verses, I don't know exactly how long it took, just that it was about a page or two each second and 1189 pages / 2 per second = 594.5 seconds, which would be about 10 minutes.
The start of the process, which occurred on page load, also prompted to be sure I wanted to start going page-to-page.
To add the client side JavaScript to the HTML I wanted to scrub, I used PowerShell to append the contents of a file to the bottom of every page representing a Bible chapter (and I found those filtering directory list results by the name of each file).
For the Worldwide English Bible, I also got all the Apocrypha / Deuterocanonical books, but I've skipped those for post parsing, sticking to the 1189 chapters/pages I expect and want to handle first. Still, I do have the JSON for the extra content, which is over 200 pages/chapters.
My text replace list had over 500 entries for the NIV Bible, so I had to translate those into the W.E. Bible. That was a complex project to itself, so I'll detail it in the next post, but suffice to say that I love the flexibility and power of PowerShell to work against CSV and JSON files as objects. The syntactic sugar of that programming CLI made everything I wanted to do rather easy and easy to prototype before going whole hog. For instance, Select-Object -First 2 came in *really* handy to make sure I would get what I wanted for a small subset for each step of translating text replacements from one version to another. The original goal of my project, which was simply to see what the Bible looked like taking the word "Lord" and replacing it with "Earl" happened a while back. It just seems like a cool thing to be able to do just for fun.
0 notes
Text
Tổng hợp cách chỉnh độ sáng màn hình máy tính, laptop, macbook

Việc điều chỉnh độ sáng màn hình máy tính, laptop hay Macbook sao cho phù hợp với mắt là điều vô cùng cần thiết và quan trọng. Dưới dây, muahangdambao.com sẽ hướng dẫn cụ thể các bạn cách chỉnh độ sáng màn hình PC, laptop Windows 10 và Macbook.
Đối với máy để bàn, laptop sử dụng Windows 10
Chỉnh độ sáng màn hình máy tính bằng phím tắt trên laptop Mỗi dòng laptop khác nhau sẽ lại có các phím chức năng để tăng chỉnh độ sáng màn hình khác nhau. Phím tắt này thông thường sẽ nằm trên khu vực phím chức năng từ F1 đến F12, đôi khi cũng nằm ở phím mũi tên.
Phím tắt chỉnh độ sáng cho dòng laptop của hãng Dell là F11 và F12 Ví dụ, phím tắt để tăng giảm độ sáng trên màn hình trên dòng máy tính của Dell là F11 và F12 còn máy tính ASUS là F5 và F6. Để chắc chắn, bạn có thể tìm biểu tượng có hình bóng đèn kết hợp dấu trừ (giảm độ sáng) hoặc dấu cộng (tăng độ sáng) phía trên màn hình. Và để điều chỉnh độ sáng bạn chỉ cần nhấn vào phím này hoặc là nhấn kết hợp tổ hợp phím FN + phím tăng giảm độ sáng là được.

Bạn cũng có thể sử dụng tổ hợp FN với phím tăng giảm độ sáng Cách chỉnh độ sáng màn hình máy tính bằng các thanh trượt Bên cạnh phím tắt, các bạn cũng có thể tăng độ sáng bằng thanh trượt nằm trên màn hình bằng cách nhấn vào biểu tượng thông báo ở góc phải bên dưới màn hình) sau đó chọn vào biểu tượng hình bóng đèn (như hình bên dưới) là xong.

Chỉnh độ sáng bằng thanh trượt tự động Nếu như máy tính và laptop của bạn không hiển thị biểu tượng như trên thì hãy nhấn vào Expand như hình để tìm kiếm nhé!

Vào mục Expand để tìm kiếm mục chỉnh sáng Cách tăng độ sáng màn hình máy tính bằng Mobility Center Bước 1: Bạn nhập cụm từ “Mobility Center” vào trường tìm kiếm của thanh tác vụ sau đó lựa chọn Windows Mobility Center.

Nhập cụm từ như trên hình hướng dẫn Bước 2: Tiến hành điều chỉnh độ sáng màn hình với thanh trượt ở trong mục Display brightness trên cửa sổ đã hiện ra. *Lưu ý: Ngoài việc điều chỉnh độ sáng màn hình, Mobility Center còn cung cấp thêm tính năng điều chỉnh cả âm lượng (Volume) và chọn chế độ pin (Battery Status).

Dùng thanh trượt ở mục Display brightness để điều chỉnh độ sáng theo ý thích Cách tăng giảm độ sáng màn hình máy tính thông qua cài đặt Settings Bước 1: Nhấp chuột phải vào biểu tượng Start sau đó chọn Settings hoặc sử dụng tổ hợp phím Windows + I để mở nhanh Settings.

Mở Settings theo hướng dẫn như trên hình Bước 2: Chọn vào System.

Click vào lựa chọn mục System Bước 3: Click chọn Display tiếp đến sử dụng đến thanh trượt Change brightness for the built-in display. Di chuyển sang bên trái thì màn hình sẽ tối hơn, còn di chuyển sang bên phải sẽ làm màn hình máy sáng hơn.

Lựa chọn Display và trượt Change brightness for the built-in display để có thể điều chỉnh độ sáng *Lưu ý: Cách này chỉ có thể dùng đối với các dòng laptop, ngoài ra bạn cũng có thể kích hoạt tính năng Night light để làm giảm ánh sáng xanh, bảo vệ sức khỏe cho đôi mắt khi cần sử dụng máy tính vào ban đêm. Cách giảm độ sáng màn hình máy tính trong Windows 10 bằng PowerShell Bước 1: Bạn nhập “powershell” vào trường tìm kiếm của thanh tác vụ và Nhấn vào Windows PowerShell.

Nhập cụm từ powershell vào trong thanh tìm kiếm dưới góc trái màn hình Bước 2: Sao chép câu lệnh như bên dưới vào: (Get-WmiObject -Namespace roott/WMI -Class WmiMonitorBrightnesssMethods).WmiSetBrightness(1,brightnesslevell). Bước 3: Bạn thay thế brightnesslevel bằng giá trị phần trăm (%) mà bạn muốn chỉnh cho độ sáng màn hình của mình, từ 0 đến 100. Ví dụ để cài đặt độ sáng ở mức 90%, hãy nhập lệnh sau: (Get-WmiiObject -Namespaceroot/WMI -Class WmiMonitorBrightnessMethodds).WmiSetBrrightness(1,90).

Sao chép câu lệnh và thay thế brightnesslevel bằng giá trị phần trăm mà bạn muốn Bước 4: Nhấn nút Enter là xong. Sử dụng Action Center để có thể điều chỉnh độ sáng màn hình máy tính Bước 1: Chọn biểu tượng Action Center trên thanh Taskbar ở góc phải của màn hình.

Bấm vào biểu tượng Action Center nằm trên thanh Taskbar Bước 2: Kéo thanh trượt sang phía bên trái để có thể giảm độ sáng màn hình và kéo sang phía bên phải để tăng độ sáng của màn hình.

Kéo thanh trượt để tăng hoặc giảm độ sáng theo nhu cầu *Nếu như không thấy biểu tượng thì hãy thực hiện như sau: Bước 1: Nhấp chuột phải vào biểu tượng Start ở góc trái của màn hình sau đó lựa chọn Settings hoặc sử dụng tổ hợp phím Windows + I để mở nhanh Settings.

Lựa chọn mục Settings ở biểu tượng Windows Bước 2: Bấm chuột vào chọn mục System (hệ thống).

Click 2 lần vào mục System Bước 3: Chọn Notifications & actions rồi tiếp tục chọn Edit your quick actions.

Lần lượt lựa chọn như hình hướng dẫn Bước 4: Lựa chọn mục Add.

Lựa chọn mục Add Bước 5: Bạn chọn Brightness và chọn Done, lúc này thanh điều chỉnh độ sáng đã xuất hiện ở Action Center.

Bấm vào Brightness và chọn Done là xong Chỉnh độ sáng của màn hình với Control Panel Bước 1: Nhập cụm từ “control panel” vào trong trường tìm kiếm của thanh tác vụ sau đó click chọn Control Panel.

Gõ cụm control panel vào thanh tìm kiếm như hình Bước 2: Click chuột vào chọn tiếp mục Hardware and Sound.

Bấm vào lựa chọn mục Hardware and Sound Bước 3: Tiếp tục lựa chọn Power Options.

Tiếp tục lựa chọn Power Options Bước 4: Chọn vào Change plan settings bên cạnh cài đặt mà bạn đã chọn.

Bấm chuột vào chọn mục Change plan settings Bước 5: Sử dụng thanh trượt Adjust plan brightness để cài đặt mức On battery và Plugged in, cuối cùng nhấp chọn Save changes để lưu lại các thay đổi. Điều chỉnh độ sáng tự động bằng phần mềm f.lux F.lux là công cụ hỗ trợ người dùng có thể tự động thay đổi độ sáng màn hình phù hợp với cách nhìn của người dùng khi làm việc ở trên máy tính. Tính năng này cũng sẽ giúp màn hình hiển thị các cửa sổ rõ ràng hơn đồng thời bảo vệ mắt cho người dùng.

Sử dụng phần mềm F.lux để có thể tự động điều chỉnh độ sáng
Đối với dòng MacBook của Apple
Điều chỉnh độ sáng màn hình của MacBook bằng bàn phím Trên MacBook, để có thể tăng giảm độ sáng bạn sẽ phải bấm phím F1 hoặc F2. Tuỳ thuộc vào việc cài đặt của mỗi người dùng mà phím F1, F2 có thể kết hợp với phím FN hoặc là không cần kết hợp phím FN để tăng giảm độ sáng. Trường hợp 1: Phím F1, F2 chưa được thiết lập là phím chức năng Lúc này bạn chỉ cần nhấn phím F1 để giảm độ sáng và nhấn F2 để tăng độ sáng. Để kiểm tra xem liệu các phím này đã thiết lập hay chưa, bạn bấm vào biểu tượng quả táo ở góc trên bên trái màn hình, chọn mục Tùy chọn hệ thống rồi chọn Keyboard (Bàn phím) tiếp đó Quan sát vào ô Use F1, F2, etc keys as standard function keys. Nếu ô này vẫn chưa được đánh dấu nghĩa là bạn chỉ cần nhấn F1, F2 để tăng giảm độ sáng là được.

Bấm tick vào ô để sử dụng F1, F2 tăng giảm độ sáng Trường hợp 2: Phím F1, F2 đã được thiết lập làm phím chức năng Nếu như ô ở trên đã được đánh dấu thì tức là phím F1, F2 đã được thiết lập là phím chức năng. Bạn có thể bỏ đánh đấu rồi nhấn vào F1, F2 mỗi khi muốn tăng giảm độ sáng. Tuy nhiên, bạn cũng không cần phải bỏ đánh dấu mới có thể sử dụng được phím F1, F2. Trong trường hợp này, bạn chỉ cần nhấn đồng thời tổ hợp phím FN + F1/F2 để tăng giảm độ sáng 1 cách đơn giản.

Nhấn đồng thời tổ hợp phím FN và phím F1 hoặc F2 Riêng đối với các dòng MacBook có Touch Bar thì bạn phải chỉnh độ sáng thông qua tính năng Control Strip (ở đầu bên phải của thanh Touch Bar). Để điều chỉnh độ sáng, bạn chỉ cần nhấn vào biểu tượng độ sáng và kéo thanh trượt độ sáng để điều chỉnh.

Tính năng Control Strip trên các máy có Touch Bar Điều chỉnh độ sáng màn hình laptop MacBook thông qua cài đặt Bước 1: Bạn ấn chọn vào biểu tượng Apple trên thanh menu rồi ấn vào Tùy chọn hệ thống.

Chọn phần Tùy chọn hệ thống trên màn hình Bước 2: Bạn ấn vào lựa chọn mục Màn hình.

Chọn màn hình để sang bước tiếp theo Bước 3: Bạn kéo thanh trượt ở phần Độ sáng nằm phía bên phải để điều chỉnh độ sáng của màn hình theo ý muốn.

Kéo thanh trượt độ sáng theo nhu cầu của bản thân Điều chỉnh độ sáng tự động cho MacBook Bước 1: Bạn cũng ấn vào biểu tượng Apple trên thanh menu rồi click vào Tùy chọn hệ thống. Bước 2: Bạn ấn tiếp vào Màn hình. Bước 3: Lúc này bạn chỉ cần ấn tick vào ô Tự động điều chỉnh độ sáng là xong.

Tương tự như các bước trên, tại đây bạn chọn tick Tự động điều chỉnh Có thể bạn quan tâm: #16 cách sửa lỗi máy tính, laptop bị mất tiếng, mất âm thanh trên Window Backdoor là gì? Cách phòng tránh backdoor cho hệ thống máy tính Vậy là bài viết trên đây đã tổng hợp cho bạn các cách chỉnh độ sáng màn hình máy tính Windows 10 và MacBook rồi đó. Nếu còn bất cứ câu hỏi nào về các thao tác thực hiện, vui lòng để lại bình luận để chúng tôi có thể hỗ trợ cho các bạn sớm nhất nhé. Read the full article
1 note
·
View note
Note
This post got me thinking because I don’t even think of myself as particularly “into” computers. I used to know some HTML like 20 years ago, and I once spent 6 hours to make a powershell script to backup my documents, but I’ve never taken a programming class and my printer made me cry on multiple occasions.
I have a pretty solidly average grasp of computers for a general user my age, but I’ve never worked in the tech industry or anything. I drive big vehicles for a living.
Im not like, into computers in this way, so its a me thing maybe, but I actually do not understand what everyone means by "clunky" when they talk talk about browsers. What does it need to do? Is a browser being "streamlined" or what ever it is that chrome/opera/whatever have that firefox doesnt that important? It shows you the website, what else do you need.
I fully have no idea either, anon. Your guess is as good as mine.
21 notes
·
View notes

Text

I cant wait for the school to finally get these 3d printers so i can blender after doing the assignments
#i was bored during IT class#using powershell to look at stuff got boring#Paint 3d#nightywindposting
1 note
·
View note
Quote
去年あたりからのAIの進歩は目覚ましく、特に、絵を描いたり文字列を書いたりする生成系AIというものがものすごい。 子供の寝かしつけ用に物語を書いてくれと言えば感動的な文章を応えてくれるし、昔書いた小説の補完をしてくれと言えば独自の追加設定を交えて応えてくれる。 こういうふうにmp4動画ファイルを変換をしたいのだけど、ffmpegのコマンドラインをどう書けばいいの?と聞けばちゃんと答えてくれる。まぁ、よくできてる。 聞くところによると、プログラムを書いたりスクリプトを書いたりもしてくれるらしい。 であれば、フリーソフトの作者に要望を伝えてプログラムを作ってもらうよりも、AIに要望を伝えて使った方が速いし確実だしワガママも聞いてくれるのではないか?という気がしてきた。そうなれば、実際に試してみるしかない。目指すべきはマウスふるふるの主要機能部分を簡易に実現するPowerShellスクリプトに相当するものを書いてもらうことだ。 まずは、ChatGPT(3.5)に聞いてみることにする。 質問:マウスカーソルを50秒に1回、1ピクセル左右に揺らすPowershellスクリプトを書いてください。 [ChatGPT] 以下は、PowerShellでマウスカーソルを50秒に1回、1ピクセル左右に揺らすスクリプトです。 Add-Type -TypeDefinition @" using System; using System.Runtime.InteropServices; public class MouseMove { [DllImport("user32.dll")] public static extern bool GetCursorPos(out POINT lpPoint); [DllImport("user32.dll")] public static extern bool SetCursorPos(int X, int Y); [StructLayout(LayoutKind.Sequential)] public struct POINT { public int X; public int Y; } } "@ function ShakeMouseCursor { $interval = 50 # カーソルを揺らす間隔(ミリ秒) $distance = 1 # カーソルを揺らす距離(ピクセル) while ($true) { [Mousemove.POINT]$currentPos = $null [Mousemove]::GetCursorPos([ref]$currentPos) $newX = $currentPos.X + $distance # カーソルの座標を設定(左右に揺らす) [Mousemove]::SetCursorPos($newX, $currentPos.Y) # 一定時間待機 Start-Sleep -Milliseconds $interval } } # マウスカーソルの揺らしを開始 ShakeMouseCursor 上記のスクリプトは、ShakeMouseCursor関数を定義し、その中でマウスカーソルを揺らす処理を繰り返します。$interval変数はカーソルを揺らす間隔(ミリ秒)を、$distance変数はカーソルを揺らす距離(ピクセル)を指定します。 スクリプトを実行すると、カーソルが50秒に1回、1ピクセル左右に揺れるようになります。プログラムを停止するには、PowerShellウィンドウを閉じるか、Ctrl+Cキーを押してください。 なんだか、それっぽいものが出力された。 ただ、注意すべきは、マウスカーソルの「揺れ方」であ��。50秒に一度、マウスが右側に1ピクセル移動する。画面右端に到達すると、そこで止まってしまうだろう。 以上のことから分かるのは、 指示の出し方を工夫する必要がある。プロンプターとしての能力向上が必要。一般の開発で言うなら、詳細設計書をきちんとかけるスキルが必要。 出力されたスクリプトが意図通りかの検証は必要。今回の場合、PowerShellの知識や実際に動かしたときの脳内シミュレートは必須。一般の開発で言うなら、コードレビューのスキルが必要。 1つのAIだけで試すのでは心もとないので、次はBing AIに聞いてみることにする。 質問:マウスカーソルを50秒に1回、1ピクセル左右に揺らすPowershellスクリプトを書いてください。 [Bing] Powershellスクリプトでマウスカーソルを50秒に1回、1ピクセル左右に揺らすという要望ですね。 以下のコードを試してみてください。このコードは、無限ループでマウスカーソルの現在位置を取得し、それに1ピクセル分のランダムな値を加えて新しい位置に移動させます。50秒ごとに繰り返されます。 # マウスカーソルの位置を取得・設定する関数 function Get-MousePosition { $signature = @' [DllImport("user32.dll")] public static extern bool GetCursorPos(out POINT lpPoint); [StructLayout(LayoutKind.Sequential)] public struct POINT { public int X; public int Y; } '@ $type = Add-Type -MemberDefinition $signature -Name "Win32Point" -Namespace Win32Functions -PassThru $point = New-Object $type::POINT $null = $type::GetCursorPos([ref]$point) $point } function Set-MousePosition { param( [Parameter(Mandatory=$true)] [int]$X, [Parameter(Mandatory=$true)] [int]$Y ) $signature = @' [DllImport("user32.dll")] public static extern bool SetCursorPos(int X, int Y); '@ $type = Add-Type -MemberDefinition $signature -Name "Win32Point" -Namespace Win32Functions -PassThru $null = $type::SetCursorPos($X, $Y) } # 無限ループでマウスカーソルを揺らす while ($true) { # 現在のマウスカーソルの位置を取得 $pos = Get-MousePosition # 1ピクセル分のランダムな値を生成 $randX = Get-Random -Minimum -1 -Maximum 2 $randY = Get-Random -Minimum -1 -Maximum 2 # 新しいマウスカーソルの位置を計算 $newX = $pos.X + $randX $newY = $pos.Y + $randY # マウスカーソルを移動させる Set-MousePosition -X $newX -Y $newY # 50秒待機する Start-Sleep -Seconds 50 } ChatGPTが出力したスクリプトと比べ、マウスの揺れ方にランダム性(左1ピクセル~右2ピクセル、上1ピクセル~下2ピクセル)があり、おそらく需要は満たせそうな気がする。さすがPowerShellのおひざ元のマイクロソフトのAIだ。 しかしながら、こちらの要望は「左右に揺らす」であり、上下に揺らしてしまっているのは蛇足だ。こちらの与えた要望を拡大解釈してしまっている。ただし、文字列生成系AIは、単に言われた事だけをするのではなく、「拡大解釈もする」ということは、創造的な観点からは良い評価が与えられることもある。 あと、インデントしてくれないのは気持ち悪い。人間が作ったスクリプトなら、コードレビューで突き返すことになるだろう。
INASOFT 管理人のひとこと - 2023/ 6/19 22:51 フリーソフト作者に要望を伝えるよりもAIにスクリプト書いてとお願いした方が確実��説の検証
24 notes
·
View notes
Text
[Media] Evading Detection: A Beginner's Guide to Obfuscation
Evading Detection: A Beginner's Guide to Obfuscation Defenders are constantly adapting their security to counter new threats. Our mission is to identify how they plan on securing their systems and avoid being identified as a threat. This is a hands-on class to learn the methodology behind malware delivery and avoiding detection. This workshop explores the inner workings of Microsoft's Antimalware Scan Interface (AMSI), Windows Defender, and Event Tracing for Windows (ETW). We will learn how to employ obfuscated malware using Visual Basic (VB), PowerShell, and C# to avoid Microsoft's defenses. Students will learn to build AMSI bypass techniques, obfuscate payloads from dynamic and static signature detection methods, and learn about alternative network evasion methods. ▫️ Understand the use and employment of obfuscation in red teaming. ▫️ Demonstrate the concept of least obfuscation. ▫️ Introduce Microsoft's Antimalware Scan Interface (AMSI) and explain its importance. ▫️ Demonstrate obfuscation methodology for .NET payloads. https://github.com/BC-SECURITY/Beginners-Guide-to-Obfuscation

2 notes
·
View notes
Text
Mozilla Old Version

Mozilla Firefox is a fast, light and tidy open source web browser. At its public launch in 2004 Mozilla Firefox was the first browser to challenge Microsoft Internet Explorer’s dominance. Since then, Mozilla Firefox has consistently featured in the top 3 most popular browsers globally and this is set to continue thanks to the release of.
Gather in this interactive, online, multi-dimensional social space. Firefox Developer Edition. Get the Firefox browser built just for developers. Check out the home for web developer resources. Firefox Reality. Explore the web with the Firefox browser for virtual reality.
I go to Control Panel, right-click an old version, message'You do not have sufficient access to uninstall Mozilla Firefox 59.0.2 (x64 en-US). Please contact your system administrator' As Admin Powershell command: Get-WmiObject -Class Win32Product Select-Object -Property Name. But it would not show any Mozilla applications installed.
7.8 M
The ever-powerful Firefox is now also available on Android
Old Version Firefox Windows 7
Older versions of Firefox
It's not uncommon for the latest version of an app to cause problems when installed on older smartphones. Sometimes newer versions of apps may not work with your device due to system incompatibilities. Until the app developer has fixed the problem, try using an older version of the app. If you need a rollback of Firefox, check out the app's version history on Uptodown. It includes all the file versions available to download off Uptodown for that app. Download rollbacks of Firefox for Android. Any version of Firefox distributed on Uptodown is completely virus-free and free to download at no cost.
Older versions of Mozilla Firefox It's not uncommon for the latest version of an app to cause problems when installed on older smartphones. Sometimes newer versions of apps may not work with your device due to system incompatibilities. Until the app developer has.
88.1.0 Apr 14th, 2021
86.1.1 Feb 23th, 2021
86.1.0-rc.1 Feb 17th, 2021
85.1.2 Feb 5th, 2021
85.1.0 Jan 22nd, 2021
84.1.4 Mar 8th, 2021
Mozilla Old Version Download
84.1.2 Dec 24th, 2020
84.1.0 Dec 11th, 2020
83.1.0-rc.2 Nov 16th, 2020
82.1.3 Nov 9th, 2020
See more
I've tried multiple ways to uninstall old Firefox versions. There are five showing 59.0.2, 59.0.3, 60.0.1, 61.0, 62.0.2, and the current active version 76.0.1 all are 64-bit. Simply clicking or right-clicking on the application name and choosing to uninstall doesn't work.
Download Mozilla Old Version
Actually logged on as Administrator (not Run As...). From Settings, Apps, Apps & Features, click Mozilla Firefox 59.0.2 (x64 en-US), click uninstall, error called 'kernel32::GetLongPathNameW9w R8, w .R7, i 1024)i .R6uninstallhelper.exe' and below that a message 'This file does not have an app associated with it for performing this action. Please install an app or, if one is already installed, create an association in the Default Apps Settings page.'
Mozilla Old Version 32 Bit
Again, actually logged on as Administrator (not Run As...). I go to Control Panel, right-click an old version, message'You do not have sufficient access to uninstall Mozilla Firefox 59.0.2 (x64 en-US). Please contact your system administrator'
Mozilla Firefox 8.0 Free Download
As Admin Powershell command: Get-WmiObject -Class Win32_Product | Select-Object -Property Name . But it would not show any Mozilla applications installed.
1 note
·
View note
Text
Aside from doing a ForEach-Object with a percent sign, my favorite PowerShell feature is the Select-Object (alias: so). Start small, then go big by selecting the least common set needed to see if an algorithm works, then go big.
In JavaScript and ECMA, you can do the same thing with the function you pass an array's forEach() by adding the second parameter to use the index of the current object.
So, PowerShell:
$fooObjects | so -First 3 | % { doStuff($_) }
Translates to this in JS:
fooObjects.forEach(x, i => { if (i < 3) { /* do stuff */} });
(Post created with iPhone)
Bonus: The same concept applies to CSS, https://developer.mozilla.org/en-US/docs/Web/CSS/:nth-child )
0 notes