#s4tutorial
Explore tagged Tumblr posts
Visit Tumblr Blog
Explore Tumblr blogs with no restrictions, modern design and the best experience.
Last Seen Tumblr Blogs


Fun Fact
The Tumblr app for Google Glass was released on May 16, 2013.
Note
Hey! Hope you're having a lovely day! I was wondering if you could share how you take your in-game pictures? (or maybe if you have some tips on how to...) They always look really good!
Hey! Thank you! Hope you too :3
I think I could share some basis 🤔
1) Ultra settings only!
2) SRWE – is your best friend if you want to take high quality screenshots. Without it in-game screenshots are pretty blurry on the distance 😔
Here is the YouTube tutorial.
3) HQ mod? You don’t actually need it, SRWE and ultra settings are enough (especially for maxis match and maxis mix style).
4) You totally need to check out better in-game lighting mod by northernsiberiawinds! It’s really awesome! Escpecially for outdoor screenshots 🌻
5) ReShade and GShade are your friends too! I regret I ignored it before 😅 For now I'm using GShade.
Here is the YouTube tutorial.
6) For making outdoors screenshots I normally put my sims in the shadow areas. The lighting there is less bright and more smooth. I add shadows in the scene by just putting random tree with tool by tmex.
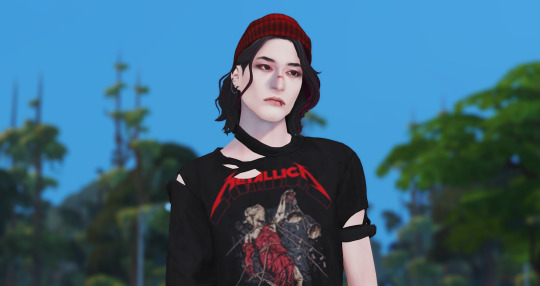
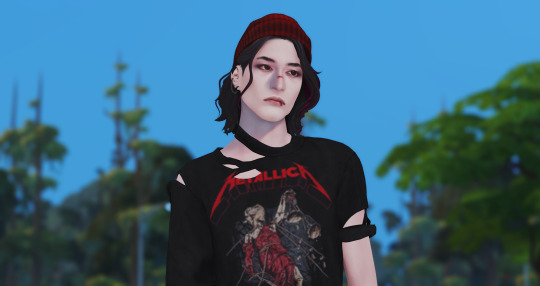

7) For in-door screenshots I highly recommend to use the achino lamps (only recently discovered that they are free now). They also make lighting much smoother and cooler.
srwe + ghade + achino lamps (click picture for better quality)
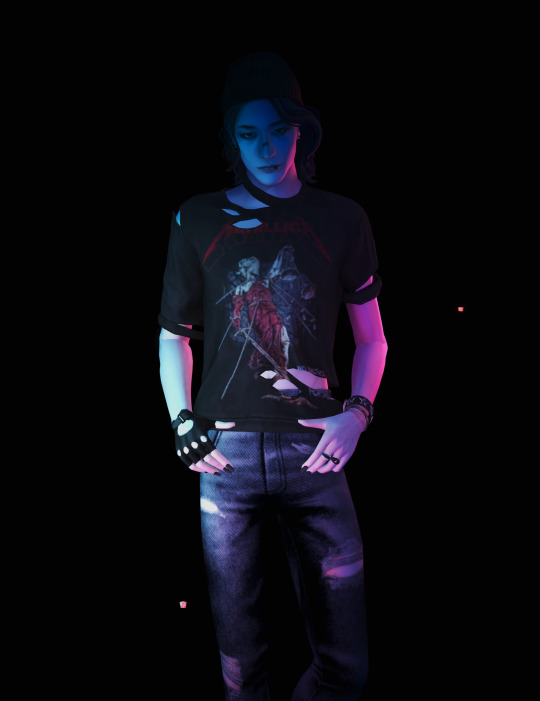
no srwe + no gshade / srwe + gshade (click pictures to feel the difference)
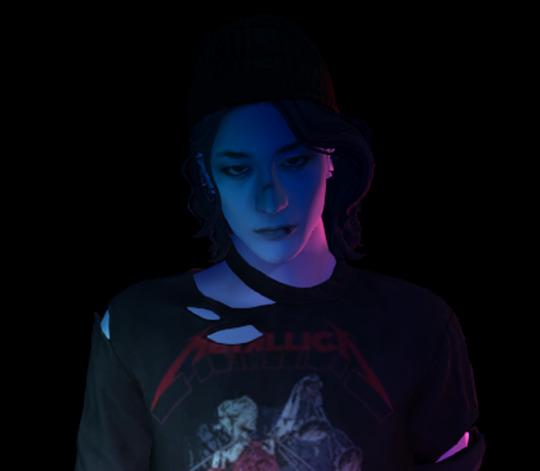

8) And don't hesitate to use diffents shadows, reflections for your sims to avoid adding them in photoshop or any editing program you use.
Here is some links: 1 | 2 | 3 | 4 | 5 | 6
Hope it helps 🤗
139 notes
·
View notes
Text
i need this later
Small guide on CAS Poses
Last updated: 25. July 23
This will be a tutorial on how you can organize your CAS poses. I will give you an overview of which traits have which animations and I will show you how you can change the trait the CAS pose replaces.
━━━━━━ ・❪ ☾ ❫ ・ ━━━━━━
Q: What are CAS poses? A: CAS poses are used to take pretty screenshots in CAS. They replace the normal animations that play when you select any trait. This works for all ages of Sims and also pets, but it does not work for occult forms, as you cannot change traits while in occult form.
Pose by @catsblob

Which CAS traits use which animations
First I will be listing all CAS traits with the name of their animation from Sims4 Studio. Some traits share the same animation, therefore you can't have animations for all of them.
You can find the Google spreadsheet here: https://docs.google.com/spreadsheets/d/1eYwZzo_tBA-vhxFXz4ANd0n075Ls_cEbfiQlaM0QNtU/edit?usp=sharing
━━━━━━ ・❪ ☾ ❫ ・ ━━━━━━
How to organize your CAS poses
I wrote down the name of the CAS traits in front to make sure i don't use the same ones multiple times and kept the original name of the CC.
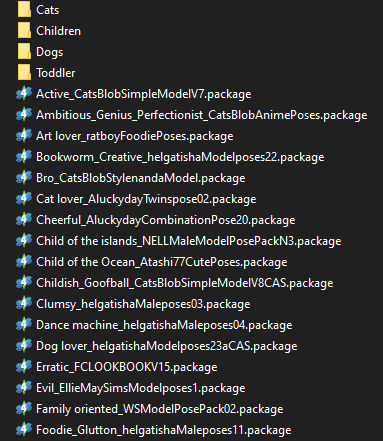
It's also nice to write down which traits you still can use for CAS poses (I crossed the traits out as I don't own the packs yet):
━━━━━━ ・❪ ☾ ❫ ・ ━━━━━━
How to change which CAS trait poses use
Most pose creators offer 1 or 2 CAS traits for their CAS poses, but if you already have poses installed for those, you can easily change that to any other CAS trait.
Requirements:
S4 Studio
The CAS pose you want
The trait you want to use
1. Download and install S4 Studio 2. Download the poses you want
3. Open up your downloaded pose and go into the warehouse tab.
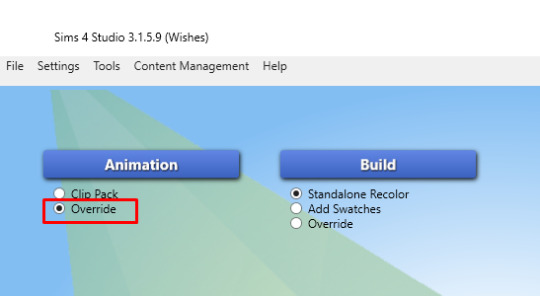
4. Open a second S4 Studio, select “Override” under “Animation” in the main menu.
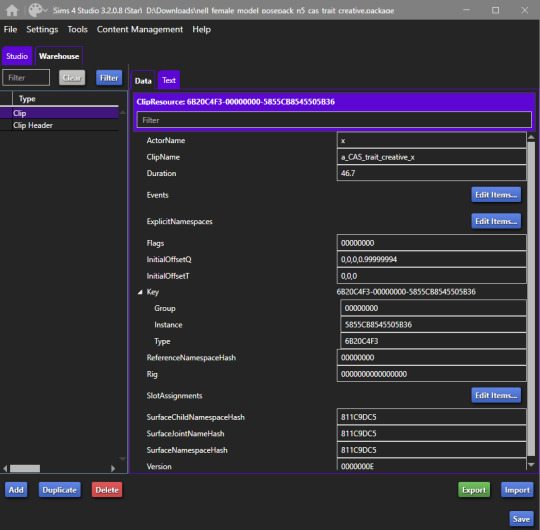
5. Select the animation name according to the spreadsheet of which trait you want to replace. I will just use the trait "Proper" for adults, so I select "a_CAS_trait_proper_x"
6. Save the file as whatever, you only need it for values and not the file itself. This is your Source. Then also go into the warehouse tab.
7. Now you need to copy over the values in "ClipName" and "Key-Instance" from the source file to the animation you want to change the traits in. They text after "Key" will change automatically later.
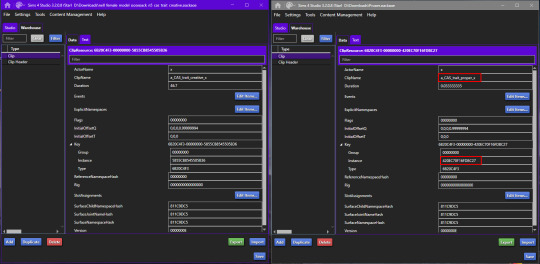
8. Now do that for both Types "Clip" and "Clip Header".
9. The Warehouse should now look exactly the same for both files.
10. Rename the animation files to however you organize your animations. I will add "Proper_" as a prefix for my package (see "How to organize your CAS poses" above).
11. Done!
━━━━━━ ・❪ ☾ ❫ ・ ━━━━━━
Bonus: My favorite CAS pose creators
@catsblob @helgatisha @nell-le @ratboysims @roselipaofficial @a-luckyday
━━━━━━ ・❪ ☾ ❫ ・ ━━━━━━
@maxismatchccworld @sssvitlanz @emilyccfinds
#sims 4#s4 studio#sims 4 tutorial#sims 4 cas poses#sims 4 cas poses tutorial#s4tutorial#s4guide#sims4#ts4#s4#sims tutorial#yorututorials
360 notes
·
View notes
Text
Hi! I recently found out about this blender trick to easily remove splits in a hair mesh when exported. When you export a hair using sims 4 studio, it will be split along the uv borders, but it will also be split on multiple other places, causing weird cuts all over the hair in game.
This tutorial will show you how to keep the hair split between the different parts, while removing the cuts and doubles in the middle of the uv islands. Continued under the cut.
1. Make sure everything is selected, and then select “Remove Doubles”. This will remove all duplicates, but will also remove the splits between the islands, making it look like a big pile of clay.

2. Press space, and then type in “Seams from Islands” and select it. You will se that the edges that you want to be split are now red.

3. Go into edge select mode and press a to deselect everything. Now select one edge that is marked as a seam (an edge that is red). Press shift + g and select “Seam”. Now all the seams will be selected.

4. Now press ctrl + e to pull up the edge panel. Choose “Edge Split”. Now all the seams will be split.

Voila! You have now removed the doubles on the hair while leaving the uv island edges alone! You can now clear the seams and continue working on your hair!!

I hope that you could understand my horrible explaining and find this tutorial useful!!
@thefoxburyinstitute
447 notes
·
View notes
Text
Gif Tutorials
Hardly anyone asked for these but I’m finally sharing anyway lol
Here are two tutorials I made on how to make gifs! They’re both fairly basic (and I’m no expert), but I think they do good on sharing the basics of gif making.
Below are the programs I use. I would say no prior knowledge of them is needed, but it would help to be at least a bit familiar: -OBS -Openshot video editor -Photoshop
*OBS and Openshot I only use for recording and editing video; if you are making gif from still images, you do not need them
**Only first video has audio (just a simple song I put on it), the other does not. If you find yourself struggling to follow along with the video or just need more explanation to processes, I recommend reading the doc I share at end of post! I also recommend watching the videos in full screen mode to see everything clearly
First video: In this video, I show how I made the Victor and Yamachan gif aka how to make a gif from video. It’s pretty short, tho there is some parts where my internet lagged while filming,, It also shows how to export a gif and settings I use
https://drive.google.com/file/d/1lRu1_rYnifYeat6XbgtOUOmHqQE9ZSPb/view?usp=sharing
Second video: In this video, I show how I did the glitch effect for the one zombie hospital gif. Glitch effect aside, it also demonstrates how to make a gif from still images.
https://drive.google.com/file/d/1j6UBEO2Bhtq8rBwdO9rIBw7QksxSGAe4/view?usp=sharing
Lastly, here is a written version of the second video as well as how to export a gif and the settings used: https://docs.google.com/document/d/1VOfNHpeefQJY0OVfJ3JBAltqw0J_UJBIeCxC_QqgVrU/edit?usp=sharing
I may remake these in future or change links to be on youtube but i’m too lazy rn and this works fine
Please feel free to hmu if you have any questions! Sorry about the wall of text,,
#ts4 tutorial#gif tutorial#my tutorials#s4tutorial#sims4#idk how all to even tag this lol#youtube is being slow with uploading videos so i just kept drive links#hopefully this helps someone#i have no speaker so yeah thats why no audio#and why i made doc
57 notes
·
View notes
Text
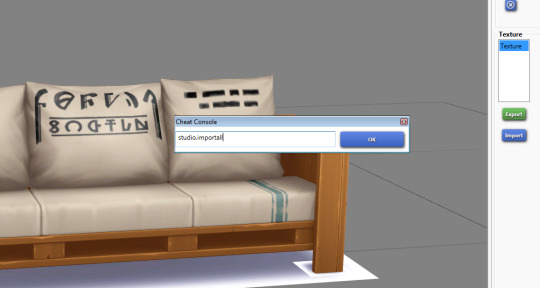
#s4tutorial
Sims 4 Studio Batch Export/Import Cheats
I’m minded not everyone may know about the batch export and import cheats in Sims 4 Studio. They make it a lot, lot easier to get your files in and out of the program (which is especially welcome when making walls and/or anything with a lot of swatches).
Here’s how it works:
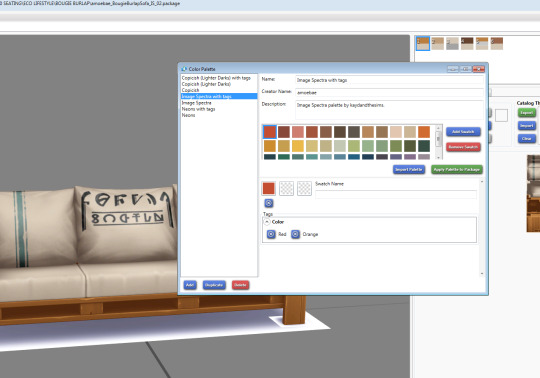
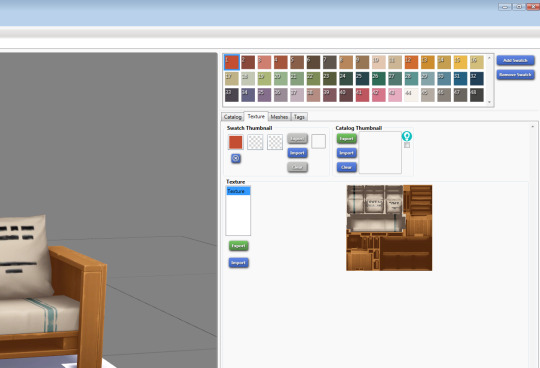
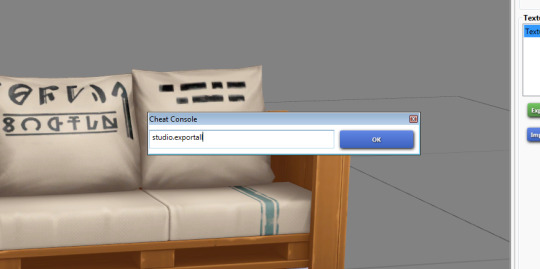
Step 1: Open S4S and ready your package by creating your swatches (the easiest way to do this is to load a colour palette you’ve already prepared using Tools > Color Palette but you can do it manually if you need to)
Step 2: Once you have your swatches in place, press CTRL+SHIFT+C (the same command to open the cheats window in TS4) and type studio.exportall
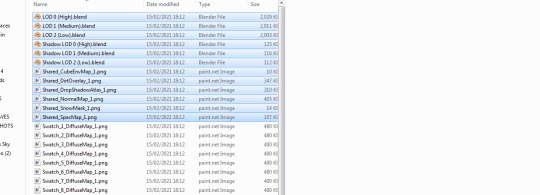
S4S will create a folder in the same location as your package that has all the various texture files associated with your package in PNG format.
Go into that folder and delete everything that isn’t a main diffuse texture (all the files highlighted in the picture below are the ones you want to delete). You’ll be left with the same amount of identical diffuse textures as there are swatches in your package.
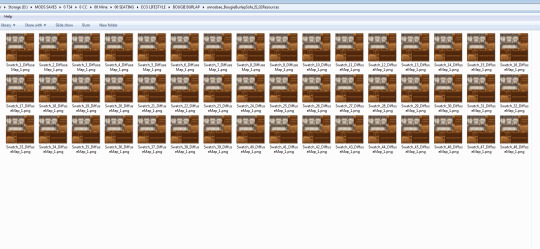
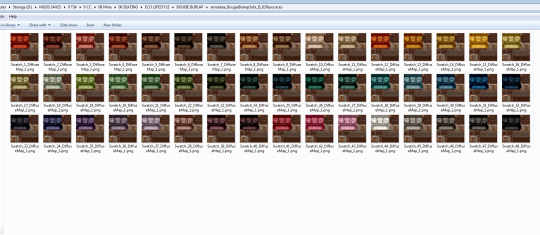
Step 3: Create your recolours/textures and save them with the file names of the corresponding diffuse textures/swatches you have in the folder S4S made. (You have to save them as PNG.)
Step 4: This is why it’s important to save the files in the same folder and with the names S4S created. Go back to S4S and in the cheats window (CTRL+SHIFT+C) type studio.importall and watch as it imports all of those nice new textures for you. It will likely throw an error at the end, but you can safely ignore it and close the error window (close it with the little red x in the top right corner).
(At first you won’t see any change. You have to click on a new swatch to see it’s imported them all.)

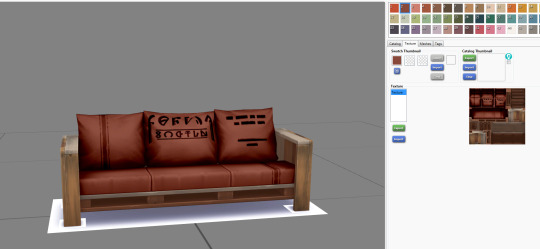
You’re done! You now have 48 (or a far more sensible number of) nice new textures and can save your package and check it in game.
This works for all objects and walls and floors. I haven’t tried it on cas objects because I don’t make them.
Sometimes when importing wall textures if you’ve been using S4S for a while its memory can get a little overloaded and it won’t import them all. If this happens you can either close the program and start again, which will clear the memory, or you can just keep typing the batch import cheat and eventually it will import them all. It just needs a little coaxing.
And for walls and floors S4S will automatically create the thumbnails for you. You still have to generate them yourself for all other objects by viewing them in game (or add your own in S4S).
This makes creating recolours in particular quick and easy. The most time consuming part is doing the recolouring itself. Gone are the days of individually importing hundreds of textures.
2K notes
·
View notes
Photo
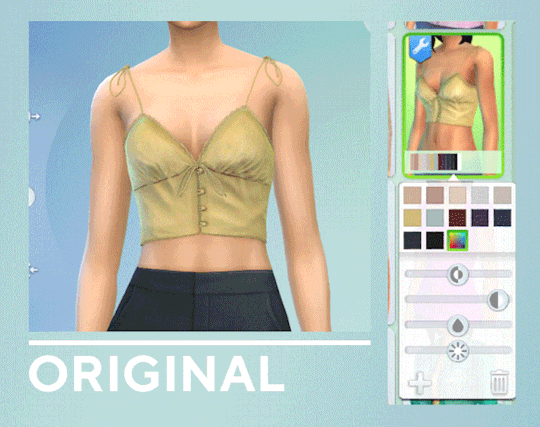
PSA - For CAS CC creators: How to make your CC colour wheel compatible.
This tutorial is a WIP and may change. All of this stuff is really new so expect some bumps along the way, and if you have any issues with this please let me know so I can improve the tutorial!
Before we start, this tutorial only shows you how to add one colour wheel swatch to your CC (although you could add as many as you want). The reasons I’m not showing you how to make all the swatches compatible is because...
Pancake is already working on a converter program for this.
The file size would double (LRLE is around 2x the file size of RLE2) - this especially sucks for HQ textures that already have huge file sizes.
LRLE textures have noticeable artifacting/pixelation in comparison to RLE2 - this may be fixed in the future.
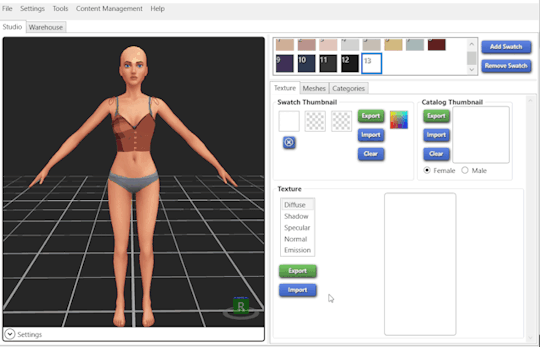
Also, in case you didn’t know, RLE2 is the image format that in-game textures use, and LRLE is the new image format that supports colour sliders (it’s what makeup and skintones use now), and is what we’re using for our colour slider swatch.
For this tutorial you need the latest version of S4S, and the Colour Slider mod by thepancake1 & @mizoreyukii (just the UI package). Got that? Alright, let’s get started..
Step 1: Add a new swatch. I added a custom swatch thumbnail so it’ll be easy to identify in game which one it is.

Step 2: Next we need to change the swatch to LRLE format.
First, you need to find the RLE2 image in warehouse of the swatch you just added. If you can’t find your RLE2 image, import some unique texture to the swatch so you can find it by looking at the previews.
For the next bit you need an empty LRLE image, which you download here - SFS / MEGA
Then, going into the data of the RLE2 image, change the type to ‘00000000’. This will make it undefined, so you can then import the empty LRLE image in the image tab (which will save s4s from crashing later), and then save your package. When you import the LRLE file, make sure you switch file explorer from .binary to all filetypes so you it lets you import the file.

Next, you go back into data and change the type to ‘2BC04EDF‘, and save again. This will make it an LRLE image.

Step 3: Next you need your colour slider swatch texture - I recommend using a bright-ish yellow or green texture as they should look the best with the sliders (red and blue textures are darker and may be more pixelated).
Then, export your texture to either .png or an uncompressed DDS - they look the same so I recommended just using .png.
After, just import the texture. If you get an error when importing, you may need to close and reopen your package (this should refresh the swatch and kick S4S into gear).
Step 4: Now you have a fully functional colour slider swatch! Note that all the other swatches will only work with the opacity slider like any RLE2 textures.
Here is a gif of how it works in-game (tumblr won’t let me embed it).
If you want more colour slider swatches, just hit add swatch while you have the first swatch selected and it will duplicate it.
Extra Note - You do not need the colour slider mod to now use this CC, it’s just that if users have the mod installed they are able to use the sliders on the swatch.
296 notes
·
View notes
Text
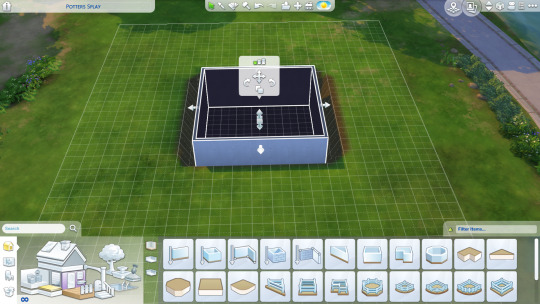
Basement Terrain Trick Photo Tutorial
One of the questions I see most often with newer builders is how to make a walk-out basement, or what to do about the terrain dip around foundation.
Rather than keep trying to explain this method in words, which is probably not very effective, I finally whipped up this little picture tutorial! Sometime I should probably update with examples of this used on real houses.
But for now, hope this will help.
1. Make the shape of your lower (basement) level with walls and sink it into the terrain. You can do it so it’s fully underground, or only part-way if you want windows on your exterior.
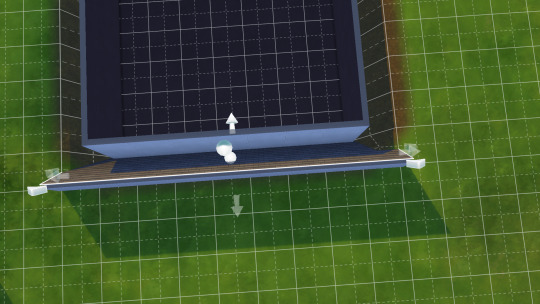
2. Make a wall the same height as your house walls for reference, and build a 1x1 half gable roof with the eaves shortened, raised to the same height as the reference wall.

3. Put that sucker in the terrain dip along your house with the wall facing out. Roofs can go on uneven terrain, huzzah!

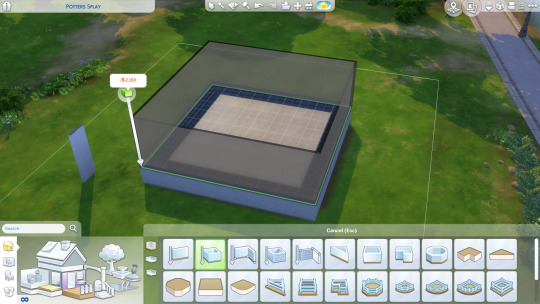
4. Drag the roof part so that it covers all of the dipped terrain... 1 tile wider than your house.
5. Copy it and do it for all of the edges of your house that will be underground in any way. (Note: if one side will have a walk-out, then you can leave the house wall alone and dig the terrain out in front of it... then just use 1x1 half gables to cover the open edges.)

6. Build your upper level 1 tile wider around so that it lines up with the roof walls.
7. Ta-da! Looks like walls flat against the terrain.
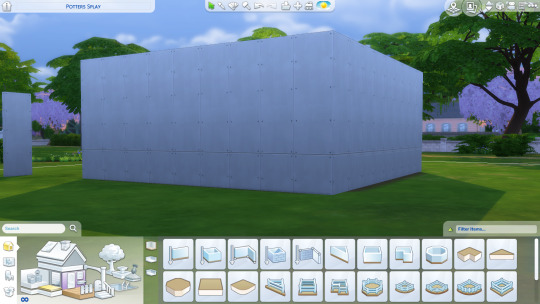
8. You can add windows in your roof walls for looks, unfortunately your lower level won’t actually have the windows for light inside.
379 notes
·
View notes
Video
youtube
HOW TO UV MAP
New video up on my channel! @caesarsims Had some issues with blender and also some people on my previous videos have asked about more tutorials so here we go ♡ I hope you guys find this helpful !
412 notes
·
View notes
Photo

The Sims 4 Tutorial – How To Make Poses With Objects
Blender Hotkeys Cheat Sheet + EA’s Rigs for posing: katverse.com
Other Posing Tutorials:
How to Create Custom Poses
How to Create CAS Poses
How to Create All in One Pose Pack
How To Make Poses With Accessories
How to make poses for Different Height Sims
How to Create Couple Poses
⋆★⋆ Subscribe to my Youtube channel ⋆★⋆
youtube
Happy Posing! 💃
#The Sims 4#Thesims4#s4tutorial#ts4tutorial#ts4 tutorial#s4 tutorial#s4 cc#ts4 cc#s4cc#ts4cc#ts4 poses#s4 poses#katverse
211 notes
·
View notes
Text
How to Create a CAS Hider and/or Disable for Random!
Last updated: September 4th, 2020
Here’s my quick and easy tutorial on how to make CAS hiders for the Sims 4!
You will need
Sims 4 Studio
TS4 CAS Tools
Before we start
Hide in CAS means hiding the item from view in Create-a-Sim. You will not be able to see it or select it in the catalog.
Disable for Random means preventing the item from appearing on randomly-generated sims, A.K.A. townies.
It is entirely possible to hide something in CAS, while still allowing it to appear on random sims - or the opposite, disabling something from appearing on random sims while still being available in your CAS catalog. With this tutorial, you will be able to do either or both of these things!
Let’s get started!
Open Sims 4 Studio and enter your desired name into the “Creator Name” section on the bottom right.

Under the blue “CAS” button, check “Override.” Then hit “CAS” again.

Navigate to the item that you want - you can use the options in the top bar to narrow down the results. (Such as species, gender, age, game pack, etc.)

When you see the image of the item that you want, hold shift and then left click. This will select all the swatches. If you hover your cursor over the thumbnail, you’ll see the name of the item. That’s what I name my .package files for clarity’s sake.
Remember to hold shift when clicking to select all the swatches!
Hit “next” on the bottom right and a window will come up asking where to save your .package file and what to name it. Do so and hit “save.”
Now open TS4 CAS Tools and go to the “Clone Package Editor” tab.

At the top, you will see the box for “Select Package” - click “Select” and navigate to your override you just made.


Now your .package file will be opened in TS4 CAS Tools.
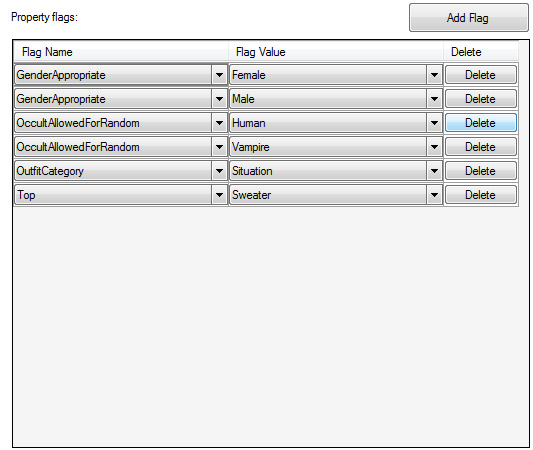
The first thing you’ll want to do is look in the box on the upper far right side.

If you want to prevent sims from wearing this item when randomly generating sims in CAS, you need to uncheck “Allow for CAS Random.”
If you want to prevent random sims from wearing this item in-game and around your town, you need to uncheck “Allow for Live Random.”
If you want to hide this item from Create-a-Sim, uncheck the box for “Show in CAS UI.”
In the “Property Flags” box, you may see the flags “OccultAllowedForRandom” If you’re creating an override that disables for random, you can delete these flags if you’d like. I find it doesn’t make too much of a difference as “Allow for CAS Random” and “Allow for Live Random” seem to override it.
Now click “Commit Changes”, then “Save Package” and you are done! It’s necessary to hit Commit before Save or else your changes won’t be saved to the package file.

And there you are! Let me know how it goes for you or if anything in this tutorial was unclear. Thank you! ♥
Bonus note:
If you’re curious about what the “Disable for ...” options at the top mean, that prevents it from showing up in CAS for that species only. So say you’d like an item to only show for aliens, you’d check “Disable for Human” and “Disable for Vampire” while leaving the alien option unchecked. You will need to leave “Show in CAS UI” checked for this to work, as this option will override all others.

Example: An item that only shows up in alien CAS, versus an item that does not show up in CAS at all.
If you want to allow this item to appear on randomly generated sims of that species, you will need to add an “OccultAllowedForRandom” flag in the “Property Flags” box.
So for the example above, you’d add “OccultAllowedForRandom - Alien.” Remember that you will also need “Allow for CAS Random” and / or “Allow for Live Random” to be checked in the upper right box.
47 notes
·
View notes
Text
shadow map issue (for cc creators)
i don't sure, if somebody mention it before, but recently i noticed what some cc are causing strange pixels on clothes
it's not big deal, but sometimes i get really confused why my cc clothes get them when they look fine in sims4studio :D
pixels/no pixels (no hq mod)


as it turned out, they are caused by the shadow map
to get rid of them you shoud avoid the situations when your shadow map is full white (you can check it better with dark sims4studio theme)

it shoud be like this (ea's necklace example)
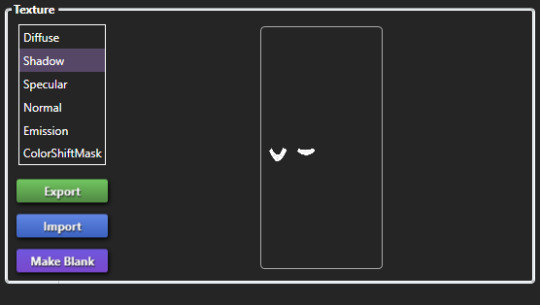
to prevent this i recommend to create your shadows map with this tutorial (it's really helpful!)
hope somebody finds this info useful ~
251 notes
·
View notes
Video
youtube
THE SIMS 4 TUTORIAL - CREATING BODY PRESETS
Easy to following video!
438 notes
·
View notes
Video
youtube
My Meshing Process | Sims 4 | Making CC | Jordutch
Programs you need:
Sims4Studio
Adobe Photoshop or Gimp
Blender 2.70 and I use also Blender 2.79
Marvelous Designer.
Information:
This isn't a tutorial, I just recorded my process when making a really basic, simple sweater without anything special.
Sometimes I use plane Shadows, Specular, Normal. But if you want to create more shadow, shine and depth you need to work with mapping.
You can ask of course, but please, take your time to first Google stuff. - This mesh is kind off high poly. I didn't reduce it this time but if its around 8k or higher I recommend to reduce it!
Please, if you have a question, make sure you have re-watched the video because it's really important to follow everything and not skip like 10 minutes. Especially in Blender (!)
9 notes
·
View notes
Text
Tutorial: How to recolor hair in SugarBox palette

I wrote this tutorial for those who want to recolor custom hairstyles for my defaults. We will use filters “HSV/HSL Adjustment” and “Levels”. They are available in all graphics editors, so you can use any of them. I’m using Krita. Many gif’s under the cut.
0. Export
We need to export all three textures ( If white is missing or damaged, you can use platinum as a base). To do this, open Sims4Studio, go to CAS>Override. Looking for a hair, which we will recolor (make sure that you put the meshes in the folder Sims4Studio/Mods). Select in order the colors: blonde, platinum and white. Usually, CC creators do not make individual icons for each swatch, so we need colors 7, 9 and 10 in a row (but can be random). Click "Next” and save package. Export the Diffuse from each swatch.

1. Recolor
Open textures in a graphics editor. If it contains accessories/colored parts - select everything except them. Next, I'll show the basic presets and fixes for some textures.
This settings are suitable for hair and facial hair. Eyebrows will be considered separately.
Let's start with the simplest - blonde. Open the “HSV/HSL Adjustment” filter and set:
HSL: 27 | 37 | -27
Colorize: check

And after that - “Levels”. Settings for them:
Input Levels: 15 | 0.888 | 233

With this color there are almost never problems, so we go further.
Eyebrows:
HSL: 27 | 37 | -27
Colorize: check
Input Levels: 0 | 1 | 255
Platinum. There are nuances. Basic settings look like this:
HSL: -10 | -10 | 10
Colorize: uncheck

Input Levels: 20 | 0.888 | 233

This is suitable for most standard hairstyles, but sometimes you have to set Levels individually for too dark / contrasting textures.
Fix:
If after applying the previous Levels preset highlights turned white or the color is too dark - cancel this action and use other settings.
Approximate settings for dark textures:
Input Levels: 20 | 0.888 | 225
Output Levels: 30 | 255

White highlights can be avoided as follows:
Input Levels: 20 | 0.888 | 240

Or that:
Input Levels: 20 | 0.888 | 244
Output Levels: 20 | 255

Contrast textures are fixed in a similar way:
Input Levels: 20 | 0.888 | 240
Output Levels: 50 | 255

HSL is the same, but sometimes you need to adjust the Color Balance:
Highlights: 3 | 0 | -4

Eyebrows:
HSL: -10 | -10 | 10
Colorize: uncheck
Input Levels: 0 | 1 | 240
At last, white. It's a little easier. Or not.
HSL: 30 | 15 | 45
Colorize: check

Input Levels: 85 | 0.666 | 244

Fix:
For dark textures, do something like this:
Input Levels: 85 | 0.666 | 240
Output Levels: 40 | 255

Or this:
Input Levels: 85 | 0.666 | 235

Too light textures are corrected like this:
Input Levels: 85 | 0.666 | 250
Output Levels: 20 | 255

Try not to allow white highlights. Sometimes, they are stretched to the entire hairstyle..
Eyebrows:
HSL: 30 | 15 | 45
Colorize: check
Input Levels: 0 | 0.666 | 255
The basic settings can be record to Actions/Macros/Scripts/etc, but don’t forget that you need to select accessories. I just saved presets. Fixes I prefer to set individually. Often, the color/contrast of textures in custom hairstyles differs from the original ones.
2. Import
Click “My Projects” and open the file that we saved in the first step. Import the changed textures into swathes and click “Save”. Copy overrides to folder The Sims 4/Mods (remember that an override must be higher in the hierarchy than the mesh) and test it in the game.

X. Note
I tried to mention all the problems that arise and suggest how to solve them. In any case, you can always ask me or send a message if it was unclear.
Please, tag me as @probosciger if you use this palette in your recolors.
68 notes
·
View notes
Photo

Tutorial: How To Make Hair Alpha Edit Туториал: Как Создать Альфа - Редактирование Волос
Туториал на русском языке, на английском будет немного позднее.
Не выдавайте туториал за свой собственный. Если вы хотите скопировать его на другой источник - дайте прямую ссылку. Do not give out the tutorial for your own. If you want to copy it to another source, give a direct link.
Русская версия
Программы, необходимые для работы.
Sims 4 Studio
Paint.Net
Adobe Photoshop

1. Открываем Sims 4 Studio. В разделе CAS выбираем Создать отдельную деталь перекраски (Create CAS Standalone). В открывшемся окне находим нужную прическу и даём имя новому файлу.

2. Экспортируем текстуру волос и сохраняем ее.

3. Открываем Paint.Net (мне удобнее в нем работат на данном этапе) и изучаем текстуру. Каждый участок отвечает за определенное отображение на меше.

4. Допустим, мы хотим изменить длину прически и сделать её короче. Для этого выделяем нужные части текстуры и сужаем их до нужного результата. Если вам хочется убрать часть прически, например, челку, вы стираете текстуру полностью.

5. Импортируем результат в Sims 4 Studio. Вот что у нас вышло. Прическа стала короче.

6. Далее переходим в Adobe Photoshop и накладываем свои ретекстуры ( если необходимо ). Импортируем в Sims 4 Studio и сохраняем файл.

7. Проверяем прическу в игре. Если результат вас устраивает, то на этом работа окончена. Поздравляю!
Прическу можно скачать здесь [x]
214 notes
·
View notes
Text
How to rig your mesh and make it game-ready (weight transfer, uv_1 & vertex paint)
Hi, I wanted to write this short tutorial on how make your CAS mesh game-ready using Sims 4 Studio & Blender, going over meshgroups, weight transfer, uv_1, and vertex paint. This tutorial assumes some knowledge about blender but it is beginner-friendly.
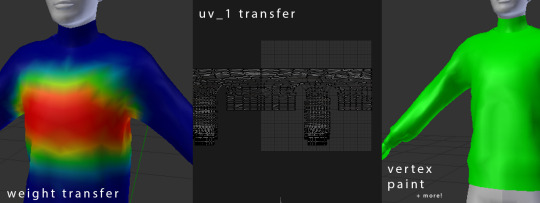
This applies to any mesh you can make in CAS, from clothes to accessories.
Prerequisites: You have a new mesh ready, with a UV+texture that fits within the Sims 4 body UV space, and you are using Blender 2.78 or Blender 2.7.
(1) Meshgroups/Cuts
In order for your mesh to show in studio, it has to have the same number of meshgroups/cuts as the .package you cloned has (these are the s4studio_mesh_x meshes in blender). You can check the cut number for a mesh on the scene tab in blender
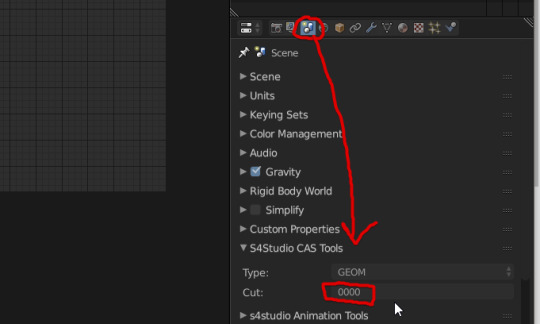
When creating a new package, I highly recommend cloning a clothing with one cut, as explained in this mini tutorial by @theslyd. This saves you from having to cut your mesh up into parts before importing and saves a lot of time.
For some accessories and other items there aren’t options you can clone with one cut, for which you just need to work with and keep the same number of cuts.
(2) Weight Transfer
STEP 1: Append either a nude top/bottom, or reference ea mesh into blender. Most of the time I use the nude meshes to transfer from because it’s easier/quicker. You can download this mesh pack I made that contains all the male and female nude meshes to save time.
You can delete any extra rigs and bone shapes.
STEP 2 (optional): Subdivide the EA mesh, especially important if your mesh is high poly. This isn’t neccessary to do but if your morphs aren’t looking smooth ingame, you need to do this,
STEP 3: Holding shift, select the EA mesh, and then your mesh, and go to weight paint, and on the left side bar (press T if it’s not open), on the tool tab, click the button ‘Transfer Weights’
Make sure ‘Auto Normalize’ is checked before you transfer weights!!!

Skip the next step if you’re using Blender 2.70
STEP 3: After clicking ‘Transfer Weights’, set the Source Layer to ‘By name’, and Destination to ‘All Layers’, and then Click the ‘Clean’ button, and set the Subset to ‘All groups’.
This procedure fully transfers all the weights, and deletes any weights that are set to 0 (these weights break the animations ingame).

Now your weights are transferred properly and your mesh is rigged to the skeleton, so it will move when your sim moves.
STEP 4 (optional): If your mesh is oversized or big there may be glitches/bad looking areas.
These are fixed via manual editing, @theslyd has tutorial that goes over this, but my advice is that the blur tool is your best friend. I recommend adding the armature modifier to your mesh if it’s not there and linking it to the rig, because then you can pose your mesh in Blender and check for weight glitches without entering the game.
(3) UV_1 Transfer
This REQUIRES Blender 2.78, older versions cannot be used for the uv_1 transfer.
This is also assuming your EA mesh (the one you appended earlier) is still in your blender file after weight transferring.
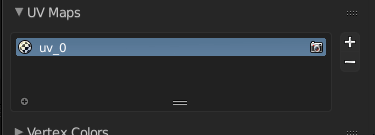
STEP 1: On the Data tab (the upside down triangle), scroll down to UV maps, create a new UV map and rename it to uv_0.
STEP 2: Select your mesh, go to the modifiers tab and add a Data Transfer modifier.

STEP 3: Make the Source Object the EA mesh, check ‘Face Corner Data Transfer’, click UVs, change All Layers to uv_1, change By Name to uv_1, and then click Apply.

Now your mesh will morph properly ingame when a sim is fat/thin. You can delete the EA mesh now if you don’t need to use it anymore.
For some accessories and parts of meshes, they do not need a uv_1 if you don’t want them to morph with the sim, like the pendant on a necklace, or zips on clothing.
For example, if there’s a zip on your clothes you don’t want to morph, go to the UV editor with the uv_1 selected, and then find where the zip is, press L to select that uv island and then size it down really small. This will make it not morph if a sim is fat/thin, with the rest of the clothing morphing like normal.
(4) Vertex Paint
STEP 1: Select your mesh, and go to the vertex paint mode.
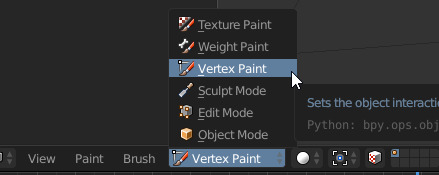
STEP 2: On the left side panel (press T if it’s not there), click the colour box and on the Hex tab, set the colour to 00FF00.

STEP 3: With the green colour entered, press shift+k to colour your entire mesh green. You don’t need any other colours like blue or yellow (as said in other tutorials), it won’t make a difference.
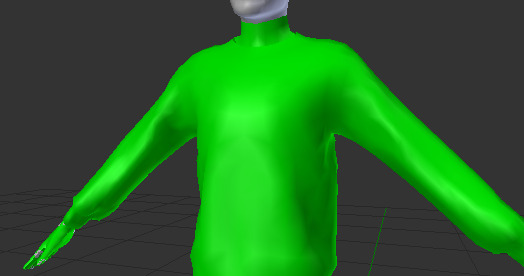
And that’s the vertex paint done! Vertex paint is crucial for your mesh to work ingame with sliders and for the other rigging parts to work, and with that the whole rigging process is finished.
Your mesh should be ready to use ingame, properly morphing and moving with the sim. I also have a tutorial on LODs if you want to continue finishing your CC for release. LODs are super important for making your CC optimised, and is the other step of making your creation completely game-ready.
If you need more info or help with common weight and uv_1 issues, I highly recommend @mauvemorn‘s tutorials. You can also post on the creator’s help section on the s4s forums if you need more specific help, I and other creators check there often to help people out.
Hopefully the helped! Feel free to ask any questions through asks/dms :)
279 notes
·
View notes