#sample tutorials
Explore tagged Tumblr posts
Visit Tumblr Blog
Explore Tumblr blogs with no restrictions, modern design and the best experience.
Last Seen Tumblr Blogs


Fun Fact
Premium Tumblr themes are available from anywhere between $9 to $49.
Text
To give you a taste of what MathYug has to offer, we are sharing a selection of sample videos from our Class 11 Maths tutorials. These videos exemplify the high-quality, in-depth teaching style that Ashish Sir is known for.
2 notes
·
View notes
Text
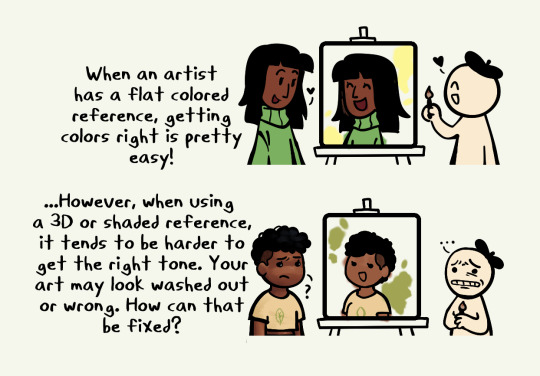

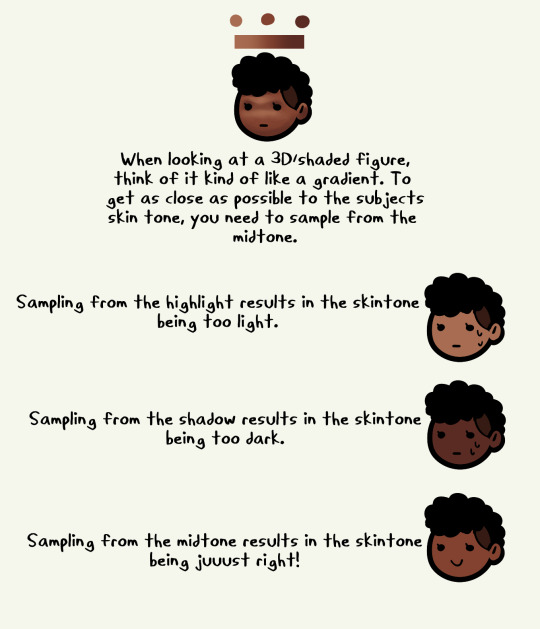
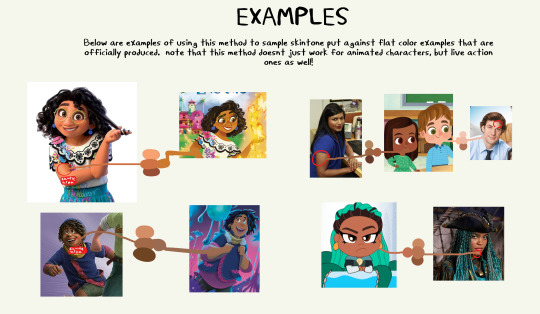

a little informational guide on trying to find skintones from 3d refs :)
i know that finding skintones from 3d characters is tricky and can result in accidental whitewashing and this isnt to make fun of those ppl! this is simply to inform and help other artists out :)
#fuck people who intentionally whitewash by sampling highlights tho hope you grow and change as a person#kupa draws#art#art help#art tips#skin tone#art tutorial
10K notes
·
View notes
Text


I got asked if I could explain my coloring process. Maybe this is helpful to someone :)
#tutorial#art tuorial#hatsune miku#I swear I will get back to regular AA posting soon hagvhbfn#also sorry for the crappy sample drawing#I didnt want to spend so much time on it :")
247 notes
·
View notes
Text
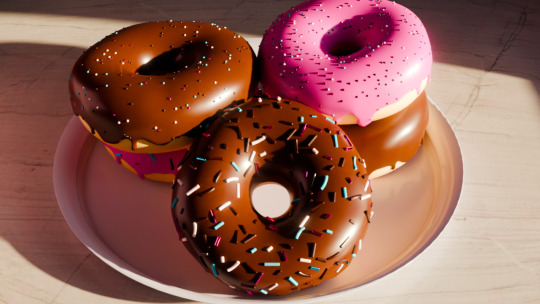
im supposed to learn how to render an Animation but this guy wants me to render each frame as a png with over 100 samples each. & i simply will Not be doing that so heres a still image of some donuts
#do NOT be fooled i was following a step by step tutorial this is not as impressive as it may look#my laptop is decent enough to play a game & stream it was not made for rendering 3d animations i fear#...Mayyybe ill set it to render overnight but thats still like 300+ samples of 160 frames. Yikes#torch chatter#um mine i made this
14 notes
·
View notes
Text
.
#the really cool thing about art classes in college was that once i finished the actual work i could kind of just do whatever#so they had these sample images that were loaded onto every computer in the lab for art students#and one of them was a bear peeking from behind a tree#and one day i finished up the work and opened up that picture of a bear in photoshop#and i was like 'by god i will make this bear green'#and i did. the teacher hadnt really taught us that yet but through the power of internet tutorials and experimentation i did it#the professor comes over halfway through and looks over my shoulder 'what are you doing'#me: 'making a green bear'#him: 'did you do the work?'#me: 'yeah here' and i pulled it up#he was like 'oh cool. nice bear'#anyway sadly i do not have my green bear anymore#but man i was so proud of that#it was so good too no artifacting or anything i did such a good job on it#i mean i could recreate it probably but it wouldnt be the original
6 notes
·
View notes
Text
I feel like I'm a voice purist when it comes to FNF songs like if a character has an established voice and their chrom doesn't sound like their voice it immediately turns me off, even if the song itself is good
#This is inspired by me clicking off a song with the Hatz ten seconds in bc Roy was the only one that sounded like himself lol#The only exception is Tutorial from Spooky Mix. Moloch's samples are obviously from someone else but the vibes are so on point#It doesn't bother me as much if at all#Friday Night Funkin#FNF Mods
6 notes
·
View notes
Text
First steps - (3d, Blender, HQ version)
#nearly the first blender thing ive ever made :3#tried using it in highschool and didnt make much and it was like 10 years ago#followed The Tutorial and i think it turned out well#cycles renderer is looooong tho#1024 samples / 60 fps / 320 frames / 36 hours#maybe would've been under 12 hours if i went for 500 samples & 30 fps but gotta go hard i guess#3d#blender#lizabeth makeabeth
4 notes
·
View notes
Text
finished the donut tutorial. once i actually learn the shortcuts you guys will see. you will see
#blender stuff#<- for my own future tagging#rendered this at 300 samples cause i didnt want to wait for 5 hours hjgdfkshgklsd#i have a couple more tutorial series lined up to continue getting the basics really down and then its making ocs times
2 notes
·
View notes
Text
“yeah I guess you could call me a programmer” --me, after a script appears to have worked once
#putting STAR on my CV who cares#it's actually easy when understand how the parameters work#lol realizing I should actually organize these shits.... sure.#love to watch a tutorial where the guys is all 'this program should run all your samples in 30 minutes' god i wish that were me#i need 4 hours per sample on the cluster at minimum with the program throttled to hell
2 notes
·
View notes
Video
youtube
Shadow Drones by Sampletraxx Review & Playthrough
#youtube#shadow drones#sampletraxx#playthrough#walkthrough#shadow drones review#music production#music producer#composer#tutorial#film scoring#music software#kontakt library#native instruments#vst#virtual instruments#sample sound review
1 note
·
View note
Text
youtube
How to design musical sounds: the core principles
#synth#synthesizer#tutorials#underdog#accoustic#synthesis#sampling#musicproduction#sounddesign#Youtube
0 notes
Note
I am so sorry to bother you with this stupid question, but Bisan has asked for a complete stop in economic activity. Can I still donate to help Palestinians or is it better to avoid any transactions for the week ? Thank you so much for what you're doing
hello anon. don't apologise, you're a breath of fresh air after the recent visitors in my inbox. I think a slightly more accurate description of Bisan’s ask is to stop or minimise all economic activity not in direct support of Palestine. Now more than ever, I would encourage people to donate to escape funds for Palestinians, to direct aid organisations like CareforGaza and the PCRF, and to buy e-sims as they’re running low.
Below I’ve compiled a list of resources below but this is definitely just a small sample size of what you can do to help during this strike. This post here is an extremely comprehensive resource that I’d recommend you have a look at.
credible organisations that are doing work on the ground in Palestine:
Care for Gaza:non-profit charity that distributes money, food and other resources directly to families in Gaza.They maintain a regular presence on Twitter and Instagram. You can donate to them via Paypal here.
PCRF / Palestine Children's Relief Fund: non-profit organisation that distributes essential food and resources to families in Gaza. Most recently, they delivered 30 tons of vital medicine, and 82,000 pounds of flour.
Medical Aid For Palestinians: deploys medical teams to treat Palestinians suffering under Israel's malicious bombardments.
Donate e-sims to Palestine: massive post with tutorials and relevant links, with discount codes included in the post and in the replies.
help people leave palestine (donate what you can)
Help a Family Evacuate Gaza (GoGetFunding)
Save Sanaa and her Family (Gofundme)
Save Amjad Saher and his family (Gofundme)
Help a family of 13 escape Gaza (Gofundme)
Help a Palestinian children's book illustrator save her family of 12 (Gofundme)
#donate what you can!!!#there are fandoms on here that have forked up truly lifechanging amounts of money for things significantly less important than this#so give generously#<3#palestine#free palestine#free west bank#free gaza
29K notes
·
View notes

Text

Month 2, day 24
Did some more tweaking to the donut tutorial, including trying to fix some of the things I goofed that was making navigating the scene all fucky. Also playing with materials on the frosting because I wanted those yellowy donuts to be more of a glazed than full on frosting, and I think it turned out pretty good :)
Currently I'm rendering the animation that the tutorial walked me through, which is taking ~15 minutes per frame for I think a 200 frame animation? So that's... *does math* Oof, if I did that math right, it'll be done rendering on Tuesday lol
So I guess we're going back to 2D animation for the next couple days! :)
#the great artscapade of 2024#art#my art#render#3d render#blender render#blender 3d#cycles render#donut tutorial#this specific render today took over an hour#but that's because I had it set to 500 samples#previous renders I had at 100 samples so they went much faster#and I set the animation to 100 samples too#anyway yeah rendering woo~ lol#gonna go write fanfic for awhile methinks#or schedule the next week of photo dumps#I'll need to pop into ITWT for that so I can accurately tag things
1 note
·
View note
Text
#how to gif:
This is a side-blog for all the helpful resources + pretty samples I’ve come across while learning to make GIFs. Welcome!
In late October 2023, I finally decided to learn how to make GIFs, using instructions from blogs on this website. (I hadn’t used Photoshop before. I had a lot to learn.)
I saved a lot of different resources (tutorials, samples, etc.), and I wanted to put them all in one place (here!). There are a lot of (really helpful! wonderful!) resources on this website, so I have outlined below the method I have been following, which is kind of cobbled together from different tutorials (all referenced), under the cut. (This is as much for my own reference as anything else!)
The tags on this post are to help me (maybe you?) navigate to the various tutorials/resources I have reblogged here. (I was really good with tagging in the beginning but not so much lately, so I need to catch up!)
All these resources (listed on this post and not) are really wonderful and helpful, and I am incredibly grateful to the kind and talented people who have generously taken the time to share their brilliance on this website—thank you so much to all of you!
@hollygl125
FOR REFERENCE
Screencapping:
I follow the instructions on screencapping from this post (#1), except that I use the latest version of MPV and I incorporate the additional lines for the mpv configuration file from this post (#2). Several times I tried checking for duplicate frames, as per the instructions from this post (#3), and each time the first frame was duplicated but no others. (As far as I can tell, none were missing?)
Gif-making (basic):
I have been following a mishmash of the instructions from this post (#4) and this post (#5) for basic GIF-making and initial colouring.
For making the initial GIF, I wanted to stick with the load files into stack method that most people seemed to use, so I mostly follow the instructions from this post (#4) for steps 4 (importing to Photoshop), 5 (cropping & resizing), 6 (animation), and 8 (sharpening) but with some alterations based on the instructions from this post (#5):
I add a few extra pixels to my initial crop size then after the initial GIF-making reduce the canvas size by that number of pixels, to eliminate the small white border that seems to show up otherwise. (See this post (#5) for much more detailed information.)
I do not play around with the initial GIF speed. (Again, see this post (#5) for more information.) The caveat on that is that, for whatever fun PS reasons, my initial frame has a 5-second delay while the others have no delay, so I change the initial frame to have no delay as well. Then at the very end, when I am exporting the GIF, I use the second action from this post (#6), which gets everything ready for export and puts all the frames to a nice 0.05 second delay. The downside is that, while I am preparing the GIF, it looks faster than it will upon export.
I use the following smart sharpening settings (sharpening twice): (1) amount: 500%, radius: 0.3 px; (2) amount: 10%, radius: 10 px. (Initially my first smart sharpen was at 0.4 px, but I found that was too sharp for some GIFs, so now I start with 0.3 px as the default and occasionally remember to check whether 0.4 px would work.)
Actions:
When I first started, I did not use any actions apart from the save action mentioned above because I wanted to understand what was going on/what I was doing. Once I had that memorized to the point that it was becoming tedious, I made my own action—which, it turns out, is really, really easy and makes the initial process way, way faster (like, almost instantaneous)! (You basically hit record, go through all your steps, then hit stop—super, super easy. But go check out this post (#7) for more detailed information/instructions.)
Colouring (initial):
This is for initially getting the colours to the right spot (i.e., something realistic).
I started by generally following the guidance from this post (#5), and I made myself a psd based on that, and then I make other adjustments from there. I have tried some other suggestions from other tutorials, but mostly I end up going back to that psd with adjustments for the particular scene/GIF.
Fonts + typograph:
After I had made my first GIF, following these initial steps, I tried adding some text, and my GIF looked... terrible. So I downloaded a bunch of fonts recommended in various places on this website then tried some different text options.
The following resources below were helpful for fonts, typography, text colouring, etc.: #8, #9, #10, #11, #12, #13.
Blending:
Though it is not what I used, this post (#14) looks like a good tutorial. This post (#15) also gives a tutorial on some gorgeous blending.
Colouring (fun!) and key frames:
This is for when you want, e.g., everything to be tinted in purple.
I really love the colouring method from this post (#17). This post (#16) talks about colouring with gradient maps and how to use key frames (for adjusting the placement of masks—for when you want Sara Sidle to have bright purple-tinted hair but not bright purple skin!), so it is also excellent.
Effects + special effects:
For clipping masks and putting multiple images in one, see this post (#10), this post (#20), and this post (#21).
For a tutorial on how to use overlays, see this post (#19).
Resources I have found particularly useful (or essential!):
gif tutorial by kylos
additions to mpv configuration file by castiel
duplicate frame deletion by laurabenanti
gifmaking for beginners by hayaosmiyazaki
giffing 101: a comprehensive guide by redbelles
action pack #2 by anyataylorjoy
actions (how-to-make) by hayaosmiyazaki
text/subtitles by hayaosmiyazaki (I have not actually made subtitles yet, only fun text—yes, the dopamine quest continues)
typography by momentofmemory
kate’s quick text styles tutorial by aubrey-plaza (which also very helpfully taught me about clipping masks)
basic gradient text by anya-chalotra
gradient text with blending options by anya-chalotra
difference/exclusion text colouring effects by yenvengerberg
how to: gif blending tutorial by delphines (not what I used but looks like a good basic intro)
double exposure/blending tutorial by yenvengerberg
how to: coloring gifs with gradient maps by delphines (taught me how to use keyframes for masks—actually very easy, even though I kept putting it off—don’t put it off!)
becca’s mega coloring tutorial by yenvengerberg (have used this a lot for making fun colourful gifs—both obviously colourful and less obviously so)
a few little tricks and tips to really make those colours pop by yenvengerberg
new & improved overlay tutorial by rosamundpkes
tutorial on how i use layer masks and clipping masks to get ‘multiple gifs in one’ by yenvengerberg
grid overlay effect by thereigning-lorelai
how to fix grainy gifs by kangyeosaang (have not used this yet but want to try it)
the beginner’s guide to channel mixer by aubrey-plaza (have not gone through this thoroughly yet but want to do so)
#gif-making#how to gif#gif tutorial#gif resources#gif sample#gif inspiration#screencapping#introduction#essentials#ps actions#fonts#typography#blending#channel mixer#brightening#effects#transition#colouring effects#special effects#overlays#key frames#gradient maps#sharpening#textures#layout templates#psds#text effects#colour palettes#templates#before and after
4 notes
·
View notes
Note
I’m obsessed with the Lackadaisy comics way of shading/colouring! Could you please give a tutorial of how you do that and what brushes you use?
Here's a sample I used for the Lackadaisy Essentials art book. About 98% of the time, I'm not using specialized brushes - just basic soft and hard-round brushes, with various opacities.


Digital scan of the establishing shot pencil drawing - I added some some grid lines on top to double check the 1-point perspective. I didn’t include the characters here because I knew I’d be using the art as a background for more than one panel in the comic.
Initial lighting pass - This was done almost entirely by burning shadow directly into the pencil art scan. This way, I preserve a lot of my pencil lines (rather than painting over them) and the grain of the paper remains in play. This helps retain a sort of aged, natural media look despite the largely digital nature of it.
Contrast and brightness adjustments - Here I hand-painted more minute details into the rug, decor and fixtures with small diameter round brushes. I drew a wallpaper pattern on a separate canvas, then applied it as an overlay layer here too. And, of course, the characters arrived as raw pencils on new layers.
Character compositing and color wash - I didn't want to go fully monochrome with the colors, but I also didn't want to treat this like a full color digital painting. Instead, I opted for something resembling a warm-to- cool wash, achieved with a color layer on top of the grayscale base. Young Mordecai and Rose were toned to match the scene with a combination of burning, dodging and painting.
Lighting effects and atmosphere - Overlay layers can be used to push warm values into a much more saturated, vibrant place than a color layer alone can manage, and that's what I did here to create the streaming sunlight. I used a screen layer to include overexposure on bright colored elements as well. Floating dust motes in the light were added for atmosphere, and I polished the characters up with their own color and overlay layers to match the scene.
There's another, older process breakdown here on the Lackadaisy web site too, if you want more information.
1K notes
·
View notes