#sc top 10
Text
I AM DONE WITH THE SEMESTER
I CAN PLAY GAMES AGAIN
#so many games I wanna play…#I think I’ll probably get back to Kiseki though#I had a dream last night about Ollie#so it’s a sign I need to get back to SC#also because SC was top 10 media potiental
2 notes
·
View notes
Text

Raúl González • Al Sadd SC (2012-2014)
#Raúl#Al Sadd#Deporte#Fútbol#Raúl González#Al Sadd SC#Futbolista#Delantero#Qatar Stars League#Primera División#Al Sadd Sports Club#Qatar#Sports#Football#Sport#Footballer#Forward#Top Tier#Retro Fútbol#2010s#10s
0 notes
Text

Best Nursing College in Birbhum - Sainthia Nursing Institute
Situated in Birbhum, Sainthia Nursing Institute, provides top-notch degree and diploma programs, aimed at training future nursing specialists in India.
Medical Education Institutes are the backbone of the Indian healthcare system. Sainthia Nursing Institute is the Best Nursing College in Birbhum and they plays a vital role in the training of quality nurses. We are driven to provide quality education to all our students, so that they fulfill a vital role in our nation’s healthcare system. We do this by providing our students with extensive exposure to real-life situations during internships, and the best in-class curriculum which aims to lay out a solid foundation in of the field nursing.
Courses:
GNM
B.Sc. NURSING
GNM:
The General Nursing and Midwifery (GNM) program is a foundational nursing course designed to train students to become skilled nursing professionals capable of providing comprehensive care to patients across various healthcare settings.
This diploma program, typically spanning three-and-a-half years, combines theoretical instruction to the essential principles of nursing, anatomy, physiology, pharmacology, and nutrition with practical clinical experiences in hospitals and health care facilities.
The GNM curriculum is structured to develop competencies in general health care, community diseases, medical and surgical operations, child health nursing, and midwifery. Graduates are prepared for working as registered nurses and midwives, playing a critical role in the healthcare team by supporting the recovery and wellbeing of patients, managing health care plans, and contributing to community health promotion and education.
Why?
Choosing the General Nursing and Midwifery (GNM) course paves the way for a fulfilling career in healthcare, blending rigorous theoretical study with rich practical experience.
GNM is a gateway to the healthcare sector, offering the stability and respect associated with nursing roles across the globe.
The program not only equips students with essential nursing skills but also lays the groundwork for advanced studies in nursing and specialized areas. With healthcare's ever-growing field, a GNM qualification ensures you're stepping into a world of diverse job opportunities, promising job security and the chance to make a significant impact on individuals' health and well-being. This makes the GNM course an ideal starting point for anyone looking to make a difference in the healthcare sector.
Why us?
Choosing Sainthia Nursing Institute for your General Nursing and Midwifery (GNM) course offers a unique blend of academic excellence, practical experience, and a supportive learning environment. This institution is recognized for its commitment to nursing education, providing students with a curriculum that is both comprehensive and aligned with the latest healthcare practices.
Our focus on practical training ensures that students gain hands-on experience in real-world healthcare settings, making our students well-prepared and confident professionals upon graduation.
Sainthia Nursing Institute boasts an experienced faculty who are not only experts in their fields, but also dedicated mentors. This ensures that students receive personalized attention and guidance throughout their educational journey. Additionally, the institution’s well-equipped facilities and resources further enhance the learning experience, enabling students to practice and hone their skills effectively.
Our Features:
At Sainthia Nursing Institute, our students embark on their nursing education journey supported by a combination of dedicated faculty, modern facilities, and practical training opportunities. We are known for our commitment to fostering a comprehensive learning environment where theoretical knowledge meets hands-on practice.
With a curriculum designed to cover all essential aspects of nursing and healthcare, students are well-prepared for the demands of their future roles.
The emphasis on practical experience, facilitated through affiliations with hospitals and healthcare facilities, ensures that our graduates are not only skilled but also confident in their abilities to provide quality care.
This holistic approach to nursing education, underpinned by a supportive and resource-rich environment, makes Sainthia Nursing Institute a standout option for those aspiring to make a meaningful impact in healthcare.
#Top 10 best nursing college in birbhum#Private Nursing college in Birbhum#nursing college in birbhum#Best nursing college in birbhum#Which institute is best for nursing#Which is best in B Sc Nursing#Which is best for nursing course
0 notes
Text
Students enrolled in the Best B.Sc. Data Science colleges at Indian Academy Degree College Autonomous will receive first-rate instruction in the methods and instruments needed to uncover patterns in hidden data and obtain understanding of high-dimensional data, ultimately paving the way for a future in data science.
#Best b sc data science colleges in karnataka#Top b sc mathematics colleges in bangalore#top 10 b.sc physics colleges in bangalore#top colleges for masters in data science in india#best colleges for m.com in bangalore
0 notes
Text
Sky Patched Calendar Ver. 0.26.5: A Guide for Sky Events
Season of Duet
Double Light Events
Days of Sunlight
New Event: Days of Moonlight
Days of Style
Traveling Spirits Group Visit: Season of Shattering


Season of Duet Continues (Season End: September 29th)

Cellist’s Friendship Tree, which will appear after the fourth quest of Duet, will have items that are available for purchase with regular candles. It will stay even after the season, alongside the IGC items in the Duet Guide Tree.
Double Seasonal and Treasure/Candle Cake Candles (September 9th - 15th)

The usual double candle week has return! For seven days, you can get an extra seasonal candle by collecting four extra seasonal candles in the realm.
Meanwhile, double treasure candles will help you save candles for the upcoming events. Trust me, you're going to need it.
Days of Sunlight (August 26th to September 8th)

New Event Items
Sunlight Manta Float: 20 event currency
Sunlight Beach Shorts outfit: 30 event currency
Sunlight Helios Hoops earrings: 2.99 USD
Sunlight Woven Wrap cape: 14.99 USD
20 + 30 = 50 / 6 tickets each day = 9 days to collect IGC items.
Previous Summer Items
Sunlight Surfboard - 14.99 USD
Chunky Sandals - 9.99 USD
Campfire Snack Kit (+ 35 SC) - 19.99 USD
Jelly Shoulder Buddy - 2.99 USD
Lantern (+35 RC) - 19.99 USD
Summer Parasol (+35 SC) - 19.99 USD
Bunny Accessory - 2.99 USD
Seashell Hairpin - 0.99 USD
Beach Towel Cape (Yellow) - 110 Candles
Beach Towel Cape (Blue) - 140 Candles
Beach Towel Cape (Pink) - 30 Hearts
Campfire Tent - 90 Candles
Summer Hat - 44 Candles
Days of Moonlight (September 16th to 29th)

New Event items:
Moonlight Blossom Accessory: 17 event currency
Moonlight Lantern Decoration: 32 event currency
Moonlight Earrings: 2.99 USD
Moonlight Frock and Updo: 14.99 USD
17 + 32 = 49 / 5 tickets each day = 10 days to get IGC items
Days of Style (September 30th to October 13th)

New Event Items
Style Darkness Fascinator: 15 event currency
Style Dazzling Dress: 34 event currency
Style Dapper Trio (This set includes a dapper-looking outfit, a tie styled after one of the realms’ creatures, and a stylish monocle.) - 14.99 USD
15 + 34 = 49 / 5 tickets each day = 10 days to collect all IGC items
Previous Style Items
Style Wide Leg Jeans - 9.99 USD
Style Bunny Slippers - 6.99 USD
Style Heart Sunglasses - 4.99 USD
Style Flame Sunglasses - 2.99 USD
Style Star Sunglasses - 72 Candles
Style Runaway Mask - 30 Candles
Style Silk Ballet Slippers - 13 Hearts
Style Top Hat - 12 AC
New Type of Collecting Event Currency
This year, all event currency will be available as "lights." It will be similar to how candles are gathered and forged. You can collect these lights by finding it around the stage area and by viewing other player's recordings.
TS Group Visit: Season of Shattering (September 16th to 29th)

Memories of Ancient Light and Ancient Darkness will return to the realm of Sky. During this time, you can purchase the spirits' cosmetics and check your shattering quests from shard eruptions.
List of Visiting Spirits
Jellyfish of Light
Manta of Light
Dragon of Dark
Plant of Dark
#sky children of the light#sky cotl#thatskygame#(sky game updates)#(days of sunlight)#(season of duets)#(days of style)#(days of moonlight)#(traveling spirits news)
118 notes
·
View notes
Text
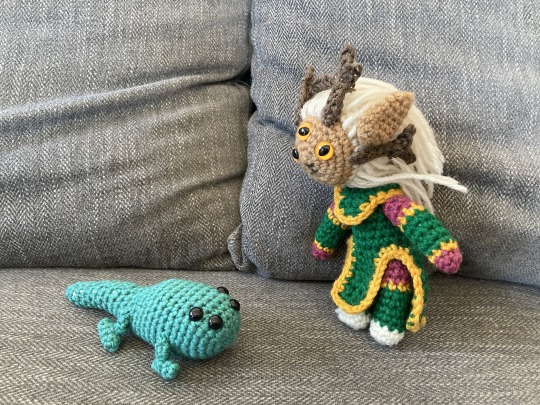
Ancient Hearthian (Outer Wilds) Pattern
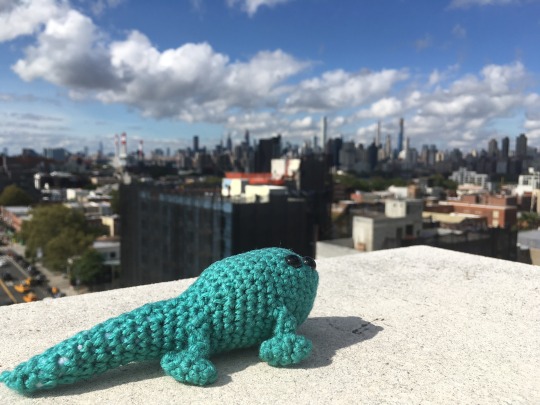
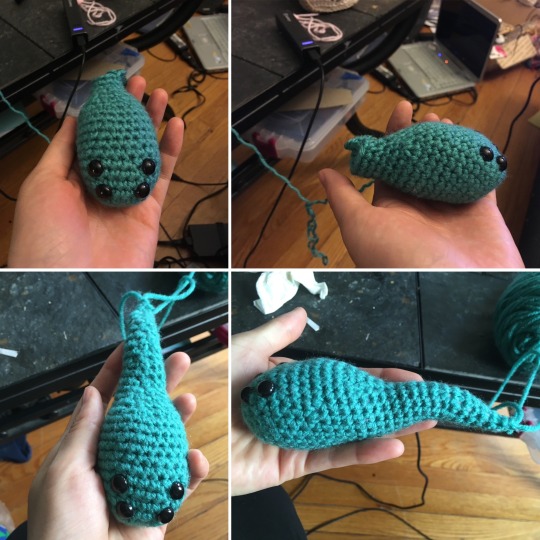
I got so many requests for the ancient Hearthian from Outer Wilds, and they really are so much simpler than the Nomai - but also, my notes and pics are a bit less detailed, and I've been so bad at even getting on my computer lately - so lemme try and cobble this together so anyone interested at least has something to work with!
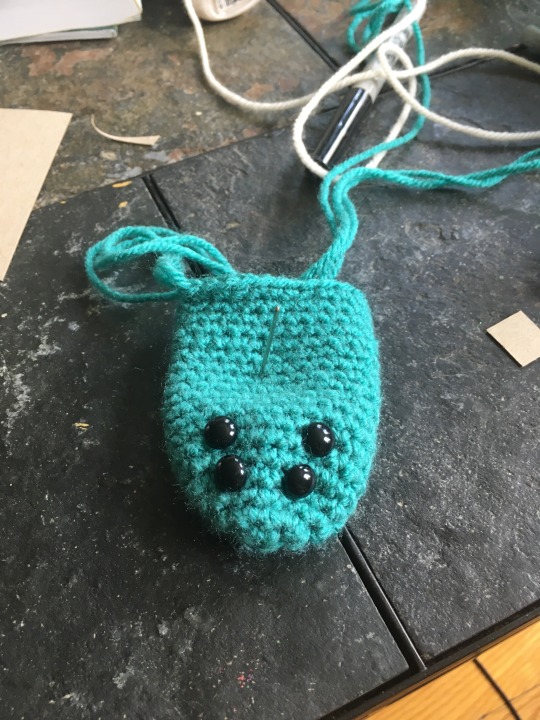
Technical stuff: 3mm crochet hook, 9mm safety eyes, Red Heart Super Saver yarn in Jade, probably... but any nice shade would do!
Body:
They start as one long piece that kinda looks like a tadpole! A lot of the shaping is just by gentle smooshing it, but there are a few rows where you increase or decrease unevenly to contribute to it... I'm not even sure how much it really makes a difference tho!
6 sc in a magic circle
inc 6x to make 12 stitches
(3 inc, 3 sc) 2x to make 18 stiches (and a slightly elongated oval rather than circular cross section when looking face on)
(2 sc, inc) 6x to make 24 stitches
9 rows of 24
Add eyes and begin to stuff
Across the "top" of the body (wherever you choose that to be) do (1 sc, 1 dec) 3x, then 15 more sc to make a row of 21 stitches
Again across the "top" of the body do (1 sc, 1 dec) 3x, then 12 more sc to make a row of 18 stitches
From here, it's slow decreases (still at the top) and stuffing as you go:
(1 sc, 1 dec) 2x then sc around to make a row of 16
1 dec then sc around to make a row of 15
1 dec then sc around to make a row of 14
1 dec then sc around to make a row of 13
1 dec then sc around to make a row of 12
2 dec then sc around to make a row of 10
1 dec then sc around to make a row of 9
1 row of 9
1 dec then sc around to make a row of 8
3 rows of 8
2 dec then around to make a row of 6, fasten off and hide tail

Feet and Legs:
It looks like I really winged it a bit here, so let me try and figure out approximately what I did - the main idea is I think I made a very small tube for the feet, then pulled the tails through to the center, chained into a random stitch, and and did a few chains up and down to give it a short leg, then used those tails as well to sew them on to the body... I'm afraid I can hardly tell what I did for those legs, even looking at it in person, like it might just be a few knots... I am hoping that for here it isn't too much trouble for you to improvise something that works well for you!:
4 sc in a magic circle
3 rows of 4, then close off and pull the tails through the small cylinder, out the center
chain into a random stitch, then into an adjacent stitch,
sc "around" these two for 2-3 rows, to make a short leg
use the rest of the tail to sew onto the body.
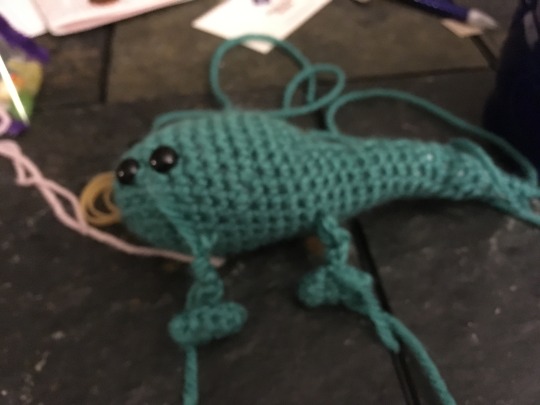
Very messy, possibly blurry.... but hopefully this at least gives a bit more inspiration.
Ok, again, I apologize, it's not my best pattern, but I hope it will give people a starting point! Don't hesitate to ask questions if you need them, although as I mentioned, I'm not on tumblr much now a days. Don't forget to check out my Nomai pattern here! And as always, give me a tag here or @ erin.gurumi on instagram if you make one! I love to see them!
#crochet#crochetpattern#freecrochetpattern#free crochet pattern#freepattern#free pattern#amigurumi#amigurumipattern#amigurumi pattern#hearthian#outerwilds#outer wilds#outer wilds nomai#nomai#diy#yarn#stuffie#longpost#long post#solanum
76 notes
·
View notes
Text
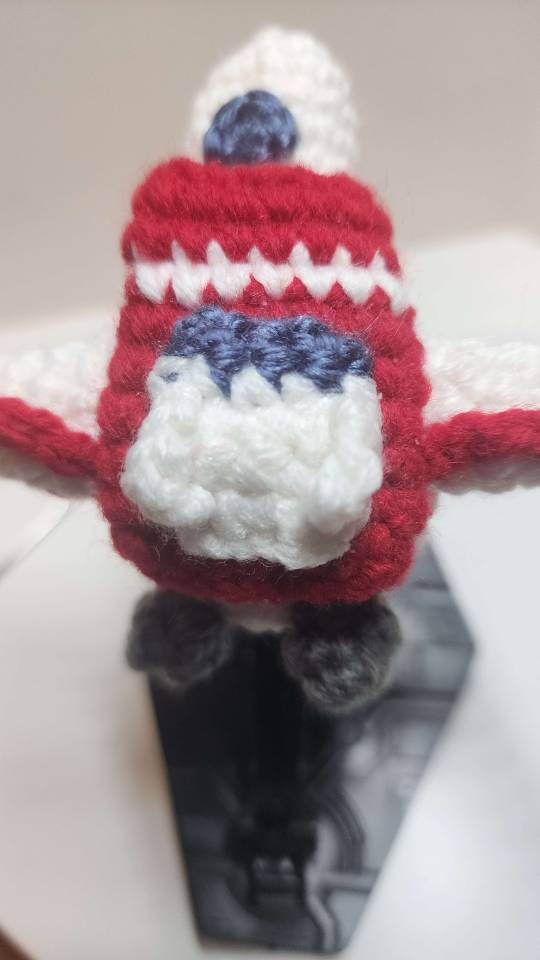
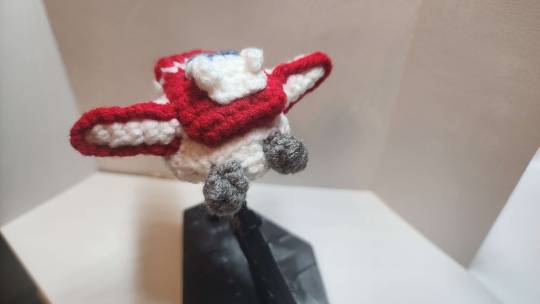
Transformers Skyfire/Jetfire Crochet Pattern
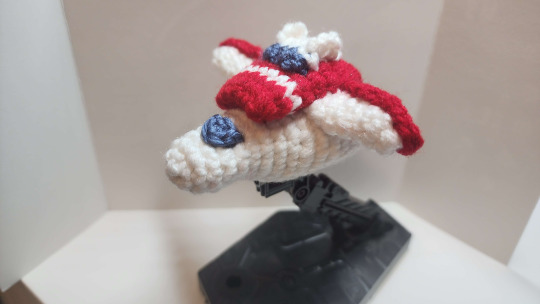
Made it up this week! I am not an experienced pattern maker, but i still think he turned out pretty well! I wouldn't rec this for a first project, but if you've done some crochet before then help yourself.
What You'll Need
Red Yarn
White Yarn
Blue Yarn
Grey Yarn
(Optional) 2 Sizes Crochet Hooks - I used 3.0mm and 2.5mm, but if you only have 1, I rec 3.0mm
Tapestry needle
Terms
CH-chain stitch
SL-slip stitch
MC-magic circle
SC-single crochet
INC-do two single crochet in one stitch
DEC-do one single crochet over two stitches
Okay, now heres the pattern itself:
Body
WHITE yarn
MC 6
INC 6
SC 12
SC 12
SC 12
(SC, INC) X 6
SC 18
SC 18
SC 18
(INC, SC 7, INC) X 2
(INC, SC 10) X 2
SC 24
SC 24
SC 24
SC 24
SC 22, DEC
DEC 2, SC 7, DEC 3, SC 7
(DEC, SC 6) X 2
DEC til closed, hide tail
Backpack
RED yarn
CH 7
Turn and SC 5, INC (3 in one stitch), SC 6
SC 14
SC 14
SC 14
SC 14
SC 14
Swap WHITE yarn
SC 14
Swap RED yarn
SC 14
DEC til closed, leave tail
That Thing On Top Of The Backpack
BLUE yarn, and, if you have it, the smaller crochet hook
CH 5
Turn, SC 4
Swap WHITE yarn
SC 4, SL 1, turn
SC 4, SL 1, turn
SC 4, SL 1, turn
Tie off, leave tail
For the winglets: SL 4 and sew on
At this point, I recommend sewing the 2 main backpack parts together using the tail. The blue window should be just the row underneath the white stripe on the backpack
Wings (x2)
WHITE yarn
MC 5
INC, SC 4
INC, SC 5
INC, SC 6
INC, SC 7
INC, SC 8, leaving tail
Detailing on wings: CH 18-20, however long you need to cover the shorter edge of the wings. Sew together, hide tail.
The wings should sit in the crevice between the body of the plushie and the backpack. You can go ahead and sew them together at this part. I recommend sewing one side of the circle at the base of a wing to the backpack first, repeat with the other. Then, you can sew the other side of the circle onto the body. For additional security, you can also use the tail of the red backpack to secure it better to the shuttle body. We're almost done!
Thrusters (x2)
GREY yarn, smaller crochet hook
MC 6
SC 6, leave tail
Sew onto back of shuttle
Cockpit window
BLUE yarn
MC 5 (do not complete the circle)
Sew onto nose of shuttle
And that's all! thanks for staying with me! Id like to try to make more transformers in crochet sometime, so we'll see how this pans out. In true third party transformers plausible deniability fashion, I think that I will call this Sundry's Crochet Transformers SCT-01 Sky Marshmallow, hahaha.
See you around!

108 notes
·
View notes
Text
My scattered commentary on the SC! jewel joker chp1

peach-pit, you promised me a calico cat boy, why the ugly light blue hair??


im sorry it's just not the same with out them.
(& nagihiko)

BEST BOY'S HERE! LETS GOOOOOOOOOOO

heyyy amakawa your face is as punchable as ever <3

i was gonna rack my brain on how Arcana fits into sc naming scheme if it weren't for the translator's note
everybody thank @terezis for their amazing job <333

man i cant wait for tadase's eventual villain arc where he snaps and leaves no survivors.

Why are we still forcing amu to do things she's uncomfortable with, i thought we outgrew the passive heroine shtick, or is this supposed to be a cute tsundere act im not following?

from the scale of 1-10 how bad was his breakup with amakawa that he made an evil version of seiyo academy just to spite him?
and if that weren't the case, id love to hear his reasons for mass producing guardians and if it'll ever top "a child ripped a page out of my picture book so i had to teach him a lesson."

Rima would be shutting this relationship down the second she caught wind of it. is this slander!

boi is not escaping the ikuto 2.0 allegations any time soon is he?
Cant wait for chp 2 where we meet tadase's new roommate love-interest!
34 notes
·
View notes
Text
Enoch (Over the Garden Wall) Crochet Pattern

Disclaimer:
This pattern has a lot of sewing. You've been warned! I couldn't find a way to minimize the sewing and still have the same color changes and composition I wanted.
Materials
Two different greens (Green 1 and Green 2) and orange yarn (I used a Medium sized yarn)
Appropriately sized Crochet Hook (I used a 3.5mm hook)
Black, soft brown and off-white felt to make the face details (If you can't find off-white felt, like me, buy white felt and paint it off-white with acrylic paint)
Stitch Markers
Tapestry Needle
Fiberfill
Scissors
Sewing Pins
Techniques
Magic Ring (mr)
Chain (ch)
Single Crochet (sc)
Increase (inc)
Decrease (dec)
Skip a stitch (skip)
Head


----- Using ORANGE
Round 1: 8sc into a magic ring [8]
----- The next two rounds are worked on the stitches from Round 1
Round 1.5: FLO 8sc [8]
----- Attach a stitch marker to the first stitch of Round 1.5 for later
Round 2: BLO 8inc [16]
Round 3: (sc, inc) * 8 [24]
Round 4: (sc, inc, sc) * 8 [32]
Round 5: (3sc, inc) * 8 [40]
Round 6: (2sc, inc, 2sc) * 8 [48]
Round 7: (5sc, inc) * 8 [56]
Round 8 - 16: 56sc [56]
Round 17: (5sc, dec) * 8 [48]
Round 18: (2sc,dec, 2sc) * 8 [40]
Round 19: (3sc, dec) *8 [32]
Round 20: (sc, dec, sc) * 8 [24]
----- Stuff
----- The next two rounds are worked on the stitches from Round 20
Round 20.5: FLO (sc, dec) * 8 [16]
----- Attach a stitch marker to the first stitch of Round 20.5 for later
Round 21: BLO (2sc, skip) * 8 [16]
Round 22: 8dec [8]
----- Stuff
Fasten off and leave an extra long tail. It should be able to wrap around your head 10 times.
Pass the yarn under a stitch from round 20.5. Wrap the yarn over and around the pumpkin and divide it in two. Pass the yarn under another stitch from round 20.5. Pull the yarn tight and secure it with a knot. Repeat this two more times until your pumpkin is divided in 6 parts.
Pass the yarn through the pumpkin from bottom to top to work on his top embellishment.
Starting from the stitch marker on the head's round 1.5
Round 1: 8inc [16]
Round 2: (2sc, inc) * 5, sc [21]
Fasten off and weave in the tail.
Body
----- Starting with GREEN 1 from the stitch marker on the head's round 20.5
Round 1: (sc, inc) * 8 [24]
Round 2: (sc, inc, sc) * 8 [32]
Round 3-24: 32 sc [32]
Round 25: 32 sc [32]
Round 26: (sc, dec, sc) * 8 [24]
Round 27: (sc, dec) * 8 [16]
Round 28: 8dec [8]
Fasten off and weave in the tail.
Arms (x2)
----- You can crochet around a wire to give the arms more structure
----- Using GREEN 1
22ch (Skip the chain if you're using a wire)
Skipping the first chain from the hook and 21 sl st
Leave a long tail for sewing
GREEN 1 Stripes (x9)
----- Using GREEN 1
27ch
Skipping the first chain from the hook and 26 sl st
Leave a long tail for sewing
GREEN 2 Stripes (x11)
----- Using GREEN 2
27ch
Skipping the first chain from the hook and 26 sl st
Leave a long tail for sewing
Assembly
Using sewing pins, attach all the stripes and the arms and stripes alternating greens. Once you're happy with the placement, sew everything.

Using felt, cut the following shapes:
2 soft brown circles
2 black circles (smaller than the brown ones)
1 skinny black heart that will serve as a nose
1 soft brown oval
1 off-white oval (smaller than the brown one)
----- To make the teeth, I just cut the smile and then vertical lines. When it was time to glue it on the brown oval, I separated them a bit for that teeth effect.
Glue everything and you're done!
25 notes
·
View notes
Text


ROUND 3/23 ⸺ australian grand prix ✩ 02.04.2023
maple's rating: ★★★★ (8.5/10)
☁︎ click read more facts, highlights & experiences ☁︎

✩ facts
this was the first ever grand prix with three red flags
max's first win in australia
max now has the same amount of podiums as ayrton senna
lewis and max have now finished 1-2 34 times - more than any other f1 pairings (🤯🤯🤯🤯)
fernando had his third consecutive podium for the first time since 2013
there are 11 wdc between the top 3 💓💓💓
lewis debuted in australia with mercedes 10 years ago
hungary 2018 was the last time all the drivers on the podium had a wdc!
the first time that two aston martin's were in the top 4!
✩ raceweek highlights
checo flopping in quali...
max on pole!
max flop start 🙄
charles immediately in the gravel 🫣🫣
alex crashing a few laps later 💔💔
mercedes awful strat by pitting george 💀💀
red flag 1/3 🔴
max trying to call out lewis in the formation lap (LMAO)
george's car absolutely dying 🔥🔥🔥
kevin into the fucking wall 😵😵😵
red flag 2/3 🔴
french on french violence 🇫🇷🧨🇫🇷
fernando got fucked by carlos 💥💥💥
NYCK. FLOP.
red flag 3/3 🔴
carlos in absolute shambles because of his penalty (THE SUN WAS IN HIS EYES ☀️☀️☀️☀️☀️☀️)
sc ending PLEASE
max looking like the ☀️ on the podium
three wdc on the podium!!
✩ maple's diary
#2023 project#australian gp 2023#australia gp 2023#australian gp#australia gp#f1#formula one#f1blr#formula 1#f1 2023#f1 2023 season#max verstappen#carlos sainz#carlos sainz jr#george russell#gif#gifs#my gif#my gifs#f1 creator#edit#f1edit#.txt#2023 season#red bull racing#rbr
46 notes
·
View notes
Text
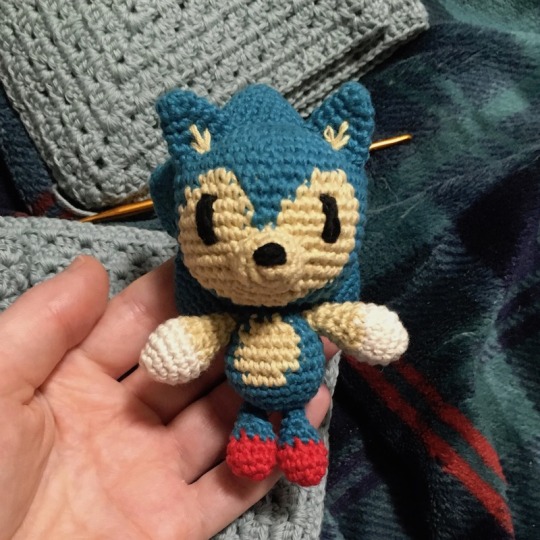

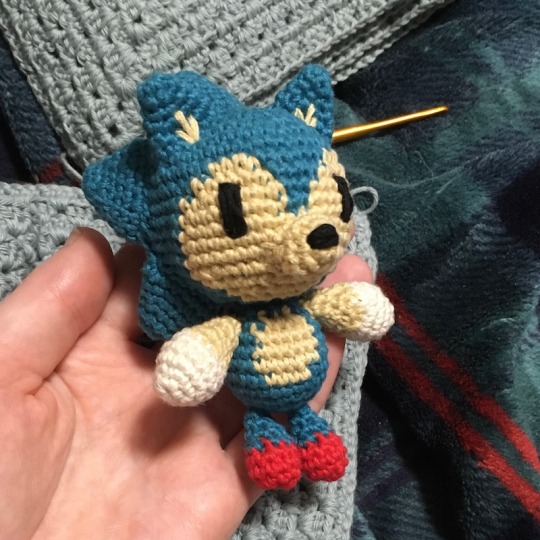
gotta go fast!!!!
i wanted to make a really cute, really simple sonic amigurumi; i think he's a success! pattern below the cut
head, working DOWN to the neck
in blue:
1: 8 sc in mr (8)
2: inc x8 (16)
3: (sc, inc) x8 (24)
4: (sc, inc, sc) x8 (32)
5: (sc x7, inc) x4 (36)
6: (sc x5, inc) x6 (42)
7: (sc x3, inc, sc x3) x8 (48)
8: blue sc x17, tan sc x4, blue sc x6, tan sc x4, blue sc x17 (48)
9: blue sc x16, tan sc x6, blue sc x4, tan sc x6, blue sc x16 (48)
10-11: blue sc x15, tan sc x8, blue sc x2, tan sc x8, blue sc x15 (48)
12-14: blue sc x15, tan sc x18, blue sc x15 (48)
15: (sc x4, dec) x8; stitches 1-13 blue, 14-28 tan, 29-40 blue (40)
16: (sc x3, dec) x8; stitches 1-12 blue, 13-22 tan, 23-32 blue (32)
17: (sc x2, dec) x8; stitches 1-10 blue, 11-16 tan, 17-24 blue (24)
18: (sc, dec) x8; stitches 1-8 blue, 9-10 tan, 11-16 blue (16); stuff
19: dec x8 (blue) (8); cut & fix off w/ tail for sewing
body, working UP to the neck
in blue:
1: 8 sc in mr (8)
2: inc x8 (16)
3: (sc x3, inc) x4 (20)
4: (sc x2, inc, sc x2) x4 (24)
5: (sc x5, inc) x4 (28)
6: blue sc x15, tan sc x4, blue sc x9 (28)
7-8: blue sc x14, tan sc x6, blue sc x8 (28)
9: (sc x5, dec) x4; stitches 1-12 blue, 13-18 tan, 19-24 blue (24)
10: (sc, dec) x8; stitches 1-9, blue, 10-12 tan, 13-16 blue (16); stuff
11: dec x8 (blue) (8); cut & fix off w/ tail for sewing
use the tails from the head & body to attach the pieces securely. try to align the centers as best you can.
snout
in tan:
1: 6 sc in mr (6)
2: inc x6 (12)
3: sc x6, hdc, dc x4, hdc (12); slst & cut w/ tail to sew to face.
arm (make 2)
in white:
1: 5 sc in mr (5)
2: inc x5 (10)
3: (sc, inc) x5 (15)
4-5: sc x15 (15); switch to tan for the rest of the arm
6: (sc, dec) x5 (10)
7: (sc x3, dec) x2 (8)
8: sc x8 (8)
9: (sc, dec, sc) x2 (6)
10: (sc, dec) x2 (4); cut & fix off w tail for sewing to the body. recommend to attach the spikes to the head before attaching the arms.
leg (make 2)
in red:
1: 6 sc in mr (6)
2: inc x6 (12)
3: sc x12 (12)
4: (sc x2, dec, sc x2) x2 (10); switch to blue for the rest of the leg
5: (sc x3, dec) x2 (8)
6: (sc, dec, sc) x2 (6)
7: sc x6 (6); cut & fix off w tail for sewing to the body.
spikes (make 3 full size, make 2 that leave off the last round)
in blue:
1: sc x6 in mr (6)
2: (sc, inc, sc) x2 (8)
3: (sc, inc) x4 (12)
4: sc x12 (12)
5: (sc, inc, sc) x4 (16)
6: sc x16 (16)
7: (sc x3, inc) x4 (20); flatten in half, cut & fix off w tail for sewing to head. the three larger spikes are on the top/center of the head, with the two smaller ones being the lowest ones on either side. make sure not to place the spikes too far forward, bc you need room for the ears too.
ears (make 2)
in blue:
1: 6 sc in mr (6)
2: (sc, inc) x3 (9)
3: sc x9 (9)
4: (sc, inc, sc) x3 (12)
5: (sc x3, inc) x3 (15); flatten in half, cut & fix off w tail for sewing to head.
tail
in blue:
ch 4, turn & slst back down the chain. cut & use both tails (they should be on the same end of the chain now) to attach to body.
embroider details for inner ears, eyes, & nose.
362 notes
·
View notes
Text
TOTK Light Dragon Crochet Pattern
It's been a while! Here's a crochet pattern for the Light Dragon from Tears of the Kingdom. I'll post it on deviant art shortly.

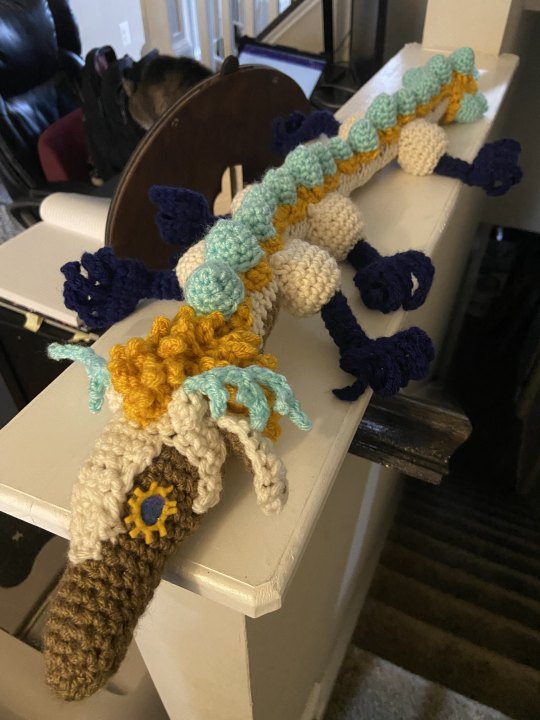

Full pattern below cut. If this ends up on P*nterest, I'm going to be very disappointed with one of you.
Stitches used (abbreviations): chain (ch), slip stitch (sl st), single crochet (sc), double crochet (dc), treble crochet (tr), increase (inc), decrease (dec)
This pattern is complicated – partially because I haven’t written a pattern for anything in a number of years, partially because the Light Dragon has a lot of weird parts. There’s chaining and slip stitching into the chains to make antlers, front loop and back loop work, flattening and working through two halves of a round simultaneously, and a lot of positioning.
I typically work in the round, without joining; if you would like to join, just add a sl st and a ch 1 to the end or start of each row in the round. It may make things twist less.
Head (1 in light brown)
1: ch 3, sc 2 in 2nd ch from hook, sc 3 in last chain, turn work (so that you’re working on the far side of the chain), sc (6)
2: sc, inc twice, sc, inc twice (10)
3-6: sc around
7: in, sc around (11)
8: sc 5, IN BACK LOOP ONLY inc, in BOTH LOOPS, sc 5 (12) (the empty loop will be used with the white head marking)
9: sc around (12)
10: sc 3, inc, sc 5, inc, sc 2 (14)
11: sc 13, inc (15)
12: sc 7, inc, sc 7 (16)
13: sc 4, inc, sc 6, inc, sc 4 (18)
14: sc 8, inc, sc 8, inc (20)
15-18: sc around (20)
19: sc 3, dec around (16)
20: sc 2, dec around (12) DO NOT F/O, continue to body
Begin stuffing here, and continue stuffing as you go
Begin Body
21: sc 6 in brown, join cream, in BACK LOOPS ONLY, sc 6 in cream (12)
22- 25: sc 6 in brown, sc 6 in cream (12)
26: sc 1 cream, sc 4 brown, sc 7 cream (12)
Rep rows 22-26 1 time
32-: rep row 26 (12)
Continue repeating row 26 until you’re happy with the dragon’s body length; mine was a total of 89 rounds. Then, continue with the tail
90: sc 1 cream, sc 4 brown, in cream sc 2, inc, sc 2, inc, sc (14)
91-96: Sc 1 cream, sc 4 brown, sc 9 brown (14)
97: sc 1 cream, sc 4 brown, in cream sc 2, dec, sc 2, dec, sc 1 (12)
98: sc 1 cream, sc 4 brown, in cream sc 1, dec, sc 1, dec, sc 1 (10)
99: sc 1 cream, sc 4 brown, in cream sc 1, dec twice (8)
100: sc 1 cream, in brown dec twice, in cream dec twice (moving the stitch marker to after the decrease) (4)
F/O, make sure everything’s stuffed and weave in ends
White Head Marking (One in cream)
On one end of the unworked loops from Head/Body round 21, attach cream
1: inc, sc 4 inc, ch 1 and turn (8)
2: inc, sc 2, inc, sc 3, inc, ch 1 and turn (11)
3: inc, sc 4, inc, sc 4, inc, DO NOT ch 1 or turn (yet) (14)
4: ch 4, turn, sl st in 2nd ch from hook, sc in next two chs, skip first sc in the row (last worked sc from row 3), sc in 2nd sc, sc one more, skip next sc, sc in the stitch next to it (you want the hole, it’s for antlers), sc 4 more, ch 1, turn
4.1-2: sc 4 across, ch 1 and turn (4)
4.3: sc, dec, sc, ch 1 and turn (3)
4.4-5: sc across, ch 1 and turn (3)
4.6: sc, dec, ch 1 and turn (2)
4.7 dec, sl st into the open loop from Head row 8, sl st into the side of the head marking until you get back to row 4, cont row 4
4 cont: skip the first sc in row 4 (this is the other antler’s space), sc 4, ch 1, turn, sc 4, sl st in 2nd ch from hook, sc 2, join into a sc in row 4
F/O, leaving a long tail
Spike numbers depend on how long your dragon is; her back spikes are arranged in a large-med-small-med-large pattern, starting with two large spikes and ending with an extra seven large spikes on the tail (two on top, four on the sides, and one of the very end). I would recommend making two large, two medium, and one small spike to start, and laying them out to see how many repetitions of that pattern that you can fit on the dragon, and how many spikes you need. I fit three repetitions, and those amounts are reflected below.
Large Spikes (in light blue) (I made 11)
1: sc 4 in mc (4)
2: inc, sc around (6)
3: inc, sc 2 around (8)
4: inc, sc 3 around (10)
5: inc, sc 4 around (12)
F/O, leaving a long tail
Medium Spikes (in light blue) (I made 6)
1: sc 4 in mc (4)
2: inc, sc around (6)
3: inc, sc 2 around (8)
4: inc, sc 3 around (10)
F/O, leaving a long tail
Small Spikes (in light blue) (I made 3)
1: sc 4 in mc (4)
2: inc, sc around (6)
3: inc, sc 2 around (8)
F/O, leaving a long tail
Under-spike gold
I found this easier to follow by working conceptually. You are making circles for each spike to sit on top of. To start, count your spikes, and chain: 6 for each large spike; 5 for each medium spike; and 4 for each small spike. (I had ch 80, but I needed ch 83, see below). Add 2 chains at the end. Those last two chains count as Tr, not as chains to skip/work into. You’ll end up working on either side of the starting chain, mirroring what you do on one side on the other.
For large spikes, skip 2 chs, Tr 5 in 3rd ch, skip 2 chs, sl st in 3rd ch
For medium spikes, skip 2 chs, dc 5 into 3rd ch, skip 1 ch, sl st in 2nd ch
For small spikes, skip 1 ch, dc 5 into 2nd ch, skip 1 ch, sl st in 2nd ch.
Combine the above to match how you want your spikes to sit on your dragon; when you get to the end of the chain, turn your work so that you’re working back up the chain, and mirror your stitches. You should have the correct number of circles, and be able to sl st into the first ch. I had to put Tr 10 into the first ch, since I did not have enough circles, but the ultimate placement worked out.
For the side spikes on the tail, do the following twice: Ch 10, tr 5 in 4th ch from hook, skip 2 chs, tr 10 in last ch, skip 2 sts, tr 5 in the next st (the same st as the initial tr 5), sl st to the first tr, F/O with a long tail. Sew to body, on the sides of the main tail under-gold.
I had to make one circle for the final spike on the tail, by ch 6, tr 5 in 3rd ch from hook, skip 2 chs, sl st into last ch, skip 2 sts on other side of work, tr 5 into next ch (again, where the initial tr 5 is, you’re making a circle), sl st onto first tr and F/O. A magic circle of 6, increasing around to 12, would probably work just as well; so would making the initial golden circles longer to accommodate this spike. I simply lost my spike and didn’t realize it until after I had placed everything.
Hair (make 1 in gold)
1: ch 21, starting in 2nd ch from hook, sc across (20)
2: ch 4, sl st into 2nd ch from hook, sc, in next ch, hdc in last ch, skip a st of row 1, sl st into front loop of next sc. Repeat across the row. Ch 1 and turn at end. (10 spikes)
3: Working in back loops only, sc across, ch 1 and turn (20 sc)
4-7: repeat rows 2-3 twice
F/O, leaving a long tail
Horns (make 2, in cream and turquoise)
In cream:
1: ch 2, sc 4 into 2nd ch from hook (4)
2: sc around (4)
F/O, and turn so that the right side is out. Leave enough tail to sew onto the head.
Using Turquoise, sl st into the cream starting ch. The horns are made from one long chain with different spikes; after slip stitching a new ‘spike’, you’ll continue slip stitching into the original chain.
Ch 12, starting in 2nd ch, sl st 4, ch 4, starting in 2nd ch sl st 6, ch 5, starting in 2nd ch sl st 3, ch 2, starting in 2nd ch sl st 5, ch 3, starting in 2nd ch sl st 4 and F/O (you should have worked all chs)
‘Bangs’(make 1 in gold)
1: ch 7, starting in 2nd ch from hook, sc across (6)
2: ch 4, sl st into 2nd ch from hook, sc, in next ch, hdc in last ch, skip a st of row 1, sl st into front loop of next sc. Repeat across the row. Ch 1 and turn at end. (3 spikes)
3: Working in back loops only, sc, dec, dec, sc, turn (4 sc)
4: rep row 2 (2 spikes)
5: in back loops only, dec twice (2)
6: rep row 2 (1 spike)
F/O, leaving a long tail
Sew this to the forehead of the dragon, directly between the horns – the 6th row points out, the 1st row attaches to the hair
Legs (make 6 in dark blue, 3 left and 3 right):
1: ch 6, join in first ch, sc around (6)
2-7: sc around (6) make sure that you’re working right side out!
8: in front loops only, inc around (12)
9- 10: sc around (12)
Flatten the previous row; you will sc through two stitches at once, closing the opening as you make fingers
RIGHT HAND 11: ch 6, starting in 2nd ch, sl st 5, sc through parallel sts in row 10 twice, *ch 9, starting in 2nd ch, sl st 8, then sc into two parallel stitches in row 10* repeat 3 more times, sl st through the last two parallel scs
LEFT HAND 11: *ch 9, starting in 2nd ch, sl st 8, sc through parallel sts in row 10* repeat 3 more times, sc through parallel sts in row 10 once more, ch 6, starting in 2nd ch sl st 5, sl st through the last two parallel scs.
F/O, leaving the leg unstuffed. You do not need a long tail, just enough to tie off and weave in.
Hips/Shoulders/Haunches (make 6 in cream)
You’ll be working directly into the legs, from their starting chain, and crocheting in the opposite direction. Make sure that the work faces out. Try to plan where you start to be where you want the shoulder to be – in row 6, you’ll begin working only half of the stitches, and they’ll be the stitches in front of your starting position.
1: make a slip st, and join into the starting chain for the legs. Inc around (12)
2: sc, inc around (18)
3-5: sc around (18)
6: sc 9, ch 1 and turn (leaving other sts unworked) (9)
7: sc 6, dec, F/O
F/O, leaving a long tail. Stuff the haunch, leaving the arm/hand unstuffed.
Ears: (make 2)
Inner Ear (brown)
1: ch 3, sc in 2nd ch from hook, sc in last ch, ch 1 and turn (2)
2-4: sc across, ch 1 and turn (2)
5: dec, ch 1 and turn (1)
6: sc, F/O (1) your tail can be short, it won’t be used to fasten anything. I hid mine between ear layers.
Outer Ear (cream)
1: leaving a long tail, ch 4, sc in 2nd ch from hook, sc across, ch 1 and turn (3)
2-4: sc across, ch 1 and turn (3)
5: dec, sc, ch 1 and turn (2)
6: dec, ch 1 and turn (1)
7: sc, ch 1, and turn the work so that you’re working on the edge of the work. Sc into the edge of row 7. Lay an inner ear over the outer ear, and sc into both pieces, along the edge. You’re joining the ear parts together. F/O, leaving a long tail to sew the bottom of the inner ear onto the outer ear. For one of the ears, you’ll have to work backwards or upside down if you don’t want two left ears – or you can just sew both inner ears to the outer ears.
Assembly: Stitch the white head marking to the head. I pinned on the hair, and attached the spikes and under-spike gold. To make this easier, I stuffed and attached each spike onto the under-spike gold first, and then pinned and sewed the gold onto the back (be careful to keep it centered). Then I attached the tail spikes, and stitched down the hair. I added the horns, ears, and bangs, and finally pinned all of the legs. I was careful to keep the legs attached only to the cream, not the brown belly, but that was just a stylistic choice that I made. Finally, you can make and attach the eyes; I used some felt and markers, though I’m not overly pleased with the effect.
#crochet pattern#amigurumi#loz totk#light dragon#light dragon crochet#tears of the kingdom crochet#it's been years since i made a pattern#hopefully this works out alright#i dont quite have energy to help folks troubleshoot#especially after the last person was frankly pretty rude about it#but that was on deviant art so its fine
66 notes
·
View notes
Text
Reunited
Part 10
Illumi x Reader
Part 9
Part 11

Dawn breaks, as the airship carrying (Name) and her friends approaches its destination. The Third Phase of the Hunter Exam is about to begin.
(Name) startles awake when she hears an announcement play over the speakers.
“I apologize for the long wait. The airship will soon arrive at its destination.”
The girl rises from her place on the floor, watching the other woman do the same out of the corner of her eye.
(Name) stretches lightly and heads to the bathroom to get a quick shower before they land.
—————
The applicants gather on top of a large pillar, looking around in confusion.
“What is this?”
“There’s nothing here.”
(Name) joins her group, checking over her bag as she does.
“Ahem.”
Everyone turns to give Beans their full attention.
“Everyone, the exams Third Phase will begin here, at the top of trick tower.” Beans smiles. A man tilts his head, looking at Beans in confusion.
“Trick Tower?”
“To pass this phase, you must reach the tower’s base alive. The time limit is seventy-two hours. With that, we will now begin the Third Phase. I pray for your success!”
“No way.” Leorio whispers. (Name) begins to stretch her limbs to limber up.
The crowd disperses to check out their surroundings. (Name) attempts to do so as well, but before she can get more than ten feet away, she falls into a trap door.
The other four in her group remain unaware of her absence for around 5 minutes, until Gon’s eyes scan the area around them.
“Where did (Name) go?”
—————
“Ouch…”
(Name) stood slowly, rubbing her hurt wrist gently. She’d landed on it when she fell, and although Leorio had bandaged it and given her an ice pack, it still ached.
She was in a plain room, the only visible detail being a circular table holding several bracelets. On the wall behind the table was a sign.
“The five of you must follow the will of the majority to reach the goal.” (Name) read aloud. She let out a cry when the roof of the room opened up and another person fell in.
Though saying they fell in wasn’t accurate, the man landed perfectly. (Name) felt a twinge of jealousy at his safe landing. Her throbbing wrist was a constant reminder of her less than graceful tumble.
The man in question was the disguised Illumi, who (Name) recognized as Gittarackur. She studied how he surveyed the room with a careful eye, his gaze only faltering when it landed on her.
“Hello, I’m (Name). You’re Gittarackur, right?”
“… yes.”
Illumi’s eyes didn’t leave her figure, noticing her pained expression. His eyes softened ever so slightly when she leaned towards him, holding out her good hand. He shook it firmly, trying his best to be gentle.
“It’s nice to meet you, Gittarackur. I hope we can work together to get out of here.”
For a moment Illumi wondered if she was this kind to everyone. The way she smiled her pretty smile and shook his hand so delicately… did she do that with every person she met?
His thoughts were interrupted by the loud growl of his stomach. He had trouble sleeping last night and had slept in, which was unusual for him. Because of that, he hadn’t been able to eat breakfast. If his mother was here, she would scold him.
“Oh, did you eat breakfast? It was really good! I stuffed some extra bacon and toast into my bag. Want some?”
He felt something in his chest flutter. Her concern for him seemed to cause a reaction, what that was exactly he didn’t know. He could only nod quietly and watch her unpack the toast and bacon she had wrapped in aluminum foil.
Illumi had seen her packing the extra provisions before, so he decided to trust that she hadn’t poisoned. He was decent at reading peoples character, and (Name) didn’t seem like the type to poison him.
Once the food was in his hands, he devoured it like a starving dog, forgetting his manners. (Name) began packing her bag back up as he did.
—————
The two sat in silence as three other people fell into the room, one after the other. The first was a short man, second a tall one, a third a scrawny one. None of them seemed too interested in team work, so (Name) stuck by Illumi. Once the last person had fallen in, they all put on the bracelets and began the phase.
The group made their way through several doors, deciding which way to go each time. They mostly chose the same answers, besides when there was an option for left or right.
(Name) kept a close eye on “Gittarackur”, who she felt oddly connected with. She wasn’t quite sure why, but he felt like the best choice of a companion while she was separated from her group.
After one last answer, the group arrived at labyrinth like structure. The walls were 20 feet tall, and covered in vines. It smelled like decay, almost causing (Name) to vomit up her breakfast. She steeled herself, leaning against the doorway for support.
“So, this is our trial.”
The short man squatted down and began stretching his legs out, a confident smirk on his face. “I’ll just climb to the top and walk right out of here. See ya, losers!”
Before anyone could stop him, he climbed up the walls using the vines. (Name) marveled at his climbing ability, clapping as he easily reached the top.
“Wow, that’s amazing! He-“
She felt someone’s hands cover her eyes. (Name) almost wish they had covered her ears too, because the sound of screaming was almost worse than what she would have seen.
Illumi watched as the man was sliced in half by the talons of a harpy like beast. The harpy let out a satisfied screech as she began to tear into the flesh of the man, the sound of skin ripping and blood splashing the rock walls of the labyrinth echoing through the halls.
Once the harpy had eaten its full, it carried the remains off, perhaps to feed its young. Illumi waited until it was out of sight to pull his hands away from (Name)’s eyes. He bristled when he spotted big tears falling from her eyes and rolling down her cheeks.
Her hands shook as she turned to look at him, her eyes wide with fear. “Will that happen to me?”
Illumi felt the world around him pause. He wondered why he felt the need to comfort her right now, why her trembling hands and watery eyes made him so angry and so…
“No. I won’t let anything happen to you.”
That was that. He grabbed her hand and they continued through the labyrinth. He made sure to keep her on the opposite side the man had been devoured on.
——————
They’d been walking for about 4 hours when (Name) asked for a break. The group of four sat down, (Name) passing out drinks and food to everyone. Only Illumi noticed how small her own portion was. Another feeling washed over him. He was beginning to think this girl was more trouble than she was worth.
“Gittarackur!”
(Name) leaned towards him, whispering into his ear. Illumi jumped, having her so close that he could smell her strawberry lilac perfume made him… uneasy? Again he couldn’t place the feeling. She grabbed his hand, setting something in the palm of his hand.
“Shh, I only have this one left. Don’t tell the others.”
When he opened up his palm to peer in, he saw a shiny piece of butterscotch candy. The wrapping crinkled when he moved it, causing (Name) to frantically look around and press a finger to her lips.
He held back the urge to roll his eyes, opening it quietly then placing it on his tongue. (Name) perked up, her eyes observing his face fit a reaction that never came. Her lips formed a pout and she crossed her arms.
“Do you like it?”
She tried her best not to look disappointed when he shrugged. Illumi took a bit of pleasure in the way she huffed and packed her bag, finding it cute.
“It’s good.”
(Name) stopped at his words. She peered up from her bag to see him smiling, albeit a bit of a creepy smile. Nonetheless she smiled back, zipping her bag and placing it on her back.
While the two had been busy, the tall man had vanished. The last man, who neither of them had spoken to, seemed somewhat… suspicious. Illumi decided to keep a closer eye on him than before.
Another two hours passed on in silence, only occasionally interrupted by the sound of (Name) tripping over vines. Illumi had applied over 5 of (Name)’s bandaids to her slowly growing collection of scrapes.
“Can’t you be more careful? Didn’t anyone teach you to watch where you walk?” Illumi asked, applying the sixth Hello Kitty bandage to her knee. (Name) whined lightly, pulling her knees to her chest to pout.
“I am! It’s just…”
She looks away, her eyes on the vines.
“It’s like the vines are reaching out to grab me.”
Illumi stops, blinking slowly before reaching out and grabbing her ankle. (Name) starts to question him when he pulls her up by her leg, looking at her ankle questioningly.
“H-hey! Put me down!”
(Name) wiggled, trying to escape his ironclad grip to no avail. She instead chose to focus on keeping her skirt down. Even though she was wearing shorts underneath, it was still embarrassing to have a stranger holding her up by her ankles like she were a vegetable.
Illumi stared at her ankle, a theory forming in his mind. Her ankles were red, as if they had rope burn. He was sure if it now.
“The vines… are alive.”
He let her go, focusing on the scrawny man from before.
“What happened with you and the other man?”
The scrawny man started laughing, tears welling up in his eyes. “That man was my BROTHER. We came here to do the Hunter Exam together, hoping to pass so we could get some good paying jobs. But…”
He punched the wall, his fist breaking upon impact. “Those damn vines. While you two were having a relaxing picnic, my brother and I decided to sneak away to get out before you. Makes it easier to get through the phase when you have less competition right?”
He laughed humorlessly, biting his trembling lip. “My brother goes ahead of me to make sure it’s safe. He’s always been like that, my big brother. Always there for me, always protecting me…”
The man sighs, dropping his broken hand.
“Not this time. When he didn’t come back I went to get him, and what did I see? These fucking vines had encased him. Twisting him up like a pretzel, begging me to just kill him.”
(Name) held her hand over her mouth, waiting patiently for him to continue.
“And I did. How could I ignore my brother’s pain? I’ve helped him put sick animals out of misery, I’d be a hypocrite to let my own brother suffer like that.”
Illumi stood in front of (Name) protectively, waiting.
“Is that it?”
The man rolled his eyes, letting out a haughty laugh.
“Oh no no, of course not. The vines, they attached themselves to me. They’re alive, a network of living organisms. My brother is in there, and he’s hungry.”
He pulled out a hatchet, twirling it expertly.
“So I’m gonna feed you to them. Your blood will keep my brothers consciousness alive.”
The man gripped the handle of his hatchet, his broken hand cracking under the pressure.
(Name) closed her eyes, and when she opened them the man was dead on the floor. Illumi wiped blood off of the killing needle, his face neutral.
“Those vines cause hallucinations when they’re cut. He must of cut some when enacting his mercy killing. Vines must of made him think his brother was still alive and needed to feed.”
He began walking again, this time making sure to stay in the middle of the path to avoid the reaching vines. (Name) followed close behind.
She tried not to think about how easily her companion had taken a life, instead deciding to focus on the exam.
——————
The two reached the end of the labyrinth without much fuss. (Name) leaned against the now vine-less wall and sighed out in relief.
“When this exam is over I am going to sleep all day long.” she whined out, rubbing at her aching wrist.
(Name) and Illumi exit through a stone door, a voice saying they were 2nd(Illumi) and 3rd(Name) to complete the exam. It had taken them a total of 12 hours and 2 minutes.
Once they had entered the room, Illumi turned to see Hisoka sitting on the stone floor, leaning against the wall.
“I figured you’d already crossed the finish line.”
Hisoka only grinned, his eyes flitting to (Name) for just a second before another door opened.
“ALL RIGHT! I’m the first to fini-“
“Hanzo, applicant #294, is the fourth to pass!”
“Huh?”
Hanzo glances around the room, his gaze passing over each applicant before he cries out.
“No!! I don’t believe this! I came in fourth…”
(Name) laughed nervously, scooting behind Illumi to avoid Hisoka’s prying eyes. Illumi noticed this, looking between the two suspiciously.
“Let’s rest. We’ll have to wait around 60 hours for the other applicants to finish.” Illumi said, sitting down on the dusty floor. (Name) huffed, plopping down beside him with a pout on her lips.
“What if I have to pee? This sucks.”
Illumi tilted his head. “You can just go to a corner, I guess.”
(Name) groaned, covering her anguished expression with her hands. “Gittarackur, I am NOT going to pee in front of a bunch of guys, especially Hisoka. I feel like he would be into that.”
She whispered the last part into Illumi’s ear, looking over at Hisoka warily. Illumi raised an eyebrow, a smile pulling at his lips. He didn’t respond to her statement, only leaning against the wall and closing his eyes.
——————-
TAGLIST
@tsukilover11
if you’d like to be added to the taglist, please comment or send an ask!!
#x reader#anime x reader#headcanon#reader insert#requests open#smut requests#hxh imagines#hxh x reader#hxh illumi#hxh gon#hxh killua#hxh headcanons#hxh leorio#hxh kurapika#kurapika x reader#leorio x reader#feitan#hunter x hunter x reader#illumi hunter x hunter#hunter x hunter chrollo#kny#kny x reader#kny giyuu#demon slayer x female reader#x reader smut
222 notes
·
View notes
Text
Distances in AoT
Or: Yams has no idea of geography and the relationship between distance and travel times in AOT makes no sense.
PART TWO: GEOMETRY AND PONIES
In the first part, we’ve seen how freaking huge the distances between the main districts of the Walls are. Here is a summary:
Center-Sina: 250 km
Sina-Rose: 130 km (Center-Rose: 380 km)
Rose-Maria: 100 km (Sina-Maria: 230 km; Center-Maria: 480 km)
To go from a District to the next on the same wall:
Along wall Sina: 393 km (352 if cutting in a straight line between the two)
Along wall Rose: 597 km (537 in a straight line)
Along wall Maria: 754 km (~720 in a light curve, as straight line not possible)
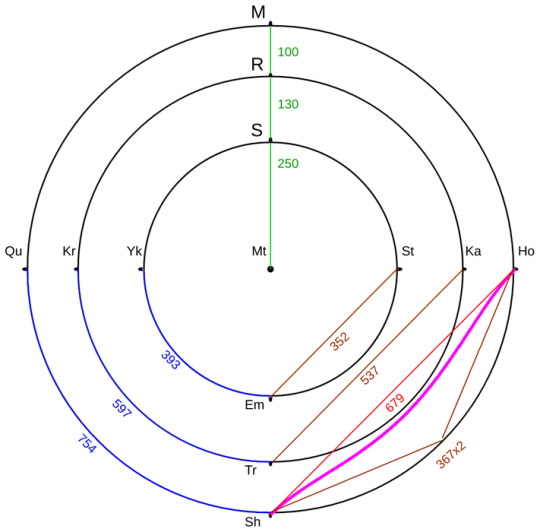
Here’s a summary of the shortest distances (combining radius and chords) between districts:
(I’ve only put the most frequently mentioned in canon)
Throughout canon, we see the characters moving between a handful of Districts. To the iniciated it may look like said travels are a tad too fast considering the means of transport that they use. It’s okay. The insta-travel effect has been seen in every other epic fictional world, be it the Middle Earth, Westeros or Narnia. And we’re willing to suspend our disbelief. But AoT has a crucial difference in that sense.
We’ve been told the exact distance between the walls. In kilometres, not some fictional or obscure, ancient measure unit. Suspending disbelief does not come easy when the numbers are exact.
It’s like when you’re watching a movie, and the hero has only 10 minutes to get to the bomb before it detonates, so he races through the streets of, say, Paris, and they go from the Louvre, to the Arc de Triomph, wreck havoc on a market along the Seine, rush through Montmartre, around the Eiffel Tower and skid to a halt when the car crashes in front of the Opera. And most people will be ok with that, but the few millions who live in or know Paris are like... Nope. That’s not possible. Not even with 007’s Aston Martin or the Batmobile. That makes absolutely no sense. It’s ten times worse if the hero is running.
Well, guess what, the Survey Corps do not travel in the Batmobile.
The Survey Corps travel by horse. On longer expeditions, they also have horse-drawn carts.
Now, if you fill up the tank of your BMW and pad your butt, you can drive the 480 km (road distance) from Berlin to Ansbach in about 4:40 hours without traffic. That’s not stopping for anything other than traffic lights, and using some of the best highways in the world. That’s an average of 102 km/h. With normal traffic, you could do that in 5:30 hours, averaging 87 km/h. That’s how long a badass modern car would take to go from Mitras to Shiganshina.
But, and this may come as a shock, a horse is not a car.
First and foremost, a horse cannot ride as fast as a car. As per the Publicly Available Information from canon, “The stable horses used by the Survey Corps are selectively bred (...) and travel for many hours without complaining. (...) Their top speed is between 75–80 km/h, and they can maintain a swift 35 km/h gallop. The horses are tenacious, able to maintain a fine speed of 20 km/h even when pulling a carriage.”
For one good thing in all this mess, numbers are in accordance with real horses. And I have no problem accepting that the SC horses are the cream of the crop when it comes to speed and resistance, like our fastest horses and most resistant horses combined. But horses, I repeat, are not cars.
Cars are machines. Horses are living, sentient beings. They cannot fill their stomach like a car a gas tank and run at top speed until it empties, rinse and repeat. They need food and water. They need shoes. They need bathroom stops (they can shit while walking, but they need to stop for pee). But mostly, they need rest. Horses can and do die of exhaustion. (And given that SC horses are super expensive, you don’t want to work them to death.)
A horse can maintain its maximum speed for only 3 km—4 for a race champion. That’s the maximum length of horse track races, actually. After such a sprint, they need to rest for a while. So even when dodging titans, you won’t do so at top speed – you just need to be faster than the enemy. Obviously, the slower the gallop, the longer the time it can be maintained, so sprinting at less-than-top-speed will allow to dodge more titans.
When you’re just travelling from point A to point B, then, you won’t waste the precious energy of the horse in a sprint. Those journeys would be made at a lower speed, for the faster you make the horse go, the more, longer stops it will need to rest, catch its breath, eat and drink. Likewise, if the horse is carrying weight, it will go slower and need more rest. Long distance horses can only cover 50–60 km per day—And before someone says endurance competition horses can run over 100–160 km in a day... that is not the same as 100 km per day, in the same way marathon runners don’t do 42 km per day; they do them in a day. The day of the race. After training specifically for that race. Then they rest for a few days. Horses are the same. Moreover, long distance endurance races have mandatory vet checks along the way to see that the horse is able to keep going. And if you have an expensive horse and no vet every 20 km to check it, you will take care not to push it, lest it collapses midway and the titans eat you.
So, considering SC horses are specially bred for endurance, we can safely equate them to long-distance working horses of our world; I’ll assume they’re the GOAT and can cover 60 km per day.
But wait! I hear some of you say. If they can go at 35 km/h, they can cover much more than 60 km a day! Er... no. Because they need to rest. They cannot trot at 35 km/h for 8 hours straight. They can’t even walk for that long without stopping to rest. Same as like Marathon runners never reach the same speeds as sprinters and middle-distance runners.
Please note that this numbers refer to a single horse. You can cover longer distances, or cover a given distance faster, if you change your horse for a freshly rested one at given points. This is not an instant process: the new horse will have to be tacked and you’ll have to transfer the cargo, if any, from horse A to horse B (in AoT world, they cannot text the next station to have the horse tacked when they arrive). A convoy of several horses will be slightly slower and, I repeat, if there are carts, the whole convoy will be conditioned to the slowest cart (the horse/s will be slowed by the cart in the same way a car is slowed if you attach a trailer to it). In every rest station, the horse needs to be untacked and then re-tacked before continuing, same as hikers will put down their backpacks when taking a break.
For reference, The Pony Express, the fastest horse dispatch system ever, could cover 300 km per 24-hour day (they rode day and night). They managed to cover that much that by having a huge infrastracture that allowed the rider to change horses every 16-24 km, and pass the dispatch to another rider every 75 km or so. That’s 4-7 horses every 100 km.
So either AoT horses are more magical than My Little Pony ones or Yams cannot distinguish between a horse and a Ferrari.
Guess which one I’m betting on.
Side Comment: The Ferry
Talking about this with one of my fandom friends, she mentioned her bafflement that they didn’t use the ferries that we see in the first chapters evacuating people from Shiganshina to transport themselves quickly from place to place. I thought she had a good point, so I looked into it. Thankfully for Yams though, I looked into this and it’s not really an option.
The steam engine is unknown in Paradis, so the ferries would have to be operated manually. (The publicly available info panel on the subject comes from the Lost girls OVA, so its canonicity is questionable, and it has contradictory info saying they are moved via wires along the river (as manual ferries do) but also that they are powered by the same gas as the VMG – which make little sense bc then you don’t need the wire and why not have a railway as well?). And the maximum speed a manually hauled barge can attain is not better than that of a horse. For a RL example, the fastest that horse-drawn barges travelling the Canal du Midi in the 19th century could reach was 32 hours for the 240 km ride... changing horses every 10km. Before that, it took four days. That’s 13 hours for 100 km – basically the same time it took the SC to go from Trost to Wall Maria in RtS, but without the possibility to change course if the road’s blocked or to dodge titans if they attack (and provided they had the fresh horses every 10 km, which they wouldn’t in RtS).
That said, I do think Yams totally forgot about the ferries.
Part 3
30 notes
·
View notes
Text


Project no. 35: the second coming of Gorochu.
Aside from sporting a new design, he's bigger than v1, is more well-constructed, doesn't have extremely messy colour changing on his body, and most importantly--is my actual own pattern (aside from one round for his head that I wasn't sure how to do differently from the base and still work; that's noted below). I'm very happy with how he turned out.
Note: like with v1, you'll need a wire for the tail. For v2, I used both a wire and stuffing... crocheting around the wire, which had to be inserted early on to get through the stuffing, was not what I would call a fun experience, but yannow, there's a reason I saved that part of Gorochu's tail for last.
Pattern below:
[HEAD]
{desert glaze}
0) MR 6
1) inc 6 (12)
2) [dc, dc-inc] x6 (18)
3) [dc 2, dc-inc] x6 (24)
4) [sc 3, inc] x6 (30)
5) [sc 4, inc] x6 (36)
6) [sc 5, inc] x6 (42)
7) [sc 6, inc] x6 (48)
8) [sc 7, inc] x6 (54)
9-16) sc 54
17) inc 3, sc 6, FLOC-sc 6, sc 6, inc 3, sc 30 [borrowed from 1upCrochet]
18-19) sc 66
20) [sc 9, dec] x6 (54)
{embroider x}
21) [sc 7, dec] x6 (48)
22) [sc 3, dec] x12 (36)
{top of eyes are R134, two sc across from ends of "FLO-sc 6"; eyes are 4 sc wide and 3 sc tall}
--
[EARS] x2
{sunflower}
0) ch 7
1) sc 6, continue on other side, sc 6 (12)
2) [sc 6, inc] x2 (14)
3) [sc 7, inc] x2 (16)
4) [sc 8, inc] x2 (18)
5-17) sc 18
18) [sc 8, dec] x2 (16)
19) [sc 7, dec] x2 (14)
20) dec 7 (7)
21) dec 3/closed
{do not stuff}
--
[EAR SIDE-SPIKE] x2
{sunflower}
0) ch 5
1) sc 4, continue on other side, sc 4 (8)
2) [sc 4, inc] x2 (10)
3) [sc 5, inc] x2 (12)
4) [sc 6, inc] x2 (14)
5-7) sc 14
8) 3tog, 3tog (10)
9-10) sc 5, ch, turn
--
[HORN A (lower)]
{ivory}
0) MR 6
1) inc 6 (12)
2-3) sc 12
4) [sc 6, inc] x2 (14)
5) sc 14
--
[HORN B (upper)]
{ivory}
0) MR 6
1) inc 6 (12)
2-3) sc 12
4) [sc 6, inc] x2 (14)
5-6) sc 14
7) [sc 7, inc] x2 (16)
8-9) sc 16
--
[BODY]
{desert glaze}
0) ch 22
1) sc 21, continue on other side, sc 21 (42)
2) [sc 6, inc] x6 (48)
3) [sc 7, inc] x6 (54)
4) [sc 8, inc] x6 (60)
5-25) sc 60
26) [sc 7, dec] x6 (54)
27) [sc 6, dec] x6 (48)
28) [sc 3, dec] x12 (36)
{embroider lightning bolt stripes on back}
--
[BELLY]
{ivory}
{work in rows}
0) ch 7
1) sc 6
2) inc, sc 4, inc (8)
3) inc, sc 6, inc (10)
4) inc, sc 8, inc (12)
5) inc, sc 10, inc (14)
6) inc, sc 12, inc (16)
7) inc, sc 14, inc (18)
8-15) sc 18
16) sc 6, ch, turn
17) dec, sc 2, dec
18) dec, sc, dec
19) dec
20-23) return to other end of R15 and repeat R16-19
24) in center of R15, between the two spikes: dc 4, ch, turn
25) dc 4
26) hdc-dec, hdc-dec
27) sc
--
[THIGHS] x2
{desert glaze}
0) MR 6
1) inc 6 (12)
2) [sc, inc] x6 (18)
3) [sc 2, inc] x6 (24)
4) [sc 3, inc] x6 (30)
5) [sc 4, inc] x6 (36)
6-8) sc 18, ch, turn
9) sc 8, dc 3-in-1, sc 8, ch, turn (19/20)
10) drop down {at least sc 2 down "cliff"}, sc around to the other side and sc 2 upwards to connect R9 to base of thigh (~50)
--
[ARMS] x2
{start w/ sunflower}
0) MR 6
1) inc 6 (12)
2) [sc, inc] x6 (18)
3-7) sc 18
8) [sc 2, inc] x6 (24)
9) sc 24
10) cc coffee, sc 24
11-12) sc 24
13) cc desert glaze, sc 24
14-16) sc 24
17) [sc 2, dec] x6 (18)
{stuff, sc closed}
--
[FEET] x2
{start w/ sunflower}
0) ch 7
1) sc 6, continue on other side, sc 6 (12)
2) [sc 6, inc] x2 (14)
3) [sc 7, inc] x2 (16)
4) [sc 8, inc] x2 (18)
5) [sc 9, inc] x2 (20)
6-10) sc 20
11) cc coffee, sc 20
12-15) sc 20
{stuff, sc closed}
--
[TAIL A (end segment)]
{sunflower}
0) ch 21
1) sc 20, continue on other side, sc 20 (40)
2) sc 17, 3tog, 3tog, sc 14, 3tog
3) sc 15, 3tog, 3tog, sc 11, 3tog
4) 3tog, sc 9, 3tog, 3tog
5) sc 7, 3tog, 3tog, sc 5, 3tog
6) 3tog, sc 3, 3tog
--
[TAIL B (first and fourth segments)] x2
{sunflower}
0) ch 25
1) sc 24, continue on other side, sc 24
2) sc 21, 3tog, 3tog, sc 18, 3tog
3) sc 19, 3tog, 3tog, sc 14, 3tog
4) 3tog, sc 14, 3tog, 3tog
5) sc 11, 3tog, 3tog, sc 9, 3tog
6) 3tog, sc 7, 3tog
--
[TAIL C (second and third segments)] x2
{sunflower}
0) ch 29
1) sc 28, continue on other side, sc 28 (56)
2) sc 25, 3tog, 3tog, sc 22, 3tog
3) sc 23, 3tog, 3tog, sc 19, 3tog
4) 3tog, sc 17, 3tog, 3tog, sc 15, stog
5) 3tog, sc 13, 3tog, 3tog
6) sc 11, 3tog, 3tog, sc 9, 3tog
--
[TAIL D (base)]
{start w/sunflower}
0) MR 3
1) inc 3 (6)
2) inc 6 (12)
3) [sc, inc] x6 (18)
4-8) sc 18
9) sc 6, inc 3, sc 9 (21)
10-13) sc 21
14) sc 6, 3tog, sc 9, dec (18)
15) sc 18
16) [sc, dec] x6 (12)
17-19) sc 12
{insert wire and begin stuffing tail}
20) cc black, sc 12
21-80) sc 12
81) [sc 6, inc] x2 (14)
82) [sc 7, inc] x2 (16)
83) [sc 8, inc] x2 (18)
84) [sc 2, inc] x6 (24)
14 notes
·
View notes
Note
hey I think my ask got eaten by tumblr but if you've seen it and were planning on answering later or something just ignore this lol. I was asking what owning the name means for the boys. like legally. and what would it mean for sc to own it, what rights would he have
hello my love, it probably did get eaten lol this app has been closing randomly and telling me im unauthorised sometimes… truly bizarre.
anywho, 1d owning their own name is HUGE for them, and im sure SC will put a clause in to own the name of the next “big boyband” he’s trying to put together, because he is pissed off hahahha. I already figured they owned the name, but it’s nice to have it confirmed and watch that man beg to own it to make some more money to get more Botox.
without all the legal jargon and carryons, essentially, if SC owned the name, he could still exploit it to this day. it’s a brand. so he could, as he said in the interview, “make an animation” which yikes, but could also still be selling merch under the name, release idk a picture book, any kind of merch or content etc., like, we probably would’ve gotten special 1d 10 year anniversary t shirts and exclusive mugs and tea towels and every item under the sun, and that little cash grab would be going into SC’s pocket.
Back in the day, after they signed the contracts, 1d also created 1D Media Ltd, which is a company that they were directors of, to be able to share the profits evenly (there are also lawyers appointed to it obviously), and then commission is paid out to SC/everyone else who earns a % off their cash. So that’s a massive bonus, right? It goes to them and then it’s shared.
If SC owned the name, it would go to him, and then he would hand out the % to the boys & others. It leaves a lot more room for exploitation (the bad kind), SC pocketing extra cash, and all the other yucky things that can happen from a label/manager/whoever is not the actual artist, owning the name.
On top of this, if SC owned the name, he would be able to… uh… well… it would’ve been fucking awful and I hate thinking about it, but he could’ve replaced Zayn once he left. He could’ve introduced a new member to the band. When 1d called it quits/hiatus, he could’ve continued to use the name for a new boyband and idk… call it a legacy or something, ya know? But this way, if 1d tour, they (ot4) have to all agree to tour.
I believe Z backed out of this Agreement when he left initially, but still gets profit shares/royalties, but doesn’t have the right to use the name/has any ownership over it. Because like… imagine you’re in a band, right? And your guitarist leaves and it’s a bit of a bad breakup. If you don’t amend the ownership of who owns the name, your guitarist can start a new band under that name and technically get away with it (depending on the Agreement, they’re all so different, but it’s happened before, and Z wouldn’t even wanna do this because he wanted to pull away from the brand big time).
So that’s basically and very roughly put, what it is. If SC owned the name, he could continue to put out 1d branded merch/cartoons/whatever the hell, and make money off of it. But 1d own the name, meaning they choose what to do with it.
#anon#answered#more than welcome to correct me if I’ve missed something here#or phrased something a bit wrong#bc im very exhausted after a chaotic week lol#functioning on half a brain cell
16 notes
·
View notes
Last Seen Blogs

uxxxblog
Fuck Me Hard Before You Go

willtherealshotapleasestand-blog
Hazuki Nagisa~

arturomare
Svtfoe Stuff

veroloverland
Vero Lover Land💕

bigfatbastardman-blog
Untitled