#simple tutorial
Explore tagged Tumblr posts
Visit Tumblr Blog
Explore Tumblr blogs with no restrictions, modern design and the best experience.
Last Seen Tumblr Blogs


Fun Fact
Mobile US users spent an average of 115.8 minutes on Tumblr app monthly.
Text

daily doodle dump (I’ll see what day we’re on tomorrow)
‼️✨DRAW YOUR OWN DUCKS TODAY✨‼️
#my art#traditional art#my artwork#traditional drawing#traditional illustration#sketches#art dump#doodle dump#doodles#sketch#ducks#birds#animals#birb#step by step#draw your own#diy#easy#simple tutorial#tutorial#reference#art tips
12 notes
·
View notes
Text
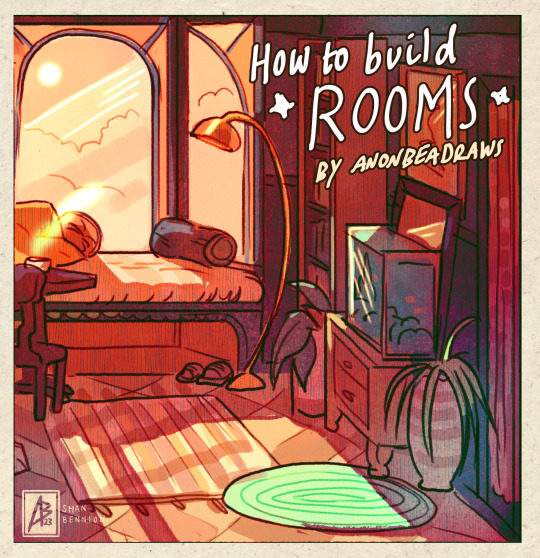
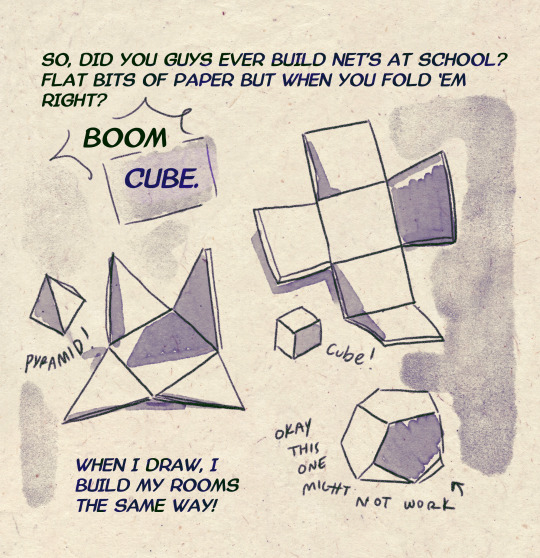
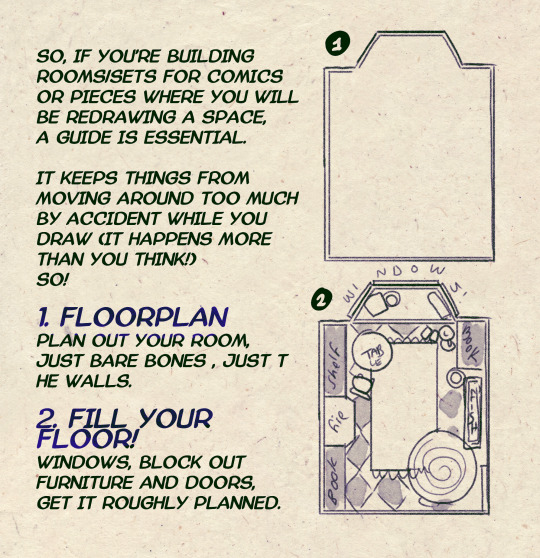
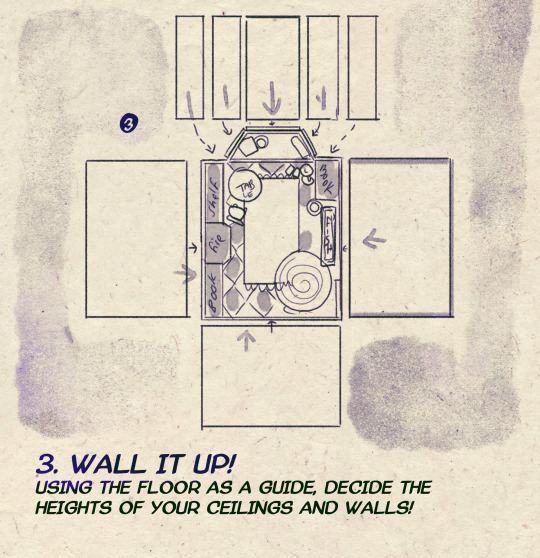


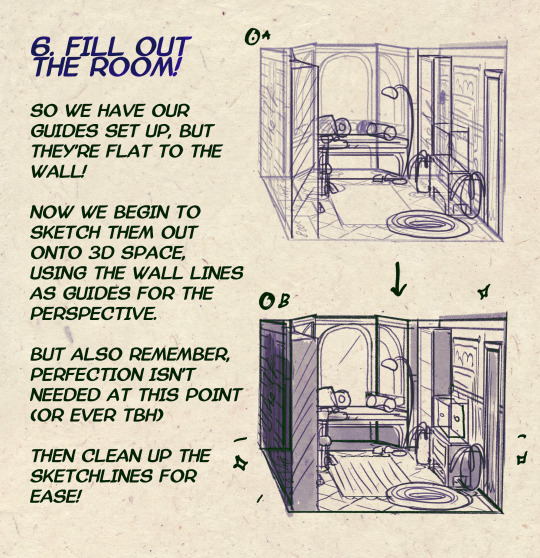

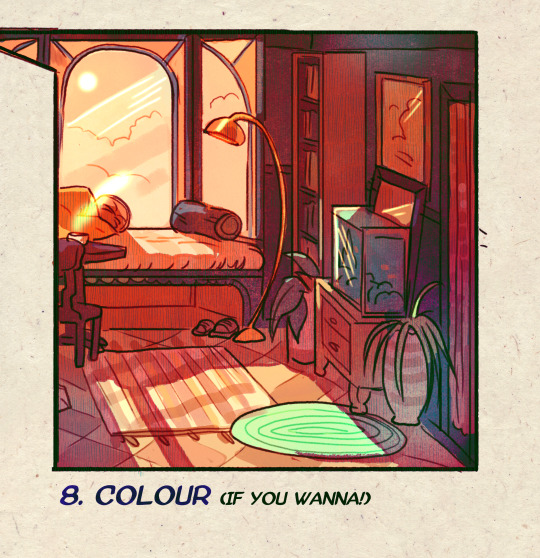
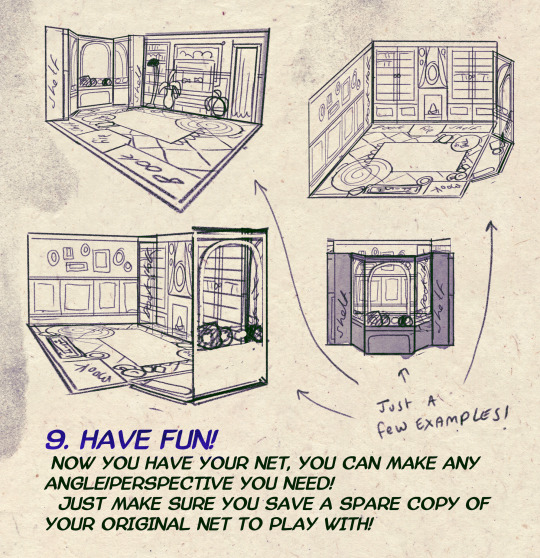
I made a Room Building tutorial! Lemme know if it helps! 🧡
Tip me here| Commission info here!
#anonbeadraws#digital#art tutorial#tutorial#room building#room design#illustration#gif#digital art#digital tutorial#art help#art resource#let me know if it helps!#tried to make it as simple as I could
42K notes
·
View notes
Text
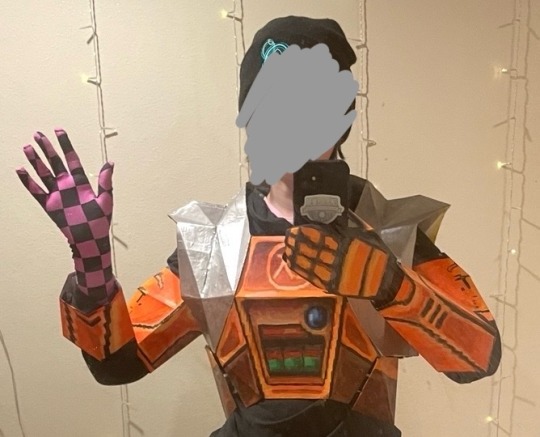
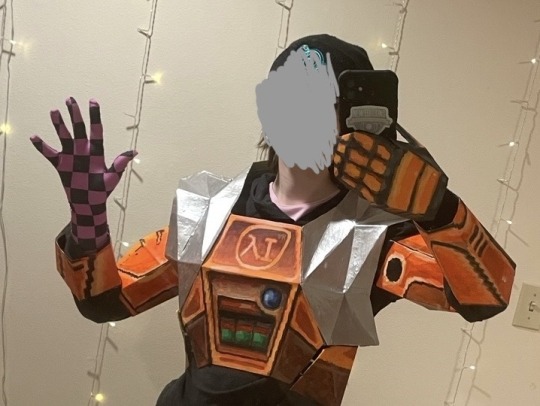
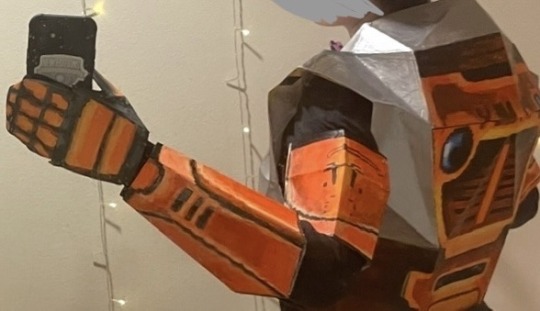
reveal of my gordon hlvrai costume project, now that about half of it is done! this is cardstock and glue and tape and more glue and paint and velcro. and 2 gloves (one hand-sewn)
i got started sometime in early-mid fall, but i committed to making it work with cardstock in january- it was originally meant to be a sizing test before construction with eva foam over the summer. then i realized how expensive thatd be, too much pressure for a form of craft ive never practiced. im pretty amazed with how its come together, even with the large seams! during that whole time when it was unpainted (started painting two weeks ago) there was no way to tell
#thank you sketchfab thank you blender thank you pepakura#school library printer… you were necessary but i dont appreciate that i had to pay per page despite my tuition#i started this because theres a tradition of wearing whatever you want to graduation at my college. ive thought abt how cool itd be to wear#an hev suit like gordon hlvrai.. hlvrai has been important throughout my whole time at college. that plus the stem degree im going for makes#hlvrai the most fitting thing to homage with my outfit#*so important to me#the support of my friends was the last push i needed before research#i havent seen anyone else go for the in-game low poly look for the hev suit! multiple tutorials out there (as expected)#but all i saw involve eva foam and molding. most of them were based on the half life 2 suit which. yeah. that one seems more desirable for#cosplay#lucky that this way was much more simple because its also the most in-theme!#hlvrai#half life vr but the ai is self aware
2K notes
·
View notes
Text

"karasu search how 2 cheer human up"
"karasu search difference between sad human and zoning out human"
"karasu search how long is it safe for humans to zone out for?"
(+ a longer look at each scene:)

#art#gif#obey me#this was meant to be a quick test. it was not quick. i think this is was the longest i've spent on drawing something since rolling ik#for some reason procreate keeps fucking up the colours on export and i'm too tired to figure out how to make it stop#can you tell that satan and lucifer were animated first?#funnily enough satan showing ik his book was pretty simple but lucifer walking was like. impossible. he kept turning out fucked up#i was so worn out by the end of it that everyone else's animations are way simpler#(the walk still doesn't look right but i've made peace with that.... i should've done some tutorials or smth first)#(such is my hubris: when i try to do new art things it's mainly by brute-forcing my way through it and hoping it works)#jtta ik#obey me lucifer#obey me mammon#obey me leviathan#obey me satan#obey me asmodeus#obey me beelzebub#obey me belphegor#anyway i'd like to experiment more with trying to animate things in future so!! look forward to that?
6K notes
·
View notes
Text
⠀⠀⠀⠀̣݊🤍 ࣭ٜ࣪ ◌゚ ⠀⠀twt links


( 1 )
(http://xn--4hbaa82xababavdd4070feae402tfaf566fgaaaaagaaa14247glak.xn--6iiaaaa)
( 2 )
(xn--xnhaaaa364da55718fbabb.xn--6iiaa)
( 3 )
(xn--6iiaa4965waaaa.xn--6iiaa)
( 4 )
(xn--mcia5t8vaaaabaabaa.xn--6iiaa)
( 5 )
(xn--hddaarbb8ucc9kdd5427eeae147daaafafa.xn--6iiaa)
#⠀⠀⠀⠀⠀⠀⠀⠀⠀⠀⠀⠀⠀⠀⠀ . ˚ * ✦ . . ✦ ˚ ˚ .˚ . . ˚ . ✦⠀⠀⠀⠀⠀#⠀⠀⠀⠀⠀⠀⠀⠀⠀⠀⠀⠀⠀⠀⠀⠀⠀⠀⠀⠀⠀⠀⠀⠀⠀⠀⠀⠀⠀⠀⠀⠀⠀⠀⠀⠀⠀⠀⠀⠀⠀⠀⠀⠀⠀#nudjismo#foryopage#archive#my post#like#visual archive#new post#helping you#recursos#links in bio#cute links#links#twitter#twitter links#x links#x#link#messy layouts#messy packs#messy symbols#aesthetic symbols#cute symbols#simple moodboard#tutorial#tumblr#simple bios#cute bios#biografía
508 notes
·
View notes
Text
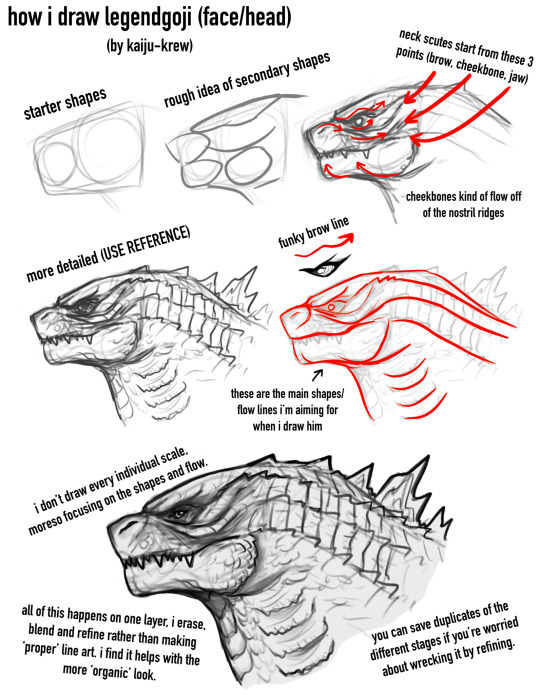
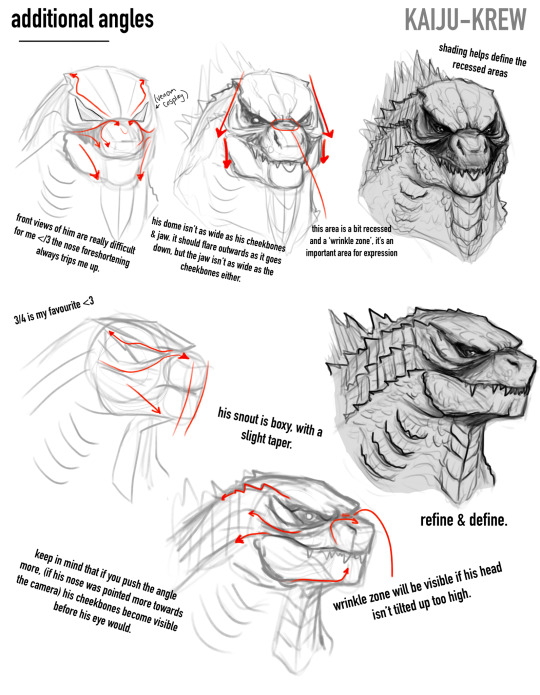
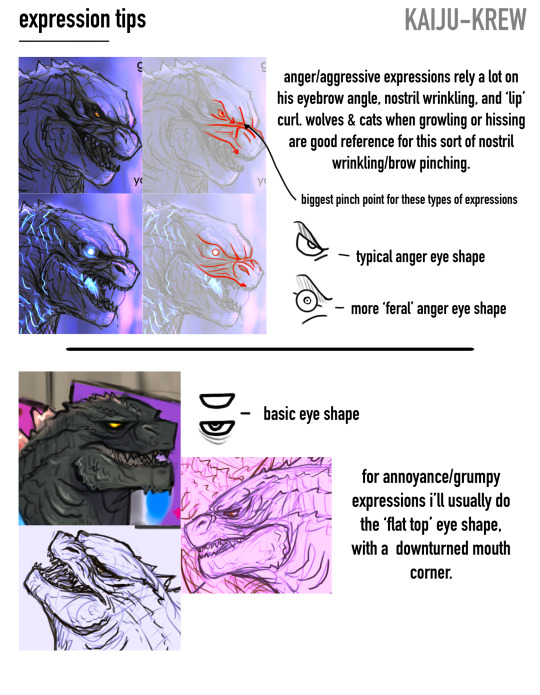
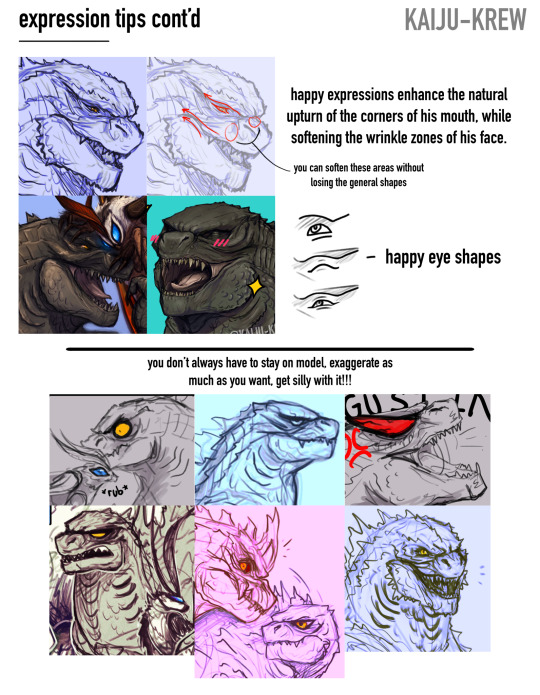
draw lizard✏️
-
i hope this isn’t too Draw The Rest Of The Fucking Owl 😭 i feel like i’m awful at explaining these kinda things but i hope this might help someone a lil bit. i’m working on one for his full body too, but wanted to cover expressions here since i get asked about them a lot!
#also yes im still working on the video tutorial too if this is too simple#it’ll show the whole process back to back#it’ll just take me longer unfortunately :(((#godzilla#kaiju#my art#drawing tutorial#art tips
1K notes
·
View notes
Text
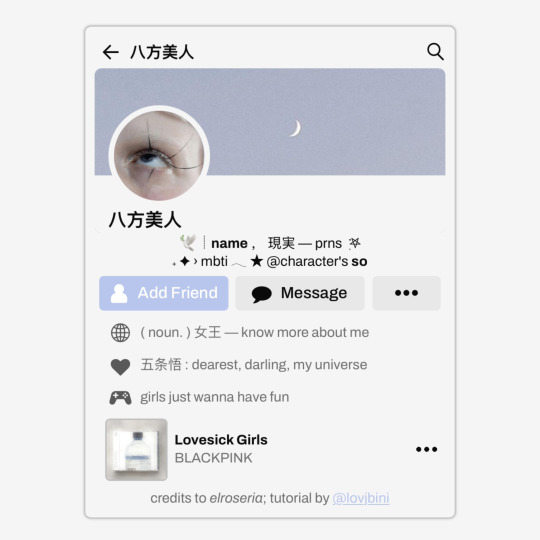
✩ CARRD INSPO by LOVJBINI // © elroseria
like or reblog if you useㅤෆㅤ2024.
✎﹏ please, put “ © elroseria – tutorial by @lovjbini ” in the description if you use our tutorial!
CLICK HERE FOR TUTORIAL
#lovjbini#carrd#carrd.co#carrd co#carrd inspo#carrd tutorial#carrd template#carrd layout#carrd tutorials#carrd templates#carrd layouts#carrd theme#carrd themes#carrd design#carrd designs#carrd stuff#aesthetic#simple#kpop#macbook#pastel colors#pastel aesthetic#kawaii#blue#pastel blue#light blue#facebook
624 notes
·
View notes
Text
🥖 𝓨𝗈 𝗍𝖾𝗇í𝖺 𝗎𝗇𝖺 𝖾𝗌𝗉𝖾𝗋𝖺𝗇𝗓𝖺 ᭪ᬻ𓏸𓈒゚⃝
𝅄 ི۪۪۪ ֯ ּ ֗ ۫ 𝖤𝗇 𝖾𝗅 𝖿𝗈𝗇𝖽𝗈 𝖽𝖾 𝗆𝗂 𝖺𝗅𝗆𝖺 𝅘𝅥𝅮♪ ˟̫ː᜴ 🍰


#꒰ atsubie ꒱ ౨ৎ︵⠀⠀#gif by me#heres how the mb from my tutorial turned out ☆#ㅤㅤㅤㅤㅤㅤㅤㅤㅤㅤㅤㅤㅤㅤㅤㅤㅤㅤㅤㅤㅤㅤㅤㅤㅤㅤㅤㅤㅤㅤㅤㅤㅤㅤㅤㅤㅤㅤㅤㅤㅤㅤㅤㅤㅤㅤㅤㅤㅤㅤㅤㅤㅤㅤㅤㅤㅤㅤㅤㅤㅤㅤㅤㅤㅤㅤㅤㅤㅤㅤㅤㅤㅤㅤㅤㅤㅤㅤㅤㅤㅤㅤㅤ#stayc layouts#stayc moodboard#stayc j#kpop icons#kpop layouts#messy moodboard#kpop themes#kpop moodboard#kpop aesthetic#alternative moodboard#alt moodboard#colorful moodboard#yellow moodboard#pink moodboard#indie moodboard#y2k moodboard#fresh moodboard#nature moodboard#soft moodboard#simple moodboard#maximalist moodboard#retro moodboard#vintage moodboard#dark moodboard#edgy moodboard#divider by im4yeons
234 notes
·
View notes
Note
Can I ask How do you color and render your art? I frickin love the way you choose colors esp for lighting and bounce light, it's really pretty
thanks so much :) this took a little bit because i'm not a teacher. but hope you can understand some concepts i put out.
I'm going to go over mostly on how I shade/render. Picking out initial base colors is something that just comes with practice, preference, and from someone more eloquent.

The top is what 'not' to do. The bottom is generally what i do.
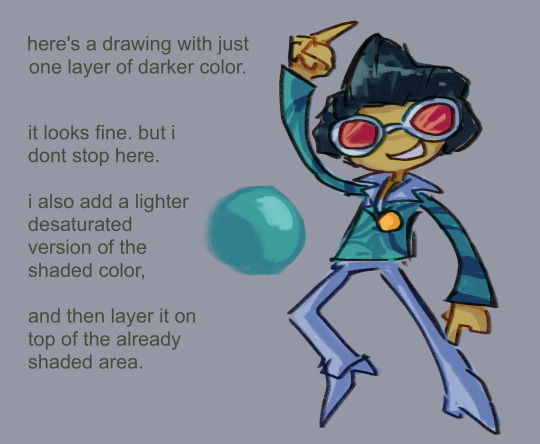
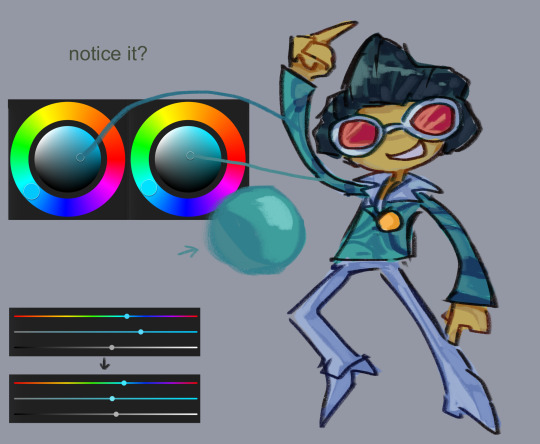
below is another example


i could do more. i meant to do more. but every other tip/tutorial i tried doing seemed like i was teaching abc's. I realized i don't know exactly what was being asked. I do have a few general tips though.
my process usually goes: Sketch, lineart, coloring, filtering/post processing.
'Post processing' can be a lot of things like; Painting over the drawing(fixing errors or adding details), or adding a noise filter, adding an overlaying photo. And/or changing the colors with gradient maps.
If you use a program that supports gradient maps then use them. they can be your best friend. Especially when colors don't look cohesive or just how you want them to.
Experiment with layer modes. At the moment I'm really into Pin-Light and Luminosity. Like I said, experiment. This is included in post-processing.
Use more than one shading color for each section. Go darker, go lighter while using that color picking method. Ex: It's usually darker under the neck than the side of the face. So use a darker color than the face.
if anythings confusing or you'd like something more specific then you're more than welcome to ask.
#the hard part about this was putting down base colors without shading. i usually do it as im just coloring everything else#my art#art tips#art tutorial#honestly i didnt know what to add exactly. are these too confusing. or too simple. or are they fine. i didnt want to be too long.#because what i do isnt majorly complicated. and the actual complicated parts come from practice and talk that would need to happen irl.#i messed up the photos me n my stupid baka life#thats why u check your posts
103 notes
·
View notes
Text
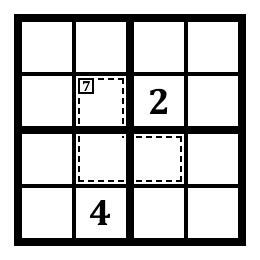
A sudoku for u all.
264 notes
·
View notes
Text
͏͏ ͏ ͏͏ ͏ ͏ ͏͏ ͏ ͏ ͏͏ ͏ ͏ ͏͏ ͏͏ ͏ ͏͏ ͏𓊆❥ིꨩ𓊇 ͏͏ ͏ ͏͏ ͏mini ͏͏ ͏♫ ͏♫ ͏♫ ͏ 𝚃𝚄𝚃𝙾𝚁𝙸𝙰𝙻 ͏͏ ͏ ͏͏ ͏🍰 ͏͏ ͏
un pequeño tutorial solicitado por una semillita de manzana dulce ✩ ✉️
͏ ͏͏ ͏
son dos maneras súper fáciles de hacer pngs a imágenes simples, solo se necesita tener estas dos aplicaciones, ibispaint y picsart 𓆉︎ abajito voy a dejar el link del apk de picsart pro que es el que necesitarían para borrar el fondo con esa opción !!
͏ ͏͏ ͏✩ ͏ ͏͏ ͏✩ ͏ ͏͏ ͏picsart
#͏͏͏ ͏ ͏͏ tommy heavenly6's ͏͏ ͏͏͏ ͏ ͏͏quaderno ͏͏͏ ͏͏ 𝄞 ͏ ͏͏ 𝄞 ͏ ͏͏ 𝄞#͏ ͏͏ ͏ ͏ ͏͏ ͏ ͏ ͏͏ ͏ ͏ ͏͏ ͏ ͏ ͏͏ ͏ ͏ ͏͏ ͏ ͏ ͏͏ ͏ ͏ ͏͏ ͏ ͏ ͏͏ ͏ ͏ ͏͏ ͏ ͏ ͏͏ ͏ ͏ ͏͏ ͏ ͏ ͏͏ ͏ ͏ ͏͏ ͏ ͏ ͏͏ ͏ ͏ ͏͏ ͏ ͏ ͏͏ ͏ ͏ ͏͏ ͏ ͏ ͏͏ ͏#tutoriales#kpop edits#mini tutorial#picsart tutorial#ibispaint x tutorial#kpop moodboard#cute edits#png cute#png edit#random pngs#soft pngs#kaomojis soft#cute kaomojis#cute moodboard#soft moodboard#kpop messy moodboard#kpop girls#kpop girls moodboard#simple moodboard#cute symbols#moodboard#kpop boys#kpop icons
125 notes
·
View notes
Text
Something I made to help someone that I thought would be helpful for other people!
#yes its very simple on purpose#my art#art tutorial#art reference#art tips#furry art#digital art#idk what else i just hope it helps ppl :)
48 notes
·
View notes
Text

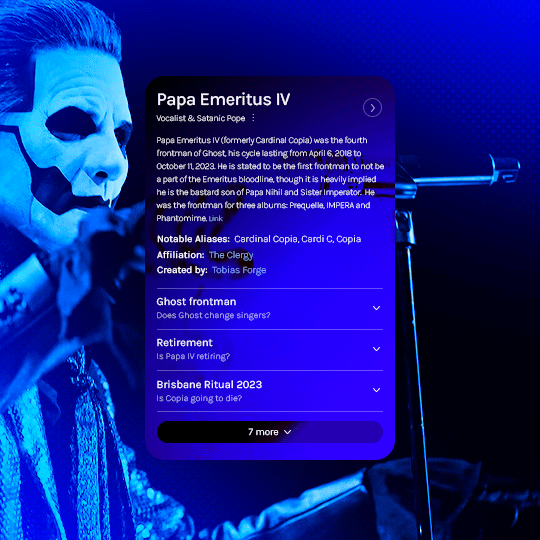
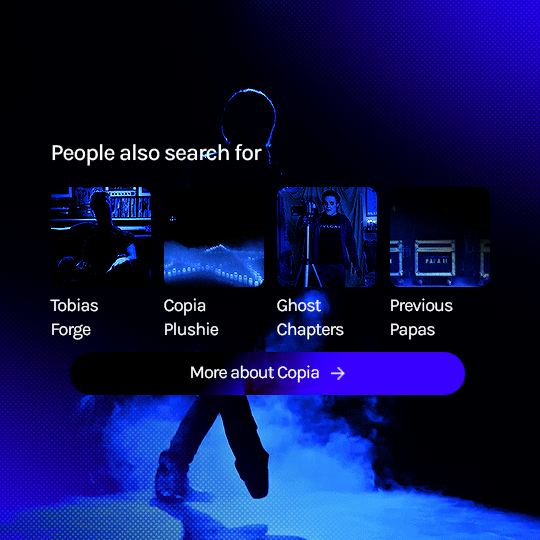
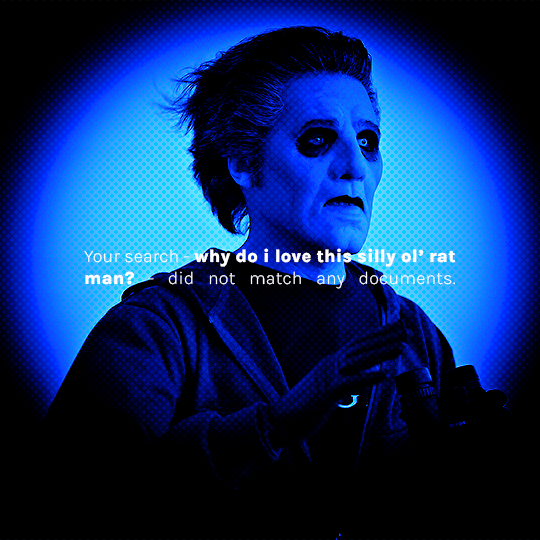
prompt: something for the silly ol' rat man? [template tutorial insp] [fan vids: ♡ ♡ ♡]
#the band ghost#ghost#ghostedit#dailymusicians#blogmusicdaily#usergif#musicgifs#usermusic#tobias forge#copia#papa emeritus iv#cardinal copia#bandsedit#musicedit#batslook#*papaseries#*gfx#~#id in alt#wanted to do this since i saw the template go up! so fun and simple to follow the tutorial too#needed something new to learn today so i broke my content ban just this once#prays no one has already done this and i was unaware orz
317 notes
·
View notes
Text


Have you ever wanted to download that one amazing build from the Gallery only to be shocked by how many packs that creator used? Do you want to download that Sims 4 build, but you're afraid of what will be missing if you don't own those packs?
Its actually pretty easy to check. From the build information screen in the Gallery, click the pack icon you would like to know about. That will bring up an information page about the pack/content. From the pack information page, click the button in the lower right corner that says "Show Used Items."
Find out if the creator is someone like me, building the build I'm showing here, who grabs one shiny candlestick from a whole expansion pack and that's all there is in the build. This build would be safe to download if you don't own Lovestruck.
*Please note it does NOT show if the creator used Debug or LiveEdit objects from this screen, so there may be more missing than what is shown.*
#ts4 resources#sims 4 resources#ts4 tutorial#a quick and easy tutorial for those who don't know about this simple way to check#it works on sims too!
115 notes
·
View notes
Note
Do you have any personal tips on drawing and rendering wrinkles and folds for your painting? I’ve seen so much of your work and it just fascinates me every time!
Have a slug my amigo 🐌
Thank you for the slug :3 Now I'm no teacher, but this is usually my thought process when drawing "wrinkles" on a fabric
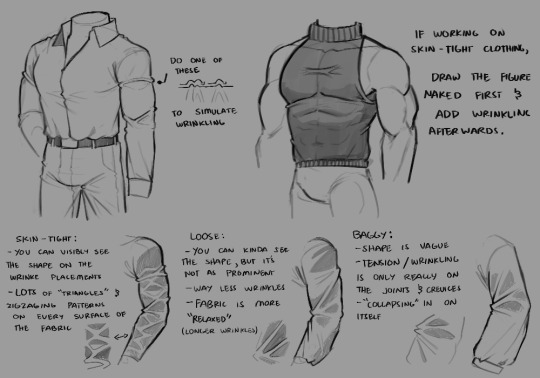
1st): I like to add one of those "bumps" on the edge of the fabric to emphasize that yes, there are wrinkles there. it pretty much helps the eyes process the idea of wrinkles being present, and it helps making it feel like figure's plausible to exist on a 3D space.
2nd): triangles, loops and zigzag-ing patterns. when I make wrinkles on fabrics, my brain automatically looks for places where "tension" would begin, and then fold everything. This means areas like joints, elbows, armpits, knees, etc. Triangles are a go-to if you want to make tighter fabrics, zigzags are more so for looser clothing depending.
When I draw tighter clothing, I also tend to draw the figure in detail first --ex. if I want to draw a tight shirt, I draw the torso in detail first-- and then adding wrinkles on where they would form after that. References definitely help a lot.

There's also the fact that I always imagine wrinkles to be two areas having a tug of war, but there's no winners
the unaffected areas of wrinkles are also ALWAYS darker (even if ever so slightly), because the wrinkles itself are more exposed to light than the rest of the fabric, except of course, on certain lighting placements. (like the light being shone directly onto the unaffected area)
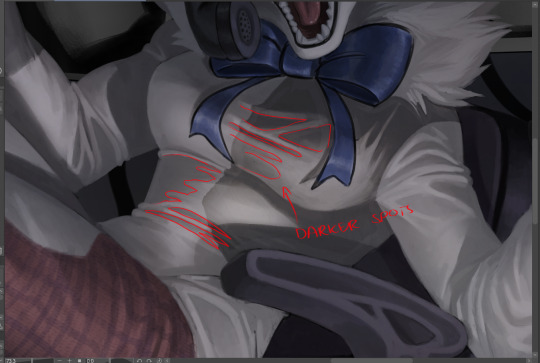
(this is a commission I'm working on)
Hopefully what I've put here is comprehensible and not overwhelming, I tried my best to explain it as much as possible lol
#thanks for the ask!#Ziku's insane rambles#simple wrinkle tutorial :3#it's not 100% accurate to real life wrinkles btw it's what I would call “the bare minimum” lol#because there's SO many types of fabric wrinkling#but these methods are what I use/encounter the most when making character art#so yeah#also OC JUMPSCARE AGAIN!!!!!
95 notes
·
View notes
Note
i just found you and i love the look of your art!! would you be open to sharing what you do for lineart? i've been trying to make mine more distinct without making it just a black/colored outline LMAO
I'll try to explain it as simple as I can because my process is very chaotic dkfhgds

The most important thing: I do almost everything with just one brush. Idk if its really that versatile or I can make it look so different by changing the size/applying different pressure with hand, but it's been my favorite brush for like... 2-3 years. This is the set this brush is from (its for photoshop, the brush in question is the 4th one).
I start with the sketch, I like and feel most comfortable working on big canvases with big brush sizes. Idk, gives the sketch some softness.
I put the sketch layer's opacity to 20-30% (usually its random). And proceed to apply lines that should be the most visible, I don't line every line from the sketch here.
This step is super chaotic and tbh i don't think it files into the definition of lineart, but it's what I do. Apply shadows, smaller details. It's usually rinse and repeat process where I make a line, erase it a little bit until I'm satisfied with the way it looks.
Fourth step is just my way of emulating the organic feel of traditional art. I leave the sketch under, I never hide it or delete it. It stays at that 20-30% opacity, I just erase some lines that "don't fit".
And that's pretty much it. I tried to simplify it for this "tutorial" but in reality there's a lot of merging layers, erasing, drawing over, forgetting what was on what layer so I merge some more. It's not a great thing if you do everything cleanly layer by layer and put the coloring layer under the drawing.The way I would color it would be a chaotic mess of mixing layers set to multiply/darken/sometimes normal to aim for something that would vaguely resemble gauche paint.
#ask me anything#tutorial#I GUESS#edit: how i would call my linearts would be just fancy and clean sketches#I struggle with keeping the process simple and clean#idk might be a strong need of trying to do what i'd do while working traditionally
39 notes
·
View notes