#the sims 2 tutorial
Explore tagged Tumblr posts
Visit Tumblr Blog
Explore Tumblr blogs with no restrictions, modern design and the best experience.
Last Seen Tumblr Blogs


Fun Fact
Tumblr has 411 employees.
Note
hi! sorry to bother you, i know this post (/post/762917330214928384/i-edited-and-merged-a-bunch-of-makeup-and-got) is super old but i came across it the other day and can't get it out of my head... could you elaborate on how you pinned makeup cc to SPs to organize your blush category better? i'm really interested in doing that but i'm not sure where to start.
Never a bother! Like I said in that post, using this trick for organization isn't a new idea (BSOK is a thing and I think Almighty Hat uses it to sort distinct cultural attire in their game) but I've never seen it applied just to make-up, and that was the only category I thought was truly annoying to plod through randomly. This is what it looks like in Bodyshop in my Blush category:

I have all my actual blushes and a few effects things in their default CC state, then it starts with eye masks, then misc. "face kits" with lots of parts, then nosemasks, then freckles/moles/beauty marks, then lip enhancements. ETA: One downside to weigh here is that the binned CC no longer displays its tooltip on mouseover. For me, this was a non-issue, but it's definitely a tradeoff.
This turned into a mini tutorial with pictures, so...
How to Organize Your Unmanageable Make-Up Categories by Pinning To EPs using Outfit Organizer
All this is done by changing the Product value. To pin stuff to an EP, we just have to change this one number in the Property Set (or Texture Overlay XML, basically the same thing.) You can do it in SimPe or Wardrobe Wrangler, but those require you to edit packages or Property Sets one at a time, so I use the Outfit Organizer by @picknmixsims. Every EP and SP has its own number, and for EAxis stuff this number tells the game what EP to put it with in the catalog (another advantage of the Outfit Organizer: you don't have to know the numbers because it's in a handy dropdown menu.) Anything that's not EAxis gets labeled as CC and appears at the front of the catalog with the CC asterisk. The first thing I did was subfolder everything by type: all my nosemasks in a folder, my moles and freckles in a folder, my lip shadows in a folder... once I get it the way I like it, I apply the change to everything in that folder. (And at this point I'd probably make a backup of everything in case something goes wrong.) Here I just went and found some nosemasks I didn't have because clearly I needed more nosemasks right? I deleted the supernatural ones I didn't think I'd use much, and then the folder is ready. I open up the Outfit Organizer and select that folder to work on. It's listed in the top left box.

All the other stuff in the bottom section can be edited to do other neat stuff but for the task at hand we don't care about that. But before we do anything, we want to make sure every last thing in this folder is selected, because that's the whole reason we're using this utility over the alternatives. So select everything!

Why TSS for nosemasks? Arbitrary! I think I chose it because of the tennis scene from Clueless. I know I thought Eye-kea was a good, punny category. (Even though there's no Bodyshop content from Ikea Stuff Pack, it puts them together with the logo.) My face kits are K&B and the beauty marks are Glamour Life Stuff.
Once you've selected an EP from the Product menu, the program might jitter for a second and then you'll be able to chose Save All. After that, you can select a new folder and repeat for any other category you want to differentiate.
Clear as mud, right? I hope this helped!
66 notes
·
View notes
Text

The Sims 2 Tutorial | Building Stacked Lots
In this video tutorial I am walking you through the process of building stacked lots. This technique was first created by the amazing @threadandsandpaper back in 2014. You can still find the original tutorial right here: https://threadandsandpaper.dreamwidth.org/5129.html
(Massive thanks for this incredible tutorial, all cred goes to you 🥰)
youtube
226 notes
·
View notes
Text
Switching between save folders without renaming them
See the tutorial on Mod The Sims
130 notes
·
View notes
Text
Raw Tutorial - How to Make Custom Harvestable/Orchard Trees and Make Them Seasons Friendly.

This tutorial is somewhat raw and has no pictures. I don't see myself adding them in the foreseeable future, However, at the time, I wrote it as detailed as possible, so I won't forget. Hope it'll be helpful as it is. If not, I will make a proper edit in the future. So, if anyone's interested in that kind of thing, Head This Way:
btw, if anyone has any notes about it, I'd like to hear them.
#Tutorial#Tutorial: SimPE#Custom Harvestable Trees#Custom Orchard Trees#SimPE#BHAVS#TS2 Tutorial#Sims 2 Tutorial#The Sims 2 Tutorial#TS2#Sims 2#Sims2#the sims 2#SimPE Tutorial
49 notes
·
View notes
Text
HOW TO MAKE YOUR SIM WORK IN A FULL-TIME* JOB AND AS AN EMPLOYEE IN A BUSINESS AT THE SAME TIME
IMPORTANT: I've tested this in my game and so far I haven't had any catastrophic glitches. However, I still recommend you make a backup of your neighborhood in case anything goes wrong. Huge thanks to @bstu for helping me out with this one!
*haven't tried this with part-time jobs but I assume it works the same way. Just remember to look for the teen-elder jobs in the career tab once you get to step 4.
Okay for some context, my Sim (Drake Walton, now Drake Jocque) works in the Politics career as a congressperson. However, since his hobby is music and dance, I wanted him to work at Cleo O'Mackey's nightclub as a DJ at the same time for some extra money, but no matter how hard I tried, the game wouldn't let me.
As I said, @bstu came up with an idea. To do this, you absolutely need to use SimPE. This method won't work with mods like Sim Blender, Sim Manipulator or similar hacks. Why, you may ask? Because we need to avoid the pop-up that shows up when switching jobs:

That being said, let's start with the tutorial:
First of all, hire the Sim you want to work in your business as you'd normally do. When the switching jobs pop-up shows up, click on "Yes". After this, save and exit your game.
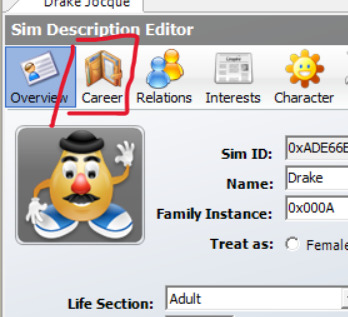
Go to SimPE, open your neighborhood under "Tools -> Neighborhood -> Neighborhood browser...", then click on "Sim Browser" and look for the Sim you want to edit, in my case Drake Jocque.
Once you do this, click on "Career", above your Sim's description:
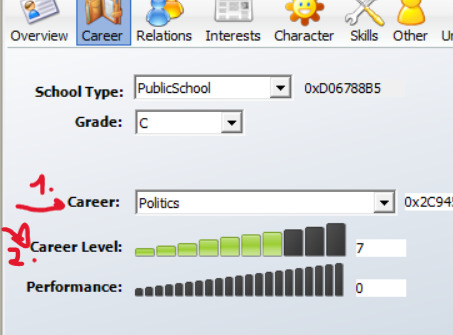
4. In here, go to the career tab, where it should say "Unknown". Change it back to your sim's previous job and career level. In my case, it was Politics, Lvl 7. Commit your changes, save and close SimPE.
5. Open your game and see if your changes got saved. If you go check your sim's job, you may encounter a glitch in which it'll display the name of the business your sim works at instead of their vacation days. Again, this is just a visual glitch and will not affect your gameplay whatsoever.

That would be pretty much it! Hope this small tutorial was of any help to anyone in here lol, I'll keep you updated in case I encounter any important glitches, but so far my game has worked as intented.
28 notes
·
View notes
Text
The Sims 2 tutorial: changing the eye color of existing pets
...Without SimPE or any mods.
You can read this tutorial on ModTheSims, or down below under "Read More".
Note: the target Pet needs to have an owner / be playable. Stray pets cannot be modified this way, unless you do use mods or cheats to temporarily add them to the household.
Tutorial under the cut:
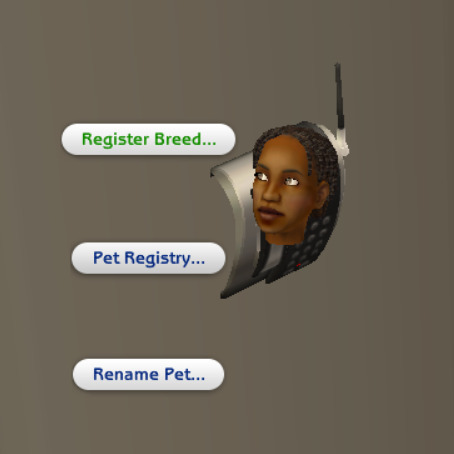
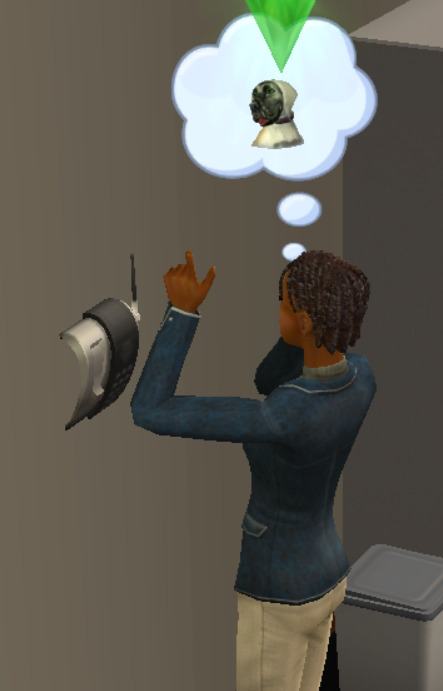
Step 1: Load the household with the target pet. Have your Sim click on their phone and select Pet Registry.../Register breed.../Your target pet.
Step 2: Save and exit the household. Enter Create-a-Sim. Create a new pet.
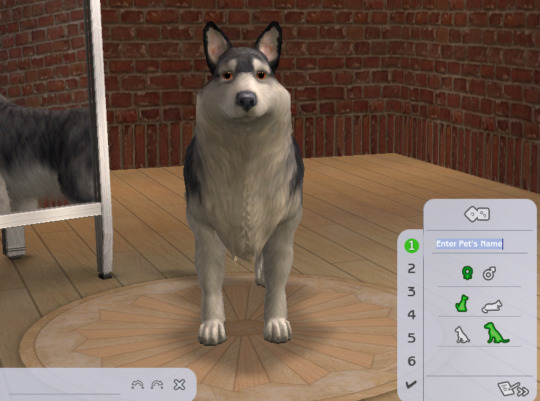
Step 3: From the breeds selection, select the breed of the target Pet that you've just registered.

Step 4: Change the pet's eye color to the desired one. At this step, you can also adjust your Pet's markings, but it's totally optional.

Step 5: Go back to the coat and markings selection. Select the "coats" button.

Step 6: Register your current coat as a new one.

Step 7: Exit Create-a-Sim and load your target household again.

Step 8: Have your Sim change the Pet's appearance in the mirror by selecting Change appearance for your pet.../Your target Pet.

Step 9: In the first screen that pops up, select the coat that you've just created. You may notice that the Pet's eye color has changed accordingly.

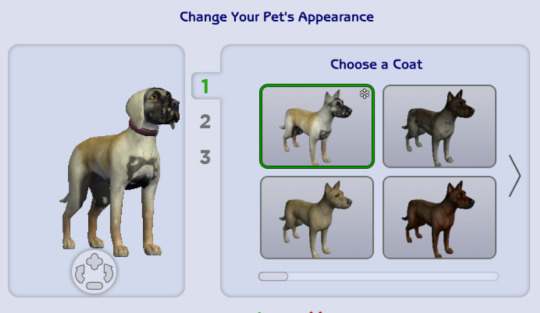
Step 10: You're done! Your Pet has a brand new eye color which is now genetic, which means that future kittens and puppies may inherit it.

#ts2#the sims 2#sims 2#sims 2 pets#the sims 2 pets#the sims 2 tutorial#sims tutorial#the sims tutorial#the sims
1 note
·
View note
Text

By popular demand (I saw two people asking) I thought I would throw together a quick guide to using the road editor tool in the newest version of SimPE! You'll see that this is a very easy tool to use, and best of all, goof-proof. If you do mess up (you probably will) it's very, very easy to correct.
Very, very, very important to make a backup of your hood before you ever do any tinkering in SimPE! I also recommend practicing on a test hood you don't actively play in to get a feel for it before you do anything to your main hoods.

We're starting with a vanilla Strangetown. I would recommend going in your game and taking a nice overhead screenshot of the hood like this first to look at for reference of where everything is situated the way that you're used to looking at it.

2. Open SimPE, go to Tools> Neighbourhood> Neighbourhood Browser and open the hood you're wanting to work on. If you're not so familiar with SimPE, opening your hood can take some time. Touch nothing until it's loaded!

3. Once it's all loaded, from the Resource Tree list pick Neighbourhood Terrain Geometry (NHTG). Then you'll see one file populate the Resource List - click that. Make sure on the bottom that you have Plugin View tab selected.

4. Now you should see this map of your hood pop up! There are different things you can toggle, I like to check the Show Lots box when I'm editing the roads. Then click the Road Editor button on the right.

5. To be able to see better, I've pulled this Plugin View window up a bit - it may rearrange the Resource List and Resource Tree windows a bit to accommodate. You can also press the Zoom 2x button to see closer, and then you'll have to use the scroll bars to move around the map and the road editor tool.

6. The road editing tools here will be placed down in the same orientation as the map. So the two parallel roads running through Strangetown from this perspective are the vertical straight road pieces (top row, second from left).
When you select a road tool, above it will indicate which tool you have selected.
Also - I recommend having Handle Stop Signs ticked.

7. Once you have the correct type of road selected for the spot you're working on, simply click on the map - it lays it down one tile at a time. If you miss a spot like shown here, just fill it in.

8. If you want to create an intersection, first delete the section of road where the intersection will go.

9. Then choose the type of junction for the intersection you're making, and add that piece in. You'll see a red circle appear (unsure if this is because it's an intersection or because you have handle stop signs selected, but I recommend you do have that selected either way).

10. Once you're done making all your changes, click Close Editor.

11. This is the part where you save your changes! First click Commit in the top right of the editor. Then, File> Save!

12. Load your game to check! Looks pretty good with all those new roads!

13. However, we have indeed made some mistakes! Which were absolutely for illustrative purposes and not truly an accident.

14. Never fear! Simply reload the hood in SimPE - I've deleted the spot where the T-junction should go and added one in, and deleted where the road just ended abruptly and added a proper end piece.
I have not experimented with what happens if you try to build a road through hood deco - if you have, please let us know in the comments how that went!
I also have barely touched the terrain editing tools, so that's outside the scope of this tutorial.
I hope this helped!
#the sims 2#sims 2#ts2#ts2 maxis match#ts2 simblr#ts2 tumblr#simblr#brightmaple#ts2 tutorial#simpe tutorial#simpe road editor
791 notes
·
View notes
Video
youtube
How to build a walkout basement in The Sims 2 🌼
I didn't think of this when I was making the video, but if you use the flowers I used, sims won't be able to water them without the water inaccessible flowers fix
Another option is to use the perfect plants mod
You can also use custom flowers that don't need watering, I recommend these & these
Download the house here (minimal CC)
504 notes
·
View notes
Text

Did you know you can modify your game files to start with custom lots in the lot bin? Did you know you can add your favorite lots to the program files and you'll never have to import them ever again? I sure didn't. Here's how.

Part 1: Freshen Up That Lot!
Locate the lot you want to freshen up. If it's in your Documents > LotCatalog, it'll be named something like cx_00000001.package. [Hint: you can use CleanInstaller to browse your LotCatalog with pictures!]
Clean it up using LotCleaner and LotCompressor (and Magic Wand, if you want). Here's a tutorial. Do NOT skip this step, or you risk contaminating future save files with old sim references.
Make it a spiffy new picture. Personally I like to lump my similar lots together with a similar title/street name. And I color-code using CatherineTCJD's color-coding format. If you want to match me, you can download my template psd here.
Open your lot in Simpe and replace that old preview. Click 'jpg/png image'. Right click the property > Replace. Change file format to 'all files' to see your image. Click either 'yes' or 'no' on the 'resource changed' popup (it doesn't matter--one updates the image preview immediately, the other doesn't). Click save.


Part 2: Relocation Time! *MAIN LOT BIN*
You cleaned up your lot, right? No sim references left? Don't skip this step or you risk messing up future hoods. Clean up that lot!
Select your lot file and rename it to the cx_00000000.package format. You can use any numbers but it must be in that format and have 8 digits. The number denotes the order so get creative with your categories. (ex: lots cx_00000100-150: modern houses / cx_00000200-250: beachy, etc.). You can use any bulk renamer to rename files in order without having to manually number each one.
Pick an Expansion for your files. Mansion and Garden comes first in the lot bin, Base Game last. The expansion you select will denote the location of your lots within the catalog. The file location is the same in every expansion, so you can even spread your lots around for max organization.
Move your cx_#.package lot file to Program Files > The Sims 2 > [expansion of your choice (ex. Nightlife)] > TSData > Res > UserData > LotCatalog. You will already see some files here. These are the maxis lots that fill the lot bin every new game. You can delete them if you really want to, or just change the extension to something else to make them go away. (Catherine has a backup if you need them back.)
Done! Now your custom lots will prefill the lot bin every time you generate a new The Sims 2 save file in your documents!
This will not pre-fill existing games. If you want to put your new clean lots into your current file, rename your main The Sims 2 save file (in your Documents folder) something else. Launch Sims 2 so it regenerates a clean copy. Create a new Hood, let the game load, and check out the LotCatalog. It will be now filled with your brand-new lots. Copy them over to your main file's LotCatalog. [Check your main LotCatalog in game to make sure you won't be deleting/overwriting anything you want to keep (make a backup just in case!) Check it again with CleanInstaller. Do not delete/overwrite occupied homes! And delete your old and crusty lots in game if you want to be extra safe.]

Part 3: Relocation Time... 2! *SPECIALTY LOT BIN*
You cleaned up your lot, right? No sim references left? Don't skip this step or you risk messing up future hoods. Clean up that lot.
We will now populate the second tab in the lot catalog, the Specialty lot bin that holds Hotels and Apartments. You can put whatever you want in here; it doesn't have to be hotels or apts. You can move lots from the main catalog to this one, if you want. These lots do not appear in the LotCatalog of your main save file, in case you try to look for them there later. They only exist in the program files.
Rename your files. Unlike the previous lots, you can name these lots anything you want, as long as it ends in _Permanent.package. stinky_Permanent.package is perfectly fine. Name it something descriptive.
Pick an Expansion for your files. You can put them in any Expansion folder, but personally I keep my apts in Apartment Life to stay organized.
Move your files. Take your stinky_Permanent.package and move it to Program Files > The Sims 2 > [expansion of your choice (ex. Nightlife)] > TSData > Res > LotTemplates. You'll see some other files here already. These are blank lots and hotels/apts (if you're in Apt Life or Bon Voyage). Don't touch the blank lots, but you can remove the hotels/apartments if you don't want them. (You can move them to the main lot bin by renaming the files to the cx_# format and moving to the location in part 2). You can open them in SimPe to check what they are, but Catherine has a visual list here.
Done! These lots will appear in the Specialty lot bin every time you boot up the game, even in your current saved game.
Have fun and enjoy organizing!
[PS: did you know you can not only delete or relocate existing bin lots, but replace them with better, and cooler lots by simply overwriting the existing cx_0000000 files in your UserData > LotCatalog folders? Catherine has a visual guide which file is which, if you want to reinvent them all. The lot bin is your oyster!]
credits: CatherineTCJD for the Lot Refresh project that made me learn this. Bluerubberbear for the majority of the lots in my thumbnails and the lot in the psd file. Plumbtales for the other lots in the thumbnails and for the beautiful lot makeovers that I replaced maxis's community lots with.
#sims 2#the sims 2#ts2#sims 2 tutorial#ts2 tutorial#lot tutorial#tutorial#mine#this literally blew my mind when i learned you could do this. i hate how messy the lot catalog is!!!!!!!!#and how you cant tell apart community lots from residential. smh.
374 notes
·
View notes
Text
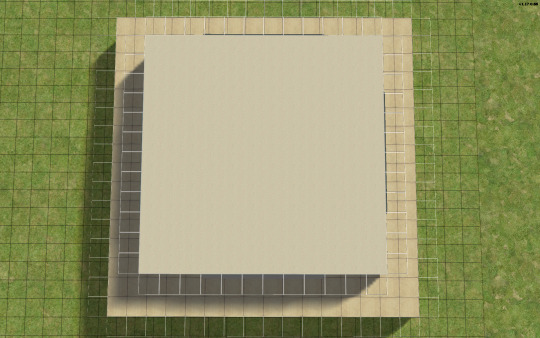
TUTORIAL: HOW TO BUILD A UFO ROOF HOUSE.
yo! one of my friends asked me how I do this, so I thought I'd put together a little tutorial and share. here's a preview of what a "ufo roof house" might look like once you're done:
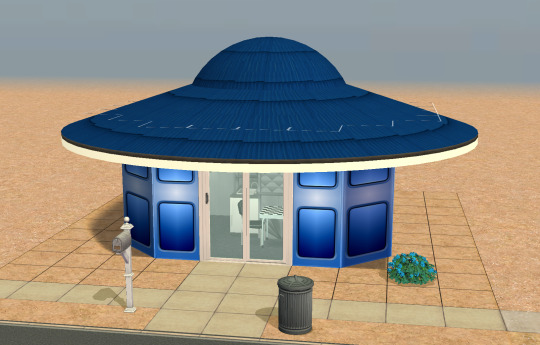
this is just a little one I built in Strangetown on a 10×10 lot, read below to learn how to do this yourself.
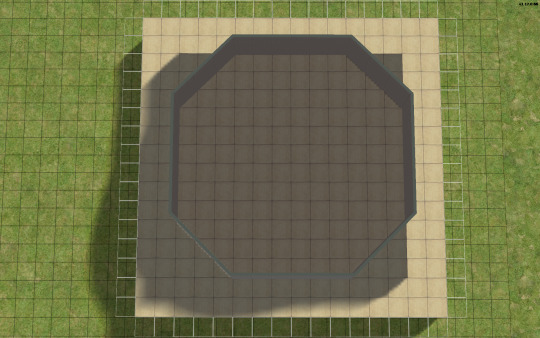
→ Step 1: Build your foundation (if you want one) + your first floor. The easiest way to do this is to make your walls an octagonal shape with the diagonal walls being half as many as the straight walls. As an example, you can see in the image below my straight walls are 6 units, so the diagonals are 3.
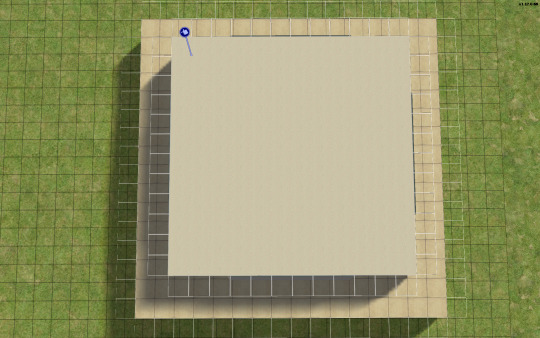
→ Step 2: Go up one level and lay a square of flooring for your roof to sit on, twice the size of your straight walls. My straight walls are 6 units, so my "roof square" will be 12×12.
→ Step 3: Using the small cone roof tool, drag from one corner of your square to the other, minus 1 unit. My square is 12×12, so the cone roof will be 11×11. You can see in the image below where to place your cursor to start:
→ When you're done with the small cone roof tool, it should look like this:
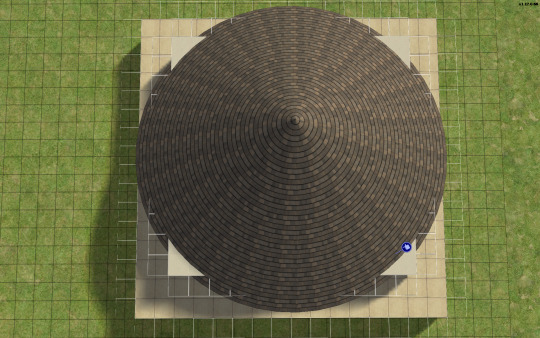
→ Step 4: Delete the excess flooring. You can press F to toggle from a full square unit to a smaller, triangular unit to trim the corners. Unfortunately, you can't click and drag to remove the corners from the diagonal walls, you can only shift click to delete one triangle at a time, but it saves you from having to put down walls or fencing you're just going to remove anyway.
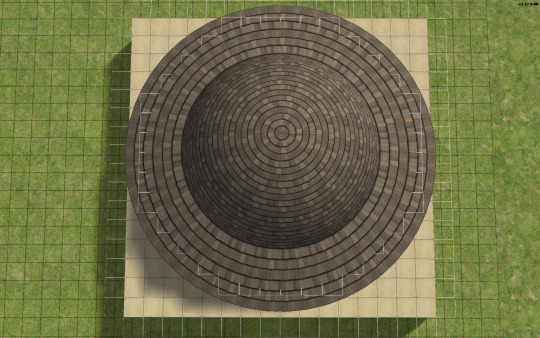
→ Step 5: Decrease your roof's angle. On my normal houses, I usually use a 25 degree angle, which in this case, looks like this:

→ Step 6: You don't want your walls sticking out like this. So, adjust your roof's angle until they're not sticking out. The lowest I could get the roof's angle on this one was 39 degrees, which looks like this:

→ Step 7: Much better! Don't worry about that spiky bit in the middle, because we're going to add a dome roof to cover it up. You can start fiddling around with the dome roof tool by using the same amount of units as your straight walls, or you can go smaller. A 6×6 dome on this house looks like this:
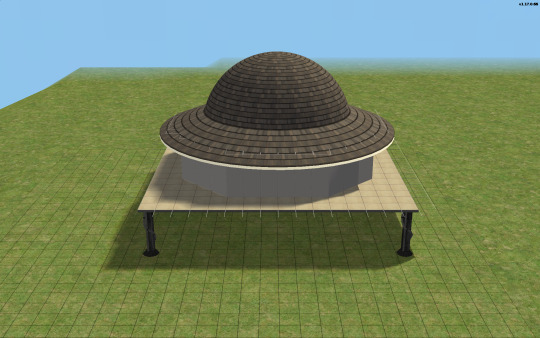
→ I like my UFO domes a little smaller, so I went with 4×4. TIP! If you have an even number of straight walls, your dome will also be even, if it's odd, your dome will also be odd. If you had 7 unit straight walls for example, your dome could be 7×7, 5×5, 3×3, etc. Here's how my 4×4 dome turned out:


→ Step 8: Nice! We're pretty much done! Decorate however you like!

→ Step 9: Enjoy your UFO roof house! All content shown on this one is maxis, except for the deck support posts, which are default replacements available HERE, thanks to @psychosim! I hope you enjoyed this tutorial. Feel free to tag me if you make a UFO roof house because of this, I'd love to see it! 👽💖 Happy Simming!
310 notes
·
View notes
Text
Because you can't save progress on them, I feel like someone should write timeloop horror for Tutorial Joe and Tutorial Jane.


#tutorial joe#tutorial jane#ts2#the sims 2#sims#idk what this is okay <3#once in a lifetime#tw glitch#flashing tw#flashing gif tw#tw flashing gif#tw flashing#tw flickering#undescribed
1K notes
·
View notes
Text

I've got a new video!
Obviously I am preaching to the choir here amongst us ts2 cc addicts, but I have a new video out with all my tips for finding sims 2 custom content. There's ads on google for the superbowl and stuff because i filmed this months ago and editing took me forever bc for some reason i was like pleasantview sims should be looking at cc on their computers dfjkdfkjsdjk
Even if you know how to find sims 2 cc, maybe you will enjoy seeing Brandi Broke browse the sims resource while Dustin gets reprimanded by the police outside!


Things I cover include: - searching on google and getting rid of those ts3 and ts4 results - using google to search specific sites and more - how to use the wayback machine - how to find/download cc from deleted tumblrs
I also share some of my favorite older, harder-to-find sites for new sims 2 cc hunters. I hope you guys like it! watch it on youtube


342 notes
·
View notes
Text
Decrease the strength of terrain paint application (in TS2)
If you are like me, you almost certainly never play around with terrain paint. It's not that I don't like to, but the application always felt too strong for me to do anything that doesn't look extreme with it.
So, the other day I was going around looking at the game's directory, and stumbled across these two values in the "Terrain.ini" file:

This file is located in: LATEST EP/TSData/Sys *The exact location depends on where you installed the game, which edition you are currently using and which is the latest EP you got installed.
This might just be common knowledge, but I personally never saw anything related to it, so I'm sharing in case it interests others.
It's fairly self-explanatory: if you change the "PaintBrushStrength" value to something between 0 and 1 (I imagine higher values are accepted but probably useless), the strength of the paint application decreases accordingly.
I've personally put the value at 0.1 – but you might find that too slow of an application. I also feel like this increases how much money is spent to paint the terrain, since weaker application = holding the mouse button longer = more money spent.

I tried to play around with the "PaintBrushApplicationInterval", increasing it to like 6000 (= 1min), but noticed no difference, so I left the default value as is.
Important note: Remember to backup the file! Alternatively, you can add a comment to any change you've made that reminds you what the default value was (I haven't changed anything else).
347 notes
·
View notes
Text
How to play TS2 with Longer Days (50% Slower Time) without going crazy
I don't think I've ever mentioned it here, but I like to play TS2 in a slow mode, to enjoy more time with my sims. This means time runs 50% slower (heavily inspired by @anibats).
But anyone who has tried playing with time at 50% slower knows there are 3 main problems: (1) time control clock in every lot, (2) need decay and (3) relatioship decay. So how do you get around this?
1. Time 50% slower
For me, the first issue is making the day slower. I'm too lazy to place a time control clock in every single household. That's why I use CJH_TimeController, the global version of the mod, that you can download here.
2. Need decay
Now that your day is 50% slower, your Sims' needs decay at the normal rate—meaning, effectively 50% faster. To prevent that, I use Lazy Duchess Motive Decay mod. You set a divider for the hood (mine is 17), and that's it! You can delete the flamingo (mod setup) and never worry about it again. Obs: this link contains the relativity mod. It would solve all our problems, but personally it never worked for me, with it the pregnancies didn't progress.
3. Relantionship decay
In an unmodded game, a Sim's relationship with another Sim drops by 2 points every afternoon. However, with longer days, the relationship drops much more—up to 12 points. Here are two alternatives:
a. For me, the solution is a mod where relationship decay only happens once a week, dropping 12 points all at once. This mod is LessRelDecay, which makes relationships decay only on Fridays.
b. Other alternative is Monique's Relationship (STR) Decay Hack. With this mod, decay is based on STR points and skips some days depending on the relationship strength. However, the total decay will still be 12 points instead of the intended 2.
Other useful mods:
Slower fitness decay
Slower fitness gain
Slower Skill and Badge Gain
Slower LTA Gain
Mods that would be very useful, but that I don't know if exists:
Slower/harder hobby enthusiasm gain (I'm aware of the mod by Tunaisafish, but I don’t notice a difference in-game)
If anyone has any more tips, please, let me know <3
338 notes
·
View notes
Text
A Few Tips for Converting from Non Sims Games, for First Timers.

Mirror: Dreamwidth.
1. Find out the game's engine. To know what type of file the game files are archived as.
2. Look up the appropriate tool for browsing that archive.
Link - my go-to resources. Info and links under programs - general → converting. Links to tutorials for said programs are under tutorials → converting.
3. Check out how that tool saves the exports. Look up the right import/export add-on for Blender accordingly. I've noted that info in the aforementioned list.
That's it. You've got the goodies in Blender. The rest is the same as with converting from other Sims games. Links to favorite tutorials for converting from Sims games; Tutorials → Converting.
Happy Simming!
@sims2tutorials I think it counts as a tutorial?

#Tutorial#Sort of#Tips#Converting#ts2 tutorial#Ts2#the sims 2 tutorial#sims 2 tutorial#Sims2#Sims 2#The Sims 2#Tutorial: converting#Conversions
25 notes
·
View notes
Text
🏡 Guide: Unlocking Hidden Catalog Content in The Sims 2
If you've ever wanted to unlock those elusive hidden items in The Sims 2, there's now a comprehensive guide that might be exactly what you need. The tutorial, "Unlocking Hidden Catalog Content," walks you through accessing hidden floor and wall patterns, terrain paints and fences.

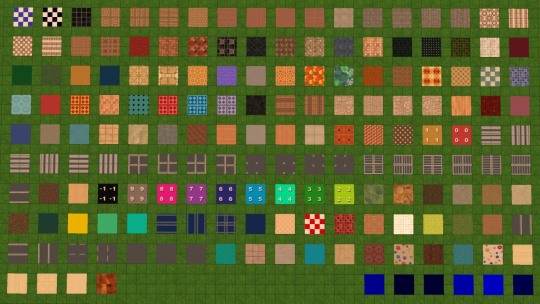

The author, building on past community contributions, has crafted a structured and user-friendly guide to simplify the process. With step-by-step instructions on modifying key files, such as adjusting the "notInCatalog" and "deprecated" parameters, it’s designed for both Windows and Mac/Linux users, making it accessible for all. Plus, there are extra tips on leveraging unique wall and pattern properties to get creative with your builds.
If you're ready to expand your in-game options, check out the full tutorial for a deeper dive into what *The Sims 2* catalog really has to offer!
316 notes
·
View notes