#sims 2 guides
Explore tagged Tumblr posts
Visit Tumblr Blog
Explore Tumblr blogs with no restrictions, modern design and the best experience.
Last Seen Tumblr Blogs


Fun Fact
Average visit duration of Tumblr.com is 10 mins and 25 secs.
Text

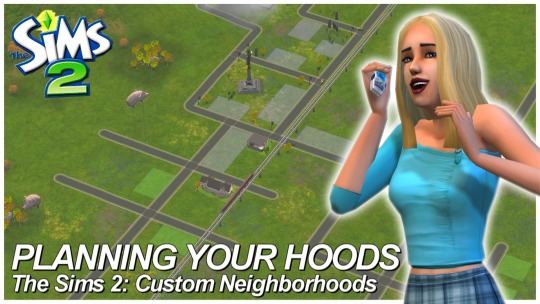
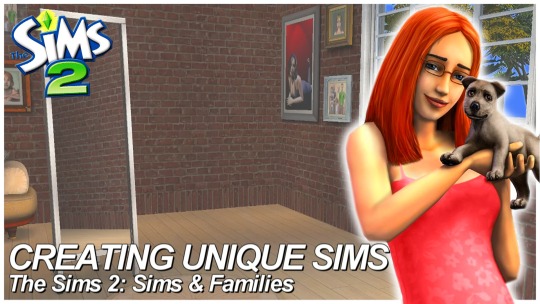
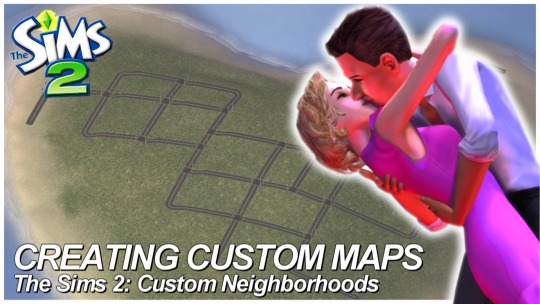
SIMS 2 • Custom Neighborhoods (4 Part Series COMPLETED)
Hey everyone! I think I forgot to share, but I finished my 4 Part Creating Custom Neighborhood series for Sims 2 on my Youtube Channel! All videos are linked below if you missed it!
I also have 2 separate tumblr posts with Map Templates and a quick Masterguide to plan 'hoods!
Best Neighborhood Templates | Links to Templates Planning Your Neighborhoods | Masterguide Creating Unique Sims Creating Custom Maps
#ts2#the sims 2#sims 2#sims 2 custom neighborhood#sims 2 custom hood#sims 2 guides#sims 2 tutorials#sims 2 youtuber#mine#edits#youtube#tutorials
392 notes
·
View notes
Text
Sims 2 Databases Database
(Alright it's an index, I just had to)
Made it for myself, I might as well share. If there's something I've missed please let me know. This list is being updated, Tumblr is being a pain and updates won't show up on re-blogs. Visit the original post to view the most current version. Mirror: Dreamwidth.
CC:
By Type:
Sims 2 Object Default Database [Discontinued - DW].
Sims 2 Object Default Database [Active - Spreadsheet].
Sims 2 [CAS] Default Database.
Sims 2 Hair Database.
Sims 2 CC: Afro Hairstyles.
Sims 2 Shoes Database.
Sims 2 EA Store Items 2016.
Sims 2 The Maxis Match Repository Project [CAS] [Pinterest Ver.]
Sims 2 Repository Finds [CAS&Objects] [sorted into categories].
Sims 2 Functional Finds [Sorted by function].
Resource list: Clutter and decorative items [massive index at GoS].
Sims 2 Lot Database [Maxis ones emptied out].
Sims 2 Lot Makeover Database [of Maxis Lots] [Note the Uploading Tutorial].
SkyBox/Horizons/Skylines Database.
Maxis Career Conversions TS1+3+4 to TS2 [Sorted by Game&EP - Under Downloads].
Fractured Moonlight's Stone Super Set Database [Creator Unknown, let me know if you know].
By Theme:
List of Maxis Lost & Found Objects Converted into Usable Items.
Stories to Sims 2 Conversion Database. [DW Backup]
TS1 to TS2 Conversion/Recreation Database.
TS1 Catalog Conversions [Active, Include OG Object Descriptions].
TS3 to TS2 Conversion Database [DW Backup].
TS3 to TS2 Traits Project Mod Tracking Sheet [Blog Ver.]
TS4 to TS2 CAS Conversion Archive [EA].
TS4 to TS2 CC Clothing Conversion Database [Custom - ts4 only?].
TS4 to TS2 Build/Buy Conversion Database [EA].
TS4 to TS2 CC Build & Buy Database [Custom].
The Sims spin-off games to the PC TS2 [&3+4].
TSM-to-TS2 Conversion Database [DW Backup].
Sims 2 Historical Finds [CAS&Objects] [Sorted by Era/Period].
Historical Sims 2 Wiki [New!].
Grunge Masterlist Project 2025.
List of Asian Sims 2 Sites With Working Downloads [As of 2017?].
CC Archives:
Sim Archive Project, at The Internet Archive [Introduction Post].
Sims Cave.
Sims Graveyard.
Simblr.cc - Dead-Site Repository.
Liquid Sims - Community Archives.
The Booty, at PSMBD.
Sims 2 Packrat, on Tumblr [Watch out for the recent SFS Hacking problem].
Ekrubynaffit (a.k.a bestbuild4sims) has re-uploaded a lot of archives of defunct creators. Albums with DL on her pinterest. Mainly build and buy mode, thanks a lot!
Resources:
CEP-Extras List, Huge Lunatic at Sims 2 Artists.
The Sims 2 Tutorials Database [Active] (Really needs a backup outside of Tumblr).
Several Lists of Maxis Resources for Modding,Pick'n'Mix Mods, own website, under Notes.
Sims 2 GUID Database Revival (Yes I'm shamelessly promoting it).
Sims 2 Trait GUID Database, by FireFlower.
Sims 2 Painting Sizes Database.
List of all Color Actions, With DL, ZeroDark/Graphic at GoS.
List of all WSO Actions, by Blue Heaven Sims, under Resources.
List of Hacks & Mods That Use Tokens, Bulbizarre at MTS.
Giant List of Simlish Fonts - Collect ‘Em All!, by franzillasims.
Masterlists of Recolouring Templates; MTS [+Cloning] | Hafiseazle | ZreoDark [not a list but a tag].
Index of Effects Names & Definitions [+ Guide], by AmmarAskar at GitHub.
Update notes are under the cut:
Update: Custom Clothing Conversion db [4t2], by @brandinotbroke/ Hair db, by @krabbysims/ Sims 4t2 CAS Conversion Archive [EA], by @mdpthatsme/ CEP-Extras List, by @hugelunatic/ Lists of Maxis Resources for Modding, by @picknmixsims/ Sims 2 Tutorials db [Active], by @sims2tutorials/ Sim Archive Project at The Internet Archive, by various - see @simnostalgia. Update 1: added EA ts2 store items at GoS/ Painting sizes db/ Tutorials db, by @sims2tutorials. Update 2: GUID db Revival. Update 3: believe it or not, there's more - Shoes db/ Sims 2. Functional Finds [sorted by function], by @sims2functionalfinds. Update 4: Resource list: Clutter and decorative items, at @gardenofshadowssims. Update 5: added archives section. Update 6: added @ekrubynaffit's Pinterest Archive. Update 7: Fixed TSM link, added Stories db/ Afro Hairstyles db, by @letomills/ SkyBox/Horizons/Skylines Database, by @simmergetic/ Grunge Masterlist Project 2025, by @pixeldolly/ and DW backup links (Everything that's exclusively on Tumblr/LJ should be backed somewhere else). Update 8: List of Asian Sims 2 Sites With Working Downloads [as of 2017?] by @0201-sims. Update 9: added Sims 2 Repository Finds [sorted into categories], by @sims2repositoryfinds. Update 10: added Sims 2 Object db [Discontinued], because the more the better. Update 11 Yet another (!): The Maxis Match Repository Project [CAS], by @whattheskell [how did i forget?]/ TS3 to TS2 Traits Project Mod Tracking Sheet, by Rowena Sims & @noodlebelli. Update 11: Maxis Career Conversions TS1+3+4 to TS2 [Sorted by Game&EP - Under Downloads], by @sims2idea-lientebollemeis2i. Update 12: HS I found another one: List of all Color Actions - Names, Creators, and Download Links. Maintained for over a decade by @zerographic at GoS :P Update 13: separated by type & theme. added Sims 2 Historical Finds [CAS&Objects] [Sorted by Era/Period], by @ts2history. Update 14: added to resources Trait GUID db, by @fireflowersims. Update 15: I shit you not, there's more - Sims 2 Lot Makeover db [Maxis Lots], by @ts2lotmakeoverdb/ List of Hacks & Mods That Use Tokens, Bulbizarre at MTS/ TS1 Catalog Conversions [Active], by @kitteninthewindow/ WSO Action Masterlist, by Blue Heaven Sims under Resources. Update 16: List of Maxis Lost & Found Objects Converted into Usable Items, @kirlicues. Update 17: Sims 2 Lot db [Maxis ones emptied out], by @mikexx2 @mrsktrout @ts2lots. Update 18: Historical Sims 2 Wiki [New!], by @theacmecatalogblog. Update 19: under archives; Simblr.cc - Dead-Site Repository by @simblrcc-site. Jackpot! Update 20: added Giant List of Simlish Fonts - Collect ‘Em All!, by @franzillasims. Update 21 [can't believe there's more]: Masterlists of Recolouring Templates; MTS [+Cloning] | @hafiseazale | @zerographic [not a list but a tag].
Update 22!: Index of Effects Names & Definitions [+ Guide], by AmmarAskar at GitHub.
#ts2#sims 2#the sims 2#resources#ts2 resources#ts2 database#ts2cc#ts2 cc#ts2 download#sims 2 cc#the sims 2 cc#sims 2 download#the sims 2 download#the sims 2 resources#tagging is a bitch#sims 2 database#the sims 2 database#sims 4t2#sims 3t2#sims 1t2#1t2#3t2#4t2#ts2 defaults#sims 2 default replacement#GUID Database#The Sims 2 GUID Database#ts2 archive#ts2 archives#sims 2 archives
2K notes
·
View notes
Text
DUE TO COPYRIGHT ISSUES, THIS GUIDE IS CURRENTLY OBSOLETE.
hi, i just want to let everyone know, if any of you are frustrated with the state of TS4, i've compiled several different tutorials and made an all-in-one guide for playing TS2 on modern computers. it has all the fixes necessary to prevent crashes + pink flashing, and tips to make the game look just as nice as TS4, if not better!
please let me know if this guide is useful for you, or if anything needs to be changed/added/removed. i've tested it myself on multiple computers, and, while it works for me, there are many possibilities for error, considering that everyone's computer is different.
thank you for reading! i hope you like it :]
EDIT: i've set up a ko-fi, if anyone wants to show their appreciation for my work!! thank you so much to anyone who donates!!
EDIT 2: if you're going to copy my guide, especially if some parts are word-for-word, please give me credit, just like how i gave credit at the end of the tutorial to all of the creators whose guides i referenced in the creation of this carrd. as far as i'm aware, i came up with this idea of an all-in-one carrd first- having a large platform does not make you better than anyone else or "above" giving credit to others.
EDIT 3:
the web installer has been taken down for a copyright issue. i will have to find an alternative method of downloading. as of right now, this guide is obsolete, and reblogs will be turned off until the issue is fixed.
last updated: february 16th, 2025, update info in the replies.
#evie.txt ♡#evie's ts2 guide#the sims 2#sims 2#TS2#ts2cc#sims 2 cc#ok to reblog!#this all being said#while anyone can use my guide#i can and will block anyone anti-LGBTQ/anti-trans who interacts with this post specifically#i'm literally a nonbinary lesbian what are you doing here
920 notes
·
View notes
Text
Hello, 3t2 traits modders. It's time for my first traits mod, albeit a minor one, but it's fun nonetheless.
"Brag Anytime" 3t2 traits is a mod I made to give more logic to the "Brag" Interaction. There is a Google Docs pdf in the linked folder that explains the mod and also offers a mini tutorial on adding trait checks to guardian BHAVs for interactions. Here is the Google Docs version if the PDF causes issue.
With this mod, Sims with four selected traits can Brag at any time, regardless of relationship level. The vanilla code doesn't let any Sim brag if their relationship gets to a certain level. This mod causes the Sims with one or a combination of these traits to bypass the relationship checks: Snob, Diva, Mean-Spirited, and Evil.
Requirements: Nightlife or later. Can make one without Nightlife if requested.
Conflicts: Anything that modifies "Social - Talk - Brag - TEST" which has a Group number of 0x7F01EC29 and Instance number of 0x2125
BONUS: Here is a trait mod guide for Romantic Interactions!
Happy Simming!
#3to2 traits project#sims 2 gameplay#sims 3t2#sims 2 mods#sims 2 trait mods#sims 2 simblr#sims community#sims 2 guide#sims 2 traits
142 notes
·
View notes
Text
Every Cheat you need for The Sims 2 + a userStartup.cheat File
I've just released a tutorial on all the cheats I use for The Sims 2 as well as how to make or install a userStartup.cheat file!
Check Out the Video:
youtube
✨Check Out the Website Post✨
Includes a downloadable copy of my userStartup.cheat file!
#sims 2#the sims 2#ts2#sims 2 cheats#sims 2 tutorial#sims 2 guide#userStartup#User Startup#User Startup Cheat#Sims 2 cheat file#sims 2 video#simtube#simtuber#BellaDovah#YouTube#Youtube
299 notes
·
View notes
Text
youtube
Unlock the full potential of your Sims 2 experience by creating and editing custom aspiration rewards with SimPE. In this step-by-step tutorial, you’ll learn how to enhance your gameplay by turning custom and Maxis objects into aspiration rewards while also editing existing rewards to better suit your needs.
#Youtube#sims 2#the sims 2#ts2#sims 2 video#ts2 video#simtube#simstube#sissysims#sissy sims#sims 2 tutorial#sims 2 guide#SimPE tutorial#sims 2 aspiration rewards#sims 2 mod tutorial#sims 2 modding tutorial#ts2 tutorial#ts2 guide
78 notes
·
View notes
Text
Casually reading the Prima Guide (as one do) and like, why do Ophelia like that? 💀

298 notes
·
View notes
Text
Quick guide to finding hairs by colour system on @/krabbysims fantastic Hair Database. This may be extremely obvious, but you never know! I just figured it out today! I wanted to add a few of Peppermint & Ginger's v4 hairs into my mix of Poppet v2, and was trying to figure out how to find only those textures on the database (in case there were any done by anyone else besides PMG themselves).

Ctrl-F like usual to bring up the search box on the sheet, then click the three little dots for more options.

2. The advanced search box pops up (I dragged it up to the top corner to be out of the way). Figure out what the hair system you are looking for is called in the "Colors" column on the sheets. In my case it was PMG v4 - put that in the Find field, leave Replace blank! You don't wanna change any fields. Make sure search: All Sheets is selected.

3. Hit Find - it may take a moment, but then it will jump to the first instance of that field in the workbook. Hit Find again to go to the next - there doesn't seem to be a way to go back that I've found.
Hope this helps anybody who didn't know about this or maybe didn't know about the database!
52 notes
·
View notes
Text
How to record videos with Sims 2 in-game camera (HD, no UI, no lag, no file format issues)
I originally planned to include this information in the behind-the-scenes video about Bring Me To Life that I'm currently working on, but it's overly technical and not that interesting. It still might be useful to some people (mostly machinima creators), so I decided to make a separate post about it.
There are two ways to record videos in The Sims 2:
Using screen recording software
This is the most common and probably the easiest way. You just need a program like OBS that will capture whatever happens on your screen exactly as it happened. If this method works for you, it's perfectly fine. No need to follow this guide then.
Using the in-game video capture tool
This way involves capturing videos directly in the game by clicking the video camera icon or pressing V on your keyboard. This method is perfect for machinima creators. It automatically hides the UI, but more importantly, the video will always be perfectly smooth, regardless of the actual performance of your game, i.e. even if it runs like a literal slide show, any videos you capture this way will look perfectly fine.
Okay, so if this method is so great, why do we need a tutorial for it? Well, as is usually the case with this game, the feature works fine, it's just a little bit outdated.
To fix it, we need to do 3 simple* things.
*If you're a Sims 2 player, you're probably used to this kind of stuff anyway
Step 1: Installing a modern codec
In the Camera settings, the game lets you choose if you want the videos to be compressed. I highly recommend choosing that option, as uncompressed videos take up way too much storage space.
The codec that the game uses to handle compression is outdated and most video editing programs will not be able to edit such files. To fix this problem, we need to download and install x264vfw, which is a free an open source codec.
Once installed, open the Configure x264vfw app. No need to change anything there (unless you want to test different settings of course), except for this one small thing:
In the Debug section, go to Log level and change it to None. Otherwise the codec will display a pop-up window each time you record in the game, which is pretty annoying.

Step 2: Making the game use the codec
Locate the VideoCapture.ini file in the installation folder with your latest expansion pack. I have Ultimate Collection, so for me the path looks like this:
D:\Program Files (x86)\Origin Games\The Sims 2 Ultimate Collection\Fun with Pets\SP9\TSData\Res\UserData\Config
Back up your file and open the original version with Notepad. You can either replace the whole thing with my settings, or just update the highlighted parts.
While you're at it, make sure to update the LargeSettings value to 1920x1080 so that the videos are captured in HD (no need to worry about it if you're copying the whole thing):
[Config] PreferredCodec=x264vfw Folder is relative to Res/Userdata Folder=Movies FilenameBase=movie NoFillFrames=0 AudioStereoOutput=0 AudioRateDivisor=4 GlobalSettings = reset, vbr:1, fps:10, keyinterval:30, mode:1, datarate:0 SmallSettings = size: 128x128 MediumSettings = size: 320x240 LargeSettings = size: 1920x1080 LowQualitySettings = minq: 6, maxq: 16, mode:0 MediumQualitySettings = minq: 4, maxq: 10, fps:15, mode:0 HighQualitySettings = minq: 2, maxq: 8, fps: 30, keyinterval: 60 SmallLowSettings = datarate: 75 SmallMediumSettings = datarate: 150 SmallHighSettings = datarate: 300 MediumLowSettings = datarate: 150 MediumMediumSettings = datarate: 300 MediumHighSettings = datarate: 600 LargeLowSettings = datarate: 300 LargeMediumSettings = datarate: 600 LargeHighSettings = datarate: 1200 AllowAntialiasing=0 # some drivers have issues with capture when AA is enabled [Codecs] 0=VP61 # On2 VP6.1 1=VP62 # On2 VP6.2 2=VP60 # On2 VP6.0 3=x264vfw # x264vfw
Save your file.
When in game, go to Camera Options and make sure Video Capture Size is set to Large and Video Quality is set to High.
Also, you might want to change the Maximum Video Recording Time to something higher than 60 seconds.

Credit for this solution goes to this person who left the following comment under this video
Step 3: Changing the file format from avi to mp4
Before doing this step, test if everything works correctly when you try to capture videos in the game. The videos will go to the Movies folder in your Documents folder for TS2.
Try to import the videos into your editing software. If it doesn't work, e.g. the program does not recognize the file or the file appears to be corrupted, you'll need to change the file format from avi to mp4.
I personally use VLC media player for that, as it's free and open-source.
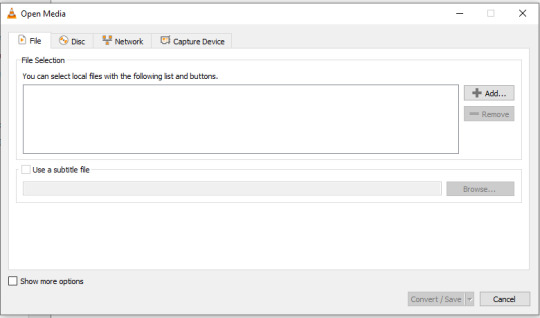
Go to Media > Convert / Save...
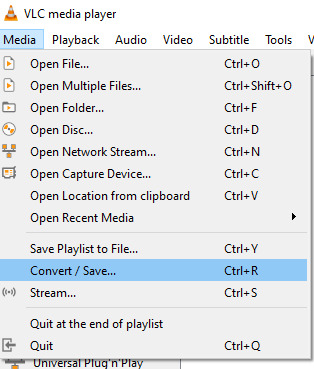
Drag your files into the File Selection section or select them by clicking the + Add button.
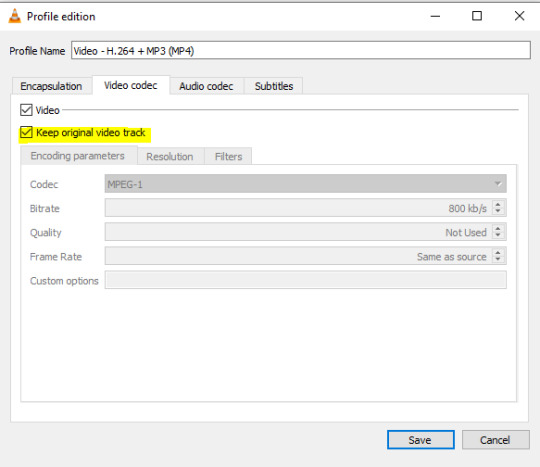
Select the Video - H.264 + MP3 (MP4) profile and click the wrench icon to edit its settings.

In the Video tab, make sure to check the box next to Keep original video track. Go to the Audio tab and check the analogous box.
Save and in the next window specify the destination folder and click Start. VLC will go through each of the files you added.
IMPORTANT:
While Steps 1 and 2 only need to be done once, Step 3 needs to be done for every new video you record (unless, your video editing software doesn't struggle opening the avi files). The good news is, this step is really fast, no more than a second per a single video. This is because we're keeping the original video track intact. The only thing that is changed is the container. That's why this change is fast and does not affect video quality in any way. Ideally, this step wouldn't be needed if we figured out a way to force the game to use mp4 when saving those videos, but I'm not sure if this is possible.
Like I said, outside of machinima creation, it probably makes more sense to just record your screen with OBS. Especially if you want to capture videos in 4K, which I don't think would be possible with this method. But it works for me and as it took me a while to figure it all out, I just wanted to share all the info in a single post!
#sims 2 machinima#ts2#sims2#sims 2 tutorial#ts2 tutorial#sims 2 guide#ts2 guide#my stuff#ts2 simblr#machinima#ts2 machinima
9 notes
·
View notes
Text
How to RESTORE The IKEA Stuff Pack! (Sims 2 Legacy Collection) 💛
Hey everyone! Later than I anticipated, but I made a guide on how to restore IKEA for the Legacy Collection! Hope this helps those that need it :)
💙 LINKS MENTIONED How To Restore IKEA (EA/Epic/Steam) S2UC SP Files (for those who dont have UC!) HugeLunatic's Tumblr SimFileShare IKEA CC
#ts2#the sims 2#sims 2#sims 2 tutorials#sims 2 tutorial#sims 2 guides#sims youtuber#youtube#mine#sims 2 ikea
5 notes
·
View notes
Text
GUID Database Revival
I've finished setting up a way to revive the GUID database, albeit not an automatic one, it is low-key, but rather simple. Instructions are on the pinned post. [It's a Dreamwidth community, basically one webpage where people can dump their GUID info, straight from Excel or a list].
It is searchable with multi search add-ons for browser. Search for multiple entries in one go.
Avoid conflicts with originally registered GUIDs (Not foolproof; assuming GUIDs where assigned in a certain way).
Avoid conflicts with new random GUIDs (that are in the DB).
Creators are indexed - see if your favorite active creators are on there.
Everyone can join, but only members can post. Happy Simming! https://sims2-guid-database.dreamwidth.org/ Example:

Obligatory CCR music:
youtube
#ts2#the sims 2#sims 2#ts2 database#ts2 GUID Database#sims 2 GUID Database#sims 2 cc#sims 2 download#ts2 cc#ts2cc#ts2 download#ts2 dl#sorry for spamming the tags but it is cc related#resources#ts2 resources#sims 2 resources#sims 2 database#The Sims 2 Database#The Sims 2 GUID Database#Music: CCR#https://youtu.be/wCCfc2vAuDU?si=K1dT2Zu4nVuHhhz1#Youtube#text post
75 notes
·
View notes
Text
The Sims 2 Disc Installation and fix guide for Windows 10/11 PCs
I’m writing this guide to hopefully instruct people on how to properly install, fix and run their disc based The Sims 2 game and also educate you on why the discs are not as bad as everyone makes them to be.
First things first, some clarifications about common misconceptions of both the Ultimate Collection and TS2 disc games I’ve been seeing being tossed around:
1. The Ultimate Collection has compatibility patches for modern hardware:
This one is actually kinda true? The UC did have some patches made to it compared to a fully patched disc game but no one has been able to tell what exactly it did.
A fully patched, fixed and correctly installed disc game should work the same as the Ultimate Collection, with no difference in compatibility or game performance.
2. SecuROM doesn’t work on modern OSes so you can’t run the game off the discs:
Totally untrue. People who says SecuROM doesn’t work on Windows 10/11 haven’t actually tried running a game that uses it at all. It 100% works even on Windows 11.
What doesn’t work on modern OSes is SafeDisc, which all packs released before Bon Voyage used. So if you install BV and any pack released after it, the game IS going to run normally as it’s using SecuROM instead.
3. But SecuROM makes the game lag:
True, for some machines it does happen. But as I will explain in the guide, you can uninstall SecuROM with the official removal tool and just use NoCD executables to have it not install itself again.
4. The discs requires Flash and it’s been deprecated:
No, the discs DO NOT require Flash. The only thing that uses it in the setup is a pop up that used to ask you if you wanted to register your game. Since of course you can’t register it anymore, you can just close it and it WILL NOT affect anything.
That out of the way, let’s get to the guide!
What you are going to need:
-All original TS2 patches released by EA back in the day:
They’re all hosted HERE on ModTheSims.
Please, be aware that there may be multiple variatons of a patch. You need to pick the right one for your game. If you have The Sims 2 Base Game DVD version, you will have to download the second option where it says “DVD Patch Notes”, for example.
For Pets and Seasons the “DD” patches mean Digital Download, so if you have them on either CD or DVD them both are going to use the “Disk Patch”
If you seem to be not able to download them, right click the download link and choose “Save Link As”.
If you have The Sims 2 Deluxe / Double Deluxe / Holiday Edition / Other compilations you’re not going to need the Base Game patch as those versions are already updated!!
You also don’t need the Nightlife patch if you have Deluxe or Double Deluxe!!
The same thing applies for the Collections: You don’t need to patch their EPs!!
-Grumpy Loader:
Get it HERE on ModTheSims.
-If you have Bon Voyage and/or packs released after it... SecuROM Removal Tool:
Get it HERE.
-If you have Mansion & Garden Stuff... Sims2RPC:
Get it HERE on ModTheSims by @lazyduchess!
If you DO NOT have this pack, you’re going to need to source a NoCD executable of the game based on your latest installed pack.
-If you DO NOT Have Mansion & Garden Stuff... 4GB Patch:
Get it HERE.
-Graphics Rules Maker:
Get it HERE.
Having downloaded everything, you can start inserting your Base Game disc one! Or your Base Game DVD!
Installing the Base Game:
There’s no mystery in this part, install your game normally as you would back in 2004 following the instructions of the setup.
Three of the biggest problems I’ve seen people have when installing the Base Game is:
1. I get a red pop up saying “This app has been blocked for your protection”
This happens usually on Double Deluxe games and later EPs such as Bon Voyage, FreeTime and Apartment Life.
There’s two ways you can circumvent this.
First one is the one that I personally prefer:
-Open the Task Manager
-On the top left, click “File”
-Click “Run new task”
-Click “Browse...”
-Now go to your disc drive in your PC and open it, select Autorun.exe
-The target box should be pointing to “D:\Autorun.exe”. The “D” letter changes depending on what letter your disc drive is set to in your PC
-Check the “Create this task with administrative privileges” box
-Now click OK.
The setup is going to run normally now.
When you are installing EPs that show you this error, you can do the same thing to every one.
The other way is just to change your PC’s date to somewhere before 2020.
This is going to work too, I can’t explain to you why though!
Something about licenses expiring!
2. I get a Flash pop up when I try to install!
As I explained earlier, you can just close it and the installation will continue normally.
3. The setup just hangs at a specific percentage and won’t progress anymore!
This is mosty probably the setup asking you to swap discs!
DVD users do not have this problem.
What happens sometimes is that the setup GUI is supposed to make a pop up window appear in front of the GUI asking you to swap to disc 2, but on modern OSes it doesn’t appear sometimes.
Actually, it does. It just is in the background, if you minimize every open window on your machine you’re going to see the little pop up!
Just swap to disc 2 and press “Ok” on the pop up and it should resume installing.
The same thing can happen when having to switch to Discs 3 and 4.
After installing the Base Game:
Now you are going to need to patch it.
Open GrumpyLoader, on the top left select “Load...” and on the window that opens, choose the Base Game patch’s executable you’ve downloaded and open it.
It’s going to automatically patch your game, if you are on the 4 CD version of the game you may have to swap discs.
Sometimes GrumpyLoader throws errors when updating, especially when it ends. But you can just ignore it.
After patching, your Base Game is FULLY installed and properly patched, congratulations!!!
But if you didn’t already try, you will see that you can’t run the game as it doesn’t open.
That’s because the Base Game uses SafeDisc that doesn’t work on modern OSes as I said earlier.
Installing Expansion and Stuff Packs:
It’s the same process of installing the Base Game. Follow the setup instructions.
After installing each one, PATCH them with GrumpyLoader.
For example: you just installed University!
Do NOT immediately install another pack right after.
Follow the same GrumpyLoader patching process you did on the Base Game but choose the University patch instead.
Do the same thing to ALL EPs and Family Fun Stuff.
Also, there has been some info online about installing packs out of release order can mess up your game.
I personally don’t think it’s true as I never had any problems but I prefer to be better safe than sorry.
If you want to, Install them in this order:
-University (or University Life Collection)
-Nightlife (skip if you have The Sims 2 Deluxe/Double Deluxe)
-Christmas Party Pack (I don’t recommend if you have Happy Holiday Stuff or The Sims 2 Holiday Edition)
-Open For Business (or Best of Business Collection)
-Family Fun Stuff (or Fun with Pets Collection)
-Glamour Life Stuff
-Pets (skip if you have Fun with Pets Collection)
-Happy Holiday Stuff (skip if you have The Sims 2 Holiday Edition)
-Seasons
-Celebration Stuff (skip if you have The Sims 2 Double Deluxe)
-H&M Stuff (skip if you have Best of Business Collection)
-Bon Voyage
-Teen Style Stuff (skip if you have University Life Collection)
-FreeTime
-Kitchen & Bath Interior Design Stuff (skip if you have Best of Business Collection)
-IKEA Home Stuff (skip if you have University Life Collection)
-Apartment Life
-Mansion & Garden Stuff (skip if you have Fun with Pets Collection)
If you’ve installed all packs, great! You can even launch your game from SP9′s (Mansion & Garden Stuff) disc and executable as it uses SecuROM which WORKS on modern OSes.
Getting your game to work properly:
Your game is fully installed, patched and even running if you have Bon Voyage and later released packs!
But you probably noticed very heavy lag, crashing, bad graphics and things not running as they should.
That’s because, just like the Ultimate Collection, the game is a PITA to get running properly on Modern OSes!
If you have Bon Voyage and/or later released packs: I HIGHLY recommend you to uninstall SecuROM from your machine.
This is going to help greatly with game performance.
Use the SecuROM Removal Tool I’ve linked earlier and remove it from your PC.
Do NOT open the game again as it’s going to install itself again if you do so.
If you have Mansion & Garden Stuff: After uninstalling SecuROM, you’re going to need to install Lazy Duchess’ Sims2RPC Launcher I’ve linked earlier. Follow their instructions on the download page and be sure to apply the 4gb patch in the launcher as it’s going to GREALTY help with the crashing.
Or... if you DO NOT have Mansion & Garden Stuff: Get an appropriate NoCD executable for the pack you are using to launch your game and apply the 4GB patch to it.
Open the 4GB patch executable and use it on your game’s exe.
After doing all that, all that remains is fixing your game performance, resolution and graphics!
Install Graphics Rules Maker and open it.
Firstly, you’re going to have to add your Graphics card to the game’s database. To do that, go the “Device Info” tab and add it there.
Back to the “Settings” tab, be sure your game is set to “The Sims 2″ and is properly recognizing where your game is installed, if for some reason it isn’t, click “Browse...” and point it to your latest installed pack’s folder.
For example: “C:\Program Files (x86)\EA Games\The Sims 2 Mansion & Garden Stuff”.
-Force Texture Memory: Use the auto-detect button and it should automatically calculate the best value for your graphics card.
Check “Disable texture memory estimate adjustment” and “Enable driver’s memory manager” boxes.
If you have an AMD Radeon HD 7000 series, also check the “Fix AMD Radeon HD 7000 series recognition”.
If you have Intel integrated graphics, check the last two boxes.
Now you can set your resolution! Choose your default (which one the game is going to start with) and maximum resolution your game is going to support.
After doing all that, you can click “Save Files...”
And... Done! You got your disc-based The Sims 2 game fully working, properly patched and fixed!!!
Any Feedback on how to improve this guide is very welcome!
Happy Simming, y’all!!! :)
256 notes
·
View notes
Text
NEUROTIC REACTIONS! UPDATE 6
THIS MOD WAS UPDATED MARCH 18 AT 5 PM CST
NOW COMPATIBLE WITH SIMLER90 UTILITIES


SIMS 3T2 TRAITS
All files are compressed.
This mod now works with dishwashers!
Renamed and re-themed to be a mini-traits pack ... but the Neurotics are the featured here.
If you missed my last post, this is a teeny tiny mod (but one that I love) that makes Neurotic Sims have a bit more ... character? Shall we say?
Neurotic Sims will react to clogged toilets and broken dishwashers since no other Sims do in vanilla gameplay! I figured they were two appliances that would cause a lot of distress if they broke.
These Sims will cry, be annoyed, or freak out!
Also, it wouldn't be as fun if the toilet only broke once a Sim year, right?
I left the dishwasher alone, but Sims with the Absent-Minded, Childish, Unlucky, or Clumsy trait objects in their inventory run different random chances to break the toilet. The Neurotic will lose significant amount of Comfort but will only do the crying or freaking out if their Mood is relatively low!
That's the kicker, but I buffered it with another tweak!
Absent-Minded Sims have an added effect of being the only ones to actually flush the toilet if it's already stopped up! That way, your poor Neurotic Sims won't risk tanking their Comfort by flushing a clearly clogged toilet. The Absent-Minded Sims just couldn't see the clog or weren't paying attention.
UPDATE 5:
Added Clumsy trait
Chose a better method of making the toilet break for Unlucky or Clumsy or any of the others besides Neurotic: I set Temp 0 to a random number and if it falls within certain ranges, those traits will break the toilet! The BHAV you need to call for this is the primitive Random Number.
Absent-Minded will now accidentally flush the toilet if it's clogged!
BE CAREFUL ... if you have an Absent-Minded Neurotic!
HAPPY SIMMING!
This mod requires 3t2 traits and Easy Inventory Check
This mod modifies these resources:
0x2015 Toilet - Flush
0x200A Interaction - Flush - Test
0x2000 Function - Wash Dishes
THIS MOD WAS UPDATED MARCH 18
It conflicts with less plumbing breakage at MATY and no toilets clog at MTS
#sims 2 gameplay#sims 2 simblr#sims 2 mods#3to2 traits project#sims 2 traits#sims 2 trait mods#sims 2 guide#sims 3t2#sims community#traits project#sims 2#ts2#ts2 mods#ts2 traits#ts2 traits project#3t2 traits
127 notes
·
View notes
Text


changes coming 📦
:: with the layoff, kayla’s feeling down and out. she doesn’t know what’s next for her. she’s feeling absent from her kids lives, unmotivated to work on her channel, and insecure from losing her job. maybe things needed to change…
#guiding my gameplay to the next gen LMAO#still a ways off tho i think#[JOCooking]#[all-joyoflife]#ts4#the sims 4#sims 4 screenshots#sims 4 gameplay#gameplay screenshots#ts4 gameplay#joy of life gen 2#joy of life challenge#ts4 story
7 notes
·
View notes
Text
Late night impulsive purchases from Japan are a curse

I only have 2 interests and it's pretty apparent isn't it
the yellow simpeople guide is an official guide btw! The only one Japan ever got I think.
EDIT: while trying to find a spot for the games and the guide I noticed.... my sims social credit card is actually unused?????

Still no value because sims social 🪦 but hey it's something
#I don't even have a player for tapes#I might scan that TS1 guide because all the searches about it lead to nothing#The Sims 2 DS#Sims Console#I'm not tagging the other game here#I swear I bought the Japanese sims 2 PSP game too but oh well ❤️🩹#Leave it to me of buying the same game in a different language multiple times#Actually now that I think about it. I don't have a Japanese DS or PlayStation console. Yass
9 notes
·
View notes
Text
Making your own career/NPC outfits (and attaching them to custom and default careers)
Tutorials I’ve used that helped me understand this a little bit more: SuperFly’s „Attaching custom clothes to careers” @rio-sims „Adding extra options to NPC and Career Outfit Templates” @itsdiamondeyesuniverse mini-tutorial on random clothes and hair and some general knowledge from Hat’s Simpe Tricks
I’m just compiling them and adding results of my own experimenting. It will be pretty long, so everything is under the cut.
Download Template files [SFS] or [Google Drive]
First step is to understand what makes an outfit template.
Looking at my empty template (OutfitTemplate-Empty.package), you can see 4 files. You don’t touch the BHAV and OBJf, they control the behaviours and functions and such. Good practice is to change the name of the OBJD and NREF to something unique. For custom outfits, you will have to change the GUID in the OBJD, but I will touch on that later in the tutorial.
But that’s just an empty template to fill with your own outfits. Every variation of an outfit is made of 2 files:
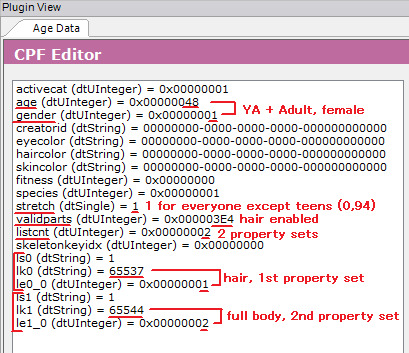
3IDR (3D ID Referencing File) - This one contains skeleton resource and hair/clothes property sets. AGED (Age Data) - This one pretty much contains instructions on how to read the 3D ID.
In my 3D ID template files you can see the first line is a Resource Node - that’s the skeleton. It always has to be there, don’t delete it. Second line is a property set - that’s the outfit that you will be replacing. 3D ID can have many lines of property sets in particular order, depending on what Age Data is saying.
(My SimPE shows Age Data in CPF, which reads hexadecimal, but sometimes can also show it in XML, which reads decimal. If some lines are different in decimal, I will put it in brackets.)
If you open up any of my Age Data templates, you can see a lot of lines that may make sense intuitively, and some that make no sense at all. Here are lines that are actually useful and how to change them:
AGE 2 - Child (also 2 in decimal) 4 - Teen (also 4 in decimal) 40 - Young Adult (64 in decimal) 8 - Adult (also 8 in decimal) 48 - Young Adult + Adult (72 in decimal) 10 - Elder (16 in decimal) 58 - Young Adult + Adult + Elder (88 in decimal)
I think it’s better to always include Young Adults with Adults. If for example you don’t use mods that enable jobs for YA, then nothing happens and nothing breaks. But if you do, then your YA can wear their job uniform.
GENDER 1 - Female 2 - Male 3 - Unisex (only for children!)
STRETCH It’s only important in teens - they use adult skeleton, but smaller. For adults/elders stretch will say 1, for teens - 0,94. Children use their own skeleton, so their stretch is also 1.
VALIDPARTS 3e4 - If you want to add hair to your outfit (996 in decimal) 3e0 - If you don’t want hair in your outfit (992 in decimal)
LISTCNT Number of elements in your 3D ID. Technically counts from 0, but as the first item is always a skeleton, for ease of counting - it’s the number of property sets used. For only fullbody outfits it will be 1, fullbody + hair or top + bottom = 2, hair + top + bottom = 3.
SKELETONKEYIDX Position of the skeleton in the 3D ID. Always 0, as it’s the first item, counted from 0.
LS, LK, LE All 3 needed together. They are counted from 0. So the first 3 lines will be named ls0, lk0 and le0_0. If you add another item to your outfit (eg. hair + fullbody clothes), next 3 lines will be named ls1, lk1 and le1_0, then ls2, lk2 and le2_0 etc.
LS Always 1.
LK The numbers are already in decimal, so the same in CPF and XML. From what I’ve tested and I’m sure of:
65537 = Hair/hat 65544 = Fullbody 65540 = Top 65552 = Bottom
LE Which line in 3D ID corresponds with this item, counting from 0. As line 0 is always a skeleton, and dealt with in the „skeletonkeyidx” line, you can just count property sets.
If you use my Age Data templates - you don’t have to worry about all that, but I made this tutorial only because I really wanted to know that. So maybe someone else would want to know too :P
Now that you can understand what makes a working outfit, lets make one! This will be split into 4 parts: part 1 - making a new, custom outfit; part 2 - replacing existing outfits; part 3 - attaching outfits to careers; part 4 - testing if it works.
Part 1 - Making a custom outfit
In this example I will make an outfit for adults only, for the sake of shorter tutorial :P
First step: Open „OutfitTemplate-Empty.package” in SimPE. I will change my OBJD and NREF names. In the OBJD you have to change the GUID (the one with all zeroes in the template) - how to make a GUID? Click here to generate 8 random characters in hexadecimal (refresh for a new string), delete any spaces, then put „0x” at the start. Then check with this spreadsheet if it conflicts with any Maxis objects. My new GUID will be 0x1234ABCD (only for tutorial purposes, yours should be more random to avoid clashing with CC objects too). Save the file as a copy.
Now we’re going to add actual outfits. First, one for female adult sims. You have to add a 3D ID template (in this case for teens/adults/elders) and an Age Data template that includes your preferred combo. For this one, I will get AF-Hair-Fullbody.
If you look at the Age Data, you can see here that it’s for Young Adult and Adult female sims (age = 48), it has hair (validparts = 3e4) and contains 2 property sets in 3D ID (listcnt). In the ls/lk/le lines you can see that it contains hair (65537) in the first property set and full body (65544) in the second one. (Though the order of the property sets is in the names of the template files, so you don’t have to check every time!)
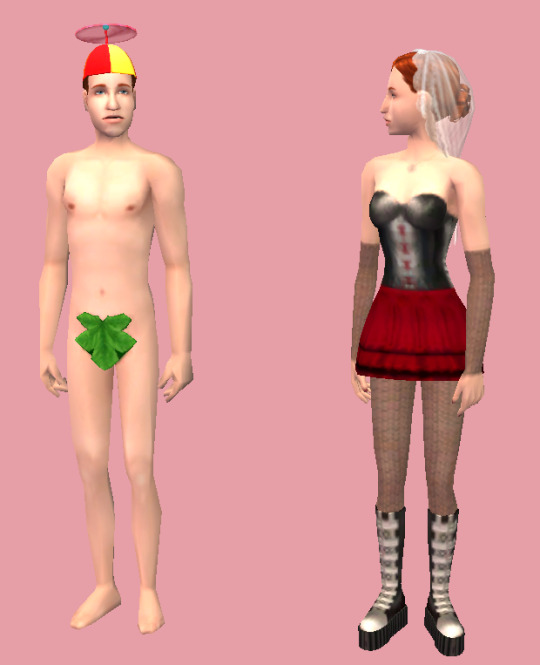
Now we go to the 3D ID. If you want to attach Maxis clothes or hair, use Scenegraph Resource Finder. Set it to Property Set Search and type your hair/clothes name there (found through the default database or the debug mode in CAS). I’ve chosen afhairupdoweddingveil_black. Doesn’t matter if you choose _black, _blond, etc, your sim will automatically wear the hair in their own hair colour (for CC hair - only if it was binned correctly). Let it search. When you’ve found what you’re looking for, note the group and instance. Now open the 3D ID. Select the property set in it and change the group and instance to the ones of your chosen hair/clothes. Commit and save.
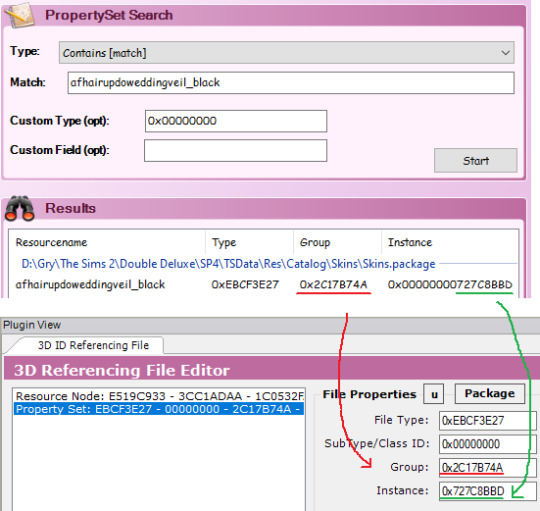
For the fullbody outfit, I’m gonna use CC clothes (AF Lolita Dress and Boots by animera at MTS). First, make sure you have a mesh and a recolour in your Downloads folder so the game can access it. Then open the recolor and find the corresponding property set. Write down group and instance and close the file. Open up your outfit template file again and go back to your 3D ID. Click on the property set line that you set up before and click „add” to clone that line. Now change the group and instance as you did before. Commit and save.
Remember that any hair and clothes used in an outfit has to be enabled for Everyday!
That’s all for the female sim, now onto the male sim.
As before - add the 3D ID template and Age Data template. I will choose AM-Hair-Fullbody.
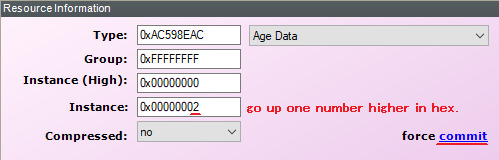
As you can see, my new 3D ID and Age Data have the same instance as the previous ones - they will clash. So we have to change each new 3D ID and Age Data’s instance to one higher. So change instance to 2 and click force commit on both.
Next steps are the same as before - add property sets. I’ve added a propeller hat and a fig leaf, classy! Commit and save.
That’s pretty much it. If you want to add other age/gender combos? You can, just each new 3D ID and Age Data pair need to change their instances to one higher. You want to add like 20 options for every age and gender? You sure can, same thing as before - instance number goes up (remember, it’s hexadecimal so after 9 you got A - F, then 10 etc). You can have one outfit with hair, other without hair, one top and bottom and one full body, one for female adult and 10 for male adult, doesn’t matter, all combos work, as long as the property sets in the 3D ID are in the same order as in corresponding Age Data.
But right now, my custom outfit is done.
Part 2 - Default replacing existing outfits
While you can attach custom outfit to any career, default replacing outfits is the only (known to me) way to change NPC outfits without digging into BHAVs (which I don’t understand lmao).
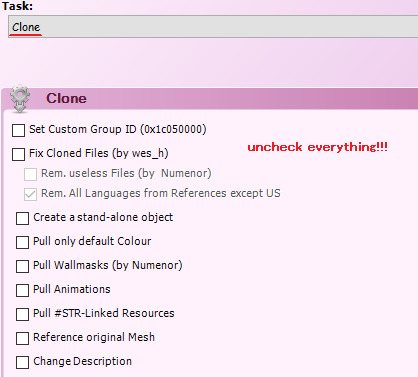
First step is to clone the outfit you’re replacing. Open Object Workshop, click Start and wait a bit as it loads. Then go to Other > Outfits and find your chosen outfit. I’ll use „Outfit_NPC_Maid_test”. Click Next. Then if it says Recolour, change it to Clone. Uncheck every box!!! Click Next. Save the file.
If you look into the Age Datas and 3D ID - they almost always look like a mess, so we’re going to replace them entirely.
Doesn’t really matter which age/gender combo you replace with which, but I’m going to check. In my example, instance 1 is for an adult female, instances 2, 3 and 4 are for an adult male.
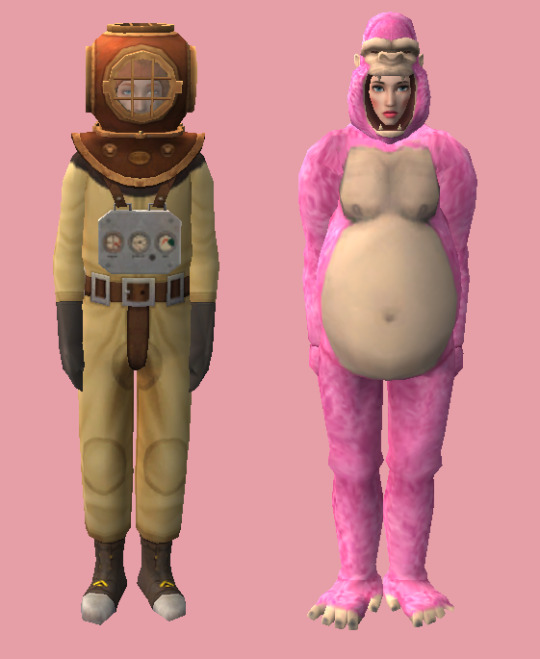
Right click on the 3D ID, instance 1, then click „Replace” and choose my 3D ID template. As you can see, group and instance remained unchanged, this is very important! Now right click on the Age Data, instance 1. Replace it with an Age Data of your choice. I will use AF-Hair-Fullbody. As I explained the process in part 1, I won’t go into detail here. I will also replace instance 2 with a 3D ID template and Age Data AM-Hair-Fullbody. I will replace female outfit with pink gorilla suit and male outfit with diver suit, because why not.
If you want to add more options: as stated in part 1 - when you add new 3D ID and Age Datas, instance numbers go up, but in this case you also need to change the group to the same as your default (in my case, the maid outfit has group 0x7FE81E93).
Maid outfit has 1 version for an adult female and 3 for an adult male. Of course you can add more, but what if it has more, and you want less? I want to have only 1 version for each gender. How to go about that? You need to replace all of the 3D IDs and Age Datas, but nobody said some of them can’t be identical. So I will replace my instances 2, 3 and 4 with the same outfit - diver suit. If I only replaced instances 1 and 2, I would have a chance to get a diver sut man maid, but also a chance to get 2 variations of vanilla man maids. Now I have 3 variations for male sims but they are identical, so all of them will spawn in diver suits.
You don’t need the OBJD, OBJf, NREF and BHAV, as we didn’t edit anything there. You can delete them from your package.
Save the file and you’re done!
Part 3 - Attaching outfits to custom and Maxis careers
If you replaced a default career or NPC outfit, you don’t need to do anything else, it just works. But for a new, custom outfit - you need to attach it to a career. Remember the GUID that you set in the OBJD? Mine was 0x1234ABCD. Write down yours somewhere.
For a custom career, open it up in SimPE and open Bidou’s Career Editor. Choose the level you want. On the bottom left, under the description, you can select some of Maxis outfits, or just type your own GUID. Do that, and your selected outfit name will change to Other. Close the Career Editor and save your file. You’re done :P

For a Maxis career, use Object Workshop. Choose Other > Sim Type, then select your career. Be sure to pick the one you need, as most careers have an Adult and Teen/Elder version, and in Object Workshop it just shows 2 identical names. I’m choosing the adult version of a Criminal career and clone it (with all boxes unchecked!!!). Save the file!! Now the steps are identical as in custom careers - open up Bidou’s Career Editor and change the outfit GUID for your chosen level to your own GUID. Close the Editor, but don’t save the file yet. Now you can see one little file that has been changed, as indicated by the italicised name. This file is named „Outfit GUIDs” and it’s the only file we need - delete the rest. Save the file and you’re done!
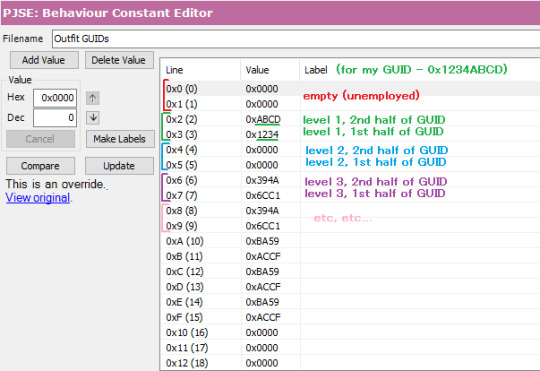
You can also edit the „Outfit GUIDs” file manually (if you, for example, don’t want to clone a career and start from scratch every time you need to make an edit). Lines 0x00 and 0x01 have to stay empty (0x0000), as they are reserved for Unemployed. Level 1 is represented by lines 0x02 and 0x03. You put your GUID there, but split in 2 halves and in reverse order. My GUID was 0x[1234][ABCD], so it will look like this: Line 0x02 - 0xABCD (level 1, 2nd half of GUID) Line 0x03 - 0x1234 (level 1, 1st half of GUID) Next lines work the same - 0x04 (2nd half) and 0x05 (1st half) for lvl 2, 0x06 (2nd half) and 0x07 (1st half) for lvl 3 etc.
Part 4 - Testing!
When all your needed files are in your Downloads folder, open the game and choose a testing hood. Make sure your boolprop cheat is on! Open a lot with at least 1 sim (we will be spawning more of them).
For testing careers, make sure you have enough sims to see your desired results. My career outfit had 1 version for adult females and 1 for adult males, so I only need 2 sims. If your outfit has more variations for the same age/gender combo, you will have to spawn a lot of sims to make sure you will get all of them! As you know, this game is famously not very good at being random, so you can have two variations of an outfit and you can get 10 sims with the first version and only the 11th will spawn with the second :P For spawning new sims, shift click on a sim and select Spawn > Tombstone of L and D. I clicked „New Adult Male” and got a random dude.
Now to get them jobs easily, I shift click on a newspaper and choose a job. You can also set their job level. For my sims, I need to test Criminal career level 1.
Now give them a wardrobe (or a few, if you have a lot of sims to change) and make them dress for work. As you can see - my sims are wearing their new pretty outfits! (Excuse my "I use lowest possible graphical settings so my laptop doesn't explode" ass screenshots)
To test NPC outfits, shift click on a sim and select Spawn > NPC and Townie Maker. First choose a gender, then find the EP of the NPC you want to create, in my case it’s the basegame, so I select Make NPC > Maid. It will spawn a random NPC of your chosen gender. You can cycle it a bit, clicking on the NPC maker again and selecting Repeat Last. If your outfit has many variations, cycle as many times as needed to make sure all your options appear correctly. When you’re done, click on the NPC maker and choose Kill. Now choose the other gender and repeat. Cycle as many times as needed. I only needed to see 1 female maid in a gorilla suit, but I needed to cycle a bit to see if nothing slipped through the cracks with the male maids. Everything works great and they were all divers :P
After all that testing we’re done! Have fun with making all of the outfits your heart desires! ♡
65 notes
·
View notes