#s4 cc tutorial
Explore tagged Tumblr posts
Visit Tumblr Blog
Explore Tumblr blogs with no restrictions, modern design and the best experience.
Last Seen Tumblr Blogs


Fun Fact
1,644 Tumblr posts in 1 second.
Text
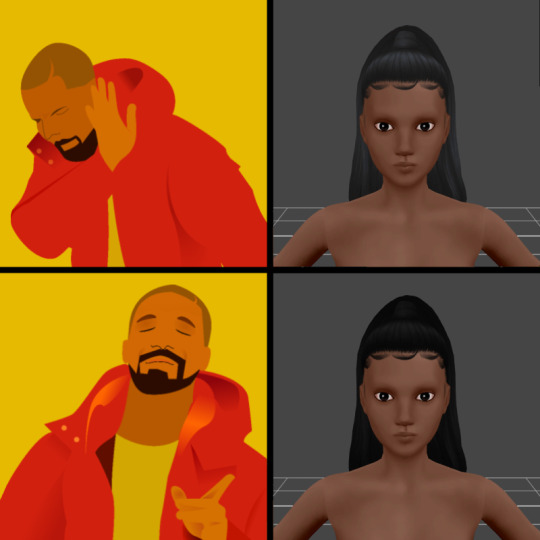
Have you ever thought that the black hair colour just wasn't black enough?
If so, I've got an easy solution for you!
DISCLAIMER! I don't mean to be hateful or rude towards anyone. Everyone is free to do as they please with their own content (as long as it complies with EA:s TOS). The original black colour just doesn't fit my taste, that's all. I made this tutorial because I thought that there might be others who share my opinion but who might not know how to change the colour. With that said, I'd like to apologise in advance if this hurts or offends anyone.
Art by Alex Espino.
The hair shown above was made by Kiara Zurk.

Let's begin!
You'll need:
- Sims 4 Studio
- A photo editing program (e.g. Photoshop, Photopea, Gimp)
1) Open the hair you want to edit in Sims 4 Studio (double click on the package file).
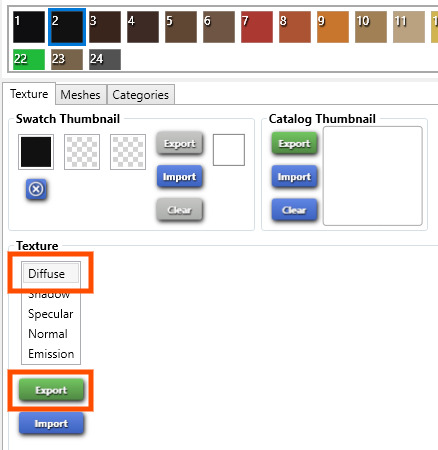
2) Export the blue-black texture as a PNG and save it somewhere that's easy to access.
3) Open the PNG you just saved in your editing program of choice. I'll be using Photopea for this tutorial.
4) Add a 'Black & White' adjustment layer.
5) Add a 'Brightness/Contrast' adjustment layer and bring it all the way down to -150 or whatever you prefer.

6) Optional! You can flatten the image into one layer by right-clicking on any of the layers and then click on 'Flatten Image'. I personally don't bother though.
7) Save as a PNG and import it back into Sims 4 Studio. Save the package file.
That's it! Now you've got yourself a true black hair colour.
Important! If you use a Reshade preset, you need to take into account the way that preset changes colours, lighting etc. in the game. If you use a preset that darkens the colours, the hair colour might look odd if you adjusted the brightness exactly the way I did in this tutorial.
Now I'll leave you to it. Happy Simming!
#s4 cc tutorial#s4 tutorial#ts4 cc tutorial#ts4 tutorial#sims 4 tutorial#sims 4 cc tutorial#the sims 4 cc tutorial#the sims 4 tutorial#s4cc tutorial#ts4cc tutorial
24 notes
·
View notes
Text
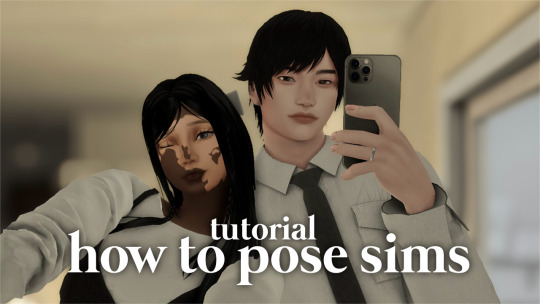
how to pose sims for photoshoots - tutorial
MODS & CC USED:
teleport any sims
pose player
mc command center
iso love photos – full control camera (optional)
photographic memory (optional)
wicked whims | wonderful whims (optional)
backdrops 1 & 2
@ts4-poses
some of my favorite pose creators: ssiat | acha | dearkim
529 notes
·
View notes
Text
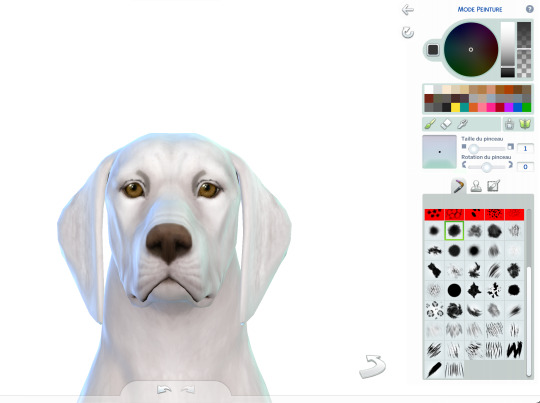
Some tricks to paint your animals in CAS
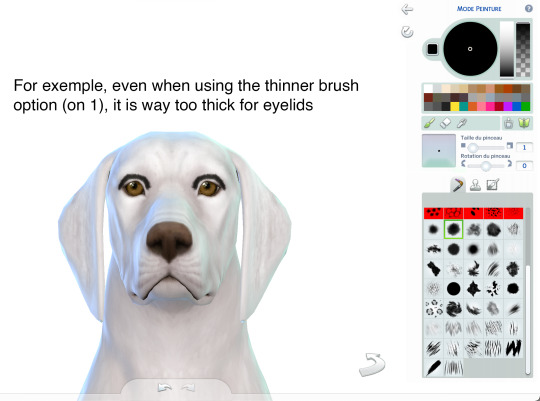
I won't make a tutorial because I wouldn't know where to start and honestly, it's mostly through practice that you'll improve yourself at painting. But here are a few tricks that might help you. 1. Enter the cheat code "cas. clockspeed 2" to almost pause the time in CAS. When the animal is breathing too fast it really makes it more difficult to paint details. 2. When you want to paint small details on your pet's face, click on "edit details", then double click anywhere else to exit the details painting mode without zooming out. You'll have a closer look of what you're doing. 3. Be aware that you can have a much darker black paint by pulling down the slider lower than it is set.

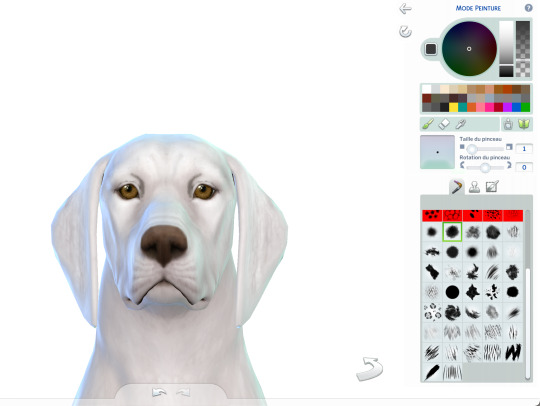
4. Use pictures as references. Can sound silly, but it isn't just for inspiration, it will really help you to see better where you are supposed to paint the lights. Aaand they are really important since they will give much more landforms, and therefore, realism to your animals. 5. Paint the eyelids and the nose of your pets. Trust me, they will look much more expressive and realistic. 6. You can paint thinner traits with a simple technique. First, you make the trait you want using the colour you want, usually darker than your pet's colour.
Once you've done your trait the way you want it, select the pet's base colour (white in this exemple) and draw an other trait just next to the first one. It has to be very close to erase some of it but not all.

Same here:
7. Make a hairy effect using the fur brushes. Use different ones, set them to to smallest option on the face and more or less bigger on the body, depending on the hair length. Also, you can start with a dark colour and draw lighter above. Pay attention of the orientation of your brushes; respect the hair's direction. 8. Don't hesitate to mess around with different colours and opacity. 9. Use fur brushes with a darker colour to give some shadows and landforms to your animals.
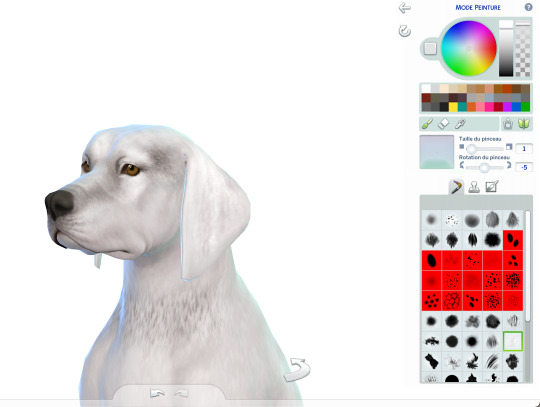
That's it, I'll update this post if I can think of anything else. I hope some of you will find it useful. Have fun ! ᵔᴥᵔ
#sims 4#ts4#s4#sims 4 pets#sims 4 cc finds#sims 4 cats and dogs#sims 4 dog#sims 4 tutorial#sims 4 tricks#sims 4 painting tricks#sims 4 help#sims 4 realistic pets
310 notes
·
View notes
Text
The other post was getting long, and this is a different sword, so here you go:

I actually fucking finished a mesh edit!!!!! Well, at least the meshing part. This thing has parts from three different sword meshes. Tomorrow it's on to texturing hell. I've never textured anything before in my LIFE, and I just know it's going to be miserable, lmao.
Especially since I assume I'm going to have to make a new uv map and I don't know shit about that. But I at the very least need a texture for renders, and this sword is low-poly enough that I could probably make it an in-game accessory too.
#morrigan.txt#wip#blender wip#in case anyone is curious: the blade is from natalia auditore's alucard sword. the cross guard is a shorter/wider version of part of the#crossguard from moriel's diego sword (which is actually wolf's rapier mesh) and the hilt is also from there.#the loop is from tinkle's rapier build/buy object from their pirate cc set. But I made it skinnier and longer iirc.#if I could I would gladly use the existing textures for the blade and hilt but idk if I can do that.#I'm gonna have to go searching for tutorials to find out how to deal with UV maps.#the only uv stuff I've done is converting build/buy objects to cas accessories which doesn't really count bc I wasn't changing the mesh.#I don't think I could share this publicly unfortunately. I would be breaking all three of the og creators' TOUs.#but ofc that assumes I can ever actually finish this lmao.#I'm gonna try tomorrow tho!!#this might end up being sigmar's sword for the seven of swords edit??#maybe.#it's simple but I like it.#sorry I haven't posted any actual sims content in a few days. I've been hyperfocusing on these fucking swords lmao.#I've learned a lot about blender though which is a plus lmao.#fingers crossed I can get this into s4s without having to update my game. bc I made it in 3.3.6 but apparently I need 3.6??#and hopefully the version of s4s I have is compatible with 3.6 cause last time I tried to import something from 3.3 it gave me an error.#so if it's not compatible with either then I'm fucked lmao.#and I really don't wanna have to update my game for this.#oh well. at least I can make blender edits without needing to get it in-game.
9 notes
·
View notes
Text
gods i wish i knew how to blender properly i have this hat i made that i really wish i could put in the sims 4 but i couldnt figure out anything other than forming the hat and ultimately gave up
#didnt help i tried going for a cat hat instead of a regular hat#except i had to have royally fucked something up because i couldnt figure out how to do the depth map or whatever it was either#the blue and red thing#and then the texture didnt work and i couldnt get the thing imported with s4s and it was a disaster#ts4#the sims 4 cc#WAIT#I MENTIONED THE BLENDER INCIDENT BEFORE???#WHEN WAS THAT#yknow it also doesnt help when all the beginner tutorials dont make sense to me nor are they the right version of blender#☼︎ rants#i suppose this is a rant#☼ rants in the tags
4 notes
·
View notes
Text
WHile sorting thru my CAS to make it make sense, as one does on a Tuesday night. I had reached the point of no return for annoyances with SKIRTS! DENIM SKIRTS as formal wear, swimsuits, BATHING ffs! Who does that?
So off I went to S4MM to try & see if there was a way to fix it there since S4S hates me & loads slower than my game does. I noticed when I can right click on the picture of a CAS item & it will show me all the categories it will go to & there is an S4S button that will open up just for this item. I thought I had corrected things but then this morning I went back in & the same dang things I had removed from the swim category are still showing there.
Exhibit A:

Is there a tutorial out there somewhere that I just haven't found that tells me how to fix it all so they can finally make sense when I am looking for items to wear? I get why creators would put everything in every list but my brain implodes when I get tank tops & shorts in cold weather wear & parka's in hot weather.
2 notes
·
View notes
Text
lmao a $42 tutorial to make CC...
ANYHOO:
Requirements You will need: Sims 4 Studio Photoshop (however you choose to acquire it), or an alternative DDS Plugin (unless you choose to save files as PNGs) Blender (any version between 2.76 and 4.3 - I use 3.3) The Basics
Recolours and Textures
The easiest thing to start with is a recolour. If you have some knowledge of photo editing software, this should be fairly straightforward, but if you’re new to it, the following tutorial covers it well: Recolouring Tutorial - Softpine
If you’re feeling confident with your recolours, but want to add a little extra to your textures, it’s worth checking out specular and normal files.
Speculars are my favourite thing for elevating CC (by that I mean covering it in glitter and sequins). This tutorial covers the basics:
Speculars - Teanmoon
Normal maps (bumpmaps) are a little different. They can give a 3d texture to an item without altering the mesh (within reason). Teanmoon also has a tutorial on that:
The Bump Map - Teanmoon
If you’re feeling extra (I know I often do), you can use emission maps to make your item glow and/or flash/twinkle.
Get to know emission the map - S4S
Meshing
Meshing is a little more complicated (or perhaps not, depending on what your strengths are. I recommend starting with the Blender Donut Tutorial (pick the one that matches your Blender version) to familiarise yourself with Blender. I didn’t do this. I went in raw from using Milkshape for over a decade (don’t start me on Milkshape lol) I would have learned faster if I did…
Once you’ve navigated the majestic plate of donuts, you might be ready for a touch of frankenmeshing! This tutorial covers the basics really well, as well as a touch of texturing:
How to Make CC Clothing for The Sims 4 - Powluna
@joliebean also has some great tutorials covering some of the more technical details.
Going forward:
So you’re feeling confident and want to mesh from scratch! There are 3980193890381 CC creators and a limited pool of meshes to frankenmesh, so you may want to create something new. Trust me, start with earrings and work your way down from there.
For the alpha girlies:
Start to Finish Marvelous Designer Tutorial by owlplumbob
I'm also happy to answer any questions people might have as they're starting out. I don't know everything, nor am I one of the top-tier CC creating girlies by a long shot, but I'll do what I can and try to sign post if I don't know.
613 notes
·
View notes
Text

As storytellers, realism and continuity are important to us, and they're sometimes hard to achieve within the confines of the game. I’m personally a big fan of posing Sims in open doorways, and unless you want to be limited to the CC options that exist, you’re stuck having to make some poor Sim walk in and out and pausing at just the right moment for the desired effect. But it’s actually very easy to edit a door in Blender to make your own open version!
I initially learned about "posing" objects from surelysims' Wicked Whims posing tutorial, which I highly recommend as a whole. However, it might be a little overwhelming to learn a whole new posing system for the sake of a screenshot or two, which is where this tutorial is meant to come in. Some of my explanations might seem overly simplistic, but I wanted it to be approachable even for beginners. I am far from an authority on using Blender or making CC, and I'm sure there are flaws in this process or easier ways to achieve certain things, but it works well enough for my purposes and I hope it will work for yours too. 💗
Now, onto the tutorial...
Figure out what door or gate you want to create an open version of. If it’s from the vanilla game, all you need to do is make note of its name. If it’s CC, find the package in your mods folder, make a copy, and paste it into My Documents > Sims 4 Studio > Mods. This will allow you to find it in S4S in the next step!
Open S4S. On the main screen, make sure “Standalone Recolor” is checked under the “Object” button, then click the button.

A new window should pop up (if it’s your first time doing this, it may take a while to load). At first, it will show every single object in the game. If you know the name of the object you’re looking for, you can use the search bar to find it. You can also use the filtering options to narrow the selection down by category, game pack, and whether it’s vanilla or custom content. Here, I’ve filtered the search to only base game doors. Once I find the door I want to adjust, I click on it and hit “Next.”

This will pop up a window prompting you to save a new file. Place it somewhere you know you’ll be able to find it easily later and name it accordingly. This file will ultimately contain your mesh edit, so you don’t want to lose it! I suggest placing it in a dedicated folder, on your desktop, or in your Mods folder directly.

On the next screen, you’ll be looking at the contents of the package itself. For this tutorial, you don’t need to worry about grabbing anything but the mesh. Click on the “Meshes” tab and then “Export Mesh.” You’ll again be prompted to save.

Open the mesh file you just saved in Blender. (If the view is funky to start, I recommend hitting 1 on your keyboard’s number pad to get a forward-facing view.) [It should also be noted I’m using Blender 3.6, so my screenshots and the location of certain settings may be different than in earlier or newer versions.]
You’ll see that there are actually multiple meshes involved (and the number can vary from object to object). Right now, we’re only concerned with the “rig.” If you’re familiar with posing, you’ll know that all Sims have a rig that is used to move different parts of their bodies around. Objects also have a rig, and objects that can open will have “bones” that control their moving parts. So click on “rig” and then change “Object Mode” in the bottom corner to “Pose Mode.”


Now, if you hit A on the keyboard, it will select all bones and you can see where they’re located. As far as I can tell, all doors have two bones that control their swinging movement. They both do essentially the same thing. I tend to stick with the top bone, which is called something like “bind_doorSwing.”

Pro-tip: If you’re having trouble seeing or selecting the rig's bones, you can change the view on the right side of the screen to “dope sheet.” Then when you save the position of the bones, just like when posing a Sim, by selecting all with A then clicking I and selecting “Location & Rotation,” the list of available bones will pop up there.


Rotate the door open using this bone or bones, if it’s a double door. On double doors, I recommend rotating each side individually rather than trying to rotate them together, as you may get unexpected results. You can use the R+Z combo on the keyboard to limit the direction of movement. (You can also use this in combo with numbers to swing them more precisely. For example, if you want a 45 degree swing, you can press R+Z+45.) Specifying the Z axis allows you to only swing the doors open and closed while restricting their movement in other directions.

Once you’ve got the doors swung open to where you want them, hit A to select all bones, then hit I and select “Location & Rotation” to save the position. (If you’re a poser, this maneuver is already familiar to you - and you know how important it is! If you skip it, the new position won’t save and the doors will revert back to closed.)

That’s it! You don’t have to do anything else to the mesh. Save your file in Blender. If you want to keep it separate from the original door mesh, save as instead and name it something different. (This is why you may want a dedicated folder, since the number of files does add up!)
Reopen the package you made earlier in S4S (or simply return to it if you’ve kept it open). From the same place you exported the mesh, you will now import the edited mesh. Hit “Import Mesh,” navigate to your edited Blender file, and you should now see your edited door replace the original. Since it’s the same mesh, all the swatches will still work perfectly with it.

You’ll notice that you’ve only replaced the “LOD 0 (High)” version of the mesh. When you click the drop-down menu, you’ll see that there are also medium and low detail versions, as well as shadow meshes at all levels of detail. If you’re only making an object for personal use, you don’t have to worry too much about LODs. You can probably just import the same mesh into LOD 1 and LOD 2 and be fine (so long as your computer isn't a potato). And if this is just for you, I honestly wouldn't even touch the shadow LODs.
The only other thing you might do is go back to the “Catalog” tab and alter the object name so you can find it easily in the game catalog. You can also edit the description, price, etc. if you so desire. Hit “Save.”

Test in game! If the package isn’t already in your Mods folder, move it there. As long as you didn’t mess with any of the tags, it should still be in the door section of build mode and work perfectly as a functional door. The door swinging animation will look different, and you could probably get rid of it if you wanted, but that’s above my current skill level and I don’t think it’s really necessary for our purposes. If all you need is an open version of a very specific door for storytelling purposes, it gets the job done.


(First screenshot: doors swung open as intended, second screenshot: doors swinging in the opposite direction as they’re walked through)
These steps can also potentially be used to create open versions of other in-game objects like gates, books, chests/boxes, etc. I’m only just beginning to experiment with minor mesh edits, but once you get the hang of it they can often be faster and easier than trying to line up the best circumstances to get the perfect shot in-game. I might make more tutorials for small edits like this that help with storytelling realism and continuity in the future!
#ts4#sims 4#ts4 storytelling#ts4 tutorial#sims 4 storytelling#sims 4 tutorial#this is the first tutorial i've written so do let me know if anything's confusing!!!#*tbw
277 notes
·
View notes
Text
youtube
NEW VIDEO TUTORIAL 🩷
After almost two years it's time for a new and improved version of my "How to make CAS CC" video. This time I will explain how to create a frankenmesh out of a jumpsuit and a dress for adult Sims! It's VERY beginner friendly so if you weren't successful yet with starting to make CC, maybe this one will give you the help you need!
All the topics I cover in this video below the cut:
00:00 Intro
01:00 Software
01:36 Downloading & Installing Sims 4 Studio
01:56 Downloading & Installing Blender 4.2
02:10 Downloading & Installing GIMP
02:20 Introducing Sims 4 Studio
03:03 S4S | Gathering assets to work with
04:09 S4S | Textures
05:12 Project Folder
05:34 S4S | Gathering assets to work with
07:10 Introducing Blender
10:17 Blender | Edit mode (Select, Delete, Wireframe)
12:38 Blender | Append second mesh (Proportional Editing, UV overlapping)
18:23 Blender | Join two meshes (Material, Merge)
20:03 Blender | Cleaning up the mesh (UV editing, Merge, Rip)
22:14 Blender | Cut number
22:43 GIMP | Making a texture (Select, Delete, Healing, Smudge)
24:52 Photoshop | Making a texture (but make it easy)
25:15 GIMP & Blender | Preview of the texture
25:43 GIMP | Making color swatches (Layers, Lighting, Fill tool)
28:33 S4S | Introducing the CAS area
29:15 S4S | Creating a package file
30:25 S4S | Importing all our assets
31:17 GIMP | Creating a shadow texture
32:24 S4S | The specular map
32:39 GIMP & Browser | Creating a normal map
35:58 S4S | Vertices & Polygons, LODs
37:02 Blender | Creating LODs
38:20 S4S | Categories (Tags, Allow for random, Gender restrictions)
39:36 S4S | Tuning tab (not covered)
39:47 Sims 4 | Results & Outro
434 notes
·
View notes
Text
Cantina Collection

Straight from Oga's Cantina comes this cobbled together industrial set.
A bit later than planned but finally here. All items are very low poly as they are all frankenmeshed from the original bar back counters.
The textures are all composites and rearrangements of the originals, as a result they are not seamless - but we'll say it just adds to the look that they've just been made from whatever scrap metal was around!
Also as the cabinet doors all have the same rust pattern, it looks odd/repetitive on very big kitchens but works fine for small spaces.
There is only one swatch for all items except the seating, which comes in the same colours as the originals.
All items are base game compatible, except the resized bar backs which require Journey to Batuu.
See below for further details, pictures and download links.
Comfort (5 items):


Industrial Bar Stools x 2 - Low Back & No Back
Industrial Dining Chairs x 2 - Low Back & No Back (shown with original JtB high back chair)
Metal Dining Chair (shown with original JtB bar stool)
Surfaces (16 items):


Kitchen Counters & Islands


Bar Table
Dining Tables x 2


Coffee & End Tables
Console Tables x 3


Smaller Replicas of the original Cantina Barbacks x 5 - resized to match the height of regular counters NOTE: You'll need to use bb.moveobjects on to align these properly. JOURNEY TO BATUU PACK IS REQUIRED.
Industrial Shelf
Decor (2 items):
Metal Splashbacks x 2
Activities & Skills (3 items):


Oga's Bars x 2
Sabacc Game Table NOTE: BGC but JOURNEY TO BATUU is required in order to change the game type to Sabacc. Without this it will function as any other base game card table.
Download All (Downloads ZIP file from Google Drive)
Pick and Choose (Opens Google Drive folder)
If there's any problems with any of these items or you have any constructive feedback, suggestions or questions, please just get in touch, I'm still learning every day!
My TOU
Credits
All textures and meshes are edited or frankenmeshed from in-game EA assets.
@myshunosun - for their gorgeous sona dining chair which I cloned in order to have an object with the necessary transparency for the chair and bar stool - can be downloaded here.
Lizbot3000 - for their base game bar tables, which I cloned for my bar table and can be found here.
@ravasheencc - for her Crop It Like It's Hot Backdrops which I used to take some preview photos and can be downloaded here.
CC created using Blender, Sims 4 Studio & GIMP. Preview images using Canva Pro.
Everyone on the S4S forums and the Creator Musings discord group for all the tutorials and advice/help.
#always free cc#alwaysfreecc#custom content#download#journey to batuu#maxis match#my cc#sims 4#sims 4 buy mode#sims 4 cc#sims 4 custom content#sims 4 futuristic cc#sims 4 industrial#sims 4 industrial cc#sims 4 futuristic#sims 4 journey to batuu#sims 4 maxis match#sims 4 star wars#sims 4 star wars cc#star wars cc#star wars sims#star wars sims 4#the sims 4#ts4 cc#ts4#ts4 bb#ts4 buy cc#ts4 custom content#ts4 download#ts4 futuristic cc
216 notes
·
View notes
Text
Self-use Sims 3 CC Tutorials List
Here is a list of tutorials from which I learn to convert/create sims 3 cc in a few months (and as a poor English speaker). I think it might help someone who also wants to try making things for sims 3 but doesn't know where to start, though it's been 15 years from the game release and even Inzoi is coming hahah.
The list covers objects, clothes, hairs and eyes. I know there're lots of tutorials not listed here, that's because I haven't tried them in my projects by hand. But The list will be updated with new things I learn. Most tutorials are in English. Thanks to all these creators for sharing their precious knowledge!
Sorry for the miserable format, cuz I wrote them in Patreon and paste here. You can also read it there, free of course.
Where I find tutorials
sims 3 tutorial hub
ts3 creators cave and its discord
Mod the sims tutorial wiki and the forum
pis3update tutorials tag
General
CC basic concepts by nightosphere (for clothes, most knowledge is shared with objects)
Tools
TSRW guide by apple (for objects, most knowledge is shared with clothes)
Blender
shortcut by Blender Guru
beginner tutorial for version 2.5, 2.8, 3.0, 4.0
3.5入门教程 (youtube / bilibili)
设置切换语言快捷键 change language shortcut settings
图片取色器网站
Mesh ToolKit with Seam Fixer for all ages
Topaz gigapixel AI guide / higher quality texture
Texture
Nicer bake / bake in blender 2.78
Bake in blender 2.93
Make normal map
small size blank texture
Reasons for black blocks on baked image
Adjust texture color without losing quality
Object
clone obejcts with S3OC
4t3
Functional Objects
Functional bed
TSRW setting
Combining Textures for Objects with Multiple Textures
Add normal map to objects
Introduction to slot categories
Add slots in TSRW
Edit in-door shadow or occluders in TSRW / Talks about 3 kinds of in-game shadow by Pocci
Clothes
4t3 by nightosphere
Reduce polycount / fix seams, holes, shadows or normals
Bone reference rule
Avoid milkshape workflow / adjust bone assignment and morphs in blender
Manually fix bone in blender
Convert between ages/body meshes
TSRW check list
Fix long clothes clip with body
Fix holes on morphs (easier in blender)
Extrude collars
Create texture in PS
Avoid TSRW workflow / CTU tutorial
Hairs
Avoid milkshape and TSRW workflow / delete backfaces / handmade morphs / DABOOBS guide
Keys pointing to in-game blank textures to save file size (for DABOOBS not TSRW)
Reduce polycount
4t3
Fix weird seam lines on hairs from s4s
Fix pigtail issue
Eyes
Convert contacts to default eyes
244 notes
·
View notes
Text

(ts4) cc making testing guide
we've been making cc for a longg time and figured it would be good to share how we test our own cc and make sure it works for as many sims as possible! the guide will be based on a loose understanding already of s4s.

remove the original shadow, specular, and normal maps!!! a lot of the base items you start on do have their own speculars (what makes it shiny), shadow maps (false shadows to make it look better), and normal maps (extra details outside the plain texture). very rarely those will work exactly with what new item you're making, so be sure to REMOVE them! double triple check that they're empty by clicking "Make Blank" in s4s. if your mesh is shiny even after removing the specular and there's already no normal, you need to upload just a blank 1024x2048 png to it to remove the shininess.
having weight transfer issues? try subdivision! sometimes when using "nearest vertex" weight transfers your CC can well.. goof up in CAS and be reallyyy spiky. those are the vertices that have screwed weights and smoothing out the weight transfer by subdividing it will help tremendously. subdividing will just double the amount of poly you have - imagine you're folding a piece of paper. your UV is small if you just fold your paper 4 times thus not much room for morphing wiggle room in your weights. fold that paper 16 times? that's a lot more coverage and wiggle room for morphs!
test on multiple sims - maxis defaults, cc presets, skintones, etc! more the merrier! just remember that everyone's sim is not like the standard female/male sim bases a lot of cc making is done on. you'll want to check how it looks on larger sims, different skintones (not just white to tan!), the opposite body frames, even on CC presets to see how well the weights are working. not everyone uses the same CC, so take it as a bouncing off point on what needs to be adjusted to work as best as possible. not everything is going to work perfectly! there's a lot of different mods that can make extreme changes you just can't account for if you're going for a general audience. it also helps to load different sims to try your CC on. sometimes you get a red herring where it works on the first sim you load up! all of the sudden everyone loads it up and it's not working at all. that's just ts4 for you, so watch out!
update your CC's tags! go through each and every category of your package to make sure it aligns to what it even is! make sure it appears in the right outfit category, not meant for kids, whether it should be on in the shower or not, and TAKE THAT ALLOW FOR RANDOM TICK OFF! not everyone knows how to use s4s and shouldn't be expected to go through all their CC to fix the tags so it works properly for your game
don't just stand there, make them walk! a lot of CC can look perfectly fine on a still model, but you can find a LOT of issues just by loading a walk cycle in CAS to see if there's any weight issues, clipping, or anything really odd that shouldn't be happening. people who use CC in their gameplay will be having their sims walk, talk, sit, and animate, so be sure they're just not gonna flash everybody or got some polygons stuck in their teeth!
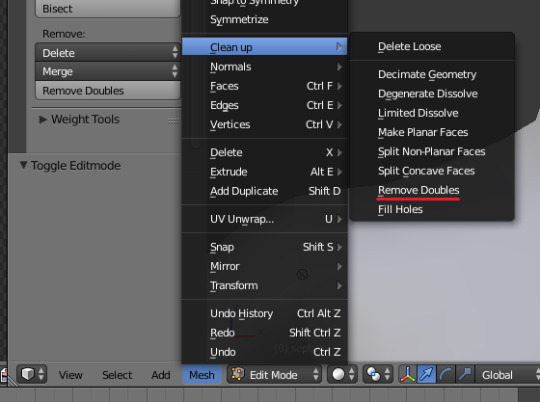
exporting a s4s mesh? let's clean it up! for some reason when you export a s4s mesh, there will be extra polygons that can easily be removed in blender. in this tutorial, we'll be using 2.7. this really helps on high poly meshes and remove any conflicting UVs that can make clipping issues.
we hope that helps! this is based on our private guide for people who test our own CC, which you should definitely try to reach out to others to test it out. each computer is unique and something can pop up you wouldn't ever come across - it doesn't hurt to try work out all the kinks before publishing! if you need some more help or starting point, we even have our own resource pack that has great references and items that will make your process go easier. good luck to your CC making journey <3
96 notes
·
View notes
Text
a little list of links to how-to posts and videos. i'll add more on as i find them! these are tutorials i found really helpful. if there's something you wanna learn how to do and it isn't linked here, then send me an ask and i'll search for a tutorial for it lol.
meshing tutorials by platinumluxesims
changing lot sizes in s4s
turning builds into deco houses
how to make animations by pixifiedtips
neon sign tutorial by simslife
how to make cc objects by sieory
how to make cc clothing by powluna
how to make custom tv shows by pixifiedtips
how to make backdrops into objects by awingedllama
how to make custom loading screens by goddessgamez
how to make custom poses by katsverse
how to make animations by simmer_creator
how to make objects by illogicalsims
newborn overlay tutorial by awingedllama
how to make alpha hairs by iconicsims
how to make maxis match hairs by alerii
how to make alpha clothing by famsimsss
blender render tutorial by famsimsss
ts4 studio tutorial index
how to make cc nails by pinkpusay
how to make cc earrings by christopher067
last updated: 08/30
785 notes
·
View notes
Note
when you say you are checking mods for updates.. do you mean that you regularly go to the sites you downloaded mods from and check on them?? 😭 i just started downloading mods and cc for sims and i def haven’t been doing that. idk how to manage mods or have good file organization habits, but it seems like everyone online already knows what they’re doing 😢
oh yeah bud, you gotta bookmark those websites, especially if you are downloading more than just hair, clothes and furniture. lots of mods break all the time, mostly after updates. curseforge has the sims actual, legit mod manager now where if you download the mods through it you can update them through it too, but there are also a few homebrew managers out there that are amazing - one even has a companion phone app to swipe away cc you don't want anymore with ease! another essential tool is sims4studio which can batch fix any broken cc, for example in one update all cc beds broke but with s4s it was easy to click a few buttons and have every file combed through and fixed automatically by the program instead of me! there's another tool called "sims 4 tray importer" which is great for manual deletion too, just put everything you don't want on a single sim or lot and then delete it en masse. all of these things are super easy to find with some googling (especially now that I've pointed you in the right direction) and I'm pretty sure most of them have comprehensive tutorials by any random person on YouTube. as for organizing your cc folders, part of it is preference and part of it is for ease of finding and fixing things. there are also plenty of tips/tricks/tools/tutorials for this aspect of simming out there too.
#source: i love downloading cc#it's like free online shopping#sometimes i sit down to play sims and just download cc for hours instead
155 notes
·
View notes
Text
Links
Tutorials I've made:
Basic Recoloring Override Apartment Hall Walls and Floors Move Deco Cars to Transportation Buy Mode Category Reschedule Tasks In Windows (Computer Optimization) Conflicting CAS CC Fix (Two Creators Showing In One Item) How To Clean San Myshuno With S4S
Downloads:
Energy Failure Animation Change Apartment Hall Overrides "Get the Fuck Out of My Bar" Pose Pack "Chilling By the Pool" Pose Pack "Sixties Model Poses" Pose Pack "Chilling On the Couch" Pose Pack Pinup/Boudoir Inspired Pose Pack
53 notes
·
View notes
Text
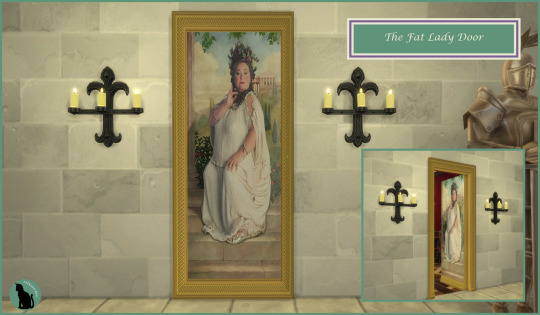
"Caput Draconis!"
The Fat Lady has guarded the Gryffindor Common Room for centuries, letting students into their home-away-from-home... if they have the password, of course!
This is the project that got me into making cc in the first place. At the end of 2020 I was building my own version of Hogwarts. I had far fewer packs and I was searching out Harry Potter-related cc to incorporate. I finally reached the Gryffindor Common Room and of course needed The Fat Lady's portrait as the entrance. Except I couldn't find one. Although I'd had one for TS3, I couldn't find an acceptable one for TS4. So I tried learning how to convert objects. I had no idea how to use blender, my texture modifier was Paint and I was teaching myself how to use TSR Workshop and Sims4Studio as I went along.
Needless to say, I failed spectacularly. The doors just didn't work. I had no idea what I was doing. I managed to follow all the steps for converting... except I was basing it on a tutorial for a deco object. Guess what doesn't get covered in such a tutorial? Weights. I ended up giving up on the door conversion, sticking the fat lady onto a base game door's texture and settling for that. Then I made paintings. Because those were doable, and moved on from there.
I actually came back to this project last May and tried again. With a few more years of experience and reading the forums I had a better idea of how to use everything and I knew weights were a thing, so I tried modifying those. I actually, somehow, made a door that functioned as a portal, except sims just stepped through the painting, at least in some cases. It failed but not as bad.
So now, nine months later, having worked with weights on several projects now (converting the Cashcraft beds most recently, as well as the various earrings from last Simblreen), I figured it was time to try again. And it worked! I got everything weight painted correctly, I actually cut up the painting mesh so it could move and now I have a proper door. The only issue is that it's a little small... but that's for a subsequent project. There is also a little bit of gapping at certain angles between the painting and the door on the reverse, but it shouldn't be too noticeable. I'm so glad I can move this from WIPs to my Completed Projects folder!
The Fat Lady is Base Game Compatible and comes in nine swatches so you have options for the reverse door (which is based on the base game six-paneled door).
I used the same base painting mesh that I adapted from @thejim07.
Download from Simfileshare here.
Made with S4S.
#simblr#the sims 4#sims#ts4#my cc#sims 4#sims 4 cc#ts4cc#ts4 custom content#ccsaturday#ts4 harry potter#ts4 wizarding world#ts4 doors#ts4 build#ts4 base game#ts4 hogwarts#ts4 magic#ts4 door#harry potter#harry potter sims#sims hogwarts#i am so bloody happy i've finally done this#the fat lady#harry potter the fat lady#wizarding portraits#ts4 secret door#ts4 hidden door
30 notes
·
View notes