#sims 4 hotsampling
Explore tagged Tumblr posts
Visit Tumblr Blog
Explore Tumblr blogs with no restrictions, modern design and the best experience.
Last Seen Tumblr Blogs


Fun Fact
There were a total of 171.5 billion posts on Tumblr in 2019.
Text
mutt's guide to using dsr on ts4, with pictures!!!
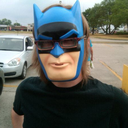
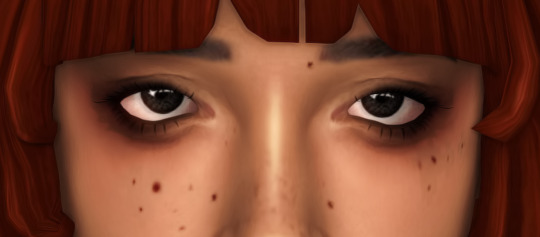
ok so, dsr is a thing available for nvidia gpus that allows you to take veeery high resolution screenshots of games without much trouble, like this
it's an alternative to srwe, as it plays nicer with a lot of reshade shaders and is just, generally more nice to use! let me teach you how to use it - full tutorial with pictures for every step under the cut (im sorry its too long without the cut)
step 1: right click your desktop and open the nvidia control panel
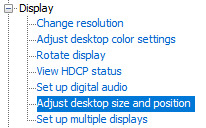
step 2: go here (adjust desktop size and position)
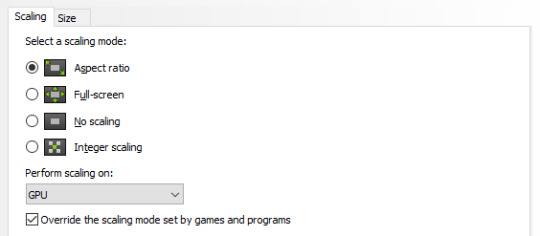
step 3: make sure your settings are set as follows! this is important
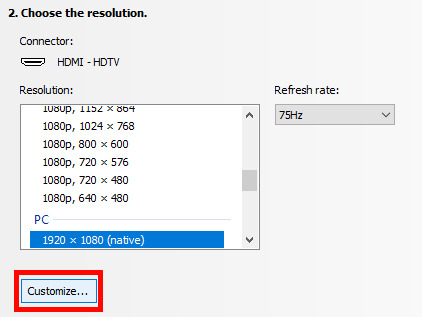
step 4: now, go here (change resolution)

step 5: under change resolution, click on this button (highlighted with a red square)
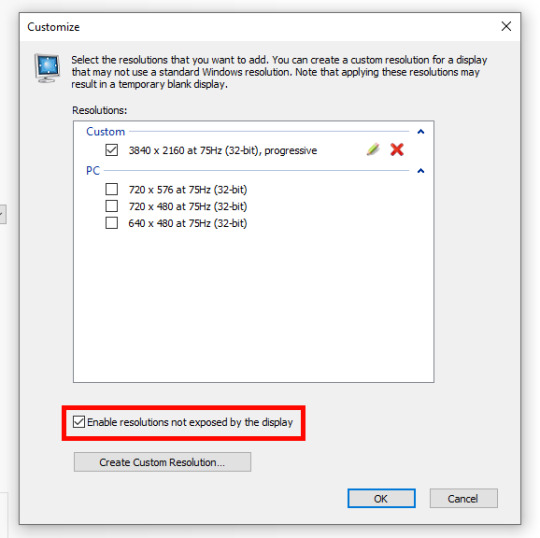
step 6: in the windows that appears, make sure that "enable resolutions not exposed by display" is ticked! this is very important! (again, highlighted in red - it should look like this)
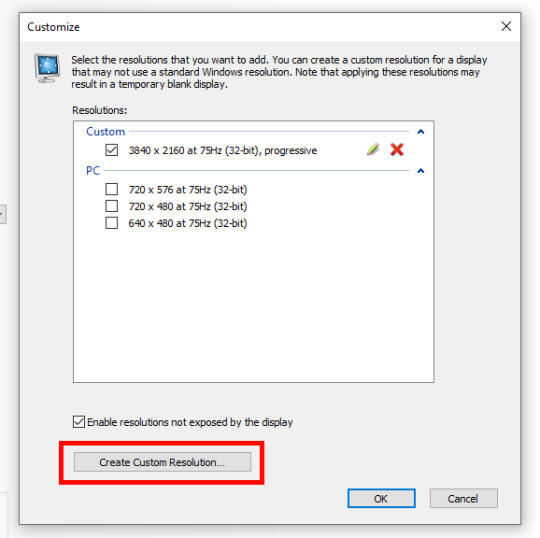
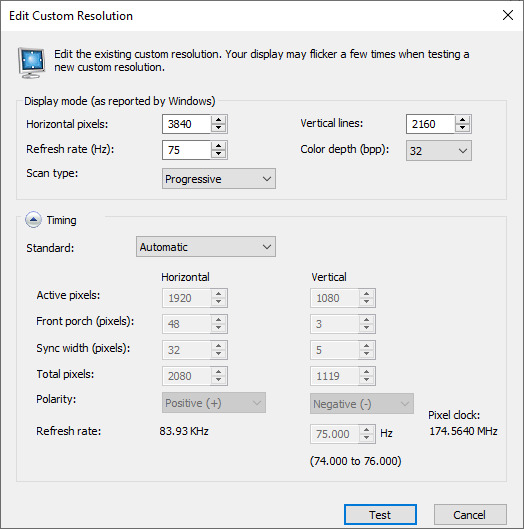
step 7: now, click on "create custom resolution"
step 8: this is where you set your desired resolution, and where i get a bit rambly; so, in my opinion, there is ZERO reason to go above normal 4K for TS4, as it's generally not a really high-poly game and it has rather simple graphics. you can fuck around a lot here, but if you don't feel like it, here are my settings - this will give you 4K screenshots. NOTE: THE REFRESH RATE DOESN'T NEED TO BE 75! SET IT TO WHATEVER THE REFRESH RATE OF YOUR MONITOR IS!
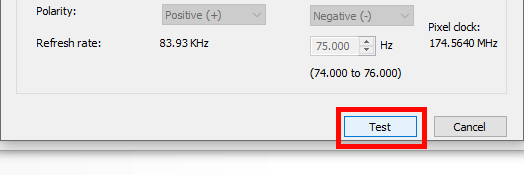
step 9: now, click on test
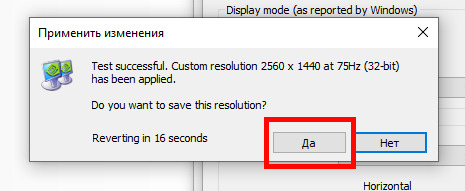
step 10: let the thing load, and after it's done, a window like this should pop up.. but yknow, in your language. click on "yes" (or accept or ok!! idk mine's in russian; basically, the button highlighted here!)
step 11: click "ok" in the window that pops up! like this! afterwards, close the nvidia panel

step 12: open the sims 4 and go into game options, then into graphics
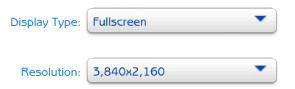
step 13: set your "display type" as "fullscreen", like this

step 14: under "resolution", select whatever resolution you setup earlier; in my case it's 4K, so if you used the same resolution, your settings should look like this
step 15: click on apply changes!
AND UR DONEE!! WAHOOIEE!! now, take your screenshot using reshade, and then go back into sims settings and set it back to what you usually play at, then apply changes!
every time you need to take an HD screenshot, simply open game settings and use your custom resolution! that's it, have fun :3
#sims 4 tutorial#ts4 tutorial#sims 4 screenshots#ts4 screenshots#sims 4 screenshot tutorial#ts4 screenshot tutorial#sims 4 hotsampling#ts4 hotsampling#srwe#nvidia#dsr#tutorials
758 notes
·
View notes
Text

Hey! I'm Amanda | Not WCIF | 18+ (Sometimes NSFW)
Find me on YouTube: Here Main series on YouTube: The Aspiring Artist | Rotational Gameplay All posts related to The Aspiring Artist can be found here. Casual gameplay posts on my blog are separate from the storyline on YouTube. All of my Sims 4 posts | All of my reblogs | Other nsfw posts CAS Mods Cas background | Cas lighting (Studio flat) | Controlled Position Mod | More Cas Columns (6 columns) Game Lighting Mods In-Game Lighting (Dark) | Sunblind Gshade/Reshade I make my own Gshade presets. They are not available for download. However, here are some that I would recommend if you are looking for a preset: Boho dreams (Neecxle) | Birdie (Sforzinda) | Lithium (Gunthermunch) | Luminescent (HazelMine) | Raices (Folkbreeze) | Almond (Glimersims) | Kaleidoscope (Okruee) | White Willow (Tianaberrie) | Serenity (Misslollypopsims) | Neapolitan (Midsummermoon) Photo Resources I use SRWE for a lot of my screenshots. I take some of them on a higher resolution monitor without hotsampling. I use Krita for photo editing and sometimes Canva. I usually crop my photos and resize them for faster uploading. Check out this tutorial if you're new to hotsampling. Check out this FAQ for help with understanding reshade. Video Resources I use OBS to record my videos and Filmora to edit. I also recommend Davinci for a free editing alternative. I use this mic for narrated episodes. Essential Gameplay Mods I don't use a lot of mods because I strongly dislike updating them. But these are the ones that I consider essential for my game: Basemental Drugs (21+) | Wicked Whims (18+) | MCCC I do have other gameplay mods installed, but I don't consider most of them to be necessities. MCCC and WW handle nearly all of the background "tuning" in my game. Other Mods The other mods I have installed: UI Cheats Extension | RPO (I only use modules 1, 7, and 14) | Somnik and Severinka Custom Foods | Control Any Sim | No Zzz | No Music Notes | Hidden Highlight | Tool | No Romantic Satisfaction Decay | Seasons Tuner | Kiss and Grind Defaults/Overrides My current default skin can be found here , default eyes here, default feet here, and default teeth here. I mostly use these skintones. Default phone | Default phone two | Default phone three | Toothbrush | Headphones | Male animation replacer (18+) | Terrain override I don't use custom loading screens, menu/map overrides etc. Some Commonly Used CC I use a lot of eyes from these creators found here and here. I typically use skins, skin details, and other genetics from these creators found here, here, and here.
144 notes
·
View notes
Text
Baldur's Gate 3 Screenshot Tutorial
Hi, I decided to make a more in-depth guide for my twitter followers, as I'm super limited in characters and formatting options over there.
For this tutorial, I'll explain how you can enhance your screenshots. I'll divide it into five parts: ReShade, making your screenshots high resolution, camera mods, photography basics, and post-processing. By the end of following all of these steps, you should have something way better than the start!
I recommend going through this tutorial downloading things step-by-step for the first three parts, as it'll help you to quickly identify where you've gone wrong if you have any issues.
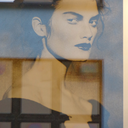
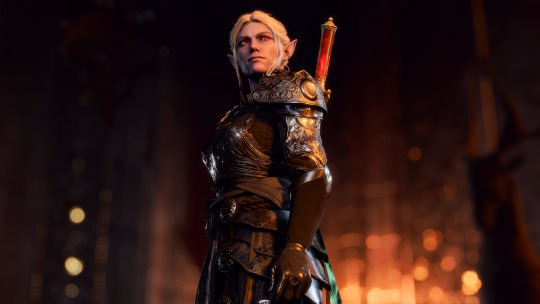
1. ReShade ReShade is a post-processing tool that allows you to change the look of a game with an array of different effects and adjustments to use. It can be a lot to wrap your head around at first, so I recommend starting off by finding a ReShade preset that speaks to you from this page if you're not already familiar with using it. The mod authors should explain how to download it. I find 22:20 of this YouTube video to be helpful to introduce ReShade if you're completely new to it. This video is for the Sims 4, but ReShade typically works the same across different games. Now that ReShade is downloaded, we can get depth of field working within the ReShade. This step is optional. Depth of field refers to what will be in focus in your screenshot, and what will be blurred. It's essentially simulating shooting with a camera, like so:

To get this effect working, you need to follow this tutorial within the ReShade menu.
2. Making Your Screenshots High Resolution Typically, Baldur's Gate 3 is ran in 1920x1080 resolution, or standard HD (unless you have a higher resolution monitor and are running the game in 4k, in which case, you can ignore this step if you'd like). This is definitely an acceptable quality, but if you'd like to capture any detail, you're not going to get much out of this. To get a better quality image, there are two ways to achieve this. The first method is through hotsampling. Hotsampling is briefly running a game in a much higher resolution than your monitor supports, allowing you to capture screenshots with incredible detail, then bringing it back down to a native playable resolution. To hotsample, you'll either need to use the BG3 camera tool, or SRWE. For either of these hotsampling tools, it's important that you've downloaded ReShade, or they will not work.
Once you have either of these downloaded, make sure your game is running in windowed mode. If you have more than one monitor, you need to change your display to show only on one screen. Or again, this will not work.
Next, you're going to want to make sure you have a key set for taking screenshots in ReShade, as well as making sure you like the folder where your screenshots are set to be saved. You can find this in the settings tab. Once you have those set, you're ready to take really HD screenshots!
To do that, you want to set your game's resolution to 2x, or even 3x what it's currently displayed as. Once it's set, your game screen is going to look giant and probably run way off your monitor. This is a sign it's working! Once it looks like this, press the screenshot key you set earlier within ReShade, and there you go, a nice big screenshot should be in the folder you set!
If you don't want to do hotsampling, and if you have a Nvidia graphics card, you can download their their app, which can take resampled screenshots. It won't be as high quality as hotsampling, but still better than standard HD.
3. Camera Mods
There are two camera mods that I know of for BG3. One is paid, the other is not.
The first one is the Native Camera Tweaks mod. This mod allows you to move the camera around more freely as you're traversing the world, but in cutscenes you'll still be stuck.
The second one is the paid one, but it allows for total freedom within the game, even during cutscenes. This tool is also very helpful for hotsampling. Within this tool, it's very useful to configure your own controls for moving the camera around in game, as well as setting a key you'll remember for pausing the game so you can set up a screenshot. I changed the movement keys to be wasd and the keys to change the angle of my camera side to side/up and down to the arrow keys.
4. Photography Basics
Taking screenshots in a game is a lot like doing photography irl tbh lol, same rules mostly apply. You of course want to do the basics like making sure your subject is in focus, it's not too dark or too light. But some other tips for people not very familiar with taking photos to take note of are:
Make sure if you're taking a photo of a person, the top of their head is within frame
Try and either make sure someone is front and center, or in the rule of thirds
Pay attention to the lighting, sometimes it's too bright or too dull. Sometimes it's unflattering in certain angles. Lighting will always make a huge difference
5. Post-Processing
You can now leave your screenshot as is, or edit it further with a photo editing software! I recommend using Photopea, as it offers basically everything Photoshop does without the insane price tag. From here you can do whatever you feel is best to enhance your image.
And that's all! If you have any questions, feel free to ask, and if you get stuck anywhere in this tutorial, don't feel bad. A lot of this stuff is just trial and error, but if you're very persistent with it, I promise you'll get these working. Also I would just like to mention that a lot of this stuff applies to taking screenshots in a lot of games! So you can take this knowledge with you elsewhere <3
If you happened to follow all this, please send in an image of your Tav you took!
124 notes
·
View notes
Note
your post about ReLight is really interesting! I wanted to try it out but I understand nothing lol would you share some tips/tricks/little tutorial for dumbs like me on how to use it/setup for The Sims?
Hi anon!
It's not a massively involved shader, it's really simple, so a full tutorial would probably be a little over the top. Using it in TS4 is no different to using it in any other game.
The first thing I'd do is look at the preprocessor definition section at the bottom of the shader settings and change number of lights to 4 and hit enter. It'll reload and then you'll have 4 different lights to play with.
For the settings at the top, you want Use Smooth Normals turned on, and then all the boxes under Shadows ticked. For Shadow Mode you'll get the best quality with Trace All selected, and Ultra for Shadow Quality, but you can play around with these if your performance suffers (bear in mind I'm using a 980ti and hotsampling to larger resolutions and I'm fine with those settings).
Leave Shadow Sharpness at its default unless you want to go for a specific look, and you can keep Z Thickness at default too. You can play around with Z Thickness if shadows look like they're starting or ending in weird places. They're never going to be 100% accurate anyway, but you can sometimes coax them into not being truly awful.
One of the most important settings is down at the bottom: Visualize Light Position. Turn this on and it'll show you a round dot where your lights are positioned. This is really useful for lining them up exactly where you want them. Then, when you're done, you can turn them off (although they will disappear when you close the ReShade menu anyway, but this setting is useful for people like me who sometimes keep the ReShade menu open when taking screenshots so I can keep tweaking).
You'll see 4 sections that each start with a checkbox that says Active. Those are your 4 lights. Tick the ones you want to use. Then you can start moving them.
Next to Position there are 3 boxes, and they each represent respectively: left-right, up-down, backwards-forwards. Play around sliding each of them and see where your dot of light goes. You'll quickly get the hang of how to move the lights around using those position numbers.
Below that is Tint. It's easiest to click on the box of colour and colour pick than it is to manually change the RGB numbers. This controls the colour of your light.
Below that is Intensity. I think by default the lights are set up at the maximum level of 1.00 but that's super super bright, so bring that down considerably. You can use this to fine tune exactly how much illumination you want once you've set up the position.
And that's really it. You can use the lights to add more accurate light fall-off and shadows from in-game light sources like lamps, streetlights, windows, etc. You can also use it to just brighten a character's face a bit more for a clearer picture. Or you can really go to town and add completely fake and dramatic lights. It's up to you.
If you find that 4 lights isn't enough, you can't add more without editing the actual shader code. However, you can just duplicate the shader, so then you can have 8 lights, or 12, or 16, however many times you duplicate it.
To duplicate ReLight, create a copy of the shader in your shader folder, and give it a unique name (for example, qUINT_ReLight2.fx). Then, open it up in a text editor (I use Notepad++) and scroll all the way down to the bottom. You'll see a section that says
technique qUINT_ReLight
edit that so it matches the name you gave your copy, so in this case
technique qUINT_ReLight2
Then you can use them both alongside each other. I do start to experience a performance impact when using a second version, so bear that in mind.
I'm sure the better option would be to edit the shader code to add the ability for more lights directly in the first shader, but you'd need to be semi-knowledgeable about what to change. You're not often going to need more than 4 anyway, so it's overkill.
139 notes
·
View notes
Note
Hi how do you take such high quality screenshots? everything you post looks so crisp
Thanks!
Honestly there's a lotta things you could do to get crisper images, but it also depends when and where it is you're having trouble getting them to look their crispiest. However if your pics look fine in Photoshop, but look horrible once you've posted them, it's as simple as remembering to refer to tumblr's photo post dimensions. The pixel width doesn't matter a lot anymore, so you don't have to resize your pics down to an itty bitty 540, but the pixel height can't be too long, which is why I'll usually add a little extra width to my pics to make a long one seem "shorter", if that makes sense...
Now if your shots look crappy even in PS, a little sharpening will go a long way, I use the reduce noise option on pics, and the smart sharpen option on GIFS. When sharpening any image, don't do it until you've resized your image first.
Finally, the bigger your screenshots are, the better they will look overall, especially if you're doing a lot of editing and cropping. More pixels = more detail, at least to me, so you won't lose a lotta quality when a screenshot is cropped or sized down. When you're posting a long pic, keep this in mind, I usually screenshot mine in 2300 pixel width.
Now if you don't use a 2k or 4k monitor, you can use a plethora of programs to get bigger shots, DSR is what I use mainly, so if you've got a GPU that supports it, you can change your screen resolution in game to one higher than your monitor allows, if for a brief time, bc I wouldn't recommend playing your game like this.
There's also hotsampling programs out there, but I think a lotta simmers tend to prefer SRWE, which I'm personally not familiar with, so here's a tutorial on how to use it with The Sims 4.
HOT GIRL TIP:
Don't do anything your computer shouldn't be doing, if your GPU can't handle taking 4k pictures, just don't do it, it isn't worth it. The GPU market is dry as a desert rn, don't push the one you've got to the limit, and end up having to wait MONTHS to replace it, even taking screens at 2100 px will render perfectly decent shots, and honestly unless I'm taking long ones, I just keep mine at my native 1920 x 1080.
48 notes
·
View notes
Note
Hey, firstly thank you so much for like, literally everything you do, you're an utter legend! I was just wondering if you happen to know of any alternatives to SRWE for taking high quality screenshots in sims 4? SRWE doesn't format properly on my laptop; the display is all messed up and compressed together, so I can't actually see any of the right settings or buttons. It worked on a previous laptop, but not this one, and I'd love to take better screenshots again. Thanks!
Hi there! Have you tried a different version of SRWE? There are several older ones you could try to see if any of those work.
By display, do you mean in-game or the SRWE display? If the latter, I'd suggest contacting Frans Bouma, who creates it, and asking if there's a requirement for it to run that you might need to download on your new laptop.
As for alternatives, you could use DSR - dynamic super resolution - if you have an nvidia card, which will let you run the game in higher resolutions, but you have to have a powerful system to be able to handle that because it's at the larger size constantly.
There's also Windowed Borderless Gaming, which does a similar thing to SRWE (the website just talks about it letting you play fullscreen borderless windowed, but it can be used in the same way as SRWE for hotsampling games for high quality screenshots).
And there is GeDoSaTo as well, although I'm not sure what the update status of it is. I found someone saying it wasn't working for them with Win10, but there is a workaround if you're vaguely capable.
I've used both WBG and GeDoSaTo in various games before. SRWE is most user friendly, then WBG, and finally GeDoSaTo, but each has its place (in GeDoSaTo for example you can get control of more things like some game post-processing, iirc). Definitely contact Frans first though to see if there's a .NET Framework update or something like that that you need to download.
15 notes
·
View notes
Note
your sims skin is so beautiful in game, how did you do that? mine looks very blurry ;-;
A few things might be in play here.
1 - I have ‘Uncompressed Sims Textures’ checked in the game’s graphics settings. Without that, the skin textures are compressed, which introduces visual artefacts.
2 - It depends on the skin you’re using. If you’re using a cc skin, perhaps it has more surface details than the one I’m using?
3 - My ReShade preset might help even out the skin a little, although I don’t think this is necessarily the case.
4 - I use SRWE to hotsample my screenshots. That means I take screenshots at quite big sizes, so when they’re viewed on smaller screens there is more pixel information available to display and everything looks smoother and higher quality. I suspect this is the main reason. Most of my 16:9 screenshots are taken at either 5K or 6K resolution (and all my other screenshots in other aspect ratios use a similar resolution count). When you look at them on a 1080p monitor, or a 1440p monitor, they’ll look higher quality than something that was taken at 1080p or 1440p. The 6K ones will even look a bit better quality on a 4K monitor. And definitely, if you’re viewing any of these screenshots on a phone or tablet they’re going to look even better (everything looks better when it’s shrunk down).
29 notes
·
View notes
Note
hi! sorry to bother you! i sent you a message a few days but am not sure it went through 😭i was just wondering if it was possible to achieve 'academy ratio'/1.37:1 in reshade? i googled around and some say to use/layer the border.fx, some say aspectratio.fx (although i tried playing around with that in 4.3 and nothing seemed to visibly change my screen), etc. i'm hopeless. 😔
Sorry, I don’t think it did come through!
I haven’t played with the new aspect ratio shader, but back in the day we used to regularly use the border shader to set up different aspect ratios, and even the vignette shader could be used to do similar. It’s been a while since I used either of them (we’re talking back in the 0.18 days of ReShade, and earlier with the vignette shader in SweetFX), so I can’t remember off-hand how they are supposed to work, but they should be applying a black border or black bars over the image – you’ll need to play with the various values to make sure it looks how you want.
HOWEVER, there is a much more reliable and sexy way of creating any aspect ratio you want without ReShade, and it’s what I use whenever I’m able. I’m sure you’ve seen me talk about SRWE before? It stands for Simple Runtime Window Editor, and it’s a small, lightweight, and free program that lets you change the size and shape of the game window to whatever you want. It doesn’t work with all games, but it does work flawlessly with The Sims 4 (presumably that’s what you’re asking about?).
I wrote an in-depth tutorial some time ago about how to use it (the tutorial is for Mass Effect: Andromeda but it works exactly the same in TS4 and almost every other game I’ve used it with). The tutorial covers a lot about how to use it for hotsampling, which means taking far larger screenshots than normal, but even if you’re not interested in doing that it’s ridiculously easy to use to run the game in whatever aspect ratio you want.
You’ll also probably want a link to this bad boy: aspect ratio calculator. It’ll let you work out the correct pixel dimensions for any aspect ratio you want. I’d let you have a copy of my AR.txt file I keep permanently open in Notepad++ but 1.37:1 is just about the only AR I don’t have noted down (I have 4:3, which is near as damn it, but is more accurately 1.33:1).
If you’re definitely not interested in using SRWE, let me know and next time I’m at my computer properly I’ll take a look at those shaders and see if I can work out the correct settings for you. But I definitely recommend taking a look at SRWE because it makes switching aspect ratios the quickest and simplest thing in the world.
12 notes
·
View notes
Note
Hi there! Reshade question. My reshade continuously reloads. I have tried several presets and versions but all of a sudden it just wants to reload the effects every 30 seconds or so. Do you know how to fix this?
Hi there! I haven’t ever experienced that. The only times I know it will reload for sure is when you either press reload or when you render the window again (for example if you’re hotsampling, or alt+tabbing back in if you’re playing in fullscreen). I’m guessing you’re talking about The Sims 4 (since I think that’s where most of my followers come from) -- to my knowledge there’s nothing that should be forcing the window to re-render otherwise.
First thing I’d check is that you haven’t accidentally bound any shader toggles to a key you press frequently when playing the game. Reload can be bound to a key, I believe, but it isn’t by default -- it’s possible you bound one to it by accident, and if it’s a key that you use to access something in the game it’ll be reloading it every time you press that. You’ll find the key bind option in the Settings tab of the ReShade menu.
Other than that, make sure you’re running both the game and Origin as admin, and turn off Origin In-Game (via Application Settings in Origin).
Also, see if it makes a difference when you change the ReShade mode from configuration to performance (or vice versa) -- there is a little check-box in the Settings tab of the ReShade menu. If you’re in performance mode it reduces the amount of calculations that are being made, so it may potentially ‘cut off’ whatever is triggering the reload. Be aware, however, that you can’t make any changes to a preset while in performance mode.
Another thing you can try, if you play in fullscreen mode, is to switch to fullscreen windowed or windowed instead. As I said above, tabbing back into a fullscreen dx9 game will cause ReShade to reload in most cases (at least this used to be the case -- it’s been a while since I played a game in fullscreen with ReShade). Playing in fullscreen windowed or in windowed mode instead eliminates that as a potential cause.
A more complex and technical reason might be if your graphics card driver is changing its settings in the background. I don’t fully understand what goes on under the hood, but my vague understanding is that ReShade relies on the output buffer of the game so that it knows what size to render everything at (shaders are written to calculate their effects based on the resolution of your game window), and if that output buffer is changed ReShade will have to reload. This is why resizing the window for hotsampling causes a reload, and it’s also, in part, why tabbing out and in again in fullscreen causes a reload, because the game loses access to the graphics card while you’re tabbed out (to save resources). If your graphics driver is doing something in the background it may be re-recognising the game or re-allocating resources frequently, causing ReShade to have to reload the output buffer. Now, I don’t know enough about this to know what your driver might do that would cause this -- my technical knowledge of the nuts and bolts of ReShade sits at about 12% and even lower for general computer stuff. If all my other suggestions above don’t fix it, I recommend making a thread over in the troubleshooting section of the ReShade forum, because they’re best placed to offer more technical advice. It might not have anything at all to do with your graphics card, so this might be a dead end, nevertheless they’re the ones with the most understanding.
6 notes
·
View notes
Note
hiiii ,Im sorry about my bad english but i really want to know how can your pictures in the sims 4 is so smooth and beautiful. The color looks so warm and really great. I know its edited. Did you use mod or something ? Like Reshade ? If yes, can you show me your setting ?Can you show me some tricks about taking pictures in sims 4 ? i would really appreciate it. Thank you ❤
Hi there, anon. You have very kind words about my pictures, thank you.
I don’t usually edit my screenshots. Everything you see (apart from my recent faceapp smiles!) is done in the game.
First, I have all the in-game graphics set to the highest they’ll go, except for Edge Smoothing, which I keep switched off (so that ReShade will work correctly).
Second, in the graphicsrules.sgr file I have shadow quality set to 4096 (which is higher than it can go in the in-game graphics settings), and I have object textures set to the same. I don’t change any cas textures any larger because it causes graphical errors if you have some textures installed that are smaller than that, and I use a mixture of textures that come in different sizes.
Third, I use ReShade. Most of my pictures for the last year or so have been using my own Hazy Days and Blueberryade preset, which I tweak quite a bit on a per-shot basis to get the look I want. A couple of my most recent pictures have shown a work in progress preset I’m trying out that I hope to eventually release.
Fourth, I use a program called SRWE to hotsample my pictures. Hotsampling means I set up a screenshot, then I use SRWE to change the size of the game window to be a lot larger than fits on my monitor, I take the screenshot, then I change the window size back down to normal again. The screenshot I’m left with is very big, and as a result has a lot more pixel information than a regular screenshot. This means that when I or you or anyone else views that screenshot on a regular monitor it looks a lot smoother and less jagged than it would had it been taken at a smaller size. You can read a tutorial on how to use SRWE here.
As for tips and tricks, other than what I’ve already said, in terms of composition or getting the best out of a scene the single most important thing you can do, in my opinion, is to think about the lighting. This is particularly important for interior shots where you have the most control over it. I’d also recommend taking your time with composition. I don’t always do this myself, and am frequently unhappy with a lot of my shots as a result, but slowing down and moving the camera around and changing angles and field of view (which can be controlled by zooming in or out) until you hit on that perfect framing can make the difference between a mediocre shot and a really lovely shot.
If you need any help with ReShade or SRWE or anything else you think I might be able to help with just let me know!
#reshade#reshade tips#reshade faq#reshade for ts4#srwe#srwe faq#srwe tips#screenshot tips#screenshot faq#anonymous
38 notes
·
View notes