#spawnitem
Explore tagged Tumblr posts
Visit Tumblr Blog
Explore Tumblr blogs with no restrictions, modern design and the best experience.
Last Seen Tumblr Blogs


Fun Fact
China blocked Tumblr because of pornography and censorship problems in 2013.
Note
Wait, we're reconnected with Ragatha, We stopped being able to spawn things since we got disconnected, right? So in theory...
[Spawnitem=20x30sheetpaper:"Testing, Testing, Hello?"]
-Curious Anon


348 notes
·
View notes
Note
-spawnitem caramel lizard burger cooked to a perfect glaze, with a perfect cheesy layer, and some scrumptious veg and condiments to go with
Malgy I apologize for ruining simpler foods for you

TA: WOAH I DIDN'T KNOW FOOD COULD TASTE LIKE THAT!
#rain world#rain world oc#rain world askblog#rw oc#the amalgamation#rw slugcat#rw slugcat oc#slugcat#rain world slugcat#slugcat oc#rain world slugcat oc
6 notes
·
View notes
Note
Okay wait hold on
[>spawnitem lozenge_box1 1 state:full]
thank you
*he pulls one out and just. sucks on it.*
1 note
·
View note
Text
Lose body weight the smart not hard way.
Losing body weight can be hard work and hard, but if you do it the right way, and the smart way, it will be a very short process where you will lose much more weight than usual.
0 notes
Text
Starbound Admin Guide
Want to get almost anything you want on starbound without crafting or searching high and low ???
Want to build without wasting materials ???
Don’t want to die ???
Follow these basic tips to be an admin in your own starbound world..
1. Enter your game world/ character world
2. type /admin in your chat box
And.. you are an admin!!
Next, you need some links and stuff in your arsenal.
To spawn in the items (which may change after updates) type in your chat box..
For spawning monsters - /spawnmonster
http://starbounder.org/Spawn_Monster_Command
Example: you want to spawn those big birds you some times see in large glitch castle areas, key in /spawnmonster largeflying
Your best friend for items. It is a generator for easy copy&paste into your game > https://starbounditems.herokuapp.com/generator
if u want 15 of the item..example: /spawnitem medievalchandelier 15
make sure all the words are not caps & position your mouse to the place you want it to spawn
http://starbounder.org/Starbound_Wiki << Guide for names of whatever you want to spawn
For spawning NPCs - http://starbounder.org/Spawn_NPC_Command
Example i would like to spawn a naked novakid.. type in: /spawnnpc novakid nakedvillager
Here’s some of the bosses. You will not be able to ‘kill’ them. so they will be stuck there till you log out.
/spawnmonster crystalboss
/spawnmonster dragonboss
/spawnmonster eyeboss (Final boss-Ruin Boss)
/spawnmonster kluexboss
/spawnmonster spiderboss
/spawnmonster apeboss
PS: Things will be spawn as perfect cube if they do not exist
To exit admin mode, type /admin again and you are free from it.
#starbound#admin#guide#starbound admin guide#how to be#boss#monster#spawn#npc#spawnmonster#spawnitem#item#steam#basic#spawnnpc#starbounder#gameplay#game
31 notes
·
View notes
Photo

My Armory and crafting/storage unit is coming along nicely!!
(yes I used /spawnitem for the upgrade anvil from a vault. Sue me.)
15 notes
·
View notes
Text
hey everyone
1. download this mod
2. make a new character
3. type /admin
4. type /spawnitem dirtmaterial 999999 (make sure your cursor is next to your character)
5. spam the p key
congratulations! you obtained the hardest achievement in the game
14 notes
·
View notes
Text
If you ever want to have a really stupid good time. >Download Starbound >Get Frackin' Universe >Type /admin in chat >Type /spawnitem gregskittlegun in chat >Hold shift and left-click in an area of your choice (preferably populated) >Watch as chaos unfolds
9 notes
·
View notes
Photo

Some early-part enclosures in my Starbound zoo/museum planet. I’ll have bigger and more elaborate stuff for some of the larger monsters, a few will probably also go underground.
Someone on the Chucklefish boards gave me a /spawnitem command that lets me create invisible monster spawners that create persistent enemies. See, normally, enemies spawn semi-randomly on worlds (until you alter the background sufficiently, which halts spawning) and will vanish once that “chunk” of the world un-loads. I could spawn enemies with /admin commands, but they weren’t persistent. And while you can capture most monsters as “pets” with not-Pokeballs, then attaching them to a “tether” device to make them persistent... I don’t like the look of those, plus again, not every monster can be captured. I want this zoo to be complete.
(Well, as complete as it can given there’s both unique monsters and proc-gen-from-parts monsters. I might throw in a few of those I like the look of.)
With the item code I got, I can place the spawner, let it spawn an enemy, and it will STAY spawned even if I go to a completely different planet and come back. I don’t have the tether devices cluttering up stuff (though I might have to use them for enemies that phase through foreground blocks, as tethered enemies have to stay in a certain area... hm), I can have those little foes outside the capture-able ranks.
*cracks knuckles*
The aquatic parts are gonna be... interesting.
52 notes
·
View notes
Text
Beamng drive xbox 360

BEAMNG DRIVE XBOX 360 HOW TO
BEAMNG DRIVE XBOX 360 ANDROID
BEAMNG DRIVE XBOX 360 SIMULATOR
Exceptional Engineering for Exceptional Results. Pouvez-vous Noclip dans le substrat rocheux de Minecraft ? Comment entrer en mode spectateur ou en mode NoClip dans l’édition minecraft bedrock ? Le mode spectateur n’est disponible que dans Java Edition.It has minimal car maintenance and survival elements. The game DOES have a file size limit per craft when spawning via the workbench! Be careful when spawning your craft.
BEAMNG DRIVE XBOX 360 SIMULATOR
The Shipyard is the place for new vessels, environments and DLC (downloadable content) packs for Ship Simulator Extremes. It's a quick, easy way to pay securely in any currency with all your transactions tracked in a single interface. Take your specially crafted, square based and programmable vehicles into wild maritime tempests.
BEAMNG DRIVE XBOX 360 HOW TO
This is an extensive guide on how to play stormworks as of 1. You will notice that its it’s locked on 60. These games have no violence, no empty action, just a lot of challenges that will make you forget you're getting a mental workout! Trivia. com is the number one paste tool since 2002. In addition to this, the command will take paramters for items you wish to spawn. The RUST noclip command often referred to as the “rust fly command” or “admin fly command”, allows admins and moderators the ability to move in 360 degrees without clipping the game’s geometry. gg is a mobile cloud gaming platform that solves the problems of user acquisition, shareability, and monetization faced by mobile game developers globally. This is because it is how you fly around the map, rapidly increasing your movement speed and letting you pass through objects and buildings as though they didn't exist.
Quicklinks Daily Announcements View past announcements » Principal's Newsletter Recent News Upcoming Events View Calendar Daily Announcements Paperspace Gaming is the ultimate cloud gaming solution focused on performance and simplicity.
We know many players play without having the minimum hardware, and we ask these players to have realistic expectations about their frame rate. View Mobile Site Follow on IG Newsletter Join Fan Lab. Uncover all that is known of Titanic’s infamous history as you catalog your journey through this massive Titanic museum. Wheels, suspension, engines, and more everything is under your control. spawnitem is an admin command that spawns all items in the Starbound Universe (Items, Weapons, Guns, Armor, etc). The official Teardown Discord Server | 19,016 members Wildcard vs Renatus // APAC South 2022 - Stage 1 - Playday #7 This is a road trip game in an almost infinite random generated desert. Choose the most valuable ship for you and start the adventure. CPU matters much more in most cases, since it’s a sandbox game based on physics simulation. Collect cryptocurrency by playing games, or by creating games (Coming Soon).
BEAMNG DRIVE XBOX 360 ANDROID
Change skp to obj on Windows, Mac, iPhone and Android in 2 clicks.
0 notes
Note
If you really dont want to hurt it, try this:
[SpawnItem(netGun)]
Likely won't do as much as killing that thing, but hopefully it's good enough.


282 notes
·
View notes
Text
The Forest: Cheats and Codes for PC

💾 ►►► DOWNLOAD FILE 🔥🔥🔥 Console commands allows you to change, add, remove things in the games without the use of mods. These are also known as cheats by some players. Game Mode commands do not work on Playstation 4. However special game mode commands will work with a connected keyboard. All other Console commands are exclusive to the Steam copy of the game and are not available on the Playstation 4. These commands are straight forward, they do not require the activation of developer console to work. To activate them, type the code in the main menu. Some commands may have serious effects on your game, there are commands for deleting save games, resetting achievements, etc. To activate the use of console commands , you need to type developermodeon in the main title screen to activate the developer console. There is no notification that the mode has been activated. Though you can press F1 to see if is working. Doing it this way will allow you add a rabbit to cage about every 1 or 2 seconds, depending how fast you are. These commands are the most common and used by players. They are easy to use and straight forward they can also be found in their categories below :. These commands change the difficulty and game modes. If you wish to change a creative game into a normal one you will need to type in setgamemode standard , then you will need to select a difficulty. These commands affect the time of day, speed of the game, changing the day, changing the lighting of the day, etc:. These commands change the players outfit : The console command listclothing will provide a list of all the clothing types in game when you press F2 and hover the mouse over the command. These commands are related to animals. For 'spawn' commands, you are able to specify the quantity using the suffix --x where x is the desired quantity. These commands are related to enemies , which include cannibals and mutants. Try both if it isn't working. Keep in mind, if you are in creative mode or peaceful, you will need to change the game mode aswell as the difficulty to be able to spawn enemies. For adding, spawning and removing individual items. Here are some examples: additem - This will add an Old Pot to your inventory spawnitem - This will spawn the Flintlock Pistol in front of you removeitem - This will remove the Modern Bow from you inventory, if you have multiple amounts it will remove them all Important notes:. To teleport to a location, you can use the goto command. It does require that you have the coordinates listed after the command. Named Locations These locations can be accessed by typing in the their name, a very easy way to teleport. There is most likely many more, though they need to be discovered by testing:. These commands will build whatever building you wish instantly, including buildings that have been removed from the game or gardens that can grow mushrooms out of caves etc. The number next to them indicates how many are built, Explosive Wire Traps are fun for this. The following is a select few of objects, there are s in the game. Using these commands will disable the objects. If you type the command in again, the arms will return. To obtain names of objects, use the diagrenderers command. It will save a file to you forest folder in steam that will contain the objects loaded around you:. These commands are quite advanced and are not recommended if you are new to console commands Needs confirmation. These behave differently depending on whether a game was already loaded and assets are already available. When loading from the main menu, most views will only show the rock cave from the main menu background trying to load a saved game with loadlevel 2 will partly load a new game plane sequence , but the camera will only continue to show the "menu cave". The following list is therefore referring to loading from within a loaded game. It is also possible to get the achievement Survive The Forest by loading into the post-game sequence. Note that for some of these levels to load, assets may need to be loaded prior. For example, unlocking the end game door with the keycard to be able to access the rest of the end game area. These commands can be dangerous to use. They can delete saved games, reset achievement status, clear settings, etc. Use caution when using these commands:. Not recommended unless you know what you are doing. Most of these are used by the devs for testing purposes:. Appears to be a multiplier. These commands change or do things that can be done without the use of console commands and can be found in the menu options. These commands are no longer listed in the game, have been removed or changed, some may still work. Requires testing:. The Forest Wiki Explore. How Can I Help? Explore Wikis Community Central. Register Don't have an account? Console Commands. Edit source History Talk 3. Do you like this video? Play Sound. Categories : Gameplay Add category. Cancel Save. Fan Feed 1 Crafting 2 Map 3 Story. Universal Conquest Wiki. Allows building like Creative Mode. Unlimited resources and building super fast. Add all items , except story items. Use twice to fill inventory storage bags such as stick bags etc. Adds all story items , such as keycards. Never run out of items , must have the item in the first place. Fast run, Be careful not to kill yourself, you get a lot of air time. This can be buggy, if turned off you may not be able to run. Try crouching, sprinting, jumping etc to reset it. Kills all cannibals and mutants in the game, they will respawn though. Adds a live rabbit to the players hand. Can be placed inside a rabbit cage. Cut grass in a 10 radius around player, choose any number. Can take a long time to load if large sizes are chosen. Lists all commands. Shows stats of your current game, these include all of the following: Days, trees cut down, enemies killed, rabbits killed, deer killed, turtles killed, birds killed, cooked food, burnt food, cancelled structures, built structures, destroyed structures, repaired structures, edible items used, items crafted, upgrades added, arrows fired, lit arrows, lit weapons, burnt enemies, exploded enemies, opened suitcase, passengers found, story elements, and infections. Shows current behavior of enemies and animals on each one, this may cause major performance issues. Not recommended on 4K resolution as the writing is too difficult to read plus the performance drop is too severe. Can be used to add commands to the debug console through a compiled C dll following a specific scheme possibly useful for modders. Change difficulty to Peaceful Mode. Change difficulty to Hard Survival Mode. Changes the speed of the game, 0 pauses, 1 is normal, 2 is faster, etc. Change to a number. Much safer than time scale. Can be toggled on and off without typing on or off at the end. When this is off, it can greatly increase view distance, though some textures look a bit funny. Using number 4 helps with filling Water Collectors , requires more testing beyond this. Revives player, might only work in multiplayer. This also allows you to move through invisible barricades within the game. For example, at the cliffs at the top end of the map and the edges of the map. Note that you can fall out of the map with this on. Poison is same as being hit by a poison arrow or a poison upgraded weapon , it causes infection which requires aloe to heal. Changes fullness amount to , 0 - can be used. Changes flashlight batteries charge to , 0 - can be used. Most likely also affects weapons with flashlights attached. Sets swim underwater time to , this should max out athleticism. Spawns a trapped animal if a Animal Trap is near by. Knock down closest cannibal , may not work on mutants. Kills closest enemy to you, cannibal or mutant. This does not work on worms , you must use killallworms for them instead. Kills all worms in the game. They cannot be killed by using killallenemies command. Spawns Regular Cannibals. Spawns Painted Cannibals. Spawns Masked Cannibals. Spawns Skinny Cannibals. Male Skinny Cannibal. Female Skinny Cannibal. Skinny Pale Cannibal. Male Regular Cannibal. Female Regular Cannibal. Fire Thrower Cannibal. Use twice to fill bag storage. Removes all items from the player, including the plane axe. Removes all story items , such as keycards. Respawns all items that have been collected. Circuit Board. Lizard Meat. Wrist Watch. Flare Gun. Weak Spear. Cassette Player. Herbal Medicine. Cassette 1. Survival Guide. Fire stick Torch. Rabbit Meat. Live Held Rabbit. Crafted Bow. Plane Axe. Tennis Ball. Throwable Rock. Rusty Axe. Crafted Axe. Modern Axe. Lizard Skin. Crafted Club. Energy Mix. Head Bomb. Aloe Seeds. Upgraded Stick. Upgraded Rock. Flare Gun Ammo. Plane Meal. Amanita Mushroom. Chanterelle Mushroom. Cassette 2. Cassette 4. Cassette 3. Cassette 5. Deer Skin. Rabbit Fur. Blue Paint. Orange Paint. Broken Toy Head. Broken Toy Arms. Broken Toy Legs. Broken Toy Body. Stealth Armor. Climbing Axe. Map cave 2. Turtle Shell. Old Pot. Air Canister. The Practical Caver. Yacht Magazine. Beneath The Limestone. Yacht Picture. Photo of Virginia. Sinkhole Photo. Virginia Sketch. Map Part 1. Map Part 2. Map Part 4. Map Part 3. Map Full. Milk Carton. Upgraded Spear. Timmy's Toy Full. Polaroid Teddy Bear. Siblings Missing Newspaper. Tennis Racket. Rabbit Head. Boar Head. Deer Head. Crocodile Head. Raccoon Head. Lizard Head. Seagull Head. Squirrel Head. Tortoise Head. Goose Head. Shark Head. Passenger Manifest. Metal Tin Tray. Rabbit Fur Boots. The Dark Haired Man Book. Bone Armor. Coneflower Seeds. Blueberry Seeds. Small Meat. Timmy Drawing. Rock Bag. Stick Bag. Artifact Sketch 1. Artifact Sketch 2. Ethical Scientist Magazine. Megan Polaroid. Photo Cache 1. Photo Cache 4. Photo Cache 5. Photo Cache 6. Photo Cache 8. Photo Cache 3. Photo Cache 2. Photo Cache 9. Cargo Manifest. Flintlock Pistol. Old Gun Ammo. Flintlock Gun Part 1. Flintlock Gun Part 2. Flintlock Gun Part 3. Flintlock Gun Part 4. Flintlock Gun Part 5. Flintlock Gun Part 6. Flintlock Gun Part 7. Paint Brush. Flintlock Gun Part 8. Keycard 2. Restraining order. Termination Email. Morgue Report. Bible Page One. Bible Page Two. Megan Crayons. Obelisk Photo. Obelisk Drawing. Megan Drawing Flowers. Megan Drawing Dad. Megan Drawing Unicorn. Megan Drawing Dinosaur. Plane Email. Megan Photo Email. Repair Tool. Polaroid Keycard 1. Polaroid Keycard 2. Polaroid Keycard 3. Chainsaw Advertisement. Camcorder Tape 1. Camcorder Tape 3. Camcorder Tape 4. Camcorder Tape 2. Camcorder Tape 6. Camcorder Tape 5. Puff Mushroom. Liberty Cap Mushroom. Jack Mushroom. Deer Mushroom. Modern Bow. Electrical Tape. Throwable Rock Bag. Crafted Bow with Torch. Modern Bow with Torch. Chainsaw with Torch. Flintlock Pistol with Torch. Spear Bag. Boar Skin. Raccoon Skin. Artifact Ball. Armsy Head. Mutant Baby Head. Cowman Head. Virginia Head. Creepy Armor. Artifact Key. Crossbow bolts. Schematic 1. Schematic 2. Schematic 3. Schematic 4. Takes you to the plane spawn location in your current game. Takes you to the Ocean , may spawn you underneath the map so you'll keep falling. Takes you to the entrance of Cave 1 - Dead Cave. Takes you to the entrance of Cave 2 - Hanging Cave. Takes you to the entrance of Cave 3 - Wet Cave. Takes you to the entrance of Cave 5 - Submerged Cave. Takes you to the entrance of Cave 6 - Lawyer Cave. Takes you to the entrance of Cave 7 - Chasm Cave. Takes you to the cache with Gun Part 1. Takes you to the cache with Gun Part 2. Takes you to the cache with Gun Part 3. Takes you to the cache with Gun Part 4 not a mistake. Takes you to the cache with Gun Part 5 not a mistake. Takes you to the cache with Gun Part 6. Takes you to the cache with Gun Part 7 not a mistake. Takes you to the cache with Gun Part 8 not a mistake. Takes you what looks like the 2nd plane? Takes you to the last placed Animal Trap doesn't work on Fish trap. Takes you to the last placed Water Collector. Takes you to the last used log doesn't work with dropped logs and some structures. Takes you to the last used stick doesn't work with dropped sticks and some structures. Takes you to the last used rope if there is no player-build structure, it takes you to the climb entrance of the Cave 10 - Waterfall Cave. Takes you to the last fired arrow except for the Modern Arrow. Takes you to the last fired Modern arrow. Takes you to the last placed Sap collector. Takes you to the last placed Armor on the Armor Rack. Takes you to the last placed skin on the Skin Rack. Takes you to the unusable fire in the Seaside Village. Takes you out of the game world and you'll become all fuzzy and pixelated, games don't like long coded numbers apparently. Takes you to the last placed Rock in the Catapult. Cave 7 - Chasm Cave , beware of virginia and cannibals. Bottom of the sinkhole , heaps of armsies , cowmans and cannibals. Cave 10 - Waterfall Cave , beware cannibals and cowman. Cave 7 - Sinkhole Cave. Cave HC , under sinkhole , don't go down it's next to you. Cave 9 - Ledge Cave , beware cannibals and mutant babies. Cave 5 - Submerged Cave. Cave 1 - Dead Cave , break wood. Cave 5 - Submerged Cave , on small rock in front of wood. Cave 7 - Chasm Cave. Cave 6 - Lawyer Cave , beware of armsy and mutant babies. Accessible via underwater. Rebreather required. Cave 10 - Waterfall Cave. Removes every blueprints that has been placed. Builds every blueprints that has been placed. You build with unlimited resources and really fast. Carried logs are infinite, must have a log in hand to work. Must be turned off to drop or use a weapon etc. This command is useful for filling up log holders or log sleds. It's also useful to testing out zipline catches. Will place the Wardrobe and Head Effigy blueprints. Not implemented into the game, can be added through this command. Unable to choose where you can place it though. Small Wall. Large Drying Rack. Removed from the game, can only be added through this command. Will sink into the ground when placed. Garden Cave. Head Effigy. Small Garden. Alpine Tree House. Alpine Tree House - With climbing rope. Tree House - No climbing rope. Tree House - With climbing rope. Tree Platform - No climbing rope. Tree Platform - With climbing rope. Sap Collector. Custom Wall. Fish Trap. Armor Rack. Arrow Basket. Bone Basket. Bone Chair. Bone Frame. Ceiling Skull Lamp. Bone Chandelier. Deer Skin Decoration. Ground Weapon Holder. Rabbit Fur Decoration. Decorative Skull. Head Trophy. Wall Planter. Wall Weapon Rack. Drying Rack. Large Effigy. Arm Effigy. Small Effigy. Bone Fence. Custom Effigy. Custom Floor. Garden Custom. Rock Wall. Rock Path. Stick Fence. Defensive Wall. Freestanding Zipline. Tree Zipline. Basic Fire. Fire Pit. Standing Fire. Explosives Holder. Large Cabinet. House Boat. Large Raft. Temporary Shelter. Log Cabin. Small Cabin. Small Log Holder. Large Log Holder. Small Cabinet. Log Sled. Rabbit Cage. Small Raft. Small Rock Holder. Large Rock Holder. Side Platform. Climbing Rope. Hunting Shelter. Skin Rack. Skull Lamp. Small Table. Defensive Spikes. Stick Marker. Small Stick Holder. Large Stick Holder. Wood Target. Deadfall Trap. Leaf Pile Trap. Animal Trap. Noose Trap. Happy Birthday Trap. Rope Swing Trap. Explosive Wire Trap. Molotov Wire Trap. Wooden Path. Basic Wall. Wall With Door. Wall With Window. Water Collector. Weapon Rack. Stick Frame. Custom Foundation. Custom Roof. Custom Stairs. Defensive Wall Extendable. Defensive Wall Gates. Defensive Wall Reinforcement. Tree Bridge. Simple Stairs. Destroys game object, it requires game object name. Unknown if it is different to disablego command. Screen becomes stuck only console elements still work , unloads some memory reference errors piling up. Screen becomes stuck only console elements still work , unloads some memory, some reference errors. Sets the ExitedEndgame value of the active save. This variable is normally set to true upon finishing the game and leaving the caves, when burning Timmy's photo. Using the command allows to directly unlock the endgame buildings and the game begins spawning Megan in the world. However, Timmy's photo will be kept and the burning photo cutscene likely won't trigger. Spawns noninteractive log s at the player's location; scaleX is width, scaleY is height, scaleZ is length. Example: instancingTestSpawn 1 1 1 1 will spawn a normal log, while instancingTestSpawn 2 2 2 2 will spawn two double sized logs. Doesn't appear to do anything, FPS can be seen regardless by press F2. Edit: Debug features, toggle fps display in VR mode. Info from Unity engine site , can improve performance. Info from Unity engine site , could improve graphic but will cause FPS drops. Causes FPS drops. Info from Unity engine site , See site for information. Has no gameplay impact, only makes The Forest use more ram. Used by the devs for testing purposes. Report logs now, Report warnings now, and Report errors now commands all do the same thing it appears. Requires further testing. On by default. It appears to add more vibrant and color to the game. Very noticeable when switched off. Tested and Unknown, appeared to have error information in the log. Makes sure that the vignette effect is enabled, then loads it with whatever was saved in the PostProcessingProfile. Probably a VR only post processing. Outputs information concerning the vignette post processing effect. Seems partially or exclusively related to VR mode. Iterates over each existing BoltEntity with two counters, then prints to log the amount of frozen and unfrozen entities. Resets some debug variables regarding active and total entities, as well as active and frozen trees, then iterates over every existing BoltEntity to calculate the amount of each. Iterates over each existing BoltEntity. Those that are active, attached, aren't frozen and aren't trees are added to a dynamic list, and their names printed out to the log after the loop. Makes a snapshot of the memory profiler and outputs it to the log. The profiler needs to be turned on with profilersample on beforehand. However it seems that the profiler may not be supported on the lastest builds of the game. Takes an exact blueprint name and sets it as active. Essentially the same thing as selecting a construction from the survival book. Adds a massive sheen that scales across the inventory of all your items, not sure what it does other than that. Cannot be switched off it seems. Enables or disables antialiasing in the PostProcessingProfile class. Most likely has the same effect as changing it in the game's settings.
1 note
·
View note
Text
i don’t like using mods. i like to experience the game as it’s intended first. anyway, if you’ll excuse me, /admin /spawnitem torch 999 /admin
1 note
·
View note
Text
how to custom color clothes (in vanilla!)
i recently became familiar with how to spawn completely custom colored fashion items in starbound and while it’s generally common knowledge by now and there are many guides out there on how to do this, i still wanted to write up a simple guide explaining the process of how i do it from the building blocks up + how to troubleshoot issues etc which should hopefully help some folks! a lot of my own friends didn’t know about /admin or /spawnitem so this will cover all the basics!
this is completely vanilla compatible as it is via the /spawnitem command, thus is NOT a mod, does NOT require save file editing, and is multiplayer friendly! you can also gift custom colored items between players and they will retain their colors, so you can make special colored clothing for friends if you want! i also explain how to do this without having to open up your game’s assets file
in order to do this, you will have to be comfy with using the /admin command in your chatbox. this will do several things such as making you invulnerable and making you able to spawn just about any item. you can turn it back off if you don’t want the effects to be permanent
introduction to /admin and /spawnitem
if you go into starbound and type /admin into your chatbox and hit enter, it will tell you something like “admin privileges now given to [playerName]” and grant you a ‘server admin’ status which will work in both single player, steam invite multiplayer, and in servers where the server owner allows players to do this (if you’re on a multiplayer server that doesn’t let you toggle /admin on you’ll have to talk it out with the server owner)
you will be granted immortality and access to some different fun commands like /timewarp and /spawnmonster, but the command we will be focusing on is /spawnitem which grants you the ability to spawn any item in the game (yes, ANY item. it’s so much power)
how to /spawnitem properly
/spawnitem works in a simple format:
/spawnitem [itemIDName] [number you want spawned]
so for example:
/spawnitem visorhead 1
will spawn a singular visor headpiece item! note that the item ID name there isn’t “visor” but rather “visorhead”-- while some items have IDs the same as the item’s name, many are named differently in the game files, and it’s that name in the game file that you need in order to spawn the item. luckily, you can easily find this by looking up any item on starbounder.org and scrolling to the bottom and looking where it says itemName
this is where we go deeper
so regular item spawning is all good and fun, you can collect all the hats in the world for free if you desired to plug itemNames into starbound for an hour straight, but on top of /spawnitem being a thing, starbound accepts additional commands tacked onto the end of the /spawnitem command which will alter the item further. these additional commands are known as “directives” and they primarily alter the item’s physical appearance
starbounder.org has a full list of every directive possible here but i will be covering the few i think are most useful for creating custom fashion items (ignore the part of the page that describes this as ‘modding’. it is NOT modding. it uses tools completely available to you in vanilla. it does not add mods to your game)
the basic format

/spawnitem itemName 1 ‘{”directives”:”?directiveYouwant=valuenumber”}’
to break it down: /spawnitem is the command you are telling the server to do. itemName is what the item you want is named within the game’s asset files. the number after the itemname is how many you want; leave it at 1 if you only want one but don’t delete it as you need at least a 1 to be there. the directives are in a set of apostrophes and curly brackets, directives is in quotes and it tells the game that you are using directives. then there’s a colon and after that, in another set of quotes, the name of the type of directive effect you want to use (like hueshift or brightness), and then = and basically a number representing how strong you want the effect to be
it’s really important to note that just like any other coding, you need to have complete symmetrical sets of brackets, apostrophes, and quotes. if your game tells you it can’t recognize your parameters or otherwise fails to spawn the item, make sure your words and numbers are in the correct brackets/quotes/etc and that the brackets/quotes/etc are symmetrical and in the right place and that you didn’t accidentally delete one or add an extra one in there
hueshift
/spawnitem visorhead 1 '{"directives":"?hueshift=180"}'
hueshift will change the ‘hue slider’ on your item relative to the number you plug into it, so for example hueshift=180 on a red item will turn it blue. you can use both negative and positive values like 45, -60, 90, 112, and so on! it will take some toying with
brightness
/spawnitem snowinfantrypants 1 '{"directives":"?brightness=-70"}'
also a ‘slider’, it’s very simple, it alters the brightness of your item. it accepts positive and negative values. so -70 will decrease the brightness by 70%. good for making already dark items darker! or already light items eyesearing if that’s your thing. you could do some neato pastel edits probably
saturation
/spawnitem visorhead 1 '{"directives":"?saturation=-100"}'
also what it says on the box, saturation increases or decreases the saturation of the item, and accepts both negative and positive values. -100 will completely desaturate the item and turn it black/grey/white for maximum emo effect. much higher values can turn you into a lisa frank nightmare
combining the above directives
/spawnitem snowinfantrypants 1 '{"directives":"?brightness=-70?saturation=-100"}'
if you want the darkest edgiest coat possible, or the most colorful pastel one imaginable, you can combine the brightness and saturation directives like so! (you can also add hueshift to this presumably, but i’ve neglected to in the premade code since it may look Weird to combine all these effects. if you want to add it in anyway just paste the ?hueshift=180 after the ‘100′ in the provided code, and make sure it’s within the quotation marks)
filters will only take you so far. we need to go deeper *matrix sfx*
there is an item directive much more complex than the others, known as the replace directive!
/spawnitem visorhead 1 '{"directives":"?replace;ffca8a=e6e6e6;e0975c=494949;a85636=313131;6f2919=121212;008cd9=d90000;60b8ea=ff0000"}'
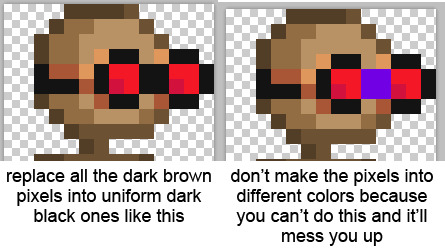
what this directive does is tells the game to look at the image file for the item, find the hex color codes on the left, and replace them with the new hex color codes that you listed on the right. this includes parts of the items that are not dyeable!
note that there are some slight limits to this: imagine each different color in an item’s image is a “slot” for a dye. you cannot add more slots, and when you specify a hex color to replace, it will always replace ALL pixels of that color. for example, you can change the visor item to have a red lens, but you cannot have a rainbow lens because there simply aren’t enough differently colored pixels to replace there in order to make it have a rainbow look! you CAN make different colors all turn into the same color, you simply cannot add more colors to an item than there are by default
(if you want to make an item one singular solid color, try using the setcolor directive which is much less complex than the replace directive)
how to use the replace directive - step 1: formatting basics
firstly, the basic formatting is such:
/spawnitem itemName 1 ‘{”directives”:”?replace;OLDHEX=NEWHEX;OLDHEX=NEWHEX”}’
the hex color code you want to replace is always on the left, and the one you want to replace it with/your custom color is always on the right. you can add and subtract as many custom colors from this string as you want, so you can replace only one color or replace allll the colors if you like!
if you want to replace multiple colors, separate the OLDHEX=NEWHEX bits by semicolons, with semicolons inbetween all of them but NOT at the end of the very last one you add (so the OLDHEX=NEWHEX bit at the very end of the code next to the “}’ part should Not have a semicolon at the end of it, but the others before it should. like this:
/spawnitem itemName 1 ‘{”directives”:”?replace;OLDHEX=NEWHEX;OLDHEX=NEWHEX;OLDHEX=NEWHEX;OLDHEX=NEWHEX;OLDHEX=NEWHEX ”}’
a replace directive code that replaces only one color should look like this:
/spawnitem itemName 1 ‘{”directives”:”?replace;OLDHEX=NEWHEX”}’
how to use the replace directive - step 2: actually creating your custom item
(note: you can skip the wiki image hunting step if you have access to the game assets and can open up the actual .png file used within the game’s files. this can save you some strife later. i don’t do this because pak files scare me so i’ll use some workarounds for this)
first what you want to do is have some kind of image editor program on hand that at minimum needs an eyedropper tool and a color selector that tells you the hex color code of the color you select. i use photoshop and in this tutorial i use the new layer and filler bucket features in my method since that makes it easier for me. if your image editing program doesn’t have a layers or fill bucket feature you might have to get creative
now what you wanna do is look up the item on the starbounder.org wiki, and obtain the image for it of it on a test dummy, and leave the tab open because you’ll need its itemName later to put it into the code
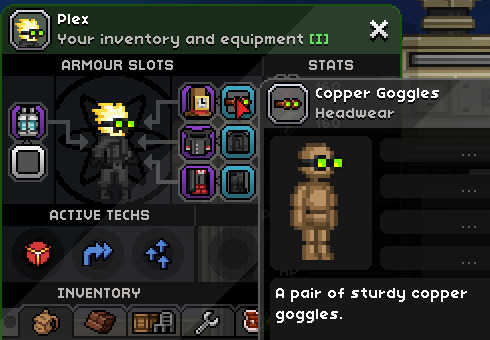
i’m going to use the copper goggles for this tutorial because they’re good looking but gee sure would be awesome if the lenses could change color!

whip open the image in your image editing program, duplicate the base mannequin image and make it a new layer above the basic one, and on the new layer go hogwild and use filler bucket or whatever to recolor the item to however you want, making sure you remember 1 color = 1 color and when you replace one color of pixel on the item, you replace all the pixels of that color
make sure to also ignore the mannequin underneath so you don’t get confused as to what pixel underneath is what (you can delete the mannequin’s pixels entirely if it helps)

i recolored the goggles to black and green as shown, with the gif on the left showing the difference between the base and the recolor!
time to CODE IT!
turning dreams into reality
you want to whip out your spawnitem code and begin the process of eyedropper-ing the hex color code of the color you want to replace, and then putting an = after it and then eyedropper-ing the color you wanna replace it with (from that recolored layer you made) and writing that down to the right of the equal sign
soooo for example:
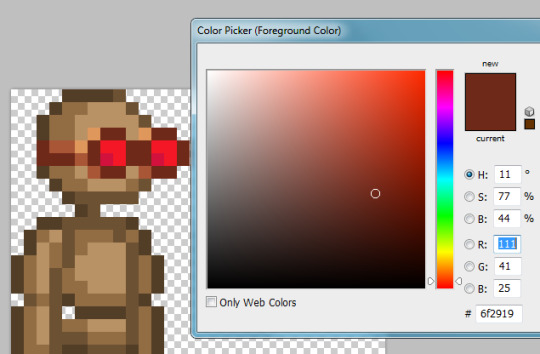
when i use eyedropper tool, i can see the darkest brown color of the goggles is hex color code 6f2919! this means i know that my code will start out like this (remember to edit in the itemName):
/spawnitem copperarmorhead 1 ‘{”directives”:”?replace;6f2919 =HEXCOLORCODETOREPLACETHATBROWN”}’
and now i use my eyedropper tool to find the color on the recolored version that will be replacing those darkest brown pixels...
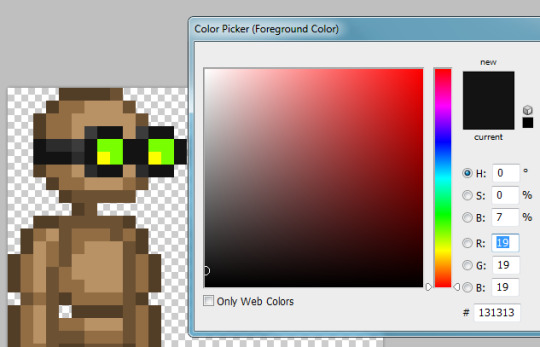
....which is 131313! so now i know that in order to spawn an item where the dark brown goggle color is replaced by dark grey, i have to make my code like this:
/spawnitem copperarmorhead 1 ‘{”directives”:”?replace;6f2919 =131313”}’
you will do this same process for the rest of the colors until every single hex color code you want to replace is listed out with its appropriate replacement!
note that since it uniformly applies the replacement, you only need to list out each color once-- you don’t need to list the replacements multiple times for each pixel or anything like that! ?replace; 6f2919 =131313 will automatically replace every dark brown pixel with dark black, you don’t need to go pixel by pixel or do ?replace;6f2919 =131313;6f2919 =131313;6f2919 =131313 or whatever. 1 color = 1 color!
in the end, my code ends up looking like this in order to replace all of the colors in this item:
/spawnitem copperarmorhead 1 ‘{”directives”:”?replace;6f2919=131313;a85636=2c2c2c;e0975c=3c3c3c;d3113d=fcff00;f41725=78ff00”}’
now just a copypaste and an enter key...
(NOTE: your custom item will spawn on your cursor. don’t spawn it underground or under your ship on accident. it will despawn eventually if not picked up but it’s still annoying if you spawn it ‘out of bounds’)
aaaand......
my item turned out perfectly!
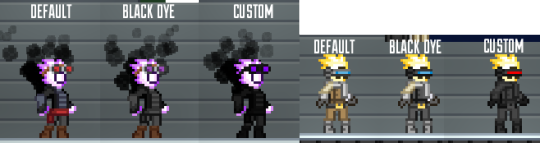
if you got your item custom recolored to your specifications (NOTE: it may not be reflected in the items thumbnail but it will look fine in the actual item itself) you did it right and starbound didn’t fight you on it! congrats!
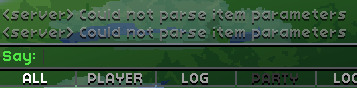
the game isn’t recognizing my code and my quotation marks are turning into squares??
some text editing programs do weird shit to quotes and apostrophes. including tumblr. try writing your spawnitem code in notepad instead or copypasting it into notepad and replacing all of the “ and ‘ whilst in there and that should do it (or just rewrite them within the game’s chatbox itself)
the game launched a HOMESTUCK REFERENCE at me instead?!
you typoed the itemName or used an otherwise incorrect itemName so the game gave you a generic filler item instead! check that your itemName is correct and matches the exact itemName on the wiki! remember that it is case sensitive
my item turned COMPLETELY INVISIBLE or the game yelled at me!!
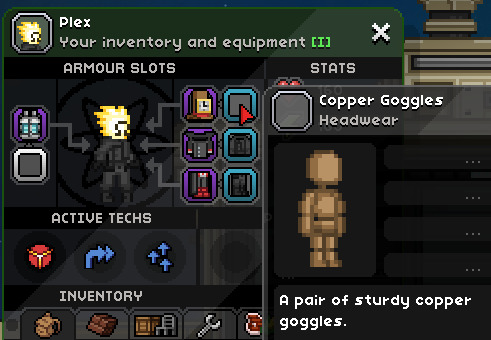
whoops, congrats on accidentally making an invisible item even though there’s a much easier way to intentionally do that!
if either of these things happened to you, there’s likely an error within your code itself somewhere. double check that all the brackets, quotes, and apostrophes are symmetrical, in the right amounts, and that you didn’t stick an extra one in there or delete one on accident. make sure that the semicolons are between your oldhex=newhex bits but that there isn’t an extra semicolon on the last one before the final quotation mark. make sure you didn’t accidentally insert a space anywhere
oh god my item somehow changed colors (probably to a weird coppery brown) and only some bits got replaced!! why is it doing this, why is it changing colors help me!!
(note: i used the visor as an example here instead of the goggles because i had no issues with the goggles but did have problems with the visor before a kind soul on a starbound discord i’m in enlightened me as to why this issue happens. i will be talking about the visor but this troubleshooting process is applicable to any item that mysteriously gains new unreplaceable colors when you try to spawn a custom colored one)
this is gonna be the BANE of anyone not directly using the .png’s found in the asset files and using the wiki instead. don’t worry, it’s fixable, it’s just a pain in the butt and it will happen a lot. you will end up spawning a lot of items as ‘beta tests’ only to correct their colors again due to this issue
essentially, sometimes in starbound, the colors that an item has by default are not actually the colors that the .png file the game assets have. for example, here’s what the visor looks like by default when you equip one you found normally in a chest or whatever:

bbbuuuut that’s not actually what it’s file in the assets looks like. those coppery brown colors are the SECRET COLORS that exist underneath the grey. the file in the assets is what your game is going to look at to try to use for the custom colored item, and when it does that, instead of seeing the grey hex color codes from wiki, it will see the coppery brown hex color codes from the assets file. you told it to replace those grey colors you see, but the game doesn’t see any grey colors in this file! it only sees coppery brown ones! and you didn’t tell it to replace the coppery brown files with anything, so it’ll leave those intact and ignore the command to replace the grey colors that don’t actually exist on the item
what you want to do is grab a screencap of the Failed Beta Test item (NOTE: remember to turn off f.lux or sweetfx or any other program that will alter the color of your screencaps), and use the eyedropper tool to find out what the hex color codes of those ‘unreplaceable’ colors are:
when i was making this visor before, i THOUGHT that the hex color codes to replace for the grey bits were 373737, 7b7b7b7, and 6b6b6b. it turns out that the hex color codes for those bits in the game files are, in same order, 6f2919, a85636, and e0975c!
this means that if my code looked like this before, with errant hex color codes bolded:
/spawnitem visorhead 1 '{"directives":"?replace;6b6b6b=494949;7b7b7b=313131;373737=121212;008cd9=d90000;60b8ea=ff0000"}'
...it should be corrected to this instead, with the corrections bolded:
/spawnitem visorhead 1 '{"directives":"?replace;e0975c=494949;a85636=313131;6f2919=121212;008cd9=d90000;60b8ea=ff0000"}'
so instead of telling the game to correct hex colors that it doesn’t think exist on the item, you are now telling it to replace those pesky copper brown colors that it DOES think exist on the item and now can properly replace because you’ve given it the direction to
..aaaaand that should sort most things out!
coding this stuff can be FUSSY so there may still be errors and whatnot! i am not a coding expert but if you CANNOT get something to behave then feel free to shoot me an ask! happy recoloring!!!
(while you’re at it, if this guide isn’t enough for you, check out https://silverfeelin.github.io/Starbound-Hatter/ which can create text commands to generate FULLY custom hats. supposedly. i haven’t tried it)
74 notes
·
View notes
Text
Ember Celica
Two fist weapons inspired by the RWBY series. Made by 4spooked
Demo: https://gfycat.com/FirsthandSpanishDeinonychus
/spawnitem clawglove 1 '{ "level" : 6, "seed" : 101, "shortdescription" : "^#FFFF00;Ember Celica^reset;", "description" : "^#FFFF00;A pair of Dual Ranged Shot Gauntlets that pack a punch!^reset;", "tooltipKind" : "base", "category" : "^#FFFF00;Custom Weapon^reset;", "needsEdgeTrigger" : false, "rarity" : "Legendary", "maxStack" : 1, "comboSteps" : 6, "itemTags" : ["weapon"], "comboTiming" : [0.2, 0.5], "comboCooldown" : 0.5, "freezeLimit" : 3.5, "inventoryIcon" : "stunglove.png:front?replace;344495=000000;1a1c51=000000;96cbe7=000000", "animationParts" : { "weapon" : "stunglove.png", "swoosh" : "/items/active/weapons/ranged/abilities/burstshot/burstshot.png"}, "animationCustom" : { "lights" : { "glow" : { "color" : [255, 255, 153]}}, "animatedParts" : { "parts" : { "specialswoosh" : { "properties" : { "transformationGroups" : ["weapon", "swoosh"], "centered" : true, "offset" : [-0.5, 0.0], "zLevel" : 1 }, "partStates" : { "attack" : { "idle" : { }, "fire" : { }, "special" : { "properties" : { "fullbright" : true, "offset" : [1, 0.5], "image" : "/projectiles/explosions/energyshardexplosion/energyshardexplosion.png:", "damageArea" : [[-1.0, -1.0], [6.0, -6.5], [4.0, -0.75], [4.0, 0.5], [6.0, 6.5], [-1.0, 1.0]]}}}}}, "swoosh" : { "partStates" : { "attack" : { "fire" : { "properties" : { "fullbright" : true, "offset" : [5.0, 0], "damageArea" : [[0, -2.5], [2.1, -3.6], [2.1, 0.8], [-7, 0.5]]}}}}}}}, "sounds" : { "fire" : [ "/sfx/gun/plasma_shotgun2.ogg" ], "special" : [ "/sfx/gun/rocket_fire1.ogg" ]}}, "primaryAbility" : { "fireTime" : 0.4, "baseDps" : 25, "damageConfig" : { "statusEffects" : [ ], "damageSourceKind" : "fire", "knockback" : 15, "knockbackMode" : "facing"}, "stances" : { "idle" : { "armRotation" : 0, "weaponRotation" : 45, "weaponRotationCenter" : [-1.0, 0.0], "weaponOffset" : [-0.25, -0.575], "allowRotate" : false, "allowFlip" : true, "frontArmFrame" : "run.2", "backArmFrame" : "jump.3"}, "windup" : { "duration" : 0.05, "armRotation" : 0, "weaponRotation" : 0, "weaponRotationCenter" : [-1.0, 0.0], "weaponOffset" : [-0.625, -0.125], "allowRotate" : false, "allowFlip" : false, "frontArmFrame" : "swimIdle.1", "backArmFrame" : "swim.1"}, "windup2" : { "duration" : 0.05, "armRotation" : 0, "weaponRotation" : 0, "weaponRotationCenter" : [-1.0, 0.0], "weaponOffset" : [-0.75, -0.125], "allowRotate" : false, "allowFlip" : false, "frontArmFrame" : "swimIdle.1", "backArmFrame" : "swim.1", "recoil" : true}, "fire" : { "duration" : 0.1, "armRotation" : 0, "weaponRotation" : 0, "weaponRotationCenter" : [-1.0, 0.0], "weaponOffset" : [0.125, -0.25], "allowRotate" : false, "allowFlip" : false, "frontArmFrame" : "rotation", "backArmFrame" : "rotation"}}}, "comboFinisher" : { "name" : "Concussive Blast", "type" : "dashslash", "class" : "DashSlash", "damageConfig" : { "statusEffects" : [ "burning" ], "baseDamage" : 7, "damageSourceKind" : "fist", "knockback" : 60, "knockbackMode" : "facing"}, "freezeTime" : 0.5, "stances" : { "idle" : { "armRotation" : 0, "weaponRotation" : 45, "weaponRotationCenter" : [-1.0, 0.0], "weaponOffset" : [-0.25, -0.575], "allowRotate" : false, "allowFlip" : true, "frontArmFrame" : "run.2", "backArmFrame" : "jump.3"}, "windup" : { "duration" : 0.05, "armRotation" : 0, "weaponRotation" : 0, "weaponRotationCenter" : [-1.0, 0.0], "weaponOffset" : [-0.625, -0.125], "allowRotate" : false, "allowFlip" : false, "frontArmFrame" : "swimIdle.1", "backArmFrame" : "swim.1" }, "windup2" : { "duration" : 0.05, "armRotation" : 0, "weaponRotation" : 0, "weaponRotationCenter" : [-1.0, 0.0], "weaponOffset" : [-0.75, -0.125], "allowRotate" : false, "allowFlip" : false, "frontArmFrame" : "swimIdle.1", "backArmFrame" : "swim.1", "recoil" : true }, "dash" : { "duration" : 0.35, "armRotation" : -20, "weaponRotation" : 0, "weaponRotationCenter" : [-1.0, 0.0], "weaponOffset" : [0.125, -0.25], "allowRotate" : false, "allowFlip" : false, "frontArmFrame" : "rotation", "backArmFrame" : "rotation", "velocity" : [-25, 15]}}}}'
9 notes
·
View notes