#stamps tutorial
Explore tagged Tumblr posts
Visit Tumblr Blog
Explore Tumblr blogs with no restrictions, modern design and the best experience.
Last Seen Tumblr Blogs


Fun Fact
Tumblr was the first site to host the blog for President Barack Obama in 2011.
Note
How to do Deviantart-inspired stamps like you? ☆⌒(ゝ。∂)🍡
I downloaded stamp borders from https://graphic--horde.tumblr.com/ ‘s stamp tutorial (I recommend you go check it out cause they explain it better than I.)
i imported my photo into Ibispaint and made sure the background was transparent.


it should look like this.
3. I import the photo I want and move it to the layer behind my frame.

4. I clean up the edges so they don’t stick out, but that’s optional.

5. I save as transparent png and that’s all.

After that, you can copy and paste and post and do whatever with your new stamp. Yay💖

(Btw, my example stamp is of big man hugging a salmonoid in splatoon rp in roblox. Ty to the big man who hugged me. Very welcoming.)
#stamps#stamps tutorial#splatoon stamps#splatoon stamp#Big man#big man splatoon#big man stamp#Big man roblox#Splatoon rp roblox#Salmonoid#salmonoid stamp#Hug#Stamp tutorial
59 notes
·
View notes
Note
hiii! just wanted to ask how you made your stamps in photopea? ive been trying to figure it out to no avail, haha

(ik im bad at explaining but im gonna do an tutorial)
(idk if this might be confusing to do this)
hiya there!
first, open from computer or grab an stamp template u have saved in the files
and then pick any image off google or anything ya want !! (or just screenshot anything)

now, press M (to cut any lines or whatever its called)
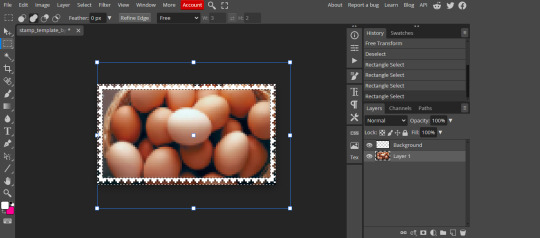
(you can see the lines over there) ^^
andd... cut THESE THINGS! (get these things off!!!)
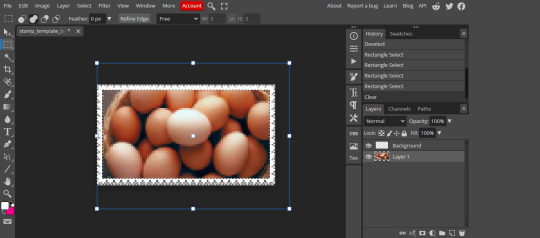
then boom !!
and then press file
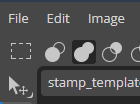
& press "export as.."
(save this as png or jpg + i mostly save stamps as png but i recommend saving stamps as png)
and.. THEN save that stamp! >:3
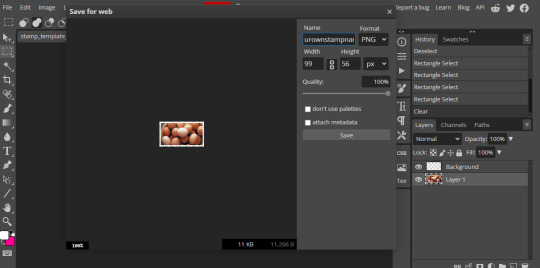
there ya go
now ill do the thing.. (the text thingy on the stamp)

press on that thing!
and then tap on the pic into your liking!

tada!
-------------------------------
and if ya want the stroke thingy on the text..
then!, press on that thingy

and now, press stroke
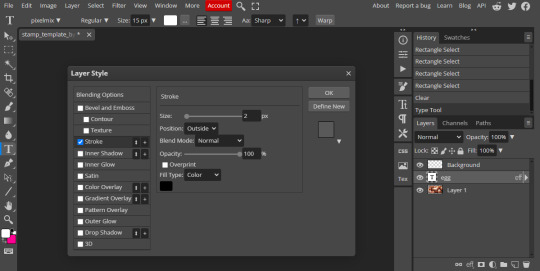
(i use the 2px for the stroke thing, uhh... you can do it into your liking)
now, press that "OK" button!

and.. oh!, you can change these colors if ya want!
(extra thing, copy the text and then press that "T" button and press on that text or uhh idjdjekjk, change the text color and then change the stroke color too)
-----------------------------
anyways.. now
THE ANIMATED THINGS!!! (two or.. three?.. things!)
the easiest thing i can do is, uhh these things like i did.. soo
first, copy/duplicate an layer like the one you did copied and pasted an image (the one you got off google or anything)
and then do the same thing like you copied off google or anything
clip the mask
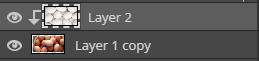
and now..
MERGE DOWN!!! >:3

boom!
and now do the same thing (three layers or any number ya want)
(and save em all!)
go into ezgif

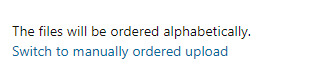
scroll down
then, press this thing that says "switch to manually ordered upload" !
now..
click on this button that says "choose file"
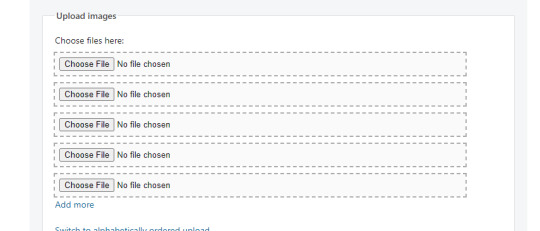
and you tap on the one you saved
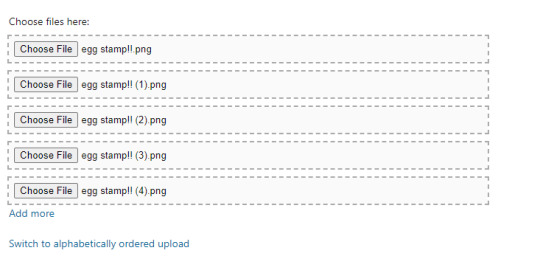
scroll down press this blue button!

and then you just..
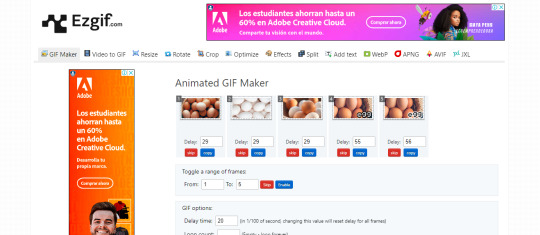
change these numbers (the one that says "20") into the one i did!
and then copy these things

boom

count those things! (7 egg stamps that says egg)
and.. then press that blue button that says "make a gif" !
-----------------------------
now look!
results:

------------------------
there's example of what i did from making those stamps!


------------------------
and other type of ANIMATED thing!
there's the tutorial, i know im bad at explaining this thing ^^
27 notes
·
View notes
Note
How do you make your stamps? :0
Disclaimer: this is an obscenely long explanation, with pictures. Efficiency is stupid
So, for the static ones, I make a 99x56 px file on ibis paint x. Other programs are probably available online but I don't use them.
After that, I either upload an image I want to make into a stamp, or I draw one.
Then, I find a frame I want to use. Ill upload them here but let it be known I stole all of these right from deviantart


Most of them are from Lil-Devil-Melii on deviantart. The rest i have no idea. They're not all 99x56px but you can crop the canvas it's fine
Make sure to erase the edges of the picture , so they're transparent. It's not as cute otherwise
Upload those frames over your image in whatever art program you're using and viola, stamp.
For moving ones, it's a lot harder. Mostly because I refuse to download Photoshop.
There are a couple ways to do this. Some are simple animations, like with flashing text and whatnot. For these, you download the individual animation frames from your art program. Make sure it's transparent.
Then, upload each frame to ezgif.com under the option "GIF maker." You can play around with how fast each frame goes and whatnot but in the end, it'll be a stamp with some rad text that moves. This is easy, and doesn't make me want to shit my pants and cry. If you're new, do this. This is fun. This is good. This does not kill me inside
I made that↓ stamp with this method :)

this next one is how we turn gifs into stamps. This one makes me sad. It involves math and sucks. But we gotta do it. For the vibe
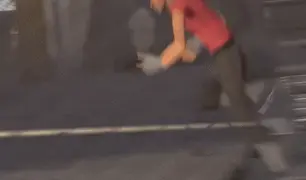
First, grab your gif. I'm using this cow gif because it's awesome

Then, I resize it using ezgif. Literally everything for this will be using ezgif. I am a simple man
At this point you should decide what frame to use. I'm using this one because its the first one I clicked
Figured out what size the inside of the frame is. That's what I resize the gif to, so the edges can be transparent. The inside of this one is 93x50 px, so those are the dimensions I'm making the gif.
Figure it out by putting the frame into ibis paint and realizing the canvas to fit just the inside of the frame, then seeing what the dimensions are. But there could be easier ways

Woah it's so small now
Then, still on ezgif, I go to the "crop" option.
Make sureeee to upload the smaller gif
press the button that says "extend canvas size", and then put the "width" and "height" as the dimensions for your FRAME. This'll put a bit of a transparent border around the gif. For this frame, I did 99px and 56px.
The "left" and "top" boxes show how many pixels the cropping happens from the edges of the canvas. The formula for finding that is
(width of gif / 2) - (difference between gif width and frame width / 2) = left box
For me it's (93 / 2) - (6 / 2) = 43.5
Then you do the same.for the height, which for me ends up being 22 from the top
This is reallyyy touchy and annoying though
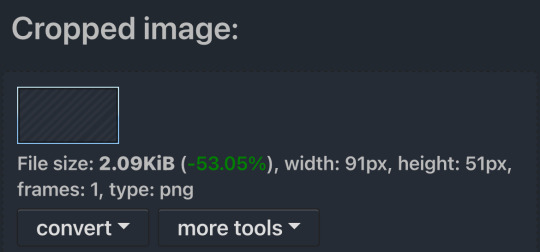
Here's my result , with no visible difference

Okay so THEN you go to the "overlay" option, under "effects." And upload your frame. If the cropping was done right, you shouldn't have to move the frame at all and can just download it
Here's my result:

if you don't care about transparency, you can resize your gif to be the same size as the frame, and then put the frame over it. But I'm a slut for transparency
Anyways. I'm sorry if anything was unclear, it's two am. And I hope this was helpful :) these really are fun to make once you get it down
also if anyone has an easier way to make stamps from gifs, please god tell me
#web graphics#old web#neocities#custom#custom blinkies#stamps#page decor#web resources#da stamps#deviantart stamps#blinking gif#How to#tutorial#How to make stamps#Spacehey#deviantart#rentry graphics#old internet#early internet#stamp collecting#ezgif#stamp making#stamp template#Stamp frames#blinkies
7K notes
·
View notes
Note
HIIIIIII!!!! sorry if this is like a stupid ask lol, but could you do a stamp tutorial? your stamps are always so high quality oml, how do you resize your gifs and images???


HIIII and no worries, I can totally make a stamp tutorial! (⌒▽⌒)
I’ll be going through on how to make a normal image stamp and then a gif stamp. By following these two tutorials, you’ll be able to make stamps just like these!


PROGRAM USED ★ Ibispaint
STAMP TEMPLATE BY ★ AHMED-ART on Deviantart.
To start off, you must find an image you’d like to make into a stamp. Then, find a stamp template you think would pair well with your image. There are many different types of stamp templates out there and you can find a lot of them on Deviantart.
Make sure to read the terms of use for the template before using though! Here is the template I will be using for this tutorial.

Making stagnant stamps is easy once you got the steps down. You can use any art program and follow a similar process, but I only use Ibispaint to create mine.
First, create a canvas that is the same width and height as your stamp template. This one is 97x57. Most stamp templates have super similar proportions. If you are unsure of your stamps dimensions, you can create a 100x100 canvas then crop it around the stamp template once you have inserted it.
(Brush icon -> Canvas button -> Trim)
To get higher quality on the image inside your stamps: the closer the better! For example:


See how the first stamp’s image is rather far away? This makes the quality appear much lower. However, once you zoom in, it becomes higher! So I recommend finding images to create stamps out of that you are able to zoom in on so the quality can pop.
You’ll need to erase the parts of the image that don’t fit inside the stamp so it remains transparent around the border.
If you want to change the border color of the stamp, fill in the canvas with the color you want. Then, clip it to the stamp border. Lastly, go and set it on multiply. This will change the stamp borders color!

If you want to put a line texture on your stamp, you can utilize the ruler tool in Ibispaint to draw lines over your stamp.

I’ll add these every once and awhile to my stamps for fun. If you set the opacity of the lines to 10%, it’ll end up looking something like this.
And that’s the completed stamp!
Changing the border color and adding the line texture is completely optional, though it’s always fun to customize stamps!

PROGRAMS USED: Ibispaint, Ezgif
GIF stamps are a little trickier, but the process is not too difficult once you got it down!
First, find a gif that you would like to make into a stamp. I’ll be using this one!

if you want to have a different colored or customized stamp border, you must edit it on Ibispaint before like explained above.
You can combine the layers and save them transparently so it’ll end up looking something like this.

I made this one blue and added a gradient to it to match the gif I want to make into a stamp! You can add a gradient to the border by adding a darker color onto the multiply layer then using an airbrush to blend both colors together in the middle on both sides of the template.
Now, open up Ezgif and click the tab called Crop. Then, insert your stamp template there. The way I find the dimensions of the inside of the stamp is by cropping my way around the inside of the template.
The dimensions inside this template in particular are 91x51. This is what we will resize our gif to! Before we can do that, click the crop tab again at the top of the page to refresh it and then insert your gif. This isn’t required to do, but I like to crop my gifs a bit so they focus more on what is going on inside my stamp. Like I said before, the closer the better, as it will make the quality higher!

Now that we have our cropped gif, click the tab called resize at the bottom of the page. The dimensions of the inside of this stamp are 91x51, so insert those numbers in the width and height boxes to then resize the gif.

Next step is to click the overlay tab at the bottom. You will need to click the button that says “extend canvas size” so we have room to overlay the stamp template on top of the gif. After extending the size, upload the stamp template as an overlay where it says choose file.

On computer, after clicking upload image, you can just drag the stamp template over the gif and situate it. However, you can also figure out the number coordinations to fix the template ontop of the gif by messing around with it a bit. I make my graphics on my phone so I use the numbers instead of dragging.

Left means to move the template left or right depending on the numbers you insert. Top moves the template up or down. The left for this template is 42 and the top is 21. It takes a bit of messing around to find the exact numbers.
Now that the template is ontop of the gif, all that is left to do is to crop the space around it. Click the crop tab again at the bottom of the page and then click where it says “trim transparent pixels around the image.” This will easily crop the extra space around the stamp.

Click download to save your gif and that’s it! Here is the finished product!
The whole process for making gif stamps is always the same, the only things that can vary or change are the dimensions of the gif (so it can fit inside different templates) and the left/right.
I hope you find this tutorial helpful and if anyone needs anything else explained, let me know. These stamps are free to use if anyone would also like to use them.
Happy stamp making everyone! 🩷
Dividers (c) @coco-coquette

#tutorial#web graphics#graphics#webcore#old web#rentry#stamps#web decor#gif stamps#alien stage#alien stage till#strawpage#spacehey#ᯓ ᡣ𐭩🐚asks
742 notes
·
View notes
Text
Digital Stamp Making Tutorial
Hello, and welcome to the long-awaited(at least on my part) digital stamp-making tutorial from neosprites! I’d like to preface that I learned what I was doing from this tutorial so it may be a bit redundant, but if anything I get a bit more specific. Thank you so much to @graphic--horde for your work, it changed me as a graphic maker. This is gunna be a long post so feel free to bookmark it for later. Now, onto the show!

The frame I will be using for this tutorial (which is the frame I use on 99.9% of my stamps) I found from the above linked post, which I believe is from a creator that OP lost track of. Its inner dimensions are 94x50 pixels and its outer dimensions are 99x56 pixels. Here it is!

Find your material! - I recommend using websites like Tumblr and searching with the “GIF” filter only on, or alternatives such as Giphy or Tenor. Your browser may let you directly save the .gif file; if not and you are noticing it restricts you to save it as a .webp file you can try an extension like “Save webp as PNG or JPEG” (for Firefox but I image other browsers have similar functions, but I really recommend you switch to Firefox). To use this you will right click on your source .gif like normal but instead of clicking on “Save image as…” click “Save webP as…” and then click “GIF”. You should be redirected to the website ezgif.com where we will actually be doing all of our editing! Here’s the .gif we’ll be working with.

Convert to GIF (optional) - if you used the extension from the above step you should already be ready to click the blue “Convert to GIF” button. If not, go ahead and open ezgif.com and click on “webP” and then “WebP to GIF”; then convert to a gif with the blue button.

Resize the GIF - now that we have a gif ready to edit, let’s make it the right size. The easiest method I have found is to change it directly to the frame’s inner dimensions, 94x50 pixels. [EDIT: Make sure in the aspect ratio drop drop menu you select "stretch to fit" and not "center and crop to fit" like I did in the photo example.] Click “resize” and then type [94] in for the width and [50] for the height. Next press the blue “resize image” button.


Add the frame - next click “overlay” then click the thin blue button that says “Extend canvas size(use if overlay exceeds GIF sizes)”. This will give us some extra room to add the frame onto the design. Next click “Browse…” and find the frame you have saved onto your device, then click the blue “Upload image” button.


After that it’s going to be misaligned, that’s normal! It will say you have the option to drag it into place, but don’t bother. That’s one of the reasons my old stamps look wack, it’s just harder to do. Instead type [44] in for the Left box and [22] in for the Right box. It took me a while to figure out these dimensions to be honest, and I’ve only tested it with this frame so I don't know if it works with others. Then click the blue “Generate image” button.


Crop the transparent edges - click on “crop”. You will have the option to check a box that says “trim transparent pixels around the image” however, I don’t recommend this as it tends to crop a few of the frame’s pixels with it sometimes. Next, set the Left position to [44] and the Right position to [22]. For the other dimensions we will use the outer dimensions of the frame which are 99x56 pixels, this will trim everything except the tiny spaces in between the stamp frame’s spikes. Type the width as [99] and the height as [56] and click the tiny blue button that says “set”. After that click the blue “Crop image” button.


Save and use! - all that's left is to click “save” and upload the graphic to your liking. (best seen on dark mode obviously)

If you’d like to tag me in stamps you’ve made using my tutorial I would love to see them, but it’s not required!! Make sure to always give credit for pictures/gifs when you can and try not to make stuff out of personal/fan art. Thank you to the person in my inbox who requested this tutorial, I had been meaning to for a while but it was just the kick I needed. :)
#carrd graphics#carrd resources#carrd stuff#rentry graphics#rentry resources#rentry decor#rentry pixels#rentry stuff#rentry inspo#deviantart#neocities#mine#my graphics#my tutorials#resources#tutorials#tutorial#how to#stamps#blinkies#graphics#web graphic#old internet#early internet#spacehey#da stamps#page decor#custom#old web#frames
428 notes
·
View notes
Text

I couldn't fit the tutorial on a reply lmao, here's a full post explaining my process :]]
STAMP TUTORIAL (TF2 edition, but works for everything)
99% of the process is done on the website ezgif. Ezgif carries the stamp-making process lmao
1. Get your GIF
Tenor: Ok place to grab your GIFs. Average quality of the GIFs is good enough, and looks ok when resized to the size of the stamp. You'll find like 1 normal GIF every 4 buff characters GIF tho.
GIPHY: Average quality of the GIF is better (I don't think the web compresses the GIFs that are uploaded)… If you find what you're looking for. You'll have to SCROLL before finding what you're looking for because there are always non-related GIFs on the top of your searches or the same GIF multiple times, it's crazy.
makeagif: You will find cool GIFs, but the quality is pretty low (I think the web itself compresses the GIFs a lot). It looks bad even when resized down. And it has a watermark, which I recommend cropping because it's not even visible when resized, it just looks like a gray blob on the corner.
Google: Best option by far, quality is pretty good and the ratio of “things I was looking for/things I actually find” is SLIGHTLY in favor of “things I was looking for” (and most of “things I actually find” are just the characters rotating, not NSFW, so that's only a nice change from Tenor). You won't have to scroll much to see different and interesting GIFs. JUST REMEMBER TO FILTER BY GIFS.

You search whatever > Images > Tools > Type > GIF
Make it on your own: Aka, you download your video, go to ezgif's “Video to GIF” (then you can crop it, CUT IT. THIS IS IMPORTANT, YOU DON'T NEED TO GO ANYWHERE ELSE TO CUT YOUR CLIP, YOU CAN DO IT ON EZGIF ITSELF). Ok, I lied, it wasn't Google, this is the best oftion by far. You get exactly what you want, the best quality if you don't compress it much until after the GIF has been resized into the size of a stamp… It's just super time-consuming, and you'll have to spend like an entire hour just watching a video to find the clips.
OK, I HAVE MY GIF NOW
Hehe, his legs go pipupipu
2. Resize
Go to ezgif, this is where the fun begins (if you weren't on ezgif already). You download your GIF, or copy the link and insert it, or you'll have it there if you made it yourself.
A STAMP MAKES 99px × 56px
THE INNER PART OF THE STAMP MAKES 91px × 47px
I RECOMMEND MAKING YOUR GIF 92px × 48px
BTW, THESE MEASURES ARE FOR THE TEMPLATE I'LL GIVE YOU LATER. If you use another template, just go to an image editor and see what the inner size of the stamp is.
So, you set your GIF's width to 92px.

Then crop it, so your height is 48px.

Or you can resize it so it's directly 92px × 48px, but the crop will be in the center, and SOMETIMES YOU DON'T WANT THAT.
For example:

It's a vertical GIF whose area of interest is not in the center, so if we resize it directly-

oops-
ANYWAY
Once you have your GIF resized:
IMPORTANT: BEFORE THE NEXT STEP, REMEMBER TO CONVERT TO GIF IF THE FILE YOU'RE WORKING ON ISN'T A GIF ALREADY
Sometimes you'll be working with a webp without even noticing (EW, I hate webp) and transparencies don't work particularly well with that extension.
3. Overlay

Click on this icon.
Ok, now that that's fixed:

Extend the size of the canvas.

Select your template and Upload image!

This is the template, btw.

Then move the overlay around until it contains the GIF nicely, or just set Left to 43, Top to 20 and Generate image! (I have these numbers memorized, it saves you like 20 seconds lmao)
Also, again, these numbers work on MY template, if you use another one, you'll have to figure it out yourself.
4. Crop

THIS OPTION IS A TIME-SAVER FR
5. Optimize (optional, highly recommend)

I always set my optimization method to Lossy GIF and level 10 because I find that there is no quality loss, and the file size might drop by 30%-70% (actually crazy). These percentages don't change much in higher compressions, even though you'll start seeing a drop in quality around level 35 of compression (the default).
6. Save

YIPPE!!! Your stamp is done :D
You can save it and look at it and place it on your profile or website.


Here it is btw, in case someone wanted it :]] The Sniper GIF but correctly cropped and made into a stamp as well.
Now do that another… eleven times, and you'll have a stamp pack to make into a Tumblr post... Oof TT
There's no website that lets you make stamps faster lmao (I wish)
@sir-broken-bones (I'm @ them so they actually see it, I made this tutorial for them after all lol)
#team fortress 2#tf2#tf2 scout#tf2 sniper#stamps#da stamps#tutorial#graphics#old graphics#neocities#old web graphics#old web
195 notes
·
View notes
Text

PRAYSIA. An editing resource sideblog. See under cut for further information and helpful links. We do all our editing in Photopea.
OUR TO-DO. RENDERS DRIVE.
Inbox is always open for questions. Want to Request?
Helpful Links: Upscale Images, Image Splitter, PhotoMosh, Text Symbols, UniCodes, Word Combiner, Remove Gif Background, Download Videos from MOST Sources, Gradient Maps, Tons of Laces.
Tutorials: How To Mask Renders via Critical Galaxy, Photopea for Dummies.
Misc Help: Site that has TONS of PNGs.
This will be updated as needed, so be sure to check back before asking for something please!
If you know us, it is likely from our past edit blogs @necromii, doveish and v-rtue, none of which we use anymore.
#𐐪 asks.#𐐪 tutorials and help.#𐐪 important.#𐐪 from praysia.#𐐪 by praysia.#𐐪 from [user].#𐐪 by [user].#𐐪 chatting.#𐐪 praysia's renders.#𐐪 promo.#⠀⠀⠀⠀⠀⠀⠀⠀⠀#transparents#dividers#frames#masks#psds#gifs#buttons#stamps#pixels#pngs#overlays
270 notes
·
View notes
Text
How I make gif stamps in GIMP!
Hi! So I thought I would make a tutorial on how I personally make my animated stamps in GIMP! With images to help!
Firstly, have your stamp base, I use old stamp templates I found or from my own stamps. Then you want to add your gif as a layer.

Once you've opened it as a layer, all the gif layers will appear! You want to first resize the background layer by scaling the layer.

This stamp has an interior width and height of 95x50 pixels, so I make sure to scale the layer to fit. Make sure width and height aren't linked because not all gifs will fit that size naturally.

Then it is very important to merge the background layer with the stamp template layer, this way when you make the gif it looks like a stamp!

Once that's done scale all your other layers to the same width and height so that they too will fit in the stamp! Then what you want to do once that is finished is to open filter > animation > optimise (for gif).

Then once you've done that you can click playback to see if the gif is all right!


Once that's done it is time to export it by going export as, now I always have to change my file to a .gif type in order for it to work. Once you've done that hit export.


Then it will show a pop up window, it is very important you hit check on animation! Otherwise it won't work!

Once that is done, you can now hit the final export and your gif stamp will be made! See my final product below!

#should work the same on a windows computer as well!#tutorial#gimp tutorial#image editing#stamp#stamps#blinkies#web#old web#webcore#old webcore#myspace#heyspace#edit#editing#page decor#help guide#guide
72 notes
·
View notes
Note
I have a question,, when you make stamps how do you add gifs to them? Images sounds easy but idk about gifs..
i actually add them the say way as an image.
see tutorial below the cut
ok, so i'm gonna first want to resize my gif (or image) and i go to ezgif.com. click resize, then choose file, then upload. once it uploads enter the dimentions (usually 99x56) the click resize. once it pops up you can click save


next i'm gonna put the stamp together. i go to my picmix.com acct for this part. (you may need an acct to do this part of the stamp process) first click create a picmix, then click image (select the stamp you just resized at ezgif.com) VERY IMPORTANT: once it pops up on your canvas, don't touch it, don't resize it, just leave it alone. then click insert again (select your stamp template) and it should pop up on your canvas directly ontop of your stamp. click save, then yes. on the last screen you can right click on your stamp to download, then click delete (unless you want to keep it on your picmix) note: before you download and delete your stamp, if your stamp is a gif and you notice the speed is going to fast or to slow, just to the right of your stamp you can use the animation speed dropdown to adjust


ok, last step. i just need to crop my stamp, so i go to online-image-editor.com. click upload image, then once it pops up on your canvas click basic, then crop. then enter your stamp dimentions (99x56). you'll see a red rectangle that you have to drag and drop on top of your stamp. once you did that, then click apply, then click save, and save again and you're all done.


i hope my instructions weren't confusing, if so, i apologize.
if anyone reading this has an easier process for making stamps, please let us know
161 notes
·
View notes
Note
Hello there! this isn't a request, But I was wondering how you make your graphics Is there any specific sites you use or stuff like that?
Hey! I already made a vague tutorial on my blinkie making process.
For userbars and shiny buttons, I have a .kra template and simply edit the text and colors and whatever to whatever is requested. The shiny button template was mostly original but the userbar template was made with the help of this tutorial.
EASY PEASY STAMP MAKING TUTORIAL BELOW VVVV
For stamps, I use an edited version of this template.
While for most of my original stamps I use a method similar to my blinkie-making method, I also like to convert GIFs I find online into stamp format! This is a really easy streamlined process and I wanna show it off.
1. Import your GIF of choice into Ezgif, whatever selection works.
MAKE SURE IT IS .GIF AND NOT .WEBP OR OTHER, AS THEN IT WILL NOT WORK!

2. Depending on what size your image is, you will either want to crop first or go to Resize immediately. If your image is 4:3/16:9 and focused the way you want, go to step 3.
Crop your image in the editor the way you want it to display. Try to leave a little room for the focus of the image so it isn't cropped out later.

Once you're done with that, you can proceed to the Resize menu from the bottom selector.
3. Resize your GIF to 99 by 56 pixels. That is 99 in width, 56 in height. Try not to tweak with any of the other settings.

Once you're done with that, go into the overlay option from the bottom selector:

3. Overlay
Upload one of these as your overlay, or make your own with the same format. Make sure it has a greenscreen/removable background around the parts you want to be transparent. The 1st one is newer and the one I typically use.


It's the same resolution so you don't have to move anything around. Once you generate that, go into the effects menu from the bottom selector.

4. Remove the greenscreen and you're done!

In the "Replace color with transparency" tab, set it to custom (HEX) with the value #00ff00 or whatever color you chose to replace transparency. This part is the reason you can't use webps, for some reason this part doesn't work very well with those.

YOU JUST MADE A STAMP CONGRATULATIONS! You can also do this manually but this method is easier if you're just compressing down a gif.
47 notes
·
View notes
Text


Blocktales stamps :0
I have more of these I need 2 make
#web graphics#internet stamps#f2u w/o credit#f2u graphics#block tales#block tales cruel king#block tales griefer#block tales bubonic plant#block tales tutorial terry#block tales banished knight#block tales kitchen wizard#cadet's graphics
108 notes
·
View notes
Note
this is embarrassing, how do you make stamps? 😭😭
For my picture ones, I use IbisPaint x!
I use this stamp template by AHMED-ART on deviantart for all my stamps!!! (97 x 57)

You can honestly use any stamp template tho! There's tons on deviantart and they're easy to find :3
On ibis, Import a picture layer
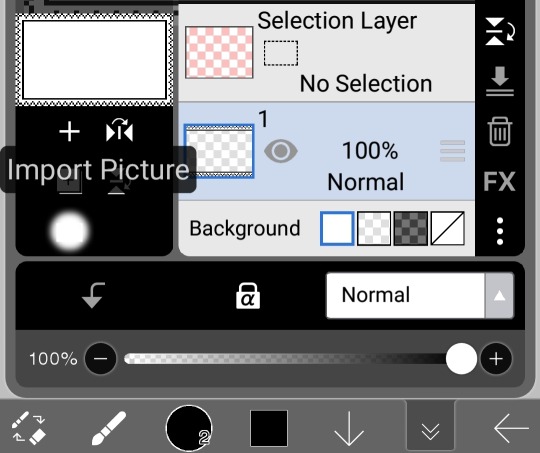
Once you do that and size it however you want on your canvas, move your picture layer down to be the first layer

And then boom, you have your very own stamp now :3

If the picture looks too pixelated / bad quality, dw, it's supposed to look like that cause the stamps are rlly tiny 👍 have fun, I hope this was understandable!! ^_^
#not art#tutorial#Michael post#questions#stamp#stamps#deviantart stamp#da stamp#da stamps#deviantart stamps#im gonna fandom tag this#toddallace#wellsgram#veganmargarita#todd x wallace#wallace x todd#wallace wells x todd ingram#todd ingram x wallace wells#todd ingram#wallace wells#sp#scott pilgrim#spto#spvtw#scott pilgrim takes off#scott pilgrim vs the world#blinkie#blinkies#f2u
144 notes
·
View notes
Note
how do u make ur stamps?
Haiii for gif stamps I use this tut and for photos this is how I personally do it
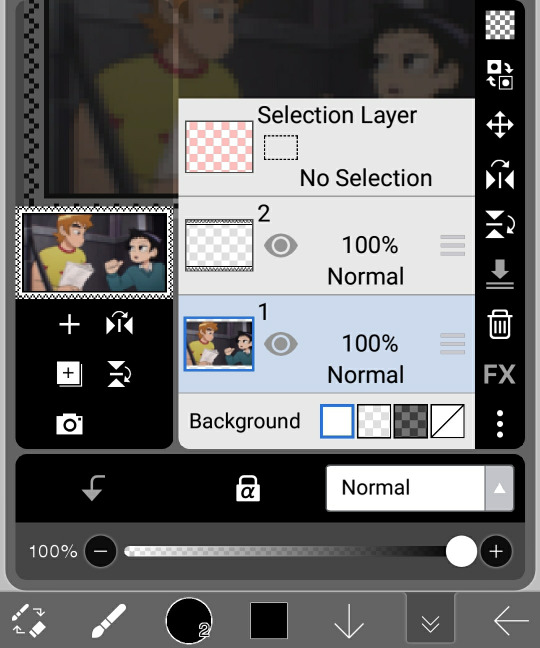
I get my stamp frame and import it into Ibis paint (I do all this on my phone)
Optional but I like putting the transparent bg so it's easier to see

Then I import my picture and fix it into the stamp
Doesn't have to be perfect you can erase anything outside of it (make sure your picture is below the stamp frame!)

Export and you're done! Yaaay stamp!


For a colored stamp frame I use clipping and color over it :3

Yaaaay colored stamp!!!

Lmk if you'd like me to explain anything else!
56 notes
·
View notes
Text
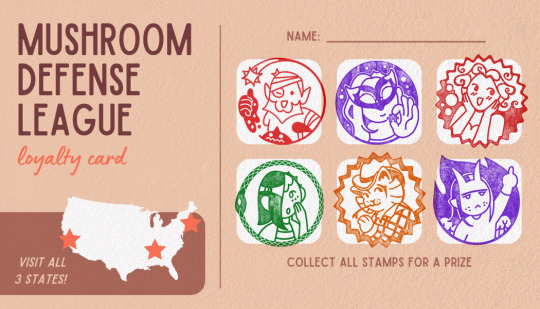
Cons playing dnd remotely: you can't hang out regularly :( Pros: you can celebrate meeting up with loyalty stamps :)
29 notes
·
View notes
Text
Simple and easy way to make a rubber stamp!✍️
24 notes
·
View notes
Text
welcome to rentrysources !


A blog that's dedicated to finding, archiving and posting rentry resources!
psd is sea glass by canarysagepsds
#🪭 tumblr layouts#🪭 discord layouts#🪭 blinkies#🪭 masks#🪭 gifs#🪭 templates#🪭 psds#🪭 pngs#🪭 tutorials#🪭 graphics#🪭 raw resoures#🪭 stamps#🪭 overlays#🪭 renders#🪭 pixels#🪭 dividers#🪭 shiny buttons#🪭 resources#🪭
22 notes
·
View notes