#systemd journal
Explore tagged Tumblr posts
Visit Tumblr Blog
Explore Tumblr blogs with no restrictions, modern design and the best experience.
Last Seen Tumblr Blogs


Fun Fact
Tumblr posted its first advertisements in May 2012 and subsequently earned $13M in revenue.
Text
Linux Sistemlerde Log Yönetimi: Journalctl ile Etkili Sistem İzleme
Merhaba, bu yazımda sizlere Linux Sistemlerde Log Yönetimi: Journalctl ile Etkili Sistem İzleme konusundan bahsedeceğim. Linux işletim sistemlerinde sistem loglarının yönetimi, sistem yöneticileri için kritik bir görevdir. Windows’taki Event Viewer’a benzer işlevselliği Linux’ta sağlayan en etkili araçlardan biri olan journalctl, sistem yöneticilerine kapsamlı log yönetimi imkânı…
#linux journal log#linux journal service#linux logs systemd#linux system journal#linux system journal files#linux systemd logging#system journal linux#systemctl journalctl log
0 notes
Link
The Blue Screen of Death (BSOD) is a longstanding and well-known occurrence in the realm of computing, often passed down through generations. Encountering a BSOD on one's own device serves as a challenge, presenting an indecipherable error code that prompts the question: "How will you resolve this issue?" While it can be entertaining to come across BSODs in unexpected situations, it is essential to remember that we are engaged in the field of technology journalism, which demands a more serious approach. In this regard, version 255 of the Linux-based systemd project has introduced a feature akin to the BSOD, albeit with a disclaimer that the 'system-bsod' component is considered experimental and subject to change, much like the very rocks we have harnessed to process information through electronic circuits and sorcery. Beyond the Windows environment, this development may initially appear as a minor addition to a single Linux-based project. However, it is crucial to note that systemd plays a pivotal role in system management across a wide range of Linux distributions, both prominent and obscure. Consider Ubuntu, a popular choice among novice Linux users, or Debian-based variants, which include Raspberry Pi OS and several other distributions suitable for various hardware configurations. Even those of us who may have grown frustrated with technology can benefit from understanding what has gone wrong and how to address it. While it may take some time for this feature to become available in your specific Linux distribution, especially if you engage in extensive system customization, you will likely appreciate this change. It may alleviate some of the frustration often associated with technical troubleshooting. Furthermore, systemd version 255 introduces significant enhancements to its data encryption services, including support for TPM 2.0. Additionally, it brings quality-of-life improvements to the repart service, streamlining the process of automating drive partition management. Nevertheless, in the grand scheme of things, these technical advancements may pale in comparison to the symbolic significance of the Blue Screen of Death. It serves as an iconic symbol, a reminder of the challenges we face and the pursuit of solutions in the world of technology. So, take a moment to gaze upon the blue screen, perhaps allowing it to transport you to a different dimension of contemplation.
0 notes
Quote
私は今でも個人のデバイスやサーバーで毎日 systemd を使用していますが、私の批判の一部を以下に示します。 * セキュリティが悪い Systemd は、多くのコードが root として実行されるように設計されており、メモリ安全ではない言語でも書かれています。 これは、攻撃対象領域が広いことを意味します (安全性を確保するには、多くのコードにバグがないことを確認する必要があります)。また、コードに本当に深刻なセキュリティ関連のバグがないことを確認するのが困難です ([NSA が推奨]( https ://www.nsa.gov/Press-Room/Press-Releases-Statements/Pre... ) このような重要なことにはメモリセーフ言語を使用します)。 確かに、同様に重要でメモリ安全ではない言語で書かれた他の重要なプロジェクト (この Linux カーネルなど) はありますが、systemd にはいくつかの [かなり重大な脆弱性]( https://cve.mitre.org/cgi-bin/cvekey. cgi?keyword=systemd ) は、この種の危険な言語を安全に使用する能力に自信が持てず、この種の問題を検出して防止するための Linux カーネルとほぼ同じ予算がないことを発見しました。 最新の SELinux を実行している大企業の顧客であれば、これはそれほど問題ではありませんが、現在の機能をすべて保持しながら pid1 の攻撃対象領域を制限する方法で systemd を作成することは可能でした。 * Journalctl はデスクトップ ユーザーや小規模チームにとって面倒です Journalctl は、systemd がログを管理する方法です。 デフォルトでは、追加のメタデータを含むバイナリ形式でログが保存されます。 これにより、大規模なチームがエンタープライズ展開向けに redhat が提供するような集中ログ収集デーモンにログを取り込むことが容易になりますが、古いシステム管理者が使用していた多くのワークフローが中断されます。 大量のログを 1 か所に rsync するだけ、または grep や find などのツールを使用してログを検査するなどです。 もちろん、Systemd はこれらのツールの代替を提供します。grep を使用する代わりに、journalctl を使用してログを検索できますが、grep を使用してテキスト ファイルを検索することもできます。 構成ファイル、ソースコード、またはログ。 ここで、もう 1 つのツールのすべてのフラグを記憶し、ログの収集方法について多くのことを変更する必要があります。 これは、システムから SD カードを取り出すだけではログを確認できないため、組み込み作業を行う人々にとっても課題となります。 ホスト マシン上で動作するjournalctl CLIが必要です。 --directory フラグが追加されましたが、以前はこれがはるかに困難で、ログを読み取るために組み込みシステム (奇妙な方法で壊れる可能性があります) に実際に chroot する必要がありました。 Journalctl には利点もありますが、それらを活用しているのは主に大企業です。 はい、それが実際には systemd-journal または単に「ジャーナル」または彼らがそれを呼んでいるものであることは知っています。 Journalctl は、ほとん���のユーザーに馴染みのあるコマンドです。 * [行動の局所性]( https://htmx.org/essays/locality-of-behaviour/ ) が不十分なため、推論が難しくなります システムがどのように機能するかを理解しようとするとき、すべてを 1 か所で確認できるのは便利です。 systemd ユニット ファイルが存在できる場所は 9 つほどあり、ユニット ファイルにオーバーライドを適用したり、ユニット ファイルはソケット ファイルなどの他のファイルに依存したりできます。 これは、企業内の特定のグループがシステムの一部に対する所有権を主張しやすくなるため、大規模なチームにとっては良いことですが、中小企業で作業するデスクトップ ユーザーやシステム管理者としては、非常に複雑さが増すことになります。 「ls /etc/init.d」と入力するだけで���どのようなサービスが存在するのかの大まかな概要を把握することはできません。さらに systemd 固有のコマンドを覚える必要があります。 サービスを編集したい場合は、単にサービスを編集することはできません。別の systemd 固有のコマンドを使用してオーバーライドを作成し、EDITOR 環境変数が設定されていることを確認してから、別のエディタで元のサービスを開く必要があります。したがって、2つを比較できます。 これにより、作業がさらに複雑になり、systemd 固有のツールを多数使用するようになります (そして、おそらく Red Hat 認定トレーニングを受けることになります)。 * 人々は systemd の準備が整う前にそれを使用します これが systemd や redhat のせいにできるかどうかはわかりませんが、redhat の公式立場では、systemd-resolved は実稼働環境に対応する準備ができていないにもかかわらず、あちこちで使用されているということです。 このため、ネットワーク設定や systemd-resolvd の中断でわずかでも何か違うことを 9 回試みようとすると、systemd-resolvd の多数のセキュリティ問題は言うまでもなく、systemd に対して悪い印象を与える可能性があります。 * Unix の哲学 多くの人は、UNIX の哲学は重要ではない、または systemd は UNIX の哲学を取り入れていると言います。 上で述べたロギングと systemd 固有のツールについてのことですか? これは、UNIX の哲学について語るときに人々が実際に意味していることです。つまり、ログやリモート サーバーへの rsync ログを grep できることを意味しています。 つまり、標準のテキスト ファイルを使用し、ユニット ファイルを「適切に」編集するためにテキスト エディタをラップする特別なコマンドを使用する必要がありません。 * chroot では実行されません 組み込み Linux とサーバー Linux に時間を割いている者として、これは私の個人的な不満にすぎません。 ワークステーションで systemd を使用していない場合、systemd を使用する組み込みシステムをデバッグするのが非常に困難になります。 systemd の使用を強制されているように感じることがあります。私はそれをほとんど克服しましたが、まだ少し苦いです。 また、KoBo 電子リーダー上で完全な Linux ディストリビューションを実行するなど、いくつかの小規模な個人プロジェクトも、必要以上に困難なものになりました。 Docker 内では混乱が生じており、組み込みシステムの大量のテストを行うために、nestybox などの代替 OCI ランタイムを使用する必要があるのはなぜでしょうか。 ありがたいことに、私は Docker の早期導入者ではなかったので、すでに成熟したソリューションが登場するまで、こうした問題に悩まされることはありませんでした。 理由はありません しかし、実際には、pid1 として実行する必要がある 。podman ツールや systemd-nspawn など、systemd と深く統合されている docker の代替手段を使用してほしいということ以外にあります。 これは、独占に近い立場を悪用しようとするあまりにも露骨な試みであったため、余計な不満を抱かざるを得ません。 * OpenRc は systemd が行うすべてのことを実行しますが、それよりも優れています 残念ながら、Gnome のような他の Red Hat の影響を受けたプロジェクトは、デフォルトのサービス ファイルを提供することはおろか、非 systemd init システムをサポートしたりテストしたりしません。つまり、gnome と互換性を持たせたいディストリビューションは、追加の多くの作業を行う必要があります。サービスファイルを作成してテストする作業。 あるプロジェクトの場合はそれが合理的である可能性があり、確かにその追加の作業を行うディストリビューションも存在しますが、可能な限り上流のソースに近づけるという明確な目標を持っている Arch のようなプロジェクトの場合、それは多かれ少なかれ不可能になります。 Systemd が生き残っているのは、それが問題に対する優れた解決策であるからではなく、大企業の支援があり、広く導入されており、コードを作成しても安全であるためです。 IT業界には「IBMを買収したことで解雇された人はいない」という古い格言があります。 安全な業界標準のオプションを選択すれば、たとえそれが技術的に劣ったオプションであっても、失敗しても誰もあなたを責めることはできません。 私は systemd 嫌いではありますが、個人のデバイスやサーバーでは今でも systemd を使用しています。これは、これが最も抵抗の少ない方法だからです。 pulseaudio と Pipewire のような同様の状況が発生することを願っています。pulseaudio の書き換えはオリジナルよりもはるかに優れていました。 ただし、systemd の速度が低下するまではそんなことは起こらないと思いますが、現時点で systemd を再実装しようとすると、規格や動作が変更されて敷物が引き抜かれることになると思います (私は真剣に考えていました)少なくとも比較的単純なユニット ファイルについては、自分で行うことについて)。 動作の局所性の問題に書き換えがどのように対処するかわからないため、私は依然として OpenRc を使用することを好みますが、systemd は時間の経過とともに改善され、信頼性が向上しています。
musl ディストリビューション管理者の目から見た Systemd | ハッカーニュース
1 note
·
View note
Text
Great idea! I’d actually thought about this before, and you convinced me to try it out. So, I modified the command to this:
sleep 60 && sudo bash -c 'echo "0" > /sys/bus/pci/devices/0000\:01\:00.0/d3cold_allowed'
Doing this changed the result… to something new… again. Now the machine brings me to the unlock screen, and it functions as normal. I can type in my password and hit enter. The loading pinwheel then appears beside the password box and the entire system freezes for 1-2 minutes, maybe longer.
After this the screen flashes black for a split second before finally logging me into my desktop. From there, the cursor corruption/no image “gray square” happens again. Any attempt to launch an app results it immediately failing and giving me the error
Failed to launch “App” Failed to execute child process “/bin/sh” (Input/output error)
If I open an app before I shut the computer’s lid, when I open it back up and make the window active again, it will crash in a weird limbo state where the dock show’s it’s closed, no windows can be found, BUT the menu bar shows the app is still active.
After trying to shutdown with the GUI (Zorin Menu) I got this:

After trying to force something to happen by using the three-finger trackpad swipe to activate the app exposé (that’s its macOS name; idk the Linux name. It’s like app switcher or something), I got the same
systemd-journal[nnn]: Failed to write entry…Input/output error systemd-journal[nnn]: Failed to rotate…Read-only file system
error that I was getting before.
Here is what that crash looks like:

So we’ve made progress… but I’m not sure if it’s good progress. Im gonna re-tag this so hopefully people will the additional info.
So I have a Linux problem, and I'm just gonna post it here. I dunno if I have the reach for this, but if you know a potential fix, I will gladly accept it:
Basically, I run Zorin OS 17.2 Core on my Mid-2017 MacBook Pro (Two Thunderbolt Ports). This computer has been hell to make work, but after years of fiddling and finding drivers and terminal commands, it works almost like OEM.
My last problem with this machine, and the only thing that does not function like it's OEM, is the Sleep/Wake function. This is a known issue with 2016 and newer MacBooks on Linux; However, there are workarounds.
Namely, I found a kernel parameter that prevents Deep sleep and only allows the computer to go into s2idle when the lid is shut. This isn't great because it means the dies quickly and gets hot when the lid is shut, but I can't really do anything about it. This did, however, fix an issue I was having where the audio would just stop working if I ever shut the lid.
The final issue was getting the computer to wake up on its own. Every time I start the computer up (not waking it up; only powering it up from a complete shutdown) I have go into terminal and run this:
sudo bash -c 'echo "0" > /sys/bus/pci/devices/0000\:01\:00.0/d3cold_allowed'
I don't know what this command does, but without it, the machine will just never wake up. If you close the lid without running this at initial startup, it cannot be woken back up until it is rebooted.
That's not really a problem, since it's only once per reboot, and I don't reboot my laptop very frequently.
You know what would really make this even more seamless, though? If I could run this command using Ubuntu's startup applications menu. That way, I wouldn't have to manually open terminal every boot just to run this command. It would just run automatically, and I'd never have to worry about it. It would work like OEM! (Minus the less efficient sleep state.)
However, I can't do that. I've tried that. In fact, I have that exact command in my Startup Applications app, as we speak.
Any time I start the computer up and DON'T manually run the command, if I shut the lid, the computer sleeps. It will, however, wakeup (unlike if the command had never been input). HOWEVER. Unlike running the command in terminal, when it finally wakes up, the cursor photo changes into a gray square, my Night Light settings are reset, my wallpaper changes to black, my system accent color is changed to default, and any time I click inside the password box to login, the field immediately becomes inactive again. It doesn't stay active long enough for me to even get two letters typed. All this happens while "Authentication Error" rapidly and randomly flashes below the password box.
Eventually, if I don't force shut down the machine, it'll crash. It'll throw me into terminal mode, and it'll infinitely repeat an error claiming it could not write to some 'systemd jounral' thing because the operating system is in read-only mode. After that it'll either repeat that error over and over, creating endless lines in terminal mode, or it'll just freeze, and I have to restart the laptop either way. So, my question is:
WHY.
Why does running this command in terminal and running it via Startup Application have different results, and is there any way to fix it??
#linux#linux help#help#zorin#zorin os#zorin is 17.2#ubuntu#ubuntu 20.04#Ubuntu 20.04 lts#computer#computers#computer help#mac#macbook#macbook pro
17 notes
·
View notes
Link
In this article, you will learn how to interpret and find systemd journals to troubleshoot problems in your Linux systems http://bit.ly/37ERvCA
0 notes
Text
Cómo borrar los registros Systemd Journal Logs

Cómo borrar los registros Systemd Journal Logs. Systemd tiene su propio sistema de registro conocido como Systemd Journal Logs, que proporciona una gestión centralizada de los registros del núcleo y también de los procesos de usuario. El servicio encargado de recopilar y almacenar los datos es "systemd-journald". Estos datos de registro se almacenan en /run/log/journal/MACHINE-ID/ si no son permanentes (se borran al reiniciar el sistema), y en /var/log/journal/MACHINE-ID si se guardan en el disco duro. Como es lógico, dependiendo de la configuración de tu sistema linux estos registros pueden ocupar un espacio considerable en el disco. En este artículo veremos cómo borrar los archivos de registro de Systemd Journal Logs.
Cómo borrar los registros Systemd Journal Logs
Antes de ver como borrar los archivos, es interesante averiguar cuanto espacio están ocupando. Ejecuta el siguiente comando para visualizar la suma de los archivos guardados y activos. journalctl --disk-usage ejemplo de salida... # journalctl --disk-usage Archived and active journals take up 344.0M on disk. # En el ejemplo anterior no ocupan mucho espacio, el motivo es porque la rotación es diaria. En sistemas con la rotación por defecto (normalmente 30 días), el espacio ocupado puede ser de varios digas (incluso decenas), y es evidente que eso tampoco es bueno, puede producir una degradación del rendimiento del disco. Para borrar todos los archivos, incluyendo los que están activos actualmente, copia, pega, y ejecuta los dos comandos que te indico. sudo journalctl --rotate sudo journalctl --vacuum-time=1s Explicamos la secuencia: --rotate: El demonio borra todos los archivos actualmente activos. --vacuum-time=1s: Se eliminan todos los archivos guardados en el registro con una antigüedad de más de un segundo. También se admiten otros tiempos, por ejemplo: 2m (dos minutos), 5h (cinco horas), 3weeks (tres semanas), 5months (cinco meses). En vez de "--vacuum-time", puedes utilizar "--vacuum-size". Con size puedes establecer el borrado por tamaño de los archivos en vez de por tiempo. Por ejemplo... sudo journalctl --vacuum-size=200M Otro detalle que debes conocer... en las ultimas versiones de systemd puedes fusionar las dos opciones, rotate y vacuum. Observa... sudo journalctl --rotate --vacuum-time=5m sudo journalctl --rotate --vacuum-size=75M Todo lo que hemos visto anteriormente es para borrar de forma manual (bajo demanda), si quieres automatizar el proceso puedes editar el archivo de configuración journald.conf. nano /etc/systemd/journald.conf Aparece algo similar a: # This file is part of systemd. # # systemd is free software; you can redistribute it and/or modify it # under the terms of the GNU Lesser General Public License as published by # the Free Software Foundation; either version 2.1 of the License, or # (at your option) any later version. # # Entries in this file show the compile time defaults. # You can change settings by editing this file. # Defaults can be restored by simply deleting this file. # # See journald.conf(5) for details. #Storage=auto #Compress=yes #Seal=yes #SplitMode=uid #SyncIntervalSec=5m #RateLimitInterval=30s #RateLimitBurst=1000 #SystemMaxUse= #SystemKeepFree= #SystemMaxFileSize= #RuntimeMaxUse= #RuntimeKeepFree= #RuntimeMaxFileSize= #MaxRetentionSec= #MaxFileSec=1month #ForwardToSyslog=yes #ForwardToKMsg=no #ForwardToConsole=no #ForwardToWall=yes #TTYPath=/dev/console #MaxLevelStore=debug #MaxLevelSyslog=debug #MaxLevelKMsg=notice #MaxLevelConsole=info #MaxLevelWall=emerg #LineMax=48K Configura el archivo según tus necesidades (recuerda descomentar las lineas a utilizar), guarda el archivo, cierra el editor y reinicia el sistema. Espero que este articulo te sea de utilidad, puedes ayudarnos a mantener el servidor con una donación (paypal), o también colaborar con el simple gesto de compartir nuestros artículos en tu sitio web, blog, foro o redes sociales. Read the full article
#-size#/run/log/journal/#/var/log/journal/#Journal#journald.conf#logs#rotate#sistemaLinux#systemd#SystemdJournal#SystemdJournalLogs#systemd-journald#vacuum
0 notes
Text
리눅스 3초만에 부팅하기
펌웨어와 부트로더를 제외하고, 순수하게 운영체제(리눅스)만 따지면 3초만에 부팅을 성공했다.
어떻게 하면 이리 빠르게 만들 수 있을까? 내가 적용한 방식을 공유해본다.
참고로 이 글은 아치 기반인 만자로를 기준으로 설명하므로 다른 배포판에서는 호환이 안될 수도 있다. 위험성이 적고 간편한 세팅을 지향해 아직 적용하지 않은 트릭들도 많으므로 아직 최적화할 여지가 많다.
우선 아치리눅스의 부팅 순서를 보고오자. LinuxBoot란 프로젝트 문서도 좋은 퀄리티다.
유저 스페이스
서비스 측정 및 중지
성능 관련한 글을 읽으면 항상 나오는 말이 있다. 측정..측정…측정….
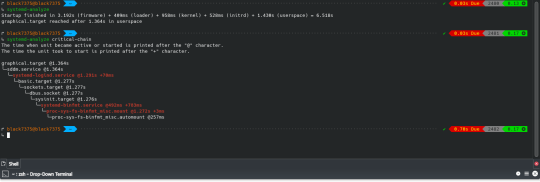
이 글도 마찬가지다. 측정은 매우 중요하다. 다른 초기화 시스템은 어떨지 모르지만 Systemd는 다양한 도구를 제공한다. systemd-analyze blame으로 오래걸리는 순으로 정렬해 볼 수 있다.
↳ systemd-analyze blame 829ms systemd-binfmt.service 373ms initrd-switch-root.service 128ms home.mount 123ms [email protected] 112ms udisks2.service 111ms systemd-udev-trigger.service 84ms systemd-tmpfiles-setup.service 82ms chronyd.service 77ms systemd-logind.service 73ms upower.service 66ms systemd-udevd.service 64ms systemd-journal-flush.service
systemd-analyze plot > ~/boot.svg는 그래프를 보여줄 수 있다.
systemd-analyze critical-chain으로 가장 문제가 생긴 서비스를 확인해볼 수 있다.
↳ systemd-analyze critical-chain The time when unit became active or started is printed after the "@" character. The time the unit took to start is printed after the "+" character. graphical.target @1.461s └─sddm.service @1.461s └─systemd-logind.service @1.381s +77ms └─basic.target @1.365s └─dbus-broker.service @1.300s +60ms └─dbus.socket @1.295s └─sysinit.target @1.291s └─systemd-binfmt.service @461ms +829ms └─proc-sys-fs-binfmt_misc.mount @1.278s +9ms └─proc-sys-fs-binfmt_misc.automount @262ms
쓸데없이 실행되는 -반-들을 그대로 놔두다 가정을 좀먹고 사회를 좀먹고 나라를 좀먹는다. 이제부터 내가 푸틴이나 시진핑이다라고 생각하고 싸그리 숙청하자.
부작용이 우려되면 의존성 확인하고 제거하면 된다.
↳ systemctl list-dependencies systemd-logind.service --all --reverse systemd-logind.service ● └─multi-user.target ● └─graphical.target
난 snapd나 NetworkManager-wait-online등을 비활성화 시켰다.
systemd에서 다른 초기화 시스템으로 바꾸려면 다음 링크들을 참고하십셔
OpenRC, OpenRC to systemd Cheatsheet
Arch Wiki - OpenRC, arch-openrc-guide(Unmaintained)
Arch Wiki - Runit, Github
Artix Wiki - Dinit, Github
systemd의 최적화는 Freedesktop.org에서 잘 설명해주고 있다.
서비스 교체
더 가볍거나 성능 좋은 프로그램으로 바꿀 수 있다. iwd는 오래된 와이파이의 신호를 못잡는 경우가 가끔 있어서 호환성을 위해 wpa_supplicant를 사용 중.
# 기존 변경 # wpa_supplicant -> iwd # systemd-timesyncd -> chronyd yay -S iwd networkmanager-iwd-overlay chrony networkmanager-dispatcher-chrony sudo systemctl disable wpa_supplicant.service systemd-timesyncd.service sudo systemctl enable iwd.service chronyd.service # 런타임 성능이 좋은 것들 # 기존 변경 # dbus -> dbus-broker # systemd-resolved -> knot-resolver # unbound도 좋다 # pulseaudio -> pipewire yay -S dbus-broker knot-resolver manjaro-pipewire sudo systemctl disable dbus.service systemd-resolved.service sudo systemctl enable dbus-broker.service kresd@{1..4}.service
또한 우분투의 DashAsBinSh 문서에서 dash를 사용하면 부팅이 더 빠르다고 언급한다.
The major reason to switch the default shell was efficiency. bash is an excellent full-featured shell appropriate for interactive use; indeed, it is still the default login shell. However, it is rather large and slow to start up and operate by comparison with dash. A large number of shell instances are started as part of the Ubuntu boot process.
yay -S dashbinsh
장치
IO 스케쥴러
저장장치에서 효율적으로 로드하기 위해 장치 타입에 따른 스케쥴러를 구성한다.
NVMe에서는 안쓰는게 좋다. [Linux 5.6 I/O Scheduler Benchmarks: None, Kyber, BFQ, MQ-Deadline] SDD의 응답성을 위해서 kyber가 좋을 수 있으나 처리량 자체는 mq-deadline이 나은 편이다. 일반 하드 디스크에서는 bfq가 전반적으로 좋은 편.
# /etc/udev/rules.d/60-io.rules # set scheduler for NVMe ACTION=="add|change", KERNEL=="nvme[0-9]n[0-9]", ATTR{queue/scheduler}="none" # set scheduler for SSD and eMMC ACTION=="add|change", KERNEL=="sd[a-z]*|mmcblk[0-9]*", ATTR{queue/rotational}=="0", ATTR{queue/scheduler}="mq-deadline" # or kyber # set scheduler for rotating disks ACTION=="add|change", KERNEL=="sd[a-z]*", ATTR{queue/rotational}=="1", ATTR{queue/scheduler}="bfq"
부팅 후에 kyber로 세팅되도록 해도 좋겠다 싶다.
비슷한 방식으로 CPU 가버너를 부팅시에만 performance로 사용하다 부팅 후에는 schedutil 사용하거나 CPU 스케쥴러 파라미터를 처리량 중심으로 세팅하다 부팅 후에는 응답성에 최적화되게 설정하는 식도 할 수 있겠다. 안드로이드 픽셀 기준 0.22초 단축했다고 한다.
D-BUS에 StartupFinished()을 이용해 구현해봐도 되겠다. 아니면 systemd에서 WantBy=graphical.target인 서비스를 만들던가.
마운트
마운트시 noatime을 사용하면 파일 엑세스 시간을 기록하지 않아 성능 측면에서 유리하다. 참고로 noatime을 사용시 nodiratime도 적용된다.
# /etc/fstab # [file system] [mount point] [type] [options] [dump] [pass] UUID=5719-722D /boot/efi vfat umask=0077 0 2 UUID=83cae8c0-161c-4bbf-8cf6-2e5875a5fce0 / f2fs defaults,noatime 0 1 UUID=36ece0d4-cbe5-4c63-a8b7-cee23f8f7845 /home f2fs defaults,noatime 0 2
ssd를 사용시 discard로 Trim을 적용하는 것도 고려해볼 수 있다. 절전을 위해 commit 값을 조정하는 경우도 있다. (SSDOptimization, 난 적용하지 않았음)
커널 및 기타 시스템
initramfs 및 압축
리눅스는 커널을 로드후 initramfs을 rootfs에 압축해제한다. 일반 zip 보다 더 좋은 알고리즘을 쓰는게 좋겠죠.
Endeavour OS 포럼의 벤치마크에 따르면 lz4가 가장 빠르다. 그러나 zstd의 압축효율을 고려했을때 밸런스가 뛰어나다 생각해서 적용했다.
mkinitcpio라는 세팅 스크립트를 사용했다.
# /etc/mkinitcpio.conf # 압축 COMPRESSION="zstd" COMPRESSION_OPTIONS=("-3" "-T0")
커널 모듈 포함
이미지에 커널모듈을 미리 포함시켜 로드하자. modeprobe 동작은 느리게 만들 수 있다.
현재 실행중인 각종 모듈은 다음 명령어를 참고.
↳ sudo mkinitcpio -M ==> Modules autodetected 8250_dw acpi_cpufreq acpi_pad aesni_intel apple_mfi_fastcharge atkbd btusb coretemp crc32c_intel crc32_pclmul crct10dif_pclmul ee1004 efi_pstore f2fs # ...기타 등등
다른 방식으로도 확인해볼 수 있다.
↳ udevadm info --attribute-walk -n /dev/sda1 | grep 'DRIVERS=="[^"]' DRIVERS=="sd" DRIVERS=="ahci" # 다른 장치도 체크 ↳ udevadm info --attribute-walk -n /dev/nvme0n1 | grep 'DRIVERS=="[^"]' DRIVERS=="nvme" DRIVERS=="pcieport"
내가 포함한 모듈들.
# /etc/mkinitcpio.conf MODULES=( "i915" # Intel graphic "f2fs" # filesystem "sd_mod" # all SCSI, SATA, and PATA (IDE) devices "atkbd" # keyboard )
파일 시스템 검사를 패스 할 예정이므로 fsck를 넣지 않았지만, 사용하고 싶다면 커널모듈과 바이너리를 추가하자.
# /etc/mkinitcpio.conf MODULES=( # 기존 모듈들에 추가 fsck ) BINARIES=( "fsck" "fsck.f2fs" # 파일 시스템이 ext4면 "fsck.ext4" )
systemd 기반 훅
병렬 실행과 종속성 관리가 가능하기 때문에 systemd를 쓸 수 있다면 최대한 활용하자.
# /etc/mkinitcpio.conf # 기존 HOOKS HOOKS="base udev autodetect modconf block keyboard keymap consolefont filesystems fsck" # 변경 HOOKS="systemd autodetect modconf block keyboard sd-vconsole filesystems"
grub 대신 systemd-boot 사용
grub보다 systemd-boot가 가볍다. 게다가 추후 나올 통합된 이미지(Unified kernel image)를 로드하거나 각종 세팅하기 쉽다.
↳ sudo bootctl install Copied "/usr/lib/systemd/boot/efi/systemd-bootx64.efi" to "/boot/efi/EFI/systemd/systemd-bootx64.efi". Copied "/usr/lib/systemd/boot/efi/systemd-bootx64.efi" to "/boot/efi/EFI/BOOT/BOOTX64.EFI". Random seed file /boot/efi/loader/random-seed successfully written (512 bytes). Created EFI boot entry "Linux Boot Manager".
만약 안된다면 esp 플래그가 설정되어 있는지 확인해보자.
# 여기서 알 수 있는점. 하드웨어 깡성능이 무척 중요. NVMe 사용자다. ㅎㅎ ↳ sudo parted --list Disk /dev/nvme0n1: 1024GB Sector size (logical/physical): 512B/512B Partition Table: gpt Disk Flags: Number Start End Size File system Name Flags 1 1049kB 538MB 537MB fat32 boot, esp 2 538MB 377GB 376GB f2fs 5 377GB 1006GB 629GB f2fs 3 1006GB 1024GB 18.1GB linux-swap(v1) swap, legacy_boot
efi 파티션에 esp 플래그가 없을 시 sudo parted /dev/nvme0n1 set 1 esp on처럼 esp 플래그를 설정해면 된다.
sudo -s로 권한을 얻어야 /boot/efi/ 내부의 내용을 확인 가능하다. 타임아웃을 0으로 하여 바로 로딩되도록 하였다.
# /boot/efi/loader/loader.conf default manjaro.efi # .efi 파일은 아직 안만들었어요!! timeout 0
참고로 efi이미지면 /[ESP 경로]/EFI/LINUX/[이미지].efi, 일반 설정이면 /[ESP 경로]/loader/entries/[설정].conf에 저장하면 systemd-boot가 인식한다.
EFI 이미지 제작
Unified kernel image작업을 해 EFI 이미지로 만들면 UEFI 펌웨어에서 직접 부팅하거나 구성이 거의 없이도 부트로더가 소싱할 수 있다.
이때 커널 이미지, 마이크로코드,initramfs등을 합치게 되는데 예를 들어 systemd-boot의 경우
# /boot/efi/loader/entries/manjaro.conf title manjaro linux /vmlinuz-5.15-x86_64 # esp 파티션 루트 기준 initrd /intel-ucode.img # initramfs보다 마이크로 코드를 먼저 명시 initrd /initramfs-5.15-x86_64.img options root=UUID=83cae8c0-161c-4bbf-8cf6-2e5875a5fce0 rw quiet apparmor=1 security=apparmor udev.log_priority=3
처럼 하던 걸 하나로 만든다.
합쳐진 이미지는 다음과 같이 인식이 된다는걸 확인가능.
↳ sudo bootctl list Boot Loader Entries: title: Manjaro Linux (rolling) (manjaro-fallback.efi) id: manjaro-fallback.efi source: /boot/efi/EFI/Linux/manjaro-fallback.efi version: rolling linux: EFI/Linux/manjaro-fallback.efi options: root=UUID=83cae8c0-161c-4bbf-8cf6-2e5875a5fce0 fsck.mode=skip rw quiet rd.systemd.show_status=auto rd.udev.log_priority=3 vt.global_cursor_default=0 i915.fastboot=1 bgrt_disable title: Manjaro Linux (rolling) (manjaro.efi) (default) id: manjaro.efi source: /boot/efi/EFI/Linux/manjaro.efi version: rolling linux: EFI/Linux/manjaro.efi options: root=UUID=83cae8c0-161c-4bbf-8cf6-2e5875a5fce0 fsck.mode=skip rw quiet rd.systemd.show_status=auto rd.udev.log_priority=3 vt.global_cursor_default=0 i915.fastboot=1 bgrt_disable title: Reboot Into Firmware Interface id: auto-reboot-to-firmware-setup source: /sys/firmware/efi/efivars/LoaderEntries-4a67b082-0a4c-41cf-b6c7-440b29bb8c4f
sudo bootctl list는 에러가 생길시 표시해주므로 꼭 체크해보자.
efi 이미지를 만드는 세팅이다.
# /etc/mkinitcpio.d/linux515.preset ALL_config="/etc/mkinitcpio.conf" ALL_kver="/boot/vmlinuz-5.15-x86_64" ALL_microcode=("/boot/intel-ucode.cpio" "i915-firmware.cpio.xz") # efi용 추가: 마이크로코드 (난 initel-ucode-clear의 이미지들을 사용 중) PRESETS=('default' 'fallback') default_image="/boot/initramfs-5.15-x86_64.img" default_efi_image="/boot/efi/EFI/Linux/manjaro.efi" # efi용 추가, 위에서 manjaro.efi를 default로 설정했었죠?? fallback_image="/boot/initramfs-5.15-x86_64-fallback.img" default_efi_image="/boot/efi/EFI/Linux/manjaro-fallback.efi" # efi용 추가 fallback_options="-S autodetect" ## Kernel cmdline # efi용 추가 # target: /etc/kernel/cmdline rootUUID=$(lsblk -o UUID,TYPE,MOUNTPOINTS | grep "part /$" | cut -f 1 -d " ") silentBoot="quiet rd.systemd.show_status=auto rd.udev.log_priority=3 vt.global_cursor_default=0" cmdline="fsck.mode=skip rw ${silentBoot} rootfstype=f2fs i915.fastboot=1 bgrt_disable plymouth.enable=0" echo "root=UUID=${rootUUID} ${cmdline}" | sudo tee /etc/kernel/cmdline >/dev/null
기본 프리셋에서 추가된 것은 microcode, efi_image, cmdline이다. 마이크로드와 efi 이미지 경로는 이해가 갈테니 cmdline에 대해서만 설명하겠다.
mkinitcpio는 ALL_cmdline이 없고, /etc/kernel/cmdline의 내용을 사용한다. 따라서 cmdline을 생성해주는 코드를 만들었다. 일반적으로 빌드 훅은 /etc/initcpio/install/에 넣는게 좋지만.. 관리하는 파일을 최대한 줄이고 싶어서 프리셋 파일에 추가했다.
cmdline 옵션들을 살펴보자.
initramfs가 마운트 될 root 파티션을 명시해줘야 해서 rootUUID를 자동으로 찾아줬다. fsck.mode=skip은 파일 시스템 검사를 패스해 빠르게 만들어준다.
silentBoot는 로그 출력들을 제거하기 위한 옵션들이며, bgrt_disable과 plymouth.enable=0은 부팅 로고등 그래픽요소를 제거한다. 이외 rootfstype을 명시하거나 i915(인텔 그래픽)의 fastboot 옵션을 활성화 했다.
+ 정보를 찾다보니 root=UUID=아이디보다 root=/dev/nvme0n1p2가 빠르다고.. lsblk -o PATH,TYPE,MOUNTPOINTS로 경로를 찾아줄 수 있겠다. 그런데 파티션 변경등 환경이 바뀌면 문제가 생길 수 있으니 난 위 설정을 유지하려고 한다. selinux=0처럼 보안을 희생하는 옵션은 속도를 올릴수 있지만 굳이? 싶어서 시도하지 않았다.
제언
얼마 안되는 설정으로 이토록 빠르게 만들수 있다는 사실이 놀랍지 않은가?
이외에 쓸만한 기법들?
dhcp 대신 고정 ip 사용
X 윈도우를 소켓으로 실행(Xorg as a systemd user service, Xorg 1.18 messes with socket activation in systemd )
rootfs로 Read Only인 파일 시스템을 사용(SquashFS나 DwarFS)
e4rat이나 readahead(유지관리 부족으로 systemd에서 삭제됨)로 프리로드

windows8의 Fast Startup처럼 프로그램을 닫은 후 하이버네이션을 하는 방법. TuxOnIce가 제격이라 생각하나 개발이 끊어졌기에 uswsusp을 사용해야 할듯
Kexec를 이용해 부트로더와 하드웨어 초기화를 건너뛰는 리부팅
Coreboot로 바이오스를 대체
기타 참조
Faster Arch 요건 글쓰며 검색하다 찾았는데 나랑 접근방식이 비슷한 것 같다.
안드로이드 부팅 시간 최적화
Tizen IVI OS의 빠른 부팅을 위한 systemd와 wayland사용
Update on boot time reduction techniques, with figures
Bootlin - train boot time 과 깃허브
LPC: Booting Linux in five seconds, Improving boot time on a general Linux distribution, not an easy task
Intel Moblin V2 Core Alpha: It Boots Fast!
1 note
·
View note
Quote
unit が標準出力したログは systemd journal に格納されます。journal に格納されたログは journalctl コマンドで参照することができます。 ログを確認するためによく使うコマンドは以下の通り。 詳細は man journalctl コマンドで確認を。 e オプションで最新の journal ログを表示する journalctl -e x オプションで詳細なログを表示 journalctl -ex f オプションで最新ログを流し続ける(tail -f のイメージ) journalctl -f u オプションで特定の unit のログのみ表示する journalctl -u nginx.service k オプションでカーネルのログのみ表示する journalctl -ek
最低限知っておきたいsystemctlとjournalctlの使い方 – karakaram-blog
1 note
·
View note
Text
Linux: Keep Disk Usage of System Journal (systemd-journald) in check
http://dlvr.it/SndK1w
0 notes
Text
Logs on any Linux system are critical for analyzing and troubleshooting any issues related to system and applications. With the help of tools like Graylog, you can easily ship these logs to a centralized platform for easy visualization. In this guide, we will look at how to Configure Rsyslog Centralized Log Server on Ubuntu 22.04|20.04|18.04LTS. On Linux, by default, all log files are located under /var/log directory. There are several types of log files storing varying messages, which can be cron, kernel, security, events, users e.t.c. Mostly these logs file are controlled by rsyslog service. On recent systems with systemd, some logs are managed by journald daemon and they are written binary format. These logs are volatile since they are written to RAM and doesn’t withstand system reboot. They are often found on./run/log/journal/ But note that journald can also be configured to permanently store log messages by writing to file. Configure Rsyslog Log Server on Ubuntu 22.04|20.04|18.04 We’re going to configure rsyslog server as central Log management system. This follows the client-server model where rsyslog service will listen on either udp/tcp port. The default port used by rsyslog is 514. On the client system, rsyslog will collect and ship logs to a central rsyslog server over the network via UDP or TCP ports. When working with syslog messages, there is a priority/severity level that characterizes a log file. Namely: emerg, panic (Emergency ): Level 0 – This is the lowest log level. system is unusable alert (Alerts): Level 1 – action must be taken immediately err (Errors): Level 3 – critical conditions warn (Warnings): Level 4 – warning conditions notice (Notification): Level 5 – normal but significant condition info (Information): Level 6 – informational messages debug (Debugging): Level 7 – This is the highest level – debug-level messages Rsyslog is installed by default on a freshly installed Ubuntu system. If for any reason the package is not installed, you can install it by running: sudo apt-get update sudo apt-get install rsyslog When installed, check service to see if it is running: $ systemctl status rsyslog ● rsyslog.service - System Logging Service Loaded: loaded (/lib/systemd/system/rsyslog.service; enabled; vendor preset: enabled) Active: active (running) since Wed 2018-07-18 11:30:10 UTC; 4 days ago Main PID: 903 (rsyslogd) Tasks: 4 (limit: 4704) CGroup: /system.slice/rsyslog.service └─903 /usr/sbin/rsyslogd -n Configure rsyslog to run in Server Mode Now configure rsyslog service to run in server mode: sudo vim /etc/rsyslog.conf Uncomment the lines for udp and tcp port binding: module(load="imudp") input(type="imudp" port="514") # provides TCP syslog reception module(load="imtcp") input(type="imtcp" port="514") If you would like to limit access from to specific subnet, IP or domain, add like below: $AllowedSender TCP, 127.0.0.1, 192.168.10.0/24, *.example.com You can add above line after input(type="imtcp" port="514") line. Remember to substitute given values with correct ones Create a new template for receiving remote messages Let’s create a template that will instruct rsyslog server how to store incoming syslog messages. Add the template just before GLOBAL DIRECTIVES section: $template remote-incoming-logs,"/var/log/%HOSTNAME%/%PROGRAMNAME%.log" *.* ?remote-incoming-logs & ~ The received logs will be parsed using the template above and stored inside directory/var/log/. The file naming follows the convention: %HOSTNAME% and %PROGRAMNAME% variables, i.e the client hostname, and client facility that produced the log message. The & ~ instructs rsyslog daemon to store the log message only to a specified file. Other variables that can be used include: %syslogseverity%, %syslogfacility%, %timegenerated%, %HOSTNAME%, %syslogtag%, %msg%, %FROMHOST-IP%, %PRI%, %MSGID%, %APP-NAME%, %TIMESTAMP%, %$year%, %$month%, %$day% Restart rsyslog service for the changes to take effect:
sudo systemctl restart rsyslog Confirm if the service is listening on configured ports: $ ss -tunelp | grep 514 udp UNCONN 0 0 0.0.0.0:514 0.0.0.0:* users:(("rsyslogd",pid=15220,fd=5)) ino:441816 sk:2 udp UNCONN 0 0 [::]:514 [::]:* users:(("rsyslogd",pid=15220,fd=6)) ino:441817 sk:5 v6only:1 tcp LISTEN 0 25 0.0.0.0:514 0.0.0.0:* users:(("rsyslogd",pid=15220,fd=7)) ino:441820 sk:a tcp LISTEN 0 25 [::]:514 [::]:* users:(("rsyslogd",pid=15220,fd=8)) ino:441821 sk:11 v6only:1 Configure Rsyslog firewall If you have ufw firewall service running, allow rsyslog firewall ports: sudo ufw allow 514/tcp sudo ufw allow 514/udp Configure Rsyslog as a Client Once you’re done configuring rsyslog server, head over to your rsyslog client machines and configure them to send logs to remote rsyslog server. sudo vim /etc/rsyslog.conf Allow preservation of FQDN: $PreserveFQDN on Add remote rsyslog server at the end: *.* @ip-address-of-rsysog-server:514 You can also use FQDN instead of Server IP Address: *.* @fqdn-of-rsysog-server:514 The above line will enable sending of logs over UDP, for tcp use @@ instead of a single @ *.* @@ip-address-of-rsysog-server:514 #OR *.* @@fqdn-of-rsysog-server:514 Also add the following for when rsyslog server will be down: $ActionQueueFileName queue $ActionQueueMaxDiskSpace 1g $ActionQueueSaveOnShutdown on $ActionQueueType LinkedList $ActionResumeRetryCount -1 Then restart rsyslog service sudo systemctl restart rsyslog Also check: Manage Logs with Graylog server on Ubuntu 18.04 How to Install Graylog 2.4 with Elasticsearch on CentOS 7.
0 notes
Text
Install java plugin 10.45.2

Install java plugin 10.45.2 install#
I did just notice /var/log/journal was filling up, but not sure if those files would have anything to do with the browser crash, but i did delete them yesterday. I also had LXDE for some time in the past. That seemed to work for a month but it soon came back. I started on xfce then read it could be related to the DM, so i switched to KDE. It is super stable! She has similar HW (AMD 64-bit quad core, Samsung SSD, etc) so its pretty decent. On mine, I use the same google-chrome-dev and have maybe 1 crash per YEAR if that. In fact i have the same combination setup on mine which works perfect. I also tried every combination of flash (Adobe vs Google/pepper, java vs open-jdk etc) and still the same issue. I also have tried with no extensions and it crashes also soon enough. I just removed that pkg, and installed Chromium and it worked great for a week then started crashing. I have re-installed the google-chrome-dev many times (removed profile data too) but same issue eventually.
Install java plugin 10.45.2 install#
This has been going on for years so I don't think its any bad install or anything. I have tried Firefox also and I think its crashing too. However, her Chrome browser will crash almost daily for some reason. The OS on both is perfectly fine, very fast and has no issues. NO issues at all for mine, always up-to-date and never crashes, very stable, using the same google-chrome-dev pkg, updated daily if there are new updates. I have 2 Arch PC's one for me and one for the wife, both re-installed about the same time (recently to do a clean install with the latest systemd/grub2, etc stuff).
0 notes
Text
Logmein hamachi service stopped

#Logmein hamachi service stopped manual
#Logmein hamachi service stopped software
#Logmein hamachi service stopped free
Only applications Windows Store can be installed on the Surface of RT Your choices are to use remote desktop, provided by Microsoft or Splashtop 2 there may be other applications - search in the Windows store. You will need to ask the people of Logmein, but they don't seem at all interested by RT apps. Are there other alternatives for easy access to the server? Or Logmein will be available shortly for RT? The app is not available in the Windows store. Openat(AT_FDCWD, "/var/lib/logmein-hamachi/h2-engine.LogMeIn Hamachi allows us to access our server of the company. I don't think this is useful, but I don't know where to start. Program terminated with signal SIGSEGV, Segmentation fault. Using host libthread_db library "/usr/lib/libthread_db.so.1".Ĭore was generated by `/opt/logmein-hamachi/bin/hamachid'. Reading symbols from /opt/logmein-hamachi/bin/hamachid.(no debugging symbols found).done. Type "apropos word" to search for commands related to "word".
#Logmein hamachi service stopped manual
Type "show configuration" for configuration details.įor bug reporting instructions, please see:įind the GDB manual and other documentation resources online at: This GDB was configured as "x86_64-pc-linux-gnu". Type "show copying" and "show warranty" for details. There is NO WARRANTY, to the extent permitted by law.
#Logmein hamachi service stopped free
This is free software: you are free to change and redistribute it. License GPLv3+: GNU GPL version 3 or later
#Logmein hamachi service stopped software
This is systemctl status logmein-hamachi output:Ĭopyright (C) 2018 Free Software Foundation, Inc. After service fail there are no hamachi related processes left. UDEV remove /devices/virtual/net/ham0/queues/tx-0 (queues UDEV remove /devices/virtual/net/ham0/queues/rx-0 (queues) UDEV add /devices/virtual/net/ham0/queues/tx-0 (queues) UDEV add /devices/virtual/net/ham0/queues/rx-0 (queues) KERNEL remove /devices/virtual/net/ham0/queues/tx-0 (queues) KERNEL remove /devices/virtual/net/ham0/queues/rx-0 (queues) KERNEL add /devices/virtual/net/ham0/queues/tx-0 (queues) KERNEL add /devices/virtual/net/ham0/queues/rx-0 (queues) KERNEL add /devices/virtual/net/ham0 (net) KERNEL remove /devices/virtual/net/ham0 (net) System was updated right before I installed hamachi on it. "Healthy" systems are running NetworkManager too, so I don't think this is NM specific bug. Hamachi don't output anything at all to journal (this is normal, confirmed on healthy systems). The difference between them is that loop in NetworkManager stops when I crash logmein-hamachi service (to be clear, I can't stop it usual ways), but systemd-udevd doesn't stop at all, I need to reboot. I noticed that these loops start as soon as I launch logmein-hamachi service. In nmcli I couldn't see any ham0 interface. Feb 21 00:26:56 router NetworkManager: manager: (ham0): new Tun device (/org/freedesktop/NetworkManager/Devices/272)įeb 21 00:26:56 router NetworkManager: manager: (ham0): new Tun device (/org/freedesktop/NetworkManager/Devices/273)įeb 21 00:26:56 router NetworkManager: manager: (ham0): new Tun device (/org/freedesktop/NetworkManager/Devices/274)įeb 21 00:26:56 router NetworkManager: manager: (ham0): new Tun device (/org/freedesktop/NetworkManager/Devices/275)
0 notes
Text
how to delete journal logs in ubuntu
how to delete journal logs in ubuntu
to check on the Systemd Journal $ du -hs /var/log/journal/ 4.0G /var/log/journal/ $ sudo rm -rf /var/log/journal/ if you want to keep some entries, you can clear lets say whatever older than 7days $ sudo journalctl --vacuum-time=7d Vacuuming done, freed 1.1G of archived journals from /var/log/journal/.... you can clear whatever exceeds a specific value, lets say 500MB $ sudo journalctl…
View On WordPress
0 notes
Text
Note to self:
journalctl --disk-usage
# => Archived and active journals take up 2.6G in the file system.
sudo journalctl --rotate
sudo journalctl --vacuum-time=2days
Source: https://ubuntuhandbook.org/index.php/2020/12/clear-systemd-journal-logs-ubuntu/
0 notes
Text
Comando pstree no Linux (lista processos) [Guia Básico]

O comando pstree no Linux irá mostrar toda a árvore de processos desde o init ou systemd até o último processo em execução. É similar ao comando ps –auxf. Ele é útil para entendermos a hierarquia dos processos no Linux. Além das opções abaixo, o pstree poderá mostrar a hierarquia pertencente a um usuário ou de um processo específico através do seu PID. -a: Esta opção mostra a linha de comando utilizada para iniciar os processos; -c: Desabilita a função de mesclar os processos idênticos no mesmo nível de hierarquia; -G: Utiliza o formato VT100 para mostrar as linhas entre os processos no lugar dos caracteres de teclado; -h: Destaca os processos ligados ao terminal no exato momento; -p: Inclui o PID dos processos na listagem. Exemplo: $ pstree -G -c -psystemd(1)─┬─acpid(2813)├─agetty(2674)├─agetty(2675)├─atd(2570)├─auditd(1884)───{auditd}(1885)├─chronyd(1940)├─crond(2590)├─dbus-daemon(1909)├─dhclient(2211)├─firewalld(1915)───{firewalld}(2274)├─nginx(10982)─┬─nginx(10983)│ ├─nginx(10984)│ └─nginx(10985)├─php-fpm(2387)─┬─php-fpm(2412)│ ├─php-fpm(2413)│ └─php-fpm(30458)├─rsyslogd(2542)─┬─{rsyslogd}(2559)│ └─{rsyslogd}(2744)├─systemd-journal(1421)├─systemd-logind(1919)└─systemd-udevd(1787) https://youtu.be/LEH2EI9bu5Y Aprenda muito mais sobre Linux em nosso curso online. Você pode efetuar a matrícula aqui. Se você já tem uma conta, ou quer criar uma, basta entrar ou criar seu usuário aqui. Gostou? Compartilhe Read the full article
0 notes