#three-dimensional mesh structure
Explore tagged Tumblr posts
Visit Tumblr Blog
Explore Tumblr blogs with no restrictions, modern design and the best experience.
Last Seen Tumblr Blogs


Fun Fact
Tumblr is available in 18 languages.
Text
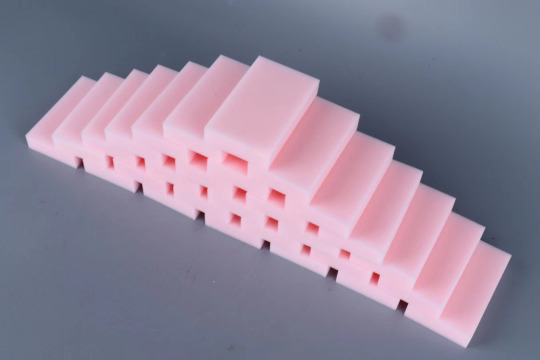
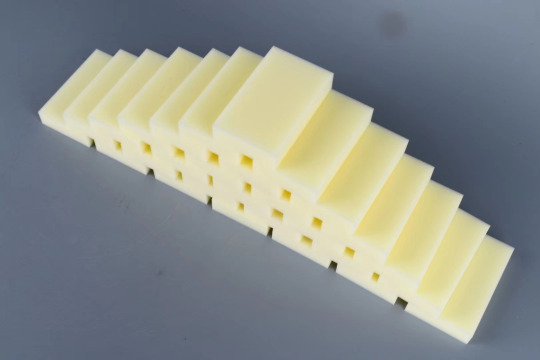
SINOYQX Launches Melamine Foam in Rolls for Electronic Precision Manufacturing Industry
SINOYQX, on 30th, 10, 2023 launches melamine foam in rolls for thermal insulation, flame retardant and heat preservation application on electronic precision manufacturing industry.
The Melamine Foam in Rolls by SINOYQX's innovative processing technology, has a uniform appearance, and high open cell ratio. It is widely used in the electronic precision manufacturing industry, providing excellent thermal insulation, flame retardant, heat preservation, and the material in rolls, which facilitates the customer's post-processing adhesive laminating process, and improves the production efficiency.

Typical Properties of SINOYQX Melamine Foam in Rolls:
Permanent flame retardancy (UL94 V-0, HF-1, B1 grade) ;
Excellent acoustic performance (0.95NRC) ;
Excellent thermal insulation (thermal conductivity, 0.035 W/ (m*K)) ;
Permanent and stable three-dimensional mesh structure (99% open-cell) ;
Wide range of weathering (minus 180 degrees Celsius to 200 degrees Celsius, up to 240 degrees Celsius, with a wide range of weathering resistance (minus 180 degrees Celsius to 200 degrees Celsius, up to 240 degrees Celsius, with a maximum resistance of 240 degrees Celsius, with a wide range of weathering resistance) ;
Lightweight (8.5KG/cubic meter) ;
Environmentally friendly (does not contain any halogenated hydrocarbons, flame retardants and/or toxic heavy metals; does not emit toxic or harmful gases when burnt in a flame);
Environmentally stable (resistant to acids, alkalis, antibacterials and molds) .
Typical Specifications for SINOYQX Rolled Melamine Foam:
Thickness: 0.3mm to 3mm
Width: 100mm to 600mm
Length: 20m/roll to 300m/roll

In addition to its properties advantages, SINOYQX melamine foam in rolls have many other merits, such as highly cost-effective, short lead time, in-time after-sales service, even OEM service.
SINOYQX is looking for partners and distributors of its melamine foam in rolls products globally.
About SINOYQX
SINOYQX is a huge chemical entity based on natural gas production chain, manufacturing urea (AdBlue), melamine(powder), melamine foam, melamine cyanurate (MCA), polyphosphate (MPP), polyvinyl butyral resin (low-polymerization PVB resin), modified melamine formaldehyde resins, and other chemical products. The annual capacity of AdBlue is 150,000Litters and 600,000Tons of Granule; Melamine, 50,000Tons; Melamine foam, 200,000M3, the Melamine Cyanurate (MCA) is 50,000Tons. And the Transulate (an Equivalent of 3M Thinsulate) is 20,000 Sqm, per day.
For more information about SINOYQX's rolled melamine foam products, please call us at 028-8411-1861 or write to us at [email protected] for free samples or quotes, or for more innovative solutions.
#melamine foam in rolls#melamine foam#rolled melamine foam#electronic rolls#permanent flame retardant#excellent acoustic performance#thermal insulation#three-dimensional mesh structure#broad weather resistance#lightweight#flame retardants#toxic heavy metals#acid resistance#alkali resistance#antimicrobial#anti-mold
1 note
·
View note
Text
Introducing a spell type I've been developing for a while: Mana Weaves.
As an introduction, a Mana Weave is working on the Principal of Mana's Centrality, or the idea that Mana is the substance of magic, and the matter your soul is made of. Under this philosophy, the process of casting spells of any kind is understood to be an act of Mana Manipulation. In the Mana Manipulation framework of practice, the Law of Three Fold applies, though I've found in my own experience that there are two ways to cast: cast with the ambient Mana in the environment, or cast with your own Mana, and the universe is much less quick to smack you if you cast from your own Mana.
Problem: I need to science up my magic by compulsion, I need to understand and iterate, but that takes a lot of Mana to use.
Solution: Mana Weave creates a bubble of partially your Mana and partially the ambient Mana, and it amplifies it in a contained work station in three dimensional space.
Setup: (only necessary to do once per wand)Take a dedicated wand and meditate, focus on bonding the wand to you so you can feel it as a part of your Mana essence. For this to work, this wand must be made so close as to feel like another organ in your soul's body. Then, find a point on your wand and ensure it is a point where you can easily place your index finger on on your dominant hand and hold it there for extended periods of time. (If you've played VRChat and used the markers, this is the rough visualization you're going for.) Focus your Mana from your belly and visualize it following a path around your heart and down your arm, into your hand and wand, then draw that path out from the tip of the wand. This is to give a focusing point. After creating that path, focus on moving the line where your fingertip rests in 3D Space to instead be bonded to your fingertip. Then, once the line is set, focus on cutting the points either side of the wand so that the path is a broken circuit. Once the connection is severed, that point where the line is bonded to your finger lets you complete the circuit and allow Mana Flow in a controlled way.
NOTE: Ensure you draw that Mana line through the point where your finger will rest on the wand and ensure that point is not at the tip of the wand.
Function: Ley lines naturally firm when Astral Caves flow near enough the Physical Plane for Mana to flow thick through the planar barrier. Over time it creates a selfperpetuating cycle of Mana from the Astral and Physical Planes blend and create a vortex. This vortex flow creates a field that sucks in Mana and amplifies it's energy output, or a "Locational Mana Density Shifting Field" that increases the Mana Density of an area that functions as a storage location, and thus amplifies the output energy draw and thus stronger magic you can cast. This weave functions by creating an artificial network of Ley lines in an ordered and repeated pattern as opposed to the more chaotic and random patterns of the natural ones. This allows the field it creates to be stronger and more structurally sound while being shrunken down.
Procedures: Take your wand and draw a mesh in 3D Space, then draw a circle around it while focusing your intention on bonding the mesh into a solid three dimensional weave. After this, you can draw circles in the air and draw Glyphs inside them. When creating the circles, focus your intention on letting what's put inside move as one piece that can jigsaw into place with other circles. (This last part is the foundation of my craft. All of my spells are comprised of Sigil Glyphs that can work together as building blocks. Think molecules and letters for how this modular images system interlocks together.) Place each Glyph in the weave and the Glyphs will draw from the Mana your weave draws in from both the environment and from you. The weave creates a self contained bubble that gives a space of super strong amplified Mana output, but fully workable as a work station safe enough for novices to practice most lone witch spells. After you place the Glyphs into position, place the Mana Weave in it's place wherever the spell requires, and then you just put a tiny bit of your own Mana into the weave to activate it.
Example Spell: Potection of My Soul
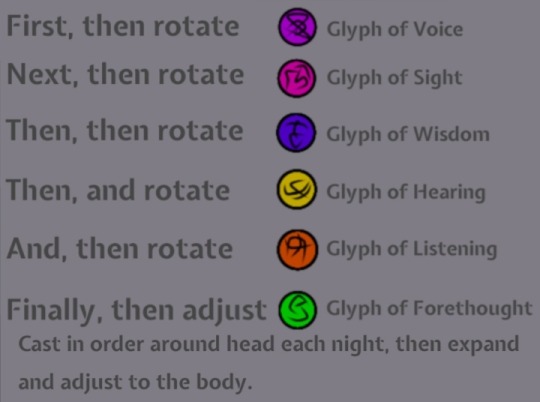
Cast Mana Weave around head and place the Glyphs inside, then grip the weave and mold it to your head shape, ensuring it is completely immersing your head in the Mana Weave boundary. Doing this ensures the effected enclosed space creates a saturation therapy of sorts and ensures that the spell is saturating your head, amplifying it and ensuring it's effects permeate your flesh. This can also effect the entire body, just mold the weave to the body and head together instead.
#baby witch#witchy things#eclectic witch#witch#witchcraft#spellcasting#spell work#spellcraft#spell crafting
7 notes
·
View notes
Text

BASEL
■Inquiries/Real Co., Ltd. 0729-64-1527
Don't call it cheap chic
A piece with attractive high quality
Despite the simple rough mesh design
The hard feel of the disc and rim makes the wheel look bigger.
When setting wheels for dress-up purposes, you need to be careful about how you want the car to look as a whole. For example, if you want your car to have a gorgeous atmosphere, but you set wheels that give it a plain look, the podium bottom will lack the power and make it look bulky. Wheels are expensive items, so they are not replaced very often. If you don't think carefully and choose without compromise, you will regret it.
However, there are quite a few people who don't have an overall image in mind, but just want to change the wheels. ``I just bought a car, but I'd like to change the wheels.What kind of design would go well with any style of tailoring?'' It's quite difficult to answer this question, but if I had to make a recommendation, I would choose this one.
There's one reason. Because it has a clean mesh design. The nine-intersection rough mesh design, where the center package is independent and recessed from the face, looks sporty when you look at the oven hole, but the rim. The elegance can be seen from the slim Y-shaped spokes. The one-piece structure with no piercing bolts and reverse rim allow the disc surface to be made as large as possible, giving it an impact that rivals the thrust produced by the large sedan body. A wheel with such a simple yet versatile design should be able to accommodate any style of dress-up. It can be used not only for beginners in dress-up who have not yet lowered the vehicle height or even installed a muffler, but also for highly original finishes that take advantage of the user's taste, and are not bound by European or Lacy models. deep in my heart
That's what makes it so appealing.
This basel has another feature. This means that the degree of curvature of the discs for the front and rear discs is slightly different. The front face has an almost straight face, while the rear face has a slightly recessed center package. This slight difference becomes a big difference when you set up the Tsuraichi. In addition to gold, we also have silver, so you can match it with either of the Y32 / Y33 Granturismos.
Message from the manufacturer
This is a wheel that emphasizes sharpness and three-dimensionality.
The deep reverse rim on the inside of the outer rim and the sharp Y-shaped spokes set tightly against the rim face, making the most of the features of a one-piece wheel, create a three-dimensional image. This makes it appear larger than its actual size. It doesn't have the sharpness of a 3-piece wheel, but if you want a mature and neat look, we recommend silver, and if you want to look clean and have an impact, we recommend gold. Since the front face and rear disc are curved differently, there is a risk, but I think it will look better if you set it further outward than the recommended size.
14 notes
·
View notes
Text

FE029 Frank Bretschneider Sweet Water Pools
Frank Bretschneider is a musician, composer and video artist in Berlin. His work is known for precise sound placement, complex, interwoven rhythm structures and its minimal, flowing approach. Bretschneider’s subtle and detailed music is echoed by his visuals: perfect translated realisations of the qualities found in music within visual phenomena.
Bretschneider was raised in Karl-Marx-Stadt (now Chemnitz), where his aesthetic developed as he listened to pirate radio and smuggled Beastie Boys tapes in the former East Germany. After studying fine arts and inspired by science fiction radio plays and films he began experimenting with tape machines, synthesisers, and modified guitars in 1984, as well as exploring the possibilities of exchange between visual art and music by various means such as film, video and computer graphics.
In 1986, after establishing his cassette label klangFarBe, Bretschneider founded AG Geige, an influential East German underground band. They released three albums before splitting in 1993. In 1995, Bretschneider and fellow AG Geige member Olaf Bender founded the Rastermusic record label which eventually merged with Carsten Nicolai’s noton to form raster-noton in 1999.
Bretschneider has released his work (in addition to raster-noton) on various labels including 12k, Line, Mille Plateaux or Shitkatapult, and contributed to some well-known compilations like Clicks & Cuts on Mille Plateaux and raster-noton’s 20’ TO 2000 series, the latter won the Ars Electronica Golden Nica. His album Rhythm was among The Wire magazine's top releases of 2007.
Besides his commitments as a musician, Bretschneider is an accomplished producer: his production In The Woods There Is A Bird… for Olaf Nicolai won the prestigious Karl Sczuka Prize for Radio Drama/Art in 2017.
Artist notes: In July 2014, I spent two weeks at EMS in Stockholm to work with the local Buchla and Serge synthesisers. Two months later, I was invited to explore the 4DSOUND system for a performance at ADE Amsterdam. I thought the EMS recordings would be perfect for a multi-channel sound project, so I cut them into pieces and moved them to my Elektron Octatrack sampler. I began to build parts and patterns, scenes and sequences to manipulate the raw material in terms of speed and pitch, as well as filters, delays and loops. And finally, I found myself in an 8,000 m² empty warehouse in Siemensstadt, Spandau, where 4DSOUND was based at the time. After familiarising myself with controlling the complex system, I decided to take advantage of the unique situation and made recordings.
In the end, it’s an analogue synthesiser sound source treated with digital sampling technology rendered through a three-dimensional sound system with over a hundred speakers in a thousand square feet of empty space. I'm not sure if it's music, maybe more of a piece of sound design, or a study in space… Everything is constantly moving and changing, suddenly stopping or changing in another direction, forming meshes and grids of sounds and noises again to end up in a repeating loop for a few seconds, or meandering around a core, eventually exploding in a cascade of sound particles. And sometimes it just sounds like Sweet Water Pools…
Two stereo recordings of the same performance on September 24, 2014, at FST Industrie GmbH, Berlin Spandau; made with two Sony PCM M10 portable recorders, one equipped with Luhd PM-01 Binaural microphones, the other using the built-in microphones. Headphones recommended.
One of the many functions of music is to listen to it. I grew up in a time when the vinyl album became the most important format, when pop music became prog rock, jazz rock, kraut rock, with many references to and from classical, contemporary and improvised music – music forms in which the long form is the rule rather than the exception. As a listener, I always found it exciting to immerse myself in a torrent of sound that would take me on a journey to new, unexplored areas. With headphones on or in front of two good speakers, at home or at a concert.
As a musician, although I occasionally combine several short pieces into a longer composition, I have always found it difficult to build pieces over seven minutes. It seems the extended format works better with projects that were not originally intended for release, such as live performances or installation/sound art, like the other two works I’ve done in the past, which in my opinion deserve the term deep listening: Kippschwingungen, a piece that uses the legendary Subharchord synthesiser; and Isolation, which was originally composed in 2012 for a sound installation in a former solitary confinement cell.
0 notes
Text
Ellora Caves
The next day, we went to the Ellora caves, another series of rock-cut temples and monasteries, but a quite different experience.
The caves are a mix of Buddhist, Hindu, and Jain styles, with significant differences in style. Although the complex has over 100 caves, only 30 are open to the public, which is still too much for one day if you have to drive there.
Thankfully, the roads were in much better condition than the day before.
The first site you see from the entrance is the Kailasha Temple, which is not actually a cave but an entire three-dimensional temple carved from solid rock. It's the largest monolithic construction in the world.


The Kailasa Temple represents the sacred mountain of Shiva and is dedicated to him. The temple has rooms and corridors within it.

Construction of the Kailasa Temple is believed to have taken place between 757 and 783 AD. During this period, over 200,000 tons of rock were excavated out of the basalt to form the magnificent temple, which was carved from top to bottom with only simple hammers and chisels.
The surfaces of the entire temple are covered with sculptures. For a start, it is carved to depict the temple standing on the backs of rows of elephants.


But there are depictions of other animals, gods, battles and more.


The interior rooms are large.


The center contains a large lingam, a votary object that symbolizes the god Shiva and is revered as an emblem of generative power.

It really is an amazing structure. But while carving it from solid rock is an amazing feat, traditional construction would probably have been more work, as individual blocks would need to be cut, transported, assembled, and then carved. With hammers and chisels, carving stone blocks from bedrock creates a lot of waste. Creating the open spaces within the temple would also be challenging.
The other caves in the complex are also impressive. There are vast multi-story complexes.

Each floor has a large central hall surrounded by smaller cells. There are carvings everywhere on the interior.


As you move further into the interior spaces, it becomes darker and darker, as no artificial lighting has been added.

At the back of the top floor was this closed door. Behind the grill, we could see a magnificent Buddha. The head of the Buddha is just visible above the top of the door!

As we peered through the mesh, a guard came to unlock the door. Inside, the gloom was almost total.
The low light robbed the images of all color in photos.

As we were looking at the Buddha, someone turned their flashlight on a side wall of the chamber, and there, in the darkness, were taller-than-lifesize statues of other deities. It felt like being on an expedition into the unknown. These photos were taken with only the lights from our phones. Without those lights, we would have stood directly in front of the statues and never even known they were there.


On the other side were yet more statues.

I would love to have seen these in more light, but the experience in the dark was amazing.
The next location was a worship hall with a large stupa at the back, but here there was also a Buddha statue on the front of the stupa.


Above the entrance was a second story, like a choir loft which allowed more light into the chamber.

While there were more temples in the Buddhist area, we headed to the far end of the complex to the Jain temples. The Jains are not well known in the West. They date to the same era as the Buddha and are more extreme in their views. They are strict vegetarians, to the point that they will wear masks to prevent inhaling insects and won't eat root vegetables because harvesting them might disturb insects in the soil. There are two branches of the faith; one only wears white clothes, and the other wears no clothes at all.
Their religious beliefs severely restrict their occupations; for instance, they can't farm. As a result, many of them went into jewelry and have become quite wealthy. (I expect those operating jewelry stores to be of the clothes-wearing branch.)
Their temples were some of the most interesting ones we visited, with some of the most intricate carvings.

They believe in stillness, and one common image is of a man who has stood so still that vines are winding around him.


The large halls had intricately and uniquely carved columns.


With that, I have reached my limit on images in a post. It was a location with impressive structures and carvings in various unique styles. This alone would have made for amazing day, but there was more, in the next post!
0 notes
Text
The Last Architecture: The Strata
The Last Architecture is a non-Euclidean three-dimensional structure of patchwork ductility in which only a handful of regions remain spatially consistent while everything between them churns in constant flux, a dying body where some organs function while other necrotise, metabolising itself eternally. The interaction of these two extremes gives rise to layers of interdependence between ecological perversions and biomechanical surrealism to create a diseased tapestry that meshes them into an ornate, self-sustaining, ever-evolving, living whole: the Strata.
Outer Strata
Locked perpetually in the frozen shadow beyond interstellar darkness, the outer strata encompass a twilit frontier known as the Nightlands, barren desolation clinging to jagged eyries broken only by elaborate spires, infinite stairways of nested arches receding into a vanishing point of gilded rot. The outer strata are a constant outflow of fractured, shifting ecologies built into giant computational shells carved with bioluminescent frescoes of blooming fungi or growing around massive resource-conversion devices where the organic and technological contend for both energy and space swarming with vines like filigree patterns.
The outermost reaches are fragmented regions marked by the remains of lost knowledge and remnants of abandoned systems; older, more primitive technologies deposited there in an inexorable, glacial evolution from the middle strata. Freezing conditions only worsen the further one ventures, and such are the degradations that much has been rendered toxic or irradiated by the death throes of decaying mechanisms, what lives made crazed by mutation and disease.
The outer strata represent the furthest reaches of the metaphysical structure, where the abstract energies that flow from the centre start to dissipate into more stable forms. Filling these regions are the leftovers of forgotten civilisations, decaying structures, dormant technologies and alien ecosystems that obey familiar rules.
These cover vast, open expanses of congealed matter, the dross of antiquated iterations that have passed from the inner strata, where the experiential coagulates into the common senses of the physical. Here, the abstractions of the other strata curdle into fragmented pathways and collapsed regions of slag and ruin where only the hardiest living creatures can persist.
Inner Strata
The inner strata, that noosphere of consciousness in abstracto, known in hushed tones as the Numina, are an altogether alien environment, where hyper-intelligent beings, the Old Ones, subsist within vast computational arrays that maintain order across the Architecture’s entire structure. Tasked with governing energy distribution, computational problem-solving and the management of the living outer layers, their presence is felt through diurnal patterns of atmospheric plasma fields called the “telluric current” that rush throughout the strata, putting motion to its contents.
Themselves dubbed “Tellurians”, these computational deities are enigmatic and inaccessible entities that control the entire system with cold precision, their indifference depended upon by the inhabitants of the other strata for survival. Even as their amoral benefactors remain isolated, engaged in an incomprehensible existence and the manipulation of information on a cosmic scale, their emissaries range throughout, the Vanyari, enigmatic figures of awe and wonder.
The inner strata are an intensely focused zone of pure energy and consciousness, a place where abstract artificial minds and sentient technologies coexist in their most primal forms. These intelligences are akin to hyper-advanced deities, acting as the central force holding the Architecture together, constantly recalibrating the energy flows throughout.
The size of the inner strata is not necessarily defined by physical space but rather by the density of information, energy concentration and the mindspace of the abstract entities within. It manifests as a virtual realm, the noosphere, a vast ocean of data that gives rise to sentient subspaces and creates interconnected realms for their physical manifestations.
Here, physical reality becomes distorted by gravitational fields that bend in unpredictable ways, creating temporal pockets where lifeforms evolve in ways that defy conventional biology and physics. It is a region where time and space are altered and infinite in nature, their limits existing only in the conceptual or energetic boundaries of the strata’s overall structure.
Middle Strata
Where the piercing vacuum cold of the Nightlands meets the grasping heat from the Numina extends a variegated gradation of coolness, heat and moisture altogether more habitable than either extreme. These are the Caerdroia, the middle strata from which advanced techno-sapient systems manage the flows of energy, water and information of the whole and where can be found the greatest populations of life.
The Caerdroia are where the majority of societies make their homes within a vast, biomechanical membrane of living, organic tissues from which are synthesised the endless materials needed to maintain the Architecture’s whole. Having evolved within this framework, various factions and even entire societies of this invasive ecosystem engage in experiments and engineering projects to manipulate the organic components, feeding the Architecture’s decay even as they try to manipulate it.
The middle strata represent the intermediate spaces where both physical realities and metaphysical energies merge, housing bastions of civilisation where both biological sapients and artificial sentient beings reside. These layers are constantly shifting, affected by both the underlying physics of this space and the wills of the artificial intelligences that control and maintain them.
Immeasurably vast, the real scale of the middle strata is reckoned in terms of experiential time and interaction with the metaphysical forces shaping them rather than any arbitrary measure of physical length. These layers are fractal, folding inward and outward, expanding or contracting depending on the direction in which they are explored, with cities and settlements existing in hyper-dense clusters or vast multidimensional spaces that may take eons to traverse.
Ecology
The strata are host to a consistent gradient of temperature running from the inhospitably hot and dry within the Numina, to wet and, ultimately, interstellar cold within the Nightlands. Between these extremes, currents of convection carry air through the gradations of the Caerdroia, resulting in strong winds and heavy humidity where the currents meet.
Bereft of seasons, different regions are defined by near-constant climates of varying extremes according to their place within this structure, those where hot and cold violently meet being roiling, tempestuous places. Where they are least active, heavy mists obscure even the largest chambers with some being of such vast size that they house their own weather systems and, subsequently, the most biodiversity.
In the absence of naturalistic development is, instead, a genetic confluence which clings like mould in the hot, wet environs, fed by the heat and water and scattered far by the constant wind. Tenacious enough to thrive where all else is barren, a surprising diversity of form can be found between the great extremes, having crawled in agonising slowness to spread in profusion throughout.
Through the passage of unnumbered aeons, the life and death of this precipitant have deposited sediments in places where convection is largely relaxed, resulting in a relatively shallow blanket of soil. Where these sediments have built up enough, the sheer pressure of layer upon layer has produced deposits of rock that have been exposed and shaped over time by the motion of wind and water.
That material which finds its way back into the inner strata is subjected to increasing heat and pressure before being gathered once more into the cyclical mechanisms therein and ejected back to the cooler outer strata. So expelled, this chemical-rich slurry is subjected to the telluric current, the resultant prebiotic ooze complexifying to add its own motive force and biological material to this endless process.
In its own way, an invasive facsimile of ecology has sprung up abundantly, both flora and fauna, to populate these alien spaces, adapting over time so that none but the coldest reaches and hottest depths are without their presence. The motion of life has gone on to reshape these contents, contributing countless bodies to the recursive cycles, adding richness and unpredictability where none was, first by chance, then unthinking imperative and, finally, intelligent direction.
A curious transitive quality exists between many flora and fauna, as juveniles alternate between instars, both vegetative and animal, developing from a larval floral phase before emerging upon the ripening of fruiting bodies into adult fauna or, in the reverse, moulting into sessile, vegetative maturity. Others eschew such metamorphic cycles to, instead, rely on interactions between sexes exhibiting animal and vegetative qualities between them, forming a symbiosis in which the animal sex consumes and is pollinated by the vegetative sex or else fertilised and fed through sporulation via droppings.
Fauna
Having evolved under conditions of unstable gravity, animals exhibit the more developed stronger hearts and lungs, with leaner, denser musculature, higher muscular irrigation and thicker, hollow bones actuated via internal hydraulics. Most complex animals are small but very strong, commonly crawling, aquatic and semi-aquatic arthropoids, with both exoskeletons and many-limbed designs being by far the most successful adaptations universally.
Relying on denser oxygen, larger animals tend to have extremely slow, efficient metabolism, many ambush predators exist and ruminants are common, but those that do not are very active, flying animals are rare and even smaller. Ruminants were the first sapient species, an abundance of ready prey incentivising the dietary diversity offered by active hunting and, eventually, farming and the preparation of calorie-dense fare which subsequently aided brain development.
The most common fauna mainly consists of a complex, but not very diverse community of largely colonial cyanobacteria, algae, fungi and microorganisms alongside a handful of simpler vermiform creatures similar to worms, sponges, and jellyfish. Fewer in number, large fauna is predominantly that which have been cultivated for food and materials but ranges in diversity from the docility of bovine analogues to the savage predation of dangerous carnivores, insects, avians and so on.
Within environs where light skews toward ultraviolet and infra-red, what little there is being obscured by thick atmosphere, perception of yellow, green and blue tones are greatly reduced. Eyes are often large, faceted or multitudinous, seeing mainly infrared light while both plants and animals rely on pigments that operate primarily in the ultraviolet portion of the electromagnetic spectrum.
Bioluminescence is common in creatures that do rely on sight and also often in plants that they feed upon, with many taking up the mechanism through ingestion of certain carrier species. Indeed, this is the primary source of visible light extant in the environment, a distinction around which many iterations of life cluster or else use as signifiers of prey.
Senses that don't rely on light are common, ie chemoreception, electroreception, thermoception, magnetoreception or echolocation, among others. This is especially true in the deep places and lifeseas, as what little light does exist does not reach more than 50 metres (164 feet) beneath any significant liquid body.
Transgenics
A distinction is made between typical animals, biomechanical amalgams of cultured flesh and cybernetic grafts, creatures which behave like organisms but have none of the attributes associated with life that is grown rather than designed. Such feral transgenic monsters show radical signs of having been engineered and do not typically find a niche in the natural ecosystem, forcing many settlements to rely on hunting or maintained barriers to corral less dangerous types.
Despite their volatile nature, breeding populations do persist for many of these and all transgenics are far more hardy and long-lived than their natural counterparts. Such resilience has allowed many singular types to range beyond the usual territories preferred by mundane creatures where they grow enormous in their solitude, meeting only to breed.
Aborganisms
It is widely understood that the ecology, from which civilisation arose and upon which its peoples rely is anomalous in itself, an invasive force of nature at odds with the dominant underlying foundations of the Architecture. Dangerous as organic life can be, far more unsettling are strange, even alien things of unknown origin which are speculated to be some manner of pseudo-living environmental precipitate, predatory abstraction with a penchant for bloody murder.
No consensus exists as to how these creatures arise, or even if they are creatures at all and not some environmental haunting produced naturally by the Architecture’s own logic. Further, while similarities are common enough that loose associations are accepted, no two examples are truly alike, but even those who are not actively hostile remain deadly merely by proximity.
Many are the reports of ambulatory geometries which float in eerie silence, only to spring open like a trap to engulf the unwary, or shadows and mists that follow travellers at a distance, peering at the periphery of vision, only to dart out of sight when observed. Roving colours sing with choirs of disembodied voices, enticing the unwary who vanish without a trace, hissing masses of blade-like growths slither along ceilings and up walls while figures in the distance call out with the voices of friends.
Despite their unsettling, and often dangerous, presence, many of these phenomena have been found to produce a range of useful materials which can be harvested and refined. Many chemical, mineral and, most notably, metals otherwise lacking a presence in the environs can instead be collected from, either directly or indirectly, aborganisms.
Sleep
Originally defined by metabolic rhythms in early microorganisms, the rise of plant life further refined this through intervals of temporal improvisation by which early plants rested between periods of UV flares and carbon dioxide intake. The complexification of animal life ultimately came to be defined by movements between the active, wet areas where the telluric current is in active flux and quieter, drier regions where they were able to escape predation, rest and rear young.
Sapient species refined this to its current reckoning as they began to cluster within regions on the edges of this dichotomy that experience a temperate mix of the two extremes. Accordingly, many animals and plants are synchronised to changing weather patterns, being dry-active or wet-active while others rely on the activities of predators and prey.
The uniform twilight within the Architecture has likewise resulted in the evolution of varying types of overlapping, nonlinear cycles of rhythmically co-ordinated biological processes across species, largely untethered from a reliance on ambient light levels. Rest is a precarious ritual and particularly so are the cycles of sleeping and waking adapted along the line of required sleep rather than time or light-locked sleep, which have grown to encompass variations of polyphasic and unihemispheric cycles, states of reduced activity called “torpor”.
In social and herd animals, these have been marked by refinements in the form of staggered cycles, where certain subsets of the population remain awake to watch over the sleepers, and an accelerated achievement of REM phases. Exertion is another factor, exhibited most sharply in predators and other solitary animals, which display an instinct to seek out hidden or darker areas in order to find security from the pressures of local competition.
Within encultured species, the above has found expression in widespread habits of mindfulness and meditation across peoples and social organisation to match and encourage certain expressions of restfulness. In the modern day, this has come to be expressed in the standard around which most of society has been ordered, consisting of six-hour periods of wakefulness interspersed with half-hour periods of rest.
Flora
Due to the constraints of gravity, plants are more often low to the ground and many crawl and cling across surfaces, independent of any substrate, but those that do not tend to be hardy outliers or rely on buttressing growth patterns that see individuals grow together into networked structures or otherwise form dense congregations. As the environs are cast in perpetual twilight, this lack of illumination renders photosynthesis a less effective means for most plant life to survive, rendering the majority black or deep purple, bioluminescence is common and forms a basis for symbiotic photosynthesis.
Most plants are purple, with more and broader structures dedicated to light absorption if they photosynthesise at all, but leaves are most often long, thin fronds. Some ignore the entire visible spectrum or only use some red light via chlorophyll in addition to infrared light, leading to white or bright blue-green-metallic vegetation, respectively.
This kind of reflectiveness allows for greater survivability, concordant with regular flares within the telluric current and subsequent UV spikes common to areas of climatic conflux. Other plants can detect UV spikes and react accordingly, rolling up, burrowing, using the sudden influx of light for reproduction or springing up rapidly after flares as others do after fires.
Plants that would otherwise wither within the constant gloom subsist upon a process of thermosynthesis, converting heat energy rather than light into chemical energy and nearly all obtain nutrients and water from the very air. Many larger plants draw energy from electrical storms prevalent throughout the telluric current, passing it throughout their root systems and metallic deposits to other plants in their community, discharging excess through their branches.
Certain groups of flora have shown a predilection for extracting minerals and metals from what passes for soil and rock, which is stored within iridescent sap in concentrations purer than can otherwise be found in solid deposits. Acting as a sort of botanical mine, these metallurgical forests are cultivated as accumulators and their sap harvested even as the fruiting bodies of more edible fare and other staple crops.
The most successful flora, by far, are those which subsist in parasitical union with other life, clinging to fauna or aggressively choking out and subsisting upon other flora, exerting such influence over dense, intractable regions around lifeseas. In their presence, other plant life is largely protected by their parasitical influence, allowing them to thrive within the lush, predatory interiors of these areas, the vast wetlands at the edges of which served as the cradles of civilisation.
1 note
·
View note
Text
Fundamentals of 3D Modeling: Shape and Form
3D modeling is the process of creating a digital representation of any object in three dimensions using specialized software. It is the foundation for producing assets in films, games, architecture, and product design, among other fields. Two key aspects at the core of 3D modeling are shape and form, which define the visual structure and aesthetic of the 3D object. Understanding these concepts is critical for creating accurate, realistic, or stylistic models that meet the intended visual outcome, and learning them at the best animation institute in Pune ensures high-quality training.
Shape in 3D Modeling
Shape refers to the two-dimensional outline or silhouette of an object, often seen from a specific viewpoint, such as a front, top, or side view. In 3D modeling, however, we deal with shapes in a three-dimensional context, which involves more complex geometries. Even though shapes are traditionally 2D, when applied in 3D modeling, they contribute to forming the object’s overall volume and proportions.
For example, in the case of modeling a car, the side profile may reveal the shape of the vehicle, while the front and back views help build the overall structure. 3D modelers often start by blocking out basic shapes such as cubes, spheres, cylinders, and cones. These primitive shapes serve as building blocks or references from which more complex forms are derived.
Key Elements of Shape in 3D Modeling:
1. Primitive Shapes: These include basic 3D geometries like cubes, spheres, and pyramids. These shapes are often the foundation for modeling more complicated forms.
2. Silhouette: The outer contour of an object, as seen from different angles, plays a critical role in visual readability and recognition.
3. Proportions: Proper proportions between different shapes in a model are crucial for realism, especially when replicating real-world objects.
Form in 3D Modeling
Form goes beyond the basic shape and defines the three-dimensional volume of an object. It deals with how the object appears in space, how it interacts with light, and how it can be perceived from various angles. While shapes provide the outline, forms add depth, texture, and details, making the object feel tangible and realistic.
In the context of 3D modeling, form is created through mesh manipulation, sculpting, and surface detailing. A mesh is a collection of vertices, edges, and faces that defines the surface of the 3D object. Modelers manipulate this mesh to add volume and detail, transforming basic shapes into complex forms like a human face, a building, or a fictional creature.
Key Elements of Form in 3D Modeling:
1. Volume: The perceived mass or solidity of an object, essential for creating lifelike models.
2. Curvature: The smooth or angular transitions between different parts of the model. Curvature is critical for defining the natural flow of organic objects, like animals or humans.
3. Detailing: Fine details, such as wrinkles on a character's face or intricate patterns on a surface, add depth and realism.
4. Surface Quality: The way light interacts with an object’s surface can suggest texture and materiality. For instance, a matte surface reflects light differently than a shiny surface, affecting the model's appearance.
The Importance of Shape and Form in Different Industries
- Entertainment Industry (Movies and Games): In films and games, shape and form dictate how characters, environments, and props appear. Characters must look visually interesting and readable in motion, making their shapes critical for dynamic action. On the other hand, form helps to ground the character or object in reality, with physical volume and convincing textures.
- Product Design: When designing products, shape and form impact both the aesthetics and functionality of an object. A sleek form might suggest a modern, cutting-edge product, while a more robust form may communicate durability. Designers must strike a balance between visual appeal and practical functionality.
- Architecture and Interior Design: In architectural visualization, shape is often used to define the layout of structures and rooms, while form emphasizes the details, such as how light enters a space or the texture of materials. Good understanding of form ensures accurate representations of surfaces like glass, wood, or metal.
Techniques for Mastering Shape and Form in 3D Modeling
1. Blocking and Refining:
- In the early stages of 3D modeling, artists block out basic shapes to establish the object’s silhouette and proportions. Gradual refinement of these shapes leads to more intricate forms and details.
- This iterative process helps prevent getting lost in the details too early, allowing for clear, manageable progress from basic shapes to fully formed models.
2. Mesh Manipulation:
- Manipulating a mesh allows 3D modelers to sculpt forms with precision. Tools such as vertex pushing, edge extrusion, and face scaling help refine shapes into complex forms.
- Mesh subdivision techniques (increasing the number of polygons) allow for smoother forms, especially in organic modeling, like creating a human face.
3. Sculpting Tools:
- Digital sculpting tools, like those in ZBrush or Blender, simulate the process of working with clay. Sculpting enables more intuitive control over shapes, creating highly detailed forms with subtle contours, wrinkles, and textures.
- This method is particularly useful for character and creature design, where organic shapes are dominant.
4. Study of Anatomy and Nature:
- Understanding real-world anatomy or natural forms (e.g., animals, plants) is crucial for creating believable models. Many 3D artists study anatomy to understand how bones and muscles influence shape and form in creatures.
- Similarly, studying man-made objects like vehicles or architecture helps build more complex and realistic forms.
5. Light and Shadow:
- The way light interacts with shapes and forms can dramatically alter their appearance. Mastering lighting techniques in 3D modeling ensures that the forms are highlighted effectively, providing depth and enhancing realism.
Conclusion
Mastering the fundamentals of shape and form is the bedrock of becoming a skilled 3D modeler. By understanding how simple shapes evolve into complex forms and how these interact with lighting, materials, and textures, artists can create captivating, believable models that excel in industries ranging from entertainment to product design. Learning these skills at an animation institute in Pune ensures that aspiring modelers develop the precision and expertise needed to bring digital creations to life, meeting professional industry standards.
0 notes
Text
How to Delete Vertices in Blender Without Deleting Face- Expert Guide
To delete vertices in Blender without deleting the face, use the “Dissolve Vertices” option. Select vertices, then press “X” and choose “Dissolve Vertices.”
Blender is a powerful 3D modeling tool used by artists and designers worldwide. Efficiently managing vertices can significantly impact your workflow and model quality. Sometimes, you may need to remove vertices without affecting the overall geometry of a face. This skill is crucial for maintaining clean and optimized mesh structures.
“Dissolve Vertices” is a feature in Blender that allows you to do just that. By dissolving vertices, you can streamline your modeling process and ensure your design remains intact. This technique is especially useful for simplifying complex models and improving performance. Understanding how to manipulate vertices effectively can elevate your 3D modeling skills.
Introduction To Blender Vertices And Faces
Blender is a powerful 3D modeling software. It lets users create amazing 3D objects. Understanding vertices and faces is crucial in Blender.
Basics Of 3d Modeling
3D modeling involves creating objects in a three-dimensional space. This means you work with objects that have width, height, and depth. In Blender, you use vertices, edges, and faces to build these objects.
Vertices are the points in 3D space. They are the building blocks of any 3D model. When you connect vertices with lines, you create edges. When you connect multiple edges, you form a face. Faces are the flat surfaces of your 3D model.
Element Description Vertices Points in 3D space Edges Lines connecting vertices Faces Flat surfaces formed by edges
Importance Of Vertices And Faces
Vertices and faces are essential in 3D modeling. They define the shape and structure of your 3D objects. Vertices allow you to control the precise location of points in your model. Faces create the surfaces of your object, giving it a solid look.
Without vertices, you cannot define any shape in 3D space. Without faces, your model will have holes and gaps. Properly managing vertices and faces ensures a clean and accurate model. This is especially important for complex models.
Vertices help in shaping the model.
Faces give the model its surface.
Both are crucial for a solid 3D object.
In Blender, you can edit vertices and faces to refine your model. Understanding how to delete vertices without deleting faces is a useful skill. It keeps your model’s structure intact.
Setting Up Blender
Setting up Blender is the first step to deleting vertices without deleting faces. This guide will help you get started with Blender. Follow these steps to make sure your setup is perfect.
Downloading And Installing Blender
Blender is free to download and use. Follow these steps to get Blender on your computer:
Visit the Blender website.
Click on the download button.
Choose your operating system.
Download the installer file.
Open the installer and follow the instructions.
After these steps, Blender will be installed on your computer.
Customizing The Interface
Customizing Blender’s interface can make your work easier. Follow these steps to set it up:
Open Blender.
Go to the top menu and click on “Edit”.
Choose “Preferences” from the drop-down menu.
Navigate to the “Interface” tab.
Change the theme if you like.
Adjust the font size for better readability.
Customize your toolbar for quick access to tools:
Right-click on any tool in the toolbar.
Select “Add to Quick Favorites”.
Now you have a personalized Blender interface.
Navigating The Blender Workspace
Navigating Blender’s workspace can be tricky for new users. Understanding the interface is crucial. Blender’s workspace consists of various panels, menus, and toolbars. Mastering these will make your tasks smoother and faster.
Using The 3d Viewport
The 3D Viewport is where most of the action happens. You can view and interact with your models here. To move around, use the middle mouse button. Rotate the view by dragging. Zoom in and out using the scroll wheel.
For precise navigation, use the Numpad. Press 1 for front view, 3 for side view, and 7 for top view. Use 5 to toggle between orthographic and perspective views.
Selecting Objects And Elements
Selecting objects and elements in Blender is crucial. To select an object, right-click on it. To select multiple objects, hold Shift and right-click. This will add to your selection.
When in edit mode, you can select vertices, edges, and faces. Press 1 for vertices, 2 for edges, and 3 for faces. Use the box select tool by pressing B. Drag to select multiple elements.

Vertex And Face Selection Methods
In Blender, selecting vertices and faces is a crucial skill. You need this for tasks like deleting vertices without affecting the faces. This section explores two powerful selection methods: Box Select and Lasso Select.
Using Box Select
Box Select is a straightforward selection method. Follow these steps to use it:
Press B on your keyboard to activate Box Select.
Click and drag to draw a rectangle over the vertices you want to select.
Release the mouse button to finalize your selection.
This method allows you to quickly select multiple vertices. Make sure you are in Edit Mode. Also, choose the Vertex Select option for accuracy.
Using Lasso Select
Lasso Select offers more flexibility. Here’s how to use it:
Hold down the Ctrl key (or Cmd key on Mac).
Click and drag to draw a freeform shape around the vertices you want to select.
Release the mouse button to confirm your selection.
Lasso Select is ideal for irregular shapes. It gives you more control over which vertices are selected. Ensure you are in Edit Mode and have Vertex Select active.
Deleting Vertices Without Deleting Faces
Blender users often face the challenge of deleting vertices without affecting the faces. Keeping the face intact is crucial for maintaining the model’s structure. This guide will show you how to delete vertices without deleting faces. Follow these steps to keep your model’s integrity.
Using The Delete Menu
The Delete Menu in Blender offers various options for deleting elements. Here’s how to use it:
Select the vertices you want to delete.
Press the X key to open the Delete Menu.
Choose Limited Dissolve from the menu. This will remove vertices but keep the faces.
Maintaining Face Integrity
Maintaining face integrity is essential to avoid model deformation. Follow these steps:
First, make sure to select vertices carefully. This prevents unintentional deletions.
Use the Knife Tool to create new edges if necessary. This helps to maintain the shape.
Always check your model in Solid View to see the changes clearly.
Here is a quick reference table for deleting vertices without deleting faces:
Action Shortcut Result Select Vertices Right-click Highlights the vertices to delete Open Delete Menu X Displays delete options Limited Dissolve Click Limited Dissolve Deletes vertices, keeps faces
Advanced Techniques
Deleting vertices in Blender without deleting the face can be tricky. Mastering advanced techniques can make this task easier and more efficient. These methods ensure that the geometry remains intact while making necessary edits.
Merging Vertices
Merging vertices is a useful technique. It allows you to combine vertices without losing the face. Follow these steps:
Select the vertices you want to merge.
Press M on your keyboard.
Choose the merge option that fits your needs.
There are different merge options:
Merge Option Description At Center Merges vertices at the center point. At Cursor Merges vertices at the cursor position. Collapse Merges all selected vertices into one.
Using Proportional Editing
Proportional Editing is another advanced technique. It helps in manipulating vertices smoothly without deleting faces. To use Proportional Editing:
Enable Proportional Editing by pressing O.
Select the vertex you want to move.
Move the vertex using the G key.
Adjust the influence radius with the scroll wheel. This technique maintains the mesh’s overall shape. It is helpful for making subtle adjustments.
Common Mistakes And Fixes
Working in Blender can be tricky, especially for beginners. Deleting vertices without deleting the face is a common challenge. Many users make mistakes and end up with unwanted results. This section covers common mistakes and how to fix them.
Fixing Accidental Face Deletion
Accidental face deletion occurs often. It happens when you delete vertices, not realizing it affects the face. To fix this, use the Dissolve Vertices option. This option removes vertices but keeps the face intact.
Select the vertices you want to delete.
Press X to open the delete menu.
Choose Dissolve Vertices.
Using Dissolve Vertices helps keep the geometry clean. It ensures no faces are deleted by mistake.
Restoring Lost Geometry
Sometimes you might delete vertices and lose important geometry. Restoring lost geometry requires a few steps. Follow these steps to bring back the lost parts.
Switch to Edit Mode.
Use the Knife Tool to recreate edges.
Press K to activate the Knife Tool.
Click to create new edges along the lost geometry.
Press Enter to confirm the new edges.
Using the Knife Tool allows precise control. It helps to restore lost geometry efficiently.
Another method involves using the Fill Tool. This tool can fill in missing faces quickly.
Select the boundary edges of the missing face.
Press F to fill the face.

Practical Applications
Deleting vertices in Blender without deleting faces has many practical uses. This technique is essential for creating complex shapes and optimizing mesh topology. Read on to discover how these applications make your 3D modeling more efficient and precise.
Modeling Complex Shapes
Creating complex shapes requires precision. Deleting vertices without affecting faces helps maintain the structure. This method enables intricate designs without compromising the model.
For example, imagine modeling a detailed character. You need to refine certain areas, like the facial features. Removing unnecessary vertices can help you achieve better detail and control.
Here are some steps to follow:
Select the vertices you want to delete.
Press Ctrl + X to dissolve the vertices.
Observe that the face remains intact.
Optimizing Mesh Topology
Optimizing mesh topology is crucial for smooth animations and efficient rendering. Removing excess vertices helps streamline your mesh. This makes your model lighter and easier to work with.
Consider a scenario where you have a high-poly model. Reducing vertex count can significantly improve performance. Follow these steps to optimize your mesh:
Select vertices that don’t contribute to the shape.
Use Ctrl + X to dissolve them.
Check the mesh for any anomalies.
Using this technique, you can maintain a clean and manageable topology. This is especially useful in game development and animation where performance is key.
Conclusion And Next Steps
Deleting vertices in Blender without deleting the face can be tricky. This guide aimed to make this process clear and straightforward. Let’s summarize the key points and provide some resources for further learning.
Summary Of Key Points
Use the Merge tool to delete vertices and keep the face.
Switch to Vertex Select Mode for better control.
Use the Knife tool to add new edges if needed.
Check the mesh integrity after making changes.
Resources For Further Learning
Blender is a powerful tool with a steep learning curve. Here are some resources to help you master it:
Resource Description Blender Manual Official Blender documentation for in-depth learning. Blender Guru High-quality tutorials for various Blender features. Andrew Price’s YouTube Channel Video tutorials on Blender tips and tricks.
By following these steps and using these resources, you can become proficient in Blender. Happy blending!
Frequently Asked Questions
How To Delete Vertices Without Deleting Face In Blender?
Select the vertices in Blender. Press ‘X’ and choose ‘Dissolve Vertices’. This removes vertices without deleting the face.
How Do You Remove Unwanted Vertices In Blender?
To remove unwanted vertices in Blender, select the vertices. Press X or Delete. Choose “Vertices” from the menu.
How To Remove Edges Without Removing Faces?
Use the “Dissolve Edges” tool in your 3D software. This retains faces while removing edges.
How Do You Select Vertices Without Faces In Blender?
To select vertices without faces in Blender, go to Edit Mode. Choose “Select” from the menu, then “Select All by Trait,” and finally “Loose Geometry. “ This highlights vertices not connected to any faces.
Conclusion
Mastering how to delete vertices in Blender without deleting the face is essential for efficient modeling. This technique enhances your workflow and keeps your meshes clean. Practice these steps to improve your 3D modeling skills. For more Blender tips and tutorials, stay tuned to our blog and elevate your creations.
0 notes
Text
Bridging Precision and Efficiency: Uniting Geometry Processing and Deep Learning in Generative AI in retail Part 1
In the dynamic and ever-evolving landscape of computational science and technology, paradigm shifts frequently challenge established norms, pushing the boundaries of what we perceive as possible. One such transformative shift was the advent of geometry processing—a field that, at its inception, faced considerable skepticism from traditional mathematicians. The notion of computationally solving partial differential equations (PDEs) on manifold domains was met with doubt, primarily because it diverged from the analytical methods that had long been the cornerstone of mathematical problem-solving. Despite these initial reservations, geometry processing, particularly through the implementation of finite element methods, proved to be groundbreaking. It enabled the precise and efficient solution of complex geometric problems, laying a robust foundation for advancements in computer graphics, simulations, and three-dimensional modeling.
As we progress into the current era, we find ourselves at the cusp of another revolutionary technological frontier: generative artificial intelligence (AI). Generative AI has demonstrated remarkable capabilities, extending beyond text and images to include the generation of intricate meshes and geometric structures. This evolution presents a unique opportunity to reconsider and potentially unify the methodologies of geometry processing and deep learning. Particularly in industries like retail, where computational complexity and precision are not just beneficial but critical, the question arises: Should we adhere to the concrete methods of geometry processing, rely on the adaptability of deep learning, or is there a synergistic approach that leverages the strengths of both to meet the industry's demanding needs?
The Skepticism and Triumph of Geometry Processing
When geometry processing first emerged, it was met with a fair amount of skepticism from the established mathematical community. Traditional mathematicians, who were deeply rooted in analytical and exact methods, viewed the computational approach to solving PDEs on manifold domains with hesitation. The complexity of manifolds—spaces that locally resemble Euclidean space but can have a different global structure—made the idea of applying numerical methods seem, to some, an insurmountable challenge.
However, the development and application of finite element methods within geometry processing began to change this narrative. Finite element methods allowed for the approximation of solutions to PDEs by breaking down complex domains into smaller, simpler pieces over which the equations could be more readily solved. This approach made it possible to tackle problems that were previously considered too complex for practical computation. The precision achieved through these methods validated the computational approach, demonstrating that it could not only complement but sometimes surpass traditional analytical techniques. This breakthrough had significant implications, leading to advancements in various fields that rely on accurate geometric computations, such as engineering design, biomedical imaging, and virtual reality.

#ai#bathroom remodeling#bathroom renovation#interior design#investors#real estate#tech#techinnovation#proptech
0 notes
Text
Nano Sponges Contain Formaldehyde Contamination?
Kitchen grease cleaning has always been a headache, and traditional cleaning sponges often need to be used with chemical cleaning agents, making cleaning stubborn stains time-consuming and laborious. In recent years, the new nano sponge has become popular because it is ideal for cleaning stubborn stains and does not require any chemical cleaning agents. So where does the cleaning superpower of the nano sponge come from?
A discreet and introverted "techie".
Nano sponges are known by the scientific name melamine foam, commonly known as magic wipe, high-tech sponge and so on. The main component of the nano sponge is a melamine resin foam, made from melamine and formaldehyde polymerisation. The melamine resin has a high porosity three-dimensional mesh structure, each "bubble hole" has at least 3 holes or 2 destructive surfaces, and most of the bubble prongs are shared by at least 3 structural units. The capillary openings in the sponge automatically absorb stains from the surface during the wiping process. Because of its comprehensive properties such as good sound absorption, flame retardancy and resistance to humidity and heat, nano sponges are widely used in the construction industry, electronic products, biological treatment processes and other fields. The nano sponge is also a good helper in household chores, with high grease removal capacity and high water efficiency (only 30-40% of the water used in traditional cleaning methods), making it a highly acclaimed cleaning tool.
Rumoured to be toxic?
While melamine and formaldehyde are both toxic chemicals when singled out, the synthetic amine resin is a stable substance that does not decompose into formaldehyde again. However, during the polymerisation of the two molecules, some of the unreacted free formaldehyde is present in the nano sponge. Therefore, manufacturers reduce the free formaldehyde content by improving the foaming process and maturing the formaldehyde removal process. In addition, formaldehyde itself is a water-soluble and chemically unstable substance and can be removed by placing it in a ventilated area or rinsing with water before use. If you buy a nano sponge from a qualified merchant, ventilate it for a period of time, rinse it and then use it, you can basically avoid the danger of formaldehyde!
Tips:
From a hygiene point of view, the spaces between the sponges can accumulate a lot of grease and food residue, which should be rinsed and dried after use.
Do not use the nano sponge on electrical products that are not suitable for contact with water.
Do not use bleach or hot water to disinfect the sponge as this will cause the sponge to yellow and deteriorate and will shorten its life.
More information or free samples or price quotations, please contact us via email: [email protected] , or voice to us at: +86-28-8411-1861.


2 notes
·
View notes
Text


4ME4YOU FEATURES “Herskind” DURING COPENHAGEN FASHION WEEK SS25.
Designer: Herskind
Welcome to Herskind’s latest lookbook, where timeless elegance meets contemporary innovation. Our philosophy is to craft apparel that harmoniously blends enduring classics with modern trends, celebrating individuality through a steadfast commitment to quality and meticulous design.
In this collection, witness our dedication to sophisticated craftsmanship. We’ve seamlessly integrated our signature tailored suiting with transparent knits and mesh, along with contemporary drapes that highlight our unique design approach. Each piece is meticulously developed from a folded paper prototype to fabric, resulting in distinct three-dimensional effects that embody our commitment to effortless elegance.
The SS25 collection presents a captivating blend of feminine silhouettes and masculine details. Our tailored suits feature structured shoulders and fitted forms, reimagining sartorial tradition with a modern twist. While we accentuate the waist to enhance feminine shapes, masculine elements like oversized cuffs, bespoke cufflinks, and pleated pants with press folds bring a distinctive edge.
Our new blazer, with its drawstring closure, offers versatile styling options—wear it loose for a relaxed look or wrap it around for a chic finish. Paired with the matching mini-skirt or fold-over pants, it perfectly exemplifies the fusion of classic tailoring with contemporary refinement.
We invite you to take a closer look at there collection and explore the intricate craftsmanship up close. Discover how Herskind’s unique design philosophy redefines contemporary elegance.
WEBSITE: Herskind
0 notes
Text
Silver Nanowires: The Next Generation of Conducting Materials
Introduction to Silver nanofibers Silver nanofibers are extremely thin silver wires with diameters measuring only tens to hundreds of nanometers. At such a small scale, silver exhibits unusual optical, electrical and thermodynamic properties compared to bulk silver. Silver nanofibers have found use in applications requiring transparent conducting materials like touchscreens. Properties of Silver nanofibers Silver nanofibers conduct electricity exceptionally well due to the high electrical conductivity of bulk silver. The electrical resistivity of silver is only about 1.59×10⁻⁸ Ω·m, second only to copper. At the nanoscale, Silver nanofibers retain much of this high conductivity despite their small cross-sectional area. Additionally, long nanowires allow percolation or contact between nanowires to form conductive networks even at low surface coverage or mass fractions. This makes Silver nanofibers viable at transmitting electricity through transparent materials. Optical properties are also influenced at the nanoscale. Silver Nanowires is highly reflective in the visible spectrum as a bulk material. However, Silver nanofibers only weakly absorb and scatter visible light due to resonance effects dependent on nanowire diameter, reducing opacity. Transmission of visible light can exceed 90% with Silver nanofibers films only tens of nanometers thick. The nanowires also transmit infrared radiation well. These qualities give Silver nanofibers their useful optoelectronic properties. Producing High Quality Silver Nanowires Several techniques exist for producing high quality Silver nanofibers on an industrial scale. Polyol synthesis is a common method which uses ethylene glycol both as a reducing agent and reaction solvent. In this process, silver nitrate is reduced by ethylene glycol at elevated temperatures (150-200°C) in the presence of a structure-directing agent like polyvinylpyrrolidone (PVP). The PVP bonds preferentially to certain crystallographic faces of growing silver nanoparticles, directing their one-dimensional growth into nanowires. Reaction time, temperature, and concentration of reagents control the dimensions of synthesized nanowires, which are usually 50-200 nm in diameter and 5-100 μm in length. Post-synthesis processing like washing and drying yields pure Silver nanofibers powders. PVP-coated Silver nanofibers produced by polyol synthesis typically have good aspect ratios above 100 and acceptable electrical conductivities. However, surfactants and byproducts must be removed before application to avoid compromising transparency or conductivity. Additional techniques like electrospinning can also fabricate Silver nanofibers, enabling mass production. Overall, wet chemistry methods allow cost-effective synthesis of high quality Silver Nanowires nanofibers materials. Uses of Silver nanofibers in Devices Transparent Conductive Films One major application of Silver nanofibers is as a material for transparent conductive films (TCFs). TCFs require optical transparency as well as high electrical conductivity, which bulk metals cannot provide. Silver nanofibers combine these properties, transmitting over 90% of visible light while achieving conductivities within an order of magnitude of ITO. Silver nanowire TCFs have begun replacing indium tin oxide (ITO) in applications like touchscreens due to lowered costs and mechanical flexibility. At optimized surface densities, Silver nanofibers form a percolated conductive mesh that maintains excellent optical qualities even as electrical conductivity surpasses that of ITO. This makes them promising for next-generation touch-enabled displays and transparent electrodes. Organic Electronics and Solar Cells
Get more insights on Silver Nanowires
Vaagisha brings over three years of expertise as a content editor in the market research domain. Originally a creative writer, she discovered her passion for editing, combining her flair for writing with a meticulous eye for detail. Her ability to craft and refine compelling content makes her an invaluable asset in delivering polished and engaging write-ups.
(LinkedIn: https://www.linkedin.com/in/vaagisha-singh-8080b91)

0 notes
Text
Source notes: Arches: a Framework for Modeling Complex Terrains
(Peytavie et al., 2009)
Type: Journal Article
Keywords: Three-Dimensional Graphics, Realism
(Peytavie et al., 2009) add to the literature by constructing a framework for modelling terrains that feature overhangs, arches and caves. The framework combines a volumetric data structure used to store different materials and a method for sculpting and reconstructing (delivered as interactive tools) the terrain surface. In addition, the authors developed a technique to generate loose rocks to add to the terrain-based environments.
Method
A discrete volumetric data structure stores layers of materials that compose the terrain and two representations of the terrain model.
One model is called "implicit" and serves as the representation used when sculpting and generating the terrain mesh (via surface polygonization algorithms).
The other is "discrete", containing material layers that is used when invoking a post-processing step to ensure sand and rock layers stabilise after each sculpting or editing step.
The method defines terrains as two-dimensional grids of material stacks (materials vary by thickness and type with air, water, sand, bedrock and rocks all supported).
Algorithms for sculpting bedrock layers and adding layers of different materials are utilised by high-level tools that enable manual editing of the terrain. Sculpting can be performed by "deforming and carving the terrain in the direction of the normal to the surface" or by executing algorithms to specifically create cracks or networks of tunnels (developed because such large-scale sculpting and editing work is time-consuming and repetitive).
Another tool, defined as a brush described by a depositing region, was developed for depositing granular material layers such as sand onto existing terrain.
The authors developed a new erosion technique to simulate rocks detaching from a terrain and forming piles on the ground. It works by way of a designer defining a tool with a region of influence and a parameter that controls how much material it erodes. The tool is then swept over the surface of the terrain to either transform bedrock into sand or completely detach rocks that then fall into the scene (simulating the case where bedrock is cracked along internal joints).
Rock piles can be generated in place (not physics or collision based, instead using precomputed contact points) using a Voronoi diagram technique. A cubic tile containing Voronoi cells representing rocks is created, erosion is then simulated by creating triangles between contact points of cells (chosen randomly on each edge). Rock models are then instantiated within the cubic tile.
Texture blending is used when rendering, with each material in the stack having its texture blended according to the ratio of neighbouring materials.

Strengths
Lots of features, able to create caves, overhangs, rock piles, and more depending on what designers do with the tools.
High level of realism with multiple materials and texture blending.
Tools for automatically creating tunnel networks, resulting in realistic cave systems.
Framework could be extended to develop tools for more automated creation of speleothems.
Interactive editing tools provide granular level of control.
High degree of expressivity (limited largely by the time, effort and skill of designers).
Limitations
No direct discussion of stalagmites and stalactites, although they can be seen in one of the images, and based on the other features created via sculpting and editing, would be trivial to create.
Manual effort required and skill of a designer to create effective results.
0 notes
Text
Porous Titanium in Next-Generation PEMFCs

Porous titanium has found a wide variety of unique and important applications including filtration, separation, catalyst supporting, gas absorbing, gas sparging, current collection, and medical implantation.
Manufacture process for porous titanium
Raw titanium powder preparation—Cold isostatic pressing or rolling—Sintering in high temperature & vacuum furnace-Machined to size-Assembled to filter if required
Liquid/gas diffusion layers (LGDLs) play a crucial role in electrochemical energy technology and hydrogen production, and are expected to simultaneously transport electrons, heat, and reactants/products with minimum voltage, current, thermal, interfacial, and fluidic losses.
Porous titanium exhibits excellent properties when it is used as the anode GDL, because of its unique three-dimensional strut structure promoting highly efficient catalytic reactions. Furthermore, it shows superior corrosion resistance with almost no thickness and weight changes in the accelerated corrosion test, as opposed to considerable reductions in the weight and thickness of the conventional GDL.
Porous Titanium provides a longer-term reliability and chemical stability, which can reduce the loss of Pt catalyst and, hence, the cost of PEMFCs.
0 notes
Text

Plaxis Software:
Plaxis Software is a finite element tool for geotechnical engineering and geology that analyses soil and rock deformation, stability, and groundwater movement. The initial version of Plaxis software was released in 1980 and was created by a team of researchers at Delft University Technology in the Netherlands.
This software aims to tackle problems including deformation analysis, stability analysis, groundwater flow, and soil-structure interaction.
Types of Plaxis Software
There are two types of Plaxis software. Plaxis 2D and Plaxis 3D are useful tools for analyzing various geotechnical engineering challenges.
Plaxis 2D Software:
Plaxsi 2D is a finite element software. It is specifically intended for 2D movement and stability in geotechnical engineering. It is used to represent soil and rock behavior under different loading situations, as well as soil-structure interactions in a planar strain or axisymmetric environment.
Plaxis 3D Software:
Plxis 3D is finite helmet software that is used to analyze 3D data in geotechnical engineering. It manages complex 3D (three-dimensional) problems while also providing superior 2D capabilities that provide deep images with greater details in geotechnical challenges.
Become an expert in the PLAXIS Software
PLAXIS Software Live Certification Training Program, Get hands-on training from Industry Professionals.
Difference Between Plaxis 2D and Plaxis 3D Software:
Here are the main differences between Plaxis 2D and Plaxis 3D
Dimensionality:
Plaxis 2D is specifically developed for two-dimensional analysis. It addresses geotechnical and loading challenges, such as plane strain or axisymmetric problems.
Plaxis 3D: In Plaxis 3D, the feature in 2D expands into 3D. It addresses the extremely complex subject of geotechnical and loading issues in 3D analysis.
Applications:
Plaxis 2D is used in foundation design to analyze deep foundations, footings, and piles under different loading conditions, slope stability to analyze the stability of slopes, embankments, and retaining walls, tunnel to analyze the behavior of tunnels, shafts, and deep excavations, and ground improvement for soil stabilization and reinforcement.
Plaxis 3D: It demands a precise 3D description of the physical interaction between soil and structures and inspects deep tunnels and under constructions with complicated geometry.
Meshing:
Plaxis 2D: Offers a 2D finite element mesh ideal for axisymmetric geometries and flat strains. It supports Triangle and rectangle element types in 2D.
Plaxis 3D: Provide a 3D finite element mesh that accurately depicts complicated geometries and soil structure. It provides hexahedral and hexagonal 3D element types.
User Interface:
Plaxis 2D: It includes a straightforward interface for configuring the model, adding boundary conditions, and visualizing the results that are specific to 2D problems.
Plaxis 3D has the same user interface, but it includes additional tools for managing complicated geometries and volumetric data that are specifically developed for 3D modeling and analysis.
Conclusion:
Plaxis is a powerful and versatile geotechnical analysis tool that may be used to tackle a wide range of geotechnical engineering problems, including slope stability, base design, and more. Users can efficiently utilize Plaxis to achieve highly precise and reliable results in geotechnical engineering assignments by following the detailed steps and best practices outlined in this manual. PIGSO LEARNING strives to provide a complete training program for engineering students, research scholars, and professionals.
0 notes
Text
3D Laser Scanning Service | Point Cloud to Bim | Rvtcad
3D laser scanning has become a game-changer in the construction and architectural industries. This technology offers a precise and efficient method to capture an environment's exact dimensions and features. Using laser beams to measure and map surfaces, 3D laser scanning creates detailed digital models that are invaluable for various applications. Let's dive into the basics, the benefits, and the transformative role of this technology in converting point clouds to Building Information Modeling (BIM) using software like Revit CAD.

What is 3D Laser Scanning?
3D laser scanning involves using a laser scanner to capture the spatial data of an object or environment. The scanner emits laser beams that bounce back from surfaces to create a point cloud, a collection of data points in a three-dimensional coordinate system. These points represent the exact shape and size of the scanned area, providing a highly accurate digital replica.
Benefits of 3D Laser Scanning
Accuracy: One of the standout benefits of 3D laser scanning is its unparalleled accuracy. Traditional measurement methods can introduce human error, but laser scanning ensures that even the smallest details are captured with precision.
Efficiency: Laser scanning significantly reduces the time needed to capture detailed measurements. This efficiency is crucial in large-scale projects where traditional surveying methods can be time-consuming.
Cost-Effectiveness: Although the initial investment in 3D laser scanning equipment can be high, the reduction in time and labor costs often results in long-term savings.
Comprehensive Data: The point cloud generated from a 3D laser scan provides a comprehensive dataset that can be used for various analyses, from structural assessments to design modifications.
Improved Collaboration: The detailed models created from laser scans facilitate better communication and collaboration among project stakeholders, including architects, engineers, and contractors.
From Point Cloud to BIM
The data captured by a 3D laser scanner is often processed into a point cloud, which serves as a foundation for creating a Building Information Model (BIM). BIM is a digital representation of the physical and functional characteristics of a facility, and it is an essential tool for modern construction projects.
Step 1: Point Cloud Processing
The first step in converting a point cloud to BIM involves processing the raw data. This includes filtering out noise, aligning multiple scans, and sometimes converting the point cloud into a mesh. Specialized software like Autodesk ReCap can assist in this process, ensuring that the point cloud is ready for further use.
Step 2: Importing into Revit
Once the point cloud is processed, it can be imported into Revit, a popular BIM software. Revit supports various point cloud formats, making it a versatile tool for this purpose. The point cloud serves as a reference model within Revit, helping designers and engineers to create an accurate BIM.
Step 3: Modeling in Revit
Using the point cloud as a guide, users can begin the modeling process in Revit. This involves tracing over the point cloud data to create the building’s geometry. Walls, floors, ceilings, and other architectural elements are defined, ensuring that the digital model reflects the exact dimensions captured by the laser scan.
Step 4: Adding Information
BIM is not just about geometry; it also includes information about the building's components. Once the basic model is created, additional data can be added, such as material specifications, structural details, and mechanical systems. This comprehensive dataset helps in managing the building throughout its lifecycle, from design and construction to maintenance and renovation.
Advantages of Point Cloud to BIM
Enhanced Design Accuracy: The use of precise point cloud data ensures that the BIM model accurately represents the existing conditions of a building or site, reducing the risk of errors and rework.
Streamlined Renovations and Retrofits: For renovation projects, having an accurate BIM model based on laser scans of the existing structure allows for better planning and execution.
Improved Project Visualization: BIM models provide a clear visualization of the project, helping stakeholders understand the design and make informed decisions.
Efficient Facility Management: With detailed information embedded in the BIM model, facility managers can efficiently manage and maintain the building, optimizing operations and reducing costs.
Conclusion
3D laser scanning and the conversion of point clouds to BIM represent a significant advancement in the construction and architectural industries. RVTCAD The accuracy, efficiency, and comprehensive data provided by these technologies enhance every stage of a project, from design to construction to maintenance. As the industry continues to embrace digital transformation, the role of 3D laser scanning and BIM will only become more critical, paving the way for smarter, more efficient building practices.
#scan to bim#point cloud to bim#bim services#3d laser scanning#as-built drawing#bim laser scanning#scan to revit#scan to cad#as-built drawings#point cloud to cad
0 notes