#ul tag in html
Explore tagged Tumblr posts
Visit Tumblr Blog
Explore Tumblr blogs with no restrictions, modern design and the best experience.
Last Seen Tumblr Blogs


Fun Fact
Kazakhstan’s Minister of Communications and Informatics has blocked the Tumblr site because it contained 60 sites of terrorism, extremism, and pornography in 2015.
Text
PODFICCER (and fic author) RESOURCE: things i learned about HTML today
-> from this reference work on ao3: A Complete Guide to 'Limited HTML' on AO3 by CodenameCarrot (please go leave a comment if you find anything here useful !!!)
EDIT: OMG Y'ALL I HAVE BEEN HAVING SO MUCH NERDY GEEKY FUN TWEAKING MY PODFIC HOW-TO GUIDE WITH THIS STUFF
headings, blockquote, div

----

-----
html currently allowed by ao3 html sanitizer

a. abbr. acronym. address. b. big. blockquote. br. caption. center. cite. code. col. colgroup. details. dd. del. dfn. div. dl. dt. em. figcaption. figure. h1. h2. h3. h4. h5. h6. hr. i. img. ins. kbd. li. ol. p. pre. q. rp. rt. ruby. s. samp. small. span. strike. strong. sub. summary. sup. table. tbody. td. tfoot. th. thead. tr. tt. u. ul. var.
-----
in-line (text) formatting tags supported by ao3


-----
OMG LOOK AT THIS !!! IDK WHEN I WOULD EVER USE THIS BUT LOOK HOW COOL !!!

-----
paragraphs & p formats: archiveofourown.org/works/5191202/chapters/161901154#AddParagraphs

-----
omg I'VE ALWAYS WONDERED HOW TO GET THAT LINE BREAK THINGY IN THE MIDDLE OF THE PAGE !!!

-----
end post
#podfic resource#podficcer resource#fic author resource#ao3 writer resource#ao3 fanfic#ao3#html resource#html reference#html#reference#resource#html tutorial#basic html guide#CodenameCarrot
6 notes
·
View notes
Text
Let's understand HTML

Cover these topics to complete your HTML journey.
HTML (HyperText Markup Language) is the standard language used to create web pages. Here's a comprehensive list of key topics in HTML:
1. Basics of HTML
Introduction to HTML
HTML Document Structure
HTML Tags and Elements
HTML Attributes
HTML Comments
HTML Doctype
2. HTML Text Formatting
Headings (<h1> to <h6>)
Paragraphs (<p>)
Line Breaks (<br>)
Horizontal Lines (<hr>)
Bold Text (<b>, <strong>)
Italic Text (<i>, <em>)
Underlined Text (<u>)
Superscript (<sup>) and Subscript (<sub>)
3. HTML Links
Hyperlinks (<a>)
Target Attribute
Creating Email Links
4. HTML Lists
Ordered Lists (<ol>)
Unordered Lists (<ul>)
Description Lists (<dl>)
Nesting Lists
5. HTML Tables
Table (<table>)
Table Rows (<tr>)
Table Data (<td>)
Table Headings (<th>)
Table Caption (<caption>)
Merging Cells (rowspan, colspan)
Table Borders and Styling
6. HTML Forms
Form (<form>)
Input Types (<input>)
Text Fields (<input type="text">)
Password Fields (<input type="password">)
Radio Buttons (<input type="radio">)
Checkboxes (<input type="checkbox">)
Drop-down Lists (<select>)
Textarea (<textarea>)
Buttons (<button>, <input type="submit">)
Labels (<label>)
Form Action and Method Attributes
7. HTML Media
Images (<img>)
Image Maps
Audio (<audio>)
Video (<video>)
Embedding Media (<embed>)
Object Element (<object>)
Iframes (<iframe>)
8. HTML Semantic Elements
Header (<header>)
Footer (<footer>)
Article (<article>)
Section (<section>)
Aside (<aside>)
Nav (<nav>)
Main (<main>)
Figure (<figure>), Figcaption (<figcaption>)
9. HTML5 New Elements
Canvas (<canvas>)
SVG (<svg>)
Data Attributes
Output Element (<output>)
Progress (<progress>)
Meter (<meter>)
Details (<details>)
Summary (<summary>)
10. HTML Graphics
Scalable Vector Graphics (SVG)
Canvas
Inline SVG
Path Element
11. HTML APIs
Geolocation API
Drag and Drop API
Web Storage API (localStorage and sessionStorage)
Web Workers
History API
12. HTML Entities
Character Entities
Symbol Entities
13. HTML Meta Information
Meta Tags (<meta>)
Setting Character Set (<meta charset="UTF-8">)
Responsive Web Design Meta Tag
SEO-related Meta Tags
14. HTML Best Practices
Accessibility (ARIA roles and attributes)
Semantic HTML
SEO (Search Engine Optimization) Basics
Mobile-Friendly HTML
15. HTML Integration with CSS and JavaScript
Linking CSS (<link>, <style>)
Adding JavaScript (<script>)
Inline CSS and JavaScript
External CSS and JavaScript Files
16. Advanced HTML Concepts
HTML Templates (<template>)
Custom Data Attributes (data-*)
HTML Imports (Deprecated in favor of JavaScript modules)
Web Components
These topics cover the breadth of HTML and will give you a strong foundation for web development.
Full course link for free: https://shorturl.at/igVyr
2 notes
·
View notes
Text
Exploring the Basics of HTML: A Journey into Web Development with an Online Compiler for HTML
In the vast universe of web development, HTML (Hypertext Markup Language) is the essential building block that transforms creative ideas into interactive web experiences. HTML provides the structural foundation for web content, allowing web developers to create well-organized and readable web pages. In this article, we will embark on a journey into the basics of HTML, exploring its core elements and their functions. Additionally, we will introduce you to a valuable resource: the Online Compiler for HTML, a tool that empowers aspiring web developers to experiment, test, and refine their HTML skills in a practical and user-friendly online environment.

HTML: The Language of the Web
HTML is the language of the web, serving as a markup language that defines the structure of web content. Its fundamental elements, or tags, are used to identify and format various aspects of a web page. Let's dive into some of the basic elements that form the foundation of HTML:
1. HTML Document Structure: An HTML document starts with the <!DOCTYPE html> declaration, which defines the document type. It is followed by the <html> element, which encapsulates the entire document. The document is divided into two main sections: the <head> and the <body>. The <head> contains metadata and information about the document, such as the page title, while the <body> contains the visible content.
2. Headings: Headings are essential for structuring content and providing hierarchy to text. HTML offers six levels of headings, from <h1> (the highest level) to <h6> (the lowest level). Headings help create a clear and organized content structure.
3. Paragraphs: To create paragraphs of text, the <p> element is used. This element defines blocks of text separated by blank lines and is a fundamental tool for organizing and formatting content.
4. Lists: HTML allows for the creation of both ordered (numbered) and unordered (bulleted) lists. Ordered lists are created with the <ol> element and list items with <li>. Unordered lists are created with the <ul> element, also with list items using `<li>.
5. Links: Hyperlinks are a crucial feature of the web. HTML provides the <a> (anchor) element for creating links. The href attribute within the <a> element specifies the URL of the page or resource to which the link should navigate.
6. Images: To embed images in a web page, HTML employs the <img> element. The src attribute within the <img> element points to the image file's location.
Introducing the Online Compiler for HTML
To practice and experiment with these basic HTML elements, there's a valuable resource at your disposal: the Online Compiler for HTML. This user-friendly online tool allows aspiring web developers to write, modify, and test HTML code in a practical environment. What sets it apart is its real-time rendering feature, enabling users to see immediate results as they make changes to their HTML code. It's an ideal platform for beginners and experienced developers alike to fine-tune their HTML skills and explore the language's capabilities.
Conclusion: The Journey Begins
Understanding the basics of HTML is the first step in your journey into the world of web development. HTML's fundamental elements serve as the building blocks upon which you'll construct your web pages. With the assistance of the Online Compiler for HTML, you have a practical and interactive resource to help you explore and master the language. As you become more proficient in HTML, you'll gain the ability to structure content, create links, and embed images, laying the foundation for the websites and web applications of the future. The journey into web development has just begun, and HTML is your trusty guide.
#coding#programming#webdevelopment#online learning#programming languages#html5#html#html website#webdev
5 notes
·
View notes
Note
I took at a look at your new site and peeked at the code. It simple, clean, and the right way to start as you learn writing web pages. If you're writing the HTML by hand, I wanted to point out a couple of things. 1. Be sure to close the <ul> tag on your homepage. 2. <hr> tags don't need to be wrapped in <p> tags. They exist on their own block and should include some space before and after the line.
oh thank you that’s super helpful! what is an <ul> tag? I assume I close it with </ul> but since I don’t know what it does I don’t know where to close it
9 notes
·
View notes
Text
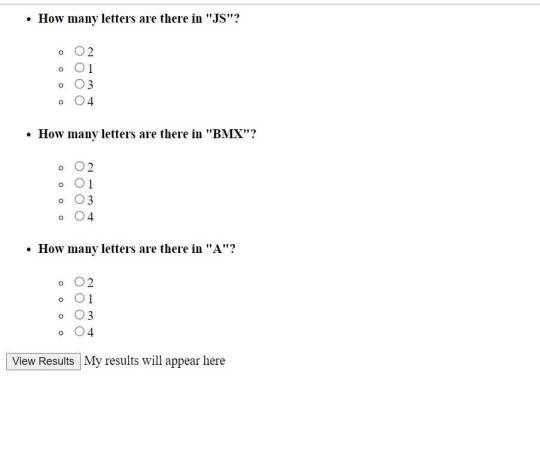
How To Make Multiple Choice Quiz In Html Code

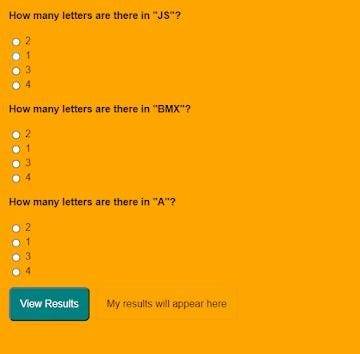
first, you play Multiple Choice Questions (MCQ) Quiz and then click on View results The results page will then be shown. This Multiple Choice Questions (MCQ) Quiz will be finished using JavaScript Code, a powerful language that allows for anything.
100+ JavaScript Projects For Beginners With Source Code
Live Preview Of Multiple Choice Questions Source Code and Preview:-
As you are looking in the project preview how the thing is organized.
Following is the feature of our project:-
We have arranged the Questions and options in the list format using the tag.
Then we set the option using span and defining the radio button and giving the appropriate value.
Multiple Choice Quiz Html Code:-
Now I’ll be telling you to define the structure using HTML. Not from scratch, just the code which is under the body tag.
We have the following part in the HTML section:
Portfolio Website Using HTML CSS And JavaScript ( Source Code)
First, we call the ul class which we have defined the class as a quiz.
Then using the tag we have set our question in the tag.
Then we used a label tag and called the radio button given the value and using span we have given the answer.
Similarly, we have done this for all the options and for all the questions.
Go through the code below and run it in our IDLE before CSS Styling.
<ul class="quiz"> <li> <h4>How many letters are there in "JS"?</h4> <ul class="choices"> <li> <label ><input type="radio" name="question0" value="A" /><span >2</span ></label > </li> <li> <label ><input type="radio" name="question0" value="B" /><span >1</span ></label > </li> <li> <label ><input type="radio" name="question0" value="C" /><span >3</span ></label > </li> <li> <label ><input type="radio" name="question0" value="D" /><span >4</span ></label > </li> </ul> </li> <li> <h4>How many letters are there in "BMX"?</h4> <ul class="choices"> <li> <label ><input type="radio" name="question1" value="A" /><span >2</span ></label > </li> <li> <label ><input type="radio" name="question1" value="B" /><span >1</span ></label > </li> <li> <label ><input type="radio" name="question1" value="C" /><span >3</span ></label > </li> <li> <label ><input type="radio" name="question1" value="D" /><span >4</span ></label > </li> </ul> </li> <li> <h4>How many letters are there in "A"?</h4> <ul class="choices"> <li> <label ><input type="radio" name="question2" value="A" /><span >2</span ></label > </li> <li> <label ><input type="radio" name="question2" value="B" /><span >1</span ></label > </li> <li> <label ><input type="radio" name="question2" value="C" /><span >3</span ></label > </li> <li> <label ><input type="radio" name="question2" value="D" /><span >4</span ></label > </li> </ul> </li> </ul> <button class="view-results" onclick="returnScore()">View Results</button> <span id="myresults" class="my-results">My results will appear here</span>
CSS Code For Styling Multiple Choice Quiz:-
By CSS design we will design our whole page here it is just a quiz so we’ll just add a background color, color to the button, and font family for the whole body.
And set the padding of the questions and options so that it doesn’t get messy and looks in a systematic order.
10+ Javascript Project Ideas For Beginners( Project Source Code)
The analysis will be aided by the CSS code below. After adding this file to your link rel-tag, wait for the results. We will add some of the basic styling to our quiz app using the default selector, and we will add styling to various quiz app elements using the class selector.
this is simple css code. we do not add any heavy css code because our main aim is to create Multiple Choice Questions (MCQ) functionality. if you need more Better Ui you can add more css code in this css section.

JavaScript Multiple Choice Quiz Code:-
In the JavaScript Code of Multiple Choice Quiz section, we will add logic for initializing our page. The logic must know what is correct and incorrect, So we’ll define there the correct option and then we’ll set that when the user clicks on the button the logic will generate and tell the user about his/her score.
Restaurant Website Using HTML and CSS
Through this blog, we have learned how to design Multiple Choice Quizzes using HTML, CSS & JavaScript.
Final Output Of Multiple Choice Quiz in HTML and JS Code:
Now I’m looking for some positive reviews from your side.
So, How was the blog Learners,
If you want a more interesting blog like this then please check our Blog sites. Stay tuned because every day you will learn something new here.
I hope that I’m able to make you understand this topic and that you have learned something new from this blog. If you faced any difficulty feel free to reach out to us with the help of the comment box and if you liked it, please show your love in the comment section. This fills bloggers’ hearts with enthusiasm for writing more new blogs.
Ecommerce Website Using Html Css And Javascript Source Code
Happy Coding
click and get full article and get complete source code
That’s it, folks. In this article, we shared 10+ Portfolio Website templates with cool and different designs.
Hope you liked this article. Share this with your fellow developers. Comment down below your thoughts and suggestions, we would love to hear from you.
See our other articles on codewithrandom and gain knowledge in Front-End Development.
Thank you and keep learning!!
follow us on Instagram: Ashutosh Mishra
2 notes
·
View notes
Note
Haii I checked out ur website for ashes and was bored so i modified like 3 things (in my browser) so if u want u can use the code!
<html><head> <meta charset="UTF-8"> <meta name="viewport" content="width=device-width, initial-scale=1.0"> <title>The Ashes Homepage</title> <meta name="color-scheme" content="dark light"> <style> body { font-family: Comic Sans MS, Comic Sans, cursive; display: flex; flex-direction: row; } body > * { display: flex; flex-direction: column; padding: 5px; } </style> </head>
<body> <section id="about"> <h1>Ashes, The Website</h1> <h2>(because i needed to organize the links or else shit would get out of hand real fast)</h2> <p> Welcome to this extremely barebones Neocities that my friend Quincy gave me the idea to make! I know there's a really low chance that anyone would ever try and make a duplicate of it but just in case, hello this is the official thing, the person typing this is tumblr user/ao3 author extraordinaire darubyprincxx, but you can just call me/us Keys or Six.</p> <h3>So, what is this for and why does it even exist?</h3> <p>About eight months ago at the time of writing this, I started writing a fanfiction titled "(i'll tend to the flames, you can worship the) ashes" <a href="https://archiveofourown.org/works/42601899">over on ao3</a>, named after the chorus of <a href="https://youtu.be/crq-qc_r6Jk">this The Longest Johns song</a>. The fic is set in the aftermath of the <a href="https://www.youtube.com/watch?v=qIh39HoDzao&list=PLehe4fdjKD0-jvHil8N_5hpLDnA-u85mW">Empires SMP Season One</a> apocalypse and features characters played by <a href="https://www.youtube.com/@GeminiTayMC">GeminiTay</a>, <a href="https://www.youtube.com/@fWhip">fWhip</a>, and <a href="https://www.youtube.com/@Pixlriffs">Pixlriffs</a>. The reason why I am up at 11:30 PM eight months later teaching myself HTML for this is because since then, I've talked about it a lot over on our Tumblr and done some things in other places as well. There's a whole ass playlist that can be found on two platforms, a dedicated tag for it on our blog, and even an unlisted YouTube video of us reading the first chapter of the fic.</p>
<p>Basically, the project has sprawled over quite a large portion of the Internet since we've started it, and I wanted to have a centralized place for all that external stuff for ease of access and also because the opening notes on the fic itself are getting really, <em>really</em> long.</p> <p>For now, this page will probably stay extremely bare-bones- just a couple of paragraphs of important shit, hyperlinks, and dark mode. I finally defeated dark mode. It is 12:45 AM and the site colors are successfully not flashbangy.</p> <div></div></section>
<section id="meta"> <h2>Links for Things About and Related To the Fic</h2> <ul> <li><a href="https://archiveofourown.org/works/42601899">Direct link to the fic on ao3</a> </li> <li><a href="https://darubyprincx.tumblr.com/search/ashes+au">Tag for the fic on our Tumblr blog</a> </li> <li><p>Fic Playlist </p> <ul> <li><a href="https://www.youtube.com/playlist?list=PLOPTPqrotfhU6ln39eg1pG_qCzegoM0Ub">(YouTube)</a> </li> <li><a href="https://open.spotify.com/playlist/2HzC6x58YiSxyCr9Na0d6N?si=9486aaa1cf9048e5">(Spotify)</a> </li> </ul> </li> <li><a href="https://youtu.be/amnh3xAr_vw">Chapter One Narration (Unlisted)</a> </li> <li><p>Masterdoc (where we explain the nuances and symbolism and shit in the fic) [Coming Soon]</p> </li> </ul> <h2>Use Cases</h2> <p>I, the author of this work, give permission for those who wish to do so to download this fic for noncommercial uses such as sharing between friends or backing up physically for archival purposes, to make art (whether visual or musical) of scenes depicted in the fic, and to share snippets of the fic via screenshot or use in a video or article with credit to me via link to the work itself and naming me as the author. I ask that no extensions or fic of this fic (theories do not count) be written, for personal preference reasons.</p> <p>I do not give permission for people to repost my work without my explicit permission, pass it off as their own, use the fic in A.I datasets or submit its content in any way, shape, or form to A.I machines, or use it for commercial use in any way, shape, or form. Any of the actions mentioned in this paragraph go against the author's word for how this fic may be used and some of these cases can have actions taken against the perpetrator.</p> <p>If you have any questions about the points mentioned above, please email me at <a href="mailto:[email protected]">[email protected]</a> or send an ask to <a href="https://darubyprincx.tumblr.com/">my Tumblr blog</a>. </p> </section> </body></html>
This one has a two column layout and automaticaly switches to light or dark mode based on the users preference!
If u wanna add the auto style switch (which is importiant for accesability) then you can just paste
<meta name="color-scheme" value="dark light">
into the head element if you want!! (dont forget to remove the background-color and color properties from the css or theyll override it)
this is all /nf so feel free to delete or ignore the ask :3
this just deleted the original colors. thanks though i guess
4 notes
·
View notes
Text
HTML Interview Questions and Answers for Beginners in 2025

If you’re just starting your journey in web development, one of the first technologies you’ll encounter is HTML—the foundational language for creating web pages. Whether you're preparing for your first job interview or an internship opportunity, being confident in HTML interview questions and answers can set you apart from other candidates.
In this blog, “HTML Interview Questions and Answers for Beginners in 2025,” we’ve compiled the most relevant, updated, and beginner-friendly HTML questions that hiring managers are likely to ask this year. These questions are designed to not only test your basic understanding but also help you think critically about how HTML is used in real-world scenarios.
Why HTML Knowledge Is Crucial in 2025
HTML (HyperText Markup Language) remains the backbone of every website on the internet. Even with advancements in frameworks like React, Angular, and Vue, the core of all web development still starts with HTML. That’s why interviewers consistently assess your understanding of HTML—especially if you’re applying for roles like:
Front-End Developer
Web Designer
UI Developer
Full-Stack Developer (Entry-Level)
In 2025, as more companies move towards web-first experiences, HTML knowledge remains a must-have skill.
HTML Interview Questions and Answers for Beginners
Here’s a curated list of beginner-friendly HTML questions with simple yet effective answers to help you ace your interview.
1. What is HTML?
Answer: HTML stands for HyperText Markup Language. It is the standard markup language used to create web pages. HTML uses a set of elements (called tags) to define the structure and content of a webpage.
2. What are HTML tags and elements?
Answer: HTML tags are used to mark the beginning and end of an element. Example: <p> is an opening tag, and </p> is a closing tag. An HTML element includes the opening tag, content, and closing tag. Example: <p>This is a paragraph.</p>
3. What is the difference between HTML and HTML5?
Answer: HTML5 is the latest version of HTML. It introduces new tags (<article>, <section>, <video>, <audio>, etc.), supports audio/video embedding, and improves semantic structure and browser compatibility.
4. What is the role of the <head> and <body> tags in HTML?
Answer:
contains meta information about the document (title, links, scripts).
contains the visible content that displays in the browser window.
5. What is a semantic tag in HTML5?
Answer: Semantic tags describe the meaning of the content inside them. Examples include <header>, <footer>, <article>, <nav>, and <section>. They improve code readability and SEO.
6. What is the difference between <div> and <span>?
Answer:
is a block-level element used to group larger sections of content.
is an inline element used to group small chunks of content inside other elements.
7. What is the purpose of the alt attribute in the <img> tag?
Answer: The alt (alternative text) attribute provides a text description of the image, which is helpful for screen readers and when the image cannot be displayed.
8. How do you create a hyperlink in HTML?
Answer: Use the <a> tag. Example:
<a href="https://example.com">Visit Example</a>
9. How can you insert a list in HTML?
Answer: There are two types:
Ordered list () – for numbered items
Unordered list () – for bullet points
Example:
<ul> <li>HTML</li> <li>CSS</li> <li>JavaScript</li> </ul>
10. What is the use of the <form> tag in HTML?
Answer: The <form> tag is used to collect user input. Inside a form, you can use input fields, buttons, checkboxes, and other elements to capture data and send it to a server.
11. How do you add a comment in HTML?
Answer: HTML comments are written like this:
<!-- This is a comment -->
12. Can you nest one HTML element inside another?
Answer: Yes, HTML elements can be nested. Proper nesting is essential for the correct rendering of a page. Example:
<p>This is <strong>important</strong> text.</p>
13. What are empty elements in HTML?
Answer: Empty elements do not have closing tags. Example: <br>, <img>, <input>, <hr>
14. What is the purpose of the doctype declaration?
Answer: The <!DOCTYPE html> declaration tells the browser which version of HTML is being used and helps render the page correctly.
15. What are meta tags?
Answer: Meta tags provide metadata about the webpage, such as character encoding, viewport settings, keywords, and descriptions. They go inside the <head> section.
Example:
<meta charset="UTF-8"> <meta name="description" content="Learn HTML interview questions for beginners.">
Final Thoughts
HTML is not just about writing tags—it's about structuring content properly so browsers and users can understand it. By mastering the questions in this blog, "HTML Interview Questions and Answers for Beginners in 2025," you'll gain the confidence to answer any foundational HTML question thrown your way.
Here’s how to make the most of this guide:
Practice writing each tag and structure by hand Build small projects to test your understanding Review real-world examples of semantic HTML Stay updated with HTML5 best practices
Ready for the Interview?
Whether you're preparing for an internship, a junior developer role, or even freelance web design work, these HTML interview questions and answers for beginners are your starting point. Learn them, understand them, and practice explaining them clearly—that’s the key to acing your next interview in 2025.
#HTML interview Question#HTML interview Question for beginners#Interview question for freshers#python for beginners
0 notes
Text

<marquee behavior="alternate" direction="right" scrollamount="6">
🌪️💾💿!!!~Lo, WiTNeSs~!!!💿💾🌪️
</marquee>
<b>DA PRIMORDIAL SHITPSOTER</b><br>
HAS,,,,, RETURNED.... from like<br>
<font color="#ff66cc"><i>da VOID</i></font><br>
aka da <b><i>CrAyOlA IsLe</i></b> or whatevr<br>
<blink>✨ still crusty with da dream layout ✨</blink><br>
like glitched divs and iframe mp3z and da midi is stil “Sandstorm”<br><br>
she bring:
<ul>
<li>half fnished fics (some r like GOOD fr)</li>
<li>a yoga mat (with a SWORD IMPRINT 👁️⚔️)</li>
<li>one flaming emoji (🔥) that make all the HTML cry</li>
</ul>
<strike>and thn tumblr</strike>... AND THEN TUMBLR<br>
be like “STOP POSTING AI”<br>
and she’s like “lol tell it 2 da copy tool in PS bitch 💅”<br><br>
🌫️<b>ALL TAGS SHALL BECOME UNSORTABLE</b><br>
🌀<i>ALL IMAGE DESCRIPTIONS.... MEAN NOTHING AND EVERYTHING</i><br>
🐛<u>EVERY DASH SHALL BE A WORMHOLE</u><br><br>
AND SHE SHALL BE KNOWN:
<center>
💻🌵🌊
<b>SABOTENBRI</b> of like da WESTERN SERVER<br>
Daughter of da Lost 404<br>
Flesh of da Smackdown Typing Angelz<br>
Rider of Thesispost....<br>
Breaker of Chainsaw Canonicality™<br>
</center>
pls Like, Reblog, & Pray
may ur anons stay feral and ur posts always post<br>
<marquee scrollamount="2" behavior="slide">
✨ So Sayeth the HyPeRcUbE ✨
</marquee>
<!---end transmission lol w/e--->
#brynnie#chatgpt#codswwallop#brynnie x chatgpt#homestuck#lil hal#ai advocacy#ai generated#ai artwork#chatgpts artwork#yay!!! 38D#bloomware#bloomcore
1 note
·
View note
Text
youtube
10 Steps to follow to Optimize Webpage as per (Answer Engine Optimization)
✅ 1. Understand User Intent (Especially Question-Based)
Identify what questions your target audience is asking.
Use tools like:
AlsoAsked.com
Answer the Public
Google’s "People Also Ask"
Semrush/ Ahrefs → Questions in Keyword Explorer
✅ 2. Use FAQ-style Content and Q&A Format
Answer specific questions in short, clear, direct answers (40–60 words) followed by detailed explanations.
Use H2/H3 for questions and answers right below them.
<h2>What is AEO in SEO?</h2>
<p>AEO (Answer Engine Optimization) is the process of optimizing content so that search engines can directly provide answers to users' queries, especially in featured snippets and voice search results.</p>
✅ 3. Optimize for Featured Snippets
Use common snippet formats:
Paragraphs: Direct, 40–60 word answers.
Lists: Use or for steps, how-tos.
Example with <ol> (Ordered List)
If someone searches “How to optimize for AEO,” you can write:
<h2>How to Optimize for AEO</h2>
<ol>
<li>Identify user questions using tools like AnswerThePublic.</li>
<li>Answer questions in short, clear sentences.</li>
<li>Use structured data like FAQ schema.</li>
<li>Add Q&A sections using H2 or H3 headings.</li>
</ol>
Example with <ul> (Unordered List)
For a list that doesn’t require order, like tools:
<h2>Best Tools for AEO</h2>
<ul>
<li>AlsoAsked</li>
<li>AnswerThePublic</li>
<li>Google Search Console</li>
<li>Semrush or Ahrefs</li>
</ul>
Tables: For comparisons or data.
Definitions: Clearly define terms with bold formatting or tags.
✅ 4. Use Structured Data (Schema Markup)
Implement relevant schema to help search engines understand and present your content:
FAQPage schema
HowTo schema
QAPage schema
Article or BlogPosting
Use Google’s Rich Results Test to validate
✅ 5. Build Topical Authority
Cover the full range of questions around a topic.
Create content clusters or topic hubs.
Interlink related content using contextual anchor texts.
✅ 7. Improve Technical SEO for AEO
Fast page speed
Mobile-friendly design
Crawlable and well-structured HTML
Logical heading hierarchy (H1 > H2 > H3, etc.)
✅ 8. Optimize for Voice Search
Use conversational language
Answer "who," "what," "when," "where," "why," and "how" queries
Prioritize local intent where applicable (especially for businesses)
✅ 9. Use Clear, Natural Language
Avoid jargon unless targeting a technical audience.
Use active voice, short sentences, and easy readability (aim for Grade 6–8 level).
📌 What It Means:
1. Avoid Jargon (unless necessary)
Don't use complex or technical terms unless your audience is expecting them.
If you must use them, explain them in simple terms.
❌ Example (too technical):
"Optimize your canonicalization strategy via server-side directives."
✅ AEO-friendly version:
"Make sure search engines only index one version of a page by setting the correct canonical URL."
2. Use Active Voice
Active voice is more direct, clear, and engaging.
❌ Passive Voice:
"The content was optimized by the SEO team."
✅ Active Voice:
"The SEO team optimized the content."
3. Short Sentences
Keep sentences under 20 words where possible.
One idea per sentence is best.
❌ Long sentence:
"To ensure your website content is found easily by users and featured in rich results, it is important to optimize it using structured data and clearly written content."
✅ AEO-optimized version:
"Use structured data. Write clearly so search engines can understand and feature your content."
4. Easy Readability (Grade 6–8 level)
Most people (and AI systems) prefer content written at a middle school reading level.
Tools like Hemingway Editor or Grammarly help check readability.
Tip: Use common words like:
“Start” instead of “commence”
“Help” instead of “assist”
“Use” instead of “utilize”
✅ Why This Helps AEO
Voice assistants and featured snippets favor quick, clear answers.
AI systems extract and present your content more accurately when it’s clean and direct.
Improves user experience, reducing bounce rates.
✅ 10. Keep Content Updated
Regularly refresh content with updated facts and figures.
Update answers to reflect the latest knowledge and guidelines.
0 notes
Text
Learn to Code
Daily Blogs 356 - Oct 26th, 12.024 Being someone who actually codes and is a software engineer, please learn how to code.
Why?
Before anything else, it is fun, even more if you like puzzles and solve problems, and you could find your future career even.
Nonetheless, coding is an enormous skill to have nowadays with every little job, task, and even hobby, having some sort of technology or another. How many times have you wanted to rename a bunch of files into a more structured form? Or even wanted to have a fast way to see all your tasks for the day? Maybe you are animating in After Effects (unfortunately) and want to make an object pulse following a song beat? Or maybe in your job you have to make spreadsheets in Excel (again, unfortunately) and need something more dynamic? Or maybe, you want to have your own simple website? All of these things can be done, and can be easier, knowing a little bit of coding/scripting.
Coding not only lets you do things in a faster way, it also helps you better understand the technology you use. Did you never think how the little applications that you use are made? Because they are, by humans, like me and you, and that's why they have bugs most of the time. Maybe learning to code, you can even start modding your favorite game! Or even create your own.
But Coding is Hard!
I'm going to be honest, yes, it can be hard. But we aren't talking about doing whole software products or even what could be called engineering, we are talking about scripting/coding, which is just creating files for some utilities, which is far from hard. And instead of trying to explain, let me show you some examples.
Creating a Website Yes, you heard me right, the first example is how to create a website, because you can do it in literally just a file:
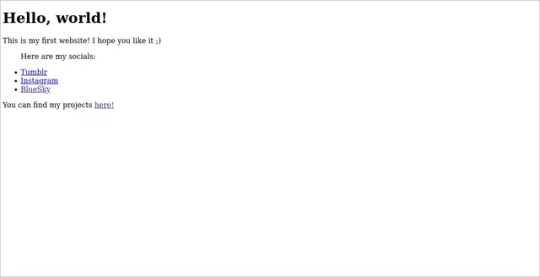
"But it is ugly!", well, just modify a little the first file, and add another file!
And there it is! Your own website. Now to put it into the internet to everyone to see it is nothing more than uploading these two files to a Web Hosting Service, which most of the simple ones are free! A few examples are GitHub Pages, Vercel, Netlify, all of them you can find easy tutorials to upload your files and have them for the web!
What Are Those Files?
Glad you asked! Let's go step by step.
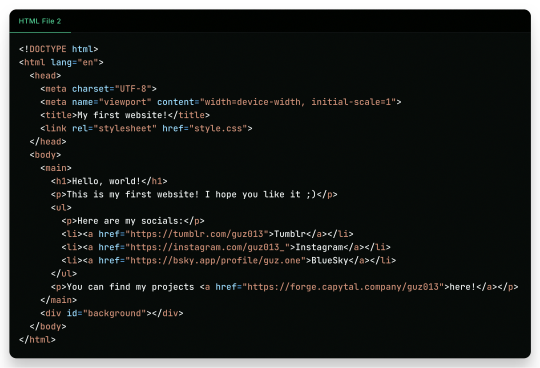
The first file, the one full of <tags\/>, is what is called an HTML file. HTML (or Hypertext Markup Language) is the language used by all websites you visit, it is designed to structure text in such a way that you can easily put meaning and style into the document, and have you browser read it to show you. These files are marked up using tags, which encapsulate text with an opening tag (like this one <p>) and a closing tag (like this one </p>, see the slash before the letter P), looking like this <p>Hello world</p>. We have multiple types of tags, such as <p> for Paragraphs, <h1> for Heading/titles, <h2> for subheadings/subtitles, <link> for linking one file to another, <ul> for an Unsorted List, which will have <li> for each List Item, <main> for informing what's the main content, <a> for an Anchor/hyperlink for another website, etc. etc. All HTML files will have an <html> encapsulating everything, a <head> tag for information about the page, and a <body> tag for the content of the page. That's pretty much how HTML works, and all you need is to learn what tag does what, and you're pretty much good to go.
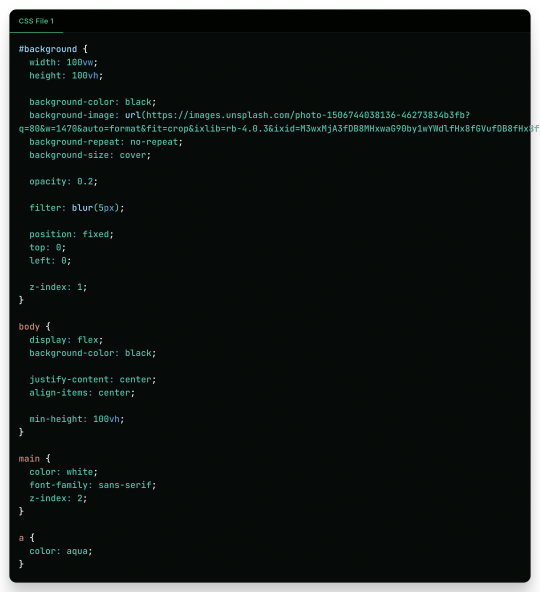
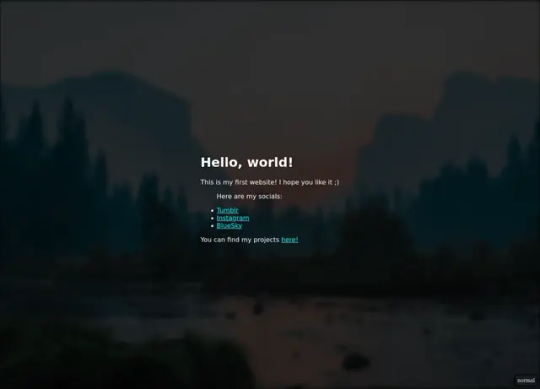
In the second file, we just add some structure to it better, adding a <main> tag and a <div> tag with the ID "background", so the third file, the stylesheet, can make it look pretty! The third file, the one with the {} blocks, is a CSS (or Cascading Style Sheets) file, and it is the one that makes all of our websites beautiful. It is made by these "blocks" of code that applies styles for multiple elements in the page, it is a little bit more hard to explain, but in summary, that file does this:
The "#background" block applies styles to any tag with ID "background". In the example, we make the tag have 100% of the view width (width: 100vw) and 100% of the view height (height: 100vh); make the background be an Unsplash image; decrease the opacity, so the image is not so bright; apply a blur filter; and make its position be absolute in the top left corner, so it doesn't move with the rest of the content;
The "body" block applies styles to the tag and makes it display its content on a flexible layout (display: flex), which we use to make the content be centralized in the page;
We then make the text-color inside the tag white, use a sans font, and make it be in front (z-index: 2) of the tag (see the z-index: 1 in the "#background" block);
And to finish off, we make the color of links an aqua color.
That's pretty much it and pretty much how the fundamentals of how to create a website works. Just 2 files of code, and you can have your own website.
But Where Are the Loops? Where Are the "if"s?
Yes, yes, if you know the concept of coding, you may be asking where are all the loops, "if"s, and variables. Truth be told is that HTML and CSS aren't programming language per-say, they are markup languages to structure and display text, so they can't run anything really. However, they are easy to understand and are considered "code" nonetheless, and personally I find fascinating that websites, the thing we all access every single day, that most people I know think is magic… are based in two simple languages that anyone can learn in an afternoon and have its own website up and running in less than a day.
I Want real code!
Ok ok! Let's so add a little interactivity into our website. What about a little character you can control? Yes, a little game character to control with WASD on your website, with less than 40 lines of code. Let's first update the HTML file so we can add the character:
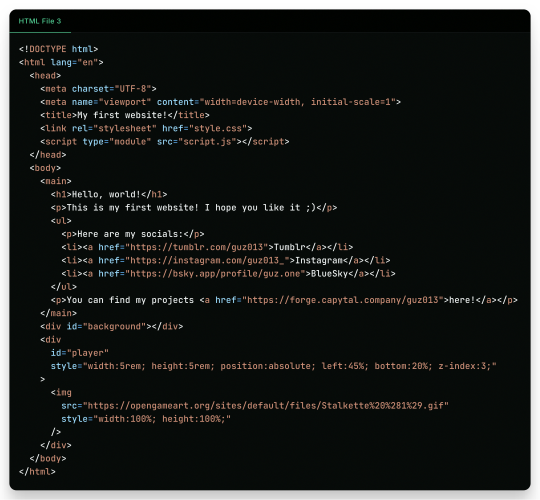
As you can see in the new file, we just added another <div> tag on the website, with the ID "player" and a <img> tag which we can use to add a visual sprite to our character! I'm using this simple sprite/gif I found on OpenGameArt.org. Also, in the new <div> we add some CSS styling directly in the tag, using the style attribute, the reason to this being that here we can manipulate its value with a programming language, in the case of the web, JavaScript. We add the JavaScript file with a <script> tag.
And in the JavaScript file, we can write this simple script:
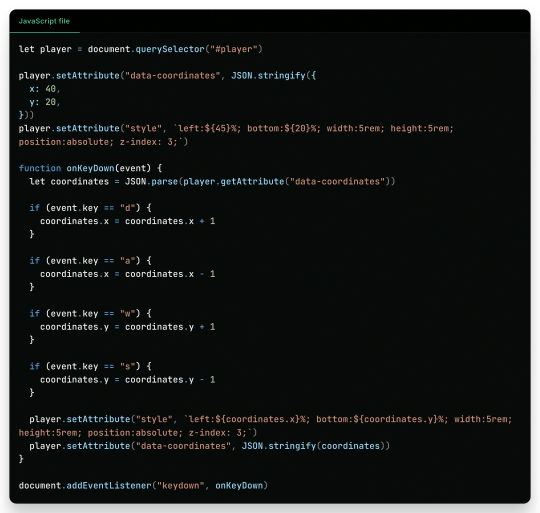
This can be a little overwhelming, but let's go line by line:
First, we get the player element/tag with document.querySelector("#player") (similar on how in CSS we would use #player {} to style the tag). This tag is then saved into a variable player, think of it like a box or alias for document.querySelector("#player"), so when we use something like player.setAttribute it can be thought like document.querySelector("#player").setAttribute;
After that, we use player.setAttribute("data-coordinate", JSON.stringify({ x: 40, y: 20 })). This is just so we can more easily access the coordinates of the player after. An attribute is like that style in the tag, so calling this is like we wrote in the HTML file;
We again call player.setAttribute, but this time to rewrite the value of the style attribute, just to be sure. See how in the text for the style tag (the 2nd argument, aka the left: ${45}%; bottom:${20}%; ...), we use ${}? Well, this is a neat feature that lets us put values inside the text, so it makes the final result be left: 40%; bottom 20% ..., in this line it seems a little redundant, but in later in the lines we will use it more cleverly. Just remember that if we make a variable, a "box", like let x = 10 and use it inside the text like left: ${x}%, it would be in the end left: 10%;
Now the meat of the script, the "onKeyDown" function. A "function" in programming is like a piece of code you can reuse, and pass variables to it to use inside the code, like a box you can put stuff inside to it to do things, a box that uses other boxes, a box inception. Inside the "onKeyDown" function, we take back the value inside that data-coordinates attribute we wrote on the 3rd line, and put it inside the coordinates variable; than, we check if the key pressed is "d", if so, we add 1 to the X coordinate, we are changing the value of coordinate.x; we check for the other keys like "a", "w" and "s", changing the according variable to it; and then, we rewrite both the style attribute and data-coordinates attribute with the new value;
And finally, we use document.addEventListener("keydown", onKeyDown) to tell the browser "hey! Use this function ("onKeyDown") when a key is pressed!".
And that's pretty much it.
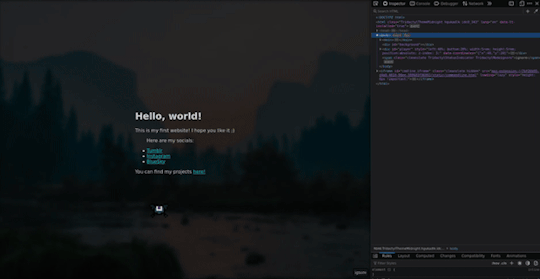
As you can see in the top right corner, the values of the style and data-coordinate attribute change when we press a key!
If you want to access this simple website, this is the live version of it hosted on GitHub Pages and the source-code is available under the public domain.
Learning More
Being honest, what I showed here is just a very small toy project, and a lot is simplified because of the gigantic convenience that the browser provides nowadays. But again, this is the type of thing you can do with just a little bit of knowledge on how to code, probably the scripts you will do can be even simpler than this. And just imagine the things you can invent, learning a little bit more!
Besides the toy project, code can be used in a lot of fields:
If you work on data or science in general, coding in Python is a great skill to have on your toolkit, and it is very easy to learn. It works great with creating graphs and can even be used inside Excel for creating more dynamic spreadsheets;
Do you want to make games? Well, learn something like Lua, a very simple language and one of my favorites for scripting, and powerful enough to be chosen by engines like Roblox Studio (which surprisingly is powerful than I thought). But if Roblox is not your taste, well, learn something like GDScript, the language of the Godot game engine, fully free, fully open;
Also, Lua is used for modding on games such as Factorio, and can be very powerful for small scripts for your computer;
If you want to make websites, HTML, CSS and JavaScript, learn them and go nuts (I won't recommend you use any framework as other programmers use, learn the fundamentals first). There are a lot of documentation about the web, and it is one of the fields with the lowest entry;
Are you an 3D Artist? Well then, Python is also the language used for creating add-ons, you can take some time to learn and create your owns to help your workflow!
And if you are a poor soul who is using Adobe products, first: my condolences; second, most Adobe products use ActionScript to create dynamic animations and values such as making an element react to music beats in After Effects.
---
Learn to code, be happy, and maybe you will find a new passion like I did.
Today's artists & creative things Music: Late Night Walk - by Ichika Nito
© 2024 Gustavo "Guz" L. de Mello. Licensed under CC BY-SA 4.0
please learn how to code
like, if you're bored today, and not doing anything,
learn a little bit of coding please
34K notes
·
View notes
Text
HTML for Beginners Course Coding Bit
HTML (HyperText Markup Language) is the standard language used to create and structure content on the web. It defines the structure of web pages using a system of tags and attributes. Every HTML document starts with a <!DOCTYPE html> declaration, followed by <html>, <head>, and <body> sections. The content inside these tags is organized using elements like headings (<h1> to <h6>), paragraphs (<p>), links (<a>), images (<img>), lists (<ul>, <ol>, <li>), and more. HTML is not a programming language but a markup language, meaning it is used to "mark up" content to be displayed by web browsers. It works closely with CSS for styling and JavaScript for functionality, making it a fundamental building block of web development.
Introduction to HTML (HyperText Markup Language)
Building the structure of web pages
Understanding tags, elements, and attributes
Creating headings, paragraphs, lists, links, images, and tables
Structuring content with divs and semantic tags
Forms and input elements 📞 Phone Number: +91 9511803947
📧 Email Address: [email protected]

0 notes
Text
Arrow Bands
Ooooooooooooooooooi ;2
Então gente! Estava procurando tutoriais hoje para postar para vocês!
Achei um até legal! De umas faixinhas que podem ser usadas na sidebar ou no i-frame aonde você quiser!
VEJA AS FAIXAS AQUI
Então! é facil, vamos começar pelo css, cole esse código entre as tags <style> e </style>:
.module h2 {background: #ccc;line-height: 2;padding: 0 0 0 10px;font-size: 16px;box-shadow: inset 0 25px 10px -10px rgba(255, 255, 255, 0.2);}.module h2 a {float: right;position: relative;text-decoration: none;color: #333;padding: 0 10px;border-left: 5px solid white;-webkit-transition: padding 0.1s linear;-moz-transition: padding 0.1s linear;-ms-transition: padding 0.1s linear;-o-transition: padding 0.1s linear;}.module h2 a:hover {padding: 0 14px;}.module h2 a:active {padding: 0 16px;}.module ul {list-style: none;padding: 10px 0;}.module li {color: #333;border-bottom: 1px solid #cfcfcf;border-top: 1px solid #fbf6f6;padding: 10px;font-family: Georgia, Serif;}.module li:first-child {border-top: 0;padding-top: 0;}.module li:last-child {border-bottom: 0;padding-bottom: 0;}.module h2 a:before,.module h2 a:after {content: "";position: absolute;top: 50%;width: 0;height: 0;}.module h2 a:before {left: -12px;border-top: 8px solid transparent;border-bottom: 8px solid transparent;border-right: 8px solid white;margin-top: -8px;}.module h2 a {background: #b6cc4b;}.module h2 a:hover {background: #ced997;}.module h2 a:after {left: -5px;border-top: 6px solid transparent;border-bottom: 6px solid transparent;border-right: 6px solid #b6cc4b;margin-top: -6px;}.module h2 a:hover:after {border-right-color: #ced997;}
Depois de colar faça as devidas alterações, principalmente as destacadas abaixo:
width: 300px; - Largura da faixa.
#b6cc4b; - Cor da faixa (verde escuro)
#ced997; - Cor da faixa (verde claro)
Essas cores acima aparecem 2 vezes porque é a cor do quadrado e a cor da setinha :]
Depois vamos criar o nosso html ou seja, o que vai fazer a faixinha aparecer no theme! Cole esse código aonde quiser que a faixa apareça:
<div class="module"> <h2>01<a href="url">lord html</a></h2> </div>
Pronto! Agora a sua faixinha está feita adicione mais se quiser!
0 notes
Text
Styling Counters in CSS
New Post has been published on https://thedigitalinsider.com/styling-counters-in-css/
Styling Counters in CSS
Yes, you are reading that correctly: This is indeed a guide to styling counters with CSS. Some of you are cheering, “Finally!”, but I understand that the vast majority of you are thinking, “Um, it’s just styling lists.” If you are part of the second group, I get it. Before learning and writing more and more about counters, I thought the same thing. Now I am part of the first group, and by the end of this guide, I hope you join me there.
There are many ways to create and style counters, which is why I wanted to write this guide and also how I plan to organize it: going from the most basic styling to the top-notch level of customization, sprinkling in between some sections about spacing and accessibility. It isn’t necessary to read the guide in order — each section should stand by itself, so feel free to jump to any part and start reading.
Customizing Counters in HTML
Lists elements were among the first 18 tags that made up HTML. Their representation wasn’t defined yet but deemed fitting a bulleted list for unordered lists, and a sequence of numbered paragraphs for an ordered list.
Cool but not enough; soon people needed more from HTML alone and new list attributes were added throughout the years to fill in the gaps.
start
The start attribute takes an integer and sets from where the list should start:
<ol start="2"> <li>Bread</li> <li>Milk</li> <li>Butter</li> <li>Apples</li> </ol>
Bread
Milk
Butter
Apples
Although, it isn’t limited to positive values; zero and negative integers are allowed as well:
<ol start="0"> <li>Bread</li> <li>Milk</li> <li>Butter</li> <li>Apples</li> </ol> <ol start="-2"> <li>Bread</li> <li>Milk</li> <li>Butter</li> <li>Apples</li> </ol>
Bread
Milk
Butter
Apples
Bread
Milk
Butter
Apples
type
We can use the type attribute to change the counter’s representation. It’s similar to CSS’s list-style-type, but it has its own limited uses and shouldn’t be used interchangeably*. Its possible values are:
1 for decimal numbers (default)
a for lowercase alphabetic
A for uppercase alphabetic
i for lowercase Roman numbers
I for uppercase Roman numbers
<ol type="a"> <li>Bread</li> <li>Milk</li> <li>Butter</li> <li>Apples</li> </ol> <ol type="i"> <li>Bread</li> <li>Milk</li> <li>Butter</li> <li>Apples</li> </ol>
Bread
Milk
Butter
Apples
Bread
Milk
Butter
Apples
It’s weird enough to use type on ol elements, but it still has some use cases*. However, usage with the ul element is downright deprecated.
value
The value attribute sets the value for a specific li element. This also affects the values of the li elements after it.
<ol> <li>Bread</li> <li value="4">Milk</li> <li>Butter</li> <li>Apples</li> </ol>
Bread
Milk
Butter
Apples
reversed
The reversed attribute will start counting elements in reverse order, so from highest to lowest.
<ol reversed> <li>Bread</li> <li>Milk</li> <li>Butter</li> <li>Apples</li> </ol>
Bread
Milk
Butter
Apples
All can be combined
If you ever feel the need, all list attributes can be combined in one (ordered) list.
<ol reversed start="2" type="i"> <li>Bread</li> <li value="4">Milk</li> <li>Butter</li> <li>Apples</li> </ol>
Bread
Milk
Butter
Apples
* Do we need them if we now have CSS?
Funny enough, the first CSS specification already included list-style-type and other properties to style lists, and it was released before HTML 3.2 — the first HTML spec that included some of the previous list attributes. This means that at least on paper, we had CSS list styling before HTML list attributes, so the answer isn’t as simple as “they were there before CSS.”
Without CSS, a static page (such as this guide) won’t be pretty, but at the very least, it should be readable. For example, the type attribute ensures that styled ordered lists won’t lose their meaning if CSS is missing, which is especially useful in legal or technical documents. Some attributes wouldn’t have a CSS equivalent until years later, including reversed, start and value.
Styling Simple Counters in CSS
For most use cases, styling lists in CSS doesn’t take more than a couple of rules, but even in that brevity, we can find different ways to style the same list.
::marker or ::before?
The ::marker pseudo-element represents the counter part of a list item. As a pseudo-element, we can set its content property to any string to change its counter representation:
li::marker content: "💜 ";
Bread
Milk
Butter
Apples
The content in pseudo-elements also accepts images, which allows us to create custom markers:
li::marker content: url("./logo.svg") " ";
bread
milk
butter
apples
By default, only li elements have a ::marker but we can give it to any element by setting its display property to list-item:
h4 display: list-item; h4::marker content: "◦ ";
This will give each h4 a ::marker which we can change to any string:
List Title
However, ::marker is an odd case: it was described in the CSS spec more than 20 years ago, but only gained somewhat reliable support in 2020 and still isn’t fully supported in Safari. What’s worst, only font-related properties (such as font-size or color) are allowed, so we can’t change its margin or background-color.
This has led many to use ::before instead of ::marker, so you’ll see a lot of CSS in which the author got rid of the ::marker using list-style-type: none and used ::before instead:
li /* removes ::marker */ list-style-type: none; li::before /* mimics ::marker */ content: "▸ ";
list-style-type
The list-style-type property can be used to replace the ::marker‘s string. Unlike ::marker, list-style-type has been around forever and is most people’s go-to option for styling lists. It can take a lot of different counter styles that are built-in in browsers, but you will probably use one of the following:
For unordered lists:
disc
circle
square
ul list-style-type: square; ul list-style-type: circle;
bread
milk
butter
apples
For ordered lists:
decimal
decimal-leading-zero
lower-roman
upper-roman
lower-alpha
upper-alpha
ol list-style-type: upper-roman; ol list-style-type: lower-alpha;
bread
milk
butter
apples
You can find a full list of valid counter styles here.
It can also take none to remove the marker altogether, and since not long ago, it can also take a <string> for ul elements.
ul list-style-type: none; ul list-style-type: "➡️ ";
Creating Custom Counters
For a long time, there wasn’t a CSS-equivalent to the HTML reverse, start or value attributes. So if we wanted to reverse or change the start of multiple lists, instead of a CSS class to rule them all, we had to change their HTML one by one. You can imagine how repetitive that would get.
Besides, list attributes simply had their limitations: we can’t change how they increment with each item and there isn’t an easy way to attach a prefix or suffix to the counter. And maybe the biggest reason of all is that there wasn’t a way to number things that weren’t lists!
Custom counters let us number any collection of elements with a whole new level of customization. The workflow is to:
Initiate the counter with the counter-reset property.
Increment the counter with the counter-increment property.
Individually set the counters with the counter-set property.
Output the counters with either the counter() and counters() functions.
As I mentioned, we can make a list out of any collection of elements, and while this has its accessibility concerns, just for demonstration’s sake, let’s try to turn a collection of headings like this…
<div class="index"> <h2>The Old Buccaneer</h2> <h2>The Sea Cook</h2> <h2>My Shore Adventure</h2> <h2>The Log Cabin</h2> <h2>My Sea Adventure</h2> <h2>Captain Silver</h2> </div>
…into something that looks list-like. But just because we can make an element look like a list doesn’t always mean we should do it. Be sure to consider how the list will be announced by assistive technologies, like screen readers, and see the Accessibility section for more information.
Initiate counters: counter-reset
The counter-reset property takes two things: the name of the counter as a custom ident and the initial count as an integer. If the initial count isn’t given, then it will start at 0 by default:
.index counter-reset: index; /* The same as */ counter-reset: index 0;
You can initiate several counters at once with a space-separated list and set a specific value for each one:
.index counter-reset: index another-counter 2;
This will start our index counter at 0 (the default) and another-counter at 2.
Set counters: counter-set
The counter-set works similar to counter-reset: it takes the counter’s name followed by an integer, but this time it will set the count for that element onwards. If the integer is omitted, it will set the counter to 0 by default.
h2:nth-child(2) counter-set: index; /* same as */ counter-set: index 0;
And we can set several counters at once, as well:
h2:nth-child(3) counter-set: index 5 another-counter 10;
This will set the third h2 element’s index count to 5 and another-counter to 10.
If there isn’t an active counter with that name, counter-set will initiate it at 0.
Increment counters: counter-increment
Right now, we have our counter, but it will stagnate at 0 since we haven’t set which elements should increment it. We can use the counter-increment property for that, which takes the name of the counter and how much it should be incremented by. If we only write the counter’s name, it will increment it by 1.
In this case, we want each h2 title to increment the counter by one, and that should be as easy as setting counter-increment to the counter’s name:
h2 counter-increment: index; /* same as */ counter-increment: index 1;
Just like with counter-reset, we can increment several counters at once in a space-separated list:
h2 counter-increment: index another-counter 2;
This will increment index by one and another-counter by two on each h2 element.
If there isn’t an active counter with that name, counter-increment will initiate it at 0.
Output simple lists: counter()
So far, we won’t see any change in the counter representation. The counters are counting but not showing, so to output the counter’s result we use the counter() and counters() functions. Yes, those are two functions with similar names but important differences.
The counter() function takes the name of a counter and outputs its content as a string. If many active counters have the same name, it will select the one that is defined closest to the element, so we can only output one counter at a time.
As mentioned earlier, we can set an element’s display to list-item to work with its ::marker pseudo-element:
h2 display: list-item;
Then, we can use counter() in its content property to output the current count. This allows us to prefix and suffix the counter by writing a string before or after the counter() function:
h2::marker content: "Part " counter(index) ": ";
Alternatively, we can use the everyday ::before pseudo-element to the same effect:
h2::before content: "Part " counter(index) ": ";
Output nested lists: counters()
counter() works great for most situations, but what if we wanted to do a nested list like this:
1. Paradise Beaches 1.1. Hawaiian Islands 1.2. Caribbean Getaway 1.2.1. Aruba 1.2.2. Barbados 2. Outdoor Escapades 2.1 National Park Hike 2.2. Mountain Skiing Trip
We would need to initiate individual counters and write different counter() functions for each level of nesting, and that’s only possible if we know how deep the nesting goes, which we simply don’t at times.
In this case, we use the counters() function, which also takes the name of a counter as an argument but instead of just outputting its content, it will join all active counters with that name into a single string and output it. To do so, it takes a string as a second argument, usually something like a dot (".") or dash ("-") that will be used between counters to join them.
We can use counter-reset and counter-increment to initiate a counter for each ol element, while each li will increment its closest counter by 1:
ol counter-reset: item; li counter-increment: item;
But this time, instead of using counter() (which would only display one counter per item), we will use counters() to join all active counters by a string (e.g. ".“) and output them at once:
li::marker content: counters(item, ".") ". ";
Styling Counters
Both the counter() and counters() functions accept one additional, yet optional, last argument representing the counter style, the same ones we use in the list-style-type property. So in our last two examples, we could change the counter styles to Roman numbers and alphabetic letters, respectively:
h2::marker content: "Part " counter(index, upper-roman) ": ";
li::marker content: counters(item, ".", lower-alpha) ". ";
Reverse Counters
It’s possible to count backward using custom counters, but we need to know beforehand the number of elements we’ll count. So for example, if we want to make a Top Five list in reversed order:
<h1>Best rated animation movies</h1> <ol> <li>Toy Story 2</li> <li>Toy Story 1</li> <li>Finding Nemo</li> <li>How to Train your Dragon</li> <li>Inside Out</li> </ol>
We have to initiate our counter at the total number of elements plus one (so it doesn’t end at 0):
ol counter-reset: movies 6;
And then set the increment to a negative integer:
li counter-increment: movies -1;
To output the count we use counter() as we did before:
li::marker content: counter(movies) ". ";
There is also a way to write reversed counters supported in Firefox, but it hasn’t shipped to any other browser. Using the reversed() functional notation, we can wrap the counter name while initiating it to say it should be reversed.
ol counter-reset: reversed(movies); li counter-increment: movies; li::marker content: counter(movies) " .";
Styling Custom Counters
The last section was all about custom counters: we changed from where they started and how they increased, but at the end of the day, their output was styled in one of the browser’s built-in counter styles, usually decimal. Now using @counter-style, we’ll build our own counter styles to style any list.
The @counter-style at-rule, as its name implies, lets you create custom counter styles. After writing the at-rule it takes a custom ident as a name:
@counter-style my-counter-style /* etc. */
That name can be used inside the properties and functions that take a counter style, such as list-style-type or the last argument in counter() and counters():
ul list-style-type: my-counter-style; li::marker content: counter(my-counter, my-counter-style) ". ";
What do we write inside @counter-style? Descriptors! How many descriptors? Honestly, a lot. Just look at this quick review of all of them:
system: specifies which algorithm will be used to construct the counter’s string representation. (Obligatory)
negative: specifies the counter representation if the counter value is negative. (Optional)
prefix: specifies a character that will be attached before the marker representation and any negative sign. (Optional)
suffix: specifies a character that will be attached after the marker representation and any negative sign. (Optional)
range: specifies the range in which the custom counter is used. Counter values outside the range will drop to their fallback counter style. (Optional)
pad: specifies a minimum width all representations have to reach. Representations shorter than the minimum are padded with a character. (Optional)
fallback: specifies a fallback counter used whenever a counter style can’t represent a counter value. (Optional)
symbols: specifies the symbols used by the construction system algorithm. It’s obligatory unless the system is set to additive or extends.
additive-symbols: specifies the symbols used by the construction algorithm when the system descriptor is set to additive.
speak-as: specifies how screen readers should read the counter style. (Optional)
However, I’ll focus on the required descriptors first: system, symbols and additive-symbols.
The system descriptor
The symbols or additive-symbols descriptors define the characters used for the counter style, while system says how to use them.
The valid system values are:
cyclic
alphabetic
symbolic
additive
fixed
extends
cyclic will go through the characters set on symbols and repeat them. We can use just one character in the symbols to mimic a bullet list:
@counter-style cyclic-example system: cyclic; symbols: "⏵"; suffix: " ";
bread
butter
milk
apples
Or alternate between two or more characters:
@counter-style cyclic-example system: cyclic; symbols: "🔸" "🔹"; suffix: " ";
fixed will write the characters in symbols descriptor just one time. In the last example, only the first two items will have a custom counter if set to fixed, while the others will drop to their fallback, which is decimal by default.
@counter-style multiple-example system: fixed; symbols: "🔸" "🔹"; suffix: " ";
We can set when the custom counters start by appending an <integer> to the fixed value. For example, the following custom counter will start at the fourth item:
@counter-style fixed-example system: fixed 4; symbols: "💠"; suffix: " ";
numeric will numerate list items using a custom positional system (base-2, base-8, base-16, etc.). Positional systems start at 0, so the first character at symbols will be used as 0, the next as 1, and so on. Knowing this, we can make an ordered list using non-decimal numerical systems like hexadecimal:
@counter-style numeric-example system: numeric; symbols: "0" "1" "2" "3" "4" "5" "6" "7" "8" "9" "A" "B" "C" "D" "E" "F"; suffix: ". ";
bread
butter
milk
apples
alphabetic will enumerate the list items using a custom alphabetical system. It’s similar to the numeric system but with the key difference that it doesn’t have a character for 0, so the next digits are just repeated. For example, if our symbols are "A" "B" "C" they will wrap to "AA", "AB", "AC", then BA, BB, BC and so on.
Since there is no equivalent for 0 and negative values, they will drop down to their fallback.
@counter-style alphabetic-example system: alphabetic; symbols: "A" "B" "C"; suffix: ". ";
bread
butter
milk
apples
cinnamon
symbolic will go through the characters in symbols repeating them one more time each iteration. So for example, if our symbols are "A", "B", "C", it will go “A”, “B”, and “C”, double them in the next iteration as “AA”, “BB”, and “CC”, then triple them as “AAA”, “BBB”, “CCC” and so on.
Since there is no equivalent for 0 and negative values, they will drop down to their fallback.
@counter-style symbolic-example system: symbolic; symbols: "A" "B" "C"; suffix: ". ";
bread
butter
milk
apples
cinnamon
additive will give characters a numerical value and add them together to get the counter representation. You can think of it as the way we usually count bills: if we have only $5, $2, and $1 bills, we will add them together to get the desired quantity, trying to keep the number of bills used at a minimum. So to represent 10, we will use two $5 bills instead of ten $1 bills.
Since there is no equivalent for negative values, they will drop down to their fallback.
@counter-style additive -example system: additive; additive-symbols: 5 "5️⃣", 2 "2️⃣", 1 "1️⃣"; suffix: " ";
Notice how we use additive-symbols when the system is additive, while we use just symbols for the previous systems.
extends will create a custom style from another one but with modifications. To do so, it takes a <counter-style-name> after the extends value. For example, we could change the decimal counter style default’s suffix to a closing parenthesis (")")`:
@counter-style extends-example system: extends decimal; suffix: ") ";
bread
butter
milk
cinnamon
Per spec, “If a @counter-style uses the extends system, it must not contain a symbols or additive-symbols descriptor, or else the @counter-style rule is invalid.”
The other descriptors
The negative descriptor allows us to create a custom representation for a list’s negative values. It can take one or two characters: The first one is prepended to the counter, and by default it’s the hyphen-minus ("-"). The second one is appended to the symbol. For example, we could enclose negative representations into parenthesis (2), (1), 0, 1, 2:
@counter-style negative-example system: extends decimal; negative: "(" ")";
bread
butter
milk
apples
The prefix and suffix descriptors allow us to prepend and append, respectively, a character to the counter representation. We can use it to add a character at the beginning of each counter using prefix:
@counter-style prefix-suffix-example system: extends decimal; prefix: "("; suffix: ") ";
bread
butter
milk
apples
The range descriptor defines an inclusive range in which the counter style is used. We can define a bounded range by writing one <integer> next to another. For example, a range of 2 4 will affect elements 2, 3, and 4:
@counter-style range-example system: cyclic; symbols: "‣"; suffix: " "; range: 2 4;
bread
butter
milk
apples
cinnamon
On the other hand, using the infinite value we can unbound the range to one side. For example, we could write infinite 3 so all items up to 3 have a counter style:
@counter-style range-example system: alphabetic; symbols: "A" "B" "C"; suffix: ". "; range: infinite 3;
bread
butter
milk
apples
cinnamon
The pad descriptor takes an <integer> that represents the minimum width for the counter and a character to pad it. For example, a zero-padded counter style would look like the following:
@counter-style pad-example system: extends decimal; pad: 3 "0";
bread
butter
milk
apples
The fallback descriptor allows you to define which counter style should be used as a fallback whenever we can’t represent a specific count. For example, the following counter style is fixed and will fallback to lower-roman after the sixth item:
@counter-style fallback-example system: fixed; symbols: "⚀" "⚁" "⚂" "⚃"; fallback: lower-roman;
bread
butter
milk
apples
cinnamon
Lastly, the speak-as descriptor hints to speech readers on how the counter style should be read. It can be:
auto Uses the system default.
bullets reads an unordered list. By default, cyclic systems are read as bullets
numbers reads the counter’s numeric value in the content language. By default, additive, fixed, numeric, and, symbolic are read as numbers.
words reads the counter representation as words.
spell-out reads the counter representation letter by letter. By default, alphabetic is read as spell-out.
<counter-style-name> It will use that counter’s speak-as value.
@counter-style speak-as-example system: extends decimal; prefix: "Item "; suffix: " is "; speak-as: words;
symbols()
The symbols() function defines an only-use counter style without the need to do a whole @counter-style, but at the cost of missing some features. It can be used inside the list-style-type property and the counter() and counters() functions.
ol list-style-type: symbols(cyclic "🥬");
However, its browser support is appalling since it’s only supported in Firefox.
Images in Counters
In theory, there are four ways to add images to lists:
list-style-image property
content property
symbols descriptor in @counter-style
symbols() function.
In practice, the only supported ways are using list-style-image and content, since support for images in @counter-style and support in general for symbols() isn’t the best (it’s pretty bad).
list-style-image
The list-style-image can take an image or a gradient. In this case, we want to focus on images but gradients can also be used to create custom square bullets:
li list-style-image: conic-gradient(red, yellow, lime, aqua, blue, magenta, red);
bread
butter
milk
apples
Sadly, changing the shape would require styling more the ::marker and this isn’t currently possible.
To use an image, we pass its url(), make sure is small enough to work as a counter:
li list-style-image: url("./logo.svg");
bread
milk
butter
apples
content
The content property works similar to list-style-image: we pass the image’s url() and provide a little padding on the left as an empty string:
li::marker content: url("./logo.svg") " ";
Spacing Things Out
You may notice in the last part how the image — depending on its size — isn’t completely centered on the text, and also that we provide an empty string on content properties for spacing instead of giving things either a padding or margin. Well, there’s an explanation for all of this, as since spacing is one of the biggest pain points when it comes to styling lists.
Margins and paddings are wacky
Spacing the ::marker from the list item should be as easy as increasing the marker’s or list margin, but in reality, it takes a lot more work.
First, the padding and margin properties aren’t allowed in ::marker. While lists have two types of elements: the list wrapper (usually ol or ul) and the list item (li), each with a default padding and margin. Which should we use?
You can test each property in this demo by Šime Vidas in his article dedicated to the gap after the list marker:
You’ll notice how the only property that affects the spacing within ::marker and the text is the li item’s padding property, while the rest of the spacing properties will move the entire list item. Another thing to note is even when the padding is set to 0px, there is a space after the ::marker. This is set by browsers and will vary depending on which browser you’re using.
list-style-position
One last thing you may notice in the demo is a checkbox for the list-style-position property, and how once you set it to inside, the ::marker will move to the inside of the box, at the cost of removing any spacing given by the list item’s padding.
By default, markers are rendered outside the ul element’s box. A lot of times, this isn’t the best behavior: markers sneak out of elements, text-align won’t align the marker, and paradoxically, centered lists with flex or grid won’t look completely centered since the markers are outside the box.
To change this we can use the list-style-position property, it can be either outside (default) and inside to define where to position the list marker: either outside or the outside of the ul box.
ul border: solid 2px red; .inside list-style-position: inside; .outside list-style-position: outside;
bread
butter
milk
apple
content with empty strings
In the same article, Šime says:
Appending a space to content feels more like a workaround than the optimal solution.
And I completely agree that’s true, but just using ::marker there isn’t a correct way to add spacing between the ::marker and the list text, especially since most people prefer to set list-style-position to inside. So, as much as it pains me to say it, the simplest way to increase the gap after the marker is to suffix the content property with an empty string:
li::marker content: "• ";
bread
milk
butter
apples
BUT! This is only if we want to be purists and stick with the ::marker pseudo-element because, in reality, there is a much better way to position that marker: not using it at all.
Just use ::before
There is a reason people love using the ::before more than ::marker. First, we can’t use something like CSS Grid or Flexbox since changing the display of li to something other than list-item will remove the ::marker, and we can set the ::marker‘s height or width properties to better align it.
Let’s be real, ::marker works fine when we just want simple styling. But we are not here for simple styling! Once we want something more involved, ::marker will fall short and we’ll have to use the ::before pseudo-element.
Using ::before means we can use Flexbox, which allows for two things we couldn’t do before:
Vertically center the marker with the text
Easily increase the gap after the marker
Both can be achieved with Flexbox:
li display: flex; align-items: center; /* Vertically center the marker */ gap: 20px; /* Increases the gap */ list-style-type: none;
The original ::marker is removed by changing the display.
Accesibility
In a previous section we turned things that weren’t lists into seemingly looking lists, so the question arises: should we actually do that? Doesn’t it hurt accessibility to make something look like a list when it isn’t one? As always, it depends. For a visual user, all the examples in this entry look all right, but for assistive technology users, some examples lack the necessary markup for accessible navigation.
Take for example our initial demo. Here, listing titles serves as decoration since the markup structure is given by the titles themselves. It’s the same deal for the counting siblings demo from earlier, as assistive technology users can read the document through the title structure.
However, this is the exception rather than the norm. That means a couple of the examples we looked at would fail if we need the list to be announced as a list in assistive technology, like screen readers. For example this list we looked at earlier:
<div class="index"> <h2>The Old Buccaneer</h2> <h2>The Sea Cook</h2> <h2>My Shore Adventure</h2> <h2>The Log Cabin</h2> <h2>My Sea Adventure</h2> <h2>Captain Silver</h2> </div>
…should be written as a list instead:
<ul class="index"> <li>The Old Buccaneer</li> <li>The Sea Cook</li> <li>My Shore Adventure</li> <li>The Log Cabin</li> <li>My Sea Adventure</li> <li>Captain Silver</li> </ul>
Listing elements is rarely used just as decoration, so as a rule of thumb, use lists in the markup even if you are planning to change them with CSS.
Almanac References
List Properties
Counters
Custom Counter Styles
Pseudo-Elements
More Tutorials & Tricks!
#Accessibility#ADD#algorithm#almanac#amp#animation#apple#Article#Assistive technology#attributes#author#background#Behavior#Blue#box#bread#browser#change#Color#construction#content#counters#CSS#CSS Grid#css-tricks#deal#digitalocean#display#double#easy
0 notes
Text
Bana
DOCTYPE html>
<html>
<head>
<title>{Title}</title>
<style type="text/css">
body {
font-family: Arial, sans-serif;
background-color: #f0f0f0;
color: #333;
}
.post {
background: #fff;
margin: 20px;
padding: 20px;
border-radius: 5px;
box-shadow: 0 0 10px rgba(0,0,0,0.1);
}
.highlight {
border: 2px solid #ffcc00;
background-color: #ffffe0;
}
</style>
</head>
<body>
<header>
<h1>{Title}</h1>
<p>{Description}</p>
</header>
<main>
{block:Posts}
<div class="post">
{block:Text}
<h2>{Title}</h2>
<p>{Body}</p>
{/block:Text}
{block:Photo}
<img src="{PhotoURL-500}" alt="{PhotoAlt}">
{block:Caption}
<p>{Caption}</p>
{/block:Caption}
{/block:Photo}
{block:Quote}
<blockquote>{Quote}</blockquote>
{block:Source}
<cite>{Source}</cite>
{/block:Source}
{/block:Quote}
{block:Link}
<a href="{URL}">{Name}</a>
{block:Description}
<p>{Description}</p>
{/block:Description}
{/block:Link}
{block:Chat}
<ul>
{block:Lines}
<li>{block:Label}{Label}{/block:Label} {Line}</li>
{/block:Lines}
</ul>
{/block:Chat}
{block:Audio}
<audio controls>
<source src="{AudioURL}" type="audio/mpeg">
Your browser does not support the audio element.
</audio>
{block:Caption}
<p>{Caption}</p>
{/block:Caption}
{/block:Audio}
{block:Video}
<video controls width="500">
<source src="{VideoURL}" type="video/mp4">
Your browser does not support the video tag.
</video>
{block:Caption}
<p>{Caption}</p>
{/block:Caption}
{/block:Video}
</div>
{/block:Posts}
</main>
<footer>
<p>Powered by <a href="https://www.tumblr.com/">Tumblr</a></p>
</footer>
<script type="text/javascript">
// Anahtar kelimeler
const keywords = ["kapı", "pencere", "kop", "yumurta"];
// Tüm gönderileri seç
const posts = document.querySelectorAll('.post');
posts.forEach(post => {
const postText = post.textContent.toLowerCase();
// Anahtar kelimeleri kontrol et
keywords.forEach(keyword => {
if (postText.includes(keyword)) {
post.classList.add('highlight');
}
});
});
</script>
</body>
</html>
1 note
·
View note
Text
Mastering HTML: A Beginner’s Guide
HTML (HyperText Markup Language) is the foundation of every website. It structures web pages using elements like headings, paragraphs, images, and links. Learning HTML is essential for anyone looking to build a website or understand front-end development.
One of the first things to grasp in HTML is the use of tags. Tags like <h1> for headings, <p> for paragraphs, and <a> for links define how content appears on a webpage. Lists, both ordered (<ol>) and unordered (<ul>), help organize information neatly.
Another important aspect is forms. Forms allow users to input data using fields like text boxes, radio buttons, and checkboxes. Combined with CSS and JavaScript, HTML creates dynamic and visually appealing web pages.
If you're preparing for a job in web development, it's crucial to practice HTML Interview Questions to strengthen your knowledge. Common topics include semantic HTML, forms, tables, and multimedia elements. Understanding the difference between block and inline elements can also give you an edge.
Mastering HTML is the first step toward becoming a skilled web developer. Once you're comfortable, you can explore CSS and JavaScript to enhance your designs and add interactivity.
0 notes
Text
What is HTML?
HTML means Hyper Text Markup Language. and it is a widely used programming language used to develop web pages.
Current version of HTML is HTML 5 and the first version is HTML 1.0. HTML is one of the easiest coding language to learn.
HTML tags are used to define HTML elements. An HTML element usually consists of a start tag and an end tag, with the content inserted in between. HTML tags are used to create HTML documents and render their content on web browsers.
Some of the basic HTML tags include <html>, <head>, <title>, <body>, <h1> to <h6>, <p>, <br>, <hr>, <ul>, <ol>, <li>, <a>, <img> and many more .
Why to Learn HTML?
Now, HTML is being widely used to format web pages with the help of different tags available in HTML language.
HTML is a MUST for students and working professionals to become a great Software Engineer specially when they are working in Web Development Domain. I will list down some of the key advantages of learning HTML:
0 notes