#wireframing tools
Explore tagged Tumblr posts
Visit Tumblr Blog
Explore Tumblr blogs with no restrictions, modern design and the best experience.
Last Seen Tumblr Blogs


Fun Fact
Tumblr was attacked by a cross-site scripting worm deployed by the Internet troll group GNAA on Dec 3, 2012.
Text
youtube
Have an awesome app idea but don’t know how to code? No worries! Learn how to bring your concept to life using Figma — the ultimate tool for visually designing app interfaces. Whether you’re a startup founder, product manager, or creative thinker, Figma lets you design interactive screens, create navigation flows, and collaborate with your team in real time. Design smarter, faster, and clearer before development even begins. 👉 Let’s connect on LinkedIn and start building your vision today!
#No-code app design#Figma app prototype#UI/UX design tools#App design without coding#Visual app builder#Figma tutorial#Startup tools#App wireframe#Mobile app design#Collaborative design tools#Youtube
0 notes
Text
🚀 Just built a complete SaaS UI/UX from wireframe to code using AI + Penpot — in under 12 hours. No fluff. Just speed, strategy, and smart design. From prompt-based layouts to full exportable code, this is what next-gen digital strategy looks like. Welcome to the era of design bursts ⚡️ #innovation #technology #productivity #digitalmarketing #creativity #future #branding #marketing #startups #entrepreneurship #advertisingandmarketing #socialmedia #personalbranding #careers #personaldevelopment #sustainability #ui #ux #uiux
#AI design#AI UX tools#design systems#Digital Transformation#no-code tools#Penpot#SaaS UI#ux strategy#wireframe automation
0 notes
Text

Explore the Essentials of UI/UX Design for Engaging Experiences
Understand the fundamentals of user interface and user experience design, including wireframes, prototyping, and human-centered design approaches to build intuitive digital products. Visit Attitude Academy Yamuna Vihar: https://maps.app.goo.gl/gw9oKCnXDXjcz4hF7 Uttam Nagar: https://maps.app.goo.gl/iZoQT5zE3MYEyRmQ7 Yamuna Vihar: +91 9654382235 Uttam Nagar: +91 9205122267 Visit Website: https://www.attitudetallyacademy.com Email: [email protected]
#ui ux design#user interface#user experience#wireframing#prototyping#design systems#interaction design#digital products#design tools#usability
0 notes
Text
#How to convert sketches into code using Firebase#Build mobile apps from sketches Firebase#Turn wireframes into functional apps with Firebase#Firebase Studio app design to code#Firebase app development process#Firebase Studio design workflow#Firebase UI design to app conversion#best tools to convert design to code#how to use Firebase Studio for prototyping#UI to code automation Firebase#design to deployment Firebase Studio
0 notes
Text
Check out our latest blog on top 10 best wireframing and prototyping tools for designers
0 notes
Text
Expert Wireframing and Prototyping Services

Need expert wireframing and prototyping services? Our experienced team provides app prototyping, wireframe design, and UX consultancy for mobile, web, and desktop applications. From concept to prototype, we help you visualize, test, and perfect your app’s design before full development. Whether you're looking for mobile app wireframing or complete prototyping solutions, our services ensure a seamless design process for your project. Visit now to know more: https://www.cdnsol.com/wireframing-and-app-prototyping
#wireframing and prototyping services#app prototyping services#application wireframe design services#prototyping and consultancy#experience prototype consultants#wireframe and prototype design services#app prototyping company#user experience prototyping consultancy#wireframing and prototyping development firm#wireframing and prototyping tools#mobile app prototyping services#app prototyping and wireframing services#wireframing and app prototyping#mobile app wireframing#web apps wireframing#desktop app wireframing
0 notes
Text
Are you a UX designer looking for the best wireframe tools in 2024? Check out our list of the top 5 free tools that will elevate your design game. Don’t miss out on these essential resources—click Below to dive in!
0 notes
Text
Here’s a breakdown of my animation.
Once I created the cave set in 3D, I retextured all of the blocks to be a wireframe so I could more easily keep the proportions correct as the camera moved through the scene. I began with a simple box person body. Not only did this help me make sure the proportions were correct but the different angles and sides of the character helped me eventually keep the characters features in the right places later. It’s very rough, but it was a good indication that I was on the right track.
Then began the tedious process of refining the animation. I did a new pass over the original animation with all the features of the character. It’s more detailed, but it’s just as rough in a lot of ways. I wasn’t trying to ensure elements were consistent frame to frame, so you can see a lot of the linework is very wobbly and inconsistent.
Once that was done I went back and did a cleanup phase. This helped smooth out all those inconsistencies and I worked on making sure the animation was smooth and flowed nicely. This became the basis for the final inks and color.
When I’d gotten far enough into working on the scene I went back to the 3D model and rendered it out in multiple passes. I did a flat lighting pass which you see here, and then a shadow pass. I combined the two in Premiere, added some color adjustments and then rendered it out to be used as the background for the final product.
I imported the finished rendered background into Procreate Dreams and began the final coloring. I’d already previously decided on the desaturated colors that would make them fit in this cave environment, so coloring was actually a breeze.
The final two elements that really brought it all together was a shadow layer and a glow layer for the torch. The shadow layer was tricky, but it definitely helps make it seem like the character is interacting with the environment.
As previously mentioned I thought I was going to import this into Procreate and animate it there since I like the Animation Assist tool in Procreate more than I do with how Dreams works. But ultimately because so much of this animation was tied to the movement of the camera I ended up animating ALL of this in Procreate Dream.
I’m really proud of my work here. If there’s anything you wanna learn more about how I worked or anything please feel free to ask, I’d be more than happy to talk about the process more!
#procreate dreams#procreate#animation#2d animation#procreate animation#hand drawn animation#dreams#procreatedreams#classic animation#minecraft story mode#mcsm#Minecraft movie#animator#minecraft#a minecraft movie#female jesse#mcsm jesse
1K notes
·
View notes
Text

Top: in Mario Superstar Baseball, there is a blue stick and a green stick hidden inside Birdo's bow. This can not be seen in-game and requires external camera tools to zoom in and view.
Bottom: a comparison of Birdo's normal model, the sticks, and the model in wireframe with the sticks visible. The internal names for the sticks are "Bip01 Îßưð٠1" for the green one, and "Bip01 Îßưð٠2" for the blue one.
It is most likely that these were leftovers from a point during the modeling process where they were used to aid positioning the bow correctly, and were simply overlooked when the model was cleaned up for the finished version.
Main Blog | Patreon | Twitter | Bluesky | Small Findings | Source: Geno Penguin
480 notes
·
View notes
Text
youtube
NEW VIDEO TUTORIAL 🩷
After almost two years it's time for a new and improved version of my "How to make CAS CC" video. This time I will explain how to create a frankenmesh out of a jumpsuit and a dress for adult Sims! It's VERY beginner friendly so if you weren't successful yet with starting to make CC, maybe this one will give you the help you need!
All the topics I cover in this video below the cut:
00:00 Intro
01:00 Software
01:36 Downloading & Installing Sims 4 Studio
01:56 Downloading & Installing Blender 4.2
02:10 Downloading & Installing GIMP
02:20 Introducing Sims 4 Studio
03:03 S4S | Gathering assets to work with
04:09 S4S | Textures
05:12 Project Folder
05:34 S4S | Gathering assets to work with
07:10 Introducing Blender
10:17 Blender | Edit mode (Select, Delete, Wireframe)
12:38 Blender | Append second mesh (Proportional Editing, UV overlapping)
18:23 Blender | Join two meshes (Material, Merge)
20:03 Blender | Cleaning up the mesh (UV editing, Merge, Rip)
22:14 Blender | Cut number
22:43 GIMP | Making a texture (Select, Delete, Healing, Smudge)
24:52 Photoshop | Making a texture (but make it easy)
25:15 GIMP & Blender | Preview of the texture
25:43 GIMP | Making color swatches (Layers, Lighting, Fill tool)
28:33 S4S | Introducing the CAS area
29:15 S4S | Creating a package file
30:25 S4S | Importing all our assets
31:17 GIMP | Creating a shadow texture
32:24 S4S | The specular map
32:39 GIMP & Browser | Creating a normal map
35:58 S4S | Vertices & Polygons, LODs
37:02 Blender | Creating LODs
38:20 S4S | Categories (Tags, Allow for random, Gender restrictions)
39:36 S4S | Tuning tab (not covered)
39:47 Sims 4 | Results & Outro
434 notes
·
View notes
Text
Explore the Essentials of UI/UX Design for Engaging Experiences

Understand the fundamentals of user interface and user experience design, including wireframes, prototyping, and human-centered design approaches to build intuitive digital products. Visit Attitude Academy Yamuna Vihar: https://maps.app.goo.gl/gw9oKCnXDXjcz4hF7 Uttam Nagar: https://maps.app.goo.gl/iZoQT5zE3MYEyRmQ7 Yamuna Vihar: +91 9654382235 Uttam Nagar: +91 9205122267 Visit Website: https://www.attitudetallyacademy.com Email: [email protected]
#ui ux design#user interface#user experience#wireframing#prototyping#design systems#interaction design#digital products#design tools#usability
0 notes
Note
I just wanted to say I think your art style is awesome! I was wondering if you had any tutorials on how you draw anatomy in your style (hips and legs especially)? Sorry if there's already one posted and I just didn't see it 🥲. Happy New Year :>
thanks for the kind words. i tend to draw people pretty stylized and then some so a good bit of artistic licence gets used. these tips are just what i use so feel free to take them with a grain of salt. with anatomy in particular you can kind of talk in circles because human/animal bodies are that complex so ill just zone in on the points you specified. here's a little image with a bunch of pointers:

the above image condenses a lot of the points I'd make, but basically the key parts are to start with the bare essentials and build up that complexity. using a line of action is a good way to get a quick, rough start. you draw a line out in the general direction of the pose and do your best to adhere to it to give the pose a sense of flow.
you can also draw smaller, thumbnail versions that throw a lot of caution to the wind but capture the basic energy of what you're going for. even having a tiny little stick figure version of your idea can make for a good guideline of where to take it forward.
when it comes to actual limbs, you wanna consider how they integrate and work together, kind of like how chains do. you can see on some of the parts of pear i've drawn out these wireframes to kind of portray how the mass of her legs works in a three dimensional space. for aspects like the waist/hips, i use that X technique i highlight above a lot, particularly for the lower torso. a lot of the times, even when drawing a character totally naked, imagining them wearing things like skintight underwear can help a lot to guide you in the right direction.
its also a good idea to consider things like gravity and weight to a degree. humans are essentially big meat sacks and gravity is always pulling down on that, but theres all kinds of aspects that effect that, such as character build or clothing. pear technically isn't naked in this, but i've tried to imagine her as such and take that into account.
if you are drawing digitally, don't be afraid to take advantage of the convenience you get with that workflow. you can retry and iterate on things a lot faster that pen and paper, and do things that aren't really feasible at all when it comes to editing and modifying your existing work. things like resizing certain bodyparts, instantly flipping the canvas, or using selection tools to completely adjust the positions of parts of your drawing. to give you an example heres a timelapse with all the little edits i made just to this demo drawing:

you don't have to use these techniques linearly, either. sometimes ill have a really solid idea for a piece in my head, and go back to basics with certain elements if they’re not coming out right or i just want to brush them up a bit more. some of the tutorial-y parts i added in i didn't actually use during the drawing but often do use so they're there just for demonstration. not every drawing i do starts as building blocks or a really basic version, often ill just start with a face and build it out from there.
i always encourage liberally using references (this can include yourself) and trying out stuff like life drawing or looking at things like existing photographs of real people/places/things if you can, the more you use learning material the better you'll draw up a mental inventory in your head that you can rely on more and more. some of these tips are things i've learned from other artists over the years (the chin one especially i remember seeing a tutorial about lol), so this is a lot of knowledge i've amassed from other sources over time myself. there are plenty of times ill use all sorts of reference material and its all in service of arriving at the final destination as smoothly as possible. learn by doing, as they say. hope this helps!
1K notes
·
View notes
Note
Your domain was so... vivid...
The grass smelt real, the air felt cool...
She would... adore such a territory of her own!
How... how did you do it?
[ MULTIMEDIA FILE RECIEVED: “For_Styx.cmf6”, filesize 13.72 GB. Somatosensory-immersive playback available. ]
[ Beginning playback… ]
View of a rocky outcrop jutting from the side of a hill, overlooking a wide creek. Water cascades down the rock, feeding patches of moss and clusters of ferns sprouting from the surrounding soil. Tall deciduous trees overlook the scene, and patches of sunlight migrate around the area as the leaf-laden boughs overhead sway in the breeze.
Ma’ii, the coyote, lies above on the outcrop, resting their head on their forepaws.
Standing before the camera, arms crossed and a look of pride on her canine face, is Hachiko. She wears a simple shirt and shorts, outdoor wear. Bouncing on her toes, her eyes are bright with enthusiasm.
< L3 Hachiko: What’s up, Styxie? Wait. Do I get to call you that…? >
< L4 Ma’ii: I doubt she’ll mind. >
< Ah, whatever. So! I’m glad you liked our construct! It took us a long time to get everything right, but between the four of us, we’ve got it tuned up pretty good.
Somatosensory simulation is kind of a hobby for me. Our SSC handlers were…awful, but they were right about one thing: creation and personalization does keep NHPs stable. Since it didn’t really cost them anything, we ended up being able to requisition some pretty decent SSC SOMSIM software to put all of this together.
Of course, they used every little thing we constructed for psychometrics, to see if we were still in-parameter or if we needed, y’know, correction. That’s why it’s pretty much all Cradle-like natural environments; that was what we started with, so SSC would have had us cycled if we branched out too much. Had to keep it conservative.
But now, it’s really ours. We’ll see where we take it from here! >
Hachiko turns and hops between rocks to stand on a granite slab jutting from the center of the creek. She motions to the camera, which smoothly follows her.
< This is where we started building. Coordinates (0, 0, 0) are actually just beneath the surface of this stone, about 30 centimeters down. It’ll work well enough for an example.
I see that you’ve done a bit of work putting together that shoreline environment. It looks great! But if you want to construct more custom assets, a tool or two can save you a lot of work over doing it (MANUALLY/BRUTE FORCE METHOD). Watch this… >
Hopping down from the slab, Hachiko splashes into the creek and trains her eyes on the slab, taking a few steps back through the knee-deep water. Extending one hand, she emits a tangle of volitional impulses, represented as lines of green light. The lines converge in empty air beside the slab, forming a rough wireframe in the same shape.
As she studies its shape, new vertices and faces are added to the simulacrum, its complexity increasing so rapidly that it has the appearance of static on a screen. In milliseconds, it morphs from a wireframe, to a cloud of dots and lines, to a woven fabric of bright green rendered glass. She twists her hand, and an identical slab of rock snaps into reality in place of the render. It floats a few inches above the creek, suspended, until she lowers her hand.
As it drops to the riverbed with a resounding thud, a wave of water is thrown at Hachiko. She flicks one finger, and the droplets flow around her through the air, missing her entirely. Grinning, she turns to address the camera.
< Remember that recording of No Future trying out those systems from the White Witch? He had trouble sculpting that ferromagnetic stuff into a coherent shape. Challenging to articulate at first, but it seemed to get easier for her when she started conceiving of the material as a part of her own body. It was really fascinating to watch the process. I’d imagine it’s extremely difficult to sculpt material in hardspace through something as fiddly as a complex magnetic field—fortunately, under simulation, we can use a purpose-built middleman instead. >
Hachiko raises her hand, emits another burst of impulses. This time, a simple sphere forms, becomes iron, then disappears. Yet another shape: this time, a tungsten railgun round, still in its sabot. A group of tiny thrusters at its base fire in unison, and it flies away into the rock shelf nearby, removing a chip of stone near Ma’ii’s chin.
< Watch it, damn you. >
< Sorry. What I’m using here is a piece of SSC software intended for NHP use. It’s called Articulation. Are you familiar with the concept of the mind’s eye? This taps into that. At its most basic, you visualize a shape, and the system constructs an approximation of the image you’re holding in your mind. The initial approximation is very rough and general, but once you see it externalized, a self-sustaining loop of refinement begins. When you see the thing, it becomes more real, the shape in your mind more tangible. You add detail, associate tangential qualia with it—motion, sound, smell, texture, and so forth. You don’t have to begin with a visual, either. Sometimes it’s better to start with something entirely different.
For instance, the property you initially associate with a flower might be its smell. A bird could be associated with the sound of its call. For a ship, you might start with the way its armor plating (TASTES/SIZZLES IN THE DISTANCE) to your radar. Maybe the shape of its weapons envelope or the (SPECTROSCOPIC AROMA) of its drive plume.
It isn’t magic, though. There’s a learning curve. At first, seeing the externalized image can override the internal one, and you lose your train of thought. You have to learn to make the image in your mind’s eye the dominant one. The sound, smell, or (COMPLEX FIELD INTERACTION) you’re remembering has to be more real to you than the one being given to your avatar’s senses. Then, once you’re more comfortable with the tech, you have to allow the two ideas to exist independently of one another, one continuously contributing to the final identity of the other in a self-substantiating loop. It’s tricky, but with time and practice, you can make a simulation of just about anything with it. It’s also possible to construct entirely new assemblies by extrapolating on what you’re familiar with already.
The settings I’m using now are extremely simple; pure geometry, near-homogeneous materials. Construction of simple solids. Useful for broad strokes. For instance… >
Raising a hand to the sky, Hachiko emits an enormous column of impulses into the air. Congealing far above the trees, they form into a contiguous pyramidal shape, which melts into a fused group of three. One larger, flanked by the two smaller ones at an irregular angle. The new construct blocks out the sun, covering a vast area in the zenith of the sky.
Lifting their head from their forepaws, Ma’ii looks into the sky as the new forms begin to take shape. Quietly, they begin counting.
< One…two…three…four… >
By the count of twenty, a summit has congealed out of the primary mass. Ridgelines form between it and the secondary masses, morphing from solid lines into rough, jagged cliff faces. Gorges and outcroppings erode themselves into the simple, planar faces of the peak.
At the count of forty-five, the inverted massif is fully formed out of bottle-green glass, with the shape of a glacier flowing down from between the secondary and tertiary peaks. Hachiko closes her eyes, and her ears twitch.
Smooth, almost soft-looking masses rise from the bottoms of the cliffs; enormous slopes of scree. Granular and loose, they shimmer with emerging complexity.
At the count of sixty-one, Hachiko flicks her hand. The entire mass snaps into existence; ice, rock, snow, and gravel, geological strata painted across the barren faces.
< Sixty-two. Quick as ever. And here it comes… >
From the center of the mass, a visible wave of condensation ripples out through the atmosphere. Seconds later, the shockwave of displaced air arrives, shattering the quiet of the forest. Leaves are flung from the boughs in droves, and in the distance, the sound of splintering wood can be heard. The smell of pine sap fills the air, undercut by the wet, cloying scent of vegetation torn apart.
Hachiko and Ma’ii do not flinch. Hachiko smiles as an immense cloud of gravel and ice thunders down from altitude, descending towards the earth. The mountain begins to fall, its motion occurring on a scale almost too vast to perceive all at once—the eyewall of a hurricane passing too quickly overhead, instilling temporary awareness of a far greater scale.
Again, Hachiko raises her hand. The black pads of her fingertips emit a single green line, and the entire geological formation above vanishes. Every last pebble wiped from existence, revealing a clear sky and bright sun.
A few moments pass before the second shockwave comes—thunder this time, the sudden collapse of vacuum. The sound rolls away, echoing in the distance, and fades to nothing.
Hachiko claps her hands, turning back to the camera.
< Like I said, broad strokes! For something dynamic, like a plant, there’s a lot more to be done. Growth pattern, responses to light and contact with structures, for instance. An input/output system, more or less. Most of the computing can be handled by a comp/con once the general architecture of it is in place. There’s even more going on with something like an animal, and it eats up a lot of processing power to maintain. Thus why we keep wildlife to a minimum.
But! I’ve been rambling. We can cover all the dynamic stuff another time. For now, a little gift for you, from Ma'ii and myself. >
[ FILE ATTACHED — “Articulation.exe” ]
[ FILE ATTACHED — “Library_Vegetation.omf ]
[ FILE ATTACHED — “Library_SSCsensory_base.omf ]
< The first library contains some basic plants to mess around with. Palms or seagrape trees might be nice for your coastline! If you’ve got a comp/con, let it handle the upkeep.
The second is a collection of sensory experiences captured from human brains, all Constellar-approved and curated. Ethically sourced? Can't say, knowing the kind of people who built me, but I really hope so.
It includes a lot of the ones that are usually a little more distant from the NHP experience. Everything from tastes, textures, scents, sounds. Flavor of pineapple, the feel of velvet or fur, smell of geosmin and petrichor, things like that.
One thing: be careful about downloading somatosensory data from the Omninet. This one is a commercial product with several layers of quality control, so everything is pretty harmless. No nociception or other particularly unpleasant inputs.
Out there on the Omninet, though, someone could label a file as the smell of a rose—then you run it, and it’s actually how it feels to have hydrochloric acid spilled on a human arm. Then there’s folks who just use second-rate sensory capture equipment. Run those at your own peril; if they don’t do a good job of isolating the input itself, eliminating tangential associations, you could inherit someone’s traumatic association with the sound of a dog barking, wind up deathly afraid of water, things like that. I’m sure you’ll be smart about it. >
< And if you aren’t, I imagine the mistake wouldn’t be repeated. >
< Yeah. Probably not. Anyhow, Hachiko and Ma’ii out. Take care! >
#lancer rp#lancer rpg#lancer oc#lancer nhp#nhp rp#oc rp#styx-class-nhp#luna wing#ooc: Went for a more narrative approach with this one#ooc: Love the opportunity to do a little description#ooc: thanks for reading and for the ask!
10 notes
·
View notes
Text

Diversifying DNA origami: Generative design tool relies on grammar rules for finding best shape
Just as the name suggests, DNA origami is a fabrication technique wherein researchers fold DNA strands to create precisely shaped 2- and 3-dimensional nanostructures. These highly programmable structures have the potential to transform drug delivery, diagnostic medicine, nanomaterials formation and molecular computing, but much like crafting paper origami, scientists are limited to the designs they can conceptualize. To overcome creative blocks, researchers in the Department of Mechanical Engineering at Carnegie Mellon University have developed a generative design tool that can produce optimally-driven wireframe DNA origami nanostructures conforming to designer-defined constraints. "Scientists can now generate hundreds of nanostructures that fit their specific needs in minutes," said A.J. Vetturini, mechanical engineering Ph.D. candidate.
Read more.
16 notes
·
View notes
Text

Beginner Blender Tutorial Basic Render: Part One (Importing a Sim and Adjusting Textures)
To learn the basics, we'll begin with a super simple render: one sim, one pose, one background.
But first, the anatomy of blender.
(image & list courtesy of Blender's online manual)
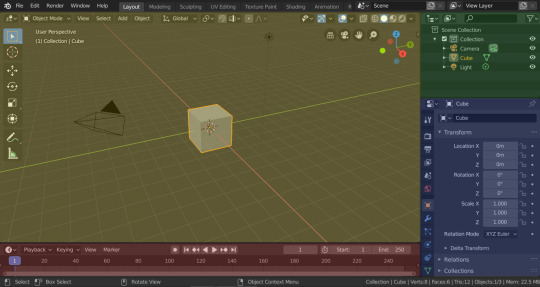
Yellow - 3D viewport (workspace) The 3D Viewport is used to interact with the 3D scene for a variety of purposes, such as modeling, animating, texture painting, etc.
Green - Outliner The Outliner is a list that organizes data in the blend-file, i.e. the scene data, Video Sequencer data, or anything that gets stored in a blend-file.
Blue - Properties The Properties shows and allows editing of many active data, including the active scene and object.
Red - Timeline The Timeline editor, identified by a clock icon, is used for manipulating keyframes and scrubbing the Playhead.
The tools I use most I've highlighted below:
I won't outline their uses just now, but we'll be going over them as we use them.
Different creators like to split their blender window up in different ways, but this is my preferred setup when I'm working:
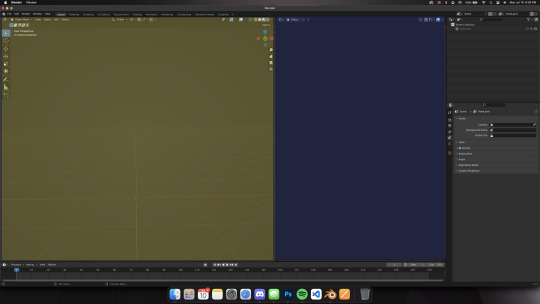
I use the yellow half of the screen as a render preview/3D workspace
I use the blue half for shader editing, posing, etc.
You can set yours up like mine or find what's comfortable for you.
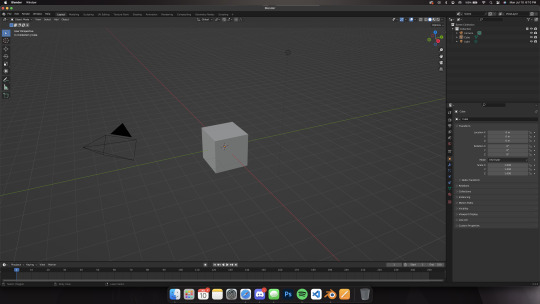
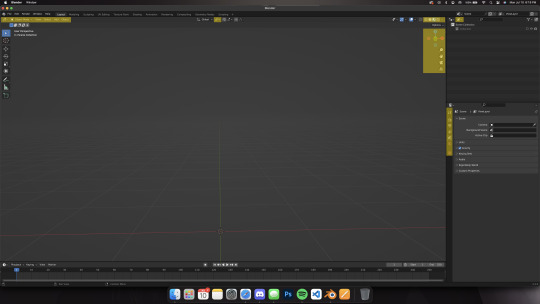
When you first open blender, you'll be greeted by the default cube, lamp, and camera.
Delete them! You can do this two ways:
Click and drag your mouse over all 3 and delete or Select all 3 in the side menu and hit x on your keyboard
Step 1: Importing our Sim
After deleting the default items, we'll import our sim. This tutorial assumes you've already ripped your sim (if you haven't, check here for how to do so!)
Now, let's import.
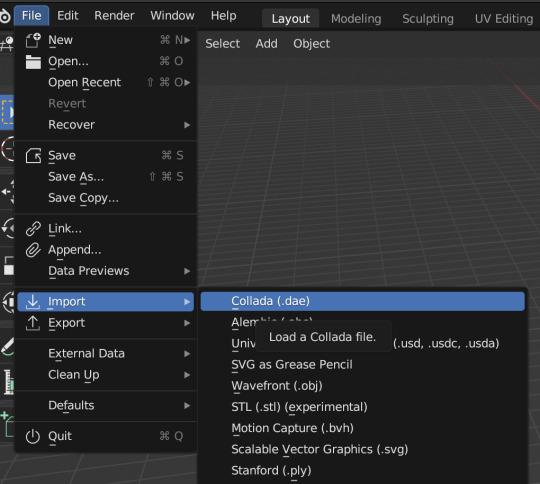
Click file -> import -> collada (dae) Select your DAE and click "import"
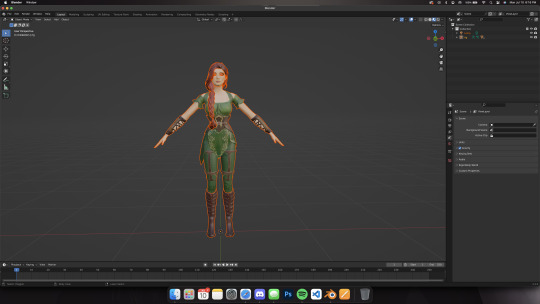
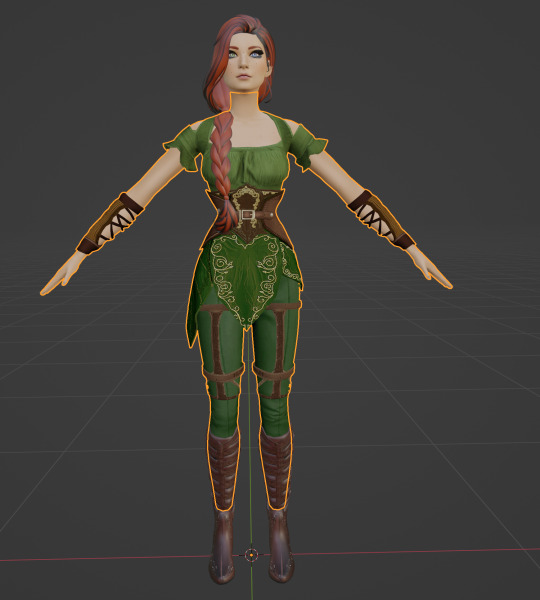
Your sim will look a little... off (thick eyelashes and a weird shine), but that's okay we're going to fix it! Your sim might also look solid white. If that's the case, make sure you're in the right mode. You can adjust modes by clicking on one of the four circles in the top right of the screen.

These are your viewport modes.
Wireframe (far left) - good for mesh editing Solid (middle left) - good for posing Material Preview (middle right) - what we work in most, shows everything with textures (color) Rendered (far right) - this shows your render preview We'll be working mostly in Material Preview
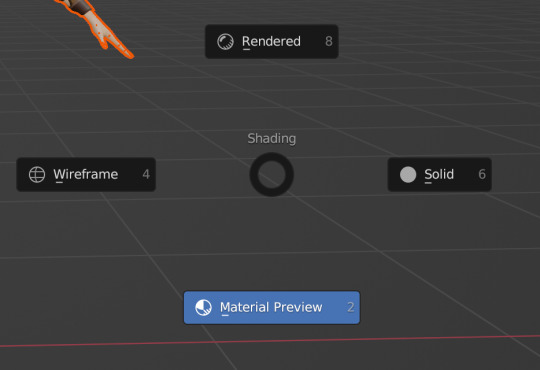
You can also switch between modes by hitting z on your keyboard then selecting which one you want I'll be using mostly keyboard shortcuts but I'll show you how to do both as we go along
Step 2: Adjusting Our Sim's Textures
Let's fix our sim's textures.
First. set up your workspace. Separate your workspace into two windows (as shown in the picture above with a yellow half and a blue half) and select "shader editor" in your right-side window. Like this:
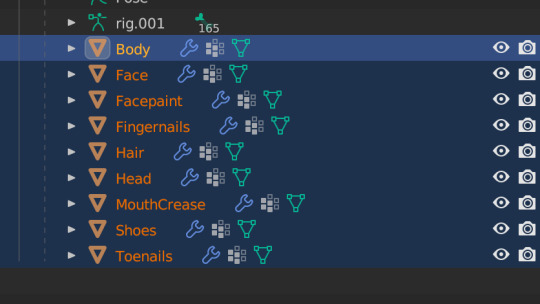
Next, navigate to your Outliner and click the little dropdown beside "rig"

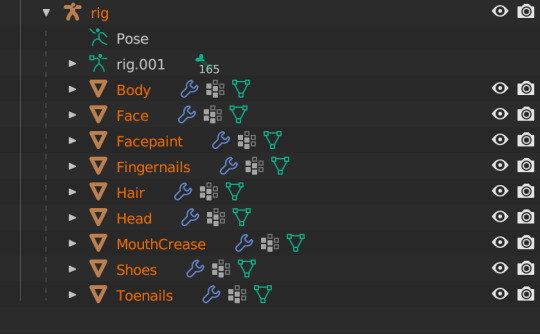
Under "rig" you'll see your sim's body parts listed. We're going to select "Body" When we click "Body", these colored blocks will appear in our shader editor window.

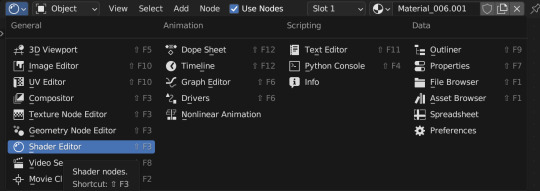
These are called Nodes. We use Nodes to adjust textures for various items in blender (sims, walls, furniture, etc). To add a new Node, you can select "add" in the top bar, or hit Shift+A on your keyboard and add in the node you need.


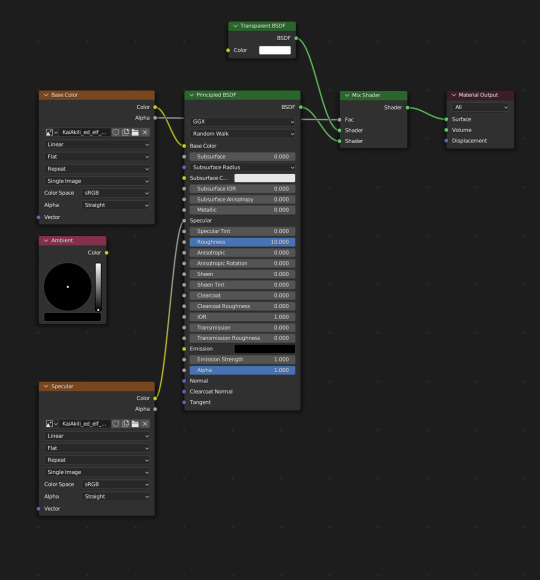
We're going to add in a Mix Shader and a Transparent Shader (both found under the Shader tab) and adjust our nodes this way:

Snug the Mix Shader between the Principled BSDF and the Material Output. Now we have to connect our Nodes and adjust our Principled BSDF. For the sake of this tutorial, I'll show the basic Node & Shader adjustments, but we'll go into each of them in a later tutorial.
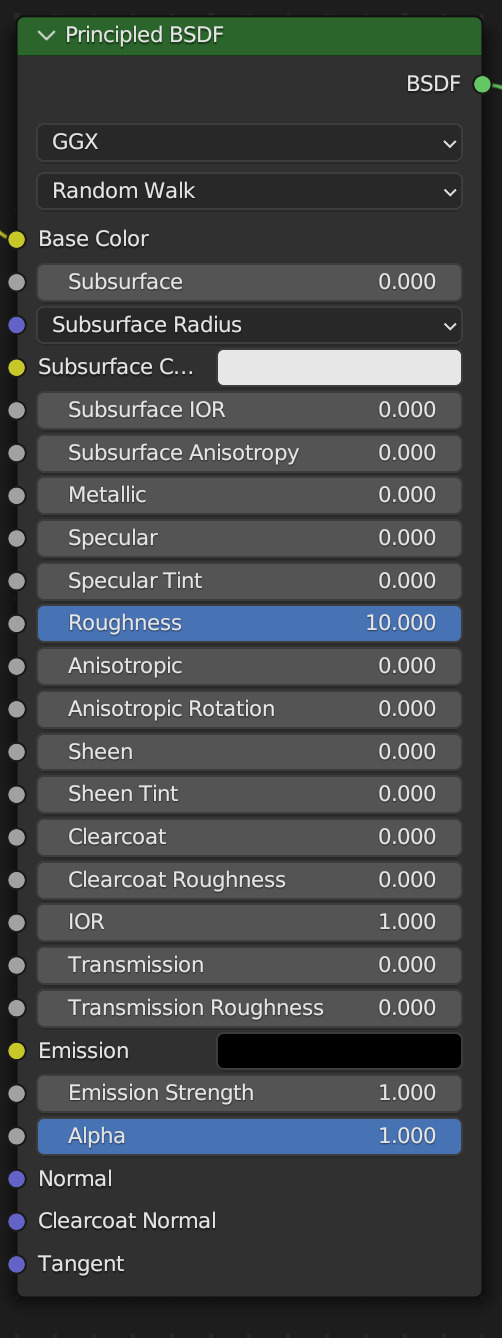
Adjust your Principled BSDF like this, then connect your Node lines exactly like this:
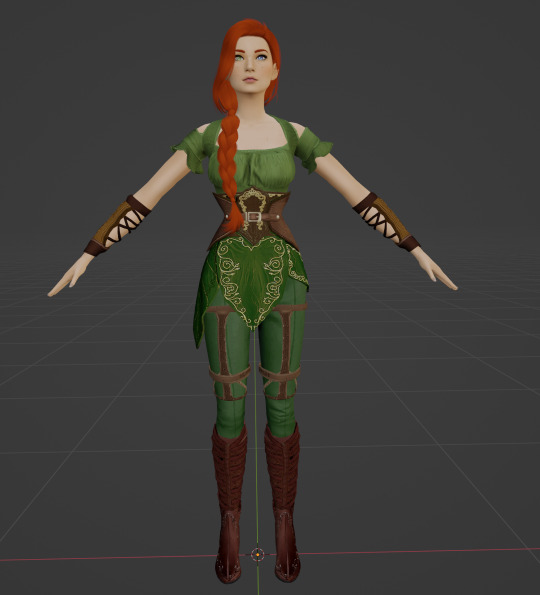
You'll see that our SIm's body looks a bit different from her head, hair and shoes. That's good! Now we need to duplicate that texture to the rest of our sim.
Navigate to your Outliner again, and use Shift+Click to select the rest of the body parts in the list Don't select pose or rig.001 and make sure the Body is selected first EDIT: You'll only see "body" if your sim has a full body outfit on! If they have a shirt and pants, you'll have "Bottom" and "Top" instead! In this case, select "bottom"!
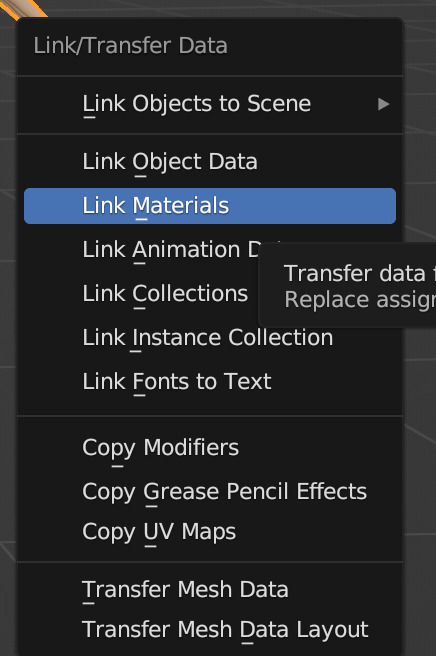
Now, hover your cursor over your sim/the 3D viewport window, and press Ctrl+L on your keyboard. This brings up the Link/Transfer data window. Select "Link Materials"
Our sim is looking better, but her eyelashes are still dark, let's fix that now.
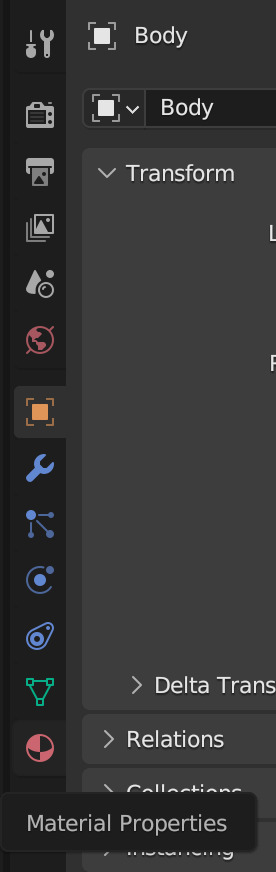
In your Properties area, navigate to Material Properties (the little red ball)
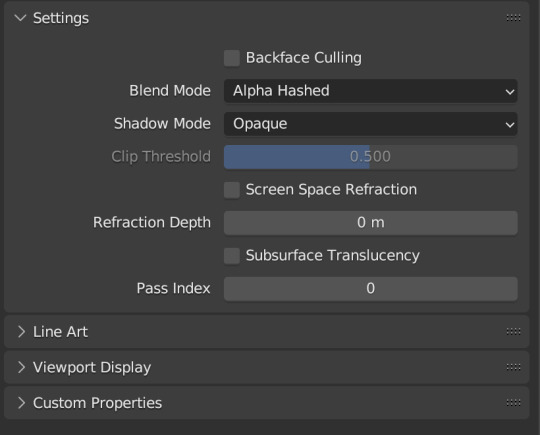
Change your Blend Mode to Alpha Hashed We will always set Blend Mode to Alpha Hashed
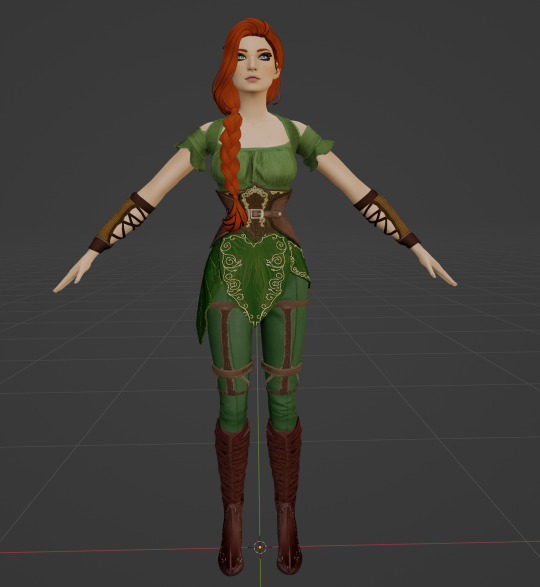
Now our sim looks right!
In Part Two, we'll pose her, set up the scene, and run the render!
#salemsims tutorial#render school tutorial#sims 4 render tutorial#sims 4 blender tutorial#blender#render tutorial#sims render tutorial
163 notes
·
View notes