#wordpress image upload plugin
Explore tagged Tumblr posts
Visit Tumblr Blog
Explore Tumblr blogs with no restrictions, modern design and the best experience.
Last Seen Tumblr Blogs


Fun Fact
70% of Tumblr users say the Dashboard is their favorite place to spend time online.
Text

Why File Upload Security Should Be Your Top Priority?
In today's digital world, websites often act as gateways to sensitive information. Whether it's customer data, confidential documents, or user-generated content, the responsibility of safeguarding it lies squarely on website owners' shoulders. And with WordPress powering over 40% of all websites, ensuring File Upload Security within this platform becomes paramount.
#File Upload Security#wordpress file upload plugin#wordpress upload plugin#wordpress image upload plugin#file upload form wordpress free#wordpress plugins free
2 notes
·
View notes
Text
5 Smart Image Optimization Tips to Boost Your Photography Portfolio Website

A photography portfolio is your digital first impression—and while high-quality visuals are a must, slow-loading images can ruin the experience. If your website takes too long to load, visitors may leave before they even see your work. That’s why optimizing images is essential for both performance and SEO.
Here are five key image optimization strategies that will help you create a fast, professional, and search-friendly photography website.
1. Choose the right file format Using the correct file format ensures that your images load quickly without compromising quality. JPEG is ideal for most photos, offering good compression with minimal quality loss.
PNG is ideal for images that need transparent backgrounds or precise, sharp edges, such as logos and graphics. WebP, supported by most modern browsers, offers superior compression, reducing file sizes even further—often 25–35% smaller than JPEGs while maintaining clarity. By selecting the right format, you improve load times and enhance site speed.
2. Resize images to display dimensions Don’t upload images in full resolution unless absolutely necessary. Large files from your camera—often 5000px wide or more—are much bigger than most screens display. Resize your images to match the dimensions they’ll appear on your site, such as 1200px or 1920px wide. This significantly reduces file size and improves page load speed. Use tools like Photoshop, GIMP, or online editors to resize before uploading.
3. Compress images without losing quality Compression reduces file size while preserving visual quality. Tools like TinyPNG, JPEGmini, or ImageOptim can cut down the size of your images without making them look blurry or pixelated. For WordPress users, plugins like ShortPixel or Smush automate this process. Always test the image quality after compression to maintain a balance between speed and visual impact.
4. Use SEO-friendly filenames and alt text Search engines can't interpret images without context. Rename files like IMG_0101.jpg to something descriptive, such as sunrise-over-grand-canyon.jpg. Also, add alt text that describes the photo accurately—for example, “Landscape view of the Grand Canyon during sunrise.” This boosts image SEO, helps visually impaired users, and improves your chances of appearing in Google Image Search.
5. Enable lazy loading and use a CDN Lazy loading defers the loading of images until they come into the user’s view, boosting the page’s initial load time and improving user experience. Most modern platforms include this feature or offer plugins. Additionally, use a Content Delivery Network (CDN) like Cloudflare or ImageKit to serve images from servers closest to your visitors. This significantly speeds up loading, particularly for users around the world.
Conclusion Optimizing your images is essential if you want your portfolio to load fast, rank high on search engines, and impress your audience. These five tips—choosing the right format, resizing, compressing, adding SEO-friendly text, and using performance tools like lazy loading and CDNs—will elevate your site’s speed and visibility. Make your work shine online without slowing things down.
#photographyportfolio#photowebsite#photography tips#digital photography#photography branding#photographers online#photography website
2 notes
·
View notes
Text
WordPress Website Designing Services In Delhi
Introduction
In today's digital world, having a strong online presence is essential for businesses of all sizes. Whether you're a startup, a small business, or a large enterprise, a well-designed website is crucial to attract customers and establish credibility. When it comes to website development, WordPress is one of the most popular and user-friendly platforms available. If you're looking for professional WordPress Website Designing Services In Delhi, you're in the right place!
Delhi is a hub of technology and innovation, with countless businesses striving to make their mark online. To stand out from the competition, your website needs to be visually appealing, functional, and optimized for search engines. In this article, we will explore the benefits of using WordPress for website design, why you should choose a professional service in Delhi, and what features to look for in a WordPress website designing company.
Why Choose WordPress for Your Website?
WordPress is the most widely used content management system (CMS) globally, powering over 40% of websites on the internet. But what makes it so popular? Let’s take a look at some of the key benefits:
1. User-Friendly Interface
WordPress is made to be user-friendly, even for novices. Managing your website doesn't require a lot of technical expertise. You can easily add material, upload images, and design your website with a straightforward interface.
2. SEO-Friendly
Search engine optimization (SEO) is critical for ranking on Google and other search engines. WordPress comes with built-in SEO features and supports various plugins like Yoast SEO, helping your site rank higher in search results.
3. Customization and Flexibility
With thousands of themes and plugins available, WordPress allows you to customize your website according to your needs. Whether you need an e-commerce store, a portfolio, or a corporate website, WordPress offers endless possibilities.
4. Mobile Responsiveness
In the mobile-first world of today, a responsive website is essential. The seamless user experience on all platforms is guaranteed by the mobile-friendly design of WordPress themes.
5. Cost-Effective Solution
Unlike custom-coded websites, WordPress offers a cost-effective solution for businesses. Many themes and plugins are available for free, while premium options are affordable and provide additional functionality.
Why Hire a Professional WordPress Website Designing Service in Delhi?
While WordPress is user-friendly, designing a website that stands out requires expertise. A professional WordPress Website Designing Services In Delhi can help you create a website that is visually appealing, fully functional, and optimized for performance. Here’s why hiring experts is a great investment:
1. Custom Design and Development
A professional provider will ensure that your website matches your brand identity by customizing the design to your business demands.
2. SEO Optimization
Expert designers integrate SEO best practices into your site structure, increasing visibility and driving organic traffic.
3. Speed and Performance Optimization
Websites that load slowly may turn off visitors. Expert developers improve user experience by optimizing your website for speed and performance.
4. Security Enhancements
Cybersecurity is a major concern for websites. Professionals ensure your site is secure, protecting it from potential threats and attacks.
5. Ongoing Support and Maintenance
A website must need regular upgrades and maintenance in order to function properly. A professional service guarantees that your website stays current and error-free by offering ongoing support.
Key Features to Look for in a WordPress Website Designing Service
When choosing a WordPress website designing company in Delhi, consider the following essential features:
1. Custom WordPress Theme Development
Instead of utilizing pre-made templates, make sure the provider offers distinctive and personalized themes. Your website stands out when it has a unique design.
2. E-commerce Integration
If you plan to sell products online, look for services that offer WooCommerce integration for seamless e-commerce functionality.
3. Responsive and Mobile-Friendly Design
Being mobile-friendly is essential. Verify if responsive design is a top priority for the business to ensure top performance across all platforms.
4. Content Management and SEO Services
Content is king! Choose a service that provides content management and SEO strategies to improve your search engine rankings.
5. User Experience (UX) and UI Design
A great website is not just about aesthetics but also about usability. A service that focuses on user experience (UX) ensures better engagement and conversions.
6. Technical Support and Maintenance
Post-launch support is crucial. Ensure the company provides regular updates, security patches, and troubleshooting assistance.
Top Industries Benefiting from WordPress Website Design in Delhi
WordPress is versatile and serves a wide range of industries. Here are some sectors that benefit the most from professional WordPress Website Designing Services In Delhi:
E-commerce: Online stores and marketplaces
Healthcare: Clinics, hospitals, and doctors’ websites
Education: Schools, colleges, and online courses
Real Estate: Property listings and real estate agencies
Corporate Websites: Business portfolios and company profiles
Blogging and News Portals: Content-focused websites
Event Management: Wedding planners, conferences, and ticket booking sites
Regardless of your industry, WordPress can be customized to meet your specific requirements and business goals.
3 notes
·
View notes
Text
I made a blog!!!

Check out my bloooooooog
(Sorry, there's not much there right now...)
I realized that while I was on cohost, the format and the posting culture (css nerd stuff) kind of encouraged me to put more time and effort into making posts in a way that I hadn't in a long time. I hadn't realized how much I missed having control over the minutiae of content I posted. So even though I resolved to crosspost some of the stuff I liked to tumblr, it's missing some of the personality that I put into it, I think, and having a blog where I can do some of those shenanigans if I want to will be fun.
Also, for your viewing pleasure, you may subscribe to the RSS feeds (there's one for each category in addition to the aggregate feed, so if you only want to hear about art or only games, you can do that as well).
Also also, if you own your own webspace, and are thinking about adding a blog, I wrote a little bit about the plugin i used under the cut. ↓↓↓
I was sifting through the blogging plugins available through my hosting service and settled on HTMLy, firstly because it's pretty lightweight--it only takes up 8mb of server space which is crazy small (compare to Wordpress' 68mb). It has a tag system, categories, and a built in search (not just a google search that crawls through your blog), and aside from how long it took me to hack the themes apart into something resembling the rest of my site, it was really easy to setup. I really like it.
I only added it to my blog, but I'm honestly kind of considering rebuilding the rest of my site using HTMLy as well.
Similar to cohost, you can use markdown and html in your posts. There's a built-in image uploader so you don't have to deal with any image hosting shenanigans. I added a bunch of special elements to my blog's css that i'd defined in the style sheet for my regular website (and even some common ones I used in my chosts), so I can insert them for a cohesive feel.
It also supports multiple users--with its own login page separate from your cpanel or however you usually access your site--which is a feature I'll never use, but I think it's really neat. :)
Aaaanyways, I need to overhaul the rest of my site since I haven't updated it meaningfully in uh... six years... but hopefully, I'll get around to making it more of a reflection of my current interests... this year... maybe....
Also, maaaaaaaan, i really wanna get back into doing little code doodles in Processing. I used to have a lot of fun with them. Maybe I'll port some of my old ones to the latest version so I can put them on the web...
3 notes
·
View notes
Text
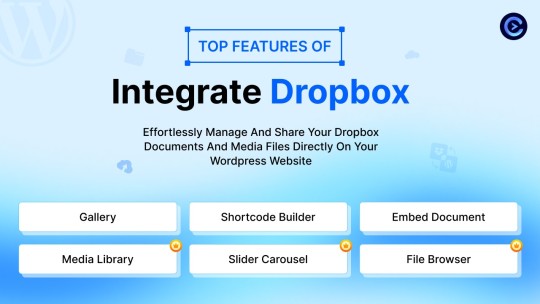
How to Enable Auto-Sync Photos from Dropbox to WordPress?
Managing media files and keeping them organized on your WordPress website can be a daunting task. Dropbox users can now simplify this process with the powerful File Manager for Dropbox (Integrate Dropbox plugin), which allows seamless auto-synchronization of your Dropbox folders with your WordPress site. Whether you're uploading photos, videos, or documents, this plugin ensures your content is always up-to-date and easily accessible. Here’s how you can get started:
What is Integrate Dropbox?
File Manager for Dropbox (Integrate Dropbox) is a WordPress plugin designed to sync your Dropbox content directly to your WordPress pages, posts, or media library. This plugin makes it easy to:
Upload images, videos, or files from Dropbox to your WordPress site.
Auto-sync shared folders for real-time updates.
Showcase Dropbox content on your website without the hassle of manual uploads.
By automating the synchronization process, Integrate Dropbox saves time and improves efficiency for bloggers, photographers, businesses, and anyone managing a WordPress site.
Who Benefits from the Integrate Dropbox Plugin?
Photographers: Automatically sync and display photo albums on your portfolio site.
Content Creators: Keep your website updated with the latest files, presentations, or videos.
Businesses: Share brochures, product catalogs, and documents seamlessly with your clients.
Using the Integrate Dropbox Plugin, you can seamlessly upload photos to your website in real time by creating a Dropbox folder and embedding it on your site using a shortcode. This functionality is perfect for events like photo booths at Christmas or New Year’s parties, where you want the latest uploads to be visible instantly.
How to Auto-Sync Photos from Dropbox to WordPress
youtube
Step 1: Install and Activate the Integrate Dropbox Plugin
Download and install the Integrate Dropbox Plugin from the WordPress Plugin Directory.
Activate the plugin from the Plugins section of your WordPress Dashboard.
youtube
Step 2: Connect Your Dropbox Account
Go to Settings > Integrate Dropbox in your WordPress admin panel.
Click Connect Dropbox Account.
Authorize the connection by logging in to Dropbox and allowing the app access.
Step 3: Create a Dropbox Folder for Uploads
Log in to your Dropbox account.
Create a new folder named, for example, Event Photos.
Share the folder with your event team or photographers, allowing them to upload photos in real time.
Step 4: Sync the Dropbox Folder with Your Website
In your WordPress dashboard, navigate to the Integrate Dropbox section.
Click Shortcode Builder and select Gallery or Slider Carousel module.
Choose the Dropbox folder (Event Photos) you created earlier.
Customize display settings like layout, style, and auto-refresh interval.
Copy the generated shortcode.
Why Use the File Manager for Dropbox Plugin?
Here are a few reasons why Dropbox users find this plugin invaluable
Effortless Media Management: Say goodbye to manually downloading files from Dropbox and re-uploading them to WordPress. With auto-sync, your Dropbox content is always mirrored on your site.
Real-Time Updates: Any changes made in your Dropbox folder are automatically reflected on your WordPress site. This feature is particularly useful for shared folders, ensuring collaboration is seamless.
Streamlined Image and Photo Uploads: Photographers and content creators can easily showcase their work by syncing their image folders directly to WordPress. No need for duplicate uploads or tedious file management.
Embed Dropbox Content: Display Dropbox files in a visually appealing format on your WordPress posts and pages, perfect for portfolios, galleries, or downloadable resources.
Customizable Settings: Configure folder synchronization, access permissions, and display preferences to meet your specific needs.
Wrapping Up
File Manager for Dropbox plugin simplifies your workflow and eliminates the hassle of manual uploads, making it the perfect solution for Dropbox users who rely on WordPress. To learn more about this plugin and its features, visit the plugin directory or explore the settings after installation.
Start syncing your Dropbox folders today and elevate your WordPress site to the next level!
5 notes
·
View notes
Text
How to Show Featured Images in Your WordPress Posts [Step-by-Step]

A featured image is a key element in making your WordPress posts visually appealing and engaging. Here’s a detailed guide on how to display featured images effectively.
Understanding the Importance of Featured Images
A featured image is the primary visual for your post, often shown on the homepage and social media. It sets the tone and context for your content.
Steps to Display a Featured Image
Access Your WordPress Admin: Log into your WordPress dashboard.
Create or Edit a Post: Select "Posts" from the left menu and choose "Add New" or an existing post to edit.
Find the Featured Image Section: Look for the "Featured Image" box on the right sidebar.
Add Your Image:
Click on “Set featured image.”
Choose from the media library or upload a new image.
Click “Set featured image” to confirm your choice.
Update Your Post: Ensure you publish or update to reflect the changes.
Best Practices for Featured Images
Select Quality Images: High-resolution images will capture more attention.
Optimize for Performance: Use image compression tools to keep your site fast.
Know Your Theme’s Specs: Different themes require different image sizes.
Common Issues and Solutions
If your featured image isn’t displaying:
Check Your Theme Settings: Make sure it supports featured images.
Look for Plugin Conflicts: Disable plugins to find any issues.
Clear Your Browser Cache: Sometimes changes won’t show until the cache is cleared.
Conclusion
Utilizing featured images effectively can enhance your posts and engage your audience. Should you need to hide a featured image for specific posts, explore How to Hide Featured Image in WordPress Post. Implementing these tips will elevate your blog’s visual presence!
4 notes
·
View notes
Text
How to Safely Use SVG Files in WordPress

SVG files are a popular choice for web graphics, but is SVG supported by WordPress by default? Unfortunately, no. WordPress doesn’t allow SVG uploads due to potential security risks. However, if used correctly, you can safely enable SVG support. For detailed instructions, check out How to Allow SVG in WordPress to add SVGs without compromising your site’s security.
What is SVG and Why Should You Use It?
SVG (Scalable Vector Graphics) is a file format designed for vector images that can be resized without losing quality. What is SVG? Unlike traditional image formats like PNG or JPEG, which use pixels, SVGs are defined by XML-based code. This means they can scale to any size while remaining sharp. How does SVG work? Since SVGs are text-based, browsers render them by interpreting code, making them ideal for responsive websites.
Why is SVG Important for WordPress?
SVGs offer unique advantages, especially when used on a WordPress website. Why is SVG important for WordPress? SVG files are incredibly scalable, which is crucial for responsive design. Whether viewed on mobile, tablet, or desktop, your images will look crisp and clear. Additionally, because SVG files are lightweight, they help reduce page load times, improving both user experience and SEO performance.
Why Can’t You Upload SVG Files to WordPress?
You might wonder, why can’t I upload SVG images to WordPress? While SVGs are useful, they also pose a security risk. Since they are XML-based, they can be manipulated to include malicious code that hackers could use to harm your website. For this reason, WordPress doesn’t allow SVG uploads by default. But don’t worry—there are safe ways to enable SVG support.
How to Enable SVG Files in WordPress?
Enabling SVG support in WordPress is possible, but it requires a few precautions. How to enable SVG files in WordPress? The easiest and safest way is to use a plugin that sanitizes SVG files before uploading them, removing any potentially harmful code. If you prefer a manual approach, you can modify your theme’s functions.php file to allow SVG uploads, but using a plugin is highly recommended to mitigate security risks.
What Are the Advantages of Using SVG in WordPress?
The benefits of using SVG files on your WordPress site are clear. What are the advantages to use SVG in WordPress? SVGs offer superior scalability, meaning they look sharp on all screen sizes without becoming pixelated. They are also lightweight compared to other image formats, which helps your site load faster. Plus, SVGs are text-based, so search engines can read and index them, improving your SEO.
Why Should You Consider SVG for Your Website?
As websites become more focused on performance and responsiveness, SVG is emerging as an essential tool. Why is SVG important for WordPress? Its ability to scale without losing quality ensures your website looks professional and modern on any device. Additionally, faster loading times provided by SVGs contribute to a better user experience, which is a key factor in SEO rankings.
Conclusion
Although SVG is not supported by WordPress out of the box, you can safely enable it with the right precautions. SVGs provide a range of benefits, from scalability to better performance, making them an excellent choice for modern web design. To learn how to safely add this functionality to your WordPress site, follow this guide on How to Allow SVG in WordPress.
#wordpress#wordpress theme#wordpress plugin#wordpress development#plugin#developer#wordpress developers
2 notes
·
View notes
Text
ShopBuildr AI Review – Create Amazon Affiliate Store In 60 Seconds!
Welcome to my ShopBuildr AI Review Post, This is a genuine user-based ShopBuildr AI review where I will discuss the features, upgrades, demo, price, and bonuses, how ShopBuildr AI can benefit you, and my own personal opinion. This is brand new automated AI software that creates 100% done-for-you and ready-to-profit affiliate stores in just minutes no Amazon APIs needed, and no content creation needed.
If you want to earn more affiliate commissions, then you are going to love this new tool. It automatically finds your products to promote, creates the posts for you, inserts content for you, and even adds your affiliate link for you! Affiliate marketing remains a popular way to generate income. It allows you to promote other companies’ products and earn commissions for each sale you make. However, building and maintaining a successful affiliate store can be a daunting task, especially for beginners. This is where ShopBuilder AI steps in. Claiming to be an all-in-one solution, ShopBuildr AI promises to automate the entire process of creating and managing an affiliate store.

ShopBuildr AI Review: What Is ShopBuildr AI?
ShopBuildr AI is a cloud-based software designed to simplify the process of building and managing affiliate websites. It utilizes artificial intelligence (AI) to automate several key tasks, including product selection, content creation, store design, and even content spinning (rewriting) for legal compliance.
ShopBuildr AI integrates with various platforms like Amazon and allows you to import product listings directly. It boasts features that streamline content creation, helping you generate product descriptions and reviews with minimal effort. Additionally, ShopBuildr AI offers built-in social media integration to promote your store and generate traffic.
ShopBuildr AI Review: Overview

Creator: Kurt Chrisler
Product: ShopBuildr AI
Date Of Launch: 2024-May-20
Time Of Launch: 10:00 EDT
Front-End Price: $17 (One-time payment)
Official Website: Click Here To Access
Product Type: Software (Online)
Support: Effective Response
Discount: Get The Best Discount Right Here!
Recommended: Highly Recommended
Bonuses: Huge Bonuses
Rating: 9.3/10
Skill Level Required: All Levels
Refund: YES, 30 Days Money-Back Guarantee
<<>> Click Here & Get Access Now ShopBuildr AI Discount Price Here <<>>
ShopBuildr AI Review: Features
Create Your First Affiliate Store In Just Minutes!
100+ DFY Affiliate Products
Offer Unlimited Products For More Commissions
Integrated with ChatGPT
Newbie Friendly, No Experience Required
No Amazon API is Needed!
Automated Free updates
Unlimited support
ShopBuildr AI Review: How Does It Work?
Creating Your Affiliate Store Has Never Been This Easy!
STEP #1: Install the Software
Simply upload the Shopbuildr AI WordPress Plugin to your WordPress site.
STEP #2: Upload Your Products
Simply upload the 100+ DFY Products we provide to get started fast!
STEP #3: Let ShopBuildr AI Take Over
Click “Post” and ShopBuildr AI will build your site for you! Everything is completely done for you.
<<>> Click Here & Get Access Now ShopBuildr AI Discount Price Here <<>>
ShopBuildr AI Review: Can Do For You
Automatically Creates An Affiliate Store
Automatically Insert the Product Name
Automatically Inserts Content
Automatically Inserts Product Images
Automatically Inserts Your Affiliate Link
Automatically Inserts Custom Ads
Add Your Optin Box to Each Page
Integrated with ChatGPT

ShopBuildr AI Review: Who Should Use It?
Affiliate Marketers
Artists
Content Creators
eCom Store Owners
Blog Owners
CPA Marketers
Video Marketers
Product Creators
Personal Brands
Freelancers
And Many Others
ShopBuildr AI Review: OTO’s And Pricing
Front End Price: ShopBuildr AI ($17)
OTO1: ShopBuildr AI PRO ($37)
OTO2: ShopBuildr AI Unlimited ($47)
OTO3: Done For You Option ($67)
OTO4: iMarketers Hosting ($39/$59 per year)
<<>> Click Here & Get Access Now ShopBuildr AI Discount Price Here <<>>
ShopBuildr AI Review: My Unique Bonus Bundle
My Unique Bonus Bundle will be visible on your access page as an Affiliate Bonus Button on WarriorPlus immediately after purchase.
And before ending my honest ShopBuildr AI Review, I told you that I would give you my very own unique PFTSES formula for Free.
ShopBuildr AI Review: Free Bonuses
Bonus #1: Azon Affiliate Bar Plugin
With this WordPress plugin, you can display a “sticky bar” at the top of your site promoting any Amazon product you want. This plugin makes it incredibly easy to start making more commissions from the Amazon Affiliate program in just a couple of minutes!
Bonus #2: FB Affiliate Alert Box Plugin
This WordPress plugin allows you to use the familiarity of Facebook to increase your affiliate commissions on all your websites. It will create pop-up boxes that resemble those from Facebook and allow you to insert affiliate products into them.
Bonus #3: WP Traffic Domination Training
You can’t make money online without traffic! The Traffic Domination course will show you how to start generating free traffic to all your websites and how to do it the right way to avoid penalties. If you need more traffic. then you need this course!
ShopBuildr AI Review: Demo Video
Just Watch The ShopBuildr AI Demo Video Down Below To Get All The Details:
>>For More Details Click Here<<
<<>> Click Here & Get Access Now ShopBuildr AI Discount Price Here <<>>
ShopBuildr AI Review: Money Back Guarantee
30 day money back guarantee
ShopBuilder AI is backed by a 30-day warranty. If you are having trouble setting up your first affiliate site and our support staff is unable to assist you. Send us an email and we’ll refund your purchase.
That’s it!
ShopBuildr AI Review: Pros and Cons
Pros:
Saves time with automated product selection and content creation.
Beginner-friendly interface for easy website setup.
Built-in social media integration for wider reach.
Cons:
You cannot use this product without an active internet connection.
In fact, I haven’t yet discovered any other problems withShopBuildr AI.
Frequently Asked Questions (FAQ’s)
Q. How many sites can I create?
With the standard version you can create 1 site. However, after you purchase you will have the option to upgrade your account to unlimited, which will allow you to create as many sites as you want.
Q. Do I need to purchase anything else?
You will need to have your own domain name and website that is using WordPress on it
Q. Is ShopBuildr AI completely free?
ShopBuildr AI typically offers a base product at a lower price, with additional features locked behind upsells. There might also be free trials available, so check their website for current pricing details.
Q. Can ShopBuildr AI guarantee my affiliate marketing success?
ShopBuildr AI is a tool to help build your website, but success in affiliate marketing depends on various factors like ongoing content creation, audience engagement, and marketing strategies.
Q. Is the content generated by ShopBuildr AI good enough?
AI-generated content can be a starting point, but it might require editing to ensure quality and uniqueness for optimal SEO impact.
ShopBuildr AI Review: My Recommendation
ShopBuildr AI offers a compelling solution for beginners or those short on time. It streamlines website creation and content generation, but it’s important to remember it’s a tool, not a magic solution. Long-term success requires ongoing effort in content creation, audience engagement, and SEO optimization. Weigh the potential benefits against the limitations to determine if ShopBuildr AI can be a stepping stone on your affiliate marketing journey.
<<>> Click Here & Get Access Now ShopBuildr AI Discount Price Here <<>>
Check Out My Previous Reviews: IntelliVid AI Studio Review, CB Ninja Review, AI Employees Review, OverLap AI Review, AI CaptureFlow Review, FlexiSitesAI Review, WP Defense Review, HostDaddy Review.
Thank for reading my ShopBuildr AI Review till the end. Hope it will help you to make purchase decision perfectly.
Disclaimer: This ShopBuildr AI review is for informational purposes only and does not constitute professional advice. Before making a purchase decision, we recommend conducting your own research and exploring the software.
Note: Yes, this is a paid software, however the one-time fee is $17 for lifetime.
#Affiliate Marketing#Ai#AI Tools#Apps#Artificial Intelligence#Buy ShopBuildr AI#Digital Marketing#Get ShopBuildr AI#How Does ShopBuildr AI Work#How to Make Money Online#Make Money#Make Money From Home#Make Money Online#Online Earning#Purchase ShopBuildr AI#ShopBuildr AI#ShopBuildr AI App#ShopBuildr AI Benefits#ShopBuildr AI Bonus#ShopBuildr AI Bonuses#ShopBuildr AI Bundle#ShopBuildr AI By Kurt Chrisler#ShopBuildr AI Demo#ShopBuildr AI Discount#ShopBuildr AI Downsell#ShopBuildr AI FE#ShopBuildr AI Features#ShopBuildr AI Funnels#ShopBuildr AI Honest Review#ShopBuildr AI Info
3 notes
·
View notes
Text
10 Easy SEO Tips for WordPress Beginners (That Actually Work in 2025)
So, you’ve launched your WordPress site and you’re wondering… “How do I get more traffic from Google?”
The answer? Search Engine Optimization (SEO). But don’t worry you don’t need to be an expert to start seeing results.
Whether you’re a blogger, small business owner, or running an online store, these 10 beginner-friendly SEO tips will help boost your visibility on Google in 2025.
And yes, we'll also show you how using the right WordPress theme (like those from WPElemento) can make a huge difference.
1. Choose the Right SEO Keywords
Before you create content, know what your audience is searching for.
Tools to try:
Ubersuggest (free & beginner-friendly)
Google Keyword Planner
Ahrefs Free Keyword Generator
👉 Look for long-tail keywords like:
“best WordPress themes for small business”
“how to improve WordPress site speed”
“affordable SEO tools for beginners”
Pro Tip: Focus on keywords with low competition and high intent.
2. Install an SEO Plugin
This is a must for WordPress beginners.
The two best free plugins are:
Yoast SEO
Rank Math
These tools help you:
Optimize title tags and meta descriptions
Create XML sitemaps
Manage canonical URLs
Improve content readability
3. Use a Fast, SEO-Friendly WordPress Theme
Your theme affects your site’s speed, code structure, mobile usability all ranking factors.
🎯 Recommended: WPElemento WordPress Theme Bundle
This bundle includes dozens of responsive, fast-loading themes across niches like:
Business
eCommerce
Education
Photography
Non-profits
All WPElemento themes are:
Built with clean code
Elementor-compatible
Mobile-optimized
Designed for SEO success
4. Optimize Your Site Speed
Google loves fast websites. So do your visitors.
Quick ways to boost speed:
Use a caching plugin (like WP Rocket or W3 Total Cache)
Compress images with ShortPixel or TinyPNG
Choose a fast web host
Minimize external scripts
🛠️ Already using a bloated theme? Switch to one from the WPElemento bundle to improve load times.
5. Write Quality, Human-Friendly Content
Forget stuffing keywords. In 2025, Google prefers content that helps real people.
✍️ Writing Tips:
Use headings (H1, H2, H3) to structure content
Answer questions directly
Keep paragraphs short and readable
Add visuals: images, infographics, and videos
Use internal links to your other pages
6. Make Your Site Mobile-Friendly
With over 60% of traffic coming from mobile, your site must be responsive.
How to check?
Use Google’s Mobile-Friendly Test
Preview your site on various screen sizes
💡 Good news: Every WPElemento theme is mobile-optimized out of the box.
7. Use SEO-Friendly URLs
Keep your URLs short, descriptive, and keyword-rich.
❌ Example of a bad URL: yourwebsite.com/page?id=37482
✅ Example of a good URL: yourwebsite.com/seo-tips-for-wordpress
To fix this:
Go to Settings → Permalinks in WordPress
Choose “Post name” as your default structure
8. Add Alt Text to All Images
Alt text helps Google understand your images. It’s also important for accessibility.
When uploading an image:
Add a short, keyword-rich description in the "Alt Text" field
Keep it relevant (don’t keyword stuff)
Example: Alt text: “Business website WordPress theme by WPElemento”
9. Submit Your Site to Google Search Console
If you want to appear in Google, let them know you exist!
Head over to Google Search Console, add your site, and:
Submit your sitemap (created by Yoast or RankMath)
Monitor which keywords bring traffic
Fix crawl errors
It’s free and gives you real data on how Google sees your site.
10. Keep Updating and Improving
SEO isn’t one-and-done. Keep your site fresh by:
Updating outdated posts
Fixing broken links
Adding new content regularly
Upgrading to better-performing themes (again, check WPElemento)
Final Thoughts
SEO may sound technical, but the basics are simple:
Choose good keywords
Write helpful content
Optimize your speed and design
Stay mobile-friendly
Use the right tools (and the right theme)
Start with the foundation: your WordPress theme. Explore the full range of fast, SEO-ready options in the WPElemento WordPress Theme Bundle and give your website a real edge in 2025.
0 notes
Text
Why File Upload Security Should Be Your Top Priority?

In today's digital world, websites often act as gateways to sensitive information. Whether it's customer data, confidential documents, or user-generated content, the responsibility of safeguarding it lies squarely on website owners' shoulders. And with WordPress powering over 40% of all websites, ensuring File Upload Security within this platform becomes paramount.
#file upload form wordpress free#File Upload Security#wordpress file upload plugin#wordpress upload plugin#wordpress plugins free#wordpress image upload plugin
1 note
·
View note
Text
Top WordPress Features Every Business Website Should Use in 2025

WordPress has come a long way from being just a blogging tool. In 2025, it is one of the most advanced and flexible platforms to create professional websites that don’t just look good—but also work hard behind the scenes. From performance to SEO and automation, WordPress offers tools that can take your business website to the next level.
In this blog, we’ll explore the top WordPress features that every business should use—and how working with the right professionals can make a huge difference.
1. Block Editor (Gutenberg) for Powerful Page Building
WordPress introduced the Block Editor (also called Gutenberg) as a major upgrade to its content editing experience. Each section of your website—text, images, buttons, videos—can now be added as blocks, making content creation intuitive and flexible.
Why It Matters:
Visual page-building without coding
Drag-and-drop interface for faster editing
Reusable block templates for branding consistency
You no longer need third-party builders for basic layouts. Gutenberg does more than enough for clean, modern designs.
2. Theme Customizer with Live Preview
The Theme Customizer in WordPress lets you change the appearance of your site in real time—colors, fonts, header styles, menus, and more—without writing any code.
Key Benefits:
Live editing without publishing changes immediately
Control over global elements like logo, navigation, and site identity
Theme-specific options like custom widgets and layouts
Great design starts here, especially when paired with lightweight, SEO-optimized themes.
3. WooCommerce for eCommerce Functionality
Planning to sell online? WooCommerce is the most powerful eCommerce plugin for WordPress.
Features Businesses Love:
Sell physical and digital products
Payment integration (UPI, PayPal, Stripe)
Coupons, discounts, shipping zones
Order management and customer accounts
Inventory tracking and analytics
WooCommerce is flexible enough to handle anything from one product to thousands.
4. WordPress SEO Features That Drive Growth
Search engines love WordPress. Its structure is clean, organized, and easy for Google bots to crawl.
Built-in SEO Strengths:
Clean permalinks (URLs)
Custom title tags and meta descriptions
Easy content hierarchy with heading tags
Image alt text support
XML sitemap generation with plugins like Yoast or Rank Math
When optimized well, your WordPress site can dominate local and global search rankings.
5. Advanced Form Builders
Contact forms aren’t just for reaching out—they can be powerful tools for leads, feedback, and bookings.
Recommended Plugins:
WPForms: Simple drag-and-drop builder
Forminator: Beautiful UI and integrations
Gravity Forms: Ideal for advanced conditional logic
Forms can be connected to CRMs, Google Sheets, and payment gateways to streamline your workflow.
6. Multilingual Capabilities
Want to reach a wider audience in different languages? WordPress makes it possible.
Plugins for Translation:
WPML (WordPress Multilingual Plugin)
Polylang
TranslatePress
With multilingual support, you can create localized content for users across the globe without duplicating your website.
7. Website Speed Optimization Tools
Website speed is no longer a luxury—it’s a ranking factor. WordPress supports powerful caching and speed tools to ensure blazing-fast experiences.
Must-Have Speed Tools:
WP Rocket (Caching + optimization)
Smush (Image compression)
Perfmatters (Disable unnecessary scripts)
Lazy Load for images and iframes
Faster websites mean lower bounce rates and higher conversions.
8. Built-in Media Management System
WordPress makes managing images, videos, and documents easy with its Media Library.
What You Can Do:
Upload and edit media files directly
Add alt text and titles for SEO
Organize with folders or plugins
Resize and compress images on the fly
For businesses in visual industries (like fashion, travel, or food), media handling is critical.
9. Security & User Roles
Keeping your website secure and managing users effectively is non-negotiable.
Key Features:
Built-in user roles (Admin, Editor, Author, etc.)
Password-protected content areas
Two-Factor Authentication (2FA) with plugins
Role-based permissions to manage workflow
Combine this with security plugins like Wordfence and iThemes Security for complete protection.
10. Integration with Third-Party Tools
WordPress connects seamlessly with modern tools used by businesses every day.
Top Integrations:
Google Analytics for traffic tracking
Mailchimp for email marketing
HubSpot or Zoho CRM for customer management
Zapier to automate workflows
WhatsApp Chat plugins for instant communication
These integrations help automate and enhance business performance.
Why You Need a Professional Web Design Partner
Even though WordPress is user-friendly, setting up a professional business website still requires design thinking, performance knowledge, and SEO strategy. That’s where a web design company in Udaipur becomes your best ally.
They help you:
Select the best-performing themes
Customize designs to match your brand
Optimize user flow and page structure
Setup security, caching, and backups
Build lead funnels and analytics dashboards
Go Beyond Basics with Expert WordPress Development
For more advanced functionalities like payment portals, booking engines, or custom dashboards, hiring a WordPress Development Company in Udaipur is the smart move.
They bring:
Plugin customization or development
Speed and database optimization
API and third-party tool integration
Multisite and membership functionality
Performance reports and future scaling solutions
The result? A high-performing website that grows with your business.
Final Thoughts
WordPress is more than just a content platform—it’s a business powerhouse. Its features in 2025 offer everything from eCommerce and SEO to automation and multilingual support. But to truly unlock its potential, design and development expertise is key.
0 notes
Text
Transform Your Online Store with a Powerful WooCommerce Auction Plugin
E-commerce is rapidly evolving, and online auctions have become a popular way to drive engagement, boost sales, and create a competitive shopping experience. If you’re looking for an innovative way to captivate your audience, the WooCommerce auction plugin is the ultimate solution. Whether you want to sell unique collectibles, limited-edition items, or high-demand products, this plugin provides a seamless integration into your WooCommerce store. Let’s dive into how this game-changing tool can elevate your e-commerce strategy.
What is a WooCommerce Auction Plugin?
The WooCommerce auction plugin is a specialized tool designed to transform your WooCommerce store into an auction-based marketplace. This plugin allows you to run timed auctions, set reserve prices, and engage users with bidding wars directly on your website. With easy setup and customization options, you can tailor the auction experience to suit your brand’s style and customer needs.
Gone are the days of relying on external platforms for hosting auctions. With the WooCommerce auction plugin, you maintain control over the auction process, customer data, and revenue. This gives you a competitive edge and strengthens customer trust.
Benefits of Using a WooCommerce Auction Plugin
1. Boosts Customer Engagement
Adding auctions to your e-commerce store creates a sense of urgency and excitement. Shoppers are more likely to participate in competitive bidding, increasing their time spent on your website. The WooCommerce auction plugin keeps customers coming back for the thrill of winning exclusive deals.
2. Increases Revenue Potential
With the WooCommerce auction plugin, you can leverage competitive bidding to maximize the final selling price of your products. Auctions can lead to higher-than-expected sales prices, especially for in-demand or rare items.
3. Seamless Integration
The WooCommerce auction plugin integrates directly with your existing WooCommerce store, ensuring a smooth user experience. You don’t need to juggle multiple platforms or systems—everything is handled within your WordPress dashboard.
4. Customizable Features
Every business is unique, and the WooCommerce auction plugin offers flexibility to suit your needs. Set start and end times, reserve prices, bidding increments, and more. This level of customization ensures your auctions align with your branding and customer expectations.
5. Enhances Inventory Management
Auctions are a great way to sell excess inventory, test the demand for new products, or feature limited-edition items. The WooCommerce auction plugin provides an effective strategy to move products while keeping customers engaged.
How to Set Up a WooCommerce Auction Plugin
Setting up the WooCommerce auction plugin is a straightforward process. Here’s a step-by-step guide:
Install and Activate the Plugin Download the WooCommerce auction plugin from the official website or WordPress plugin repository. Upload it to your WordPress site and activate it.
Configure Plugin Settings Navigate to the plugin settings to customize your auction parameters. Define bidding rules, time limits, and reserve prices.
Add Auction Products Create new auction listings by adding products through the WooCommerce dashboard. Include product details, images, and descriptions to attract bidders.
Promote Your Auctions Use email marketing, social media, and your website to promote upcoming auctions. The more participants, the better the bidding competition!
Monitor and Manage Auctions Keep track of live auctions, manage bids, and communicate with participants. The WooCommerce auction plugin provides real-time updates to help you stay in control.
Features to Look For in a WooCommerce Auction Plugin
When choosing a WooCommerce auction plugin, consider the following features:
Responsive Design: Ensure the plugin works seamlessly on all devices.
Bidding Notifications: Keep users informed about bids and auction statuses.
Reserve Price Settings: Protect your products by setting minimum acceptable prices.
Countdown Timer: Create urgency with a visible auction timer.
Multi-Language Support: Cater to a global audience with multilingual functionality.
The WooCommerce auction plugin offered on AuctionPlugin.net checks all these boxes, making it a top choice for e-commerce businesses.
Success Stories: Businesses Thriving with WooCommerce Auction Plugins
Exclusive Art Dealer A small art gallery used the WooCommerce auction plugin to auction rare paintings, resulting in a 50% increase in revenue. The competitive bidding attracted new customers and established the gallery as a go-to destination for exclusive art.
Tech Gadgets Store By hosting weekly auctions for refurbished gadgets, an online retailer boosted sales and cleared inventory quickly. The WooCommerce auction plugin made it easy to manage auctions and engage tech-savvy customers.
Charity Organization A nonprofit organization leveraged the WooCommerce auction plugin to auction donated items during a virtual fundraising event. The plugin’s user-friendly features helped the organization raise significant funds for its cause.
Why Choose AuctionPlugin.net?
If you’re ready to elevate your e-commerce game, AuctionPlugin.net offers the perfect WooCommerce auction plugin to meet your needs. With cutting-edge features, intuitive design, and reliable support, this plugin is designed to help your business succeed.
Don’t miss out on the opportunity to stand out in the competitive e-commerce landscape. Transform your store into a dynamic auction platform with the WooCommerce auction plugin from AuctionPlugin.net.
Final Thoughts
The WooCommerce auction plugin is more than just a tool—it’s a strategy to enhance customer engagement, increase sales, and add excitement to your online store. By incorporating auctions, you create a unique shopping experience that keeps customers coming back for more.
Visit AuctionPlugin.net today to learn more and start your journey toward a thriving auction-based marketplace!
0 notes
Text
Why Are CMS Websites the Smart Choice for Startups and Growing Brands?

In today’s fast-paced digital world, having an online presence isn’t just an option — it’s a necessity. Whether you're a new startup aiming to make your mark or a growing brand looking to scale, your website is often the first interaction potential customers have with your business. That’s why choosing the right platform to build your website is critical.
A Content Management System (CMS) is a software platform that allows users to create, manage, and modify digital content without needing deep technical knowledge. Platforms like WordPress, Shopify, Wix, Squarespace, and Webflow offer startups and growing businesses a powerful way to establish an online presence quickly, cost-effectively, and with room to grow.
Let’s explore why CMS websites are the smart choice for startups and growing brands in 2025 and beyond.
1. Cost-Effective and Budget-Friendly
Startups typically operate on limited budgets, especially in the early stages. CMS platforms offer affordable options that eliminate the need to hire a full-time developer or invest in custom-built websites right away.
How it helps:
Many CMS platforms offer free or low-cost templates and themes.
Open-source CMS options (like WordPress) are free to use.
Hosting, domain, and maintenance can all be scaled according to budget.
For startups, this affordability ensures they can launch a fully functional website without burning through their financial resources.
2. Quick Setup and Easy to Launch
Time is of the essence for startups. Getting your business online quickly can mean the difference between missing and seizing an opportunity. CMS platforms are built for speed — with pre-designed templates, drag-and-drop interfaces, and plug-and-play features.
Advantages:
Launch your website in days instead of weeks or months.
Customize templates to match your brand’s style.
Add or remove pages with ease, no coding required.
The ease of setup makes CMS ideal for fast execution and pivoting based on business needs.

3. No Technical Skills Needed
You don’t have to be a web developer to manage a CMS website. Most platforms are user-friendly and designed for non-tech users. That means startup founders and small teams can manage their own website content, updates, and media without outside help.
Benefits:
Easily publish blog posts, update product pages, and upload media.
Access a visual editor (what you see is what you get).
Get ongoing support from community forums and tutorials.
This level of independence helps startups stay agile and reduces dependency on external developers.
4. Scalability to Match Business Growth
One of the strongest advantages of CMS websites is scalability. As your business grows, your website can evolve alongside it. Need a new landing page? Want to add a blog or an e-commerce store? It’s all possible without rebuilding from scratch.
Why it matters:
Add plugins and integrations as your needs change.
Upgrade themes, features, and hosting plans without downtime.
CMS platforms can handle increased traffic and data without performance loss.
Whether you're expanding to new markets or scaling your services, your CMS website grows with you.

5. Built-in SEO Features
Being found online is critical, and CMS platforms understand that. Most come with built-in SEO features or plugins that make it easier for startups to rank on search engines.
Features include:
Editable meta titles and descriptions
Automatic sitemap generation
Image alt tags and URL customization
SEO plugins like Yoast SEO (for WordPress)
Good SEO tools mean that even without hiring an SEO agency, you can set a solid foundation for organic growth.
6. Mobile-Responsive and User-Friendly Designs
In 2025, mobile-first design is no longer optional — it’s a requirement. Fortunately, most CMS themes are built to be mobile-responsive by default, ensuring your site looks great and functions smoothly on any device.
User Experience Wins:
Auto-optimized layouts for phones and tablets
Faster loading times for better engagement
Enhanced navigation and readability
With more users browsing and buying from mobile devices, this responsiveness enhances trust and increases conversions.
7. E-commerce Ready
Many startups launch with a product or service to sell. CMS platforms like Shopify, WooCommerce (for WordPress), and Squarespace Commerce make it simple to set up an online store with full shopping cart functionality.
Features you’ll love:
Product listings and inventory management
Secure payment gateways (Stripe, PayPal, etc.)
Tax and shipping calculation
Mobile checkout and analytics integration
You don’t need to reinvent the wheel — these tools are ready-made and proven to work for small businesses.
Ongoing Support and Community
CMS platforms are supported by large communities of developers, designers, and users. This means you have access to hundreds of tutorials, forums, plugins, and expert services — which is a huge asset for startups without an internal tech team.
Community Value:
Open-source contributions keep platforms up to date
You can find experts or freelancers easily on Upwork or Fiverr
24/7 support options available with many paid CMS tools
The support ecosystem helps you troubleshoot problems quickly and learn on the go.
9. Content Marketing Friendly
Startups and growing brands need to establish credibility, and content marketing is one of the most effective strategies. CMS platforms are designed for blogging, video embedding, landing pages, and lead capture — all essentials for inbound marketing.
Use cases:
Launch a blog to build SEO and trust
Add call-to-action buttons and lead magnets
Share resources, whitepapers, and guides easily
A CMS makes it easy to position your startup as a thought leader without needing constant tech assistance.
10. Security and Regular Updates
CMS platforms today are designed with security in mind. Regular updates, plugins, SSL support, and automatic backups give peace of mind to startups concerned about cyber threats or data loss.
Security Perks:
Automatic security patches and updates
Access to security plugins (like Wordfence for WordPress)
SSL certificates included in most hosting plans
Your CMS-based website can be just as secure as any custom-built one — without the complexity.
Final Thoughts
For startups and growing businesses, time and resources are always tight. A CMS-based website empowers you to launch fast, operate efficiently, and scale smoothly — without needing a full-scale IT department.
From affordability to flexibility, SEO benefits to e-commerce features the case for CMS-based website development is stronger than ever in 2025.
So, if you're a startup looking for a smart, sustainable, and scalable solution to take your brand online, look no further. A CMS website is not just a tool — it's the foundation of your digital success.
#CMSWebsite#StartupTips#SmallBusinessWebsite#WebsiteDevelopment#DigitalGrowth#WordPress#Shopify#WixWebsite#OnlineBusiness2025#ScalableWebDesign
0 notes
Text

Work Smarter, Not Harder Use Dropbox As WordPress Hosting
Running a WordPress site often means juggling increasing hosting costs as your content grows. Many website owners find themselves paying premium prices for storage space, especially when their sites become media-heavy with images, videos, and documents.
Maximize Efficiency and Minimize Hosting Costs with Our Integrate Dropbox Plugin for WordPress
Integrate Dropbox best plugin for WordPress. Our Dropbox integration plugin reimagines how WordPress handles media storage. Instead of relying solely on your hosting server's storage, your media library seamlessly connects with Dropbox's robust infrastructure.
In the digital age, managing media files and optimizing website performance are top priorities for businesses and content creators. The balance between delivering rich media content and maintaining hosting efficiency can be challenging. That’s where Dropbox Integration Plugin comes in, providing a seamless bridge between Dropbox and WordPress to help you streamline file management, save on hosting costs, and enhance your user experience—all without coding hassles.
Why Hosting Optimization Matters
Every media file, video, or high-quality image hosted directly on your WordPress site consumes hosting resources. For companies scaling their content, this can quickly lead to higher hosting costs, slower load times, and potential website downtime. By integrating Dropbox with WordPress, CodeConfig’s plugin allows users to manage, display, and play Dropbox-hosted files directly on their site, significantly reducing the hosting load.
Integrate Dropbox Key Features To Solve Real Problems
Our plugin is packed with features designed to make Dropbox integration simple, secure, and efficient:
Media Library Integration Directly access Dropbox files from your WordPress Media Library. Upload files, use high-quality images for featured posts, and seamlessly add media to your content without overloading your hosting.
Elementor and Gutenberg Integration Designed to work with popular page builders, our plugin offers 7 customizable blocks for Gutenberg and over 7 Elementor widgets. Effortlessly add Dropbox-hosted media, galleries, sliders, and file browsers to your pages without coding.
WooCommerce Compatibility For e-commerce sites, our plugin provides a unique solution for downloadable products. Upload product files to Dropbox and offer them as downloadable products in WooCommerce. This ensures smooth delivery and saves precious server space.
Dynamic File Browser, Gallery, and Media Player Add Dropbox files as interactive elements, such as galleries or media players, directly into your content. This feature is ideal for course creators and content-heavy websites. Our Slider Carousel and Media Player are customizable to fit your brand’s aesthetic, offering both style and function.
Shortcode Builder and Custom Embeds With our intuitive Shortcode Builder, users can quickly generate and customize modules like media players, sliders, and file browsers. Embed files, set view-only permissions, and create download links—all with simple shortcodes. This means less reliance on heavy plugins and more control over your content display.
Saving Costs Without Sacrificing Quality
Using CodeConfig’s Dropbox Integration Plugin not only reduces hosting expenses but also delivers a faster, more reliable user experience. By offloading storage to Dropbox, your website can handle more traffic and richer content without performance dips.
Our responsive design ensures that these features look great on both desktop and mobile, providing a seamless experience across devices.
Lightning-Fast Media Management
WordPress users can now upload media directly through the familiar WordPress interface while the plugin automatically syncs it to Dropbox. No need to learn new tools or change your workflow - everything happens behind the scenes.
Enhanced Website Performance
By offloading media storage to Dropbox, your WordPress site becomes significantly lighter and faster. Your server resources focus on running core WordPress functions rather than handling heavy media requests.
4 notes
·
View notes
Text
Why Developers Choose WordPress for Website Design & Development?
There was a time when WordPress was mainly a tool for designing basic blogs. But nowadays, WordPress has become the most powerful tool for developers to design websites. WordPress now provides a vast ecosystem of website themes and plugins through numerous changes in core codes.
Major Types of Websites Made on WordPress
WordPress website design services can host almost any sort of website through their tools. It includes –
· Portfolios
· Blogs
· E-Commerce
· Forums
· Social Networks Etc.
Services doing website development in Dubai love WordPress for reasons.
Reason One: Security Brings Mental Peace
The most crucial reason developers prefer WordPress is its security features. Phishing and hacking are common incidents in these days. While an online presence is essential for your business, the security of your website will bring a sense of belief in your customers.
Reason Two: A Huge Community of Skilled Developers
WordPress has already built an enormous community of skilled people who help each other during website design in Dubai. These community contacts become more potent during the troubleshooting of any particular issue. In fact, the community consists of skilled professionals in various fields — be it business owners, fitness freaks or developers. This unique diversity helps in creating a good website.
Reason Three: A Large Plethora of Plugins
Plugins can be compared to any programming language’s library or pre-set functions. WordPress has a vast bank of quality plugins that helps to finish the work faster. It helps complete the WordPress website design professionally within a short time span. Free or paid — both types of plugins are available in WordPress.
Reason Four: Themes for Every Mood
The number of themes offered by WordPress is enormous in numbers. Website development in Dubai is considered as a tricky job due to the diversity of customer needs. But WordPress makes the developers’ life easy by providing many themes to choose from. Like plugins, paid or free themes can be selected according to the clients’ needs.
Reason Five: Media File Support
Developers engaged with website design in Dubai, will understand the importance of making a website interactive. To make a website interactive proper insertion of audio, video, and image files are necessary. Besides supporting all the above-mentioned media formats, URLs of uploaded file formats are also supported here.
Reason Six: All Other Things You Can Imagine
WordPress enjoys a severe upper hand in SEO matters compared to its peers. Moreover, the User Interface of WordPress is so user-friendly that it is even understandable to non-techies too. Last but not least, free WordPress website development tools are also available. This feature is extremely useful in reducing the cost of web designing.
Conclusion
WordPress has seen many changes in the web world and kept its evolution going according to the need of time and developers. Its user-friendliness and the quality to adapt to the necessity made WordPress the developers’ delight to work with. Along with WordPress, its developer community is also developing exponentially.
#wordpress#wordpress website design#wordpress web development#website#web development#website development
1 note
·
View note
Text
Step-by-Step On Page SEO Techniques List for WordPress Sites
Whether you're a blogger, entrepreneur, or business owner, having a WordPress website puts you in a strong position to optimize for SEO. WordPress is inherently SEO-friendly, but simply publishing content isn’t enough. If you want your site to rank on Google, you need to implement structured on page SEO techniques list. These help search engines understand your content and ensure users have a good experience.

On-page SEO involves optimizing elements directly on your web pages—such as content, metadata, internal links, and site structure. With WordPress, this can often be done easily through built-in features or plugins like Yoast SEO or Rank Math. In this step-by-step guide, we’ll walk through all the essential techniques you need to boost your visibility and improve your site's performance on search engines, starting from the ground up.
Optimize Page Titles and Meta Descriptions
The page title (also called the title tag) is one of the most important on-page SEO elements. It tells both users and search engines what your page is about. In WordPress, you can easily edit your title tags using an SEO plugin like Yoast or Rank Math. Your title should include the primary keyword near the beginning, be under 60 characters, and clearly explain the page's topic.
Meta descriptions, although not a direct ranking factor, influence click-through rates from search engine results pages (SERPs). A compelling, keyword-rich meta description (150–160 characters) can significantly increase traffic. WordPress SEO plugins allow you to edit meta descriptions for each post or page. Aim for descriptions that summarize the page content and create curiosity—this will help drive more visitors from Google search.
Use Proper Heading Tags (H1, H2, H3)
Structuring your content with heading tags improves both readability and SEO. Each page should have one H1 tag, which is usually your post or page title in WordPress. It should contain your main keyword and clearly define the topic. Below that, use H2 and H3 subheadings to break content into sections. This not only helps users scan the page but also gives search engines context about your content.
To implement this properly, use the “Paragraph” and “Heading” blocks in the WordPress editor (Gutenberg). Avoid using multiple H1 tags, and don’t skip levels—go from H2 to H3, not H2 to H4. SEO plugins like Rank Math will alert you if your heading structure is incorrect. Clean, logical heading usage boosts engagement, lowers bounce rates, and helps Google index your content more effectively.
Optimize Content with Keywords and Readability
Your content should be valuable, relevant, and optimized for the keywords your audience is searching for. Start by doing keyword research using tools like Ubersuggest, Ahrefs, or Google Keyword Planner. Then naturally integrate your target keyword into the page title, first paragraph, subheadings, and throughout the body content. Avoid keyword stuffing—aim for natural, reader-friendly usage.
WordPress plugins like Yoast or Rank Math include content analysis tools that grade your keyword density, paragraph length, use of transition words, and passive voice. Use these recommendations to improve your writing. Additionally, add synonyms and related keywords (LSI keywords) to broaden your page’s relevance. Well-written, well-optimized content keeps users engaged and helps search engines understand the full context of your page.
Optimize Images with Alt Text and Compression
Images enhance the visual appeal of your content but must be optimized for SEO and performance. First, ensure that all images are properly named before uploading—use descriptive filenames that include keywords (e.g., “on-page-seo-checklist.jpg”). In WordPress, add alt text for every image through the media editor. Alt text describes the image for search engines and users using screen readers, and it can help your images rank in Google Images.
Large, uncompressed images slow down page loading, which negatively affects SEO. Use plugins like Smush, ShortPixel, or Imagify to automatically compress and resize images without losing quality. Additionally, serve next-gen image formats like WebP if your theme and plugins support it. Fast-loading, optimized images improve both user experience and search engine visibility—making this a key on-page SEO step.
Strengthen Internal Linking and Anchor Text
Internal links connect one page or post on your site to another, guiding users and distributing link authority. In WordPress, adding internal links is easy—just highlight a phrase and use the link tool to point to another relevant page. Make sure your anchor text (the clickable text) includes descriptive keywords that hint at the target page's content.
Create a network of related posts and cornerstone content by regularly linking between them. For example, link blog posts to your service pages or from older articles to newer ones. Internal linking improves crawlability and time on site—both of which can boost SEO rankings. SEO plugins can also audit internal linking opportunities, helping you build a more strategic content hierarchy within your WordPress site.
Improve Site Speed and Mobile Friendliness
Google uses page speed and mobile usability as ranking factors, especially with Core Web Vitals. Slow websites frustrate users and hurt SEO. Begin by choosing a fast, lightweight WordPress theme and reliable hosting provider. Then use caching plugins like WP Rocket, W3 Total Cache, or LiteSpeed Cache to speed up loading times. Minify CSS and JavaScript files, and defer non-essential scripts.
Mobile optimization is equally important. Use responsive themes that adapt to all screen sizes, and test your site using Google’s Mobile-Friendly Test and PageSpeed Insights. Avoid pop-ups and overlapping elements on smaller screens. A mobile-optimized, fast-loading website offers a better user experience and improves rankings—two things that matter immensely in today's mobile-first SEO environment.
Conclusion: Turn These Steps into an Ongoing SEO Routine
Improving on-page SEO for your WordPress site isn’t a one-time task—it’s an ongoing effort. By following the step-by-step techniques outlined here, you’ll give search engines exactly what they need to rank your content, while also providing a better experience for your users. WordPress, with its plugins and flexibility, makes it easier than ever to apply these best practices—even for beginners.
youtube
Start with the basics: optimize titles, content, and images. Then move on to advanced strategies like internal linking and mobile optimization. Use tools and plugins to automate and simplify your workflow, but always keep quality and user experience in focus. As you stay consistent with these SEO efforts, you’ll notice improved rankings, higher traffic, and better engagement across your site.
0 notes