#wordpress plugin list files in directory
Explore tagged Tumblr posts
Visit Tumblr Blog
Explore Tumblr blogs with no restrictions, modern design and the best experience.
Last Seen Tumblr Blogs


Fun Fact
Tumblr has been providing a Korean-language service since 2013.
Text
"how do I keep my art from being scraped for AI from now on?"
if you post images online, there's no 100% guaranteed way to prevent this, and you can probably assume that there's no need to remove/edit existing content. you might contest this as a matter of data privacy and workers' rights, but you might also be looking for smaller, more immediate actions to take.
...so I made this list! I can't vouch for the effectiveness of all of these, but I wanted to compile as many options as possible so you can decide what's best for you.
Discouraging data scraping and "opting out"
robots.txt - This is a file placed in a website's home directory to "ask" web crawlers not to access certain parts of a site. If you have your own website, you can edit this yourself, or you can check which crawlers a site disallows by adding /robots.txt at the end of the URL. This article has instructions for blocking some bots that scrape data for AI.
HTML metadata - DeviantArt (i know) has proposed the "noai" and "noimageai" meta tags for opting images out of machine learning datasets, while Mojeek proposed "noml". To use all three, you'd put the following in your webpages' headers:
<meta name="robots" content="noai, noimageai, noml">
Have I Been Trained? - A tool by Spawning to search for images in the LAION-5B and LAION-400M datasets and opt your images and web domain out of future model training. Spawning claims that Stability AI and Hugging Face have agreed to respect these opt-outs. Try searching for usernames!
Kudurru - A tool by Spawning (currently a Wordpress plugin) in closed beta that purportedly blocks/redirects AI scrapers from your website. I don't know much about how this one works.
ai.txt - Similar to robots.txt. A new type of permissions file for AI training proposed by Spawning.
ArtShield Watermarker - Web-based tool to add Stable Diffusion's "invisible watermark" to images, which may cause an image to be recognized as AI-generated and excluded from data scraping and/or model training. Source available on GitHub. Doesn't seem to have updated/posted on social media since last year.
Image processing... things
these are popular now, but there seems to be some confusion regarding the goal of these tools; these aren't meant to "kill" AI art, and they won't affect existing models. they won't magically guarantee full protection, so you probably shouldn't loudly announce that you're using them to try to bait AI users into responding
Glaze - UChicago's tool to add "adversarial noise" to art to disrupt style mimicry. Devs recommend glazing pictures last. Runs on Windows and Mac (Nvidia GPU required)
WebGlaze - Free browser-based Glaze service for those who can't run Glaze locally. Request an invite by following their instructions.
Mist - Another adversarial noise tool, by Psyker Group. Runs on Windows and Linux (Nvidia GPU required) or on web with a Google Colab Notebook.
Nightshade - UChicago's tool to distort AI's recognition of features and "poison" datasets, with the goal of making it inconvenient to use images scraped without consent. The guide recommends that you do not disclose whether your art is nightshaded. Nightshade chooses a tag that's relevant to your image. You should use this word in the image's caption/alt text when you post the image online. This means the alt text will accurately describe what's in the image-- there is no reason to ever write false/mismatched alt text!!! Runs on Windows and Mac (Nvidia GPU required)
Sanative AI - Web-based "anti-AI watermark"-- maybe comparable to Glaze and Mist. I can't find much about this one except that they won a "Responsible AI Challenge" hosted by Mozilla last year.
Just Add A Regular Watermark - It doesn't take a lot of processing power to add a watermark, so why not? Try adding complexities like warping, changes in color/opacity, and blurring to make it more annoying for an AI (or human) to remove. You could even try testing your watermark against an AI watermark remover. (the privacy policy claims that they don't keep or otherwise use your images, but use your own judgment)
given that energy consumption was the focus of some AI art criticism, I'm not sure if the benefits of these GPU-intensive tools outweigh the cost, and I'd like to know more about that. in any case, I thought that people writing alt text/image descriptions more often would've been a neat side effect of Nightshade being used, so I hope to see more of that in the future, at least!
246 notes
·
View notes
Text
Automattic, the company that owns WordPress.com, is required to remove a controversial login checkbox from WordPress.org and let WP Engine back into its ecosystem after a judge granted WP Engine a preliminary injunction in its ongoing lawsuit. In addition to removing the checkbox—which requires users to denounce WP Engine before proceeding—the preliminary injunction orders that Automattic is enjoined from “blocking, disabling, or interfering with WP Engine’s and/or its employees’, users’, customers’, or partners’ access to wordpress.org” or “interfering with WP Engine’s control over, or access to, plugins or extensions (and their respective directory listings) hosted on wordpress.org that were developed, published, or maintained by WP Engine,” the order states. In the immediate aftermath of the decision, Automattic founder and CEO Matt Mullenweg asked for his account to be deleted from the Post Status Slack, which is a popular community for businesses and people who work on WordPress’s open-source tools.
“It's hard to imagine wanting to continue to working on WordPress after this,” he wrote in that Slack, according to a screenshot viewed by 404 Media. “I'm sick and disgusted to be legally compelled to provide free labor to an organization as parasitic and exploitive as WP Engine. I hope you all get what you and WP Engine wanted.” His username on that Slack has been changed to “gone 💀” Mullenweg began to publicly denounce WP Engine in September, calling the web hosting platform a “cancer” to the larger Wordpress open-source project and accusing it of improperly using the WordPress brand. He’s “at war” with WP Engine, in his own words. In October, Mullenweg added a required checkbox at login for WordPres.org, forcing users to agree that they are not affiliated with WP Engine. The checkbox asked users to confirm, “I am not affiliated with WP Engine in any way, financially or otherwise.” The checkbox was still present and required on the WordPress.org login page as of Wednesday morning. Automattic and Mullenweg have 72 hours from the order to take it down, according to the judge’s order. WP Engine sent a cease and desist demanding that he “stop making and retract false, harmful and disparaging statements against WP Engine,” the platform posted on X. Automattic sent back its own cease and desist, saying, “Your unauthorized use of our Client’s intellectual property has enabled WP Engine to compete with our Client unfairly, and has led to unjust enrichment and undue profits.” WP Engine filed a lawsuit against Automattic and Mullenweg, accusing them of extortion and abuse of power. In October, Mullenweg announced that he’d given Automattic employees a buyout package, and 159 employees, or roughly 8.4 percent of staff, took the offer. “I feel much lighter,” he wrote. But shortly after, he reportedly complained that the company was now “very short staffed.” All of this has created an environment of chaos and fear within Automattic and in the wider WordPress open-source community. Within 72 hours of the order, Automattic and Mullenweg are also required to remove the “purported” list of WP Engine customers contained in the ‘domains.csv’ file linked to Automattic’s website wordpressenginetracker.com, which Automattic launched in November and tracks sites that have left WP Engine. It’s also required to restore WP Engine’s access to WordPress.org, including reactivating and restoring all WP Engine employee login credentials to wordpress.org resources and “disable any technological blocking of WPEngine’s and Related Entities’ access to wordpress.org that occurred on or around September 25, 2024, including IP address blocking or other blocking mechanisms.” The judge also ordered Mullenweg to restore WP Engine’s access to its Advanced Custom Fields (“ACF”) plugin directory, which its team said was “unilaterally and forcibly taken away from its creator without consent” and called it a “new precedent” in betrayal of community access. “We are grateful that the court has granted our motion for a preliminary injunction,” a spokesperson for WP Engine told 404 Media. “The order will bring back much-needed stability to the WordPress ecosystem. WP Engine is focused on serving our partners and customers and working with the community to find ways to ensure a vigorous, and thriving WordPress community.” A spokesperson for Automattic told 404 Media: “Today’s ruling is a preliminary order designed to maintain the status quo. It was made without the benefit of discovery, our motion to dismiss, or the counterclaims we will be filing against WP Engine shortly. We look forward to prevailing at trial as we continue to protect the open source ecosystem during full-fact discovery and a full review of the merits.”
16 notes
·
View notes
Text
Top WordPress Plugins to Supercharge Your Website in 2024

Building and maintaining a WordPress site is both exciting and challenging. While the platform provides a robust foundation, the true power of WordPress lies in its plugins. From enhancing site functionality to improving user experience, WordPress plugins are indispensable tools for developers, businesses, and bloggers alike. In this blog, we’ll explore the best WordPress plugins that can transform your website into a highly functional, user-friendly, and SEO-optimized powerhouse.
What Are WordPress Plugins?
WordPress plugins are software add-ons designed to extend the functionality of your WordPress site. Whether you need to improve site speed, enhance SEO, secure your website, or add unique design features, there’s likely a plugin for that. Plugins allow both beginners and advanced users to customize their sites without coding expertise.
With over 60,000 plugins available on the WordPress Plugin Directory alone, the options can feel overwhelming. Choosing the right plugins for your website’s goals is critical for success. Below, we’ve rounded up some of the most essential WordPress plugins to consider.
Must-Have WordPress Plugins for Every Website
1. Yoast SEO
SEO is crucial for driving organic traffic to your site, and Yoast SEO is one of the best tools for optimizing your content. This plugin provides on-page optimization tips, readability analysis, and technical SEO tools to help your site rank higher on search engines.
2. Elementor
Looking to build a visually stunning website without hiring a designer? Elementor is a drag-and-drop page builder that makes designing websites easy. Its intuitive interface and vast array of widgets allow you to create professional-looking pages in minutes.
3. WPForms
For websites that rely on user interaction, a contact form is a must-have feature. WPForms allows you to create customizable, mobile-responsive forms effortlessly. Whether it’s contact forms, surveys, or payment forms, this plugin has you covered.
4. WooCommerce
If you’re running an online store, WooCommerce is the go-to plugin. It transforms your WordPress site into a fully functional e-commerce platform, complete with features for product listings, payment gateways, and inventory management.
5. Akismet Anti-Spam
Spam comments can clutter your website and ruin user experience. Akismet Anti-Spam automatically filters out spam comments, keeping your site clean and professional.
6. Jetpack
Created by Automattic, the team behind WordPress, Jetpack is a multipurpose plugin offering features like performance optimization, security, site analytics, and social media integration.
7. Rank Math
Another excellent SEO plugin, Rank Math provides advanced features like schema integration, keyword tracking, and detailed analytics. It’s an excellent alternative to Yoast SEO for more advanced users.
8. UpdraftPlus
Backup and restoration are critical for any website. UpdraftPlus allows you to schedule automatic backups and store them securely on cloud services like Google Drive or Dropbox.
9. Smush
Site speed plays a major role in user experience and search engine rankings. Smush compresses images without compromising quality, helping your site load faster.
10. MonsterInsights
Understanding how visitors interact with your site is essential. MonsterInsights integrates Google Analytics directly into your WordPress dashboard, offering real-time insights into traffic, user behavior, and more.
11. W3 Total Cache
Slow-loading websites lose visitors and revenue. W3 Total Cache improves website performance by caching static files and optimizing server resources.
12. Sucuri Security
Cybersecurity is non-negotiable in today’s digital landscape. Sucuri Security offers malware scanning, firewall protection, and blacklist monitoring to keep your site secure.
13. Social Snap
Boost social media engagement with Social Snap, a powerful social sharing plugin. It offers customizable sharing buttons and in-depth analytics to track your social media performance.
14. Litespeed Cache
For websites hosted on LiteSpeed servers, LiteSpeed Cache is a high-performance optimization plugin that enhances speed and reduces server load.
15. TablePress
If your site needs to display complex data, TablePress is a lifesaver. It lets you create and manage tables without requiring any coding knowledge.
Why Use WordPress Plugins?
Enhanced Functionality: WordPress plugins extend the capabilities of your site, making it easier to achieve your goals.
Ease of Use: Many plugins are beginner-friendly and require no technical expertise.
Scalability: Whether you’re running a blog, an e-commerce store, or a portfolio, plugins grow with your needs.
Cost-Effective: Most plugins offer free versions with premium features, making them accessible for all budgets.
Tips for Choosing the Right WordPress Plugins
Identify Your Needs: Start by determining what features your site requires.
Check Reviews and Ratings: Plugins with high ratings and positive reviews are generally more reliable.
Update Frequency: Look for plugins that are updated regularly to ensure compatibility with the latest WordPress version.
Avoid Overloading: Too many plugins can slow down your site. Stick to essential ones.
Final Thoughts
WordPress plugins are the backbone of a successful website. By selecting the right ones, you can enhance your site’s functionality, user experience, and performance. Whether you’re aiming to boost your SEO, secure your site, or create stunning designs, there’s a plugin tailored for your needs.
Experiment with the plugins mentioned above and watch your WordPress site thrive. Remember to regularly review your plugin list and update them to ensure optimal performance.
4 notes
·
View notes
Text
Automate Your Workflow: Using Contact Form to Any API Plugin
In today's fast-paced digital world, automation isn't just a luxury—it's a necessity. Whether you're running a business, managing a nonprofit, or building a personal brand, streamlining your processes can save you time, reduce errors, and boost productivity. One of the most effective ways to automate your WordPress site is by integrating your contact forms with external APIs. That's where the Contact Form to Any API plugin comes in.

What Is a Contact Form to Any API?
Contact Form to Any API is a powerful WordPress plugin that extends the capabilities of the popular Contact Form 7. It allows you to send form submissions directly to any RESTful API endpoint, giving you full control over where your data goes. Whether you're pushing leads to a CRM, sending support tickets to a helpdesk, or syncing subscribers with your email marketing tool, this plugin makes it easy.
Why Automate With This Plugin?
Manual data entry is time-consuming and error-prone. With automation, you eliminate the need to copy and paste form submissions into other platforms. Here's why Contact Form to Any API stands out:
Universal Compatibility: Works with any API that accepts JSON or URL-encoded data.
Custom Triggers: Send data before or after email notifications.
Advanced JSON Support: Supports multi-level and custom JSON structures.
Authentication Options: Includes support for Basic and Bearer Token authentication.
Data Logging: Keep track of all submissions and API responses with detailed logs.
Real-World Use Cases
Let’s take a look at how this plugin can transform your daily operations:
1. Lead Generation & CRM Integration
Imagine a user fills out your contact form. Instead of checking your email and manually entering the details into your CRM (like Salesforce or HubSpot), the data is instantly transmitted through the API. Your sales team gets notified in real-time and can follow up faster.
2. Customer Support Automation
Using platforms like Zendesk or Freshdesk? This plugin can forward user inquiries directly to your support system. Automatically create support tickets, assign them to the right department, and kick off workflows based on tags or priorities.
3. Email Marketing Sync
Add form data directly into your email lists on Mailchimp, Sendinblue, or ActiveCampaign. No more exporting CSV files or dealing with import errors.
4. Custom Dashboards and Internal Tools
If you've built a custom dashboard or internal tool, you can feed data into it in real time. This is especially useful for custom ERPs, analytics dashboards, or membership systems.
Key Features at a Glance
Here's a breakdown of some of the plugin's most impactful features:
Unlimited API Connections: No cap on how many APIs you can connect to.
File Upload Support: Convert uploaded files into Base64 and send them with your API request.
Conditional Logic: Send data to different endpoints based on user selections.
Webhook Compatibility: Works flawlessly with platforms like Zapier, Integromat, and Make.
Security First: HTTPS support and robust authentication methods to ensure data security.
How to Set It Up
Install the Plugin: Search for "Contact Form to Any API" in the WordPress Plugin Directory and activate it.
Create Your Contact Form: Use Contact Form 7 to design your form.
Add API Settings: Navigate to the plugin settings, input your endpoint URL, headers (for authentication), and body structure (JSON or form data).
Test Your Integration: Submit a test form and review the API logs to verify data transmission.
Go Live: Once you're confident in the setup, publish the form on your site.
Pro Version Perks
While the free version is robust, the Pro version takes things to the next level:
Multi-API Support: Send data to multiple APIs at once.
Advanced Mapping: Handle complex data structures with nested fields.
Priority Support: Get help faster with dedicated customer support.
Tips for Optimization
Use Postman or Insomnia to test your API endpoints before connecting them.
Sanitize User Input to prevent malformed data from causing issues.
Monitor Logs regularly to catch any transmission errors or failures.
Document Your APIs for team use and future integrations.
Final Thoughts
Contact Form to Any API is more than just a plugin—it's a game changer for anyone looking to streamline their WordPress operations. By automating the flow of information between your site and external platforms, you can focus on what really matters: growing your business, engaging your audience, and delivering value.
If you're tired of manual processes and want a smarter, faster way to handle form data, give this plugin a try. The time and energy you save will speak for itself.
0 notes
Text
Use Cases Beyond Name Listings: What You Can Build with Directory Plugins
Directory plugins are the Swiss Army knives of the WordPress world. Most folks think of them as tools to build a basic name directory or maybe a simple business listing. But let me tell you—that's just scratching the surface. These plugins have evolved, and today, they offer features that let you build much more than a phonebook-style directory.
In this article, we’re diving deep into the untapped potential of directory plugins. If you thought directories were just for local businesses or contact lists, you’re in for a fun surprise. From membership communities to niche marketplaces, the possibilities are endless.
Let’s explore what you can really build with directory plugins.
What Is a Directory Plugin, Really?
At its core, a directory plugin is a tool that allows you to list and manage items—users, businesses, services, products, or anything else—in a structured format. Think of it as a digital filing cabinet that can sort, filter, search, and display information.
But just like how a spreadsheet can be used for budgeting or project planning, a directory plugin can be molded into many different things.
Why Go Beyond Basic Listings?
Here’s the deal—basic listings are boring. They’re functional, sure, but they don’t wow anyone. If you want to create a sticky, engaging website that offers real value, you need to think beyond the yellow pages-style directory.
Advanced use cases not only boost engagement but also increase monetization potential, SEO value, and user-generated content.
1. Job Boards and Career Directories
One of the most popular use cases is turning a directory plugin into a full-blown job board.
How It Works
You can create listings for job openings categorized by industry, location, or experience level. Add application forms, company profiles, and even resume submission options.
Great For
Recruitment websites
Niche industries like tech, healthcare, or remote jobs
**2. Real Estate Listings
Why spend a fortune on a real estate platform when your directory plugin can do the job?
Features to Add
Property images
Location filters
Price ranges
Contact forms for agents
It’s perfect for small agencies or niche markets like vacation rentals or student housing.
**3. Event Directories
Running a website about local events or global conferences? You can easily list events using your plugin.
What to Include
Dates and times
Locations with maps
RSVP or ticket purchase options
Bonus: Add recurring events and calendar integrations to make it even better.
**4. Membership Sites and Communities
Want to build a private or public community? Directory plugins are your secret weapon.
Use Cases
Professional networks (like LinkedIn, but niche)
Alumni directories
Clubs and associations
Add profile pages, member bios, photos, social links, and messaging features.
**5. Product Directories and Marketplaces
You’re not limited to service-based listings. Build a product catalog or even a mini marketplace.
Add-Ons to Consider
WooCommerce integrations
Filters like price, category, and ratings
“Add to cart” or “Buy now” buttons
Whether you're showcasing handcrafted goods or digital downloads, this turns your directory into a revenue generator.
**6. Course and Tutor Listings
If you're in the education niche, this one’s gold. Directory plugins can help you create a course directory or a listing of available tutors.
Useful Features
Course descriptions
Skill levels
Instructor profiles
Booking systems
It’s like Udemy or Coursera, but personalized for your niche.
**7. Freelancer and Agency Showcases
Whether you're building a site for digital marketers, web developers, or photographers, you can create a freelancer directory that allows users to list their services, portfolios, and availability.
Extras to Include
Reviews
Service tags
Instant contact forms
Perfect for creating a Fiverr-style platform for your audience.
**8. Nonprofit and Charity Directories
Directories can help promote causes and organizations doing great work.
Why It Works
Helps users find charities by cause or location
Increases exposure for nonprofit efforts
Provides an easy way to donate or volunteer
Add donation buttons, mission statements, and success stories.
**9. Tourism and Travel Guides
If you run a travel blog or local tourism site, a directory plugin can showcase:
Attractions
Restaurants
Hotels
Tours
Include map integration, ratings, hours of operation, and ticket options. Turn your site into a local TripAdvisor.
**10. Startup or SaaS Directories
Got a tech-savvy audience? Build a directory of startups, apps, or tools.
Features You’ll Want
Categories like marketing, sales, or productivity
Pricing details
Screenshots or demo videos
Affiliate links
Great for earning passive income through referrals or sponsorships.
**11. Pet Adoption or Breeder Listings
Animal lovers, this one's for you. You can create a directory of adoptable pets or registered breeders.
Add This Stuff
Breed info
Location and age
Adoption forms
Owner testimonials
You’d be surprised how many people search online before heading to shelters.
**12. Coupon or Discount Directories
Everyone loves a good deal. Why not list exclusive coupons or discounts?
Directory Elements
Brands or stores
Validity dates
Discount codes
Redemption links
Make it searchable and mobile-friendly to encourage repeat visits.
**13. Podcast or YouTube Show Listings
If you're into content creation, list podcasts, YouTube channels, or creator directories in one place.
Include
Episode lists
Subscribe links
Channel info
Social profiles
Curated content hubs are amazing for building authority in a niche.
**14. Portfolio or Gallery Directories
Designers, photographers, and artists can showcase their projects or artwork using a directory-style layout.
What to Show
Thumbnails
Categories (logos, branding, web, etc.)
Client testimonials
It’s like Behance, but totally branded for you.
**15. Local Services and Gig Economy Platforms
Want to compete with platforms like TaskRabbit or Thumbtack? You can! Create a directory of local handymen, cleaners, or other service providers.
Useful Features
Location filtering
Booking calendar
Reviews and ratings
It adds value to your local community while creating monetization opportunities.
**16. Internal Company Directories
If you’re building a company intranet, use a directory plugin for listing:
Departments
Employee contact details
Skillsets
Office locations
Keep it clean and secure with role-based access controls.
Key Features to Look for in a Directory Plugin
Not all plugins are created equal. To build these awesome directories, make sure your plugin supports:
Custom fields
Frontend submissions
Search and filters
User ratings and reviews
Maps integration
Monetization tools (paid listings, ads, etc.)
Popular Directory Plugins to Try
Here are some top WordPress directory plugins you might want to explore:
aDirectory
Business Directory Plugin
Directorist
ListingPro (Theme + Plugin)
HivePress
Connections Business Directory
Each one comes with unique features, so test them out to see what fits your project best or you can see more alternatives here.
Final Thoughts: Directories Are What You Make of Them
Directory plugins are no longer just about listing names. They’re powerful tools that can help you build thriving communities, profitable marketplaces, and useful online platforms—without touching a single line of code.
So, if you’ve got a niche, an audience, or an idea—there’s a directory plugin out there ready to bring it to life.
Now, go ahead. Build something amazing.
FAQs
1. Can I monetize a directory site? Absolutely! You can offer paid listings, banner ads, featured placements, and even charge for access to premium content or members.
2. Do I need coding skills to use directory plugins? Nope! Most modern plugins offer drag-and-drop builders and user-friendly interfaces. Though some CSS tweaks might help if you want full customization.
3. What’s the best plugin for building a job board? Plugins like WP Job Manager or Directorist (with job board extensions) are great options for job board-style directories.
4. Can I use directory plugins on any WordPress theme? Yes, but for the best compatibility and design, choose a theme optimized for directory-style content—or use page builders like Elementor for customization.
5. How do I get users to add their listings? Offer incentives! Think free trials, exposure, or SEO benefits. Also, make the submission process smooth and mobile-friendly.
0 notes
Text
Mastering Technical SEO: A Step-by-Step Guide
Technical SEO refers to optimizing a website's infrastructure to improve search engine visibility and ensure that search engines can effectively crawl, index, and rank its pages. It focuses on elements like site speed, mobile-friendliness, structured data, security, and much more. In this blog, we’ll walk you through the essential aspects of technical SEO, from core tools and sitemap creation to URL optimization and schema markup.

Core Technical SEO Tools
To effectively implement technical SEO, you'll need to leverage a set of tools that can help you monitor, analyze, and optimize your website. Here are some essential tools to get started:
Google Search Console: Google’s free tool provides insights into your website’s search performance, indexing issues, and crawl errors.
Google Analytics: This tool helps track user behavior, site traffic, and conversions, allowing you to assess how well your technical optimizations are performing.
GTmetrix: GTmetrix evaluates your website’s speed and performance, offering specific recommendations to enhance your site’s load time.
Screaming Frog SEO Spider: A comprehensive crawler that scans your website for broken links, redirects, and other technical issues.
Ahrefs: A powerful tool for backlink analysis, keyword tracking, and website health audits to ensure your website is optimized for SEO.
TechnicalSEO.org: A valuable resource for analyzing and generating schema markup, structured data, and identifying technical SEO issues.
What is a Sitemap and Its Uses?
A sitemap is a file that contains a list of all the pages on your website that you want search engines to crawl. It shows the relationship between pages and the importance of each page, helping search engines understand your website’s structure.
Uses of a Sitemap:
Ensures search engines can discover all important pages on your website.
Helps avoid orphaned pages that are difficult to index.
Designers use sitemaps to plan a website���s structure.
Sitemap help users to navigate the site.
Types of Sitemaps
There are two primary types of sitemaps:
XML Sitemap: A file that lists the pages of your site, helping search engines index them effectively.
HTML Sitemap: A user-friendly webpage listing the key pages on your website, assisting visitors in navigating your content.
How Do I Find a Website Sitemap?
To find a sitemap on a website, you can:
Add /sitemap.xml to the website’s URL (e.g., www.example.com/sitemap.xml).
Check the robots.txt file, which may contain a link to the sitemap.
Use online tools like Screaming Frog to crawl the website and identify the sitemap location.
How to Create a Sitemap?
You can create a sitemap by:
Manually coding it, if you have a small website with few pages.
Using plugins like Yoast SEO (for WordPress) to automatically generate an XML sitemap.
Using tools like XML-Sitemaps.com or Screaming Frog to create sitemaps for larger websites.
What is Robots.txt?
The robots.txt file is a text file placed in the root directory of a website to control how search engines crawl and index your site. It can allow or disallow access to certain pages, helping manage crawling behavior.
Canonical Tags, NoIndex & NoFollow Tags, Indexability, and Breadcrumbs
Canonical Tags: Prevent duplicate content issues by telling search engines which version of a page should be indexed.
NoIndex & NoFollow Tags: Use these tags to control whether a page should be indexed or whether search engines should follow links on that page.
Indexability: Refers to the ability of search engines to crawl and index a page for ranking purposes.
Breadcrumbs: These are navigational aids that improve user experience and help search engines understand the structure of your website.
Tips for URL Optimization, Page Speed Optimization, and Image Optimization
URL Optimization:
Use descriptive keywords in your URLs.
Avoid special characters and keep URLs short and simple.
Use hyphens to separate words and keep URLs in lowercase.
Page Speed Optimization:
Enable GZIP compression for text files.
Leverage browser caching and reduce HTTP requests.
Optimize for Core Web Vitals: LCP (loading), FID (interactivity), and CLS (visual stability).
Image Optimization:
Use appropriate formats (JPEG for photos, PNG for sharp images, WebP for modern compression).
Compress images without losing quality using tools like TinyPNG.
Use responsive images and lazy loading for better mobile performance.
What is LCP, INP, and CLS?
Largest Contentful Paint (LCP): Measures how long it takes for the largest element on the page to load. Aim for an LCP under 2.5 seconds.
Interaction to Next Paint (INP): Measures the delay between a user’s interaction and the next visual change. Keep INP under 200 milliseconds.
Cumulative Layout Shift (CLS): Measures visual stability. A good CLS score is under 0.1, ensuring content doesn’t shift unexpectedly.
Tips for Mobile-Friendliness and Responsiveness
Use responsive design to ensure your website adapts to all screen sizes.
Optimize touch elements (buttons, links) for easy tapping on mobile.
Prioritize performance with optimized images and fast loading times.
Simplify navigation with mobile-friendly menus and make text readable without zooming.
What is Schema Markup?
Schema markup is a code added to your website that helps search engines understand your content more clearly. By using structured data, you can enhance your visibility with rich snippets in search results, improving click-through rates.
Common Schema Markups:
Article Schema: For news articles and blog posts.
Product Schema: For e-commerce sites, showing product details.
FAQ Schema: To markup FAQs and display answers directly in search results.
Local Business Schema: For showing local business information like address, phone number, and hours.
Event Schema: For events like concerts, conferences, and meetups.
Recipe Schema: For food recipes, showing ingredients and cooking time.
Tools for Schema Markup:
Google’s Structured Data Markup Helper
Schema.org
Yoast SEO (for WordPress)
Rich Results Test (Google)
Merkle Schema Markup Generator
TechnicalSEO.org
Conclusion
Technical SEO is an essential part of improving your website’s search engine visibility and performance. From optimizing site speed and mobile-friendliness to implementing schema markup and structured data, every element helps search engines better understand and rank your website. By applying the tips and tools discussed in this blog, you’ll be able to improve your website’s SEO performance and Dthinker MEDIA , the digital marketing agency provides you a better experience, driving more traffic and conversions.
0 notes
Text
youtube
How to Install & Delete Theme in Wordpress in 2025 ?
Method 1: Installing a Theme from the WordPress Repository
Log in to Your WordPress Dashboard:
Go to yourwebsite.com/wp-admin and log in with your credentials.
Navigate to Themes Section:
In the left-hand sidebar, hover over Appearance and click on Themes.
Add New Theme:
Click the Add New button at the top of the page.
Browse or Search for a Theme:
You can browse Featured, Popular, or Latest themes, or use the Search bar to find a specific theme.
Preview and Install:
Hover over a theme and click Preview to see how it looks.
Click Install to add the theme to your site.
Activate the Theme:
After installation, click Activate to make it live on your website.
Method 2: Uploading a Premium or Custom Theme
Download the Theme File:
Ensure you have the theme file in .zip format, usually provided when purchasing from marketplaces like ThemeForest or directly from developers.
Log in to Your WordPress Dashboard:
Go to yourwebsite.com/wp-admin.
Navigate to Themes Section:
Hover over Appearance > click Themes > then click Add New.
Upload the Theme:
Click the Upload Theme button at the top.
Click Choose File, select your .zip theme file, and click Install Now.
Activate the Theme:
Once installed, click Activate to apply the theme to your site.
Method 3: Installing via FTP (Advanced Method)
Extract the Theme Files:
Unzip the theme file on your computer.
Connect to Your Site via FTP:
Use an FTP client like FileZilla and connect to your server with your FTP credentials.
Upload the Theme Folder:
Navigate to wp-content/themes/ in your WordPress directory.
Upload the extracted theme folder here.
Activate the Theme in WordPress:
Go back to your WordPress Dashboard.
Navigate to Appearance > Themes, and you’ll see your uploaded theme listed. Click Activate.
Post-Installation Steps:
Install Required Plugins:
Some themes recommend or require specific plugins. You’ll usually see a notification after activation. Click Begin Installing Plugins and activate them as needed.
Import Demo Content (Optional):
Many premium themes offer demo content to make your site look like the theme preview. Check the theme documentation for instructions.
Customize Your Theme:
Go to Appearance > Customize to tweak the theme settings like colors, fonts, and layout.
0 notes
Text
Jupiter X Multi Purpose Responsive Theme v4.6.0
https://themesfores.com/product/jupiter-x-multi-purpose-responsive-theme/ Jupiter X Multi Purpose Responsive Theme v4.6.0 Note: After installation, upload and overwrite the Jupiter X Core plugin provided in the zip file. Jupiter X is your all-in-one platform to create pixel-perfect websites, fast & easily. It comes with Elementor page builder, the world’s leading WordPress Theme page builder. You can customize Jupiter X globally using WordPress Customizer. The brand new shop customizer helps you customize every aspect of your online shop including checkout and cart page. Moreover, you can now build your headers and footers easily with visual editors. Jupiter X also makes it possible to customize your blog and portfolio list and single pages. It doesn’t stop there though! You can now easily customize your custom posts archive and single pages which allows the creation of any listing/directory websites such as hotels, car rentals, real estate, library, recipe, job boards and much more. Jupiter X comes not only with over 250 pre-made website templates but also hundreds of page block templates to save your time and help you get inspired. We deliver a new website and block templates every month. Jupiter X Multi-Purpose Responsive Theme Features Jupiter X Theme Built upon the best open source libraries/plugins for more extendibility and customisability. Developer friendly (highly customisable in different aspects). Strictly loyal to standard WP techniques for more plugin compatibility. Extremely lightweight Assets compiler. Dynamic asset loading. Every line of code optimised Countless actions and filters for more customisation SEO Optimised Multi Language RTL Support Google & Adobe Fonts Developer friendly & super extendible Unique Header per Page Auto Update Plugin Manager Unique footer per Page Responsive & Retina Ready Customise 404 page Contact Form builder Sidebar manager Customise Search page Title Bar customiser Auto-Save Revision History Customise Lightbox Custom Color Picker Undo-Redo Save & Reuse sections Responsive editor Customise Widgets Custom burger menu Custom maintenance page Website templates (PSD included) Page section templates Widget customiser GDPR Compliant Custom Lightbox Custom Archive 22 Exclusive elements for Elementor Save & Re-use pages and sections Page section navigator and manager Please note that any digital products presented on this website do not contain malicious code, viruses or advertising. https://themesfores.com/product/jupiter-x-multi-purpose-responsive-theme/ #NewspaperThemes #WordpressTheme
0 notes
Text
How to Add Security through WordPress
WordPress itself provides several built-in security features, and you can further enhance security by utilizing various plugins and best wordpress hosting india. Here's how you can add security to your WordPress site:
Step 1: Update WordPress Core, Themes, and Plugins: - Keep your WordPress installation, themes, and plugins up to date to patch any known security vulnerabilities. Step 2: Use Secure Hosting: - Choose a reputable hosting provider that offers security features like firewalls, malware scanning, and regular backups. Step 3: Strong Admin Passwords: - Use strong, unique passwords for your WordPress admin accounts and encourage all users to do the same. Step 4: Limit Login Attempts: Install a plugin to limit the number of login attempts from a single IP address to protect against brute force attacks. Step 5: Two-Factor Authentication (2FA): - Implement 2FA for WordPress logins using plugins like Google Authenticator or Duo Two-Factor Authentication. Step 6: Secure wp-config.php: - Protect your wp-config.php file by moving it to a higher-level directory or adding code to your .htaccess file to restrict access. Step 7: Disable Directory Listing: - Prevent directory listing by adding Options -Indexes to your .htaccess file to hide directory contents. Step 8: Disable XML-RPC: - If you're not using XML-RPC functionality, disable it to prevent potential exploitation by attackers.

Step 9: Limit File Permissions: - Set appropriate file permissions for your WordPress files and directories to restrict unauthorized access. Step 10: WordPress Security Headers: - Implement security headers like Content Security Policy (CSP), X-Frame-Options, X-XSS-Protection, and others to enhance browser security. Step 11: WordPress Security Plugins: - Install reputable security plugins like Word fence, Sucuri Security, or themes Security to monitor and protect your site from various threats. Step 12: Regular Backups: - Set up regular backups of your WordPress site, including files and the database, and store them securely offsite. Step 13: WordPress Salts and Keys: - Update your WordPress salts and keys regularly to enhance encryption and protect against brute force attacks. Step 14: Disable File Editing: - Prevent file editing within the WordPress dashboard by adding define ('DISALLOW_FILE_EDIT', true); to your wp-config.php file. Step 15: Security Headers: - Add security headers to your site's HTTP responses to protect against various types of attacks. You can do this manually or by using a security plugin. Step 16: Monitor File Changes: - Install a plugin or set up alerts to monitor and notify you of any unauthorized changes to your WordPress files and cheap wordpress hosting india. Note: By implementing these security measures, you can significantly improve the security of your WordPress site and protect it from various threats. Additionally, staying informed about security best practices and regularly auditing your site's security can help you stay one step ahead of potential attackers.
0 notes
Text
Is it possible to do technical SEO without programming skills?

Purpose of Technical SEO:
Aims to help search engines find, understand, and index website pages.
Critical for ensuring pages can be discovered and indexed by search engines.
Simplicity for Beginners:
Technical SEO, even for beginners, involves basic concepts.
Focus on regular maintenance to uphold search engine visibility.
Importance of Proper Access:
Inaccessibility, misinterpretation, or non-indexing by search engines can lead to poor rankings.
Avoid mistakes like unintentional noindex tags or misleading crawlers.
Noindex Meta Tag:
Addition of the noindex meta tag communicates to search engines not to index the page.
Common issue during website development or redesign when the noindex tag may be inadvertently left
.
Robots.txt Files:
Robots.txt is a file containing rules for search engine crawlers, indicating where they can and cannot go on a site.
Different domains may have separate robots.txt files for varied rules.
Robots.txt Directives:
User-agent directive defines the crawler to which the rule applies.
Disallow directive designates pages or directories not to be crawled.
Usage Examples:
Examples include blocking specific parts of a site or excluding certain crawlers.
Troubleshooting indexing issues may involve checking the robots.txt file.
Sitemaps in SEO:
Sitemaps, often in XML format, list important URLs (pages, images, videos) for intelligent crawling.
Facilitates efficient crawling by search engines like Google.
Creation and Maintenance: XML file creation can be complex without coding knowledge.
CMS platforms like WordPress offer plugins (e.g., Yoast, Rank Math) to handle sitemaps.
Practical Considerations:
Understanding the impact of noindex tags and proper robots.txt usage.
Sitemaps play a crucial role in aiding search engines in comprehensively crawling a site.
Relevance for Troubleshooting:
Beginners need not overly worry about robots.txt initially.
It becomes a valuable tool for troubleshooting indexing issues when necessary.
Plugin Assistance for CMS Users:
CMS plugins like Yoast and Rank Math assist users in implementing technical SEO practices.
Particularly beneficial for WordPress users seeking an accessible approach to technical SEO.
Sitemap Generation:
CMS plugins like Yoast and Rank Math automatically generate sitemaps.
Use the Sitemap directive in the robots file and submit it in Google Search Console for search engine visibility.
Redirects:
Redirects guide visitors and bots from one URL to another.
Purpose: Consolidate signals, e.g., redirecting an old URL to a current one for relevant content.
Canonical Tag:
Canonical tag in HTML indicates the preferred URL for a page.
Resolves duplicate content issues, signaling search engines about the primary version of the page.
Example Scenario:
Consideration of duplicate content when a site is accessible through both HTTP and HTTPS.
Canonical tag helps pass signals, ensuring link equity is not diluted across duplicate pages.
CMS Handling:
Simple WordPress sites, among other CMSs, often handle these technical aspects automatically.
Users of CMS platforms may not need to worry extensively about issues like redirects and canonical tags.
Google's Role:
Google may choose to ignore canonical tags in certain cases.
For instance, if a canonical tag suggests HTTP, Google might prioritize the HTTPS version.
Focus on Indexing:
Indexing is a foundational aspect of SEO.
If pages aren't indexed, other SEO efforts become less impactful.
Future Lessons:
Future lessons will delve into technical SEO best practices for overall website health.
Subscribers will receive updates on upcoming lessons, ensuring they don't miss valuable content.
Proactive Approach:
Emphasis on understanding indexing issues when problems arise.
Subscribers encouraged to stay tuned for proactive maintenance practices in upcoming lessons.
Subscribe for Updates:
Subscription ensures timely access to upcoming lessons and content.
Viewers can check the description for course links if watching at a later date.
SEO Importance Recap:
Technical aspects, including sitemaps, redirects, and canonical tags, are crucial for effective SEO.
Future lessons will provide in-depth insights into maintaining website health and implementing best practices.
Read More: 2023 SEO Trends: Strategies for Success in the Evolving Digital Landscape
0 notes
Text
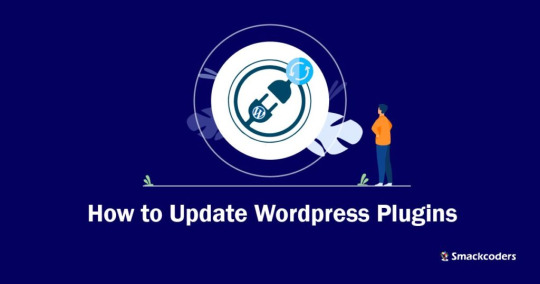
How to Update WordPress plugins
WordPress plugins are software extensions that add new functionality to your WordPress website. They are like apps for your website, allowing you to customize and enhance its features without having to write any code. With over 55,000 plugins available in the official WordPress Plugin Directory, there’s a plugin for practically every need.
Why is it Important to Update WordPress Plugins?
Keeping your WordPress plugins up to date is crucial for several reasons. First and foremost, updates often contain bug fixes and security patches that address vulnerabilities discovered in previous versions. By updating your plugins, you ensure that your website remains protected against potential attacks.
Additionally, updates can introduce new features, improve performance, and enhance compatibility with the latest version of WordPress. By regularly updating your plugins, you can take advantage of these improvements and ensure that your website runs smoothly.
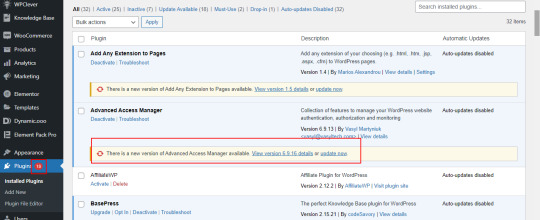
How to Check for Plugin Updates
Before we dive into the update process, it’s important to know how to check for plugin updates. Fortunately, WordPress makes it easy. Here’s how:
1. Login to your WordPress dashboard: Visit your website’s admin area and enter your login credentials.
2. Navigate to the Plugins page: From the sidebar, click on “Plugins” to access the list of installed plugins.

3. Check for updates: On the Plugins page, you’ll see a notification if any updates are available. Look for the number in a red circle next to “Plugins”.
4. Update individual plugins: To update a specific plugin, click on the “Update Now” link beneath its name. The latest version will be downloaded and installed by WordPress automatically.
5. Update all plugins: If you prefer to update all plugins at once, click on the “Update Available” link at the top of the page. WordPress will update all plugins that have pending updates.
Manual Update Process for WordPress Plugins
While updating plugins manually is not the most convenient option, it still provides you with greater control over the process. Here’s how to manually update WordPress plugins:
Secure your website: Before implementing any updates, it’s advisable to generate a backup of your website. This precautionary step ensures that should any issues arise during the update process, you can effortlessly revert your website to its previous state.
Download the latest version: Visit the plugin’s website or the official WordPress Plugin Directory to download the latest version of the plugin you want to update.
Deactivate the old version: In your WordPress dashboard, navigate to the Plugins page and deactivate the plugin you wish to update.
Delete the old version: Once the plugin is deactivated, click on the “Delete” link beneath its name to remove the old version from your website.
Upload and activate the new version: On the Plugins page, click on the “Add New” button at the top. Choose the downloaded plugin file from your computer and click “Install Now”. Finally, click on “Activate” to enable the updated plugin.
Pros and Cons of Manually Updating Plugins
While manual updates give you more control, they also come with their own set of pros and cons.
Pros:
Greater control over the update process.
Ability to thoroughly test the updated plugin before activating it.
No reliance on automatic updates, which can sometimes cause compatibility issues.
Cons:
Requires manual effort and time investment.
Higher risk of human error during the update process.
It might pose a greater challenge for users who are not familiar with technical concepts.
How to Update WordPress Plugins Automatically
If you prefer a more hands-off approach, you can enable automatic updates for your WordPress plugins. Automatic updates ensure that your plugins are always up to date without requiring any manual intervention. Here’s how to enable automatic plugin updates:
Install a plugin for automatic updates: There are several plugins available that can handle automatic updates for you. A well-liked choice is the “Easy Updates Manager” plugin, which can be installed and activated directly from the WordPress Plugin Directory.
Configure automatic updates: Once the plugin is activated, navigate to its settings page. Here, you can specify which plugins you want to update automatically and choose the update frequency.
Save your settings: After configuring the automatic update settings, make sure to save your changes.
Benefits of Using Automatic Plugin Updates
Automatic plugin updates can offer several advantages for website owners:
Improved security: With automatic updates, you can ensure that your plugins are always up to date with the latest security patches, minimizing the risk of potential vulnerabilities.
Time-saving: Automatic updates eliminate the need for manual intervention, saving you time and effort that can be better spent on other website management tasks.
Enhanced performance: By regularly updating your plugins, you can take advantage of performance improvements and bug fixes, ensuring your website runs smoothly.
Compatibility: Automatic updates help ensure that your plugins remain compatible with the latest version of WordPress, preventing any compatibility issues that may arise from using outdated plugins.
Best Practices for Updating WordPress Plugins
To ensure a smooth update process and maintain the security and functionality of your website, follow these best practices:
Backup your website: Before updating any plugins, always create a backup of your website. This allows you to restore your website in case anything goes wrong during the update process.
Update one plugin at a time: To minimize the risk of conflicts or compatibility issues, update one plugin at a time and thoroughly test your website after each update.
Keep track of plugin updates: Regularly check for plugin updates and stay informed about any new features, bug fixes, or security patches. This helps you make informed decisions about which plugins to update.
Read release notes and changelogs: Before updating a plugin, read the release notes or changelogs provided by the plugin developer. This gives you valuable insights into what changes are included in the update and any potential impact on your website.
Test after updating: After updating a plugin, thoroughly test your website to ensure that everything is functioning correctly. Pay special attention to any areas or features that are directly affected by the updated plugin.
Common Issues and Troubleshooting Tips When Updating Plugins
While updating WordPress plugins usually goes smoothly, occasionally, issues may arise. Below, you’ll find a list of common issues along with troubleshooting tips:
White screen of death: If your website displays a blank white screen after updating a plugin, it may indicate a compatibility issue. Try deactivating the recently updated plugin and see if the issue resolves. If it does, contact the plugin developer for further assistance.
Plugin conflicts: Sometimes, updating a plugin can cause conflicts with other plugins or themes. If you notice any unexpected behavior after an update, deactivate other plugins one by one to identify the conflicting plugin. Once identified, contact the plugin developer for a possible solution.
Missing or broken features: If a plugin update results in missing or broken features, ensure that you have followed the update process correctly. If the issue persists, reach out to the plugin developer for guidance, or consider rolling back to the previous version of the plugin.
Slow website performance: Occasionally, a plugin update may negatively impact your website’s performance. To address this, check if the updated plugin has any new settings that could affect performance. If necessary, revert to the previous version or consider alternative plugins.
Importance of Keeping Plugins Updated for Website Security
Keeping your WordPress plugins updated is crucial for maintaining the security of your website. Outdated plugins can become a prime target for hackers looking to exploit vulnerabilities and gain unauthorized access to your website.
By regularly updating your plugins, you ensure that any security vulnerabilities discovered in previous versions are patched. This significantly reduces the risk of your website being compromised.
Additionally, outdated plugins can also pose compatibility issues, leading to website malfunctions or conflicts with other plugins or themes. By keeping your plugins up to date, you minimize the chances of these compatibility issues and ensure a smooth user experience.
Conclusion
Updating your WordPress plugins is a vital part of website maintenance. It not only improves security but also enhances performance and compatibility. Whether you choose to update your plugins manually or enable automatic updates, following best practices and staying vigilant ensures that your website remains secure and up to date.
By regularly checking for updates, testing after each update, and addressing any issues promptly, you can keep your website running smoothly and provide a seamless experience for your visitors.
Don’t neglect the importance of updating your WordPress plugins. By staying proactive, you can safeguard your website and leverage the latest features and improvements offered by plugin developers.
Remember, your website’s security and functionality depend on regular plugin updates. Stay informed, stay updated, and keep your website in top shape.
Stay ahead of the curve. Update your WordPress plugins today!
#wordpress#wordpress plugins#wordpress tutorial#cms#website development#plugins#blog post#import#wordpresswebsite#csvimporter#Wordpressplugindata
0 notes
Text
Customizing WooCommerce for Digital Product Sales: eBooks, Courses, and Downloads
Digital products have emerged as a lucrative market. From eBooks to online courses, selling these digital products with the right setup can be a highly profitable venture. In this blog, we'll explore how to customize WooCommerce, a popular e-commerce plugin for WordPress, to effectively sell digital products and enhance your customers' experience.
Understanding the Digital Product Market
Before diving into customization, let's take a moment to understand the digital product landscape. In recent years, the convenience and accessibility of digital items have led to a surge in demand for them. A rising audience is eager to learn more about your offerings, whether you provide in-depth online courses, educational eBooks, or downloadable tools.
Setting Up WooCommerce for Digital Products
Installation and Configuration
To get started, you'll need to install and configure WooCommerce on your WordPress website. WooCommerce offers a straightforward setup guide to help you through the procedure. Make sure that the settings for digital product sales are enabled, including those for accepting online payments and specifying tax settings.
Customizing Product Listings
Optimize Product Descriptions
Write in-depth, captivating descriptions that emphasize the advantages and features of your digital items. Showcase the products that clients will receive using photographs and visuals of the highest quality.
Digital Product File Management
File Formats and Storage
Consider the file formats for your digital products. Common choices include PDFs for eBooks, video files for courses, and ZIP archives for downloads. Ensure that you have secure and reliable storage for these files, whether through your web host or a dedicated file storage solution.
Security
Protect your files from unauthorized access by storing them in a secure directory with restricted permissions. Additionally, consider implementing measures like download link expiration and IP restrictions for added security.
Pricing Strategies
Fixed Pricing
Set fixed prices for your digital products. Determine a fair value based on the content and market demand. Fixed pricing simplifies the purchasing process for customers.
Variable Pricing
For courses or eBooks with multiple tiers or access levels, consider variable pricing. WooCommerce allows you to offer different pricing options based on customer needs.
Discounts and Coupons
Use WooCommerce's discount and coupon features to attract more customers. Offer time-limited discounts, bundle deals, or special promotions to increase sales.
Payment Gateways for Digital Products
Secure Payment Processing
Choose payment gateways that are secure and suitable for digital product sales. Popular options include PayPal, Stripe, and Square. Ensure that your chosen gateway supports online transactions and offers fraud protection.
Streamlined Checkout
Customize the checkout process to make it as streamlined as possible. Remove unnecessary fields and steps to create a frictionless experience for customers.
Automating Product Delivery
Email Notifications
Set up automated email notifications to deliver digital products to customers immediately after purchase. Include clear instructions and download links in these notifications.
Download Links
WooCommerce generates unique download links for each customer. These links are time-sensitive and expire after a defined period, ensuring secure product delivery.
Managing Customer Accounts
Account Creation
Enable account creation for customers. This allows them to access their order history and download links easily. Provide an option for guest checkout as well for those who prefer not to create accounts.
Digital Product Security
Protecting Your Products
Implement security measures to prevent unauthorized access to your digital products. Use secure download links, limit the number of download attempts, and consider IP restrictions to enhance security.
Marketing and Promotion
Content Marketing
Leverage content marketing to promote your digital products. Create engaging blog posts, videos, or webinars that showcase the value of your offerings.
SEO Optimization
Optimize your product listings for search engines. Use relevant keywords and meta descriptions to improve visibility in search results.
Analytics and Insights
Tracking Conversions
Use analytics tools to track conversions and monitor customer behavior. Gain insights into which products are popular and optimize your strategy accordingly.
Conclusion
Customizing WooCommerce for digital product sales is a wise choice in today's competitive e-commerce industry. You may give your customers a simple and secure purchasing experience by expediting the checkout process, giving flexible price options, and optimizing your product listings and digital file security. Take advantage of the rising market for eBooks, courses, and downloads by embracing digital product sales with WooCommerce. To know more visit us at https://magnigeeks.com/
0 notes
Text
WordPress automatic login link
I manage many WordPress sites for customers and need to log in to them occasionally, but don’t tend to record the passwords in my password manager and just reset them to something random each time using WP CLI.
I came up with a niftier solution - generate a one-time login link which will automatically log me in as an administrator!
The script is below.
Run it in the top level directory of a WordPress installation. You can run it as the user who owns the files or as root (it will su as a appropriate and set file ownership).
The script will creates a file and then output the one-time login URL to the console e.g. https://example.com/auto-login-abcdef1234.php . If you visit this link, WordPress will log you in as the first administrator it finds in the database and then delete the PHP file.
Further improvements that could be considered:
Check if you already have an admin user, perhaps by returning the entire list and searching for one matching your name / email. It should then use that one if possible, or else pick a random administrator or create a new admin for you. It doesn’t really matter, but customers with WordFence or similar plugins installed might get alerts that you have logged in as them and this could be confusing
If you don’t visit the link, it should auto-expire after some time. A system-wide cron job which finds and deletes them would be a good idea. The script could/should also be extended with a self-expiry - i.e. the shell script can set the current timestamp in a variable in the PHP script, and then PHP should check if the system time is no more than 10 minutes since the script was created. If the script is expired, it should not proceed with the login.
#!/bin/bash # Detect if wp-load.php exists in the current directory. If not, exit. if [ ! -f "wp-load.php" ]; then echo "wp-load.php not found. Exiting." exit 1 fi # Create a PHP file with a random name and .php extension filename=auto-login-$(cat /dev/urandom | tr -dc 'a-zA-Z0-9' | fold -w 16 | head -n 1).php wpsu() { if [[ "$PWD" =~ ^/home/([^/]+)/.*$ ]]; then sudo -u ${BASH_REMATCH[1]} /usr/local/bin/php /usr/local/bin/wp "$@" else /usr/local/bin/php /usr/local/bin/wp "$@" fi } # Write the PHP script to the file cat <<EOF > "$filename" <?php require_once('wp-load.php'); \$users = get_users([ 'role' => 'administrator', 'number' => 1, ]); if (!empty(\$users)) { \$user = \$users[0]; \$username = \$user->user_login; wp_set_auth_cookie(\$user->ID); wp_redirect(admin_url()); unlink(__FILE__); exit; } else { echo "No administrator user found in the WordPress database."; } ?> EOF # Get the current site's URL siteurl=$(wpsu option get siteurl) # Print the URL + / + the new file name echo "$siteurl/$filename" # Check if the current user is root if [ $(id -u) -eq 0 ]; then # Get the uid and gid of wp-load.php uid=$(stat -c "%u" wp-load.php) gid=$(stat -c "%g" wp-load.php) # Change the ownership of the PHP file to match wp-load.php chown "$uid:$gid" "$filename" fi
0 notes
Photo

Enhance Your Website Speed Now Using WordPress AWS S3 Plugin
Get WordPress AWS S3 Plugin on CWP Display Files. Make your website blazing fast by offloading your files to AWS S3 with a top-notch WordPress plugin that offers seamless synchronization between your WordPress Media Library and AWS S3. For more information visit https://www.wpdisplayfiles.com/
#listing plugin wordpress#wp directory plugin#wordpress listing plugin#WordPress Google Drive Plugin#WordPress Cloud Plugin#WordPress AWS S3 Plugin#WordPress DROPBOX Plugin#wordpress directory plugin#wordpress directory listing plugin#wp display files#wp display files pro#WordPress Display Files Pro#wordpress file list plugin#wordpress plugin list files in directory#wordpress list files in directory
0 notes
Note
Hi! No pressure to answer, 'cuz I know it's not exactly comic related, but how easy was setting up/moderating your site?
It wasn't too bad! Like every big project, it was kind of a matter of solving the big problems first and then solving the little problems that big problem revealed - and then solving all the even smaller problems those problems revealed. It's a pretty fractal process, but eventually you get to the point where the problems are so tiny it's not worth pulling the site apart to get to them.
The rough process was:
FIRST BIG PROBLEM - getting the domain set up. I got it from a web hosting provider that allowed me unlimited server storage - very important for the number of large images I needed to upload, and since I didn't need users or email addresses or anything it was kind of my only requirement. This part was fairly painless.
SECOND BIG PROBLEM - getting the site arranged correctly. I looked up some tutorials for wordpress webcomic sites, found appropriate plugins and started playing with themes and customization. This part I remember took a few days, but it gave me the basic foundations of the site - the ability for me to add new pages, the ability for users to navigate between pages, all the logos and buttons and backgrounds and stuff. There are ways to code this manually, but I wasn't eager to revisit the horrors of linked lists if I didn't have to. This is also around when I started uploading the first chapter and scheduling the second and third chapter pages. This step was about building out the foundations of the site and making it look how I wanted it to look, so that theoretically after this point all I'd need to worry about was scheduling more pages and occasionally filtering comments for spam.
SMALLER PROBLEM - oopsies, my load times are garbage. The file size I work at is 9000 pixels tall, which is great for detailed artwork but makes wifi networks cry. All my shiny buttons and logos were huge and high-resolution, and they were being loaded every time someone loaded a page. It wasn't so bad to load up the homepage once to read the new page, but reading the archive was unbearably slow. I went a little mad trying to optimize it - first step was downscaling the pages to a slightly more sensible 2000x2829, but I wanted to avoid losing image resolution as much as possible because the entire point of the site was showing people the comic, so optimizing those images any further wasn't an option. Instead I pulled in browser caching, a serverside caching plugin that'd serve saved pages rather than rebuilding them from the ground up every time, and eventually Cloudflare to add an additional layer of solidity to the structure and make sure the site didn't crash again. This was a much longer and more stressful process, because load times are one thing I can't directly control. The process of site optimization was a lot of throwing stuff at the wall and seeing what stuck, and I had to actively stop myself from continuing the optimization spiral - after a while the temptation to rebuild it better than before was turning into the temptation to gut the site and rework it from scratch.
ASSORTED TINY PROBLEMS: changing my image naming scheme so people couldn't interpolate the name of future page images and load them directly as soon as I scheduled them, making it so people couldn't directly access my file directory and read ahead (which only happened once, I think, and was a pretty easy permission fix that I'm not entirely sure why it isn't just automatically set that way), adding spam filter terms to avoid getting inundated by random spambot waves, building my own wordpress theme rather than modifying an existing one and risking it getting updated out from under me, IP blocking my cyberstalker that one time (fortunately very easy and satisfying), fixing a problem where scheduled posts started getting skipped over (slightly more difficult), failing to fix the problem where comment threads broke after the site crash (my b)
Setting up a website like this isn't a quick process, and I wouldn't call it an easy process either, but it's very manageable. The problems don't come at you all at once. It's just about solving one thing at a time at a sustainable pace that won't burn you out or depress you.
70 notes
·
View notes
Text
How To Eliminate Wordpress Blog Comments Spam

One of the most serious problems with any blogging system, including WordPress, is that the comments area is wide open to that scourge of the Internet, spammers. In this case, it's comment spam.
Comment spam is created by people seeking to boost their Google rankings by having lots of links pointing to their own websites. This causes a wide variety of problems:
• When Google detects content spam, they will often block the site it's coming from because it messes up their ranking system.
• It takes up your valuable time and bandwidth to eliminate these posts.
• If the onslaught of spam is heavy enough, it may result in a denial-of-service attack, intended or not, which is a situation in which the server tries so hard to post bad information and/or deliver notification emails to you that it denies service to the legitimate requests. In at least one case, a blogger received over two thousand email notifications of comments that needed approval; as he dealt with these, he continued getting more, ultimately crashing his mail server.
As you can see, even if you have your comments set to post only upon approval, this can be a serious problem. One solution is the Akismet plugin for WordPress.
Akismet Plugin and Other Plugin Options for WordPress
Akismet is designed to help you filter out those nasty spammers, and it's not hard to get it installed into your WordPress system. Download the plugin, and upload it to the blog directory on your server in the plugins subdirectory under wp-content. Activate from the WordPress plugins menu. If you have a notice that you need the Akismet API, go to the WordPress website and look or ask for one.
Here's the magic: the only instruction in Akismet is "forget that spam was ever a problem." You don't have to do anything else at all – the spam will simply be bounced. You will not receive a notification, nor will you have to go out and delete spam.
Another plugin for eliminating spam from bots is the "Did You Pass Math" plugin. This one makes the user perform a simple math problem before submitting a comment. As most humans can handle this and most spambots can't, it's pretty likely that a comment posted through this is a legitimate comment. You should add a note of caution that your comments will be deleted if you answer the math wrong, though; a wise commenter will use an offline composition tool, not post directly to the comments area.
If This Still Doesn't Work
If you still can't eliminate spammers with these plugins, you can eliminate them by denying them access to your comments area. This does not mean you have to disable your comments section, only that you need to set up a filter.
It's not usually as simple as just blocking their IPs. Serious spammers use random IPs, while blocking IPs may get rid of them for a short time, it will ultimately prevent legitimate comments from being posted. Spammers are also notorious for hijacking other people's IP addresses. But as a short-term emergency solution, you can try it. The IP address is included in the information packet for the comment; it's similar to a traceable phone number. Look for clear patterns in your IP numbers.
Use the .htaccess file to block unwanted IPs from even seeing your blog. For instance, these lines can be added:
order allow,deny
deny from 123.123.123.123
deny from 456.456.456.*
deny from 789.789.*.*
allow from all
IPs are four-part numbers, such as 192.168.0.1. Typically, if you see a pattern with the first two sections being identical, you can block all IPs of that type by simply listing them as 192.168.*.*, as you see above. This screens out all these IP numbers. Blocked IPs will get a 403 error page; customize yours so that your contact details are listed in case you're blocking out a legitimate user. Don't use your regular email; a spammer can harvest that too, for a whole new set of problems. Instead, encode your email so that it's not automatically readable.
When you think you have your problems addressed, you can remove the block from your .htaccess file. If it still doesn't work, or if you don't see an IP pattern, it's likely that spambots are hijacking someone else's machine to attack your site. In this case, do not use the IP block.
Again, if you don't have an IP pattern of attack, this may not be worth doing. Remember, too, that with IP addresses, the first numbers affect the largest number of computers, like a reverse address: USA, California, Sacramento, X Building, Ste. 101, Joe Schmo. An IP follows roughly the same pattern, with the last of the four sections referring to the specific computer it is attached to.
Google's Nofollow Attribute
Of course, if it's a waste of their time to spam you, spammers may just skip you altogether. For this reason, you can use the Google Nofollow attribute for links: . This attribute is embedded automatically by modern versions of WordPress.
It does not eliminate links, which is what spammers are working on adding to your site. Instead, it makes those links irrelevant to Google. The end result is that it doesn't hurt your rank in Google, and it doesn't help a spammer to send data to your site. It also marks you, for spambots looking for an easy target, as a waste of time.
This is not an immediate fix. But it is a way to make your blog resistant to spammers in the future. If you're already a target, you'll have to work with it slowly, incorporating all these fixes. If you aren't a target, the very least you should do is turn on the nofollow option in your WordPress system; this will deter any hungry spambots. Upgrade your version, or look for one of the plugins that provides this service for you.
2 notes
·
View notes