
This is both a combination of my work and my inspirations -- I do that youtube thing --
Don't wanna be here? Send us removal request.
Statistics
We looked inside some of the posts by thestudentarchitect and here's what we found interesting.
Average Info
Notes Per Post
119
Likes Per Post
95
Reblog Per Post
23
Reply Per Post
1
Time Between Posts
3 months
Number of Posts By Type
Text
9
Photo
8
Last Seen Tumblr Blogs


Fun Fact
70% of Tumblr users say the Dashboard is their favorite place to spend time online.
Text
Interview Questions for Freelance Interviewees
So you've been sought out by a potential client or filled out a bunch of project proposals, and someone's expressed interest in working with you. That's great, congrats!
Though, if you're like most people, you're probably dreading the interview that's inevitably coming.
If you're anxious about your upcoming interview, guess what, you're not the only one on the hot seat.
As a freelance interviewee, you have the choice to position yourself as a passive participant, or you can take the reigns and actively play a part in the interview process.
Remember, you're interviewing them as much as they're interviewing you.
This is a business you will potentially be working with, so you need to make sure they align with your goals and values and that you actually want to work with them. The company you're meeting with has a lot of the power, yes. They will decide whether or not to hire you, but once they make that choice, you have the power to either accept or decline. Just because they may want you, it doesn't mean you have to accept, so your interviewer needs to do their job to sell you on the idea of working with them, too.
Note: this post is geared toward freelancers working with other design professionals. If you work directly with clients who have their own projects, I recommend checking out this post.
Here are some essential questions you should have ready to ask your interviewer(s) to ensure they're a good fit for you.
Disclaimer: Some of the links below are affiliate links. Please understand that I have experience with all of the products I recommend, and I recommend them because they are helpful and useful, not because of the small commissions I make if you decide to buy something. Please do not spend any money on these products unless you feel you need them or that they will help you achieve your goals.
Where are most of your projects located?
This is important to know for so many reasons. Do they have projects in different states? In different regions of the country? This will influence design decisions, code regulations, and a whole host of other variables. A follow-up to this question could be what your responsibilities are in terms of code research, etc. Of course, as architects and designers, we should always be aware of code regulations, but it's important to know if you're solely responsible for researching and documenting that information or if it's a team effort.
What types of projects do you work on?
You've likely been hired to work on a particular project, but hopefully, you'll be working with this client on future projects, too. For example, perhaps you've been hired to work on a residential building, but when you check out their website, you see that they also work on commercial buildings. Ask if they expect to need help on different types of buildings or if you'll be working with them only on residential projects or whatever project types suit your situation.
Do you do everything in-house or outsource certain parts of your projects?
Do they design millwork and cabinetry for custom kitchens, built-ins, bathrooms, etc., or outsource that work to someone else? That could be useful information to know what level of detail they typically get into for different project areas.
Do they create structural drawings or RCP's or is that work done by engineers? This could be an opportunity to clarify if you need to collaborate or communicate with other disciplines.
What stages of the project will I be involved in?
Will you create existing conditions models and work through until construction documents are completed? Will your involvement begin in the design development phase? Will you be involved in construction administration?
What is your process like?
Do they have templates for project files and folders, established drawing standards, oversight checklists for different stages of the project, etc.?
Now you can interpret this information in a couple of ways. If you're more experienced, you could see the lack of organization and systemization as an opportunity to impart your own wisdom and techniques to improve their productivity and quality control. Alternatively, you could interpret this as a firm that doesn't quite have it together yet, so if you're still early on in your freelancing or architecting career, you may want to seek out a client that will provide more guidance and direction.
If they do have established drawing standards, templates, checklists, etc., that may be a good sign that they value productivity and quality and know what they're doing. These are great clients to learn from.
See also: TSA templates and guides
Can you send me a PDF of a project set example?
Looking at a drawing set that they consider their "gold standard" is an excellent tool for you to reference when you start working on a project. It's a good way to familiarize yourself with how they compose their drawing sets, what types of information they show, etc. It can also help you determine whether your skills are up to par with the types of drawings they typically produce or if you can improve upon their drawing sets. Don't be afraid to step out of your comfort zone a little, but if you're completely overwhelmed by the level of detail, types of drawings, diagrams, renderings, code tables, etc., then you should be upfront about your reservations. Transparency from both you and the client throughout your working relationship is imperative.
What programs do you use?
I assume the types of software you'll be using would be included in the job description, but if not, you should ask. For example, maybe your client uses AutoCAD; would they be okay with you using Revit and exporting drawings to AutoCAD? Perhaps you have Revit LT, but your client needs you to have full Revit so you can use plug-ins, worksharing tools, etc. That's a huge expense you'd have to take on. You may want to talk about the versions of software you're using. Maybe you're using Revit 2021, but your client is using Revit 2022. Are you able to upgrade to 2022?
Suppose your client requires you to have Sketchup Pro. Is that something you can invest in if you don't have it already? Do they use InDesign to create design packages for clients? You'll probably want to make sure you have Adobe CC, then. The conclusions you find from these conversations may be deal-breakers for either of you, so it's always a good idea to be upfront about these conditions before you engage in a contract.
See also: Software I use in my businesses
What weekly time commitment do you need?
If you're an established freelancer, you likely already have some recurring clients or other projects you're working on. You need to evaluate your own availability to make sure that you have enough bandwidth to accommodate the firm you're interviewing with.
Do they need you to work 40 hours a week, 10 hours a week, or does it vary from week to week?
How much time can you give them? Is your schedule consistent, or does it vary weekly?
Can we set up weekly meetings?
Over the years, I've found the best way to keep projects on track is to have weekly meetings with my clients. A scheduled meeting every week, at the same time, even for just 10 minutes, can be very helpful. Even on weeks with nothing to report or no work that week, you can always meet to discuss upcoming projects to prepare your schedules for the following weeks. Meeting consistently is a great way to set expectations, stay on track, and resolve any issues that might come up—they can be quick, and it benefits everyone.
How do you prefer to communicate?
Most freelancing platforms will have built-in messaging boards for each project. Some freelancers or clients prefer to use these platforms for communication, but your clients may also have an established system. Do they prefer to use email, Teams, Slack, or another program?
How do you prefer to share files?
Clients may want you to share files through the integrated messaging board if you're on a freelancing platform. Or, maybe they have OneDrive, Google Workspace, Dropbox, or something else they prefer to use. If your client prefers to use Dropbox, keep in mind you're required to purchase storage space to share files with others. So if you don't have extra funds to fork over to another storage system, that's a good thing to talk about ahead of time.
See also: My favorite work from home tools
What are your views individually and as a company on [insert value(s) here]?
This, to me, is one of the most important questions. Their answer carries so much weight and is one of the most significant determining factors in deciding whether or not I work with each client.
If you're passionate about racial justice or social justice issues, environmental issues, women's rights, LGBTQ+ rights, etc., make sure you ask them their views on those issues. You can ask on an individual level as well as the business as a whole.
Maybe you're interested in the environment. Working in architecture, we directly impact the environment and need to be conscious about the decisions we make as designers. Don't be afraid to ask them what initiatives they're taking to lessen their impact. For example, do they use sustainable materials, have LEED or Passivhaus certifications, use energy-efficient products, or allow their non-freelancing employees to work from home occasionally to cut down on emissions?
For another example, if you identify as someone who's LGBTQ+, BIPOC, and/or a woman and the firm tends to hire only cisgender, straight, white people, or only men, maybe that's not the right firm for you. You need to make sure that you work with people who make you feel safe, valued, and supported.
This question can make many people cringe; it's uncomfortable for some to discuss these issues. Some may deflect or say they prefer to separate work issues from life issues. However, any business that's not willing to take a stance to be more inclusive to make people feel safe and welcome is probably not a business worth working for.
You can say something like, "I'm curious about your office culture. I've made a conscious decision to align myself with companies that share my goals and values. So, I'm wondering what your views are on [insert value(s) here], on an individual level as well as the firm as a whole."
I always ask some variation of this question toward the end of the interview with my potential clients.
Prepare yourself for different answers and try to remain calm. If you're faced with defensiveness or an answer that doesn't sit well with you, then it's better that you find out now rather than 6 months into a project. If you get a less than desirable response, you can politely say something like, "Thank you for your response; I'm not sure if we're a good fit for each other. Thank you for your time." And you can leave knowing you just dodged a bullet.
Hopefully, you'll receive a positive response and leave knowing you've found a special firm that aligns with you. I'm happily surprised by the responses every time I pose that question—I've been thanked many times and even had clients open up to me about their own experiences. I've found that it deepens your connection to your clients and opens the opportunity for one or both of you to share a story.
Everyone else will likely steer clear of this "taboo" question. Some may say it's too personal, it's inappropriate, it's irrelevant, etc. But, by asking this question, you're going to stand out from the crowd, and it's likely your conversation will stick with them long after the interview is over.
In a way, you're teaching them that it's okay to discuss these topics openly, even in a workplace setting, especially in a workplace setting. And you're showing them that it's not a hindrance to be vocal in your stance on issues you care about.
I'm happy to share my social justice stance and commitment with anyone interested in knowing my core values and the issues I fight for. I have had people stumble upon my Justice page and reach out just to thank me for being vocal and open about my positions.
If you feel safe in doing so, I encourage you to challenge the norms and approach things differently. Take charge of your interview process, ask questions that are important to you, and stay true to your convictions.
Remember, you don't owe anyone anything. If something in your interview feels off or you find you don't have a great rapport with your potential client, you can always send a message following the interview thanking them for meeting with you, but you don't feel that you're a good fit for each other. There's nothing wrong with turning down a client; just be sure to do it amicably because it's a small world out there.
Interviews can be stressful, but it gets a lot less intimidating if you take some of the control back and gain more experience.
I wish you the best of luck with your interview; you've got this!
Happy freelancing!
♥ Chelsea
More posts you might like
#the architecture student#the architect#thestudentarchitect#the student#the student architect#the student archi#girl architect#woman#chelsea#chelsea weibust#designer#architectural designer#female designer#worman architect#freelance#freelancer#freelancing#freelance tips#tips and tricks#interview#interviews#inerviewee#interview questions#goals#values#architecture software#architecture programs
25 notes
·
View notes
Text
Do I Have to Be an Artist to Be an Architect?
You've seen it before, right? The beautiful hand-drawn renderings, whimsical sketches, expertly crafted models. You're sitting there thinking to yourself, well, I can't do that; I must not be cut out for architecture.
Since you're reading this post, I'm assuming you've felt this way at one time or another, and you're not alone! So many people feel the same as you do, and many of them let those thoughts get in the way of pursuing their dream to study architecture.
Let's make one thing clear—architecture school isn't art school.
Does it help to have art skills and to be able to translate your thoughts and ideas clearly on paper? Of course, it does, but there's so much more to architecture than drawing a pretty picture.
Being a great architect means having insight into so many different aspects of the world around you. It's about knowing what kinds of information you need to know, where to find it, and incorporating those ideas into your designs.
The magical thing is that everyone is creative. Whether or not you think you're creative, you are. Given the exact same information and parameters as anyone else, you will develop a unique solution that only you could come up with—that's creativity.
If you're struggling with representing your ideas or developing interesting concepts, though, you may need to start thinking outside of the box.
See also: How to Avoid All-Nighters
Disclaimer: Some of the links below are affiliate links. Please understand that I have experience with all of the products I recommend, and I recommend them because they are helpful and useful, not because of the small commissions I make if you decide to buy something. Please do not spend any money on these products unless you feel you need them or that they will help you achieve your goals.
If you're not great at drawing, try model making
You can try additive model making (adding objects to create a form) or subtractive modeling (such as carving space out of a block). You can use wood blocks, relive your lego days, cardboard boxes, create paper forms, etc. Find a way to imagine and explore ideas through form-making.
Having trouble thinking spacially or drawing perspectives?
Try using Sketchup! Sketchup is an amazing free tool that allows you to quickly create meaningful forms digitally, which can then be printed out and sketched over to easily test out different ideas.
Printing out and physically sketching over these conceptual drawings can be a fantastic way to practice drawing, learn how to create perspectival views, and help you begin to really understand the world through a different lens.
See also: Essential Architecture Tools
Want to test out different ideas?
Once you have a design or sketch drawn or printed out, you can overlay multiple layers of trace paper to develop and test out different ideas. This is great for reconfiguring spaces in plan, experimenting with different elevation configurations, playing with section designs, and even diagramming.
Try collaging!
Photoshop* is another fundamental design tool that can be used to create collages and overlay images to develop compositions to portray your ideas. Students and teachers* can take advantage of a very generous discount on the Adobe Cloud programs, including Photoshop, InDesign, Illustrator, and many other programs.
You could even try creating tangible collages using colored paper or magazine cutouts.
Give sketching another go
It can be intimidating to see classmates and coworkers effortlessly churn out beautiful sketches and renderings but you can’t let that stop you from developing your own drawing skills. You can’t compare yourself to someone who has clearly been drawing their entire life. Give yourself a break and embrace your inner child, the part of you that has no fear of “messing up” or embarrassing yourself.
If the fine point of a pencil or pen doesn’t work for you, explore different tools! Try using charcoal, thicker markers, the side of the pencil tip, painting, drawing on tinted paper like newsprint. Instead of drawing a building, you can focus on gesture, form, light vs shadow, etc. You can even try blind contour drawings. There are all kinds of ways you can change it up and find a better tool or method that works for you. Try a combination of tools and methods and open your mind to new possibilities.
If you’re insecure about drawing or expressing your ideas, take more drawing classes. The more you draw, the easier it becomes and the sharper your seeing eye gets. Don’t let the fear of something not being perfect prevent you from trying. Architecture isn’t about perfection, it’s about exploring ideas, trial and error, and finding the balance between form and function.
What I've found through working in architecture is you need to find out what you're good at and what you like doing.
There are so many niches within the architecture and design industry; you just need to find your strengths and leverage them.
As for getting through architecture school, I get that you don’t exactly have the freedom to niche down and focus only on things you’re interested in. That’s by design. You’re still discovering who you are, pushing your limits, and learning all kinds of new things. I urge you to embrace those uncomfortable feelings in areas you’re not as confident in and try to take everything you can out of all your experiences, both inside and outside of school. Our experiences and what we focus on are what define us as designers. Don’t be afraid to do things differently and take advantage of all the resources and liberties available to you.
Happy designing!
♥ Chelsea
More posts you might like
#the architecture student#the architect#thestudentarchitect#the student#the student architect#the student archi#girl architect#woman#chelsea#chelsea weibust#designer#architectural designer#female designer#worman architect#art#artist#architecture#sketchup#photoshop#conceptualize#sketching#architecture school#modeling#model making#form making#tools#architecture tools#technology#concept#ideas
12 notes
·
View notes
Text
Tips for Existing Conditions Surveys
Tips for Existing Conditions Surveys
By Chelsea Weibust 04/23/2019
Each project is totally different, from the information available, scope of work, schedule, etc. It's important to know the purpose of your site visit before you head out to the site.
Sometimes when you have a site visit you'll have access to detailed existing drawings. They may be just printed drawing sets or PDF's, or ideally they'd be CAD or Revit drawings. Other times you won't be given any information at all. In the latter case, it's a good idea to check out Google Maps and Tax Assessor information to get an idea of the size, shape, materiality, aesthetic, context, etc. of the building before your visit.
You may need to sketch the plans and elevations on site so be sure to bring a clipboard and graph paper for sketching and notes.
Another consideration is the scope of the project. If the project focus is strictly on interior work then you shouldn’t spend too much time documenting exterior conditions - just stick to the basics. The same is true to strictly exterior projects. If you're working on a deck renovation then documenting a ton of interior information will be a waste of time, unless of course it’s related to the project. [Full disclosure: some of the links below are affiliate links.]
Here are some tips and tricks I’ve picked up from doing existing conditions surveys.
General Survey Information:
Make sure to write the date, location, and project name of the site visit on each sheet in case there's any question in the future about when the existing conditions survey was taken or what project the drawings are from. Also, write what each drawing shows, i.e. first floor plan, exterior dimensions, section through living room, etc. It may also be helpful in some cases to write the names of the people at the site visit for future reference.
Color Coding:
Sometimes existing conditions surveys will have a ridiculous amount of information and it can be tough to decipher between vertical dimensions, horizontal dimensions, opening dimensions, structural elements, etc. For this reason I like to use color and thickness variations for distinctions. For example, I like to switch between a thick black pen/marker* and a multicolored pen* to make it easy to switch between colors quickly. You can color code your notes however you like but you may want to make a legend so anyone who might look at your drawings will understand them. Here’s how I color code my surveys:
Black marker/pen: exterior walls
Black pen: horizontal dimensions, general notes, interior walls, cabinets and fixtures
Green pen: vertical dimensions (heights), spot elevations
Blue pen: window and door types, overall dimensions
Red pen: center line dimensions, mechanical elements, structural elements
Dimensions:
Write dimensions perpendicular to the dimension string in areas where you have a cluster of dimensions so you can fit all of the information.
Units:
Be consistent with how you're writing dimensions and make sure if using a laser measuring* tool that it's set to the same units you've been using. Most of the time I find it's best to write in only inches. Other times I like to write in feet and inches but when I use these units I'm careful not to use ticks for feet and inches (1' - 3 1/2") because the ticks could be mistaken for numbers. Instead, I like to keep it simple and write them like: 1 - 3.5 (0 - 4.75 if no feet) so that there's no confusion with ticks or fractions being misinterpreted.
Vertical Dimensions:
It's easy to remember to take horizontal dimensions to get wall placements and openings but something that can easily be forgotten are vertical dimensions. Ceiling heights, soffits, window sill and header heights, door heights, openings, floors, etc. can easily be overlooked until you're at your desk modeling the building.
Continue reading below
Do you have all of these helpful tools for doing existing conditions surveys?
Sections, Elevations & 3D Views:
Don’t limit yourself to drawing in plan. Some information is better represented in section like roof/ceiling slopes, floor to floor heights, soffit heights, stairs, bump outs, etc. You might also find a quick 3D sketch or elevation can be helpful too.
Storyboard:
If you're short on time or are looking to get a set of dimensions that don't have to be totally accurate you can take a picture of a storyboard to get accurate enough information. To do this, hold the tape measure against whatever it is you want to dimension and take a picture of it. Try to set the camera as parallel to the tape as possible so you don't distort the image.
In the image shown you can see we wanted to quickly get the dimensions of an existing railing on a roof deck. You can see clearly the center lines of the pipes, the diameter of the pipes, and the overall height of the railing.
Topography:
Pay attention to the topography and make note of the elevation of the ground in relation to the bottom of siding material at each corner of the building, at the very least.
Material Dimensions:
Note materials and dimensions - if masonry, measure and make note of the size of the blocks used. If lap siding, shingle siding, etc. make note of the reveal and material. This will be really helpful if you need to figure out heights if you forget to measure something or just want to verify dimensions. Since reveals can vary on each course, a handy tricks is to measure the height of 10 courses and divide that number by 10 to get a more accurate gauge.
You can see from the photo that 10 courses of this siding is 27 1/8” which is roughly a 2 3/4” reveal per course.
Photos:
Often one of my biggest frustrations when reviewing site visit information is not having enough photos. Anytime I'm on a site visit, I'll leave with hundreds of photos and somehow it's still not enough! There's always some wonky condition that I didn't get a great photo of or I needed a picture just 4 inches to the right. Go out of your way to take more photos than you might think you need from different angles, perspectives, and distances. Nowadays we have awesome smartphones that are capable of high quality photos, panoramas, and even videos! Videos can be especially helpful when walking through the building with an owner or consultant (with permission) so you can take note of what was discussed so you don’t have to take as many notes! I personally prefer to use my iPhone or a small point and shoot* that’s not too heavy and can be easily tucked away when not in use. I once had a project where we had to survey hundreds of windows for a renovation project and most windows were totally different conditions. We needed multiple detail photos of each window. This would've been an almost impossible task to keep track of each individual window but luckily I had a Samsung Note phone with a pen so I was able to take a photo of each window, take a screenshot, and make a note on each photo which window it was. I'm not sure what we would've done otherwise but I was so thankful to have that phone at that moment! We also had a google docs spreadsheet open on my iPad to document information about the windows rather than writing it on paper so we wouldn't have to duplicate our work in transferring written notes to the computer. So in short, I guess I'm saying to make the most of your technology!
Locate Photos:
Mark interesting things on your plans that will make it easier for you or someone else to orient themselves while looking through the photos later. Maybe it's a painting on a wall, a red sweatshirt hanging on a pipe, a stain on the ceiling, etc. but it should be something distinct that will help place tricky conditions in photos on the plans. If you're taking detail photos, remember to step back and take context photos so you can locate them later.
The photo below shows a steel rod tied to the roof rafters which was holding up the 2nd floor of a old home. This was both fascinating and terrifying (since the house needed significant repair) but we needed to be sure to mark the locations of these rods on the plans. This picture is great to see the detail of how the tensile system works but doesn’t help at all in telling us where this rod is located. So on the floor plan I made a note on the plan with a star and a cone (<) showing the direction of the photo, saying something like “steel rod tied to roof structure, tension wheel” and this was really helpful because none of the other pictures of the rods showed the wheel or tensile system and now we knew exactly where it was and what direction we were looking.
Locating pictures on plans is really only necessary in tricky areas like basements, attics, eaves, or in monotonous buildings where a lot of spaces look exactly the alike, so try not to go overboard with this.
BONUS: Tips for You
Backpack:
I recommend carrying a small bag with you while on site visits to hold extra tools and whatever else you may have. I suggest using a small backpack* rather than something like a messenger bag since it wont get in the way.
Snacks:
Maybe I'm the only one who thinks about food constantly, but I always find it's a good idea to keep a couple snacks with me on a site visit. Sometimes things take longer than expected and you don't want to be famished, trying to rush through your survey so you can get a bite to eat. It can't hurt to throw a couple granola bars and a water in your bag, right?
Dress Appropriately:
If it's the middle of winter and you're surveying a building without heat, you're going to want to dress in lot's of warm layers. Be sure to check the weather beforehand so you know if it's supposed to rain (and will need rain gear and umbrella), if it's going to be brutally cold (and need hats, gloves, scarves, lots of layers, etc.), if it's going to be windy (and you need a windbreaker and extra clips to attach papers to your clipboard)... you get the idea
Shoes:
Two things you need to consider about footwear are safety and comfort. You should never wear open toed shoes or high heels to a site visit, there are just too many things that could go wrong. You're probably going to be walking around for hours, sometimes crawling around in icky places, and potentially walking on unstable surfaces or trekking through the mud. Opt for comfortable sneakers or boots.
Good luck on future surveys!
- Chelsea
More posts you might like:
#architecture#survey#existing conditions survey#existing conditions#tips and tricks#tools#measuring tools#architecture tools#building survey#dimensions#design#architecture supplies#thestudentarchitect#the student architect
3 notes
·
View notes
Photo

Hidden streets • • • • #thestudentarchitect #architecture #architecturephotography #city #architect #street #paris #latinquarter #cobblestone #parisintherain #parisinwinter #winter (at Quartier Latin) https://www.instagram.com/p/BqqPWAYBtqW/?utm_source=ig_tumblr_share&igshid=1143g1bbbd8o1
#thestudentarchitect#architecture#architecturephotography#city#architect#street#paris#latinquarter#cobblestone#parisintherain#parisinwinter#winter
1 note
·
View note
Photo

#govote🇺🇸 What’s your favorite part of voting? _________ For me, I love the fact that everyone gets one vote and all votes are created equal. It doesn’t matter how much money you have, how famous you are, the color of your skin, your gender, sexual orientation, age, or anything else. All that matters is that you cast your vote. My vote doesn’t count any more or any less than anyone else’s and that to me is the most amazing part. _________ Happy Voting! #govote _________ #govote #elections #politics #vote #voice #empoweringwomen #empowerment #elections2018 #midterms #rockthevote #ivoted #electionday #vote2018 #voting #votingmatters #pleasevote https://www.instagram.com/p/Bp2TZISBTG7/?utm_source=ig_tumblr_share&igshid=swvxbi8jtcjp
#govote🇺🇸#govote#elections#politics#vote#voice#empoweringwomen#empowerment#elections2018#midterms#rockthevote#ivoted#electionday#vote2018#voting#votingmatters#pleasevote
0 notes
Photo

🎃 Happy Halloween! _________ You know, tracking your expenses doesn’t have to be so spooky. Confused about what a write-off is, wondering what expenses you can write-off, or wondering how to track your expenses? Check out my latest blog post! → Link in bio https://thestudentarchitect.com/blog/writeoff • • • • #thestudentarchitect #freelancing #entrepreneur #freelance #architect #architecture #money #makingmoney #onlinebusiness #time #creative #designer #writeoff #pairs #hoteldeville #parisintherain (at Hôtel de Ville, Paris) https://www.instagram.com/p/BpmhhB_F063/?utm_source=ig_tumblr_share&igshid=s8v24oydswmc
#thestudentarchitect#freelancing#entrepreneur#freelance#architect#architecture#money#makingmoney#onlinebusiness#time#creative#designer#writeoff#pairs#hoteldeville#parisintherain
2 notes
·
View notes
Text
You Don't Even Know What a Write-Off Is!
When I first started freelancing I didn’t consider myself to be running a business.
It was all so new to me, I didn’t really know what to think. My main concern was making money, making connections, and getting more jobs. Just about the last thing on my mind was learning about tracking my expenses. I thought that was something only big companies could do.

Granted, all I had to go off of were Seinfeld references, but if Jerry and Kramer didn’t know what a write-off was, why would I?

Well, eventually I got in touch with an accountant to help me with my taxes and learnt pretty quickly that I needed to start tracking my expenses.
Okay, so what exactly is a write-off?
Throughout the year you document the various costs of running your business and when you file your taxes, the money used for those business expenses is deducted from your taxable income. This means, when you file your taxes, your taxable income will be lower and thus you will owe less money! I don’t know about you, but I like the sound of that!
Continue reading below
Want to track your time and invoice clients for free? Find out how here!

So I should just start buying things to save money on taxes?
Not exactly. It doesn’t make much sense to spend hundreds of dollars to save a few bucks on taxes. It’ll save you more money to only buy what you truly need and save the rest rather than spending carelessly to save a little come tax time.
What types of things can I write-off?
I was really surprised at all of the different types of expenses you can write-off. Here are some things you may not have thought to write-off that won't cost you anything extra.
Mileage Keep track of all your traveling for client meetings, site visits, etc. Figure out the total mileage driven and multiply it by the standard mileage rates established by the government. Find the going rates here. It will seem minuscule at first, but believe me, it adds up!
Office supplies This is the most obvious deduction you can make but be sure not to forget things like a printer, computer, paper, pens, drafting supplies, etc.
Software I was really bummed when my student pricing for Adobe CC* ran out and I had to start paying the normal rate. The only bright side is now I can write-off that expense as well as other architecture and design software!
Website hosting & domain fees Think of various online fees you pay for like website hosting, domains, email addresses, etc.
Accounting fees You can write-off both accounting software and professional fees for accounting services.
Rent and utilities Whether you work from home or rent an office space, you can deduct your rent and utility fees. If you work from home, you should have a designated room in your house for working and only a portion of rent and utilities can be deducted - but it’s better than nothing!
Licenses and dues Recurring licensing fees and membership dues can also be deducted. Think AIA fees, NCARB fees, etc.
Awesome! So what’s the best way to track expenses?
The service I use and recommend for tracking expenses and all other accounting needs is Freshbooks Cloud Accounting. [Full disclosure: I am an affiliate for Freshbooks. I recommend their product to you because I get incredible value from their services, not because of the commission I receive if you choose to subscribe to their services through my links.]

Benefits of using Freshbooks:
Organize expenses by category
Create recurring expenses to save tons of time
Make expenses billable to clients
Log expenses automatically from linked bank account
Upload receipts for each expense

However you track your expenses, two things to remember are: only spend money on what you need and make sure to deduct whatever you can to save yourself more of your hard earned cash!
#freelance#freelancing#freelancer#expense#expenses#deductible#write off#seinfeld#freshbooks#accounting#accounting software#business#small business expenses#track expenses
2 notes
·
View notes
Photo

Follow your dreams 🕊 ✨ * ✨ * #thestudentarchitect #photography #goldenhour #beach #ocean #followyourdreams #fly #sand #sunset #silhouette #island #islandgirl #explore #justgoshoot #outdoors #nature https://www.instagram.com/p/BpC8wJpBdxW/?utm_source=ig_tumblr_share&igshid=1p24mpu71ve2b
#thestudentarchitect#photography#goldenhour#beach#ocean#followyourdreams#fly#sand#sunset#silhouette#island#islandgirl#explore#justgoshoot#outdoors#nature
0 notes
Text
How to Link Excel Spreadsheets into AutoCAD and Revit
One of the biggest issues I see in projects is duplicate information. This is something I always try to avoid whenever I can. This might mean duplicate information within a single Revit file across multiple sheets, or duplicate information between different programs.
If you find yourself getting structural schedules from engineers, or have non-Revit-using people at your firm who prefer to write keynotes, room schedules, etc. in Excel that need to be imported into Revit or AutoCAD, please see the video below for a step-by-step tutorial of how to safely link your files so they will update from a single source.
So if you tend to learn better with pictures rather than videos, see below for a step-by-step tutorial of how to link your Excel schedules into both AutoCAD and Revit.
Linking Excel table into AutoCAD
1. Open Excel Spreadsheet
First you'll want to open the excel spreadsheet that needs to be linked into your project files. You can format the fonts, columns widths, cell merging, etc. now, or you can always come back and edit the table later.
2. Open a new AutoCAD file
Open a new AutoCAD file if you will be linking the spreadsheet into Revit, but if you’re linking into an existing AutoCAD project, open that project file.
3. Click the Link Data icon
You can find this under the Annotate tab in the Tables section.
4. Click Create a new Excel Data Link
5. Enter Data Link Name
Enter the name of the schedule you'll be linking in and hit OK. Then hit OK on the Data Link Manager dialogue box.
7. Check cell range
Flip back over to your Excel file to check the cell range for the information you're linking. In this case, the cell range is A1 to C14.
8. Modify Data Link settings
Flip back over to your AutoCAD file and in the data link dialogue box, enter the following information.
To choose the Excel file you’ll be linking in, click the three dots and find the file.
Make sure the path type is set to full path.
Make sure the correct sheet is chosen.
Check the Link to Range box and enter the cell range that you found in step 6 in the format of A1:C14
9. Click on the Table icon
You can find the table icon under the Annotate tab in the Tables section.
10. Select Insert From Data Link
Then use the drop down menu below it to select the data link you just created and hit OK.
11. Place table
Click anywhere in the drawing space to place your table. Your screen should look something like this.
12. Save the file
Linking Excel into Revit
Excel can't link directly into Revit so a workaround for that problem is to link the Excel file into AutoCAD (as we just did above) and then link the AutoCAD file into Revit. Luckily the hard part is over; linking into Revit is very simple.
1. Open your Revit project
2. Select Link CAD icon
You can find the Link CAD icon on the ribbon under Insert in the Link section.
3. Modify Link settings
Navigate to where your AutoCAD file is saved, make sure it's a DWG file, and select the file.
Change the colors to Black and White
Change positioning to Manual - Center
4. Click anywhere on the drawing area to place the schedule.
5. Save your file
That's it you're done!
Making Changes to the Table
Any changes that need to be made to the table/spreadsheet, whether it's formatting, content, etc. should be done within the Excel file. Something to keep in mind though is that, although the table is linked into both AutoCAD and Revit, it won't automatically update when you make changes.
Here's what you need to do to make sure those changes are reflected in AutoCAD and Revit as well as Excel.
1. Save your Excel file
Once you make changes to the Excel spreadsheet, save the file.
2. Update AutoCAD
No go back to your AutoCAD file, select the entire table, and click the Download From Source icon. You can find it under the Annotate tab in the Tables section. This will pull the new information from the Excel file and update it in the CAD file.
If the table ends up having strange formatting after updating, you can make a mark the top left corner of the table, delete it, and then insert a new table using the same data link. This should resolve any formatting issues.
3. Save the file
Make sure the updates are reflected and then save the file.
4. Manage Links in Revit
Go back to to Revit and select the Manage Links icon on the ribbon under the Manage tab in the Manage Project section.
5. Reload Link
Select the CAD Formats tab
Click on the link you want to update
Select Reload and hit OK
6. Save your file
Check to make sure that the updates are reflected in your Revit project and save the file.
Note: If you close and reopen your Revit project after updating the AutoCAD file, the changes will automatically update in Revit once you reopen the file. This will not happen automatically in AutoCAD though. You will still have to reopen the AutoCAD file, download from source, and save the file to update any changes made in the linked Excel file.
Final Tips
Modifying Number of Cells
If you make any changes to the number of rows or columns in the table, simply go back to the Data Link Manager and adjust the cell range. Then save and reload the link in Revit.
Again, if you have any formatting issues, mark the top left corner of the table, delete it, and then insert a new table using the data link.
Copying Schedules in Revit
If you copy a linked schedule in Revit across multiple sheets, only the original schedule will be linked. So if you want to have the same schedule on multiple pages, be sure to link them in on each page, not copy them.
#architecture#thestudentarchitect#the student architect#revit#autocad#autodesk#excel#excel spreadsheet#link#linking#design#construction documents#tutorial#step-by-step#schedules#keynotes#safely link#tips and tricks#tutorials#how to#data#troubleshooting
53 notes
·
View notes
Photo
Looking for a way to track your time and invoice your clients for free? 📐 Check out my latest video and blog post showing step-by-step how to create your own template for free! → Link in bio . . . . #freelance #architect #architecture #money #makingmoney #onlinebusiness #time #creative #designer #entrepreneur https://www.instagram.com/p/BojkUIpBHD8/?utm_source=ig_tumblr_share&igshid=wdbyjadm1s0e
#freelance#architect#architecture#money#makingmoney#onlinebusiness#time#creative#designer#entrepreneur
2 notes
·
View notes
Text
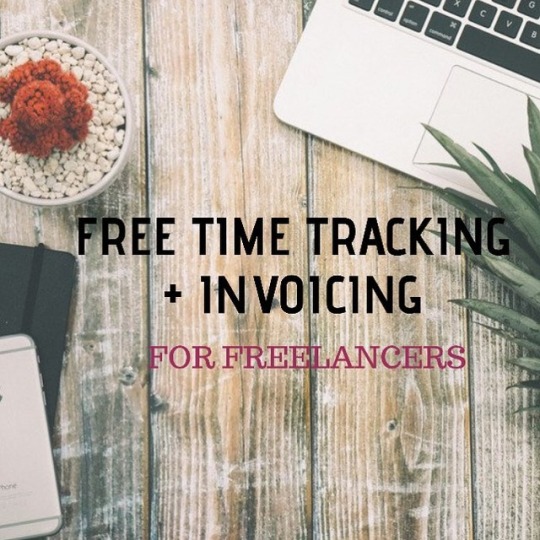
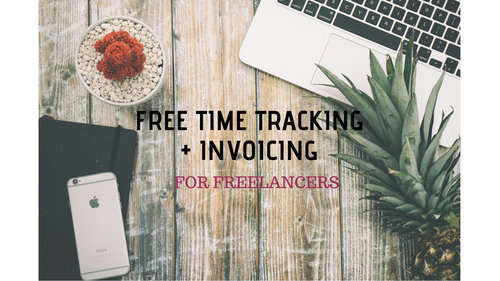
Free Time Tracking and Invoicing for Freelancers
When I first started freelancing I was documenting all of my project hours in my notebook! Trust me, it took only a few weeks for me to realize that it was a terrible way to track my hours and that I needed some way to invoice my clients.
I was frustrated that I couldn't find a way online to track my hours and invoice clients for free. Since I was just starting out, I didn’t have any extra money to spend on something like accounting software so I decided to make my own spreadsheet which allowed me to track my hours and invoice my clients. The spreadsheet used simple formulas so I didn’t have to calculate my hours anymore which was essential for me.
One thing that really stressed me out was making sure I was calculating my hours correctly and also monitoring how much time I was actually spending on specific tasks for my projects to make sure I didn't blow through all my hours too quickly.
Invoicing and time tracking doesn't have to be so fancy when you're just starting out. All your client really wants to know is the number of hours your spending on a project, tasks completed, and the total cost due. Don't stress too much about the aesthetics of your invoices, spend your time on things that will get you paid!
So here's the method I used for the first few months of my freelancing to both track my project hours and bill my clients.
Before we begin…
You can track time and finances the free way, or the easy way.
I started out using this free method I’m about to show you but I wish I switched to a better system like Freshbooks much sooner! Using a platform that is designed for freelancers and other creatives was so much easier and made so much more sense than trying to create my own system. I found myself spending hours on accounting every month, hours that I could have spent working and getting paid. Once I realized this, I decided to switch to Freshbooks, my only regret being that I didn’t do it sooner. [Full disclosure: I’m an affiliate for Freshbooks and I recommend their product to you because I’ve gotten so much value from their software and really believe in their product, not because of the commission I get if you choose to subscribe to their software through my links.]
If you’re intrigued by using accounting software but not sure if you’re ready to go all in, you can try Freshbooks for 30 days for free without having to provide any credit card information. This was a condition that was really important for me because I wanted proof that I needed accounting software without having to fully commit to it.
Try it before you buy it!

If you’d rather track your time the free way, here’s the spreadsheet method I created for myself when I first started freelancing.
IF YOU TEND TO LEARN BETTER WITH PICTURES RATHER THAN VIDEOS, SEE BELOW FOR A STEP-BY-STEP TUTORIAL OF HOW TO CREATE YOUR OWN FREE TIME TRACKING/INVOICING TEMPLATE.
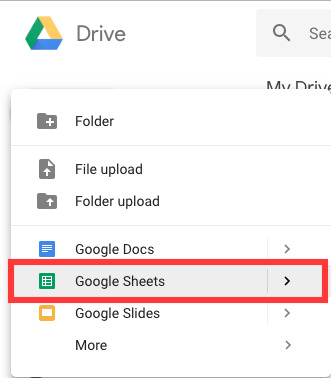
1. Open Google Drive
Navigate to your Google Drive account. Click the New icon and select Google Sheets. Alternatively, you can create your template using Excel.
I personally liked using Google Sheets so I could update my hours wherever I was, on any device.

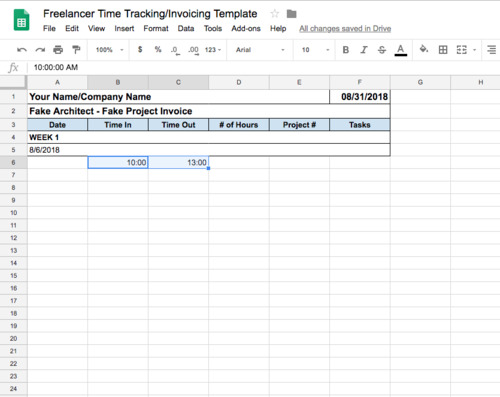
2. Plug in general info
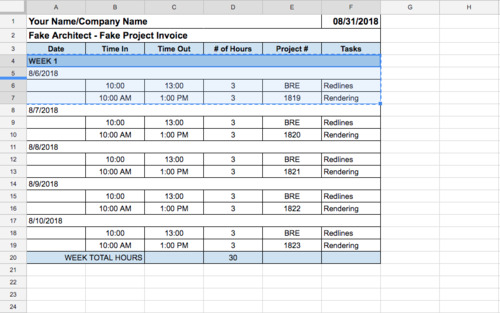
Write in general invoice information like your name, the date of the invoice, and who and what the invoice is for. Set up the time tracking portion of the table with date, time in, time out, number of hours, project number, and tasks. You may also want to add an invoice number too as well as any other relevant info for your projects.
Start adding info like Week 1 and the date at the start of the billing period.

3. Input hours
Plug in sample hours for time in and time out for the first day of the billing period.
4. Change time format
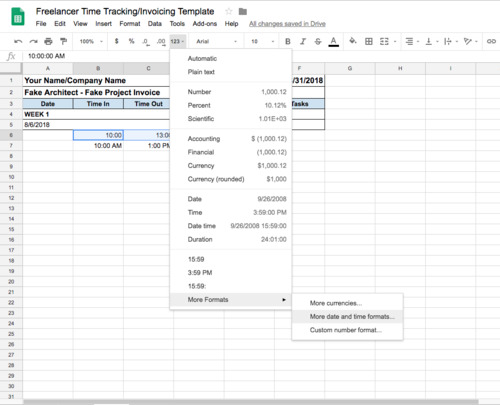
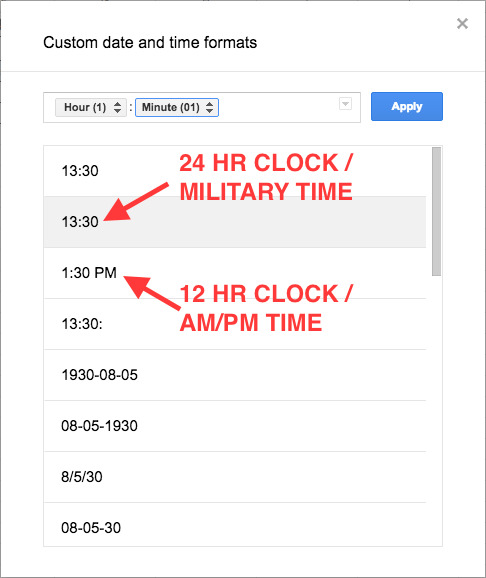
You have the option to use a 12 hour clock or 24 hour clock when entering your time. If using a 12 hour clock you’ll need to specify whether it’s AM or PM. To change the time format you can either go to format → number → more formats → more date and time formats or click the 123 drop down → more formats → more date and time formats. From here you can select your preferred time format.
5. Block Time Formula
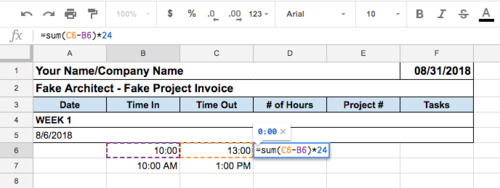
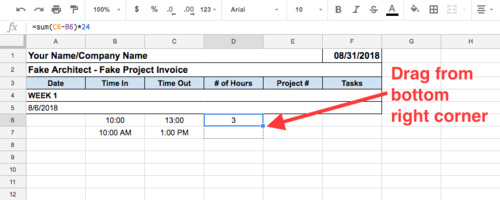
For me this is the best part of tracking time on a computer - formulas! This is a very simple formula for keeping track of your hours during blocks of time.
Formula: =sum(C6-B6)*24
All you’re doing here is subtracting your time out from your time in and multiplying by 24 hours to get the total time worked during that duration.
6. Cell formatting
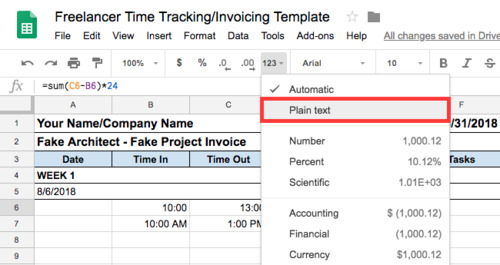
Change the cell formatting under # of Hours to Plain text under the 123 drop down menu.
7. Drag to Copy Formula
A quick and easy way to copy information, formulas, and formatting is to select the cell or cells you want to copy from and drag the box in the bottom right corner to the cells you want to copy to.
Here you can use that method to copy the block time formula to the other cells by dragging the box down to multiple cells below.
8. Select information
Select the rows with the date and time entries you just entered for the first day of the billing period.
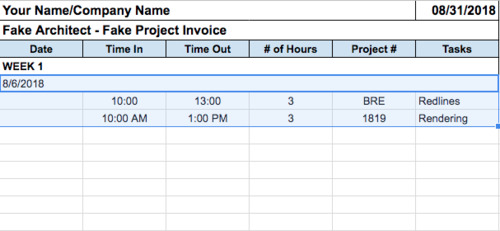
9. Drag to copy
Now that you have the information selected, use the drag to copy method again by clicking and dragging the bottom right box down 15 rows to enter a full week of hours. This will ensure that your dates are copied sequentially and the block time formula is applied to all of the cells in the # of Hours column for the week.
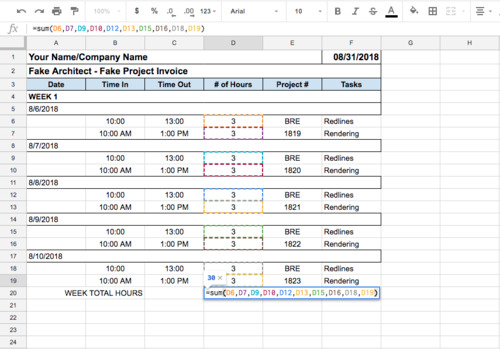
10. Week total hours formula
Make a row for the weeks total hours and under the # of Hours column enter a new formula.
Formula: =sum(D6,D7,D9,D10,D12,D13,D15,D16,D18,D19)
This formula calculates the sum of all the hours you entered for the week. You can start typing in the formula with “=sum(“ and then select each cell in the # of Hours column for that week while holding down CTRL or CMD.
As of late, Google Sheet unfortunately does not have a way of deselecting a cell, so if you accidentally select a cell you can just erase it from the formula. In Excel you can hold CTRL and click on the cell again to deselect it.
Feel like using Freshbooks yet? 😉
Fun fact: I can’t actually wink irl…

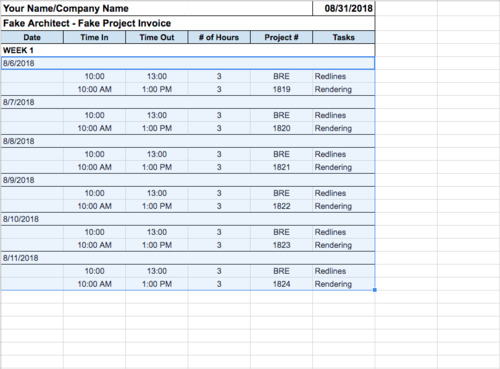
11. Select top row
Select the top row of your time entries for the first day, including the Week 1 row, and CTRL+C or CMD+C to copy the information.
12. Paste information
Select the blank cell under the Week Total Hours row and CTRL+V or CMD+V to paste the copied information. Change the Week 1 text to read Week 2 and erase the Time In and Time Out hours as well as the Project # and Task information. Change the date to reflect the week 2 date in your billing period.
The # of Hours column under Week 2 should read 0. This tells us that the formula is still present in those cells.
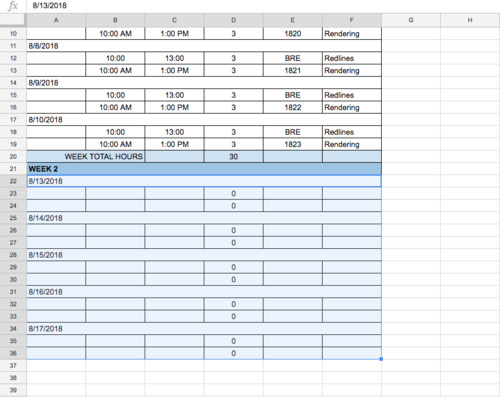
Repeat the process of selecting the date and times for the first day of week 2.
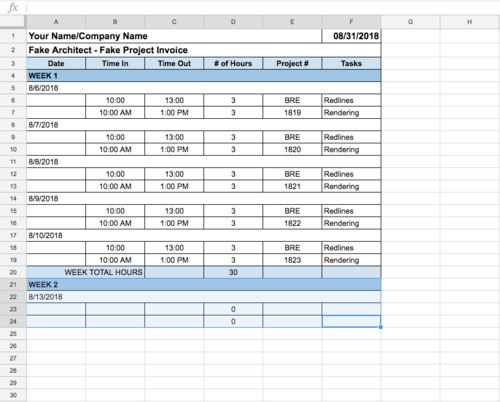
13. Drag to copy
Repeat the process of dragging box at the bottom right corner of the selected cells down 15 cells to round out the week.
14. Check your formulas
One thing I highly recommend, especially when your copying and pasting cells with formulas, is that you check all of your formulas before you start adding information. All of these formulas build off of one another so if there’s a problem with one formula, there will be problems with all the formulas that follow. Check to make sure that they’re referencing the correct cells and that the equations are correct.
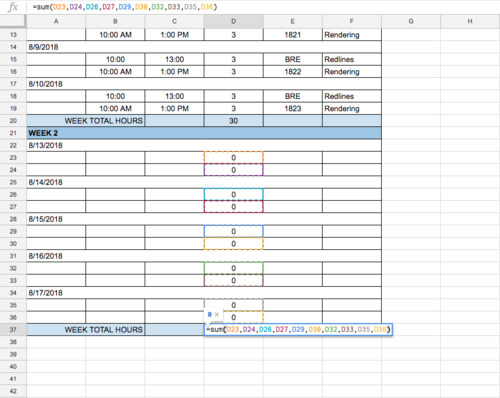
15. Total hours
Make a row at the end of your table for Total Hours worked during the billing period. Here you’ll add another formula under the # of Hours column.
Formula: =sum(D28,D37,D54,D71)
What you’re doing here is adding up all of your weekly hours to get your grand total for the billing period. As always, you can simply select the cells you want to add while holding CTRL or CMD instead of typing in the cell numbers.
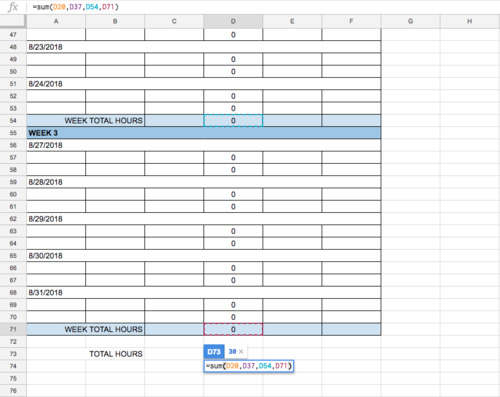
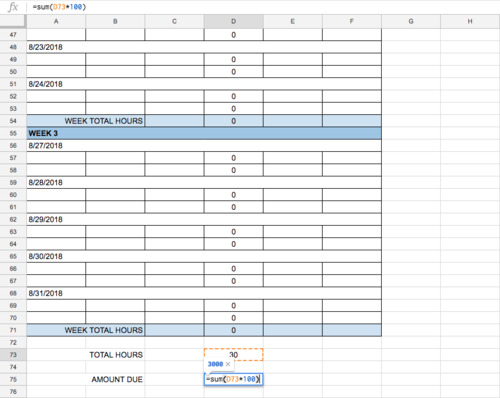
16. Amount Due
Under your Total Hours row, make a new row for the Amount Due by your client. Add another formula under the # of Hours column.
Formula: =sum(D73*100)
Here you’re finding the sum of your total hours multiplied by your hourly rate. High five if you’re making $100 an hour.
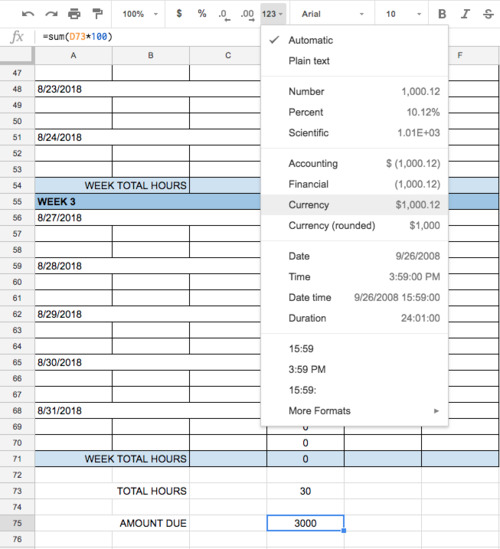
17. Change cell formatting
To ensure your amount due reads as a dollar amount, you’ll need to change the cell formatting. Go to the 123 drop down menu and choose currency. For other currencies, go to the 123 menu → more formats → more currencies.
18. Check info
Now that you’ve reached the end, make sure to recheck all of your dates, formulas, formatting and other information.

19. Send invoice
Finally, to send your spreadsheet as an invoice to your client you can simply send them a PDF of your spreadsheet. Go to File → Download as → PDF document and send as an email.
Congrats!! You made it to the end!
If you’d like to skip all of this work, you can download a copy of the template I made here!
If you don’t have the extra cash to fork over to accounting software, stick with the free spreadsheet method. It’s a solid starting point for kicking off your freelancing career that may be all you need if you don’t mind the monotony of checking, rechecking, and changing the same information over and over. For me though, the money I was wasting (from using valuable time) by accounting on my own was far greater than the small cost of Freshbooks every month. I also had another problem where I was neglecting to track my expenses because I didn’t have a system set up to do so, but it became much less daunting once I started using Freshbooks.
If this sounds like you, give it a try! The only reason you might not want to try it is because you’ll realize how much you need it and every other method will pale in comparison!

Here are the pros and cons of tracking hours and invoicing using the spreadsheet method
Pros
It’s free
Could look very professional if you spend time on the graphics
Formulas help avoid mathematical mistakes - it’s a step up from using a notebook
Very customizable
Cons
It get’s annoying constantly modifying information for each invoice
No time tracking timer
No expense tracking
Easy to make mistakes/forget to change information
Takes time to modify the template for each invoice
Takes a lot of time to get professional looking invoices
Conclusion
The biggest benefit here is that the spreadsheet method is free. That’s a huge plus for people that don’t have the extra $15 or so a month to fork over to accounting software. The other big benefit is the full customization capabilities but it will take some valuable time to get these invoices to look great. The biggest bummer about this method is the lack of automation. Everything (apart from mathematics - thank you formulas!) has to be done manually. This means you have to spend a lot of time reentering information for the changing dates, projects, clients, time entries, tasks, etc. That’s a lot to keep track of.
The pros and cons of using accounting software
Pros
Everything is automated (no tedious updating of invoice numbers, dates, etc.)
Hours can be grouped by project and further by phases
Generate invoices from hours tracked
Hour tracking timer
Payment reminders if you have late-paying clients
Online payment options
Really great customer support (speaking from experience)
Professional looking invoices
Expense tracking
Handy graphs (for us visual folk) for things like total profit, unbilled time, revenue streams, spending, etc.
Filtered view for total project hours
Set project goals
Create proposals and estimates for projects
Cons
Costs money - see pricing
Lack of customization for invoices
Conclusion
The biggest drawback for using accounting software is that it costs money. If you think about it though, it’s about the cost of one coffee per week for the month… that’s not so bad, right? If you apply your hourly rate to the amount of time you spend on accounting every month, chances are, you’d be better off spending the money on accounting software instead and saving yourself lot’s of time and mistakes. There’s so much to gain from using accounting software beyond just simple time tracking and invoicing. You gain peace of mind that your information is correct; you gain the ability to view your accounting information graphically, cleanly, and all in one place; you can create and send professional looking invoices in seconds; and you get a platform to document your expenses on the go, among many other benefits.
Ultimately it’s up to you whether or not you want to spend extra time on modifying data over and over or if you’d rather save that time and spend the money on a tool that will benefit your business.

Comments? Questions? Feel free to leave them below!
More posts you might like:
#invoice#invoicing#freelance#freelancer#freelancing#architecture#architectural designer#time tracking#time tracker#free time tracking#free invoicing#client#clients#accounting#accounting software#affordable accounting#software#google drive#excel#spreadsheet#excel spreadsheet#creatives#independent creatives#business#math#formulas#formatting#customization
4 notes
·
View notes
Text
Must Have Tools for Existing Conditions Surveys
After you do your first few existing conditions surveys, you'll start to get an idea of what types of tools you need. It's helpful to develop a routine and a method for documentation on site visits so you can make the best of your time on site, have coherent notes, and be able to get all the information you need for the project. Here are the most important tools I have found to help me on site visits and existing conditions surveys.
Flashlight
A bright, wide angled, compact, tactical flashlight* is an important tool for peeking into attics, basements, and other dark spaces. I was once on a site visit in a building without power in the middle of winter. We were down in the basement with no lights whatsoever and my iPhone flashlight did practically nothing to illuminate the space and eventually died since the temperature was so cold. The structural engineer with us whipped out his super cool compact flashlight and it was like someone turned on the sun. It was extremely bright (it made my iPhone flashlight look obsolete) and it was wide angled so we could see a good amount of what was around us without having to move the flashlight around too much. It may be useful having a headlamp* or clip your flashlight onto the bill of a hat so you can make better use of your hands during your survey. You may even want to try this crank flashlight* which has a slew of other functions as well if you're worried about running out of battery life.
Camera
Whether you use a smartphone, DLSR*, point and shoot*, or all three, pictures and videos will be one of your greatest assets on an existing conditions survey. Always take more photos than you think you'll need; you'll never be mad for taking too many photos and you can always delete ones you don't need later. Panoramas and video are super important to helping you understand a room in 3 dimensions and will help you locate photos when you're back at the office. Videos can be crucial if you're with an owner or consultant who is speaking about specific aspects of the project so you can refer to the video later if you have questions. Just be sure to ask permission first before you start filming. Two things to make sure of is that you have plenty of spare batteries* or a portable charger* and to have enough memory, so you may want to carry an extra memory card* with you.
Pens
All of the pens I use now are exclusively from Japan. From the Pilot Razor Point II* to the Pentel Sign Pen* to the Pentel Twist-to-Erase Pencil* I find that Japan is doing it right! While on site visits I find the best pen for me is the Uni Jetstream Multi Function Pen* because it's four pens and a pencil all in one! When I mark up drawings for existing conditions surveys I like to color code my notes; the best way I've found to do this is to use the Jetstream pen because I'm able to switch between multiple colors in seconds and don't have to carry around a bunch of different pens.
Measuring
Whether you're documenting existing conditions solo or with a team, it's extremely helpful to have a variety of measuring tools for different conditions. For measuring smaller things like doorways, trim, material exposure, or other things that would be tough with a laser measuring tool, it's great to have a measuring tape. Cheap measuring tapes will collapse after only a couple feet of extension, I recommend spending a little more to get a tape like this* one that will remain sturdy for at least 6 feet and one that has a magnet at the end which makes it easier to solo measure.
Laser measuring tools are AMAZING and can make surveying a building move exponentially faster than working with a tape alone. There are two things you'll need to verify before using your laser measurer: 1. Make sure it's set to the units you're working with on the tape. If you're writing your dimensions in inches only then make sure your laser is set to the same and vice versa for feet and inches. 2. The second thing to verify is the base point where the measurement is being taken from. Sometimes you'll want it to be at the bottom of the laser measuring tool, like when the bottom is pressed against the wall to get the dimensions of a room or on the floor to get ceiling heights but other times you might want it to be at the center or the top, so just be sure to set it to whatever you need and don't forget to change it back.
Clipboard
Since you'll be taking notes and dimensions and will probably be working with larger documents, you'll need a large clipboard* or sturdy surface to write on. Sometimes if you're on site for a few hours, carrying around a clipboard can be heavy so you may consider cutting a piece of foam core to the size you need and just use metal clips* to fasten your drawings to the board. Using foam core is much lighter, cheaper, and convenient, You can cut it to any size you need and can even customize it with cut out or added handles if you're fancy like that.
Paper
For times when you'll be documenting existing conditions from scratch, it can be really useful to have gridded paper* on hand to layout the building quickly. You don't necessarily have to scale your drawings on the graph paper, I just personally like to use grids to keep my drawings orthogonal and organized, but large plain paper could work just as well. When choosing a paper size, consider what size scanner you have; it's best if you can keep your scanned drawings and notes on a single page rather than have to scan them in multiple parts.
Backpack
You only have two hands and will only have so many pockets to carry everything you'll need for a site visit or existing conditions survey. I've seen people carry around messenger bags and purses but they tend to get in the way and can be awkward or uncomfortable to carry for long periods of time. Personally, I prefer to use a small backpack like this* one so I can swap out tools that I need or carry snacks, an extra sweatshirt, sunglasses, or whatever else I might need.
More posts you might like:
#architecture#site visit#existing conditions survey#survey#architecture studio#studio#flashlight#tool#tools#architecture tools#thestudentarchitect#the student architect#the student archi#architecture student#architecture supplies#camera#dslr#point and shoot#pens#japanese pens#measuring tools#tape measure#laser measure#grid paper#backpack
7 notes
·
View notes
Text
My Vermicomposting Troubleshooting Experiences
It's been almost a year and a half since I started my worm bin at the tail end of winter last February. I had just begun diving into zero wasting and was trying every which way to reduce my waste and needless consumption, and found one of the best things I could do for the earth was compost!
Why I started composting
Once I really started to pay attention to what was filling up our trash, I quickly noticed it was food waste. Some of this was food scraps from peeling potatoes or cutting off nibs of carrots and onions, and some unfortunately was food that had just gone bad before I had a chance to eat it.
To resolve the latter problem, I became more mindful of what I was buying and how much. I noticed when I went to the grocery store I would just buy the usual things without much thought. I often didn't think to check if we already had what I was buying and often didn't have a plan for the food I was buying. Now when I go shopping, I make sure to look at all the food I have and make sure only to get what I need.
I also will only buy something if I need it for a meal I have planned for that week. Planning meals has been a really important concept for me because I used to come home after work and have no idea what to make and would often be missing a couple key ingredients for things I wanted to eat. Since I plan my meals now and often cook batch meals in advance, I don't have that problem and my decision fatigued brain is very appreciative!
Now to tackle the former problem, I decided to take up vermicomposting or worm bin composting to manage the amount of food waste. Instead of throwing my food scraps in the trash to then sit in a landfill forever, this seemed like the best solution for me. Being a vegetarian, it was pretty easy for me since the worms and I basically have the same diet! They've actually encouraged me to eat healthier since they can't eat processed foods, dairy, meats, etc.
How I set up my bin
Worms escaping the bin
Just like starting anything new, the beginnings of setting up my bin was a definite learning curve.
Something to keep in mind is that it can take anywhere from a few days to a few weeks for your worms to acclimate to their new environment. This might mean that they'll stay huddled together in a corner for a while and not eat or it could mean that they try to escape in any way possible. Unfortunately, I experienced both of these scenarios.
The first couple of days they we're huddled together because they were cold (it was winter and they were in the garage) and they weren't used to their new home yet. Once they started to get settled in they began migrating around the bin in search of food and before I knew it I was overfeeding my bin and they were all trying to escape. They were climbing up the walls, huddling against the lid of the bin and trying to escape through the air holes.
Once I realized what was happening I took out almost all the food, put it in the freezer, and placed the worms back under the soil. Then I left the lid off the bin and placed a bright light directly over it for two days. Not only did this provide them with warmth, but it encouraged them to burrow back under the soil because worms don't like bright light. Don't get me wrong, take the lid off a bin that had worms desperately trying to escape it was terrifying to me and seemed totally unintuitive, but once I sat and watched the bin for about 10 minutes and saw them actually crawling back inside I felt much more confident and at ease.
Finding a feeding balance
After a few weeks, the cycle of having the worms trying to escape and being lured back into the bin finally started to subside. I was slowly learning how to balance everything from how much food to put in, how often to feed, and what to feed them. I learned pretty quickly not to put too much food in the bin at once. I learned to carve a couple of small holes out of the soil, drop in whatever food scraps would fit in, and then whatever was left over I would freeze. Then I would cover the food with soil and give the bin a spritz of water to keep the soil a moist consistency.
Tip: Freezing and thawing food actually helps it break down faster, it becomes mushy and is easier for the worms to eat!
I started out with a regular feeding schedule where about twice a week I'd add food to the bin without really paying attention to how the worms were doing breaking down the food already in there. This was another time over feeding would occur and it would be too much for them. Now before I feed them, I take a second to sift through the bin just to make sure that there's not too much food already in there.
Another issue I've had is with what I've been feeding them. Sometimes I put too much of one thing (like potato skins) and they just get sick of eating potato skins. Like any of us, worms like variety in their meals too! You'll notice they're sick of something if week after week the same food is still untouched. Now I make a point to add a variety of fruits and vegetables and freeze excess foods for a later time.
Wanting more from my bin
I'm not going to lie, it's been an amazing experience building up my worm bin from scratch and watching my food waste be transformed into nutrient rich soil - it's magic. I never thought much about how soil was formed, the decomposition process, or much else about the world around me until recently. Now that I'm starting to gain an understanding about how things work I want to know more and do more!
That being said, I've been frustrated that I'm not able to compost all of my food waste because my bin just can't keep up with it. I've decided I'm going to build another bin, an outdoor composting bin without worms, to compost the majority of my food scraps. I'm going to DIY the bin again and build this one out of a trash can and will record the entire process! Stay tuned for an update on my outdoor bin!
Maintaining a healthy worm bin
Like I said, when I started off my bin, it was a bit of a learning curve. I had to learn to pay attention to my to my worms, be more mindful of the food I was eating and buying, and learn how to manage my bin. Now that I've gone through all of this trial and error for over a year, I've figured out that my bin works best when I just let it be, occasionally add a variety of foods, and keep it a moist consistency. Your bin should never smell like anything other than soil and should not attract flies or animals. The way to avoid this is to maintain a healthy balance of green (food scraps) to brown (paper, soil, etc.) materials, cover any foods you add with soil and/or other brown materials, and make sure to put in the right foods (i.e. no meats, dairy, oils, citrus, cooked foods, etc.). Once you start really paying attention to your bin, you'll find that it's actually pretty simple to maintain a healthy environment for your worms and you can feel good about leaving valuable foods out of the landfill!
Happy Composting!
Chelsea
#composting#compost#vermicompost#vermicomposting#worm bin#worm compost#troubleshoot#troubleshooting#zero waste#organic foods#food scraps#reduce#reuse#recycle#trash#worms#red wigglers#double bin#diy compost bin#diy composting#diy
1 note
·
View note
Photo
👣 . . . . #thestudentarchitect #figuredrawing #drawing #art #artclass #sketch #pencildrawing #sketch #sketching #lifedrawing
1 note
·
View note
Photo
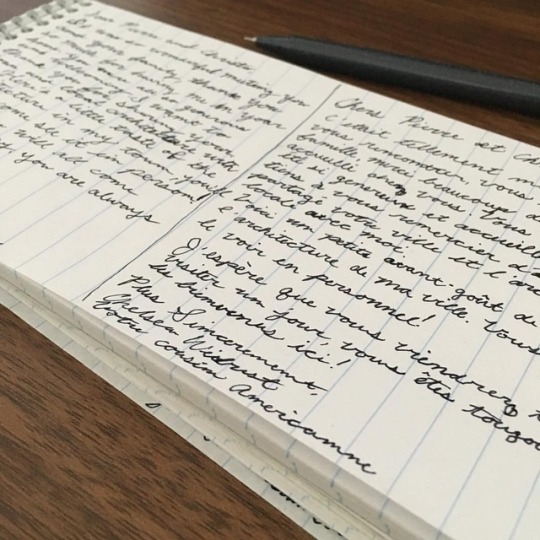
Currently drafting out both an English and a French version of a letter to a special family I met while in Paris a few months ago. I should note that I NEVER and I mean neverrr write in cursive. I write almost exclusively in all caps (a result of working in architecture), but I wanted this letter to be special and meaningful. This charming French family was so welcoming and generous and I want them to know how much their kindness meant to me. This is the fifth draft of the letter! I’m still relearning how to form and connect all the letters and I’m planning on doing at least a few more drafts until I get it right. Cursive is such a beautiful lost art and it feels like stepping back in time to write this way. It’s so fluid and forces you to slow down and be more mindful and present. Every stoke requires your full attention, I think that’s what I love about it so much. 🖋☕️
1 note
·
View note
Text
5 Resources Every Architect and Architectural Designer Needs at their Desk
There's so much more to being a great designer than drawing pretty pictures and building models.
Pretty pictures have to be accompanied by well designed spaces that not only comply with the code but also remain functional. The way to become a great designer is to gain as much experience as you can and know the right material to use as a guide. Having the right resources at your disposal is such an important element in your success as a designer, along with working under a seasoned and skilled professional.
For the resources mentioned below, I not only use them almost every day while I'm working, but I also used all of them while studying for my ARE's. Even while still in school I used a few of these books like the Ching* books and The Architect's Studio Companion* but I honestly wish I would have had all of them while in school. At any stage in your career, whether in school, a young designer, or an experienced architect, these resources are fundamental.
QUICK NOTE: When I was in college I bought most of my books on my Kindle so I wouldn't have to carry so many books around and could always have them with me. Occasionally I'm really grateful that I did that since I can reference information from basically anywhere and enjoy the benefit of being able to use the search tool to find things, but most of the time I'm kicking myself for it. For me personally, I find a lot of value in holding a physical book, physically bookmarking pages, writing notes, and being able to visually see where I am in the book. While you can do much of that with an ebook version, it's just not quite the same. Just something to think about when decided whether to get the ebook version or the physical book.
Building Codes Illustrated
Building Codes Illustrated* (BCI) is one of many amazing Ching* books. This book breaks down the International Building Code* (IBC) and explains complicated concepts through really helpful diagrams. Building codes can be hard to decipher and understand, the BCI helps to interpret the code to show how it's meant to be applied to your buildings.
Architectural Graphic Standards
The Architectural Graphic Standards* is a book that's endorced by the American Institute of Architects so you can feel confident when using the information in this book. This book not only shows you how to graphically represent materials, products, assemblies, etc. but also provides super useful diagrams for accessibility, room and fixture layouts, and human scale diagrams, among so many other things.
Wondering what supplies you'll need in studio? See my recommended supplies here!
The Architect's Studio Companion
The Architect's Studio Companion*, like Building Codes Illustrated, helps interpret the Building Code but also provides rules of thumb for sizing structural systems, explains mechanical and plumbing systems, accessibility, and sustainable design, in addition to so much more. This book contains easy to understand diagrams and tables to explain complex topics like mechanical systems.
The Architect's Portable Handbook
The Architect's Portable Handbook* is similar to the Architect's Studio Companion in that it has lots of great information about sizing structural and mechanical systems but it also has more of the "tricks of the trade" types of information. It goes much more in depth into the different aspects of a project and it's compact size makes it easy to carry around with you. This book provides guidance throughout the design phases along with baseline cost estimates that are really helpful.
Here's my list of 25 Architects you should know and why - do you know all of them?
Accessibility Guidelines
ICC A117.1-2009 is a document that's referenced by the International Building Code (IBC) regarding accessibility guidelines for buildings. While accessibility is neither a building code or a zoning code, it is required by law for buildings to comply with established accessibility standards. Accessibility isn't just for people in wheelchairs, but also for the blind, hearing impaired, and covers many other disabilities you may not have thought to consider. This book shows crucial diagrams for accessibility clearances as well as other vitally important information to help you be sure you're designing properly accessible buildings. You should also refer to the 2010 ADA Standards for Accessible Design which is another free resource for ADA standards. Don't forget to check local codes as well, as any changes made on the local level will trump these documents.
BONUS RESOURCES:
TSA Guides
The Student Architect Guides page is another great resource. From keyboard shortcuts to standard architecture sheet sizes, I've created a variety of downloadable and printable resources to help you stay on top of your game while at work or studio that you can find on the Guides page. To get the most out of these resources, place them on your desktop or print them out and pin them up at your desk for easy reference.
International Building Code
Another crucial resource you should always have at your desk is a copy of the codes applicable for your project. If you're working on residential projects you'll need to use the International Residential Code* (IRC), and for other projects you'll need the International Building Code* (IBC). Something to keep in mind though is that changes to the code can be made at the state level and can be time consuming to keep track of. Luckily though, there's a resource called UpCodes which has the codes with the state amendments written in to make the process much simpler. Another tip I have is to check out the commentary version of the code books as they help explain interpretations of parts of the code.
More posts you might like:
#thestudentarchitect#the student architect#architecture books#architecture book#architects#architecture book recommendations#recommended books#recommended architecture books#book recommendations#architecture studio#how to survive studio#how to survive architecture studio#life of an architect#life of an architecture student#studio companion#ching#ching books#building codes#building codes illustrated#international building code#architectural graphics#american institute of architects#aia#accessibility#architects studio companion#architects portable handbook#accessibility guidelines#ada standards#ada#upcodes
4 notes
·
View notes
Photo

🎥 Posted a new video this morning for How to Write a Killer Cover Letter when you’re applying for jobs and internships! You can also download free cover letter templates I’ve written over at www.thestudentarchitect.studio/guides . . Good luck with your job search and happy Earth Day!! . . . . #thestudentarchitect #howto #coverletter #jobsearch #job #internship #earth #earthday #photography #architecture #nature #video #beach #coast #ocean #walk #beachwalk
#architecture#nature#walk#beach#coverletter#jobsearch#earth#job#howto#ocean#thestudentarchitect#internship#earthday#video#beachwalk#photography#coast
1 note
·
View note