
Don't wanna be here? Send us removal request.
Statistics
We looked inside some of the posts by xiaoxinlu and here's what we found interesting.
Average Info
Notes Per Post
3
Likes Per Post
3
Reblog Per Post
0
Reply Per Post
0
Time Between Posts
5 months
Number of Posts By Type
Text
10
Link
4
Conversation
2
Photo
1
Last Seen Tumblr Blogs


Fun Fact
Tumblr Inc. has $15.1M in annual revenue.
Text
Hey Siri, should I open my window 🤔 ?
It's been pretty cool (up until recently 😒) at night and I enjoy going to bed with the windows open. I don't know what it is but for some reason, the cool fresh air and increased oxygen in the bedroom make for a night of very enjoyable sleep. 😴
I'm faced with the same question every night and that is "should I open the window?" To answer this I launch the Ecobee app on my phone, drill into the temperature sensor for the bedroom, make note of the temperature, and then look at the weather app for the current outside temperature and compare them. If it's cooler I open my windows otherwise I keep them shut. After doing this for a while I thought to myself I'm too good for this! And wouldn't it be great if Siri could just tell me if I should open my window? After all, she's a personal assistant, isn't she? It's her damn JOB!

Well, it turns out Siri can't do this. Not without help anyway. So I need to implement a solution myself. I need to get the bedroom temperature, the temperature outside, throw some logic in there, and then wire it up all up with Siri.
I need to access my thermostat programmatically and to do that I need to sign up for an Ecobee developer account. This was more difficult than I expected because their sign-up system was not working for me! At first, I thought it was my browser and I tried all the usual browsers Chrome, Safari to no avail, it was something to do with my account. I got on their support chat and thirty minutes later we figured out it was because I have 2FA enabled on my account and their signup is incompatible with it. I had to turn off 2FA within my app and then I was able to sign up.

That's great. I created an app and started reading their API page and figured out how to authenticate and get the proper tokens to make requests. After spending more time with their API I was able to pull the temperature from the bedroom sensor! Step 1 is now complete! 😁
Next, I need to get the outside temperature. In the past, I've used DarkSky's API but unfortunately, they sold out to Apple last year and their API is going to be discontinued after 2021. Bummer. I signed up for Open Weather Map API. Easy signup. Unfortunately, it takes some time for their API keys to be effective so I spend that time looking at how Apple Shortcuts work.
Easily enough. Looks like I need to set up an HTTP server. I downloaded Fastify and started playing with their routes. At this point, my weather API key works so I was able to pull the outside temperature and put it all together.

Next, I created a new shortcut and named it the question I wanted to ask Siri. So I would only need to say "Hey Siri, should I open the window" and Siri will run the shortcut and give me the answer.
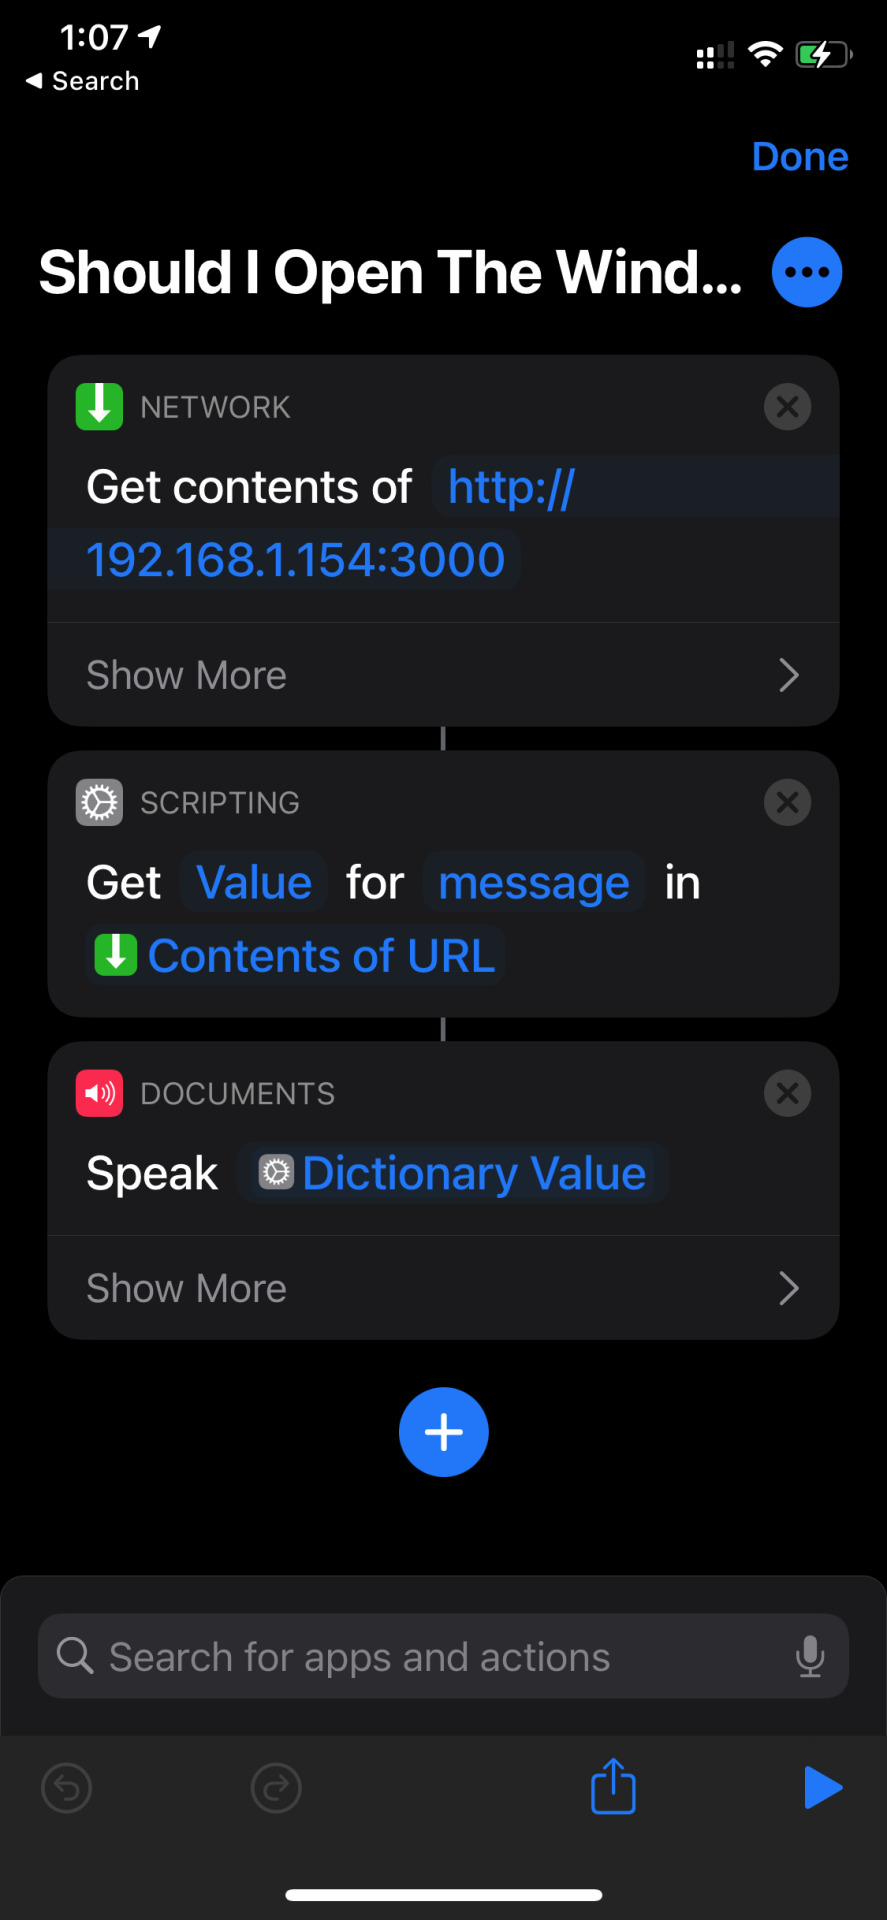
Note in the video you can't hear me say the command because the iPhone's screen recording doesn't record the sound from the mic.
This also works from the Apple watch.

The source code is here. https://github.com/hyperlink/open-window-service
0 notes
Text
Garage Door Monitor using Machine Learning in JavaScript
Last week I discovered my garage door was left open all night because my kids were playing outside the day before and forgot to close it. That was a serious security issue that needs to be rectified. So I was on a mission to solve this problem and started the safer garage project.
First I wanted to install a wifi security camera. I mounted the camera facing the garage doors so if I was concerned I could always launch the app on my phone to check the door. This was a good solution but not foolproof since I can (and probably will) forget to check every day.
What I need was something to notify me when the garage door was left open.

So I looked into coding up a solution.
Fortunately, for me, my cheap Amazon camera is capable of RTSP which is a standard protocol and so I can easily pull video/images from it. Now I needed some mechanism to recognize when the door was open and when it was closed. I had an inkling I needed some employ machine learning to accomplish this so I started googling. I discovered OpenCV, and TensorFlow and stumbled on what looked like an easy-to-use web app called Teachable Machine which is built on top of TensorFlow.JS. It's in JavaScript something I am familiar with.

Teachable Machine was great in that it's easy to use to get started. I started feeding it various screenshots of my garage door in various states (with the door open and closed and under different lighting conditions) and right away I got some very promising results.
So onward!

I downloaded the Model TM generated and tried to open it in node. Unfortunately, TM is entirely browser-based and so I was forced to do some hacking involving jsdom, and node-canvas. This was probably the ugliest part. Anyway, it's done. I started looking at pulling the images off my webcam and came upon FFmpeg which is an application that's been around forever and is pretty much the cURL of the video world. Spawn this app and get an image. Done and done! So now I have it hooked up together and it sends me a push notification when the garage door is left open.

Problem solved!

I posted the source code on GitHub and released it as a module on npm.
0 notes
Text
Customizing StartExplorer to use iTerm
StartExplorer is a useful plug-in for Eclipse. It's convenient to be able to open Finder or shell into a directory directly from Eclipse. Unfortunately, the shell menu uses the default Terminal.app while I prefer to use iTerm.
The app to open a shell is hardcoded but since this project is Open Source it's pretty easy to change it to whatever app we want. Here's how to get the shell to open iTerm instead of Terminal:
clone [email protected]:basti1302/startexplorer.git
Edit /plugin/src/de/bastiankrol/startexplorer/crossplatform/RuntimeExecCallsMacOs.java
Replace the path Terminal.app with iTerm on line 63
brew install maven
mvn clean install
copy plugin/target/de.bastiankrol.startexplorer-1.6.0-SNAPSHOT.jar to your eclipse plugin directory (replacing the original one)
Start Eclipse and enjoy!
0 notes
Text
Ubuntu! Meet your long lost son Ubuntustus.
The two embrace.
Ubuntustus unsheathe a hidden dagger and violently stabs Ubuntu. Ubuntu staggers away and says with his dying breath "Et tu, Ubuntustus?" #TheTragedyOfLinux
0 notes
Text
Moving Tabs in editors can be such a pane!
I am officially making a UX complaint about tab activation behavior in code editors.
The Problem
So lets say we have two panes next to each other in two columns.

I currently have tab A focused/activated on my right pane. I drag another tab in the same pane to the left pane.
What tab do you expect to be activated on the right pane?
Tab A right?
Nope, in Sublime Text it seems to be whatever the left most tab is currently. Now if your Tab A was the left most tab than this works well otherwise it really throws off your flow.
I have yet to see a single code editor get this right. The offenders are well known editors such as Sublime Text and Eclipse.
EDIT: Revising my previous statement after having tested both Light Table and Atom editors. They both pass the tab moving test.
0 notes
Text
sven a more Enhanced version of svn
I recently released a Subversion command line utility called sven. It's written in node.js and uses the Subversion command line client.
Reasons sven even exists
Job
It started with my new job's rather unconventional branching model with Subversion. Branching for a new feature in ProjectA look like this:
Start by branching off trunk for your feature. For example: /projectA/developers/xiaoxin/FeatureA
Continue to work on feature/task by committing into this branch
Once done and reviewed merge back to trunk /projectA/community and commit
You typically see this kind of personal branching model for distributed revision control systems such as git since personal branches are fairly cheap. Anyway, there's some overhead but I believe the goal is to maintain trunk in a stable condition by keeping the potentially unstable WIP checkins out. I'm dubious on how effective this strategy is but that is neither here nor there. Moving on and--
Away from Windows
The second reason for sven is my transitioning from a Windows to a Mac development environment. I haven't yet found a Mac equivalent of tortoisesvn. And unfortunately probably won't anytime soon.
Realizing I've been spoiled by toroise I forced myself to learn how to use the SVN command line. I had some common tasks that I did but with command line it required a lot of manual typing. I could script out every branch but it seemed having a general purpose command-line tool on top of SVN could be the solution.
CLIs with JavaScript isn't that cool?
And that's the final reason why sven was born.
Here are some Use Cases
#1 - Switch between trunk and feature branches with ease.
#2 - Branches should be created just as easily and present you with an option to switch to that branch.
#3 - Since those branches can accumulate overtime let's be able to easy delete those branches as well.
#4 - A common task is to merge your feature back into trunk. This can be easily done.
1 note
·
View note
Text
Automatically reposition your Mac's Dock after connecting or disconnecting an external monitor
My recent obsession to automate all things lead me to figure out a way to automatically move my Dock based on available screen space.
Reasoning
When I am disconnected from my external monitors I want to have my Dock on the right. The goal is to optimize vertical space since it is severely reduced on the MacBook’s own screen.
Things change once I plug in one or two external monitors. And having the Dock be on the Right of the rightmost monitor no longer makes any sense. It can go back on the bottom of the screen. Usually I would do this manually after plugging in my monitors. But we don’t like anything manual so lets fix this with an applescript!
activate application "Finder" tell application "System Events" tell process "Finder" click menu item "Position on Bottom" of menu 1 of menu item "Dock" of menu 1 of menu bar item "Apple" of menu bar 1 end tell end tell
Running this script will move the Dock to the bottom. To move to the Right simply change the String “Position on Bottom” to “Position on Right” and vice versa to the Left.
So this script solves the problem of how to move the Dock programmatically so how do we do this automatically when we connect a new monitor?
After some intense Googling I found something called ControlPlane that sounded like it would do what I wanted. Unfortunately, I was not able to get it to work correctly. It’s a very powerful app that allows it to guess the context based on state of your system but for our needs we need something simpler.
Fortunately, after more searching I found DisplayWatcher to solve my problem.
To completely automate this follow the below steps:
Go to DisplayWatcher’s site to download the app. Then install it with these directions here
Export your Applescript to two different apps (example: Move Bottom.app and Move Right.app)
Run both apps. Your Mac should prompt to add the apps to your assistive permission list. Add it.
Go to the DisplayWatcher configuration panel and add the exported app to run when it’s on it’s native monitor
Plugin your external monitors and open the configuration panel again to add the move bottom app to run
Once this is setup your mac will automatically move the Dock when you disconnect and connect your monitors.
0 notes
Link
Apple has really screwed the pooch on this one. Fortunate you won't need to do a full update and lose your jailbreak just for this fix.
0 notes
Link
I just set this up and it works really well!
First, don't bother buying the App with terrible reviews mentioned in the beginning. Instead download and run the free Proximity.
Second, pair your device to your Mac if you haven't already done so.
Then set it to run the apple script to turn on your screensaver. I have added an additional command to pause Spotify for me.
say "iPhone out of range" set SSID to do shell script "/System/Library/PrivateFrameworks/Apple80211.framework/Resources/airport -I | awk '/ SSID: / {print $2}'" if SSID is not "YourHomeNetwork" then tell application "ScreenSaverEngine" try activate end try end tell end if if application "Spotify" is running then tell application "Spotify" to pause end if
This should work with any paired device even if you have an Android.
Updated the script to only run if you are not on your home wifi network
0 notes
Conversation
A conversation I just had with my wife
Me: Feel my butt.
*drops trou*
*wife reluctantly feels butt*
Her: Okay... and?
Me: It's warm right?
Her: Yes.
Me: Now, feel my hands.
*wife feels hands*
Me: They feel cold right?
Her: yes.
Me: Well, why the hell is that!? Why is my butt warm but my hands are cold?!!
0 notes
Text
Scraping JavaScript Code
The Bug
A user of my channel Lookup extension recently left a bug in the form of a bad review. My initial reaction was a incredulous
How dare they?! Don't they know who I am?!
Then, after calming down a bit I set out to test this case and sure enough there was a bug. With certain zip codes such as 28304 and 28306 the extension would return a message that TWC did not have any lineups in this area which was not true.
How to lookup channels
My extension uses web scraping since there was not a free API I could use. I outlined the technique in a previous post.
We request the data from http://tvlistings.timewarnercable.com. And to display a list of channels with a request to this specific page:
/findTvListings/viewChannelLineUp/?headendId=:headEndId&zipCode=:zipCode
The headEndId is a variable we need from their website (zip code seems to be ignored).
When the extension is setup for the first time the user is prompted for a zip code. The extension looks up the supplied zip code by a call to
/findTvListings/?zipCode=:zipCode
The zip codes I've been testing with will spit out a list of lineups. And the system would just pick the first one and capture the headEndId. What I did not know was if there was only a single lineup in the area the server would instead send a 302 HTTP redirect and navigate them directly to the TV Listing Page. The system did not expect this and thus mistakes the zip as an area that's not supported by TWC.
Fiiiix it!
The 302 redirect is unexpected and not something I can even detect from an extension point of view since the web browser swallows redirect occurrences and sneakily hides them.
However on the TV Listing page I notice an interesting bit of inlined JavaScript code:
var dvr = {}; dvr.settings = { dvrEnabled: false, userInfo: { headEnd: "NC32401X", gmOffset: -5, availableDates: { "headendId": "NC32401X", "startDate": "20131216", "endDate": "20131223" } }, pathChannelListJson: "/digitalcable/epg/#{headendId}/channelListJson.txt", pathChannelMarkup: "/digitalcable/epg/#{headendId}/channelListHtml.txt", pathScheduleList: "/digitalcable/epg/#{headendId}/#{startDate}/#{startTime}/#{channelstart}.txt", pathBrowseTitlesJson: "/data/Json/browseList/titles.cfm", pathBrowseEpisodesJson: "/data/Json/browseList/episodes.cfm", pathEpisodesTimesJson: "/data/Json/episodeTimes/index.cfm", pathCategoriesListJson: "/data/Json/subgenreList/index.cfm", pathSearchTitlesJson: "/search/1/1/searchResults.cfm", pathSearchPeopleJson: "/search/1/1/searchResults.cfm", pathSearchEpisodesJson: "/search/1/1/programResults.cfm", pathDetailedEpisodeJson: "/data/Json/detailEpisodeInfoJson/", pathAvailableDates: "/digitalcable/epg/#{headendId}/availableDates.txt", pathFirstFilteredChannel: "/data/Json/filterChannelListJson/firstFilterMatch.cfm" };
Well, there it is! The headEndId staring right at me. I can just run this chunk of code and get the headEndId with ease. And with this ID I can request the channel list page, fix the functionality of the extension and thereby restoring my tarnished reputation!
So it looks like I will need to do more scraping and then evaling of this code. But oh wait a minute, I can't do that in Chrome Extensions because of their ever so strict CSP.
Enter Sandboxing
Fortunately, Chrome extensions do provide an safe way to use eval and new Function through sandboxing. This process involves creating a separate page that's designed specifically to run the scrapped JS code (this page doesn't have access to any extension's API) and only can communicate with the extension using postMessage. The sandbox page is exposed to the extension as an iframe.
The setup logic is now this:
Request find tv listing's given zip code
Look for the link with the headEndId
If not found, scrape the JS code and pass it into the sandbox to be executed
If the code contains headEndId return successfully otherwise call the failed handler to display an error
That's it. I hope you enjoyed scraping JavaScript. My commit can be found here. The extension is (of course) open source and can be forked here.
0 notes
Photo

Tried to feed him food that will sustain him.
2 notes
·
View notes
Conversation
Sophia: Daddy, there's hair coming out of your nose.
Me: What?!? Get it out, get it out now!
Sophia: No! Nooo! *runs away*
0 notes
Link
Apple made the natural scrolling setting linked between trackpad and mouse. This Scroll Reverser can fix the issue by allowing you to reverse the scroll direction by device and it's FREE.
0 notes
Link
This is a pretty darn useful tip.
Ever need a quick look at a bunch of pictures in one folder all at once? QuickLook is all well and good, but it's a slow-going one-photo-at-a-time.
0 notes
Text
A New Chrome Extension
I am thrilled to announce the release of my new Chrome Extension TWC Channel Lookup.
Designed for my wife in mind.
From time to time she will ask me what channel number a certain network was on and I would then go to tvlistings.timewarnercable.com and look it up. Well, now there’s an easy way for her to look it up herself directly from Chrome without having to anywhere (or ask me).

0 notes
Text
Simple Client Side JavaScript Dependency with Browserify
I’ve been holding on to this blog post for a year. So I will share it now.
I write Chrome extensions as a side project. And as my projects got bigger and bigger I wanted to manage my code better as well as sharing code between projects. I needed to add dependency management to my workflow.
This is a big deal for me because I resist change. But we should keep an open mind and I decided to experiment and try it out.
Enter Browserify
Browserify will bundle your code (concat) and handles your app’s dependencies synchronously at build time. The only API you need to use is the CommonJs require ala NodeJs
Unlike other dependency management systems that force you to specify all your dependencies upfront. You use a simple require function in your code and Browserify will figure out the dependency tree for you.
I don’t know about you but for my money’s worth there’s nothing better than adding a simple require and forgetting about it. Like any good tool it should do it’s job and then get out of your way and Browerify does exactly that.
Powerful
Browserify has some built in shims that makes it possible to use most node modules on the client side. And since you have node installed adding a new dependency is easy as
npm install <module name>
require it in your code and your done!
Seriously folks it does not get simpler than that.
If you want to make your workflow simpler and you are familiar with Grunt take a look at the grunt task grunt-browserify2
Debugging
Debugging should be easy and browserify comes with a debugging option that generates source maps. This is an option that can be configured with the grunt task mentioned above.
Browserify is simple and synchronous resource loading. And we all could use a little synchronicity to simplify our lives don’t we?
0 notes