
Artist | 30+ | WhateverestBananas without the B is just a pineapple.
Don't wanna be here? Send us removal request.
Statistics
We looked inside some of the posts by confusedananass and here's what we found interesting.
Average Info
Notes Per Post
325
Likes Per Post
225
Reblog Per Post
99
Reply Per Post
0
Time Between Posts
10 days
Number of Posts By Type
Text
17
Last Seen Tumblr Blogs


Fun Fact
Users from the US are the majority of Tumblr visitors.
Text
(ig) (cara)
#art#drawing#artists on tumblr#illustration#animation#artwork#2d animation#motion design#alive#out of spite#alive out of spite#sarcasm#irony#sarcastic#spite#petty#sticker design
4 notes
·
View notes
Text
(x)
#artists on tumblr#illustration#animation#artwork#2d animation#motion design#drawing#art#espresso#depresso#fun#funny#sticker art#sticker#retro#gif#looping gif#infinite loop#loop#perfect loop
24 notes
·
View notes
Text
(instagram)
#art#drawing#artists on tumblr#illustration#animation#artwork#2d animation#motion design#shy#not shy#relatable#introverts#funny#sticker art#sticker#looping gif#animated gif#gif#gif art#sarcastic#rude#animated illustration#my art#retro#retro aesthetic
34 notes
·
View notes
Text
(instagram)
Tutorial in After Effects under the cut.
• Create a new composition and call it Split.
• Write your text, pre-comp it, call it Text or whatever you want.
• Create a mask from the center to one side (top/bottom), change anchor point to the top.
• Bring down Scale property and unlink it, keyframe the text to go from 100% to 0% in 1s towards the anchor point.
• Cut the layer at the end.
• Duplicate pre-comp.
• Select the bottom one, click M to bring down mask properties, invert the mask and move anchor point to the bottom (so the text scales to the bottom).
• Duplicate Text pre-comp one more time. Select it, press M and delete the mask, move anchor point to the center. Create new keyframes to scale it from 0 to 100 in 1s (properties unlinked). Select both keyframes and delay it by 1 frame. It makes the text look like it’s scaling from the center.
• Change bottom and top text color by adding Fill effect to the pre-comp.
• Easy ease all keyframes.
• Select all pre-comps and duplicate them, put them at the top and put them at the back to extend your animation (or arrange in your preferred order if you’re doing a phrase like me). So far it should look something like this:
• Create new comp Wave of 10s, add your Split comp.
• Create new Solid layer, call it Map, add Gradient Ramp effect, make white at the left, black at the right and hide the layer.
• Select Split pre-comp, Right-click → Time → Enable Time Remapping and extend the layer to the end.
• Add loopOut() expression to Time Remap.
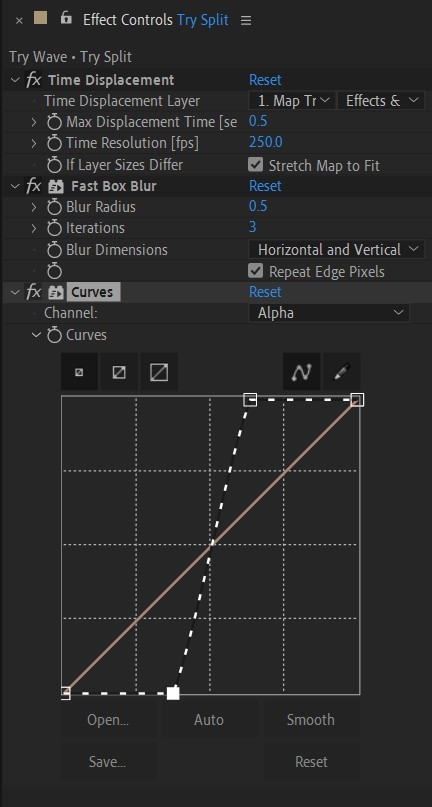
• On Split pre-comp add the effect Time Displacement, on Time Displacement Layer select your Solid layer (Map), and on Source select Effects & Mask.
• Change Time Resolution (fps) to 250-300.
• Add Fast Box Blur effect, change Blur Radius to 0.5.
• To bring back the sharpness add Curves effect, change the Channel to Alpha and change values (see screenshot).
• Play around with Max Displacement Time [sec] on Time Displacement effect depending on the look you’re going for. I set it to 0.5.
• Now this whole animation is driven by our Solid layer (Map) we created. So if you make any changes to it, the animation changes too. For example, you can change Ramp Shape to Radial on Gradient Ramp effect, and see how it changes your animation.
• I additionally added some texture on the text, used Track Matte and added wiggle(5,500) expression to the Rotation property so texture would be constantly moving. Also added some additional effects to the new Adjustment Layer on top such as Roughen edges, Turbulent Displace, Posterize Time and Noise. Let your freak flag fly - it’s a matter of taste and creativity of what you do with it. Your animation should look something like this:
#artists on tumblr#animation#artwork#2d animation#after effects#gif tutorial#art tutorial#art tips and tricks#after effects tutorial#tutorial#art#motion design#tips and tricks#tips#digital art#gif#visual art#loop#learn after effects#illustration#infinite loop#pasta#funny#pasta humor
70 notes
·
View notes
Text
(instagram)
Tutorial in After Effects under the cut.
ALRIGHT let's get into it. Straight to the point, no nonsense tutorial.
• Create a new composition 1080px x 1080px, let’s call it Design.
• Write some text, turn it into shapes (right-click → Create → Create shapes from text).
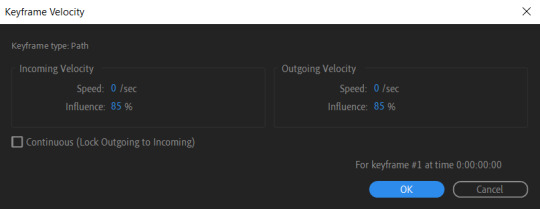
• Animate the path so the text stretches like so in a few seconds time. When animated, right-click on a keyframe and select Keyframe velocity and change coming & going velocity influence to 85%:

• Create another new composition and call it FX. Add your Design pre-comp in this composition.
• Add a new Solid layer on top, call it Displacement map. Now we’re gonna add a bunch of effects on that solid layer.
• First add Gradient Ramp. Make it so the white color would be on the right side (End of Ramp) and black would be on the left side (Start of Ramp);
• Next add a Tritone effect and change the Highlights color to black and Midtones color to white.
• Add Fast Box Blur and change Blur Radius to 100.
• Then it’s time to add Fractal Noise effect, and change Fractal Type to Swirly, Noise Type to Spline. Then bring down the Transform panel and uncheck Uniform Scaling, make Scale Width 60, and change Scale Height to a very high number, such as 10000.0.
• Add a keyframe to Evolution at the beginning, and the second keyframe at 2 seconds rotating the slider for one rotation. Add an expression loopOut() on these keyframes so it loops.
• And lastly change the Blending mode to Overlay (at the bottom of the effect).
• The last effect we’re gonna add is Turbulent Displace. Change Displacement to Twist, Amount to 150, Size 130. Add the same keyframes to the Evolution as we did previously on Fractal Noise and loop them with the same expression.
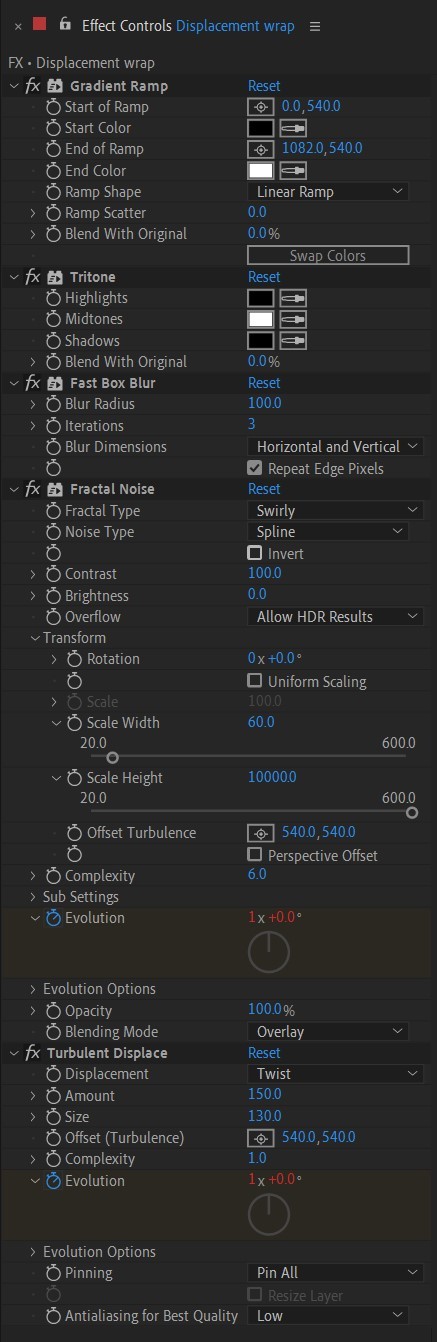
So far your work should look something like this:

• Then it’s time to add colors! Create another new composition, add your FX pre-comp to it, add a background with a new solid layer (CTRL + Y).
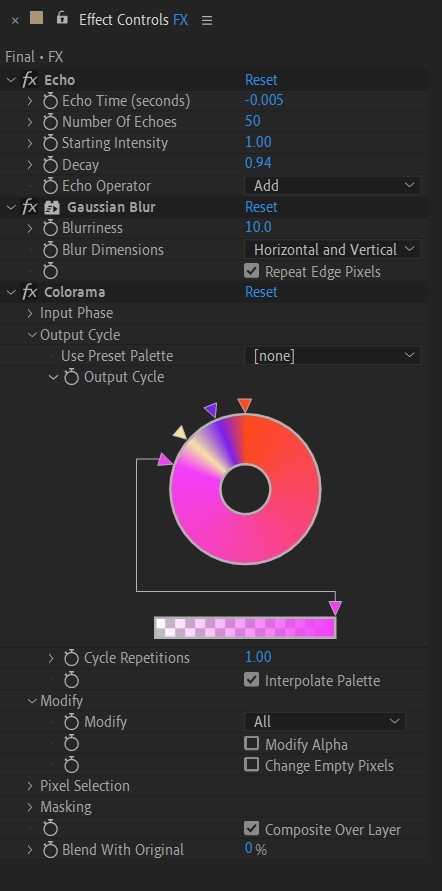
• Then add Echo effect to your FX pre-comp, change Echo Time to -0.030, Starting Intensity to 0.03, Decay to 0.94.
• Next add Gaussian Blur effect, make the Blurriness 10.
• Add Colorama effect, change Get Phase From to Alpha. Then go to Output Cycle and change the color presets (Use Preset Palette) to let’s say Solarize Red (it doesn’t really matter, we’re gonna change the colors, we just need it to have two sliders instead of a lot). Then grab a bottom slider and put it on the left side and choose the lighter color you want. I chose pink.
• Now duplicate your FX pre-comp. We’re gonna change some parameters on the effects.
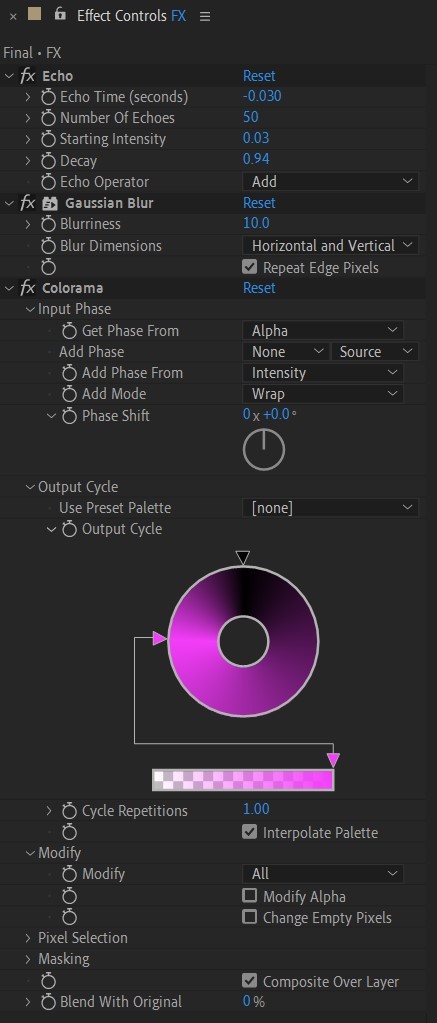
• So the first thing you want to do is change Echo Time to -0.005, Starting Intensity to 1.
• On Colorama go to Modify and uncheck Modify Alpha. Then go to Output Cycle, and add more colors like you see in the screenshot.
• Duplicate your FX pre-comp one more time and delete all the effects on it.
• Last thing to do is add an Adjustment Layer (Ctrl + Alt + Y), add the Noise effect, and make the Amount of Noise 15.0%.
• And you're done!
#art tutorial#tutorial#friday#art#motion design#artists on tumblr#tips and tricks#art tips and tricks#tips#artwork#digital art#gif#animation#visual art#loop#gif tutorial#learn after effects#illustration#2d animation#infinite loop
52 notes
·
View notes
Text
wanted to make something for the sleeping girls. enjoy my sticker art, it's close to heart.
(instagram)
#artists on tumblr#illustration#animation#artwork#2d animation#2d art#sleepy#it is what it is#stickers#sticker art#looping gif#animated gif#animated illustration#anxious
2 notes
·
View notes
Text
(instagram)
#cat#art#artists on tumblr#illustration#animation#cats of tumblr#black cat#kitty#cute cat#artwork#drawing#2d animator#2d animation#motion design#kitty cat#cute kitty
12 notes
·
View notes
Text
(instagram)
#panic attack#mental health#art#artists on tumblr#illustration#animation#artwork#2d animation#2d art#motion design#animation art#indie animation#retro#vaporwave#vaporaesthetic#gifs#my art#animators on tumblr
7 notes
·
View notes
Text
Are you?
(instagram)
#art#drawing#artists on tumblr#illustration#animation#artwork#2d animation#2d art#motion design#2d#women in art#art of the day#animation art#indie animation#animators on tumblr#digital art#retro#analog#80s synth#retro aesthetic
6 notes
·
View notes
Text
(instagram)
#art#drawing#artists on tumblr#illustration#animation#artwork#2d animation#2d art#motion design#2d#illustrated animation#valentines day#love is love#retro#goth#looping gif#aesthetic#retro aesthetic#lovers#i hate you the least#funny shit
4 notes
·
View notes
Text
The other side of this card.
(instagram)
#dark academia#cottagecore#goth#light academia#fairycore#naturecore#artists on tumblr#forestcore#artwork#illustration#animated illustration#looping gif#aesthetic#animation#tarot design#tarot deck#tarot cards#tarot#divination#art
28 notes
·
View notes
Text
Tarot card "The Moon".
(instagram)
#dark academia#cottagecore#goth#light academia#fairycore#naturecore#artists on tumblr#forestcore#artwork#illustration#animated illustration#looping gif#aesthetic#animation#tarot design#tarot deck#tarot cards#tarot#divination#art
44 notes
·
View notes
Text
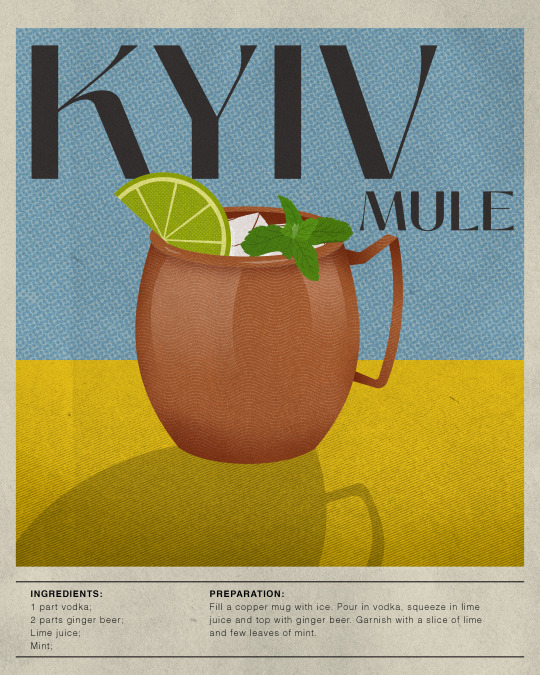
Slava Ukraini.
#art#drawing#illustration#artists on tumblr#artwork#2d art#poster art#poster design#ukraine#kyiv mule#kyiv#kyiv ukraine#fuck russia#slava ukraini#retro poster#poster#vintage poster#graphic design#graphic art#adobe illustrator#coctail#coctail hour
10 notes
·
View notes
Text
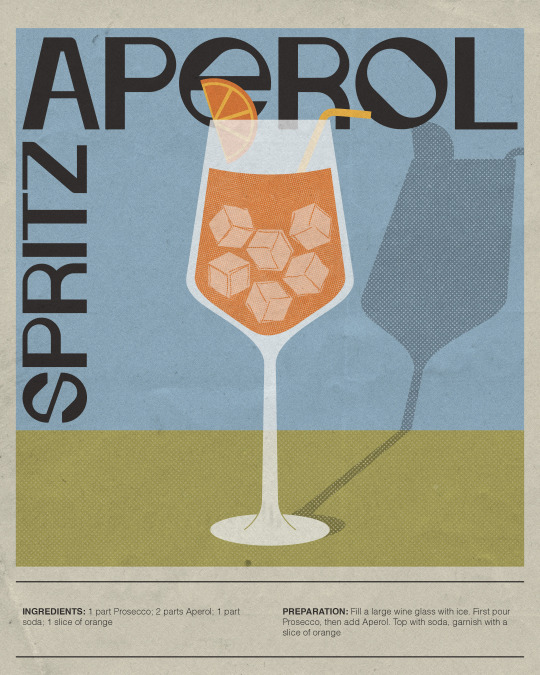
I was recording my screen while making this poster because I wanted to share it on Instagram, but rest assured I did NOT actually record 😂 sums up my latest luck in life.. anyways I'll make another one
#art#drawing#artists on tumblr#illustration#artwork#2d art#drink recipes#illustrated recipe#aperol spritz#italy#vintage poster#retro poster#digital art#art of the day#illustrative art#retro aesthetic#aesthetic
13 notes
·
View notes
Text
No.12 in my Animated Alphabet series - L.
#art#drawing#artists on tumblr#animation#illustration#2d animation#artwork#motion design#2d art#2d#typography animation#typography art#typography#typography design#kinetic typography#kinetic type
0 notes
Text
No. 11 in my Animated Alphabet series - K.
#art#drawing#artists on tumblr#animation#illustration#2d animation#artwork#motion design#2d art#2d#typography#letters#alphabet#animated alphabet#path animation#text animation#digital animation#after effects#mograph#motion lovers#motion graphics#perfect loop#looping gif#animated gif
7 notes
·
View notes
Text
That's how I imagine myself when someone says my head is somewhere else. It happens a lot.
(instagram)
#illustration#animation#2d animation#artists on tumblr#drawing#art#motion design#2d art#artwork#my art#animated illustration#looping gif#infinite loop#starry night#dreamy#dreamy aesthetic#perfect loop#falling star#dreaming#digital art#2d
8 notes
·
View notes