#Backup and Restore Tools
Explore tagged Tumblr posts
Visit Tumblr Blog
Explore Tumblr blogs with no restrictions, modern design and the best experience.
Last Seen Tumblr Blogs


Fun Fact
There are dozens of funny blogs to kill time on Tumblr.
Text
#Backup and Restore Tools#backup strategies#Cloud Storage for MSPs#Data Security#Data Transfer Solutions#managed service providers#MSP backup solutions#Multi-Location Backups#Ransomware Protection#Secure Data Backups
0 notes
Note
Give the rat a 500 lumen flashlight

i think Rat might be jealous of its brightness
22 days remain
#rain world#rainworld#rain world fanart#rw lantern mouse#lantern mouse#✼RatArt#✼Asks#ibispaint's fill tool is bugged right now and i had to restore like 3 backups when making this
16 notes
·
View notes
Note
I've just finished reading your response for the first time,
First off, thank you very much for the GIF and Video, as well as the explanations. I can definitely work with this.
I've downloaded and installed FireAlpaca for myself so I can start comparing what I'm seeing vs what is supposed to happen.
Immediately, Something stood out as weird to me: You're selecting multiple tools at once. That's... not supposed to happen. I tried it myself, Opened like 20 tabs and just started throwing colours at each canvas. This doesn't happen for me At all.
So I'm gonna give you some more instructions. (Tl:Dr for the instructions at the bottom, just above my little rant)
Backing Up your Brushes
FIRST let's make sure you don't lose all of your beloved brushes. from what I'm about to suggest.
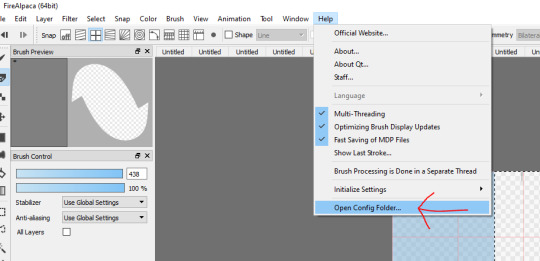
in FA, I want you to go to Help > Open Config Folder
That will lead to a folder that, for me, looks like this
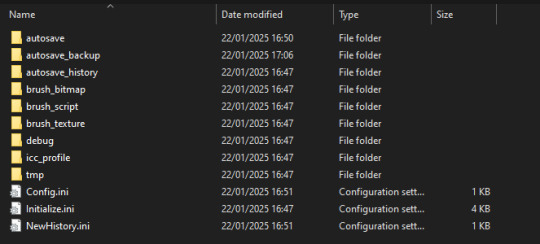
Keep in mind that it could look different for you, I have a fresh install with no cool special brushes. (also I can't draw to save my life)
Now simply Ctrl+A (select all) and copy it to another folder. go to like... Documents or Downloads or something, Make a folder called "Brushes Backup" and Paste all of it in there.
Alright, now to the actual thing I want you to do.
2. and 3. Uninstall and Reinstall FireAlpaca
There is some weird glitch I cannot Reproduce. So Just Reinstall FireAlpaca. this is the reason I wanted you to back up your brushes. Deleting the program and reinstalling will nuke all of the settings you use, so by copying the Config folder, you can easily reinstate your settings.
4. Testing
After you have reinstalled the program, I want you to open it, and mess around for however long you think it will take to trigger the glitch. (which sounded like only a few minutes) and see if something happens.
If not: Great!
If yes: You might want to reach out to https://firealpaca.com/report/ and fill out a bug report, and tell them that you have no way of reproducing the bug. (although I really think reinstalling will work)
5. Reinstating your brushes
Now, after you've made sure that FireAlpaca works, only then do I want you to Open the config folder again and put your brushes back. (simply close FireAlpaca after you've opened the folder, delete everything that's in it, and then copy everything from your "Backup Folder" into the config folder. )
6. Testing Part 2: Electric boogaloo
Then if you re-open FireAlpaca I want you to once again mess around a little and pay attention. Because the Bug might come back.
If it DOES come back, It might be one of your settings/brushes that is causing it. Which in that case I unfortunately have to suggest starting over with your brushes.
To recap: I'm asking you to:
Back up your brushes
Uninstall FireAlpaca
Reinstall FireAlpaca
Test to see if the weirdness is gone
Restore your brushes
Test to see if the weirdness is still gone
--- Rant Below ---
I have no clue what's happening to your program. This looks like some bug in the code that just causes FA to say "Nope" and stop responding to the side bar.
This acutally reminds me of a bug I've been encountering in Unity where the program refuses to open one of the UI pages in the Program's settings, which just completely shuts me out of the settings for one of the input libraries. Funnily enough it actually printed an error in my console, and the error was thrown so incredibly deep into compiled code that I was pretty sure I was reading Unity Source Code at that point.
I still don't know what's happening. Luckily I have Other People to interact with that settings page for me.
(This ask is in response to this post)
So once again I took sometime to test all this out, but unfortunately it didn't take me very long to come back with bad news.
So this is exactly what I did in this order:
I went to my config folder and copied everything into a new folder I created in my Documents tab. Then I went to my settings > apps > FireAlpaca and uninstalled. I then went to the official website and reinstalled it.
I opened up what should have been a fresh FireAlpaca and found this,

The red numbers are brushes that I have adjusted/used. And the "Fire roller (multiple colors)" and "twisted ribbon" are brushes that didn't come with FireAlpaca by default. I downloaded them afterwards from their little brush shop. For some reason FireAplaca remembered my brushes..
And of course, FireAlpaca was still breaking in the way that I've described in your last ask.
So I thought "Okay, I don't care if I lose my brushes and settings. I just want FireAlpaca to work." So I deleted that copied folder from Documents that I made, I unpinned FireAlpaca from my taskbar and deleted the desktop shortcut too just to he extra safe I guess..? Then I went to settings > apps > FireAlpaca and hit uninstall. Then went back to the website, reinstalled the latest version and wouldn't you know it,

All the exact same brushes, in the same order with the same settings. And FireAlpaca continued to break the same way.
So now I'm wondering if I did something wrong.. why does FireAlpaca keep remembering my settings? Did I do the uninstall process wrong? I wondered if that cache thing might be holding data or something? I've heard about that before. But with the help of a friend recently I cleared my Google Chrome and Laptop's caches. And FireAplaca didn't change at all and I didn't lose any of my settings. So that cant help me here..
I wonder if somehow my pen could be a problem? I've dropped it on the hard floor 100s of times. Could it be contributing? And what did I do wrong in this process for FireAlpaca to remember all my brush settings?
If anyone has any advice I would love to hear it <:(( Please and thank you very much 🙏🙏🙏
#my response#long post#I am starting to assume that FireAlpaca is just bugging out in this update#but I cant confirm that yet if I cant seem to download a fresh FireAplaca#It KEEPS REMEMBERING MY BRUSHES 😭#And I'm quick to assume I obviously did something wrong but I don't know what <:(((
77 notes
·
View notes
Text
Studio Star (Windows) & Aurora (Mac) update
Both versions include:
Build category filter in the Objects section containing doors, windows, and other items
Object dirt overlays on the Studio tab,
Support for pool, fountain, roof, exterior, half wall, and deco trims
Batch fix "Disallow CC shoes for barefoot" that replaces the disallow for towel and stops Sims from wearing custom shoes when stomping grapes or other actions that should be performed barefoot
A submenu in the batch fix section including all allow and disallow batch fixes
Batch fix to disallow for werewolves
Batch fix to disallow for all occult entities at once
Updated disallow for random to prevent aging up sims using items that were disallowed for random
A new "Browse Game Content" selection in the Tools menu that replaces the Windows Object and CAS preview cheats and introduces this functionality to Mac. The content browser also includes Build items.
Aurora (Mac) also has a new corner tab in the Wall editor
Star (Windows) also has numerous UI updates and improvements
Both versions also include many bug fixes addressing reported issues.
Important note about batch fixes: The new versions contain new and updated batch fixes. These have been tested, but it isn't possible to test them on every CC item that's been created. Please remember to check your batch fixed items in the game and only delete the batch fix backup file once you're confident the batch fix worked as intended. If you identify problems with batch fixed items, you can restore the original items using the backup. If you notice problems with a batch fix please let us know so the issue can be addressed.
As always, thank you to everyone who has made suggestions for new features and/or reported bugs. Your contributions are vital to Studio's ongoing improvement!
Choose your version to download HERE. Changelogs for Star and Aurora are in their respective download threads.
532 notes
·
View notes
Text
trying out Obsidian, my first setup, my opinions, etc.
Okay, so this is going to be a long post. Earlier this week I decided to give Obsidian a go to see if it would work for my longer writing projects. I heard some of my mutuals use it and others would like to see my setup, so I'm making a post about what I learned so far. I downloaded it three days ago so I'm sure things will change, but this is where I am right now.
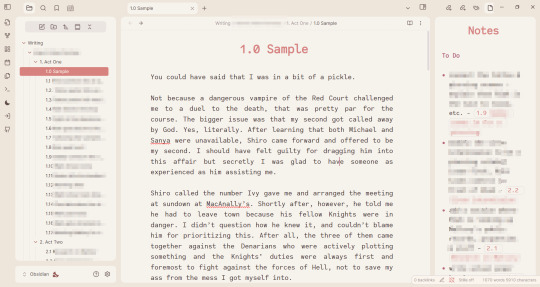
I'm shy about my WIPs so what you see there is the beginning of heart worth the trouble. But hopefully, this lets you see my folder structure and the links in the notes.
My wishlist and how I got here
I recently wrote a rambly post about writing software which got way more notes than I expected (bc the lovely @barbex reblogged it <3). After I made that post, I started using Focus Writer (again a recommendation from the writing discord) for my discovery writing in March. After more than two weeks of heavy use, I realized I needed a little bit more than that (but it's a great program).
Initially, I tried combining it with Wavemaker bc I liked that when I played around with it, but that completely pissed me off, bc it turns out it's just not compatible with other things I'm using. Like Firefox. -.-
Still, this whole ordeal made me narrow down what I really want and need from a piece of writing software at this moment. I think it's a good idea to start with such a wishlist if you are looking for a new software. Here is mine:
free
no account required, not stored on someone else's cloud, I can back it up wherever I want instead
Linux support
widely compatible file formats
focus mode, where it's full-screen, and ideally highlights the paragraph you are working on
I can make it look nice and calming on the eyes currently all I want is a cream paper background look, and a friendly monospace font changed to brown or something
clicky keyboard/typewriter noises - luckily I got this covered by Mechvibes already!
something like the card feature in Wavemaker, where I can have individual notes and choose to display them on the side. this might sound like it conflicts with the focus mode but I just want to have the option to have some notes without having to vomit them into the draft
easy to rearrange the order of the scenes
wordcount obviously
Tall order? Weird order? Maybe.
I think the most important is to figure out is how you work as a writer and find tools that match that. This is just honestly what is important for me right now.
It seems like Obsidian might just do this.
it's free
doesn't require an account
text is stored locally in markdown files
works on Linux I'm using the AppImage if you want to know
can be integrated with Github for backup & sync
tons of customization options to achieve the rest of my requirements
The Basics
If you want to use Obsidian for note-taking (or for writing fic but you're not very picky about the how), you can pretty much just download it, pick a pretty theme if you want and you're good to go. It's that easy. I promise it's not as hard as people make you believe.
This is a local-first software, which I love. However, this also means if you are not used to storing your writing locally, you need to get into the habit of backing your things up because if something happens to your computer, there is no copy of your files on the web.
That said, you can pay I think 4USD/month for the subscription and then you'll have an account, and your files will get synched to other devices, and you can restore your files. (And remember, if something is free and doesn't have ads and you have cloud storage space you didn't have to pay for... then you are the product and the company is paying for it with your data. So the fact that this is paid is actually a very good thing.)
The file structure works pretty much 1:1 as your file explorer btw
If you create a folder on the sidebar, it will create a folder on your computer.
If you create a note on the sidebar, it will create a text file on your computer.
If you drag the note into the folder on the sidebar, it will put the text file in the folder on your computer.
Each note is stored as a separate markdown file. Markdown files are widely compatible with various software so that's great. Also, you can even just rename the file to have .txt extension instead of .md extension and literally every text editor will open it for you (you will lose the formatting tho). The opposite also works. If you have a note in .txt format, you can copy it into your Obsidian folder, rename the extension to .md and it will appear in Obsidian.
That all makes it very easy to import things and switch between files to edit them.
There is only one downside to this that I found. You know how in your file explorer you can drag and drop files into folders but you can't drag and drop files to change their order? Well, your Obsidian side-bar is the same. You can choose to order them based on the name, last modified, etc. But if you want custom order, I suggest you number your notes and folders.
I feel like we're not that used to this anymore but again, this is literally like a file explorer, so it's not a big deal imo.
Another important basic concept is linking your notes. You can just right-click a piece of text and link a note, drag and drop the note into your other note, or do [[Note]] whatever you like. Then you can quickly access the other note by clicking on it, or see a preview while hovering over it (If you turned that feature on). Linking notes is also how you get those cool graph views.
I just wanted to mention all of this bc I feel like all the videos I came across on Obsidian intimidate people into thinking it's more complex than that lol
Appearance
I go a little crazy about visual optimization if you give me a chance. You can change a couple of simple things out the box. Light/dark theme, change the font, etc. I'm using a font called Code Saver for the editor (regular is free for personal use).
Then, there are the themes you can download. There are so many awesome ones! I'm using one called Underwater right now bc I liked the rounded edges.
Most themes come with a light/dark version. But if you download the Style Settings plugin, you might unlock more easy-to-customize options. It depends on the theme what you see there. The one I'm using has a couple of built-in colorways. I went with the "rose pine dawn" option and then I switched out some colors in the color pickers. If you want to mess with the colors I highly recommend finding some hex color palettes online, they make your life so much easier. You can find colors that look good together and look up a color and find lighter/darker versions instead of trying to blindly click around on the color picker.
For this theme, you can also add a background image if you want. (If you really want to make it look like Focus Writer for example ;)

Plugins
These are the plugins I'm using right now.
GitHub Sync: This is what I use to sync my progress and back up my files. I started with this before anything else, but I'm not going to go into what I did bc I don't want to make this post even more complicated. If you have a specific question about it, pls feel free to ask me :)
Focus Mode: This is a full-screen mode, very nice for writing
Stille: Dims everything but the active paragraph, again, very nice for writing. I found that the combination of these two plugins work best for me, but there are others like Typewriter Mode that can do both (I couldn't turn down the vignette mode on that one tho and it was annoying me)
Smart Typography: switches the straight quotation marks for curly ones
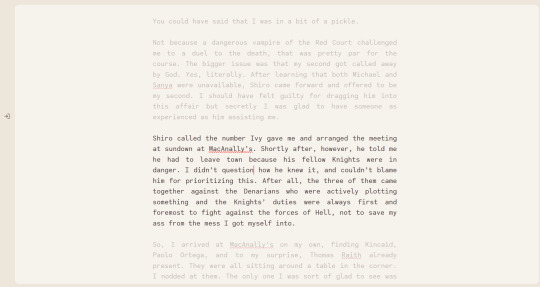
This is how it looks with Focus Mode and Stiille both on.
And lastly, a bit of a disappointment: Longform. This is the plugin that everyone seems to recommend for longer writing projects in Obisdian. Basically what it does is it can compile your individual notes into one file, and allows you to move the order of them freely, unlike the normal Obsidian sidebar. Here is a pretty good video on it.
Unfortunately, this plugin gets absolutely wrecked by synchronizing to another device.
From what I gathered, this happens regardless of what method of synching you use, meaning it happens even with the paid synching feature. You can read about this more here btw. It's a community plugin so I'm not going to be mad at the creators for not fixing this, however this means it just doesn't work for me.
If it worked on the one computer where I originally set it up, just not on the other, I would be fine with it. But I set it up on my Linux, and after I synched to my Windows, the scene list disappeared from both. (Not the actual files! It just doesn't get recognized as a Longform project anymore so it pretty much becomes useless lol)
So, I just decided to create the the same structure with folders and notes. Right now, this is a discovery draft and I don't have chapters. But I'm making a folder for an "Arc", and put the numbered scenes into them. I'm also making separate notes that I can link with stuff I want to remember/work on.
At the moment I don't require an extensive wiki where I note what each of the characters like to have for breakfast and such. But you can absolutely do that with Obsidian. You can create a folder for Characters, Worldbuilding, whatever you want, really. Put images there, links both internal and on the web and just go wild if you want.
Obviously, without Longform I will need to compile the files into one at the end by a different method, like copy-paste into one, turn them into .txt, and concatenate from the terminal, you know, depending on your comfort level xD. It will probably include more work than with this plugin, but it's not like you don't go through your manuscript about a million times anyways, am I right?
Word Count
Lastly, mentioning the wordcount options bc they are important
there is a built-in wordcount, about which the common agreement is that it's not very good lol
because of this there is a community plugin called Better Wordcount, which is self-explanatory. If you want to get the total word count, you can right-click the top folder of your project and ask it to count the words for you.
Longform also has a wordcount and it will display it like words of the scene/total words of the project if you are using that
if you don't want to have three different word counts displayed I recommend you only have one of these active (:
That's where I am right now. If you have read all this to the end, you're awesome, and also we both should stop procrastinating and go write instead :P But if you also use Obsidian for writing and have cool tips pls let me know xx
#nara's writing diary#nara rambles about writing software again#obsidian#writing software#tech stuff#long post
25 notes
·
View notes
Note
Hello Amelie, how are you? I saw that you only have 50gb of mods, how can you control it so that you don't have much? Because I have an addiction to downloading several ccs every day before entering the game 😭😭
Hello, I am well thank you! 50gb is a lot for me and I'd like to go a little lower but here are my favorite tips!

Start with Essential Mods: Begin by identifying and downloading essential mods that improve gameplay, fix bugs, or add features you really want. These might include mods for better lighting, smoother gameplay, or more control over your gameplay.
Limit the Amount: Set a limit for yourself on how many mods and CC items you want to download or what size you want your mods folder to be. This can help prevent your game from becoming too cluttered or unstable. For example, decide on a maximum number of mods or CC items per category (e.g., hairstyles, clothing, furniture).
Keep from downloading mods that are no longer maintained/updated: Before downloading any mod or CC, check descriptions to ensure they are compatible with your game version and other mods you're using. Look for mods that are regularly updated by their creators.
Organize Your Downloads: Keep your mods and CC organized in separate folders. This makes it easier to manage and uninstall items if needed. You can create folders by category (e.g., hair, clothing, gameplay mods) or creators to stay organized.
Use Mod Managers: Consider using mod managers like Mod Conflict Detector or The Sims 4 Mod Manager. These tools can help you detect conflicts between mods and keep your game stable.
Regularly Clean Out: Periodically review your mods and CC. Remove any items that you no longer use or that are causing issues with your game. Keeping your mods folder tidy can help prevent conflicts and improve game performance.
Backup Your Saves: Before adding new mods or updating existing ones, back up your save files. This way, if something goes wrong, you can restore your game to a previous state without losing progress.
Avoid Redundancy: Be mindful of downloading multiple mods that serve similar purposes. Choose the ones that best fit your gameplay style and needs to avoid unnecessary clutter.
Stay Updated: Keep your mods and CC updated with the latest versions released by their creators. Updates often fix (or create) bugs and compatibility issues.
Test Mods Carefully: When adding new mods or a lot of CC, install them in 'small portions' if possible. This makes it easier to identify which mod might be causing issues if something suddenly goes wrong.
62 notes
·
View notes
Text
Apollo Program: Lunar Module (LM) production and names
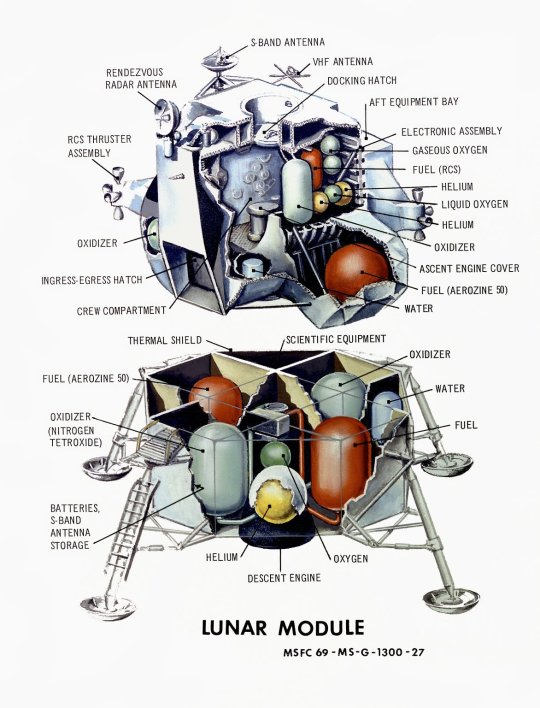
The Grumman Aerospace Corporation was awarded the contract on November 7, 1962. Originally designated Lunar Excursion Module (LEM), NASA ordered 25 lunar modules (10 test articles and 15 production models) for testing and landing on the moon. This was to go with the 15 Saturn Vs and Apollo CSMs. They were assembled in Grumman's factory in Bethpage, New York.


"There were initially four major subcontractors: Bell Aerosystems (ascent engine), Hamilton Standard (environmental control systems), Marquardt (reaction control system) and Rocketdyne (descent engine).
The Primary Guidance, Navigation and Control System (PGNCS) was developed by the MIT Instrumentation Laboratory; the Apollo Guidance Computer was manufactured by Raytheon (a similar guidance system was used in the command module). A backup navigation tool, the Abort Guidance System (AGS), was developed by TRW."
-Information from Wikipedia: link
After the Gemini 3 spacecraft was dubbed Molly Brown by Gus Grissom, NASA forbade naming spacecraft. For Apollo 9, this changed due to mission controllers in Houston needing a way to differentiate between the two spacecraft.
Between 1969 and 1972, Grumman produced a series of insignias for their Lunar Modules which were distributed in limited quantities to their employees in the form of decals and prints.

Apollo 5 (LM-1): none

Apollo 3 (and later 2) (LM-2): Never used, intended for a mission similar to Apollo 5. The success of LM-1 led to the cancellation.


Apollo 9 (LM-3): Spider
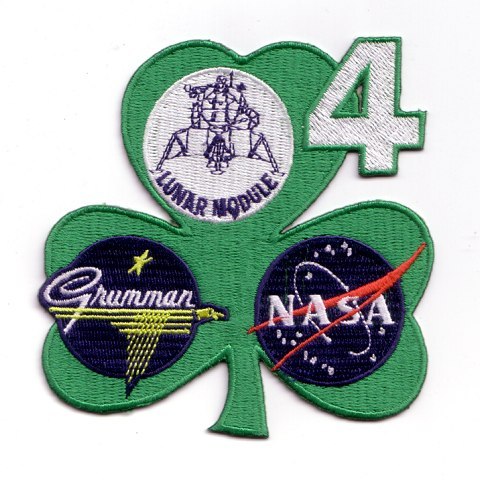

Apollo 10 (LM-4): Snoopy. The LM ascent stage in heliocentric orbit and is the only known one to have survived intact


Apollo 11 (LM-5): Eagle (originally named haystack)


Apollo 12 (LM-6): Intrepid
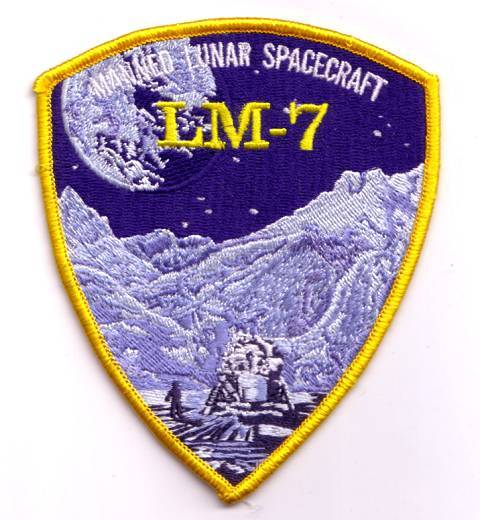

Apollo 13 (LM-7): Aquarius
Humorously, Grumman sent North American (the manufacturer of the Apollo Command and Service Module) a tow bill sometime after the crew returned. North American retorted back saying they've never sent them a tow bill for the previous missions.


Apollo 14 (LM-8): Antares.


Apollo 15 (originally) (LM-9): never used, on display the Kennedy Space Center.
Intended for Apollo 15 and was the last H-type mission. When Apollo 18 was cancelled, it was decided to make Apollo 15 the first J-type mission.


Apollo 15 (LM-10): Falcon, originally intended for Apollo 16. First of the extended stay series.
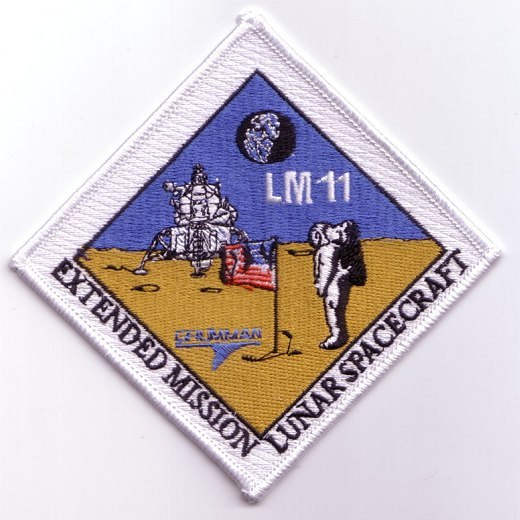

Apollo 16 (LM-11): Orion, originally intended for Apollo 17


Apollo 17 (LM-12): Challenger, originally intended for Apollo 18.
Note: this name was reused for the second operational Space Shuttle Orbiter. After the Challenger Disaster, NASA officially retired the name.
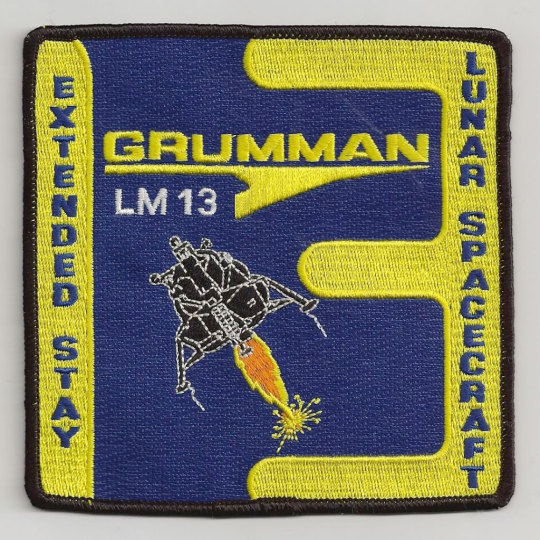

Apollo 18 (LM-13): never used, originally intended for 19. It was partially completed when Apollo 18 and 19 were cancelled. Later restored by Grumman workers and is on display at the Cradle of Aviation History and Education Center.
Apollo 19 (LM-14): never used, originally intended for Apollo 20. It was partially completed when Apollo 18 and 19 were cancelled. What was completed, was later scrapped.

Apollo 20 (LM-15): never used, partially completed, scrapped. When Apollo 20 was cancelled, it was intended for modification into the Apollo Telescope Mount. Later the Telescope Mount was integrated into Skylab and this dedicated mission was cancelled.
source, source, source, source, source
NASA ID: MSFC-69-MS-G-1300-27, S67-50927, AS09-21-3183, AS10-34-5087, AS11-40-5946, AS12-46-6726, AS13-59-8566, AS14-66-9306, AS15-88-11866, AS16-113-18339, AS17-140-21370
#Lunar Module#Apollo Program#Apollo 5#LM-1#LM-2#Apollo 9#LM-3#Apollo 10#LM-4#Apollo 11#LM-5#Apollo 12#LM-6#Apollo 13#LM-7#Apollo 14#LM-8#LM-9#Apollo 15#LM-10#Apollo 16#LM-11#Apollo 17#LM-12#Apollo 18#LM-13#Apollo 19#LM-14#Apollo 20#LM-15
252 notes
·
View notes
Text

How 3D Scanners Revolutionize Archaeology
As a science that explores human history and culture, archaeology has always relied on excavation and manual recording to preserve artifacts and cultural relics. However, this discipline has ushered in a technological revolution in recent years. The introduction of 3D scanning technology has changed the traditional way of working, making archaeological research more efficient, accurate and interactive. With its unique non-contact measurement method, 3D scanners have completely changed the way archaeologists obtain, store and analyze data, bringing great changes to cultural heritage protection.
How 3D Scanning Works 3D scanners capture point cloud data on the surface of an object through lasers, structured light or other sensors to generate a three-dimensional model of the object. These devices can perform high-precision scans of objects of various materials, from tiny artifacts to entire archaeological sites, and can be digitally preserved. Different types of scanners have their own advantages. For example, laser scanners are suitable for large-scale field recording, while structured light scanners are more suitable for high-precision scanning of delicate artifacts.
Accurately capture the details of artifacts Traditional archaeological records rely on manual measurement and drawing, which is not only time-consuming and labor-intensive, but also prone to errors. 3D scanners can quickly and accurately record every detail of the artifact and generate accurate digital copies. For example, a fragile piece of pottery may not be able to be moved multiple times, but with 3D scanning technology, only one scan is needed to generate a digital model for research and display. Researchers can observe and analyze artifacts from different angles without touching the original, thereby minimizing potential damage to the artifacts.
For example, the British National Museum used laser 3D scanning technology to record the Rosetta Stone. This method not only preserves the subtle inscriptions on the stone, but also provides a permanent digital reference for future research and education.
Site restoration and virtual display
Another major challenge in archaeology is to restore damaged or partially lost site structures. With 3D scanning technology, archaeologists can scan the remaining parts of the site and simulate its original appearance with the help of computers. This virtual restoration allows researchers to better understand the structure and use of ancient buildings. For example, after the ruins of the ancient Roman city of Pompeii were 3D scanned, researchers were able to simulate its complete layout before the volcanic eruption, providing visitors and scholars with an immersive experience.
3D scanning also enables museums to offer interactive exhibitions. Virtual reality (VR) and augmented reality (AR) technologies combined with 3D scanning data allow visitors to "touch" digitized artifacts and explore the details of archaeological discoveries. This interactive experience stimulates the public's interest in history and culture and improves the effectiveness of education.
Protection and restoration The restoration of cultural relics requires extremely high precision and meticulous craftsmanship, and 3D scanning provides a powerful support tool for the restoration process. Scanning technology can help restorers accurately measure defective parts and generate restoration plans. For example, when repairing the golden mask of Egyptian pharaoh Tutankhamun, the restoration team used high-resolution 3D scanning data to ensure that the restoration process conforms to the original structure and appearance.
At the same time, the digital model generated by 3D scanning can be used as a permanent backup to prevent natural disasters, wars or accidents from causing irreversible damage to cultural relics. For example, the ancient city of Palmyra, which was destroyed during the Syrian civil war, was partially restored through previous 3D scanning data, providing a valuable reference for future restoration work.
Expanding research perspectives 3D scanning technology is not only a tool for recording cultural relics, but also provides new analytical methods for academic research. With the help of computer programs, researchers can measure every detail on the digital model to obtain richer research data. For example, when studying the traces of use of ancient tools, using 3D scanning models can magnify tiny wear details, and can also be used with an all-in-one 3D scanner to help scholars understand the purpose and frequency of use of tools.
In addition, similar artifacts unearthed from different locations can be compared through 3D scanning data to analyze the similarities of their design and manufacturing techniques. This method provides a new perspective for the study of cross-regional cultural exchanges.
Unlimited possibilities in the future With the continuous development of 3D scanning technology, its application in archaeology will become more extensive
13 notes
·
View notes
Note
After I deleted a bunch of projects (thankfully non-critical, though representing a great deal of work in total) during a recent fresh OS install, I realized that my backup practices are practically non-existent. Any tips or sources on getting started making, and eventually automating, effective backups?
I am stealing the concept here from jwz's backup guide, but I am recommending different tools, focusing on personal files only, and also addressing Windows. jwz's guide is a good reference:
Doing a way, way better job than most people of backing up one single system is very easy. Let us begin.
The most basic step of having decent backups is getting your hands on two external hard drives at least big enough to hold your entire system, and putting a label on them that says "BACKUP ONLY DO NOT USE FOR ANYTHING ELSE I AM BEING FOR REAL HERE"
Once you've got those, plug one into your system wherever it spends the most time. If you have a desktop then that's solved, if it's a laptop hopefully you already have a USB hub you plug it into when you sit down to work or whatever and you can just leave it there.
Now set up regular scheduled backups to that device. On Windows and Mac, there's a built in tool for backing up your system to an external drive. We'll assume that you just want to back up your user files on Windows and Linux, since doing full system backups isn't tricky but is kind of unnecessary.
(Ugh. Windows seems to be trying to phase out Windows Backup and Restore in favour of their File History thing. That's annoying, let me log in to windows and check how this actually works. Mac in the meantime)
Mac has Time Machine. Time Machine is extremely good, and you can tell Time Machine to save its backups to a disk. Point Time Machine at your external hard drive and tell it to schedule a backup however frequently you want. If anything goes wrong in the future, you can ask Time Machine to look at that backup disk and it'll show you a few versions of whatever you backed up there. I'm not a Mac user but I think you can even use Time Machine to transfer between an old computer and a new one.
Windows now has File History which I have never used in my life, they added it after I stopped using Windows. Same idea though, pick some folders and back them up to an external storage device. If anything goes wrong, use File History to go back through that device and find the version of the file you wanted. I don't know if there's still a way to access the older Backup and Restore system.
On Linux, my favoured way to manage simple desktop backups is Deja Dup, a GUI for Duplicity. Duplicity can do a lot more than just backup to a disk, but we'll start there. Install Deja Dup, open it up, and follow the prompts to back up your user files to the external drive. Deja Dup can also do backups to remote storage servers, Google Drive/Onedrive, and commercial storage providers like Amazon and Backblaze. It will even encrypt your backups if you are worried about Amazon spying on your files or whatever. If something goes wrong, point Deja Dup at your backup drive and it will offer you a suite of restore options covering a few versions.
Now, you have a permanently plugged in hard drive that will always get rolling backups you can restore from. These aren't safe from, say, ransomware, or your house burning down, but at least you won't lose anything when you update a computer or accidentally delete something and have an ohshit moment.
Now you take that other drive you bought, and do the same backup you're already doing to that. Now you go put it somewhere else where it's readily accessible and won't be accidentally used for anything, keep it at the office, give it to your dad, whatever. Set a reminder on your phone for once a month. Once a month, go get that drive, run another backup, and put it back. You now have better backups than many medium sized businesses.
This is impractical to scale beyond one PC, but if we're being honest even when I had like half a dozen laptops, only one contained much of value. Back up the system you care about.
Don't worry too much about making sure your backups are space efficient, like, yeah it would be a good idea to exclude game installs and stuff from your backups to save space but if that sounds daunting or time consuming literally do not do it. Decision paralysis is brain poison, just back it up and sort it out later. 2TB external hard drives are cheap.
FURTHER STEPS YOU CAN TAKE:
Easy Cloud backup: Backblaze personal backup on Windows and Mac is $6/month and pretty easy to use. If you are struggling to keep track of a monthly remote backup, or you want an easy remote backup. Backblaze is a reasonably reliable company and one of the Go To Companies in the world of data reliability. Yes, it's a cloud subscription. If you don't want that don't use it.
Network backup: If you have access to a storage server, that can be a good way to make a remote backup without having to shuttle disks around. That could be a physical server if you maintain some kind of lab, or it could be a cloud storage provider like Backblaze B2 or Onedrive or whatever. Deja Dup specifically supports backing up to a lot of different network storage providers, and even if you only have a fifty or sixty gigabytes of network storage on hand, your most essential personal files can probably fit in there.
Drive failures: Eventually one of your drives will fail, either your storage drive or your backup drive. If the storage drive fails, well, that's what the backup is for, go get a replacement and restore from the backup. If your backup drive fails, well, that's why you have two of them. As soon as humanly possible go get a replacement drive, and substitute it in for the dead one.
101 notes
·
View notes
Text
Making Your Own Website
To follow up on the last reblog... for those HTML/CSS curious:
༼ つ ◕_◕ ༽つ Neocities
Free site hosting, community-based (if you want it), and a great place to start out and play around with coding your own site. I have a Supporter account there (very reasonable hosting cost) and host all of my HTML sites/blogs with them.
However, I keep backups of all my HTML files/images on my own computer - and backups of my backups!
In fact, I was able to recreate a FFIV fan website I last updated in 2004 (not a typo) because I still had my backup files from those days. All I had to do was upload the files to a host, do a little clean up, and there you go! Site restored from almost 20 years ago!
༼ つ ◕_◕ ༽つSite making resources I've gathered
There's tons of HTML resources out there besides this!
Plus, if you just want to type straight into something like Word/Google Docs and convert writing to HTML (or copy paste from another source), there's this great HTML conversion tool I use all the time!
If you do join Neocities, or have a page there, let me know and I'll give you a follow. :)
137 notes
·
View notes
Note
Do you know any way I could move my playlists out of spotify and onto a different app/website?
Hello ! I have Oh So Many tools for you >:D
Migration
Firstly, the simple migration tools. There are multiple services that allow you to do that, depending on the target platform. Here's the ones for Apple Music and Youtube Music. Deezer have their built-in tools.
I don't know many streaming services, but I would recommend using Youtube Music : with the help of Newpipe or alternatives, you can listen to your playlist with no ads for free :) And you can mix in youtube videos in your playlists - very cool when a specific version of a track isn't on streaming services ! Plus Newpipe has a very handy download tool
Download
Secondly, I wanna talk about downloading. Having your own library with the files accessible anytime are a must, to my sense. It will greatly improve your battery life and reduce your mobile data usage. And you can keep them your whole life !! Make mixtapes on CDs for your friends !!! And- ok let's get to the point
From other services
The go-to tool for downloading music and videos is yt-dlp. It's the base of most DL tool out there ! The vanilla version is a command-line tool, but there's a few apps with an interface. If you're on PC, I like to use Parabolic for that. I *think* LibreTube has batch download ? NewPipe only has single download. Seal does it but is a bit clunky.
From Spotify
Spotify is infamous for being very good at protecting its files against download. They make breaking changes regularly, making it hard to find reliable, durable tools. Usually, the solution is to hack into the official Spotify app, and get the data from there. On PC, you can use OnTheSpot to hook into the official app. You can also mod the official app with Soggfy (windows only). I wasn't able to find any working Android app as of April 2025. Seal used to do it but not anymore, and popular options are discontinued or getting sketchy.
There are also tools that allow you to download music from CSV files
Backups
Finally: Backup !!! Your !!! Playlists !!! While pretty unlikely, it is possible that you may lose access to your account for one reason or another. Playlist.cloud (the very first link) allow you to do that. If anything goes wrong, you'll be able to restore all your playlists from these CSV files !
If you want to go even deeper : Soulseek is the gold standard for peer-to-peer music sharing (use an interface). With community scripts, you can even input your CSV list and have it downloaded.
ℹ️ Why should I trust any of these apps ? Github links are scary
A very wise consideration ! Some of these apps I used myself, so I can vouch for them. The rest is taken from FMHY (Free Media Heck Yeah), **the most comprehensive resource for piracy and free media access**. Here are the quick links to Migration and Download. I cannot overstate how good this resource is. Read it, bookmark it, this will be your best ally for the years to come !!! All recommendations on this website are curated by experimented communities. They are mostly safe and up to date.
Closing thoughts
Thank you for your patience ! I spent a lot of time researching this answer, so the information would be as useful, complete and accurate as possible. Tech companies makes it as hard as possible to escape them, so this can be an arduous journey. I hope this will be helpful, and your migration will be smooth !
Love and Piracy <3
5 notes
·
View notes
Text
Unlocking Mysteries: How Forensic Biology & Serology Solve Crimes

In the corners that have not been explored, that's where you find the answers, which you may be looking for. From the set of fields Forensic Biology & Serology forensic science which took a couple of years to evolve, has today undoubtedly given to investigators methods, which they could easily and very precisely be sure of. Bio and Serology are the areas of the criminalistics science, which concern not only with the answer to the questions of where and when but also with the so-called "who." The world has witnessed the incidence of the wrong people being jailed or their executions just because of wrongful conviction, which only high-quality forensic evidence-based justice systems can help avoid.
This article will explain to you the process by which Forensic Biology and Serology combine their efforts to clarify the situation, using the usual real-life procedures that are also easy to grasp for beginners who are not educated in forensic science.
What is Forensic Biology & Serology?
The term Forensic Biology & Serology relates to the scientific study of biological evidence used in criminal investigations.
Bio forensics is the branch of the science of forensics that deals with the identification of the DNA, cells, tissues, bones, and hair of the individuals who are the possible perpetrators or victims of a crime.
Serology applies to us finding the source of a stain such as blood, saliva, or semen.
When a crime is committed, there is usually potential evidence at the scene. The expertise of the analyst in the use of Serology and Forensic Biology can reveal who was the victim of the crime, identify culprits, and in the process, they can also prove the innocence of some of the victims. The technological advancement of the crime scene investigation domain has led to, for example, micro quantities of biological material being beneficial to the investigation.
Thanks to the modern developments in forensic science, skin cells, tiny traces of blood, etc., that used to be impossible to get prints, are now potential sources of evidence that can be used in an investigation.
If you've lost ransomware data, recovering it can be a challenging process, but there are strategies to help. First, ensure that the infected system is isolated to avoid further damage. Utilize backups to restore your files, or reach out to professionals who may offer decryption tools. In complex cases, you may need to apply forensic techniques to track down traces of compromised data. Forensic Biology & Serology methods, while traditionally used in criminal investigations, can sometimes be adapted to analyze digital evidence and identify the origin or alteration of files, helping you recover lost data securely.
How Forensic Biology Aids in Criminal Investigations
In most cases, the invisible that can solve the mystery to itself can indeed be seen through the use of a microscope. Forensic Biology and Serological research can bring out those hidden traces of evidence.
DNA Profiling: A Mute Testimony
DNA is one of the biggest game-changers in the domain of crime investigation. Each individual possesses a unique set of genes and by employing contemporary methodologies, DNA technology can take DNA samples from extremely inconspicuous sources such as a hair, or some saliva, for example.
According to the domain of Biology and Serology in Forensics, DNA profiling is like unimpeachable evidence, which, however, is exclusively based on science. If it's a case of convict to evidence relation or alienating suspects, DNA has become one of the most effective forensic evidence due to its reliability.
Instances when DNA obtained from deteriorated samples can still be used for identification and in the pursuit of justice, even some decades after a crime has taken place are the results of these technical advances.
Biological Traces Detection
A lot of times, pieces of evidence are not visible to the naked eye. Crime scene units who are engaged in the field of Forensic Science: Biology & Serology with the use of chemicals, nature light, and microscopic studies, can retrieve latent biological elements.
Tools such as flushing, an example of blood on a washed territory, or fine saliva droplets can be detected through the use of these devices ensuring that there will be no traces that can be ignored and in the end could be crucial to being missed out.
The Importance of Serology in Crime-Solving
While Forensic Biology delves into DNA and cellular structures, Serology is a source of the valuable information that helps in solving crimes.
Blood Typing and Pattern Analysis
If DNA testing is not possible or gives an inconclusive result, blood typing can still be informative in finding a solution to the case.
The examination of the blood can give information on many points, for example, a struggle, or what direction the blow was delivered, etc.
People, skilled in Serological and Biological Forensics are capable to understand the patterns and provide the necessary information that can positively or negatively corroborate a witness's words.
Identifying Bodily Fluids
In investigation of sexual assaults and physical aggressions, finding out the presence of bodily fluids and their type are important matters.
The respective domain of Forensic Serology and Biology carries out the necessary testing to detect the sexual assault, namely the presence of sperm, vaginal secretions as well as the saliva and be sure about the perpetrated crime.
Through the analysis of these fluids, the time and areas of contact between different individuals are established, thereby the investigation is further supported in regard to the integrity.
Real-World Impact: Success Stories from Forensic Biology & Serology
Through the careful use of Biological and Serological Forensic Analysis, many cases have been solved in a methodical way over the years.
Here are a few cases:
Solving Cold Cases: Once with no evidence, these were cases left to be forgotten and abandoned, now they are minutely reopened. Old biological samples, that have been kept for years, are re-examined by modern methods which leads to the detection and conviction of unknown suspects.
Exonerating the Innocent: The analysis done in the projects at Forensic Biology and Serology has been a factor in correcting mistakes that were made in the past and that have wrongfully accused a certain party, thus, upholding the belief that forensic science is not just about guilt or innocence, but also the truth.
Such true-to-life examples underline the importance of forensic science as a foundation for criminal justice in today's world.
Building a Career in Forensic Biology & Serology
For those who find fascination in science and justice, following a career in Forensic Biology & Serology can be a very meaningful and exciting path.
Specialists are in demand for the various roles such as:
Forensic Biologists: They are the professionals who are responsible for the examination of the tissue, DNA, and cellular material that are collected in laboratory operations.
Forensic Serologists: They are the individuals in the field of forensic science that are specialized in recognizing and studying the body fluids found at a crime scene.
Crime Scene Technicians: These are field experts who are responsible for collecting and preserving biological evidence.
Conclusion: Science and Justice Move as One
With the help of some of the forensic branches like Forensic DNA & Serology, precision and science that exists through the latter, secrets are revealed, and justice is reached with a fervour
The rising technologies besides the one mentioned above, are proving the competences of forensic experts, that they are faster, more accurate and are making it difficult for the offenders to be hidden.
Every little drop of blood or exiguous DNA segment can really bring on some implications, and at last, through science, that is making the real difference is being exposed.
2 notes
·
View notes
Text
In today’s digital world, our smartphones are more than just devices—they're personal storage units for our lives. From treasured photos and confidential videos to sensitive contacts, private notes, and login credentials, we rely on our phones to keep it all safe. But what happens when that privacy is compromised? Whether it’s by someone snooping through your phone or a hacker trying to gain access remotely, your personal information could be at serious risk.
If you’ve been wondering how to protect your personal information from hackers, one tool that stands out for everyday users is SafeCalc. It combines powerful privacy features with a smart disguise—appearing as a simple calculator app on your phone. Let’s take a closer look at how this clever little app can protect your digital life without drawing any attention.
Hidden Photo and Video Vault
Most people store photos and videos that are deeply personal. These could be family moments, travel memories, or even private clips not meant for public eyes. SafeCalc offers a hidden vault that locks away your media files securely. Only you can access them using a private code, and because the app is masked as a calculator, no one would ever suspect it contains sensitive content.
Whether you're worried about someone borrowing your phone or concerned about data theft, keeping personal media secure is a solid first step in defending against privacy invasion.
Keep Your Contacts Truly Private
Some contacts are best kept confidential—close friends, work-related connections, or other sensitive relationships. SafeCalc includes a hidden contacts feature that stores important phone numbers away from your default contact list. This means even if someone is casually browsing your phone, these contacts won’t show up.
In cases where you might be dealing with business competitors, concerned about digital tracking, or just value your privacy, separating your personal contacts from public ones is a smart approach.
Secure Notes and Private Thoughts
We often jot down thoughts, ideas, reminders, or personal plans in our phone’s notes app. Sometimes these notes include access information or deeply personal content like journals or affirmations. SafeCalc features a secure notes locker that helps you keep this information under digital lock and key.
Unlike standard notes apps, the locker is encrypted and discreet. No icons, no flashy design—just a calculator on the surface and a secure storage zone underneath.
Smarter Management of Login Details
One of the most common habits that puts people at risk of hacking is using the same login details across multiple sites or apps. Remembering all your different usernames and access codes can be overwhelming, which leads many to cut corners. SafeCalc offers a protected area where you can store your login information, safely encrypted and easy to retrieve when needed.
This is especially helpful for people managing several online accounts, including work platforms, streaming services, and banking apps. Instead of using insecure options like writing them down or reusing old combinations, you can store them safely using a tool like SafeCalc.
Private and Secure Web Browsing
Your browsing history can reveal a lot about you—what you're searching for, where you're going online, and what kind of content you're consuming. SafeCalc includes a private browser that allows you to explore the internet without leaving behind traces like history logs or cookies.
This is ideal for those who value anonymity online, are researching sensitive topics, or simply want a more secure way to browse. It’s a practical solution for staying safe from trackers and minimizing the risk of phishing or targeted hacking attempts.
Built-In Backup and Restore Features
Even if you’ve locked everything away securely, there’s still the possibility of losing your phone or experiencing a technical failure. That’s why SafeCalc includes backup and restore capabilities. All your hidden content—photos, notes, contacts, and login data—can be saved securely and recovered when needed.
This feature offers peace of mind, especially for users who depend on their device as their primary storage. Backing up personal content is one of the most effective ways to safeguard against both hackers and accidental loss.
Why Use SafeCalc for Personal Security?
Unlike typical vault apps that are clearly labeled and attract curiosity, SafeCalc blends in perfectly. It functions like a normal calculator, making it an ideal choice for anyone who wants protection without drawing attention. The app is also designed with simplicity in mind—no complex settings or technical steps, just effective privacy in a user-friendly format.
It combines the power of multiple security apps into one: a photo and video vault, a hidden contact list, a secure notes locker, a login manager, and a private browser—all housed in an app that looks like a basic calculator.
For users looking for a discreet and effective way to safeguard their digital life, SafeCalc has become a trusted companion. Whether you’re worried about hackers, nosy friends, or just want more control over your personal data, it offers a comprehensive solution that fits right in your pocket.
2 notes
·
View notes
Text
What to Expect During the Water Damage Restoration Process with RestoPros
Introduction
Water damage can strike unexpectedly, often leaving homeowners feeling overwhelmed and uncertain about what comes next. From a burst pipe in the dead of winter to unexpected spring water damage after heavy rainfall, the effects can be devastating. Fortunately, with the right help from a professional water damage restoration company like RestoPros, you can navigate this challenging situation with confidence.
In this comprehensive guide, we’ll explore what you can expect during the water damage restoration process with RestoPros. Whether you're facing minor leaks or significant floods, our aim is to equip you with knowledge and insights that will ease your worries and help restore your home to its former glory.
Understanding Water Damage What is Water Damage?
Water damage refers to the destruction caused by water intrusion into materials or possessions. This could stem from various sources, including:
youtube
Burst pipes Flooding Roof leaks Sewage backups
Each source presents unique challenges and requires tailored approaches for effective restoration.
youtube
Types of Water Damage Clean Water Damage: Arises from clean sources like broken pipes. Gray Water Damage: Comes from sources like washing machines or dishwashers; it's not safe for consumption but isn't highly contaminated. Black Water Damage: Contains harmful bacteria and requires immediate professional attention—sources include sewage backups. The Importance of Quick Response
Did you know that the longer water sits in your home, the more extensive the damage becomes? Mold growth, structural weakening, and increased repair costs are common consequences of delayed action. That’s why contacting a trusted water damage restoration company like RestoPros as soon as possible is crucial.
What to Expect During the Water Damage Restoration Process with RestoPros Initial Assessment https://www.restopros.co/tx-houston-north/services/fire-smoke-damage/ Step 1: Contact RestoPros
When you call RestoPros, our team will gather essential information about your situation. Questions may include:
What type of water caused the damage? How long has it been since the incident occurred? Are there visible signs of mold? Step 2: On-Site Evaluation
Once we arrive at your property, our skilled technicians will perform a thorough inspection. We utilize advanced tools such as moisture meters and thermal imaging cameras to identify hidden pockets of water.
Planning and Documentation Step 3: Creating a Restoration Plan
After assessing the situation, we’ll develop a detailed restoration plan tailored to your needs. This step includes discussing:
Estimated costs Timeframes Necessary equipment
We believe in transparency; hence you'll receive a clear outline of what to expect moving forward.
Step 4: Insurance Coordination
If applicable, we’ll assist you in filing an insurance claim. Our expertise allows us to handle paperwork efficiently whil
youtube
2 notes
·
View notes
Text
How VHS to Digital Conversion Works: A Step-by-Step Guide for Alexander Heights Residents
In today’s digital world, many people in Alexander Heights still have old VHS tapes filled with treasured memories. However, VHS tapes are susceptible to deterioration, and VCRs are becoming obsolete. Converting VHS tapes to a digital format is the best way to preserve these precious moments for future generations. Here’s a step-by-step guide on how VHS to digital conversion works and why it’s beneficial.
Step 1: Assess Your VHS Tapes
Before starting the conversion process, gather all your VHS tapes and check their condition. Look for:
Signs of mold, dust, or physical damage.
Faded labels or missing information about the tape’s content.
Signs of tape degradation, such as warping or sticky residue.
If the tapes are in poor condition, professional restoration may be necessary before conversion.
Step 2: Choose a VHS to Digital Conversion Method
There are two primary ways to convert VHS to digital:
DIY Conversion Using VHS-Digital Equipment
Requires a working VCR, a capture device (USB video converter), a computer, and software.
The VHS tape plays on the VCR while the capture device records the video onto your computer.
Requires manual editing and file formatting.
Professional VHS to Digital Services
Professionals use high-quality equipment to ensure better video and audio quality.
They offer additional services such as video enhancement, noise reduction, and cloud storage options.
Ideal for those who lack the technical expertise or equipment.
Step 3: Preparing the Equipment
For DIY conversions, ensure you have:
A VCR in good working condition.
A USB video capture device that connects the VCR to your computer.
Conversion software (e.g., OBS Studio, Roxio, or Elgato Video Capture) to record the video.
Adequate storage space on your computer for digital files.
For professional services, you simply need to drop off or mail your tapes to the service provider.
Step 4: Connecting and Capturing the Video
For DIY conversions:
Connect the VCR to the Computer – Plug the RCA cables (red, white, yellow) from the VCR into the capture device, then connect the device to your computer via USB.
Launch the Capture Software – Open the software and set the video resolution and format (MP4, AVI, MOV, etc.).
Play the VHS Tape – Start playing the tape while the software records the footage in real-time.
Monitor the Process – Ensure the audio and video sync correctly and make adjustments if needed.
Step 5: Editing and Enhancing the Video
Once the video is recorded:
Trim Unwanted Sections – Cut out blank spaces or static noise.
Enhance Quality – Use software tools to adjust brightness, contrast, and color correction.
Remove Background Noise – Some software allows for noise reduction to improve sound quality.
Add Titles or Chapters – Organize videos into sections for easy navigation.
Professional services often provide these enhancements automatically for optimal quality.
Step 6: Choosing a Storage Format
After editing, save your digital files in a preferred format:
MP4 – Best for universal compatibility.
AVI – High quality but larger file size.
MOV – Ideal for Apple devices.
Consider multiple storage options:
USB Flash Drive – Portable and easy to share.
External Hard Drive – Suitable for storing large video collections.
Cloud Storage – Offers remote access and backup security.
DVDs – Traditional but may not be as future-proof as cloud storage.
Step 7: Organizing and Backing Up Files
Create folders labeled by event or year.
Store files in multiple locations for extra security.
Consider cloud services like Google Drive, Dropbox, or OneDrive for remote access.
Why Convert VHS to Digital?
Prevents Tape Degradation – Digital files do not degrade over time.
Saves Space – Eliminates the need for bulky VHS tapes.
Easier Sharing – Share videos with friends and family via email or social media.
Enhances Accessibility – Watch videos on modern devices like smartphones and smart TVs.
Final Thoughts
Converting VHS to digital is a crucial step in preserving your most treasured memories. Whether you choose DIY conversion or professional services in Alexander Heights, ensuring your tapes are digitized will keep your family’s history alive for generations. Don’t wait until your tapes deteriorate—future-proof your memories today!

youtube
#Vhs To Digital Perth#Vhsc To Digital Perth#Convert Vhsc To Digital Perth#Convert Vhs To Digital Perth#Transfer Vhs To Digital Perth#Vhs To Dvd Perth#Vhsc To Dvd Perth#Transfer Cassette To Digital Perth#Convert Audio Cassette To Digital Perth#Convert Audio Tapes To Digital Perth#Youtube
2 notes
·
View notes
Text
What is 3uTools? A Comprehensive Guide for iOS Users
Managing an iPhone or iPad can be difficult, especially when you're restricted by iTunes. This is where 3uTools comes in. It is a free, all-in-one application that allows you more control over your iOS device. Whether you want to flash firmware, transfer data, or monitor your battery's condition, 3uTools makes the procedure simpler and more flexible.

Let's go over everything iOS users need to know about 3uTools.
What is 3uTools?
3uTools is a robust iOS management tool available for Windows and macOS. It allows users to manage apps, images, music, ringtones, movies, files, and other content on iPhones and iPads. It has a clean interface and user-friendly design, and it includes powerful features such as iOS flashing, jailbreaking, real-time device monitoring, and backup/restore all in one location.
Key Features of 3uTools
Here are some of the best things you can accomplish with 3uTools:
🔧 One-Click Flashing and Jailbreaking
Simple one-click tools allow you to upgrade or downgrade your iOS version, as well as jailbreak your smartphone if it is supported.
📁 File and Data Management
You can easily transfer music, images, videos, documents, and other data between your iPhone and computer.
🔄 Backup and restore.
Create full or selective backups that can be restored at any time. No iCloud required.
🔋 Battery and System Monitoring
Monitor your battery's health, storage utilization, and CPU performance in real time.
🔔 Custom ringtones and wallpapers.
Create and apply custom ringtones, or download wallpapers directly to your smartphone.
📍 Virtual location
Change your iPhone's GPS position without jailbreaking—ideal for testing or privacy.
Why iOS Users Love 3uTools
It is absolutely free to use.
Compatible with all major iOS versions.
Several functionalities do not require an Apple ID.
The interface is fast, trustworthy, and easy.
Advanced tools without jailbreaking (optional for some functionalities)
Is 3uTools safe?
Yes, 3uTools is safe to download from the official website. It is widely used by iOS users worldwide and has a solid reputation for dependability. To protect your device, always avoid using unapproved versions.
Final Thoughts
If you're an iPhone or iPad owner seeking for a more powerful, adaptable alternative to iTunes, 3uTools is the answer. With its extensive tool set and user-friendly interface, even beginners can manage their iOS devices like a master.
Try 3uTools today and gain complete control over your iOS experience.
#3uTools#3uTools Guide#iOS Management#iPhone Tools#Flash iOS#Jailbreak iPhone#iPhone File Transfer#iOS Backup Tool#iPhone Optimization#iPhone Utility Software#3uTools 2025
3 notes
·
View notes