#Best Method
Text
You know that Chris Fleming line that goes "Call yourself a community organizer even though you're not on speaking terms with your roommates"?
I honestly think every leftist who talks about the "revolution" like Christians talk about the rapture needs to spend a year trying to organize their workplace. Anyone who sincerely talks about building a movement so vast and all-encompassing that it overwhelms all existing power structures needs the dose of humility that comes with realizing they can't even build a movement to get people paid better at a badly run AMC Theaters where everyone already hates the manager.
#method speaks#union stuff#politics#i guess#best case scenario in this plan we get some successful union drives#worst case people realize that movement building is hard#and also explicitly mentioning socialism is counterproductive#mostly i'm just venting#it's only april how is election discourse this unhinged already?
17K notes
·
View notes
Text
What is the best way to remove sticky label residue?
Try these methods for remove sticky residue:
Oil-Based Products: Apply cooking oil, coconut oil, or olive oil to the residue, let it sit for a few minutes, then wipe it away with a cloth.
Rubbing Alcohol: Dampen a cloth with rubbing alcohol and gently rub the residue until it lifts off.
Vinegar: Soak a cloth in vinegar, place it over the residue for a few minutes, then wipe it away.
Warm Soapy Water: Soak the affected area with warm, soapy water, let it sit for a few minutes, then scrub with a sponge or cloth.
Commercial Adhesive Removers: Purchase a commercial adhesive remover from a hardware or home improvement store and follow the manufacturer's instructions.
0 notes
Text

Thanks to artfight, I’ve finally finished a detailed, official dbhc cub reference! :D
(I’ve put his Artifight description below the cut, which has a more detailed explanation of his timeline, lore, and aesthetics! >:3)
-ˋˏ ༻ ❁ OVERVIEW ❁ ༺ ˎˊ-
Name: C.B.F.N.4000 (Cub)
Pronouns: He/Him
Species: Android
Height: 5’9’’
Associated Visual Themes: vex, ghosts, explosions, mischief, scientist aesthetic, potions, potionmaking, sleepy/tired aesthetic, conspiracies
-ˋˏ ༻ ❁ ABOUT ❁ ༺ ˎˊ-
CBFN4000 is an au version of MCYT Hermitcraft’s Cubfan, set in my DBHC (or Detroit Become Hermitcraft) AU! This au is inspired by the 2018 game Detroit Become Human, but not because it really has anything to do with DBH—I simply yoinked the android mechanics and incorporated them into the world of Hermitcraft. It began as a S8 au, and has roughly followed the hermitcraft timeline up to the present!
Cub was the last android made during Season 8. While many of the hermit androids were made at the beginning of season 8 and a few were made for season 9, Cub was finished and activated mid-late Season 8, around the time when Hermits started noticing the Big Moon. Cub’s model ended up being a sloppy experiment in deviation, as Doc suggested they try to transfer deviancy to an android upon activation to try and avoid traumatic situations that might cause an android to deviate violently or upsettingly, such as Etho’s, Tango’s, or Mumbo’s experiences. While this went relatively well initially, it clearly wasn’t very thoroughly thought out, as Xisuma (who is normally so adamant and detail-oriented when it comes to assuring the androids’ safety with experiments like this) wasn’t truly himself due to external manipulation and mostly left a relatively young-deviant Doc to carry out the project himself.
Cub, though adjusting to sentience rather well at first, very quickly became wrapped up in the Big Moon happenings on the server, new personality and inexperience to emotions like fear and ignorance completely overwhelming his young system. He became obsessive over the implications and consequences of the Season 8 Moon Apocalypse, joining the Mooners and spreading his conspiracy theories religiously throughout the server as he descended into madness. The insanity was like a virus to his programming, pervasive and all-engulfing, and Cub’s final attempt to free himself from the Moon’s impact with the Earth—to launch himself on a llama into space via potion-powered TNT(insane btw)— left his hands and feet singed and cracked to ruin.
The experiment, considered a horrific failure by a deeply shameful—and more awake—S9 Xisuma, left Doc and Xisuma with the decision to reset him for the new season, and they ended up pairing him with a hermit like they had done with the other androids until they had found deviancy enough to pursue their own projects. So, at the start of season 9 and fresh after a reset, Cub was paired with Scar. Naturally, because Scar is… Scar, Cub deviated almost instantly after being given to him, and very quickly adopted the iconic lazy, stoic, amused attributes normally associated with Cubfan. Scar’s tendency towards mischief and general shenanigans grew instantly on Cub, and the two were an immediate inseparable pair. So much so that when Scar began rambling one day about his Season 5 Hermitcraft Shenanigans (where deals with the Vex may or may not have been involved), Cub immediately stated he was interested in being in on it. Whatever “it” means. It’s unclear if Cub also made a deal with the vex or became connected to them in some other way, but… well, he got Doc’s help to trick out his eyes, hair, and back to best fit the part. Scar is very jealous that he can't magically make himself have the same features to match.
Cub is closest with Scar, but he gets along just as well with any of the other hermits! He’s close with Jevin and many of the other redstoners like Etho and Doc, who are the other two androids I’ve put on artfight!
-ˋˏ ༻ ❁ EXTRAS ❁ ༺ ˎˊ-
Cub's eyes can light up in the dark, and he’s the only android who has edited his programming so that the default state of his LED is white, not blue. It still will go yellow and red if his processors are working particularly hard, but he’s replaced the blue setting on his LED with white to better match the Vex vibe. Cub has all of the vibes of a fae. If that’s anything <3
#dbhc#dbhc art#dbhc ref#dbhc cub#cubfan#hermitcraft#cubfan135#hermitcraft au#art escapades#writing everything out in a really succinct/condense way is actually really helpful#I might add Etho and Doc’s artfight descriptions to their own reference pages actually#just because it’s really helpful to have all of the lore in one place LOL#I always wrap up these ideas in my head and save them for when I can make art to reveal the plot dramatically yknow#but for characters that aren’t really my priority right now it’s kind of nice to just get the info down#especially for the people who ask about specific characters a lot#SO ANYWAY#I ramble#if anyone has any opinions on this method of relaying dbhc lore feel free to lmk!#there will obviously be things that I keep hidden :3#Bc sometimes art reveals are the best >:3#but for stuff I might not get to in a while…. yeah#I don’t mind it#ALSO#HILARIOUS TO ME THAT freshly awoken cub reminds me a lot of IRL cub LMAO
1K notes
·
View notes
Text
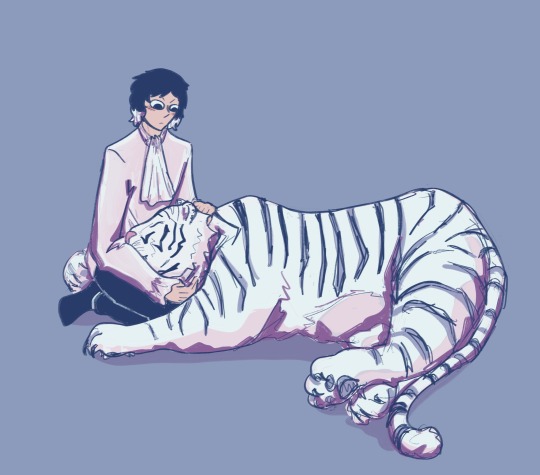
#wanted to draw Atsushi for his birthday and then my brain got hijacked by tiger form cuddling with Akutagawa#this is the best method of team building lololol#bsd#my art#bsd atsushi#bsd akutagawa#shin soukoku#sskk#bungou stray dogs
1K notes
·
View notes
Text


The gentlemen are swappin' andouille sausage recipes, Miss Carroll.
#interview with the vampire#iwtvedit#loustat#otp: all my love belongs to you#my edit#my gifs#the best part of this scene is of course the knowledge that louis was def attracted to lestat the moment he laid eyes on him#and lestat was in his head and knew this#and right from the start trying to piss each other off became their preferred method of foreplay
563 notes
·
View notes
Text
Seeing, "Zuko is canonically bad at firebending," takes on my dash, so...
Zuko is canonically not bad at firebending. He may not be the natural prodigy that Azula or Iroh are, but skills don't work on a basis of either "extreme prodigy" or "not good at all."
Zuko works hard throughout the series to grow and improve in his firebending, and he does.
He defeats Zhao, an adult firebending master, in an Agni Kai when he's 16 and ostensibly still stuck on the basics, because mastering the fundamentals is a huge part of getting "good" at any skill.
He learns lightning redirection in about a day and later successfully uses it against Ozai, who is meant to be an extremely powerful firebender.
He learns to understand and appreciate his fire on a fundamental level from the dragons, who were the original firebenders, and in so doing he becomes a firebending master just as much as Katara (who had a few days/weeks at most of formal training) or Toph (who declared herself an earthbending master after learning from badgermoles) are masters of their elements.
And then he took everything he had learned about fire and put it together to help Aang master firebending over the course of a few weeks.
None of that says, "canonically bad firebender." It says that Zuko didn't start out as a major natural prodigy like his sister, but he worked hard, never stopped learning and growing, and developed into a very strong and capable firebending master in his own right by the end of the show.
#atla#zuko#zuko meta#just because one person takes a bit longer to learn a skill than the person next to them#or because they aren't *as* strong as The Best person in their field#or because their talents lean towards more niche areas#and/or their learning style doesn't mesh well with traditional methods#doesn't mean that person is doomed to being forever “Bad” at said skill
3K notes
·
View notes
Text

they're doing such important work
#fobedit#patrick stump#pete wentz#peterick#fall out boy#fob#anni edits#2005#um. ok they are doing this for a reason but. is this. is this obscene to anyone else. um#anyway here's pete complimenting patrick's breasts and then methodically rubbing his nipple while patrick bites his lip#softcore yet visceral. lmao#your partner and your best buddy noted. looool
518 notes
·
View notes
Text
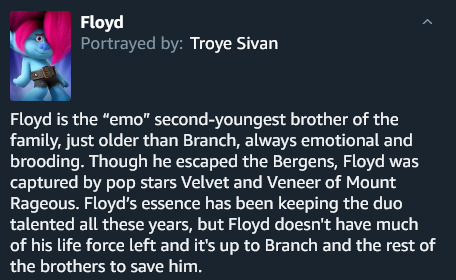
so i'm readin various stuff on the xray cause this silly film is my current source of joy and
wait

hold up.
what...

WAHT ??? WHAT
XRAY CAST DESCRIPTION????

YEARS???
xrAY dESCRIPTION eXPLaIN!!! WHAT DO YOU MEAN FLOYD WAS HELD CAPTIVE FOR YEARS, WHAT SECRET INFO DO U HAVE ACCESS TO???
#joey babbles#trolls band together#trolls floyd#I. don't know what to do with this random snippet#to be fair -#each description of the brozone bros expands a little bit further than the films do (ex. clay being a prankster) so is this. is this canon?#no? yes? half?#did velvet and veneer have him for years and only recently explode on the scene cause they got like. a big break?#some financial backing? a viral video? spotlight on spotify?#were they just experimenting with the best way to harvest a troll's core and only recently hit the jackpot method?#we never learn how the spritz bottle was made in the first place#my brain is bungled .#y. years....?
670 notes
·
View notes
Text
spock with his hair that looks like a lego piece taking in a child with really curly hair and having to figure out how to properly take care of her curls and then having to figure out how to get saavik to be still long enough for him to actually take care of them
#in the beginning her hair is sooooo matted#and he doesn’t know what went wrong#he calls kirk to ask how to hypothetically take care of curly hair#doesn’t realize that it’s not the same as washing his flat shiny straight ass hair#but once he learns that he has to treat it differently he is researching the best products and methods to take care of curls#i hope you all see my vision#star trek#saavik#spock#mr spock#tos spock#star trek tos#star trek the original series#star trek original series#the pandora principle#pandora principle#carolyn clowes#star trek wrath of khan#wrath of khan#star trek 49#certified ali post
386 notes
·
View notes
Text
Transcript:
I'd like to congratulate you on getting your CPR certification.
Now remember, when you’re going in for compressions, it should sound like somebody is standing behind you with the worlds largest Dorito and cracking it open!
Go in firm and hard and snap as many ribs as you can on the way down, that means you’re doing it right.
You save that life. Good luck.
Or... Or... Or kill them, I don’t fucking care.
Audio source
#ultrakill#gabriel ultrakill#congratulations this is misinformation and by listening to it you have actually gotten a bit dumber <3#you're welcome!#anyway. this is the first post using a new method for the filter. my second time completely redoing it lol#can anyone but me tell the difference? probably not! did i spend hours trying to figure it out? yes!#basically what i did was download an unedited audio from his patreon and compared it to the edited version (the srimp special if u care LOL#and did edits- then compared it to the edited version. over. and over. and over........ and over.......................#ANYWAY.#turns out i have been delaying too little#before i had done between .025 to .075 depending on the audio#its more around .1#i also downloaded reaper to add the bitcrush#so its about as close as i can get it without having the exact number that the filter is supposed to be delayed by#i could not for the life of me figure out why mine has less 'echo' but its close enough..#plus the audio from the streams is not the best quality and already has a slight filter on it anyway so like- theres only so much i can do#cough. so anyway i brought my laptop to work today and spent a long time figuring that out#paid to shitpost on company time~#also i have no idea if this is too loud or too quiet cause the audio levels on my laptop are weird#like anything over 10% volume is super loud#i was at 6% while editing but idk how that is going to translate over to other people uhhhhh idk let me know if its ok
166 notes
·
View notes
Text
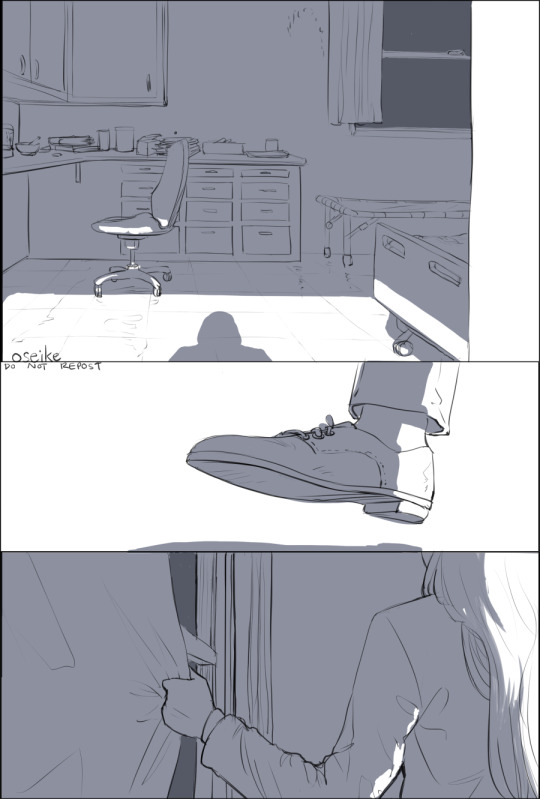
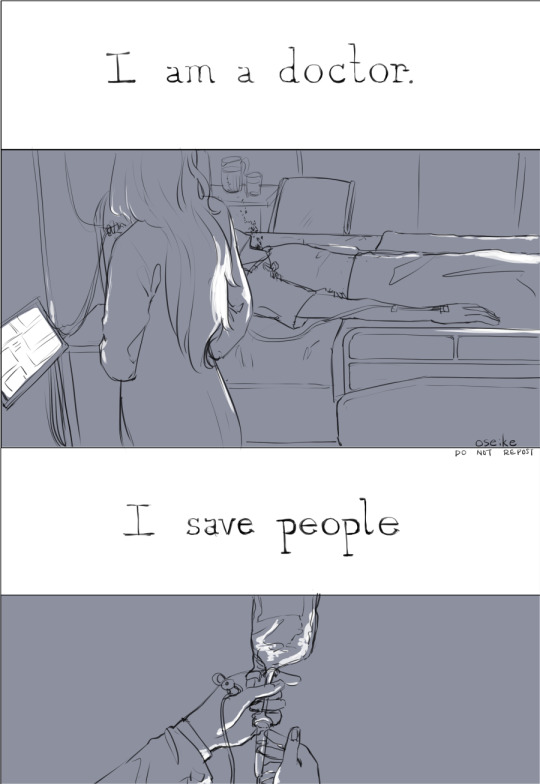
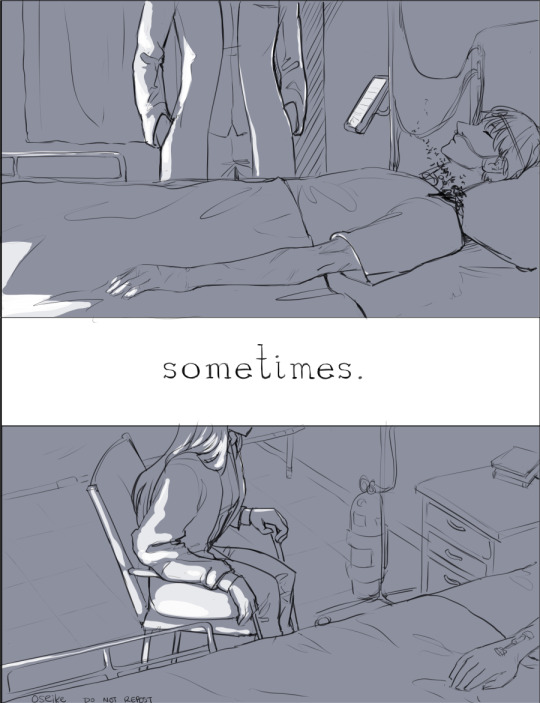
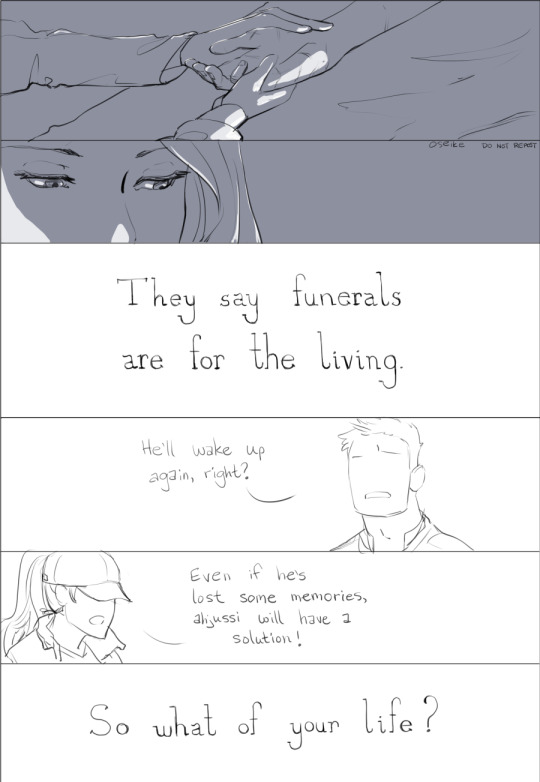

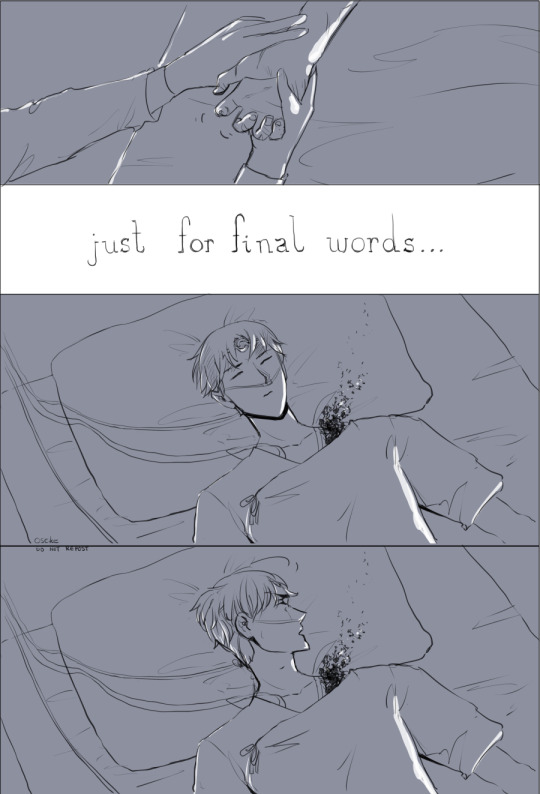

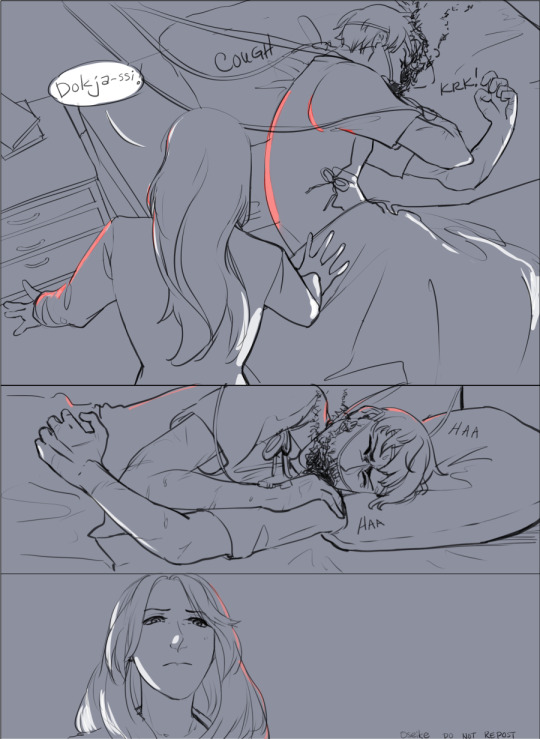

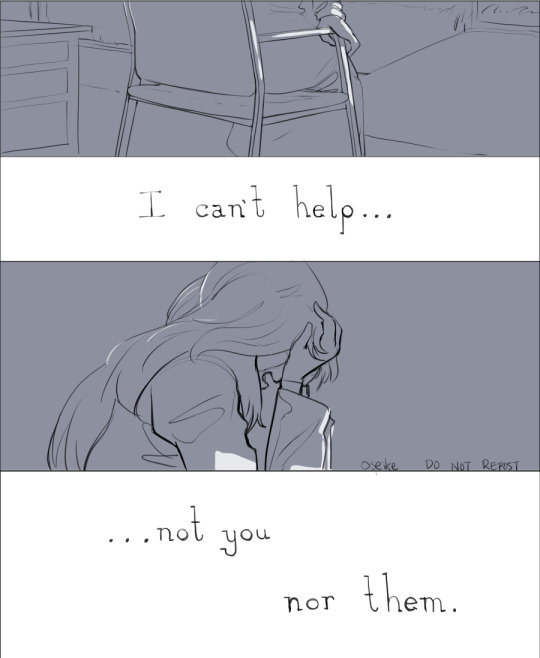
"This person, who not so long ago searched for herbs with me so earnestly....
"It's too sudden. There's so much everyone wants to say, wants to hear.
"If only he could open his eyes one more time..."
If funerals are for the living, what of one's final moments? For whom do they exist? Is it okay to force wakefulness one more time, even if it should cause pain?
EDIT: @keidokusha has translated this to Vietnamese:
Many thanks to them!
#orv#orv spoilers#lee seolhwa#there really isnt much about her written originally or in fanart that I've seen#i would imagine as his state becomes more precarious the usual drugs or methods don't work on him as well#and some substances might not be available anymore#so this is lsh testing out something that might wake him up#she does it at night so no one else is around just in case the result is bad#the party shouldnt see him in danger or in pain#but that also includes lsh too#her own helplessness in the face of kdj's situation must be crushing#to see the party expecting her to save him and not be able to answer those hopes#she's supposed to be the best!!#between her and aileen what problem could they not fix?#and when she fails the party can walk away but she must stay and watch him disintegrate#i feel that would have some hard repercussions on a person#oseiart#vietnamese translation
599 notes
·
View notes
Text
I'm pretty sure I've said this before but the reason my Elrics & Roy relationship tag is "Roy is a dad" is NOT because I see their dynamic as adopted dad and kids or think it's particularly parental
it's because the idea of Roy willingly saddling himself with two chaos-prone teenagers and ultimately making himself the closest thing to their guardian (outside of Pinako who is mostly unaware of what they're doing at any given time) while being so completely unprepared for and annoyed by is so funny to me
my guy, you did this to yourself
you encouraged a minor to join the military, put him under your command, and then failed to be heartless enough to NOT care about his wellbeing, you forced the role of guardian on yourself
my elrics & riza tag is "riza is a mom" because riza is a Mom
#don't know if i'm explaining this well#i don't think the dynamic is adopted parental figures#the dynamic is more like I care too much about your situation to just leave you to the wolves so I'm sort of appointing myself as the perso#who kind of looks out for you#not really in the way a parent would bc Roy has his own problems and his go-to problem solving method is too often “point Edward at it” to#be TRULY parental#but like#he and team Mustang are uniquely in a position to try to protect Ed and do to the best of their ability#it's like#not adopted dad#it's adopted uncle who doesn't even really want that responsibility#roy mustang#edward elric#c: roy mustang#roy is a dad#fullmetal alchemist
114 notes
·
View notes
Text
Simple skin & accent tutorial!
I'm only familiar with making accents in CSP so some of the things you see here might be program specific, but for the most part it should be generally applicable.
Okay with that being said, here's a very basic tutorial, under a readmore because it got long (image heavy)
Assuming you already know roughly what you want to make and what breed pose you want to make it on, go to the custom skins page on the sidebar then download PSDs. For this step I'm choosing coatl F!

It should download automatically, the file will be compressed (zipped). I normally just open the folder and move the top file (without elements_friendly) to my accents folder to access it from my art program:

Open your preferred art program and open the file! It is a PSD file so it should be compatible with most art programs. When you open it, everything should look like this:
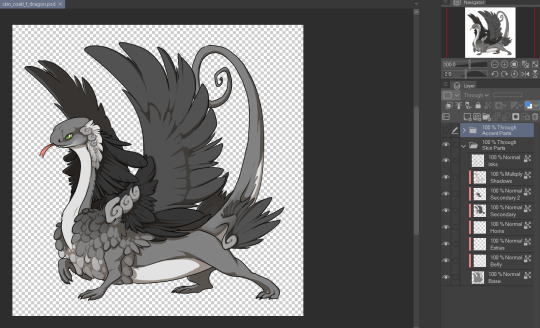
The layers probably look complicated, and it isn't super clear where you can and can't draw- but I promise it will get easier to understand! Before I even start drawing I do two things: I resize the image (changing the image resolution) to 700px by 700px. This means the image the resize better later on when I need to downscale it to 350px by 350px. Next, I make a new folder under both the existing folders with a single, full white layer in it. And set everything in "Through Skin Parts" to 50% opacity.

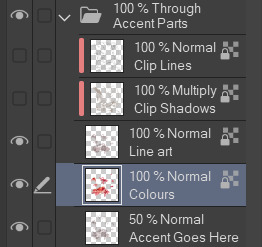
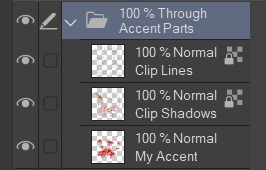
Lastly, put the bottom two folders completely out of your mind, we won't be touching them at all. The only folder that matters is "Through Accent Parts". As I'm drawing the accent itself, I make the lines and shadows layer invisible because they can just be distracting, like this:

That layer beneath both lines and shadows layers? The one labelled "Accent Goes Here"? That's where you draw, and you can make more layers to draw more on later. For now you can sketch your design on that layer. Here's my sketch for my skin Strawberry Pavlova:

It's pretty rough at the moment so I want to add another layer to draw my clean line art on, in CSP this means just adding another layer and turning off clipping which automatically applies as the layers above it have clipping turned on. When that's done it should look like this:


(You can absolutely use more layers for lining if that's what you prefer!)
Next is adding colour. An important thing to note for this step is to avoid using colours that are very close to black, and to avoid using black altogether. This is against skin and accent rules as you need lines and shadows to remain visible over your design, and very dark colours make this a lot harder!
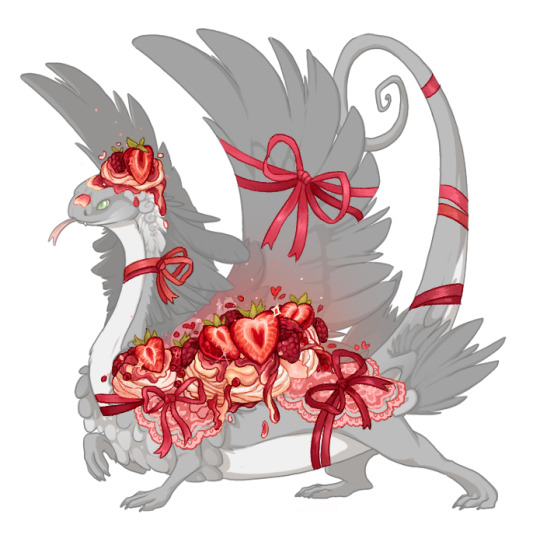
When I typically colour my skins and accents I will separate out design elements (so for example all plants on one layer, all blue cloth into another layer, all jewellery on another, etc etc.) into different layers- this is purely to make recolouring easier and isn't necessary. In this case I didn't have my colours separated out as I had no intention of recolouring this skin! This is what this skin looked like when I was finished colouring:
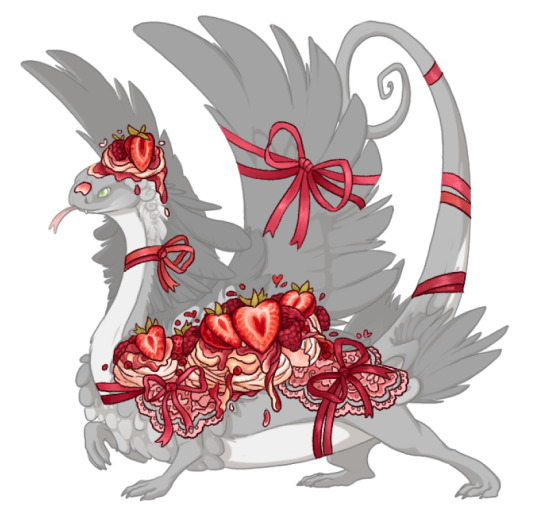
Now I just need to do some final finishing polish on the design! For this one it involves adding a bit of pink transparent colour behind the strawberries, adding pale transparent colour under my lace and of course- adding sparkles! One of the final things I do is recolour my own line art to a red-pink colour (in this case I had it set to multiply as well- but this isn't needed!) this takes some of the harsh edges out of the accent and make the design feel more cohesive imo!

And the design is finished! The final step before we can submit this is a big one! We have to change the lines and shadows that we've been ignoring this whole time. For this I flatten all the art work into one layer, like this:
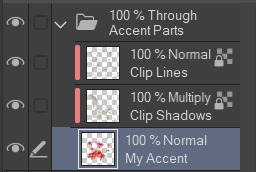
Why do we have to change the lines and shadows? Well...

The default shadows are pretty high opacity and very grey, they cover up my accent and make the details harder to see. And the default line art is black. You can edit these layers to make them much nicer. You can edit them manually- making sure to lock transparent pixels so you don't edit the coverage of the lines and shadows. Or you can do this: (You can ignore this next part if you're finding it overwhelming) Duplicate your accent design twice (so you have three layers with it on total), set both your lines and shadows layers to normal and unclip them. Your layers will look like this:

Ignore what the accent looks like for now. Next move the copied layers so one is above the lines and one is above the shadows, keeping only one in the original position. And then clip these duplicated accent layers to the layers directly beneath them, it will look like this:
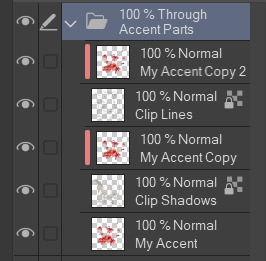
Merge the accent copy layers with its corresponding lines or shadows layer, you should still have 3 separate layers when you're done: The lines, the shadows and your original accent design. Like this:
Then clip both of the lines and shadows onto your accent design layer and set both lines and shadows layers to multiply. Like this:
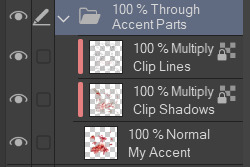
If you've done it all correctly your accent should now look like this:
This is a lot better than the default lines and shadows already! It's pretty dark in spots and my lines are definitely too light in other places though. So next I usually start by setting my shadows layer to 50% opacity and then going over both lines and shadows layers manually recolouring the lighter parts to a darker colour so they are visible on top of my final design. When you downscale your art to submit it, lines and shadows that were super obvious suddenly vanish- so don't be afraid to downscale it and keep editing the lines and shadows.
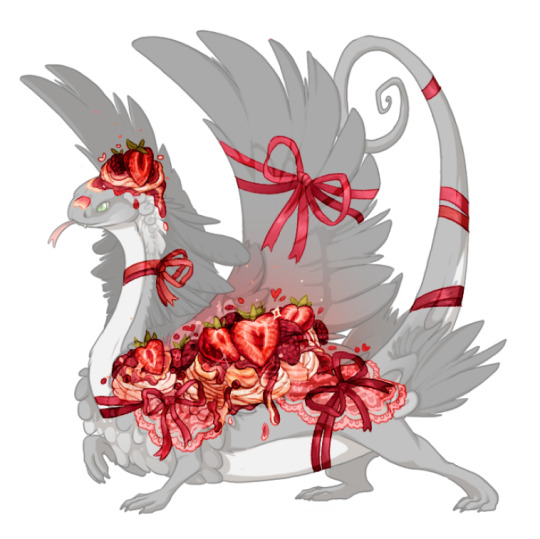
Here's what the final product, downscaled to 350 pixels, looks like:

This got accepted first try by skin mods (just in time for valentines!) Important things to note: places where my design is less opaque the lines and shadows are also less visible, this is completely fine! You don't have to fix this. Lines should always be visibly darker than the shadows they're on top of, this means sometimes they will have to be black to get them to show up or you may even have to make your accent underneath lighter to get everything to conform to the rules! Lastly, lines and shadows are subjective and you may end up getting rejected a few times before they're to skin mods liking. Its one of the harder parts of skin making and you won't always get it right.
Community feedback is your best friend, don't create in a vacuum! Go join discord servers where other people are making accents too, ask for help! Now go forth and make!
#this is very basic but this covers all the parts i found confusing when starting#the best way to get used to everything is to just start making the accents but i understand it can be very intimidating#i hope i did a good job explaining the lines and shadows method i use. i didnt make it! just got taught it#its very good. i have nearly 100% acceptance rate by skin mods#if anyone has questions please ask!#okay. i think thats everything...#flight rising#fr skins and accents
224 notes
·
View notes
Text

Flat vs render
There's been an art trend going on Twitter comparing flat colors vs rendering and I wanted to give it a shot
#your turn to die#kimi ga shine#yttd#sara chidouin#z art#my method of rendering is slapping colors down and hoping for the best
250 notes
·
View notes
Text
small PSA: if you shop at craft shows or artist alleys, please bring more than apple pay or a virtual card - especially if you're not comfortable entering your card number manually. not all of us have fancy card readers, so please also bring your physical card or cash, even if it's only as backup 👍
#psa#conventions#artist alley#not art#i've done two craft shows and two conventions with just my swipe reader. and cash ofc. but i did have to miss a couple sales at the cons#because people only had apple pay. no cash no physical card. It Sucks For Both Of Us!#when i say there are small businesses in the artist alley i mean some of us are Small#i don't speak just for myself but for other artists who have this trouble as well. some folks are just starting out and some folks#just do this for a hobby and can't afford or can't justify the bigger terminals yet or at all#if i get into ACEN again next year i'll opt for a terminal but they're Pricey and not something to start out with y'know#if you want to be an artist's best friend though? pay in cash.#not to mention if there's technical or wifi trouble - cash just works 100% of the time. no reader or wifi will stop you from using cash.#semi related but i had someone try to pay with apple pay at my last show and i said they'd have to enter their number manually then#and they said they'd go find their partner and see if they had card/cash. and then while they were walking away from their booth#their friend asked why and they said it wasn't safe. on one hand i can't be mad because its VERY good to practice card safety!#on the other hand. you're entering it into the same app that would process a swipe payment. it's exactly as safe as if you'd swiped it#i promise as long as you're entering the number into a square app your card info is safe lmao#anyway yeah a lot of us aren't Big Businesses. please just be courteous and bring some traditional payment methods Just In Case
92 notes
·
View notes
Text


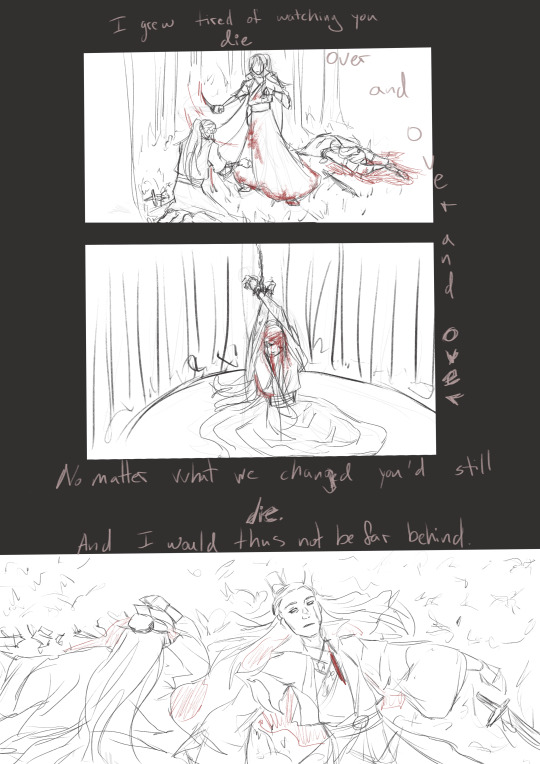


Day 2: Timeloop / Xiao Qi and Jiu Ge
I am cringe and I am not even free
Feel free to reuse this idea but 24 hours are not enough for me to finish an entire comic. I could have taken the simpler prompt but nOOOOOO timeloop is too tempting. Past me why are we like this
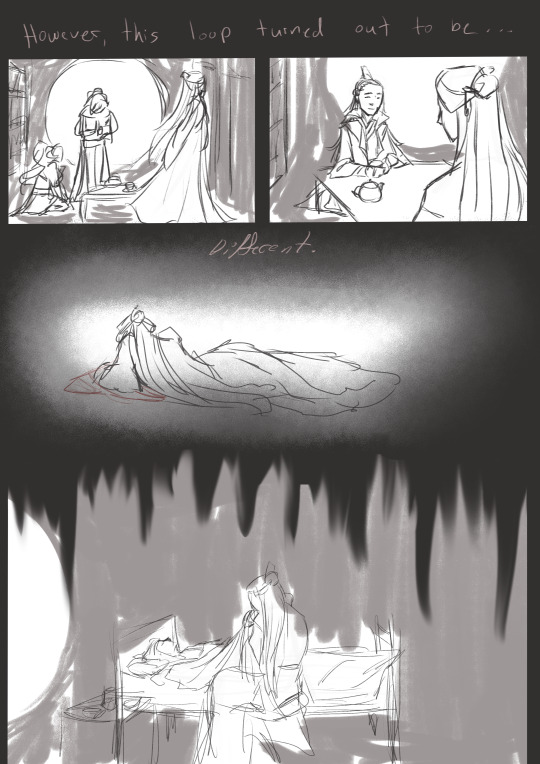
#svsss#shen jiu#yue qingyuan#qijiu#qijiuweek2024#the basic idea for this was that both yqy and sj remember each loop#the loop started after their individual deaths in PIDW and resets them to close to disciple era#aka the time Yue Qi was in the caves and SJ presumably got away from the Qiu household or was already with Wu Yanzi#I imagine the first few loops they qi deviated so hard from the shock that they didnt even make it like 1 hour in the loop before beingrese#and then had a few loops just fucking around and finding out#eventually they realise that the other has the memories of all loops and so begins the talks and figuring how tf they can get out of this#maybe they resolve their issues with the promise or not your choice tbh#they try different plans and methods#but they keep dying (read: SJ keeps dying first and YQY either dies or sewerslides not soon after) and getting reset with no end in sight#until the last pages where the svsss timeline begins#SJ got replaced with SY and the system isn't letting YQY join him in death or smth nor letting him do anything about SY being there instead#And due to their closeness from being immensily tired from all the loops#YQY notices it immediately but can't do anything about it#the bonus for SY is that this timeline was very kind to LBH & co - 79 figured by now that keeping him in the sect and happy was their best#bet at staying alive - or well at least for longer#I'll continue this storyline in one of the future prompts of this qijiu week#btw the one with the cliff is just the whoopsie daisy timeline where SJ accidentally falls into the Abyss trying to keep LBH from falling i#79 had a bit of a good laugh about that one#cw death#cw violence#cw blood#cw angst
113 notes
·
View notes
Last Seen Blogs

crazyhippos
Crazy Hippos Advertising Agency

xitlalystyles
Xixi

quake-live-cheats-downloa4v
🔥 quake live cheats download (mod working) 3T5?

moonguest
☾⋆。𖦹 °✩

yesitsjessip
yesitsjessip :)