#CentOS version
Explore tagged Tumblr posts
Visit Tumblr Blog
Explore Tumblr blogs with no restrictions, modern design and the best experience.
Last Seen Tumblr Blogs


Fun Fact
Tumblr’s reach among the 26-to-35-year-olds in the US is 11%.
Text
I think I may be stupid? I've been going ":(((( its' so sad I can't get da vinci resolve to work on my linux PC" but??? guess what??? I've been using CSP inside a virtual machine bc I couldn't get THAT to work either?? so just get dvr on your virtual machine??? idiot?????
#just thinking thoughts...#the linux version of dvr only works on centOS and I use mint#and I've been sad abt this for a while. while I can still use it for motion picture prestidigitation it has trouble importing videos
6 notes
·
View notes
Text
How I ditched streaming services and learned to love Linux: A step-by-step guide to building your very own personal media streaming server (V2.0: REVISED AND EXPANDED EDITION)
This is a revised, corrected and expanded version of my tutorial on setting up a personal media server that previously appeared on my old blog (donjuan-auxenfers). I expect that that post is still making the rounds (hopefully with my addendum on modifying group share permissions in Ubuntu to circumvent 0x8007003B "Unexpected Network Error" messages in Windows 10/11 when transferring files) but I have no way of checking. Anyway this new revised version of the tutorial corrects one or two small errors I discovered when rereading what I wrote, adds links to all products mentioned and is just more polished generally. I also expanded it a bit, pointing more adventurous users toward programs such as Sonarr/Radarr/Lidarr and Overseerr which can be used for automating user requests and media collection.
So then, what is this tutorial? This is a tutorial on how to build and set up your own personal media server using Ubuntu as an operating system and Plex (or Jellyfin) to not only manage your media, but to also stream that media to your devices both at home and abroad anywhere in the world where you have an internet connection. Its intent is to show you how building a personal media server and stuffing it full of films, TV, and music that you acquired through indiscriminate and voracious media piracy various legal methods will free you to completely ditch paid streaming services. No more will you have to pay for Disney+, Netflix, HBOMAX, Hulu, Amazon Prime, Peacock, CBS All Access, Paramount+, Crave or any other streaming service that is not named Criterion Channel. Instead whenever you want to watch your favourite films and television shows, you’ll have your own personal service that only features things that you want to see, with files that you have control over. And for music fans out there, both Jellyfin and Plex support music streaming, meaning you can even ditch music streaming services. Goodbye Spotify, Youtube Music, Tidal and Apple Music, welcome back unreasonably large MP3 (or FLAC) collections.
On the hardware front, I’m going to offer a few options catered towards different budgets and media library sizes. The cost of getting a media server up and running using this guide will cost you anywhere from $450 CAD/$325 USD at the low end to $1500 CAD/$1100 USD at the high end (it could go higher). My server was priced closer to the higher figure, but I went and got a lot more storage than most people need. If that seems like a little much, consider for a moment, do you have a roommate, a close friend, or a family member who would be willing to chip in a few bucks towards your little project provided they get access? Well that's how I funded my server. It might also be worth thinking about the cost over time, i.e. how much you spend yearly on subscriptions vs. a one time cost of setting up a server. Additionally there's just the joy of being able to scream "fuck you" at all those show cancelling, library deleting, hedge fund vampire CEOs who run the studios through denying them your money. Drive a stake through David Zaslav's heart.
On the software side I will walk you step-by-step through installing Ubuntu as your server's operating system, configuring your storage as a RAIDz array with ZFS, sharing your zpool to Windows with Samba, running a remote connection between your server and your Windows PC, and then a little about started with Plex/Jellyfin. Every terminal command you will need to input will be provided, and I even share a custom #bash script that will make used vs. available drive space on your server display correctly in Windows.
If you have a different preferred flavour of Linux (Arch, Manjaro, Redhat, Fedora, Mint, OpenSUSE, CentOS, Slackware etc. et. al.) and are aching to tell me off for being basic and using Ubuntu, this tutorial is not for you. The sort of person with a preferred Linux distro is the sort of person who can do this sort of thing in their sleep. Also I don't care. This tutorial is intended for the average home computer user. This is also why we’re not using a more exotic home server solution like running everything through Docker Containers and managing it through a dashboard like Homarr or Heimdall. While such solutions are fantastic and can be very easy to maintain once you have it all set up, wrapping your brain around Docker is a whole thing in and of itself. If you do follow this tutorial and had fun putting everything together, then I would encourage you to return in a year’s time, do your research and set up everything with Docker Containers.
Lastly, this is a tutorial aimed at Windows users. Although I was a daily user of OS X for many years (roughly 2008-2023) and I've dabbled quite a bit with various Linux distributions (mostly Ubuntu and Manjaro), my primary OS these days is Windows 11. Many things in this tutorial will still be applicable to Mac users, but others (e.g. setting up shares) you will have to look up for yourself. I doubt it would be difficult to do so.
Nothing in this tutorial will require feats of computing expertise. All you will need is a basic computer literacy (i.e. an understanding of what a filesystem and directory are, and a degree of comfort in the settings menu) and a willingness to learn a thing or two. While this guide may look overwhelming at first glance, it is only because I want to be as thorough as possible. I want you to understand exactly what it is you're doing, I don't want you to just blindly follow steps. If you half-way know what you’re doing, you will be much better prepared if you ever need to troubleshoot.
Honestly, once you have all the hardware ready it shouldn't take more than an afternoon or two to get everything up and running.
(This tutorial is just shy of seven thousand words long so the rest is under the cut.)
Step One: Choosing Your Hardware
Linux is a light weight operating system, depending on the distribution there's close to no bloat. There are recent distributions available at this very moment that will run perfectly fine on a fourteen year old i3 with 4GB of RAM. Moreover, running Plex or Jellyfin isn’t resource intensive in 90% of use cases. All this is to say, we don’t require an expensive or powerful computer. This means that there are several options available: 1) use an old computer you already have sitting around but aren't using 2) buy a used workstation from eBay, or what I believe to be the best option, 3) order an N100 Mini-PC from AliExpress or Amazon.
Note: If you already have an old PC sitting around that you’ve decided to use, fantastic, move on to the next step.
When weighing your options, keep a few things in mind: the number of people you expect to be streaming simultaneously at any one time, the resolution and bitrate of your media library (4k video takes a lot more processing power than 1080p) and most importantly, how many of those clients are going to be transcoding at any one time. Transcoding is what happens when the playback device does not natively support direct playback of the source file. This can happen for a number of reasons, such as the playback device's native resolution being lower than the file's internal resolution, or because the source file was encoded in a video codec unsupported by the playback device.
Ideally we want any transcoding to be performed by hardware. This means we should be looking for a computer with an Intel processor with Quick Sync. Quick Sync is a dedicated core on the CPU die designed specifically for video encoding and decoding. This specialized hardware makes for highly efficient transcoding both in terms of processing overhead and power draw. Without these Quick Sync cores, transcoding must be brute forced through software. This takes up much more of a CPU’s processing power and requires much more energy. But not all Quick Sync cores are created equal and you need to keep this in mind if you've decided either to use an old computer or to shop for a used workstation on eBay
Any Intel processor from second generation Core (Sandy Bridge circa 2011) onward has Quick Sync cores. It's not until 6th gen (Skylake), however, that the cores support the H.265 HEVC codec. Intel’s 10th gen (Comet Lake) processors introduce support for 10bit HEVC and HDR tone mapping. And the recent 12th gen (Alder Lake) processors brought with them hardware AV1 decoding. As an example, while an 8th gen (Kaby Lake) i5-8500 will be able to hardware transcode a H.265 encoded file, it will fall back to software transcoding if given a 10bit H.265 file. If you’ve decided to use that old PC or to look on eBay for an old Dell Optiplex keep this in mind.
Note 1: The price of old workstations varies wildly and fluctuates frequently. If you get lucky and go shopping shortly after a workplace has liquidated a large number of their workstations you can find deals for as low as $100 on a barebones system, but generally an i5-8500 workstation with 16gb RAM will cost you somewhere in the area of $260 CAD/$200 USD.
Note 2: The AMD equivalent to Quick Sync is called Video Core Next, and while it's fine, it's not as efficient and not as mature a technology. It was only introduced with the first generation Ryzen CPUs and it only got decent with their newest CPUs, we want something cheap.
Alternatively you could forgo having to keep track of what generation of CPU is equipped with Quick Sync cores that feature support for which codecs, and just buy an N100 mini-PC. For around the same price or less of a used workstation you can pick up a mini-PC with an Intel N100 processor. The N100 is a four-core processor based on the 12th gen Alder Lake architecture and comes equipped with the latest revision of the Quick Sync cores. These little processors offer astounding hardware transcoding capabilities for their size and power draw. Otherwise they perform equivalent to an i5-6500, which isn't a terrible CPU. A friend of mine uses an N100 machine as a dedicated retro emulation gaming system and it does everything up to 6th generation consoles just fine. The N100 is also a remarkably efficient chip, it sips power. In fact, the difference between running one of these and an old workstation could work out to hundreds of dollars a year in energy bills depending on where you live.
You can find these Mini-PCs all over Amazon or for a little cheaper on AliExpress. They range in price from $170 CAD/$125 USD for a no name N100 with 8GB RAM to $280 CAD/$200 USD for a Beelink S12 Pro with 16GB RAM. The brand doesn't really matter, they're all coming from the same three factories in Shenzen, go for whichever one fits your budget or has features you want. 8GB RAM should be enough, Linux is lightweight and Plex only calls for 2GB RAM. 16GB RAM might result in a slightly snappier experience, especially with ZFS. A 256GB SSD is more than enough for what we need as a boot drive, but going for a bigger drive might allow you to get away with things like creating preview thumbnails for Plex, but it’s up to you and your budget.
The Mini-PC I wound up buying was a Firebat AK2 Plus with 8GB RAM and a 256GB SSD. It looks like this:

Note: Be forewarned that if you decide to order a Mini-PC from AliExpress, note the type of power adapter it ships with. The mini-PC I bought came with an EU power adapter and I had to supply my own North American power supply. Thankfully this is a minor issue as barrel plug 30W/12V/2.5A power adapters are easy to find and can be had for $10.
Step Two: Choosing Your Storage
Storage is the most important part of our build. It is also the most expensive. Thankfully it’s also the most easily upgrade-able down the line.
For people with a smaller media collection (4TB to 8TB), a more limited budget, or who will only ever have two simultaneous streams running, I would say that the most economical course of action would be to buy a USB 3.0 8TB external HDD. Something like this one from Western Digital or this one from Seagate. One of these external drives will cost you in the area of $200 CAD/$140 USD. Down the line you could add a second external drive or replace it with a multi-drive RAIDz set up such as detailed below.
If a single external drive the path for you, move on to step three.
For people with larger media libraries (12TB+), who prefer media in 4k, or care who about data redundancy, the answer is a RAID array featuring multiple HDDs in an enclosure.
Note: If you are using an old PC or used workstatiom as your server and have the room for at least three 3.5" drives, and as many open SATA ports on your mother board you won't need an enclosure, just install the drives into the case. If your old computer is a laptop or doesn’t have room for more internal drives, then I would suggest an enclosure.
The minimum number of drives needed to run a RAIDz array is three, and seeing as RAIDz is what we will be using, you should be looking for an enclosure with three to five bays. I think that four disks makes for a good compromise for a home server. Regardless of whether you go for a three, four, or five bay enclosure, do be aware that in a RAIDz array the space equivalent of one of the drives will be dedicated to parity at a ratio expressed by the equation 1 − 1/n i.e. in a four bay enclosure equipped with four 12TB drives, if we configured our drives in a RAIDz1 array we would be left with a total of 36TB of usable space (48TB raw size). The reason for why we might sacrifice storage space in such a manner will be explained in the next section.
A four bay enclosure will cost somewhere in the area of $200 CDN/$140 USD. You don't need anything fancy, we don't need anything with hardware RAID controls (RAIDz is done entirely in software) or even USB-C. An enclosure with USB 3.0 will perform perfectly fine. Don’t worry too much about USB speed bottlenecks. A mechanical HDD will be limited by the speed of its mechanism long before before it will be limited by the speed of a USB connection. I've seen decent looking enclosures from TerraMaster, Yottamaster, Mediasonic and Sabrent.
When it comes to selecting the drives, as of this writing, the best value (dollar per gigabyte) are those in the range of 12TB to 20TB. I settled on 12TB drives myself. If 12TB to 20TB drives are out of your budget, go with what you can afford, or look into refurbished drives. I'm not sold on the idea of refurbished drives but many people swear by them.
When shopping for harddrives, search for drives designed specifically for NAS use. Drives designed for NAS use typically have better vibration dampening and are designed to be active 24/7. They will also often make use of CMR (conventional magnetic recording) as opposed to SMR (shingled magnetic recording). This nets them a sizable read/write performance bump over typical desktop drives. Seagate Ironwolf and Toshiba NAS are both well regarded brands when it comes to NAS drives. I would avoid Western Digital Red drives at this time. WD Reds were a go to recommendation up until earlier this year when it was revealed that they feature firmware that will throw up false SMART warnings telling you to replace the drive at the three year mark quite often when there is nothing at all wrong with that drive. It will likely even be good for another six, seven, or more years.

Step Three: Installing Linux
For this step you will need a USB thumbdrive of at least 6GB in capacity, an .ISO of Ubuntu, and a way to make that thumbdrive bootable media.
First download a copy of Ubuntu desktop (for best performance we could download the Server release, but for new Linux users I would recommend against the server release. The server release is strictly command line interface only, and having a GUI is very helpful for most people. Not many people are wholly comfortable doing everything through the command line, I'm certainly not one of them, and I grew up with DOS 6.0. 22.04.3 Jammy Jellyfish is the current Long Term Service release, this is the one to get.
Download the .ISO and then download and install balenaEtcher on your Windows PC. BalenaEtcher is an easy to use program for creating bootable media, you simply insert your thumbdrive, select the .ISO you just downloaded, and it will create a bootable installation media for you.
Once you've made a bootable media and you've got your Mini-PC (or you old PC/used workstation) in front of you, hook it directly into your router with an ethernet cable, and then plug in the HDD enclosure, a monitor, a mouse and a keyboard. Now turn that sucker on and hit whatever key gets you into the BIOS (typically ESC, DEL or F2). If you’re using a Mini-PC check to make sure that the P1 and P2 power limits are set correctly, my N100's P1 limit was set at 10W, a full 20W under the chip's power limit. Also make sure that the RAM is running at the advertised speed. My Mini-PC’s RAM was set at 2333Mhz out of the box when it should have been 3200Mhz. Once you’ve done that, key over to the boot order and place the USB drive first in the boot order. Then save the BIOS settings and restart.
After you restart you’ll be greeted by Ubuntu's installation screen. Installing Ubuntu is really straight forward, select the "minimal" installation option, as we won't need anything on this computer except for a browser (Ubuntu comes preinstalled with Firefox) and Plex Media Server/Jellyfin Media Server. Also remember to delete and reformat that Windows partition! We don't need it.
Step Four: Installing ZFS and Setting Up the RAIDz Array
Note: If you opted for just a single external HDD skip this step and move onto setting up a Samba share.
Once Ubuntu is installed it's time to configure our storage by installing ZFS to build our RAIDz array. ZFS is a "next-gen" file system that is both massively flexible and massively complex. It's capable of snapshot backup, self healing error correction, ZFS pools can be configured with drives operating in a supplemental manner alongside the storage vdev (e.g. fast cache, dedicated secondary intent log, hot swap spares etc.). It's also a file system very amenable to fine tuning. Block and sector size are adjustable to use case and you're afforded the option of different methods of inline compression. If you'd like a very detailed overview and explanation of its various features and tips on tuning a ZFS array check out these articles from Ars Technica. For now we're going to ignore all these features and keep it simple, we're going to pull our drives together into a single vdev running in RAIDz which will be the entirety of our zpool, no fancy cache drive or SLOG.
Open up the terminal and type the following commands:
sudo apt update
then
sudo apt install zfsutils-linux
This will install the ZFS utility. Verify that it's installed with the following command:
zfs --version
Now, it's time to check that the HDDs we have in the enclosure are healthy, running, and recognized. We also want to find out their device IDs and take note of them:
sudo fdisk -1
Note: You might be wondering why some of these commands require "sudo" in front of them while others don't. "Sudo" is short for "super user do”. When and where "sudo" is used has to do with the way permissions are set up in Linux. Only the "root" user has the access level to perform certain tasks in Linux. As a matter of security and safety regular user accounts are kept separate from the "root" user. It's not advised (or even possible) to boot into Linux as "root" with most modern distributions. Instead by using "sudo" our regular user account is temporarily given the power to do otherwise forbidden things. Don't worry about it too much at this stage, but if you want to know more check out this introduction.
If everything is working you should get a list of the various drives detected along with their device IDs which will look like this: /dev/sdc. You can also check the device IDs of the drives by opening the disk utility app. Jot these IDs down as we'll need them for our next step, creating our RAIDz array.
RAIDz is similar to RAID-5 in that instead of striping your data over multiple disks, exchanging redundancy for speed and available space (RAID-0), or mirroring your data writing by two copies of every piece (RAID-1), it instead writes parity blocks across the disks in addition to striping, this provides a balance of speed, redundancy and available space. If a single drive fails, the parity blocks on the working drives can be used to reconstruct the entire array as soon as a replacement drive is added.
Additionally, RAIDz improves over some of the common RAID-5 flaws. It's more resilient and capable of self healing, as it is capable of automatically checking for errors against a checksum. It's more forgiving in this way, and it's likely that you'll be able to detect when a drive is dying well before it fails. A RAIDz array can survive the loss of any one drive.
Note: While RAIDz is indeed resilient, if a second drive fails during the rebuild, you're fucked. Always keep backups of things you can't afford to lose. This tutorial, however, is not about proper data safety.
To create the pool, use the following command:
sudo zpool create "zpoolnamehere" raidz "device IDs of drives we're putting in the pool"
For example, let's creatively name our zpool "mypool". This poil will consist of four drives which have the device IDs: sdb, sdc, sdd, and sde. The resulting command will look like this:
sudo zpool create mypool raidz /dev/sdb /dev/sdc /dev/sdd /dev/sde
If as an example you bought five HDDs and decided you wanted more redundancy dedicating two drive to this purpose, we would modify the command to "raidz2" and the command would look something like the following:
sudo zpool create mypool raidz2 /dev/sdb /dev/sdc /dev/sdd /dev/sde /dev/sdf
An array configured like this is known as RAIDz2 and is able to survive two disk failures.
Once the zpool has been created, we can check its status with the command:
zpool status
Or more concisely with:
zpool list
The nice thing about ZFS as a file system is that a pool is ready to go immediately after creation. If we were to set up a traditional RAID-5 array using mbam, we'd have to sit through a potentially hours long process of reformatting and partitioning the drives. Instead we're ready to go right out the gates.
The zpool should be automatically mounted to the filesystem after creation, check on that with the following:
df -hT | grep zfs
Note: If your computer ever loses power suddenly, say in event of a power outage, you may have to re-import your pool. In most cases, ZFS will automatically import and mount your pool, but if it doesn’t and you can't see your array, simply open the terminal and type sudo zpool import -a.
By default a zpool is mounted at /"zpoolname". The pool should be under our ownership but let's make sure with the following command:
sudo chown -R "yourlinuxusername" /"zpoolname"
Note: Changing file and folder ownership with "chown" and file and folder permissions with "chmod" are essential commands for much of the admin work in Linux, but we won't be dealing with them extensively in this guide. If you'd like a deeper tutorial and explanation you can check out these two guides: chown and chmod.

You can access the zpool file system through the GUI by opening the file manager (the Ubuntu default file manager is called Nautilus) and clicking on "Other Locations" on the sidebar, then entering the Ubuntu file system and looking for a folder with your pool's name. Bookmark the folder on the sidebar for easy access.

Your storage pool is now ready to go. Assuming that we already have some files on our Windows PC we want to copy to over, we're going to need to install and configure Samba to make the pool accessible in Windows.
Step Five: Setting Up Samba/Sharing
Samba is what's going to let us share the zpool with Windows and allow us to write to it from our Windows machine. First let's install Samba with the following commands:
sudo apt-get update
then
sudo apt-get install samba
Next create a password for Samba.
sudo smbpswd -a "yourlinuxusername"
It will then prompt you to create a password. Just reuse your Ubuntu user password for simplicity's sake.
Note: if you're using just a single external drive replace the zpool location in the following commands with wherever it is your external drive is mounted, for more information see this guide on mounting an external drive in Ubuntu.
After you've created a password we're going to create a shareable folder in our pool with this command
mkdir /"zpoolname"/"foldername"
Now we're going to open the smb.conf file and make that folder shareable. Enter the following command.
sudo nano /etc/samba/smb.conf
This will open the .conf file in nano, the terminal text editor program. Now at the end of smb.conf add the following entry:
["foldername"]
path = /"zpoolname"/"foldername"
available = yes
valid users = "yourlinuxusername"
read only = no
writable = yes
browseable = yes
guest ok = no
Ensure that there are no line breaks between the lines and that there's a space on both sides of the equals sign. Our next step is to allow Samba traffic through the firewall:
sudo ufw allow samba
Finally restart the Samba service:
sudo systemctl restart smbd
At this point we'll be able to access to the pool, browse its contents, and read and write to it from Windows. But there's one more thing left to do, Windows doesn't natively support the ZFS file systems and will read the used/available/total space in the pool incorrectly. Windows will read available space as total drive space, and all used space as null. This leads to Windows only displaying a dwindling amount of "available" space as the drives are filled. We can fix this! Functionally this doesn't actually matter, we can still write and read to and from the disk, it just makes it difficult to tell at a glance the proportion of used/available space, so this is an optional step but one I recommend (this step is also unnecessary if you're just using a single external drive). What we're going to do is write a little shell script in #bash. Open nano with the terminal with the command:
nano
Now insert the following code:
#!/bin/bash CUR_PATH=`pwd` ZFS_CHECK_OUTPUT=$(zfs get type $CUR_PATH 2>&1 > /dev/null) > /dev/null if [[ $ZFS_CHECK_OUTPUT == *not\ a\ ZFS* ]] then IS_ZFS=false else IS_ZFS=true fi if [[ $IS_ZFS = false ]] then df $CUR_PATH | tail -1 | awk '{print $2" "$4}' else USED=$((`zfs get -o value -Hp used $CUR_PATH` / 1024)) > /dev/null AVAIL=$((`zfs get -o value -Hp available $CUR_PATH` / 1024)) > /dev/null TOTAL=$(($USED+$AVAIL)) > /dev/null echo $TOTAL $AVAIL fi
Save the script as "dfree.sh" to /home/"yourlinuxusername" then change the ownership of the file to make it executable with this command:
sudo chmod 774 dfree.sh
Now open smb.conf with sudo again:
sudo nano /etc/samba/smb.conf
Now add this entry to the top of the configuration file to direct Samba to use the results of our script when Windows asks for a reading on the pool's used/available/total drive space:
[global]
dfree command = /home/"yourlinuxusername"/dfree.sh
Save the changes to smb.conf and then restart Samba again with the terminal:
sudo systemctl restart smbd
Now there’s one more thing we need to do to fully set up the Samba share, and that’s to modify a hidden group permission. In the terminal window type the following command:
usermod -a -G sambashare “yourlinuxusername”
Then restart samba again:
sudo systemctl restart smbd
If we don’t do this last step, everything will appear to work fine, and you will even be able to see and map the drive from Windows and even begin transferring files, but you'd soon run into a lot of frustration. As every ten minutes or so a file would fail to transfer and you would get a window announcing “0x8007003B Unexpected Network Error”. This window would require your manual input to continue the transfer with the file next in the queue. And at the end it would reattempt to transfer whichever files failed the first time around. 99% of the time they’ll go through that second try, but this is still all a major pain in the ass. Especially if you’ve got a lot of data to transfer or you want to step away from the computer for a while.
It turns out samba can act a little weirdly with the higher read/write speeds of RAIDz arrays and transfers from Windows, and will intermittently crash and restart itself if this group option isn’t changed. Inputting the above command will prevent you from ever seeing that window.
The last thing we're going to do before switching over to our Windows PC is grab the IP address of our Linux machine. Enter the following command:
hostname -I
This will spit out this computer's IP address on the local network (it will look something like 192.168.0.x), write it down. It might be a good idea once you're done here to go into your router settings and reserving that IP for your Linux system in the DHCP settings. Check the manual for your specific model router on how to access its settings, typically it can be accessed by opening a browser and typing http:\\192.168.0.1 in the address bar, but your router may be different.
Okay we’re done with our Linux computer for now. Get on over to your Windows PC, open File Explorer, right click on Network and click "Map network drive". Select Z: as the drive letter (you don't want to map the network drive to a letter you could conceivably be using for other purposes) and enter the IP of your Linux machine and location of the share like so: \\"LINUXCOMPUTERLOCALIPADDRESSGOESHERE"\"zpoolnamegoeshere"\. Windows will then ask you for your username and password, enter the ones you set earlier in Samba and you're good. If you've done everything right it should look something like this:

You can now start moving media over from Windows to the share folder. It's a good idea to have a hard line running to all machines. Moving files over Wi-Fi is going to be tortuously slow, the only thing that’s going to make the transfer time tolerable (hours instead of days) is a solid wired connection between both machines and your router.
Step Six: Setting Up Remote Desktop Access to Your Server
After the server is up and going, you’ll want to be able to access it remotely from Windows. Barring serious maintenance/updates, this is how you'll access it most of the time. On your Linux system open the terminal and enter:
sudo apt install xrdp
Then:
sudo systemctl enable xrdp
Once it's finished installing, open “Settings” on the sidebar and turn off "automatic login" in the User category. Then log out of your account. Attempting to remotely connect to your Linux computer while you’re logged in will result in a black screen!
Now get back on your Windows PC, open search and look for "RDP". A program called "Remote Desktop Connection" should pop up, open this program as an administrator by right-clicking and selecting “run as an administrator”. You’ll be greeted with a window. In the field marked “Computer” type in the IP address of your Linux computer. Press connect and you'll be greeted with a new window and prompt asking for your username and password. Enter your Ubuntu username and password here.

If everything went right, you’ll be logged into your Linux computer. If the performance is sluggish, adjust the display options. Lowering the resolution and colour depth do a lot to make the interface feel snappier.

Remote access is how we're going to be using our Linux system from now, barring edge cases like needing to get into the BIOS or upgrading to a new version of Ubuntu. Everything else from performing maintenance like a monthly zpool scrub to checking zpool status and updating software can all be done remotely.

This is how my server lives its life now, happily humming and chirping away on the floor next to the couch in a corner of the living room.
Step Seven: Plex Media Server/Jellyfin
Okay we’ve got all the ground work finished and our server is almost up and running. We’ve got Ubuntu up and running, our storage array is primed, we’ve set up remote connections and sharing, and maybe we’ve moved over some of favourite movies and TV shows.
Now we need to decide on the media server software to use which will stream our media to us and organize our library. For most people I’d recommend Plex. It just works 99% of the time. That said, Jellyfin has a lot to recommend it by too, even if it is rougher around the edges. Some people run both simultaneously, it’s not that big of an extra strain. I do recommend doing a little bit of your own research into the features each platform offers, but as a quick run down, consider some of the following points:
Plex is closed source and is funded through PlexPass purchases while Jellyfin is open source and entirely user driven. This means a number of things: for one, Plex requires you to purchase a “PlexPass” (purchased as a one time lifetime fee $159.99 CDN/$120 USD or paid for on a monthly or yearly subscription basis) in order to access to certain features, like hardware transcoding (and we want hardware transcoding) or automated intro/credits detection and skipping, Jellyfin offers some of these features for free through plugins. Plex supports a lot more devices than Jellyfin and updates more frequently. That said, Jellyfin's Android and iOS apps are completely free, while the Plex Android and iOS apps must be activated for a one time cost of $6 CDN/$5 USD. But that $6 fee gets you a mobile app that is much more functional and features a unified UI across platforms, the Plex mobile apps are simply a more polished experience. The Jellyfin apps are a bit of a mess and the iOS and Android versions are very different from each other.
Jellyfin’s actual media player is more fully featured than Plex's, but on the other hand Jellyfin's UI, library customization and automatic media tagging really pale in comparison to Plex. Streaming your music library is free through both Jellyfin and Plex, but Plex offers the PlexAmp app for dedicated music streaming which boasts a number of fantastic features, unfortunately some of those fantastic features require a PlexPass. If your internet is down, Jellyfin can still do local streaming, while Plex can fail to play files unless you've got it set up a certain way. Jellyfin has a slew of neat niche features like support for Comic Book libraries with the .cbz/.cbt file types, but then Plex offers some free ad-supported TV and films, they even have a free channel that plays nothing but Classic Doctor Who.
Ultimately it's up to you, I settled on Plex because although some features are pay-walled, it just works. It's more reliable and easier to use, and a one-time fee is much easier to swallow than a subscription. I had a pretty easy time getting my boomer parents and tech illiterate brother introduced to and using Plex and I don't know if I would've had as easy a time doing that with Jellyfin. I do also need to mention that Jellyfin does take a little extra bit of tinkering to get going in Ubuntu, you’ll have to set up process permissions, so if you're more tolerant to tinkering, Jellyfin might be up your alley and I’ll trust that you can follow their installation and configuration guide. For everyone else, I recommend Plex.
So pick your poison: Plex or Jellyfin.
Note: The easiest way to download and install either of these packages in Ubuntu is through Snap Store.
After you've installed one (or both), opening either app will launch a browser window into the browser version of the app allowing you to set all the options server side.
The process of adding creating media libraries is essentially the same in both Plex and Jellyfin. You create a separate libraries for Television, Movies, and Music and add the folders which contain the respective types of media to their respective libraries. The only difficult or time consuming aspect is ensuring that your files and folders follow the appropriate naming conventions:
Plex naming guide for Movies
Plex naming guide for Television
Jellyfin follows the same naming rules but I find their media scanner to be a lot less accurate and forgiving than Plex. Once you've selected the folders to be scanned the service will scan your files, tagging everything and adding metadata. Although I find do find Plex more accurate, it can still erroneously tag some things and you might have to manually clean up some tags in a large library. (When I initially created my library it tagged the 1963-1989 Doctor Who as some Korean soap opera and I needed to manually select the correct match after which everything was tagged normally.) It can also be a bit testy with anime (especially OVAs) be sure to check TVDB to ensure that you have your files and folders structured and named correctly. If something is not showing up at all, double check the name.
Once that's done, organizing and customizing your library is easy. You can set up collections, grouping items together to fit a theme or collect together all the entries in a franchise. You can make playlists, and add custom artwork to entries. It's fun setting up collections with posters to match, there are even several websites dedicated to help you do this like PosterDB. As an example, below are two collections in my library, one collecting all the entries in a franchise, the other follows a theme.

My Star Trek collection, featuring all eleven television series, and thirteen films.

My Best of the Worst collection, featuring sixty-nine films previously showcased on RedLetterMedia’s Best of the Worst. They’re all absolutely terrible and I love them.
As for settings, ensure you've got Remote Access going, it should work automatically and be sure to set your upload speed after running a speed test. In the library settings set the database cache to 2000MB to ensure a snappier and more responsive browsing experience, and then check that playback quality is set to original/maximum. If you’re severely bandwidth limited on your upload and have remote users, you might want to limit the remote stream bitrate to something more reasonable, just as a note of comparison Netflix’s 1080p bitrate is approximately 5Mbps, although almost anyone watching through a chromium based browser is streaming at 720p and 3mbps. Other than that you should be good to go. For actually playing your files, there's a Plex app for just about every platform imaginable. I mostly watch television and films on my laptop using the Windows Plex app, but I also use the Android app which can broadcast to the chromecast connected to the TV in the office and the Android TV app for our smart TV. Both are fully functional and easy to navigate, and I can also attest to the OS X version being equally functional.
Part Eight: Finding Media
Now, this is not really a piracy tutorial, there are plenty of those out there. But if you’re unaware, BitTorrent is free and pretty easy to use, just pick a client (qBittorrent is the best) and go find some public trackers to peruse. Just know now that all the best trackers are private and invite only, and that they can be exceptionally difficult to get into. I’m already on a few, and even then, some of the best ones are wholly out of my reach.
If you decide to take the left hand path and turn to Usenet you’ll have to pay. First you’ll need to sign up with a provider like Newshosting or EasyNews for access to Usenet itself, and then to actually find anything you’re going to need to sign up with an indexer like NZBGeek or NZBFinder. There are dozens of indexers, and many people cross post between them, but for more obscure media it’s worth checking multiple. You’ll also need a binary downloader like SABnzbd. That caveat aside, Usenet is faster, bigger, older, less traceable than BitTorrent, and altogether slicker. I honestly prefer it, and I'm kicking myself for taking this long to start using it because I was scared off by the price. I’ve found so many things on Usenet that I had sought in vain elsewhere for years, like a 2010 Italian film about a massacre perpetrated by the SS that played the festival circuit but never received a home media release; some absolute hero uploaded a rip of a festival screener DVD to Usenet. Anyway, figure out the rest of this shit on your own and remember to use protection, get yourself behind a VPN, use a SOCKS5 proxy with your BitTorrent client, etc.
On the legal side of things, if you’re around my age, you (or your family) probably have a big pile of DVDs and Blu-Rays sitting around unwatched and half forgotten. Why not do a bit of amateur media preservation, rip them and upload them to your server for easier access? (Your tools for this are going to be Handbrake to do the ripping and AnyDVD to break any encryption.) I went to the trouble of ripping all my SCTV DVDs (five box sets worth) because none of it is on streaming nor could it be found on any pirate source I tried. I’m glad I did, forty years on it’s still one of the funniest shows to ever be on TV.
Part Nine/Epilogue: Sonarr/Radarr/Lidarr and Overseerr
There are a lot of ways to automate your server for better functionality or to add features you and other users might find useful. Sonarr, Radarr, and Lidarr are a part of a suite of “Servarr” services (there’s also Readarr for books and Whisparr for adult content) that allow you to automate the collection of new episodes of TV shows (Sonarr), new movie releases (Radarr) and music releases (Lidarr). They hook in to your BitTorrent client or Usenet binary newsgroup downloader and crawl your preferred Torrent trackers and Usenet indexers, alerting you to new releases and automatically grabbing them. You can also use these services to manually search for new media, and even replace/upgrade your existing media with better quality uploads. They’re really a little tricky to set up on a bare metal Ubuntu install (ideally you should be running them in Docker Containers), and I won’t be providing a step by step on installing and running them, I’m simply making you aware of their existence.
The other bit of kit I want to make you aware of is Overseerr which is a program that scans your Plex media library and will serve recommendations based on what you like. It also allows you and your users to request specific media. It can even be integrated with Sonarr/Radarr/Lidarr so that fulfilling those requests is fully automated.
And you're done. It really wasn't all that hard. Enjoy your media. Enjoy the control you have over that media. And be safe in the knowledge that no hedgefund CEO motherfucker who hates the movies but who is somehow in control of a major studio will be able to disappear anything in your library as a tax write-off.
1K notes
·
View notes
Text

Un’Europa sottomessa e senza bussola
Gli europei non si accorgono neppure più dove stanno andando, o forse fanno finta di non saperlo: sono un po’ sonnambuli e un po’ sottomessi al loro destino. Siamo all’agonia della politica estera comune europea, che per altro non è mai esistita, cullando nel settore difesa l’idea di una Banca per il Riarmo destinata a divorare altre risorse. Hanno sempre seguito l’agenda americano-israeliana, dall’Est Europa al Medio Oriente, e ora ne pagano le conseguenze.
La loro disonestà è tale da pensare che la guerra in Ucraina sia cominciata il 24 febbraio 2022 e non quando, nel gennaio 2014, il sottosegretario di Stato Usa Victoria Nuland, in una conversazione con il suo ambasciatore a Kiev, pronunciò la ormai famosa frase «Fuck the Eu», letteralmente «l’Unione europea si fotta».
Si discuteva ancora di un accordo tra il governo ucraino del filo-russo Viktor Janukovich e l’opposizione. Allora non c’era Trump alla Casa bianca ma Barack Obama e il suo vice era Joe Biden, che accorse a Piazza Maidan a celebrare il primo anniversario delle proteste mentre suo figlio Hunter guadagnava milioni di dollari in Ucraina nel settore energetico. E ora vorremmo stupirci se Trump trascina Zelensky a firmare l’accordo multi-miliardario sulle terre rare mentre Putin, diventato ormai a Washington un «volenteroso dittatore», si offre di portargli quelle in possesso dei russi? Chi più ne ha più ne metta mentre ognuno si fa i propri conti in tasca e Macron, nella sua visita da Trump, reclama che l’Europa ha versato all’Ucraina il 60 per cento degli aiuti, più degli Stati uniti.
Ma il presidente americano si tappa le orecchie: questa guerra, nonostante le copiose commesse all’industria bellica americana, è un «cattivo affare» e bisogna chiuderla. C’è da pensare alla Cina. A raccontare la favoletta della «pace giusta» ormai insistono solo i giornali del mainstream, spiazzati dagli eventi. Ma quale pace giusta? Gaza e la Palestina sono la prova che in Europa non ci crede nessuno.
La sottomissione europea al complesso militar-industriale israelo-americano è totale. Pochi giorni dopo il massacro di Hamas del 7 ottobre, Biden spostava le portaerei nel Mediterraneo orientale e stanziava miliardi di dollari di aiuti militari per Israele: gli Stati uniti si sono immediatamente schierati non per la pace ma per una escalation del conflitto. E noi europei con loro, mascherando i nostri aiuti a Israele dietro la ormai sfiorita formula «due popoli e due stati». Il complesso militar-industriale israelo-americano si è schierato all’Onu con Putin e le dittature perché tra un po’ gli Usa riconosceranno l’annessione israeliana della Cisgiordania.
Chiediamo giustamente a Putin di ritirarsi dai territori occupati in Ucraina ma Israele occupa il Libano, ha esteso la sua presenza nel Golan siriano e si sta divorando la West Bank. Giustifichiamo tutto questo con la necessità di Israele di preservare la sua “sicurezza”, le stesse argomentazioni che usa Putin quando chiede alla Nato di tenersi lontana dall’Ucraina. Non è un caso che contro la risoluzione all’Onu che difendeva l’integrità territoriale dell’Ucraina abbiano votato contro Usa e Israele insieme a Russia, Bielorussia, Mali, Nicaragua, Corea del Nord e Ungheria (Iran e Cina si sono astenuti, si presume per la vergogna).
Il Consiglio di Sicurezza ha poi approvato una brevissima risoluzione degli Stati uniti che chiede la «rapida fine della guerra», senza però citare la Russia come aggressore e senza far riferimento alla sovranità territoriale di Kiev. Francia e Gran Bretagna, che avrebbero potuto porre il veto, hanno preferito astenersi, spianando la strada alla versione di Trump che piace tanto a Israele. Da notare il doppio binario dell’Italia. Stiamo con l’Unione europea ma Meloni, con la scusa del Forum con gli Emirati, si è sfilata dalla cerimonia di Kiev per il terzo anniversario della guerra: prendiamo 40 miliardi di dollari di mancia dagli sceicchi membri del Patto di Abramo con Israele e la premier incassa le lodi sperticate di Trump.
Cosa volete di più? È il manuale della giovani marmotte di Trump. La Ue paga anni di sottomissione a Usa e Israele: Trump è l’anello mancante di decenni in cui abbiamo giustificato, partecipato o avallato guerre di occupazione e aggressione, dall’Iraq alla Libia, dall’Afghanistan alla Palestina, provocando la disgregazione di interi paesi e popoli, centinaia di migliaia di morti e milioni di profughi. Basti pensare all’Iraq nel 2003, dove tra i soldati si contava pure un nutrito contingente di ucraini. Fu un conflitto per «esportare la democrazia» che ha precipitato la regione nell’anarchia e nel terrorismo integralista più feroce.
In un momento in cui ci si indigna per le bugie e i travisamenti della realtà di Trump, bisogna ricordare che la guerra del 2003 fu la più grande fake news della storia recente, quando gli Usa giustificarono l’attacco con una campagna di stampa e propaganda mondiale che sbandierava il possesso da parte di Saddam Hussein di armi di distruzione di massa che non furono mai trovate. Venne persino esibita all’Onu dal segretario di stato Powell una falsa provetta con armi chimiche. Una tragica commedia. Nessuno dei responsabili ha mai pagato – né Bush né Blair – e abbiamo partecipato a quella guerra e alle altre senza fiatare. Ora ci tocca accettare le bugie di Trump e gli insulti del suo vice Vance a Monaco: sanno con chi hanno a che fare. I sottomessi europei. Alberto Negri, ilmanifesto.it, 26/02/2025
44 notes
·
View notes
Text
maybe this is not news to other people but I just found out about the poem Cento Nuptialis by the 4th century Roman poet Ausonius
a cento is a type of poem that is made from lines of other poems, like a sort of collage or remix
first of all, I didn't even think such a thing existed back then, which is silly of me of course but still:
anyway, this particular cento is made up of lines (and half-lines) from Virgil. I had a read through it and 1. I actually recognise some lines from the Aeneid, and 2. there's a sex scene in it.
this mad motherfucker Decimus Magnus Ausonius actually sentence mixed (line-mixed??) Virgil into smut
I'm going to look online later to see if someone has done a nice annotated version so you can see where stuff is from
...otherwise I might have to do it myself (just for a small section) to get my points across how wild it is
11 notes
·
View notes
Text
Nosferatu: il vampiro come metafora della salute mentale

"Vieni da me", sussurra una stravolta Lily-Rose Depp, nel ruolo di Ellen Hutter, sposa che vive nel senso di colpa costante. Lo prova perché pensa di essere sbagliata a cercare "la mano della morte", come la chiama lei. Nei suoi sogni evoca infatti un'ombra, al contempo terrificante e seducente. È quella di un vampiro, un demone: Nosferatu. Ovvero "il non morto". Ma è lei ad averlo chiamato a sé, oppure è lui a essersi insinuato nella sua mente? Probabilmente se lo chiede da tutta la vita anche Robert Eggers nella sua versione della storia raccontata cento anni fa da Murnau.

Lily-Rose Depp in Nosferatu
Il regista ha visto il film dell'autore tedesco quando aveva nove anni e da allora ne è rimasto folgorato. Tanto da dirigere uno spettacolo teatrale dedicato al vampiro a soli 17 anni. E ora, dopo anni di preparazione (Nosferatu avrebbe dovuto essere il suo secondo film, con Anya Taylor-Joy come protagonista), tutto il suo studio del personaggio e del folclore legato agli strigoi (i vampiri nella mitologia romena) sono confluiti in quello che non è un semplice remake, ma una complessa rielaborazione di un mito fondante del cinema e, prima di tutto, della letteratura.
Nosferatu è in realtà Dracula: non avendo i diritti del romanzo di Bram Stoker, Murnau e la casa di produzione Prana-Film decisero di cambiare nome al protagonista e agli altri personaggi, spostando l'ambientazione dall'Inghilterra alla Germania. Questo stratagemma non impedì però di perdere la causa mossa dagli eredi dello scrittore, che portò lo studio tedesco alla bancarotta e alla distruzione di tutte le copie del film, tranne una. Proprio come quell'unica copia, che ha tramandato Nosferatu a noi, i vampiri continuano a contagiare e affascinare pubblico e autori, che ogni volta adattano il significato di questo mostro iconico ai tempi in cui vivono. Eggers è uno di loro e il morso del Conte Orlok lo ha indotto a plasmare una figura che rappresenta una delle più grandi paure del nostro tempo, ovvero la precarietà della salute mentale e la repressione del corpo (e della sessualità).
Nosferatu e la salute mentale
I sogni di Ellen si fanno sempre più vividi: l'ombra che vede avvicinarsi a lei le provoca sensazioni fisiche. La sua reazione è sconvolgente agli occhi degli altri: il corpo si contorce, gli occhi si girano, le urla diventano assordanti, in una flessione muscolare che sembra qualcosa a metà tra un attacco epilettico e un orgasmo. Tutti pensano sia pazza. E sporca. Eppure Ellen è l'unica che sembra davvero in connessione con una grande minaccia che incombe sulla città, la fittizia Wisborg, e i suoi cari. Il marito Thomas (Nicholas Hoult), per fare carriera, accetta infatti un incarico impegnativo: andare in Transilvania per la firma di un contratto con il Conte Orlok (Bill Skarsgård). Non sa che, così facendo, sarà il tramite fisico tra la bestia e la moglie.
Al contrario di Murnau e Werner Herzog, che ha trasformato Nosferatu in un eroe romantico, schiacciato dalla solitudine e dal desiderio, Eggers dà una rappresentazione inedita e brutale del personaggio, che, anche nell'aspetto, richiama una natura primordiale e violenta, un predatore, incarnazione del male puro. Questa forza è irresistibilmente attratta da Ellen, che, a differenza di tutte le altre persone che la circondano, non reprime questi istinti per conformarsi alle regole della società. E, per questo, dubita di se stessa, mette in discussione la propria mente e somatizza questa sofferenza di spirito e cuore.
Questo dolore viene reso per immagini dall'eccezionale fotografia di Jarin Blaschke, che lavora con Eggers fin dal suo esordio, The Witch. Più Ellen perde forza vitale, più le immagini si fanno desaturate, al punto da sembrare quasi in bianco e nero: come se il film perdesse sangue insieme alla sua protagonista.
La centralità della donna

Nicholas Hoult in Nosferatu
Ancora una volta la figura della donna è fondamentale per Eggers: è attraverso di lei (e il suo corpo) che si crea il legame tra la società e Nosferatu. Tramite Ellen il vampiro interagisce con le grandi istituzioni che condizionano le nostre vite: la famiglia, incarnata dal marito Thomas, il capitale, rappresentato dai coniugi Harding (Aaron Taylor-Johnson ed Emma Corrin), dal patrimonio consistente, e la scienza, ovvero il Professor Albin Eberhart Von Franz, interpretato da Willem Dafoe, ormai attore feticcio di Eggers, al terzo film con il regista (e non è certamente un caso che Dafoe sia stato Max Schreck, interprete del Nosferatu di Muranau, nel film L'ombra del vampiro).

Willem Dafoe in Nosferatu
Laddove gli altri personaggi non riescono a contrastare, e soprattutto a comprendere e riconoscere, la forza insopprimibile e inarrestabile di Orlok, è proprio Ellen la figura chiave tra la razionalità e l'inimmaginabile. Perché lei, mortificata dalla società nella mente e nel corpo in quanto donna, ha da tempo riconosciuto, grazie alla continua repressione di ogni istinto e libertà, il male dentro di sé e può quindi guardarlo negli occhi. Questo è evidente in un finale molto interessante, che tradisce l'originale e, ovviamente, non vi sveliamo.
Per dire tutto questo Eggers ha costruito un film dalla cura formale impeccabile, in cui l'accuratezza storica si fonde con il suo amore per i classici del cinema, a cominciare dall'espressionismo tedesco. Più che un remake, questo Nosferatu è quindi un dialogo tra i grandi del passato e il nostro presente, che diventa sempre più incerto e soffocante. Se soffrite di ansia e claustrofobia la visione potrebbe essere catartica. Oppure terrificante. In ogni caso, ci troviamo di fronte a una svolta per l'autore, che torna alle origini, realizzando il suo film più vicino al magnifico The Witch, e contemporaneamente si libera dell'eredità ingombrante di chi l'ha preceduto.
Conclusioni
Splendido esteticamente, grazie soprattutto alla fotografia di Jarin Blaschke, il quarto film di Robert Eggers segna un punto di svolta nella carriera del regista. Realizzando il remake del film che più lo ha segnato, è ora pronto per una nuova fase. Grazie a questo punto di vista originale sul classico di Murnau (che a sua volta è una rivisitazione di Dracula), lo spettatore può fare un viaggio nel proprio subconscio. Un'esperienza che, nel bene e nel male, non lascia indifferenti.
👍🏻
La bellezza delle immagini di Eggers: ogni inquadratura sembra un dipinto.
La fotografia di Jarin Blaschke.
L'interpretazione sorprendente di Lily-Rose Depp, qui alla sua prova migliore finora.
La bravura di Willem Dafoe.
👎🏻
La rielaborazione dell'aspetto di Orlok potrebbe lasciare spiazzati.
Alcune scene sono volutamente esagerate e potrebbero non convincere tutti.
Nella seconda parte c'è un'accelerazione di ritmo che contrasta con la sensazione di paralisi della prima, risultando un po' forzata.
#nosferatu#nosferatu 2024#nosferatu movie#robert eggers#count orlok#nosferatu spoilers#lily rose depp#willem dafoe
8 notes
·
View notes
Text
Ultima notte di un campo intenso ma molto molto bello. Adesso stiamo dormendo con le lupette sotto le stelle sul balcone che c’è fuori dalla nostra stanza, il clima secco lo permette senza stare alla guazza dell’umidità. Domani anzi, ormai oggi essendo le due passate, arriveranno i genitori a prenderli e torneremo alla nostra quotidianità.
In queste vdb ho capito, per l’ennesima volta, quanto io tenga ai miei bambini. Quanto vedermeli appiccicati addosso in cerca di un abbraccio, di conforto, in cerca di ascolto, di comprensione sia meraviglioso. Nonostante il caldo intenso, nonostante fiumi di lacrime al giorno, nonostante nasi sanguinanti, nonostante rimproveri, nonostante momenti in cui bisognava contare fino a cento è stato un bel campo e sono, e siamo, molto soddisfatti del risultato del nostro impegno e delle mille corse dell’ultimo minuto. Con Ake e Kaa ci siamo supportati tutto il tempo e siamo arrivati cotti ma soddisfatti e contenti. Tra di noi di staff non tutto è andato perfettamente, o meglio, tra noi tre tutto è andato bene e abbiamo continuato a lavorare esattamente come abbiamo fatto fino ad ora, ma con il quarto membro abbiamo avuto la conferma che c’è qualcosa che non va e che ciò non può fermare una staff e deve essere discusso.
Fare il capo scout non è semplice, stare con i ragazzi, stare con i bambini non è semplice. Ti risucchia a livello emotivo e a livello fisico al 110% tutto il tempo, devi pensare prima di parlare in modo da usare le parole giuste, devi saper usare il tono della voce in modo da non farli sentire sempre sotto attacco, devi saper gestire crisi di rabbia, pianti da nostalgia, pianti da coccole, pianti da influenza, pianti da stanchezza, momenti di tristezza, momenti di invidia, momenti di debolezza e tutto questo non mostrando mai loro la tua stanchezza. Devi gestire il risultato di genitori assenti, di genitori iperprotettivi, di genitori che non li vogliono rendere autonomi e quindi fanno tutto al posto loro ma al tempo stesso li vorrebbero già maturi e grandi da potersela cavare da soli senza intralciare le loro vacanze, i loro aperitivi o le loro serate fuori. Per fortuna non tutti i genitori che abbiamo sono così, ci sono anche quelli che dedicano il tempo ai figli, che sono protagonisti alla loro crescita, che li supportano in tutto. E quest’ultimi sono i miei preferiti e quelli con i quali ho un rapporto più stretto ed onesto.
Essere un educatore è stancante, ti mette alla prova, ti fa tirare fuori tutta la creatività che possiedi, ti fa pensare per buona parte del tuo tempo ai bisogni dei bambini ed alle attività da proporre per aiutarli a crescere. Essere un educatore ti mette anche in crisi, ti fa venire paure, dubbi, incertezze e devi molte volte migliorare te stesso per offrire loro sempre una versione migliore di te e per dar loro il buon esempio.
Queste vdb stanno per giungere al termine ed è stata proprio una cosa ben fatta.
23 notes
·
View notes
Text
"Ti sceglierei in cento vite, in cento mondi. In una qualsiasi versione della realtà, ti troverei e ti sceglierei ancora"
43 notes
·
View notes
Text


deathscape: a cento
A cento is a poem composed entirely of other texts. In this case, 4 articles and 1 book, cited at the end. Each source uses a different font.
shareable & screen-reader friendly version on my substack (audio version to come)
9 notes
·
View notes
Text
RMNewsletter 2025 02/02/2025 Story Pitch January 2025 Synthographers Conversations 2024 Black Romantic Compulsory Figures - synthography Cento Series 89 Spoils of War government Miss Evers Boys from Movies That Move We Economic Corner 09 - media properties dictate? Economic Corner 10 - online divestiture Economic Corner 11 - What should you see after a Deepseek? Year of the Snake https://rmnewsletter.over-blog.com/2024/11/12/01/2024-rmnewsletter.html
#rmnewsletter
#rmnewsletter#pitch#synthography#cento#poetry#spoilsofwar#missevers#moviesthatmovewe#economiccorner#media#online#deepseek#ai#chinesenewyear#snake
4 notes
·
View notes
Text
non risolveremo mai la discussione media in lingua originale vs doppiaggio tra noi italiani perché una delle due fazioni non avendo provato tutte e due le opzioni argomenta puramente in malafede però mi preme dire che anche l’ultimo bastione dei millennial e genx, cioè le opening degli anime sono purtroppo cento volte meglio nella versione originale, tipo Anri - Cat’s Eye a noi ce la hanno tenuta nascosta per decenni sostituendola con una merda indecente senza groove alcuno.
2 notes
·
View notes
Text

Il primo monopattino elettrico della storia ha più di cento anni
Te lo raccontiamo qui:
L'Autoped, come veniva chiamato, fu inventato da Arthur Gibson a New York. Vennero prodotte due versioni: una con motore elettrico e un'altra con motore a benzina. Raggiungevano una velocità di trentadue chilometri all'ora, ma la versione elettrica aveva un'autonomia di soli diciannove chilometri.
Costava cento dollari, che al cambio odierno sarebbero quasi 2.700. Tuttavia ne è valsa la pena per i viaggi brevi a causa del minor consumo di energia (anche il motore a benzina consumava meno carburante di un'auto o di una moto). I suoi acquirenti erano soprattutto donne, poiché a quel tempo erano poche quelle che avevano la patente.
L'Autoped veniva utilizzato anche da postini, agenti di polizia e persino ladri. Nonostante il successo, ebbe vita breve, un po' perché non ci fu una grande distribuzione e un po' come oggi a causa di gente sconsiderata che provocava incidenti. Ha smesso di essere prodotto nel 1922 ma, come si suol dire, le mode tornano sempre.
3 notes
·
View notes
Text
Guía sobre Red Hat Enterprise Linux: La Solución Empresarial en Linux
1. Introducción
Presentación de Red Hat Enterprise Linux (RHEL)
Red Hat Enterprise Linux (RHEL) es una distribución de Linux de clase empresarial desarrollada por Red Hat, Inc. Lanzada en 2000, RHEL está diseñada para ser una solución robusta y confiable para entornos empresariales y de misión crítica.
Importancia de RHEL en el ecosistema Linux
RHEL es ampliamente utilizado en servidores y entornos de nube debido a su estabilidad, soporte técnico y la capacidad de integrarse con una amplia gama de tecnologías empresariales. Es conocida por su enfoque en la seguridad y la escalabilidad.
2. Historia y Filosofía de Red Hat Enterprise Linux
Origen y evolución de RHEL
RHEL se basa en la distribución comunitaria Fedora y fue creado para ofrecer una versión comercial y soportada de Linux. Red Hat ha lanzado versiones de RHEL con ciclos de vida extensos, lo que garantiza soporte a largo plazo para empresas.
Filosofía de RHEL y el software libre
RHEL sigue la filosofía del software libre y open source, pero ofrece soporte comercial, lo que incluye asistencia técnica, actualizaciones y servicios adicionales. Esto proporciona a las empresas la confianza de contar con respaldo profesional.
3. Características Clave de Red Hat Enterprise Linux
Soporte a largo plazo y estabilidad
RHEL ofrece soporte extendido para cada versión, con actualizaciones de seguridad y mantenimiento durante 10 años. Esto es crucial para entornos empresariales que requieren estabilidad y confiabilidad a largo plazo.
Gestor de paquetes
YUM (Yellowdog Updater, Modified) fue el gestor de paquetes tradicional de RHEL, pero ha sido reemplazado por DNF (Dandified YUM) en versiones más recientes. DNF mejora la gestión de paquetes y la resolución de dependencias.
Comandos básicos: sudo dnf install [paquete], sudo dnf remove [paquete], sudo dnf update.
Formatos de paquetes soportados
RHEL utiliza varios formatos de paquetes:
.rpm: El formato de paquetes nativo de Red Hat y sus derivados.
.deb: Aunque no es nativo, puede instalarse en sistemas basados en RHEL con herramientas específicas.
Soporte para entornos virtuales y en la nube
RHEL ofrece herramientas y soporte para la virtualización, incluyendo KVM (Kernel-based Virtual Machine), y es compatible con plataformas de nube como AWS, Azure y OpenStack.
4. Proceso de Instalación de Red Hat Enterprise Linux
Requisitos mínimos del sistema
Procesador: 1 GHz o superior.
Memoria RAM: 1 GB como mínimo, 2 GB o más recomendados.
Espacio en disco: 10 GB de espacio libre en disco.
Tarjeta gráfica: Soporte para una resolución mínima de 1024x768.
Unidad de DVD o puerto USB para la instalación.
Descarga y preparación del medio de instalación
La descarga de RHEL requiere una suscripción activa con Red Hat. Se puede preparar un USB booteable usando herramientas como Rufus o balenaEtcher.
Guía paso a paso para la instalación
Selección del entorno de instalación: El instalador gráfico de RHEL, basado en Anaconda, ofrece una interfaz intuitiva para la instalación.
Configuración de particiones: El instalador permite particionado automático y manual, adaptándose a diferentes configuraciones de almacenamiento.
Configuración de la red y selección de software: Durante la instalación, se configuran las opciones de red y se pueden elegir paquetes y características adicionales.
Primeros pasos post-instalación
Actualización del sistema: Ejecutar sudo dnf update después de la instalación garantiza que todo el software esté actualizado.
Instalación de controladores adicionales y software: RHEL puede instalar automáticamente controladores adicionales necesarios para el hardware.
5. Comparativa de RHEL con Otras Distribuciones
RHEL vs. CentOS
Objetivo: CentOS era una versión gratuita y sin soporte de RHEL, pero ha sido reemplazado por CentOS Stream, que ofrece una vista previa de la próxima versión de RHEL. RHEL proporciona soporte técnico y actualizaciones extendidas, mientras que CentOS Stream actúa como un puente entre Fedora y RHEL.
Filosofía: RHEL se centra en el soporte empresarial y en la estabilidad, mientras que CentOS Stream se enfoca en el desarrollo y la contribución de la comunidad.
RHEL vs. Ubuntu Server
Objetivo: Ubuntu Server está diseñado para ser fácil de usar y de administrar, con un ciclo de lanzamientos regular. RHEL, por su parte, se enfoca en ofrecer soporte a largo plazo y en satisfacer las necesidades de grandes empresas.
Filosofía: Ubuntu Server ofrece versiones LTS para estabilidad, mientras que RHEL proporciona soporte y servicios comerciales extensivos.
RHEL vs. SUSE Linux Enterprise Server (SLES)
Objetivo: SLES, desarrollado por SUSE, es similar a RHEL en términos de soporte empresarial y estabilidad. Ambas distribuciones ofrecen soporte extendido y herramientas para la gestión de servidores.
Filosofía: RHEL y SLES son comparables en términos de soporte empresarial, pero cada uno tiene su propio enfoque y conjunto de herramientas específicas.
6. Herramientas y Servicios de Red Hat
Red Hat Satellite
Red Hat Satellite es una solución de gestión de sistemas que permite la administración centralizada de sistemas RHEL, incluyendo la implementación, configuración y mantenimiento.
Red Hat Ansible Automation
Ansible Automation es una herramienta para la automatización de tareas y la gestión de configuraciones, facilitando la administración de sistemas a gran escala.
Red Hat OpenShift
OpenShift es una plataforma de contenedores y Kubernetes gestionada por Red Hat, ideal para la implementación y gestión de aplicaciones en contenedores.
7. Comunidad y Soporte
Acceso al soporte de Red Hat
Red Hat ofrece soporte técnico profesional a través de sus suscripciones, que incluyen asistencia técnica 24/7, actualizaciones de seguridad y parches.
Recursos comunitarios y documentación
Red Hat Customer Portal: Acceso a documentación, guías de usuario, y foros de soporte.
Red Hat Learning Subscription: Cursos y formación en línea para usuarios de RHEL.
8. Conclusión
RHEL como una opción robusta para empresas
Red Hat Enterprise Linux es una opción sólida para empresas que buscan una distribución de Linux con soporte técnico profesional, estabilidad y escalabilidad. Su enfoque en la estabilidad y el soporte extendido lo convierte en una opción ideal para entornos empresariales y de misión crítica.
Recomendaciones finales para quienes consideran usar RHEL
RHEL es adecuado para organizaciones que requieren soporte técnico y estabilidad a largo plazo, y que están dispuestas a invertir en una solución de Linux empresarial respaldada por Red Hat.
9. Preguntas Frecuentes (FAQ)
¿RHEL es adecuado para pequeñas empresas?
RHEL es ideal para empresas de todos tamaños que buscan un sistema operativo empresarial robusto y con soporte técnico profesional.
¿Qué diferencia a RHEL de CentOS?
CentOS era una versión gratuita y comunitaria de RHEL, pero ahora CentOS Stream sirve como una vista previa de las próximas versiones de RHEL. RHEL proporciona soporte empresarial y actualizaciones extendidas.
¿Cómo obtengo soporte para RHEL?
El soporte se obtiene a través de una suscripción con Red Hat, que incluye asistencia técnica, actualizaciones y acceso a herramientas de gestión.
¿RHEL es compatible con software de terceros?
Sí, RHEL es compatible con una amplia gama de software y aplicaciones de terceros, y Red Hat ofrece soporte para integrar soluciones empresariales.
#Red Hat Enterprise Linux#RHEL#distribución Linux empresarial#Linux#gestor de paquetes#DNF#RPM#instalación RHEL#soporte técnico RHEL#Red Hat Satellite#Red Hat Ansible#Red Hat OpenShift#comparación RHEL#RHEL vs CentOS#RHEL vs Ubuntu Server#RHEL vs SLES#comunidad RHEL#recursos RHEL#actualizaciones RHEL
3 notes
·
View notes
Note
hellooo!! I saw your painland cento on love and devotion and it’s so so gorgeous! The edits are so mesmerizing and the quotes all work so well. Can I ask which version of Orpheus and Eurydice you used for the “let go of me” quote? I checked the sources and it wasn’t super clear but it’s just so romantic I can’t stop thinking about it
Hi! First, thank you so much, you are so kind! ♡
About that... sorry for the lack of clarity, that was the last quote i added after reading a ridiculous amount of retellings of the myth.
So, this was the original source for the image, i didn't found any more direct information about it, but do to the style of the writing and the font, I deduced it was from a play based on the story, I didn't found which one still, so my apologizes.
Like I said, I read several versions and articles about that myth, and I'll be unfair not to share some of it, as an apology for not sending you the source.
From Eurydice by Sarah Ruhl (note: this is tragic but it's also curious in its own way cuz it's eurydice's pov of the story)

From The story of Orpheus and Eurydice, as told by Apollonius of Rhodes, Virgil and Ovid (and retold by Edith Hamilton in Mythology):
Note: Probably my favourite quote!

+ Myth of the Week: Orpheus in the Madeline Miller web:
Note: I'm just letting this here cuz I found it too hilarious and interesting not to

#i feel like this is too much#it's the autism#I'm gonna keep looking for that source I promise#asks <3
4 notes
·
View notes
Text
How to Pin Versions in Yum or Dnf for RHEL or CentOS Linux
Let us see how to lock a package to a specific version, only exclude a package from the yum update or dnf update on CentOS, RHEL, Fedora, and friends.
3 notes
·
View notes
Text
How To Setup Elasticsearch 6.4 On RHEL/CentOS 6/7?

What is Elasticsearch? Elasticsearch is a search engine based on Lucene. It is useful in a distributed environment and helps in a multitenant-capable full-text search engine. While you query something from Elasticsearch it will provide you with an HTTP web interface and schema-free JSON documents. it provides the ability for full-text search. Elasticsearch is developed in Java and is released as open-source under the terms of the Apache 2 license. Scenario: 1. Server IP: 192.168.56.101 2. Elasticsearch: Version 6.4 3. OS: CentOS 7.5 4. RAM: 4 GB Note: If you are a SUDO user then prefix every command with sudo, like #sudo ifconfig With the help of this guide, you will be able to set up Elasticsearch single-node clusters on CentOS, Red Hat, and Fedora systems. Step 1: Install and Verify Java Java is the primary requirement for installing Elasticsearch. So, make sure you have Java installed on your system. # java -version openjdk version "1.8.0_181" OpenJDK Runtime Environment (build 1.8.0_181-b13) OpenJDK 64-Bit Server VM (build 25.181-b13, mixed mode) If you don’t have Java installed on your system, then run the below command # yum install java-1.8.0-openjdk Step 2: Setup Elasticsearch For this guide, I am downloading the latest Elasticsearch tar from its official website so follow the below step # wget https://artifacts.elastic.co/downloads/elasticsearch/elasticsearch-6.4.2.tar.gz # tar -xzf elasticsearch-6.4.2.tar.gz # tar -xzf elasticsearch-6.4.2.tar.gz # mv elasticsearch-6.4.2 /usr/local/elasticsearch Step 5: Permission and User We need a user for running elasticsearch (root is not recommended). # useradd elasticsearch # chown -R elasticsearch.elasticsearch /usr/local/elasticsearch/ Step 6: Setup Ulimits Now to get a Running system we need to make some changes of ulimits else we will get an error like “max number of threads for user is too low, increase to at least ” so to overcome this issue make below changes you should run. # ulimit -n 65536 # ulimit -u 2048 Or you may edit the file to make changes permanent # vim /etc/security/limits.conf elasticsearch - nofile 65536 elasticsearch soft nofile 64000 elasticsearch hard nofile 64000 elasticsearch hard nproc 4096 elasticsearch soft nproc 4096 Save files using :wq Step 7: Configure Elasticsearch Now make some configuration changes like cluster name or node name to make our single node cluster live. # cd /usr/local/elasticsearch/ Now, look for the below keywords in the file and change according to you need # vim conf/elasticsearch.yml cluster.name: kapendra-cluster-1 node.name: kapendra-node-1 http.port: 9200 to set this value to your IP or make it 0.0.0.0 ID needs to be accessible from anywhere from the network. Else put your IP of localhost network.host: 0.0.0.0 There is one more thing if you have any dedicated mount pint for data then change the value for #path.data: /path/to/data to your mount point.
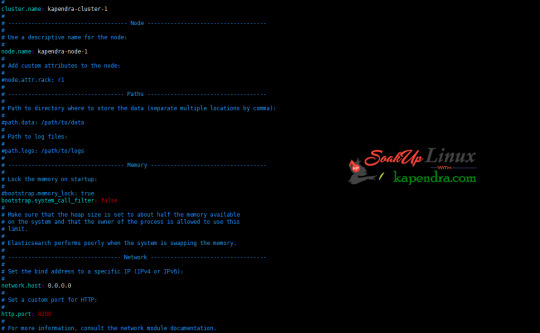
Your configuration should look like the above. Step 8: Starting Elasticsearch Cluster As the Elasticsearch setup is completed. Let the start Elasticsearch cluster with elastic search user so first switch to elastic search user and then run the cluster # su - elasticsearch $ /usr/local/elasticsearch/bin/elasticsearch 22278 Step 9: Verify Setup You have all done it, just need to verify the setup. Elasticsearch works on port default port 9200, open your browser to point your server on port 9200, You will find something like the below output http://localhost:9200 or http://192.168.56.101:9200 at the end of this article, you have successfully set up Elasticsearch single node cluster. In the next few articles, we will try to cover a few commands and their setup in the docker container for development environments on local machines. Read the full article
2 notes
·
View notes
Text
operating system
An Operating System (OS) is system software that manages computer hardware, software resources, and provides common services for computer programs. It's the most fundamental software that enables other applications to run on a computing device. Here's a detailed breakdown of an operating system:
1. Definition of Operating System
An Operating System is software that acts as an intermediary between computer hardware and the user. It provides a user interface and controls all hardware components, making it easier for users and applications to interact with the computer without needing to know hardware-level details.
2. Functions of Operating System
✅ a. Process Management
Manages processes in a system: creation, scheduling, termination.
Handles multitasking (running multiple processes simultaneously).
Provides mechanisms for process synchronization and communication.
✅ b. Memory Management
Allocates and deallocates memory space as needed by programs.
Keeps track of each byte in a computer’s memory and optimizes RAM usage.
Manages virtual memory (swap space on disk).
✅ c. File System Management
Organizes files on storage devices like hard drives or SSDs.
Provides file-related operations: create, delete, read, write, etc.
Manages file permissions and security.
✅ d. Device Management
Controls and manages I/O devices (keyboard, mouse, printer, etc.).
Uses device drivers to communicate with hardware components.
Allocates devices to processes when needed.
✅ e. Security and Access Control
Protects data and system resources from unauthorized access.
Supports user authentication and permissions.
Provides encryption and firewall mechanisms.
✅ f. User Interface
Provides a user interface to interact with the system:
Command-Line Interface (CLI)
Graphical User Interface (GUI)
🔷 3. Types of Operating Systems
TypeDescriptionBatch OSExecutes batches of jobs without manual intervention.Time-sharing OSMultiple users share system resources simultaneously.Distributed OSManages a group of distinct computers and makes them appear as one.Real-time OSResponds to input instantly (used in critical systems like flight control).Network OSManages network resources and allows shared access to files and printers.Mobile OSSpecialized OS for mobile devices (e.g., Android, iOS).Embedded OSUsed in embedded systems like smart TVs, washing machines, etc.
🔷 4. Examples of Operating Systems
💻 Desktop and Server OS:
Microsoft Windows
Linux (Ubuntu, Fedora, CentOS)
macOS
UNIX
📱 Mobile OS:
Android
iOS
🔷 5. Multitasking, Multithreading, and Multiprocessing
✅ Multitasking:
Running multiple applications at the same time.
✅ Multithreading:
Multiple threads within a single application run concurrently.
✅ Multiprocessing:
Using multiple CPUs/cores to execute processes simultaneously.
🔷 Conclusion
An Operating System is vital for any computing device to function. It manages hardware, provides essential services, ensures user interaction, and forms the platform on which application software runs. Its design and performance deeply influence the overall system reliability and efficiency.
If you'd like, I can also provide a PDF version or create a presentation outline for this content.
0 notes