#DIY Arduino
Explore tagged Tumblr posts
Visit Tumblr Blog
Explore Tumblr blogs with no restrictions, modern design and the best experience.
Last Seen Tumblr Blogs


Fun Fact
Celebrities use Tumblr as well.
Text
youtube
#SIM800L#ESP32#arduino#IOT#smart city#DIY#DIY Arduino#internet of things#smart home#dc to dc buck converter#lm2596#Youtube
0 notes
Text

Выпаял пару экранов для моих будущих проектов. Занимаюсь своего рода переработкой отходов. Иначе их просто выкинули бы.
#diy#diy projects#arduino#фотоархив#фотоблог#мои фотографии#фотография#фото#личный тамблер#мой тамблер#русский тумблер#личный блог#личный дневник#мой tumblr#мой блог#моя жизнь#русский тамблер#русский текст#тумбурочка#турумбочка#тамблер на русском#русский tumblr#русский блог#русский пост
31 notes
·
View notes
Text
More custom trackball!

Some more progress on this custom trackball. That's the core "module" for it comprised of the main PCB + ball. Stuff like button clusters and wrist rest will literally be bolted on to that.
The ball itself's also 3D-printed, works better than expected!
22 notes
·
View notes
Text
Skaven warpstone lantern prototype!
Warning: flashing lights


Here's a little Arduino project I've been working on for my Skaven themed LARP group! It's a multifunctional lantern with three different modes, an unstable warp stone powered light, a standard flame lantern and a full bright white light for those late-night toilet runs.
I'm pretty proud of the warpstone effect, I made it so when the light dims the warpstone becomes unstable and starts crackling unpredictability as it tries to restabilize, then eventually once it destabilizes it glows more solidly and more brightly for a time before it fades and destabilizes again.
#3d printing#larp#larp costume#skaven#warhammer fantasy#arduino#diy craft#diy projects#rgb lights#led lights#led lamp#electronic
9 notes
·
View notes
Text
Today I fixed up my Mini-Hakkero prop for my cosplay!
Originally made it last year, but bringing it to cons ended up killing my terribly loose solder and crimp jobs for the admittedly janky internal wiring. For my fix I ended up having to skip 3 unreachable LEDs and attach new wires to the LED spiral (the shell stuck too much together and I could not reach under the battery holder anymore). A compromise, but one that ended up looking alright.
It's not the cleanest thing, but it was my first ever arduino project and with the new pattern i set up, it works decently enough as a cosplay prop :)
#marisa kirisame#touhou project#東方project#touhou#arduino#cosplay#diy projects#3d printing#my cosplay#touhou cosplay
41 notes
·
View notes
Text
DIY Laser Tripwire Security System Using Arduino

The project consists of a laser module that continuously emits a beam aimed at a laser receiver sensor. When an object (such as a person) obstructs the laser, the receiver detects the interruption and triggers an alarm via a buzzer. This system is ideal for securing doorways, hallways, or any restricted area.
COMPONENTS REQUIRED
Arduino Uno
Laser LED Module
Laser Receiver Sensor Module
Buzzer
Jumper wires
Breadboard
Circuit Diagram

CODE
#define LASER_PIN 7
#define RECEIVER_PIN 8
#define BUZZER_PIN 9
void setup() {
pinMode(LASER_PIN, OUTPUT);
pinMode(RECEIVER_PIN, INPUT);
pinMode(BUZZER_PIN, OUTPUT);
digitalWrite(LASER_PIN, HIGH); // Laser ON
Serial.begin(9600);
}
void loop() {
int status = digitalRead(RECEIVER_PIN);
if (status == 1) { // If laser beam is blocked
Serial.println("⚠️ Intruder Detected!");
digitalWrite(BUZZER_PIN, HIGH);
} else {
Serial.println("✅ Area Secure");
digitalWrite(BUZZER_PIN, LOW);
}
delay(500);
}
youtube
9 notes
·
View notes
Text
need a bit of advice on something rather new to me... i have been DYING to get into some semblance of diy electronics/robotics, specifically regarding the idea of building a flipper zero knockoff with a raspberry pi/esp32/arduino. or a hack rf one ripoff, etc. u get it? i wanna make a lil handheld pwnagotchi pet style device for rolljam rf shit, something that can copy and paste and send and receive rf signals, but homemade by my self....
please if anyone has experience, resources, ideas, anything at all= hit me up right now immediately asap today please.... i am so passionate and ready to do this please help me make device go beepboop
#flipper zero#hack rf one#raspberry pi#esp32#arduino#diy electronics#diy#diy hacking#car hacking#hacking hardware#hacking#help#hacking help#hacking question#need advice#diy projects#diy craft#diy punk#upcycle#homebrew
14 notes
·
View notes
Text

#robot#robotics#robots#technology#art#engineering#arduino#d#electronics#transformers#mecha#tech#toys#anime#robotic#scifi#gundam#ai#drawing#artificialintelligence#digitalart#innovation#illustration#electrical#automation#robotica#diy#design#arduinoproject#iot
33 notes
·
View notes
Text
The Instrument : Part 2: Components
<- Go to Part 1
Cables

The veins and arteries. As is tradition with any new idea I have, I make new cables. Mostly because the cables I made previously were all custom that the lengths or connectors just cannot be used anywhere else. Coming off of the relay box, I kept the solder gun warm and went straight into making cables. I used Canare wires and Yongsheng connectors. Easy to source for me and good quality.
I never made a MIDI cable before and believe me, they look really beautiful with these metal connectors (see above).
I made a total of 37 analog/midi cables.
I also made:
Four 10 pin remote control cables for the Revox units.
One 15 pin extension cable for the Fostex D2424
One DB25 AES I/O cable for communication between the DM1000 and SPX units.
This makes a grand total of 43 finished cables, 93 connectors, and about 90 meters of cable. All93 heat shrunk and perfectly made. 93
You can b93elieve me when I say 93 that I was counting 93down Every. Last. One. 9.3.
Phew. 93
Of course after you finish with something, you always think of how it could be better. After connecting it all up, I am really wanting to have a more polychromatic palette of cables rather than just a rat's nest of black (boring). Maybe I can sell the black cables and make a more colorful back-end (gulp).
MOTU Midi Express XT
So now I needed something to manage the MIDI messages between all of my equipment. I have used MOTU software and hardware for 20 years and their MIDI patchbays were always affordable and reliable so I found a used one for a reasonable price and wired it up.
In my research I found this article and decided MOTU was the way to go.
RME Digiface USB

Connecting the DM1000 to the computer took a bit of consideration. I knew that once the audio was converted in the DM1000, I wanted it to stay in the digital domain wherever it went until it was output again. So I needed a multichannel USB interface that didn't take up another rack space and had a reasonable cost. I didn't need any other preamps or other extra things, just a digital I/O. The RME was the best solution and had the best reputation. This was the only thing that I bought new.
The DIGIface has 32 digital I/O via 4 banks of ADAT I/O which allows me to input/output sound from the computer (to the recorders) and manage the audio routings throughout the instrument using the included RME TotalMIX software. Every single connection was used like it was made just for this.
Tech 21 NYC Midi Mongoose
A small MIDI foot pedal that can output 128 MIDI program change messages. So far I have programmed it to start the Freeze layer playback in each internal effect. The foot pedal is a bit fiddly when you want to go from say, 3 to 65, but it should make you arrange the programs in such a way that makes it easier for you. To make it more dynamic and user friendly, I will program more functions in the MIDI translator program.
Speaking of which...
Computer and Software
This is the climax of this post. At least for me. Best take a seat for this one. <br><br>
Welcome to the Brain. The computer exclusively manages all MIDI and audio routing. For the MIDI translator, I use Bome MIDI Translator PRO (BMT). An amazing program that allows you to translate anything to anything (really, i mean it) and more.
I hired the Bome forum moderator, Steve Caldwell, to help me make a program using BMT that remembered the fader, button, and knob positions between each USER DEFINED layer on both REMOTE layers. The USER DEFINED layer on the DM1000 has 4 banks but they are only overlays that are meant to be used one at a time. With this custom program, I now have a total of 8 INDEPENDENT banks over two REMOTE layers (384 controls total) that can be recalled with a button press and be used to control anything via MIDI. This was not how Yamaha intended it but this is the kind of power MIDI can have. This rack mountable DM1000 just got a whole lot BIGGER.
[Techie side note: The only drawback for this is that you cannot exclude (Recall Safe) these faders from a scene change like you can for the top level faders. Still searching for a solution or workaround...]
As an example, I mapped all of the parameters of each SPX2000 unit AND all 4 internal effects to the faders and knobs allowing live control of multiple parameters at the same time in any combination using BMT. The controls can also be automated with the internal automation on the DM1000. The sky's the limit.
I should add that even on the top layers, each control for the audio channels 1-48 (faders, knobs, buttons) can be used exclusively as a MIDI controller (no audio thru the channel) or mixed together (MIDI fader next to an audio fader) side by side, as desired. For example, I am using faders 9-16 to exclusively send MIDI messages to control the A77s (for now). Additional buttons (72 buttons) can be programmed on the USER DEFINED KEYS section. So taking all of this into account, you can have a grand total of 600 controls* for other MIDI instruments from a single console. (Not counting all the other function buttons on the console that transmit MIDI. Even the headphone level knob sends MIDI!)
* Note: I think there is a limit with the amount of unique MIDI messages that can be programmed, but using BMT you can program a computer keystroke to control software, use SysEx, and so on.
Studio
Okokok. Deep breaths.
I had to get some furniture to put all this stuff. I had a custom table made per my specifications and got rid of all the old furniture (green desk). For monitors, I bought a pair of JBL Studio 2 speakers. These are powered by my old, underused Yamaha Hi-fi amplifier (RX-V357) and subwoofer that I woke up after a very long, dusty, moldy, sleep in storage.

The JBL speakers are designed to be recessed in a wall but I custom made an aluminum enclosure for them and hung them on speaker wall mounts. This was a cost saving measure but also a space saving one, as these speakers are not as expensive, deep, and boxy as a typical monitor.
I opted for a standing studio to practice a 'live' performance. After so much soldering, I really didn't mind standing and its good practice for the future. I found I move faster that way, though I do have to take breaks more often. I had to put the DM1000 on sturdy packing paper boards to prop it up.
Sonosax Mini R82

My trusty Sonosax. This and my other recorders, are the breath that give this instrument life. I don't create sound.
I made a new custom cable that connects to the digital stereo out of the DM1000 for quick sketches and stereo recordings. At the end of the day I take it on the road to listen to the daily recordings and take notes.
Fostex D2424 LV

Last but not least. This was the last thing I bought. It was pretty much a new unit and very reasonably priced for a 24-track recorder. I only needed to get a compatible HD, replace the lithium battery, and change the FAN which was SO noisy. I replaced it with a Noctua NF-A8 ULN (Ultra low noise) and now it lives silently under my desk. If you have one of these HD recorder units, I HIGHLY recommend this upgrade. I found out that the reason that the fans are so loud is because the unit does not have a thermometer that regulates fan speed. So the fans are just running at its maximum speed all the time, hence all the noise. With research, I found that the Noctua was one of the quietest fans on the market at its highest RPM.

I remember these Fostex units way back when and it was the remote that caught my eye. All of the controls and display are contained in a removable unit that can be extended and used as a remote control. I contacted Fostex and their great customer service answered any questions I had with this long discontinued unit. I have my eye on another one just for parts for the future.
The D24 + DM1000 will essentially be my DAW. To tell you the truth I have been on the fence about using this. On one hand it's a solid piece of equipment. On the other its discontinued. I reassure myself saying that many people still use vintage synths so this should be no different, no? I assume, vintage synth owners always have something in the back of their mind hoping that their synth doesn't die before they sell it. Even the A77 has a better chance of lasting longer than this unit (and it has). By using a computer it will be future proof but it also has its shortcomings. In any case, since the DIGIface is managing the audio via my computer, I can also use my DAW to playback and record files if needed. I guess it is reassuring that these equipment are built within their capabilities so there will be fewer surprises during use. I have evolved to embrace and enjoy the fleeting nature of sound, maybe I should also embrace and enjoy the finite life of recording equipment.
There is some housekeeping that needs to be done with this machine. The HD is cloned to another one after each session and also backed up on a computer. NOS compatible hard drives for the unit are still easily bought at the moment. I'd better stock up. The manual is very extensive and a little crazy at times, but easy to read. Once you start using it, it gets pretty easy and there is just something about pressing a physical click-y button that just makes things more fun. The audio can also be recorded in real time to a DAW.
One thing is that new HDs need to be formatted in the unit before use. This takes FOREVER. 160 GB took about 12 hours to format. So its best to format all your HD ahead of time to save time. I probably didn't need to get the 160GB HD. I think 40 or 80 GB would have been more than enough for me.
Special Mention:
Deity V-Lav Microphones

In my recent recording tests, I realized that although you can hear the tape machines in a 'live' setting, you miss this experience in the audio recording. This means you cannot distinguish the edits recorded to the tape and the edits made by stopping/ starting the machine. I tried several options from mounting microphones on stands, or on the desktop but they were in my way and were going to be pretty expensive if I got 4 of them. I needed a smaller, affordable solution.

I had made some videos for Deity a few years ago and they gave me a sampler of all their microphones at the time to try out. The D2 and D3 are great short shotgun microphones and great for field recording. They also gave me one V-Lav and I was amazed how easy it was to use. Its built-in 'smart' power supply means you can plug it anywhere which is great because some pro lavaliers usually require a 10V phantom supply via a special adapter. I gave my contacts at Deity a ring and asked if I could have some more for my new sound project. They graciously sponsored 3 more microphones and D-XLR adapters for the project. Now the recordings all have the tape machine sounds which indicate stop/start of the audio and a sense of movement. I know you haven't heard any sounds yet but trust me it is just the right touch.

Which brings us back to...
Today. One year after our journey, and the beginning of a new one. As you can see the amount of thought and hours put into creating this instrument were many but worth it. I feel that it is truly an extension of me and reflects the way I think and move.
Stay tuned for sounds, articles, and videos of how this instrument evolves as well as a more in depth look at how I configure my components and creation process.
Thanks for reading!
In Winter 2021 I was able to finally present this instrument to the public during the Vital performance in Shanghai. Read about it here.
2 notes
·
View notes
Text
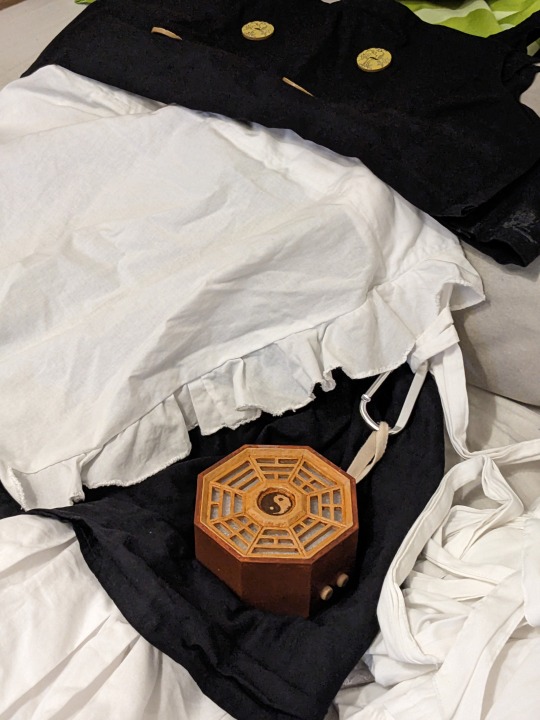
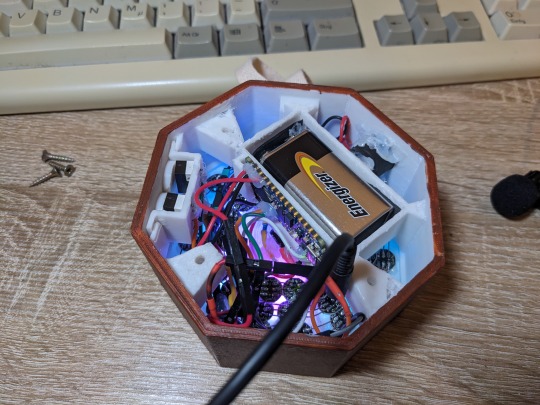
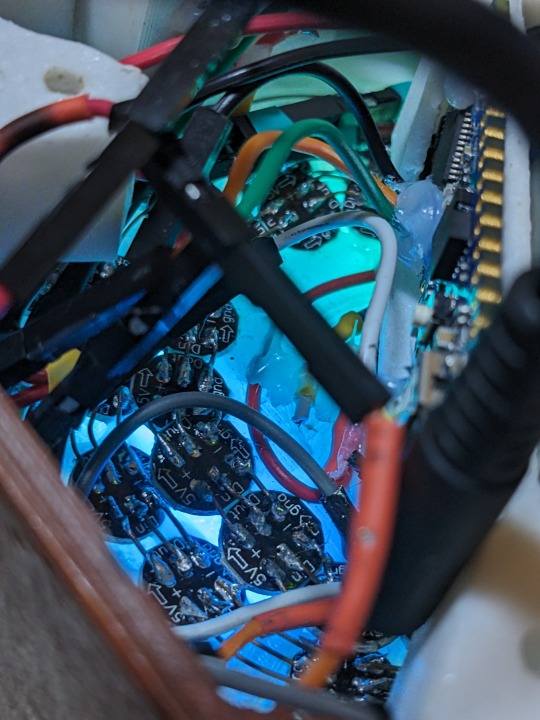
В догоночку. Анимация работы.
#личный тамблер#мой тамблер#русский тумблер#личный блог#личный дневник#мой tumblr#моя жизнь#русский тамблер#русский текст#мой блог#arduino#diy projects#diy#турумбочка#тумбурочка#тамблер на русском#русский tumblr#русский блог#русский пост
33 notes
·
View notes
Text
First time messing with e-paper, of course it's gonna be some Hola Mundo thingy lol
11 notes
·
View notes
Text
Guess who just achieved rudimentary digital to analog conversion!

(FREE LARGE FRIES! - lol, ignore the ad on the free oscilloscope app)
I tweaked the code to use timer B instead of A, which I guess is better for driving audio with PWM (also frees up timer A for some higher bit depth PWM to drive the current on the eventual analog components). Totally changed my sample rate, so I'm back to V/Hz instead of V/Oct until I update the python script to generate the exponential values (I suppose I should do a write up at some point instead of just rambling). I also don't have any LPF on the output, so *maybe* the wiggle is from the 62kHz sample rate.
Next steps:
- V/Octave control
- Wavetable lookups (unrelated to DCO)
- DCO analog circuit
- Adapt code for ATtiny (including adapting Arduino syntax into C)
- Figure out how to even flash the ATtiny
- Build the DCO
30 notes
·
View notes
Text
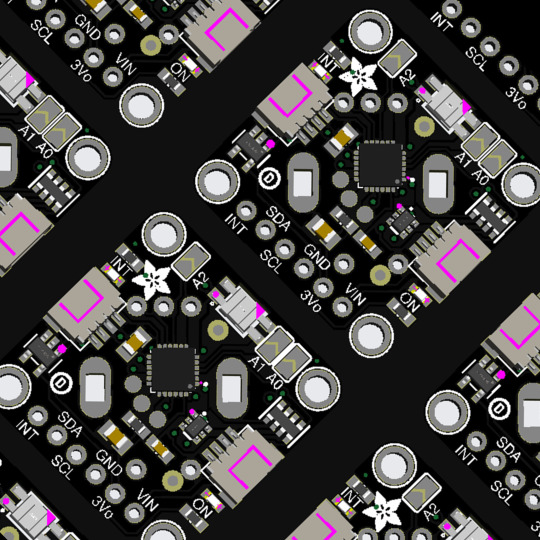
PCB of the day! Adafruit I2C Stemma QT Rotary Encoder Breakout with NeoPixel - STEMMA QT / Qwiic 🔧🔄🎛️
Rotary encoders are soooo much fun! Twist them this way, then twist them that way. Unlike potentiometers, they go all the way around and often have little detents for tactile feedback. But, if you've ever tried to add encoders to your project, you know they're a real challenge to use: timers, interrupts, debouncing…
This Stemma QT breakout makes all that frustration disappear - solder in any 'standard' PEC11-pinout rotary encoder with or without a push switch. The onboard microcontroller is programmed with our seesaw firmware and will track all pulses and pins for you and then save the incremental value for querying over I2C. Plug it in with a Stemma QT cable for instant rotary goodness with any microcontroller from an Arduino UNO up to a Raspberry Pi.
You can use our Arduino library to control and read data with any compatible microcontroller. We also have CircuitPython/Python code for use with computers or single-board Linux boards.
#adafruit#electronics#pcb#opensource#opensourcehardware#pcboftheday#arduino#raspberrypi#circuitpython#python#linux#rotaryencoder#stemmaqt#neopixel#i2c#breakoutboard#engineering#hardware#microcontroller#diy#technology
35 notes
·
View notes
Text
youtube
2 notes
·
View notes
Text
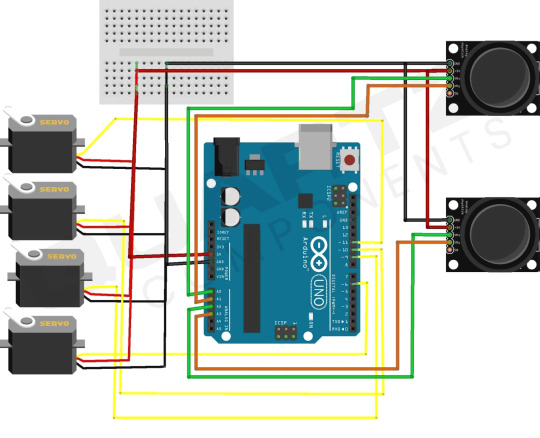
Build Robotic Arm Using Arduino
A robotic arm is a type of mechanical arm, usually programmable, that is designed to move materials, parts, tools, or specialized devices through various types of programmed motions for the purpose of manufacturing, assembly, testing, inspection, and other tasks. Robotic arms are widely used in a variety of industries, including automotive, aerospace, electronics, food processing, and pharmaceuticals.
COMPONENTS REQUIRED
Robotic Arm Kit
Arduino Board (UNO)
USB –A to micro-USB cable
Servo motor
Dual Axis XY Joystick Module
Connecting wires
Software Required
Arduino IDE
Circuit Diagram
youtube
41 notes
·
View notes
Text

8 notes
·
View notes