#Design Patterns Tutorial
Explore tagged Tumblr posts
Visit Tumblr Blog
Explore Tumblr blogs with no restrictions, modern design and the best experience.
Last Seen Tumblr Blogs


Fun Fact
Tumblr has 411 employees.
Text
Understanding Design Patterns in Python: A Beginner's Guide

Design patterns in Python offer structured solutions to common programming problems. They assist developers in creating scalable, efficient, and maintainable code. Let's delve into some fundamental design patterns and their significance.
Singleton Pattern: Ensures a class has only one instance and provides a global point of access to it.
Factory Pattern: Creates objects without specifying the exact class to be instantiated.
Decorator Pattern: Adds new functionalities to objects dynamically, without altering their structure.
Observer Pattern: Establishes a one-to-many dependency between objects, allowing changes in one object to reflect in others.
Strategy Pattern: Defines a family of algorithms, encapsulates each one and makes them interchangeable.
Implementing these patterns in Python enhances code readability and flexibility. They provide standard solutions, aiding in better software architecture and improved problem-solving capabilities.
Learning and implementing design patterns in Python is pivotal for aspiring developers. They simplify complex coding scenarios and foster efficient software development practices.
For an in-depth understanding of Design Patterns in Python, explore Tutorial and Example's comprehensive guide. Dive deeper into these patterns and elevate your Python programming skills!
0 notes
Text

Explore comprehensive design patterns tutorial, unraveling concepts for software development efficiency and mastery. Learn essential strategies and implementations for optimal coding structures.
1 note
·
View note
Text
Na'vi Stripes Tutorial!
Tagging @eywaschild891, in case you were still interested in this! (note: this tutorial is about the digital process of adding the stripes, not actually designing the patterns)
I'm using MediBang Paint Pro, but this technique should work in any program that supports layers.

So you've drawn your Na'vi and now you want to add some stripes! First we'll have to start with a base color. Underneath your lineart layer, add two new layers: one as the main base color layer (for coloring hair, eyes, clothes, etc), and on top of that, a separate layer for the skin. Putting the skin on a separate layer is important because that way you'll be able to do the stripes as a clipping mask.
Your layer box should look something like this (you can ignore the gray background and extra folder, they're not important for this tutorial):

Now we can start on the base stripe layer. Create a new layer and set it as a clipping mask on your skin layer. This makes it so that you can't "color outside the lines", so to speak, while drawing the stripes. Then take a hard-edged brush and start drawing the patterns you want. I like to use MediBang's "mapping pen", which has a subtly textured edge, but the regular default Pen tool will work perfectly fine as well.


If you'd like, you can stop here and call this done: solid stripes are perfectly acceptable in a cartoonified stylization. However, if you look closely at Na'vi stripes on canon characters, you'll note that they're not completely solid: they have a subtle fading effect, where they're darker along the edges and a bit lighter in the middle, and in some places they fade out into the body. Sometimes it almost looks watercolor-ish.


(I'm sure there are better examples out there than these but I'm not up to digging for them rn 😅)
So, let's continue! To fade our stripes, create another clipping mask layer above the main stripe layer. Use a brush with pressure-based opacity such as MediBang's "pencil" to loosely fill the insides of the stripes with the base skin color.


Once you have filled in all the stripes, use the gaussian blur filter to smooth out the fade. The filter doesn't need to be super strong—in fact, if you make it too strong you will loose the detail and the stripes will look solid again. With MediBang's version of the tool, I had it set to 7 (out of a max of 64) for this image, though of course the way it works may be different in other programs; mess around with different settings until you get something you like.
(sadly I do not have a screenshot of the blurred version because apparently the way my cintiq takes screenshots is dumb; it only captured the "gaussian blur" popup window instead of the whole screen. oh well. :P)
Now that we have the fade within the stripes, let's also make them fade into the rest of the body. The areas you'll want to do this with are the torso, inner arms, and inner/back of legs.
Create another clipping mask. Using the same pressure-opacity brush and base skin color as before, loosely block in where you want the stripes to fade into the body.

Once you've finished, gaussian blur the layer just like before. This one can be a little stronger than the inside-stripe one. For this image I had it set to 14.
Sometimes, the areas you block out will overlap with areas that shouldn't be faded—for example, here the fading from the back of the character's thigh is overlapping with her tail. To fix this, just erase it to remove the fade from where it shouldn't be (this is why we do this step on separate layers). Make sure you do this erasing after you've applied the gaussian blur.

Depending on the pose of your character, there may be places where one faded area overlaps with another. For example, in this drawing, the blocking for the arm fading overlaps with the blocking for the torso fading. Here it is with the torso fading turned off so you can see the overlap:

This makes it difficult to do both the arm and the torso on the same layer, because I won't be able to remove where the arm fading overlaps the torso fading without also removing the actual torso fading.
Luckily, there's a simple fix: just do the arm fading on a separate layer. Do this as many times with as many layers as you need to for your particular pose. Sometimes you'll only need one or two, like here; other times you'll need several.
BUT, fading the stripes is the last step! Regardless of how many layers you end up needing, once you're done, you're done! Now you have a Na'vi with nice natural-looking striping 😸

At this point you can go ahead and merge all the clipping masks into the main skin layer and even merge the skin layer with the other-base-colors layer if you're ready!
Hopefully that wasn't too hard to follow; feel free to ask if anything is confusing or unclear. Happy drawing! 😸
#avatar#avatar 2009#way of water#na'vi#na'vi oc#my art#tutorial#yes i draw every stripe individually yes it takes a long time 😭#anyways...#wanted to make this over the holidays but then i was sick the whole time and not up to it ;w; oh well#i suppose this is also technically a preview for a new ref sheet though 👀#i have made some changes to my sona's design since making her current ref so it was in need of an update#they're not *major* changes or anything; just some minor adjustments to outfits and stripe+sanhì patterns#but enough to want a new ref#so 👀
130 notes
·
View notes
Text

The Elegant Pentagram Granny Square, made with gray gradient cotton yarn. Get the pattern on my Etsy, RoseOfMayGreece!
#crochet#pattern#tutorial#roseofmaygreece#etsy#granny square#alternative#elven#fairycore#witchy#pentagram#pentacle#occult#pagan#goth#afroditigaitanidi#pattern design#Ravelry#star#gray
18 notes
·
View notes
Text

From Victoriana Quilt Designs ·
With AQS QuiltWeek going on in Paducah, KY this week, I thought it would be fun to share this giant Needle and Thread sculpture, which was commissioned to honour the quilting and crafts culture there! Photo from: TheNotSoDramaticLife
#crafts#gifts#decor#sewing#quilting#briar rose quilts#bedding#shopping#quilters of tumblr#holiday#victoriana quilt designs#aqs quiltweek#paducah#ky#needle and thread#sculpture#needle and thread sculpture#quilting as art#fabric art#fibre arts#weaving#embroidery#quilts#textiles#crafting#hand sewing#quiltblr#art quilt#quilt pattern#quilt tutorial
10 notes
·
View notes
Text

Crochet Round Stool Covers 🌈
Add a dash of colour to your home with these seat covers. Ideal for using up scrap yarn, they’re a fab way to refresh an old dull chairs for a bright new appearance 🧶
#crochet tutorial#bar stool#cafe aesthetic#crocheting#yarn#granny stitch#easy crochet#cheerful#yarn crafts#retro lovers#design#makers#crochet#crochet pattern#summer crochet
7 notes
·
View notes
Text
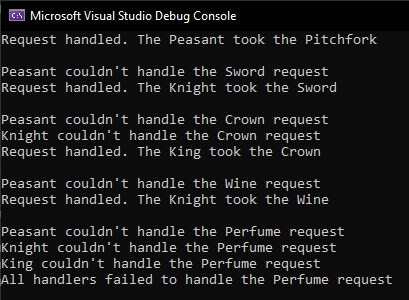
Coding tutorial: Chain-of-responsibility pattern
A peasant, knight and king walk into a software design tutorial, and are here to teach you the chain-of-responsibility pattern. Learn how to create a chain of handlers which can handle different request types.

This tutorial shows you how to code the chain-of-responsibility pattern in the Visual Studio development environment, using a console application and the C++ programming language.
The chain-of-responsibility pattern passes on a request to a chain of handlers one at a time. Each handler can handle different requests. So if the first handler can’t handle the request, then it will pass it on to the next handler. Once a request is handled, the chain ends. Since there is no longer a need to pass on the request.
It is also possible that the request doesn’t get handled by any of the handlers. Since each handler can handle 0, 1 or many requests of different types.
See the full tutorial here.
Console output:
#cpp#coding#programming#gamedev#indiedev#tutorial#visual studio#software#software design#software development#game development#design patterns#cppprogramming
20 notes
·
View notes
Text

youtube
#free crochet pattern#crochê#crochet tutorial#crochet flower#crocheting#crochet flower motif#flowers#diy flower#crochet free pattern#crochet easy#tejido#crochet youtube#unchinetto#crochet design#Youtube
9 notes
·
View notes
Text
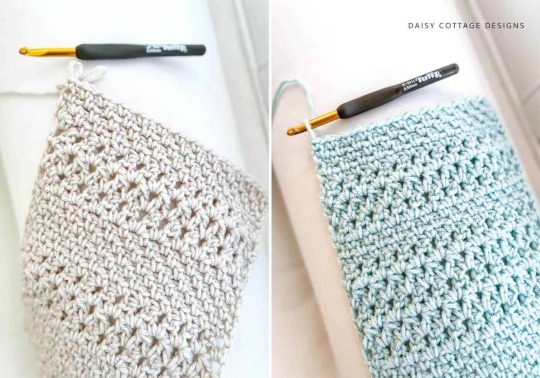
Crochet Throw Blanket Pattern: Cobblestone Pathways
Sharing a free written pattern (and video tutorial) by Lauren over at Daisy Cottage Designs. This makes such lovely use of the 'moss stitch'.
youtube
#moss stitch#crochet#crochet tutorial#video tutorial#how to#diy#pattern#free pattern#daisy cottage designs#Youtube
9 notes
·
View notes
Text
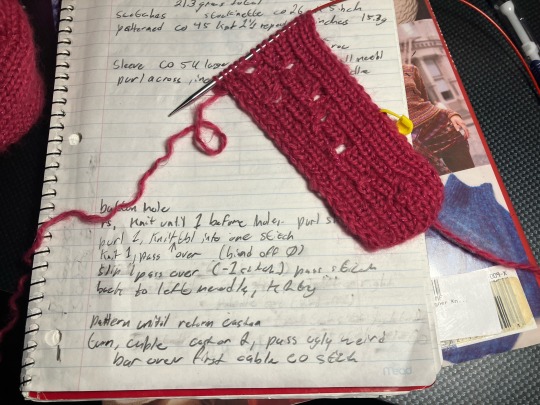
I realized I had forgotten to swatch for the button hole before starting the second sleeve. And an Hour later I have a swatch with 8 button holes before I got happy with how they look. The pattern basically says "make buttonhole" and I'm not experienced enough with garment knitting to go on just that.
I did manage to confirm that despite sizing up my yarn, I'm still going to need 1 inch/25mm buttons. I don't currently have 6 matching 25mm buttons that would look good with this yarn, so decisions have to be made. And unfortunately my brain has decided the best possible button would be a rose gold coloured shank back(?) button preferably that looks like an actual flower. Which, good luck to me for finding that relatively affordably.
I think I'm just going to knit the cardigan and decide once it's all sewn up. If it fits well and I think I'll wear it, I'll spend the money to get Nice buttons.
#swatching the button holes only took an hour of testing and writing and googling tutorials for things#but looking at buttons on ebay/etsy/random craft stores... that was three hours#i had fun tho tbh i love shopping :)#there IS novel reasons for the Ideal Buttons!!!#theres no actual description of buttons or anything. but still Novel Reasons#the Guy who Knit the Cardigan is representing by gold. like his hairs and eyes are described as golden regularly#i think its actually like a pale gold? but i think rose gold with the pinkish would look better with this pink#(i don't actually own anything rose gold i plan on taking a swatch with me to Somewhere with Rose gold to see them together)#also this is a designer pattern. the buttons deserve a bit of Class. i found some chanel buttons that would be great if i give up on flower#another thing about the Guy who Knits is that he like. CONSTANTLY is bringing the protag flowers. somehow not bl btw#off the top of my head i'm 100% sure he brings him carnations and i'm prettyyyyy sure roses?#sadly there's no canon colour on the carnations. the list of questions i have for the author grows every day#but the flower buttons Speak to me. maybe if i go for more simple buttons i can get a carnation applique or something#also i really really hope that i can read my own handwriting in the (v optimistic) two months it'll be before i knit the button bands
10 notes
·
View notes
Text
youtube
In this tutorial, I will walk you step by step through making this lined, gathered skirt from one piece of fabric. This pattern is great for beginners, super customizable, and low to zero waste. The possibilities are endless with this skirt! I have a few ideas of my own and will be posting a follow up video covering some easy ways to customize and make it your own. I’m here to help! If you give this a try and get stuck at any step, leave me a comment and I will help you through it. :-)
#design#handcrafted#handmade#fashion#slow fashion#textiles#textile art#youtube#artists on tumblr#outfit inspiration#outfit#one of a kind#fiber arts#fashion art#art#sewing#fashion design#fabric#video#sewing tutorial#my sewing#sewing project#sewing patterns#skirt#gathered skirt#DIY#diy tutorial#Youtube
18 notes
·
View notes
Text
Odysseus having the ultimate storytime youtube channel dedicated to telling stories of his travels, the war, and yapping about his wife and son
#Penelope with the weaving/loom tutorials#she does 'weave with me :D ' livestreams and sometimes you can hear Odysseus and Telemachus off screen playing#when she explains the designs or patterns of her pieces you can hear the love and fondness behind the memory or inside joke its about#she's experimenting with making tapestry clothing and Odysseus wears each piece with pride in his videos#the odyssey#homers odyssey
8 notes
·
View notes
Text
Four more squares left and my wall tapestry is finished!! The pattern is Stained Glass Pentagram Granny Square

#stained glass#crochet#witchy#pentagram#goth#elven#star#dark fairytale#fairycore#tapestry#wall art#pattern#tutorial#roseofmaygr#granny square#etsy#forest#alternative#whimsical#whimsigoth#window#colorful#pattern design
17 notes
·
View notes
Text

Someone asked for a Rose Quilt Block. I found a couple: There were no written instructions for these, just the diagrams so you will have to figure out how large to make your pieces.
#quilting#briar rose quilts#bedding#shopping#sewing#holiday#quilters of tumblr#gifts#decor#crafts#rose quilt block#rose quilt#rose block#quilt block#jitka design inc#paper piece rose block#paper piece quilt block#free pattern#free quilt pattern#free block pattern#quilt#quilts#patchwork#quiltblr#fabric arts#textiles#quilt tutorial#quilt pattern#quilting as art#embroidery
6 notes
·
View notes
Text


i made this lil kitty plushie for ian as their valentine's gift ^_^ love them so much ~ it's my first time making a plushie of this style. While there are some adjustments i wish i could make, I'm rather proud of the results. I did most of the sewing by hand, though the body and the white back leg were done on a machine. I'm quite confident with my hand sewing now hehehe (人*´∀`)。*゚+
here's the tutorial i followed if you'd like to make one yourself:
youtube
#melloof#textile art#art doll#mellsart#mellcrafts#the pattern artist has other designs that I'd like to make as well#please check out their YouTube ^_^#hehehe mine is a little um lumpy compared to the tutorial#Youtube
44 notes
·
View notes
Text
Coding tutorial: Observer pattern
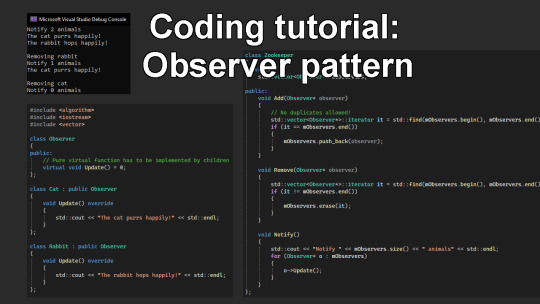
The observer pattern has an object named the ‘subject’ which maintains a list of ‘observers’. The subject will notify all the observers when an event occurs. The observers can then choose how they wish to respond to the event.
In this tutorial you will code a zookeeper and animals. The zookeeper represents the subject of the observer pattern. Whilst the animals represent the observers.
The zookeeper will notify the animals when he arrives, and the animals will respond in there own unique way.
To follow along to this tutorial, you can either just read it and apply the knowledge to your programming language. Or you can use Visual Studio, by creating a solution, then create a project with a console application. Then run the project to see the output in the console window.
Walkthrough and full code example on the blog:
#cpp#programming#coding#gamedev#indiedev#visual studio#tutorial#software#software design#software development#design patterns
24 notes
·
View notes