#Double Bottom Pattern for Beginners
Explore tagged Tumblr posts
Visit Tumblr Blog
Explore Tumblr blogs with no restrictions, modern design and the best experience.
Last Seen Tumblr Blogs


Fun Fact
The KCSC sent more than 20K requests to delete posts related to prostitution and porn to Tumblr from January to June 2017.
Video
youtube
Mastering the DOUBLE BOTTOM FOREX TRADING for Maximum Gain 2023
#youtube#youtube trending#Double Bottom Pattern Explained#Trading Strategies with Double Bottom#Identifying Double Bottom Reversals#Double Bottom Chart Pattern Tutorial#How to Spot Double Bottoms in Forex#Double Bottom Candlestick Patterns#Double Bottom Trading Signals#Double Bottom vs. Double Top Differences#Double Bottom Formation Analysis#Successful Double Bottom Trading Tips#Double Bottom Pattern for Beginners#Real Examples of Double Bottom in Stock Market#Double Bottom Breakout Strategies#Double Bottom Technical Analysis Guide#Common Mistakes in Double Bottom Trading
0 notes
Text
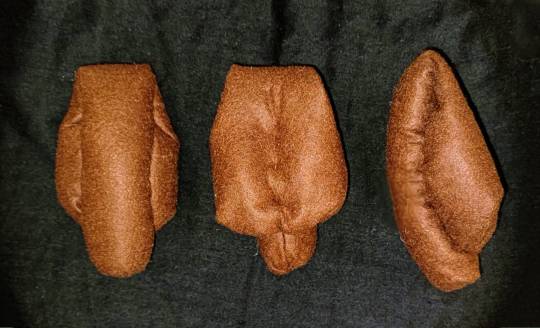
gio officialpenisenvy's DIY packer tutorial
are you transmasc and tired of shoving socks down your boxers? did you lose your penis in a freak accident and wish you could have your bulge back? do you know the basics of sewing and want to find out how to make a packer? you've come to the right place! i have been making and selling packers for a year, and this is my tried and true method for hand-sewing a packer in roughly half an hour, to results such as these:
MATERIALS NEEDED: felt in your choice of colour (if you want to use fabric, go for a jersey knit so it won't fray, and use more stuffing to make up for the lack of structure), sewing thread in your choice of material and colour, stuffing of any kind (i use acrylic batting, you can use an old pillow, cotton balls, fabric scraps cut into tiny pieces...)
SEAMS USED: a backstitch or running backstitch is the only seam you really need to know; i employ a gathering stitch and a whipstitch as well for aesthetic purposes, but if you only know how to backstitch you can absolutely make a slightly uglier version of this packer. if you're an absolute beginner, here is a helpful tutorial: just double up the thread and knot it for a stronger seam.
STEPS:
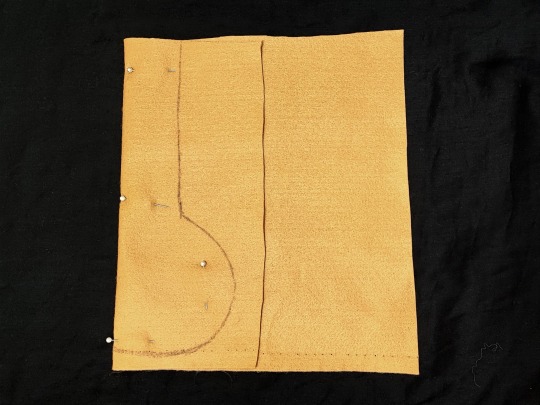
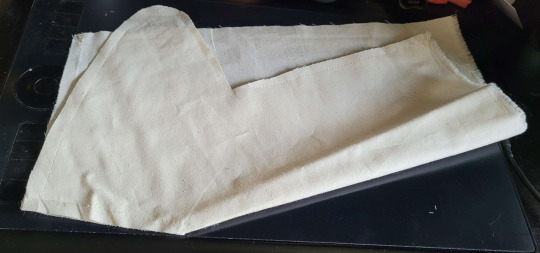
cut a piece of fabric approx. 25x25cm or 10x10in wide and fold it in half vertically, then draw a shape on the fold like the one pictured above, with the widest point measuring roughly 12cm or 5in and the smallest point (the shaft) measuring roughly 5cm or 2in
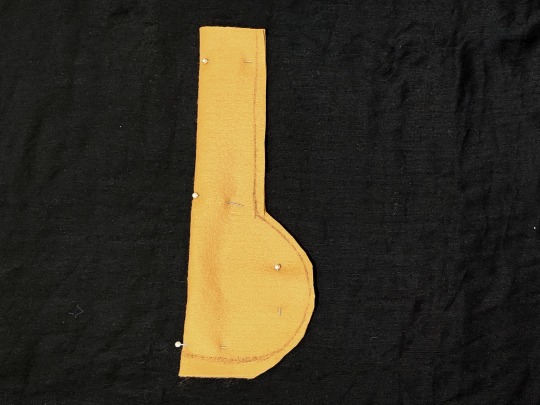
carefully pin the fabric and cut out the pattern along the shape you've drawn, leaving a small seam allowance of approx. 1/2cm or 1/4in (if you feel unsure in your ability to follow a small seam allowance, you can cut it larger and trim it to size later; if you're using fabric, a larger seam allowance is recommended)
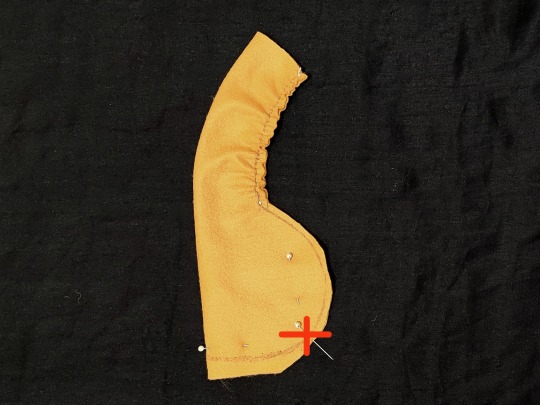

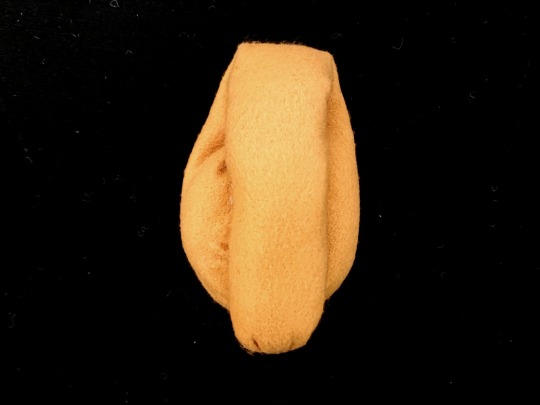
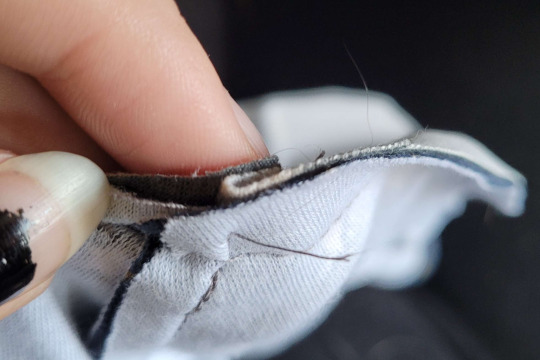
sew alongside the seam of the shaft with a tight backstitch or running backstitch; you can tug on the thread after every stitch, so the seam will pucker up and give the shaft a more natural curved-inwards effect
close the top part of the shaft (the head) and the bottom part of the sac (roughly up to the marked X in the picture) with a tight and multiply-reinforced gathering stitch, almost like a drawstring effect; you can use a backstitch here, but it won't look as natural


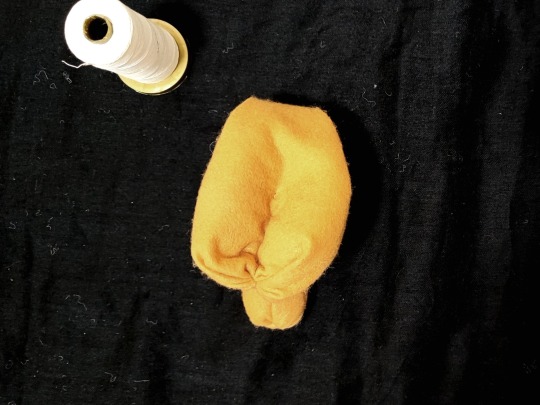
turn the packer inside out and put your stuffing inside the shaft, packing it quite full (but not so full it has no give, as real soft penises are somewhat squishy); this might be tricky to do if you have short fingers like me, so you can use a pen or your scissors or any other thin elongated tool to help you get to the tip
stuff the sac a bit less than the shaft, and try to make two balls with your stuffing (you can see i have cut out two strips of batting in the first picture) so they look like two separate testicles
sew the sac closed: i used a whipstitch and pulled the thread tight so the fabric would gather and pucker like a real sac, but you can use a ladder stitch or a backstitch at your preference
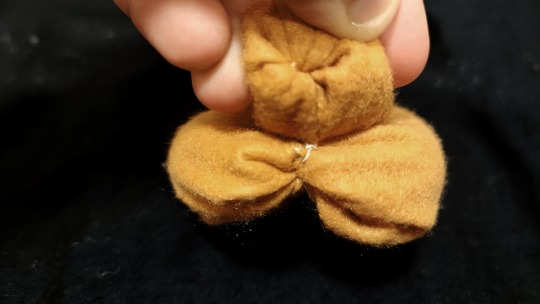
to further separate the testicles, sew a few stitches down the middle of the sac, so the two balls will lay separate with a flat seam in the middle (pictured above you can see how the stitches should look from the back)
optionally, you can secure the very tip of the shaft to the very bottom of the sac with a few stitches, so the packer will stay folded and won't run the risk of opening up (of course, you can skip this step if you want your shaft and your sac to be able to separate like a real penis)
and here you have it, your packer is finished! you can wear it in your underwear directly on your skin, or sandwiched in between two pairs of underwear, or however you prefer. direct contact with water should be avoided as much as possible; the packer doesn't need to be cleaned daily, but a spritz with rubbing alcohol will kill most germs and get rid of any funky smells, and if it gets stained you can spot-treat it with a little water and soap and make sure it dries thoroughly.
#transmasc#ftm#trans diy#trans resources#ftm packer#sewing#ok to rb#mine#long post#(didn't put this under a readmore so it can still be fully visible in case i delete or move blogs)
92 notes
·
View notes
Text
Hello!! breakdown of Choir Cosplay!! This is not really gonna be a step by step but a general vibe of what I did to make this cosplay :) To note: I haven’t sewn anything since I was in highschool which was 8 years ago, so a lot of this is like a ‘ya that works’ - make improvements where I could not :p Overall I wanted the cosplay to not be an exact copy of what is in game, personally I prefer more fitted clothing so I went close to my size with the pattern. Fabric: I used an ivory polycotton, ivory satin and black cotton. 1. I started hunting for a pattern that at least captured the vibe of the choir garb. I had split up the garment in my head into 3 separate parts: The base, the capelet, all the extra fancy bits. The big concern when picking fabric is I didn’t want the garment to be translucent, which is a problem for lighter coloured fabric. BUT!! I found that I didn’t have to make a lining and could instead flatline the fabric - where you cut double the piece and stitch them flat against each other - making it both thicker and opaque!
Flatlining tutorial:
https://www.youtube.com/watch?v=5N-qdP9tcc4&pp=ygUSZmxhdCBsaW5pbmcgc2V3aW5n
I found this pattern by Gunnar Deatherage on Etsy (as a beginner I loved this pattern, it’s very in depth and easy to follow)
https://www.etsy.com/uk/listing/1270370974/maxi-duster-wrap-pattern-instant?ga_order=most_relevant&ga_search_type=all&ga_view_type=gallery&ga_search_query=gunnar+deatherage&ref=sr_gallery-1-14&pro=1&sts=1&dd=1&content_source=95a164c411331c5aaff8fee029dee1e6377d3f92%253A1270370974&search_preloaded_img=1&organic_search_click=1
I did not use the sleeve pattern from it, instead I made my own to have the right fall and size.

Use the sleeve cap from the pattern so it can attach correctly to the bodice/back pieces - then where the sleeve starts to become longer draw out diagonally on both sides. For length I used the original pattern and went slightly longer! :) I used the same pattern for the peplum sorta top section and again for the skirt on the bottom. It creates a stitch line along the front but it’ll be covered by the belt!

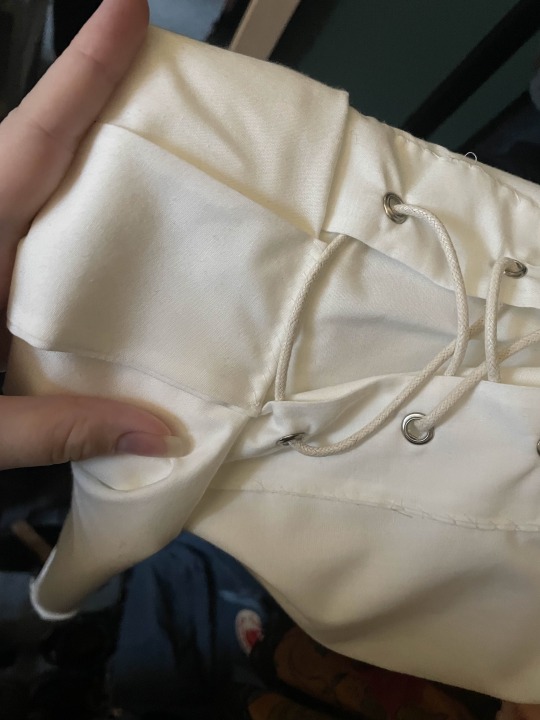
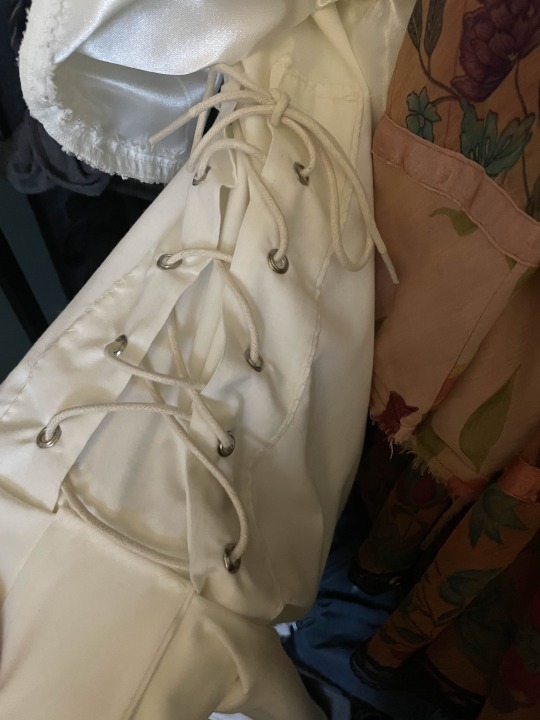
I bought this embroidered ribbon and attached it around the edges of the garment! https://www.etsy.com/uk/listing/840215852/35-mm-golden-victorian-jade-jacquard?click_key=2c042e9416627d9bf9d2f1e85385ba93e48ca464%3A840215852&click_sum=1fe453a7&ref=shop_home_active_1&sts=1 Corset/rolled sleeves: I did this last Corset pieces: Cut out 4 pieces (twice) - and attach them together leaving the end open to turn them inside out. Use a grommet tool and punch some holes through your fabric - make sure they line up. Roll the sleeves to roughly where your inner elbow is and attach another piece of fabric around the width of the roll - pin it in place. Hand sew the corset pieces on and the other piece of fabric so it is all secure :) Thread some similar coloured lacing to the fabric through the holes.
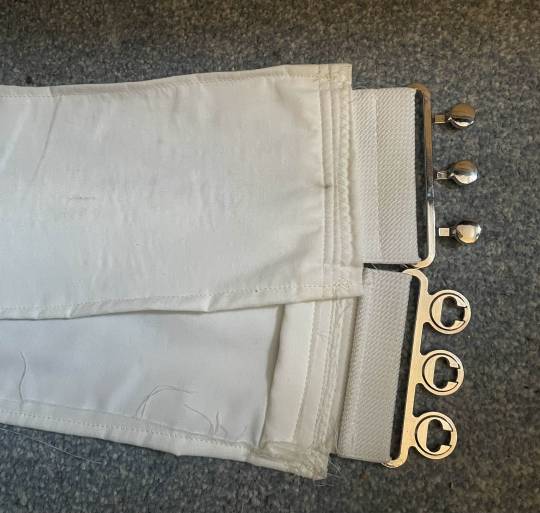
2. The belt! (My mum helped me a lot on this and was my voice of reason) Originally I had bought an elasticated belt with a clasp, but it didn't work at all and ruined the fall of the garment.
I chopped off the end of the belt, leaving me with some elasticated ‘fabric’ and the clasp. Measured my waist and cut out a thick piece of fabric twice and one piece of iron on interfacing. The measurement I did with the base on and added slightly more for both seam allowance and so there was breathing room for myself. Put the clasp piece on either end of the fabric and sew it all together! :) (marks are from the paint of the chain rubbing off onto the fabric :P)

3. The caplet! For the capelet I used this tutorial Easy DIY Capelets | For Halloween, Thanksgiving & Christmas🎃🍂🎄 (The only issue with this is I couldn’t get my head around how to attach a non circle collar) Ivory polycotton + Ivory satin used. Doing the base of this is pretty straightforward with the tutorial - it’s just a circle skirt but for your neck. If you want to be evil to yourself, you can do what I did and hand sew bridal applique all around the garment. If you can machine sew it please do :p I went for a big swooping shaped applique in ivory - any gaps I had were filled with more applique https://www.etsy.com/uk/listing/628065500/beaded-sequinned-lace-flower-wedding?click_key=d8b4937d8079ab34b301cf2d4dc7fbd0d6ede960%3A628065500&click_sum=81fb49a9&ref=shop_home_recs_1 I used poppers on the base and the cape to attach them together - it kept choking me if i didn’t 4. The collar - made me want to cry ngl I could not figure out for the life of me how to attach a non circle collar to the capelet (which is how I wanted it). Instead we have a removable collar!! I copied the size of collar from one of my own shirts and followed these tutorials TWO PIECE COLLAR TUTORIAL | KIM DAVE How to Sew a Collar and Collar Stand Easily by Sew Sew Live 5. Graduation hood???? For some reason you can’t just buy these in the UK without paying £30, so I made my own Cut out double for the pieces around your neck and one for the ‘hood’ part Gather the ends of the rectangular piece and attach them to the other pieces!
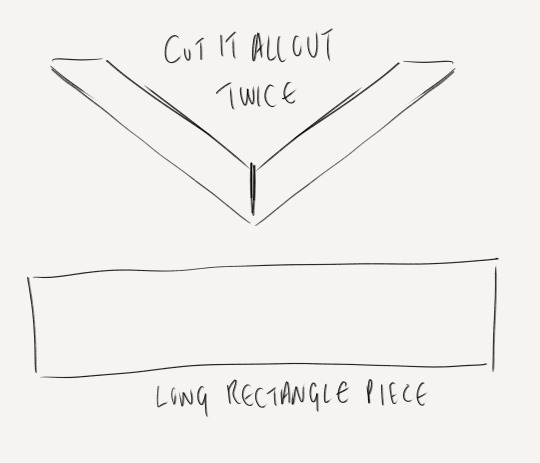
6. The Fancy back panel piece Measure from mid shoulder blade to the bottom of the garment for the main rectangular piece. Cut out two other rectangles of the same width coming into an arrow shape. Sew them all together and start sketching on the design. The great thing here is you can make it up, because it’s too complicated and nobody is gonna look at it and be like ‘u did it wrong’ I used a fabric medium and gold metallic acrylic
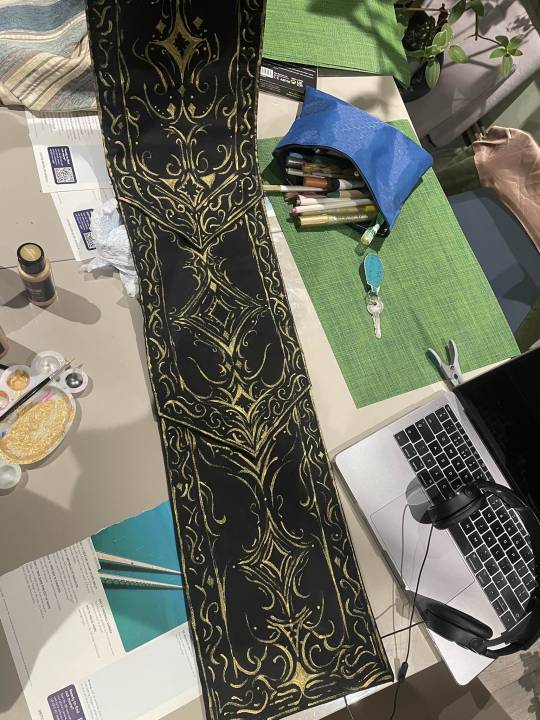
Once it’s all done, I machine sewed it to the back of the base garment because it’s hidden by the cape. 7. THE REST Chain: Me and the chain belt had a fight - Originally I used metal chain,, but I’m allergic to some metal and can’t deal with the smell,, I switched to a plastic chain with 2 D Ring clasps - had to sand it down but the gold spray paint loves to flake off. If I knew about it before, I’d use EVA foam chain :) Black pieces underneath: I bought a turtle neck and a long black skirt :P but you could make it as a dress or smth! Purchased long black velvet gloves, a pocket watch and a key necklace (I didn’t want to use a censer - and they are v expensive/idk how to make one) Ribbon + brooch: I bought chunky soft blue ribbon and found a vintage brooch on vinted

The mask: If you have contacts you’d probably be fine, but I don’t and this mask messed with my depth perception and balance so I had to take it off so I could wear my glasses :(
Use buckram plastic mesh - the thicker kind, used for fursuit eyes and in black! You can see out but nobody can see in. I made a mock up with paper but sorta looks like this shape :)

Eva foam pieces cut out into swirls and filigree like shapes, glue it onto the buckram I did a base coat in grey over the entire thing and painted it with black, gold and bronze acrylic! I hole punched and put the ribbon through it so the mask could be tied around my head.
If you’re making the mask and hat - I’d attach the mask to the hat so it’s one piece :) Where I went wrong/what I’d improve I wish I had been able to attach the collar to the rest of the garment. There is a gap that appears between the collar and the caplet/base at the back (mainly due to gravity and it moving) that can be annoying, since my hair is on the longer side it was covered but still I wish it wasn’t there. I’d also want a bigger collar! I’d not use satin as a lining for the skirt and capelet - it’s so annoying to use and it’s so slippery Maybe would not hand sew all that applique because it took me over a week :P BUT OVERALL for a first cosplay, it’s pretty good! I’m mostly happy with the outcome and it was one of my dream ones to do! :) I hope this helps, I didn’t take photos of all the steps unfortunately but hopefully it makes sense :)


#Choir cosplay breakdown as best as I could#with links and things to where I got my patterns and tutorials from#I hope it helps - if you wanna know more or see more photos feel free to dm and ask idm showing!!#bloodborne#bloodborne cosplay#choir cosplay#bloodborne art#bloodborne choir#cosplay#fanart#art#artist#fromsoft
54 notes
·
View notes
Text
The Collector's Hat Sewing Pattern and Tutorial
Image of the pattern I made with measurements:

As a little heads up to people with big/small heads and/or more voluminous hair, this was based on measuring my own head which has a circumference of 22 inches which is dead on the average and my hair is completely straight and relatively flat. You may need to do some adjustments of these measurements because the final fit is very fitted, in that it can be easily put on and taken off but does not fall off on it's own under typical circumstances.*
This pattern is meant for knit or other stretch fabrics, I did not make a completed version with woven or stiffer fabrics, so quality may vary depending on the material you select. I recommend knits.

If you are new to sewing or this is one of your first projects you are doing without a physical pattern, I recommend following the given measurements and drawing it out on some type of paper first and then using that as reference for yourself. I am an outlier when it comes to not making patterns and drawing the shape of what I want out onto the fabric directly, and you shouldn't follow my horrible example. This hat is actually the first time I've even made a muslin prototype.
When you are going to cut out the pieces you need to make sure, like double and triple check, that if you were to lay them pattern/top side up, that they would mirror each other like in the above picture. If you don't then you'll have two lefts or two rights.
The first actual step for sewing is taking the straight lines from the V shaped notch in the top of the hat, and lining them up by folding the piece in half so the patterned/top of the fabric is on the inside of the fold, like in the picture above. You do this on one half at a time. When they are lined up sew them with a straight line stitch a 1/4 inch (1/2 cm) in from the cut, starting at the fold towards the top of the hat.
After that you want to lay them pattern to pattern, and pin them into place to make sure it's aligned properly on both sides. To reduce bulk I recommend making the excess fabric from the darts (the V cut-out) point in opposite directions, as shown in the above picture.
After you've sewn the sides together there is an optional step that I did to make sure the seam lies flat on the top of your head. I opted to sew both sides down onto the blue half of my hat because my machine was being picky and skipping stitches on they grey fabric if there was no blue fabric as well (I got around this on the hem by inserting thin pieces from the blue's selvage into the seam). But if your machine isn't being picky or you are hand sewing this, then you could split the excess and sew them down onto their corresponding half. Example above, as usual.
Optional step that MUST go here. If you are attaching a ribbon, or lace for a trim to edge you have to do it now. I do not recommend this step to beginners. I recommend sewing it down while rolling the edge to create the hem, and then securing the other side of the ribbon/lace further into the piece because this guarantees a better placement and straighter lines. If you are doing this step along solely the bottom or front edges then let the lace/ribbon stick out further than the edge of the fabric, so you can fold it under the hem.
The final required step is to hem it, just fold what remains of the raw edge and sew it down.

Final optional step is for adding little trinkets. I added trinkets to the front corners and the floppy bit in the back like the Archivists are depicted as having. I used embroidery thread and slid the needle to go between the seams and tied it off on the inside. If your trinkets are not detachable, like the little stars on my hat, you need to thread the needle through the ring before putting it back into the hat and tying off the thread. Thinner cord or thin ribbon could work as well.
*I actually just did some tests and I have to be tilted further back than lying flat on my back for it to fall off. I was able to bend over and look through my knees and it didn't fall off. I tested it's wind resistance against my two strongest fans and neither could knock it off my head even when I shook it. So I think it will stay in place just shy of someone pointing a leaf blower at you.


Enjoy these pictures of the finished product, including a glamor shot of me wearing it backwards while I fumble with my phone for a picture.
#the owl house#toh#owl house#the collector#the collecter toh#toh the collector#toh the archivists#the archivists#the archivists toh#cosplay#sewing#sewing tutorial
207 notes
·
View notes
Text
Charming Shamrock Applique
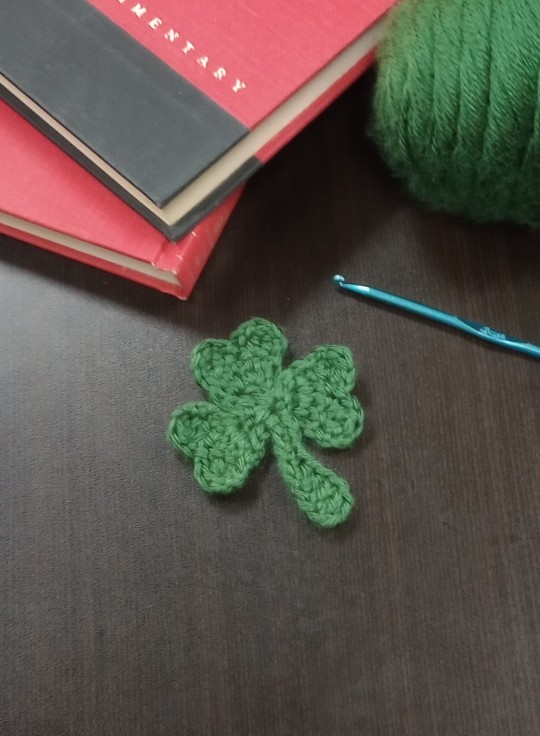
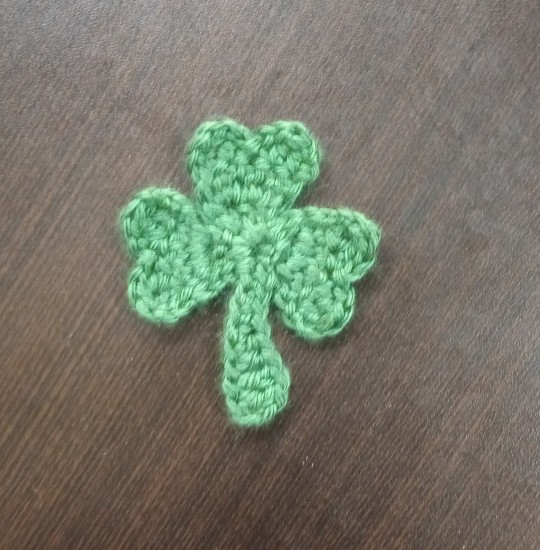

In honor of Saint Patrick's Day here is my first pattern!
If you have any questions, need help with anything, or I need to correct something, please let me know in the notes!
Notes:
I use American/Canadian terminology.
For experienced crocheters it takes about 10 to 15 minutes to complete. For beginners it may take up to 40 minutes.
Using the weight of yarn and size hook listed, the Shamrock is about 3 inches or 8 centimeters starting from the bottom of the stem to the top of one of the petals.
You can change the size of your Shamrock by decreasing or increasing the weight of yarn and size hook.
You will need:
Worsted weight yarn (weight 4). I used acrylic, but you can use any fiber.
Size 3.75 mm crochet hook (size F)
Scissors (or a sword if you're not a coward)
Hope
Abbreviations:
SS=Slip Stitch
CH=Chain
HDC=Half Double Crochet
DC=Double Crochet
DCDEC=Double Crochet Decrease
Round 1:
Make a magic ring, CH 2, DC 2 into magic ring. Turn work.
Round 2:
CH 2, DC 2 each in the next 2 stitches, in the top CH from Round 1, DC 1. Turn Work.
Round 3:
CH 2, DCDEC, CH 2, SS into next stitch, CH 2, DCDEC, CH 2, SS into the top CH from Round 2. As down the side of the petal until you reach the magic ring. SS into magic ring.
Repeat Rounds 1-3 two more times. You should now have 3 flower petals.
Stem:
Starting from the magic ring, CH 10, skip 2, into the next 8 CHs, DC 2, HDC 2, SC 4, SS into magic ring, finish off.
There you have it folks. Your very own shamrock. Woohoo.
If you finished, good job! You get a high five from yours truly! ✋
If you didn't finish, you get a participation award 🏅

#my patterns#crochet#shamrock#crochet shamrock#applique#crochet applique#yarn#yarn crafts#scrap yarn#scrap yarn projects#crocheting#crochet hooks#crochet hook#art#artwork#em's handiwork#emandmhandicrafts
11 notes
·
View notes
Text
Mini fish/whale pattern + video tutorial easy to make and beginner friendly + has pictures
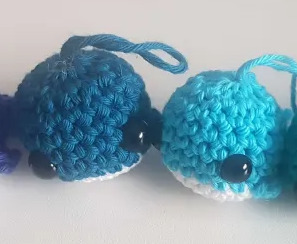

There are some differences to the whale in the vid and mine, but the basic pattern is still the same (body, fins, tail). So things will vary from the video (video also isn't mine). Mini whale: Body: start with white Rnd 1: 6 sc (6) Rnd 2: inc (12) Rnd 3: sc, inc (18) CHANGE COLOUR Rnd 4-8: sc (18) eyes between round 5 & 6, 4 apart. Put the fins and tail on the body Rnd 9: sc, dec (12) DON'T FASTER OFF, cut the yarn, leave it decently long close the hole like in the video Make the loop on top for keychains (not in the video) Fins: ch 2, sc in 1st chain. attach to the sides of whale (the lil triangles) Tail: magic circle 2 sc, dc, fasten off put on the back of the whale (the half hearts, the bottom ones)

How to change colour: Go into the last stitch of the round. Pull up a loop. Take the colour u want to change to and pull that one through both. Continue to crochet like normal. Cut the (in this case) white yarn. Make a knot to secure.


How to put the fins and tail on the mini whale/fish: Fin: First put the eyes opposite of the end of your round. Then put the fins into the second hole. Take the second other yarn of the fin and put it into the stitch next to the other one. Repeat for the other fin. Tail: The tail is put between the two fins. The stitches between the fins should be 7 stitch holes (and one down. the fins aren't on the same height. That's normal). Put both tails into the 4th stitch, so it's in the center. Knot: Knot the fins 2 yarns together to secure them. Knot the tails with each other and then use the yarn of the center white to secure the fins (or they will be able to be pulled out). Knot the yarn of the outside fins togehter with a double knot and cut close to the knots.

Keychain loop: Take the yarn, go through the top of one of the yarn strands made by closing the head and make a knot. Pull through the hole of the head. Use the yarn still on the other side to knot it to the whale. Spin test. Hide the yarn in the whales body.
Congratulations you're done ^^.
youtube
#crochet#crocheted#crocheters of tumblr#cute#crochet pattern#crochet ideas#I'm finally done with writing this down omg#Youtube#amigurumi
2 notes
·
View notes
Text
Crochet Dishcloth Pattern for Beginner 2023

Here now, I can provide you with a basic crochet pattern example. Keep in mind that crochet patterns can vary in complexity, so this is a simple pattern to get you started. If you're looking for more intricate or unique patterns, you might want to consult specialized crochet resources or designers.
Crochet Dishcloth Pattern:
Skill Level: Beginner
Materials Needed:
Worsted weight cotton yarn (Color of your choice)
Crochet hook (Size H/5mm or as recommended for the yarn)
Scissors
Yarn needle
Abbreviations:
CH: Chain
SC: Single Crochet
DC: Double Crochet
SL ST: Slip Stitch
Pattern:
Start with a slip knot on your crochet hook.
Chain 23.
Row 1: 3. In the second chain from the hook, work 1 SC. Continue working 1 SC in each chain across. You'll have 22 SC stitches.
Chain 1, turn.
Row 2: 5. Work 1 SC in the first stitch. Work 1 SC in each stitch across.
Chain 1, turn.
Repeat Row 2: 7. Repeat Row 2 until your dishcloth measures approximately 8 inches (20 cm) in length, or your desired size.
Edging: 8. After your last row, work 1 SC in each stitch across the top edge of the dishcloth.
In the corner, work 3 SC stitches to turn the corner smoothly.
Work 1 SC in each stitch down the side edge of the dishcloth.
Repeat the corner technique from step 9.
Work 1 SC in each stitch along the bottom edge.
Repeat the corner technique from step 9.
Work 1 SC in each stitch up the other side edge.
Join with a slip stitch to the first SC of the edging.
Finish: 16. Fasten off your yarn and weave in any loose ends using a yarn needle.
Congratulations! You've completed a simple crochet dishcloth.
#crochet pattern#crochet yarn#Crochet#crochet clothes#crochet plushie#crocheting#Crochet for beginner
3 notes
·
View notes
Text
3NPS Melodic Minor Patterns for Shredding
I've just released the last of the common Minor scales for the 3NPS system: the Melodic Minor scale patterns.
The chart is already available in all 3 common variations that I usually produce: ■ with beginner-friendly note names ■ as scale degrees ■ and as flat style notes for those who like it clean!
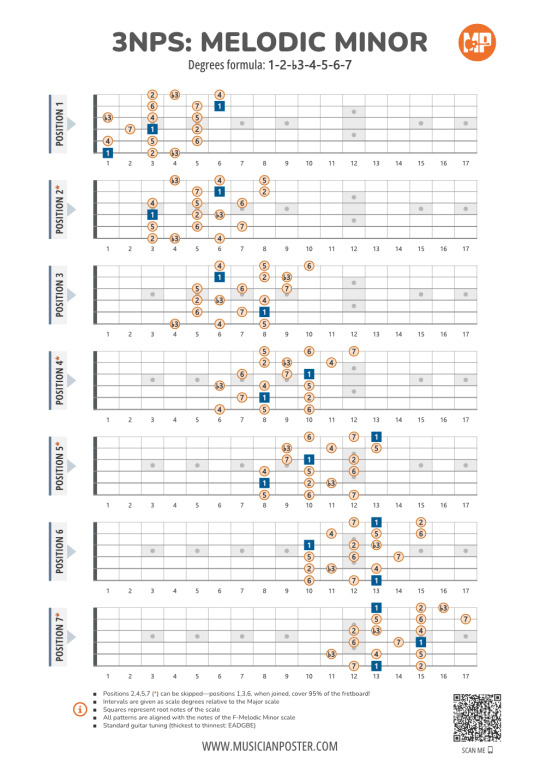

Download them all here (variations are linked down at the bottom):
And we're getting closer to finishing the 3NPS for shredding series. Still a couple of scales left in the family of Melodic Minor and one scale from the Double Harmonic Major scale.
Hope you have fun with it!
If you find this content helpful, I'd appreciate any kind of support—a Like, a share, or a comment—everything helps! Have fun learning! Oleg
#guitarplayers#guitarlesson#guitarpractice#musicman#instamusic#singers#musictheory#musicproducer#acousticguitarcover#musicianposter#musicposter
2 notes
·
View notes
Text
How to Read Stock Charts for Beginners?

If you’re new to investing, learning how to read stock charts for beginners can feel like deciphering a foreign language. But don’t worry—it’s easier than it looks. Stock charts are powerful tools that help you understand market trends, spot opportunities, and make smarter investment decisions. Whether you're a casual trader or planning long-term investments, mastering the basics of stock charts is the first step toward building confidence and growing your portfolio.
How to Read Stock Charts for Beginners – Understanding the Basics
Stock charts visually show a stock's price over time. They allow investors to track price movements, trading volume, and patterns that can help predict future performance.
The most common types of stock charts include:
Line charts – Simple and clean, showing the closing prices over a set period.
Bar charts – Display opening, closing, high, and low prices for each time unit.
Candlestick charts – Popular among traders, offering visual cues with color-coded bars.
Key Components of a Stock Chart
1. Price and Time Axes
Stock charts usually have time on the horizontal (X) axis and price on the vertical (Y) axis. This setup shows how the stock's price changes over days, weeks, or months.
2. Volume Bars
Volume bars appear at the bottom of most charts. They show how many shares were traded during a specific period. High volume often means strong interest or big news.
3. Moving Averages
Moving averages smooth out price data over a certain period, helping you spot trends.
Simple Moving Average (SMA): The average price over a defined time (e.g., 50-day SMA).
Exponential Moving Average (EMA): Gives more weight to recent prices.
Reading Candlestick Charts
Candlestick charts are ideal for beginners who want more detail in a visual format. Each candlestick represents one period (like a day) and shows:
Open and Close: The “body” of the candle.
High and Low: The “wicks” or “shadows” above and below the body.
Color: Green means the stock closed higher than it opened; red means it closed lower.
Recognizing common candlestick patterns—like dojis, hammers, and engulfing candles—can help forecast market behavior.
Identifying Trends and Patterns
Understanding trends can help you determine when to buy or sell.
Types of Market Trends
Uptrend: A series of higher highs and higher lows.
Downtrend: A series of lower highs and lower lows.
Sideways/Flat: Little movement in either direction.
Common Chart Patterns
Head and Shoulders: Indicates potential trend reversal.
Double Top/Bottom: Suggests strong support or resistance.
Flags and Pennants: Short-term continuation patterns.
Practical Tips for Beginners
Keep It Simple
Start with line or candlestick charts and focus on one stock at a time.
Combine Charts with Research
Charts are helpful, but always consider news, earnings reports, and broader market conditions.
Use Reliable Tools
Many platforms offer beginner-friendly charting tools. For a helpful resource on getting started, check out this complete beginner’s guide on how to read stock charts.
📊 Final Thoughts + CTA
Learning how to read stock charts for beginners doesn’t have to be overwhelming. By focusing on basic chart types, understanding key components, and recognizing simple patterns, you’ll gain the confidence to analyze stocks like a pro.
1 note
·
View note
Text
Trading Chart Patterns PDF Guide & Algo Tools
Mastering Market Moves: The Ultimate Guide to Trading Chart Patterns Book PDF
Introduction
Have you ever looked at a stock chart and thought, “What am I even looking at?” You’re not alone! Deciphering those zig-zagging lines can feel like trying to read an alien language. But what if I told you that those shapes — those patterns — actually tell a story? And once you understand that story, you could make smarter trading decisions. That’s where a trading chart patterns book PDF becomes your secret weapon.
In this article, we'll break down trading chart patterns in a friendly, no-nonsense way. We'll also explore how combining this knowledge with algorithmic trading software — especially the best algo trading software in India — can supercharge your trading game.
Download the best trading chart patterns book PDF. Learn how chart patterns, algorithmic trading software, and the best algo trading software in India help you win.
What Are Trading Chart Patterns?
Think of chart patterns like footprints in the snow. They show you where traders have been — and sometimes where they might go next. A chart pattern is just a visual formation on a price chart that helps traders make predictions. Whether it’s a triangle, a head and shoulders, or a double bottom — these shapes can signal buying or selling opportunities.
Why Use a Trading Chart Patterns Book PDF?
Let’s be real — the internet is loaded with scattered info. But a trading chart patterns book PDF puts everything in one place. It’s your go-to guide, available offline, structured, and perfect for both beginners and seasoned traders. Plus, you can refer to it anytime — even during a coffee break.
The 3 Main Types of Chart Patterns
Just like in movies, there are three main types of chart patterns:
Reversal Patterns: These hint that the trend is about to change.
Continuation Patterns: These suggest the trend will likely continue.
Bilateral Patterns: They could go either way — like a cliffhanger ending.
Understanding these gives you the power to react smartly, not emotionally.
Top Reversal Patterns Explained
Reversal patterns are like plot twists. They tell you the story is changing.
Head and Shoulders: Think of it like a person slumping. It often signals a shift from up to downtrend.
Double Top and Bottom: These patterns look like the letter ‘M’ or ‘W’. They scream, “Change is coming!”
Learning to spot these can save you from a bad trade — or help you enter just in time.
Key Continuation Patterns You Should Know
Continuation patterns keep the story flowing in the same direction.
Triangles (Ascending, Descending, Symmetrical): Imagine price compressing like a spring — ready to break out.
Flags and Pennants: These are like pit stops in a rally. The price pauses, then zooms off again.
Master these, and you’ll catch trends before others even notice.
How to Read Patterns Like a Pro
Reading chart patterns is part art, part science. Here’s how to get good at it:
Use candlestick charts for clarity.
Watch volume — it tells you how strong a move is.
Use support and resistance lines like guardrails.
It’s like learning to read music — confusing at first, but magical once you get it.
Common Mistakes Traders Make
Even the best traders mess up. Here are common traps:
Forcing patterns: If it doesn’t fit, don’t force it.
Ignoring volume: Patterns without strong volume are weak.
Overtrading: Don’t jump into every “almost” pattern.
Remember: Quality over quantity wins the game.
Best Resources for Chart Pattern PDFs
Here are some great places to find your next trading chart patterns book PDF:
Chart Patterns & Technical Indicators by Edward Dobson
Technical Analysis of the Financial Markets by John Murphy
Online libraries like Scribd, Academia, and even Reddit threads
Official broker platforms often offer free downloads
Just make sure you pick one with charts and examples, not just theory.
How Algorithmic Trading Software Helps
This is where things get exciting. Algorithmic trading software uses computer code to place trades. It can recognize patterns faster than any human. When you combine this with your knowledge of chart patterns, you’ve got a winning formula.
It’s like pairing Sherlock Holmes (your pattern spotting) with Watson (your algo software). Together, unbeatable!
Best Algo Trading Software in India
If you’re in India, here are some top-rated options:
Quanttrix – Known for speed and user-friendly interface.
Zerodha Streak – Drag-and-drop logic for non-coders.
AlgoTrader India – Offers institutional-grade automation.
Each has features like backtesting, live execution, and real-time analysis — ideal for traders who want results.
Using Chart Patterns in Algorithmic Strategies
Good algorithmic traders don’t just rely on numbers. They bake in pattern recognition rules:
Code to detect head and shoulders
Alerts for double tops
Algorithms that track breakout triangles
These strategies can be coded in platforms like MetaTrader, Python scripts, or even Streak.
Getting Started With a Chart Pattern Book
Here’s how to start:
Download a recommended trading chart patterns book PDF.
Start with 3-5 basic patterns.
Print a cheat sheet.
Look at real charts daily.
Journal what you see.
Consistency is key — don’t expect overnight success.
Tips to Practice Pattern Recognition
Think of pattern spotting like facial recognition. The more faces (charts) you see, the better you get.
Use trading simulators
Join trader communities
Quiz yourself using historical charts
Mark up charts manually
This hands-on practice boosts your confidence and instincts.
Mobile Apps & Tools for Chart Learning
Want to learn on the go? Try these:
TradingView: Mobile-friendly and packed with features.
Investing.com App: Clean charts and lots of news.
ChartSchool by StockCharts: A mini chart encyclopedia.
These help reinforce what you read in your chart pattern PDF.
Final Thoughts
Trading isn’t magic — it’s mastery. Understanding chart patterns gives you a serious edge. And when paired with powerful algorithmic trading software, especially the best algo trading software in India, you can turn insights into intelligent action.
So go ahead. Download that trading chart patterns book PDF, open up a demo account, and start seeing the market with new eyes. The journey from confusion to clarity starts with one pattern.
FAQs
What is the best trading chart patterns book PDF for beginners? “Technical Analysis for Dummies” and “Chart Patterns Explained” are great PDFs for those starting out.
Can I use chart patterns with algorithmic trading software? Yes! Many algorithmic tools allow you to code or automate pattern recognition and trading rules.
Which is the best algo trading software in India? Quanttrix and Zerodha Streak are widely recommended due to their user-friendly tools and performance.
Are trading chart patterns reliable for predicting markets? They’re not perfect, but when combined with volume and confirmation signals, they greatly improve your odds.
Where can I practice chart pattern recognition for free? Websites like TradingView and platforms like MetaTrader offer free tools and demo accounts.
0 notes
Text
Why Every Trader Should Learn Multiple Charts Pattern Analysis

In the dynamic world of trading, patterns are more than just lines and shapes on a chart—they are visual representations of market psychology, a roadmap to potential price movement. For traders looking to enhance their market analysis and decision-making skills, learning Multiple Charts Pattern analysis is not just beneficial—it’s essential.
Whether you're new to trading or a seasoned market participant, understanding various chart patterns can dramatically improve your success rate. This article explores why every trader should learn Multiple Charts Pattern analysis and how this skill forms the foundation of profitable trading strategies.
The Power of Patterns in Trading
Each chart pattern captures the interplay of buyer and seller psychology, offering a glimpse into market sentiment. These patterns, when correctly interpreted, can signal whether the market is likely to continue its current direction or reverse course. Patterns such as head and shoulders, double tops and bottoms, triangles, flags, and wedges provide traders with clear entry and exit signals.
However, relying on just one or two familiar patterns can limit your potential. The complexity of markets is reflected in the diverse and intricate patterns they produce. That’s why it’s important to learn Multiple Charts Pattern analysis—to broaden your perspective and increase your adaptability in different market conditions.
What is Multiple Charts Pattern Analysis?
Multiple Charts Pattern Analysis is the practice of studying and recognizing a wide range of technical chart patterns across various timeframes and market scenarios. Rather than focusing solely on one chart type or timeframe, traders analyze different patterns from candlestick charts, bar charts, line charts, and more. They also explore these patterns across daily, weekly, and intraday time frames to get a comprehensive view of market behavior.
This approach helps traders spot potential setups with greater accuracy, avoid false signals, and align their trades with the broader market trend.
Benefits of Learning Multiple Charts Pattern Analysis
Improved Decision Making: When you learn Multiple Charts Pattern techniques, you gain a structured way to interpret market data. This leads to better, faster decision-making and increased confidence in your trades.
Greater Flexibility in Trading Strategies: Not all markets move the same way. By mastering different chart patterns, you can adapt your trading strategy to suit trending, ranging, or volatile markets.
Reduced Emotional Trading: Fear and greed can cloud judgment, leading traders to act on impulse rather than logic. A solid understanding of chart patterns adds discipline to your trading, helping you rely on logic and analysis instead of gut feelings.
Enhanced Risk Management: Most chart patterns come with well-defined areas for placing stop-loss and take-profit orders. This clarity allows for better risk-reward setups, keeping losses small and maximizing potential gains.
How to Start Learning Multiple Charts Pattern Analysis?
With the growing availability of trading courses online, mastering this skill is more accessible than ever. With structured guidance, practical demonstrations, and community support, online courses help traders go from beginner to advanced level at their own pace.
When looking to learn trading online, make sure the course includes:
A wide variety of chart patterns
Real-world trading examples
Practice charts and quizzes
Access to mentors or peer groups
The best online trading course will not only teach you the patterns but also show you how to apply them in live market scenarios.
Why Traders Prefer Online Learning?
More traders today are turning to online trading courses due to their accessibility, flexibility, and cost-effectiveness. Instead of spending hours sifting through scattered resources, these courses offer a streamlined path with expert insights and practical tips.
At Chart Monks, for example, our online trading course is designed specifically to help you learn Multiple Charts Pattern analysis in a structured and engaging way. From beginner-level basics to advanced strategies, our course modules guide you through every step of the journey with clarity and confidence.
Real-World Application of Multiple Chart Patterns
Consider a situation where a head and shoulders pattern develops on the daily chart, while a bullish flag takes shape on the 15-minute timeframe. A trader who understands both patterns can make a more informed decision—perhaps waiting for the intraday breakout to align with the longer-term trend reversal before entering a trade.
This kind of multi-pattern, multi-timeframe approach allows for:
Stronger confirmation before trade execution
Precision in entry and exit points
Reduced risk due to enhanced clarity
Such insights are only possible when you've committed the time to learn Multiple Charts Pattern analysis thoroughly.
Final Thoughts
To keep up with the ever-changing markets, your trading game must keep improving. Limiting yourself to a handful of patterns may provide short-term success, but if you're aiming for long-term consistency, mastering Multiple Charts Pattern Analysis is crucial.
With the right online trading course, dedication, and practice, any trader can develop this vital skill. So if you’re serious about leveling up your trading game, it’s time to learn Multiple Charts Pattern analysis and turn uncertainty into opportunity.
Ready to start your journey? Take the next step in your trading journey by visiting Chart Monks and exploring our expert-led online courses. Learn at your own pace, sharpen your skills, and become a more confident and consistent trader.
#Learn Multiple Charts Pattern#Multiple Charts Pattern Analysis#Learn Trading Online#Online Trading Course#Trading Courses Online#Chart Monk
0 notes
Text
Master the Stock Market with Free Stock Market Courses by ICFM

Introduction to Free Stock Market Courses
Are you interested in learning about stock trading but unsure where to start? Free stock market courses can be the perfect solution for you. Offered by ICFM (Institute of Career in Financial Market), these courses provide comprehensive training in stock market concepts, strategies, and techniques, all at no cost. Whether you're a beginner or someone looking to enhance your trading skills, ICFM’s free stock market courses are an excellent resource to unlock your trading potential.
In this article, we’ll explore the benefits of taking free stock market courses and how ICFM’s structured program can set you up for success in the world of stock trading.
Why Choose Free Stock Market Courses?
Investing in stock market education can often come with hefty fees, making it difficult for newcomers to enter the field. ICFM’s free stock market courses eliminate this barrier by offering top-notch education at no cost. Here are some reasons why these courses are an ideal choice for both beginners and experienced traders:
Learn Without Financial Commitment
One of the primary reasons to take free stock market courses is the lack of financial commitment. Many people are hesitant to invest in education without knowing if trading is right for them. With ICFM’s free stock market courses, you can explore the basics and decide if stock trading is the right path for you without any pressure.
Quality Instruction from Industry Experts
ICFM’s free stock market courses are taught by experts with years of experience in the stock market. These instructors share real-world insights, ensuring that you gain practical, actionable knowledge that you can apply to your trading endeavors. You’ll learn from professionals who have successfully navigated the challenges of the stock market.
Flexible Learning
ICFM’s free stock market courses are designed to fit into your schedule. Whether you're a student, working professional, or someone with limited time, you can complete the courses at your own pace. This flexibility allows you to learn about stock trading without interfering with your other commitments.
What Will You Learn in ICFM’s Free Stock Market Courses?
ICFM’s free stock market courses provide a comprehensive curriculum covering the key aspects of trading. From the fundamentals to more advanced strategies, here’s what you can expect to learn:
Introduction to Stock Markets
Before diving into trading, it’s essential to understand the stock market. In the free stock market courses, you’ll learn:
What the stock market is and how it functions
Types of stock markets (primary and secondary markets)
How stocks are traded and the role of stock exchanges
Key participants in the stock market such as brokers, investors, and traders
This foundational knowledge will help you better understand the stock market’s structure and how trades are executed.
Fundamental Analysis
Fundamental analysis is the process of evaluating a company’s financial health. ICFM’s free stock market courses introduce you to this important skill by teaching you:
How to read financial statements such as balance sheets and income statements
How to use financial ratios (e.g., P/E ratio, debt-to-equity ratio) to assess a company’s performance
Understanding economic indicators and how news events impact stock prices
Mastering fundamental analysis helps you make informed decisions based on a company’s underlying financial health.
Technical Analysis
Another crucial aspect of trading is technical analysis—the study of past market data, primarily price and volume, to forecast future price movements. In the free stock market courses, you’ll learn how to:
Interpret stock charts and identify patterns like head and shoulders, double top/bottom, and flags
Use technical indicators like moving averages, RSI (Relative Strength Index), and Bollinger Bands
Analyze price trends and market momentum to make informed trading decisions
Trading Strategies
Developing a trading strategy is vital for success in the stock market. In ICFM’s free stock market courses, you’ll explore various strategies to suit your trading style:
Day trading vs. long-term investing: Understand the differences and when to use each strategy
Swing trading and scalping techniques for short-term gains
Creating a trading plan to define your goals, risk tolerance, and trade management rules
Real-World Practice
ICFM emphasizes hands-on learning in their free stock market courses. You won’t just be learning theories; you’ll also gain practical experience through:
Simulated trading environments where you can practice without real money
Live trading demonstrations to observe the strategies in action
Interactive webinars where you can ask questions and gain insights from professionals
How ICFM’s Free Stock Market Courses Set You Up for Success
ICFM’s free stock market courses are designed to prepare you for real trading. Here’s how these courses ensure you are well-equipped to succeed in the stock market:
Practical Knowledge You Can Apply
ICFM’s free stock market courses focus on practical knowledge. The curriculum not only covers theoretical concepts but also gives you the tools to apply what you’ve learned in live market conditions. This practical approach increases your confidence and helps you make well-informed decisions when you start trading with actual funds.
Ongoing Mentorship and Community Support
When you enroll in ICFM’s free stock market courses, you also gain access to mentorship and a supportive learning community. Whether you need help understanding specific concepts or are seeking guidance on complex strategies, ICFM’s experienced mentors are there to support you. Plus, by joining the ICFM community, you can exchange ideas with fellow learners and traders.
Networking Opportunities
ICFM’s free stock market courses also provide the opportunity to network with other aspiring traders. Participating in webinars, discussion forums, and group activities can help you connect with people who share your passion for trading. This network can provide valuable insights and even lead to new opportunities as you continue your learning journey.
Who Can Benefit from ICFM’s Free Stock Market Courses?
ICFM’s free stock market courses are perfect for a wide range of individuals:
Beginners who want to learn the basics of stock market trading
Intermediate traders looking to expand their knowledge and refine their skills
Students interested in pursuing a career in finance or trading
Professionals wanting to diversify their income through trading
How to Enroll in ICFM’s Free Stock Market Courses
Getting started with ICFM’s free stock market courses is easy:
Visit the ICFM website to explore the available courses.
Register by providing your details.
Choose your course schedule based on your availability.
Start learning and exploring the stock market!
Conclusion
If you’re looking to gain a comprehensive understanding of stock market trading, ICFM’s free stock market courses are the perfect starting point. With expert instructors, flexible learning, and practical experience, these courses give you the tools you need to succeed in the stock market. Whether you’re a beginner or an experienced trader, enrolling in free stock market courses at ICFM can help you unlock your trading potential.
0 notes
Text
Finished Fingerless Gloves

On top: The Easy Fingerless Mitts. I used Red Heart Super Saver 100% acrylic worsted weight yarn in Cafe Au Lait and size US 6 (4.0 mm) double pointed needles.
On the bottom: The Seeded Fingerless Mitts. I used Walmart Mainstays 100% acrylic worsted weight yarn in Red. I used Size US 7 (4.5 mm) double pointed needles for the main body, and size US 5 (3.75 mm) double pointed needles for the thumb.
#finished object#fingerless mitts#knitting#hand knitted#knitters of tumblr#yarn#yarn crafts#yarnblr#knitblr
4 notes
·
View notes
Text
Conquer the Day: A Beginner's Guide to Intraday Trading

The world of Online intraday trading is booming. Did you know that intraday trading volumes have surged by over 30% in recent years? This growth highlights how more individuals are drawn to the fast-paced nature of trading stocks within a single day. Simply put, intraday trading involves buying and selling financial instruments like stocks or commodities on the same day, aiming to take advantage of short-term price movements. This guide will help beginners grasp the essentials of intraday trading and consider stepping into this dynamic arena.
Understanding the Mechanics of Intraday Trading
Order Types
To engage in intraday trading, you need to understand different order types:
Market Orders: These are orders to buy or sell at the current market price. For example, if a stock is trading at $50, you might place a market order to buy it. This order completes instantly at that price.
Limit Orders: A limit order allows you to specify the price at which you're willing to buy or sell. If you only want to buy a stock at $48, you would set a limit order. It won’t execute until that stock reaches your desired price.
Stop-Loss Orders: This order helps minimize losses. If you own a stock at $50 and want to limit losses to 10%, you set a stop-loss order at $45. If the stock price drops to this point, your shares will automatically sell.
Trading Platforms
Choosing the right trading platform is vital. Some popular options include:
Robinhood: Known for its user-friendly interface. Great for beginners and offers commission-free trading.
TD Ameritrade: Offers advanced tools and excellent research resources, which can be beneficial for rookies.
E*TRADE: Provides a robust mobile app along with a web platform that’s easy to navigate.
(Screenshots would enhance understanding but are not included here.)
Leverage and Margin
Leverage allows traders to control larger amounts of money with a smaller investment. It means you borrow money from your broker to increase your buying power, potentially amplifying profits. However, this comes with risks. A statistic shows that around 70% of intraday traders use leverage. If the market moves against you, losses can exceed your initial investment.
Key Indicators and Chart Patterns for Intraday Traders
Technical Analysis Basics
Understanding technical analysis can boost your trading success. Here are a few key concepts:
Support and Resistance Levels: Support is where a stock tends to stop falling and bounce back up, while resistance is where it often stops rising. These levels can inform your buy or sell decisions.
Moving Averages: This tool smooths price data over a specific period, making trends clearer. For instance, a 50-day moving average might help identify whether a stock is in an uptrend or downtrend.
Relative Strength Index (RSI): A momentum oscillator that indicates whether a stock is overbought (above 70) or oversold (below 30).
Chart Patterns
Recognizing chart patterns can provide valuable insights:
Head and Shoulders: This pattern indicates a trend reversal. The “head” is a peak between two smaller “shoulders.”
Double Tops/Bottoms: A double top signals a potential price decline, while a double bottom suggests a price increase.
Flags/Pennants: These patterns represent brief price consolidations before a continuation of the trend.
Interpreting Market Sentiment
Market sentiment can sway price movements significantly. To gauge sentiment, traders often review news articles, social media, and reports from reliable financial news sources like CNBC or Bloomberg.
Risk Management Strategies in Intraday Trading
Position Sizing
Position sizing helps manage risk effectively. For instance, if you have a $1,000 account and are willing to risk 2% per trade, you would only risk $20. Therefore, if you buy a stock at $50, you should only purchase 0.4 shares to limit your risk.
Stop-Loss Orders
Setting stop-loss orders is vital for protecting your capital. For example, if a trader buys shares at $100 but sets a stop-loss at $95, they limit potential loss to 5%.
Emotional Discipline
Emotional control is crucial. Many traders face challenges with impulsive decisions. Trading expert Van Tharp states, “Your trading plan has to be solid, but your mind must also be calm to execute it.”
Choosing the Right Assets for Intraday Trading
Stocks vs. Futures vs. Forex
Each asset class has unique features.
Stocks are popular for intraday trading due to their volatility.
Futures offer high leverage but can be risky for beginners.
Forex trading provides high liquidity with low capital needed to start.
Liquidity and Volatility
Liquid assets have high trading volumes, making it easier to enter and exit trades. Volatile assets experience frequent price changes, providing more opportunities. Some highly liquid stocks include Apple, Amazon, and Tesla.
Diversification
Diversifying your portfolio helps mitigate risk. Trading across sectors or asset classes reduces the impact of a poor-performing asset.
Developing an Intraday Trading Plan
Defining Trading Goals
Setting clear and realistic trading goals is crucial. Goals could include achieving a specific profit amount each month or steadily growing your trading account.
Backtesting Strategies
Before entering live trades, backtesting strategies can show how they would have performed in the past. This helps in understanding potential profitability. Websites like TradingView offer backtesting features.
Journaling Trades
Tracking trades improves decision-making. Recording details, like entry and exit points, helps identify what works and what doesn’t. Over time, this practice can enhance your trading effectiveness.
Conclusion: Mastering the Art of Intraday Trading
Understanding intraday trading involves grasping various key components: order types, charts, and effective risk management. Prioritizing risk management and adopting a continuous learning mindset will enhance trading skills. With determination and the right resources, you can navigate the exciting world of intraday trading successfully. Start small, stay informed, and let your journey unfold.
#intaday tading#intraday trading in India#Intraday trading Platform#stock trading platform in india#forex trading in india
0 notes
Text
🍕🍕🍕How to Make a Perfect Pepperoni Pizza at Home 🍕🔥

💥.Making a homemade pepperoni pizza is one of the most rewarding kitchen experiences. Not only does it fill your home with an amazing aroma, but it also lets you control the ingredients, toppings, and flavors exactly how you like them! 🤩 Whether you're a beginner or an experienced cook, this guide will walk you through each step to create the perfect crispy, cheesy, and flavorful pizza right in your own kitchen. So, roll up your sleeves, grab your ingredients, and let’s get started! 🍽️👩🍳

Step 1: Gather Your Ingredients 🛒
Before you start, make sure you have all the necessary ingredients ready. Here's what you'll need:
For the Dough: 🍞
2 ½ cups of all-purpose flour 🌾
1 packet (2 ¼ teaspoons) of active dry yeast 🧫
¾ cup of warm water (about 110°F/45°C) 💧
1 teaspoon of sugar 🍚
1 teaspoon of salt 🧂
1 tablespoon of olive oil 🫒
For the Toppings: 🍕
1 cup of pizza sauce 🍅
1 ½ cups of shredded mozzarella cheese 🧀
20-25 slices of pepperoni 🍖
Optional: oregano, basil, red pepper flakes 🌿🔥
Now that you have everything, it's time to make the perfect pizza dough from scratch! 🏆

Step 2: Prepare the Dough 🍞
The dough is the foundation of a great pizza, so let’s make it soft, chewy, and crispy at the same time! 💪
Activate the Yeast 🧫
In a small bowl, combine the warm water, sugar, and active dry yeast. Stir it lightly and let it sit for about 5-10 minutes until it becomes foamy. 🫧 This means the yeast is activated and ready to make your dough rise!
Mix the Dough Ingredients 🥣
In a large mixing bowl, combine the flour and salt. Pour in the yeast mixture and add the olive oil. Stir everything together until a rough dough forms.
Knead the Dough 💪
Transfer the dough to a floured surface and knead it for about 8-10 minutes. Use the heels of your hands to stretch and fold the dough until it becomes smooth and elastic. This step is crucial for developing the gluten structure, which gives the pizza its signature chewiness.
Let the Dough Rise ⏳
Place the dough in a lightly greased bowl, cover it with a clean kitchen towel, and let it rest for about 1 hour in a warm place. The dough should double in size. This fermentation process gives the dough a light, airy texture.

Step 3: Shape the Pizza Crust 🍕
Now that your dough has risen, it's time to shape it into a perfect pizza crust! 😍
Punch and Roll the Dough 👊
Gently punch down the dough to release any air bubbles, then transfer it to a floured surface. Use a rolling pin (or your hands) to stretch the dough into a 12-inch circle. If you prefer a thicker crust, keep it slightly smaller.
Transfer to a Baking Pan 🍽️
Place the rolled-out dough onto a pizza stone, baking sheet, or a pizza pan lined with parchment paper. If you like a crispy bottom, you can preheat the pan in the oven before adding the dough.

Step 4: Add the Sauce and Toppings 🍅🧀👉👉 join now free class
This is where the magic happens! Let’s add all the delicious flavors that make pepperoni pizza so irresistible. 🤤
Spread the Pizza Sauce 🍅
Take your favorite pizza sauce and spread it evenly across the dough, leaving about ½ inch of space around the edges for the crust. Use the back of a spoon to create a nice, even layer.
Add the Cheese 🧀
Sprinkle a generous amount of shredded mozzarella cheese over the sauce. If you love extra cheese, go ahead and pile it on! The more cheese, the better. 😋
Top It with Pepperoni 🍖
Now, place pepperoni slices all over the pizza. Arrange them however you like—whether in a neat pattern or randomly scattered. If you want a super meaty pizza, add extra pepperoni for a double-layered effect.
Optional Seasonings 🌿🔥
For an extra burst of flavor, sprinkle some oregano, basil, or red pepper flakes over the top. This will give your pizza that authentic Italian touch. 🇮🇹

Step 5: Bake the Pizza 🔥
Preheat the Oven ♨️
Preheat your oven to 475°F (245°C). A hot oven is key to getting a crispy crust and perfectly melted cheese.
Bake to Perfection 🍕
Place your pizza in the oven and bake for 12-15 minutes. Keep an eye on it—once the cheese is bubbly and golden, and the crust turns a beautiful golden brown, it’s ready! 🏆
Step 6: Slice and Serve 🍽️
Cool the Pizza ⏳
Once your pizza is out of the oven, let it cool for a few minutes before slicing. This helps the cheese set so it doesn’t slide off when you cut into it.
Cut Into Slices 🔪
Use a sharp pizza cutter or knife to slice your pizza into 6-8 equal pieces. If you like big slices, cut it into 4!
Enjoy Every Bite 🤤
Grab a slice, take a bite, and savor the delicious combination of crispy crust, gooey cheese, and flavorful pepperoni. 🍕🔥
Extra Tips for the Best Homemade Pizza 💡
Use a Pizza Stone: If you have one, baking on a preheated pizza stone gives the crust a perfect crisp.
Experiment with Cheese: Try mixing mozzarella with provolone or cheddar for a unique flavor. 🧀
Add a Drizzle of Olive Oil: A light drizzle of olive oil over the baked pizza enhances the flavor. 🫒
Reheat Properly: Heat leftovers in a skillet instead of a microwave for a crispy crust! 🍳
Final Thoughts 🤩👉👉 join now free class
Making a homemade pepperoni pizza is truly a fun and rewarding experience. With this step-by-step guide, you now have all the skills to make a delicious, cheesy, and crispy pizza right in your own kitchen. 🍕🔥 So next time you’re craving pizza, skip the delivery and make your own! It’s fresher, tastier, and way more satisfying.
Now, tell me—what’s your favorite pizza topping? 🍕😋

Here's a post for you:
🔥 Join Our Free Cooking Classes – Limited Seats! 🔥
🍳 Learn to Cook Like a Pro! From delicious appetizers to mouthwatering desserts, we’ll guide you through every step. 🌍 Classes available worldwide!
📅 Deadline: Join before March 5, 2025 🎯 What You Get: ✅ Expert cooking guidance ✅ Step-by-step recipes ✅ Global cuisine experience
⏳ Hurry! Seats are filling up fast!👉👉 Sign up now free class
👩🍳🍕🥘 Don’t miss this golden opportunity! 👉👉 see more free recipe
#pizza rolls#pizza cooking#pizzahead#pizza recipe#good pizza great pizza#pizzalover#sandwich#showbiz pizza#cheese#recipe
0 notes
Text
10 Most Powerful Chart Patterns for Traders!
@ParkaviFinance Discover the 10 Most Powerful Chart Patterns for Traders! 📈Unlock the secrets of technical analysis with our comprehensive guide to the 10 most powerful chart patterns. In this video, you'll learn how to identify and trade patterns like Head and Shoulders, Double Top, Double Bottom, and Wedge. Whether you're a beginner or an experienced trader, these patterns can be a game-changer for your trading strategy.
What You'll Learn:
- Identifying Chart Patterns: Spot patterns on stock charts with ease.
- Understanding Patterns: Learn the significance of different parts of a chart pattern.
- Trading Strategies: Utilize bullish, bearish, and neutral patterns in your trades.
- Risk Management: Be aware of common risks involved in trading chart patterns.
- Expert Tips: Enhance your technical analysis and trading strategies.
Watch till the end to gain the confidence to analyze trends and make informed trading decisions. Don't forget to LIKE, COMMENT, and SUBSCRIBE to Parkavi Finance for more stock market insights, tips, and strategies! Hit the notification bell so you never miss an update.
Watch in Tamil:
https://youtu.be/WjhhXfiFOFE
Watch in English:
https://youtu.be/A5udwIpo2p0
Read in English:
https://www.parkavifinance.com/2024/11/10-most-powerful-chart-patterns-every.html
Read in Tamil:
https://tamilparkavifinance.blogspot.com/2024/11/tamil-market-insights-10-chart-patterns.html
chart patterns, stock market trading, head and shoulders, double top, double bottom, wedge trading, bullish patterns, bearish patterns, technical analysis for traders, risk management in trading, trading strategies, top chart patterns, beginner trading tips, #ChartPatterns #TechnicalAnalysis #StockTrading #HeadAndShoulders #DoubleTop #DoubleBottom #TradingStrategies #Bullish #Bearish #WedgePattern #RiskManagement #TopChartPatterns #BeginnerTradingTips
#share market#technical analysis#financial freedom#trading strategies#financial updates#investing stocks#stock market#chartpatterns
0 notes