#File Sharing Apps Comparison
Explore tagged Tumblr posts
Visit Tumblr Blog
Explore Tumblr blogs with no restrictions, modern design and the best experience.
Last Seen Tumblr Blogs


Fun Fact
Tumblr is used by 21% of adults online aged 18-29 years.
Text
File Sharing Apps Comparison: Finding the Right Solution for Your Needs
In the digital age, file sharing has become an integral part of how we collaborate and work together. From sharing documents with colleagues to sending large media files, file sharing apps play a crucial role in facilitating seamless communication and collaboration. However, with a plethora of options available, choosing the right file sharing app can be a daunting task. In this article, we'll compare some of the top file sharing apps to help you find the perfect solution for your needs.
Why Use File Sharing Apps?
Before diving into the comparison, let's understand why file sharing apps are essential in today's work environment:
1. **Efficiency:** File sharing apps streamline the process of sharing documents, photos, videos, and other files, saving time and effort.
2. **Collaboration:** These apps often come with collaboration features like real-time editing, commenting, and version control, enabling teams to work together seamlessly.
3. **Security:** Many file sharing apps offer robust security features such as encryption, password protection, and access controls to ensure sensitive data remains secure.
4. **Accessibility:** With file sharing apps, files can be accessed from anywhere, on any device, making remote work and collaboration more convenient.
Comparison of File Sharing Apps
Let's compare some popular file sharing apps based on key features, security, ease of use, and pricing:
1. Google Drive
- **Key Features:** Real-time collaboration, document editing, file organization, integration with Google Workspace apps.
- **Security:** Encryption, access controls, version history.
- **Ease of Use:** User-friendly interface, intuitive file management.
- **Pricing:** Free with limited storage, paid plans for additional storage and features.
2. Dropbox
- **Key Features:** File syncing, sharing, collaboration tools, file recovery.
- **Security:** Encryption, two-factor authentication, access controls.
- **Ease of Use:** Simple interface, drag-and-drop functionality.
- **Pricing:** Free with limited storage, paid plans for more storage and advanced features.
3. Microsoft OneDrive
- **Key Features:** Integration with Microsoft 365 apps, file sharing, collaboration tools.
- **Security:** Encryption, ransomware detection, access controls.
- **Ease of Use:** Seamless integration with Windows and Office apps.
- **Pricing:** Included with Microsoft 365 subscription, with various storage options.
4. Box
- **Key Features:** Secure file sharing, collaboration, workflow automation.
- **Security:** Encryption, access controls, data loss prevention.
- **Ease of Use:** User-friendly interface, customizable workflows.
- **Pricing:** Free trial, paid plans for businesses with advanced features.
5. WeTransfer
- **Key Features:** Large file transfers, customizable sharing options, no account required.
- **Security:** Encrypted transfers, expiration dates for shared links.
- **Ease of Use:** Simple interface, no login required for basic use.
- **Pricing:** Free with limited file size, paid plans for larger files and additional features.
Choosing the Right File Sharing App
When selecting a file sharing app, consider factors such as:
- **Features:** Which features are essential for your workflow? Real-time collaboration, version history, and integration with other apps are key considerations.
- **Security:** Ensure the app offers adequate security measures such as encryption, access controls, and data protection features.
- **Ease of Use:** A user-friendly interface and intuitive file management can enhance productivity and user adoption.
- **Cost:** Evaluate the pricing plans to choose a solution that fits your budget while meeting your requirements.
In conclusion, file sharing apps are indispensable tools for modern businesses and individuals alike. By comparing the features, security, ease of use, and pricing of different file sharing apps, you can make an informed decision and choose the right app to streamline your file sharing and collaboration efforts.
1 note
·
View note
Text

If you create CC for TS2 you probably avoid using DXT1 format, because it often looks really bad, right? Well, I've got news for you😐
‣ SimPe texture viewer can't correctly decode DXT1 textures. It often displays artifacts not visible in the game.
Up until now it was not possible to extract such texture from a package without 'glitches'. @chieltbest recently shared their revolutionary YaPe package editor. It's an experimental version, for now - it's still being developed - but I've already edited 180+ CC textures with no issues. YaPe is very easy to use. It allows you to reconvert textures inside a package to different format, remove or add mipmaps with one click, replace textures with drag and drop method - supports JPEG, TIFF, DDS and more! You can get it here.
YaPe editor is also the only app I know, that allows you to extract DXT1 texture from the package file without glitches. Below the cut you'll find a little tutorial on that. I also included a detailed comparison of DXT textures built with various plugins:
Note: YaPe is a huge time saver, however I still recommend SimPe for textures with smooth gradients, where quality is very important - such as skintones, and especially dark ones (also for removing mipmaps from such content, current version of YaPe rebuilds textures in the process fixed).
-------------------------------------------------------------------------
*DXT1 format has gained a bad reputation amongst TS2 creators, mostly because of borked SimPe DXT1 texture preview/export.
But the fact is - DDS plugins (aside from SimPe DDS Builder) create DXT1 that looks quite similar or identical to flat DXT3 / DXT5.
Important thing about DXT1 format: file size is around half smaller than DXT3/5.
‣ What's wrong with SimPe DXT1 textures?
Nothing, really. SimPe /Nvidia tools DDS builder is using special settings for DXT1. It saves textures as DXT1a format.
Unlike ordinary DXT1 (DXT1c) that doesn't support transparency at all, DXT1a format has basic 1-bit transparency switch. DDS builder 'hides' black pixels from compression by enabling transparency - this trick is actually meant to reduce artifacts in some areas /thanks @chieltbest for explaining this/.
Transparent parts of DXT1a texture are displayed as black in the game, as long as TXMT doesn't have transparency enabled.
Below: DXT1a previewed in YaPe. Left pic features transparent pixels (hard to notice if you enable dark UI mode). Please note that, unlike SimPe, it displays colors and grays correctly.
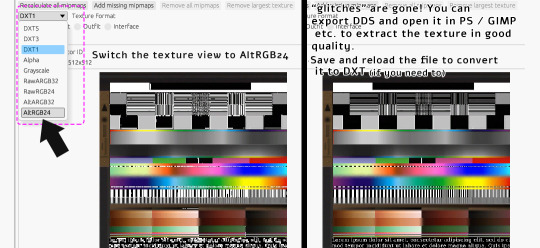
‣ Extracting DXT1 texture without 'glitches' in YaPe:
Open package in YaPe editor. Preview TXTR resource, pick AltRGB24 (Raw24Bit) from dropdown menu.
AltRGB24 preview displays flattened version of the texture (texture background is exposed)
'Export DDS' button creates .dds file out of the previewed texture
/optional: If you save the changes, then you can reload the package and convert from Raw to DXT format/
exported DDS texture can be opened in apps with DDS plugin - GIMP, Paint.NET etc.
if you don't have apps with DDS plugin, you can use SimPe (click on texture in SimPe, pick 'import DDS..', choose dds exported in YaPe, then export as PNG.
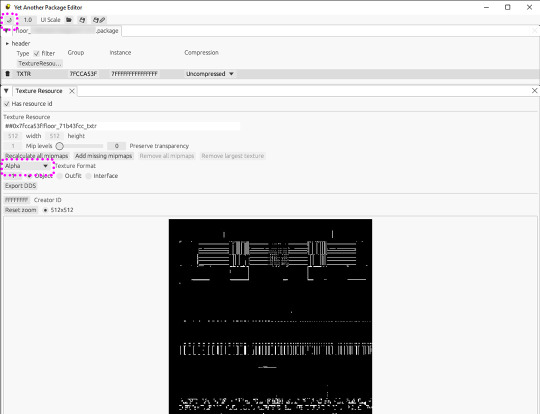
Pic above: Yet Another Package Editor v0.4.0, light UI mode. My sample DXT1a texture in Alpha preview - transparent pixels are clearly visible.
⚠️ Editing original SimPe DXT1a texture with YaPe (removing or adding mipmaps - for example) and saving as DXT1 again, will most likely increase the number of 'false artifacts'
..however, the texture will still look decent in game. I edit CC with DXT1a for my own use that way - because reconverting to other formats doesn't improve texture quality, might even make it a little worse in some cases.
BUT if you're going to share such content, it might be best to reconvert it. Because if it looks very glitchy in SimPe, it also looks glitchy in Sims2Pack Clean Installer. And people might just delete it.
Alternatively, if you use DXT1 for your CC, you could inform people that "glitches" in SimPe / Clean Installer preview are not visible in the game.
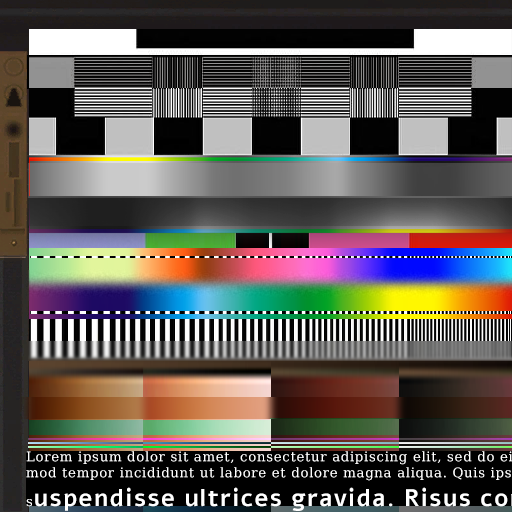
DXT1 vs flat DXT 3/ 5:
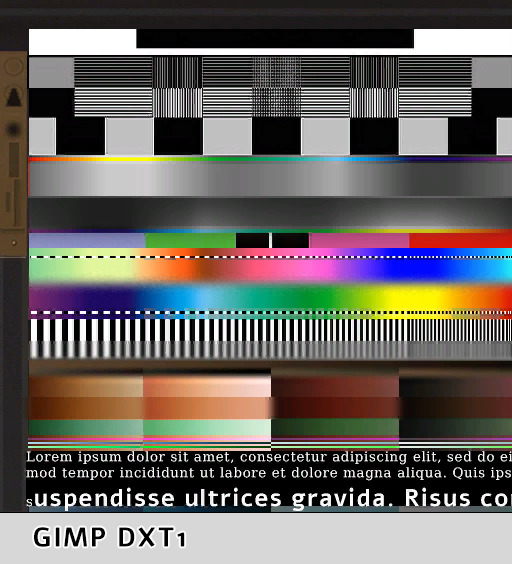
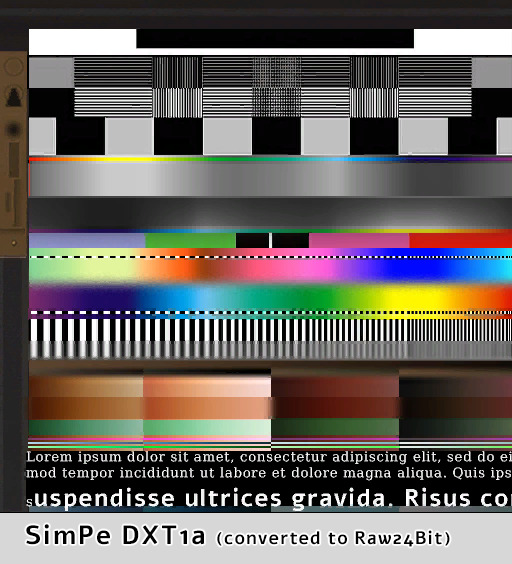

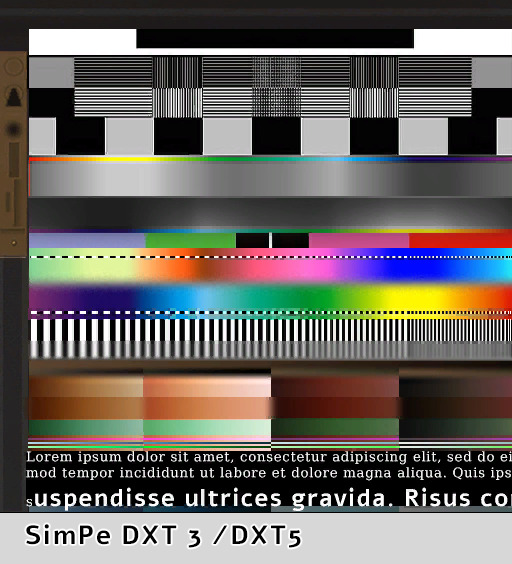


(YaPe allowed me to extract SimPe DXT1a texture without glitches)
*Yes, flat DXT1 and DXT3 / DXT5 created in GIMP really looked exactly the same.
GIMP had 'perceptual error metric' option on, it slightly improves some details.
so, who won?
You be the judge. Overall, I think YaPe (v0.4.0) did really good in this particular case.
SimPe DTX3 shows more artifacts in the blue/ turquoise /black dots area but dark gradients are smoother than others. GIMP DXT had issues with black dots over the pink - red tones seep into black.
SimPe DXT1 is not bad, but has some issues - a few artifacts appeared over thin black & white stripes. Also, blurred colors in the middle became a bit crunchy. /Dark brown gradients are better than GIMP DXT tho/.
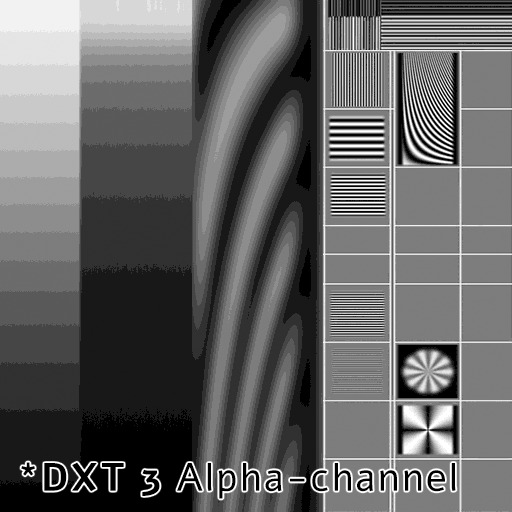
‣ DXT5 Alpha-channel quality
The difference between DXT3 and DXT5 lies only in the way transparency is handled. DXT5 can store more alpha-channel grayscale information and offers much smoother transparency.

Pic above: alpha-channels extracted from DXT5 (white = opaque parts, pure black = 100% transparent). These looked basically the same so I did another test using more demanding texture - darker alpha gradients plus thin lines:

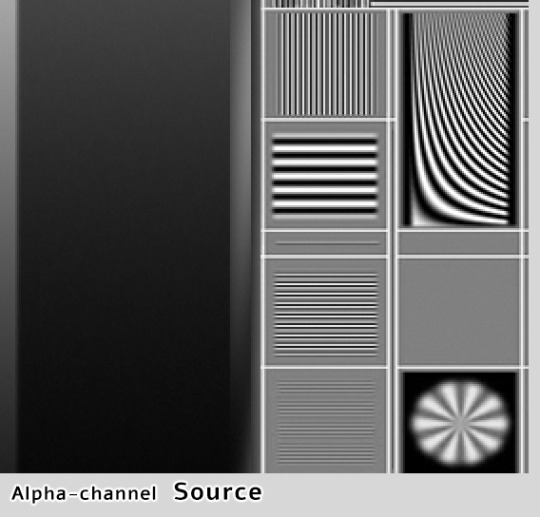
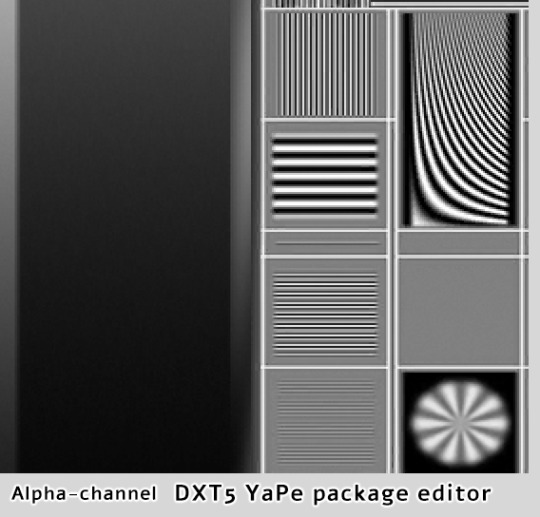
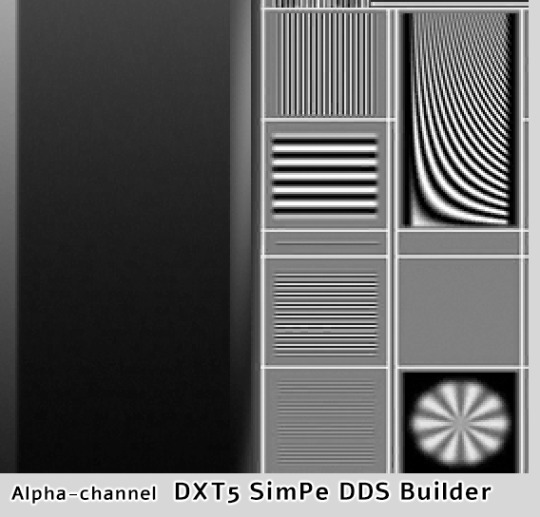
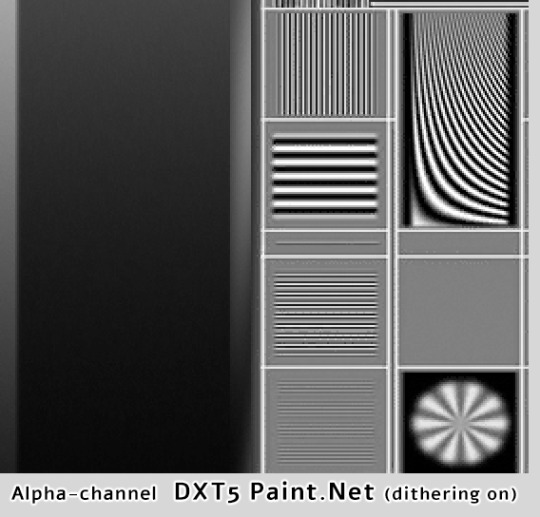
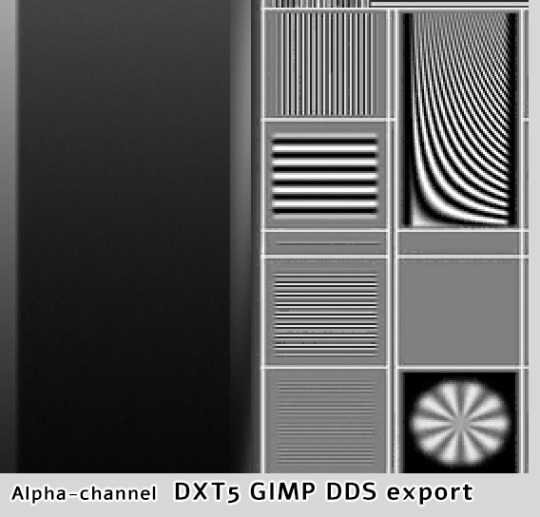
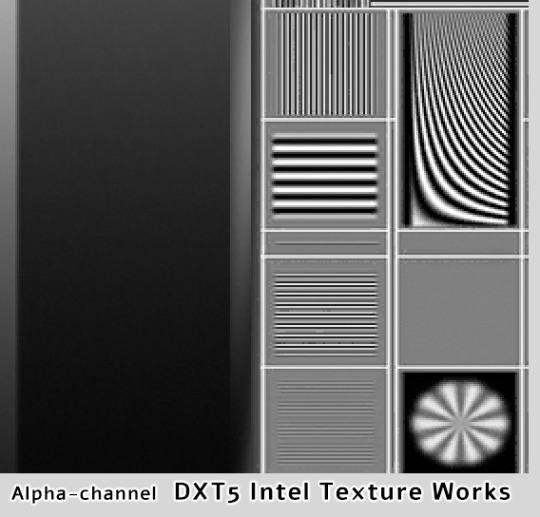
YaPe has produced very nice alpha channel without much artifacts, the gradient looks almost as the source. SimPe DXT5 - also clean details, but surprisingly, darkest parts of the gradient are a little bit choppy. GIMP DXT5 and the other two show tiny pixel artifacts around light lines.
Last pic above is DXT3 alpha-channel for comparison - crisp details are clean, but gradients are very choppy. I've compared various plugins, all produced identical DXT3 alpha. DXT3 format is OK for stuff that's using alpha-test transparency (not smooth, not see-through) - leafy plants etc.
*Please note that's exactly why transparent clothing looks so bad when created with Bodyshop - it doesn't use DXT5, only DXT3.
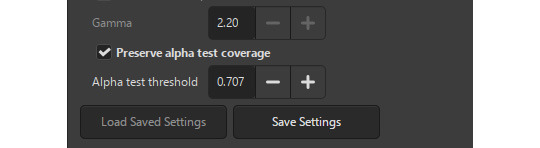
GIMP DDS exporter allows you to improve transparent mipmaps for plant textures etc, you need to select 'Preserve alpha test coverage' and increase the threshold if required - it will make very thin details a bit more thick on zoom-out and reduce details disappearing.
YaPe editor also has an option to tune transparent mipmaps (increase the value with "preserve transparency" slider). YaPe lets you preview each mipmap, which is very convenient. Here's a detailed tutorial by Chieltbest.
‣ Color gradient: DXT3 /DXT5
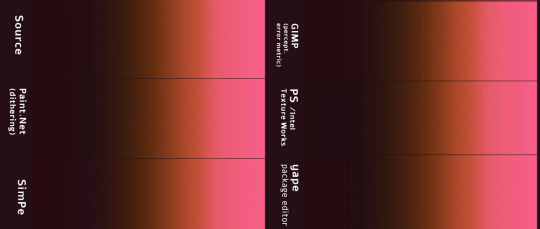
Paint.NET (DDSFileTypePlus 1.12.13.0) did best in this case, thanks to agressive error-diffusion dithering. SimPe DDS Builder DXT 3/5 did really good and you probably won't find better DDS plugin for building clothing or skintone DXT textures, especially dark skins.
Next goes YaPe editor - gradient is quite smooth, aside from the darkest tones - quite choppy. GIMP DXT and Intel Texture Works are so-so.
*I already posted one DXT formats test here, it features darker gradients. I still need to compare how textures look as actual SimSkin or overlays in game. The TS2 game is not great at displaying grey / dark color gradations, especially on Sims...
Above, uncompressed png texture for reference.
101 notes
·
View notes
Text
visored longwing harpies & the hall of faces
I did say there was no exclusive global culture on Siren shared by humans of a certain body type, and I lied, because there is One.
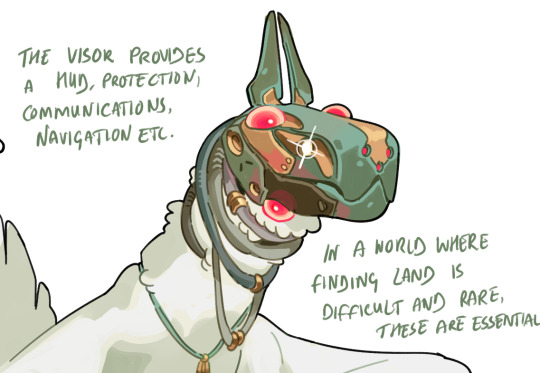
The early settlers on Siren were the unaltered human workforce of a certain megacorporation. While an almost unlimited budget was poured into the dodgy gene programs, since that was why they chose to settle a planet so far out of the reach of The Authorities, everything else was done pretty cheaply, including the settling itself. In order to map out their new home planet, incredibly cheap mass-produced aircraft were used by pilots. These aircraft could be made quickly and easily at the settlement site because they lacked a flight computer or any real sensors - or any equipment at all in the cockpit. Rather than a multitude of different equipment loadouts on an aircraft that would take time and effort to swap out or maintain, the pilots instead used these visors which were universally compatible with the one-size-fits-all aircraft. It's kind of like how it's easier to just carry a phone around with a calculator app than it is to carry a phone and a calculator, even if the phone app calculator experience sucks by comparison.
The visors were the real expensive kit, each custom built to a pilot's exact needs and flight style, and they were built to last. the aircraft fell apart in the following centuries but the visors remained, hyperlight plastic powered by the planet's native star, and something interesting happened. The remains of the first settlement were largely inaccessible to anyone but longwing harpies, and these harpies had the right head shape to fit the visors. Many of the pilots had filled their visors with video and photo files from home, from Earth, like a worker decorating his cubicle with photos of his family. Some had been decorated on the outside, as well, resembling birds. The harpies that found the visors obviously tried to use them. They found themselves experiencing visions of strange worlds, recordings of long-dead pilots and ATC, and found that each visor can interface with every other one, no matter how far apart. Each visor came with its own callsign, its own name, which has remained for thousands of years - and because of this, each visor is considered by the cultures of Siren to be a named character with a distinct personality (eg. the swan visor was cygnus2, it is known now as Signastoo)
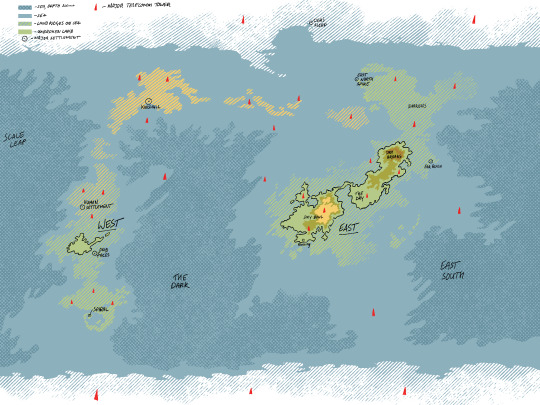
I keep posting the map and it needs to be redrawn but essentially every red triangle is an ancient telecomm tower. These became the only remaining waypoints on the visors' HUD and mapping software, meaning that 1. a true global culture could emerge, with longwings gathering at these sites, and 2. visored longwings became the gold standard for navigation on Siren. In a world that is basically just water, that's a big deal.
There exist only a few thousand visors (about 3k I'd say). The unused visors are kept in the Hall of Faces, the ancient aviation bay at the first settlement in West. Because of how water levels and land structures have changed over the years, this building exists on a mesa that rises another few thousand feet out of the water, with sheer sides, and is utterly inaccessible to anyone but a longwing harpy. When a visored harpy dies, the visor is returned here. If you want to claim a visor, you need to hold an interview with one of the elders at the site, who will test you rigorously to see if you can inhabit the character of one of the visors. If not, too bad. If you do get it, it's yours until either you die or you do something considered 'out of character' for the wearer of that particular visor. It is DEEPLY discouraged to steal a visor off anyone because it would be largely impossible, given how they all can communicate (imagine a gigantic worldwide discord server where the location & name of every person is known at all times... the drama is likely insane but at least if someone steals a visor, everyone will know about it)
not every longwing desires a visor because it comes with a lot of responsibility alongside its automatic prestige, and you can't really give it up once you have it. also there's always the possibility of being diagnosed with a super annoying, glitchy, or hated visor character lol. but among the roughly 2700 visored harpies on Siren there does exist a global culture exclusive to them. they chat to one another long-distance, engage in closed-practice ceremonies where they all get high and look at videos of Earth, and essentially become a class outside the mundanity of normal life on Siren. to the rest of the population, they basically become telepathic wizards
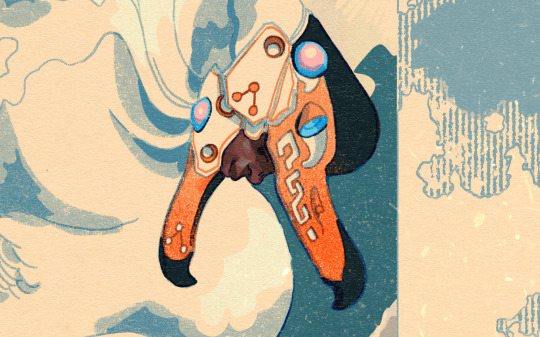
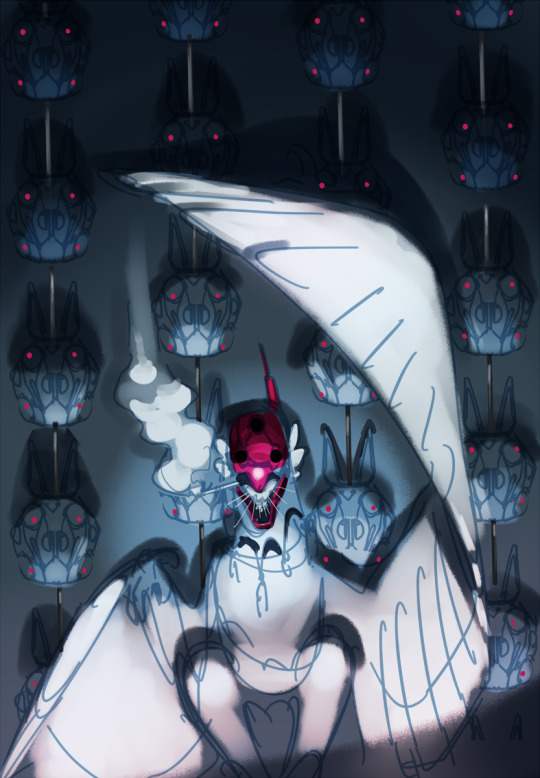
Terwyef's visor (first pic) is called Scrappercharlee and is one of the more common models, tho it has been decorated over the years with extra bits. Scrappercharlee is a bit busted and half the HUD is missing. Miakef's visor (second pic) Signastoo is one of the very fancy and well-known ones, it's shaped like a swan's head and likely belonged to a high-ranking pilot who could afford a bit of frippery and showmanship back in the day. Birds do not exist on Siren and harpies are mammals so the swan itself is symbolically meaningless, but the bird-style visors introduce the idea of 'a bird' in the abstract, and this has been imbued with its own form of meaning by harpies.
347 notes
·
View notes
Text
3/?
C1 (and prompt) / C2 / C3 / C4
Duke’s no visual artist.
He’s a writer, first and foremost, and knows how to weave words into tapestries of literature even though when he speaks, he fumbles as hard as any other teenager. He’s got about seven different documents scattered across three different devices crammed full of quotes that he doesn’t have a use for but wants to, and that’s probably the best metaphor for his day-to-day life that he can come up with.
So, yeah, definitely not a visual artist, unless one can call his half-decent handwriting ‘art.’ Since gaining his powers, though, he’s had to train the skillset to the best of his ability, because otherwise it’s impossible to always convey exactly what he sees in the world.
Shrimp colours? Yeah, they’re funky things. (And technically not shrimp colours, according to Tim, but Duke refuses to call them anything else). Skin stripes? Complete bullshit, thanks for nothing internet.
Okay– not the point.
The point is that sometimes, he loses touch with what exactly is weird, or simply doesn’t notice because he doesn’t have a way of comparing what he sees to what everyone else sees.
The point is that Duke and Damian are in one of the lesser used rooms in the manor, enjoying some much-needed quiet time. Damian has his fancy pencils and markers next to him on the couch, while Duke is on the floor surrounded by a mix of supplies from different brands, and a couple highlighters that Damian sneers at but Duke uses to portray the aforementioned shrimp colours.
Does he think that there’s anything secret to see with their new foster sibling? Nah, not really. The guy looked pretty average, from Duke’s perspective, but often times with magic users or metas, normal doesn’t necessarily mean nothing. (For example, the absolute shitshow that was Duke meeting John Constantine).
With no photo to use for reference, Duke has to wing his drawing. Once or twice he discreetly pulls up the file on his phone, but otherwise there’s no reference, and it shows.
Certainly a bad sketch for a case, but when they need something like that, it’s usually Damian’s job first. What matters more is making him look human enough to get the point across, and Duke manages that just fine. Pale skin, distractingly green eyes, and a monotonous expression make the drawing recognisably their newest foster sibling.
… Okay, yeah, he doesn’t look as human on paper, but that’s probably just Duke’s mediocre art skills. Maybe he should try again.
“Who are you drawing?” Damian asks, glancing down at Duke’s sketch.
⠀
⠀
Cass, in the cave and about to go through some exercises to work out her energy, is not at all amused when she unlocks her phone to see herself logged into the secure JL app that is password locked to oblivion.
There sits a not-so-innocent file, entitled Not A Case: The Case. The folder icon is Oracle’s signature shade of green, in case Cass thought about wondering who made the new file. Clicking around, it seems to be shared with about half of the Bats.
Will it be helpful to gather information? Yes. Is it unfairly invasive? Yes. Is Cass going to complain?
… No.
This is how the Bats show their love, as other heroes tell them over and over (and over, and over).
She flicks out of the JL files and starts up her music. The fight for not turning their new brother into a case has already been lost, but Cass isn’t here to do work.
⠀
⠀
The front entryway of the manor is bugged. This is not considered an invasion of privacy, since Babs warned the family in advance, but maybe it’s a bit of an invasion of privacy now that there’s someone present who doesn’t know about the bugs.
Ehn. She can apologise once John Doe inevitably finds out about the Bat business. In comparison, Barbara’s constant monitoring doesn’t seem as stifling and unnecessary.
To the point – she uses high quality bugs in the manor. It’s the Bats’ safest of safehouses, and she will never take the risk of infiltration.
She zooms in on the scene of the social worker and Brucie chatting in the entry way. Despite being at an angle, the social worker is in crisp quality, while in comparison the teen beside him is completely out of focus, despite the fact that he’s practically angled straight at the camera.
Barbara has been stuck on this oddity all day. None of the footage was modified in any way, and there’s no smudge in any other footage. This, combined with the fact that all attempts at putting him through facial recognition have failed, begins to paint an intriguing picture.
Either he has some impressive masking tech, which has gone undetected by both the Bats and the government, or he may be a meta with some sort of ability to disrupt technology. Barbara is leaning towards the meta theory on account of his odd behavior. Metas are enough to be somewhat of a scientific mystery, and have a wide variety of possible hardships and genetic manifestations that could lead to an unpleasant collection of trauma responses, especially in a city as volatile as Gotham.
She places her current evidence into the slowly growing folder. So far, she’s only drawn Cass’ attention to it, but she knows that the rest of the Bats will come across it in time, and they will all draw their own conclusions. Barbara feels like she’s gotten somewhere, but she’s also a gal with a terrible sleep schedule, and is usually working on at least three cases at a time. It’s always helpful to get a second opinion.
Barbara reaches for her coffee mug, and finds to her dismay that there’s barely a sip left. She figures that’s a good a sign as any to take a break before starting on another case.
⠀
⠀
“Must I have father reduce your patrol lengths?”
Thomas groans, as though Damian’s scepticism is somehow unwarranted, despite the fact his memory is clearly failing him. “Damian, I’m fine.”
Damian raises the supposed drawing of Doe close to Thomas’ face. It’s likely too close, but the motion is mostly for emphasis, and Thomas surely knows what his own drawing looks like. “This hardly looks like him.”
“If you think my art is shit, you can say so.”
“It’s not that,” Damian snaps, dropping the sketchbook to the ground. Thomas’ art may not meet the standards that Damian sets for himself, but the progress he has made in only a few months has been admirable. “You’ve drawn Doe with green eyes, despite the fact that it is clearly stated in his file, as well as extremely evident when looking at him, that his eyes are blue.”
Thomas raises a finger into Damian’s face. “Counterpoint.” Damian swats the finger away, sneering. “His eyes are extremely green. Even greener than yours, and they definitely can’t be confused like Babs’ can.”
Damian scoffs. “Did you pay any attention to him?”
“Did you?”
“If I may,” Alfred’s voice cuts in from the doorway, causing the two to spin around and face the butler. “Could it be possible this odd illusion has something to do with Master Duke’s abilities?”
Hm.
Yes, it very well could be.
“God bless Alfred,” Thomas mutters.
Damian sighs.
⠀
⠀
JT: Looked at the new file.
JT: I’m assuming you wouldn’t have left us the bait if it was just a technical error?
BG: yeah thanks for noticing
BG: congrats on being first
JT: I got nothing better to do during daylight.
JT: So are we thinking android, storable tech, or meta?
JT: I know what I’m leaning towards.
BG: Is android even an answer?
JT: With some pieces of evidence? Yeah. With everything we have? Fuck no.
JT: Just trying to lighten the atmosphere. I don’t like that shit happened to a kid without us picking up on it.
BG: We can’t save everyone, Jay.
JT: Don’t I know it.
26 notes
·
View notes
Text
The Ellipsus Experience*
From someone who’s been using Google Docs for over a decade and LibreOffice for. Idk a year, probably.
*I don’t have a collaborator helping me out with this, so this is a solo-writer’s experience: please keep that in mind
Ellipsus is a writing website (not an app) that can be considered a collaborative alternative to Google Docs. They are [anti-AI] and don't plan on going back on this "barring significant regulatory changes." It has been compared both to Google Docs and LibreOffice. As stated above, I've used both of these other products (heavily) for a while and feel I'm properly familiar enough with both of them to say this one is... well deserving of the comparisons.
TL;DR
Ellipsus is essentially a GDocs/LibreOffice lovechild that is currently in open beta, works well, and I do recommend it as a Google Docs alternative for any collaborative needs just because it’s free and anti-AI, though it is only on par with LibreOffice so far as I can tell for solo work.
I was made aware of Ellipsus through a Blazed post here on Tumblr, though I haven't actually heard of it anywhere else, but I could just have completely and utterly forgotten if I'd ever seen them elsewhere. They also have a presence here on Tumblr, @ellipsus-writes, if you would like to have a browse for yourself.
All hyperlinks will be underlined and associated words will be between these [ ] brackets.
Getting Started
Ellipsus does not use a password system. You sign up/log in with your email, which will then send you a one-time code to get in. While signing up, the site asks a few questions while setting up, such as if you write with others (options boil down to yes, no, and not yet) and where you heard about Ellipsus from. You also initially choose your light mode/dark mode preference here. It can also use your system setting.
Once you’ve gotten through that, you’re taken to a document to introduce you to the features and capabilities of Ellipsus, though it doesn’t appear to really be… properly up-to-date… but it isn’t too badly divergent as to be too confusing (notably, there isn’t a “merge this draft” button to click like the doc tells you). It also offers several links to useful posts they’ve made to help you get started.
You will then be brought to the dashboard and unleashed.
Their layout is very simple, clean, and minimalist. There aren’t a thousand features, but sometimes you don’t need a thousand features. The site itself is easy to navigate and none of the toolbars or pages even look a little bit crowded, which is nice. Unfortunately, this does mean your settings are also very barebones. You can’t delete your account directly from the settings, but you can change your display name and email from the account settings page. Here, you can also download your logs or stored data. Unfortunately, though you can have an avatar/icon, you have to use Gravatar for it, with no exceptions. Other than that it displays the first two letters of the email associated with your account. This may be visible when collaborating with others.
On Desktop (and basics)
The dashboard (home page) shows your works, with a separate tab/page/button to show anything shared with you. Here is where you make new documents or manage existing ones, or make and manage folders.
Folders are named, and can have descriptions of their contents. They can be repeatedly nested for your highly-organized needs. (Or for organizing parts/arcs/chapters/etc. for your stories.) They can be bulk deleted by deleting the parent folder (the very first folder they’re all in).
When making a new document, you can either make a completely blank one or import a markdown (.md) file. Documents can be named here and renamed later. If you’re coming from Google Docs, you’ll have to use a desktop to download your documents as a markdown (.md) file in order to reupload it directly to Ellipsus. This is currently the only way to upload a file from elsewhere.
While writing, Ellipsus offers a focus mode (the cup icon) that will automatically hide all other panels/icons except for the outline (table of contents) and the icon to leave focus mode.
The other panels available are on the left- and right-hand sides of the screen. Both panels can be collapsed to increase screen space for the document. The right panel can be collapsed directly from within its additional menus through the arrow icon on the top left of the panel or returned to the expanded panel menu through the squares-in-a-square icon on the top right of the panel. It also has a keyboard icon (which the welcome doc calls a controller) to check available keyboard shortcuts, as well as a gear icon, both on the top right. (Will expand on the gear menu later.) The right panel also contains the “create a new draft” button, which becomes “compare changes” within drafts (expanded on later).
Formatting can be done through the bar on the bottom (basic* only) or through the formatting icon on the right panel. The default font is Literata and the default font size is 16pt. The default font color will change depending on your choice of light/dark mode, but you can pick from ten colors (nine, plus the default that changes per light/dark mode). If you don’t want to use the formatting bar/menu, markdown (like Discord) is also available for use while writing, and can be set to apply automatically.
Outline is simply a table of contents that allows you to jump between headers in your document. This makes it much easier to navigate a document, particularly if it’s long and you want to get from Point A to Point T but they’re a few tens of thousands of words apart (or more. Idk how much you write).
Find and replace is exactly that. It also has “match case,” “whole words only,” and “use regular expressions” toggles to better finess the find and replace experience.
Spellcheck will be elaborated on in the writing section.
Version history will open either the main document or the specific draft you’re on in a new page, where you can go between versions and pick on to overwrite with, if that’s what you want. I don’t fully understand how this works, but you can go through each day the document has been edited and pick a time you would like to replace the document with. These versions are saved at what appear to be every ten minutes of the clock, as every version of my stuff has shown only //:/0 am/pm as available within the version history.
Comments, chat, and collaborators will be expanded on in the collaborating section later.
Share and export is expanded on in the export section.
Document info becomes draft info when on a draft. This just gives you information like when it was made and last edited, as well as who edited it last and owns it (I think?). It also shows the word count, character count, and the estimated reading time.

The last option is “get support” and just opens to show you buttons to where to share feedback, find overviews/guides, or contact support from the team.
The left panel is where the main document and all associated drafts are kept. Remember to name your drafts appropriately so you don’t lose them; these can be duplicated, deleted, or renamed at any point.
*Basic formatting includes bold, italic, underline, and undo/redo. Ellipsus’s floating bar has these as well as a shortcut to the formatting menu, indent and unindent, and search. This is “basic formatting” for this review.
On Mobile
Since I first logged in on desktop, I’m not sure if this pops up when you do an initial login on mobile, but there was a pop-up that offered extra guidance in using the site on mobile, though I declined it. This is still a good feature, and not something you stumble on all the time. The site does look and work identically across devices, and the icons used are all identical. This is also a good thing.
On mobile, the basic formatting bar is moved to the top of the screen to account for pop-up keyboards, and side panels are hidden away. Thankfully, across screen sizes, the buttons for basic formatting aren’t absolutely tiny, though this does mean you may have to scroll to access parts of the basic formatting bar depending on the size of your display. The left panel has a “papers” icon on the top left, to the left of the cloud icon, and the right panel is within a “hamburger menu” (the three lines stacked on each other) on the top right, to the right of the bell icon (notifications for collaboration reasons).
Actually typing and working on mobile tends to be a bit buggy, but this is a beta so I’m not going to hold it against them. I’ll likely be using mobile as desktop through landscape full-screen on my iPad instead of vertically. The screen tends not to follow as you write, disappearing behind the basic formatting bar and/or the keyboard, which is a bit annoying. It says it will default to device settings with the double-spacing (expanded below) but doesn’t appear to always work on mobile.
Additionally
There are a few more settings on the right panel in the gear menu on the top right. These include features regarding smart formatting, collaboration, and display. This is the “editor settings” menu.
Smart formatting has quotes (from " to “ when typing quotation marks), ellipses (changing the three periods to one symbol …), markdown shortcuts (*and* such, like Discord), double-space period (tapping space twice will insert a period; unchecked will do as your device does), and en and em dashes (– and — from -; there is an option of “- - for —” or “- - for – as well as - - - for —”).
Collaboration has toggles for live cursors and collaborator avatars for when collaborators are viewing alongside you.
Display allows you to turn off the floating basic formatting bar (desktop/landscape only), turn on “invisible characters” (like paragraph symbols, spaces, etc.) or the word count, and is also where you can change from light/dark/system.
These additional settings (aside from light/dark/system) apply across your account, so you don’t have to do it per device as with other settings.
Actually Writing* With Ellipsus
*I used pre-written things for this review
Ellipsus synchronizes practically immediately. I don’t have anyone else to do this with, but between my own account on different devices, there’s a negligible amount of lag, which is notable considering my laptop is currently trying to die on me.* Different users** (or yourself on another device) are flagged with a colorful live cursor with their display name attached, which moves accordingly and swiftly to wherever they are in the doc, including if they’re navigating through the text using the arrows on their keyboard (for mobile hiding the keyboard might not remove your cursor, and for desktop opening a different window will not remove your cursor). When the other user** (or, again, yourself) highlights something, it is replicated in yellow for the other. The highlighting is surprisingly reactive and can follow per-letter (again, between me, myself, and I).
Spellcheck can add languages, has “accept” or “ignore all” options, offers multiple suggestions for (detected) misspellings, remembers what was “ignored” after leaving the document and returning. This has to be run through for every device you open the document on, which is a pain when you have fifty characters who have names the dictionary has beef with. The English dictionary appears to be on par with LibreOffice (disappointing) (the “se” in “per se” gets marked) (fanfiction will be painted in red). Detected misspellings (whether they are or aren’t) are both underlined and highlighted in red; the “first” detected misspelling with have both a highlight and an underline, but subsequent instances (“inactive” instances that you do not have selected) will only be underlined.
Additional languages currently available (Jan 2025) consist of: English (US, AUS, GB, CA), German, Spanish, French, Italian, Korean, Dutch, Russian, Polish, Portuguese, and Ukrainian.
If you want to change the font or text size, it currently (Jan 2025) applies across the entire document or draft’s corresponding paragraph style. This means the only way to have differently-sized portions in your document at this time is to have an individual paragraph with a different paragraph style (headings 1 through 4, paragraph/body, caption) applied, as they all have different font sizes associated with them.
There is also an optional word count displayed at the top of the screen next to the focus mode icon/notifications (depending on long or tall screen). It does display the word count with commas where appropriate.
My most favorite feature is that you can tab indent the start of your paragraphs. I’m not even kidding I love that so much. I don’t actually like the double-spacing (hitting the enter key twice for a new paragraph) format I do for fanfiction even though it looks better on AO3 that way, but having the ability to insert a tab indent just once and have it automatically carry through to each following paragraph…….. that’s so tasty. I’ve always hated writing on mobile because there’s usually no tab!!! It’s just there on Ellipsus!
Drafts are like a copy of the main document at the time of the draft’s creation. These are stored on the left panel menu and can be accessed simply by clicking them. This is useful more so for collaboration or when you’re struggling to pick an idea you like more. You can create these at any point, and merge them into the main document in order to make the content of the main document match that of the draft chosen.
Drafts can be compared to the main document through the “compare changes” page, accessible either from the “…” menu attached to the draft card on the left panel, or through the button on the right panel when you’re already in the draft. This “compare changes” page is where you’ll be able to do just that; additions are highlighted in green and anything removed is highlighted in red. On mobile you have to swap between the draft and the main document with the highlighted changes, but it’s laid out side-by-side on desktop. You can merge a draft with the main document from here.
You can also just make an empty draft and use it for things like notes and outlines and all that good stuff. They don’t have to be merged at any point. If you want a blank draft, though, you’ll either have to delete the whole doc within the draft or make a base blank draft at the start of your doc’s lifespan to later duplicate to edit when you need/want a blank draft.
*The responsiveness between me, myself, and I is notable because Google Docs lags so much for no reason, even if it’s just yourself on different devices in the same room. I’m doing this across three different browsers (Firefox, Safari, and DuckDuckGo) and three different devices (actively dying Windows laptop, iPhone, and iPad) it’s reactive and barely stutters, as opposed to how Google Docs needs to think about it across… itself (mobile app and Chrome browser, even!). Yes, I tested it to be sure.
**Disclaimer, again, I do not have friends to collaborate with to test otherwise.
Available Fonts
Here are all the currently available fonts (defaulted to 16pt when using the paragraph/body style). Photos* of just a few included because I’m doing this on mobile Tumblr and I can only use a few images so I’m picky. Also, this is all on dark mode, and the text color would be black if I were on light mode.
Baskerville
Caveat (#1)
Comic Neue
Courier Prime
EB Garamond
Inter
Literata (default font)
Merryweather
Monteserrat
Open Dyslexic
Raleway
Whatever this is? Doctor handwriting? Cursive Russian? (#2)
Roboto Mono
Sylexiad Serif (#3)
Ubuntu Mono


*Excerpt used is from the original concept Maddox and Li Hua, my ex-military dragon dad and his dragon daughter, were used in. It was originally in outside POV before I got bored with Darren. Sorry, Darren. (He’s still present later, just not as the POV character anymore.)
Importing
If you have a markdown (.md) file on hand, then go ahead.* Everything else you’re going to have to copy/paste in. Copy/paste will not automatically tab indent paragraphs like I extolled above even if there was a tab indent in the original text copied. The font will likely change to fit whatever you’re using on Ellipsus (it did for me between Liberation Serif -> Literata and Helvetica -> Literata) but it also won’t remove every single bit of formatting, so it’s not a completely exasperating exercise to copy/paste your works over. It won’t copy over things like headings properly, either, though that’s much less of a hassle than having to go back through and add all your italics back in.
For the sake of this review I did make my very first markdown (.md) file and... I honestly don't know what happened but about half of it was stuck in the "code" mode in the formatting section, which I couldn't figure out how to undo, outside of just copying the text (triple-clicking/tapping would select everything within the code block) and pasting it as plain text (ctrl/cmd+shift+v). I'm not sure you can paste as plain text on mobile (couldn't figure it out myself) so I, personally, am not going to be doing a whole lot of uploading previous stuff to Ellipsus. Other than this, importing a single-spaced (hitting the enter key once for a new paragraph) document will merge everything into a "single" paragraph, so I had to go through and separate all my paragraphs again so I could properly indent/unindent/apply other formatting as needed. I'll just completely re-type or batch copy/paste everything else in the future so I can have a better grip on the formatting.
*As stated way up at the start, you can upload a text file to Google Drive, open it in Docs (which makes into a .docx file, which they're working on allowing you to import as well), and then download that file as a .md file. This requires a desktop you can download/upload from. If you've never done this before, you can download as .md (and other file types) through the "File -> Download" section on an open document.
Exporting
This is accessed through the document directly instead of on the dashboard. It’s under “share and export” on the default right-hand panel menu.
You can “share” through two different methods. You can share a link to a document (logged-in users only or anyone with the link), which only allows for viewing the doc with zero editing abilities, and the entire document will be visible. The other option is a “snippet,” which is primarily what you’ll see pictures of when browsing the Ellipsus tag here; it’s a .png of a selected section of text* to create a slightly more interesting excerpt of what you’re working on. This helps your excerpt stand out without having to make it yourself. Example of a snippet with the default white background color:

(Snippets will export in only this font, but you can choose to keep any colored text.)
Exporting the entirety of the main document can be done by downloading as a PDF or markdown (.md) file. You can also copy it as HTML, markdown (.md), or rich text (.rtf). Most notable is a direct export to AO3 button! Ellipsus might tell you your blorbo’s name is spelled wrong, but it’ll let you upload your fic straight from the draft. ([Here’s] the official post about it.)
*You MUST make a selection of text in order to make a snippet; it won’t work if you don’t highlight anything for it to process. It also might be a bit slow, but a bit of patience will get you your .png to share.
Collaborating
… aha. I don’t know anyone currently using Ellipsus to review this with. Here’s paraphrased info off this [link].
Collaborating is done through email: your collaborator(s) have to have an Ellipsus account in order to actually work on the document. Inviting collaborators is done through entering their email, which will send them a link, which will bring them to the site where they will either make an account or log in to access the document. The owner of the document therefore knows the email of any and all collaborators, though other collaborators will only be able to see everyone’s display names. Collaborators can be given one of two roles with different permission levels: “can merge” means they can merge drafts into the main document, edit the main document, create drafts, as well as everything the next level can do; “can edit” can create drafts, edit existing drafts, and use the chat/comments features. Collaborators cannot invite or manage collaborators. Document owners can remove collaborators or change their role/access level at any time.
Information from Discord says this might be laggy and buggy, but the staff is looking into it.
Comments can be left through highlighting parts of the doc/drafts. Chat is a live chat to use while working together, or something, because I can’t test that.
Extras!
Their Discord server consists mostly of adults (age 18 or over) and offers opportunities to find collaborators of all stripes that also use Ellipsus. It has nearly 1600 members at the time of writing, though not everyone has chosen their roles, but of the approximately 500 reactions on the bot’s age role message, only nearly 40 chose the “under 18” role. It is a fairly active social space for the size, and doesn’t have an absolute hoard of channels. There’s even an art channel, with the description reading “original, human-powered art or credited or linked to the respective artist.”
They have a [blog] with resources/templates you can use to get started. You have to scroll through to find them since you can’t sort by the resource tag, but they’re pretty good templates for worldbuilding, story planning, and character information. I would recommend saving these as individual docs on their own and then copy/pasting the templates into the drafts of your stories to keep the information connected to the main doc you’re using it for. (Don’t forget to appropriately name all your drafts so you don’t lose anything.)
They have been in open beta since May 2024. There were apparently nine months of closed beta before this. They are also a former sponsor of NaNoWri(teNo)Mo(re) but [dropped them] when they made the stupid announcement about AI (2024).
Yes, you can use emojis on Ellipsus. Yes, you can have your leads text 🥴 to each other.
They are ellipsus_writes on Twitter/X and TikTok, ellipsuswrites on Instagram, and ellipsus-writes here on Tumblr (as mentioned way back at the start).
#ellipsus#BOUNCY. REVIEW.#if you wanna help me test ellipsus's collaborative abilities hmu asks and dms are open#review#site review#writers on tumblr#writeblr#queer writers#writer stuff#original writing#writing#writers#fanfic#fanfic writing#writing community#writerscommunity#writers community
6 notes
·
View notes
Note
🍅🦷🍓📚🌿🥤? :D
🍅 ⇢ give yourself some constructive criticism on your own writing
oh god. well. something i'm very conscious of is that i have a bad track record of giving my (female) main characters positive and lasting female relationships. particularly in comparison to their relationships w men.
🦷 ⇢ share some personal wisdom or a life hack you swear on
you get what you put up with. ppl are going to take advantage if you tolerate that kind of behavior. not to victim blame, bc sometimes there are just truly shitty situations and no good moves. but generally speaking, ppl treat you well if you model the behavior you expect in return.
🍓 ⇢ how did you get into writing fanfiction?
lmao i got my start in twilight fandom. don't worry abt it.
📚 ⇢ what's the last thing you wrote down in your notes app?
a reminder to have my coworker share a file w me
🌿 ⇢ give some advice on writer's block and low creativity
i think if you're struggling to write and be creative, it's time to enrich the enclosure. read a book (not fanfic), do a little craft project, watch a movie, listen to music, go for a walk, etc. personally love a walk to percolate the thoughts.
🥤 ⇢ recommend an author or fanfic you love
survival of the fittest by cwyscross is a nrt fave ig? i feel funny giving general recs, everyone's tastes are different!
3 notes
·
View notes
Text
sometimes I'm just going along minding my own business reading a post agreeing with it entirely and then it suddenly takes a turn – and I say this while actively trying not to be the "tiktok guy". actively I am attempting not to be tiktok guy. but if you're writing a post about how young artists, inexperienced artists, artists in general should not be rushing to commodify their art or their artistic labor (great point 👍🏻), should not experience their art as building a brand or selling a product (yeah love the energy 👍🏻), and you then take a left turn and suddenly you're talking about how they should never post their work on an app full of other artists getting their work seen moreso than ever before on any other app, like, I'm sorry to say but you have completely lost the plot.
tiktok was (is? was?) to date one of the best apps ever created for not just sharing art but also connecting meaningfully with other artists. deviantart, tumblr, twitter, and instagram have all occasionally (or often in deviantart and tumblrs case) billed themselves as sites/apps for artists. but if you're an artist and you've posted your art to any one of those sites, you know creating art for social media is a huge time intensive process with usually very little reward. most people who post art on any of these sites will never be seen. the algorithm (if it exists) will never circulate their in any meaningful way. getting lots of eyes on your work or making art friends is a complete and total crapshoot.
the ease of content creation and intense level of customized feed curation on tiktok made it so much better in comparison it's crazy. like, what do you think "kids back in the day posting on deviantart" were looking for? just to file their art away in the internet archive, never to be seen by anyone? artists (and humans) generally want people to see the things they make. the majority of artists on tiktok are not trying to sell you anything, except maybe commissions or the occasional sticker or brush pack – which by the way is exactly how artists on da used to use that site as well. maybe that is a mindset to push back against – stop turning everything into a grind! you're allowed to just have hobbies! but at what point are we demonizing people for just trying to make a little extra money doing something they love?
i don't know a single tiktok artist with a mass media empire. I do know several who, for the first time since they started posting their art online when they were 17, can actually make a living off art commissions they receive on tiktok.
I think there's plenty of space to talk about how all of us over commodify our hobbies now, how you shouldn't always be trying to sell yourself while you're doing something you enjoy, how easy it is to get sucked into making art for attention instead of making art that you enjoy making. but tiktok is not the problem. and the problems surrounding making art on tiktok are not...tiktok based problems, except in that tiktok is so much more effective at making sure art content gets SEEN that people are likely to get a lot more attention than they have anywhere else, for good and for ill.
but when you say "back in my day people just posted on deviantart like normal people," you tell on yourself as an Old Complaining About the Youths. yeah, back in your day, that is what people did. now, people post that same content to tiktok, and it gets way more attention, and people are way more able to turn their art making process into content than ever before, and way more able to connect far more easily with other artists and also to people who might appreciate their work. it means the problems of deviantart – chasing attention, trolls, imposter syndrome, feeling competitive/jealous of other artists, and self-commodifying – happens much faster there and at a far higher rate. all that shit happened on deviantart too. but there was another part of most people's experience of deviantart too which you're not mentioning, which is that it was really isolating and demoralizing for a lot of people, because there weren't nearly as many ways to get seen or connect. and that has some pretty severe effects on young artists too.
I guess my point is, y'all have got to stop derailing good points with deranged tirades about how the most popular social media app ever created is actually satan. just... just talk your talk about commodifying art, man. stop being weird about tiktok. I don't want to be this guy.
3 notes
·
View notes
Text
Types of Posts
I dunno how to categorize things well. Also I haven't combed through all the posts in my inventory so tagging may be inconsistent and things might not appear. I aim to fix this but I'm sleeepy.
Art
art - I use this to describe visual art of any sort
animation - visual art depicting movement by replacing images. Some of these might technically not be animation but have a similar style. My brain don't work. Like a story board.
character portrait - describes art of a character that isn't doing much.
character reference sheet - art of a character that appears meant to describe their physical appearance for others to draw if they wish.
comic - a sequence of events depicted in panels.
couple portrait - describes art of two characters in a romantic relationship interacting in a romantic way.
craft art - something more 3D than most of the stuff under 'art'
duo portrait - describes art of two characters in one image, in either a platonic, familial way, or ambiguous way.
size comparison - exactly what it sounds like; art or a screenshot of more than one character, for the purpose of comparing their height or size.
storyboard - it's a story board. I dunno. A certain style of communication that isn't the same as a full-blown animation or comic.
storytelling - anything that tells a story. Comic, storyboard, portrait with caption, fanfiction, animation, anything.
Game Captures
photo of screen - someone took a photo of the screen with their phone.
video game screenshots - i too tired to explain.
video game cutscene - it's a file of the cutscene taken from a screen recording.
gameplay sharing - screenshots or video that aren't just of cinematic cutscenes. Or text posts describing people's gaming experience.
Text
text post - is exclusively or primarily composed of text.
Long post - is likely to mainly be composed of text or multiple images, and is very long
one-time-i-dreamt - is tumblr's dream-sharing tag. There seems to be a number of KNACK dreams, heheh.
Uncategorized
I'm not the smartest block in the. The shed? Not the brightest bulb for sure. So lots of things can go uncategorized.
ask and answer - anything that uses tumblr's ask feature. Usually asking people about their headcanons, or art requests, etcetera.
gif - it's a gif of anything. animation or screen recorded.
discord screenshot - it's a screenshot from the discord app, people talking about knack or sharing things about it.
video - it's not a gif, but it's anything video. YouTube, TikTok, Tumblr-grown, etc. it could be anything: speedpaints, gameplay, skits, whatever!
There is plenty more but I'm gonna pass out
8 notes
·
View notes
Text
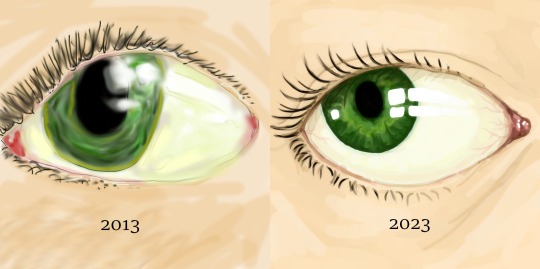
Digital art done without a tablet (art progress)
July -> September
thought I'd share this comparison cos I feel like it really shows how I've improved in the few short months I've been doing digital art without a tablet!
also figured this might be a good time to talk about my process with digital art at the mo, which might be helpful to anyone who hasn't got a graphics tablet of some kind lol?
with both of these I started the drawing in my phone's notes app (I did briefly try another app on my phone but I found it wasn't as easy to use as the notes app... I might try looking for other drawing apps though so if I find a good one I may make a post about it lol) before transferring that file to my usual art program (which is FireAlpaca, in case you didn't know!)
I have to scale up the image at this point which does make the line art look pixelated, though I don't dislike it as I think it can help give it a pencil-like quality! it's not ideal if you want to create neat and smooth lines, though, so bear that in mind!
I then make the sketch background transparent (make sure to draw on either a white or light grey background otherwise this can be tricky to do!) so I can add the paint layer behind the drawing. I also sometimes add the paint layer directly onto the sketch layer if I don't want the sketch to be in the final piece (this is no different from the way I paint digitally with a tablet, though, so I won't go into great detail here)
I paint with just my mouse (specially my laptop's mousepad, rather than a separate mouse btw) which yes, before you ask, is a very tedious process lol! it takes a lot to learn how to control the mouse, and I definitely haven't mastered it yet, but like all art related things, it just takes practise!! I will say that I have yet to figure out how to do really blended paintings with just my mouse, but for the more painterly style I've been doing recently, using the mouse works a treat!
another note is that you can't really get pressure effects when drawing with your mouse or finger (which is effectively where the harder you press, the thicker and/or darker the line is), but I've just been working around it since the very first digital artworks I ever did had no pressure opacity to them lol...
idk tbh this whole thing is a learning process for me which is simultaneously frustrating and very exciting, and I look forward to seeing how I progress in another few months lol!
...
finally, I thought I'd share this drawing from 2013 I did drawing with just my mouse and a comparison to one I did recently too! I didn't use a reference with either so it's a kinda janky looking eye, but I like to think I've made some sort of improvement in these 10 years lol
#art advice#artists on tumblr#digital art#no tablet digital art#phone art#art improvement#art progress#i'm honestly really proud with what i've been able to produce even without a tablet!#i dont know whether i'll go long term w/o one since it is frustrating at times#but for now i'm really enjoying doing art this way!#i hope y'all agree lol??
15 notes
·
View notes
Text
Honeygain App Download | Earn Passive Income in 2024
In today's digital age, finding ways to make passive income online has become increasingly popular. One app that stands out in this realm is Honeygain. This app allows users to earn money effortlessly by sharing their internet bandwidth. By simply running the Honeygain app on your devices, you can start earning passive income without any upfront investment.

What is Honeygain?
Honeygain is a unique app that enables users to earn money by sharing their unused internet bandwidth. The app is designed to be easy to use and is available for download on multiple platforms, including Windows, Android, iOS, and Linux.
Getting Started with Honeygain Download
Download and Installation
Downloading and installing the Honeygain app is straightforward. You can download the honeygain app on your preferred platform:
Windows
macOS
Linux
iOS
Android
You can also download the Honeygain APK file for Android devices. After downloading the app, you need to register using your email address and confirm your registration. Once installed and active, Honeygain securely shares your internet connection without accessing your personal data. The app can be run on multiple devices to maximize your earning potential.
Welcome Bonus
If you are new to Honeygain, there is a special welcome bonus for you. By joining Honeygain, you receive a $5 gift to kickstart your journey of earning passive income.
How Does Honeygain Work?
Once you have set up the Honeygain app on your device, it starts sharing your internet connection to gather publicly available data online. This data is used by credible companies for purposes such as web statistics, price comparison, and other business processes. Your earnings begin within ten minutes of joining, and you earn money for all the traffic you share.
You can choose to receive your payouts via PayPal or in cryptocurrency. To maximize your profit, it's advisable to use multiple devices and share as much internet bandwidth as possible.
Honeygain Review and Trustscore
Before using any app, it's essential to understand its credibility and trustworthiness. Honeygain has received excellent reviews on Trustpilot, with a trust score of 4.5 stars based on over 11,000 reviews. This high rating indicates a strong level of trust and satisfaction among its users.
Refer a Friend and Earn Extra Income
Honeygain offers a referral program that allows you to earn additional income by inviting your friends to join. Each new user who joins through your referral link receives a $5 bonus. Additionally, you earn a 10% bonus based on the traffic shared by your referrals. When your referral shares at least 2GB of data, you receive an extra 500 Honeygain credits.
Honeygain Calculator: Estimate Your Earnings
Honeygain provides a calculator to help you estimate your potential earnings. For instance, by sharing 20GB of traffic per month using ten different IP addresses, you could earn approximately $180. This estimate helps you understand the earning potential and how much you can make by sharing your internet bandwidth.
Honeygain and JumpTask Collaboration
Honeygain has partnered with JumpTask, a renowned earning platform, to offer users an opportunity to earn even more. By connecting your Honeygain account with JumpTask, you can earn an additional 10% bonus on all your earnings.
Conclusion
Honeygain is a reliable and easy-to-use app that allows you to earn passive income by sharing your internet bandwidth. With its high trust score, welcome bonus, and referral program, it offers a straightforward way to make extra money. Additionally, the collaboration with JumpTask provides an opportunity to boost your earnings even further. You can refer to detailed information on coinbaba.net. Whether you're using a Windows, macOS, Linux, iOS, or Android device, Honeygain makes it simple to start earning today.
5 notes
·
View notes
Note
Hello! Thank you for sharing your PingXie fic recs! Since you post a lot of fics on Weibo, I don't know if you're a Chinese speaker, but if you're not, I was wondering how you read Weibo fics since a lot of them are in image format, and sometimes the Google Translate app doesn't work very well for them. I'd really love to read them, so if you have any tips on apps or translators to use I'd be grateful!
Hi! It's my pleasure to share! ( ◜‿◝ )♡
I'm not a Chinese speaker, I use machine translator. Since I always use my phone to read them, I'm not sure how it works on computer.
I assume that what you mean is the super long images, because normal images work fine on Google Translate. For long images, the Chinese characters are so tiny that they can't be detected properly and thus failed to translate. To solve this problem, I need to either crop the images using a photo/image editor or screenshot them. I usually do the latter, so I don't have to go back and forth editing them. For flipped/mirrored images I still have to use a photo/image editor though. For scribbled images, I have to resign to my fate and hope that the app would recognize them >.<
Other than Google Translate, I'm also using 2 translation apps in which all of them can also translate text from images; Microsoft Translator and DeepL. The former, I use it for comparison and the latter, the quality is pretty good but it has limited usage. If you don't mind spending more money then you can consider it.
I usually don't directly use Google Translate app though, I use Google Lens in my file manager. It's more convenient for me, here is what I usually do:
1. Download the image (it's optional, but I decided to download it just in case that it's suddenly gone) → go to File Manager and find the image → zoom it → screenshot it (one image needs many screenshots, I did it in one go to avoid getting the same image)

It's a gif, Tumblr didn't let me post more than 1 video :(
2. Find the screenshot image → scan it with Google Lens (make sure that every sentence is in white line which means it's detected by the app)
If the result is too tiny, you can choose to open it on Google Translate app.
It's a bit tricky, but I haven't found another way.
Hope this helps!
Thanks for asking! (。・ω・。)ノ♡
4 notes
·
View notes
Text
Choosing the Right Control Panel for Your Hosting: Plesk vs cPanel Comparison

Whether you're a business owner or an individual creating a website, the choice of a control panel for your web hosting is crucial. Often overlooked, the control panel plays a vital role in managing web server features. This article compares two popular control panels, cPanel and Plesk, to help you make an informed decision based on your requirements and knowledge.
Understanding Control Panels
A control panel is a tool that allows users to manage various features of their web server directly. It simplifies tasks like adjusting DNS settings, managing databases, handling website files, installing third-party applications, implementing security measures, and providing FTP access. The two most widely used control panels are cPanel and Plesk, both offering a plethora of features at affordable prices.
Plesk: A Versatile Control Panel
Plesk is a web hosting control panel compatible with both Linux and Windows systems. It provides a user-friendly interface, offering access to all web server features efficiently.
cPanel: The Trusted Classic
cPanel is the oldest and most trusted web control panel, providing everything needed to manage, customize, and access web files effectively.
Comparing Plesk and cPanel
User Interface:
Plesk: Offers a user-friendly interface with a primary menu on the left and feature boxes on the right, similar to WordPress.
cPanel: Features an all-in-one page with visually appealing icons. Everything is sorted into groups for easy navigation.
Features and Tools:
Both offer a wide range of features, including email accounts, DNS settings, FTP accounts, and database management.
Plesk: Comes with more pre-installed apps, while cPanel may require additional installations.
Security:
Plesk: Provides useful security features like AutoSSL, ImunifyAV, Fail2ban, firewall, and spam defense.
cPanel: Offers features such as password-protected folders, IP address rejections, automated SSL certificate installations, and backups.
Performance:
Plesk and cPanel: Both offer good performance. cPanel is designed for faster performance by using less memory (RAM).
Distros:
Plesk: Compatible with both Linux and Windows systems.
cPanel: Works only on Linux systems, supported by distributions like CentOS, CloudLinux, and Red Hat.
Affordability:
cPanel: Known for its cost-effective pricing, making it preferred by many, especially new learners.
Preferred Hosting Options
If you are looking for a hosting solution with cPanel, explore web hosting services that offer it. For those preferring Plesk, Serverpoet provides fully managed shared, VPS, and dedicated hosting solutions. Serverpoet also offers server management support for both Plesk and cPanel, including troubleshooting, configuration, migration, security updates, and performance monitoring.
Conclusion
In the Plesk vs cPanel comparison, cPanel stands out for its cost-effective server management solution and user-friendly interface. On the other hand, Plesk offers more features and applications, making it a versatile choice. Consider your specific needs when choosing between the two, keeping in mind that cPanel is known for its Linux compatibility, while Plesk works on both Linux and Windows systems.
2 notes
·
View notes
Text
Easily Merge Images Online Free – The Fastest Way to Combine Your Photos in One Click
In today’s content-driven digital space, merging images isn’t just a graphic designer’s job—it’s become a daily need for students, marketers, photographers, bloggers, and even casual users. Whether you're crafting a presentation, curating a visual story, or just looking to combine two or more pictures into one neat file, being able to merge images online free is an essential tool. The good news? You don’t need fancy software or technical skills. With tools like A2Z Converter’s Image Merger, it’s fast, secure, and absolutely free.
✅ Why Merge Images Online?
There are countless reasons why someone might want to combine multiple images into one:
To create comparison visuals for product listings
Merge screenshots for documentation
Combine travel photos into a single collage
Design a single layout for printing
Create before-and-after visuals for social media
Offline tools may offer merging capabilities, but they often come with heavy software, complicated interfaces, or limited functionality in the free version. That’s where online image merging tools shine—they're light, fast, and require no installation.
🛠️ How to Merge Images Online Free with A2Z Converter
Using A2Z Converter is as simple as dragging and dropping. Here’s how you can merge photos online in seconds:
Visit A2Z Converter's Merge Tool
Upload the images you want to combine
Arrange them vertically or horizontally as needed
Preview and adjust the order
Click "Merge" and download your final image instantly
There’s no watermark, no login, and no hidden charges. It’s truly merge images online free, no strings attached.

🌟 Features That Make A2Z Converter the Best Image Merger Tool
When it comes to merging images, speed and simplicity matter. A2Z Converter delivers both—with these standout features:
Completely Free to Use – No subscriptions, no paywalls
Supports Multiple Formats – Merge JPG, PNG, BMP, WEBP, and more
Secure File Handling – Your files are never stored on servers
Instant Preview & Download – Get results in seconds
Mobile Friendly Interface – Works seamlessly on all devices
Whether you’re a pro or a beginner, merging images online has never been easier.
📈 Who Can Benefit from Online Image Merging?
The ability to combine images online free isn’t just for design experts. Here’s who can get the most value:
E-commerce Sellers: Display multiple product angles in one image
Teachers & Students: Compile diagrams and visuals into a single document
Bloggers: Create visually engaging blog graphics
Social Media Managers: Combine stories and posts for campaigns
DIY Creators & Hobbyists: Make custom collages or inspiration boards
If your work involves visuals, you need an image merger you can count on.
💡 Pro Tips for Better Image Merging Results
To make the most of your image merging:
Ensure your images are of similar resolution for better alignment
Use horizontal layout for product comparisons
Use vertical layout for before-and-after photos
Compress images before upload for faster processing
Rename your merged file with a descriptive name for better SEO
And remember, the best part? You can merge images online free without any registration at all!
🚀 Ready to Merge Your Photos?
If you’ve been looking for a free, fast, and simple image merging tool, look no further. With A2Z Converter’s free online photo merge tool, you can get the job done in seconds. No downloads. No limits. Just upload, merge, and go.
👉 Try A2Z Converter's Image Merger Now
📌 Final Thoughts
Merging images doesn't have to be complicated. With the rise of online tools, you now have powerful editing abilities at your fingertips—no need for Photoshop or bulky apps. Whether you're working on a school project, a client campaign, or a social media post, the ability to merge images online free can save you time and elevate your work quality.
So go ahead—combine, create, and share with confidence. Let A2Z Converter handle the merge, so you can focus on your vision.
0 notes
Text
RCS Message Explained: Why It’s the Future in RCS vs SMS Battle

RCS Message: The Future of Mobile Texting in the RCS vs SMS Era
In today’s fast-paced digital age, the way we communicate is undergoing a massive transformation. Enter the RCS message, or Rich Communication Services—a modern solution built to overcome the outdated limits of SMS. As smartphones become smarter, the shift from traditional texting to RCS messaging is gaining momentum, and for good reason.
Unlike SMS, which restricts users to 160 characters and lacks multimedia support, RCS message platforms offer a full-featured communication experience. Think of it as bringing the best of chat apps directly into your default messaging app—no downloads, no third-party logins, just seamless interaction.
What Exactly Is an RCS Message?
To clarify, RCS message technology is the next-generation protocol that enhances messaging on mobile devices. Instead of sending only basic text, you can now share high-resolution photos and videos, see typing indicators, get read receipts, and even use smart replies. All of this happens within the native messaging app, making it incredibly user-friendly.
Furthermore, rcs message systems sync across multiple devices, allowing users to switch from their phone to a tablet without losing the conversation thread. This cross-device functionality significantly improves productivity and user experience.
Key Features of RCS Messaging
Compared to traditional texting, the feature set of an rcs message is far more advanced. Here are a few reasons why it’s gaining ground in the rcs vs sms debate:
Multimedia Sharing: Send videos, audio files, and images in high quality.
Typing Indicators & Read Receipts: Know when someone’s typing or has seen your message.
Group Chat Enhancements: Enjoy seamless group coordination with thread replies and message reactions.
Verified Business Accounts: Communicate safely with verified brands.
Interactive Elements: Buttons like "Buy Now" or "Track Order" streamline tasks.
Additionally, these enhancements make conversations more natural and efficient—whether you’re planning a trip with friends or checking on an online order.
RCS vs SMS: Why the Shift Matters
The rcs vs sms comparison often boils down to capability and user experience. SMS lacks modern features and security protocols, while rcs message platforms offer encrypted communication, real-time delivery updates, and a more app-like interface.
Moreover, in the rcs vs sms battle, RCS stands out by offering richer, branded messaging for businesses. This means customers can interact with companies in a personalized, visual, and engaging way—something SMS simply can’t match.
RCS Messaging for Businesses: A New Frontier
From a business standpoint, the rcs message model is a major breakthrough. Brands can now engage customers using branded messages, interactive product carousels, and AI chatbots—all without requiring an app.
More importantly, platforms like LeminAi allow small businesses to create these engaging campaigns without technical expertise. For example, retailers can send promotional offers with images and buttons; logistics companies can offer real-time delivery tracking; and healthcare providers can simplify appointment confirmations.
As a result, customer engagement and satisfaction increase significantly, giving businesses a competitive edge in communication.
How to Enable RCS Messaging on Your Device
Switching to rcs message technology is incredibly easy. Here's how to activate it:
On Android:
Open Google Messages
Tap your profile photo
Go to Settings > RCS Chats
Toggle it ON
On iPhone (iOS 18+):
Open Settings
Tap Messages
Turn ON RCS Messaging
Once both parties have RCS enabled, you'll notice instant upgrades—smoother chats, enhanced media sharing, and a more connected experience.
Real-World Applications of RCS Messaging
Across industries, rcs message technology is proving its value:
Retail: Shoppers get visually rich promotions and one-click purchase options.
Healthcare: Patients confirm appointments through interactive messages.
Customer Support: Service agents provide quick, visual responses using automated tools.
Even better, since RCS works within the native messaging app, there’s no learning curve for users or customers.
Final Thoughts: Embracing the Future of Communication
In conclusion, the rcs message is not just a trend—it’s the future of mobile communication. Its features make texting more dynamic, intelligent, and responsive. Compared to SMS, it delivers a far richer and more personalized experience, both for users and businesses.
Whether you're chatting casually, sharing media, or interacting with a brand, RCS makes the process smarter and more intuitive. As more carriers and devices adopt this technology, the RCS revolution is well underway—proving that in the battle of rcs vs sms, RCS is the clear winner.
Now is the time to upgrade how you message—because the future is already typing
0 notes
Text
📱 The Role of Mobile Apps in Managing Your Insurance
In a world where everything is just a tap away — food, travel, banking — insurance is no exception. The rise of insurance mobile apps in India has transformed how people buy, manage, and claim insurance policies.
Gone are the days of storing bulky paper documents, visiting branches for queries, or calling customer care for every update. Now, your entire insurance experience is available in your pocket.
In this blog, we explore how mobile apps are reshaping insurance management, and why companies like Ginteja are building seamless app-based solutions for a faster, smarter customer experience.
📲 Why Mobile Apps Are Essential for Modern Insurance Users
✅ 1. Instant Access to All Policies
With an app, users can view all active insurance policies in one dashboard — from health and life insurance to motor and travel policies. This reduces the need for physical files or scattered emails.
✅ 2. Quick Claim Filing
Need to file a claim? Mobile apps allow users to upload documents, submit claim requests, and track status in real-time. It’s the simplest way to manage your insurance online without waiting in queues or paperwork delays.
✅ 3. Renewals and Reminders
Automated push notifications ensure you never miss a renewal date. Renew your health insurance, vehicle insurance, or term plan with just a few taps — saving time and avoiding policy lapses.
✅ 4. 24/7 Customer Support
Today’s best insurance apps come with live chat, ticket systems, or chatbot support — making it easier to get help instantly. The Ginteja app, for example, ensures round-the-clock customer service to address any query.
✅ 5. Premium Calculators and Policy Comparisons
Many apps offer premium calculators and allow you to compare plans based on your needs — making them excellent tools for both research and purchase.
📈 How India is Adopting Digital Insurance Services
With over 600 million smartphone users and growing comfort in digital transactions, India’s insurance sector is undergoing a mobile revolution. People now prefer to:
Buy insurance via apps
Raise claims digitally
Get instant policy documents on their phones
Speak to advisors through in-app chat
At Ginteja, we are proud to be part of this shift — offering one of the best insurance apps in India designed for ease, transparency, and speed.
🔒 Security and Privacy: What You Should Know
Modern insurance apps come with:
End-to-end encryption
Secure login via biometrics or OTP
Document protection using cloud backups
You can confidently manage your insurance online knowing your sensitive information is protected.
🌟 What Makes a Great Insurance App?
When choosing an app, look for features like:
✅ Multi-policy support (health, life, vehicle)
✅ Easy claim upload and tracking
✅ Real-time premium payment and receipts
✅ 24/7 insurance customer support app access
✅ Document storage and sharing
✅ Personalized offers and reminders
The Ginteja app is designed to deliver all these features and more — backed by expert advisors and a smooth digital interface.
🚀 Conclusion: Insurance in Your Pocket
Mobile apps have made insurance smarter, faster, and more personal. Whether it’s buying a new policy, tracking a claim, or talking to a support team, mobile platforms have become essential for anyone looking to simplify their insurance experience.
👉 Ready to manage your insurance on-the-go? Explore the Ginteja app and discover how we’re making digital insurance services simple, secure, and stress-free. Visit: www.gintejainsurance.com
#insurance#bike insurance#health insurance#online bike insurance#car insurance#ginteja#health insurance online#bike insurance online
0 notes
Text
How to Create and Sell Digital Products
Creating and selling digital products online sounds exciting—but let’s be honest, it’s hard and time-consuming.
From brainstorming profitable digital products to figuring out how to build and sell them online, every step requires effort, tools, and patience.
Plus, with so many platforms and digital product types to choose from, it's easy to get overwhelmed and give up before you’ve even started.
But it doesn’t have to be that way.
In this blog post, I’ll show you how to create and sell digital products, step by step, even if you're just getting started.
N.B.: ProductDyno can help you create and sell your own digital products with ease, quickly. It offers everything you need in one place—AI tools, templates, pre-made blocks, marketing and sales tools, payment gateways, etc.
If you want to learn more about how to use ProductDyno to create your own digital products and how it compares with other platforms, check out my blog posts:
Teachable alternatives — where I share more platforms for selling digital products.
Thinkific vs. Teachable — a detailed comparison of two popular tools.
Best learning management systems for small businesses — find out why ProductDyno stands out.
Let’s first look at why you should create and sell digital products.
10 Reasons to Create Your Own Digital Products
Highly profitable – With minimal overhead, even a few sales can lead to a profitable digital product business.
Low startup costs – Unlike physical goods, digital products don’t require manufacturing or shipping. Once created, they can be sold an unlimited number of times with zero inventory.
Scalable income – Whether you sell one or one thousand, your profit margin stays the same. That's the beauty of creating digital products.
Global reach – Sell products online and reach buyers around the world 24/7, without leaving your home.
Passive income potential – Once your own digital product is live, you can earn income on autopilot.
Easy updates – If you need to make a change, you just update your file or course—no recalls, no hassle.
Instant delivery – Digital product buyers get immediate access after purchase, increasing satisfaction and reducing support tickets.
Creative freedom – You can create what you love—courses, templates, ebooks—while helping others.
No shipping logistics – No packaging, no delays, and no broken items in the mail.
Build authority – Selling digital products positions you as an expert in your niche.
10 Types of Profitable Digital Products You Can Create and Sell
Let’s take a look at some of the most popular products online today:
Templates – From resume templates to Notion planners, templates are simple to create and sell.
Worksheets – Great for educators, coaches, or consultants offering step-by-step activities.
Ebooks – Share your expertise, tell a story, or compile valuable info in a downloadable format.
Printables – From wall art to planners, printables are creative and easy to distribute digitally.
Online courses – Teach a skill, walk learners through a transformation, and get paid for your knowledge.
Memberships – Offer premium content monthly and build recurring income.
Designs – Graphics, logos, UI kits—designers can thrive selling digital assets.
Photography – Sell stock photos or niche-specific bundles for bloggers, brands, and creators.
Music and audio – Loops, beats, background music, and even guided meditations are all sellable.
Software and games – Build apps, plugins, or interactive games and license them online.
How to Create Digital Products and Sell Them Online
Let’s break down the six steps you need to follow to create and sell profitable digital products successfully:
Step 1: Find a Unique Idea
Your journey to creating a profitable digital product starts with a unique idea.
Look for problems people face and offer a digital solution.
Think about your own experiences—what do people often ask you about?
Explore forums, Reddit, Facebook groups, or even Quora to discover what people are searching for.
Step 2: Research Market Trends and Demand
Before creating and selling digital products, validate your idea. Use tools like Google Trends, Answer the Public, or keyword tools to check demand.
Search for related products on platforms like Etsy, Gumroad, and Udemy. If people are already paying for similar products online, that’s a good sign your idea is profitable.
Step 3: Identify Your Target Audience
Narrow your focus.
Who is your digital product for?
What are their pain points?
Are they beginners, professionals, parents, or students?
Creating your digital product online becomes easier when you understand who it’s for and what result they want.
Step 4: Plan Your Digital Products
Don’t jump into creating and selling digital products online without a plan.
List your goals, create an outline, and decide how you’ll deliver the product online.
Use a spreadsheet, a mind map, or a free tool like Trello to organize your steps. This will make your process more efficient.
Step 5: Create Your Digital Products with ProductDyno
There are many ways to create your digital products online—like using Canva for templates, Google Docs for ebooks, or Loom for course videos.
But the simplest and most efficient way of creating and selling profitable digital products is to use ProductDyno.
ProductDyno offers these features for creating andselling digital products:
Site Builder – Create beautiful product pages without coding.
UI Builder – Customize your product dashboard and user interface with drag-and-drop ease.
AI Course Creation Tools – Use AI to build course modules faster with structured lessons and quizzes.
Ultimate Course Blueprint Designer – Plan, design, and structure your course before building it.
Instant Course Builder – Auto-generates a course from your files or ideas in minutes.
Page Builder – Launch landing pages or sales pages in just a few clicks.
Templates – Choose from pre-made, high-converting templates for different product types.
Unlike other platforms, ProductDyno allows you to create and host your digital products online not only on their platform but also on your own website—giving you complete control and flexibility.
And there are no monthly fees—just a one-time payment or installment options, which means no recurring bills draining your income. This makes it ideal for new creators looking to sell profitable digital products online.
Learn more about how you can make money creating and selling digital products by reading my blog post how to create and sell digital products.
#tech#saas#makemoneyonline#onlinecourses#createonlinecourse#sellonlinecourse#bestcourseplatform#onlinecoursetools#coursecreationsoftware#creatortech
0 notes