#Fur tutorial
Explore tagged Tumblr posts
Visit Tumblr Blog
Explore Tumblr blogs with no restrictions, modern design and the best experience.
Last Seen Tumblr Blogs


Fun Fact
China blocked Tumblr because of pornography and censorship problems in 2013.

Note
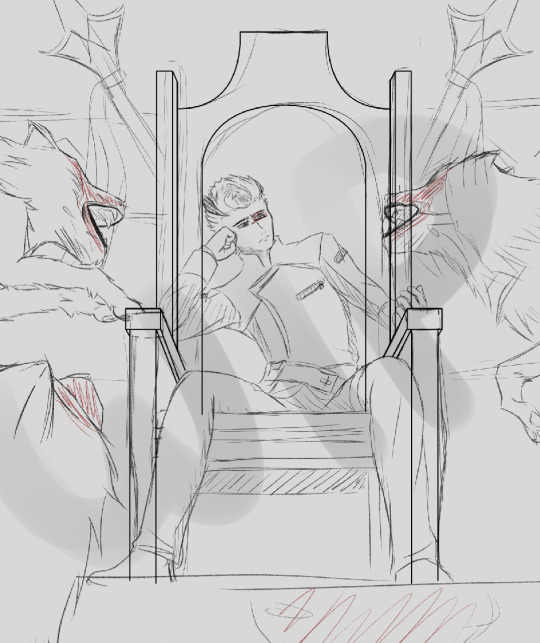
Do ya mind a fur tutorial?
I'm not entirely sure how to go about a fur tutorial? But I can try!
Here is a little example sheet of the more common ways I draw fur!

When it comes to fur and really any other part of design I really try to use shape language!
Spikey shapes , in this case fur, makes a cat look more harsh, mean, or a fighting type
While rounded shapes, or fur, makes a cat look more kind, and spunky, it makes them more huggable and squishy!
I love the furred with loopies in them it just exentuates the fluff and round ness even more!
I use more straight pointed lines for harsh or spinky characters, while I use rounded lines for kind huggable characters!
With my "silky fur" example, I use curvy/wavy lines more to make them look more soft like the fluffy cats, but I still give them a spike! This makes them look soft and "pretty" while they still have a bit of an edge!
153 notes
·
View notes
Text

I got asked to make a little tutorial on how I render fur so here it is :)
I hope someone finds it useful
124 notes
·
View notes
Text
I made a tutorial. For fur


74 notes
·
View notes
Video
youtube
My brand new process / tutorial video is now live!
More of my work: Instagram | Twitter | Facebook | Website
#dog portrait#pet portrait#soft pastel#pastel#dry pastel#pastel artwork#animal artwork#animal art#artist#art#portrait#dog#realistic art#realistic animal art#realistic portrait#art tutorial#portrait tutorial#fur tutorial
42 notes
·
View notes
Photo


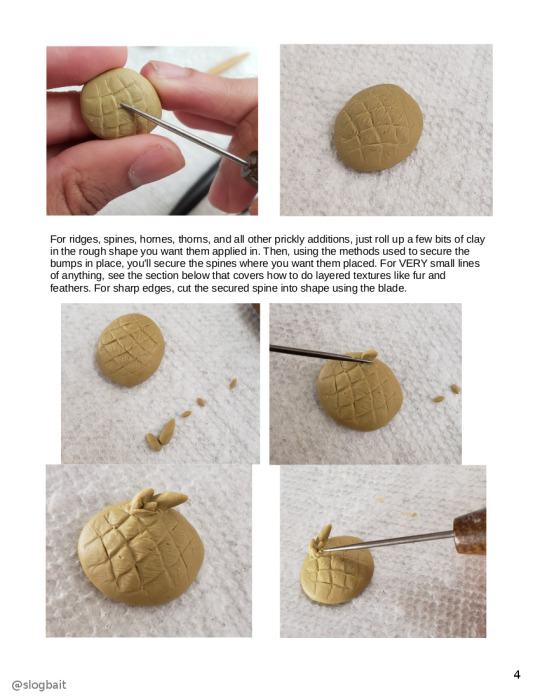


Wanted to try my hand at a tutorial, so when asking, one request was adding bits and textures to polymer clay sculpts. I use nearly all of these techniques for detailing my sculptures while doing slight variations on each to get different desired effects depending on what I'm working on. For larger pieces, you just use larger chunks of clay and larger tools. An important thing to remember is that because it's additive sculpting, you can add and remove as much clay as you please to get something to work. If you're not quite getting the result you want when adding something, try just using more clay than you think you need and trimming off the excess once something's secured! Happy scuplting :)
#sculpting#sculpture#sculpt#tutorial#how to#diy#sculpting tutorial#polymer clay#sculpey#super sculpey#fimo#craftsmart#fur tutorial#scales tutorial#texture tutorial#muh arts
82 notes
·
View notes
Link
Monika Zargrobelna has written up an awesome fur drawing tutorial. Check it out!
#art#how to draw fur#fur tutorial#drawing fur#drawing animals#monika zargrobelna#fur reference#lineart tutorial#art tutorial
98 notes
·
View notes
Photo

Shaded my previous drawing since a fur and cell shade tutorial was the most requested in a poll I made. Tutorial here
25 notes
·
View notes
Photo

Doggo December Day 31
“Everything I learned about different fur types this month”
27 notes
·
View notes
Text
I use this tutorial when coloring and shading fur. Although it mostly applies to paint tool sai so idk how helpful it'll be:
https://youtu.be/EnLEqUSLjvQ
guess who got a new tablet
17 notes
·
View notes
Photo

how to draw a lovely fluffy dragon, featuring sushi!!
430 notes
·
View notes
Text
How to draw Fur


Credit: Etherington Brothers
#207#208#fur#animal#animals#animal anatomy#creature#creatures#monster#monsters#art tutorial#drawing tip#art tip#art tips#art tutorials#drawing#drawing tips#drawing tutorial#drawing tutorials#art#tip
103 notes
·
View notes
Text

Some wickerbeast head explainations
Twitter | Furaffinity | Instagram | Art Discord
#tutorial#furry#furry artist#furry artwork#wickerbeast#wickers#furry art#clean fur#safe fur work#clean furries#furries#q
251 notes
·
View notes
Photo


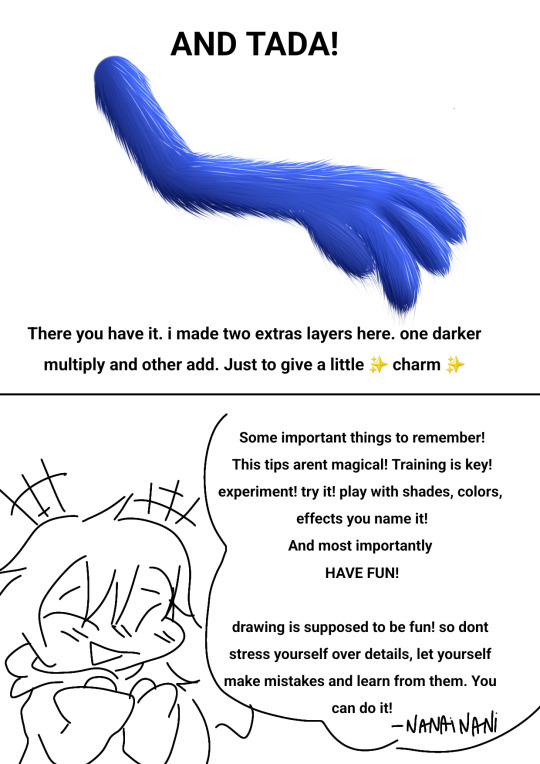
stylized fur tutorial. thanks for the question! i’ve been getting quite a few requests regarding how i paint fur, but honestly even i don’t have a set procedure for it yet orz
still i thought i would take a few moments to randomly blob out a clump of fur just to see for myself what techniques i’m using right now. so for brushes, i generally like using the watercolour ones. i have two atm, one set to a larger min. diameter (with high ease of mixing), and another set to a smaller min diameter (with low ease of mixing and high load colour).
(1) i use the smaller brush first to sketch in the general fur shapes, they’re pretty big at this stage, we’ll be adding in smaller clumps later
(2 - 3) using the larger watercolour brush now, i blob in a few shadows - keeping in mind the light source. i then select a lighter colour and make the brush smaller to make the definition between the light and shade sharper.
(4 - 7) now i take out the smaller brush again and refine the edges and points! i also use it to quickly add extra tufts of fur and then i’ll switch back to the larger brush to blend the new tufts in. and i basically keep doing this until i’m satisfied with the level of detail.
(8) i adjusted the levels to make the contrast higher. you can do this to make the character blend into whatever environment you’re painting them in.
(9) added colour with an overlay layer! although tbh i usually paint in colour to begin with in most of my drawings. but overlay/add layers are still super helpful for creating nice lighting effects and interest! you can add highlights and rim lighting at this stage too~
hope this was helpful!
3K notes
·
View notes
Text
How to fluff in Paint Tool SAI
Let’s go
Usually i have this on a multiply layer over the colour. Anyway we’re gonna erase our fur. This is my eraser’s settings:

Airbrush that ho

Keep going

You got this

Lower the opacity on your eraser and make it smaller. We’re gonna do little furs on the dark shaded bits.
Make a clipping mask on multiply and darken some of it. add overlay if you wish. done.
2K notes
·
View notes
Note
I love the way you do colored lines!! How do you do it??
Hello :) thank you very much
First i start out by alpha locking the lineart layer, this is preferable to a clip layer because it cuts down on time later in the other steps. Alpha lock just locks you into what you've already drawn, so its like a clipping layer... except all on one layer!

Then, I use an airbrush, and color it in with colors that are darker than the body, but within the same shade. For this one, I used a darker blue, and then a bit of a lighter blue toward the edges of white.


Now that we've done this, you want to turn off the alpha lock. We dont need it anymore and it will get in the way of our next steps!
You want to duplicate the lineart layer, and then once you've selected the top layer of lines (the new one), you want to gaussian blur it slightly. I do between 1-2%, because in procreate that's all you need to give a fuzz to it. Depending on the program you might want to go for a higher percent.


Your blurred upper lines should be fuzzy looking, but not completely blurred out to where it distracts from the colors inside of the character.

Now that we have our blurry guy, you want to select the top, blurred layer of lineart, and turn the layer setting to overlay. Depending on how bright it becomes it might require you to alpha lock it and airbrush a darker shade onto it to tone it down.

Now we have a little man with colored lines :)
44 notes
·
View notes