#Golden Caster Sugar
Text
Coconut Panna Cotta (Vegan)
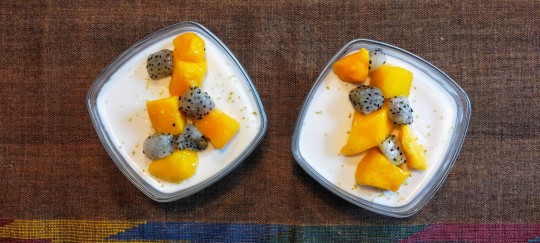
These gorgeously creamy Coconut Panna Cotta make a light yet indulgent dessert to end a meal on a high note! Happy Saturday!
Ingredients (serves 2):
2 1/2 gelatin leaves
1 (400-millilitre/13.5-fluid ounce) coconut milk
1/4 cup golden caster sugar
1/2 pitaya (dragon fruit)
1/4 ripe mango
a small lime
Soak gelatin leaves in a bowl of cold water. Set aside.
Pour coconut milk into a medium saucepan, and heat over medium heat.
Once just simmering, stir in golden caster sugar until dissolved. Bring to a slow boil.
Once boiling, remove from the heat. Thoroughly squeeze water out of the gelatin leaves, and stir them into the hot coconut mixture until completely dissolved.
Pour coconut mixture into two large ramekins or serving bowls. Let cool completely, before placing in the refrigerator to chill and set overnight.
Cut pitaya and mango into cubes, and arrange on top of set panna cotta. Chill until serving time.
Serve Coconut Panna Cotta, grating a little lime zest on top.
#Recipe#Food#Coconut Panna Cotta#Coconut Panna Cotta recipe#Panna Cotta#Panna Cotta recipe#Coconut Milk#Golden Caster Sugar#Caster Sugar#Sugar#Gelatin#Gelatin Leaves#Pitaya#Dragon Fuit#Mango#Lime#Lime Zest#Dessert#Dessert recipe#Easy recipe#5 Ingredients or Less#Vegan#Vegan Dessert#Vegan recipe#Vegetarian and Vegan
4 notes
·
View notes
Text
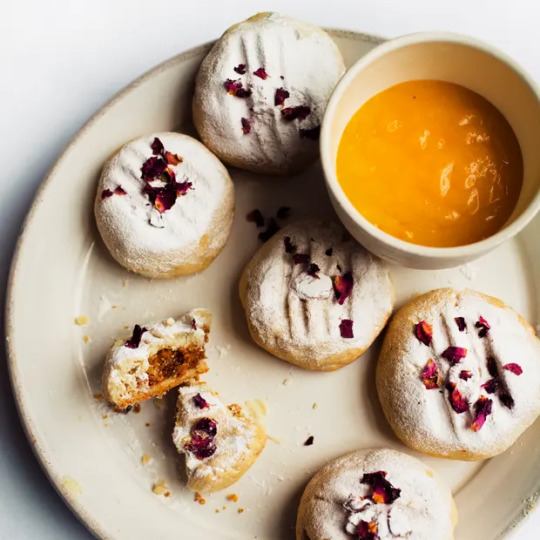
Fig and Orange Shortbread Cookies
by Nigel Slater from The Guardian
Makes approximately 12-16
For the fig paste
dried figs 150g
golden sultanas 100g
For the shortbread
butter 200g
golden icing sugar 90g
vanilla extract a few drops
ground almonds 140g
plain flour 190g
pistachio nuts 80g, shelled
orange zest of 1
To finish
icing sugar
rose petals
Set the oven at 180C/gas mark 4. Place a piece of baking parchment on a baking sheet.
Remove and discard the hard stems from the figs, then put the figs into a food processor, add the golden sultanas and process to a coarse paste. Set aside.
Put the butter, cut into small pieces, into the bowl of a food mixer, add the icing sugar and beat, with a flat paddle beater, to a pale, soft cream. Pour in the vanilla extract, and blend in the ground almonds and flour. Roughly chop the pistachios and fold them in, together with the orange zest.
Lightly flour a chopping board. Take a tablespoon of the fig paste and roll it into a ball. Scoop up two tablespoons of the almond shortbread dough, roil it into a ball then press a deep hollow in the centre. Place the ball of fig paste in the hollow and draw the almond shortbread around it to completely enclose it. Flatten the balls lightly with a fork, then place on the lined baking sheet, with a little space between them.
Bake for 20-25 minutes until pale biscuit coloured, then remove from the oven and allow to cool. Sift icing sugar over the biscuits and, if you wish, scatter with dried rose petals.
#cookies#shortbread cookies#nigel slater#celebrity chef recipe#dried figs#golden raisins#almonds#pistachios#orange zest#rose petals#confectioners sugar#powdered sugar#golden caster sugar
0 notes
Text
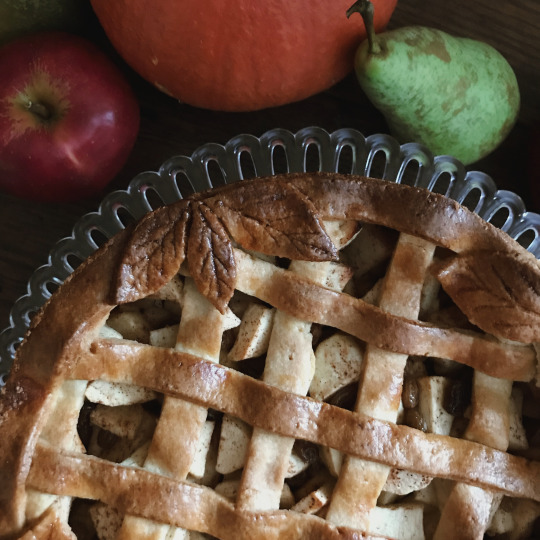

Mabon apple pie recipe
In celebration of Mabon next week, I am sharing my favorite apple pie recipe. I chose to share this a week in advance so that those who want to make it can prepare the ingredients.
All ingredients can be plant-based, for those who are vegan the egg is not necessary (you may need to add a little more butter)
Witchy tips during baking:
Mix clockwise and say your intentions for the cake out loud, this could be "I welcome abundance into my life with open arms.", "I embrace the blessings of the harvest and celebrate the abundance it brings." or if you plan to share the pie with friends and family: "May this pie nurture the bonds of love and friendship among us."
When you sprinkle the spices into the cake, do this clockwise and say each correspondence out loud as you do this:
Cinnamon: for love, and warmth
Cardamom: for attraction and harmony
Nutmeg: for prosperity and luck
Carve sigils of choice in the bottom of the pie before adding the filling.
Ingredients
For the dough:
500 grams plain flour
1 sachet (15 grams) baking powder
150 grams of white caster sugar
50 grams of light brown caster sugar
150 grams of melted butter
1 egg
Pinch of cinnamon, cardamom and nutmeg
For the filling:
1-1.5 kilos of apples
100 grams soaked and patted dry raisins (optional!)
1 tablespoon cinnamon (or more, until all apples are nicely coated)
To brush the dough before it goes into the oven:
To give the cake a beautiful golden color, I recommend brushing the cake with 1 beaten egg OR a dash of milk of your choice before putting it in the oven.
Preheat the oven to 190 degrees celcius (374 F)
Peel and cut the apples into wedges, sprinkle with the cinnamon and the raisins that you have pre-soaked and patted dry.
Mix all the ingredients for the dough together until it becomes a crumbly dough (it should be able to stick together and not be too dry, if this is the case I recommend adding more butter to the dough!)
Grease a baking tin with butter or oil and line the bottom with baking paper.
Divide the prepared dough into 3 parts, and put 1 part over the bottom. Press this with your hands or a spoon with a little flour on it so that the dough does not stick.
Then take 1 more part of the divided dough and press it onto the edges around the baking tin. You can roll this out with a rolling pin and cut it to size, I think this takes too long so I just press the dough along the edges (about 0.5 cm thick)
Put the apple filling in the pie and spread it evenly.
Sprinkle the last remaining part of the made dough over the pie to get an apple crumble pie, if you want a lattice top: make a ball of the dough and roll it out with a rolling pin. Cut strips from the dough that are 1.5 cm wide and long enough to cover the pie.
If you are making a lattice top, brush it with egg OR milk of your choice to give it a nice golden glow. If you have a crumb top this is not necessary.
Bake the pie for 40-50 minutes, but keep an eye on the pie because every oven is different! You know the pie is ready when you insert a toothpick or skewer into it and the apples can be pierced and the dough does not remain wet around the stick.
Let the pie cool down for fifteen minutes before removing it from the baking tin.
#kitchen witch#kitchen magic#kitchenwitch#baking#bake#recipe#witch#witchyvibes#witchcraft#witchy#whimsical#witchythings#witch aesthetic#witches#pagan#pagan witch#paganism#pagan community#cooking#recipes#dessert#sabbat#witchy vibes#green witchcraft#hearth witch#traditional witchcraft#witch blog#mabon#mabon recipe#apple pie
651 notes
·
View notes
Text
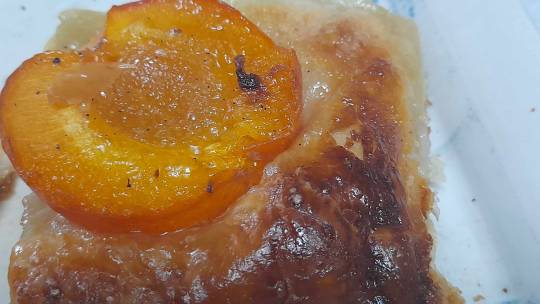
For summer afternoons: Shipper Mom's Lazy Apricot Tart (feat. whisky)
Unlike me, Shipper Mom is not a cook and bless her, never pretended to be one. She has no patience and a #silly hidden talent for cutting or burning herself almost every time she tries to prepare something, against her better judgement.
However, I must immediately add that she has perfected three things up to sublime levels: omelets, Belgian endive/chicory salads and a couple of tarts (for which she joyfully cuts all corners that can be cut).
Her Lazy Apricot Tart, a French recipe fished out of the Femme Actuelle magazine sometimes around the Stone Age, has always been a summer staple in our house. Again, a 5 year old could make it in about 10 to 15 minutes, plus baking time (minimal). It requires nothing more than the basics. And it is to die for.
You will need:
250 grams/ half a pound seasonal apricots (ripe, but still firm); 1 sheet of store bought puff pastry; roughly 4 Tsp/60 grams caster sugar (or, even better, brown sugar/cassonade); a hefty dash of whisky; lime juice (optional).
Preheat the oven (medium heat). About 350 Fahrenheit/180 Celsius will do.
Cut apricots in half, remove stones.
Unroll the puff pastry in a properly prepared sheet pan. Cut it in squares, in the pan, before baking.
Place half an apricot on each square, cut side up. Add about half a teaspoon sugar and a bit of whisky on every apricot (fill in the stone hollow completely). Whisky-wise, I recommend a basic blended one. The Famous Grouse is the best I can think of, and a fixture in my kitchen: it was tipped to me by a Swiss family friend who used to be a Nestlé food chemistry executive - I have never looked back. You can add a dash of lime juice on top, if you feel adventurous - I know I always do. Today, we had an exceptional sample of single malt (you know who you are, 😘) and I find it's elevating it immediately. Predictable, really.
Bake for 15 to 25 minutes, until golden brown and properly caramelized, depending of your own oven's whims (mine is exactly like Shipper Mom, has zero patience). Let cool. Serve with confidence and watch the magic in action:
You're welcome.
92 notes
·
View notes
Text

Fantasy Berry Meringue Layer Cake
Ingredients:
For the Cake Layers:
300 grams of all-purpose flour
300 grams of granulated sugar
1 teaspoon of baking powder
1/2 teaspoon of baking soda
A pinch of salt
4 large eggs
240 ml of buttermilk
120 ml of vegetable oil
2 teaspoons of vanilla extract
Food coloring in violet, blue, and pink
For the Meringue:
4 large egg whites
200 grams of caster sugar
1 teaspoon of cornstarch
1 teaspoon of white vinegar
1 teaspoon of vanilla extract
For the Whipped Cream Frosting:
500 ml of heavy cream
50 grams of powdered sugar
1 teaspoon of vanilla extract
For the Garnish:
Fresh strawberries, halved
Fresh blueberries
Fresh raspberries
Edible gold leaf (optional)
Edible pearls or colored sprinkles
Instructions:
1. Make the Cake Layers:
Preheat your oven to 175°C (347°F). Grease and line three 20 cm (8 inch) cake pans.
In a large bowl, whisk together the flour, sugar, baking powder, baking soda, and salt.
In another bowl, beat the eggs, buttermilk, oil, and vanilla extract until well combined.
Gradually add the wet ingredients to the dry ingredients, mixing until just combined.
Divide the batter into three bowls. Color each one with a different food coloring.
Pour the batter into the prepared pans and bake for 25-30 minutes, or until a toothpick inserted into the center comes out clean.
Let the cakes cool in the pans for 10 minutes, then transfer to a wire rack to cool completely.
2. Prepare the Meringue:
Whisk the egg whites until soft peaks form.
Gradually add the sugar, cornstarch, vinegar, and vanilla extract, and continue to whisk until stiff peaks form.
Transfer the meringue into a piping bag fitted with a large star nozzle.
3. Make the Whipped Cream Frosting:
Whip the heavy cream with powdered sugar and vanilla extract until stiff peaks form.
Keep the frosting chilled until you're ready to assemble the cake.
4. Assemble the Cake:
Place one cake layer on a serving plate and spread a layer of whipped cream frosting over it.
Top with the second cake layer and spread another layer of whipped cream.
Add the final cake layer and cover the entire cake with a thin layer of whipped cream, smoothing it out. This is your crumb coat.
Chill the cake in the refrigerator for 30 minutes.
5. Decorate the Cake:
After chilling, cover the cake with another layer of whipped cream frosting, creating a smooth surface or swirling texture as you prefer.
Pipe meringue peaks on the top of the cake.
Garnish the cake with fresh berries, edible pearls, and gold leaf if using.
6. Final Touches:
Use a culinary torch to lightly toast the meringue peaks until golden.
Drizzle some melted white chocolate or a fruit coulis over the meringue and berries for extra decadence.
7. Serve:
Let the cake set in the fridge for at least an hour before serving.
Slice and enjoy your Fantasy Berry Meringue Layer Cake!
#cake#rainbow#meringue#layred cake#delicious recipes#cake recipe#foodie#recipe#food blogs#food pics#homemade#foodshow#dessert#food#foodporn#baking#cooking#creamy#daily recipe#food photography#food blog
43 notes
·
View notes
Text
Doc's Best In Goddamn Show Montana State Fair Coconut Cream Pie
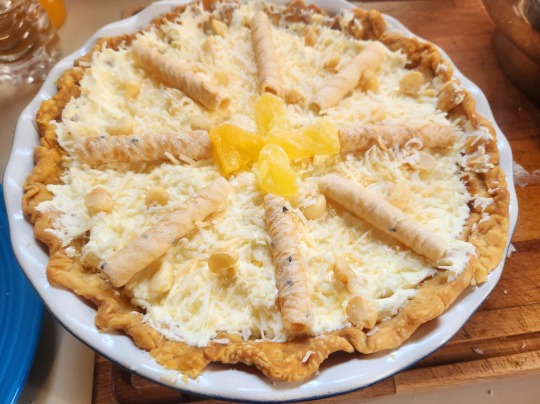
As promised, the baked good that did the best, I'll release the recipe. This is one of my favorite pies of all time, hewed into a perfect custard-based pie that won me my first Best in Show rosette in nine years. And pies is even a tough category!
The other shocking thing: This is one of the easiest pies I make. It's very much "don't worry about it." It even tastes better if you make everything but the topping the day before serving.
“Doc, why don’t you use cream of coconut for the custard?” Friend, I tried for years to get that to work, only to find out that cream of coconut just does not bake up as nice as milk and cream, so I use a nice extract and toast the coconut to get the flavors.
YOU WILL NEED:
A crust (I presume you can either make or buy a crust. I might even have a recipe here on the blog, I can’t remember)
Pie:
5 eggs
¾ cup caster/baker’s sugar
2 cups of whole milk
½ cup half and half (I believe this is called half cream in the UK)
1 tsp vanilla bean paste
1 tsp coconut extract (I like Olivenation or watkins. Also, bear in mind you may need to use more. I do this to taste and the tsp is a guess on my part. Don’t worry, I’ll tell you where to taste in the recipe)
Pinch salt
1 cup sweetened flaked coconut
Topping:
2 cups heavy cream VERY COLD (can use whipping or double also, but I prefer heavy)
2 tablespoons jello or jello style pudding mix, coconut
Powdered/icing sugar (this will be to taste)
Decoration: Most definitely toasted coconut. I really like Nuts.com’s organic dried coconut chips, but it depends on how flush I’m feeling--I did not use it in this competition. Macadamia nuts are great, dried pineapple, for this competition I used coconut rolls from costco. This is mostly for visual appeal, so be creative.
Toast your coconut: Put the oven at 350F. Put some parchment down on a baking sheet, and then put your sweetened flaked coconut on the sheet. Don’t forget to put in a bit extra for your topping decoration. Toast for about five minutes, it will probably need a stir and watch it closesy--coconut burns easy. When it’s a nice pale golden, pull it and up the temperature of the oven to 375F.
Blind bake your crust. If you haven’t done this before, I think it’s easy but admit maybe not everyone will. Roll your crust out into a pie plate, just like you always would, and then cover the bottom with tin foil, and fill with pie weights or beans, or rice--I’m a big fan of using sugar. Whatever you use. Bake it about 15-17 minutes, it should be lightly brown at the edges. Take out the pie weight you used. Bake it about 5 minutes more, just so the bottom gets very lightly toasted.
Make the filling! Beat your eggs in in a large bowl until they are very well combined but not whipped. Beat in everything but the coconut itself. NOW TASTE IT. Does it taste coconutty enough, or do you want to add a little more extract? Have an easy hand with the stuff, it’s powerful. Mix in the toasted coconut.
Yeah, I’m serious, that was the whole of the filling instructions. I told you this was ridiculously easy.
Bake: Pour your filling (carefully) into the pie crust, and cover the edges of your pie crust so it doesn’t burn (I use tin foil, but they do make fancy pie shields). I like to put it on a jelly roll pan so it’s easier for me to take in and out of the oven. You’re going to bake it at 375F for about 30-40 minutes, but the real test is: if you shake it a little, is it set at the sides but with a little wiggle in the center? That’s when it’s done.
Let it cool totally.
Topping! Beat your cold cream and pudding mix together, adding the powdered sugar slowly. I start with a quarter cup and work my way up until it’s as sweet as I like. I prefer a harder peak for this, but soft peaks are acceptable if you enjoy that more. Decorat with your topping choices!
GO WIN A FUCKIN ROSETTE

Please tell me if you made this! If you found this really helpful and would like to leave me a tip, my ko-fi is here!
86 notes
·
View notes
Text

Gluten free puff pastry
Recently found this recipe for puff pastry, and knew I had to try it: https://theloopywhisk.com/2022/10/22/gluten-free-puff-pastry/
Did some tweaking and ended up with a pretty good result :)
Mix until wet sand consistency:
2 cups gluten free flour (schär type B)
½ tbsp caster sugar
½ tsp salt
40 g (3 tbsp) cold salted butter, cubed
I used my pastry cutter, but you could use a blender or your fingers.
Add and toss with a fork:
120 g cold salted butter, sliced. I used a cheese slicer.
Add and toss, 2 tbs at a time:
1 dl water, iced or very cold
Form into ball, gently
Put in plastic bag, roll out into square and chill for 30 mins minimum
Laminate using 2 letter folds
Chill again 30 mins minimum
Use as you like
Bake at 200C until golden and crisp :)
#gluten free#gluten free recipes#food#gluten free baking#recipes#baking#puff pastry#gluten free puff pastry#gluten free pastry#pastry#recipe#gluten free recipe
83 notes
·
View notes
Text
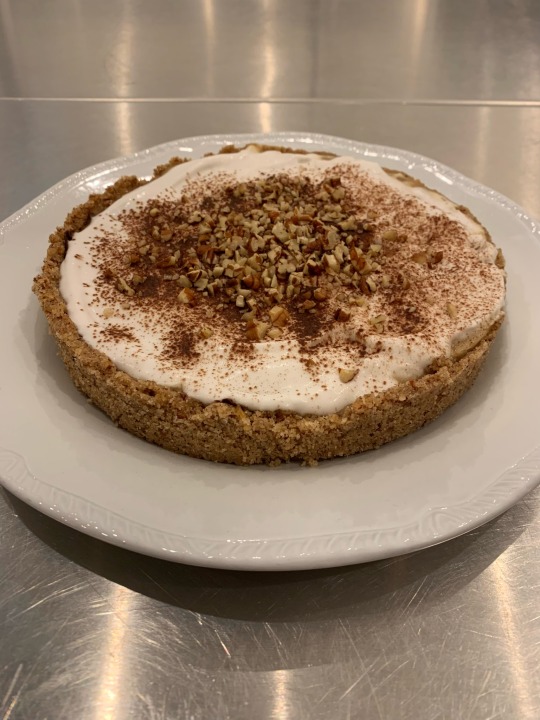
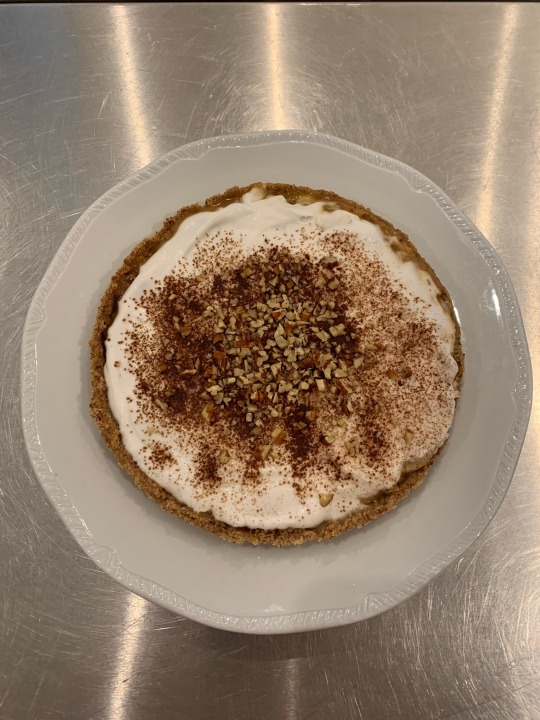

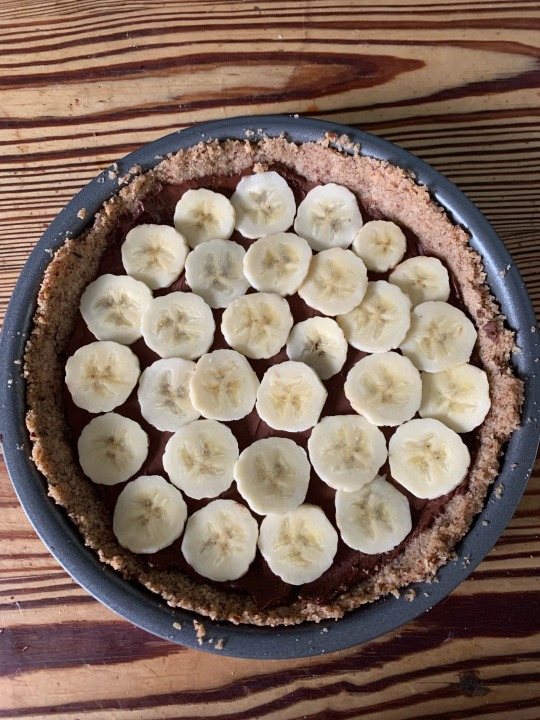
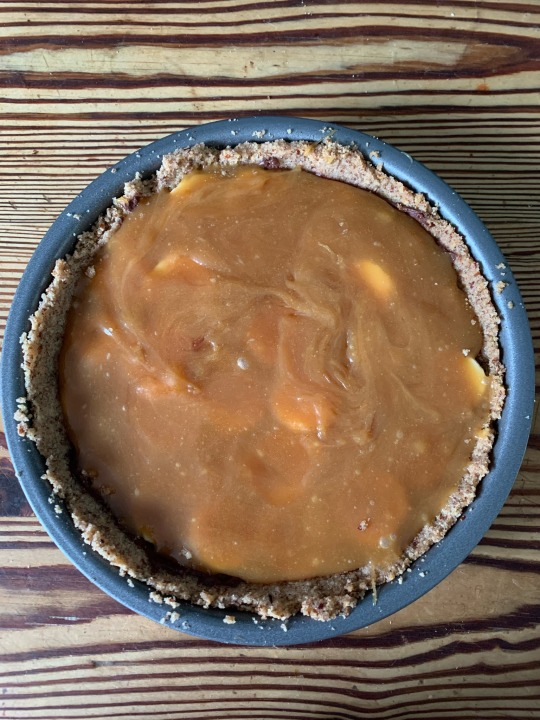
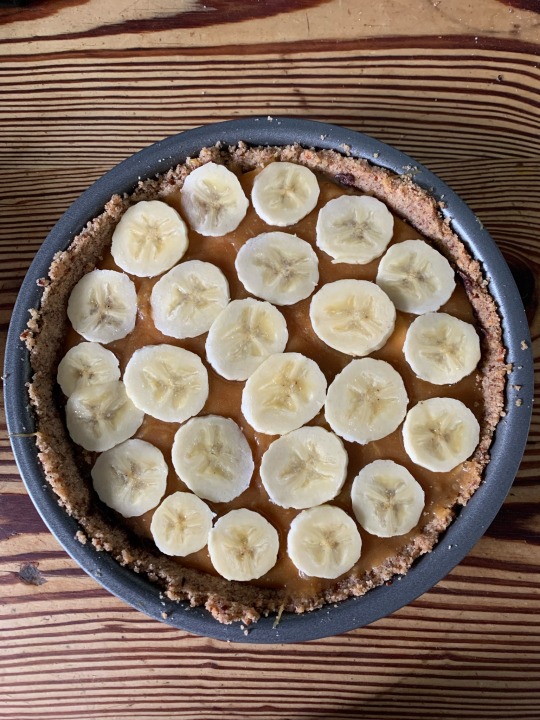
Vegan Passover Pecan-Banoffee Pie: my magnum opus
I set out with a dream. An impossible dream. To create a vegan dessert for my synagogue seder that was also kitniyot-free. Did I have to do this? Not really, my shul allows anything vegan, vegetarian or pescatarian that doesn’t have chametz, and we have a section for kitniyot. Am I vegan? No. Do I even keep kosher for Passover myself? Also no. But, you see, I have an almost pathological need to feed as many people as possible, and I am intractably stubborn, so once I realised how difficult this was going to be it only made me dig my heels in further.
It turns out to be borderline impossible to find vegan substitutes for pretty much anything that don’t contain soy, oats, cornflour, chickpeas, or some sort of forbidden legume. Subsequently this recipe is heavily reliant on coconut milk; luckily for me I live in an area with a large Muslim population and it’s currently Ramadan, so tins of coconut are front and centre of every supermarket display.
It’s taken almost a full month of trial, error and meltdowns in the butter aisle of Sainsbury’s, but I finally did it. I had to cobble bits of the recipe together from half a dozen different sources, so I feel relatively justified in calling this my own invention. The pecan crust is borrowed from a Tori Avey cheesecake recipe, I just swapped pistachios for pecans. I really think the crust is what makes it, to be honest. You could probably skip the ganache layer if you can’t be bothered, I just feel like it helps cut through the sweetness.
Recipe under the cut. Please please tag me if anyone decides to make this! I would be so delighted to see it out there in the world.
Crust
84g (⅔ cup) pecans
84g (⅔ cup) pecans
84g (⅔ cup) pecans
60g (½ cup) matzo meal
66g (⅓ cup) granulated sugar
71g (5 tbsp) Kosher for Passover vegan margarine (Rakusen’s Tomor*), melted, + extra for greasing
Pinch of salt (optional)
Ganache
113g KFP vegan dark chocolate (Lindt Excellence 70%, Green & Black’s 70%, Green & Black’s cooking chocolate are all KFP)
113g coconut cream/full-fat coconut milk
A few drops of vanilla extract (optional)
Caramel
200g caster sugar
100g KFP vegan margarine (Tomor)
200g coconut cream/full-fat coconut milk
Whipped cream
200g coconut cream/full fat coconut milk, kept in the fridge overnight
15-45g KFP icing sugar (check it doesn’t contain maize starch. You could probably omit the sugar and leave the cream unsweetened if you can’t find it, or grind your own- there are recipes for Passover powdered sugar online.)
¼ tsp vanilla extract
3-4 bananas
cocoa powder or grated chocolate to serve (optional)
chopped pecans to serve (optional)
Method
Make the caramel. Place the sugar into a medium / large saucepan. Place the pan on the hob over a low heat. Allow the sugar to melt, this will take around 5-8 minutes. Don’t burn the sugar! Make sure to stir constantly to prevent burning. You can use a wooden spoon or heat proof spatula.
When all of the sugar has melted and is a golden / amber colour, add in the margarine. Be careful, as the sugar is very hot. Remove the pan from the heat and stir to combine. Allow the margarine to melt into the sugar. It might bubble but that's fine. Once it’s combined, it might have a thick consistency. It might look like the margarine isn’t mixing with the sugar, but it should combine once you add the cream. Now add in 200g coconut cream. It will steam and bubble again so be careful.
Add the pan on the heat and allow to simmer for 3-5 minutes to help thicken it up.
Remove the pan from the heat. Set aside to cool for 30 minutes, then transfer / pour the caramel into a heat proof jar. Place the jar into the fridge. Allow to chill overnight. The coconut cream for the whipped cream should also be kept in the fridge overnight, to encourage it to separate and firm up.
If the caramel separates overnight, use an electric whisk to combine into a smooth consistency until there are no remaining lumps. It’ll be a more custard-like texture but still delicious. Keep caramel in the fridge until needed.
Make the crust. Preheat oven to 180˚C. Grease a loose-bottomed tin with margarine and line with greaseproof paper.
Blitz the pecans in the food processor until finely processed. Add matzo meal, salt and sugar and pulse until the entire crust is uniform in colour. With the processor on, drizzle the melted butter into the machine.
Once all the butter has been added, turn the processor off and dump the wet crumbs into the bottom of the lined pan. Using the back of a spoon, press the crumbs evenly into the bottom and up the sides of the pan (it doesn’t have to go all the way up, just as much as you can).
Place the crust in the oven for 8-10 minutes, or until the edges of the crust start to brown a bit and smells fragrant. Leave crust to cool for about ten minutes and then transfer to the fridge to finish cooling.
Make the ganache. Finely chop the chocolate and put in a medium-sized bowl. Put 200g coconut cream in a microwave-safe bowl and heat in the microwave for about 1 minute, watching to make sure it doesn’t bubble over.
Pour the warm cream over the chocolate chips and let sit for 2-3 minutes. Don't stir yet.
After 2-3 minutes, whisk the chocolate/melted coconut milk until smooth. Add vanilla if desired. Let cool in the fridge for around 30 minutes.
Make the whipped coconut cream. Chill a mixing bowl in the fridge for ten minutes (you can do this while the ganache is cooling to save time). Put 200g coconut cream (the thick white part, not the clear liquid) in the chilled bowl. Beat for 30 seconds with an electric whisk until creamy. Add vanilla and icing sugar and mix until creamy and smooth – about 1 minute. Avoid overwhipping because it can cause separation. Taste and adjust sweetness as needed.
Carefully run a knife around the edge of the crust tin and remove the crust from the tin.
Spread a layer of the cooled ganache over the bottom of the crust. Top with a layer of sliced banana and return to the fridge to set for ten minutes.
Add a layer of the caramel, another layer of sliced banana, and return to the fridge for ten minutes again.
Top with the whipped cream (I like to leave the edge of the bananas visible around the edge). Dust with cocoa powder or grated chocolate and add chopped pecans if desired.
*Tomor contains sunflower oil, but sunflower oil is not considered kitniyot in England: https://www.kosher.org.uk/article/sunflower-oil-kitniyot
#Passover recipe#pesach 5783#pesach 2023#pesach recipe#passover#Passover 5783#Passover 2023#Passover food#pesach food#פסח 5783#פסח#פסח שמח#jumblr#judaism#jewish#jewish food#kosher#kosher food#kashrut
80 notes
·
View notes
Text
Ingredients
Gluten free pumpkin sponge:
3 US large/UK medium eggs, room temperature
150 g (¾ cup) caster/superfine or granulated sugar
150 g (⅔ cup) canned pumpkin puree
½ tsp vanilla bean paste (or 1 tsp vanilla extract)
80 g (⅔ cup) plain gluten free flour blend (I used Doves Farm Freee plain gluten free flour that doesn't have any xanthan gum added. You can also mix your own gluten free flour blend using this recipe. Note that for this homemade blend, 1 cup = 150g, so ideally use a digital food scale for best results.)
¾ tsp xanthan gum (If your gluten free flour blend already contains xanthan gum, reduce the amount to ½ tsp.)
½ tsp baking powder
½ tsp baking soda
¼ tsp salt
½ tsp ground cinnamon
¼ tsp ground ginger
¼ tsp ground nutmeg
Vanilla cream cheese filling:
155 g (⅔ cup) heavy/double cream, cold from the fridge
60-80 g (½-⅔ cup) powdered/icing sugar, sifted (depending on how sweet you want the filling to be)
½ tsp vanilla bean paste (or 1 tsp vanilla extract)
150 g (⅔ cup) cream cheese, cold from the fridge
You will also need:
1-2 tbsp powdered/icing sugar, for dusting the top of the cake
Instructions
Gluten free pumpkin sponge:
Adjust the oven rack to the middle position, pre-heat the oven to 350ºF (180ºC) and line a 10x15-inch (25x38cm) rimmed baking sheet with parchment/baking paper.
Using a stand mixer fitted with the whisk attachment or a hand mixer fitted with the double beaters, whisk the eggs and sugar together until pale, thick, fluffy and about tripled in volume (the ribbon stage). This should take about 5-7 minutes on a high speed setting.
Add the pumpkin puree and vanilla, and whisk briefly until combined.
In a separate bowl, sift together the gluten free flour blend, xanthan gum, baking powder, baking soda, salt, cinnamon, ginger and nutmeg.
Add the dry ingredients to the egg mixture and whisk well for about 15-30 seconds until no flour clumps remain. Scrape down the bottom and sides of the bowl to prevent any unmixed patches. The final batter will be smooth and fairly fluffy in texture.
Transfer the batter into the lined baking sheet and smooth it out into an even layer. You can tap it a few times on the counter to make it perfectly level and also to get rid of any large trapped air pockets.
Bake at 350ºF (180ºC) for about 12-14 minutes or until well risen, golden on top, soft and spongy to the touch, and an inserted toothpick comes out clean.
Immediately out of the oven, cover the baking sheet with a large sheet of aluminium foil. Allow to cool to room temperature or lukewarm – ideally, the temperature of the sponge shouldn't drop below 72ºF (22ºC).
Tip: Covering the sponge with aluminium foil traps the moisture within the sponge, making it much more pliable and flexible – and therefore less likely to crack when you roll it.
Vanilla cream cheese filling:
You can prepare this filling by hand with a large balloon whisk, using a stand mixer fitted with the whisk attachment, or with a hand mixer fitted with the double beaters.
If using a stand or a hand mixer, whisk the filling on a low speed setting. This gives you better control over the texture/consistency of the filling and it lowers the chances of over-whipping it.
In a large bowl, whisk together the heavy/double cream and powdered/icing sugar until soft peaks form.
In a separate bowl, whisk the cream cheese until it's smooth and looser in texture.
Add the cream cheese and vanilla to the whipped cream, and whisk until well combined and soft peaks form.
Assembling the pumpkin roll:
Once the sponge is sufficiently cooled, remove the sheet of aluminium foil and loosen the sponge from the edges of the baking sheet with an offset spatula or a thin knife.
Tip: For the next steps, you can work with the sponge still in the baking sheet, or you can carefully slide it off the baking sheet onto a work surface – either option works well.
Spoon dollops of the filling evenly over the sponge, and use a small offset spatula to spread it out into an even layer all the way to the edges.
Note that when assembling the pumpkin roll, you want to get a 10-inch/25cm long pumpkin roll, starting out with a 10x15-inch/25x38cm sponge.
Turn the sponge so that a short edge is closest to you.
Using the parchment/baking paper underneath (the one that lines the baking sheet) to help you, lift the edge of the sponge closest to you and gently fold it over itself to start the roll.
Gently lift the parchment paper to continue the roll all the way to the end (so that the sponge rolls away from you) – the parchment paper should easily peel away from the sponge as you roll it. You should get a crack-free 10-inch (25cm) long pumpkin roll.
Tip: Make sure to keep the roll fairly tight from the very beginning, otherwise you’ll be left with an empty hole in the centre of your pumpkin roll.
Dust the pumpkin roll with some powdered/icing sugar before slicing and serving.
14 notes
·
View notes
Text
OC Recipe Tag
Oh wow, this is the best tag ever. Thank you @pheita (tag here)💜 I'll tag: @i-can-even-burn-salad (fully aware of the irony) @acertainmoshke @winterandwords @talesofsorrowandofruin @kittensartswriting @flock-from-the-void @cee-grice and leave an open tag.
Rules: share a recipe your OC would make, either one passed down to them or one they found all by themselves. Bonus if you have an actual recipe to link! Some OCs can't cook to save their lives, but let's talk about the ones who can! :D
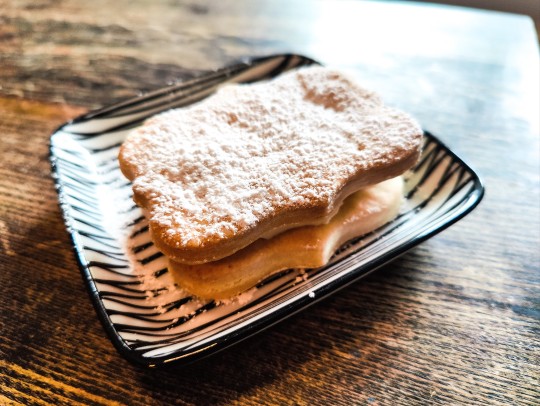
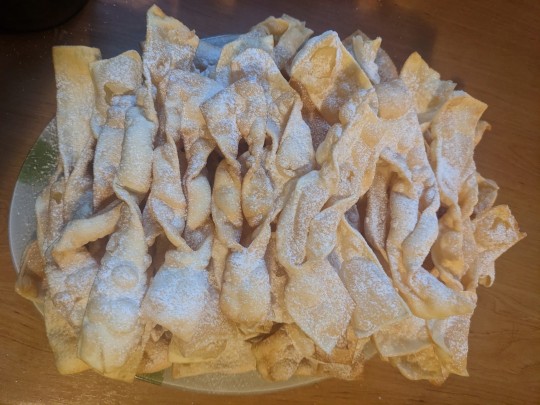
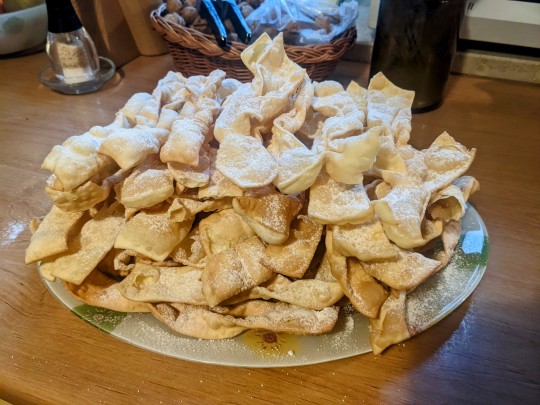
Ok, ok. Lissan can cook, and he'd probably make a simple apple pie. Gullin can't so his recipe would be a hardboiled egg (burnt). However, I really want to share a recipe for the cakes Ianim's cooks prepared. I call them brushwood cakes, but I think they're sometimes known as angel wings.
Here's the description from Gifts of Fate:
Ianim had, however, brought them a box of brushwood cakes to lift their spirits — something they didn’t have a chance to dig into last night. The cakes were delicious, so much finer than the ones offered at the winter fairs back in Aritia, and much, much sweeter, but not as aromatic. Ianim noticed Lissan’s confusion, and quickly explained that they were sweetened with beet sugar, not honey. Lissan gulped at how offhandedly he’d said it.
Ingredients:
5 egg yolks
340g extra fine flour
2 tablespoons sour cream
1 tablespoon 95-97% spirit (as pure alcohol as you can get)
1 tablespoon white caster sugar
1 pinch salt
lard for frying
icing sugar for dusting
Method:
Sift the flour, mix with sugar and salt. Add the wet ingredients and knead until combined.
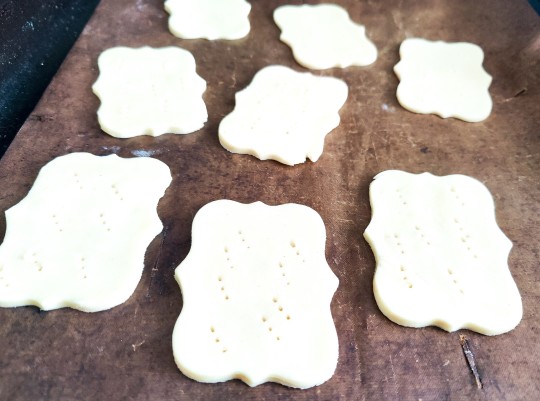
Roll out the dough, fold in thirds, beat with the rolling pin, roll, fold again, for 45 minutes or so. You want to repeat the process about 20 times, and the dough will be hard to roll. If you have a pasta roller, it speeds things up a lot. Finally roll it out to be about 1 mm thick - the thinner the better.
Cut into strips 12 x 4 cm, and cut a slit in the middle. Fold through the slit.
Melt the lard in a large, shallow pan, to be 2 cm deep. When dropped in, the cakes should puff up and turn golden, but not brown. It takes less than a minute on each side. Fish them out with a metal skimmer and put on a tea towel to soak up the excess oil.
Dust with icing sugar.
13 notes
·
View notes
Text
Rosie Berry Angel Food Cake

I made this beautifully floral and fruity Rosie Berry Angel Food Cake for Mother's Day, but it is so good, so gorgeously light, so flavourful, it might actually become a Summer favourite!
Ingredients (serves 4):
half a dozen Garden Strawberries
2 tablespoons Rosie Gin Liqueur
1/3 cup plain flour
2 tablespoons caster sugar
4 large egg whites
½ teaspoon salt
½ teaspoon cream of Tartar
1/3 cup Rose Sugar
1/2 teaspoon Rose Bitters
1/3 cup Dried Rose Petals
4 fresh raspberries, quickly rinsed
a teaspoon Rosie Gin Liqueur
a small bunch sweet william flowers, shaken and dusted (or other edible flowers from your garden)
Rinse Garden Strawberries under cold water and pat them dry. Save the two largest for later, and dice remaining Strawberries.
Place diced Strawberries into a small bowl. Drizzle generously with Rosie Gin Liqueur, and toss gently to combine. Chill in the refrigerator, at least, a couple of hours.
Preheat oven to 190°C/375°F. Butter a deep round cake pan. Set aside.
In a medium bowl, sift flour and caster sugar together. Set aside.
In another medium bowl, beat egg whites, gradually increasing speed to high until soft peaks form. Add salt and cream of Tartar, and continue beating, gradually adding Rose Sugar, until stiff peaks form. Gently fold in Rose Bitters with a rubber spatula. Then, gently fold in flour mixture, in three times, adding the Dried Rose Petals with the last of the flour mixture, until completely blended.
Spoon batter carefully into prepared cake pan. Level well with rubber spatula, to avoid air pockets.
Place in the warm oven, and bake at 190°C/375°F, 20 to 25 minutes, until just golden brown and sponge springs back when lightly touched. Let cool slightly, then turn over onto serving plate. Let cool completely.
Before serving, spoon Rose Liqueur Strawberries on top. Halve remaining Strawberries, and place them in a small bowl with the raspberries. Drizzle with Rosie Gin Liqueur, tossing gently, to coat, and arrange them onto the cake. Finally, garnish with sweet william flowers.
Serve Rosie Berry Angel Food Cake with chilled Champagne.
#Recipe#Food#Rosie Berry Angel Food Cake#Rosie Berry Angel Food Cake recipe#Angel Food Cake#Angel Food Cake recipe#Cake#Cake recipe#Flour#Caster Sugar#Egg Whites#Rose Sugar#Rose Bitters#Rose Petals#Dried Rose Petals#Cream of Tartar#Salt#Rosie Gin Liqueur#Rose Liqueur#Strawberries#Garden Strawberries#Garden Fruit#Raspberries#Berries#Cake Pavlova and Pudding#Celebratory Food#Mother's Day#Mother's Day recipe
8 notes
·
View notes
Text
The worst recipe for Kimchi I've ever seen.
So I'm a food nerd, if the love of Anthropology of food isn't self-evident enough in the 50 page doc on the history of food and food Anthropology based on Subsistence. lol
And I'm a super food nerd when it comes to kimchi. I've tried almost all the varieties of vegetables one can kimchi and learned their mush points.
And this, by far is one of the worst recipes of kimchi I've ever, ever read. And being a food nerd, I'll break it down for you.
Don't worry, it's not made by a Korean--it's made by someone white, but I am Korean. And before someone chases me down, "You're an adoptee" I grew up in Korea for the first 5 years and have been tracking down Eomma's kimchi recipe after I semi-remembered the flavor. TT Covid stopped me from going overseas to test it out.
I know when you think of kimchi, you most likely think of the spicy cabbage variety, but I'll inform you that I've made a lot of types of kimchi. I made the Dae Jang Geum Kimchi after a lot of research and digging around. I made kimchi in plastic that never turned out well. I've taken out ingredients and put them back in. I've made kimchi out of different vegetables, and I famously got cited by my own city for making Eomma's kimchi, which BTW, has raw clams and mussels in it.
I've made monk Kimchi too, and gave those tips off to Maangchi.
I'm like kimchi geek over here. I can tell you all different facets of kimchi. Maybe because I tend to hyper focus on things, and I definitely hyperfocused on kimchi.
So I definitely can say the above is not kimchi.
Let's define Kimchi:
Kimchi is an aerobic lacto-fermetation process that is usually balanced with a protein in order to preserve mainly vegetables/vegetation, but sometimes seafood or other seafood matter.
Why is this not a kimchi?
1 Chinese cabbage
3 garlic cloves, crushed
2.5cm/1in piece ginger, grated
2 tbsp fish sauce (optional)
2 tbsp sriracha chilli sauce or chilli paste (see below)
1 tbsp golden caster sugar
3 tbsp rice vinegar
8 radishes, coarsely grated
2 carrots, cut into matchsticks or coarsely grated
4 spring onions, finely shredded
Chinese cabbage is not the same as napa. Chinese cabbage is longer than napa. Does it look similar, yes. Have I attempted to make kimchi out of it yes. Did it have the same properties? No.
But forgive the white person for not knowing that. Chinese cabbage has more water content than your average large head of Napa.
3 Garlic cloves is laughable. It won't preserve for a year like kimchi is supposed to.
1 thumb of ginger? No. No. No. That's not enough.
The fish sauce is not optional. You need that to even out the lactobacilli. If you're not going to use fish sauce, then up the protein content with barley. I really do swear after messing up kimchi on purpose the fish sauce does have a FUNCTION not just a taste.
BTW, more than fish sauce goes into kimchi, though. Usually depending on the region you might get shrimp paste, mussels, clams, crab, octopus, squid, oysters. These pretty much ceviche in the liquid over time.
My favorite is Eomma's recipe with katuggi. ^^;; But I suppose that would anger both my parents. Hers I'm fairly sure had mussels, clams and maybe crab? And yellow corvina fish sauce.
Anyway... Sriracha is made up of red jalapenos, which do not belong in kimchi. Kochu is special. BTW, this already has sugar in it. Kochu is designed to stain on purpose. See the slurry portion below.
golden caster sugar isn't something that came about until industrialization.
rice vinegar is a totally different process of fermentation than kimchi. It won't render the same results.
European radishes don't belong in kimchi. Have I tried it? Yes. Did I regret it? 100%. TT There isn't really a substitute for Mu. Daikon is a distant second. European radishes are when you're dying in a desert and there is a gun to your head to make the kimchi with them and you have no other choice. Get this: Koreans who moved to Brazil, rather cut out the radish component completely, use European cabbages than use European radish. It's just nasty to bite into as a kimchi. Mu has less water content and is far denser than your average daikon and definitely over European radish. I'd choose watermelon radish over European radishes. (Have I made that into kimchi? Yes.)
Carrots do sometimes go into kimchi, but I don't think that's why it's there. This is more a Jeolla thing though.
You're not supposed to shred green onion for any dish I know... and I'm thinking of things like pajeon and green onion soup.
Where is the slurry? ALL Korean Kimchi has a slurry, if it has sweet rice flour, whole wheat flour or Barley flour. It has to have a slurry. The slurry has a function. It's there to make sure the ingredients distribute evenly.
Lactobacilli aren't going to act in ONE day. This brings the health benefits of kimchi.
The food science:
Since the majority of Korean fermentation lives on the wild side and likes things like air and sun, often the "weird" ingredients in kimchi that foreigners hate are there to MAKE SURE YOU DON'T DIE when you eat it. Stop trying to cut it out without understanding its function.
Got it? Now stop doing this crap and actually understand the food science of things like the anti-bacterial properties of garlic. How lacto fermentation is good for you, so you don't leave it out for only one day.
Koreans boast their heads off about the health benefits of kimchi as passed down from our ancestors for thousands of years. Why mess with a good thing without understanding why our ancestors made it that way?
7 notes
·
View notes
Text
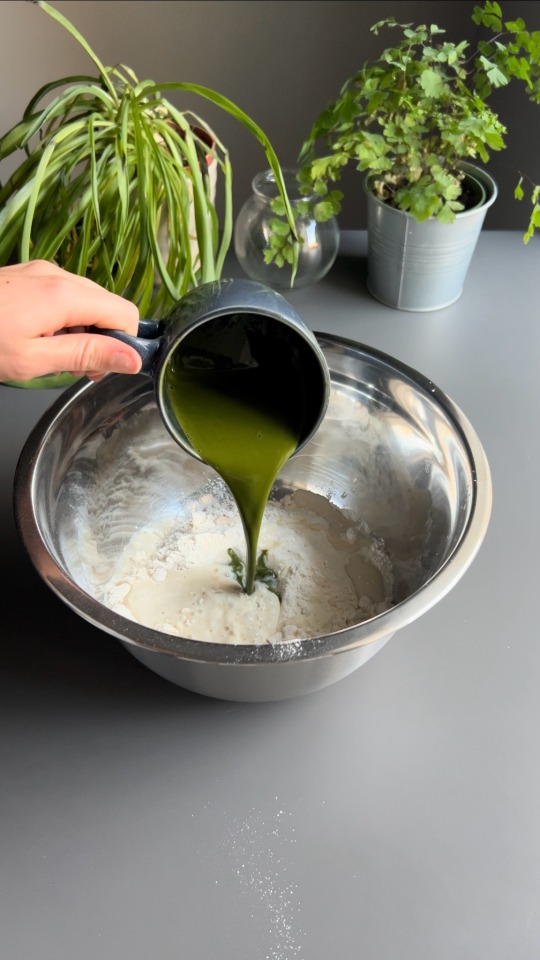
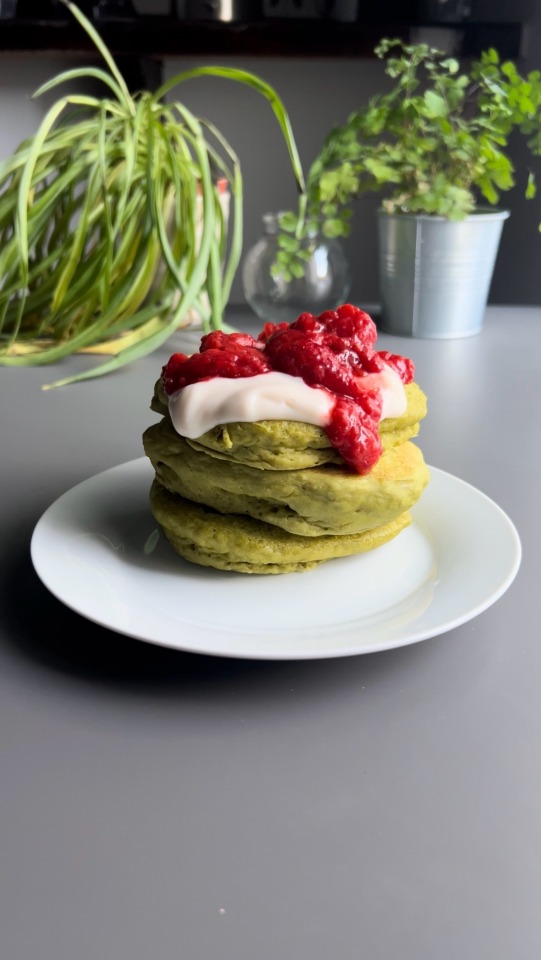


Matcha Pancakes 🥞 🍵 - Serves 2
(One serve is pictured here) 🥞
1 cup non-dairy milk
1 teaspoon apple cider or white vinegar
1 ½ cups self-raising flour
2 tablespoons caster sugar
1 teaspoon baking powder
1 tablespoon vegetable or olive oil
1 teaspoon vanilla extract
Pinch of salt
Vegan butter, for frying
1/3 cup boiling water
2 teaspoons matcha powder
* Place milk and vinegar together in a bowl or cup, leave for 5 minutes to curdle (for a buttermilk-like mixture).
* Mix matcha and boiling water together using a matcha whisk (or a fine tea strainer like I do).
* Combine dry ingredients in a bowl and whisk until combined. Add all wet ingredients to the dry ingredients, then whisk until just combined.
* The mixture should be quite thick - add more or less liquid as needed, but do not overmix.
* Heat a frying pan on medium heat and grease with butter. Once it’s hot, pour in the batter using a ¼ cup measurement and form it into a circle.
* Cook the pancake on the first side for a few minutes, once bubbles have formed on the top of the pancakes and the bottom is golden, flip. Cook on the other side for a minute or two more, until golden. Repeat for the rest of the batter.
The amount of milk you will need to use may vary (due to the type/brand of flour you use), look for the consistency of the batter that was in this video.
16 notes
·
View notes
Note
REESES COOKIES :]
SHIT MAKES LIKE, FIFTEEN ODD COOKIES DEPENDING ON THE SIZE. AND THIS IS ALL IN,, NON FREEDOM UNITS SO, MY APOLOGIES.
INGREDIENTS-
SELF RISING FLOUR, 280G
BROWN SUGAR, 150G
CASTER SUGAR, 100G
ONE EGG, AND A YOLK
SALTED BUTTER, 170G
REECES CHOC CHIPS, 100G
DARK CHOC CHIPS, 100G
MINI REECES CUPS, LIKE,, THREE PER COOKIE I DUNNO.
STEPS-
-IN A LARGE MIXING BOWL, MELT DOWN YA BUTTER AND MIX IN BOTH THE BROWN AND CASTER SUGAR.
-MIX IN YA EGG AND YOLK, AND THEN THE FLOUR.
-ONCE YA FLOURS FULLY COMBINED, ADD YOU CHIPS.
-DUMP THE SHIT IN THE FREEZER FOR A FEW, YOU CAN LOG THEM IF YOU WANT.
-AFTER A FEW, PREHEAT YOUR OVER TO 160° (CELSIUS)
-PULL EM OUT OF THE FREEZER AND ROLL THEM INTO BALLS, ABOUT TEN CENTIMETRES ACROSS.
-SHOVE A FEW MINI CUPS IN THE TOP OF EACH BALL AND PUT EM IN THE OVER FOR ABOUT TWELVE MINUTES OR UNTILL THEY'RE A GOOD GOLDEN BROWN.
-MAKE SURE YOU LET THEM REST FOR ATLEAST HALF AN HOUR BEFORE CONSUMPTION.
I ALSO PUT SMOKED SEA SALK FLAKES ON TOP, BUT THATS REAL FANCY SO,, YOU DONT GOTTA.
WITH HOW FUCKIN LONG THIS SHIT IS, I HAVE A FEELING THESE MIGHT BE ONE OF MY TOP 3 COOKIES EVER TASTED.
THANKS PAL, I AM MOST DEFINITELY MAKING THESE FOR MY ENEMIES.
#everymanhybrid#emh#TOTALLY NOT HABIT#slenderverse#RED ONE#habit everymanhybrid#habit emh#ask blog#ask answered#ADDITONAL;#COOKIE RECIPE#cookie log#??
4 notes
·
View notes
Text

Chocolate Truffle & Honeycomb Torte Cake with the described embellishments and presentation, follow these steps:
Ingredients:
• For Torte Cake:
• 200g dark chocolate
• 100g unsalted butter
• 3 large eggs
• 150g caster sugar
• 50g plain flour
• 1 tsp baking powder
• For Honeycomb:
• 100g caster sugar
• 2 tbsp golden syrup
• 1 tsp baking soda
• For Decoration:
• Whipped cream
• Purple candy floss
• Candy sparkles and stars
• Cookies (your choice)
• Fresh strawberries
• Mini marshmallows
• Cinnamon powder
Equipment:
• 20cm round cake tin
• Baking paper
• Heavy-duty saucepan (for honeycomb)
• Canon 5D or similar DSLR (for photography)
Instructions:
Chocolate Torte Cake:
1. Preheat Oven: Preheat your oven to 180°C (350°F).
2. Melt Chocolate and Butter: Gently melt the dark chocolate and butter in a heatproof bowl over a pan of simmering water. Stir until smooth and let it cool slightly.
3. Whisk Eggs and Sugar: In a separate bowl, whisk the eggs and sugar until fluffy.
4. Combine Ingredients: Gently fold in the melted chocolate mixture into the egg mixture. Then sift in the flour and baking powder, folding until just combined.
5. Bake: Pour into a lined cake tin and bake for 25-30 minutes. Let it cool in the tin.
Honeycomb:
1. Prepare Ingredients: Line a tray with baking paper. In a saucepan, gently heat sugar and golden syrup until sugar dissolves.
2. Make Honeycomb: Increase the heat and boil until golden. Quickly whisk in baking soda (it will bubble up) and pour onto the tray. Leave to set and cool.
Assembly:
1. Layer Honeycomb: Break honeycomb into pieces and press into the top of the torte.
2. Decorate: Top with whipped cream, sprinkle with cinnamon, and decorate with purple candy floss, candy sparkles, stars, cookies, strawberries, and marshmallows.
3. Set the Scene: Place the cake on a wooden table. Decorate around with a Christmas and winter theme, possibly adding elements that evoke an Asian village in winter.

#food#chocolate#chocolate cake#honeycomb#festive#Christmas#cake#food photography#sweet#Christmas food#winter wonderland#fruit#strawberry
14 notes
·
View notes
Note
Got any recipes for bananas and pears?
Ingredients
Pear and banana bread
100g unsalted butter, melted, plus extra for greasing
3 (about 250g) really ripe and speckly bananas (see tip)
100g golden caster sugar
2 ripe but still firm comice pears, cored and chopped, dusted in a little flour
1 tbsp maple syrup, plus extra to serve
1 tsp vanilla extract
1 large free-range egg
150g plain flour
½ tsp bicarbonate of soda
50g pecans, roughly chopped
Method
Heat the oven to 180°C/fan160°C/gas 4. Grease and line a 1 litre loaf tin (approx 21.5cm x 11 x 7cm) with baking paper so it overhangs the short edges of the tin (see tip).
Mash the bananas in a mixing bowl, then stir in the melted butter and caster sugar with a wooden spoon until well combined. Stir through the pears, the maple syrup and vanilla extract, then beat in the egg. Sift in the flour and bicarbonate of soda, then gently fold in, along with the pecans, using a metal spoon.
Pour the mix into the loaf tin, then bake for 45 minutes to one hour. The cake should be dark on top with a soft, moist sponge. Check it’s done by poking a skewer into the centre – if it comes out clean it’s ready. Leave to cool in the tin for 10 minutes, then lift out onto a wire rack to cool. Drizzle with extra maple syrup to serve.
5 notes
·
View notes
Last Seen Blogs


