#HTML elements for websites
Explore tagged Tumblr posts
Visit Tumblr Blog
Explore Tumblr blogs with no restrictions, modern design and the best experience.
Last Seen Tumblr Blogs


Fun Fact
Mobile Tumblr US users spend an average of 4.04 minutes per session on the app.
Text
Working on my javascript for my web page. Turns out I have the perfect kind of setup to accomplish some of the project requirements, specifically with even handlers and user interactions
My website, conceptually, will load a different employee details page depending on what employee name is clicked on. But I need to load it dynamically (instead of hard-coding it) so that the user can add or delete employees & it'll be able to still load the relevant shit.
So! Only one employee details page, but depending on how it's loaded, it'll load a different employee's information. Still working on getting down Exactly how to do it (I'm thinking using URL parameters that'll read a different object depending on what ID is used)
It's entirely doable. In fact, it's probably extremely common to do in web pages. No one wants to hard-code information for every new object. Of course not. And thus the usefulness of dynamic javascript stuff.
I can do this. I can very much do this.
#speculation nation#i wasnt very good when i got home and i read fanfic for a while#then took a nap. and now im up again and Getting To Work.#i dont have to have this 100% perfect for final submission just yet. bc final submission isnt today.#but i need to have my final presentation over my thing done by noon (11 hours from now)#and im presenting TODAY. and part of that will be giving a live demo of my project website#so. i need to have all of the core functionality of my website down at the Very Least#might not be perfect yet. but by god if im gonna show up to my presentation with my website not working.#i need to have the employee list lead to employee details with personalized information displayed per employee#i need to create an add employee field that will Actually add an employee. using a form.#and that employee will need to show up on the list and have a new id and everything. the works.#need to set it up so that employees can be deleted. shouldnt be too much extra.#and it would be . interesting. to give an actual 'login' pop-up when someone clicks on the login button#with some kind of basic info as the login parameters. this cant be that hard to code.#the project requirements are: implement 5 distinct user interactions using javascript. at least 3 different eventhandlers#at least 5 different elements with which interaction will trigger an event handler. page modification & addition of new elements to pages#3 different ways of selecting elements. one selection returning collection of html elements with customized operations on each...#hm. customized operations on each... the example given is a todo list with different styles based on if an item is overdue or not#i wonder if my personalized detail page loading would count for this... i also have some extra info displayed for each#but i specifically want the employees to be displayed in the list uniformly. that's kinda like. The Thing.#actually im poking around on my web pages i made previously and i do quite enjoy what i set up before.#need to modify the CSS for the statistics page and employee details to make it in line with what i actually wanted for it#maybe put a background behind the footer text... i tried it before & it was iffy in how it displayed...#but it looks weird when it overlaps with a page's content. idk that's just me being particular again.#theres also data interchange as a requirement. but that should be easy if i set an initial employee list as a json file#good god im going to have to think of so much extra bullshit for these 10 made up employees#wah. this is going to be a lot of work. but. im going to do it. i just wont get very much sleep tonight.#that's ok tho. ive presented under worse conditions (cough my all nighter when i read 3gun vol 10 and cried my eyes out)#and this is going to be the last night like this of my schooling career. the very last one.#just gotta stay strong for one more night 💪💪💪
6 notes
·
View notes
Text
I have successfully killed the clown
#thank you u block origin element picker#thank you html inspect#thank you very basic html knowledge and website editing
8 notes
·
View notes
Text
HTML Elements & Tags
Element: anything from the start tag to the end tag.
Tag: a piece of markup language that is used to indicate the beginning and end of an html element in an html document.
Example: <p> your text here </p>
<header><;/header> - Represents a container for introductory content or a set of navigation links. Usually contains one or more heading elements (<h1> - <h6>), logo or icon, or authorship information.
<;h#></h#> - header element. The higher the number, the greater the importance. Only use one <h1> element per page. There can only be six. Main topic on a web page. When visitors to your website see the h1's, it draws attention as it stands out the most on the page as it generally appears as a larger font size and in bold.
<p></p> - paragraph. used to create a paragraph of text on websites. Always starts on a new line. A lot of browsers add some white space (a margin) before and after a paragraph.
<;!-- ____: _______ --> - comment. Used to notate code with text that will not appear on the website/browser display. It allows you to make code inactive. You can use them to explain your code, which can help you when you edit the source code at a later date.
<main></main> - an element that identifies a content area. The main element. Specifies the main content of a document. This type of element/tag makes your html easier to read and helps with Sear Engine Optimization and accessibility. Should not contain any content that is repeated across documents such as sidebars, navigation links, copyright information, site logos, and search forms. When you put things inside the main element, this is called nesting. Nesting elements should be placed two spaces further to the right from the element they are nested in. This spacing is called indentation and is used to make html easier to read.
Example: <main> <h1>Tumblr Meme App</h1> <h2>Tumblr Photos</h2> <!-- TODO: Add link to Tumblr photos --> <;p>See more Tumblr memes in our gallery</p> </main>
<img> - used to images to your website. This element has an opening tag without a closing tag. A tag for an element without a closing tag is called a self-closing tag.
{{ under construction }}
#html#html coding#coding#web development#website development#web design#responsive web design#html web design#html how to#how to html#hot to html#html5#html elements#html tags
3 notes
·
View notes
Text
If you don't like how Firefox's tabs float above the toolbar (I don't!) I HIGHLY recommend Firefox UI Fix. It's slightly more complicated to install than a prepackaged extension just because you have to move files around and/or use git, but you can have it working in 5 minutes. It also adds icons to the right click menus that I quite like.
hey instead of bullying or scaring you into switching to firefox, let me tell you why i LOVE firefox and how my online life has improved significantly since installing it
- the setup process is easy, and even fun! if you’re using tumblr rn, you can handle it, and if you’re the kind of tumblr user who likes customizing your blog or tinkering with xkit, you can have a lot of fun personalizing really granular settings and picking themes and extensions and everything, it’s very customizable and i happily spent like 2 hours getting everything perfect.
- you can use a command line entry tool to change specific settings right from the search bar! i did this to make firefox stop auto filling my email information since i use a different password locker (which you should too! try bitwarden!), and it was easier than digging through a bunch of submenus for a setting i wasn’t sure existed. you can just turn shit off!
- there’s a preset theme called aurora that’s purple and VERY pretty
- once you get ublock origin and as many other blockers as you’d like set up, no ads, anywhere, ever! streaming sites, youtube, all the basics, totally no stress and no compatibility issues for me
- in browser screenshot and picture in picture functions!! holy shit i use these every day, the PiP is especially helpful, it replaced an extension i used to use on chrome and it’s leagues better and works on all video content pretty much
- overall better downloads management imo, it’s a lot easier to get to your downloads and find them later
- better bookmark system, with the ability to organize your bookmarks with searchable tags and assign them a shortcut you can type into the search bar to go to
- containers! you can have two accounts to the same website open in two different tabs and switch between them without having to switch accounts. also gives firefox the ability to contain facebook and their trackers, so you can click that party invite link without feeling like you just let mark zuckerberg into your house
these were just off the top of my head, i love firefox a lot and actively enjoy using it, which i never felt with chrome! please download firefox!! you will not regret it!!! where’s your fucking rage!!!!!! go!!!!!!!!!
#hard agree that uBlock should come preinstalled. it makes my internet time so quiet#it's easy to block specific things like tumblr's annoying y2k stuff#(as long as the classes/ids on the HTML element stay consistent)#and it's easy to turn it off if you need to on a specific website
65K notes
·
View notes
Text
Hot take digital accessibility is actually not that hard to do well if you're writing good HTML in the first place
#literally 90% of it is just using the correct html element for the thing youre doing#if you use a <label> with a for attribute instead of a <p> to label your text box#the screen reader can tell that its a label for that text box#you don't have to do anything fancy#inaccessible websites = skill issue#web development#web design#digital accessibility#rambles
0 notes
Text

neocities guide - why you should build your own html website
do you miss the charm of the 90s/00s web where sites had actual personality instead of the same minimalistic theme? are you feeling drained by social media and the constant corporate monopoly of your data and time? do you want to be excited about the internet again? try neocities!!
what is neocities?
neocities is a free hosting website that lets you build your own html website from scratch, with total creative control. in their own words: "we are tired of living in an online world where people are isolated from each other on boring, generic social networks that don't let us truly express ourselves. it's time we took back our personalities from these sterilized, lifeless, monetized, data mined, monitored addiction machines and let our creativity flourish again."
why should I make my own website?
web3 has been overtaken by capitalism & conformity. websites that once were meant to be fun online social spaces now exist solely to steal your data and sell you things. it sucks!! building a personal site is a great way to express yourself and take control of your online experience.
what would I even put on a website?
the best part about making your own site is that you can do literally whatever the hell you want! focus on a specific subject or make it a wild collection of all your interests. share your art! make a shrine for one of your interests! post a picture of every bird you see when you step outside! make a collection of your favorite blinkies! the world is your oyster !! here are some cool example sites to inspire you: recently updated neocities sites | it can be fun to just look through these and browse people's content! space bar | local interstellar dive bar creature feature | halloween & monsters big gulp supreme peanutbuttaz | personal site dragodiluna linwood | personal site patho grove | personal site
getting started: neocities/html guide
sound interesting? here are some guides to help you get started, especially if you aren't familiar with html/css sadgrl.online webmastery | a fantastic resource for getting started with html & web revival. also has a layout builder that you can use to start with in case starting from scratch is too intimidating web design in 4 minutes | good for learning coding basics w3schools | html tutorials templaterr | demo & html for basic web elements eggramen test pages | css page templates to get started with sadgrl background tiles | bg tiles rivendell background tiles | more free bg tiles
fun stuff to add to your site
want your site to be cool? here's some fun stuff that i've found blinkies-cafe | fantastic blinkie maker! (run by @transbro & @graphics-cafe) gificities | internet archive of 90s/00s web gifs internet bumper stickers | web bumper stickers momg | gif gallery 99 gif shop | 3d gifs 123 guestbook | add a guestbook for people to leave messages cbox | add a live chat box moon phases | track the phases of the moon gifypet | a little clickable page pet adopt a shroom | mushroom page pet tamaNOTchi | virtual pet crossword puzzle | daily crossword imood | track your mood neko | cute cat that chases your mouse pollcode | custom poll maker website hit counter | track how many visitors you have
web revival manifestos & communities
also, there's actually a pretty cool community of people out there who want to bring joy back to the web! melonland project | web project/community celebrating individual & joyful online experiences. Also has an online forum melonland intro to web revival | what is web revival? melonking manifesto | status cafe | share your current status nightfall city | online community onio.cafe | leave a message and enjoy the ambiance sadgrl internet manifesto | yesterweb internet manifesto | sadly defunct, still a great resource reclaiming online social spaces | great manifesto on cultivating your online experience
in conclusion
i want everyone to make a neocities site because it's fun af and i love seeing everyone's weird personal sites that they made outside of the control of capitalism :) say hi to me on neocities
EDIT: part 2!!
#neocities#old web#webcore#old internet#web revival#indie web#html#website#recource#guide#can you tell that i've gotten REALLY into neocities this month!!!!!#but its so FUN i love seeing everyones weird af websites#its amazing#i love celebrating the old web#ANYWAYS MAKE A NEOCITIES HERES A GUIDE#i haven't touched html in like a decade#and i've been having a great time relearning#:)#share your sites with me!!!!!!#oh and share resources if you have them!
88K notes
·
View notes
Text
#Accessible Form#Accessible Website#AdvancedBytez#Aria Attributes#Color Blindness#Color Contrast#Error Message#Generate Accessible#HTML Elements#JavaScript#Screen Readers#Section 508#Using JavaScript#WCAG
0 notes
Text
Honestly I recommend everyone learn just a littttle bit of CSS because it really is powerful and just makes bits and pieces of your internet experience more convenient.
Right now I'm cataloguing recipes I've really enjoyed, just trying to get them all in one place. Many of these are instagram recipes and, because I don't trust link rot (aka the possibility that the instagram link goes dead one day), I'm including a screenshot of the recipe along with the link.
But instagram on desktop... looks like this
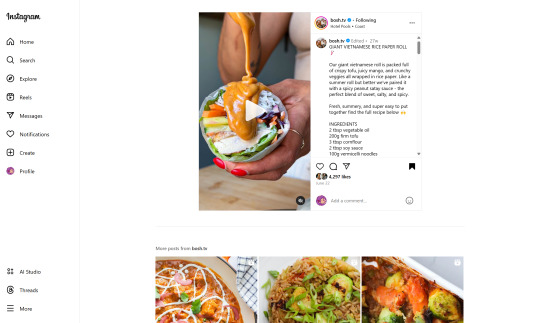
(Link, for credit. It's a good recipe)
I obviously could just copy-paste the recipe out of there. But a screenshot would be cleaner for how I'm cataloguing these.
And as-is, I'd have to scroll the whole height of that small right-side window about 4 times to fit it all.
But actually... I can just resize that div holding that whole right-side content
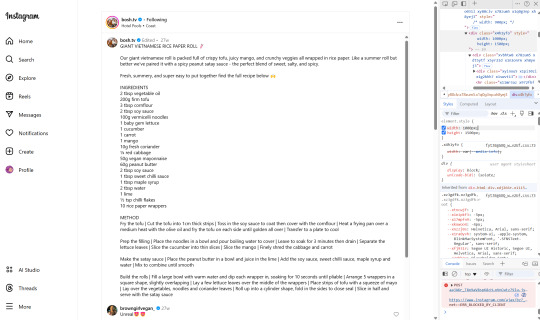
Basically I
hit f12 to open the dev tools
clicked the element finder
clicked on an element inside the recipe side
followed it up the tree until I found the element holding the whole recipe side (do this by hovering the div in the dev tools panel way on the right, then hovering upward and up until I find the element which is the highest up that still only contains the recipe-side content)
in the element.style part, set "width: 1000px" and "height: 1500px"
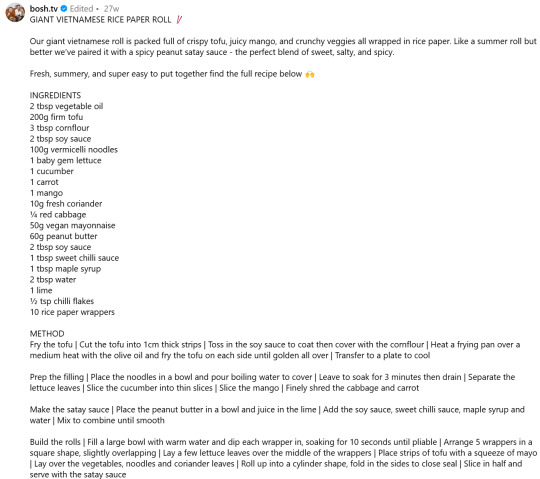
(I notice the width seems to still be less than 1000px, even though it got bigger)
likely suggests there's an element above it with a max-width set
go up the tree higher until I find the element with the max-width and uncheck that style
screenshot ready
Maybe that sounded complicated but it took me probably 20-30 seconds
And this isn't just about screenshotting recipes like.
website with an annoying gif? select gif, delete gif
do you want a clean screenshot of a digital receipt for record-keeping without a large company banner or irrelevant information? delete unnecessary elements, adjust widths, screenshot
SOMETIMES, you can bypass paywalls if they're relying on something like overflow: hidden, or an overlay in the way, or some JS that runs (you can disable JS in the dev tools)
lost the jpg/png file you used for your profile picture and size doesn't totally matter? grab it from the img src while logged in. (you might even be able to find it in a bigger size by changing the url query parameters)
color contrast on an article really bad? find and change background color. find and change font color
want to make a funny fake screenshot without learning photoshop? just edit the page content in the dev tools
This isn't about like being good enough to write scripts or browser extensions. Really if you just have some basic HTML/CSS understanding a hat worth of tricks, you can make so many little adjustments in your favor.
678 notes
·
View notes
Text

Tutorials for Aesthetics
Hi! Reign here and this guide is dedicated to teaching you how to make:
a) colour gradient text b) dividers c) pictures with gradients
Now, as a disclaimer, I'm not saying you should have all these things on your posts. Having pretty things won't guarantee a boatload of interactions and aesthetics shouldn't take away from the actual substance of your writing. Many fics do very well without all the glitz and glamour, and indeed simplicity goes a long way.
You should always prioritise clarity, improvement, and conviction in your writings. Don't get caught up in trying to look pretty and definitely don't be copying other creators' aesthetics unless they've given consent for you to do so.
This serves only as a starting off point for exploring styles that suit you.
Be bold, be brave, be you!
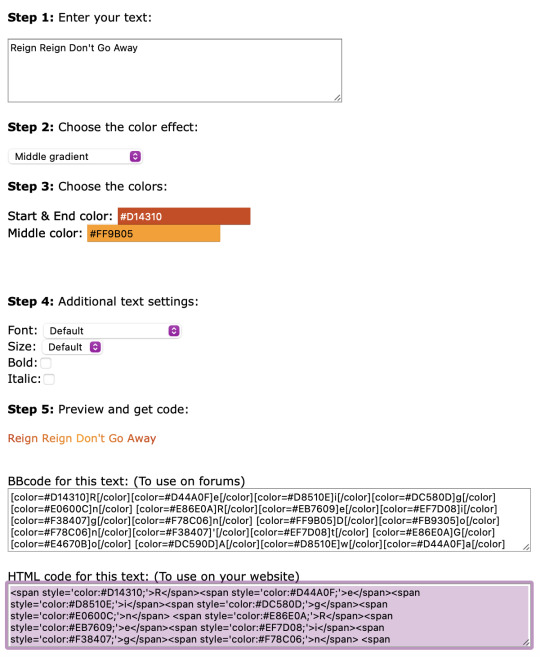
How to get the colour gradient text!
༯ I use stuffbydavid.com
༯ Decide if you want a horizontal gradient/middle gradient/three coloured gradient
༯ Pick your colours + write out the text you'd like to be coloured in the text box
༯ You can see the preview and when you're happy copy all the text in the HTML code box
༯ Go on Tumblr, create a post, click the settings icon of the post, then in the Text Editor function change it from Rich Text to HTML
༯ All your coding will be pasted in the HTML side and they'll appear formatted in the Preview on your Tumblr post


How to make dividers!


༯ I use Canva
༯ Click Create a design
༯ Click Custom size -> for my colour gradient dividers, I use the 3000 x 40 px but you can use whatever sizing you'd like of course -> experiment to your liking
༯ Click the colour wheel to change your background colour
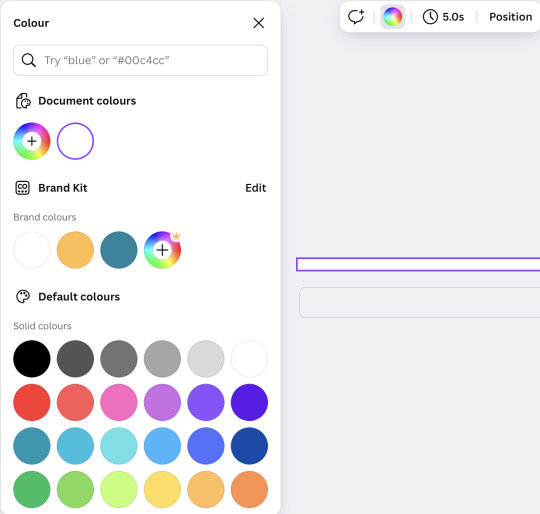
༯ You can do solid colours and use whatever hex code you'd like but to make gradients, scroll through the colour palettes to get to the different kinds of gradient options
༯ From there, you can change the colours of the gradient and adjust to your liking
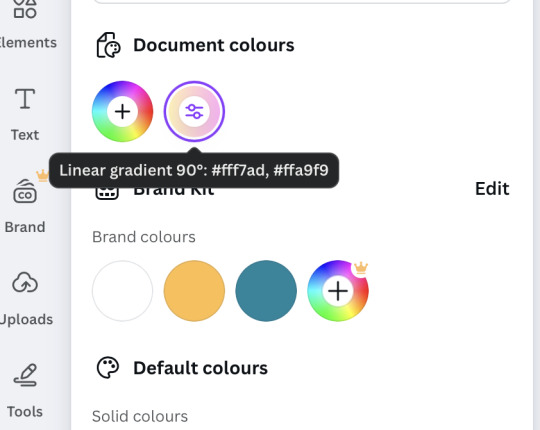
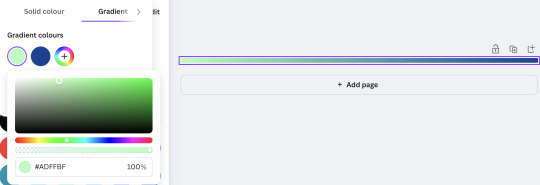
༯ To download it, click Share, Download, keep it PNG, size 1 and Download for real

༯ On Tumblr, you're going to just drag and drop that downloaded image on the website or if you're on the app, just add it as a picture and adjust it where you'd like it to go on the post
༯ If you were to have drawings like the hearts or croissants for the divider, you'll want to adjust the Custom size, arrange the pictures or elements on the page, and download with a transparent background

༯ A lot of this will involve experimenting for what works for you. There's no cheat code to that, unfortunately. But have fun with it. Don't be afraid to trial and fail -- everyone did at some point
How to add gradient colour to pictures!
༯ Use Canva again
༯ Click Custom size -> 3000 x 800 px (or, again, whatever size you like)
༯ Pick a picture you like -> for manga panels, I like to use Pinterest
༯ Drag that picture onto the blank page and adjust to fit
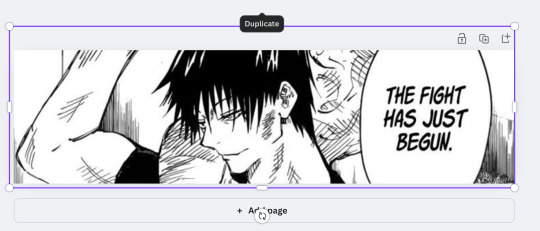
༯ Click Add Page -> on that page, change the background colour. You can use solid colours or gradient colours, it's the same process as for making gradient dividers

༯ Click the colour page, copy and paste it on your picture
༯ Adjust the transparency of your picture depending on how opaque you'd like the colour to be


༯ Delete the colour page and keep the picture
༯ Then, again, click Share and Download
༯ This is the final product -> you can obviously find better pictures and do whatever colours you'd like, this was just an example
༯ I'm not very tech savvy so if my explaining is terrible, I am so sorry 😭 but hopefully this makes senses and encourages you to experiment and be bolder with your layout!
94 notes
·
View notes
Text
YOU MUST MAKE A WEBSITE
Oh wow, look at that! YET ANOTHER post urging you to make a webbed site! What a completely new thing that people haven't made a thousand masterposts for already!!
• Making a website might look scary. It is Not.
At first, I too thought making a website was too much work. It really isn't! It turns out that all you need is
an HTML file,
a web hosting service and
w3schools tutorials,
and that's about it!
This post will point you towards these resources, and others I found useful while figuring out how to make a website.
• VERY QUICK EXPLANATIONS:
What's HTML and CSS?
HTML is the content of your webpage, the skeleton of it. What shows up in a webpage is what's written in the HTML file!
CSS is the way the HTML is styled; the colour of the background and the letters, the size of elements, the font, all that!
Do I absolutely NEED JavaScript for a website?
Not at all! You don't need to worry about learning it before getting started.
• What do I make a website for? What do I put in there?
ANYTHING AND ALMOST EVERYTHING. Here's some ideas for pages from a post of mine were I was very normal about websites:
You can make a page that's only pictures of your pets.
You can make an interactive adventure.
You can make your own academic blog full of your own essays or articles.
You can just post a ton of art or make a full music page.
You can make a blog and infodump eternally, give book reccs and reviews. You can host a thousand virtual pets and nothing else.
Upload entire books in a single html file. Make a wikipedia for your ocs. Make a fake site for a random fictional place (restaurant, hotel, whatever). You can make a thousand fanpages/shrines about your favorite media. You can upload your own webcomic and make it all like a fancy website and shit.
I could keep going but, for the sake of "brevity", I won't.
• WEBSITE EXAMPLES!
If I started listing the websites I know, this post would be bottomless. Here's only seven:
https://publictransit.neocities.org/ - A webbed site, for sure
https://ribo.zone/ - A personal site
https://leusyth.neocities.org/ - An art archive
https://solaria.neocities.org/ - Personal website with A Lot of stuff (it'll come up in a bit, because it offers web making resources)
https://hog.neocities.org/ - The Hogsite
https://thegardenofmadeline.neocities.org/ - Another personal site! It also has a web resources page and has made another masterpost like this one (but better)
https://spiders.neocities.org/ - My own website, which must be weird to see in mobile . sorry
• You've convinced me. I want a webbed site. Where do I start?
https://neocities.org/
FIRST OF ALL: Neocities. It is a free web hosting service, and it's the one I and the sites I linked use!
When I first started, my website was a black page with red letters and a drawing, and nothing else! It was like that for a month, till i started picking up on how to do things.
Here's what helped me get an idea of how to make things work:
https://sadgrl.online/learn/articles/beginners-guide-neocities
An absolute beginners guide to neocities -- while when you make an account there you get a tutorial page from the site, this one's extra support for that.
https://www.w3schools.com/
Learn HTML, CSS, JavaScript and MANY other coding things for free. All the tutorial/reference pages have live testing windows for you to mess with!! helped me a LOT while figuring this stuff out!
https://htmlcheatsheet.com/
https://htmlcheatsheet.com/css/
Cheatsheets for HTML and CSS, respectively. It includes a JavaScript one too!
https://sadgrl.online/webmastery/
Sadgrl's webmastery resources! Also includes the next resource listed here:
https://sadgrl.online/projects/layout-builder/
Sadgrl's layout builder; not a lot of customization at a first glance, but I've seen wildly different websites all using it as a base, plus it works using CSS Flexbox, so it generates a responsive layout!
(basically, a responsive layout is one that translates well in different sized screens)
https://www.tumblr.com/fysa/728086939730919424/wikitable-code?source=share
Tumblr user fysa made this layout imitating a wiki page!
https://brackets.io/
At some point, you might want to do things outside the Neocities code editor and get one outside the site. I recommend Brackets, because my old as fuck computer can run that and absolutely nothing else apparently, and it works wonderfully! Though I recommend either turning off the code autocomplete or using it after a good while of already using the Neocities code editor, so you get used to coding on your own.
http://www.unit-conversion.info/texttools/text-to-html/
Turn your text into HTML code! i use this kind of pages for my lengthy blog entries that I don't feel like formatting myself.
https://imagecompressor.com/
COMPRESS YOUR IMAGES.
The heavier an image is, the more your site weighs and the more time your page will spend loading. You don't want that, specially if your site is heavy on graphics. This might help!
https://solaria.neocities.org/guides
Some CSS, JavaScript and Accessibility guides! Worth checking out!
https://eloquentjavascript.net/
This is a free, interactive book for learning JavaScript! NOTE: It is very intuitive, but JavaScript is HARD!! I still haven't learned much of it, and my website does fine without so don't worry if you end up not doing much with it. It's still useful + the exercises are fun.
And now, accessories!
• Silly stuff for your page :]
https://gifypet.neocities.org/
Make a virtual pet, copy the code and paste it in your HTML file! You'll get a little guy in your webbed site :]
https://www.wikplayer.com/
Music player for your website!
http://www.mf2fm.com/rv/
JavaScript silly effects for your site :]
https://blinkies.neocities.org/geoblinkies
Blinkie search engine!
https://www.cbox.ws/
Add a chatbox to your site!!
https://momg.neocities.org/
Infinite gallery of gifs. i've spent hours in there looking at moving pictures and out of them all, the ONLY gif i actually ended up using on my site was a rotating tomato slice. it is still there. trapped.
https://wrender.neocities.org/tarotinstructions
A widget that gives you a random tarot card!
https://www.websudoku.com/widget.php
Sudoku widget!
That's about it for now! I don't know how to end this!!! Remember to have fun and google everything you don't know :]
569 notes
·
View notes
Text
Edgaring time!
Tutorial on how to make your own responsive Edgar :D I will try to explain it in really basic terms, like you’ve never touched a puter (which if you’re making this… I’m sure you’ve touched plenty of computers amirite??? EL APLAUSO SEÑOOOREEES).
If you have some experience I tried to highlight the most important things so you won’t have to read everything, this is literally building a website but easier.
I will only show how to make him move like this:
Disclaimer: I’m a yapper.
Choosing an engine First of all you’ll need something that will allow you to display a responsive background, I used LivelyWallpaper since it’s free and open-source (we love open-source).
Choosing an IDE Next is having any IDE to make some silly code! (Unless you can rawdog code… Which would be honestly impressive and you need to slide in my DMs and we will make out) I use Visual Studio!!!
So now that we have those two things we just need to set up the structure we will use.
Project structure
We will now create our project, which I will call “Edgar”, we will include some things inside as follows:
Edgar
img (folder that will contain images) - thumbnail.png (I literally just have a png of his face :]) - [some svgs…]
face.js (script that will make him interactive)
index.html (script that structures his face!)
LivelyInfo,json (script that LivelyWallpaper uses to display your new wallpaper)
style.css (script we will use to paint him!)
All of those scripts are just literally like a “.txt” file but instead of “.txt” we use “.js”, “.html”, etc… You know? We just write stuff and tell the puter it’s in “.{language}”, nothing fancy.
index.html
Basically the way you build his silly little face! Here’s the code:
<!doctype html> <html> <head> <meta charset="utf-8"> <title>Face!</title> <link rel = "stylesheet" type = "text/css" href = "style.css"> </head> <body> <div class="area"> <div class="face"> <div class="eyes"> <div class="eyeR"></div> <div class="eyeL"></div> </div> <div class="mouth"></div> </div> </div> <script src="face.js"></script> </body> </html>
Ok so now some of you will be thinking “Why would you use eyeR and eyeL? Just use eye!“ and you’d be right but I’m a dummy who couldn’t handle making two different instances of the same object and altering it… It’s scary but if you can do it, please please please teach me ;0;!!!
Area comes in handy to the caress function we will implement in the next module (script)! It encapsulates face.
Face just contains the elements inside, trust me it made sense but i can’t remember why…
Eyes contains each different eye, probably here because I wanted to reuse code and it did not work out and when I kept going I was too scared to restructure it.
EyeR/EyeL are the eyes! We will paint them in the “.css”.
Mouth, like the eyeR/eyeL, will be used in the “.css”.
face.js
Here I will only show how to make it so he feels you mouse on top of him! Too ashamed of how I coded the kisses… Believe me, it’s not pretty at all and so sooo repetitive…
// ######################### // ## CONSTANTS ## // ######################### const area = document.querySelector('.area'); const face = document.querySelector('.face'); const mouth = document.querySelector('.mouth'); const eyeL = document.querySelector('.eyeL'); const eyeR = document.querySelector('.eyeR'); // ######################### // ## CARESS HIM ## // ######################### // When the mouse enters the area the face will follow the mouse area.addEventListener('mousemove', (event) => { const rect = area.getBoundingClientRect(); const x = event.clientX - rect.left; const y = event.clientY - rect.top; face.style.left = `${x}px`; face.style.top = `${y}px`; }); // When the mouse leaves the area the face will return to the original position area.addEventListener('mouseout', () => { face.style.left = '50%'; face.style.top = '50%'; });
God bless my past self for explaining it so well, but tbf it’s really simple,,
style.css
body { padding: 0; margin: 0; background: #c9c368; overflow: hidden; } .area { width: 55vh; height: 55vh; position: absolute; top: 50%; left: 50%; transform: translate(-50%,-50%); background: transparent; display: flex; } .face { width: 55vh; height: 55vh; position: absolute; top: 50%; left: 50%; transform: translate(-50%,-50%); background: transparent; display: flex; justify-content: center; align-items: center; transition: 0.5s ease-out; } .mouth { width: 75vh; height: 70vh; position: absolute; bottom: 5vh; background: transparent; border-radius: 100%; border: 1vh solid #000; border-color: transparent transparent black transparent; pointer-events: none; animation: mouth-sad 3s 420s forwards step-end; } .face:hover .mouth { animation: mouth-happy 0.5s forwards; } .eyes { position: relative; bottom: 27%; display: flex; } .eyes .eyeR { position: relative; width: 13vh; height: 13vh; display: block; background: black; margin-right: 11vh; border-radius: 50%; transition: 1s ease } .face:hover .eyeR { transform: translateY(10vh); border-radius: 20px 100% 20px 100%; } .eyes .eyeL { position: relative; width: 13vh; height: 13vh; display: block; background: black; margin-left: 11vh; border-radius: 50%; transition: 1s ease; } .face:hover .eyeL { transform: translateY(10vh); border-radius: 100% 20px 100% 20px; } @keyframes mouth-happy { 0% { background-color: transparent; height: 70vh; width: 75vh; } 100% { border-radius: 0 0 25% 25%; transform: translateY(-10vh); } } @keyframes mouth-sad { 12.5%{ height: 35vh; width: 67vh; } 25% { height: 10vh; width: 60vh; } 37.5% { width: 53vh; border-radius: 0%; border-bottom-color: black; } 50% { width: 60vh; height: 10vh; transform: translateY(11vh); border-radius: 100%; border-color: black transparent transparent transparent; } 62.5% { width: 64vh; height: 20vh; transform: translateY(21vh); } 75% { width: 69vh; height: 40vh; transform: translateY(41vh); } 87.5% { width: 75vh; height: 70vh; transform: translateY(71vh); } 100% { width: 77vh; height: 90vh; border-color: black transparent transparent transparent; transform: translateY(91vh); } }
I didn’t show it but this also makes it so if you don’t pay attention to him he will get sad (mouth-sad, tried to make it as accurate to the movie as possible, that’s why it’s choppy!)
The .hover is what makes him go like a creature when you hover over him, if you want to change it just… Change it! If you’d rather him always have the same expression, delete it!
Anyway, lots of easy stuff, lots of code that I didn’t reuse and I probably should’ve (the eyes!!! Can someone please tell me a way I can just… Mirror the other or something…? There must be a way!!!) So now this is when we do a thinking exercise in which you think about me as like someone who is kind of dumb and take some pity on me.
LivelyInfo.json
{ "AppVersion": "1.0.0.0", "Title": "Edgar", "Thumbnail": "img/thumbnail.png", "Preview": "thumbnail.png", "Desc": "It's me!.", "Author": "Champagne?", "License": "", "Type": 1, "FileName": "index.html" }
Easy stuff!!!
Conclusion
This could've been a project on git but i'm not ready and we're already finished. I'm curious about how this will be seen on mobile and PC,,, i'm not one to post here.
Sorry if I rambled too much or if i didn't explain something good enough! If you have any doubts please don't hesitate to ask.
And if you add any functionality to my code or see improvements please please please tell me, or make your own post!
98 notes
·
View notes
Text
Friendly reminder that Wix.com is an Israeli-based company (& some website builders to look into instead)
I know the BDS movement is not targeting Wix.com specifically (see here for the companies they're currently boycotting) but since Wix originated in Israel as early as 2006, it would be best to drop them as soon as you can.
And while you're at it, you should leave DeviantArt too, since that company is owned by Wix. I deleted my DA account about a year ago not just because of their generative AI debacle but also because of their affiliation with their parent company. And just last month, DA has since shown their SUPPORT for Israel in the middle of Israel actively genociding the Palestinian people 😬
Anyway, I used to use Wix and I stopped using it around the same time that I left DA, but I never closed my Wix account until now. What WAS nice about Wix was how easy it was to build a site with nothing but a drag-and-drop system without any need to code.
So if you're using Wix for your portfolio, your school projects, or for anything else, then where can you go?
Here are some recommendations that you can look into for website builders that you can start for FREE and are NOT tied to a big, corporate entity (below the cut) 👇👇
Carrd.co

This is what I used to build my link hub and my portfolio, so I have the most experience with this platform.
It's highly customizable with a drag-and-drop arrangement system, but it's not as open-ended as Wix. Still though, it's easy to grasp & set up without requiring any coding knowledge. The most "coding" you may ever have to deal with is markdown formatting (carrd provides an on-screen cheatsheet whenever you're editing text!) and section breaks (which is used to define headers, footers, individual pages, sections of a page, etc.) which are EXTREMELY useful.
There's limits to using this site builder for free (max of 2 websites & a max of 100 elements per site), but even then you can get a lot of mileage out of carrd.
mmm.page

This is a VERY funny & charming website builder. The drag-and-drop system is just as open-ended as Wix, but it encourages you to get messy. Hell, you can make it just as messy as the early internet days, except the way you can arrange elements & images allows for more room for creativity.
Straw.page
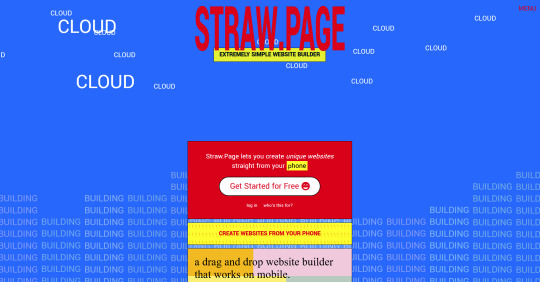
This is an extremely simple website builder that you can start from scratch, except it's made to be accessible from your phone. As such, the controls are limited and intentionally simple, but I can see this being a decent website builder to start with if all you have is your phone. The other options above are also accessible from your phone, but this one is by far one of the the simplest website builders available.
Hotglue.me

This is also a very simple & rudimentary website builder that allows you to make a webpage from scratch, except it's not as easy to use on a mobile phone.
At a glance, its features are not as robust or easy to pick up like the previous options, but you can still create objects with a simple double click and drag them around, add text, and insert images or embeds.
Mind you, this launched in the 2010s and has likely stayed that way ever since, which means that it may not have support for mobile phone displays, so whether or not you wanna try your hand at building something on there is completely up to you!
Sadgrl's Layout Editor

sadgrl.online is where I gathered most of these no-code site builders! I highly recommend looking through the webmaster links for more website-building info.
This simple site builder is for use on Neocities, which is a website hosting service that you can start using for free. This is the closest thing to building a site that resembles the early internet days, but the sites you can make are also responsive to mobile devices! This can be a good place to start if this kind of thing is your jam and you have little to no coding experience.
Although I will say, even if it sounds daunting at first, learning how to code in HTML and CSS is one of the most liberating experiences that anyone can have, even if you don't come from a website scripting background. It's like cooking a meal for yourself. So if you want to take that route, then I encourage to you at least try it!
Most of these website builders I reviewed were largely done at a glance, so I'm certainly missing out on how deep they can go.
Oh, and of course as always, Free Palestine 🇵🇸
#webdev#web dev#webdesign#website design#website development#website builder#web design#websites#sites#free palestine#long post#I changed the wording multiple times on the introduction but NOW I think im done editing it
490 notes
·
View notes
Note
https://www.tumblr.com/olderthannetfic/766611758459879424/youtube-just-showed-me-the-most-dumb-video-essay?source=share
Youtube fed you that swill and you actually watched it? And then you read the comments?? That's why the algorithm is like this. Feeding people hateful garbage makes them stick around.
Log out (If you very much like features that are only available logged in, just make a second google account to use for youtube and nothing else)
Download Firefox https://www.mozilla.org/en-US/firefox/windows/
Go into the privacy settings and set Enhanced Tracking Protection to "strict"
Install an adblocker, I like ublock origin https://ublockorigin.com/
Optionally, install some more anti-track addons, like Privacy Badger or Duckduckgo's privacy essentials
Install the container addon and set one up to qurantine youtube away from everything else https://addons.mozilla.org/en-US/firefox/addon/multi-account-containers/
Now what you have is a box that has youtube in it and literally nothing else. No ads, no personal information, no creepy stalkerware, no ability for other websites to see in the box, or for youtube to see out of it.
And now the fun part. Use the adblocker to nuke the entire sidebar and endcard overlays. Just select these with the eyedropper from the adblock extension, preview it to make sure you're not blocking more than you mean to, and bam, it's like three clicks and and you'll never see it again, it's beautiful.
Do this and you can watch all the videos you please and will NEVER have the algorithm shove some misogynistic garbage in your face because it crunched some math and knows that users with your profile are stasticsally likely to spend time on the side when served that sort of trash.
You can also use the adblocker to get rid of the entire comments section, or to nuke any design element or feature that you find annoying or ugly. It's called an adblocker, but it blocks anything based on URLs and HTML strings. The posibilites are endless, freeing, and beautiful. I use adblockers for aesthetics and accesibility at least as much as for actual ads.
I do this with every website I use regularily, including tumblr (though only the worst few [including youtube] have dedicated quarantine containers). It's a few steps to set up, but once you have the extensions installed and know how to use them, nuking algorithmic feeds and making sure that you only see what you actually want to see takes like ten seconds.
And no, before you say you have to use the app, this does work on mobile. Download Firefox for mobile, install the adblocker, install the anti-trackers, and use youtube in the browser instead of the app because taking an extra three seconds to load and having a slightly less optimized layout is worth not being unundated with advertisements and hate.
You can also root your phone and install adblockers that work with apps, but that's a more involved process and takes more effort and knowledge than simply installing a new browser and using an eyedropper tool to select a sidebar.
--
73 notes
·
View notes
Text
Convert HTML to Image: A Step-by-Step Guide ✨

Do you want to turn some HTML code you've made that's on your website and have a way to convert it into an image for you to save?
Well, look no further! I too wanted to do the same thing but funny enough, there weren't any straightforward tutorials out there that could show you how! After hours of searching, I finally discovered the solution~!
This is an old tutorial I made 🐼

💛 Set your environment
Before we dive into the conversion process, I'll assume you already have your HTML code ready. What you want to learn is how to turn it into an image file. You should have a good grasp of HTML and JavaScript. For this tutorial, we'll use the following HTML code example:

We won't include the CSS code, as it doesn't affect this tutorial. The JavaScript file (script.js) at the bottom of the body element is where we'll add the functionality for the conversion.
Your page should resemble the following:

As you can see, the "Click me" button will handle the conversion. We aim to convert everything within the div.info-div into an image.
💛 Using the html2canvas JavaScript Library
The html2canvas library allows you to take screenshots of webpages and target specific elements on a screen. Here are the steps to include the library in your project:
The steps to put the library in your project:
Visit the html2canvas website for more information.
Copy the CDN link from here

and include it in a script tag in your project's head tag in the HTML file:

That's it for including the library on the HTML side. Now, let's move on to the JavaScript code.
💛 JavaScript Functionality
Here's the JavaScript code to handle the conversion:

In this code, I want to turn the whole div.info-div into an image, I put it into a variable in const div = document.querySelector(".info-div");.
I also put the button into a variable in const button = document.querySelector("button");
I added a click event listener to the button so when the user clicks the button, it will follow the code inside of the event listener!
You can find similar code like this in the documentation of the html2canvas library:

What is happening here is:
We add the div (or what the element we want to take an image of) into the html2canvas([element]).then((canvas)
Added the image file type url to a variable = const imageDataURL = canvas.toDataURL("image/png"); - You can replace the png to other image file types such as jpg, jpeg etc
Created an anchor/link tag, added the href attribute to imageDataURL
The download attribute is where we will give the default name to the image file, I added "dog.png"
Perform the click() function to the anchor tag so it starts to download the image we created
And that's it!
💛 The End
And that's it! You've successfully learned how to turn your HTML into an image. It's a great way to save and share your web content in a unique format.

If you have any questions or need further clarification, please comfortable to ask. Enjoy converting your HTML into images! 💖🐼
#my resources#coding#codeblr#programming#progblr#studying#studyblr#programmer#html#html css#javascript#neocities#coding tips#html5 tutorial#html tutorial
156 notes
·
View notes
Text
Is privacy important to you?
So recently, I've seen an uptick of people interested in privacy regarding electronics (phones, pc, what have you). When I say people, I'm referring to non-techy people, like myself. I know my way around my computer and can do some basic troubleshooting for hardware/software, but beyond that, I'm sort of helpless. I don't know anything about hacking or cybersecurity and the only coding I can do is some html. I'm below a novice haha. So, if you're that sort of person, then maybe this could be of interest to you. What I am about to discuss involves no coding or really any in depth knowledge regarding technology. You don't have to be Elliot Alderson for this.
>Why does privacy even matter?
The answer to this question will vary from person to person. I, for one, do not like the idea of any corporation hoarding my data to sell or store or do fuck all with. If this does not bother you, I'd consider asking yourself if you're comfortable with, let's say, something like Google knowing everything about you. And I mean everything. Suppose that doesn't bother you, then okay. Maybe think about how it would feel if your classmates or coworkers knew what Google knows about you. Corporations also extend to governments because they're jerking each other off, so something to keep in mind. And individuals, people like you and I, work for these entities. And these people can abuse your data. For any reason.
Your data is a tool for them to control you. You might not realize it until it's too late. I'm being a little vague here because this point alone could be an entire wall of posts.
Additionally, something to consider is the level of privacy that you may require. If you are someone who attends public protests or is part of some sort of organization that criticizes your government, you are at risk of potential scrutiny or harassment. Obviously, but I mean specifically from a lack of privacy practices. Maybe from your government or somebody who opposes your views, etc. And depending on how you've been communicating about these gatherings or communities, you're potentially putting others at risk as well. If you're one of the people who's in charge of organizing or playing a large role, some of the methods I will be going over will likely not be enough to protect you. Activists and journalists need a different level of privacy that I can't begin to match.
Listed below are some videos that I watched that really helped me to understand why this is important.
“I Have Nothing to Hide” – The Dangerous Myth About Privacy
Is it impossible to be private online? (Eric's channel has been very helpful for me personally because his explanations do not alienate the tech illiterate)
>So...Where do I start?
Luckily, there are small steps you can take to prevent some information about you from being hoarded. And I say some, not all. Unfortunately, the only way to completely avoid all of this is to live out in a cabin in the middle of nowhere and never use the internet ever. Which I can assume you don't want because you're reading this on a website right now! You will have to make some compromises for some of these options, and if you can't replace all of these and only some, that's fine. Most of these can be adjusted in just a few minutes, if that.
General
Oh my god, stop using chrome. I'm serious, please stop. If you are using chrome to read this, close out of this and download firefox. or brave or chromium or whatever. I use firefox, and the second you download firefox, download ublock origin. Ads on the internet are completely out of control. Firefox is not foolproof either, other add-ons can provide not just a more private experience, but also a much smoother one. ClearURLs removes tracking elements from urls. And it's open source. There are a few others, but I don't know everything lol. There are VPNs you can use, but I only ever use one if I'm away from home and using the Wi-Fi at work or something.
Stop using google search engine. In firefox, you can set something else by default. I just use duckduckgo, but there are alternatives. You can also turn off the ai bullshit. Find one that works best for you and your needs.
Email. So this is one I have not moved yet. I still have gmail for my youtube account. I also have to use gmail for my university. I do have a protonmail, though, that I've been slowly moving over to. This could be an easy fix for some people, while impossible for others. This is something that I am willing to compromise on. Again, you can't have it all with how things are set up. I'm sure there are some ways to circumvent this, but I am not aware of it. For things like drive and docs there are also some alternatives, but I don't use drive all that much, so finding an alternative isn't that pressing for me. There's proton drive, which functions similarly, and several paid options, but I'm trying to keep this process free for people just starting to be privacy-conscious.
Signal is a good messenger especially if you're moving from something like facebook messenger, instagram, whatsapp, whatever. It's end to end encrypted and pretty modern (so stuff like emojis, reactions, voice messages) You do need a phone number though, but again, better than just whatsapp. More people are moving to it now, so you might have an easier time introducing friends to it.
Cellphone
Alright, so this is going to depend on a few factors, mainly whether you have Android or iOS. I had an iPhone for a long time, up until last year. I was never an Apple fanboy, it's just what I had, but I wasn't deep in the ecosystem by any means. I've always used a Windows computer, so I didn't have a Mac or apple watch or whatever. I had an ipad but sold it to a friend last year because I transitioned to using my Wacom full time on my PC. I only say that because if you like your apple products just keep in mind that while you are secure (apple does have great security), you may not be private. iOS is closed source, so it's more difficult for third parties or hackers to get your data, but apple has it. And apple can do whatever. Also, you are limited to the ways you can customize your phone.
I will link a video on someone who discusses privacy on iphone but aside from the few things I listed above I can't really help you much further than a few other points. Sorry.
A brief guide to privacy for iPhone
If you have an Android based phone you are in luck. Most Android phones allow you to put a different os on your cellphone since you can access the bootloader (unlike iphones) BUT your phone in most cases has to be OEM unlockable. Phones from carriers like Verizon aren't able to be unlocked because Verizon is weird and kinda treats their consumers like shit lol. I own a Google pixel 9 and I will admit I splurged on this phone by buying it brand new. It was on sale, I got a bonus at work and hey what can I say... Also my iphone 12mini was shitting itself so it was time for a new phone. The money must have been burning a damn hole in my pocket. In retrospect though, the smarter thing would have been to buy used or an older model. Which I will be doing in the future. Back on track though.
You're probably scratching your head here: if he was just complaining about google why the hell does he have a Google phone?
I'm glad you asked, hypothetical voice in my head.
Grapheneos is a os that is only available on Google pixels (I believe from 6 onward). What it does is basically degoogles your phone. So removes google services. And the thing is, you can redownload these services but refuse network permissions and limit what they can and cannot do or have access to. Or tweak settings that you would not otherwise have access to. You have control over your device and it actually somewhat feels like your device. It's easy to install...like, modding a ds takes longer than installing graphene on your phone. Here is a video that I watched that goes over specifics and installation.
Here is the grapheneos website
For non google phones there's calyxOS but I have no personal experience with it. But both of these OS give you back some ownership on your device by letting the user control how their cellphone functions and not a company. Also, it can help your phone feel a little smoother because it removes a lot of proprietary apps that companies like Samsung add to android. If your phone can't be unlocked, then start by switching to alternative apps and delete as many proprietary apps as possible. Watch this video on fdroid.
Remove face ID if you're able and remove fingerprints as well. It might be a bit inconvenient but it's much safer. I understand that these may be great accessibility tools for some so just do what you can. Turn off location when you're not using it. With graphene, you can give map applications your approximate location, not your exact location. There are also map options that can be disconnected from network, and you can save routes, but I use public transportation and really need to see when my bus is going to arrive. My cities bus app is so shit sometimes. Again, another example of compromising that is going make you ask what's important to you, and if you're willing to risk your privacy for it.
If you watch most of these videos, you'll hear a lot of these points are going to overlap.
I was considering discussing what you can do for your PC, but I'm a complete noob. I've been using Linux mint for a little bit now, and I avoid the terminal most of the time because I'm a little baby. Even still, I recommend getting away from windows if you're able. Especially if you have a windows 10 computer since Microsoft is dropping support this fall iirc. Linux mint is super beginner friendly and much lighter on your computer, so even better if your PC is older.
Some videos that might help you decide if Linux could be a good alternative for you.
Switching to Linux: A Beginner’s Guide
Why Linux is Better Than Windows 11
Linux Mint 22: Excellent Distro for Windows Users
Linux Mint for Gaming (2025) | Linux Gaming Setup (for Beginners) Pt. 1
This privacy stuff can go so deep and you'll feel kinda crazy lol. Once you learn about what people can do with this data, and read about how people's lives have been ruined by it getting into the wrong hands, it'll never leave your head. But it's important to start small. And start sooner rather than later.
Social media was something I considered discussing but I think it could be added to a later post since this is kinda long already. I hope this is somewhat helpful, I tend to ramble a lot of the time. If you're someone who is a bit more savvy than I, then please reply with any info that you think could be important. But remember that this post is for basic beginners who are just now learning about this stuff so keep it simple. Thanks for reading!
21 notes
·
View notes
Text
HELLO
I'M BACK
So much has happened this summer (I finished grad school! I moved halfway across the country!) and I'm trying to get back into a routine that involves having a life again: reading books, watching movies, playing video games, and, of course, drawing and painting again.
I am currently revamping my website. For many years, my website was solely a professional portfolio and shop. White background, simple links, zero personality. Purely a hub to point to my social medias, where all the fun stuff was. I hated going to my own website because it was boring and uninspiring.
Last year, I made a neocities account and learned HTML/CSS for fun. I became obsessed after realizing how much more exciting it is to NOT have a bland, minimalist, corporate-esque website. I love exploring everyone's fun neocities sites, which are nostalgic and truly personalized. It made me hate my old website even more. Then I had a big brain moment: incorporate the fun elements of my neocities site into my website. LOOK AT IT NOW. There is COLOR. Silly fonts. There is a pixelated space background. Tiny gifs sprinkled about!
I will be actually be maintaining my website's blog. That's where the main, long-form content of all my art-making will live. Social media will just get snippets of that content. I do think there is a way to connect Tumblr to my blog so that whatever I post there will be posted here, too, but I haven't tried it yet.
Anyway, Hello Hello Hello Tumblr!
57 notes
·
View notes