#How to import and export WordPress website
Explore tagged Tumblr posts
Visit Tumblr Blog
Explore Tumblr blogs with no restrictions, modern design and the best experience.
Last Seen Tumblr Blogs


Fun Fact
Tumblr has 16.74 million mobile monthly users in the US.
Text
WordPress Site Export & Import Guide 2023
WordPress, the world s most popular content management system, offers a plethora of features that make it easy for users to create, manage
0 notes
Text
How to Quickly Duplicate a Page in WordPress for Easy Reuse

Duplicating a page in WordPress is a fast and efficient way to replicate content or layouts without having to start from scratch. WordPress itself doesn’t offer an option for this, but with the right approach, it’s easy to learn how to duplicate an entire page in WordPress. For a step-by-step guide, check out our article on How to Duplicate a Page in WordPress.
Why Duplicating a Page is Useful
There are several reasons you might want to duplicate a page:
You need a similar layout for different pages on your site.
You want to quickly create landing pages for marketing campaigns.
You’re making updates to a page but want to keep the original version as a backup.
How to Duplicate an Entire Page in WordPress
The two main ways to duplicate a page in WordPress are through plugins or manually copying content.
Duplicating with a Plugin
Using a plugin is the easiest and quickest method to make a duplicate page. Here’s how:
Install and activate a plugin like "Duplicate Post" or "Duplicate Page."
Go to your WordPress dashboard and navigate to "Pages."
Hover over the page you wish to duplicate and click on "Clone" or "Duplicate."
A new draft will be created with the same content, layout, and settings as the original.
This method ensures you don’t miss any important page settings or SEO configurations.
Manually Copying a Page
Another option is to manually duplicate a page by copying the content from the original page into a new draft. However, you’ll need to reapply any settings like SEO, featured images, or custom templates.
How Do I Duplicate a WordPress Site?
If you need to go beyond just a page and duplicate your entire WordPress site, tools like "Duplicator" or "All-in-One WP Migration" are designed for this purpose. To duplicate a WordPress site, you’ll need to:
Install one of these migration plugins.
Export your current site’s data.
Import the site backup into a new WordPress installation.
Make adjustments to URLs and settings as needed for the new site environment.
This method will give you a complete copy of your site, including all content, settings, and plugins.
Best Practices for Duplicating Pages
Duplicating pages can be a powerful tool in your website management. Whether for A/B testing, marketing campaigns, or simply saving time, knowing how to duplicate an entire page or even a full site can help streamline your workflow. Keep in mind that using plugins for this task is much faster than manually duplicating content, especially if you’re handling multiple pages.
Conclusion
Duplicating a page in WordPress is a simple process, especially with the right tools. Whether using a plugin or doing it manually, the ability to easily replicate content can save you time and effort. For more details on how to duplicate an entire page in WordPress, check out our full guide on How to Duplicate a Page in WordPress.
3 notes
·
View notes
Text

How To Migrate Your Site To WordPress: A Seamless Journey With Sohojware
The internet landscape is ever-evolving, and sometimes, your website needs to evolve with it. If you're looking to take your online presence to the next level, migrating your site to WordPress might be the perfect solution. WordPress is a powerful and user-friendly Content Management System (CMS) that empowers millions of users worldwide.
However migrating your site can seem daunting, especially if you're new to WordPress. Worry not! This comprehensive guide will equip you with the knowledge and confidence to navigate a smooth and successful migration. Sohojware, a leading web development company, is here to help you every step of the way.
Why Choose WordPress?
WordPress offers a plethora of benefits that make it an ideal platform for websites of all shapes and sizes. Here are just a few reasons to consider migrating:
Easy to Use: WordPress boasts a user-friendly interface, making it easy to manage your website content, even for beginners with no coding experience.
Flexibility: WordPress offers a vast array of themes and plugins that cater to virtually any website need. This allows you to customize your site's look and functionality to perfectly match your vision.
Scalability: WordPress can grow with your business. Whether you're starting a simple blog or managing a complex e-commerce store, WordPress can handle it all.
SEO Friendly: WordPress is built with Search Engine Optimization (SEO) in mind. This means your website has a better chance of ranking higher in search engine results pages (SERPs), attracting more organic traffic.
Security: WordPress is constantly updated with the latest security patches, ensuring your website remains protected from potential threats.
The Migration Process: A Step-by-Step Guide
Migrating your site to WordPress can be broken down into several key steps.
Preparation: Before diving in, it's crucial to back up your existing website's files and database. This ensures you have a safety net in case anything goes wrong during the migration process. Sohojware offers expert backup and migration services to ensure a smooth transition.
Set Up Your WordPress Site: You'll need a web hosting provider and a domain name for your WordPress site. Sohojware can assist you with choosing the right hosting plan and setting up your WordPress installation.
Content Migration: There are several ways to migrate your content to WordPress. You can use a plugin specifically designed for migration, manually copy and paste your content, or utilize an XML export/import process, depending on your previous platform. Sohojware's team of developers can help you choose the most efficient method for your specific situation.
Theme Selection: WordPress offers a vast library of free and premium themes. Choose a theme that aligns with your brand identity and website's functionality.
Plugins and Functionality: Plugins extend the capabilities of your WordPress site. Install plugins that enhance your website's features, such as contact forms, image galleries, or SEO optimization tools.
Testing and Launch: Once your content is migrated and your website is customized, thoroughly test all functionalities before launching your new WordPress site. Sohojware provides comprehensive website testing services to guarantee a flawless launch.
Leveraging Sohojware's Expertise
Migrating your website to WordPress can be a breeze with the help of Sohojware's experienced web development team. Sohojware offers a comprehensive suite of migration services, including:
Expert Backup and Migration: Ensure a smooth and secure transition of your website's data.
Custom Theme Development: Create a unique and visually appealing website that reflects your brand identity.
Plugin Selection and Integration: Help you choose and implement the right plugins to enhance your website's functionality.
SEO Optimization: Optimize your website content and structure for better search engine ranking.
Ongoing Maintenance and Support: Provide ongoing support to keep your WordPress site running smoothly and securely.
FAQs: Migrating to WordPress with Sohojware
1. How long does the migration process typically take?
The migration timeframe depends on the size and complexity of your website. Sohojware will assess your specific needs and provide an estimated timeline for your migration project.
2. Will my website be down during the migration?
Typically, no. Sohojware can migrate your website to a temporary location while your existing site remains live. Once the migration is complete, the new WordPress site will be seamlessly switched in place, minimizing downtime and disruption for your visitors.
3. What happens to my existing content and SEO rankings after migration?
Sohojware prioritizes preserving your valuable content during the migration process. We can also help you implement strategies to minimize any potential impact on your SEO rankings.
4. Do I need to know how to code to use WordPress?
No! WordPress is designed to be user-friendly, and you don't need any coding knowledge to manage your website content. Sohojware can also provide training and support to help you get the most out of your WordPress site.
5. What ongoing maintenance does a WordPress website require?
WordPress requires regular updates to ensure optimal security and functionality. Sohojware offers ongoing maintenance plans to keep your website updated, secure, and running smoothly.
By migrating to WordPress with Sohojware's expert guidance, you'll gain access to a powerful and user-friendly platform that empowers you to create and manage a stunning and successful website. Contact Sohojware today to discuss your website migration needs and unlock the full potential of WordPress!
2 notes
·
View notes
Text
Easy way to get job data from Totaljobs
Totaljobs is one of the largest recruitment websites in the UK. Its mission is to provide job seekers and employers with efficient recruitment solutions and promote the matching of talents and positions. It has an extensive market presence in the UK, providing a platform for professionals across a variety of industries and job types to find jobs and recruit staff.
Introduction to the scraping tool
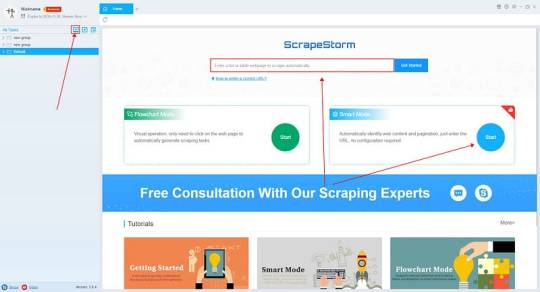
ScrapeStorm is a new generation of Web Scraping Tool based on artificial intelligence technology. It is the first scraper to support both Windows, Mac and Linux operating systems.
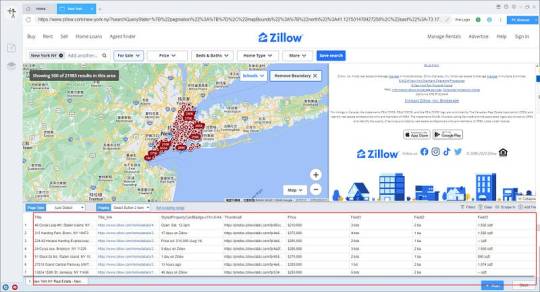
Preview of the scraped result

1. Create a task

(2) Create a new smart mode task
You can create a new scraping task directly on the software, or you can create a task by importing rules.
How to create a smart mode task
2. Configure the scraping rules
Smart mode automatically detects the fields on the page. You can right-click the field to rename the name, add or delete fields, modify data, and so on.
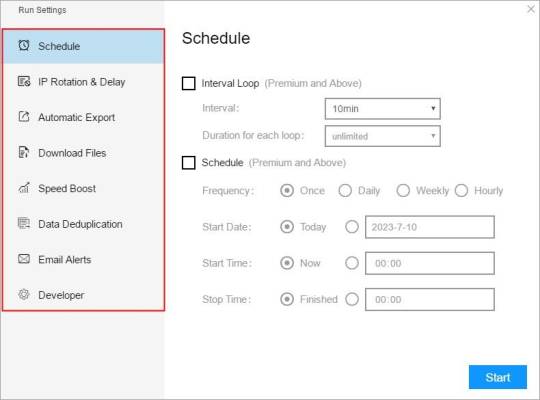
3. Set up and start the scraping task
(1) Run settings
Choose your own needs, you can set Schedule, IP Rotation&Delay, Automatic Export, Download Images, Speed Boost, Data Deduplication and Developer.
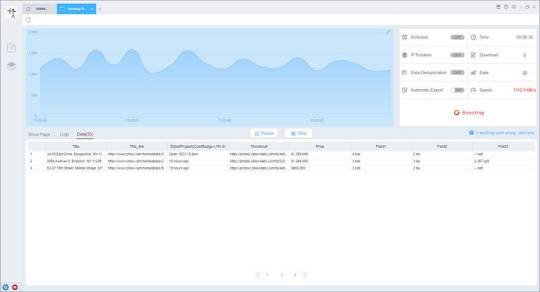
4. Export and view data
(2) Choose the format to export according to your needs.
ScrapeStorm provides a variety of export methods to export locally, such as excel, csv, html, txt or database. Professional Plan and above users can also post directly to wordpress.
How to view data and clear data
2 notes
·
View notes
Text
Business Setup in Meydan Free Zone, Dubai

Business Setup in Meydan Free Zone, Dubai
Meydan Free Zone (Meydan FZ) is a premier location in the heart of Dubai, offering immense growth opportunities for startups and established enterprises. Strategically positioned near major business districts, Meydan FZ is designed to attract global entrepreneurs aiming to scale their businesses in the UAE and beyond.
With Unicorn Global Solutions as your business setup partner, you’ll receive professional assistance in every stage of Meydan Free Zone company formation. From documentation to licensing and visa processing—we’ve got you covered.
Why Choose Meydan Free Zone?
Meydan FZ is renowned for its competitive pricing, straightforward setup process, and business-friendly environment. Here are key advantages of establishing your company in Meydan:
0% Corporate & Personal Income Tax
100% Foreign Ownership
No minimum paid-up capital requirement
Full repatriation of capital and profits
No import or re-export duties
Office facilities available 24/7
Easy UAE bank account setup assistance
Close proximity to Dubai International Airport (15 mins)
Option to engage in global business operations
Access to 1500+ licensed business activities
Visa and non-visa packages available
Documents Required for Meydan Company Formation
For Individual Shareholder:
Passport Copy
Digital Passport Size Photo
Residence Visa Copy (if applicable)
Emirates ID Copy (if resident in UAE)
For Corporate Shareholder:
Certificate of Incorporation
Board Resolution
Memorandum & Articles of Association
Passport Copy of the Authorized Signatory
Off-Page SEO & Backlink Strategy
To boost the online visibility of your Meydan Free Zone company setup services, it’s essential to engage in off-page SEO. Below are some strategies you can follow to create backlinks and improve search rankings:
Blog Submissions – Publish informative blog articles on platforms like Medium, Blogger, and WordPress with backlinks to your main site.
Business Listings – Submit your company profile to UAE business directories (e.g., Connect.ae, YellowPages, Yalwa).
Q&A Websites – Answer queries on Quora and Reddit related to “how to start a business in Meydan Free Zone” and include your service link.
Social Bookmarking – Share content on sites like Mix, Flipboard, and Pocket for backlink generation.
PDF/Slide Submissions – Upload informative brochures or company overviews with links to your website on SlideShare, Scribd, etc.
Classified Listings – Post offers or packages on Dubizzle, Locanto, or JustLanded with a contact link.
Get Started with Unicorn Global Solutions
At Unicorn Global Solutions, we provide end-to-end services for business setup in Meydan Free Zone. From selecting the right license to handling government approvals, we make your company formation simple, fast, and fully compliant.
WhatsApp us or call now to speak with our consultants and get your business registered in Meydan Free Zone hassle-free.
#BusinessSetup#DubaiBusiness#MeydanFreeZone#BusinessInDubai#DubaiCompanyFormation#MeydanDubai#FreeZoneDubai#UAEBusinessSetup#CompanyFormation#DubaiFreeZone#BusinessOpportunitiesDubai#StartBusinessInDubai#SetUpCompanyDubai#MeydanCompanySetup#UAEFreeZoneBusiness#BusinessInUAE#StartupDubai#EntrepreneurshipDubai#BusinessConsulting#MeydanBusiness
0 notes
Text
What Can Conversational Forms Help Your ChatBot Do Better?

In today’s fast-moving digital environment, user engagement isn’t just important—it’s essential. Websites must offer smarter, more interactive ways to collect data, provide support, and deliver seamless experiences. One powerful tool leading this transformation is Conversational Forms—a standout feature of WPBot, the advanced WordPress chatbot plugin.
In this article, we’ll explore what conversational forms are, why they outperform traditional web forms, and how you can use them effectively across industries to increase engagement and automate processes.
youtube
What Are Conversational Forms?
Conversational Forms replace static, multi-field forms with an interactive, chat-style interface. Instead of overwhelming users with a block of fields, they simulate a real-time conversation—asking one question at a time and dynamically responding to the user’s input.
With WPBot’s drag-and-drop Conversational Form Builder, you can easily design smart, engaging forms that support:
Multiple input types (text, email, date, file uploads)
Advanced conditional logic
AI-driven responses via OpenAI integration
Why Conversational Forms Outperform Traditional Forms
Here’s why businesses are choosing conversational forms over traditional ones:
✅ Higher Engagement
They feel like chatting with a human instead of filling out a boring form, resulting in more interaction.
✅ Better Completion Rates
Small, focused questions reduce user fatigue and prevent form abandonment.
✅ Real-Time Personalization
Forms adapt based on user input, tailoring the experience for each visitor.
✅ AI Intelligence
With OpenAI, the form can interpret vague answers, ask clarifying questions, and provide smart assistance.
For companies that rely on user input—whether for lead generation, support intake, or service requests—these advantages are game-changing.
Key Features of WPBot Conversational Forms
1. Visual Drag-and-Drop Builder
No coding needed. Design complex forms with:
Text, email, number, and URL fields
Checkboxes and radio buttons
File and image uploads
Calculation and hidden fields
HTML blocks for rich content
Perfect for contact forms, calculators, surveys, and more.
2. Advanced Conditional Logic & Variables
Build intelligent workflows:
Branch questions based on user choices
Show or hide fields based on conditions
Reuse responses with dynamic variables
Example: Ask different sets of questions for “Sales” vs. “Support” queries—all within the same form.
3. OpenAI-Powered Smart Responses
Bring your forms closer to natural human interaction:
Understand and process open-ended input
Clarify vague or incomplete answers
Accept voice, text, file, or image input
This elevates the user experience and reduces the need for human intervention.
4. Pre-Built Templates
Save time with fully customizable templates for:
Contact Forms
Appointment Booking
Customer Feedback
Job Applications
Quote Requests
Quickly deploy common use cases without building from scratch.
5. Data Handling & Notifications
Take control of your form data:
Store submissions in the WordPress database
Export responses as CSV files
Trigger email alerts to admins or users
Use autoresponders for submission confirmation
These features support serious business operations and CRM workflows.
6. Flexible Form Deployment
Show your forms when and where they’re needed:
Launch from chatbot menus
Trigger with keywords like “Book Now”
Embed with shortcodes or widgets
Use click-to-chat buttons for instant interaction
Ensure users always see relevant forms at the right moment.


Real-World Use Cases for Conversational Forms
✅ Lead Generation
Capture and qualify leads naturally without overwhelming visitors.
✅ Customer Support Intake
Collect structured issue data, file attachments, and more to streamline resolution.
✅ Appointment Booking
Effortlessly schedule meetings with form-driven date/time input.
✅ Smart Calculators
Build interactive tools such as:
BMI/BMR calculators
Mortgage estimators
Room painting cost estimators
✅ Job Applications
Enable smooth application flows with file uploads, screening questions, and AI evaluation.
Benefits by Industry
eCommerce: Reduce cart abandonment, offer personalized product recommendations, and gather post-purchase feedback.
Healthcare: Book appointments, run symptom checkers, and collect patient consent forms.
Education: Enroll students, conduct quick assessments, and gather course feedback.
Agencies & Freelancers: Capture project briefs, auto-generate quotes, and screen potential clients.
WPBot vs Other Form Builders: Quick Comparison

Final Thoughts
Conversational Forms are revolutionizing how websites interact with users. By merging the simplicity of chat with the depth of structured data collection, WPBot empowers WordPress site owners to create more personalized, automated, and conversion-driven experiences.
If you want to stay competitive in 2025 and beyond, WPBot Conversational Forms are a must-have tool in your digital strategy.
Try WPBot today and see how chat-based forms can transform your site—from lead generation to support automation and everything in between.
This article was inspired by What Can You Do with Conversational Forms for a ChatBot?
#ConversationalForms#ChatbotDesign#AIChatbot#ChatbotMarketing#ConversationalAI#WPBot#NoCodeTools#SmartForms#Youtube
1 note
·
View note
Text
Migrate or move WordPress website to a new host in 2025
Why You Might Need to Move Your WordPress Site
Your website is important. But sometimes, your web host may be slow, expensive, or not helpful. When that happens, it’s smart to move your website to a better hosting company. A better host can help your site load faster, stay online, and keep visitors happy.
You can move your website in two ways:
Manually (you do everything step by step)
Automatically (you use a plugin to help)
This full guide will show you both ways. It will also teach you what to do after you move your site to make sure everything works.
If this sounds hard, don’t worry. You can also get help from Creation Wave LLC. We help people move WordPress websites safely and quickly.
Table of Contents
Manual vs Automatic Migration
Manual Migration – Step by Step
How to Move WordPress Without cPanel
How to Use a Plugin to Migrate Your Site
What to Check After Migration
Final Thoughts and Expert Help
Should You Move Your Site Manually or Use a Plugin?
There are two ways to move your WordPress site:
Manual Migration
This is where you download your files and database and upload them to the new host yourself. It gives you more control, but you need to be careful. One small mistake can break your site. This is better for large websites or people with some technical skills.
Automatic Migration
This uses a WordPress plugin to move your site. It is easier and faster. It is perfect for small websites or beginners. You don’t have to touch any code.
If you're not sure which to pick, try a plugin first. If it doesn't work or gives errors, you can move it manually or get expert help.
Need help? Creation Wave LLC offers both manual and automatic WordPress migration services.
Manual WordPress Migration (Step-by-Step Guide)
This part will show you how to manually move your WordPress website to a new host.
Step 1: Choose a New Hosting Company
Make sure your new host is fast, secure, and helpful. Look for companies that offer good customer support and daily backups.
Types of hosting:
Shared hosting (basic and cheap)
VPS hosting (faster and more private)
Managed WordPress hosting (easy and fully managed)
Dedicated server (for very large sites)
If you need help picking the right host, Creation Wave LLC can help you choose the best one.
Step 2: Backup Your WordPress Files
Your website files are very important. They include your theme, plugins, images, and settings.
To back them up:
Use an FTP client like FileZilla.
Connect to your old host using FTP login details.
Find the folder named “public_html” or your WordPress folder.
Download all the files to your computer.
Wait until the download finishes before going to the next step.
Step 3: Export Your Database
Your website database has all your posts, pages, user accounts, and comments.
To export it:
Log in to cPanel on your old host.
Open phpMyAdmin.
Click your WordPress database name on the left.
Click the “Export” tab at the top.
Choose “Quick” and “SQL” format.
Click “Go” to download the file.
Save this file in a safe place.
Step 4: Create a New Database on Your New Host
Now go to your new hosting account. Do this:
Log into cPanel.
Click “MySQL Databases.”
Create a new database.
Create a new user and give it a strong password.
Add the user to the database and give it all permissions.
Write down the database name, user name, and password. You will need them soon.
Step 5: Upload WordPress Files to New Host
Now it’s time to put your website files on the new server.
To upload:
Open FileZilla again.
Connect to your new host with your new FTP details.
Go to the folder named “public_html” or root folder.
Upload all your website files from your computer.
Wait for the upload to finish before moving on.
Step 6: Import Your Database
Now you need to import your old database to the new host.
Log in to cPanel on the new host.
Open phpMyAdmin.
Click your new database name.
Click the “Import” tab.
Choose the .sql file you downloaded earlier.
Click “Go.”
This will add your old content to your new hosting account.
Step 7: Update the wp-config.php File
WordPress needs to know how to connect to the database.
In FileZilla, find and open the file “wp-config.php.”
Right-click and choose Edit.
Update the database name, user, and password:
define('DB_NAME', 'your_new_db_name'); define('DB_USER', 'your_new_db_user'); define('DB_PASSWORD', 'your_new_password');
Save and close the file.
Now WordPress can talk to the new database.
Step 8: Point Your Domain to the New Host
This is the final step.
Log into the account where you bought your domain (like GoDaddy or Namecheap).
Find DNS or Nameserver Settings.
Change the nameservers to the new hosting company’s nameservers.
Save and wait.
It can take 1–24 hours for the DNS to update fully. After that, your site will be live on the new host.
How to Migrate Without cPanel
Some hosting providers don’t use cPanel. That’s okay. You can still migrate your website.
Here’s what to do:
Ask your host for FTP access and MySQL access.
Use FileZilla to upload files.
Use another tool like Adminer or CLI (command-line) to import your database.
Update your wp-config.php file as shown earlier.
If this sounds too technical, Creation Wave LLC can do it for you.
How to Use a Plugin to Migrate Your WordPress Site
If you want an easier way, use a migration plugin. Here are three good ones:
All-in-One WP Migration
Simple drag-and-drop tool.
Great for beginners.
Duplicator
Makes a full copy of your website.
Offers more options for developers.
UpdraftPlus (Paid)
Does backups and migrations.
Good support.
To use a plugin:
Install the plugin on your old website.
Use the plugin to export the full site.
Set up a clean WordPress install on your new host.
Install the same plugin there.
Import the file you exported earlier.
After a few minutes, your site should be live.
What to Check After Migration
After moving your website, test everything. Check the following:
Is your homepage loading fast?
Are all your pages and posts showing?
Are your images loading?
Can you log into the WordPress dashboard?
Are all your plugins working?
Is the site mobile-friendly?
Also test your contact forms, menus, and links. You can use free tools like GTmetrix or Google PageSpeed to check speed.
If anything looks broken, go back and check your steps.
Need help? Creation Wave LLC offers a full post-migration checkup.
Final Thoughts
Moving your WordPress website can feel scary. But with the right steps, it’s not so hard. This guide helps you move your site by yourself or with a plugin. You also learned how to test your site after moving.
A better host can give you faster speed, better uptime, and better support. If you don’t want to take risks or waste time, you can let experts do it for you.
1 note
·
View note
Text
Choose the Right Web Hosting
Thinking of switching web hosting providers but worried about losing your website or breaking something important? You're not alone. Many website owners hesitate to make the move because they’re unsure about how the process works. But the truth is, with the right steps, you can move your website to a new host safely and easily — even as a beginner.
In this guide, we’ll walk you through a simple and safe way to transfer your website, while also helping you choose the right web hosting for long-term success. If you ever need quick assistance, feel free to call +91 9818 62 9898.
Why People Change Web Hosting Providers
Before we dive into the steps, let’s understand why someone might need to move their website:
Slow website performance
Frequent downtime or server issues
Poor customer support
Limited features or outdated technology
High renewal costs
If any of these issues sound familiar, it’s a clear sign that you need to move on and choose the right web hosting provider. For expert help during the switch, call us directly at +91 9818 62 9898.
Pre-Move Checklist: What You Need to Prepare
To ensure a smooth transfer, gather the following:
Access to your current hosting account
Access to your domain registrar
A backup of your website files and database
Login credentials for your new hosting provider
Some time (ideally during non-peak hours)
If you get stuck at any point, just dial +91 9818 62 9898 — our team is here to help.
Step-by-Step Guide to Move Your Website Safely
Step 1: Choose the Right Web Hosting Provider
The first and most important step is to choose the right web hosting for your current and future website needs. Look for:
99.9% uptime guarantee
High server speed
Free migration services
24/7 support
User-friendly dashboard
Not sure which provider is right for you? Get a quick recommendation by calling +91 9818 62 9898.
Step 2: Backup Your Website Files and Database
Always create a full backup before migrating.
For WordPress: Use plugins like All-in-One WP Migration or Duplicator to back up both files and database.
For non-WordPress sites: Download your files via FTP and export your database using phpMyAdmin.
Need help taking a backup? Reach out at +91 9818 62 9898.
Step 3: Upload Files to the New Host
Once your new host is ready, it’s time to upload:
WordPress Users:
Install WordPress on the new host
Import the backup using your chosen plugin
Non-WordPress Sites:
Upload via FTP
Recreate the database and import your .sql file
For technical support, don’t hesitate to call +91 9818 62 9898.
Step 4: Update Database Settings
If your website is database-driven (like WordPress), update the config file with new database credentials.
For WordPress, modify wp-config.php with:
sql
CopyEdit
define('DB_NAME', 'new_db_name'); define('DB_USER', 'new_db_user'); define('DB_PASSWORD', 'new_db_password'); define('DB_HOST', 'localhost');
Not sure where to find these details? We’re one call away at +91 9818 62 9898.
Step 5: Preview the Website on New Host
Before changing your domain settings, preview your site using:
A temporary URL (provided by your new host)
Hosts file modification (advanced users)
Ensure everything works — images load, forms submit, pages function properly. If you see issues, give us a call at +91 9818 62 9898 for quick troubleshooting.
Step 6: Change Domain DNS Settings
Now it’s time to go live.
Log in to your domain registrar
Update the DNS (nameservers) to your new host’s settings
Wait for DNS propagation (can take 24–48 hours)
During this period, avoid editing the website. If you're unsure how to do this, call +91 9818 62 9898 and we’ll walk you through it.
Step 7: Test After DNS Propagation
After DNS has updated, test your site:
Load pages
Test forms
Check mobile responsiveness
Verify email services (if connected to domain)
Pro Tips for a Smooth Migration
Migrate during low-traffic hours
Inform your visitors if there will be downtime
Keep your old host active for at least a week
Clear browser and site cache after the move
Always double-check backups
Need guidance through any of these steps? Talk to our web experts at +91 9818 62 9898.
Final Thoughts
Switching your hosting might feel scary, but it’s easier than it looks — especially when you follow the right steps. The key is to be prepared, follow a structured process, and above all, choose the right web hosting that meets your performance and support expectations.
Whether you're unhappy with your current provider or just want to upgrade, now is the perfect time to make the move. And if you ever feel stuck, don’t worry — just call +91 9818 62 9898, and we’ll guide you every step of the way.
Want expert help with your hosting migration? Call us now at +91 9818 62 9898 and get started without stress.
0 notes
Text
The Ultimate Guide to Becoming an Ecom Expert: Strategies for Success
The ecommerce market is expanding on a daily basis, and businesses would need assistance from professionals to take them through the competition. If you are an upcoming entrepreneur or a businessman looking for growth, becoming an ecom expert could be the key to long-sustained success for your business operation. This article will be all about the major steps to becoming a famous ecomexport in Noida, Delhi, India and beyond.

Understanding the Job of Ecom Expert An ecomexpert means an expert in e-commerce strategy, store configuration, digital marketing, customer experience, sales optimization. There are scores of them who are becoming independent entrepreneurs nowadays with the growing platforms such as Shopify, WooCommerce, and Amazon.
Expertise in E-Commerce Platforms To become an ecom expert, you require hands-on experience with some of the international leading e-commerce platforms. Here are some must-there platforms:
Shopify: Best for starters and businesses working towards scaling.
WooCommerce: WordPress user-friendly plug-in.
Amazon & Flipkart: Good for marketplace selling.
So, if you are in Delhi or Noida, India, try to attend local training programs and workshops to develop your skills on this platform across real-life environments.
Digital Marketing Strategies to Drive E-Commerce Success Driving traffic and turning visitors into customers are the two most important things a successful ecomexpert should know. Below are the must-have marketing techniques:
SEO (Search Engine Optimization): Google rank ready for the store.
Social Media Marketing: For brand visibility, use Instagram, Facebook, and LinkedIn.
Google & Facebook Ads: Paid ads for driving sales.
Digital marketing agencies are the best places to learn for Noida, Delhi, India-based companies. You can join local startups or work for an agency during the initial phase to learn on the job.
Customer Experience Optimization User Experience (UX) makes or breaks e-commerce. To become a trustworthy ecom expert, pay attention to:
Mobile Optimization: Optimize your website for mobile devices.
Quick Loading Speed: Slow websites drive customers away.
Secure Payment Gateways: Offer multiple secure payment options.

Data Analytics and Conversion Optimization Performance analysis of the store should be the responsibility of an ecom expert, while conversion plans should be optimized. Learn how to work with instruments such as:
Google Analytics: Analyze site traffic and user activities.
Hotjar: Test the user experience on your website.
A/B Testing Tools: Convert your product pages into conversion-optimized ones.
Networking and Continual Learning For an emerging Indian, a visit to a couple of e-commerce events around Noida or Delhi, and network with experts in the field, would do wonders in personal development. Consider joining local business networks and going to seminars to keep abreast with current happenings.
Conclusion Knowledge, practice, and continual learning become the three pillars of being an ecomexport. It does not matter anywhere in Noida, Delhi, India, or else-an ecom-exporter has everything to learn on platforms, marketing, and customer experience.
0 notes
Text
Top Features to Look for in an SEO Report Generator Tool
In the ever-evolving digital landscape, SEO plays a crucial role in driving organic traffic to your website. Businesses and marketers need powerful tools to analyze, track, and improve their SEO strategies. A robust SEO report generator can help you gain valuable insights, optimize your content, and stay ahead of the competition. But with so many options available, how do you choose the right one? In this guide, we’ll explore the top features to look for in an SEO report generator.
1. Comprehensive Site Audits
A high-quality SEO report generator should provide in-depth website audits that analyze key SEO factors such as:
On-page SEO elements (title tags, meta descriptions, headers, and keyword usage)
Technical SEO issues (broken links, page speed, mobile-friendliness, XML sitemaps, and indexability)
Backlink analysis and domain authority
Content quality and readability scores
Competitor benchmarking
2. Keyword Analysis and Rank Tracking
Effective SEO depends on well-researched keywords. An SEO report generator should:
Identify high-performing keywords based on search volume and competition
Track keyword rankings over time
Provide suggestions for keyword optimization
Analyze keyword gaps compared to competitors
3. Backlink Analysis and Monitoring
Backlinks remain a critical ranking factor for search engines. Your SEO report generator should:
Identify new and lost backlinks
Assess the quality of backlinks (domain authority, spam score, etc.)
Monitor competitor backlinks for potential link-building opportunities
Highlight toxic links that could harm your rankings
4. Customizable and White-Label Reports
For agencies and businesses, branding is essential. Look for an SEO report generator that allows:
White-labeling (custom logos, colors, and report layouts)
Customizable report templates
Automated scheduled reporting
Easy export options (PDF, Excel, or CSV)
5. Competitor Analysis
Understanding what your competitors are doing can help refine your strategy. Your SEO report generator should offer:
Competitor keyword tracking
Side-by-side domain comparisons
Backlink comparison reports
Content gap analysis
6. User-Friendly Interface and Data Visualization
A good SEO report generator should provide a clean, easy-to-navigate interface with visual reports, including graphs and charts, making it easier to interpret data at a glance.
7. Integration with Other SEO Tools
For a seamless workflow, the tool should integrate with popular platforms such as:
Google Analytics and Google Search Console
SEMrush, Ahrefs, and Moz
WordPress and other CMS platforms
Social media analytics tools
8. Performance Metrics and Actionable Insights
The best SEO report generators not only identify issues but also provide actionable recommendations to fix them. These insights should be tailored to improve website performance, user experience, and search engine rankings.
9. Automated Reporting and Alerts
Automation can save time and ensure you never miss an important update. Look for a tool that offers:
Scheduled reports sent via email
Real-time alerts for SEO issues
Daily, weekly, or monthly reporting options
10. Pricing and Scalability
Finally, consider your budget and business needs. Some tools offer free basic reports, while others provide advanced features for a subscription fee. Choose a solution that scales with your business growth.
Conclusion:
An SEO report generator is an essential tool for businesses, digital marketers, and agencies looking to improve their website’s search engine rankings. By choosing a tool with comprehensive site audits, keyword tracking, backlink monitoring, competitor analysis, and automation, you can gain a competitive edge in the digital landscape.
When selecting the right SEO report generator, consider your specific needs, ease of use, and integration capabilities to maximize your SEO efforts effectively.
Looking for the best SEO tools? Explore our in-depth reviews and comparisons to find the perfect fit for your business!
0 notes
Text
Efficient Content Migration Strategies for Web Development Projects
Content migration sounds simply as interesting as untangling a box of cables. Deliver top-notch eCommerce solutions with white-label Shopify development—your brand, our expertise!
It’s one of the maximum crucial steps in any website overhaul.
Done wrong, it is able to wreak havoc on search engine optimization and person enjoy.
Done proper? It can skyrocket a internet site’s overall performance and make you look like a hero for your customers.
So, how do you make sure it’s the latter?
By following verified strategies that turn ability pitfalls into power movements.
Stick with us—we’ll show you the way to make content material migration your secret weapon for net improvement achievement.
Define Your Migration Goals for Success
Identify the Purpose of the Migration
Understanding the reason of any migration is critical earlier than beginning it. Is the client aiming to replace old content material, consolidate a couple of web sites, or absolutely overhaul their layout? Each scenario needs a unique approach.
Redesign Goals: A remodel regularly improves consumer experience (UX) and modernizes aesthetics. Content wishes to align with the up to date format and shape.
Consolidation Goals: Combining web sites entails streamlining content and ensuring no redundancies.
Update Goals: When updating content material, preserve crucial records whilst improving relevance and exceptional.
By defining clear desires, you can set measurable objectives, inclusive of a 20% development in search engine optimization ratings or superior web site overall performance metrics, to assess the migration’s fulfillment.
Conduct a Comprehensive Content Audit
A thorough audit lays the groundwork for green migration. Start by means of cataloging all current belongings—net pages, blogs, photographs, movies, and metadata. A few actionable steps include:
Categorization: Separate content into groups together with “hold,” “update,” or “eliminate.” For instance, old blog posts with negative traffic won't need migration. Elevate your eCommerce game with Shopify Development Service—custom, scalable, and brand-ready!
Automation Tools: Tools like Screaming Frog or SEMrush can quick discover metadata issues, broken links, or underperforming pages, saving huge guide effort.
Pro Tip: Leverage analytics facts to assess which content performs nicely and deserves prioritization throughout migration
Align With Stakeholders
Migration is not often a solo endeavor. Collaborating with clients or inner teams guarantees the approach aligns with broader business targets.
Clear Expectations: Use workshops or strategy calls to agree on priorities, consisting of keeping excessive-value content material or adding new search engine marketing factors.
Documentation: Document every selection—targets, time limits, and key deliverables—to avoid scope creep.
When stakeholders are aligned, the process is smoother, and ability conflicts are minimized.
Create a Migration Plan That Ensures Success
Map Out a Future-ready Content Structure
An optimized content material structure is vital for user experience and search engine performance. Start by using designing a detailed sitemap for the brand new website.
User Navigation: Group associated content material into logical classes that decorate navigation.
Redirect Planning: Use 301 redirects to redirect all antique URLs to their new places. This prevents search engine marketing penalties for broken links and keeps link equity.
Pro Tip: Use tools like Google Search Console to monitor crawl errors and quick cope with redirect issues post-release.
Choose the Right Tools for the Job
The gear you select can make or spoil the migration manner. Automated equipment assist keep time and ensure accuracy when paired with manual oversight.
CMS-specific Tools: Many platforms, like WordPress or Drupal, have built-in import/export capabilities.
Custom Scripts: For more complex migrations, custom scripts tailored in your purchaser’s needs can handle big-scale records transfers.
Ensure compatibility among the supply and destination platforms. For instance, while migrating from a custom CMS to WordPress, confirm whether or not all dynamic elements (bureaucracy, sliders, and so forth.) will characteristic successfully in the new environment.
Establish Realistic Timelines
Efficient migrations are phased to minimize risks. Breaking the assignment into doable tiers—auditing, migration, trying out, and release—helps hold focus.
Buffer Time: Always account for delays caused by unexpected technical hurdles or stakeholder remarks.
Milestones: To preserve the assignment on the right track, set checkpoints, which includes “content material audit of completion” or “staging web page live. ”
Planning timelines meticulously reduces ultimate-minute rushes and increases patron self belief in your manner.
Optimize Content to Boost SEO and User Experience
Standardize Formatting Across Platforms
Content presentation consistency guarantees a elegant and professional person enjoy. Standardize all formatting elements in the course of migration to align with the brand new web site’s layout and capability.
Typography: Use consistent font patterns, sizes, and colors for headings, body textual content, and hyperlinks.
Media Standards: To enhance web page performance without compromising exceptional, make certain photographs meet uniform dimensions, resolutions, and report sizes.
Metadata: Standardize metadata tagging throughout all pages to simplify destiny content management.
Pro Tip: Create a style manual for content formatting to keep consistency at some stage in and after migration.
Maximize search engine optimization and Accessibility
Content migration is an exquisite opportunity to optimize for serps and make the website extra on hand to all users.
SEO Enhancements: Review and update metadata, together with titles, descriptions, and keywords, to align with modern great practices. Ensure inner linking systems are preserved or greater.
Accessibility Compliance: Add or update alt textual content for all pix and make sure the web site meets Web Content Accessibility Guidelines (WCAG). Simple modifications like proper heading systems (H1 to H3) and descriptive link texts enhance accessibility.
Pro Tip: Use equipment like Yoast SEO or Google Lighthouse to discover areas for development at some stage in migration.
Integrate and Test Advanced Features
Migrating content isn’t just about static pages—it additionally includes dynamic and interactive elements
Forms and Widgets: Ensure paperwork are purposeful and connected correctly to CRM or electronic mail structures.
APIs and Integrations: Test all 1/3-party integrations, along with analytics gear, social media feeds, or fee gateways, for compatibility.
Testing these capabilities during staging prevents disruptions publish-release and guarantees the site meets client expectations.
Test, Refine, and Ensure a Seamless Launch
Conduct Thorough Pre-launch Testing
Pre-launch testing is vital to discover and fix any troubles earlier than the brand new web site goes live.
Validate Links and Media: Check for broken links, missing images, or formatting mistakes throughout all pages.
Search engine optimization Checks: Use gear like Screaming Frog or Sitebulb to confirm XML sitemaps, robots.Txt, and canonical tags are effectively configured.
Browser and Device Testing: Ensure the web site is fully responsive and plays nicely across numerous browsers and gadgets.
Pro Tip: Create a trying out tick list to standardize the process and ensure no critical step is disregarded.
Gather and Implement Stakeholder Feedback
Client and stakeholder remarks in the course of the staging segment is essential for refining the final product.
Share a Staging Site: Provide stakeholders access to a fully functional staging web site to simulate the person enjoy.
Incorporate Feedback: Address tips and solve concerns directly to keep away from delays.
Proactively engaging stakeholders at this level reduces put up-launch revisions and builds believe within the migration process.
Perform Post-launch Monitoring
Once the web site is live, non-stop monitoring ensures a clean transition and catches any sudden issues.
Analytics Monitoring: Use gear like Google Analytics and Search Console to tune traffic styles, person conduct, and overall performance metrics.
Error Resolution: Address any broken hyperlinks, server errors, or capability system defects without delay.
Post-launch tracking facilitates maintain person delight and ensures the new website meets its performance goals.
Avoid Common Content Migration Pitfalls
Skipping a Backup Plan
One of the biggest errors at some point of migration is failing to create a backup of the original website. Without a right backup, facts loss or errors during migration should lead to irreversible harm.
Full-web page Backup: Use dependable tools to returned up the entire web site, which include databases, documents, and configurations.
Restore Points: Create a couple of restore points at some point of the migration to roll again if some thing goes wrong.
Pro Tip: Test your backup by way of restoring a staging environment to ensure its integrity.
Overlooking Compatibility Checks
Compatibility problems can disrupt user experience and functionality on the brand new platform. Ensure that each one elements paintings seamlessly after the migration.
Cross-platform Testing: Verify that the migrated content material and functionality (e.G., plugins, forms, or widgets) are well suited with the destination CMS or framework.
Third-celebration Integrations: Check APIs and 0.33-birthday celebration tools for correct connection and facts synchronization.
Proactively addressing compatibility ensures a smoother transition and less client complaints.
Neglecting Metadata and Redirects
Failing to migrate crucial search engine optimization elements along with metadata and redirects can notably drop seek ratings.
Metadata Migration: Verify that page titles, descriptions, and key phrases are carried over as it should be to the new web page.
301 Redirects: Redirect antique URLs to their new opposite numbers to keep link equity and save you damaged links.
Pro Tip: Use gear like Screaming Frog to generate a redirect map and reveal the repute of old hyperlinks post-launch.
Failing to Communicate Changes
Communication gaps between the migration team and stakeholders can result in confusion or misaligned expectations.
Regular Updates: Keep stakeholders knowledgeable approximately development, capacity delays, and checking out outcomes.
Clear Documentation: Provide precise notes about adjustments made during migration, consisting of up to date content systems or new integrations.
Transparent communique fosters agree with and guarantees all parties are at the equal page.
Neglecting Post-release Monitoring
Many agencies mistakenly don't forget a migration “whole” once the web site is going stay. However, submit-release tracking is vital for lengthy-term fulfillment.
Traffic Analysis: Monitor website overall performance to make sure no unexpected visitors drops or jump charge spikes.
Error Management: Regularly test for broken links, missing snap shots, or different problems that would impact person experience.
Ongoing monitoring helps maintain a excessive-performing website and ensures continuous consumer delight.
Closing the Gap Between Migration Challenges and Opportunities
Content migration doesn’t have to be the chaotic mess it’s regularly made out to be. With the proper technique, it’s your threat to create a future-ready website that’s quicker, extra prepared, and optimized for both customers and search engines.
By placing clear dreams, auditing efficaciously, leveraging the proper gear, and meticulously making plans every step, you’ll avoid commonplace pitfalls and exceed your client’s expectancies. Remember, it’s now not pretty much moving content material—it’s approximately remodeling it to liberate its full ability.
So, the subsequent time you’re tasked with a migration undertaking, don’t just flow the records—make it paintings harder, perform higher, and shine brighter. Turn the mundane into a masterpiece, and watch your clients sing your praises.
Also Read : How to Bulk Edit Collections in Shopify: Complete Guide
How to Add a Telegram Chat to Shopify? (No App Needed)
0 notes
Text
Quick way to extract job information from Reed
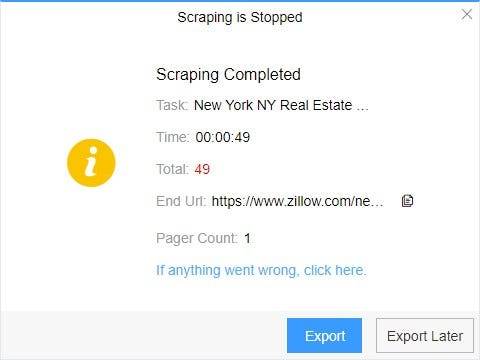
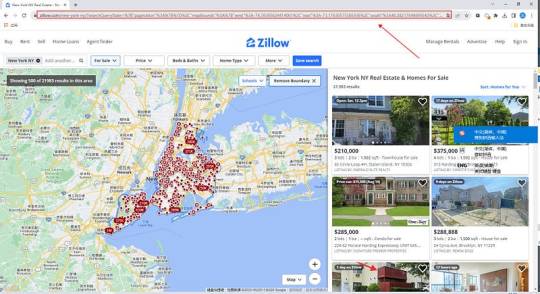
Reed is one of the largest recruitment websites in the UK, covering a variety of industries and job types. Its mission is to connect employers and job seekers to help them achieve better career development and recruiting success
Introduction to the scraping tool
ScrapeStorm is a new generation of Web Scraping Tool based on artificial intelligence technology. It is the first scraper to support both Windows, Mac and Linux operating systems.
Preview of the scraped result

1. Create a task
(2) Create a new smart mode task
You can create a new scraping task directly on the software, or you can create a task by importing rules.
How to create a smart mode task

2. Configure the scraping rules
Smart mode automatically detects the fields on the page. You can right-click the field to rename the name, add or delete fields, modify data, and so on.

3. Set up and start the scraping task
(1) Run settings
Choose your own needs, you can set Schedule, IP Rotation&Delay, Automatic Export, Download Images, Speed Boost, Data Deduplication and Developer.


4. Export and view data

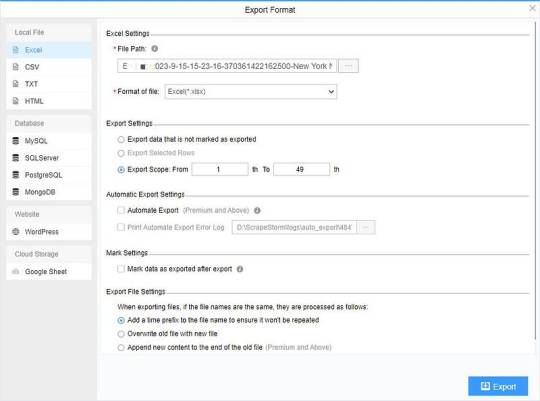
(2) Choose the format to export according to your needs.
ScrapeStorm provides a variety of export methods to export locally, such as excel, csv, html, txt or database. Professional Plan and above users can also post directly to wordpress.
How to view data and clear data

2 notes
·
View notes
Text
WP 301 Redirects Lifetime Deal: Boost Your SEO & Fix Broken Links Effortlessly
If you're managing a WordPress website, handling broken links, outdated URLs, and SEO Redirections can be a hassle. WP 301 Redirects is a powerful plugin designed to simplify this process, ensuring your website visitors always land on the right page while improving your search engine rankings. With the WP 301 Redirects Lifetime Deal, you get access to all the premium features of the plugin for a one-time payment, saving you from recurring subscription fees.
Key Features of WP 301 Redirects
Automatic Redirects:
Effortlessly fix 404 errors and broken links by automatically redirecting users to the correct pages.
SEO-Friendly Redirects:
Implement 301 (permanent) and 302 (temporary) redirects to maintain your website’s search engine rankings.
Comprehensive Dashboard:
Manage all your redirects, track traffic, and monitor 404 errors from an intuitive dashboard.
Bulk Redirect Management:
Easily set up bulk redirects to streamline large-scale website migrations or content restructures.
Import/Export Options:
Transfer redirect settings between sites with ease using the import/export feature.
Google Analytics Integration:
Track redirection performance and analyze visitor data without needing additional plugins.
Security & Performance Optimization:
Prevent malicious bots and incorrect redirects that could harm your SEO efforts.
Benefits of the WP 301 Redirects Lifetime Deal
One-Time Payment: Enjoy lifetime access without worrying about monthly or yearly fees.
Continuous Updates: Stay updated with the latest features and improvements at no extra cost.
Lifetime Support: Get premium support whenever you need assistance with redirect management.
Cost-Effective Solution: Ideal for businesses, agencies, and webmasters looking to optimize their websites affordably.
Who Can Benefit from WP 301 Redirects?
Bloggers and content creators looking to redirect old posts.
E-commerce store owners fixing outdated product pages.
Agencies managing multiple client websites.
Businesses undergoing website migrations or rebranding.
How to Grab the WP 301 Redirects Lifetime Deal?
To take advantage of the WP 301 Redirects Lifetime Deal, visit their official website or popular deal platforms like AppSumo, where lifetime deals are often offered at discounted rates. Make sure to check the features and plan details before purchasing to ensure it fits your needs.
Conclusion
The WP 301 Redirects Lifetime Deal is a must-have for anyone looking to enhance website performance, fix broken links, and improve SEO without recurring costs. Don’t miss the chance to secure this valuable tool for a one-time investment and keep your website optimized for years to come.
0 notes
Text
How to Move Your WordPress Site from Localhost to a Live Server
Developing a WordPress site on localhost is a great way to build and test your website in a controlled environment. However, the real challenge arises when it's time to move the site from your local server to a live hosting environment. If not done correctly, you could encounter broken links, missing images, or even database errors.
In this blog, we'll guide you through a step-by-step process to successfully move your WordPress site from localhost to a live server.

Step 1: Choose the Right Hosting Provider
Your first step is to select a reliable web hosting provider that meets your website’s needs. Look for:
Server Speed: Fast servers for better performance.
Uptime Guarantee: At least 99.9% uptime to ensure availability.
Ease of Use: User-friendly dashboards and tools.
WordPress Support: Hosting optimized for WordPress websites.
Popular options include Bluehost, SiteGround, and WP Engine.
Step 2: Export Your Local WordPress Database
The database is the backbone of your WordPress site. To export it:
Open phpMyAdmin on your local server (e.g., XAMPP or WAMP).
Select your WordPress database.
Click on the Export tab and choose the Quick Export method.
Save the .sql file to your computer.
Step 3: Upload Your WordPress Files to the Live Server
To move your files:
Compress Your WordPress Folder: Zip your local WordPress installation folder.
Access Your Hosting Account: Use a file manager or an FTP client like FileZilla.
Upload the Files: Transfer the zipped folder to your hosting server's root directory (usually public_html).
Unzip the Folder: Extract the files once uploaded.
Step 4: Create a Database on the Live Server
Now, set up a new database on your live hosting server:
Log in to your hosting control panel (e.g., cPanel).
Navigate to the MySQL Databases section.
Create a new database, database user, and password.
Assign the user to the database with full privileges.
Step 5: Import the Database to the Live Server
Open phpMyAdmin in your hosting control panel.
Select the new database you created.
Click the Import tab.
Choose the .sql file you exported from your localhost.
Click Go to import the database.
Step 6: Update the wp-config.php File
To connect your site to the live database:
Locate the wp-config.php file in your WordPress installation.
Open the file in a text editor.
Update the following lines: define('DB_NAME', 'your_live_database_name'); define('DB_USER', 'your_live_database_user'); define('DB_PASSWORD', 'your_live_database_password'); define('DB_HOST', 'localhost'); // Keep this unless your host specifies otherwise.
Save the file and upload it to your server via FTP.
Step 7: Update URLs in the Database
Your localhost URLs need to be replaced with your live site URLs.
Use a tool like Search Replace DB or run SQL queries in phpMyAdmin.
In phpMyAdmin, run the following query: UPDATE wp_options SET option_value = 'http://your-live-site.com' WHERE option_name = 'siteurl'; UPDATE wp_options SET option_value = 'http://your-live-site.com' WHERE option_name = 'home';
Step 8: Test Your Live Website
Once everything is uploaded and configured, check your website by entering its URL in a browser. Test for:
Broken Links: Fix them using plugins like Broken Link Checker.
Missing Images: Ensure media files were uploaded correctly.
Functionality: Verify forms, buttons, and features work as expected.
Step 9: Set Up Permalinks
To ensure proper URL structure:
Log in to your WordPress admin dashboard on the live site.
Go to Settings > Permalinks.
Choose your preferred permalink structure and click Save Changes.
Step 10: Secure Your Live Website
After migrating, secure your site to prevent vulnerabilities:
Install an SSL Certificate: Most hosting providers offer free SSL certificates.
Update Plugins and Themes: Ensure everything is up to date.
Set Up Backups: Use plugins like UpdraftPlus for regular backups.
Conclusion
Moving your WordPress site from localhost to a live server may seem daunting, but by following these steps, you can ensure a smooth and error-free migration. A successful move allows you to showcase your site to the world, engage your audience, and achieve your goals.
Start today and take your WordPress project live with confidence!
0 notes
Text
Effortless Figma to Elementor Conversion for Your WordPress Needs
When it comes to building dynamic, aesthetically appealing websites for WordPress, the integration of design tools with page builders is crucial. Figma and Elementor are two powerful platforms that, when combined, can take your web design to the next level. The process of converting Figma designs into Elementor layouts might seem daunting at first, but with the right strategies and tools, the transition from Figma to Elementor can be incredibly seamless. This guide will help you understand how to effortlessly perform a figma to elementor conversion, ensuring your website looks exactly as envisioned and functions perfectly.
Understanding Figma to Elementor Conversion
Figma is a popular design tool widely used by UX/UI designers to create wireframes, prototypes, and high-fidelity mockups. Elementor, on the other hand, is a drag-and-drop page builder for WordPress that allows users to build stunning websites without needing to write a single line of code. The combination of these two tools makes designing and building a website faster and more efficient.
The key to a successful Figma to Elementor conversion lies in understanding the relationship between a static design and the dynamic elements that Elementor offers. While Figma provides an accurate visual representation of how a page should look, Elementor helps translate that design into a fully functional website. With the right workflow, converting your Figma designs into Elementor pages becomes a straightforward task.
Preparing Your Figma Design for Elementor
Before diving into the actual Figma to Elementor conversion, it’s important to ensure that your Figma design is structured in a way that is compatible with Elementor. Start by ensuring that your design is clean, organized, and broken down into sections that make sense for a web page layout. Proper use of grids, alignments, and spacing in Figma will make the conversion process smoother.
Additionally, ensure that all the images, typography, and colors used in your Figma design are clearly defined. By keeping a consistent design language, you’ll save time when transferring assets into Elementor. It’s also helpful to export Figma elements like icons, logos, and images in high-quality formats that are optimized for the web. This will ensure that the design’s integrity remains intact when using Elementor.
Tools for Effortless Figma to Elementor Conversion
There are several tools available that can significantly speed up the Figma to Elementor conversion process. For instance, there are plugins that allow you to import your Figma design directly into Elementor, reducing the manual effort of recreating each element. These tools automatically map the visual elements from Figma to their Elementor counterparts, preserving the design’s layout, typography, and other key components.
Additionally, using a Figma-to-HTML converter can also streamline the conversion. This tool generates an HTML version of your Figma design, which can then be imported into Elementor as custom HTML. Once you have the design in Elementor, you can further refine it using Elementor’s advanced styling options to ensure that it matches the original Figma design.
Steps for Converting Figma to Elementor
The process of converting Figma to Elementor involves several key steps that can be broken down into manageable tasks. First, begin by preparing your design files in Figma for export. This involves ensuring that all elements are grouped and organized in layers, so they can be easily manipulated once in Elementor.
Next, export the Figma files you need, such as images, icons, and any other assets you want to keep. These files should be saved in a web-friendly format, such as PNG or SVG, ensuring that they retain their clarity and resolution when used on your WordPress website. Now, create a new page or post in WordPress and open it with Elementor. Begin the process of building your page by replicating the design structure from Figma, using Elementor’s widgets to add elements like text, images, and buttons.
For more advanced users, Elementor allows custom CSS and HTML integration, which can be used to fine-tune the design to match Figma precisely. During this stage of the Figma to Elementor conversion, be mindful of responsiveness. Make sure your design looks great on both desktop and mobile devices by utilizing Elementor’s responsive editing features.
Customizing Your Elementor Design
Once the basic structure of your page is built, it’s time to dive into the customization options that Elementor offers. Elementor’s theme builder allows you to fine-tune the design by customizing headers, footers, and even global design settings like fonts, colors, and spacing. This gives you full control over the look and feel of your website while keeping it in line with the original Figma design.
You can also take advantage of Elementor’s advanced features, such as animations, hover effects, and dynamic content. These features enable you to add interactivity and visual appeal to your website, which might not be possible with static Figma designs alone.
Testing and Refining Your Figma to Elementor Conversion
After the Figma to Elementor conversion is complete, it’s important to thoroughly test your website for functionality and visual consistency. This includes checking how it looks on different devices and browsers to ensure that your design remains responsive and fully functional across various platforms. You may need to adjust certain elements for optimal display, especially for mobile users.
Additionally, check for any broken links, missing images, or alignment issues that might have occurred during the conversion process. Elementor’s preview mode allows you to see how your design will look once published, which is an essential step before going live with the new page.
Conclusion
The process of Figma to Elementor conversion doesn’t have to be time-consuming or complicated. With careful planning, the right tools, and an understanding of how to leverage both platforms effectively, you can easily turn your Figma designs into fully functional WordPress pages. Whether you’re a designer or developer, mastering this workflow will help streamline your web design process and ensure that your website looks exactly as envisioned.
1 note
·
View note
Text
How to Export and Import WordPress Posts and Pages: A Beginner's Guide
Managing a WordPress website comes with its challenges, but exporting and importing posts and pages shouldn’t be one of them. Whether you’re migrating to a new host, creating backups, or sharing content between websites, WordPress makes this process surprisingly simple. In this beginner-friendly guide, we’ll walk you through how to export and import your WordPress posts and pages, step by…
#backup WordPress content#export WordPress posts#how to export WordPress posts#how to import WordPress pages#import posts to WordPress#import WordPress pages#manage WordPress content#migrate WordPress content#transfer WordPress content#WordPress#WordPress admin tools#WordPress beginners guide#WordPress export and import tutorial#WordPress migration#WordPress tools#XML file WordPress
0 notes